

switel M550, M350 Operating Instructions Manual
Mobile Phone
Operating Instructions
M550

2
2
Operating Instructions 3. . . . . . . . . . . .
Declaration of Conformity 95. . . . . . . . .
HAC Hearing Aid Compatible
to M3 / T3 Rating
The M550 Phone has a built in Induction Coil and is
hearing aid compatible.
To ensure optimum benefit, users with hearing aids
may wish to select the T setting on their hearing aids.

1
Contents
3
1 Quick Start Guide 4. . . . . . . . . . . . . .
2 At a Glance 16. . . . . . . . . . . . . . . . . .
3 How does it work 20. . . . . . . . . . . . . . .
4 Getting Started 24. . . . . . . . . . . . . . . .
5 Phone Book Set Up 29. . . . . . . . . . . . .
6 Making and Receiving Calls 35. . . . . . .
7 Calls List 39. . . . . . . . . . . . . . . . . . . .
8 SMS − Text Messages 40. . . . . . . . . . .
9 Voice Mail 45. . . . . . . . . . . . . . . . . . .
10 Other Useful Features 47. . . . . . . . . . .
11 SIM Tool Kit 67. . . . . . . . . . . . . . . . . .
12 Menu Structure 68. . . . . . . . . . . . . . . .
13 Trouble Shooting 77. . . . . . . . . . . . . . .
14 Technical Properties 80. . . . . . . . . . . .
15 Safety Information 84. . . . . . . . . . . . . .
16 Maintenance / Guarantee 89. . . . . . . . .
17 Index 91. . . . . . . . . . . . . . . . . . . . . . .

Quick Start Guide
4
1 Quick Start Guide
Important: Before you start, please read the
safety information on page 84.
Quick Glance
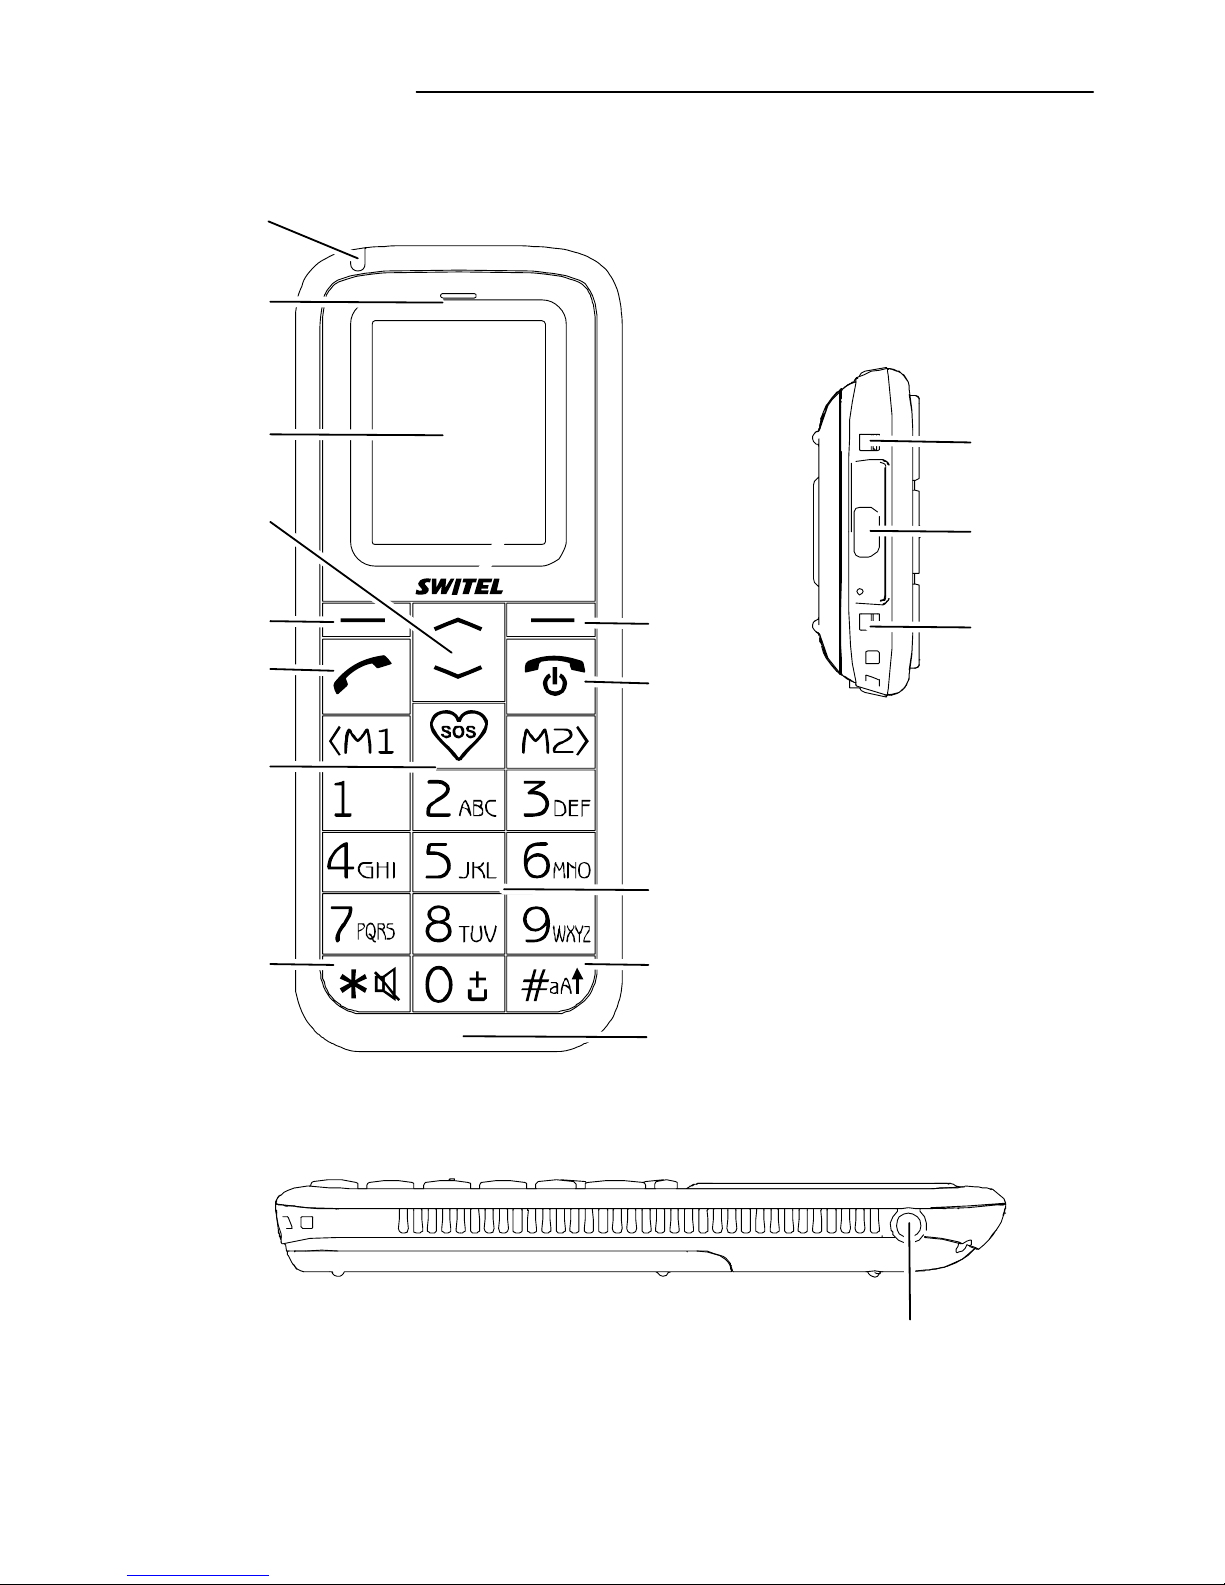
1 LED
2 Earpiece
3 Display
4 Navigation keys (scroll up/down)
5 Softkey, left
6 Call key
7 One−touch dialling keys
8 Star key / Ringer On/Off − Silent Mode
9 Softkey, right
10 On/Off key / End call key
11 Keypad
12 Hash key
13 Microphone
14 Charge contacts
15 Mini USB socket
16 Headset socket (Headset not supplied)
Quick Start Guide
5
1
2
3
4
5
6
7
8
9
10
11
12
14
15
16
13
14
2
Quick Start Guide
6
What is in the box
The package contains:
1 mobile phone 1 desktop charging unit
1 li−ion battery 1 operating manual
1 AC adaptor
Installing the SIM card
Risk of swallowing small objects!
The SIM card can be removed.
Small children can swallow them.
Switch the phone off.
Pay attention that the SIM card is not bent or
scratched. Prevent any contact with water, dirt
or electrical charges.
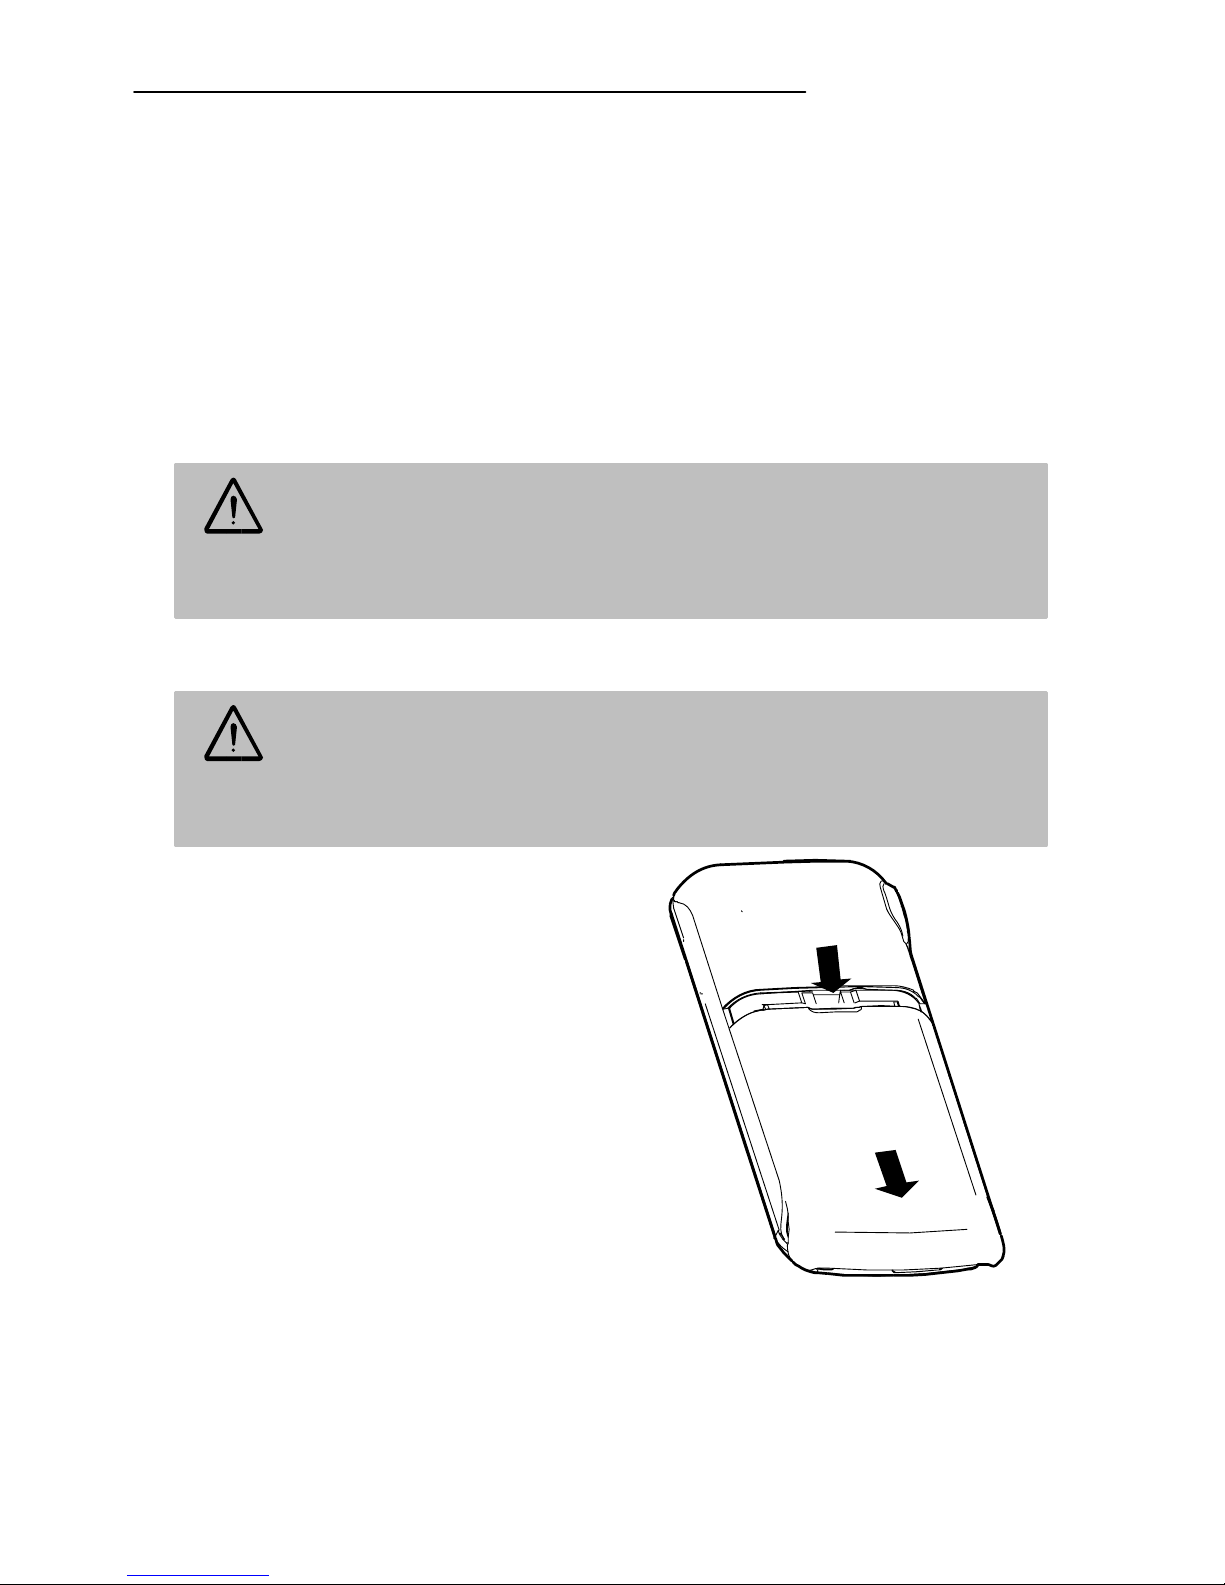
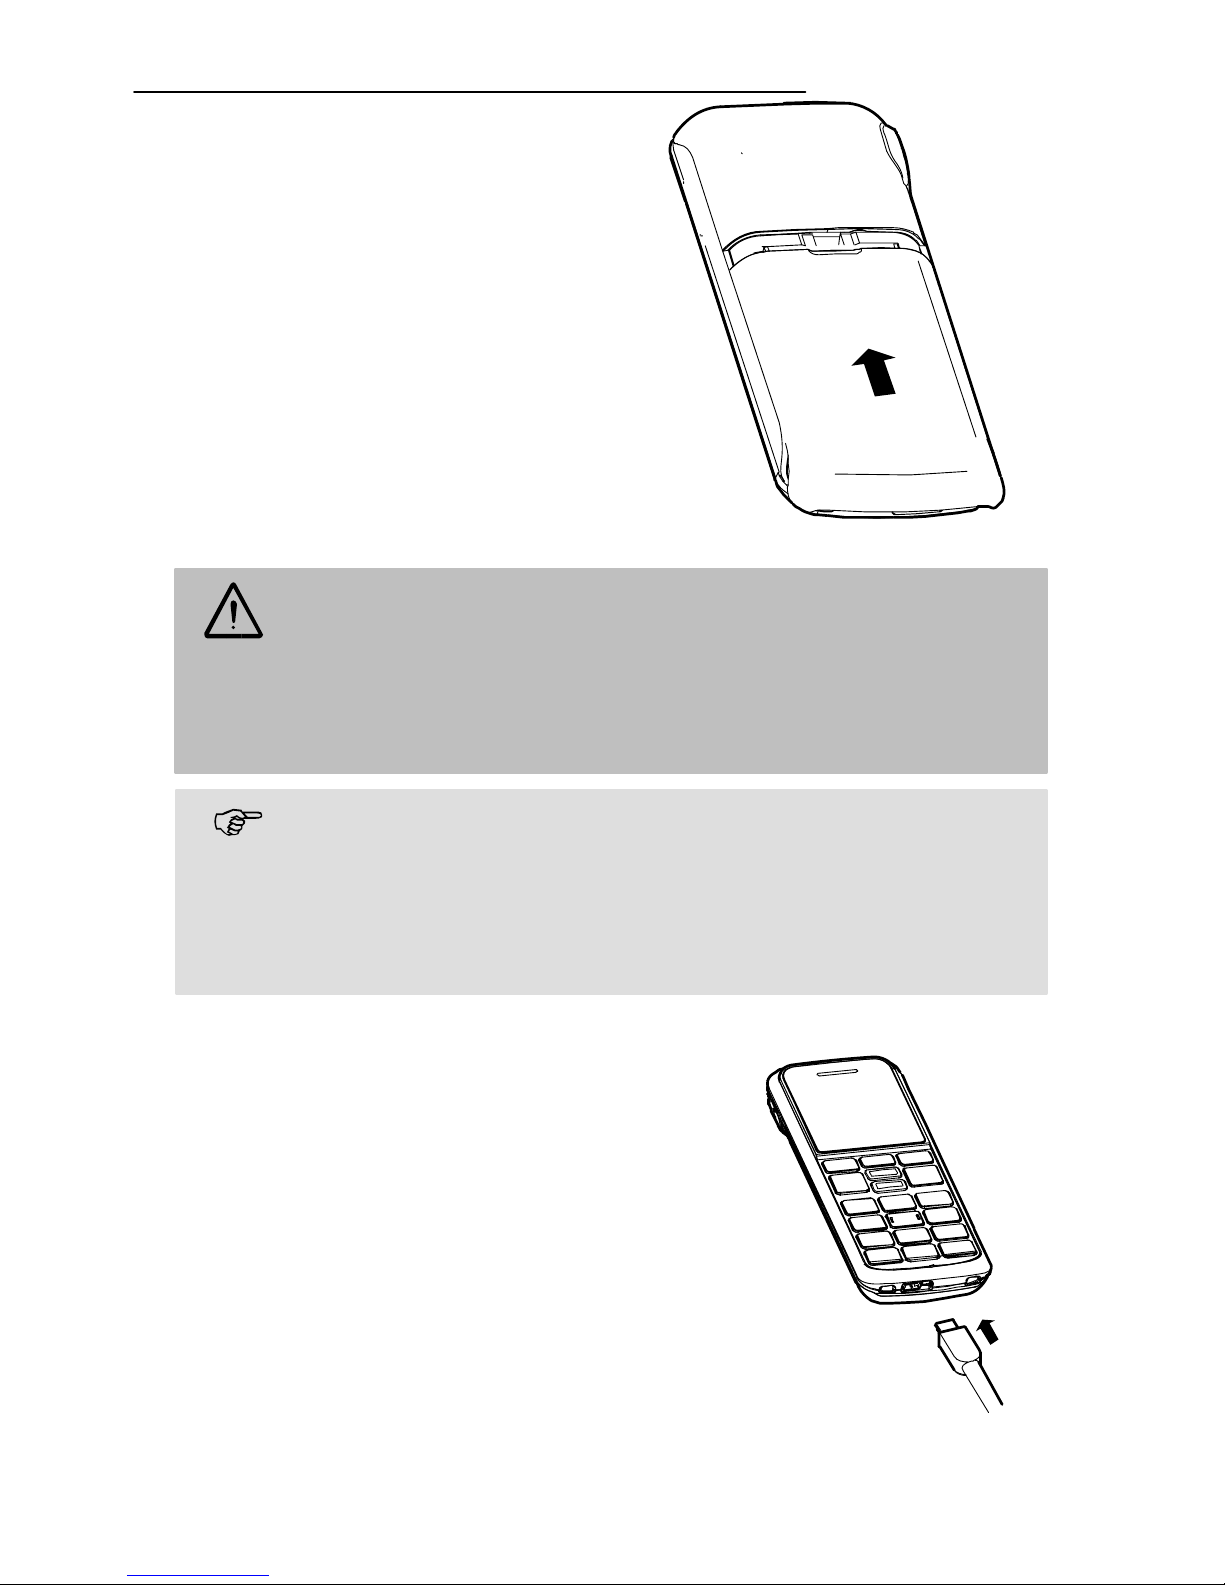
Slide the mobile phone’s
battery compartment cover
towards the bottom using a
little force. Lift the battery
compartment cover off the
phone completely.
If there is already a battery
inside, remove it.
Quick Start Guide
7
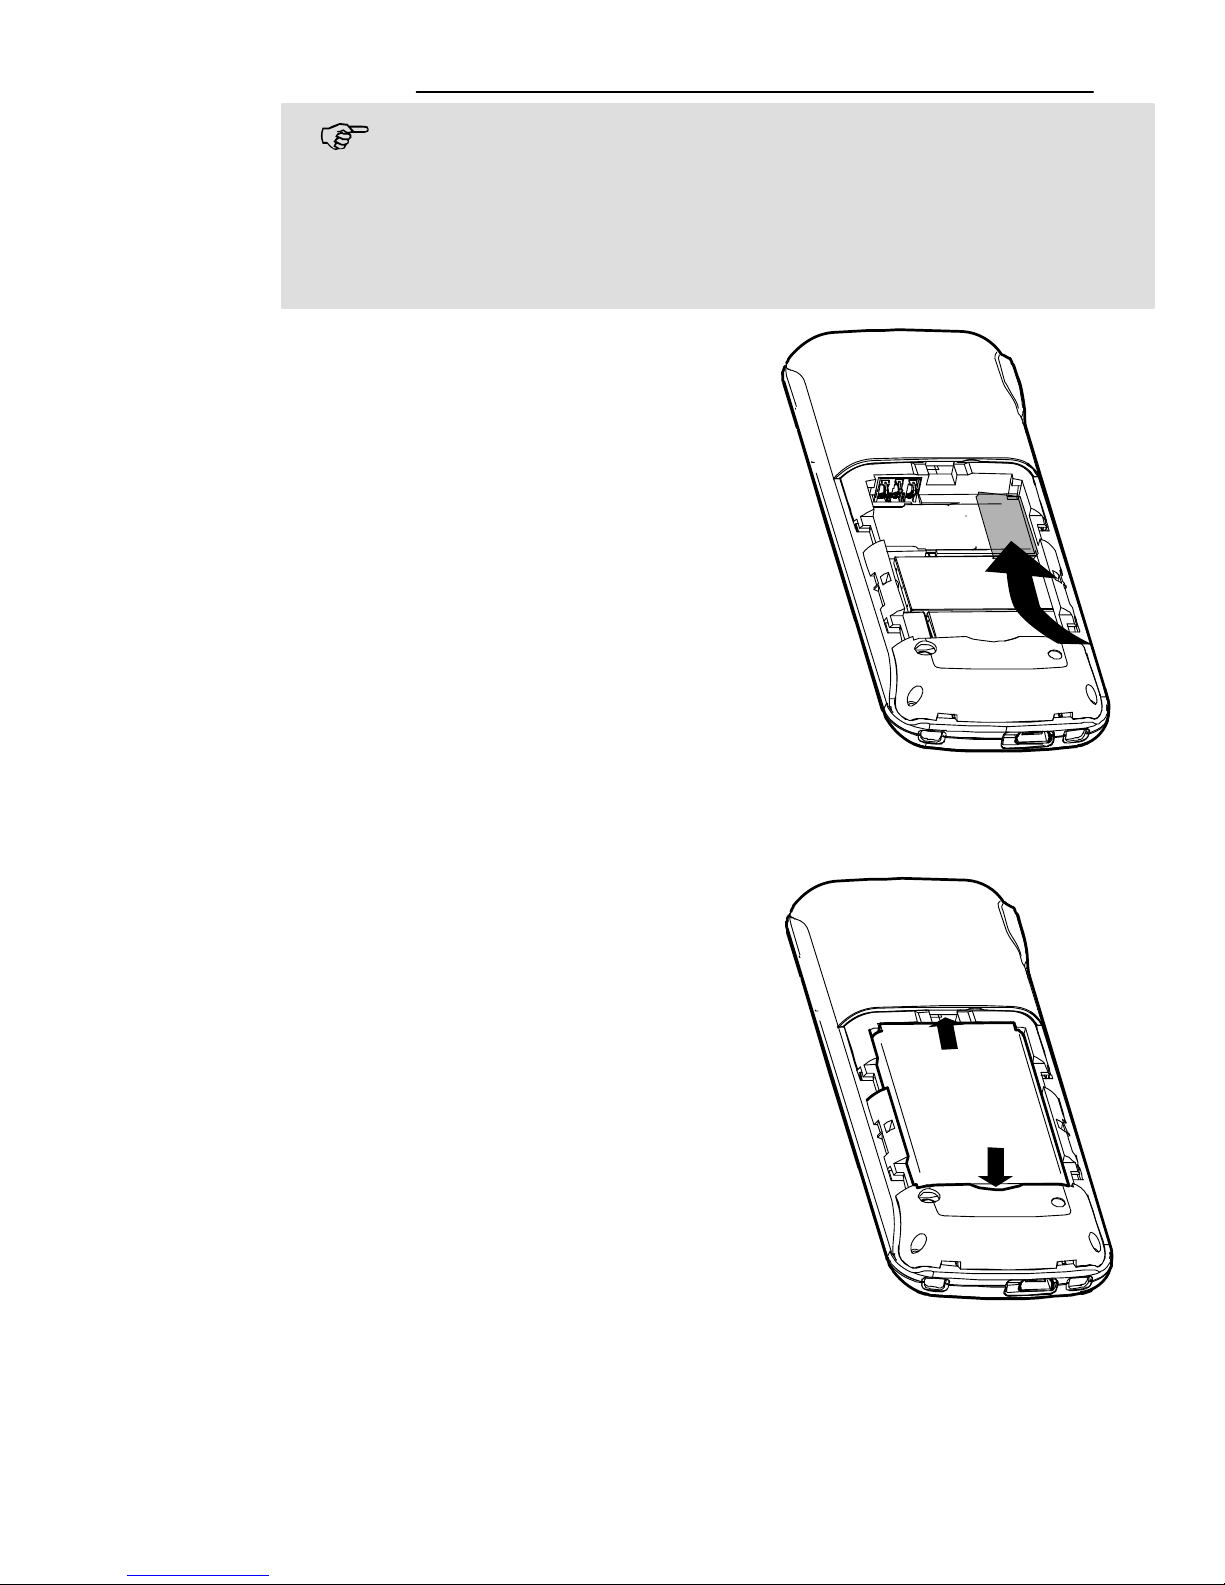
Your telephone number is carried by the SIM
card, not the phone. Therefore if you use a
SIM card you had in a previous phone, you will
keep the same phone number.
Slide the SIM card with the
golden contacts facing
down in the SIM card
holder provided for it at the
top right. The SIM card
must be located under the
metal retaining bar to be in
the correct position.
Insert the battery. The
golden contacts on the battery must face towards the
top left. Press lightly on the
bottom end of the battery
until it snaps into place.
3
Quick Start Guide
8
Replace the battery compartment cover back on
the phone. Slide the battery compartment cover
upwards until it snaps in to
place.
Charging the battery
Before starting to charge the battery, check
that it has been installed properly.
Do not remove the battery while it is being
charged. This could damage the phone.
When charging the battery for the first time, it
should be charged for at least 4 hours. Some
batteries only reach their full capacity after several complete charge/discharge cycles.
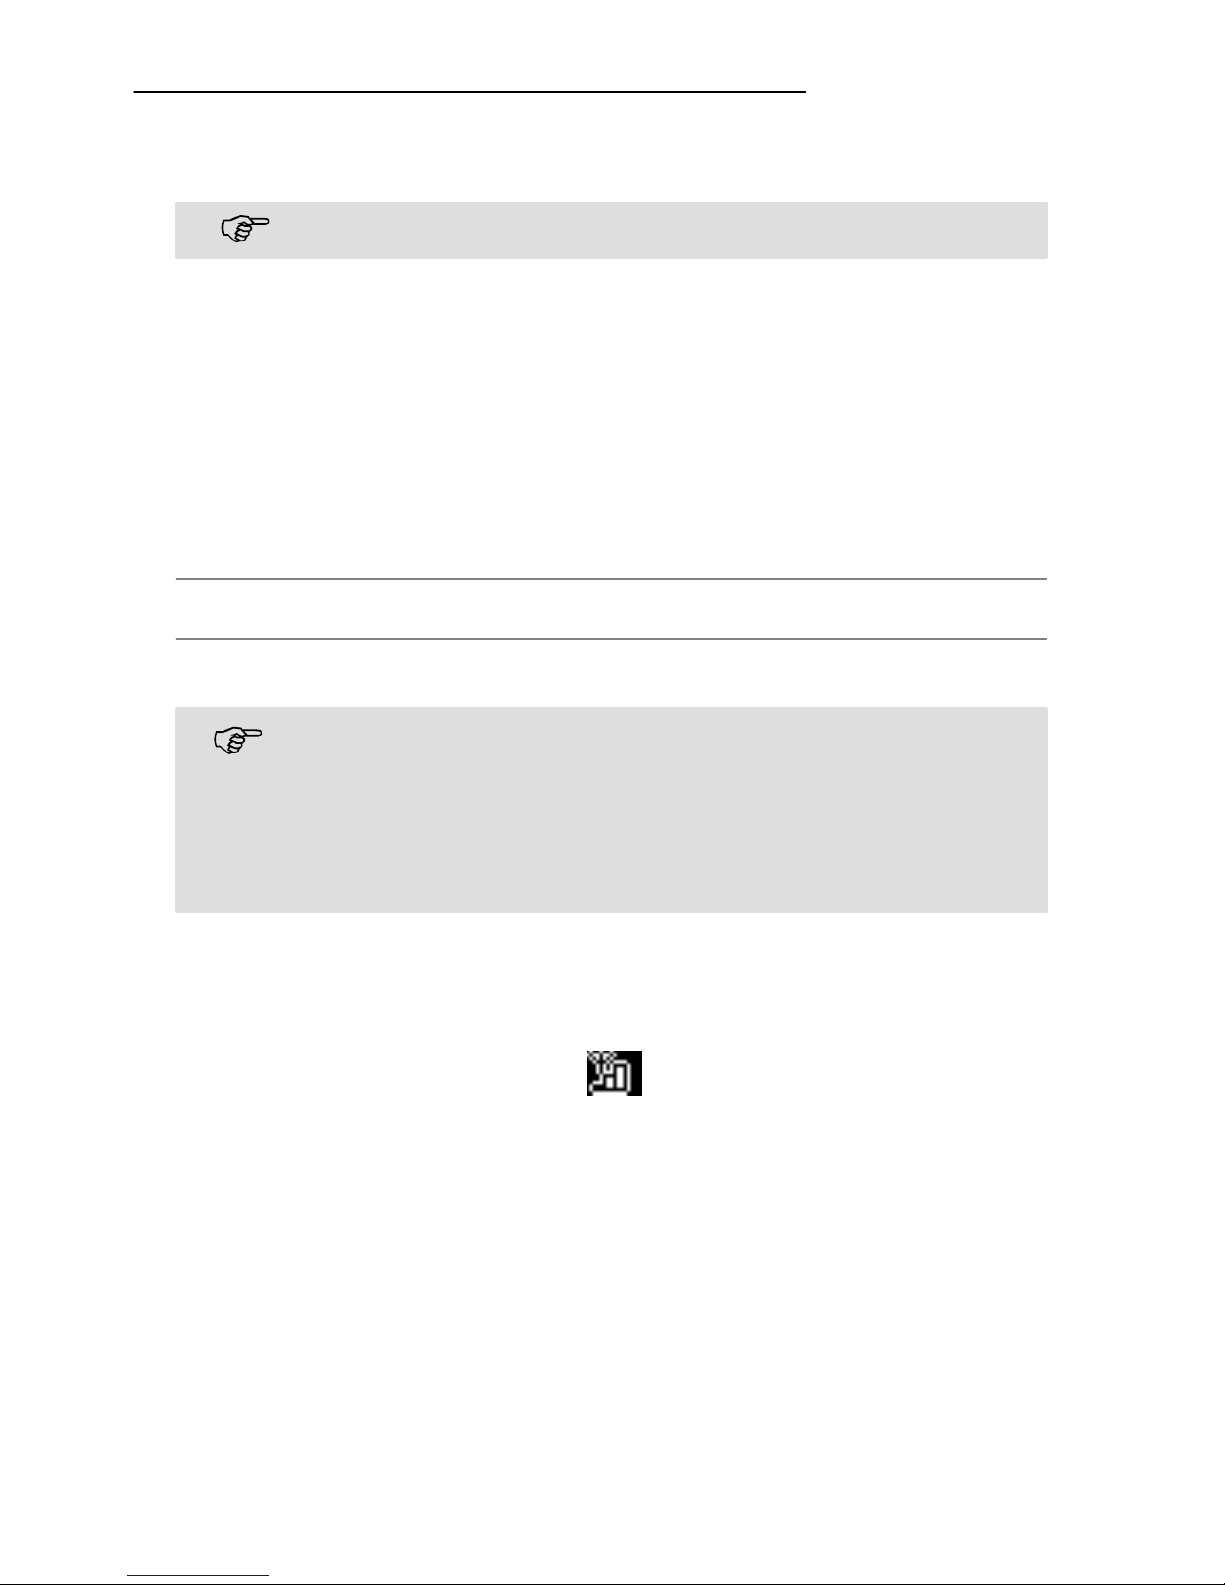
Charging via the mini USB socket
Plug the power adapter in the
mini USB port.

4
5
Quick Start Guide
9
Connect the power adapter
plug as illustrated in the diagram. For safety reasons,
only use the power adapter
plug supplied.
Charging via the desktop charging unit
Plug the power adapter in the
mini USB socket on the charging unit. Insert the phone in
the charging unit to charge it.
The display will go blank but even so the bat-
tery is still being charged. This is correct operation.
It may take a few seconds before the phone in-
dicates the charging process.
You can use the phone during the charging
process.
Battery status warning
The current battery charge status is indicated in the
display as follows:
Full Half empty Low Empty
Mains power
outlet
Quick Start Guide
10
When the battery charge is low, a corresponding
warning message appears in the display.
Charge the battery.
In cases where the battery charge is extremely low, it
is possible that the back−lighting no longer works and
certain functions are no longer available.
When the battery charge drops below the minimum
status, the phone switches off automatically.
Switching the mobile phone on and off
3 sec. Switch the mobile phone on
3 sec. Switch the mobile phone off
Some SIM cards will require you to enter a PIN
code. Follow the prompts on the screen or
read more details about PIN & PIN2 on
Page 58.
Make sure you are in range of your Network
Some networks offer better coverage than others in
different areas. The icon indicates you have a
signal and are connected to the network. The network will also appear in the display.

Quick Start Guide
11
Setting the display language
If you want to select a different language please refer
to Page 51.
The following languages are available: German,
English, French and Italian.
Setting the time and date
Refer to Page 49.
Setting the loudest Ringer
Refer to Page 60.
Now you are ready to make and receive calls.
Taking a call
{} Take the call
Rejecting a call
{} Reject the call
Ending a call
or
End
Ending a call (on−hook)
Making a call
Enter the phone number
Clear
Delete the last number if
incorrect
Dial the phone number
Quick Start Guide
12
Advanced Settings and Functions
For more details about setting up your Switel M550
and other functions follow the descriptions in this
user guide.
Examples;
Set your one−touch dialling keys; Page 47.
Store numbers in the phone book; Page 26.
Use the Index; Page 91.
If you have any questions please call the
Service−Hotline: Tel. 0900 00 1675 within
Switzerland (cost via Swisscom at time of going to print: CHF 2.60/min).
Questions and Answers
In the majority of cases your M550 phone is
supplied without a SIM card. You may find the
following ˆQuestions and Answers˜ (Q & A)
helpful.
Q − Why hasn’t the mobile phone been supplied with
a SIM card?
A − Many people already have a mobile phone and
wish to transfer their existing SIM card over to the
new phone. This has the advantage of keeping the
same telephone number and if the card is subscribed
to a Pay−as−you−go service then you also benefit
from being able to carry over any credit that has
been paid the card.

Quick Start Guide
13
Q − Where can I get a SIM card from?
A − Any high street mobile phone shop will be able to
provide you with a SIM card. Some of the major
supermarket chains also provide mobile phone services and can supply a SIM card. A useful tip when
choosing a SIM card / service provider however is to
make sure that you have adequate signal coverage
at home; this particularly important if you live in a
very rural area.
Q − Why doesn’t the Switel mobile phone have a telephone number?
A − The telephone number is supplied by the service
provider and will be registered onto the SIM card.
Q − Can I use the SIM card from my old mobile
phone?
A − Yes as long as the SIM card is less than three
years old you can transfer the card over. Some old
SIM cards however are not compatible with the Switel mobile phone as they are from an earlier generation of SIM card design.
Q − Can I use a SIM card from any mobile phone
company?
A − Yes. The Switel mobile phone is what is termed
as an open SIM card phone and so it is not restricted
to any particular service provider or mobile phone
company.

Quick Start Guide
14
Q − How do I pay for my calls?
A − There are two main types of registration with a
service provider or mobile phone company. One is a
contract − this is where you sign up for agreed contract over several months / year and pay an agreed
monthly fee. This is more suited to people who are
using their mobile phone as part of their job for
example. The other is Pay−as−you−go, sometimes abbreviated to PAYG. With this type of service you add
credit to the card and top up as and when required.
Topping up the card is easy, you can do this over the
phone, on−line, at many shops and even some cash
points allow you to do this. PAYG is more suited to
less frequent users.
Q − How do I find out my credit balance?
A − The service provider of the SIM card should have
provided an information pack with the card. This will
give details of a short number to dial in order to
check your balance. These access codes differ between mobile phone companies so please check the
details specific to your service provider. Key in your
number, press the talk button and the credit balance
will be announced to you.

Notes
15
Notes

At a Glance
16
2 At a Glance
Keys and Parts
1 LED
2 Earpiece
3 Display
4 Navigation keys (scroll up/down)
5 Softkey, left
6 Call key
7 One−touch dialling keys
8 Star key / Ringer On/Off − Silent Mode
9 Softkey, right
10 On/Off key / End call key
11 Keypad
12 Hash key
13 Microphone
14 Charge contacts
15 Mini USB socket
16 Headset socket (Headset not supplied)

At a Glance
17
1
2
3
4
5
6
7
8
9
10
11
12
14
15
16
13
14
At a Glance
18
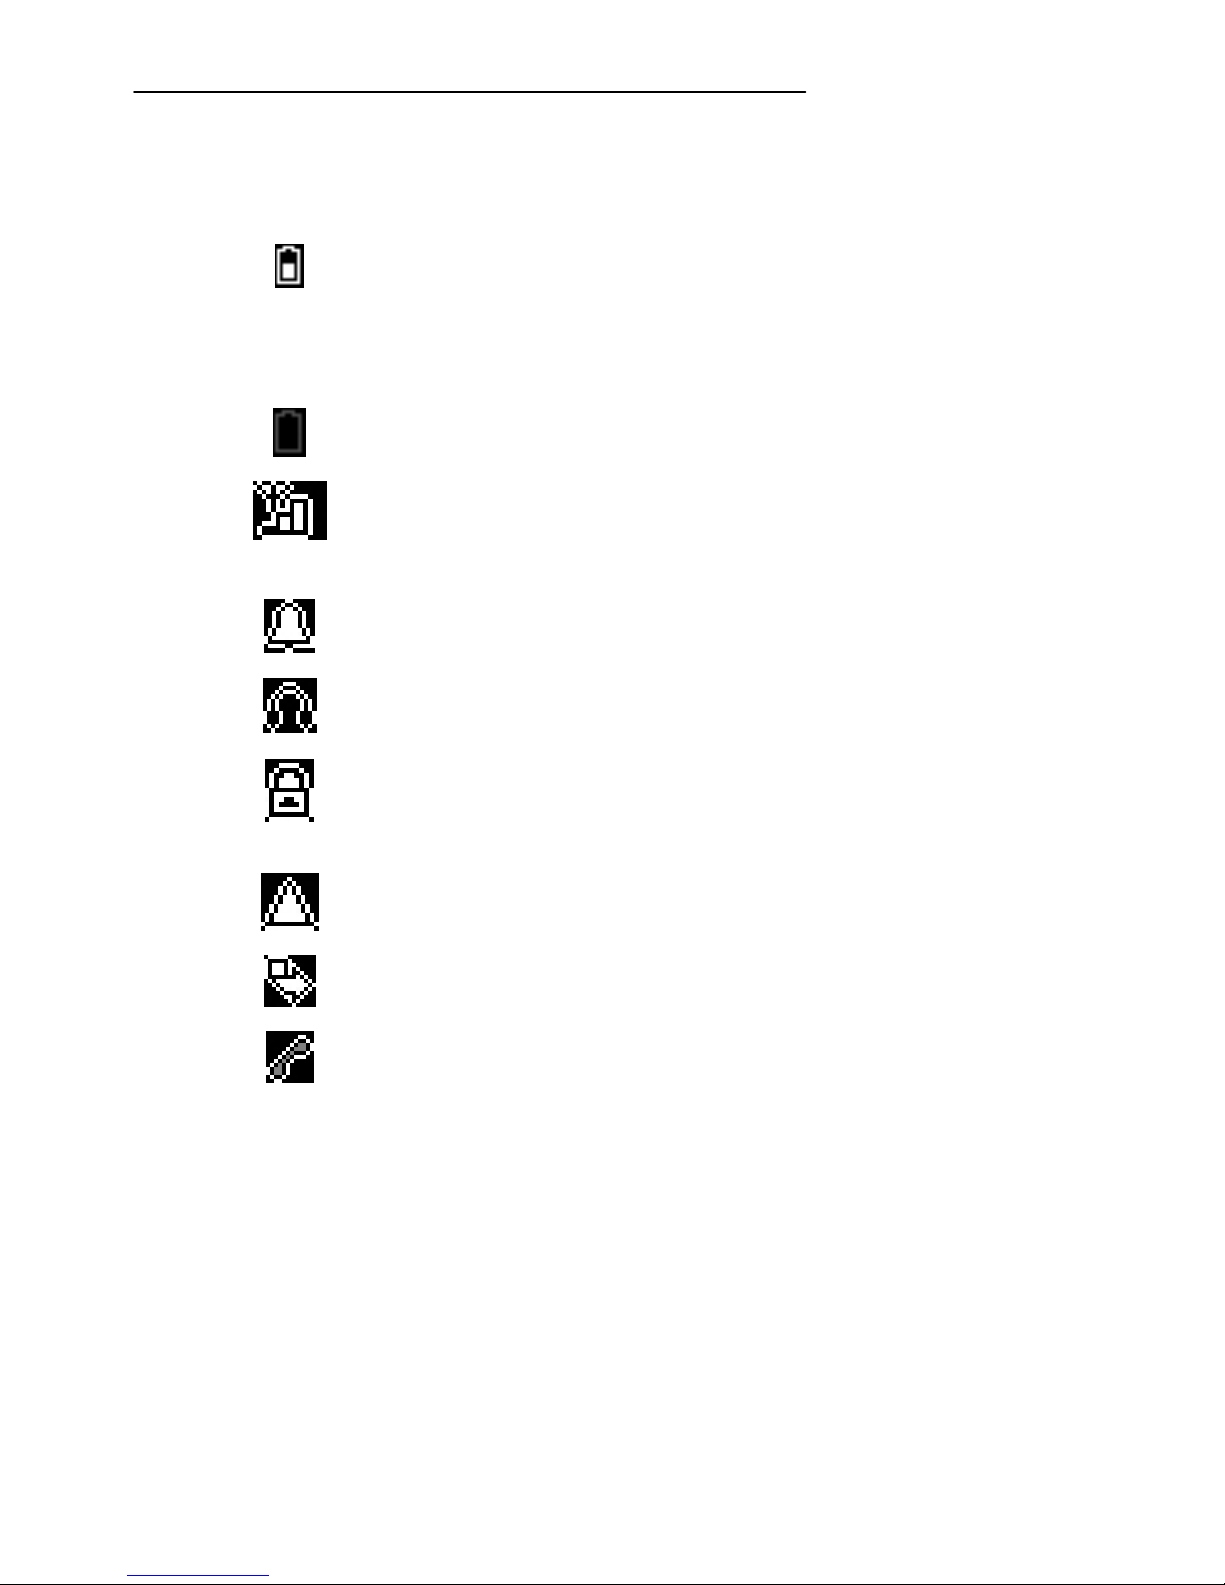
Icons and texts in the handset display
Icon Description
Displays the battery capacity.
Running−through segments : the
battery is being charged.
Charge the battery.
Signal strength of the phone connection.
Alarm is activated.
A headset is connected.
The key lock function is activated;
Page 37.
Roaming
1
Call forwarding is active.
There are new calls in the call list;
Page 39.
1
Cost of roaming calls and SMS will vary considerably from country to country. Check with your Operator.
At a Glance
19
A new SMS1 text message has been
received; Page 40.
SMS text memory is full; Page 44.
Ringing tone only is activated
Vibration alert only is activated
Vibration alert and ringing tone are
activated
The volume is set high and care
should be taken when using the
phone.
1
SMS: Short Message Service = Service for send-
ing text messages.

How does it work
20
3 How does it work
1 LED Indicates the phone operating
status. The LED will stay on
while charging and will flash if
no signal is detected or no
network to be clamp on to
alert the user.
2 Earpiece The voice of the caller can be
heard here when no headset
is being worn and the device
not set to Handsfree mode.
3 Display The information which
appears in the display guides
you through the menu
structure and helps operate
the mobile phone.
4 Navigation keys
Use the Navigation keys to
scroll through the menus and
select settings.

How does it work
21
5 Softkey, left The softkeys are assigned
different functions in the
various menus. The function
currently assigned is always
indicated by a word in the
display directly above the
softkey.
6 Call key Take a call or dial a number.
Redial.
7 CED One−touch dialling keys
A phone number can be
assigned to each one−touch
dialling key and then dialled
directly by pressing and
holding the respective key.
In addition:
CD = Scroll left/right,
e.g. to program settings in the
Alarm menu.
8 Star key Enter special characters.
Ringer On / Off − Silent Mode

How does it work
22
9 Softkey, right The softkeys are assigned
different functions in the
various menus. The function
currently assigned is always
indicated by a word in the
display directly above the
softkey.
10 On/Off key, End call key
Switch the mobile phone on
and off.
Cancel the current process.
End or reject a call.
11 − Keypad Enter phone numbers and
names or write a text.
12 Hash key Activate the key lock.
Switch between upper/lower
case and numbers.
13 Microphone Is activated during a call.
14 Charging contacts The phone is charged via
these contacts when in the
charging unit.
15 Mini USB socket For connecting the power
adapter plug.
How does it work
23
16 Headset socket (Headset not supplied)
Connect a headset.
The earpiece, loudspeaker
and microphone are
deactivated. You can only
hear and speak via the
headset.
Special Function Keys
Mode Press and hold Press and hold
Standby Ringer On / Off − Si-
lent Mode
Activate the key
lock
This icon will appear in the display.
Press and hold A connection is established to
your mailbox and you can
listen to your messages;
Page 45.
6
Getting Started
24
4 Getting Started
This chapter provides basic information on using the
operating instruction manual and the telephone.
Description of operating sequences in the manual
Display Description
Press the key depicted briefly
2 sec. Press the key depicted for
2 seconds
Hold Press and hold down the key
depicted
Enter numbers or letters
Mobile phone rings
Message
Represents text in the display
Indicates icons in the display
OK
Press the softkey; Page 25
Standby mode
All descriptions in this operating manual assume that
the mobile phone is in Standby mode. The system is
switched to Standby mode by pressing the key,
several times if necessary. It may be necessary to
deactivate the key lock function.

7
8
Getting Started
25
Energy−save mode
When the phone has been in Standby mode for
some time, it automatically switches to energy−save
mode. The display no longer lights up. Press any key
to reactivate Standby mode.
Softkeys
The and softkeys are assigned different
functions in the various menus. The softkeys are always referred to in this manual according to the word
directly above them in the display.
Key In Standby mode In a menu
left
− Open the main menu
− Various
functions
right
− Open the phone book
− Various
functions
Navigating in the menu
All the functions can be accessed via the various
menus. Refer to Menu Structure, Page 68, for information on how to access each respective function.
Menu
Open the main menu
/ Select the submenu required
OK
Open the submenu
/ Select the function required
9
Getting Started
26
OK
Open the function
/
OK
Select the setting required
Use the keypad to enter
numbers or letters
(left) Confirm the entries
(right) Move one level back
Cancel the programming and
saving processes and return
to Standby mode
Creating phone book entries − example
The way in which to navigate through the menus and
define settings is explained by means of the example
Creating phone book entries. Proceed as in this
example for all the settings.
Menu
Open the main menu
/
Contacts
OK
Select the phone book
(Contacts) and confirm it
/
New contact
OK
Select the submenu and
confirm it
/
Save to SIM
or
Save to phone
OK
10
How to enter text and numbers
27
Select the memory location
and confirm it
OK
Enter the name and confirm it
OK
Enter the number and
confirm it
How to enter text and numbers
The keypad is labelled with letters for the entry of
text.
The phone provides various methods by which text
can be entered. These are used when creating or
editing contacts in the phone book, when searching
for names in the phone book and when writing SMS
text messages.
Not every method is always available for each
application.
Methods of entering text
Multitap
In order to enter text in Multitap mode, press the key
labelled with the corresponding letter/character. If the
first character of the group is required, press the key
once. If the second character is required, press it
twice, and so on.
How to enter text and numbers
28
To enter two characters assigned to the
same key, press the key the respective
number of times to enter the first character.
Then wait for approx. 2 sec. and enter the
second letter.
Multitap upper case
Multitap lower case
The first character of a new
sentence will be upper case
and the rest is lower case.
Numbers
To switch between the text and numbers,
press the key.
Punctuation and special characters
When in Editing mode, press the key. Punctuation marks and special characters are displayed.
Use the / and C / D keys to select
the required character and insert it by pressing the
OK
softkey. A wide range of frequently used
special characters are available when editing by repeatedly pressing the key.
Other entries and functions
Enter a space
Delete
Delete character
/ Move the cursor

11
Phone Book Set Up
29
5 Phone Book Set Up
The phone book in the phone can store up to 200
entries.
Always enter the area code and country codes
with all the phone numbers.
When the memory capacity is used up, the
corresponding message appears when an
attempt is made to store another entry. Before
new entries can be stored, old entries must be
deleted.
The phone book entries are arranged
alphabetically. To skip directly to a required phone
book entry, press the corresponding first letter. To
search for the entries manually, use the /
keys.
Your provider can state how many entries
you can store on your SIM card.
Entering names
The keypad is labelled with letters for the entry of
names. Press the corresponding key the respective
number of times to enter letters. Information on ways
of entering text; Page 27.
1213
14
Phone Book Set Up
30
Creating phone book entries
See Page 26.
Saving in Standby mode
Enter the phone number
Options
Open the Options menu
/
Save number
OK
Start the saving process
/
Save to SIM
or
Save to phone
OK
Select the memory location
and confirm it
OK
Enter the name and confirm it
OK
Edit the number and confirm it
Modifying, editing, deleting phone book entries
Menu
Open the main menu
/
Contacts
OK
Select Contacts" and confirm
it
/
View contacts
OK
Select the submenu and
confirm it
Search for the required entry as described at the beginning of this chapter.
 Loading...