

Page 1
eSmart M2
Mobile phone
Operating instructions
Page 2

Basic Information
The SWITEL eSmart M2 is a Smartphone customized for special needs with an
Android 5.1 operating system. In addition to the “normal” options on a
Smartphone it offers a special user interface with large, clearly arranged menu
items, an especially large display, increased handset volume, and an emergency
call button.
In this manual only the specific features for operation in "SWITEL mode" are
described. This is kept deliberately simple. If you want to use more settings and
options, you can operate the unit in "Android" mode.
For information about the features of the operating system "Android 5.1" please
use the relevant sources on the Internet.
To change the operating system from the "SWITEL mode" to “Android mode“ open
“Settings“ -> “Advanced Settings" -> "Operating System". After the change, a
restart of the phone is necessary for proper function.
Hearing aid compatibility
This telephone is equipped with T Coil coupler making it compatible with
most popular hearing aids. Due to the wide range of hearing aids available
there is no guarantee that the telephone will function with all hearing aid
models. Please check your hearing aid immunity rating is higher than M2. This
rating can be provided by the manufacturer of your hearing aid. Instruments with
rating lower than M2 may not be compatible with this telephone. When using this
telephone press the ‘T’ button on your hearing aid to switch it to Telecoil mode,
this will link your hearing aid to the phone and will enable clearer sound without
background noises. Please check if your hearing aid is equipped with ‘T’ facility
and if it is automatic or manual. Hearing aids with high immunity rating equipped
with automatic T mode should be able to detect your phone automatically and
switch over to T position. Hearing aids with Manual T function would need manual
activation of this function on your hearing aids.
Page 3

Table of content
1 Get to know your eSmart M2...................................................................4
1.1 At a glance..................................................................................................................4
1.2 Delivery Contents .....................................................................................................5
1.3 Insert SIM Card(s), Memory Card and Battery ..................................................5
1.4 Charging the battery ................................................................................................7
1.5 Battery status ...........................................................................................................7
1.6 Turning On/Off your Mobile Phone.........................................................................8
1.7 First use ......................................................................................................................9
2 Basic Operating Instructions ...............................................................10
2.1 General Information for Operating the Telephone ..........................................10
2.2 Select/Open an Element .......................................................................................10
2.3 Scrolling/Swiping....................................................................................................10
2.4 Enlarge image..........................................................................................................10
2.5 The screen................................................................................................................11
2.6 Screen elements .....................................................................................................11
2.7 Status bar/Quick access menu.............................................................................12
2.8 Screen lock...............................................................................................................13
2.9 The touch keys.........................................................................................................13
2.10 The side keys/Emergency (SOS) key ..................................................................13
2.11 Turning the screen..................................................................................................14
2.12 Entering text ............................................................................................................15
2.13 Connecting your mobile phone to a computer...................................................15
3 Calling (Switel OS) .................................................................................16
3.1 Entering the phone number by hand ...................................................................16
3.2 Dialling from your contacts/calls list / Editing entries ....................................17
3.3 Incoming calls.........................................................................................................17
3.4 Initiate an Emergency Call ..................................................................................18
1
Page 4

4 Contacts (Phonebook)............................................................................19
4.1 Creating a new contact..........................................................................................19
4.2 Editing contacts.......................................................................................................20
4.3 Deleting contacts....................................................................................................20
5 Quick dial ................................................................................................21
5.1 Storing quick dial ....................................................................................................21
5.2 Using/deleting quick dial buttons ........................................................................21
6 Calls list..................................................................................................22
7 SMS/MMS................................................................................................23
7.1 Writing and sending messages.............................................................................23
7.2 Reading/deleting messages..................................................................................24
8 SOS (Emergency call) ............................................................................25
8.1 Sequence of an emergency call ...........................................................................25
8.2 Cancelling the emergency call function.............................................................25
8.3 Settings.....................................................................................................................26
9 Settings ..................................................................................................28
10 Bluetooth devices ..................................................................................29
11 Camera ...................................................................................................30
12 Apps ........................................................................................................31
12.1 Creating an account ...............................................................................................31
13 Updating the firmware...........................................................................31
2
Page 5

Appendix...........................................................................................................32
Technical data .....................................................................................................................32
Tips on the battery .............................................................................................................33
Intended use ......................................................................................................................33
Areas of use ........................................................................................................................33
Safety information .............................................................................................................33
Power adapter plug............................................................................................................35
Disposal ................................................................................................................................35
Maintenance .......................................................................................................................35
Declaration of Conformity ................................................................................................36
Trademarks..........................................................................................................................36
Guarantee ............................................................................................................................37
Index ................................................................................................................38
Service ..............................................................................................................41
3
Page 6
1 Get to know your eSmart M2
1
2
3
4
56
7
8
9
11
12
13
14
15
16
10
Important: Before beginning please read the safety information on page
33.
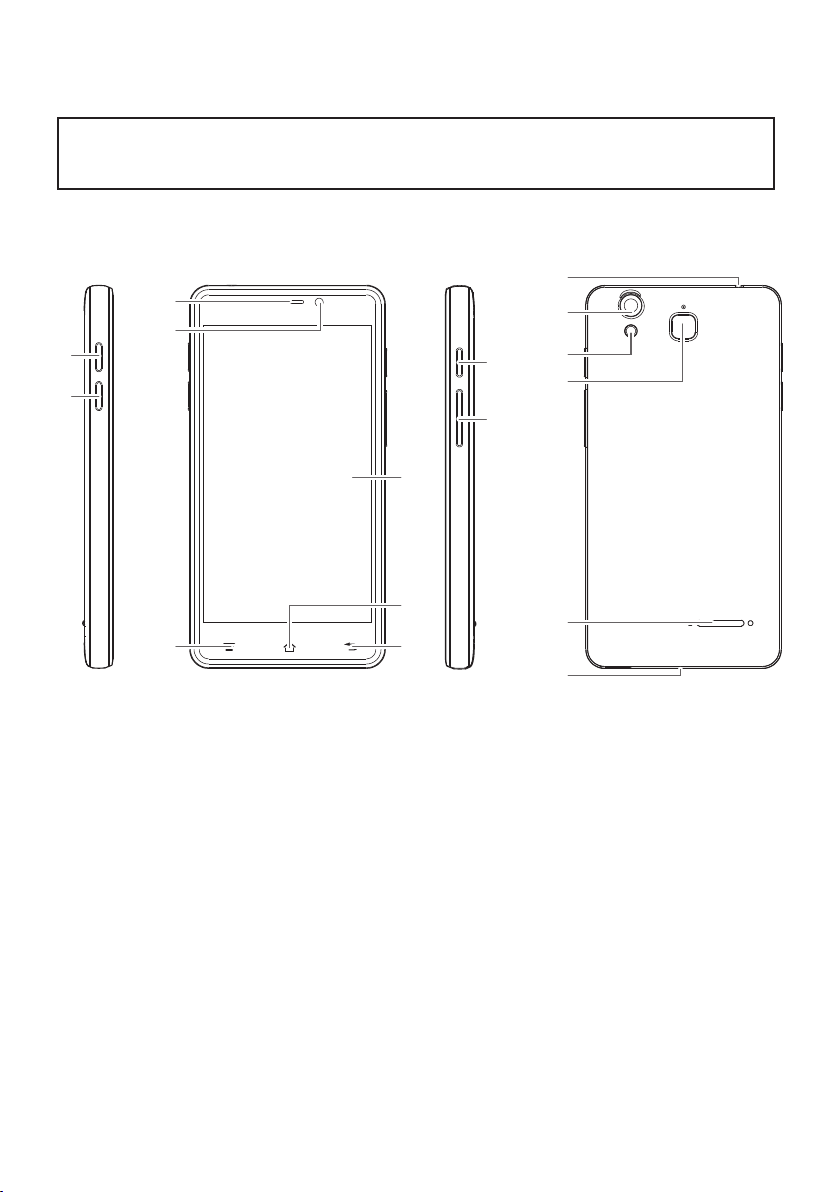
1.1 At a glance
1 Radio (FM) key
2 Boost key (press whilst in a call)
3 Receiver
4 Front camera
5 Options touch key
6 Back touch key
7 Home touch key
8 Touch screen (Display)
9 On-Off key
4
10 Volume buttons +/11 Headset socket
12 Main camera
13 Flashlight / Flash LED
14 Emergency call (SOS) key
15 Speaker
16 Micro-USB socket
(Loading/PC Connection)
Page 7
1.2 Delivery Contents
1 Mobile phone 1 Lithium Ion Battery
1 Battery charger 1 USB cable
1 Headset 1 additional back cover
1 Quick Start Guide
1.3 Insert SIM Card(s), Memory Card and Battery
Possible risk of swallowing small parts!
The SIM card can be removed. Small children could swallow it.
Please make sure that the SIM card is not bent or scratched.
Avoid contact with water, dirt, or electrical charges.
Your phone number is on the SIM card, and is not stored on the phone. If
you use the SIM card from your previous phone then you will keep your
phone number, because your telephone number is allocated to the SIM
card and is not stored on the phone.
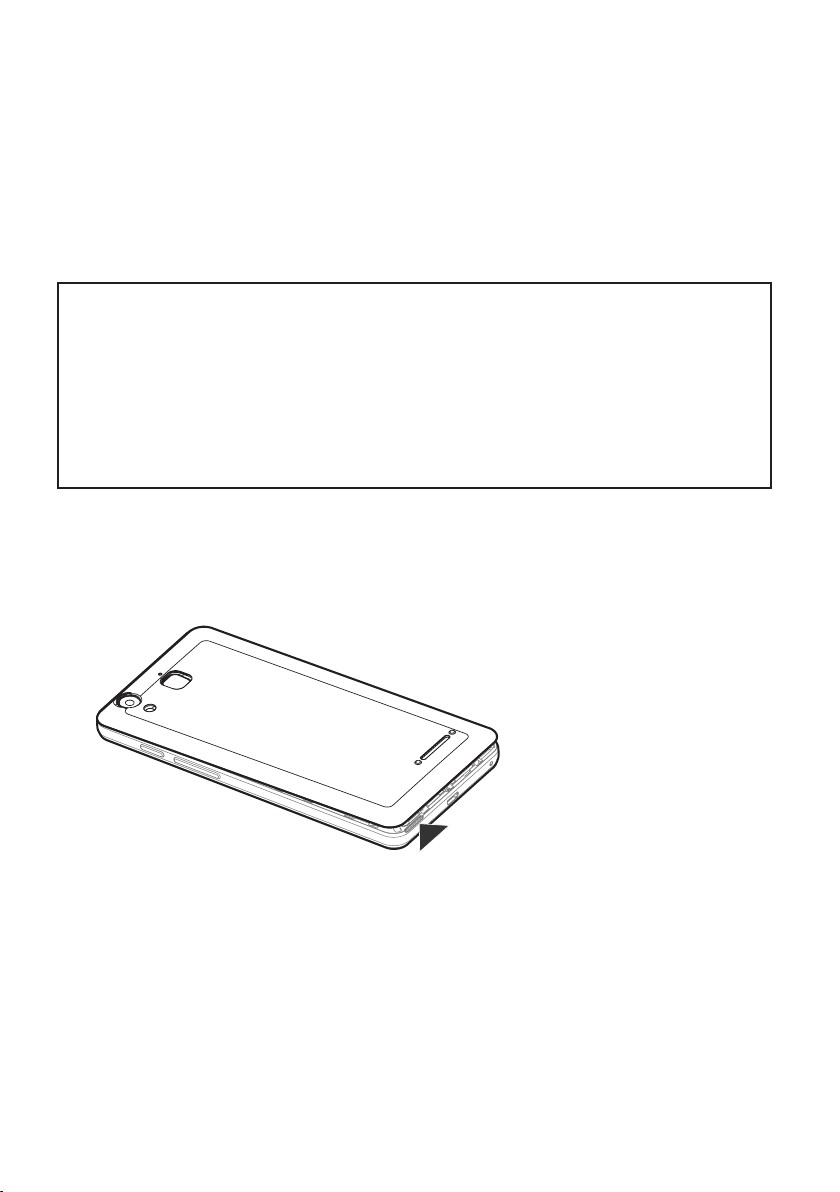
• The phone must be powered off!
• Remove the back cover by sliding a fingernail in the small slot found on the
bottom side of the phone, and pulling the cover up.
5
Page 8
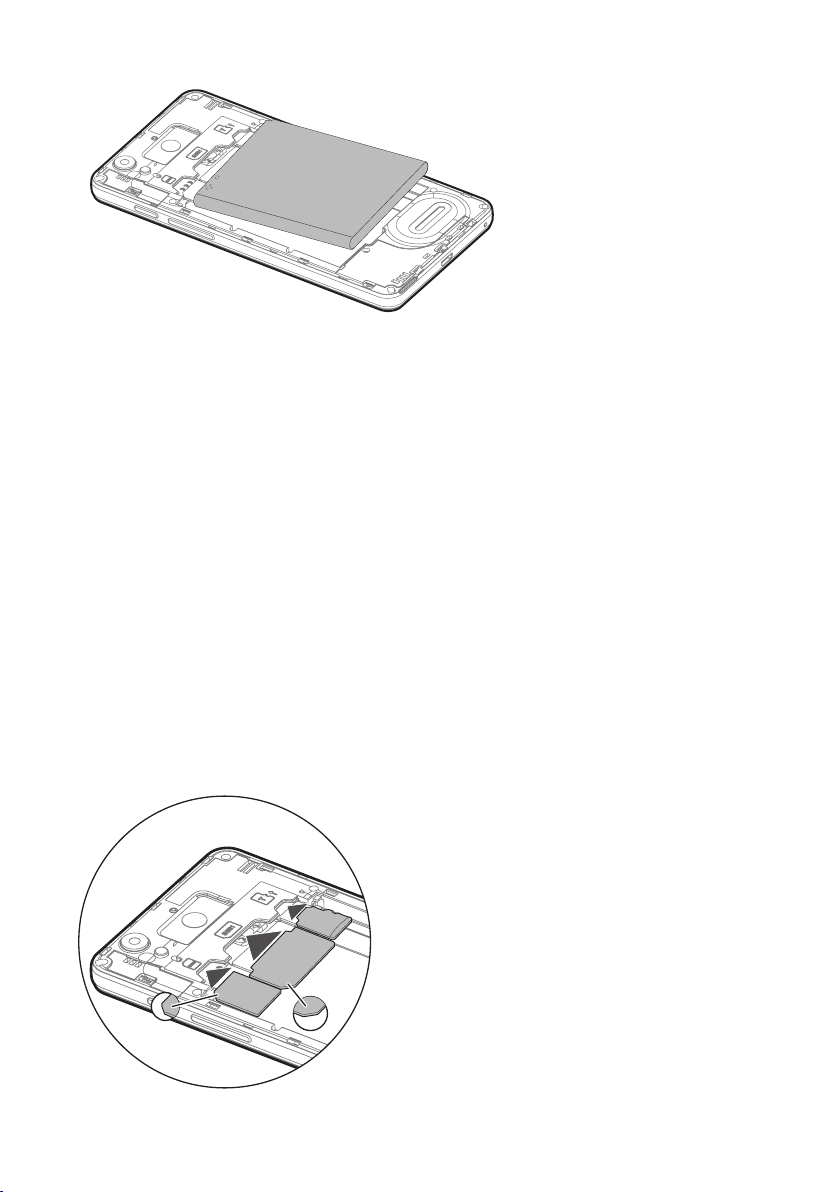
• If a battery is inserted, remove it.
SIM1
SD
SIM2
• Your phone offers two equivalent SIM card holders in different sizes (slot 1 for
standard SIM cards used in older mobile phones, and slot 2 for micro SIM
cards commonly used in smartphones). Depending on the format of your SIM
card, you can choose which SIM card holder you want to use. Insert the SIM
card(s) into the SIM card holder(s) with the gold contacts facing down as
shown in the sketch. Pay attention to the position of the bevelled corner.
In addition, the device supports the simultaneous operation of two SIM cards.
This enables you to use cards from two different networks and/or countries.
Before making an outgoing call, sending a text message or using data services
the phone will prompt you to decide and chose which SIM Card to use if you
are using two at that time (Switel OS: Settings -> Advanced settings -> SIM
cards / Android: Settings -> SIM cards).
NOTE: Both card slots (1=Standard SIM, 2=Micro SIM) support LTE (4G).
However, if you use two SIM cards at a time, the SIM card in slot 2 is limited to
UMTS/GSM (3G/2G).
6
Page 9

• You have the option to insert a micro SD card (max. 64 GB) to increase the
storage capacity. Slide the memory card, with the golden contacts facing down,
into the slot until it stops.
• Insert the battery. In doing so, the battery’s contacts will be on the left and
point up. Press lightly on the bottom end of the battery until it snaps into place
(as shown above).
• Place the back cover back onto the phone and press firmly all around the edges
until it snaps into place.
1.4 Charging the battery
• Ensure that the battery is correctly installed before charging. Do not remove
the battery while the phone is charging. The phone could be damaged as a
result.
• When first starting your phone charge the battery for at least 4 hours. Some
batteries only reach their full capacity after multiple complete
charging/discharging cycles.
• Insert the small plug of the charger into the mini USB charging socket,
ensuring the plug is inserted the correct way around. Do not use excessive
force when inserting the plug.
• Connect the charger. For safety reasons use only the charger delivered with
phone.
1.5 Battery status
The current battery charge status is indicated in the display.
When the battery charge is low, a corresponding warning message appears in the
display. Charge the battery.
When the battery charge drops below the minimum status, the phone switches off
automatically.
7
Page 10
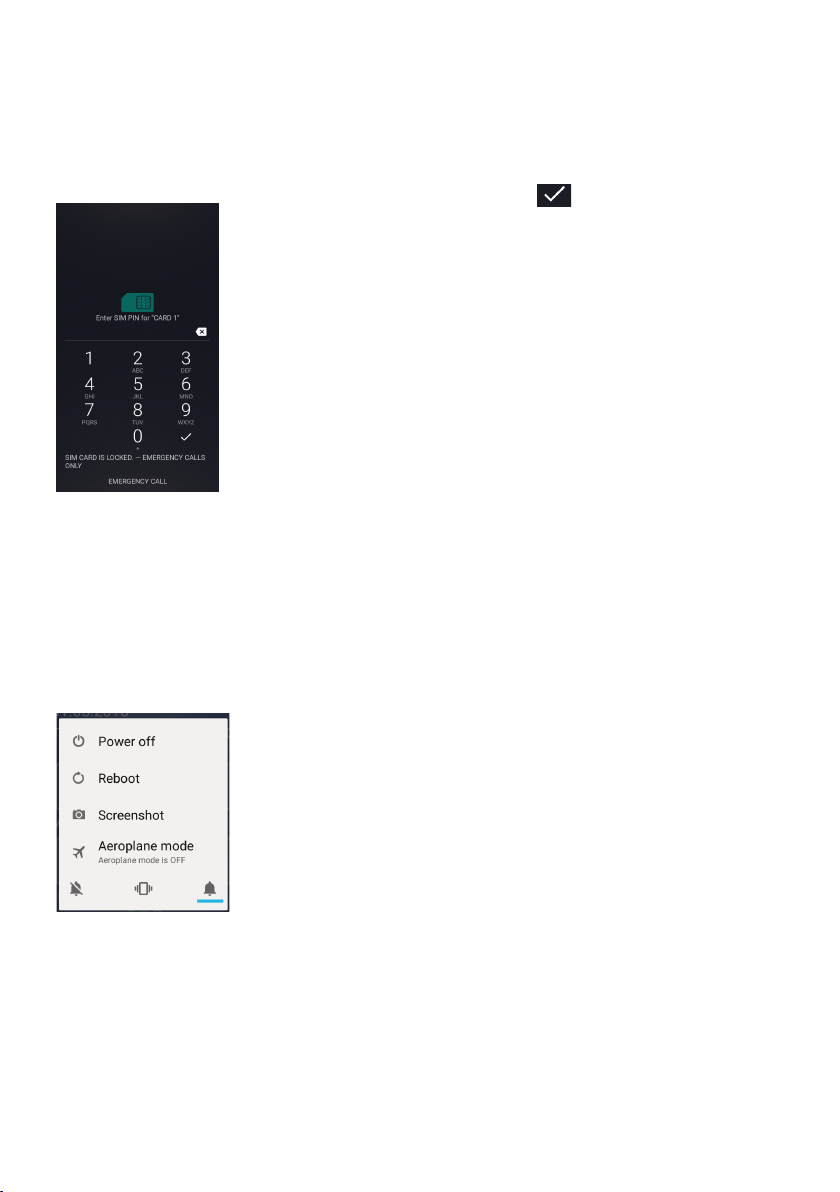
1.6 Turning On/Off your Mobile Phone
To turn on your phone hold the on/off button, top left, down until the display lights
up. Depending on the setting of your SIM card you may then be prompted to enter
your PIN.
Enter the SIM PIN and then click . The phone will log
onto the mobile phone network.
Note: The SIM-Code (the SIM card PIN), which you received
together with the SIM card, protects the SIM card from use
by unauthorized persons. The PIN2 code, which you will
receive together with certain SIM cards, is required for
access to certain services. If you enter the PIN, or PIN2,
incorrectly three times in a row you will be prompted to enter
the PUK or the PUK2 code. Please contact your mobile phone
company if you do not know these codes.
If you press down the On/Off button on your phone for approx. 2 seconds, when it
is turned on, the turn-off dialogue box will be displayed.
Make a selection by tapping the respective entry:
- Power off: turn off the phone
- Reboot: restart
- Screenshot: saving a screenshot to the gallery. You can
also make a screenshot by pressing and holding the
On/Off button and the Volume down button
simultaneously for approx 3 seconds.
- Airplane mode: Turn on/off airplane mode
By selecting (blue line) the symbols in the bottom line you
can choose between (from left to right) Silent, Vibrate and
Normal ring.
8
Page 11

1.7 First use
When you turn on your phone for the first time, you will be guided by an assistant.
You’ll see a Welcome screen.
Choose the language you want and touch the arrow to continue.
Note: To complete the setup process, it’s best to have a Wi-Fi connection.
9
Page 12

2 Basic Operating Instructions
2.1 General Information for Operating the Telephone
Your mobile phone is equipped with a touch screen which is used for the actual
operation of the phone.
The touch screen should not be scratched. Do not touch it with sharp objects and
do not let it come into contact with water. Do not touch the screen if the glass is
broken.
2.2 Select/Open an Element
• Click on the element to open it.
2.3 Scrolling/Swiping
• Slide your finger across the screen in the direction in which you
want to scroll.
2.4 Enlarge image
• In many applications (Website/Image, etc.) you can enlarge the
image by sliding your fingers apart. In order to shrink the image
again slide your fingers back together.
Alternatively, you can also tap 2x on an area to enlarge/reduce
the size.
10
Page 13
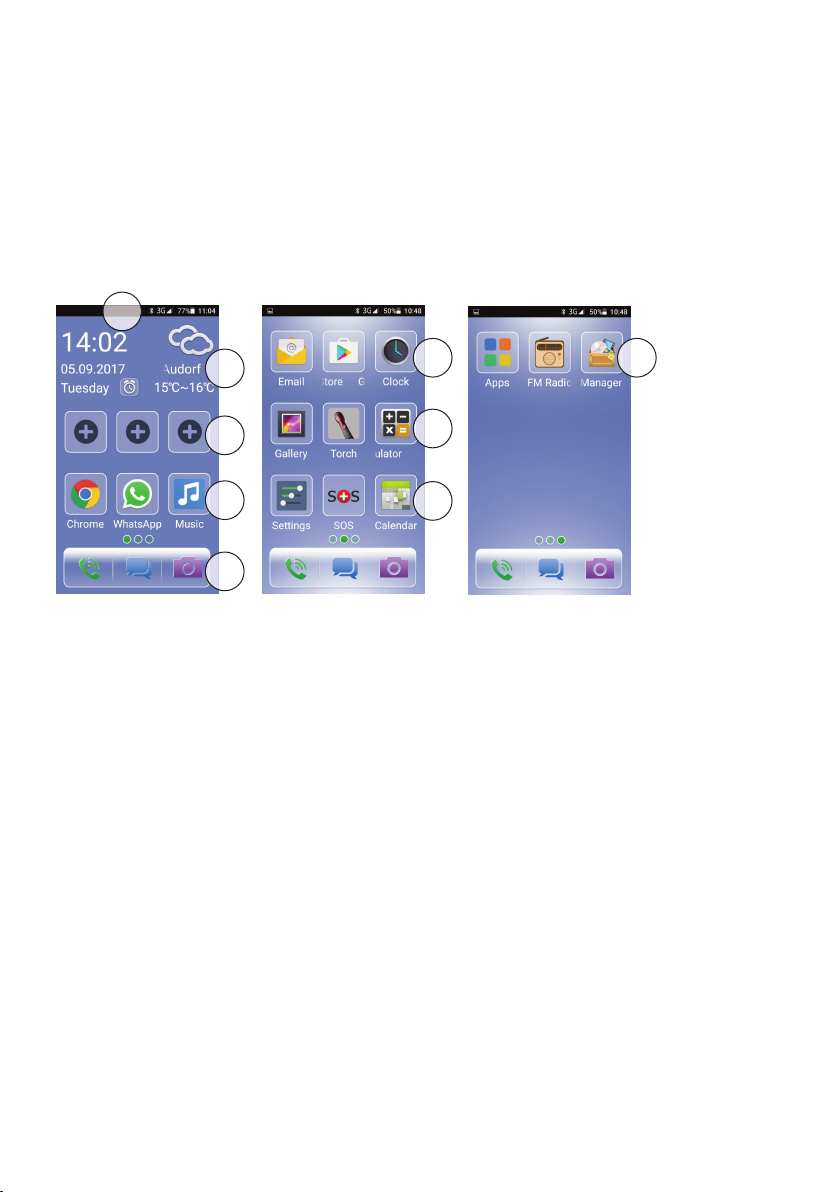
2.5 The screen
The status bar at the top of edge of the screen shows the signal strength, current
statuses and the battery level. If applicable, other information are also displayed
here (illustration: Switel OS).
• By swiping to the left you will reach the individual menus.
• You can return to the start screen at any time by clicking the home key.
1
+ +
2
3
5
4
5 5
5
5
2.6 Screen elements
1 Status bar
2 Info area (date/time/weather - weather only when “Location“ is set to on and
available).
Tapping the alarm clock icon opens the alarm clock settings.
3 Quick dial: Tapping an icon if no contact is stored yet opens the contacts list to
select an entry. If a contact is already stored, tapping opens the selection to
call the contact, send a SMS or delete the corresponding assignment.
4 Quick access for phone functions, messages and camera.
5 Apps
- Browser (Chrome): accesses the internet.
- WhatsApp: opens WhatsApp.
- Music: playback of audio files, stored on your phone.
- Email: access to the email client.
- Google Playstore: access to Google Playstore.
- Clock: settings for the alarm clock.
11
Page 14

- Gallery: display of pictures/fotos, stored on your phone.
- Torch: switching the torch function on/off.
- Calculator: opens the calculator function.
- Settings: access to the most important settings. Tap “Advanced settings“ to
access the complete settings options on Android level. Note: go to “Advanced
settings“ -> “Operating System“ to switch from “Switel“ to “Android“
(Android -> Switel: “Settings“ -> “Operating system“). After switching the
phone should be restarted in order to proper function.
- SOS: settings for the SOS function.
- Calendar: program for managing appointments etc.
- Apps: opens the directory with all apps, stored on the phone. If you
download apps from the playstore they will be stored in this directory.
- FM Radio: starts the radio function. On the very first start tap the magnifying
glass icon to perform a channel search. To shut down the radio function tap
the || icon.
- File Manager: management program for your files.
2.7 Status bar/Quick access menu
If you drag down the status bar, the system notifications of
your mobile device will be displayed. To call up the quick
access menu click on , in the top corner or drag down the
status bar once again.
12
In the quick access menu you can immediately enter
important settings without a lengthy search for the
corresponding menu item, i.e. WI-FI, Bluetooth, and turning
on/off Airplane mode, audio profiles, etc.
Page 15

2.8 Screen lock
After a pre-set amount of time the screen will be locked in order to prevent
unintentional touch interaction with your screen and to save battery capacity.
Note: You can also lock the screen by quickly pressing the On/Off key.
If you wish to unlock the screen, press the on/off key briefly
in order to activate the display screen. Tap the lock symbol,
drag it upwards and then lift your finger.
If you drag the lock symbol to the left in the direction to the
phone receiver icon, the camera icon lights up and you can
take a photo directly.
If you drag the lock symbol to the right in the direction to the
camera icon, the phone receiver icon lights up and you can
directly start a call.
2.9 The touch keys
There are three touch keys located below the display.
Options: display of the corresponding available options
Home: back to the start screen
Back: goes back one “screen”.
2.10 The side keys/Emergency (SOS) key
On-Off key
Press and hold down the On-Off key to turn on or off the phone.
If the phone is on, press the On-Off key briefly to wake up the phone from sleep
mode.
13
Page 16

The volume keys
- In standby mode: setting the volume for ringer and notfication tones. Below
the volume setting you find “All“, “Priority“ and “None“. This refers to the tone
signalling. “All“ means signalling of any event.
Tap on “Priority“ to set the kind of events to be signalled exclusively as well as
the time, you wish this restriction, e. g. you will not be disturbed for the next
hour.
Tap on “None“ to set the time for no signalling anything (mute mode). In this
case your phone will be muted even at an incoming call..
- Whilst in a call: setting of earpiece and loudspeaker volume.
Boost key
Whilst in a call, press the Boost key to activate or de activate the receiver Boost
volume. Receiver volume boost up to +40dB.
Caution: this mobile phone can produce very loud sounds. When the receiver
volume is set very high this image will be displayed in the status bar.
Radio (FM) key
Press to access the radio (FM) menu.
Emergency (SOS) key
Press and hold down the Emergency (SOS) key to start SOS emergency call. For
more information please see page 25.
2.11 Turning the screen
You can turn the screen in order to view a larger image when, for example, looking
at pictures, surfing the internet or writing an SMS/MMS. Please note that not all
applications support this function.
14
Page 17

2.12 Entering text
An on-screen keyboard is displayed for entering your contacts (telephone book
entries), for writing an SMS/MMS or for entering a website address in your
internet browser. Click on the corresponding letters in order to write your text.
• With the key you can switch between upper and lower case letters (in order
to set it to “only upper case letters” hold the key down).
• To enter blank spaces press the key down.
• To enter a full stop click on (to the right of the space key). Hold this key
down for a moment in order to call up a table with special characters. Drag
your finger to the desired symbol and then lift it off of the screen. The symbol
will be entered.
• To enter a comma, click on (to the left of the space key). If you hold the key
down for a moment the entry options will be displayed (Input
languages/Android key settings).
• To delete characters and symbols, press .
• In order to move the cursor, click on the text and pull the mark to the desired
location using your finger.
• With the key you will switch the keyboard to numbers.
• Press to insert a line-feed.
2.13 Connecting your mobile phone to a computer
You can connect your mobile phone to a computer in order to transfer data back
and forth. When connecting both units using an USB cable you can select
connection mode and other options.
Note: During active USB connection some of the mobile phone’s functions, which
access the memory, (i.e. camera, media player, etc.) are not accessible.
15
Page 18

3 Calling (Switel OS)
3.1 Entering the phone number by hand
Tap the icon.
The dialling keypad is displayed.
Enter the phone number and then tap the green phone icon.
The phone number will be dialled.
The key displays all the calls that you have received,
dialled, or missed.
The key opens your contacts. You can select from your
contacts.
During the call the duration of the call is displayed.
The key displays the dialling keypad again in the event
you would like to make an entry, i.e. for remote access to an
answering machine.
16
The key turns on the loudspeaker.
Tap the key in order to end the call.
Page 19

3.2 Dialling from your contacts/calls list / Editing entries
Tap the icon.
Tap (Calls list) or (Contacts).
Tap an entry in the list to call directly.
or
Tap the icon on the right hand side of each entry to view the details.
Tap in the top right corner to edit the entry.
3.3 Incoming calls
An incoming call is indicated with the set ringtone (active
audio profile) and on the display screen. If the caller is
entered in your contact list the name and picture are also
displayed, and a special ringtone used. These options are only
accessible if the contact is stored on the mobile and not on
the SIM card.
Tap “ANSWER“ to take the call or “DISMISS“ to reject the
call.
17
Page 20

3.4 Initiate an Emergency Call
Press the emergency call button for approx. 3 seconds. You will hear a siren and
the emergency call will be sent to the emergency number(s) specified.
The emergency call button also works when the screen lock is on.
For configuring the emergency call numbers and further settings refer to page 25.
18
Page 21

4 Contacts (Phonebook)
4.1 Creating a new contact
Open your contacts (Phonebook). Your contacts will be
displayed.
NOTE: When inserting a SIM card the contacts from this
SIM card will be automatically be copied to the phone’s
memory in order to be available for connections via
Bluetooth (e. g. handsfree device in a car).
Create a new contact by tapping .
Tap the upper entry field and enter the christian name
and in the field below the name.
If you want to attach a photo to the entry tap the picture
area and select a photo.
Tap the field for the (first) telephone number and enter
the number.
It is possible to store more than one telephone number
to an entry (to get access to additional fields for
telephone numbers tap .
When starting a call to this entry, you can select the
desired telephone number from a list.
You can create call groups by assigning them the same
call group name.
Tap to save the new entry.
19
Page 22

4.2 Editing contacts
Open your contacts (Phonebook). Your contacts will be
displayed.
Tap the icon on the right hand side of each entry to
view the details.
Tap in the top right corner to edit the entry.
Tap to save the entry.
4.3 Deleting contacts
In order to delete contacts tap the Options touch key when in list view and mark
the contacts to delete.
20
Page 23

5 Quick dial
You can assign contacts you want to reach quickly and easily to the quick dial
keys.
5.1 Storing quick dial
Tap a quick dial key and select an entry from your
contacts you want to assign. If more than one telephone
number is stored to that contact, select the desired
phone number by tapping on it.
5.2 Using/deleting quick dial buttons
Tap an assigned quick dial key.
For calling tap .
For creating and sending a message (SMS/MMS) tap
.
Tap to delete the assignment (the entry in
your contacts will be untouched).
21
Page 24

6 Calls list
All calls are stored in the calls list (received, missed, dialled).
Open the calls list and scroll to the desired entry.
Tap the Options touch key and tap Delete.
Mark the entries you want to delete and tap in
order to delete the entries or tap to exit without
deleting.
or
Tap the icon on the right hand side of each entry to
view the details.
Tap to call.
Tap to create and send a message (SMS/MMS).
22
Page 25

7 SMS/MMS
7.1 Writing and sending messages
Open the SMS/MMS menu. The list of existing messages
is opened.
Tap for creating a new message.
Tap the upper entry field for entering a name (if this is
saved in your contacts) or enter the telephone number
for the recipient. Alternatively tap and select an
entry from your contacts.
Tap and enter the text of the message.
Tap to assign an attachment (picture/ video/
contact/ audio).
Tap to record a voice message.
Once you have assigned an attachment or a voice
message, the message is automatically converted into a
MMS.
Tap to send the message.
23
Page 26

7.2 Reading/deleting messages
Open the SMS/MMS menu. The list of existing messages
is opened.
Tap the desired message to open it.
Tap the desired message and hold your finger down for
approx. 3 seconds.
Select from the options to view the message, to copy the
senders phone number to your contacts (if not yet
stored) or to delete the message.
24
Page 27

8 SOS (Emergency call)
Your mobile is equipped with an emergency call function. Up to 5 personal phone
numbers can be entered for an automatic emergency call sequence, or the phone
number for an emergency call centre.
8.1 Sequence of an emergency call
Press the emergency call button on the back of the device for approx. 2-3 seconds.
As soon as the automatic emergency call begins you will hear a “siren” sound for
several seconds.
For “Individual emergency call numbers” setting:
• The first phone number is called.
• If the first emergency number isn’t answered, the second is dialled and so on.
All emergency numbers (max. 5) will be dialled one after another. If you have
only entered one emergency number it will be dialled repeatedly. If necessary,
this process will be repeated until the battery in your mobile is empty. The
emergency call loop stops as soon as someone answers the call. The
emergency call message will be played. The hands free function on your
mobile will be activated automatically and you will be able to personally speak
with whomever you called.
• The emergency call loop will also be resumed after an accepted
emergency call is ended until you cancel the emergency call (press
the emergency call button again).
8.2 Cancelling the emergency call function
Press the emergency call button again.
25
Page 28

8.3 Settings
Open “SOS“ and tap on:
: Select whether the emergency call
should go to individual emergency numbers (max. 5) or
to an emergency call centre (green tick = enabled).
At the bottom of the screen you can set the emergency
call function to on or off in general.
: Tap an entry field and enter the
desired telephone number(s). Tapping on the icon on the
right hand side of each field opens your contacts and you
can selct an entry. After having entered all phone
numbers tap Save.
Entering public authorities such as the Police
Department, Fire Department, or Rescue
Coordination Centres is not permitted. This is a
purely “private” emergency call.
: Tap the entry field, enter the desired
telephone number and tap Save.
: You can select between the already
stored standard message or a personal message, you
need to record first. For the personal message you have
20 seconds available.
Press l for recording and n to stop recording. Press
to playback your recorded message. Then actvate
,Personal' (green tick = enabled).
Complete the entry with Save.
26
Page 29

: You can enter a personal emergency
SMS. To do so, tap the text field, delete the existing
message, if necessary, and enter your own emergency
SMS. In addition, you can select whether your GPS
coordinates (GPS activation in Switel OS: Settings ->
Advanced settings -> Location) should be transmitted
together with the emergency SMS (green tick =
enabled).
Complete the entry with Save.
: If you have inserted two SIM cards
you can select which one will be used to send the
emergency call (green tick = enabled).
27
Page 30

9 Settings
Open “Settings“ and tap on:
: Switch on/off Wi-Fi or Mobile data,
monitor your data usage or establish an Android Hotspot
with your phone..
: Select the font size for the display.
: Select a tone for notifications (e. g.
SMS/MMS).
: Select a ringtone for incoming calls.
: Access to the native Android settings.
For detailed information on the settings of the operating
system "Android 5.1" please use the relevant sources on
the Internet.
28
Page 31

10 Bluetooth devices
You can use Bluetooth devices such as a headset. To pair and connect Bluetooth
devices, proceed as follows):
1. Open “Settings“ and tap .
2. Tap . By this the eSmart M2 is prepared for pairing with a new
Bluetooth device. A list with already paired Bluetooth devices is shown.
3. Now perform the necessary steps on the device which you want to connect
with your eSmart M2. These can be found in the device's user guide.
4. After a short time appears. Tap the entry in order to connect.
is shown. depending on the configuration you will be asked
for the pairing code. In most cases it is “0000“.
5. After connecting the device enters the list of current connections:
.
6. Tap to edit the name or to delete the connection.
29
Page 32

11 Camera
Open the camera.
The camera is turned on.
Tap in oder to switch the flash function.
Tap in oder to switch the camera (front/rear).
The current camera is shown respectively.
Tap in order to take a photo.
or
Tap in order to record a video. The duration of the
recording is displayed. To end video recording, press the
red button.
The stored photos / videos you can view in the gallery and continue to use them
(set as wallpaper or contact picture via Bluetooth, e-mail or MMS messages, etc.)
or delete them.
30
Page 33

12 Apps
On your phone, some apps are preinstalled.
Open "Apps" to see the installed apps (programs). When
you download Apps from the Google Play Store, these
are also stored here.
To start an application, tap its icon.
12.1 Creating an account
In general for Google applications, such as Play Store, from which you can
download more apps for your device, you need a Google Account.
Create an account in order to operate the device optimally.
1. Open Settings -> Advanced settings -> Accounts ->
+ Add account ->Google, to log-in using a Google account or to create a new
account.
2. Tap on Or create a new account to create a new account and follow the
instructions to finalize account settings or Enter your email to get access to
your already created account.
You can set up multiple Google Accounts on the device.
13 Updating the firmware
Thanks to the firmware service (FOTA), the device can be updated directly to the
latest operating software. Please make sure wifi is available for the phone.
1. Open Settings -> Advanced settings -> About phone -> Wireless update.
2. Tap Check for updates and follow the instructions on the screen.
31
Page 34

Appendix
Technical data
Band GSM (850/900/1800/1900 MHz) , WCDMA (2100/850 MHz) ,
4G Band-FDD LTE (800/1800/2100/2600 MHz)
Dual cards SIM + 4G USIM; dual standby, standard SIM/micro SIM
HAC M4/T4
Processor MTK 6735M Quad-cortex 1GHz CPU
OS Android 5.1
Memory RAM 1 GB DDR2, ROM 8 GB, supports a TF Memory Card
(micro SD) up to 64 GB (optional)
Camera Front 2 M pixel, Rear 8 M pixel, Autofocus
Display 5.0“ (12.7cm) qHD (960x540 pixel)
Sensor accelerometer / proximity / lighting
WiFi IEEE 802.11b/g/n, 2G GPRS, 3G: WCDMA/HSPA, 4G:FDD-LTE
Bluetooth 4.0
Battery Li-Ion, 3.8V, 3200 mAh, 12.16 Wh
Power adaptor plug energy-efficient power adaptor model AD06F050100EU
(Input 100-240V - 50/60Hz 0.3A, Output 5V/1A)
Maximum earpiece volume up to +40dB
Talk time up to 6 hours
Standby time up to 8 days
Dimensions approx. 143 x 73 x 10.6 mm
Weight 176 g (incl. battery)
USB jack Micro USB, EU Standard
Headset connection 3.5 mm jack
SAR 1.269W/kg
32
Page 35

Tips on the battery
• Only use batteries, cables and charging unit approved by the manufacturer,
otherwise the battery could be damaged.
• Never throw the battery into fire or water.
• Do not short circuit the battery.
• Always leave the battery in the phone to avoid accidentally short circuiting the
battery contacts.
• Keep the battery contacts clean and free of dirt.
• The battery can be charged/discharged hundreds of times but its service life is
limited.
• Replace the battery when the battery power has decreased noticeably.
Intended use
This mobile phone is designed for use when connected to a mobile phone network.
Any other use is considered unintended use. Unauthorised modification or
reconstruction is not permitted. Under no circumstances complete any repair
work yourself.
Areas of use
• Do not use the phone in prohibited areas.
• Switch the phone off in the vicinity of medical equipment (e.g. in hospitals).
• Do not use the phone in petrol stations or near fuels and chemicals.
• Check with the airline whether mobile phones may be used on board.
Safety information
• Prevent exposure to smoke, dust, vibration, chemicals, moisture, heat and
direct sunlight. The phone is not waterproof; therefore, keep it dry. Liquids will
change the colour of a label that indicates water damage inside the device.
Water damage to your device can void your manufacturer’s warranty.
• Only use original accessories and batteries. Never attempt to connect other
products.
• If you want to connect the phone to another device, read the manual supplied
with that device with regard to any detailed safety information.
• Never attempt to connect incompatible products.
• Repairs to this device may only be completed by qualified service personnel.
33
Page 36

• All mobile communication equipment is subject to interference which may
impair its performance.
• Keep the phone and accessories out of the reach of children.
• The SIM card can be removed. Caution! Small children can swallow them.
• The ringing tone is issued via the loudspeaker. Take an incoming call first and
then hold the phone to your ear. This prevents any possible hearing damage.
• Only use the phone while driving or riding a transport vehicle in road traffic
when using the approved handsfree equipment and appropriately positioned
holders. Ensure that no safety−related functions are interfered with when
operating the phone. It is essential to ob serve the applicable national laws and
regulations.
• Always maintain a distance of at least 15 cm to implanted heart pacemakers to
prevent any possible interference. If you have had a pacemaker implanted, do
not carry the phone in a breast pocket when switched on. Always hold the
phone to the ear furthest away from the pacemaker during calls. Switch the
phone off immediately if you notice or suspect any adverse effects.
• This phone is hearing aid compatible. If you wear a hearing aid, however,
please contact your doctor or the hearing aid manufacturer to inquire about
any possible impairments through mobile communication equipment.
• Do not rely on the mobile phone as a safeguard for emergencies. For a variety
of technical reasons, it is not possible to guarantee a reliable connection under
all circumstances.
• Ensure access to the power adapter plug is not obstructed by furniture or such.
34
Page 37

Power adapter plug
The power adapter plug supplied fulfils the ecodesign requirements of the
European Community (Directive 2005/32/EC). This means that the current
consumption is considerably less, both in operation as well as in standby, in
comparison to older power adapter plug models.
Disposal
In order to dispose of your device, take it to a collection point provided
by your local public waste authorities (e.g. recycling centre). According
to laws on the disposal of electronic and electrical devices, owners are
obliged to dispose of old electronic and electrical devices in a separate
waste container. The symbol indicates that the device must not be
disposed of in normal domestic waste!
Batteries represent a hazard to health and the environment!
Never open, damage or swallow batteries or allow them to pollute the
environment. They may contain toxic, ecologically hazardous heavy
metals. You are legally required to dispose of batteries and
rechargeable batteries safely, either at a retailer that sells batteries or
at an appropriate collection point that provides a suitable container.
Never put batteries in the household waste.
Disposal is free of charge.
Lithium batteries and battery packs of all kinds should be fully
discharged before you drop them off. Be sure to take precautions
against short-circuits, e.g. by covering poles with adhesive tape, to
prevent the risk of a fire.
Packaging materials must be disposed of according to local
regulations.
Maintenance
• Clean the housing surfaces with a soft, fluff−free cloth. Do not use any
cleaning agents or solvents.
35
Page 38

Declaration of Conformity
This device fulfils the requirements stipulated in the EU directive:
RED 2014/53/EU.
Conformity with the above mentioned directive is confirmed by the CE mark on the
device. To view the complete Declaration of Conformity, please refer to the free
download available on our web site www.switel.com
Trademarks
• The Android logo, Google™, Google Maps™, Google Mail™, YouTube™, Google
Play™ Store and Google Talk™ are trademarks of Google, Inc.
• Bluetooth® is a registered trademark of Bluetooth SIG, Inc. worldwide.
• Wi-Fi®, Wi-Fi Protected Setup™, Wi-Fi Direct™, Wi-Fi CERTIFIED™ and the Wi-
Fi logo are registered trademarks of the Wi-Fi Alliance.
• All other trademarks and copyrights are the property of their respective
owners.
36
Page 39

Guarantee
SWITEL equipment is produced and tested according to the latest production
methods. The implementation of carefully chosen materials and highly developed
technologies ensure trouble−free functioning and a long service life. The terms of
guarantee do not apply when a device malfunction was caused by the mobile
telecommunications network operator/provider. The terms of guarantee do not
apply to the batteries or power packs used in the products. The period of
guarantee is 24 months from the date of purchase.
All deficiencies related to material or manufacturing errors within the period of
guarantee will be redressed free of charge. Rights to claims under the terms of
guarantee are annulled following tampering by the purchaser or third parties.
Damage caused as a result of improper handling or operation, normal wear and
tear, incorrect positioning or storage, improper connection or installation or Acts
of Gods and other external influences are excluded from the terms of guarantee.
In the case of complaints, we reserve the right to repair defective parts, replace
them or replace the entire device.
Replaced parts or devices become our property. Rights to compensation in the
case of damage are excluded where there is no evidence of intent or gross
negligence by the manufacturer.
If your device shows signs of defect during the period of guarantee, please return
it to the sales outlet in which you purchased the SWITEL device together with the
purchase receipt. All claims under the terms of guarantee in accordance with this
agreement can only be asserted at the sales outlet.
No claims under the terms of guarantee can be asserted after a period of two
years from the date of purchase and hand−over of the product.
37
Page 40

Index
A
Apps. . . . . . . . . . . . . . . . . . . . . . . . . . . . . . . . . . . . . . . . . . . . . . . . . . . . . . . . . . . . . . . . . . . . . . . . 31
Areas of use . . . . . . . . . . . . . . . . . . . . . . . . . . . . . . . . . . . . . . . . . . . . . . . . . . . . . . . . . . . . . . . . . 33
At a glance . . . . . . . . . . . . . . . . . . . . . . . . . . . . . . . . . . . . . . . . . . . . . . . . . . . . . . . . . . . . . . . . . . . 4
B
Basic Operating Instructions . . . . . . . . . . . . . . . . . . . . . . . . . . . . . . . . . . . . . . . . . . . . . . . . . 10
Battery status . . . . . . . . . . . . . . . . . . . . . . . . . . . . . . . . . . . . . . . . . . . . . . . . . . . . . . . . . . . . . . . . 7
Bluetooth . . . . . . . . . . . . . . . . . . . . . . . . . . . . . . . . . . . . . . . . . . . . . . . . . . . . . . . . . . . . . . . . . . . 29
C
Calling . . . . . . . . . . . . . . . . . . . . . . . . . . . . . . . . . . . . . . . . . . . . . . . . . . . . . . . . . . . . . . . . . . . . . . 16
Calls list . . . . . . . . . . . . . . . . . . . . . . . . . . . . . . . . . . . . . . . . . . . . . . . . . . . . . . . . . . . . . . . . . . . . 22
Camera . . . . . . . . . . . . . . . . . . . . . . . . . . . . . . . . . . . . . . . . . . . . . . . . . . . . . . . . . . . . . . . . . . . . . 30
Charging the battery. . . . . . . . . . . . . . . . . . . . . . . . . . . . . . . . . . . . . . . . . . . . . . . . . . . . . . . . . . . 7
Contacts . . . . . . . . . . . . . . . . . . . . . . . . . . . . . . . . . . . . . . . . . . . . . . . . . . . . . . . . . . . . . . . . . . . . 19
Creating an account . . . . . . . . . . . . . . . . . . . . . . . . . . . . . . . . . . . . . . . . . . . . . . . . . . . . . . . . . . 31
D
Declaration of Conformity . . . . . . . . . . . . . . . . . . . . . . . . . . . . . . . . . . . . . . . . . . . . . . . . . . . . 36
Delivery Contents . . . . . . . . . . . . . . . . . . . . . . . . . . . . . . . . . . . . . . . . . . . . . . . . . . . . . . . . . . . . . 5
Dialling from your contacts/calls list. . . . . . . . . . . . . . . . . . . . . . . . . . . . . . . . . . . . . . . . . . . 17
Disposal. . . . . . . . . . . . . . . . . . . . . . . . . . . . . . . . . . . . . . . . . . . . . . . . . . . . . . . . . . . . . . . . . . . . . 35
E
Editing entries . . . . . . . . . . . . . . . . . . . . . . . . . . . . . . . . . . . . . . . . . . . . . . . . . . . . . . . . . . . . . . . 17
Emergency (SOS) key . . . . . . . . . . . . . . . . . . . . . . . . . . . . . . . . . . . . . . . . . . . . . . . . . . . . . . . . 13
Emergency call . . . . . . . . . . . . . . . . . . . . . . . . . . . . . . . . . . . . . . . . . . . . . . . . . . . . . . . . . . . . . . 25
Emergency Call. . . . . . . . . . . . . . . . . . . . . . . . . . . . . . . . . . . . . . . . . . . . . . . . . . . . . . . . . . . . . . 18
Entering text. . . . . . . . . . . . . . . . . . . . . . . . . . . . . . . . . . . . . . . . . . . . . . . . . . . . . . . . . . . . . . . . . 15
Entering the phone number . . . . . . . . . . . . . . . . . . . . . . . . . . . . . . . . . . . . . . . . . . . . . . . . . . . 16
38
Page 41

F
First use. . . . . . . . . . . . . . . . . . . . . . . . . . . . . . . . . . . . . . . . . . . . . . . . . . . . . . . . . . . . . . . . . . . . . . 9
G
General Information . . . . . . . . . . . . . . . . . . . . . . . . . . . . . . . . . . . . . . . . . . . . . . . . . . . . . . . . . 10
Guarantee . . . . . . . . . . . . . . . . . . . . . . . . . . . . . . . . . . . . . . . . . . . . . . . . . . . . . . . . . . . . . . . . . . . 37
I
Incoming calls. . . . . . . . . . . . . . . . . . . . . . . . . . . . . . . . . . . . . . . . . . . . . . . . . . . . . . . . . . . . . . . 17
Initiate an Emergency Call . . . . . . . . . . . . . . . . . . . . . . . . . . . . . . . . . . . . . . . . . . . . . . . . . . . 18
Insert SIM Card(s) and Battery . . . . . . . . . . . . . . . . . . . . . . . . . . . . . . . . . . . . . . . . . . . . . . . . 5
Intended use . . . . . . . . . . . . . . . . . . . . . . . . . . . . . . . . . . . . . . . . . . . . . . . . . . . . . . . . . . . . . . . . 33
M
Maintenance. . . . . . . . . . . . . . . . . . . . . . . . . . . . . . . . . . . . . . . . . . . . . . . . . . . . . . . . . . . . . . . . . 35
P
Phonebook . . . . . . . . . . . . . . . . . . . . . . . . . . . . . . . . . . . . . . . . . . . . . . . . . . . . . . . . . . . . . . . . . . 19
Power adapter plug . . . . . . . . . . . . . . . . . . . . . . . . . . . . . . . . . . . . . . . . . . . . . . . . . . . . . . . . . . 35
Q
Quick access menu. . . . . . . . . . . . . . . . . . . . . . . . . . . . . . . . . . . . . . . . . . . . . . . . . . . . . . . . . . . 12
Quick dial. . . . . . . . . . . . . . . . . . . . . . . . . . . . . . . . . . . . . . . . . . . . . . . . . . . . . . . . . . . . . . . . . . . . 21
S
Safety information . . . . . . . . . . . . . . . . . . . . . . . . . . . . . . . . . . . . . . . . . . . . . . . . . . . . . . . . . . . 33
Screen elements. . . . . . . . . . . . . . . . . . . . . . . . . . . . . . . . . . . . . . . . . . . . . . . . . . . . . . . . . . . . . 11
Screen lock. . . . . . . . . . . . . . . . . . . . . . . . . . . . . . . . . . . . . . . . . . . . . . . . . . . . . . . . . . . . . . . . . . 13
Sequence of an emergency call . . . . . . . . . . . . . . . . . . . . . . . . . . . . . . . . . . . . . . . . . . . . . . . 25
Service. . . . . . . . . . . . . . . . . . . . . . . . . . . . . . . . . . . . . . . . . . . . . . . . . . . . . . . . . . . . . . . . . . . . . . 41
Settings . . . . . . . . . . . . . . . . . . . . . . . . . . . . . . . . . . . . . . . . . . . . . . . . . . . . . . . . . . . . . . . . . . . . . 28
SMS/MMS . . . . . . . . . . . . . . . . . . . . . . . . . . . . . . . . . . . . . . . . . . . . . . . . . . . . . . . . . . . . . . . . . . . 23
SOS. . . . . . . . . . . . . . . . . . . . . . . . . . . . . . . . . . . . . . . . . . . . . . . . . . . . . . . . . . . . . . . . . . . . . . . . . 25
Status bar . . . . . . . . . . . . . . . . . . . . . . . . . . . . . . . . . . . . . . . . . . . . . . . . . . . . . . . . . . . . . . . . . . . 12
39
Page 42

T
Technical data . . . . . . . . . . . . . . . . . . . . . . . . . . . . . . . . . . . . . . . . . . . . . . . . . . . . . . . . . . . . . . . 32
The side keys . . . . . . . . . . . . . . . . . . . . . . . . . . . . . . . . . . . . . . . . . . . . . . . . . . . . . . . . . . . . . . . . 13
The touch keys. . . . . . . . . . . . . . . . . . . . . . . . . . . . . . . . . . . . . . . . . . . . . . . . . . . . . . . . . . . . . . . 13
Tips on the battery . . . . . . . . . . . . . . . . . . . . . . . . . . . . . . . . . . . . . . . . . . . . . . . . . . . . . . . . . . . 33
Turning On/Off your Mobile Phone . . . . . . . . . . . . . . . . . . . . . . . . . . . . . . . . . . . . . . . . . . . . . . 8
Turning the screen . . . . . . . . . . . . . . . . . . . . . . . . . . . . . . . . . . . . . . . . . . . . . . . . . . . . . . . . . . . 14
U
Updating the firmware . . . . . . . . . . . . . . . . . . . . . . . . . . . . . . . . . . . . . . . . . . . . . . . . . . . . . . . 31
40
Page 43

Service
In the case of technical questions, please use the service form on our website:
http://www.switel.com/en/product-information-technical-support/
Version 1.1 / 10.2017
 Loading...