

Page 1
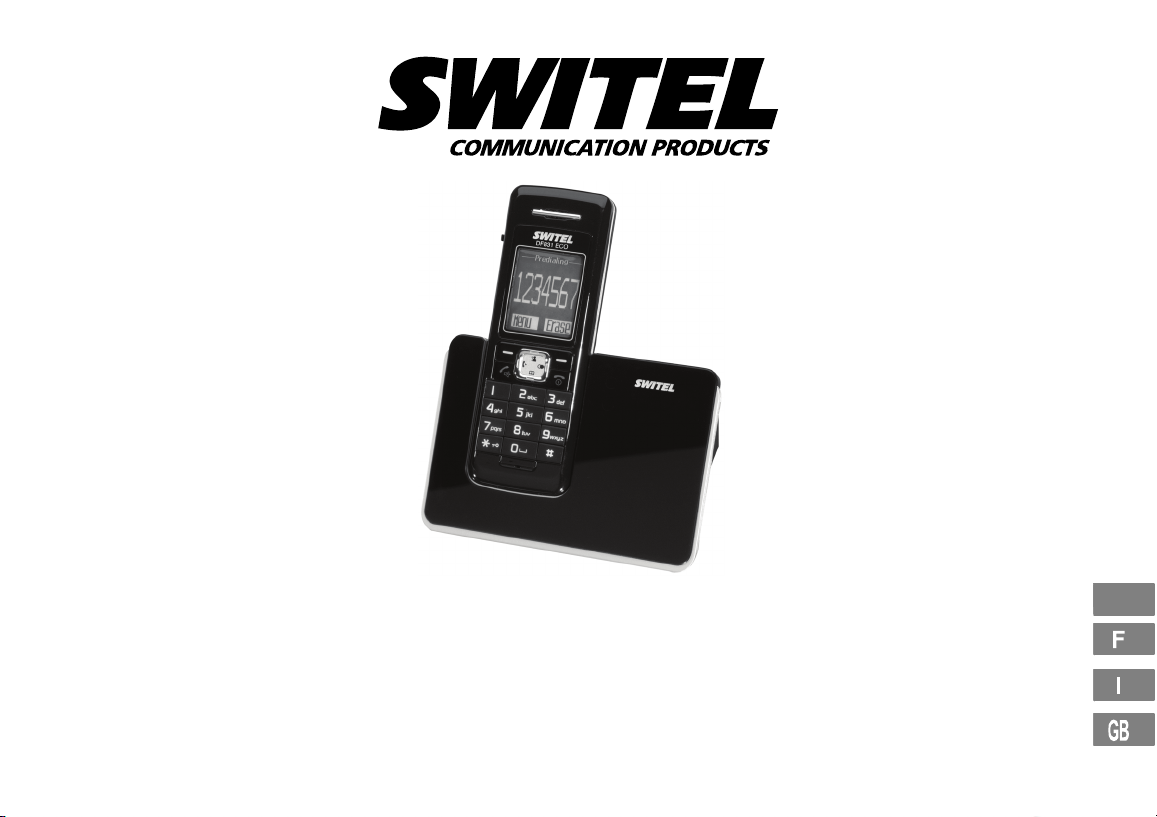
Schnurloses DECT−/GAP−Telefon
Téléphone DECT GAP sans fil
Telefono DECT/GAP cordless
Cordless DECT/GAP telephone
DF 83X
Bedienungsanleitung
Mode d’emploi
Istruzioni per l’uso
Operating Instructions
D
Page 2

2
Bedienungsanleitung 3. . . . . . . . . . . . . . . . . .
Mode d’emploi 27. . . . . . . . . . . . . . . . . . . . .
Istruzioni per l’uso 51. . . . . . . . . . . . . . . . . . .
Operating Instructions 75. . . . . . . . . . . . . . . .
Declaration of Conformity 100. . . . . . . . . . . .
Page 3

1 Sicherheitshinweise 4. . . . . . . . . . . . . .
2 Telefon in Betrieb nehmen 5. . . . . . . . . .
3 Bedienelemente 7. . . . . . . . . . . . . . . . .
4 Einführende Informationen 8. . . . . . . . . .
5 Telefonieren 11. . . . . . . . . . . . . . . . . . . .
6 Nebenstellenanlagen / Zusatzdienste 13. .
7 Menüstruktur 14. . . . . . . . . . . . . . . . . . .
8 Telefonbuch 16. . . . . . . . . . . . . . . . . . . .
9 Anruferliste 18. . . . . . . . . . . . . . . . . . . . .
10 Besondere Funktionen 20. . . . . . . . . . . . .
11 Erweitern des Telefonsystems 21. . . . . . .
12 Falls es Probleme gibt 22. . . . . . . . . . . . .
13 Technische Eigenschaften 23. . . . . . . . . .
14 Pflegehinweise / Garantie 24. . . . . . . . . .
15 Stichwortverzeichnis 25. . . . . . . . . . . . . .
1
Inhaltsverzeichnis
3
Page 4
Sicherheitshinweise
1 Sicherheitshinweise
Lesen Sie diese Bedienungsanleitung sorgfältig durch.
Bestimmungsgemäße Verwendung
Dieses Telefon ist geeignet zum Telefonieren innerhalb eines Telefonnetzes. Jede andere Verwendung gilt als nicht bestimmungsgemäß.
Eigenmächtige Veränderungen oder Umbauten sind nicht zulässig.
Öffnen Sie das Gerät in keinem Fall selbst und führen Sie keine eigenen Reparaturversuche durch.
Aufstellungsort
Vermeiden Sie Belastungen durch Rauch, Staub, Erschütterungen,
Chemikalien, Feuchtigkeit, Hitze oder direkte Sonneneinstrahlung.
Verwenden Sie das Mobilteil nicht in explosionsgefährdeten Bereichen.
Netzteil
Achtung: Verwenden Sie nur das mitgelieferte Stecker-
netzteil, da andere Netzteile das Telefon beschädigen können. Sie dürfen den Zugang zum Steckernetzteil nicht durch
Möbel oder andere Gegenstände versperren.
Aufladbares Akkupack
Achtung: Werfen Sie Akkus nicht ins Feuer. Verwenden Sie
nur Akkus des gleichen Typs! Achten Sie auf die richtige Polung! Bei verkehrter Polung der Akkus besteht beim Aufladen Explosionsgefahr.
Stromausfall
Bei Stromausfall kann mit diesem Telefon nicht telefoniert werden.
Halten Sie für Notfälle ein schnurgebundenes Telefon bereit, welches
ohne externe Stromversorgung arbeitet.
Medizinische Geräte
Achtung: Benutzen Sie das Telefon nicht in der Nähe von
medizinischen Geräten. Eine Beeinflussung kann nicht völlig ausgeschlossen werden.
DECT1−Telefone können in Hörgeräten einen unangenehmen
Brummton verursachen.
Hörgeräte−kompatibel
Das Telefon ist mit den meisten am Markt befindlichen Hörgeräten
kompatibel. Eine einwandfreie Funktion mit jedem Hörgerät kann jedoch nicht garantiert werden.
Entsorgung
Wollen Sie Ihr Gerät entsorgen, bringen Sie es zur Sammelstelle Ihres kommunalen Entsorgungsträgers (z. B. Wertstoffhof). Das nebenstehende Symbol bedeutet, dass Sie das
Gerät auf keinen Fall in den Hausmüll werfen dürfen! Nach
dem Elektro− und Elektronikgerätegesetz sind Besitzer von
Altgeräten gesetzlich gehalten, alte Elektro− und Elektro-
nikgeräte einer getrennten Abfallerfassung zuzuführen.
Akkus entsorgen Sie beim batteriever-
treibenden Handel sowie bei zuständigen Sammelstellen, die entsprechende
Behälter bereitstellen.
Verpackungsmaterialien entsorgen
Sie entsprechend den lokalen Vorschriften.
1
DECT: Digital Enhanced Cordless Telecommunication = Standard
für kabellose Telefone.
4
Page 5

2 Telefon in Betrieb nehmen
Sicherheitshinweise
Achtung: Lesen Sie vor der Inbetriebnahme unbedingt die
Sicherheitshinweise in Kapitel 1.
Verpackungsinhalt prüfen
Zum Lieferumfang gehören:
Inhalt
Basisstation mit Netzteil 1 1 1 1
Ladestation mit Netzteil − 1 2 3
Mobilteil 1 2 3 4
Telefonanschlusskabel 1 1 1 1
Akkupack 1 2 3 4
Bedienungsanleitung 1 1 1 1
2
DF 83X−Modell
DF
831DF832
Telefon in Betrieb nehmen
Basisstation anschließen
Achtung: Stellen Sie die Basisstation mit einem Mindestab-
stand von 1 m zu anderen elektronischen Geräten auf, da es
sonst zu gegenseitigen Störungen kommen kann.
Schließen Sie die Basisstation wie auf der Skizze abgebildet an. Verwenden Sie aus Sicherheitsgründen nur das mitgelieferte Netzteil sowie das beigefügte Telefonanschlusskabel.
DF
1
833
DF
1
1
834
Ladestation anschließen
Telefonanschlussdose
Netzsteckdose
Schließen Sie
die Ladestation
wie auf der
Skizze abgebildet an. Verwenden Sie aus Sicherheitsgrün−
den nur das mitgelieferte Netzteil.
2
Netzsteckdose
1
Unter www.switel.com erfahren Sie, ob dieses Telefonset bereits
erhältlich ist.
2
Gilt nur für Telefonsets mit mindestens zwei Mobilteilen
Verpackungsinhalt prüfen" auf Seite 5.
5
Page 6

Telefon in Betrieb nehmen
Akkupack einlegen
Drücken Sie den Sicherungsknopf am Akkufachdeckel hinein
und schieben Sie gleichzeitig
den Akkufachdeckel abwärts.
Nehmen Sie den Akkufachdekkel ab. Stecken Sie den Stecker
des Akkupacks in die Buchse im
Akkufach. Legen Sie das Akkupack in das Akkufach ein. Verwenden Sie nur das mitgelieferte
Akkupack. Achten Sie darauf,
dass Sie das Kabel nicht einklemmen. Setzen Sie den Deckel
wieder auf das Akkufach und
schieben Sie ihn nach oben, bis
der Sicherungsknopf einrastet.
Akkupack aufladen
Stellen Sie das Mobilteil bei der ersten Inbetriebnahme für
Haben Sie das Mobilteil richtig in die Basisstation / Ladestation gestellt, ertönt ein Hinweissignal und es leuchtet die Ladekontrollleuchte. Das Mobilteil erwärmt sich beim Laden. Dies ist normal und
ungefährlich. Laden Sie das Mobilteil nicht mit fremden Aufladegeräten. Der aktuelle Akkuladezustand wird im Display angezeigt:
Datum und Uhrzeit des Mobilteils einstellen
Datum und Uhrzeit stellen Sie über das Menü ein. Auf Seite 15 finden
Sie die Position im Menü.
3
mindestens 15 Stunden in die Basisstation / Ladestation.
Voll 2/3 Voll Schwach Leer
Automatische Anrufannahme
Haben Sie diese Funktion aktiviert, wird ein Anruf automatisch beim
Herausnehmen des Mobilteils aus der Basisstation angenommen. Die
automatische Anrufannahme wird über das Menü aktiviert oder deaktiviert. Auf Seite 15 finden Sie die Position im Menü.
Nebenstellenanlagen
Auf Seite 13 erhalten Sie weitere Informationen, falls Sie Ihr Telefon
an eine Nebenstellenanlage anschließen möchten.
Strahlungsreduzierung (ECO−Mode)
Die Strahlung wird im Vergleich zu Standard−DECT−Schnurlostelefonen im Stand−by−Modus erheblich verringert (wenn das Mobilteil in
der Basis steht).
6
Page 7
3 Bedienelemente
Die Tasten Ihres Telefons werden in dieser Bedienungsanleitung
nachfolgend mit vereinheitlichten umrandeten Symbolen dargestellt.
Leichte Abweichungen der Tastensymbole Ihres Telefons gegenüber
den hier verwendeten Tastensymbolen sind daher möglich.
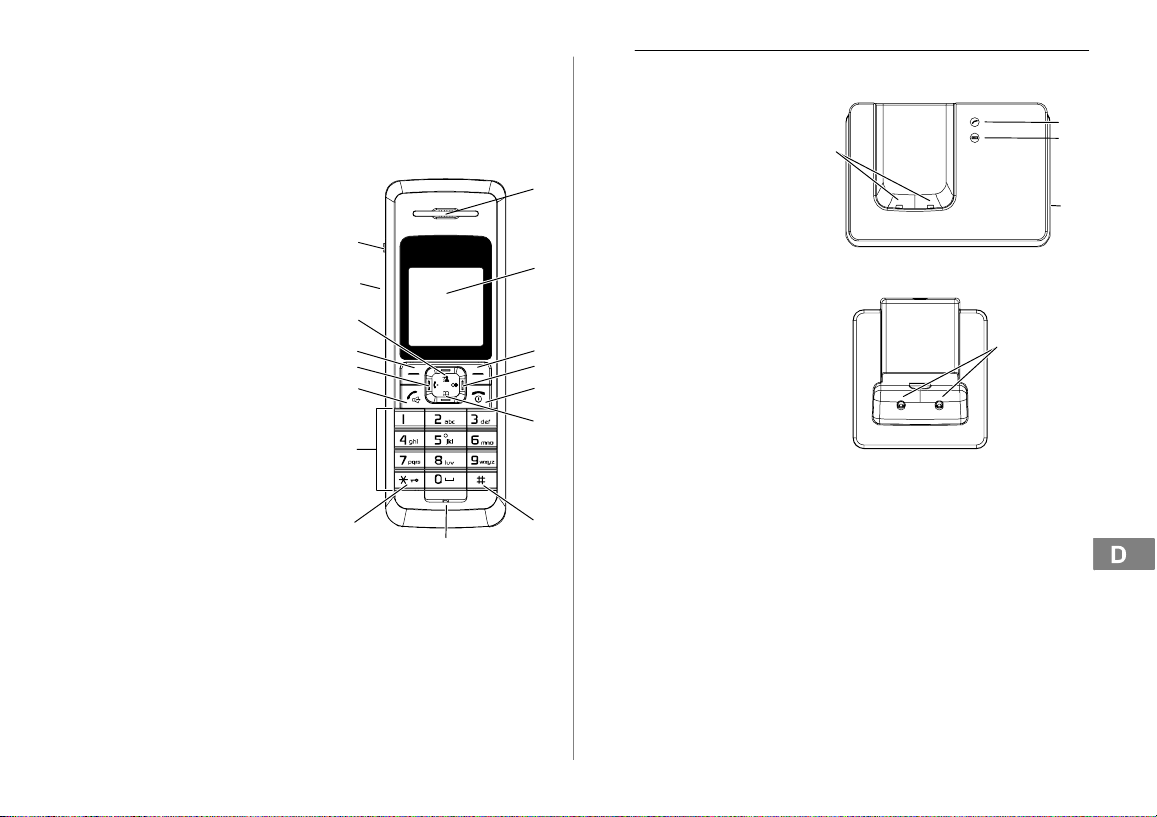
Mobilteil
1 Hörer
2 Display
3 Softkey−Taste rechts
4 Wahlwiederholung £ /
Wahlpause einfügen
5 Auflegen−Taste )
6 Navigation abwärts /
Telefonbuch ´
7 #−Taste
8 Mikrofon
9 *−Taste /
Tastensperre /
Temporäre Tonwahl
10 Zifferntastenblock
11 Freisprechen /
Gesprächstaste (
12 Intern telefonieren ¹
13 Softkey−Taste links
14 Navigation aufwärts /
Anruferliste «
15 Lautsprecher
(auf der Rückseite)
16 Headset−Anschluss
16
15
14
13
12
11
10
9
Bedienelemente
Basisstation
1 LED:
Gesprächsanzeige
1
2
3
4
5
6
7
8
2 LED:
3 Mobilteil suchen
4 Ladekontakte
Ladestation
1 Ladekontakte
Ladekontrollleuchte
(Paging) Z
1
4
1
2
3
1
1
Gilt nur für Telefonsets mit mindestens zwei Mobilteilen
Verpackungsinhalt prüfen" auf Seite 5.
7
Page 8

Einführende Informationen
4 Einführende Informationen
In diesem Kapitel finden Sie grundlegende Informationen zur Handhabung der Bedienungsanleitung und des Telefons.
Darstellungsweise in der Bedienungsanleitung
Darstellung Beschreibung
! Darstellung von Tasten
* Abgebildete Taste kurz drücken
3 Sek. * Abgebildete Taste 3 Sekunden drücken
halten * Abgebildete Taste halten
loslassen * Abgebildete Taste loslassen
Nummern oder Buchstaben eingeben
Mobilteil klingelt
Basisstation klingelt
Mobilteil aus der Basisstation nehmen
Mobilteil in die Basisstation stellen
Hauptmenü
Löschen
Darstellung von Display−Texten
Darstellung von Display−Symbolen
Softkey−Taste drücken Seite 9
Symbole und Texte im Display des Mobilteils
Symbol Beschreibung
Anzeige der Batteriekapazität.
TT−MM/MM−TT Anzeige des Datums Seite 15.
hh:mm Anzeige der Uhrzeit Seite 15.
Alarmfunktion aktiviert.
Sie führen ein Gespräch. / Es erreicht Sie ein
Anruf Seite 11.
Es sind neue Anrufe in der Anruferliste
Seite 18.
Das Freisprechen ist aktiviert Seite 12.
Die Tastensperre ist aktiviert Seite 12.
Anrufbeantworter im Telefonnetz.
1
VMWI
− Zusatzdienst Ihres Netzbetreibers
Seite 13.
Stumm
Das Mikrofon ist stummgeschaltet Seite 12.
Konstant: Die Verbindung zur Basisstation ist gut.
Blinkend: Die Verbindung zur Basisstation bricht
ab. Nähern Sie sich der Basisstation.
1
VMWI: Visual Message Waiting Indication = Optische Anzeige
neuer Nachrichten.
8
Page 9
Stand−by−Modus
Alle Beschreibungen in dieser Bedienungsanleitung gehen davon
aus, dass sich das Mobilteil im Stand−by−Modus befindet. Den Stand−
by−Modus erreichen Sie, indem Sie die Taste ) drücken.
4
Energiesparmodus
Nach einiger Zeit im Stand−by−Modus wechselt das Mobilteil in den
Energiesparmodus. Tasten und Display sind nun nicht mehr beleuchtet. Drücken Sie eine beliebige Taste, um den Stand−by−Modus zu aktivieren.
Navigationstasten
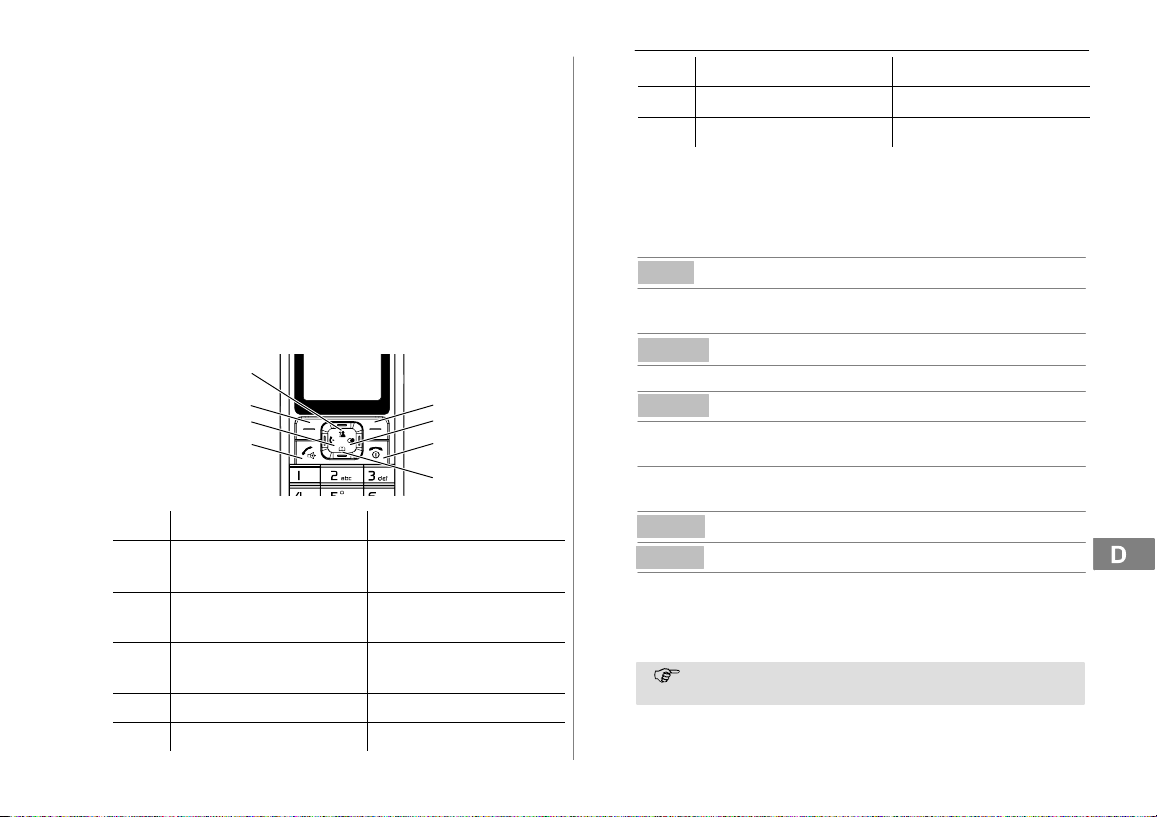
Die Softkey−Tasten (1) und (7) sind in den verschiedenen Menüs mit
unterschiedlichen Funktionen belegt. Sie sind in dieser Bedienungsanleitung immer nach den darüber liegenden Texten im Display benannt.
Taste Im Stand−by−Modus
1
2
3
4 − Telefonbuch öffnen − Navigation abwärts
5 − Gesprächstaste
5
8
7
6
5
− Wahlwiederholungsliste
öffnen
− Wahlwiederholungsliste
öffnen
− Mobilteil ein−, ausschalten
Im Menü
− In den Stand−by−Modus
wechseln
Einführende Informationen
6 − Intern telefonieren
7 − Hauptmenü öffnen
8 − Anruferliste öffnen − Navigation aufwärts
Navigation im Menü
Alle Funktionen sind über unterschiedliche Menüs zu erreichen.
Den Weg zur gewünschten Funktion entnehmen Sie der Menüstruktur
Seite 14.
Menü
« oder ´ Gewünschtes Untermenü
Wählen
« oder ´ Gewünschte Funktion auswählen
1
2
3
4
Wählen
« oder ´ Gewünschte Einstellung
Über Tastenfeld Nummern oder
Speich
Zurück
) Programmier− und
Jeder Vorgang wird automatisch abgebrochen, wenn inner-
6
Hauptmenü öffnen
auswählen
Untermenü öffnen
Funktion öffnen
auswählen
Buchstaben eingeben
Eingaben bestätigen
Eine Ebene zurück
Speichervorgänge abbrechen und
in den Stand−by−Modus
zurückkehren
halb von 35 Sekunden keine Eingabe erfolgt.
9
Page 10
Einführende Informationen
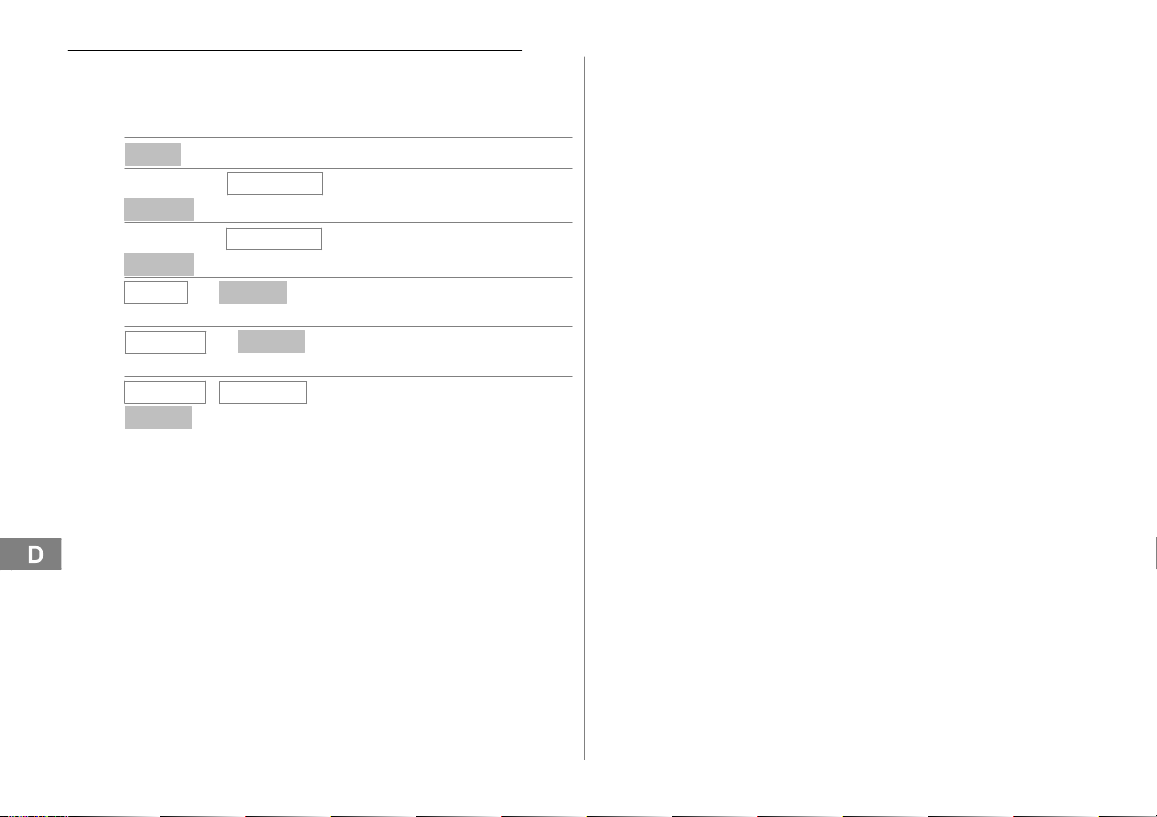
Telefonbucheinträge erstellen − Beispiel
Wie Sie in den Menüs navigieren und Einstellungen vornehmen, ist
hier anhand des Beispiels Telefonbucheinträge erstellen erklärt.
Verfahren Sie bei allen Einstellungen wie in diesem Beispiel.
Menü
« oder ´
Wählen
« oder ´
Wählen
Name?
Nummer?
Melodie 1
Speich
Telefonbuch
Neuer Eintr.
Weiter .
, ,
Weiter .
, ,
Melodie 10 , Ruftonmelodie auswählen und
−
, Telefonbuch auswählen
, Untermenü auswählen und
7
Hauptmenü öffnen
bestätigen
Namen eingeben (max. 12
Stellen) und bestätigen
Rufnummer eingeben (max. 20
Ziffern) und bestätigen
speichern
10
Page 11

5 Telefonieren
Anruf annehmen
, ( Anruf annehmen
Gespräch beenden
) Gespräch beenden
Anrufen
Rufnummer eingeben (max. 32
Lösch
( Rufnummer wählen
Sie können auch zuerst die Gesprächstaste drücken und
Wahlwiederholung
Ihr Telefon speichert die 10 zuletzt gewählten Rufnummern in einer
Wahlwiederholungsliste.
£ Wahlwiederholungsliste öffnen
« oder ´, ( Eintrag auswählen und
Eingegangene Anrufe zurückrufen
Ihr Telefon speichert 40 Anrufe in einer Anruferliste.
« Anruferliste öffnen
« oder ´, ( Eintrag auswählen und
8
Ziffern)
Bei Falscheingabe letzte Ziffer
löschen
erhalten damit das Freizeichen. Die eingegebenen Ziffern
Ihrer gewünschten Rufnummer werden sofort gewählt. Eine
Korrektur einzelner Ziffern der Rufnummer ist bei dieser
Form des Gesprächsaufbaus nicht möglich.
Verbindung herstellen
Verbindung herstellen
Telefonieren
Rufnummern aus dem Telefonbuch wählen
Sie müssen Rufnummern im Telefonbuch gespeichert haben
Seite 10 und 16.
´ Telefonbuch öffnen
« oder ´, ( Eintrag auswählen und
Intern telefonieren
1
9
Interne Gespräche führen
Sie müssen zwei oder mehr Mobilteile (MT1, MT2, ...) an Ihrer Basisstation angemeldet haben, um interne kostenlose Gespräche führen
zu können.
MT1: ¹, z. B. 2 Interne Rufnummer des
MT2: ( Internes Gespräch am anderen
MT1 / MT2: ) Internes Gespräch beenden
Externe Gespräche intern weiterleiten
MT1: ¹, z. B. 2 Während des externen Gesprächs
MT2: ( Internes Gespräch am anderen
MT1: ) Gespräch weiterleiten
Sollte sich das gerufene Mobilteil nicht melden, können Sie
sich das externe Gespräch zurückholen, indem Sie die Tas−
te ¹ drücken.
Verbindung herstellen
gewünschten Mobilteils wählen
Mobilteil annehmen
interne Rufnummer wählen
Mobilteil annehmen
1
Das interne Telefonieren ist nur mit mindestens zwei Mobilteilen
möglich Verpackungsinhalt prüfen" auf Seite 5.
11
Page 12
Telefonieren
Rücksprache / Makeln
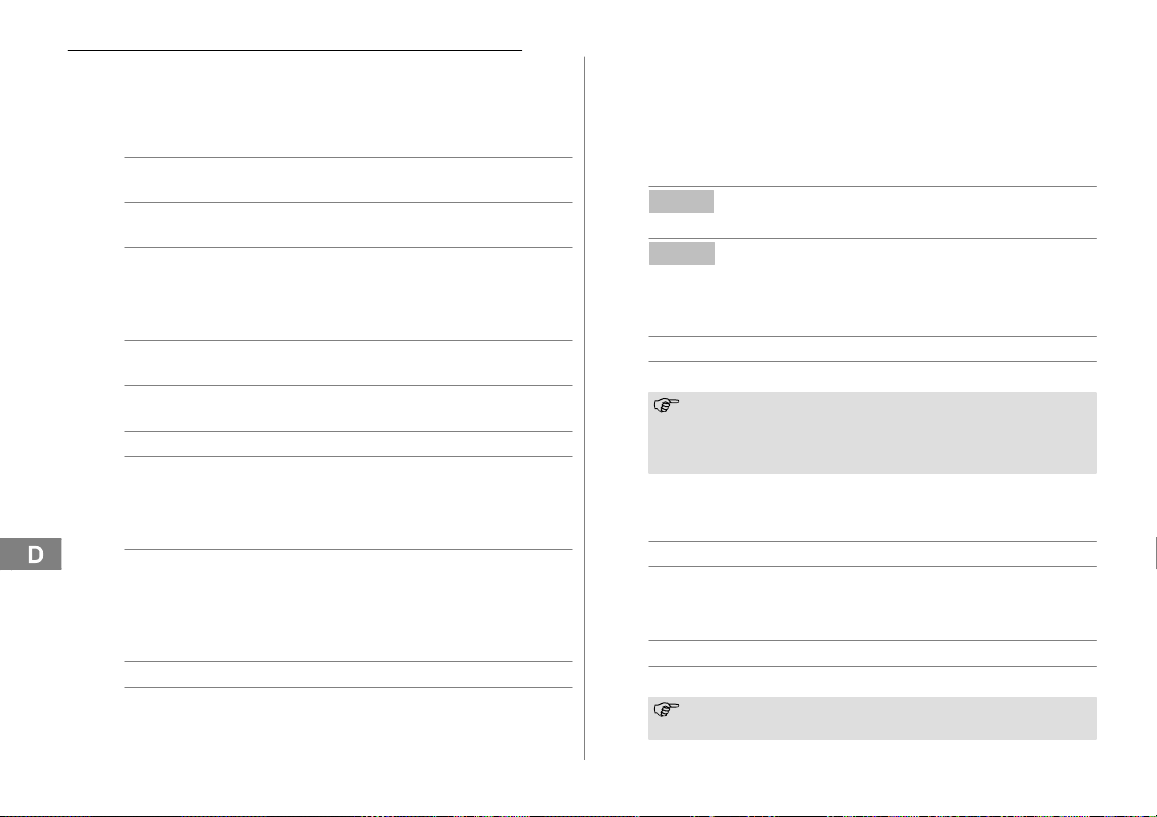
Während eines externen Gesprächs können Sie ein anderes Mobilteil
anwählen, um Rücksprache zu halten. Der externe Gesprächspartner
wird gehalten, während Sie mit dem internen Gesprächspartner sprechen. Diesen Vorgang können Sie beliebig oft wiederholen.
MT1: ¹, z. B 2 Während des externen Gesprächs
MT2: ( Internes Gespräch am anderen
MT1: ¹ Gesprächspartner wechseln
Konferenzgespräche führen
Ein externes Gespräch kann mit einem weiteren internen Gesprächs−
partner zum Konferenzgespräch geschaltet werden.
MT1: ¹, z. B. 2 Während des externen Gesprächs
MT2: ( Internes Gespräch am anderen
MT1: * Konferenz starten
MT1 / MT2: ) Konferenz beenden
Einstellen der Hörerlautstärke
Sie können während eines Gesprächs die Lautstärke in 5 Stufen anpassen.
« oder ´ Gewünschte Lautstärke
Freisprechen
10
Nutzen Sie diese Funktion, um den Gesprächspartner über den Lautsprecher zu hören.
( Freisprechen einschalten
( Freisprechen ausschalten
interne Rufnummer wählen
Mobilteil annehmen
interne Rufnummer wählen
Mobilteil annehmen
auswählen
Anzeige der Gesprächsdauer
Während eines Gesprächs wird die Gesprächsdauer in Stunden, Minuten und Sekunden angezeigt.
Mikrofon im Mobilteil stummschalten
Sie können während eines Telefongesprächs das Mikrofon des Mobilteils aus− und einschalten.
Stumm
Stumm
Tastensperre
12
Die Tastensperre soll verhindern, dass versehentlich Funktionen ausgelöst werden.
3 Sek. * Tastensperre einschalten
3 Sek. * Tastensperre ausschalten
Bei eingeschalteter Tastensperre können eingehende An-
rufe wie gewohnt angenommen werden. Wird eine andere
Taste gedrückt, hören Sie einen langen Signalton. Die Hintergrundbeleuchtung schaltet sich nicht ein.
11
Mikrofon ausschalten
(stummschalten)
Mikrofon einschalten
Mobilteil suchen (Paging)
Wenn Sie Ihr Mobilteil verlegt haben, können Sie es über einen Suchton leicht wiederfinden.
{«} Suchton starten
oder © Suchton beenden
Mobilteil aus− und einschalten
Um das Akkupack zu schonen, können Sie das Mobilteil ausschalten.
3 Sek. ) Mobilteil ausschalten
3 Sek. ) Mobilteil einschalten
Die Hintergrundbeleuchtung schaltet sich beim Einschalten
nicht ein.
12
Page 13

6 Nebenstellenanlagen / Zusatzdienste
R−Funktion an Nebenstellenanlagen
Ist Ihr Telefon an einer Nebenstellenanlage angeschlossen, können
Sie über den Softkey R Funktionen, wie z. B. Anrufe weiterleiten und
automatischen Rückruf, nutzen. Lesen Sie bitte in der Bedienungsanleitung Ihrer Nebenstellenanlage, welche Flash−Zeit Sie zur Nutzung
dieser Funktionen einstellen müssen. Ob Ihr Telefon an Ihrer Nebenstellenanlage einwandfrei funktioniert, erfahren Sie bei dem Händler,
bei dem die Anlage gekauft wurde. Die Flash−Zeit stellen Sie über das
Menü ein. Auf Seite 14 finden Sie die Position im Menü.
Der Softkey R steht nur zur Verfügung, wenn sich das Mo-
bilteil im Gesprächsmodus befindet.
R−Funktion und Zusatzdienste
Ihr Telefon unterstützt Zusatzdienste Ihres Netzbetreibers, wie
z. B. Makeln, Anklopfen und Konferenz. Über den Softkey R können
Sie diese Zusatzdienste nutzen. Bitte fragen Sie Ihren Netzbetreiber,
welche Flash−Zeit Sie zur Nutzung von Zusatzdiensten einstellen
müssen. Zur Freischaltung von Zusatzdiensten wenden Sie sich bitte
an Ihren Netzbetreiber. Die Flash−Zeit stellen Sie über das Menü ein.
Auf Seite 14 finden Sie die Position im Menü.
Rufnummernanzeige (CLIP1)
Die Rufnummernanzeige ist ein Zusatzdienst Ihres Netzbe-
treibers. Fragen Sie Ihren Netzbetreiber nach weiteren Informationen.
Wenn diese Funktion an Ihrer Telefonleitung zur Verfügung steht, wird
Ihnen bereits die Rufnummer des Anrufers angezeigt, wenn das Telefon klingelt. Hat der Anrufer das Übertragen seiner Rufnummer unterdrückt, wird eine entsprechende Meldung angezeigt. Die Rufnummer
kann nicht angezeigt und somit auch nicht in der Anruferliste gespeichert werden.
1
CLIP: Calling Line Identification Presentation = Anzeige der Ruf-
nummer eines Anrufers.
13
14
Nebenstellenanlagen / Zusatzdienste
Wahlpause
Bei Nebenstellenanlagen ist es erforderlich, eine Amtskennzahl vorzuwählen, um ein Freizeichen zu bekommen. Bei wenigen älteren
Nebenstellenanlagen dauert es einige Zeit, bis das Freizeichen zu
hören ist. Für diese Nebenstellenanlagen kann nach der Amtskennzahl eine Wahlpause eingefügt werden, um direkt weiterwählen zu
können, ohne das Freizeichen abzuwarten.
£ Wahlpause einfügen
Nach der Amtskennzahl erfolgt die Wahl der eigentlichen Rufnummer
nach einer bestimmten Zeit.
Die Wahlpause kann auch bei der Eingabe von Rufnum-
mern im Telefonbuch gespeichert werden.
Anrufbeantworter im Telefonnetz
Der Anrufbeantworter im Telefonnetz ist ein Zusatzdienst vieler Netzbetreiber. Wenn Ihr Netzbetreiber einen Anrufbeantworter im Telefonnetz für Sie bereitstellt, werden Sie mit einem Symbol über neue
Nachrichten informiert (VMWI
dann verfügen, wenn Ihr Netzbetreiber diesen Zusatzdienst anbietet.
Bitte fragen Sie Ihren Netzbetreiber nach weiteren Informationen.
2
VMWI: Visual Message Waiting Indication = Optische Anzeige
neuer Nachrichten.
15
2
). Über diese Funktion können Sie nur
13
Page 14
Menüstruktur
7 Menüstruktur
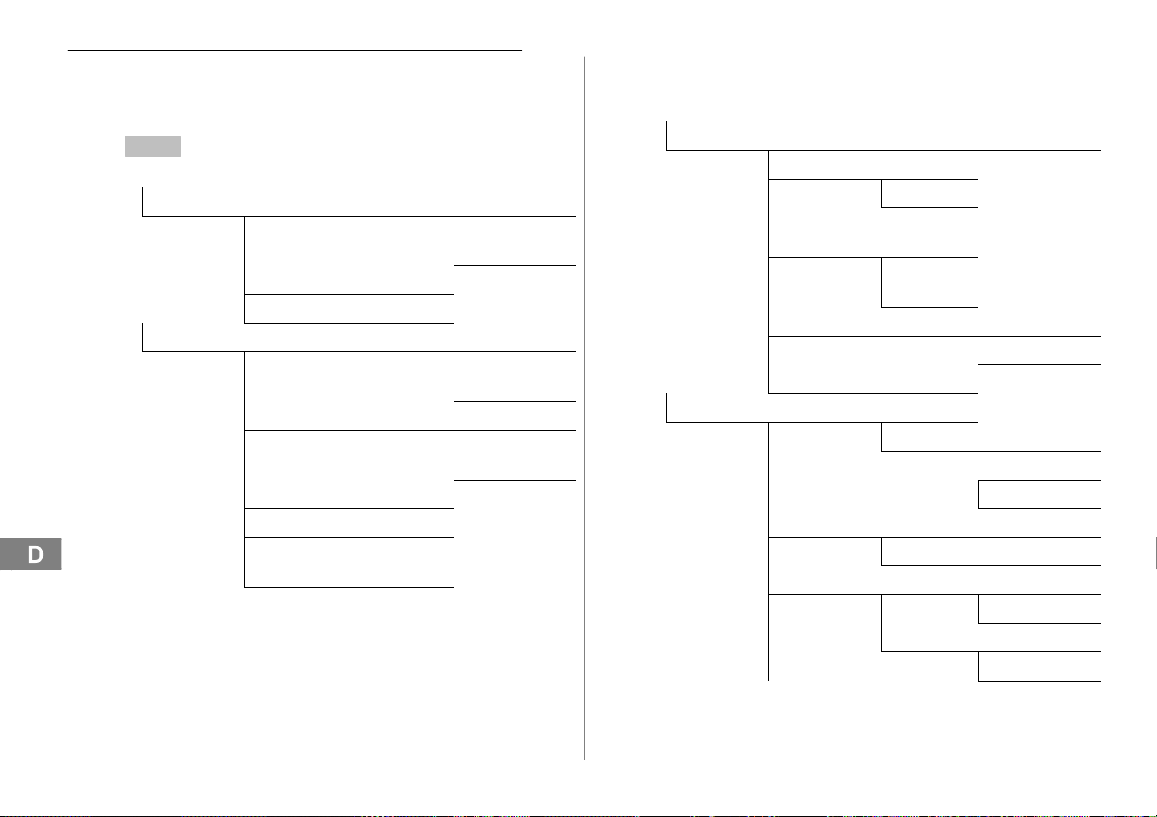
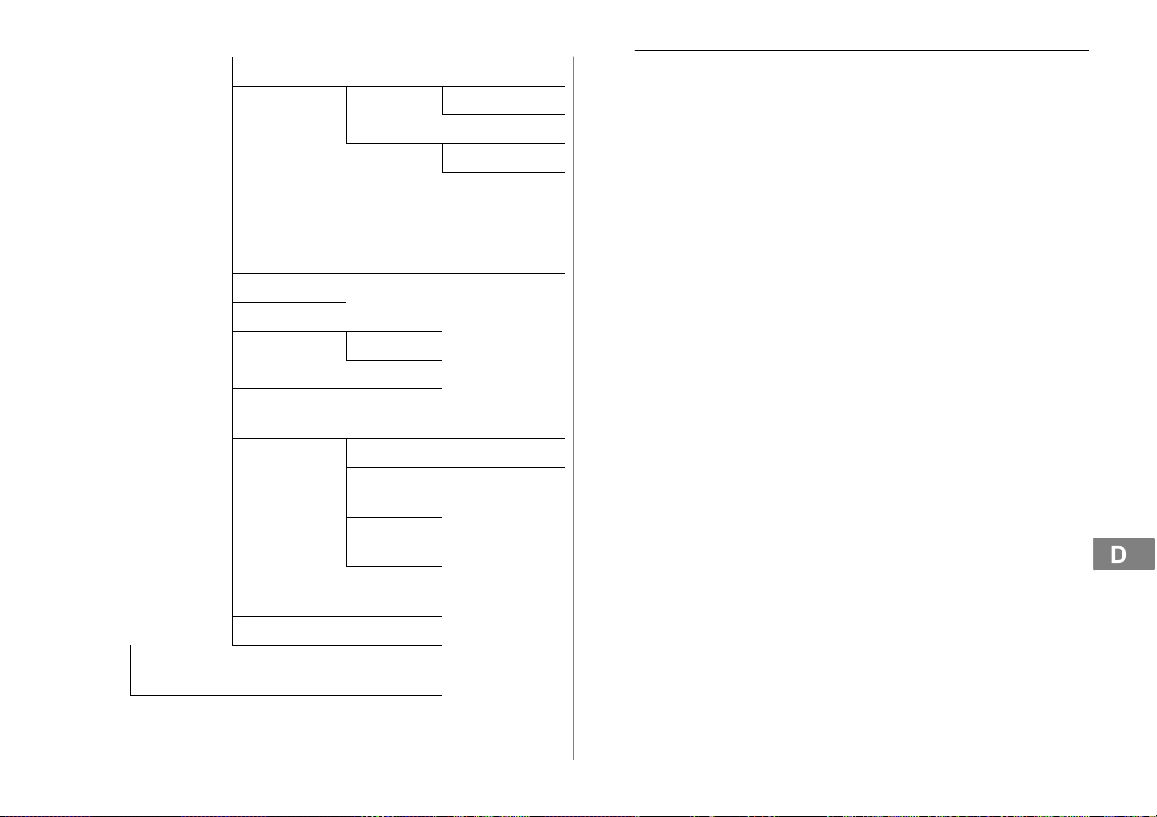
Hauptmenü
In das Hauptmenü gelangen Sie durch Drücken der Softkey−Taste
Menü . Wie Sie sich im Menü bewegen und Eingaben vornehmen,
zeigt Ihnen Seite 9.
1
Für das Anzeigen und Speichern von Rufnummern in Anruferli-
sten wird die Rufnummernanzeige (CLIP
mernanzeige ist ein Zusatzdienst Ihres Netzbetreibers. Fragen Sie
Ihren Netzbetreiber nach weiteren Informationen. Weitere Informationen zur Rufnummernanzeige Seite 13.
2
CLIP: Calling Line Identification Presentation = Anzeige der Ruf-
nummer eines Anrufers.
14
16
Anruferlis.1Nr.speichern Name? Nummer?
Melodie 1 −
Melodie 10
Löschen Bestätigen?
Alle Lösch. Bestätigen?
Telefonbuch Neuer Eintr. Name? Nummer?
Melodie 1 −
Melodie 10
Ändern Name? Nummer?
Melodie 1 −
Melodie 10
Löschen Bestätigen?
Alle Lösch. Bestätigen?
Speich.Stat.
Speich.Stat.
(z. B.: 04/50)
2
) benötigt. Die Rufnum-
BS Einstell. MT Abmelden PIN ?
3
MT 1 − MT 5
Wahlverfahr. Tonwahl
Impulswahl
Flashzeit Flash−1
(100 ms)
Flash−2
(300 ms)
PIN ändern PIN ? Neue PIN
Bestäti.
Zurücksetzen PIN ?
MT Einstell. Alarm Aus
An hh:mm
Snooze An
Snooze Aus
Audio Einst. Lautsp.Lau. Stufe 1 − Stufe 5
Hörerlauts. Stufe 1 − Stufe 5
Rufton Einst Rufton Int. Melodie
Lautstärke
Rufton Ext. Melodie
Lautstärke
3
Der PIN−Code ist werkseitig auf 0000" eingestellt.
Page 15
Ton Einst. Tastenton Aus
An
Reichweite Aus
An
Menüstruktur
Sprache ENGLISH / FRANCAIS / ES-
MT Name
Auto Annahme Aus
Kontrast 00 − 16
Datum & Zeit Datumsfor-
Basis Wahl Basis 1 −
Zurücksetzen PIN ?
Anmelden Basis 1 −
Basis 4
17
PANOL / DEUTSCH / ITALIANO / NEDERLANDS /
SVENSKA
An
TT−MM / MM−TT
mat
Zeitformat 12 Std. / 24 Std.
Datum
Einst.
Zeit Einst.
Basis 4
PIN ?
15
Page 16
Telefonbuch
8 Telefonbuch
Im Telefonbuch können Sie 50 Rufnummern mit den dazugehörigen
Namen speichern.
Die Telefonbucheinträge sind alphabetisch geordnet. Um direkt
zum gewünschten Telefonbucheintrag zu gelangen, drücken Sie
den entsprechenden Anfangsbuchstaben.
Namen eingeben
Die Zifferntasten sind mit Buchstaben beschriftet. Durch mehrmaliges
Drücken der entsprechenden Taste können Buchstaben, Ziffern und
Sonderzeichen eingegeben werden.
0 Leerzeichen eingeben
Lösch Löschen
0 oder 1 Sonderzeichen eingeben
Um den gleichen Buchstaben zweimal einzugeben, drü-
cken Sie die entsprechende Taste. Warten Sie, bis der Cursor eine Stelle weitergesprungen ist. Geben Sie den Buchstaben erneut ein.
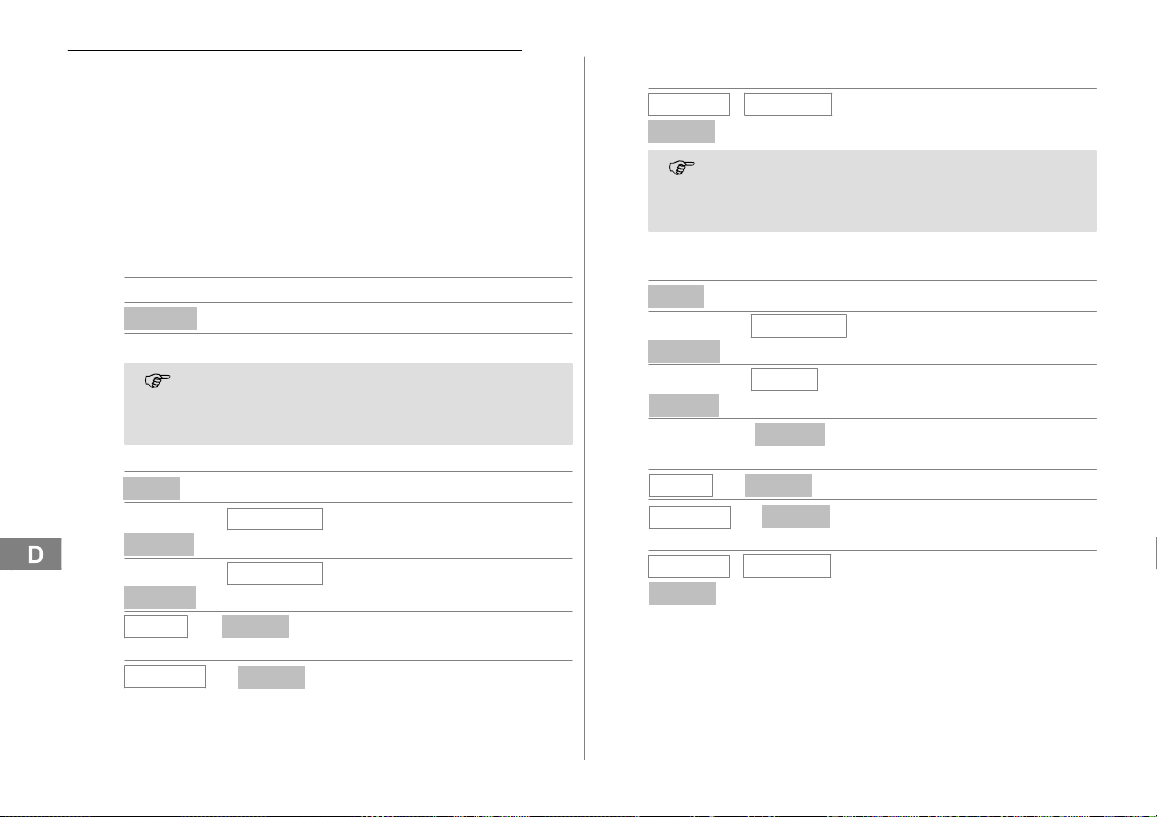
Telefonbucheinträge erstellen
Menü
, ,
Telefonbuch
Weiter .
, ,
Weiter .
« oder ´
Wählen
« oder ´ Neuer Eintr. , Untermenü auswählen und
Wählen
Name?
Nummer?
18
Hauptmenü öffnen
, Telefonbuch auswählen
bestätigen
Namen eingeben (max. 12
Stellen) und bestätigen
Rufnummer eingeben (max. 20
Ziffern) und bestätigen
Melodie 1
Speich
Die Anzahl der bereits von Ihnen gespeicherten Telefon−
Melodie 10
−
bucheinträge können Sie sich über das Menü SEND CNTR
anzeigen lassen. Auf Seite 14 finden Sie die Position im
Menü.
Telefonbucheinträge ändern
Menü
, ,
Telefonbuch
Ändern
Wählen
Weiter .
Melodie 10
−
Weiter .
« oder ´
Wählen
« oder ´
Wählen bestätigen
« oder ´,
Name?
Nummer? , ,
Melodie 1
Speich
, Ruftonmelodie auswählen und
speichern
19
Hauptmenü öffnen
, Telefonbuch auswählen
, Untermenü auswählen und
Telefonbucheintrag auswählen
und bestätigen
Namen ändern und bestätigen
Rufnummer ändern und
bestätigen
, Ruftonmelodie auswählen und
speichern
16
Page 17

Telefonbucheinträge löschen
Einen Eintrag löschen
Menü
« oder ´
Wählen
« oder ´
Wählen
« oder ´,
Bestätigen?
Telefonbuch
Löschen
Wählen
,
OK /
Alle Einträge löschen
Menü
« oder ´
Wählen
« oder ´
Wählen
Bestätigen?
Telefonbuch
Alle Lösch.
OK
,
/
Hauptmenü öffnen
, Telefonbuch auswählen
, Löschvorgang aktivieren
Telefonbucheintrag auswählen
und bestätigen
Abbre
Löschvorgang bestätigen oder
abbrechen
Hauptmenü öffnen
, Telefonbuch auswählen
, Löschvorgang aktivieren
Abbre
Löschvorgang bestätigen oder
abbrechen
Telefonbuch
17
Page 18

Anruferliste
9 Anruferliste
Insgesamt werden 40 Rufnummern in einer Anruferliste gespeichert.
Die Rufnummernanzeige (CLIP1) ist ein Zusatzdienst Ihres
Netzbetreibers. Ihr Telefon zeigt die Rufnummern im Display, wenn Ihr Netzbetreiber diesen Service anbietet. Bitte
fragen Sie Ihren Netzbetreiber nach weiteren Informationen.
Meldungen im Display:
Display Beschreibung
Konstant: Der Eintrag in der Anruferliste ist neu.
Blinkend: Die Speicherkapazität ist erschöpft.
Nicht Mögl. Die Information der Rufnummer ist nicht
Privat Der Anrufer hat das Senden seiner Rufnummer
Rufnummern aus der Anruferliste anzeigen
«, « oder ´, Anruferliste öffnen und Eintrag
( Rufnummer wählen
Rufnummer aus der Anruferliste im Telefonbuch speichern
Eine Rufnummer kann direkt aus der Anruferliste im Telefonbuch gespeichert werden.
Menü
« oder ´,
Wählen
1
CLIP: Calling Line Identification Presentation = Anzeige der Ruf-
nummer eines Anrufers.
verfügbar. Es könnte sich um ein internationales
Gespräch handeln.
unterdrückt.
auswählen
Hauptmenü öffnen
Anruferlis.
, Anruferliste auswählen
20
« oder ´ Eintrag auswählen
Mehr
, ,
Nr.speichern
Weiter .
, ,
Melodie 10
−
Weiter .
« oder ´,
Wählen
Name?
Nummer?
Melodie 1
Speich
Die Rufnummer wurde im Telefonbuch mit Namen abgelegt.
Einträge im Telefonbuch ändern Seite 16.
, Speichervorgang aktivieren
, Ruftonmelodie auswählen und
Rufnummern aus der Anruferliste löschen
Einzelne Rufnummer löschen
Menü
« oder ´
Wählen
« oder ´ Eintrag auswählen
Mehr Funktion öffnen
« oder ´
Wählen und bestätigen
Bestätigen?
Anruferlis.
Löschen
OK
,
, Anruferliste auswählen
, Löschvorgang aktivieren
Abbre
/
Funktion öffnen
und bestätigen
Namen eingeben (max. 12
Stellen) und bestätigen
Rufnummer wird angezeigt und
bestätigen
speichern
Hauptmenü öffnen
Löschvorgang bestätigen oder
abbrechen
18
Page 19
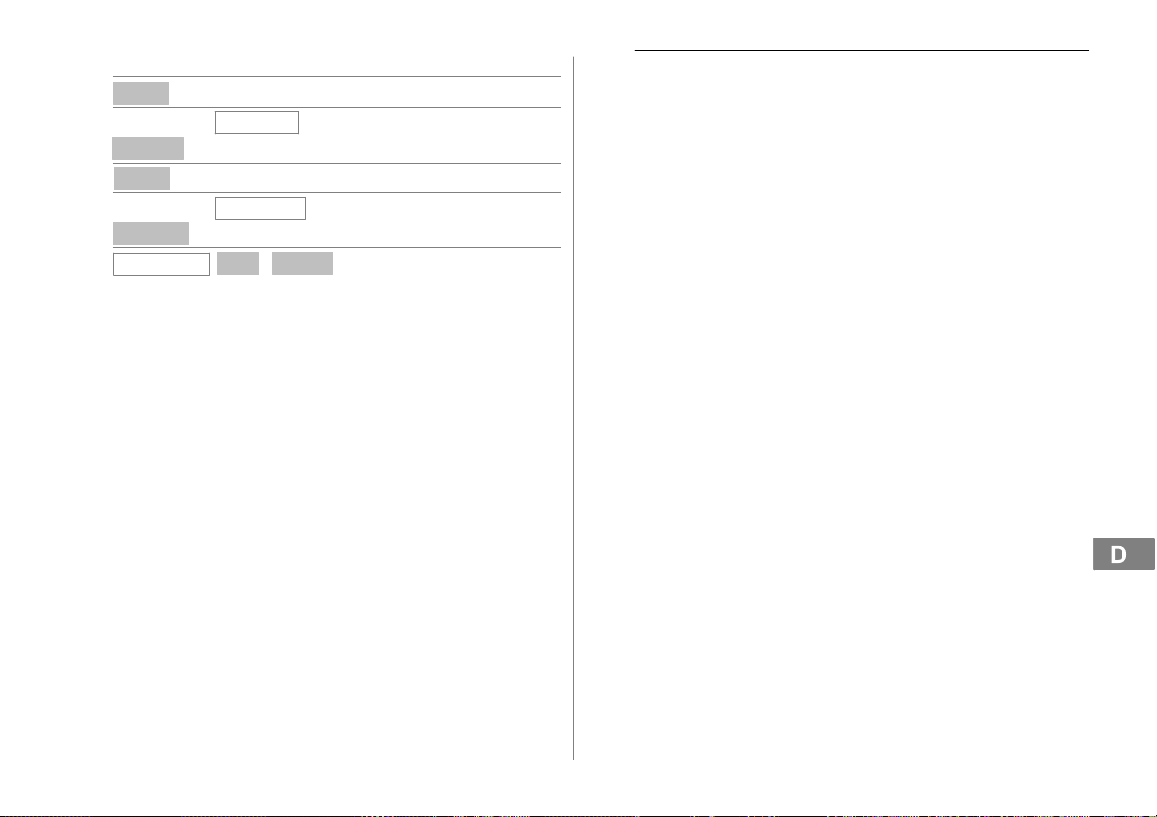
Alle Rufnummern löschen
Menü
« oder ´
Wählen
Mehr
« oder ´
Wählen
Bestätigen?
Anruferlis.
Alle Lösch.
OK
,
Hauptmenü öffnen
, Anruferliste auswählen
Funktion öffnen
, Löschvorgang aktivieren
und bestätigen
Abbre
/
Löschvorgang bestätigen oder
abbrechen
Anruferliste
19
Page 20

Besondere Funktionen
10 Besondere Funktionen
Wahlverfahren
Sie können Ihr Telefon sowohl an den analogen Vermittlungsstellen
(Impuls−Wahlverfahren) als auch an den neuen digitalen Vermittlungsstellen (Ton−Wahlverfahren) betreiben. Das Wahlverfahren wird über
das Menü eingestellt. Auf Seite 14 finden Sie die Position im Menü.
Temporäre Tonwahl
Können Sie Ihr Telefon nur mit dem Impuls−Wahlverfahren betreiben,
brauchen Sie nicht auf die Vorteile des Ton−Wahlverfahrens (z. B.: Abfrage eines Anrufbeantworters im Telefonnetz) zu verzichten. Während einer bestehenden Verbindung können Sie vorübergehend zum
Ton−Wahlverfahren wechseln.
1 Sek. * Während des Gesprächs drücken
Nach Gesprächsende wird wieder automatisch auf das Impuls−Wahl-
verfahren zurückgeschaltet.
Alarm
Mit dieser Funktion können Sie sich zu einer bestimmten Zeit von Ihrem Mobilteil wecken lassen. Sie können die Schlummerfunktion
(Snooze) aktivieren, um nach 11 Minuten erneut geweckt zu werden
oder das Wecksignal beenden. Auf Seite 14 finden Sie die Position im
Menü.
Um das Wecksignal zu beenden, betätigen Sie eine belie-
bige Taste. Um während des Wecksignals die aktivierte
Schlummerfunktion (Snooze) zu deaktivieren, drücken Sie
die Taste ).
Headset−Anschluss (optional)
Auf der linken Seite des Mobilteils finden Sie eine Anschlussmöglichkeit für ein Headset. Verwenden Sie ein Headset mit einem 2,5 mm
Klinkenstecker. Eine Funktionsgarantie kann nicht übernommen werden.
Wenn Sie ein Headset angeschlossen haben, ist das Mikro-
fon des Mobilteils deaktiviert.
1 Hörer
2 Mikrofon
3 Clip
4 Klinkenstecker
5 Headset−Anschlussbuchse
5
4
1
2
3
20
Page 21
11 Erweitern des Telefonsystems
Über den international genormten GAP1−Standard ist die Kompatibilität von Mobilteilen und Basisstationen unterschiedlicher Hersteller geregelt. So ist es möglich, SWITEL−Geräte und Geräte anderer Hersteller zusammen in ein Telefonsystem zu integrieren. Es ist jedoch
möglich, dass einige Funktionen nicht zur Verfügung stehen.
Mehrere Mobilteile
Sie können insgesamt 5 Mobilteile an Ihre Basisstation anmelden.
Anmelden von Mobilteilen
Bevor Sie ein Mobilteil anmelden, müssen Sie die Basisstation in den
Registriermodus setzen. Halten Sie die Paging− Taste an der Basis
gedrückt, bis Sie einen Signalton hören. Jetzt ist die Basis für 60 Sekunden im Registriermodus. Fahren Sie am Mobilteil fort.
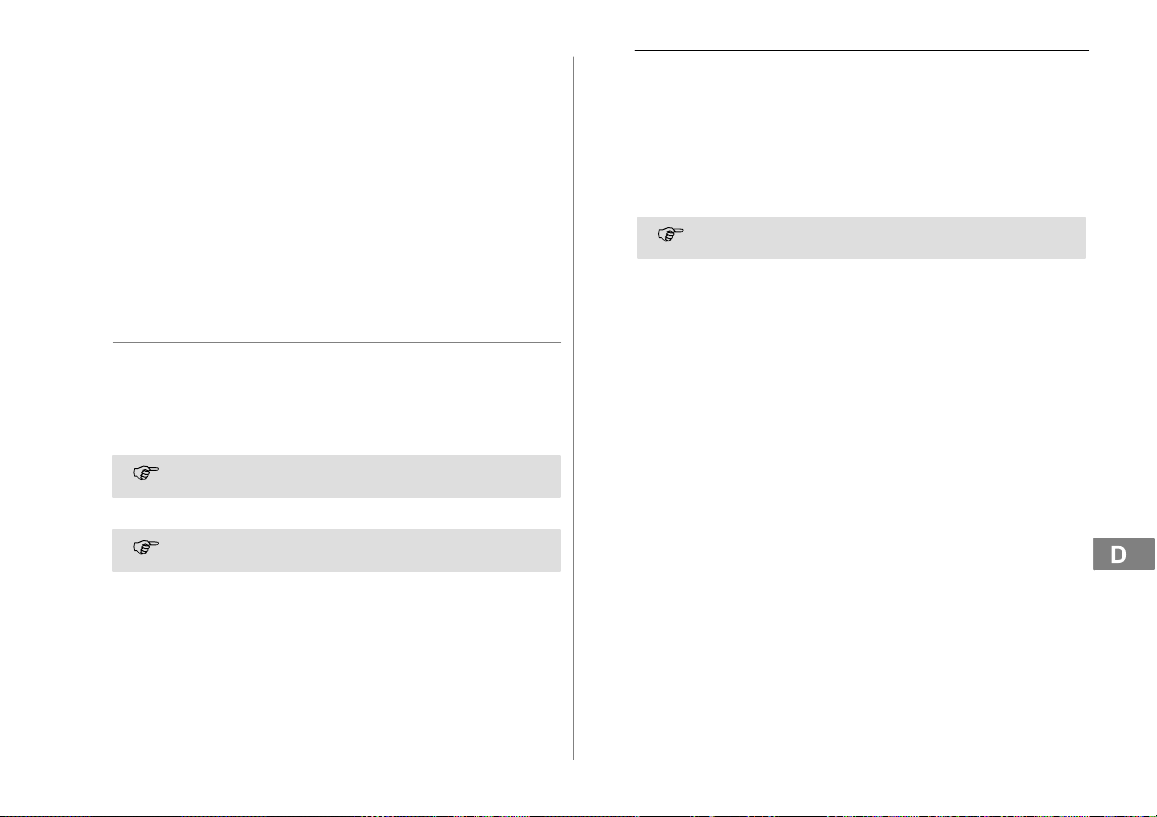
5 Sek. Registriermodus starten
Melden Sie nun das Mobilteil an Seite 15. Benutzen Sie zur
Anmeldung den aktuell eingestellten PIN−Code Seite 14.
Nach dem Anmelden wird dem Mobilteil eine interne Rufnummer
zugeteilt.
Um Mobilteile anderer Hersteller anzumelden, lesen Sie
bitte deren Bedienungsanleitungen.
Abmelden von Mobilteilen
Jedes Mobilteil kann andere an dieser Basisstation ange-
meldete Mobilteile abmelden.
Mobilteile werden über das Menü abgemeldet. Auf Seite 14 finden Sie
die Position im Menü.
Erweitern des Telefonsystems
Mehrere Basisstationen
Sie können die Reichweite Ihres Mobilteils vergrößern, wenn Sie es
an mehrere Basisstationen anmelden. Es kann gleichzeitig an 4 verschiedenen Basisstationen angemeldet sein. Jede Basisstation benötigt eine eigene Telefonsteckdose. Es können Anschlüsse mit derselben und auch mit unterschiedlichen Rufnummern sein.
Laufende Gespräche können nicht von einer zur anderen
Basisstation übertragen werden.
1
GAP: Generic Access Profile = Standard für das Zusammenwir-
ken von Mobilteilen und Basisstationen unterschiedlicher Hersteller.
21
Page 22

Falls es Probleme gibt
12 Falls es Probleme gibt
Service−Hotline
Haben Sie Probleme mit Ihrem Telefon, kontrollieren Sie zuerst die
folgenden Hinweise. Bei technischen Problemen können Sie sich an
unsere Service−Hotline unter Tel. 0900 00 1675 innerhalb der
Schweiz (Kosten Swisscom bei Drucklegung: CHF 2.60/min) wenden. Bei Garantieansprüchen wenden Sie sich an Ihren Fachhändler.
Die Garantiezeit beträgt 2 Jahre.
Fragen und Antworten
Fragen Antworten
Keine Verbindung zur
Basisstation möglich
Kein Telefongespräch
möglich
22
− Prüfen Sie, ob Sie sich mit
dem richtigen PIN−Code an der
Basisstation angemeldet haben
Seite 14.
− Das Telefon ist nicht korrekt angeschlossen oder gestört. Verwenden Sie nur das mitgelieferte
Telefonanschlusskabel.
− Testen Sie mit einem anderen Telefon, ob Ihr Telefonanschluss in
Ordnung ist.
− Das Netzteil ist nicht eingesteckt
oder es liegt ein totaler Stromausfall vor.
− Das aufladbare Akkupack ist leer
oder defekt.
− Sie haben sich zu weit von der
Basisstation entfernt.
− Wahlverfahren falsch eingestellt
Seite 14.
Verbindung abgehackt,
fällt aus
Das System reagiert
nicht mehr
Das Akkupack ist in
kürzester Zeit leer
Die Rufnummernanzeige
1
(CLIP
) funktioniert nicht
1
CLIP: Calling Line Identification Presentation = Anzeige der Ruf-
nummer eines Anrufers.
− Sie haben sich zu weit von der
Basisstation entfernt.
− Falscher Aufstellungsort der Basisstation.
− Setzen Sie alle Funktionen über
Lautsp.Lau." in den Werkszustand zurück Seite 14.
− Ziehen Sie kurzzeitig das Netzteil
aus der Steckdose.
− Das Akkupack ist leer oder defekt.
− Stellen Sie das Mobilteil richtig
auf die Basisstation. Reinigen Sie
die Kontaktflächen am Mobilteil
und an der Basisstation mit einem
weichen trockenen Tuch.
− Stellen Sie das Mobilteil für
15 Stunden in die Basisstation.
− Die Rufnummernanzeige ist ein
Zusatzdienst Ihres Netzbetreibers. Bitte fragen Sie Ihren Netzbetreiber nach weiteren Informationen.
− Der Anrufer hat das Übertragen
seiner Rufnummer unterdrückt.
Page 23
13 Technische Eigenschaften
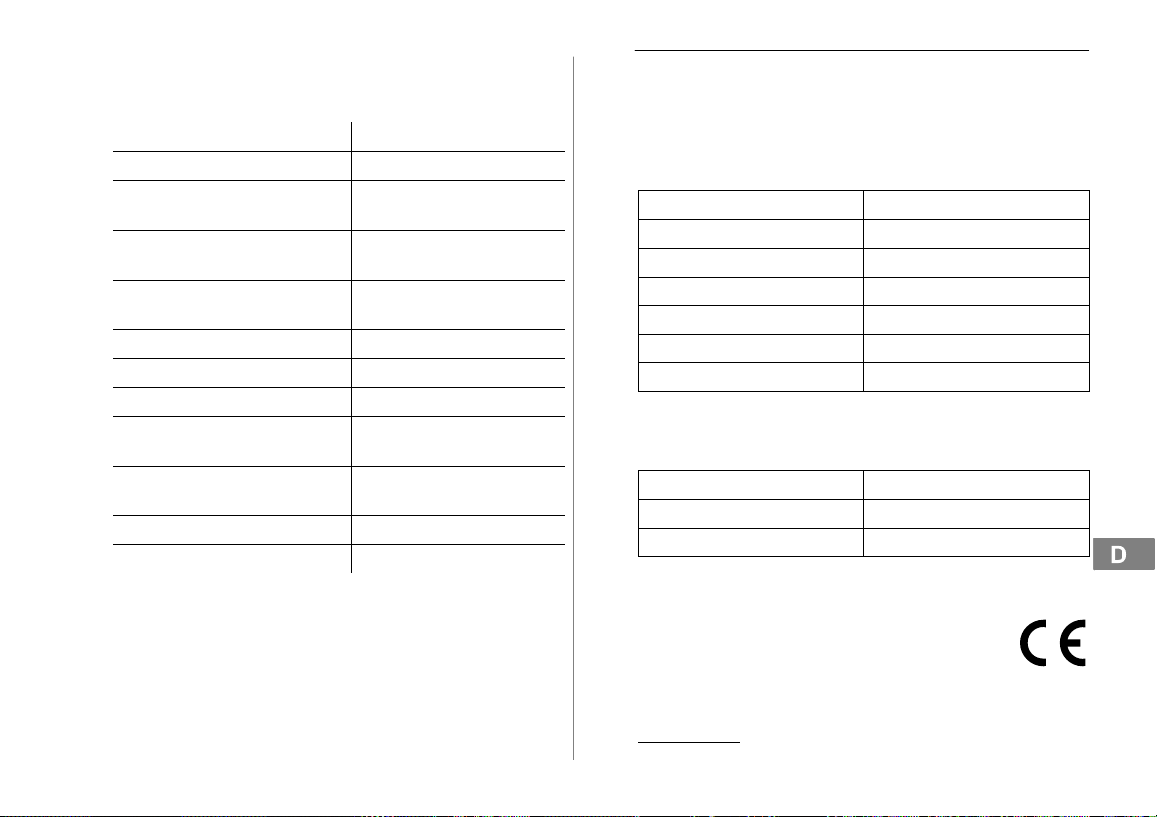
Technische Daten
Merkmal Wert
Standard DECT1−GAP
Stromversorgung (Basisstation) Eingang: 100−240 V, 50/60 Hz
Stromversorgung (Ladestation) Eingang: 100−240 V, 50/60 Hz
Reichweite Außen: ca. 300 m
Stand−by−Zeit Bis zu 45 h
Max. Gesprächsdauer Bis zu 7 h
Aufladbares Akkupack NiMH 3,6 V 400 mAh
Wahlverfahren Ton−Wahlverfahren
Zulässige Umgebungstemperatur Normal: 15 °C bis 35 °C
Zulässige relative Luftfeuchtigkeit 0 % bis 90 %
Flashzeiten 100 ms, 300 ms
1
DECT: Digital Enhanced Cordless Telecommunication =
Standard für kabellose Telefone.
2
GAP: Generic Access Profile = Standard für das Zusammenwir-
ken von Mobilteilen und Basisstationen unterschiedlicher Hersteller.
2
Ausgang: 7,5 V 300 mA
Ausgang: 7,5 V 300 mA
Innen: ca. 50 m
Impuls−Wahlverfahren
Extrem: 0 °C bis 40 °C
Technische Eigenschaften
Werkseinstellungen
Mobilteil
Die Werkseinstellungen werden über das Menü wiederhergestellt.
Auf Seite 14 finden Sie die Position im Menü.
Alarm Aus
Audio Einst. 3
Rufton Int. / Rufton Ext. Melodie 1 / Lautstärke 3
Tastenton An
Reichweite An
Sprache DEUTSCH
MT Name SWITEL
Basisstation
Die Werkseinstellungen werden über das Menü wiederhergestellt.
Auf Seite 14 finden Sie die Position im Menü.
Wahlverfahr. Tonwahl
Flashzeit Flash−1
Pin−Code 0000
Konformitätserklärung
Dieses Gerät erfüllt die Anforderungen der EU−Richtlinie:
1999/5/EG Richtlinie über Funkanlagen und Telekommuni-
kationsendeinrichtungen und die gegenseitige Anerkennung ihrer Konformität. Die Konformität mit der o. a.
Richtlinie wird durch das CE−Zeichen auf dem Gerät bestätigt. Für die komplette Konformitätserklärung nutzen Sie
bitte den kostenlosen Download von unserer Website
www.switel.com
.
23
Page 24

Pflegehinweise / Garantie
14 Pflegehinweise / Garantie
Pflegehinweise
Reinigen Sie die Gehäuseoberflächen mit einem weichen und
fusselfreien Tuch.
Verwenden Sie keine Reinigungs− oder Lösungsmittel.
Garantie
SWITEL − Geräte werden nach den modernsten Produktionsverfahren
hergestellt und geprüft. Ausgesuchte Materialien und hoch entwickelte
Technologien sorgen für einwandfreie Funktion und lange Lebensdauer. Ein Garantiefall liegt nicht vor, wenn die Ursache einer Fehlfunktion des Geräts bei dem Telefonnetzbetreiber oder einer eventuell
zwischengeschalteten Nebenstellenanlage liegt. Die Garantie gilt nicht
für die in den Produkten verwendeten Batterien, Akkus oder Akkupacks. Die Garantiezeit beträgt 24 Monate, gerechnet vom Tage des
Kaufs.
Innerhalb der Garantiezeit werden alle Mängel, die auf Material− oder
Herstellungsfehler zurückzuführen sind, kostenlos beseitigt. Der Garantieanspruch erlischt bei Eingriffen durch den Käufer oder durch
Dritte. Schäden, die durch unsachgemäße Behandlung oder Bedienung, natürliche Abnutzung, durch falsches Aufstellen oder Aufbewahren, durch unsachgemäßen Anschluss oder Installation sowie durch
höhere Gewalt oder sonstige äußere Einflüsse entstehen, fallen nicht
unter die Garantieleistung. Wir behalten uns vor, bei Reklamationen
die defekten Teile auszubessern, zu ersetzen oder das Gerät auszutauschen. Ausgetauschte Teile oder ausgetauschte Geräte gehen in
unser Eigentum über. Schadenersatzansprüche sind ausgeschlossen,
soweit sie nicht auf Vorsatz oder grober Fahrlässigkeit des Herstellers
beruhen.
Sollte Ihr Gerät dennoch einen Defekt innerhalb der Garantiezeit aufweisen, wenden Sie sich bitte unter Vorlage Ihrer Kaufquittung ausschließlich an das Geschäft, in dem Sie Ihr SWITEL − Gerät gekauft
haben. Alle Gewährleistungsansprüche nach diesen Bestimmungen
sind ausschließlich gegenüber Ihrem Fachhändler geltend zu machen.
24
Nach Ablauf von zwei Jahren nach Kauf und Übergabe unserer Produkte können Gewährleistungsrechte nicht mehr geltend gemacht werden.
Page 25

15 Stichwortverzeichnis
A
Abmelden, 21
Akkuladezustand, 6
Akkupack einlegen, 6
Alarm, 20
Anmelden, 15, 21
Anrufannahme, 6, 11
Anrufbeantworter im Telefonnetz, 13
Anrufen, 11
Anruferliste, 14, 18
Aufladen, 6
Auflegen, 11
Ausschalten, 12
B
Basis einstellen, 14
Basisstation, 5, 21
Bedienelemente, 7
Bedienung, 8
C
CLIP, 13
D
Datum, 6
Display, 8
Displaymeldungen, 18
Displaysymbole, 8
E
ECO−Mode, 6
Einschalten, 12
Energiesparmodus, 9
Erweiterung, 21
F
Fehlerbehebung, 22
Fragen und Antworten, 22
Freisprechen, 12
Funktionen, 20
G
GAP−Standard, 21
Garantie, 24
Gespräch beenden, 11
Gesprächsdauer, 12
Gesprächsweiterleitung, 11
H
Hauptmenü, 14
Headset−Anschluss, 20
Hörerlautstärke, 12
I
Impuls−Wahlverfahren, 20
Inbetriebnahme, 5
Interngespräche, 11
K
Konferenzgespräche, 12
Konformitätserklärung, 23
L
Ladestation, 5
M
Makeln, 12
Menüstruktur, 14
Mikrofonstummschaltung, 12
Mobilteil, 21
Mobilteil einstellen, 14
Mobilteil suchen, 12
N
Namenseingabe, 16
Navigationstasten, 9
Nebenstellenanlagen, 13
P
Paging, 12
Pflegehinweise, 24
Probleme, 22
R
R−Funktion, 13
Rückruf, 11
Rücksprache, 12
Rufnummernanzeige, 13, 18
S
Schreibweisen, 8
Service−Hotline, 22
Sicherheitshinweise, 4
Speichern, 10, 16, 18
Stand−by−Modus, 9
Strahlungsreduzierung, 6
Stummschaltung, 12
Symbole, 8
T
Tastensperre, 12
Technische Daten, 23
Telefonbuch, 11, 14, 16
Telefonbucheinträge, 10, 16
Telefonieren, 11
Temporäre Tonwahl, 20
Texteingabe, 16
Ton−Wahlverfahren, 20
U
Uhrzeit, 6
Stichwortverzeichnis
V
Verpackungsinhalt, 5
VMWI, 13
W
Wählen, 11
Wahlpause, 13
Wahlverfahren, 20
Wahlwiederholung, 11
Weiterleitung, 11
Werkseinstellungen, 23
Z
Zusatzdienste, 13
25
Page 26

Notizen
Notizen
26
Page 27

1 Consignes de sécurité 28. . . . . . . . . . . . .
2 Mettre votre téléphone en service 29. . . . .
3 Éléments de manipulation 31. . . . . . . . . .
4 Introduction 32. . . . . . . . . . . . . . . . . . . .
5 Téléphoner 35. . . . . . . . . . . . . . . . . . . . .
6 Installations à postes suppl. /
Services confort 38. . . . . . . . . . . . . . . .
7 Structure du menu 39. . . . . . . . . . . . . . . .
8 Répertoire 41. . . . . . . . . . . . . . . . . . . . .
9 Liste d’appels 43. . . . . . . . . . . . . . . . . . .
10 Fonctions particulières 45. . . . . . . . . . . . .
11 Extension du système téléphonique 46. . .
12 En cas de problèmes 47. . . . . . . . . . . . . .
13 Caractéristiques techniques 48. . . . . . . . .
14 Remarques d’entretien / Garantie 49. . . . .
15 Index 50. . . . . . . . . . . . . . . . . . . . . . . . .
21
Table des matières
27
Page 28
Consignes de sécurité
1 Consignes de sécurité
Lisez très attentivement ce mode d’emploi.
Utilisation conforme aux prescriptions
Ce téléphone convient pour téléphoner à l’intérieur d’un réseau
téléphonique. Tout autre utilisation est considérée comme non conforme à l’usage. Des modifications ou changements effectués d’un
propre gré ne sont pas autorisés. N’ouvrez en aucun cas l’appareil et
n’effectuez aucun essai de réparation vous−même.
Lieu d’installation
Évitez les nuisances causées par la fumée, la poussière, les vibrations, les produits chimiques, l’humidité, la grande chaleur ou un ensoleillement direct.
Ne vous servez pas du combiné dans des endroits exposés aux
explosions.
Bloc secteur
Attention : N’utilisez que le bloc secteur fourni avec l’appa-
reil, d’autres pouvant endommager votre téléphone. Vous
ne devez pas bloquer l’accès au bloc secteur par des meubles ou autres objets.
Pack de piles rechargeables
Attention : Ne jetez jamais les piles rechargeables dans le
feu. N’utilisez que des piles rechargeables du même type !
Observez une polarisation correcte ! Risque d’explosion
lors de leur chargement si la polarisation est incorrecte.
Panne de courant
En cas de panne de courant, il n’est pas possible de téléphoner avec
cet appareil. Pour les cas d’urgence, ayez à votre disposition un
téléphone à fil fonctionnant sans alimentation externe en courant.
Appareils médicaux
Attention : N’utilisez pas ce téléphone à proximité d’appa-
reils médicaux. Leur influence ne peut pas être entièrement
exclue.
Les téléphones DECT1 peuvent causer un bourdonnement désagréable dans les prothèses auditives.
Ce téléphone est compatible avec la plupart des prothèses auditives
en vente sur le marché. Cependant, un fonctionnement irréprochable
ne peut être garanti pour chacune d’entre elles.
Élimination
Si vous ne voulez plus vous servir de votre appareil, veuillez
l’apporter au centre de collecte de l’organisme d’élimination
des déchets de votre commune (par ex. centre de recyclage). L’icône ci−contre signifie que vous ne devez en aucun
cas jeter votre appareil dans les ordures ménagères !
D’après la loi relative aux appareils électriques et électroniques, les propriétaires d’appareils usagés sont tenus de mettre tous les appareils électriques et électroniques usagés
dans un collecteur séparé. Éliminez les
piles rechargeables auprès d’un revendeur spécialisé ainsi que dans des
centres de collecte qui tiennent à votre
disposition les collecteurs appropriés
correspondants.
Éliminez les fournitures d’emballage
conformément au règlement local.
28
1
DECT: Digital Enhanced Cordless Telecommunication = Standard
pour les téléphones sans fil.
Page 29
2 Mettre votre téléphone en service
Remarques concernant la sécurité
Attention : Avant de mettre votre appareil en service, lisez
impérativement les consignes de sécurité mentionnées au
chapitre 1.
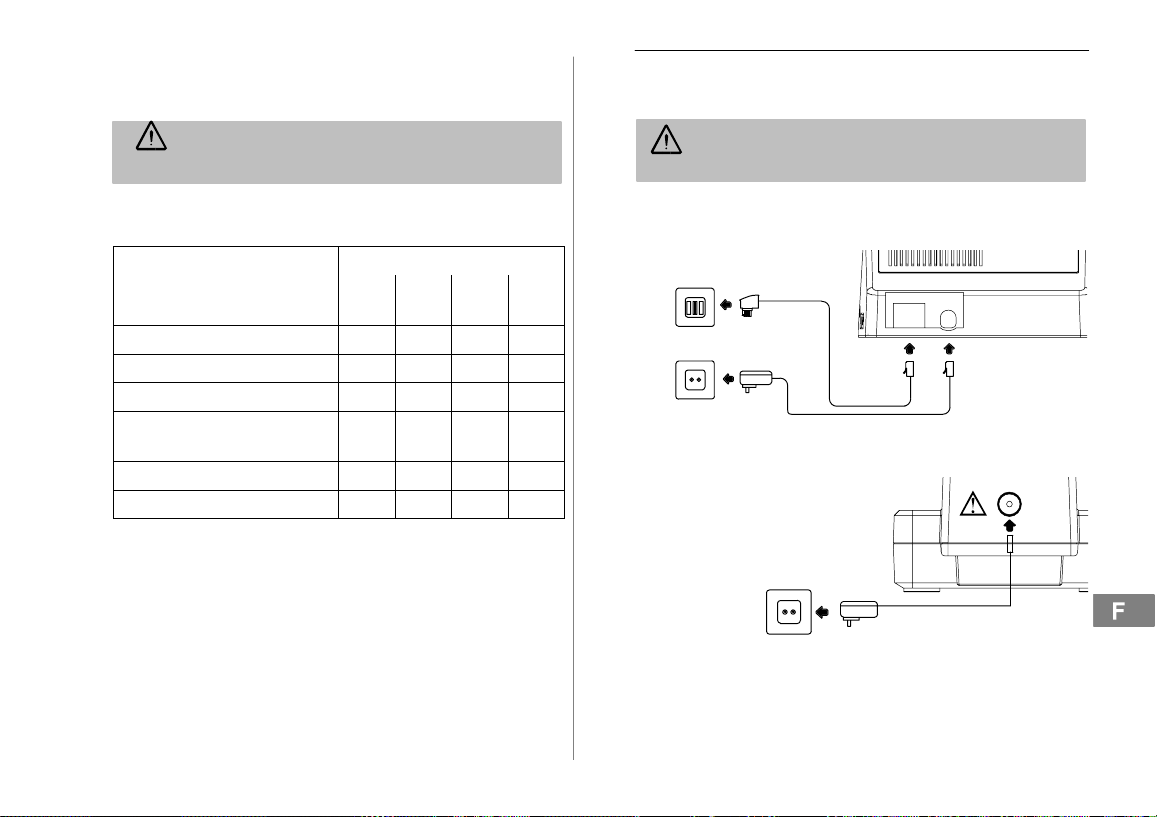
Vérifier le contenu de l’emballage
Les éléments suivants font partie de la livraison :
Contenu
Base avec bloc secteur 1 1 1 1
Chargeur avec bloc secteur − 1 2 3
Combiné 1 2 3 4
Câble de raccordement télépho-
nique
Pack de piles rechargeables 1 2 3 4
Mode d’emploi 1 1 1 1
22
DF
831DF832
1 1 1 1
Modèle DF 83x
DF
1
833
Mettre votre téléphone en service
Raccorder la base
Attention : Posez la base à une distance minimum d’1 m par
rapport à d’autres appareils électroniques, une distance
inférieure pouvant provoquer des interactions.
Raccordez la base comme représenté sur le croquis. Pour des raisons de sécurité, n’utilisez que le bloc d’alimentation fourni avec l’appareil ainsi que le câble de raccordement téléphonique ci−joint.
Prise de raccordement
DF
1
1
834
Raccorder le chargeur
téléphonique
Prise réseau
Raccordez le
chargeur tel que
représenté sur le
croquis. Pour
des raisons de
sécurité, n’utilisez que le bloc
secteur fourni
avec l’appareil.
2
Prise réseau
1
Le site www.switel.com vous indiquera si cet ensemble téléphoni-
que est déjà disponible.
2
Valable uniquement pour les installations téléphoniques équipées
d’au moins deux combinés
Contenu de l’emballage" à la page 29.
29
Page 30
Mettre votre téléphone en service
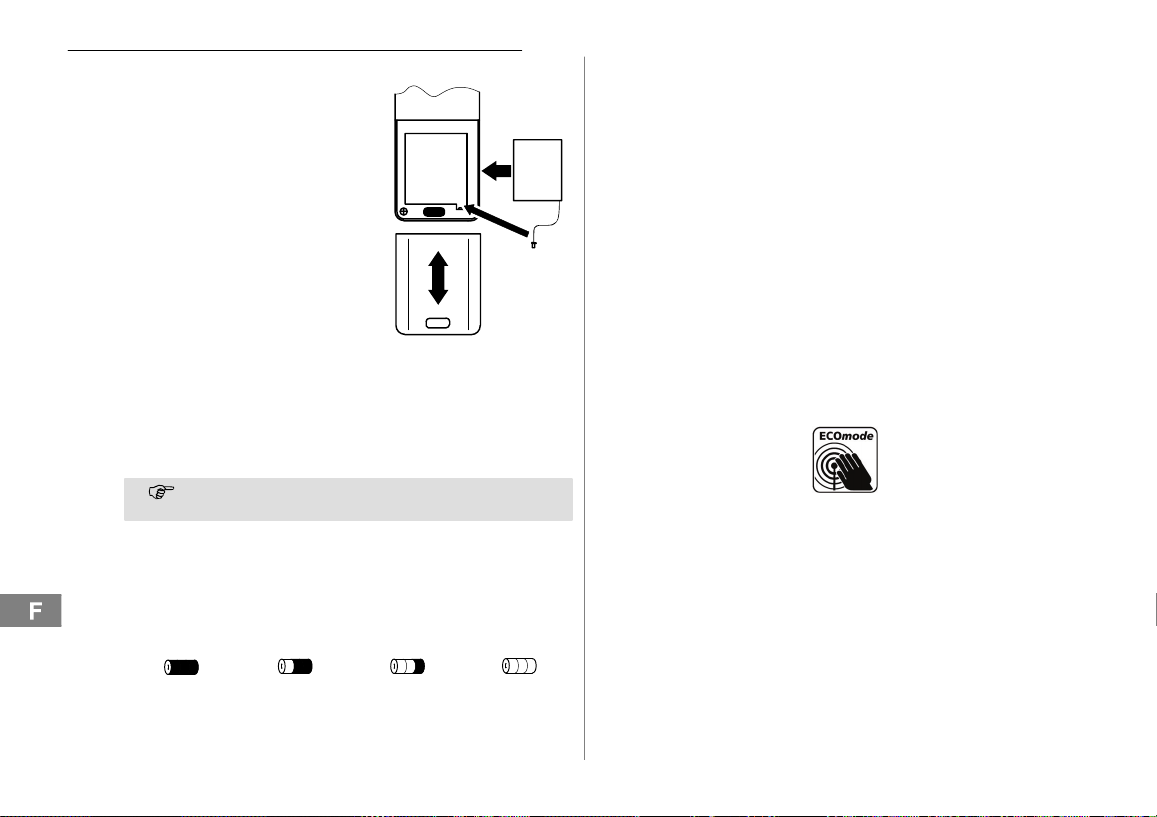
Mettre en place le pack de piles rechargeables
Enfoncez le bouton de sécurité
situé sur le couvercle du compartiment à piles rechargeables en
poussant en même temps le couvercle vers le bas. Déposez le
couvercle du compartiment à piles. Enfoncez la fiche du pack de
piles rechargeables dans la
prise située dans le compartiment à piles. Insérez le pack de
piles rechargeables dans le
compartiment à piles. N’utilisez
que le pack de piles rechargeables fourni avec l’appareil. Veillez à ne pas coincer le câble. Reposez le couvercle sur le
compartiment à piles et poussez−
le vers le haut jusqu’à ce que le
bouton de sécurité s’enclenche.
Recharger le pack de piles rechargeables
Lors de la première mise en service, laissez le combiné pen-
dant au moins 15 heures sur la base / le chargeur.
Si vous avez correctement posé le combiné sur la base / le chargeur,
un signal indicateur se fait entendre et le voyant de contrôle de
charge s’allume. Le combiné chauffe lors du chargement. C’est normal et inoffensif. Ne chargez pas le combiné avec des chargeurs
d’autres fabricants. Le niveau actuel de chargement des piles re-
chargeables est affiché à l’écran :
23
Régler l’heure et la date du combiné
Vous réglez l’heure et la date via le menu. La page 40 vous donnera
la position dans le menu.
Prise d’appel automatique
Si vous avez activé cette fonction, l’appel sera automatiquement pris
lorsque vous retirerez le combiné de la base. La prise d’appel automatique s’active ou se désactive via le menu. La page 40 vous donnera la position dans le menu.
Installations à postes supplémentaires
La page 38 vous donnera de plus amples informations au cas où
vous désireriez raccorder votre téléphone à une installation à postes
supplémentaires.
Réduction du rayonnement (mode ÉCO)
Le rayonnement est, comparé aux téléphones sans fil DECT standard, considérablement réduit en mode veille (quand le combiné repose sur la base).
30
Plein 2/3 Plein Faible Vide
Page 31
3 Éléments de manipulation
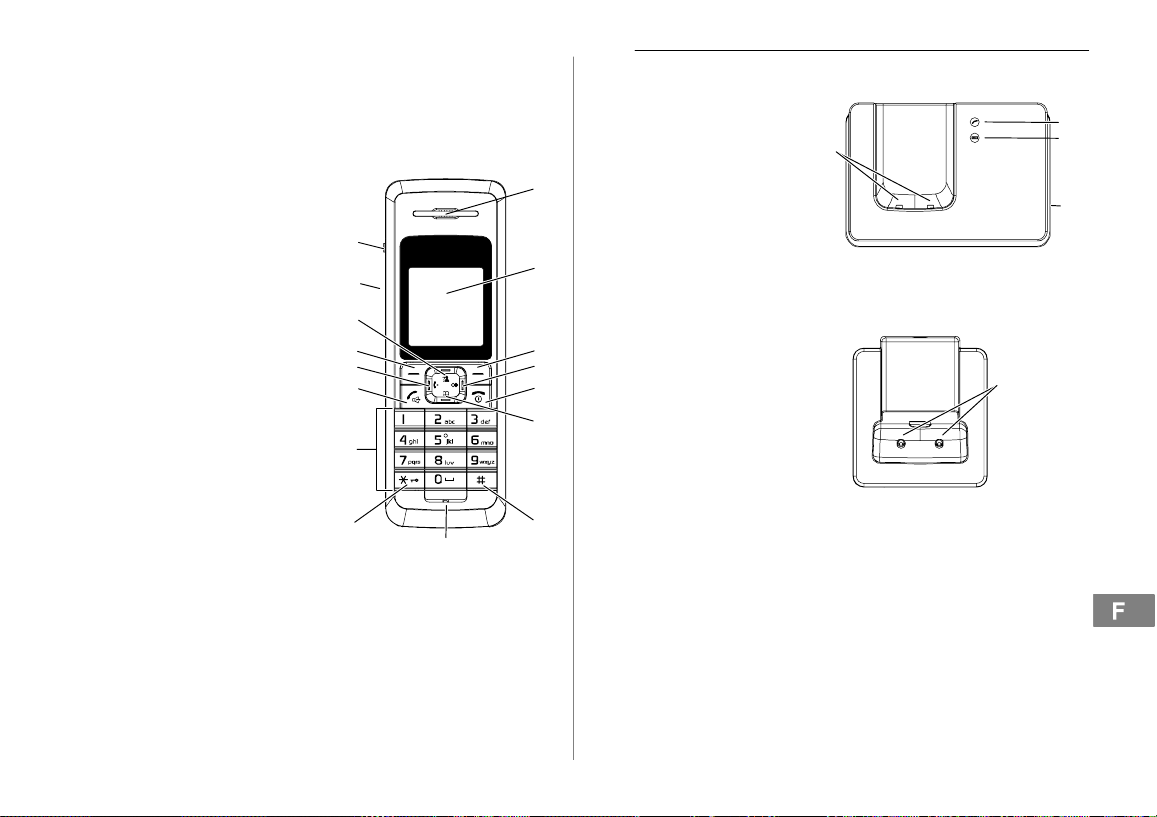
Dans ce mode d’emploi, les touches de votre téléphone seront
représentées par la suite par des icônes encadrées standardisées. Il
peut donc y avoir de légères différences entre les icônes des touches
de votre téléphone et celles des touches utilisées ici.
Combiné
1 Écouteur
2 Écran
3 Touche softkey droite
4 Répétition automatique des
derniers numéros £ /
Insertion d’une pause de
numérotation
5 Touche pour
raccrocher )
6 Navigation vers le bas /
Répertoire ´
7 Touche #
8 Microphone
9 Touche */
Verrouillage du clavier /
Numérotation temporaire
par tonalité
10 Pavé numérique
11 Mode mains−libres /
Touche de communication (
12 Téléphoner en interne ¹
13 Touche softkey gauche
14 Navigation vers le haut /
Liste d’appels «
15 Haut−parleur (sur la face arrière)
16 Raccordement au kit d’oreilles
16
15
14
13
12
11
10
9
Éléments de manipulation
Base
1 DEL :
affichage de
communications
1
2
3
4
5
6
7
8
2 DEL :
voyant de contrôle
de charge
3 Chercher le combiné
(paging) Z
4 Contacts de chargement
Chargeur
1
1 Contacts de chargement
1
Valable uniquement pour les kits téléphoniques équipés d’au
moins deux combinés Contenu de l’emballage" à la page 29.
4
1
2
3
1
31
Page 32
Introduction
4 Introduction
Dans ce chapitre, vous trouverez des informations de base vous expliquant comment vous servir du mode d’emploi et du téléphone.
Mode de représentation dans le mode d’emploi
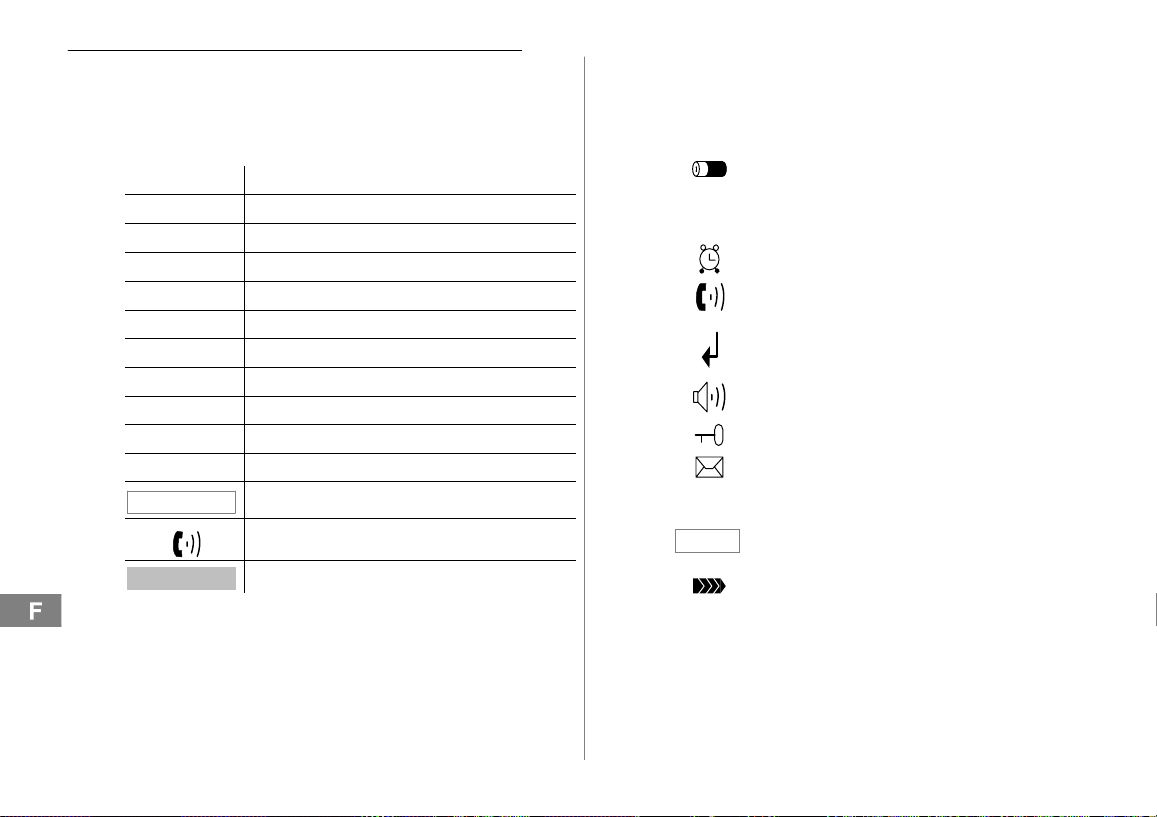
Visualisation Description
! Visualisation des touches
* Appuyer brièvement sur la touche représentée
3 sec. * Appuyer 3 secondes sur la touche représentée
Maintenir * Maintenir appuyée la touche représentée
Relâcher * Relâcher la touche représentée
Saisir des chiffres ou des lettres
Le combiné sonne
La base sonne
Prendre le combiné de la base
Poser le combiné sur la base
Menu Princip
Supp. Fiche
Visualisation des textes de l’écran
Visualisation des icônes de l’écran
Appuyer sur la touche softkey page 33
Icônes et textes à l’écran du combiné
Icône Description
Affichage de la capacité des piles.
JJ−MM/MM−JJ Affichage de la date page 40
hh:mm Affichage de l’heure page 40
Fonction d’alarme activée.
Vous téléphonez. / Un appel vous parvient
page 35.
De nouveaux appels se trouvent dans la liste
d’appels page 43.
Le mode mains−libres est activé page 36.
Le verrouillage du clavier est activé page 36.
Répondeur dans le réseau téléphonique.
Services confort VMWI
page 38.
Secret
Le microphone est réglé sur silencieux
page 36.
Constant : la liaison avec la base est bonne.
Clignotant : la liaison avec la base s’interrompt.
Rapprochez−vous de celle−ci.
1
de votre opérateur
32
1
VMWI: Visual Message Waiting Indication = Affichage optique de
nouveaux messages.
Page 33
Mode veille
24
Toutes les descriptions de ce mode d’emploi partent du fait que le
combiné se trouve en mode veille. Vous parvenez au mode veille en
appuyant sur la touche ).
Mode économie d’énergie
Après avoir été quelque temps en mode veille, le combiné passe au
mode économie d’énergie. Touches et écran ne sont plus éclairés.
Appuyez sur une touche quelconque pour activer le mode veille.
Touches de navigation
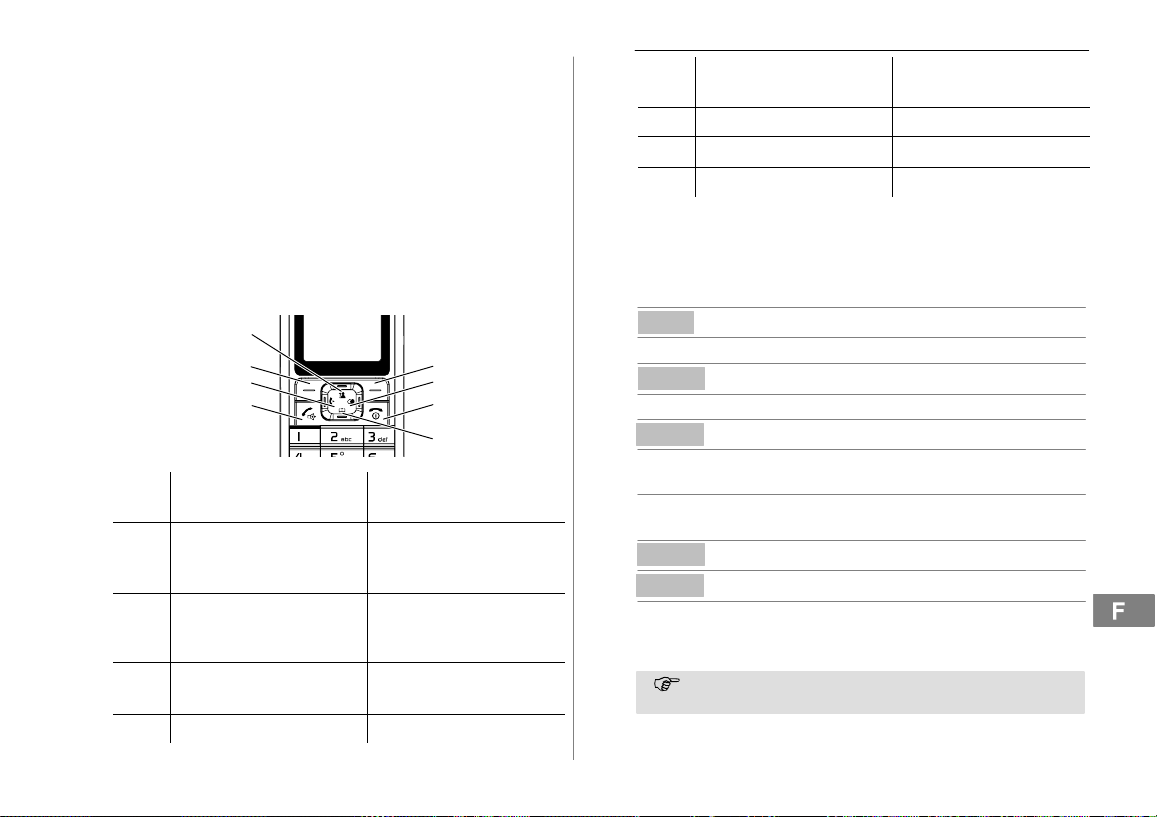
Les touches softkey (1) et (7) sont occupées par des fonctions
différentes dans les divers menus. Dans ce mode d’emploi, elles sont
toujours dénommées selon les textes inscrits ci−dessus à l’écran.
Tou-
En mode veille
che
− Ouvrir la liste de répéti-
1
− Ouvrir la liste de répéti-
2
− Allumer, éteindre le com-
3
4 − Ouvrir le répertoire − Navigation vers le bas
25
8
7
6
5
tion automatique des
derniers numéros
tion automatique des
derniers numéros
biné
Dans le menu
− Passer en mode veille
Introduction
− Touche de communica-
5
tion
6 − Téléphoner en interne
7 − Ouvrir le menu principal
8 − Ouvrir la liste d’appels − Navigation vers le haut
Navigation dans le menu
Vous pouvez accéder à toutes les fonctions via différents menus.
La structure de menu vous montre comment accéder à la fonction
désirée page 39.
Menu
1
2
3
4
« ou ´ Sélectionner le sous−menu désiré
Select
« ou ´ Sélectionner la fonction désirée
Select Ouvrir la fonction
« ou ´ Sélectionner le paramétrage
Saisir des chiffres ou des lettres
Sauve
Retour
) Annuler les opérations de
Chaque opération est automatiquement interrompue si
vous n’effectuez pas de saisie dans les 35 secondes.
26
Ouvrir le menu principal
Ouvrir le sous−menu
désiré
via le pavé numérique.
Confirmer les entrées
Reculer d’une position
programmation et de sauvegarde
et retourner en mode veille
33
Page 34
Introduction
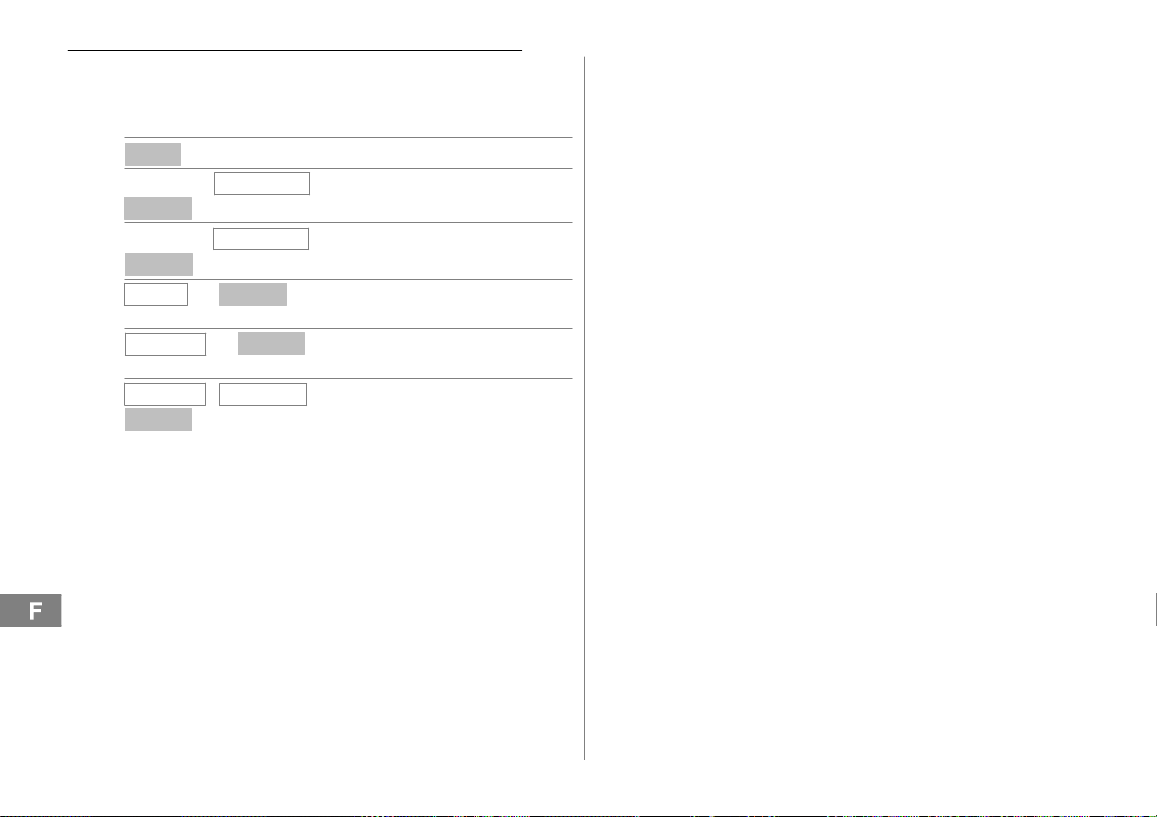
Créer des enregistrements du répertoire − exemple
L’exemple Créer des enregistrements du répertoire vous explique
ici comment naviguer dans les menus et réaliser des paramètrages.
Pour tous les paramétrages, procédez comme dans cet exemple.
Menu
« ou ´
Select
« ou ´
Select
Nom ?
, ,
Numéro ?
Mélodie 1
Sauve
Répertoire
Ajout. Fiche
Suiv.
Suiv.
, ,
Mélodie 10 , Sélectionner la mélodie d’appel et
−
Ouvrir le menu principal
, Sélectionner le répertoire
, Sélectionner le sous−menu et
confirmer
Saisir le nom (max. 12 positions)
et confirmer
Saisir le numéro d’appel (max.
20 chiffres) et confirmer
sauvegarder
27
34
Page 35
5 Téléphoner
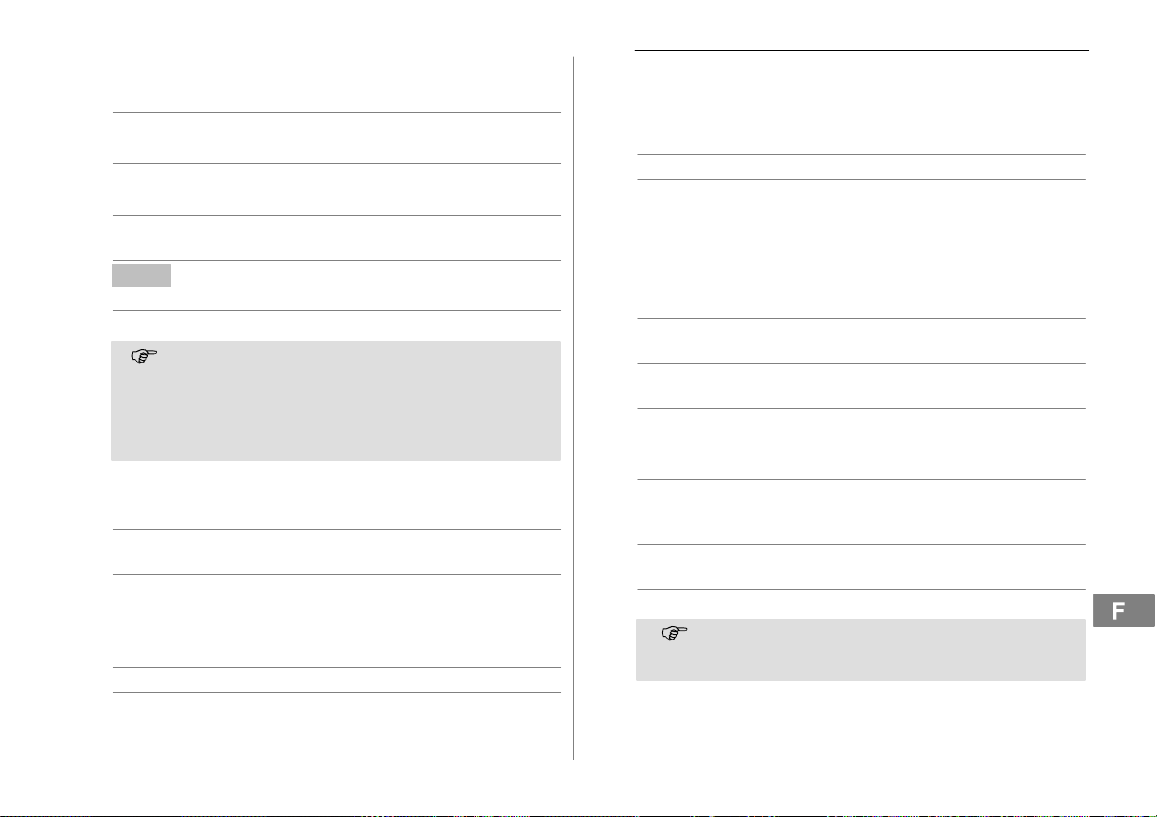
Prendre un appel
, ( Prendre un appel
Terminer la communication
) Terminer la communication
Appeler
Saisir le numéro d’appel (max.
Effac
( Composer le numéro d’appel
Vous pouvez également appuyer d’abord sur la touche de
Touche de répétition automatique des derniers numéros
Votre téléphone enregistre les 10 derniers numéros composés dans
une liste de répétition des derniers numéros.
£ Ouvrir la liste de répétition auto−
« ou ´, ( Sélectionner l’enregistrement et
Rappeler des appels entrés
Votre téléphone enregistre 40 appels dans une liste d’appels.
« Ouvrir la liste d’appels
« ou ´, ( Sélectionner l’enregistrement et
28
32 chiffres)
Si la saisie est erronée, effacer le
dernier chiffre
communication, vous obtenez ainsi la tonalité. Les chiffres
saisis de votre numéro d’appel seront immédiatement composés. Une correction individuelle des chiffres du numéro
n’est pas possible quand la communication est établie de
cette manière.
matique des derniers numéros
établir la communication
établir la communication
Téléphoner
Composer des numéros d’appel à partir du répertoire
Vous devez avoir enregistré des numéros dans le répertoire
page 34 et 41.
´ Ouvrir le répertoire
« ou ´, ( Sélectionner l’enregistrement et
Téléphoner en interne
1
29
Téléphoner en interne
Vous devez avoir déclaré deux ou plusieurs combinés (CB1, CB2, ...)
sur votre base afin de pouvoir téléphoner gratuitement en interne.
CB1 : ¹, par ex. 2 Sélectionner le numéro d’appel
CB2 : ( Prendre la communication interne
CB1 / CB2 : ) Terminer une communication
Transférer des communications externes en interne
CB1 : ¹, par ex. 2 Sélectionner le numéro d’appel
CB2 : ( Prendre la communication interne
CB1 : ) Transférer la communication
Si le combiné appelé devait ne pas répondre, vous pouvez
reprendre la communication externe en appuyant sur la touche ¹.
1
Téléphoner en interne n’est possible qu’avec au moins deux com-
binés Contrôler le contenu de l’emballage" à la page 29.
établir la communication
interne du combiné de votre choix
sur l’autre combiné
interne
interne pendant la communication
externe
sur l’autre combiné
35
Page 36
Téléphoner
Intercommunication / Va−et−vient
Vous pouvez, pendant une communication externe, composer le
numéro d’un autre combiné, pour intercommuniquer. Le correspondant externe sera maintenu en ligne pendant que vous parlez avec le
correspondant interne. Vous pouvez répéter cette opération autant de
fois que vous le désirez.
CB1 : ¹, par ex. 2 Sélectionner le numéro d’appel
interne pendant la communication
externe
CB2 : ( Prendre la communication interne
sur l’autre combiné
CB1 : ¹ Changer de correspondant
Mener des conférences téléphoniques
Une communication externe peut être branchée sur un autre correspondant interne dans le but de mener une conférence.
CB1 : ¹, par ex. 2 Sélectionner le numéro d’appel
interne pendant la communication
externe
CB2 : ( Prendre la communication interne
sur l’autre combiné
CB1 : * Démarrer la conférence
CB1 / CB2 : ) Terminer la conférence
Régler le volume sonore de l’écouteur
Vous disposez de 5 niveaux pour régler le volume pendant une communication.
« ou ´ Sélectionner le volume sonore
désiré
Mode mains−libres
Utilisez cette fonction pour entendre le correspondant par l’intermédiaire du haut−parleur.
( Brancher le mode mains−libres
( Désactiver le mode mains−libres
30
Affichage de la durée de la communication
Pendant une communication, sa durée s’affiche en heures, minutes et
secondes.
Mettre le microphone du combiné sur silencieux
Pendant une communication, vous pouvez activer et désactiver le microphone du combiné.
Secret
Secret
Verrouillage du clavier
Le verrouillage du clavier doit empêcher que des fonctions soient déclenchées par inadvertance.
3 sec. * Activer le verrouillage du clavier
3 sec. * Désactiver le verrouillage du
Lorsque le verrouillage du clavier est activé, vous pouvez
comme d’habitude réceptionner des appels entrants. Si une
autre touche est appuyée, vous entendez un long signal sonore. L’éclairage de fond ne s’allume pas.
32
Désactiver le microphone (le
mettre sur silencieux)
Activer le microphone
clavier
31
36
Page 37
Chercher le combiné (paging)
Si vous avez égaré votre combiné, vous pouvez le retrouver facilement grâce à un son de recherche.
{«} Lancer le son de recherche
ou © Arrêter le son de recherche
Allumer et éteindre le combiné
Vous pouvez éteindre le combiné pour ménager le pack de piles rechargeables.
3 sec. ) Éteindre le combiné
3 sec. ) Allumer le combiné
L’éclairage de fond ne s’allume pas quand vous allumez le
combiné.
Téléphoner
37
Page 38
Installations à postes suppl. / Services confort
6 Installations à postes suppl. / Services confort
Fonction R sur les installations à postes supplémentaires
Si votre téléphone est raccordé à une installation à postes supplémentaires, vous pouvez via la touche softkey R tirer profit de fonctions, comme par ex. le transfert d’appels et le rappel automatique.
Veuillez lire dans le mode d’emploi de votre installation à postes supplémentaires quel temps de flash vous devez paramétrer pour l’utilisation de ces fonctions. Le revendeur, chez lequel vous avez acheté
l’installation, vous dira si votre téléphone fonctionne impeccablement
sur votre installation à postes supplémentaires. Vous paramétrez le
temps de flash via le menu. La page 39 vous donnera la position dans
le menu.
La touche softkey R n’est disponible que lorsque le com-
biné se trouve en mode de communication.
Fonction R et services confort
Votre téléphone supporte des services confort de votre opérateur tels
que le va−et−vient, la signalisation d’appel en instance et la conférence. Vous pouvez tirer profit de ces services confort via la touche
softkey R. Demandez à votre opérateur quel temps de flash vous devez paramétrer pour utiliser ces services conforts. Contactez votre
opérateur pour déconnecter ces services. Le temps de flash se paramètre via le menu. La page 39 vous donnera la position dans le
menu.
Affichage du numéro d’appel (CLIP1)
L’affichage du numéro d’appel est un service optionnel de
votre opérateur. Veuillez lui demander de plus amples informations.
Si cette fonction est disponible sur votre ligne téléphonique, le numéro d’appel du correspondant vous sera affiché dès que le téléphone sonnera. Si votre correspondant a bloqué la transmission de
son numéro, un message correspondant sera affiché. Le numéro
1
CLIP: Calling Line Identification Presentation = Affichage du
numéro d’appel d’un correspondant.
38
34
33
d’appel ne peut pas être affiché et ne peut donc pas être sauvegardé
dans la liste d’appels.
Pause de numérotation
Dans le cas d’installations à postes supplémentaires, il est nécessaire
de composer auparavant un code réseau pour obtenir la tonalité. Sur
quelques installations à postes supplémentaires plus anciennes, vous
devez attendre quelques instants avant de pouvoir entendre la tonalité. Pour ces installations à postes supplémentaires, une pause de
numérotation peut être insérée après le code réseau afin de pouvoir
continuer à numéroter directement sans attendre la tonalité.
£ Introduire une pause de
Après le code réseau, le numéro est composé au bout d’un temps déterminé.
La pause peut également être enregistrée lors de la saisie
de numéros d’appel dans le répertoire.
Répondeur dans le réseau téléphonique
Le répondeur dans le réseau téléphonique est un service confort offert par de nombreux opérateurs. Si votre opérateur met à votre disposition un répondeur dans le réseau téléphonique, vous serez informé
par une icône de l’arrivée de nouveaux messages (VMWI
pouvez disposer de cette fonction que si votre opérateur offre ce service. Veuillez lui demander de plus amples informations.
2
VMWI : Visual Message Waiting Indication = Affichage optique de
nouveaux messages.
numérotation
35
2
Vous ne
Page 39

7 Structure du menu
Menu principal
Vous parvenez au menu principal en appuyant sur la touche softkey
Menu
. Vous trouverez comment vous déplacer dans le menu et ef-
fectuer des saisies à la page 33.
Liste App.1Ajout Rep. Nom ? Numéro ?
Supprimer Confirmé ?
Tout Supp. Confirmé ?
Répertoire Ajout. Fiche Nom ? Numéro ?
Modif. Fiche Nom ? Numéro ?
Supp. Fiche Confirmé ?
Tout Supp. Confirmé ?
Etat Répert.
1
L’affichage du numéro d’appel (CLIP2) est nécessaire pour l’affi-
chage et la sauvegarde de numéros d’appel dans les listes d’appels. L’affichage du numéro d’appel est un service confort de votre
opérateur. Demandez−lui de plus amples informations. D’autres informations sur l’affichage du numéro d’appel page 38.
2
CLIP: Calling Line Identification Presentation = Affichage du
numéro d’appel d’un correspondant.
36
Etat Répert.
(par ex.: 04/50)
Mélodie 1 −
Mélodie 10
Mélodie 1 −
Mélodie 10
Mélodie 1 −
Mélodie 10
Structure du menu
Réglages BS Sup. Combiné PIN ?
Mode Num. Freq Voca-
Temps"flash" Flash−1
Modifier PIN PIN ? Nouv PIN
RAZ Base PIN ?
Réglage
Alarme Off
Comb
Régl. Audio Volume HP Volume 1 − Vo-
Régl Mélodie Appel Int Mélodie
Volume
3
Le code PIN est réglé en usine sur 0000".
3
Combiné 1 −
Combiné 5
les
Décimal
(100 ms)
Flash−2
(300 ms)
Confirmé
On hh:mm
Buzzer On
Buzzer Off
lume 5
Vol Ecoute Volume 1 − Vo-
lume 5
39
Page 40
Structure du menu
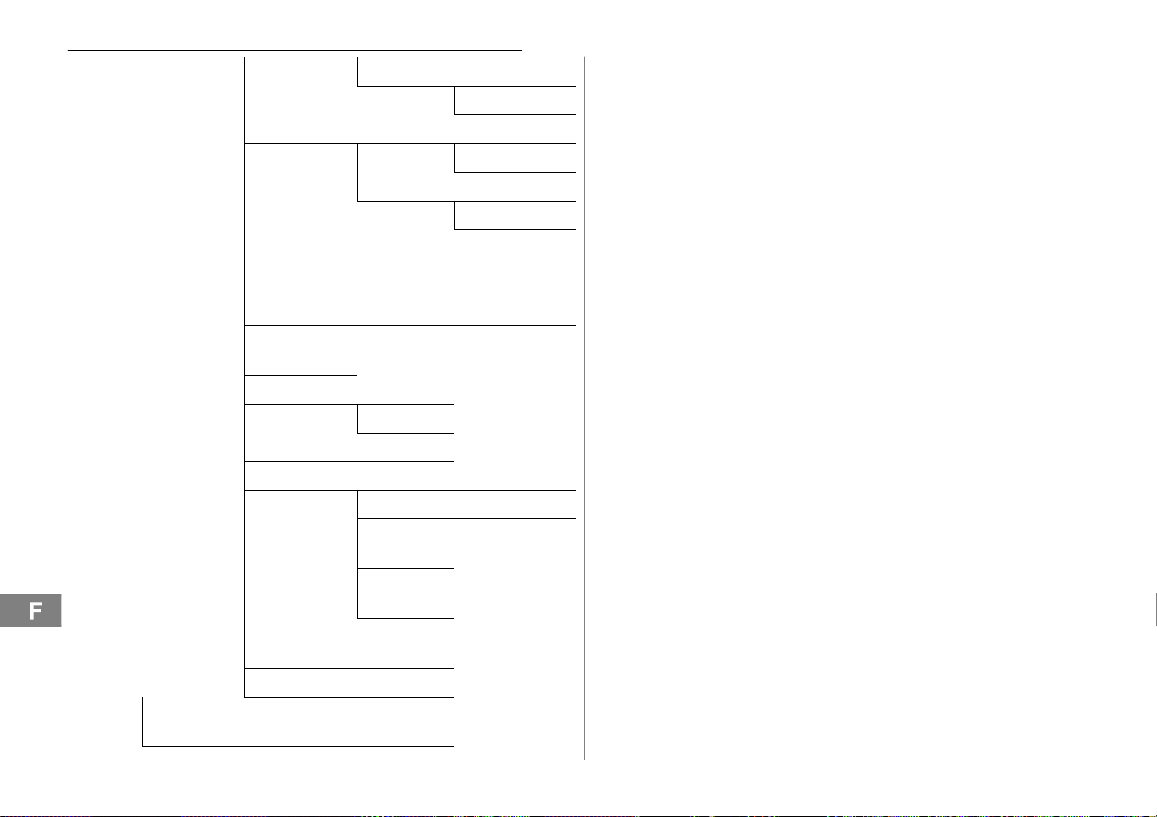
Appel Ext Mélodie
Réglage Tona Bip Clavier Off
37
Volume
On
Niv. Alarme Off
On
40
Langue ENGLISH / FRANCAIS / ES-
Nom Combiné
Réponse Auto Off
Contraste 00 − 16
Date & Heure Format Date JJ−MM / MM−JJ
Select Base Base 1 −
RAZ Combiné PIN ?
Enregistr. Base 1 −
Base 4
PANOL / DEUTSCH / ITALIANO / NEDERLANDS /
SVENSKA
On
Format H. 12H / 24H
Régl. Date
Régl. Heure
Base 4
PIN ?
Page 41
8 Répertoire
Vous pouvez enregistrer 50 numéros d’appel et les noms y afférant
dans le répertoire.
Les enregistrements du répertoire sont rangés par ordre
alphabétique. Pour accéder directement à l’enregistrement
désiré, appuyez sur l’initiale correspondante.
Saisir le nom
Des lettres sont gravées sur les touches numériques. En appuyant
plusieurs fois sur la touche adéquate, vous pouvez saisir des lettres,
des chiffres et des symboles.
0 Entrer des espaces
Effac
0 ou 1 Saisir des caractères spéciaux
Pour entrer deux fois la même lettre, appuyez sur la touche
correspondante. Attendez que le curseur soit passé derrière
la lettre. Puis tapez la lettre une nouvelle fois.
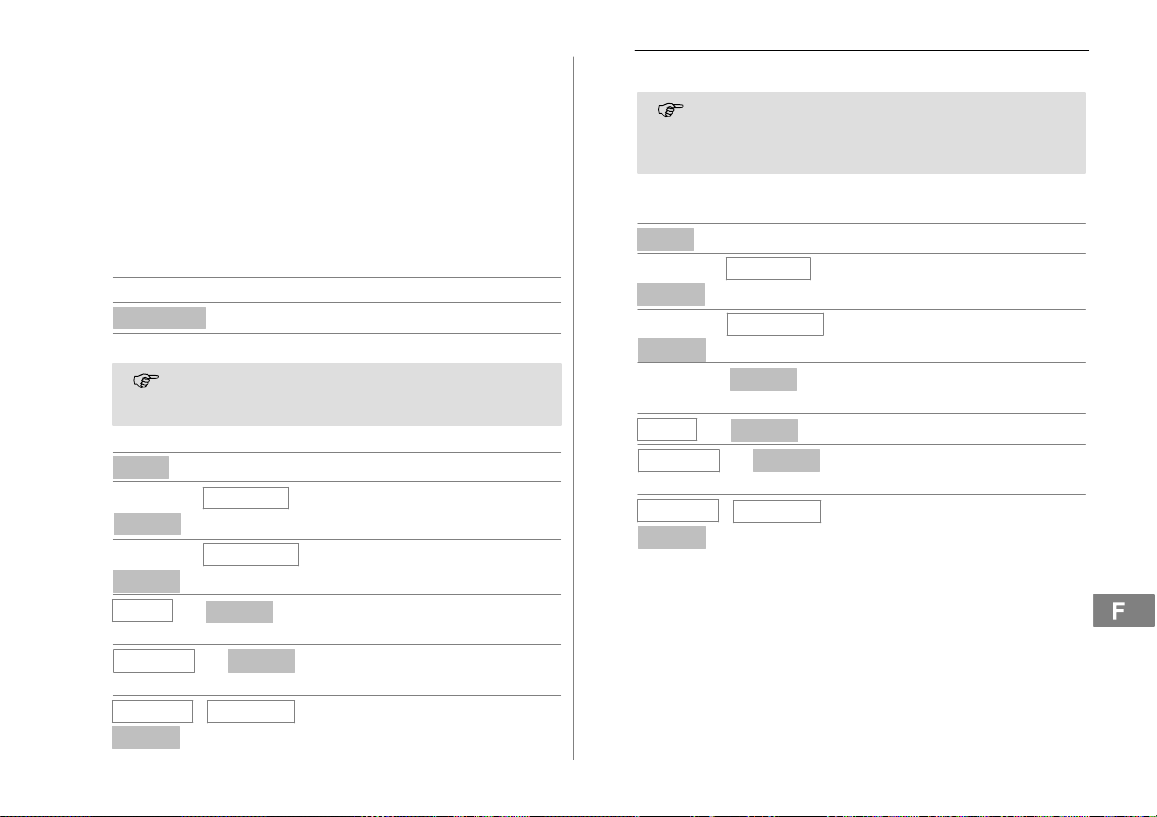
Créer des enregistrements du répertoire
Menu
« ou ´
Select
« ou ´
Select confirmer
Nom ?
Numéro ?
Mélodie 1
Sauve
Répertoire
Ajout. Fiche
, , Suiv. Saisir le nom (max. 12 positions)
Suiv.
, ,
Mélodie 10
−
Supprimer
38
Ouvrir le menu principal
, Sélectionner le répertoire
, Sélectionner le sous−menu et
et confirmer
Saisir le numéro d’appel (max.
20 chiffres) et confirmer
, Sélectionner la mélodie d’appel et
sauvegarder
Vous pouvez vous faire afficher le nombre des enregistre-
ments du répertoire que vous avez sauvegardés via le menu
SEND CNTR La page 39 vous donnera la position dans le
menu.
Modifier des enregistrements du répertoire
Menu
, ,
, ,
−
Répertoire
Modif. Fiche
Select
Suiv.
Suiv.
Mélodie 10
« ou ´
Select
« ou ´
Select confirmer
« ou ´,
Nom ?
Numéro ?
Mélodie 1
Sauve
Ouvrir le menu principal
, Sélectionner le répertoire
, Sélectionner le sous−menu et
Sélectionner un enregistrement du
répertoire et confirmer
Modifier le nom et confirmer
Modifier le numéro d’appel et
confirmer
, Sélectionner la mélodie d’appel et
sauvegarder
Répertoire
39
41
Page 42
Répertoire
Effacer des enregistrements du répertoire
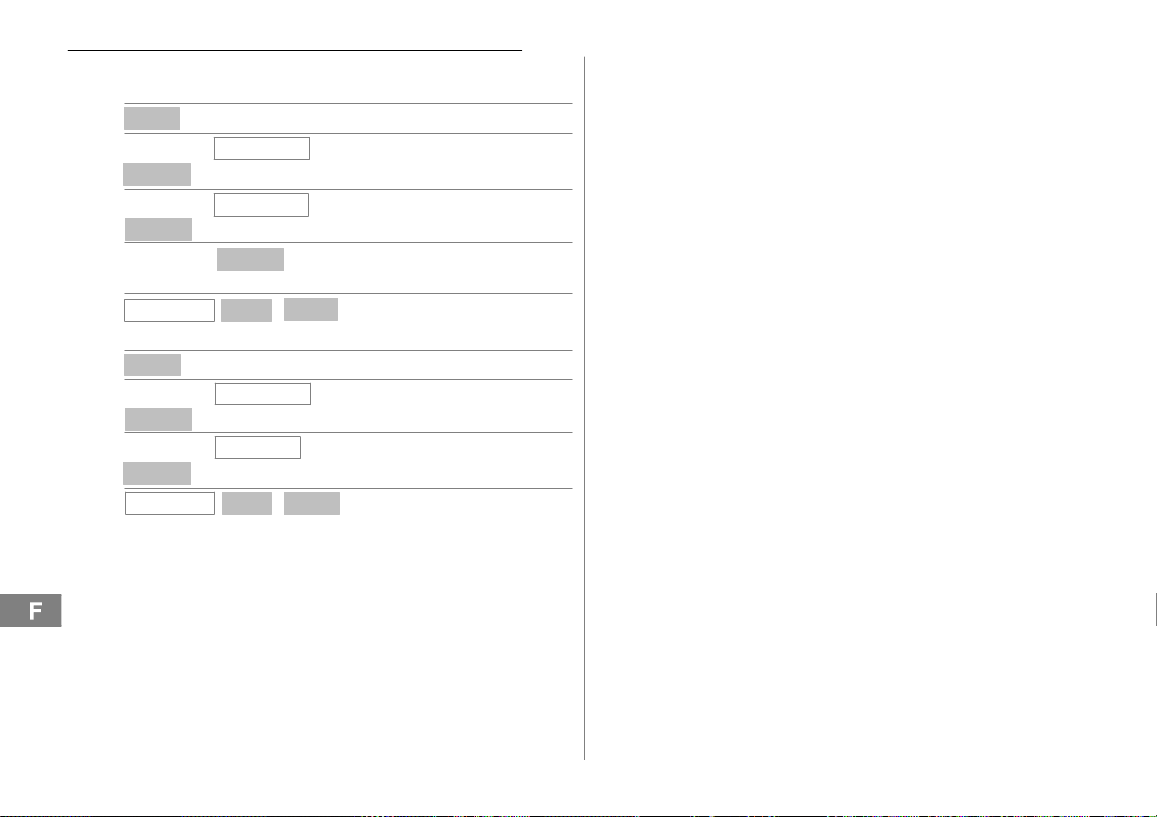
Effacer un enregistrement
Menu
« ou ´
Select
« ou ´ Supp. Fiche , Activer l’effacement
Select
« ou ´,
Confirmé ?
Répertoire
Select
OK
,
/
Effacer tous les enregistrements
Menu
« ou ´
Select
« ou ´
Select
Confirmé ?
Répertoire
Tout Supp.
OK
,
/
Ouvrir le menu principal
, Sélectionner le répertoire
Sélectionner un enregistrement du
répertoire et confirmer
Annul
Confirmer ou annuler l’effacement
Ouvrir le menu principal
, Sélectionner le répertoire
, Activer l’effacement
Annul
Confirmer ou annuler l’effacement
42
Page 43
9 Liste d’appels
40 numéros d’appel en tout sont enregistrés dans la liste d’appels.
L’affichage du numéro d’appel (CLIP1) est un service con-
fort de votre opérateur. Votre téléphone affiche les numéros
d’appel à l’écran si votre opérateur offre ce service. Veuillez
lui demander de plus amples informations.
Messages à l’écran :
Écran Description
Constant : l’enregistrement est nouveau dans la
liste d’appels.
Clignotant : la capacité de mémoire est épuisée.
Hors Zone L’information du numéro d’appel n’est pas dispo-
Privé Le correspondant a bloqué la transmission de
Faire afficher les numéros d’appel issus de la liste d’appels
«, « ou ´, Ouvrir la liste d’appels et
( Composer le numéro d’appel
Enregistrer un numéro de la liste d’appel dans le répertoire
Vous pouvez sauvegarder un numéro d’appel dans le répertoire directement à partir de la liste d’appels.
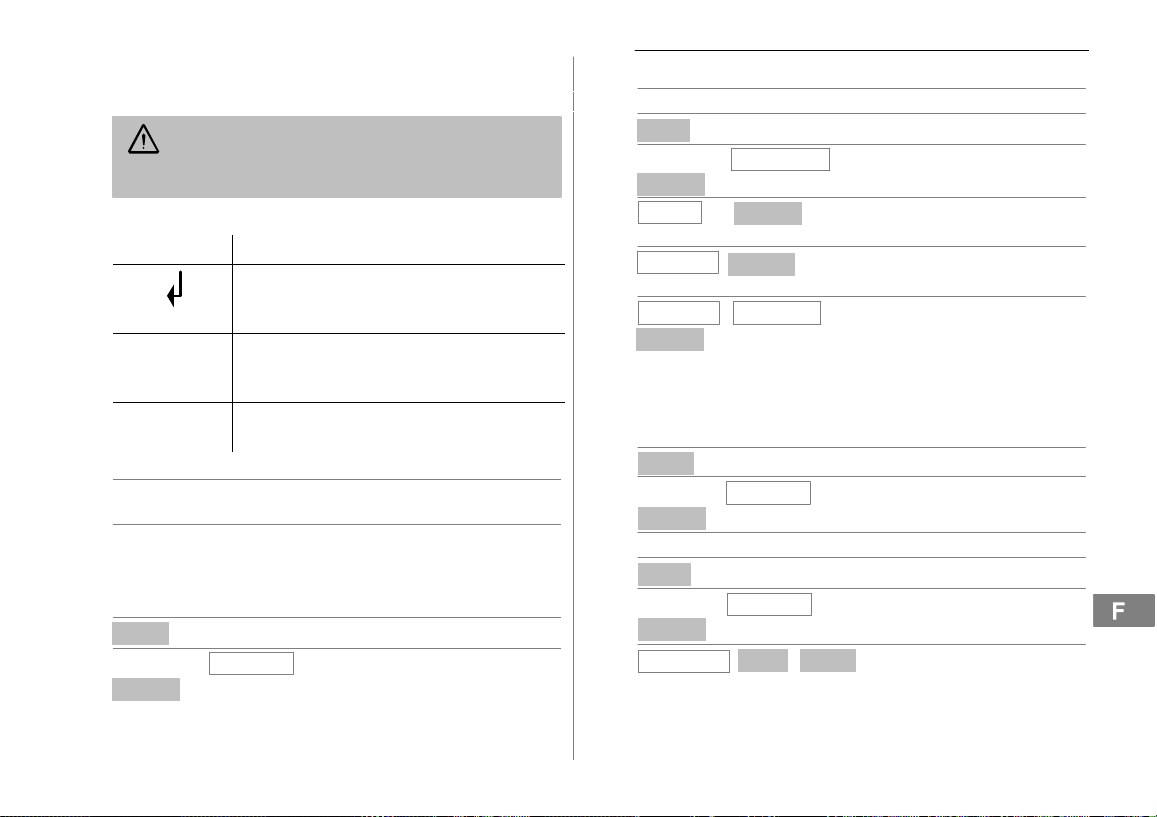
Menu
« ou ´,
Select
1
CLIP: Calling Line Identification Presentation = Affichage du
numéro d’appel d’un correspondant.
nible. Il pourrait s’agir d’une communication internationale.
son numéro d’appel.
sélectionner l’enregistrement
Ouvrir le menu principal
Liste App.
, Sélectionner la liste d’appels
40
« ou ´ Sélectionner l’enregistrement
Plus
« ou ´,
Select et confirmer
Nom ?
, ,
Numéro ?
Mélodie 1
Sauve
Le numéro d’appel a été déposé avec le nom dans le répertoire.
Pour modifier les enregistrements dans le répertoire Page 41.
,
−
Effacer des numéros individuels
Menu Ouvrir le menu principal
« ou ´
Select
« ou ´ Sélectionner l’enregistrement
Plus
« ou ´
Select
Confirmé ? ,
Liste d’appels
Ouvrir la fonction
Ajout Rep.
Suiv.
Suiv. Le numéro d’appel s’affiche et
Mélodie 10
Liste App.
Supprimer
OK
, Activer la sauvegarde
Saisir le nom (max. 12 positions)
et confirmer
confirmer
, Sélectionner la mélodie d’appel et
sauvegarder
, Sélectionner la liste d’appels
Ouvrir la fonction
, Activer l’effacement
et confirmer
Annul
/
Confirmer ou annuler l’effacement
43
Page 44
Liste d’appels
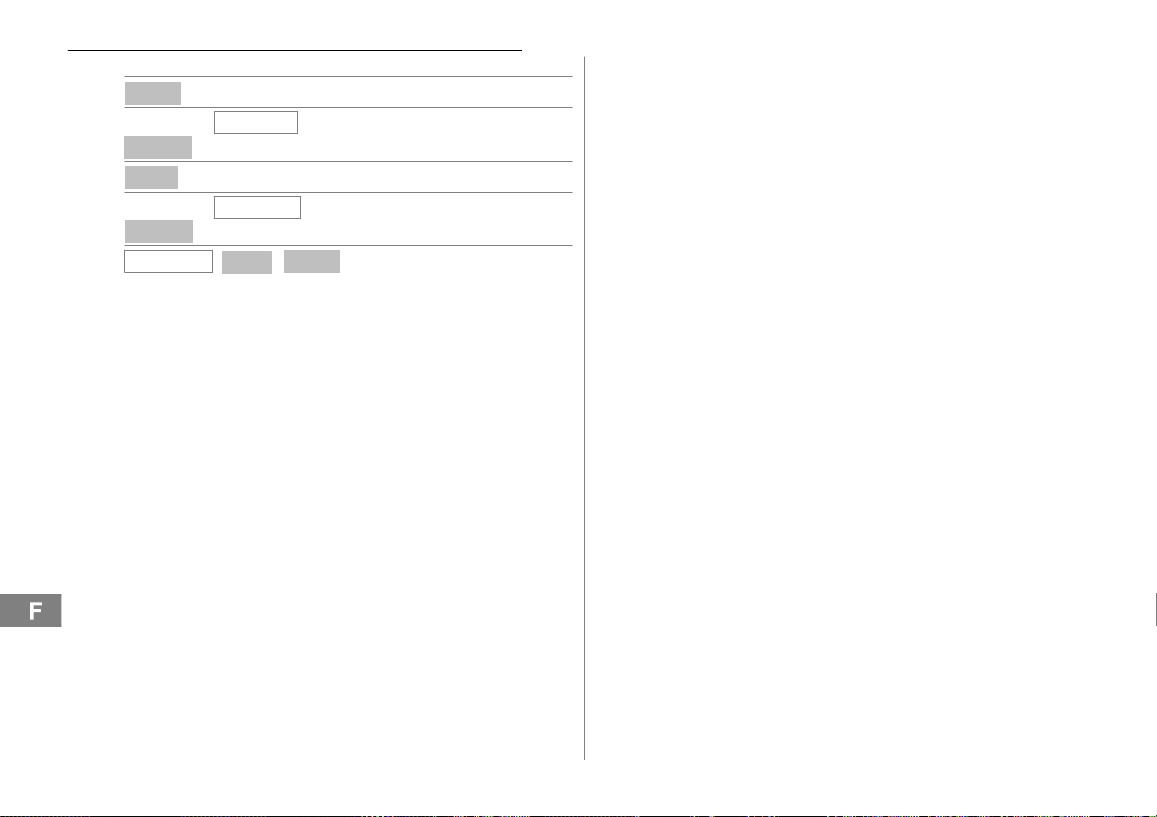
Effacer tous les numérosd’appel
Menu
« ou ´
Select
Plus
« ou ´
Select
Confirmé ?
Liste App.
Tout Supp.
OK
,
/
Ouvrir le menu principal
, Sélectionner la liste d’appels
Ouvrir la fonction
, Activer l’effacement
et confirmer
Annul
Confirmer ou annuler l’effacement
44
Page 45
10 Fonctions particulières
Système de numérotation
Le système de numérotation est programmé via le menu. La page 39
vous donnera la position dans le menu.
Numérotation temporaire par tonalité
Si vous ne pouvez utiliser votre téléphone qu’avec la numérotation
par impulsions, vous n’avez pas besoin de renoncer aux avantages
de la numérotation par tonalité (par ex. : consultation d’un répondeur
dans le réseau téléphonique). Vous pouvez passer provisoirement à
la numérotation par tonalité pendant que vous passez une communication.
1 sec. * Appuyer sur la touche pendant la
communication
Quand la communication est terminée, la numérotation par impulsions est automatiquement rétablie.
Alarme
Cette fonction vous permet de vous faire réveiller par votre combiné à
un moment précis. Vous pouvez activer la fonction d’endormissement
(snooze) pour être à nouveau réveillé au bout de 11 minutes ou terminer le signal de réveil. La page 39 vous donnera la position dans le
menu.
Pour terminer le signal de réveil, actionnez une touche quel-
conque. Pour désactiver la fonction d’endormissement
(Snooze) pendant le signal de réveil, appuyez sur la touche
).
Fonctions particulières
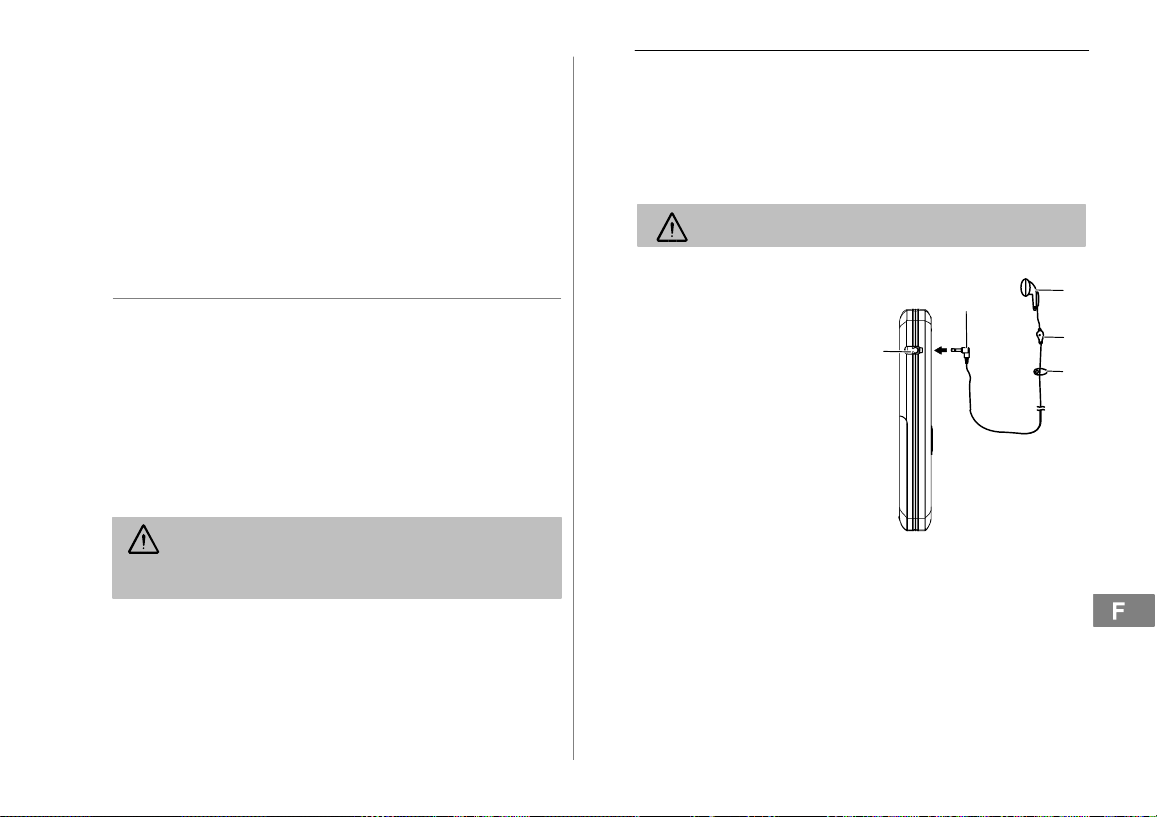
Raccordement au kit d’oreilles (en option)
Sur la partie gauche du combiné, vous trouverez une possibilité de
raccorder un kit d’oreilles. Utilisez un kit d’oreilles avec une fiche à
jack de 2,5 mm. Nous ne pouvons pas garantir un fonctionnement
parfait.
Si vous avez raccordé un kit d’oreilles, le microphone du
combiné est désactivé.
1 Écouteur
2 Microphone
3 Clip
4 Fiche à jack
5 Douille de raccordement
au kit d’oreilles
5
4
1
2
3
45
Page 46
Extension du système téléphonique
11 Extension du système téléphonique
Le standard international normé GAP1 règle la compatibilité entre les
combinés et les bases de fabricants différents. Il est ainsi possible
d’intégrer ensemble des appareils SWITEL et des appareils d’autres
fabricants dans un système téléphonique. Il est toutefois possible que
certaines fonctions ne soient pas disponibles.
Plusieurs combinés
Vous pouvez déclarer 5 combinés en tout sur votre base.
Déclaration de combinés
Avant de déclarer un combiné, vous devez mettre la base en mode de
déclaration. Maintenez appuyée la touche de paging de la base jusqu’à ce qu’un signal sonore se fasse entendre. Maintenant, la base se
trouve pendant 60 secondes en mode de déclaration. Continuez sur
le combiné.
5 sec. Démarrer le mode de déclaration
Déclarez maintenant le combiné page 40. Pour cela, utilisez le
code PIN actuellement paramétré page 39.
Après la déclaration, un numéro d’appel interne est attribué au com-
biné.
Pour déclarer des combinés d’autres fabricants, veuillez lire
leur mode d’emploi.
Annulation de combinés
Chaque combiné peut annuler d’autres combinés déclarés
sur cette base.
Les combinés sont annulés via le menu. La page 39 vous donnera la
position dans le menu.
Plusieurs bases
Vous pouvez élargir la portée de votre combiné si vous le déclarez simultanément à plusieurs bases. Il peut être déclaré simultanément
sur 4 bases différentes. Chaque base a besoin d’une prise téléphonique individuelle. Ces raccordements peuvent porter le même numéro
d’appel ou bien des numéros différents.
Les communications en cours ne peuvent pas être
transférées d’une base à l’autre.
46
1
GAP: Generic Access Profile = Standard pour l’action conjointe
de combinés et de bases de fabricants différents.
Page 47

12 En cas de problèmes
Hotline de service
Si vous avez des problèmes avec votre téléphone, contrôlez d’abord
les indications suivantes. S’il s’agit de problèmes techniques, vous
pouvez vous adresser à notre hotline de service en Suisse au numéro
de tel. 0900 00 1675 (frais Swisscom à la date d’impression de ce
manuel : CHF 2.60/min). En cas de droits de garantie, veuillez vous
adresser à votre revendeur. La durée de la garantie est de 2 ans.
Questions et réponses
Questions Réponses
Pas de connexion possible
avec la base
Pas de communication
téléphonique possible
− Contrôlez que vous vous êtes déclaré sur la base avec le
code PIN correct page 39.
− Le téléphone n’est pas raccordé
correctement ou est en dérangement. N’utilisez que le câble de
raccordement téléphonique fourni
avec l’appareil.
− Testez avec un autre téléphone si
votre raccordement téléphonique
fonctionne.
− Le bloc secteur n’est pas branché
ou il y a une panne totale de courant.
− Le pack de piles rechargeables
est vide ou défectueux.
− Vous vous êtes trop éloigné de la
base.
− Programmation erronée du système de numérotation
page 39.
En cas de problèmes
La liaison est hâchée,
s’interrompt
Le système ne réagit plus − Remettez toutes les fonctions en
Le pack de piles rechargeables se vide
très rapidement
L’affichage du numéro d’ap-
1
pel (CLIP
pas
1
CLIP: Calling Line Identification Presentation = Affichage du
numéro d’appel d’un correspondant.
) ne fonctionne
− Vous vous êtes trop éloigné de la
base.
− Mauvais lieu d’installation de la
base.
configuration usine via Volume
HP" page 39.
− Retirez le bloc secteur de la prise
de courant pendant un court
instant.
− Le pack de piles rechargeables
est vide ou défectueux.
− Placez le combiné correctement
sur la base. Nettoyez les surfaces
de contact du combiné et de la
base avec un chiffon doux et sec .
− Posez le combiné sur la base
pendant15 heures.
− L’affichage du numéro d’appel est
un service optionnel de votre opérateur. Veuillez lui demander de
plus amples informations.
− Le correspondant a bloqué la
transmission de son numéro d’appel.
47
Page 48
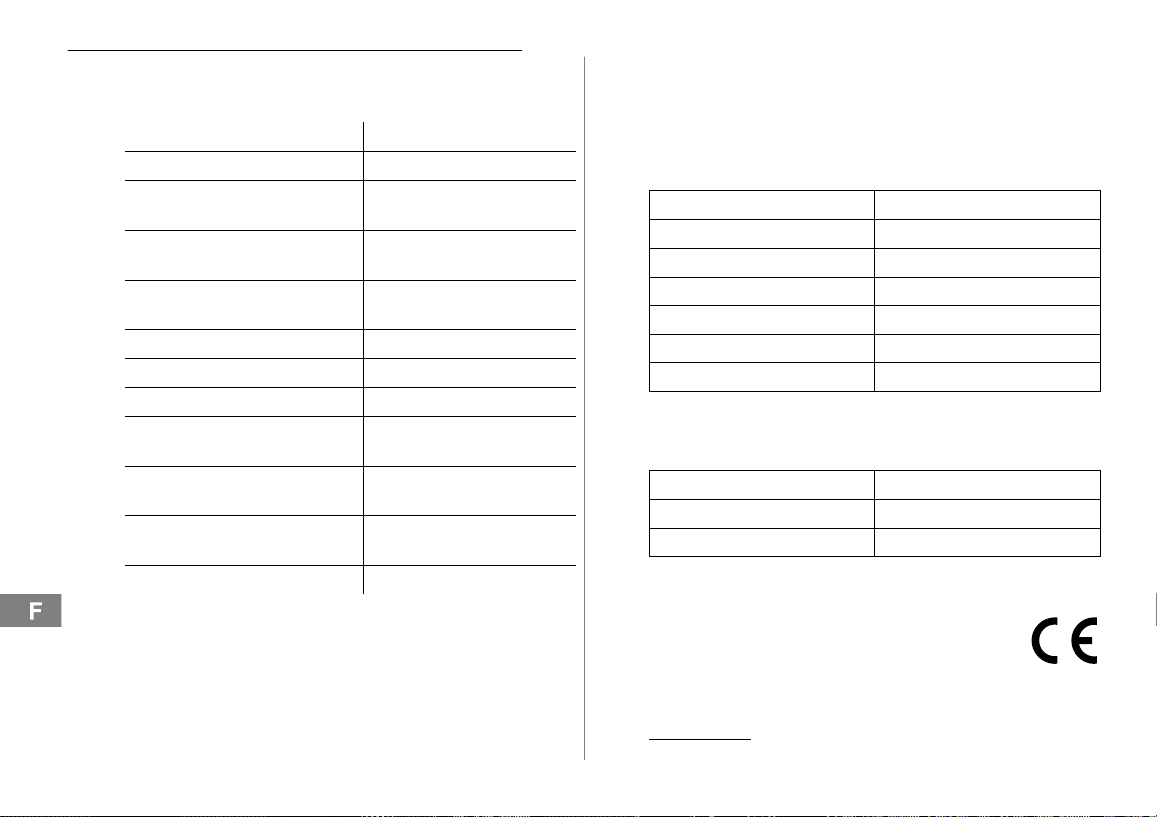
Caractéristiques techniques
13 Caractéristiques techniques
Données techniques
Caractéristique Valeur
Standard DECT1−GAP
Alimentation en courant (base) Entrée : 100−240 V, 50/60 Hz
Alimentation en courant (chargeur)
Portée Extérieur : env. 300 m
Autonomie en veille Jusqu’à 45 h
Durée max. de communication Jusqu’à 7 h
Pack de piles rechargeables NiMH 3,6 V 400mAh
Système de numérotation Numérotation par tonalité
Température ambiante autorisée Normal : 15 °C à 35 °C
Humidité atmosphérique relative
autorisée
Temps de flash 100 ms, 300 ms
1
DECT: Digital Enhanced Cordless Telecommunication =
Standard pour les téléphones sans fil.
2
GAP: Generic Access Profile = Standard pour l’action conjointe
de combinés et de bases de fabricants différents.
2
Sortie : 7,5 V 300 mA
Entrée : 100−240 V, 50/60 Hz
Sortie : 7,5 V 300 mA
Intérieur : env. 50 m
Numérotation par impulsions
Extrême : 0 °C à 40 °C
0% à 90%
Réglages usine
Combiné
Les paramétrages usine sont rétablis via le menu.
La page 39 vous donnera la position dans le menu.
Alarme Off
Régl. Audio 3
Appel Int / Appel Ext Mélodie 1 / Volume 3
Bip Clavier On
Niv. Alarme On
Langue ALLEMAND
Nom Combiné SWITEL
Base
Les paramétrages usine sont rétablis via le menu.
La page 39 vous donnera la position dans le menu.
Mode Num. Freq Vocales
Temps"flash" Flash−1
Code PIN 0000
Déclaration de conformité
Cet appareil répond aux exigences des directives de l’union
européenne (UE) : 1999/5/CE Directive sur les installations
de radio et de télécommunication et la reconnaissance
réciproque de leur conformité. La conformité avec la
directive mentionnée ci−dessus est confirmée par le signe
CE placé sur l’appareil. Pour obtenir la déclaration de conformité
complète, veuillez utiliser le téléchargement gratuit de notre page web
www.switel.com
.
48
Page 49

14 Remarques d’entretien / Garantie
Remarques d’entretien
Nettoyez les surfaces du boîtier avec un chiffon doux et non
pelucheux.
N’utilisez pas de produits d’entretien ou de solvants.
Garantie
Les appareils SWITEL sont fabriqués et contrôlés selon les procédés
les plus modernes. Des matériaux sélectionnés et des technologies de
pointe ont pour effet un fonctionnement irréprochable et une longue
durée de vie. La garantie ne rentre pas en jeu si l’exploitant du réseau
téléphonique ou une installation à postes supplémentaires éventuellement intercalée est responsable du dysfonctionnement de l’appareil.
La garantie ne s’applique pas aux piles, piles rechargeables ou packs
de piles rechargeables utilisés dans les produits. La durée de la garantie est de 24 mois à partir de la date d’achat.
Pendant la période de garantie, tous les défauts dus à des vices de
matériel ou de fabrication seront éliminés gratuitement. Le droit à la
garantie expire en cas d’intervention de l’acheteur ou de tiers. Les
dommages provenant d’un maniement ou d’une manipulation incorrects, d’une usure naturelle, d’une mauvaise mise en place ou d’une
mauvaise conservation, d’un raccordement ou d’une installation incorrects ainsi que d’un cas de force majeure ou autres influences extérieures sont exclus de la garantie. En cas de réclamations, nous nous
réservons le droit de réparer, de remplacer les pièces défectueuses ou
d’échanger l’appareil. Les composants remplacés ou les appareils
échangés deviennent notre propriété. Les demandes de dommages et
intérêts sont exclues tant qu’elles ne reposent pas sur l’intention ou
une négligence grossière du fabricant.
Si votre appareil devait malgré tout présenter une défectuosité pendant la période de garantie, veuillez vous adresser, muni de la quittance d’achat, exclusivement au magasin où vous avez acheté votre
appareil SWITEL. Vous ne pouvez faire valoir vos droits à la garantie
selon ces dispositions qu’auprès de votre revendeur exclusivement.
Remarques d’entretien / Garantie
Deux ans après l’achat et la remise de nos produits, il n’est plus possible de faire valoir les droits à la garantie.
49
Page 50

Index
15 Index
A
Affichage du numéro d’appel, 38, 43
Alarme, 45
Allumer, 37
Annulation, 46
Appeler, 35
B
Base, 29, 46
C
Chargeur , 29
Chercher le combiné, 37
CLIP, 38
Combiné, 46
Communications internes, 35
Composer des numéros, 35
Conférences téléphoniques, 36
Consignes de sécurité, 28
Contenu de l’emballage, 29
D
Date, 30
Déclaration, 46
Déclaration de conformité, 48
Désactivation du micro, 36
Données techniques, 48
Durée de la communication, 36
E
Écran, 32
Éléments de manipulation, 31
Emploi, 32
Enregistrement, 40
Enregistrements du répertoire, 34, 41
Éteindre, 37
Extension, 46
50
F
Fonction R, 38
Fonctions, 45
G
GAP−Standard, 46
Garantie, 49
H
Heure, 30
Hotline de service, 47
I
Icônes, 32
Icônes à l’écran, 32
Installations à postes
supplémentaires, 38
Intercommunication, 36
L
Liste d’appels, 39, 43
M
Menu principal, 39
Messages à l’écran, 43
Mettre en place le pack de piles
rechargeables, 30
Mise en service, 29
Mise sur silencieux, 36
Mode ÉCO, 30
Mode économie d’énergie, 33
Mode mains−libres, 36
Mode veille, 33
N
Niveau de chargement des piles, 30
Notations, 32
Numérotation par impulsions, 45
Numérotation par tonalité, 45
Numérotation temporaire par tonalité, 45
P
Paging, 37
Paramétrer la base, 39
Paramétrer le combiné, 39
Pause de numérotation, 38
Prise d’appel, 30, 35
Problèmes, 47
Q
Questions et réponses, 47
R
Raccordement au kit d’oreilles, 45
Raccrocher, 35
Rappel, 35
Rechargement, 30
Réduction du rayonnement, 30
Réglages usine, 48
Remarques d’entretien, 49
Répertoire, 35, 41
Répondeur dans le réseau
téléphonique, 38
S
Saisie de nom, 41
Saisie de texte, 41
Sauvegarder, 34, 41, 43
Services confort, 38
Structure du menu, 39
Suppression d’erreurs, 47
Système de numérotation, 45
T
Téléphoner, 35
Terminer la communication, 35
Touche de répétition automatique des
derniers numéros, 35
Touches de navigation, 33
Transfert, 35
Transfert de communication, 35
V
Va−et−vient, 36
Verrouillage du clavier, 36
VMWI, 38
Volume sonore de l’écouteur, 36
Page 51

1 Indicazioni di sicurezza 52. . . . . . . . . . . .
2 Mettere in funzione il telefono 53. . . . . . .
3 Elementi di comando 55. . . . . . . . . . . . . .
4 Informazioni introduttive 56. . . . . . . . . . . .
5 Compiere telefonate 59. . . . . . . . . . . . . .
6 Impianti telefonici interni /
Servizi addizionali 62. . . . . . . . . . . . . .
7 Struttura dei menu 63. . . . . . . . . . . . . . . .
8 Rubrica telefonica 65. . . . . . . . . . . . . . . .
9 Elenco chiamate 67. . . . . . . . . . . . . . . . .
10 Funzioni speciali 69. . . . . . . . . . . . . . . . .
11 Ampliamento del sistema telefonico 70. . .
12 In presenza di problemi 71. . . . . . . . . . . .
13 Specifiche tecniche 72. . . . . . . . . . . . . . .
14 Consigli per la cura / Garanzia 73. . . . . . .
15 Indice alfabetico 74. . . . . . . . . . . . . . . . .
41
Contenuto
51
Page 52
Indicazioni di sicurezza
1 Indicazioni di sicurezza
Leggere attentamente le presenti istruzioni per l’uso.
Impiego conforme agli usi previsti
Il presente telefono consente di svolgere telefonate all’interno di una
rete telefonica. Qualsiasi altro impiego è considerato come non conforme agli usi previsti. Non sono consentite modifiche o trasformazioni
non autorizzate. Non aprire per nessuna ragione l’apparecchio autonomamente, né compiere riparazioni di propria iniziativa.
Luogo di installazione
Evitare un’esposizione a fumo, polvere, vibrazioni, sostanze chimiche,
umidità, calore e raggi solari diretti.
Non utilizzare l’unità portatile in aree esposte al rischio di deflagrazione.
Alimentatore di rete
Attenzione: Utilizzare solo l’alimentatore a spina fornito in
dotazione visto che altri alimentatori di rete potrebbero addirittura danneggiare il telefono. Non ostacolare il libero accesso all’alimentatore a spina con mobili o altri oggetti simili.
Accumulatore ricaricabile
Attenzione: Non gettare gli accumulatori ricaricabili nel
fuoco. Utilizzare solo accumulatori dello stesso tipo. Osservare la corretta polarità! Pericolo di esplosione durante il caricamento degli accumulatori in caso di errata polarità.
Caduta di tensione
In caso di caduta di tensione non è possibile compiere chiamate con
questo telefono. Si consiglia di ricorrere in caso di emergenza ad un
telefono con filo in grado di funzionare anche senza alimentazione
elettrica esterna.
Apparecchiature mediche
Attenzione: Non utilizzare il telefono in prossimità di appa-
recchiature mediche. Non è infatti possibile escludere il rischio di possibili interferenze.
Telefoni DECT1 possono causare un fastidioso ronzio in apparecchi
acustici.
Compatibilità con apparecchi acustici
Il telefono è compatibile con il maggior numero di apparecchi acustici
presenti sul mercato. Ciò nonostante non è possibile garantire un perfetto funzionamento con qualsiasi tipo di apparecchio acustico.
Smaltimento
Procedere allo smaltimento dell’apparecchio esaurito consegnandolo presso uno dei punti di raccolta istituiti dalla propria società di smaltimento rifiuti comunale (ad es. centro di
riciclo materiali). Il simbolo riportato qui a lato indica che non
è assolutamente consentito smaltire l’apparecchio assieme
ai normali rifiuti domestici! Secondo quanto previsto dalla
legge sugli apparecchi elettrici ed elettronici, i proprietari di
apparecchi esauriti sono per legge tenuti alla consegna di
tutti gli apparecchi elettrici ed elettronici presso un centro
di rilievo rifiuti in raccolta differenziata.
Consegnare gli accumulatori per lo
smaltimento presso rivenditori al dettaglio di batterie o centri di raccolta che
mettono a disposizione appositi contenitori.
Smaltire confezioni ed imballaggi in base a quanto indicato dalle
norme in vigore a livello locale.
52
1
DECT: Digital Enhanced Cordless Telecommunication = Standard
per telefoni senza cavo.
Page 53
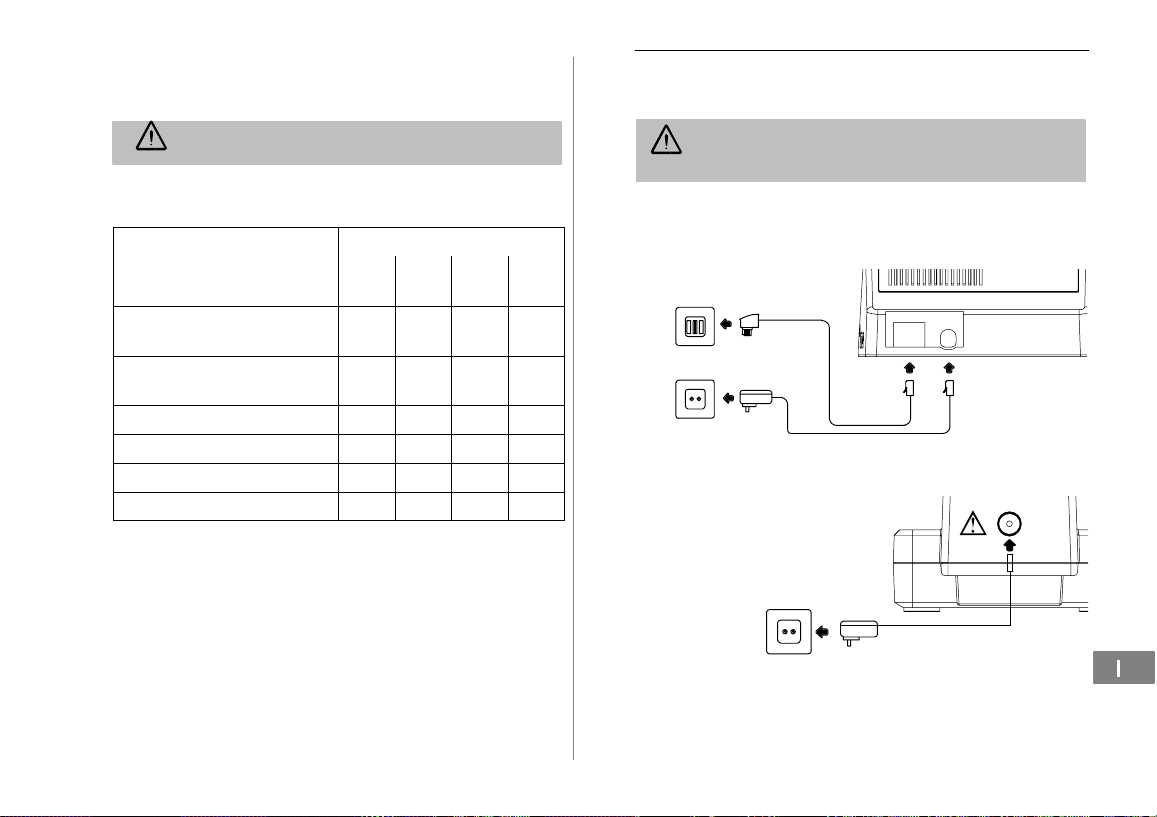
2 Mettere in funzione il telefono
Indicazioni di sicurezza
Attenzione: Prima della messa in funzione, leggere attenta-
mente le indicazioni di sicurezza riportate al capitolo 1.
Verificare il contenuto della confezione
La confezione contiene:
Contenuto
Stazione base con alimentatore
di rete
Stazione di carica con alimentatore di rete
Unità portatile 1 2 3 4
Cavo di collegamento telefonico 1 1 1 1
Accumulatore ricaricabile 1 2 3 4
Istruzioni per l’uso 1 1 1 1
1
Per ulteriori informazioni riguardo la disponibilità di questo set te-
lefonico si prega di visitare il sito www.switel.com.
DF
831DF832
42
Modello DF 83x
DF
1
1
833
834
1 1 1 1
− 1 2 3
Collegare la stazione base
Attenzione: Montare la stazione base con una distanza mi-
Procedere al collegamento della stazione base seguendo quanto raffigurato nella figura. Utilizzare per motivi di sicurezza solo l’alimentatore di rete oltre al cavo di collegamento telefonico fornito in dota-
DF
1
zione.
Presa telefonica
Presa elettrica
Collegare la stazione di carica
Procedere al collegamento della
stazione di carica seguendo la
figura. Per motivi
di sicurezza si
prega di utilizzare soltanto l’alimentatore di
rete fornito in dotazione.
2
Vale solo per set telefonici con minimo due unità portatili
Verificare il contenuto della confezione" a pagina 53.
Mettere in funzione il telefono
nima di 1 m da altri apparecchi elettronici in modo da evitare
interferenze reciproche.
2
Presa elettrica
53
Page 54
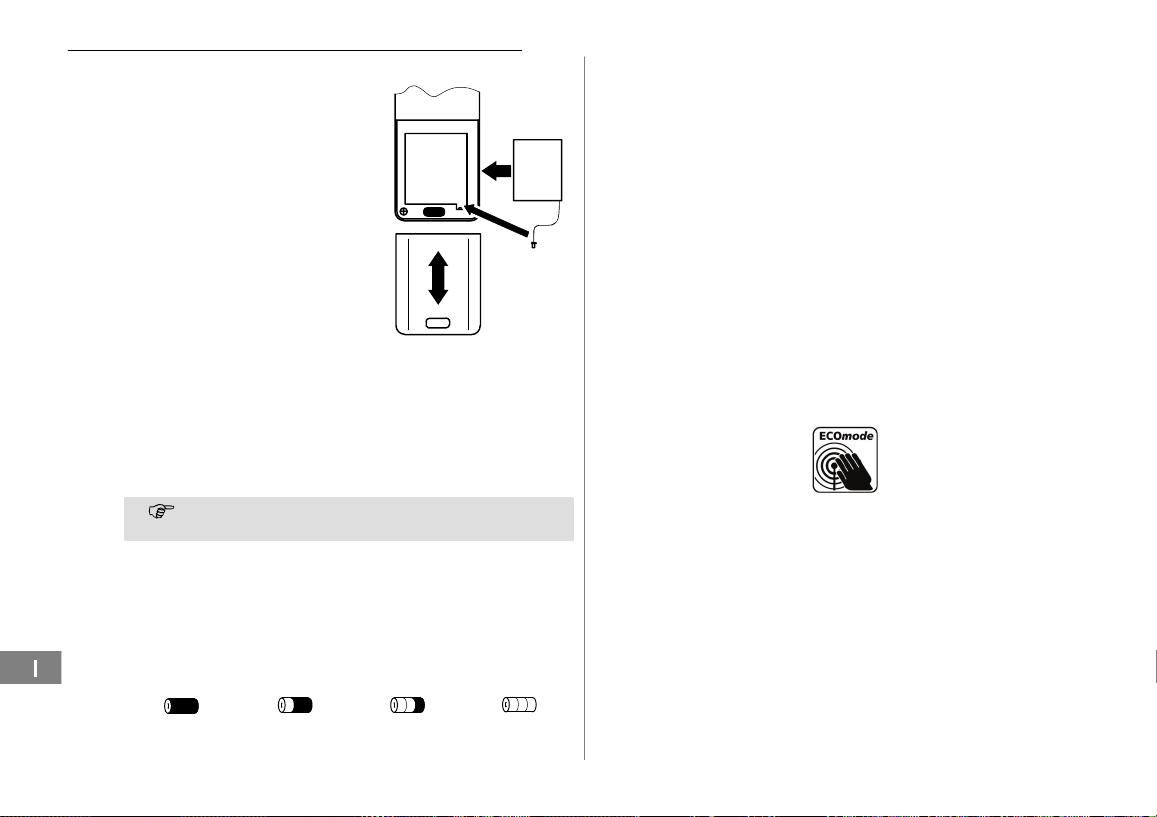
Mettere in funzione il telefono
Inserire l’accumulatore ricaricabile
Premere il pulsante di sicurezza
presente sul coperchio del vano
accumulatori e spingere contemporaneamente il coperchio del
vano accumulatori in basso. Rimuovere il coperchio del vano
accumulatori. Innestare il connettore dell’accumulatore ricaricabile nella presa presente
all’interno del vano accumulatori. Inserire l’accumulatore ricaricabile nell’apposito vano accumulatori. Utilizzare
esclusivamente l’accumulatore
ricaricabile fornito. Fare attenzione a non incastrare il cavo.
Riposizionare il coperchio sul
vano accumulatori e spingere
quindi il pulsante di sicurezza
verso sopra.
Caricare l’accumulatore ricaricabile
Riporre l’unità portatile in sede di prima messa in funzione
per minimo 15 ore nella stazione base / stazione di carica.
Non appena il portatile è posizionato correttamente nella stazione
base / stazione di carica, si avverte un segnale di avviso e la spia di
controllo dello stato di carica si accende. L’unità portatile si surriscalda durante il processo di carica. Questo è un fenomeno normale
e non pericoloso. Evitare di caricare l’unità portatile con dispositivi di
carica differenti o estranei. Lo stato di carica attuale è visualizzato
sul display:
43
Impostare data e ora dell’unità portatile
Una voce di menu consente di impostare data e ora. A pagina 64 è indicata la posizione da scorrere nel menu.
Accettazione di chiamata automatica
L’attivazione di questa funzione consente di ricevere automaticamente una chiamata estraendo semplicemente l’unità portatile dalla
stazione base. L’accettazione di chiamata automatica è attivata o disattivata nel menu. A pagina 64 è indicata la posizione da scorrere
nel menu.
Impianti telefonici interni
A pagina 62 sono riportate ulteriori informazioni nel caso in cui si volesse collegare il telefono ad un impianto telefonico interno.
Riduzione delle radiazioni (modalità ECO)
La radiazione in modalità di stand−by è stata considerevolmente ridotta se paragonata a quella emessa da telefoni cordless a standard
DECT (con unità portatile nella base).
54
Carico Carico per 2/3 Debole Scarico
Page 55
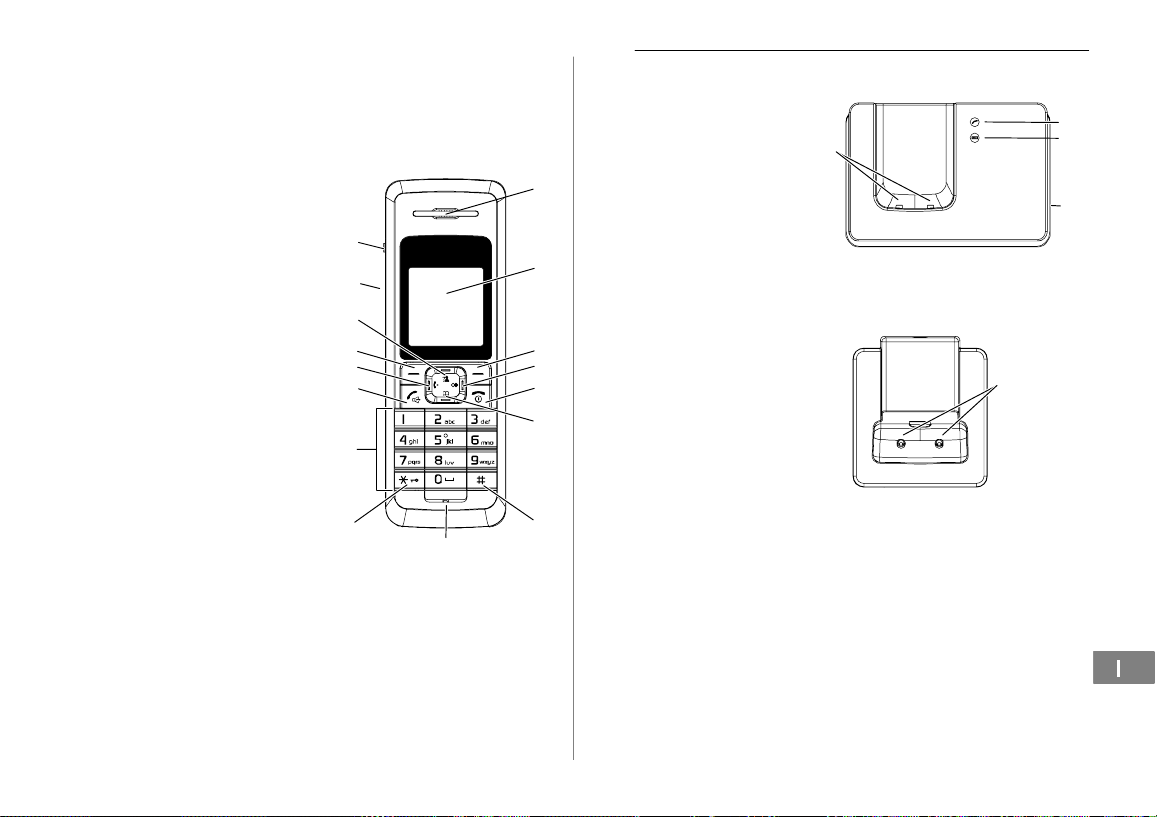
3 Elementi di comando
I tasti del telefono riportati nel presente manuale d’istruzioni per l’uso
sono raffigurati sotto forma di simboli uniformi all’interno di un riquadro. Sono possibili lievi scostamenti dei simboli dei tasti sul telefono
rispetto ai simboli qui raffigurati.
Unità portatile
1 Ricevitore
2 Display
3 Tasto softkey di destra
4 Ripetizione di chiamata
£ / Immettere pausa
di selezione
5 Tasto di riaggancio )
6 Navigare verso sotto /
Rubrica telefonica ´
7 Tasto #
8 Microfono
9 Tasto */ Blocco tastiera /
Selezione a toni temporanea
10 Tasti numerici
11 Funzione vivavoce /
Tasto di chiamata (
12 Compiere chiamate
interne ¹
13 Tasto softkey di sinistra
14 Navigazione verso sopra /
Elenco chiamate «
15 Altoparlante
(sul retro)
16 Presa per auricolare
16
15
14
13
12
11
10
9
Elementi di comando
Stazione base
1 LED:
Visualizzazione
di chiamata
1
2
3
4
5
6
7
8
2 LED:
Controllo dello stato
di carica
3 Cercare unità portatile
(paging) Z
4 Contatti di carica
Stazione di carica
1 Contatti di carica
1
Vale solo per set telefonici con minimo due unità portatili
Verificare il contenuto della confezione" a pagina 53.
1
4
1
2
3
1
55
Page 56
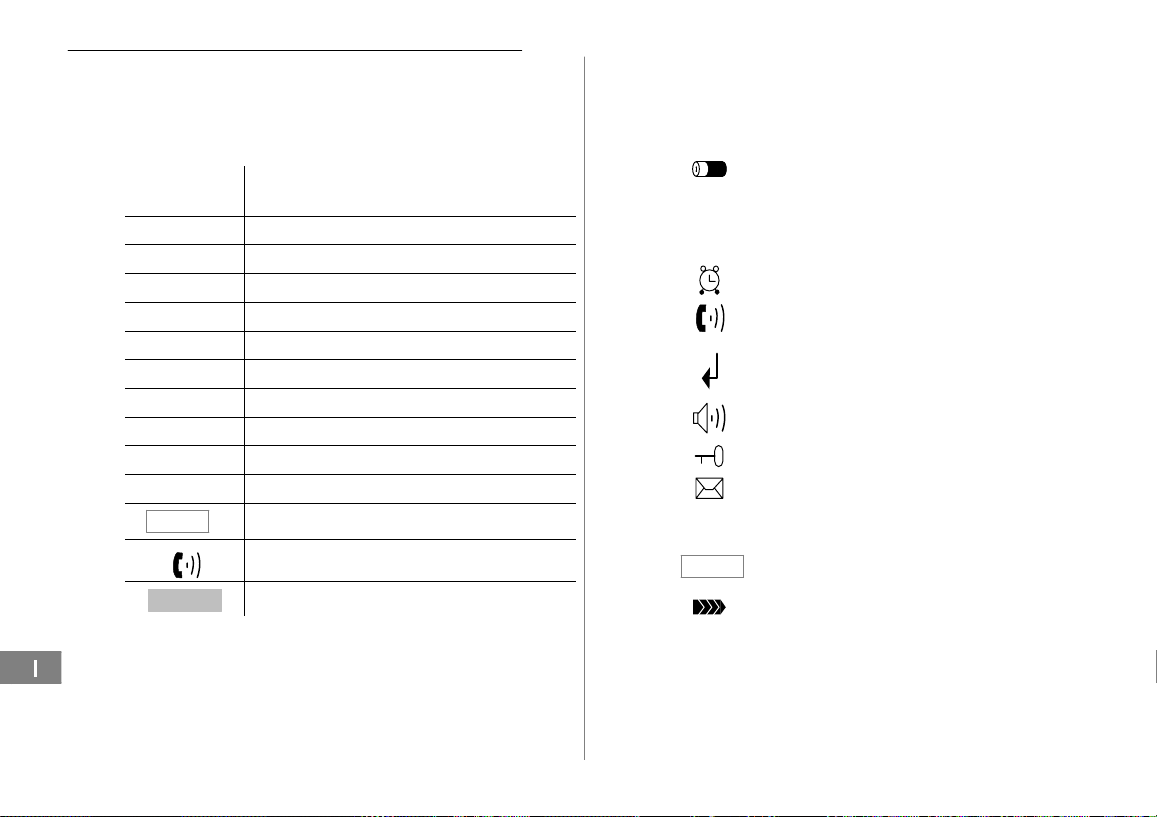
Informazioni introduttive
4 Informazioni introduttive
In questo capitolo sono riportate le principali informazioni riguardo
l’uso delle presenti istruzioni e del telefono.
Modi di rappresentazione nelle istruzioni per l’uso
Rappresentazione
! Rappresentazione dei tasti
* Premere brevemente il tasto raffigurato
3 sec. * Premere il tasto raffigurato per 3 secondi
tenere * Tenere premuto il tasto raffigurato
rilasciare * Rilasciare il tasto raffigurato
Inserire numeri o lettere
Unità portatile squilla
Stazione base squilla
Estrarre l’unità portatile dalla stazione base
Riporre l’unità portatile nella stazione base
Menu
Cancella
Descrizione
Rappresentazione di testi sul display
Rappresentazione di simboli sul display
Premere il tasto softkey pagina 57
Simboli e testi sul display dell’unità portatile
Simbolo Descrizione
Indicazione dello stato di carica delle batterie.
GG−MM/
MM−GG
hh:mm Visualizzazione dell’ora pagina 64.
Muto
Visualizzazione della data pagina 64.
Attivata la funzione allarme.
Chiamata telefonica in corso. / Chiamata telefonica in arrivo pagina 59.
Presenza di nuove chiamate nell’elenco chiamate pagina 67.
La funzione vivavoce è attivata pagina 60.
Il blocco tastiera è attivato pagina 60.
Segreteria telefonica integrata nella rete telefonica. VMWI
gestore di rete telefonica pagina 62.
Il microfono è in modalità silenziamento
pagina 60.
Costante: Il collegamento con la stazione base è
buono.
Lampeggiante: Il collegamento con la stazione
base si interrompe. Avvicinarsi alla stazione
base.
1
− Servizio addizionale del proprio
56
1
VMWI: Visual Message Waiting Indication = Segnalazione ottica
di nuovi messaggi.
Page 57

Modalità di stand−by
In tutte le descrizioni del presente manuale di istruzioni si considera
l’unità portatile in modalità di stand−by. Per passare alla modalità di
stand−by, premere il tasto ).
44
Modalità di risparmio energetico
Dopo un determinato periodo di tempo in modalità di stand−by, l’unità
portatile passa alla modalità di risparmio energetico. A questo punto,
tasti e display non risultano più illuminati. Premere un tasto qualsiasi
per attivare di nuovo la modalità di stand−by.
Tasti di navigazione
I tasti softkey (1) e (7) sono programmati con funzioni differenti in
base al menu in cui ci si trova. Nelle presenti istruzioni per l’uso questi
tasti sono denominati sempre in base ai testi di display visualizzati direttamente al di sopra.
Tasto In modalità di stand−by
1
2
3
4
45
8
7
6
5
− Aprire l’elenco di ripetizione di chiamata
− Aprire l’elenco di ripetizione di chiamata
− Attivare/Disattivare l’unità portatile
− Aprire la rubrica telefonica
Nel menu
− Passare alla modalità di
stand−by
− Navigazione verso sotto
Informazioni introduttive
5 − Tasto di chiamata
− Compiere chiamate in-
6
terne
7 − Aprire il menu principale
8 − Aprire l’elenco chiamate − Navigazione verso sopra
Navigazione nel menu
I differenti menu consentono di raggiungere tutte le funzioni del telefono. Il percorso da seguire per giungere alla funzione desiderata è
indicata dalla struttura di menu pagina 63.
Menu
« oppure ´ Selezionare il sottomenu
1
2
3
4
OK
« oppure ´ Selezionare la funzione desiderata
OK
« oppure ´ Selezionare l’impostazione
La tastiera consente di inserire
Salva
Indiet Tornare indietro di un livello
) Interrompere le procedure di
Ogni singolo processo si interrompe automaticamente se
46
Aprire il menu principale
desiderato
Aprire il sottomenu
Aprire la funzione
desiderata
numeri o lettere
Confermare le immissioni
programmazione e
memorizzazione e tornare indietro
alla modalità di stand−by
entro 35 secondi non si procede con una immissione.
57
Page 58
Informazioni introduttive
Creare voci della rubrica telefonica − Esempio
La navigazione nei menu e la procedura da seguire per compiere impostazioni è indicata a titolo esemplificativo in Creare voci nella ru-
brica telefonica. Si consiglia di seguire quanto riportato nell’esempio
per tutte le impostazioni che si desiderano compiere.
Menu Aprire il menu principale
Succes
, ,
Melodia 10
Rubrica
Aggiungi
Succes
, Selezionare la rubrica telefonica
, Selezionare il sottomenu e
Immettere il nome (max.
12caratteri) e confermare
Inserire il numero di chiamata
(max. 20 cifre) e confermare
, Selezionare la melodia di suoneria
e salvare
« oppure ´
OK
« oppure ´
OK confermare
Nome? , ,
Numero?
Melodia 1 −
Salva
47
58
Page 59
5 Compiere telefonate
Accettare una chiamata
, ( Ricevere una chiamata
Concludere una chiamata
) Concludere una chiamata
Compiere telefonate
Immettere un numero di chiamata
Canc
( Selezionare un numero di
È altresì possibile premere il tasto di conversazione e otte-
nere quindi il segnale di linea libera. Le cifre immesse per la
composizione del numero di chiamata desiderato sono immediatamente selezionate. Nel corso di una simile chiamata
non è possibile eseguire la correzione di singole cifre che
compongono il numero di chiamata.
Ripetizione di chiamata
Il telefono memorizza gli ultimi 10 numeri di chiamata selezionati in un
elenco disponibile per la funzione di ripetizione di chiamata.
£ Aprire l’elenco di ripetizione di
« oppure ´, ( Selezionare la voce e instaurare
Richiamare una telefonata ricevuta
Il telefono memorizza 40 chiamate nell’elenco chiamate.
« Aprire l’elenco chiamate
« oppure ´, ( Selezionare la voce e instaurare
48
(max. 32 cifre)
In caso di immissione errata
cancellare l’ultima cifra
chiamata
chiamata
un collegamento
un collegamento
Compiere telefonate
Selezionare numeri di chiamata dalla rubrica telefonica
Per fare questo è necessario aver precedentemente memorizzato dei
numeri nella rubrica telefonica pagina 58 e 65.
´ Aprire la rubrica telefonica
« oppure ´, ( Selezionare la voce e instaurare
Compiere chiamate interne
1
49
Condurre chiamate interne
Per condurre telefonate interne gratuite bisogna aver registrato due o
più unità portatili (UP1, UP2, ...) presso la stazione base.
UP1: ¹, ad es. 2 Selezionare il numero di chiamata
UP2: ( Accettare una telefonata interna
UP1 / UP2: ) Concludere la telefonata interna
Trasferire internamente chiamate esterne
UP1: ¹, ad es. 2 Selezionare il numero di chiamata
UP2: ( Accettare una telefonata interna
UP1: ) Trasferire la telefonata
Nel caso in cui l’unità portatile chiamata non rispondesse, la
telefonata esterna può essere di nuovo ripresa premendo il
tasto ¹.
1
Per compiere telefonate interne sono necessarie minimo due
unità portatili Contenuto della confezione" a pagina 53.
un collegamento
interno dell’unità portatile
desiderata
presso l’altra unità portatile
interno con telefonata esterna in
corso di svolgimento
presso l’altra unità portatile
59
Page 60
Compiere telefonate
Riscontro / Chiamata in attesa
Durante lo svolgimento di una chiamata esterna è possibile chiamare
un’altra unità portatile allo scopo di consultarsi o eseguire un riscontro. Mentre è in corso la conversazione con l’interlocutore interno, la
chiamata esterna è trattenuta. La procedura può essere ripetuta a piacere.
UP1: ¹, ad es. 2 Selezionare il numero di chiamata
interno con telefonata esterna in
corso di svolgimento
UP2: ( Accettare una telefonata interna
presso l’altra unità portatile
UP1: ¹ Passare ad un altro interlocutore
telefonico
Condurre chiamate a conferenza
Questa funzione consente di condurre una conferenza con una chiamata esterna ed un altro interlocutore interno.
UP1: ¹, ad es. 2 Selezionare il numero di chiamata
interno con telefonata esterna in
corso di svolgimento
UP2: ( Accettare una telefonata interna
presso l’altra unità portatile
UP1: * Avviare una chiamata in
conferenza
UP1 / UP2: ) Concludere la chiamata in
conferenza
Impostare il volume del ricevitore
Il volume è regolabile durante lo svolgimento di una chiamata in 5 livelli.
« oppure ´ Selezionare il volume desiderato
Funzione vivavoce
Utilizzare questa funzione per ascoltare il partner di chiamata attraverso l’altoparlante.
( Attivare la funzione vivavoce
( Disattivare la funzione vivavoce
50
Visualizzazione della durata di conversazione
Durante lo svolgimento di una chiamata, la durata della telefonata è
visualizzata in ore, minuti e secondi.
Silenziamento del microfono nell’unità portatile
È possibile attivare e disattivare il microfono dell’unità portatile con
chiamata telefonica in corso.
Muto Disattivare il microfono
(silenziamento)
Muto
Blocco tastiera
Il blocco tastiera aiuta ad impedire l’attivazione inavvertita di determinate funzioni.
3 sec. * Attivare il blocco tastiera
3 sec. * Disattivare il blocco tastiera
L’attivazione del blocco tastiera consente di ricevere telefo-
52
nate in arrivo come di consueto. Premendo un altro tasto si
avverte un segnale acustico lungo. La retroilluminazione
non si accende.
Attivare il microfono
Ricerca dell’unità portatile (funzione di paging)
Avendo perso d’occhio la propria unità portatile è possibile ritrovarla
facilmente grazie all’emissione di un tono di ricerca.
{«} Avviare il tono di ricerca
o © Interrompere il tono di ricerca
51
60
Page 61
Attivare e disattivare l’unità portatile
Allo scopo di non sollecitare troppo l’accumulatore ricaricabile è possibile spegnere l’unità portatile.
3 sec. ) Disattivare l’unità portatile
3 sec. ) Attivare l’unità portatile
La retroilluminazione non si accende in caso di attivazione.
Compiere telefonate
61
Page 62
Impianti telefonici interni / Servizi addizionali
6 Impianti telefonici interni / Servizi addizionali
Funzione R in impianti telefonici interni
Avendo collegato il telefono ad un impianto telefonico interno, il tasto
softkey R consente di accedere a tutte le altre funzioni disponibili
come ad es. trasferimento di chiamata e funzione di richiamata automatica. Si prega di consultare le istruzioni per l’uso del proprio impianto telefonico interno per individuare il tempo flash da impostare al
fine di poter usufruire di queste funzioni. Il rivenditore autorizzato è in
grado di indicare se il telefono acquistato funzionerà senza alcun problema nel proprio impianto telefonico interno. Il tempo flash è impostato nel menu. A pagina 63 è indicata la posizione da scorrere nel
menu.
Il tasto softkey R è disponibile con unità portatile in modalità
di conversazione.
Funzione R e servizi addizionali
Il telefono supporta servizi addizionali messi a disposizione dal proprio gestore di rete telefonica come ad es. le funzioni di chiamata in
attesa, avviso di chiamata e chiamata a conferenza. Il tasto softkey R
consente di accedere ai servizi addizionali. Si prega di consultare il
proprio gestore di rete telefonica per ottenere informazioni sul tempo
flash necessario all’utilizzo dei servizi addizionali. Rivolgersi al proprio gestore di rete telefonica per ottenere l’abilitazione ai servizi addizionali. Il tempo flash è impostato nel menu. A pagina 63 è indicata la
posizione da scorrere nel menu.
Visualizzazione del numero di chiamata (CLIP1)
La visualizzazione del numero di chiamata è un servizio ad-
dizionale offerto dal proprio gestore di rete telefonica. Si
consiglia di rivolgersi al proprio gestore di rete telefonica per
ricevere ulteriori informazioni a riguardo.
1
CLIP: Calling Line Identification Presentation = Visualizzazione
del numero telefonico del chiamante.
53
54
A condizione che il collegamento telefonico disponga di questa funzione, l’apparecchio visualizza il numero telefonico del chiamante non
appena il telefono squilla. Nel caso in cui il chiamante abbia soppresso la trasmissione del proprio numero di chiamata, appare un’apposita indicazione. Se il numero di chiamata non è visualizzabile,
questo non sarà memorizzato nell’elenco chiamate.
Pausa di selezione
In presenza di impianti telefonici interni è necessario preselezionare
un numero di accesso alla rete esterna per ottenere un segnale di linea libera prima di poter compiere una telefonata. Alcuni impianti telefonici interni di vecchia data richiedono un po’ di tempo prima di
trasmettere il segnale di libero. Per questi impianti telefonici interni è
possibile inserire una pausa di selezione dopo il numero di accesso
alla linea esterna in modo da poter proseguire con la selezione del
numero senza dover attendere il segnale di libero.
£ Inserire una pausa di selezione
Dopo il numero di accesso alla rete esterna si procede, trascorso un
determinato intervallo di tempo, con la selezione del numero di chiamata vero e proprio.
La pausa di selezione è memorizzabile anche in sede di im-
missione di numeri di chiamata nella rubrica telefonica.
Segreteria telefonica integrata nella rete telefonica
Sono numerosi i gestori di rete telefonica che offrono come servizio
addizionale una segreteria telefonica integrata nella stessa rete. Se il
proprio gestore di rete telefonica mette a disposizione una segreteria
telefonica all’interno della propria rete telefonica, un simbolo informa
sulla presenza di nuovi messaggi (VMWI2). Questa funzione è disponibile solo nel caso di abilitazione al servizio da parte del gestore di
rete telefonica. Per maggiori dettagli a riguardo, rivolgersi al proprio
gestore di rete telefonica.
2
VMWI: Visual Message Waiting Indication = Segnalazione ottica
di nuovi messaggi.
55
62
Page 63
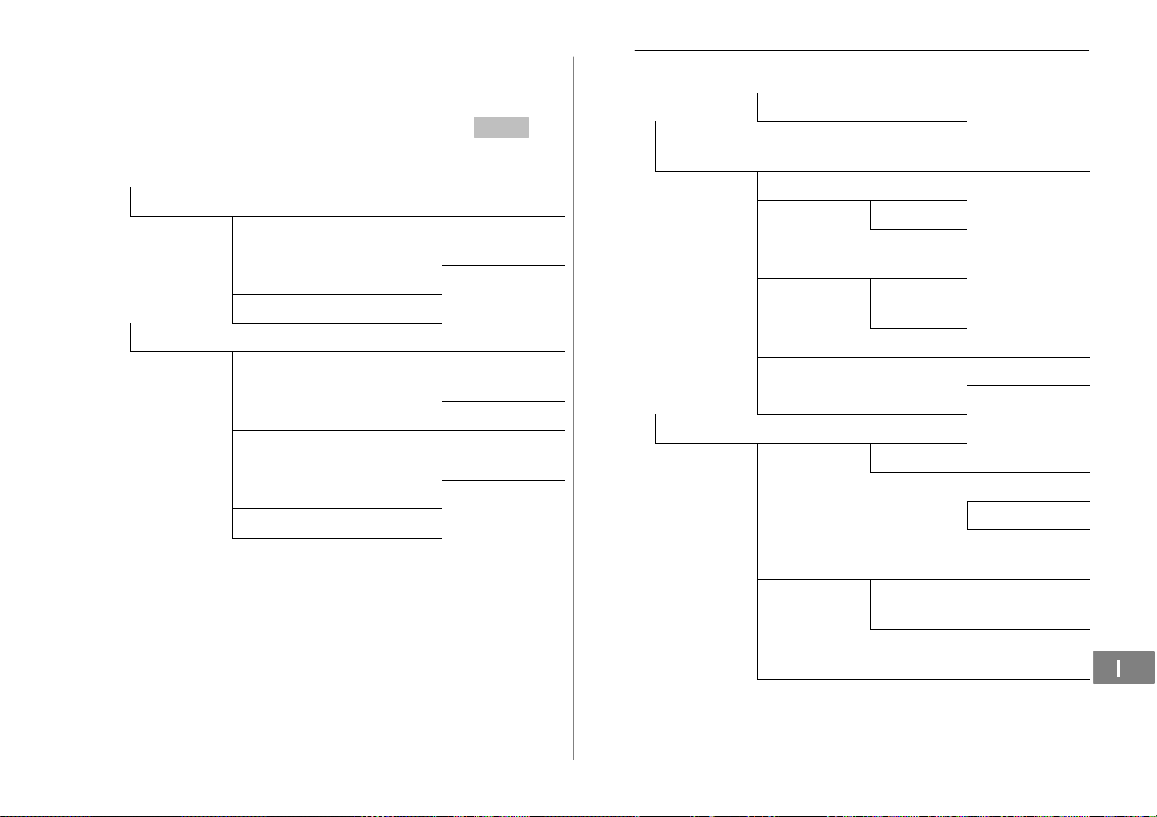
7 Struttura dei menu
Menu principale
Nel menu principale si giunge premendo il tasto softkey Menu . La
procedura da seguire per scorrere all’interno del menu ed eseguire
immissioni è riportata a pagina 57.
1
Lista Chiam
Agg. Rubrica Nome? Numero?
Cancella Confermi?
Canc Tutto Confermi?
Rubrica Aggiungi Nome? Numero?
Modifica Nome? Numero?
Cancella Confermi?
Canc Tutto Confermi?
1
Per visualizzare e memorizzare numeri di chiamata in elenchi
chiamata è necessaria la visualizzazione del numero di chiamata
(CLIP2). La visualizzazione del numero di chiamata è un servizio
addizionale offerto dal proprio gestore di rete telefonica. Si consiglia
di rivolgersi al proprio gestore di rete telefonica per ricevere ulteriori
informazioni a riguardo. Per ulteriori informazioni sulla visualizzazione del numero di chiamata vedi pagina 62.
2
CLIP: Calling Line Identification Presentation = Visualizzazione
del numero telefonico del chiamante.
56
Melodia 1 −
Melodia 1 −
Melodia 1 −
Melodia 10
Melodia 10
Melodia 10
Struttura dei menu
Memorie Rub. Memorie Rub. (ad es. 04/50)
Imposta
Elimina PT PIN ?
Base
Modo Selez. DTMF
Tasto R Flash−1
Cambia PIN PIN ? NuovoPIN
Reset Base PIN ?
Imposta PT Sveglia Spenta
Audio Vivavoce Volume 1 −
Suoneria Chiamate
3
Il codice PIN è impostato in fabbrica su 0000".
3
Portatile 1 −
Portatile 5
Decadica
(100 ms)
Flash−2
(300 ms)
Conferm.
Accesa hh:mm
Snooze Att.
Snooze Disat
Volume 5
Auricolare Volume 1 −
Volume 5
Melodia
Int
63
Page 64
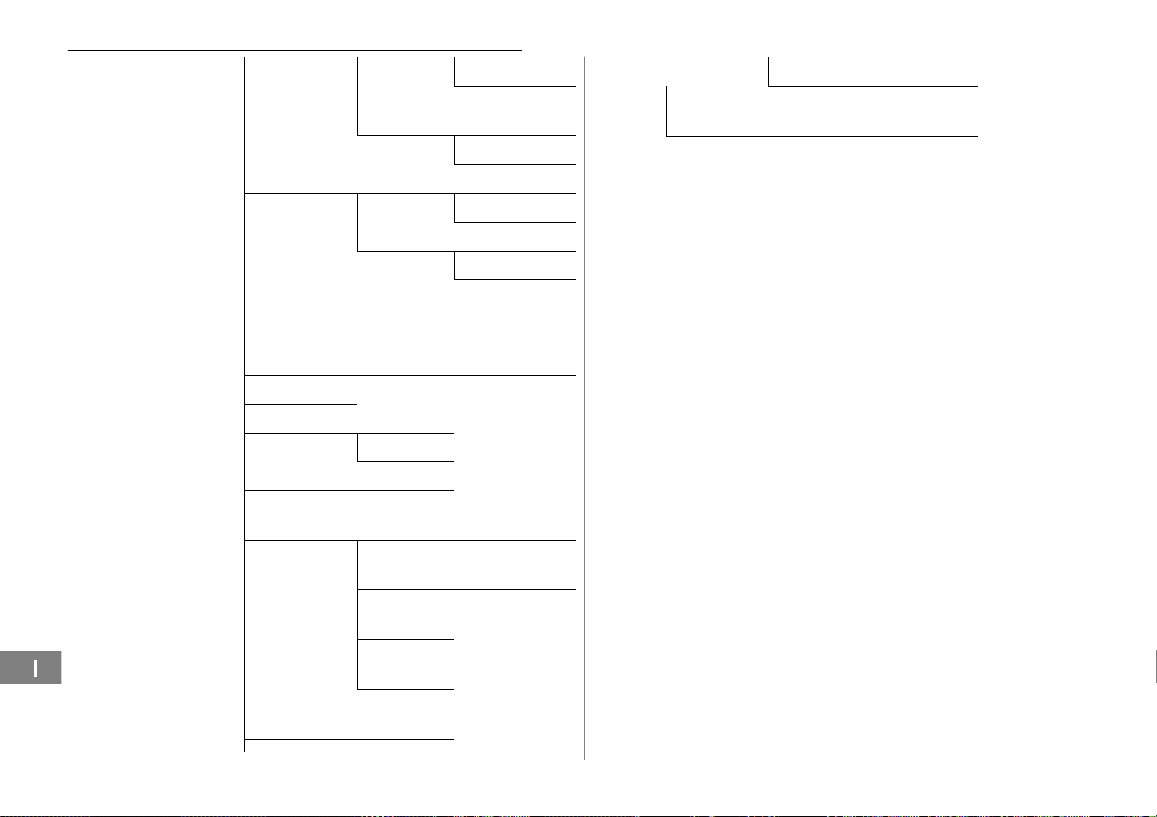
Struttura dei menu
Volume
Chiamate
Est
Toni Toni Tasti Spenta
Allarme Dist Spenta
Lingua ENGLISH / FRANCAIS / ES-
PANOL / DEUTSCH / ITALIANO / NEDERLANDS /
SVENSKA
Nome PT
Risp. Auto Spenta
Accesa
ContrastoLCD 00 − 16
Data & Ora Formato
Data
Formato
Ora
Imposta
Data
Imposta Ora
Seleziona BS Base 1 −
Base 4
Melodia
Volume
Accesa
Accesa
GG−MM /
MM−GG
12 Ore /
24 Ore
Reset PT PIN ?
Affilia Base 1 −
Base 4
57
PIN ?
64
Page 65

8 Rubrica telefonica
Nella rubrica telefonica è possibile memorizzare 50 numeri di chiamata con rispettivi nomi.
Le voci della rubrica telefonica sono elencate in ordine alfabetico.
Per accedere direttamente alla voce della rubrica telefonica
desiderata, premere la lettera iniziale corrispondente.
Immettere nomi
I tasti numerici riportano altresì delle lettere. Premendo ripetutamente
il relativo tasto si ha modo di selezionare lettere, cifre e caratteri speciali.
0 Immettere spazi vuoti
Canc
0 oppure 1 Inserire caratteri speciali
Per immettere la stessa lettera una seconda volta, premere
il rispettivo tasto. Attendere fino a quando il cursore si sia
spostato di una posizione. Immettere quindi la lettera una
seconda volta.
Creare voci della rubrica telefonica
Menu
, ,
Rubrica
Succes
Succes
« oppure ´
OK
« oppure ´ Aggiungi , Selezionare il sottomenu e
OK
Nome?
, ,
Numero?
Cancellare
58
Aprire il menu principale
, Selezionare la rubrica telefonica
confermare
Immettere il nome (max.
12caratteri) e confermare
Inserire il numero di chiamata
(max. 20 cifre) e confermare
Rubrica telefonica
Melodia 1
Salva
Il numero di voci della rubrica telefonica già memorizzati è
Modificare le voci della rubrica telefonica
Menu Aprire il menu principale
« oppure ´
OK
« oppure ´
OK
« oppure ´,
Nome?
Numero? , ,
Melodia 1
Salva
Melodia 10
−
visualizzabile nel menu SEND CNTR. A pagina 63 è indicata la posizione da scorrere nel menu.
Succes
, ,
Succes
Melodia 10
−
, Selezionare la melodia di suoneria
e salvare
Rubrica
Modifica
OK
, Selezionare la rubrica telefonica
, Selezionare il sottomenu e
confermare
Selezionare la voce della rubrica
telefonica e confermare
Modificare il nome e confermare
Modificare il numero di chiamata e
confermare
, Selezionare la melodia di suoneria
e salvare
59
65
Page 66
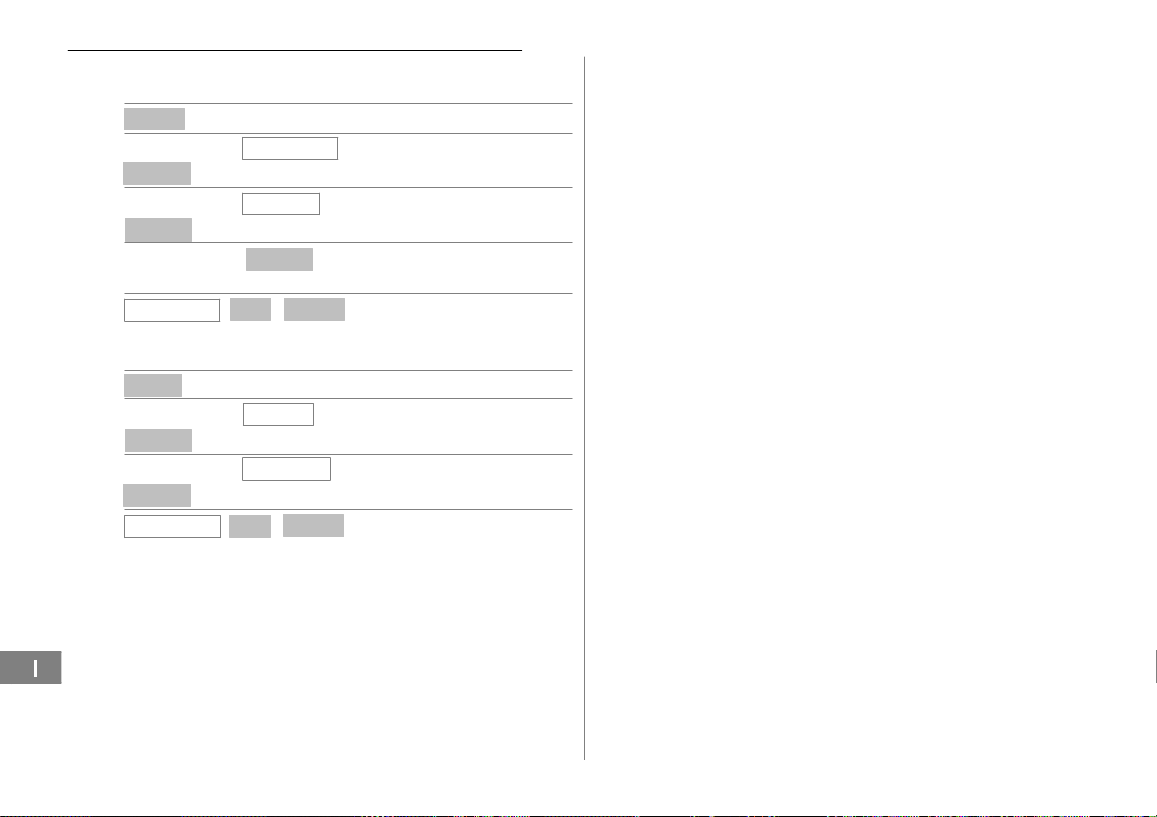
Rubrica telefonica
Cancellare le voci della rubrica telefonica
Cancellare una voce
Menu
« oppure ´
OK
« oppure ´
OK cancellazione
« oppure ´,
Confermi?
Cancellare tutte le voci
Menu Aprire il menu principale
« oppure ´
OK
« oppure ´
OK
Confermi?
OK
,
OK
,
Rubrica
Cancella
OK
/
Rubrica
Canc Tutto
/
Aprire il menu principale
, Selezionare la rubrica telefonica
, Attivare la procedura di
Selezionare la voce della rubrica
telefonica e confermare
Canc
Confermare o interrompere la
procedura di cancellazione
, Selezionare la rubrica telefonica
, Attivare la procedura di
cancellazione
Canc
Confermare o interrompere la
procedura di cancellazione
66
Page 67

9 Elenco chiamate
All’interno dell’elenco chiamate è possibile memorizzare complessivamente 40 numeri telefonici.
La visualizzazione del numero di chiamata (CLIP1) è un ser-
vizio addizionale del proprio gestore di rete telefonica. Nel
caso in cui il gestore della rete telefonica supporti il servizio,
sul display del telefono è visualizzato il numero di chiamata.
Per maggiori dettagli a riguardo, rivolgersi al proprio gestore
di rete telefonica.
Messaggi di display:
Display Descrizione
Non Disp. L’informazione relativa al numero di chiamata
Riservato Il chiamante ha disattivato la trasmissione del
Visualizzare numeri di chiamata dall’elenco chiamate
«, « oppure ´, Aprire l’elenco chiamate e
( Selezionare un numero di
1
CLIP: Calling Line Identification Presentation = Visualizzazione
del numero telefonico del chiamante.
60
Costante: La voce nell’elenco chiamate è nuovo.
Lampeggiante: La capacità di memoria è esaurita.
non è disponibile. Si potrebbe anche trattare di
una chiamata internazionale.
proprio numero di chiamata.
selezionare una voce
chiamata
Elenco chiamate
Memorizzare nella rubrica telefonica un numero di chiamata
presente nell’elenco chiamate
È possibile memorizzare un numero di chiamata direttamente dall’elenco chiamate nella rubrica telefonica.
Menu Aprire il menu principale
Succes
Succes
,
Melodia 10
−
Lista Chiam
Agg. Rubrica
,Selezionare l’elenco chiamate
Aprire la funzione
,Attivare la procedura di
memorizzazione e confermare
Immettere il nome (max.
12caratteri) e confermare
Numero di chiamata è visualizzato
e confermare
, Selezionare la melodia di suoneria
e salvare
« oppure ´,
OK
« oppure ´ Selezionare la voce
Altri
« oppure ´,
OK
Nome?
, ,
Numero?
Melodia 1
Salva
Il numero di chiamata è stato memorizzato nella rubrica telefonica assieme all’indicazione del nome.
Modificare le voci nella rubrica telefonica pagina 65.
67
Page 68
Elenco chiamate
Cancellare i numeri di chiamata dall’elenco chiamate
Cancellare singoli numeri di chiamata
Menu
OK
,
Lista Chiam
Cancella
Canc Confermare o interrompere la
/
« oppure ´
OK
« oppure ´ Selezionare la voce
Altri
« oppure ´
OK
Confermi?
Cancellare tutti i numeri di chiamata
Menu Aprire il menu principale
« oppure ´
OK
Altri
« oppure ´
OK
Confermi?
Lista Chiam
Canc Tutto , Attivare la procedura di
Canc
OK
,
/
Aprire il menu principale
,Selezionare l’elenco chiamate
Aprire la funzione
, Attivare la procedura di
cancellazione e confermare
procedura di cancellazione
, Selezionare l’elenco chiamate
Aprire la funzione
cancellazione e confermare
Confermare o interrompere la
procedura di cancellazione
68
Page 69
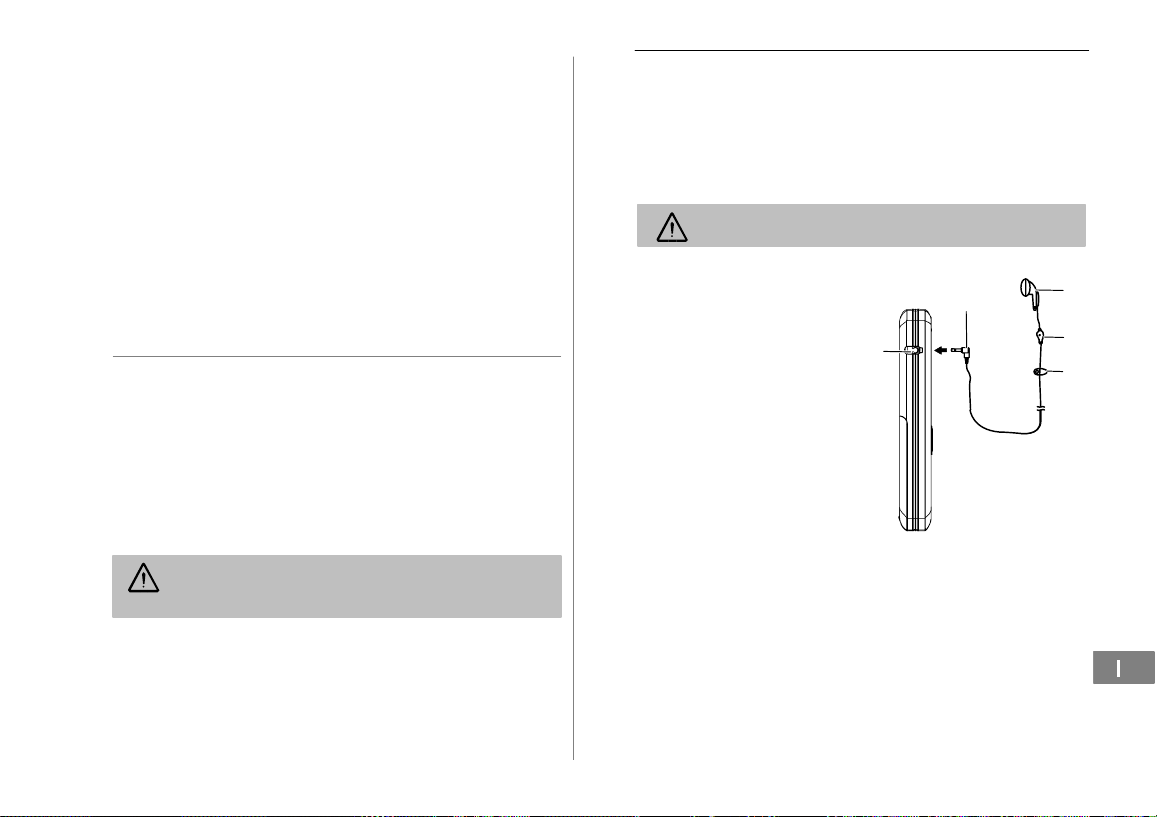
10 Funzioni speciali
Procedura di selezione
Il presente telefono funziona sia all’interno di sistemi telefonici analogici (procedura di selezione a impulsi) sia se integrato in moderni sistemi telefonici digitali (procedura di selezione a toni). La procedura di
selezione è impostata nel menu. A pagina 63 è indicata la posizione
da scorrere nel menu.
Selezione a toni temporanea
Qualora fosse possibile utilizzare il telefono soltanto con la procedura
di selezione a impulsi, non sarà necessario rinunciare ai vantaggi
della procedura di selezione a toni (ad es. per l’interrogazione della
segreteria telefonica dalla rete telefonica). Con chiamata in corso è
possibile passare temporaneamente alla procedura di selezione a
toni.
1 sec. * Premere con chiamata in corso
A conclusione della chiamata il telefono passa di nuovo automatica-
mente alla procedura di selezione a impulsi.
Allarme
Con la funzione è possibile farsi svegliare dalla propria unità portatile
all’orario precedentemente impostato. Con funzione snooze attivata è
possibile essere svegliati di nuovo dopo 11 minuti, oppure mettere
fine al segnale di sveglia. A pagina 63 è indicata la posizione da scorrere nel menu.
Per disattivare il segnale di sveglia, premere un tasto qual-
siasi. Per disattivare la funzione snooze attivata durante il
segnale di sveglia, premere il tasto ).
Funzioni speciali
Presa per auricolare (opzionale)
Sul lato sinistro dell’unità portatile si trova una presa per l’allacciamento di una cuffia auricolare. Si consiglia di utilizzare un auricolare
con una presa jack da 2,5 mm Non si assume alcuna garanzia riguardo il rispettivo funzionamento.
Una volta collegata la cuffia auricolare, il microfono dell’u-
nità portatile risulta disattivato.
1 Ricevitore
2 Microfono
3 Clip
4 Presa jack
5 Adattatore di connessione
per auricolare
5
4
1
2
3
69
Page 70
Ampliamento del sistema telefonico
11 Ampliamento del sistema telefonico
Lo standard internazionale GAP1 regola la compatibilità di unità portatili e stazioni base di costruttori differenti. In tal modo è possibile
adoperare apparecchi SWITEL in combinazione con apparecchi di altri costruttori all’interno di un unico sistema telefonico. Può comunque
anche verificarsi la mancata disponibilità di alcune funzioni.
Maggior numero di unità portatili
La stazione base prevede la registrazione di complessivamente 5
unità portatili.
Registrazione di unità portatili
Prima di registrare un’unità portatile, passare con la stazione base
alla modalità di registrazione. Tenere premuto il tasto di paging sulla
base fino ad avvertire un segnale acustico. A questo punto la base è
in modalità di registrazione per una durata di 60 secondi. Procedere
con l’unità portatile.
5 sec. Avviare la modalità di
registrazione
Procedere a questo punto con la registrazione dell’unità portatile
pagina 64. Utilizzare per la registrazione il codice PIN attualmente
impostato pagina 63.
Una volta eseguita la selezione, all’unità portatile è assegnato un numero di chiamata interno.
Per registrare unità portatili di altri costruttori, leggere prima
le rispettive istruzioni per l’uso.
Deregistrazione di unità portatili
Ogni unità portatile può compiere la deregistrazione di un’u-
nità portatile registrata presso la stessa unità base.
Unità portatili sono deregistrate nel menu. A pagina 63 è indicata la
posizione da scorrere nel menu.
Maggior numero di stazioni base
La portata della propria unità portatile può essere aumentata registrando l’apparecchio ad un numero maggiore di stazioni base. È possibile registrarsi contemporaneamente presso 4 stazioni base differenti. Ogni stazione base necessita di una propria presa telefonica. Si
può trattare di allacciamenti con lo stesso o differente numero di chiamata.
Per chiamate in corso non è invece possibile compiere un
trasferimento da una stazione base all’altra.
70
1
GAP: Generic Access Profile = Standard per l’interazione di unità
portatili e stazioni base di altri costruttori differenti.
Page 71

12 In presenza di problemi
Hotline di assistenza tecnica
In presenza di problemi con il telefono, seguire le indicazioni riportate
qui di seguito. In caso di problemi tecnici è possibile rivolgersi alla
nostra hotline di assistenza tecnica chiamando al numero 0900 00
1675 valido per la Svizzera (spese da rete Swisscom alla data di
stampa: CHF 2.60 / min). In caso di reclami entro il periodo di garanzia, rivolgersi al rivenditore autorizzato. Il periodo di garanzia ricopre
2 anni.
Domande e risposte
Domande Risposte
Non è possibile instaurare
un collegamento con la stazione base
Non è possibile condurre
una chiamata telefonica
− Verificare se la registrazione alla
stazione base è stata eseguita
con il codice PIN corretto pa-
gina 63.
− Il telefono non è collegato correttamente oppure presenta un guasto. Utilizzare esclusivamente il
cavo di collegamento telefonico
fornito.
− Provare con un altro telefono se
l’allacciamento telefonico in questione è funzionante.
− L’alimentatore di rete non è inserito oppure si è in presenza di una
caduta di tensione totale.
− L’accumulatore ricaricabile è scarico o difettoso.
− La distanza dalla stazione base è
troppo grande.
− Procedura di selezione non impo-
stata correttamente pagina 63.
In presenza di problemi
Collegamento disturbato, interrotto
Il sistema non reagisce più − Scegliere Vivavoce" per tutte le
L’accumulatore ricaricabile
si scarica in pochissimo
tempo
La visualizzazione del numero di chiamata (CLIP
non funziona
1
CLIP: Calling Line Identification Presentation = Visualizzazione
del numero telefonico del chiamante.
− La distanza dalla stazione base è
troppo grande.
− Luogo di installazione della stazione base errato.
funzioni ripristinando la configurazione iniziale pagina 63.
− Estrarre brevemente l’alimentatore di rete dalla presa di corrente.
− L’accumulatore ricaricabile è scarico o difettoso.
− Riporre l’unità portatile correttamente nella stazione base. Pulire
le superfici di contatto su unità
portatile e stazione base con un
panno morbido e asciutto.
− Posizionare l’unità portatile per la
durata di
15 ore nella stazione base.
− La visualizzazione del numero di
1
chiamata è un servizio addizio-
)
nale offerto dal proprio gestore di
rete telefonica. Per maggiori dettagli a riguardo, rivolgersi al proprio gestore di rete telefonica.
− Il chiamante ha disattivato la trasmissione del proprio numero di
chiamata.
71
Page 72

Specifiche tecniche
13 Specifiche tecniche
Specifiche tecniche
Caratteristica Valore
Standard DECT1−GAP
Alimentazione elettrica (stazione
base)
Alimentazione elettrica (stazione
di carica)
Portata Esterno: ca. 300 m
Durata di stand−by fino a 45 ore
Max. autonomia di chiamata fino a 7 ore
Accumulatore ricaricabile NiMH 3,6 V 400 mAh
Procedura di selezione Selezione a toni
Temperatura ambiente ammessa Normale: da 15 °C a 35 °C
Umidità dell’aria relativa ammessa da 0% a 90%
Tempi flash 100 ms, 300 ms
1
DECT: Digital Enhanced Cordless Telecommunication =
Standard per telefoni senza cavo.
2
GAP: Generic Access Profile = Standard per l’interazione di unità
portatili e stazioni base di altri costruttori differenti.
2
Ingresso: 100−240 V, 50/60 Hz
Uscita: 7,5 V 300 mA
Ingresso: 100−240 V, 50/60 Hz
Uscita: 7,5 V 300 mA
Interno: ca. 50 m
Selezione a impulsi
Estremo: da 0 °C a 40 °C
Configurazione iniziale
Unità portatile
La configurazione iniziale è ripristinata nel menu.
A pagina 63 è indicata la posizione da scorrere nel menu.
Sveglia Spenta
Audio 3
Chiamate Int / Chiamate Est Melodia 1 / Volume 3
Toni Tasti Accesa
Allarme Dist Accesa
Lingua DEUTSCH
Nome PT SWITEL
Stazione base
La configurazione iniziale è ripristinata nel menu.
A pagina 63 è indicata la posizione da scorrere nel menu.
SEND 1 DTMF
RECEIVE 2 Flash−1
Codice PIN 0000
Dichiarazione di conformità
Questo apparecchio risponde a quanto disposto dalla Direttiva UE:
1999/5/CE Direttiva concernente le apparecchiature radio,
le apparecchiature terminali di telecomunicazioni e il reciproco riconoscimento della loro conformità. La conformità
con la Direttiva di cui sopra viene confermata dal marchio
CE applicato sull’apparecchio. Per la dichiarazione di conformità completa si prega di voler usufruire del servizio gratuito di download dal nostro sito Internet www.switel.com
.
72
Page 73

14 Consigli per la cura / Garanzia
Consigli per la cura
Pulire le superfici degli apparecchi con un panno morbido e
antipilling.
Non utilizzare mai detergenti o solventi.
Garanzia
Gli apparecchi SWITEL sono costruiti e collaudati in osservanza dei
processi di produzione più moderni. L’impiego di materiali selezionati e
tecnologie altamente sviluppate sono garanti di una perfetta funzionalità e lunga durata in vita. La garanzia non viene considerata esecutiva
qualora la causa del malfunzionamento dell’apparecchio sia riconducibile al gestore della rete telefonica oppure se questa è da attribuirsi ad
un impianto telefonico interno interposto. La garanzia non si estende a
batterie, accumulatori o batterie ricaricabili utilizzati all’interno degli apparecchi. Il periodo di garanzia ricopre 24 mesi a partire dalla data di
acquisto.
Entro il periodo di garanzia si procederà all’eliminazione gratuita di tutti
i guasti dovuti a difetti di materiale o produzione. Il diritto di garanzia
cessa in caso di interventi da parte dell’acquirente o di terzi. Danni derivanti da un impiego o esercizio non conforme agli usi previsti, a naturale usura, a errato montaggio o errata conservazione, a collegamento
o installazione impropri, dovuti a forza maggiore o ad altri influssi esterni non sono coperti da garanzia. In qualità di produttore ci riserviamo il diritto, in caso di reclami, di riparare o sostituire le parti difettose o di rimpiazzare l’apparecchio. Parti o apparecchi sostituiti
passano di nostra proprietà. Sono esclusi diritti di risarcimento per
danni qualora non siano dovuti a intenzione o colpa grave del costruttore.
Nel caso in cui il presente apparecchio dovesse ciò nonostante presentare un difetto durante il periodo di garanzia, si prega di rivolgersi
esclusivamente al negozio di rivendita dell’apparecchio SWITEL assieme al relativo scontrino di acquisto. In base alle presenti disposizioni, tutti i diritti di garanzia dovranno essere fatti valere esclusiva-
Consigli per la cura / Garanzia
mente nei confronti del rivenditore autorizzato. Decorso il termine di
due anni dalla data di acquisto e consegna dei nostri prodotti non sarà
più possibile fare valere alcun diritto di garanzia.
73
Page 74

Indice alfabetico
15 Indice alfabetico
A
Accettazione di chiamata, 54, 59
Agganciare il ricevitore, 59
Allarme, 69
Ampliamento, 70
Attivare, 61
B
Blocco tastiera, 60
C
Caricare, 54
Chiamata in attesa, 60
Chiamate a conferenza, 60
Chiamate interne, 59
CLIP, 62
Compiere telefonate, 59
Concludere una chiamata, 59
Configurazione iniziale, 72
Consigli per la cura, 73
Contenuto della confezione, 53
D
Data, 54
Deregistrare, 70
Dichiarazione di conformità, 72
Disattivare, 61
Display, 56
Domande e risposte, 71
Durata di conversazione, 60
E
Elementi di comando, 55
Elenco chiamate, 63, 67
Eliminare guasti, 71
Esercizio, 56
F
Funzione di richiamata, 59
Funzione R, 62
Funzione vivavoce, 60
Funzioni, 69
G
Garanzia, 73
H
Hotline di assistenza tecnica, 71
I
Immissione di un nome, 65
Immissione di un testo, 65
Impianti telefonici interni, 62
Impostare l’unità portatile, 63
Impostare la base, 63
Indicazioni di sicurezza, 52
Inserire l’accumulatore ricaricabile, 54
M
Memorizzare, 67
Menu principale, 63
Messa in funzione, 53
Messaggi di display, 67
Modalità di risparmio energetico, 57
Modalità di stand−by, 57
Modalità ECO, 54
Modi di scrittura, 56
O
Ora, 54
P
Paging, 60
Pausa di selezione, 62
Presa per auricolare , 69
Problemi, 71
Procedura di selezione, 69
Procedura di selezione a impulsi, 69
Procedura di selezione a toni, 69
R
Registrare, 70
Registrazione, 64
Ricerca dell’unità portatile, 60
Riduzione delle radiazioni, 54
Ripetizione di chiamata, 59
Riscontro, 60
Rubrica telefonica, 59, 63, 65
S
Salvare, 58, 65
Segreteria telefonica integrata nella
rete telefonica, 62
Selezionare, 59
Selezione a toni temporanea, 69
Servizi addizionali, 62
Silenziamento, 60
Silenziamento del microfono, 60
Simboli, 56
Simboli di display, 56
Specifiche tecniche, 72
Standard GAP, 70
Stato di carica dell’accumulatore
ricaricabile, 54
Stazione base, 53, 70
Stazione di carica, 53
Struttura dei menu, 63
T
Tasti di navigazione, 57
Trasferimento di chiamata, 59
U
Unità portatile, 70
V
Visualizzazione del numero di
chiamata, 62, 67
VMWI, 62
Voci della rubrica telefonica, 58, 65
Volume del ricevitore, 60
74
Page 75

1 Safety Information 76. . . . . . . . . . . . . . . .
2 Preparing the Telephone 77. . . . . . . . . . .
3 Operating Elements 79. . . . . . . . . . . . . . .
4 Preliminary Information 80. . . . . . . . . . . .
5 Telephoning 83. . . . . . . . . . . . . . . . . . . .
6 PABX / Supplementary Services 85. . . . . .
7 Menu Structure 86. . . . . . . . . . . . . . . . . .
8 Phone Book 88. . . . . . . . . . . . . . . . . . . .
9 CID Book 90. . . . . . . . . . . . . . . . . . . . . .
10 Special Functions 92. . . . . . . . . . . . . . . .
11 Extending the Telephone System 93. . . . .
12 In Case of Problems 94. . . . . . . . . . . . . .
13 Technical Properties 95. . . . . . . . . . . . . .
14 Maintenance / Guarantee 96. . . . . . . . . . .
15 Index 97. . . . . . . . . . . . . . . . . . . . . . . . .
61
Contents
75
Page 76
Safety Information
1 Safety Information
Please read this operating instruction manual thoroughly.
Intended use
The telephone is suitable for telephoning within a public telephone
network system. Any other use is considered unintended use. Unauthorised modification or reconstruction is not permitted. Under no circumstances open the device or complete any repair work yourself.
Installation location
Prevent excessive exposure to smoke, dust, vibration, chemicals,
moisture, heat and direct sunlight.
Do not use the handset in potentially explosive areas.
Power adapter plug
Attention: Only use the power adapter plug supplied be-
cause other power supplies could damage the telephone.
Ensure access to the power adapter plug is not obstructed
by furniture or such.
Rechargeable battery pack
Attention: Never throw batteries into a fire. Only use
batteries of the same type. Pay attention to correct polarity.
Incorrect polarity of the batteries represents a risk of
explosion during charging.
Power failure
The telephone cannot be used to make calls in the event of a power
failure. Always keep a cord connected telephone which operates without an external power supply available in case of emergency situations.
Medical equipment
Attention: Never use the telephone in the vicinity of medical
equipment. Effects on such equipment cannot be fully ruled
out.
DECT1 telephones can cause an unpleasant humming sound in hear-
ing aids.
Hearing aid compatible
The telephone is compatible with most popular hearing aids on the
market. However, it cannot be guaranteed that all hearing aids will
work perfectly.
Disposal
In order to dispose of your device, take it to a collection point
provided by your local public waste authorities (e.g. recycling
centre). The adjacent symbol indicates that the device must
not be disposed of in normal domestic waste!
According to laws on the disposal of electronic and electrical
devices, owners are obliged to dispose of old electronic and
electrical devices in a separate waste container.
Batteries must be disposed of at the
point of sale or at the appropriate
collection points provided by the public
waste authorities.
Packaging materials must be disposed of according to local regulations.
76
1
DECT: Digital Enhanced Cordless Telecommunication = Standard
for cordless telephones.
Page 77
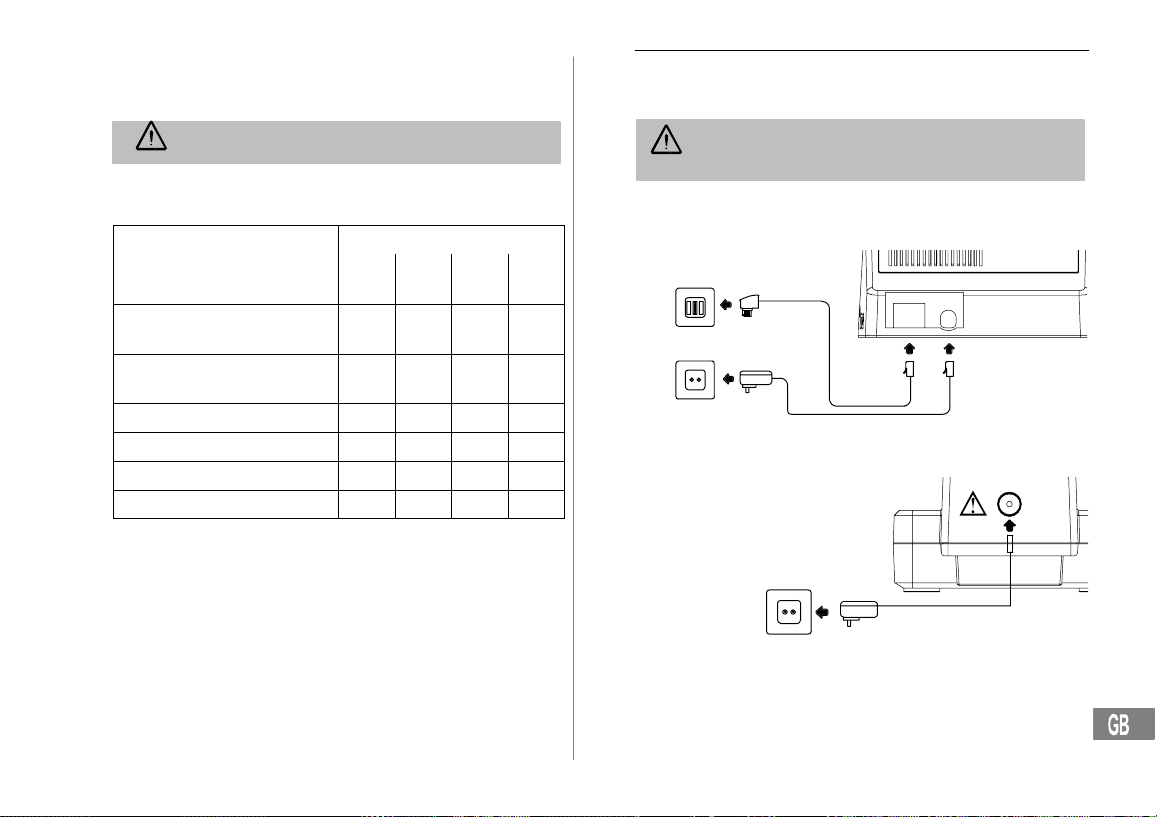
2 Preparing the Telephone
Safety information
Attention: It is essential to read the safety information in
Chapter 1 before starting up.
Checking the package contents
The package contains:
Content
Base station with power adapter
plug
Charging station with power
adapter plug
Handset 1 2 3 4
Telephone connection cable 1 1 1 1
Battery pack 1 2 3 4
Operating instructions 1 1 1 1
62
Model DF 83x
DF
831DF832
1 1 1 1
− 1 2 3
Preparing the Telephone
Connecting the base station
Attention: Position the base station at least 1 m away from
other electronic devices, otherwise there is a risk of mutual
disturbance.
Connect the base station as illustrated in the diagram. For reasons of
safety, only use the power adapter plug and telephone connection line
supplied.
DF
1
833
DF
1
1
834
Connecting the charging station
Telephone line socket
Mains power outlet
Connect the
charging station
as illustrated in
the diagram. For
safety reasons,
only use the
power adapter
plug supplied.
2
Mains power outlet
1
Visit www.switel.com to find out whether the telephone set is al-
ready available.
2
Only applies to telephone sets with at least two handsets
Checking the package contents" on Page 77.
77
Page 78
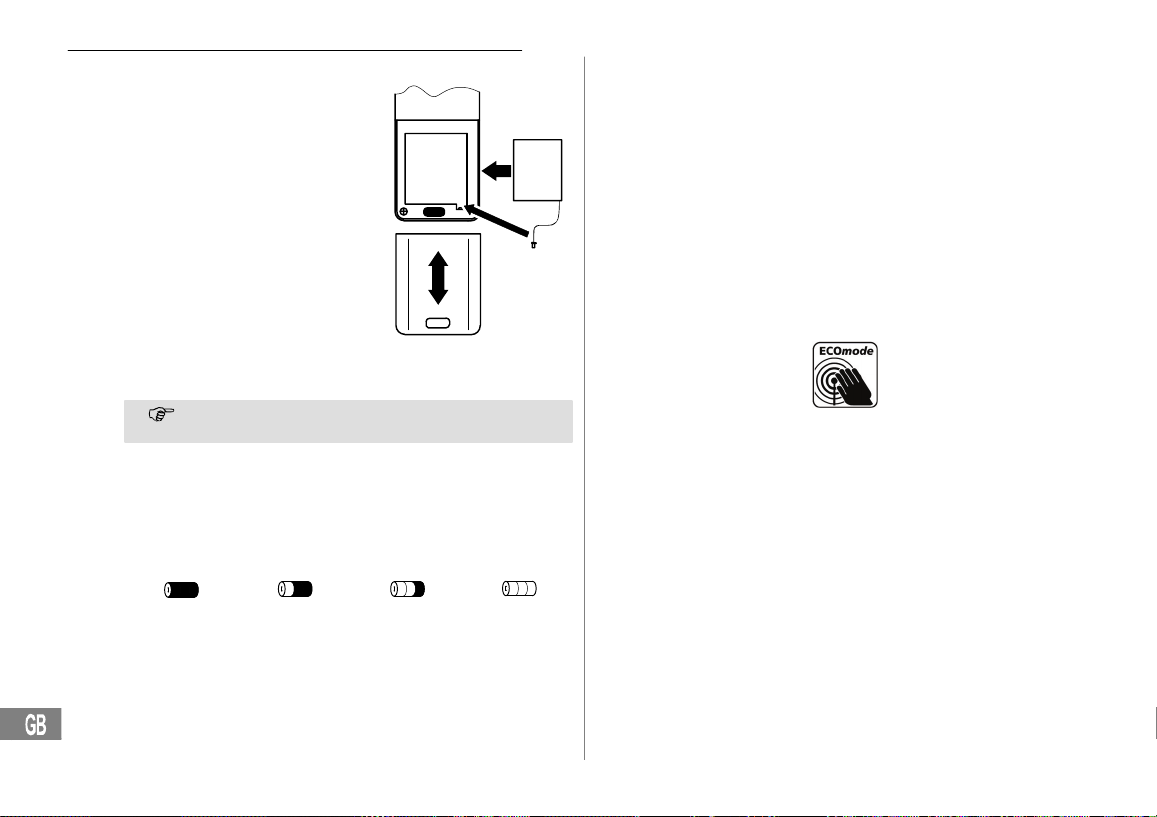
Preparing the Telephone
Inserting the battery pack
Press the locking button on the
battery compartment cover and,
at the same time, slide the cover
down. Remove the battery compartment cover. Connect the
plug on the battery pack in the
socket in the battery compartment. Insert the battery pack in
the battery compartment. Only
use the battery pack supplied.
Pay attention that the cable is
not jammed. Replace the cover
back on the battery compartment
and slide it upwards until the locking button snaps into place.
Charging the battery pack
Before the handset is used for the first time, insert it in the
base/charging station for at least 15 hours.
When the handset is inserted in the base/charging station properly,
you will hear an acoustic confirmation signal and the charge control
lamp lights up. The handset warms up during the charging process.
This is normal and does not represent a risk. Do not charge the
handset with charging units from other manufacturers. The current
battery charge status is indicated in the display:
Full 2/3 Full Low Empty
Setting the time and date on the handset
The time and date are set via the menu. Refer to Page 87 for the sequence of menu option selections.
63
Automatic answering
If this function is activated, an incoming call is taken when the handset
is removed from the base station. The automatic answering function is
activated and deactivated using the menu. Refer to Page 87 for the
sequence of menu option selections.
Private branch exchanges
The information on Page 85 explains how to install your telephone in
a private branch exchange.
Low−radiation operation (ECO mode)
The level of radiation is considerably lower than that of standard
DECT cordless telephones when in Standby mode (when the handset
is in the base station).
78
Page 79
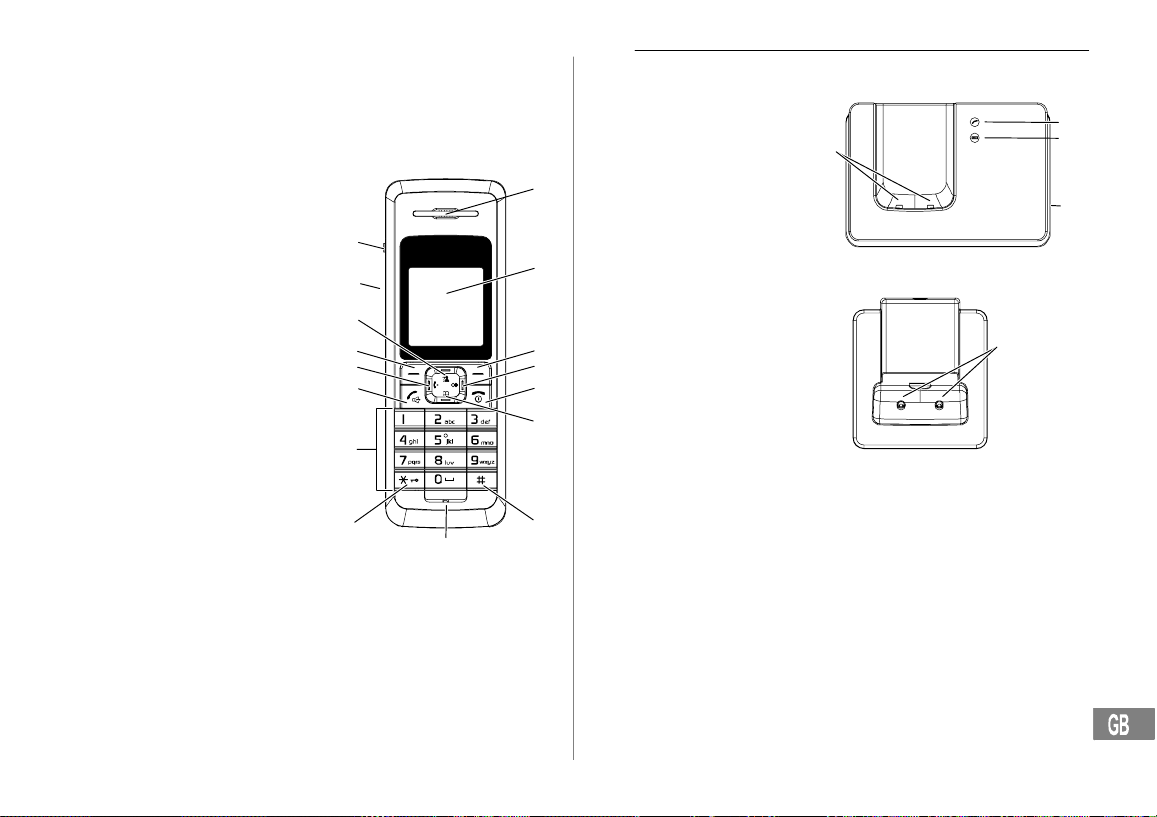
3 Operating Elements
The buttons in this operating manual are subsequently depicted with
a uniform contour. Therefore, slight deviations in the appearance of
the symbols on the telephone buttons compared to those depicted
here are possible.
Handset
1 Receiver
2 Display
3 Softkey, right
4 Redialling £ /
Inserting a dialling pause
5 On−hook button )
6 Navigation downwards /
Phone book ´
7 # button
8 Microphone
9 * button /
Key lock /
Temporary tone dialling
10 Digit keys
11 Handsfree facility /
Call button (
12 Internal calls ¹
13 Softkey, left
14 Navigation upwards /
CID book «
15 Loudspeaker
(on rear side)
16 Headset port
16
15
14
13
12
11
10
9
Operating Elements
Base station
1 LED:
Call indicator
1
2
3
4
5
6
7
8
2 LED:
Charging control lamp
3 Locating the handset
(paging) Z
4 Charge contacts
Charging station
1 Charge contacts
1
4
1
2
3
1
1
Only applies to telephone sets with at least two handsets
Checking the package contents" on Page 77.
79
Page 80
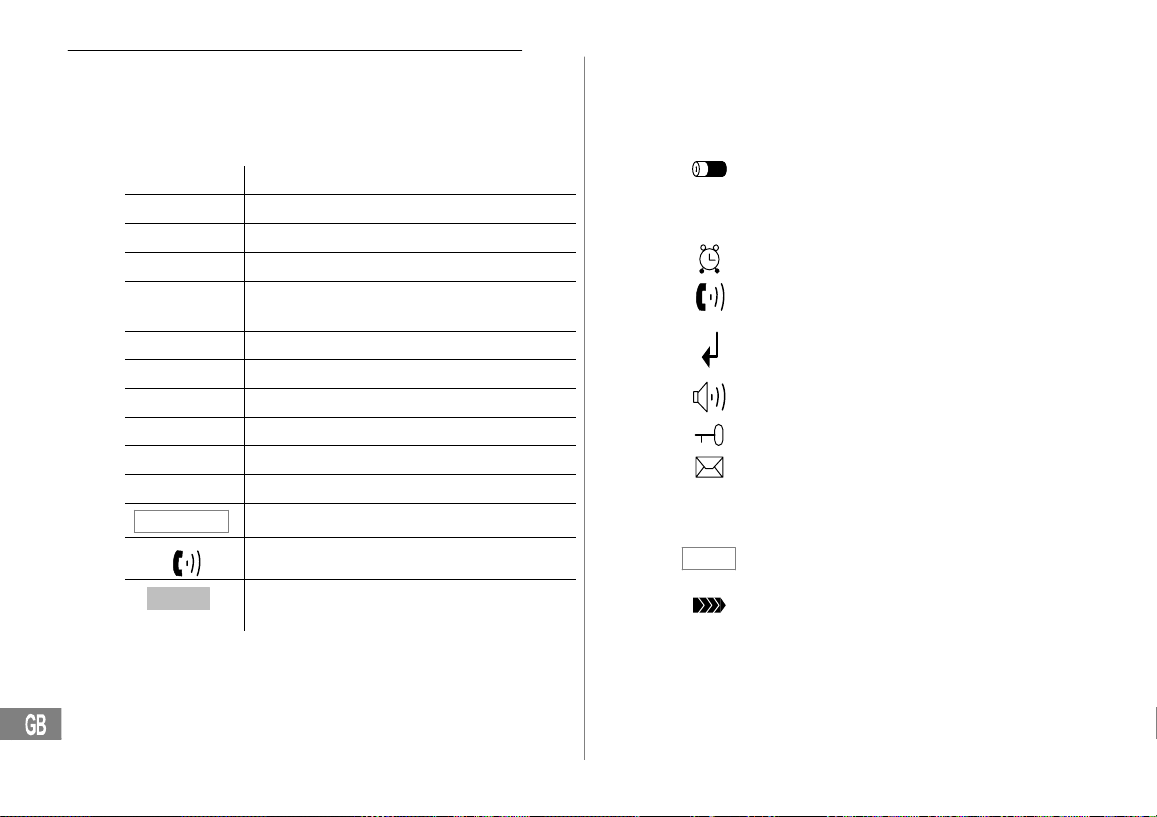
Preliminary Information
4 Preliminary Information
This chapter provides basic information on using the operating instruction manual and the telephone.
Description of operating sequences in the manual
Display Description
! Displays the contour of buttons
* Press the button depicted briefly
3 sec. * Press the button depicted for 3 seconds
Press and hold*Press and hold the button depicted
Release * Release the button depicted
Enter digits or letters
Handset rings
Base station rings
Remove the handset from the base station
Place the handset in the base station
Main Menu
Delete
Depicts text in the display
Depicts icons in the display
Press the softkey; Page 81
Icons and texts in the handset display
Icon Description
Displays the battery capacity.
DD−MM/MM−DD Displays the date; Page 87.
hh:mm Displays the time; Page 87.
Alarm function is activated.
A call is currently being made / A call has been
received; Page 83.
New calls have been registered in the CID book
(calls list); Page 90.
The handsfree facility is activated; Page 84.
The key lock function is activated; Page 84.
Answering machine provided in the telephone
network.
1
VMWI
− Supplementary service offered by tele-
phone network providers; Page 85.
Mute
The microphone is deactivated (muted).
Page 84.
On: The connection to the base station is good.
Flashing: The connection to the base station is
interrupted. Move nearer to the base station.
80
1
VMWI: Visual Message Waiting Indication = Visual indicator that
new messages have been recorded.
Page 81
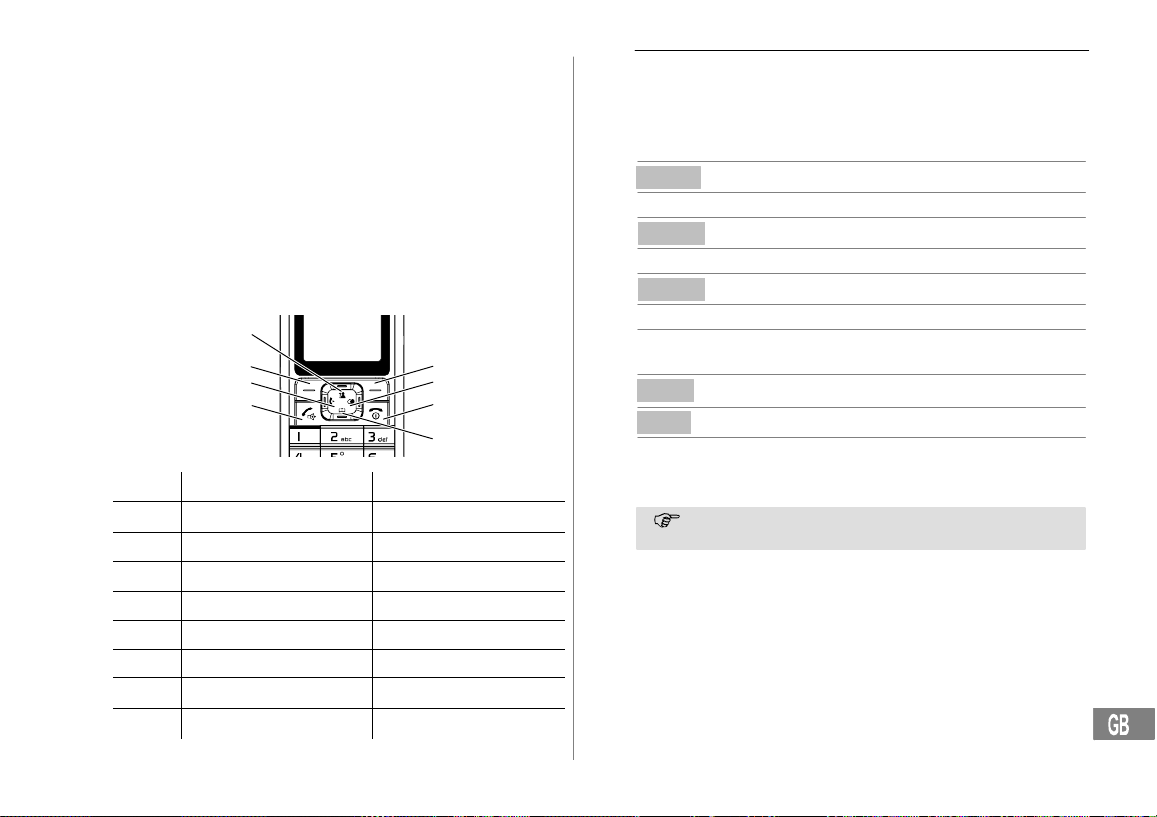
Standby mode
All descriptions in this operating manual assume that the handset is in
Standby mode. Set the telephone to Standby mode by pressing the
) button.
64
Energy−save mode
When the handset has been in Standby mode for some time, it automatically switches to energy−save mode. The buttons and display no
longer light up. Press any button to reactivate Standby mode.
Navigation buttons
The softkeys (1) and (7) are assigned different functions in the different menus. The function buttons are always referred to in this manual
according to the texts directly above them in the display.
Button In Standby mode
1 − Open the redialling list
2 − Open the redialling list
3 − Switch handset on/off − Switch to Standby mode
4 − Open the phone book − Navigation downwards
5 − Call button
6 − Internal calls
7 − Open the main menu
8 − Open the CID book − Navigation upwards
65
8
7
6
5
In a menu
Preliminary Information
Navigating in the menu
All the functions can be accessed via the various menus.
Refer to Menu Structure, Page 86, for information on how to
access each respective function.
Menu
« or ´ Select the submenu required
Select Open the submenu
« or ´ Select the function required
Select Open the function
« or ´ Select the setting required
1
2
3
4
Use the digit keys to enter
Save
Back Move one level back
) Interrupt the programming and
Every process is automatically cancelled if there is no input
within 35 seconds.
66
Open the main menu
numbers or letters
Confirm the input
saving processes and return to
Standby mode
81
Page 82
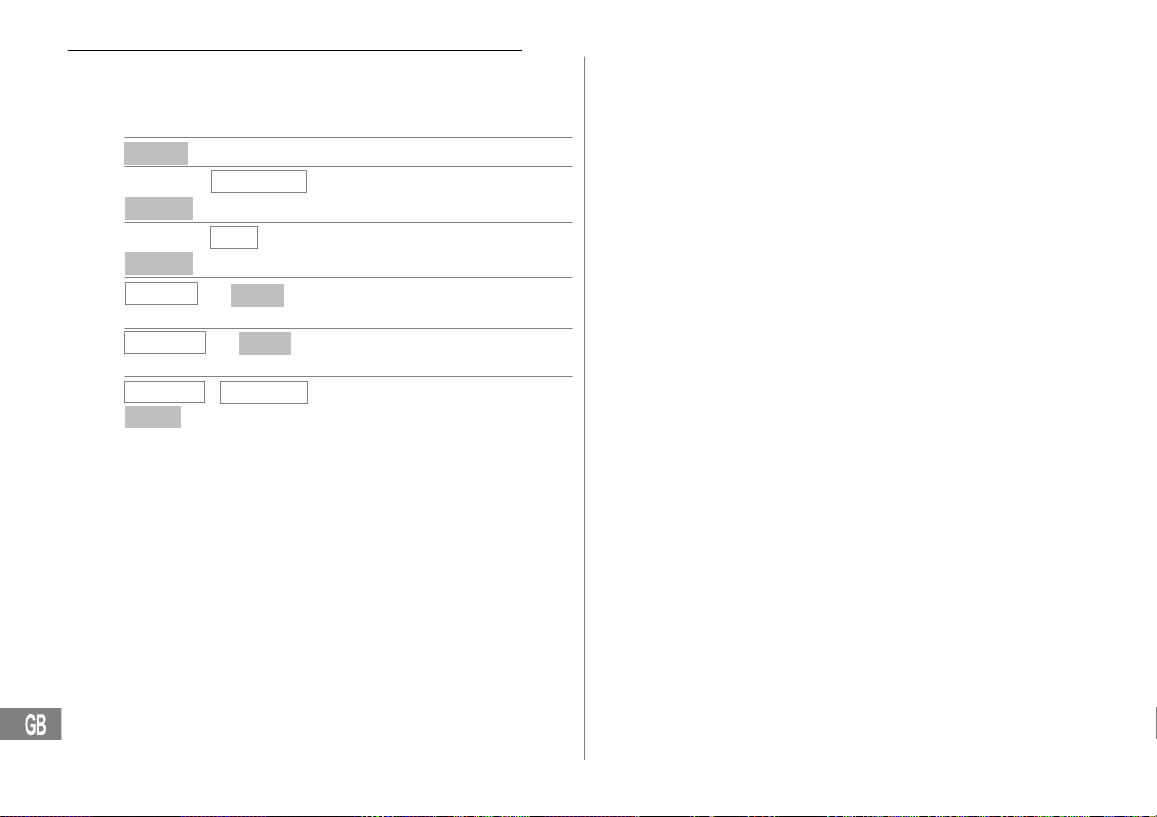
Preliminary Information
Creating phone book entries − example
The way in which to navigate through the menus and select settings is
explained by means of the example Creating phone book entries.
Proceed as in this example for all the settings.
Menu Open the main menu
« or ´
Select
« or ´
Select
Name ?
Number ?
Melody 1
Save save it
Phonebook
New
, , Next Enter the name (max. 12
, ,
Melody 10 , Select the ringing melody and
−
, Select the phone book
, Select the submenu and
Next Enter the number (max. 20digits)
67
confirm it
characters) and confirm it
and confirm it
82
Page 83
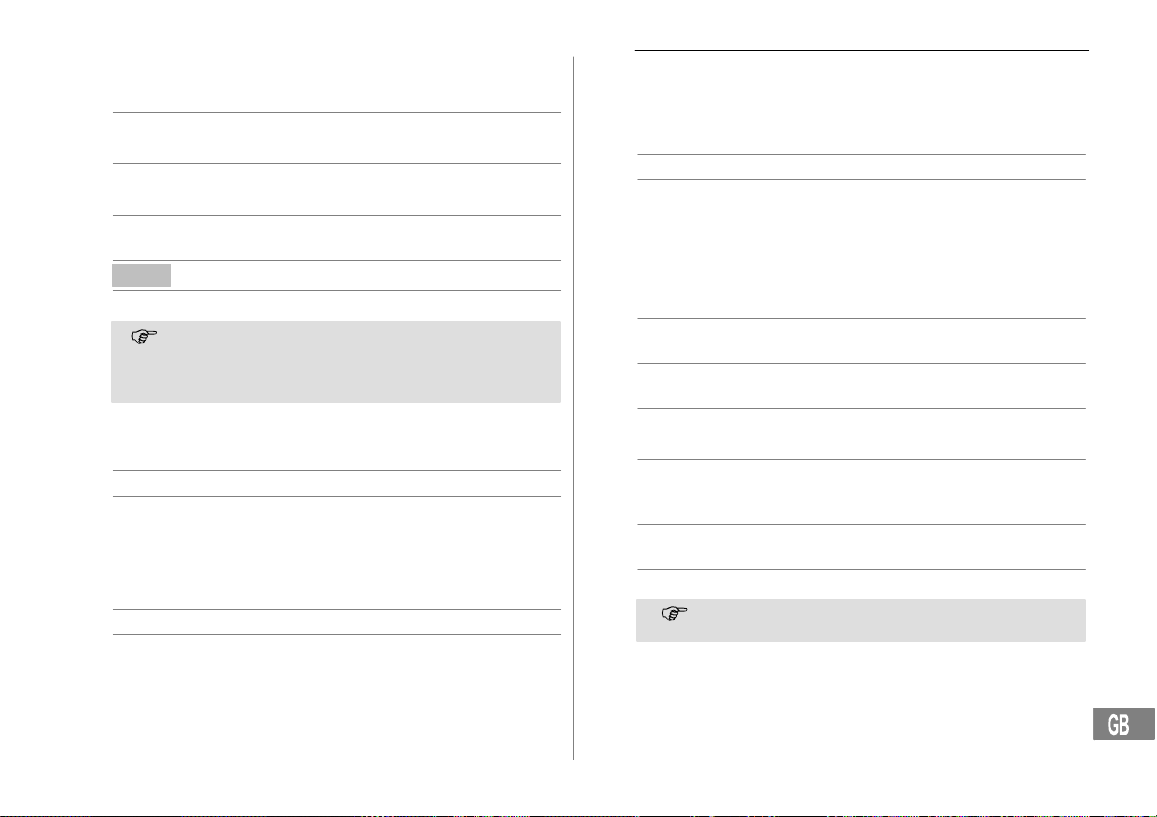
5 Telephoning
Taking a call
Ending a call
Making a call
Redialling
Calling back calls received
68
, ( Take the call
) End the call
Enter the phone number
Erase
( Dial the phone number
It is also possible to press the Call button first to obtain the
dialling tone. The digits then entered are dialled immediately. It is not possible to correct wrong digits individually
using this dialling procedure.
The telephone stores the last 10 phone numbers dialled in a redialling
list.
£ Open the redialling list
« or ´, ( Select the entry and dial the
The telephone stores the numbers of the last 40 calls received in a
CID book (calls list).
« Open the CID book
« or ´, ( Select the entry and dial the
(max. 32 digits)
Delete the last digit if incorrect
number
number
Telephoning
Dialling numbers from the phone book
Phone numbers must have been stored in the phone book for this
function; Pages 82 and 88.
´ Open the phone book
« or ´, ( Select the entry and dial the
Internal calls
1
69
Making internal calls
There must be two or more handsets (HS1, HS2, ...) registered on
your base station in order to make internal calls free of charge.
HS1: ¹, e.g. 2 Dial the internal call number of the
HS2: ( Take the internal call on the other
HS1/HS2: ) End the internal call
Forwarding external calls internally
HS1: ¹, e.g. 2 Dial the internal call number of the
HS2: ( Take the internal call on the other
HS1: ) Transfer the call
If the handset called does not answer, take the external call
back by pressing the ¹ button.
number
handset required
handset
handset required during the
external call
handset
1
Internal calls are only possible when at least two handsets are
registered in the system; Checking the contents of the package"
on Page 77.
83
Page 84
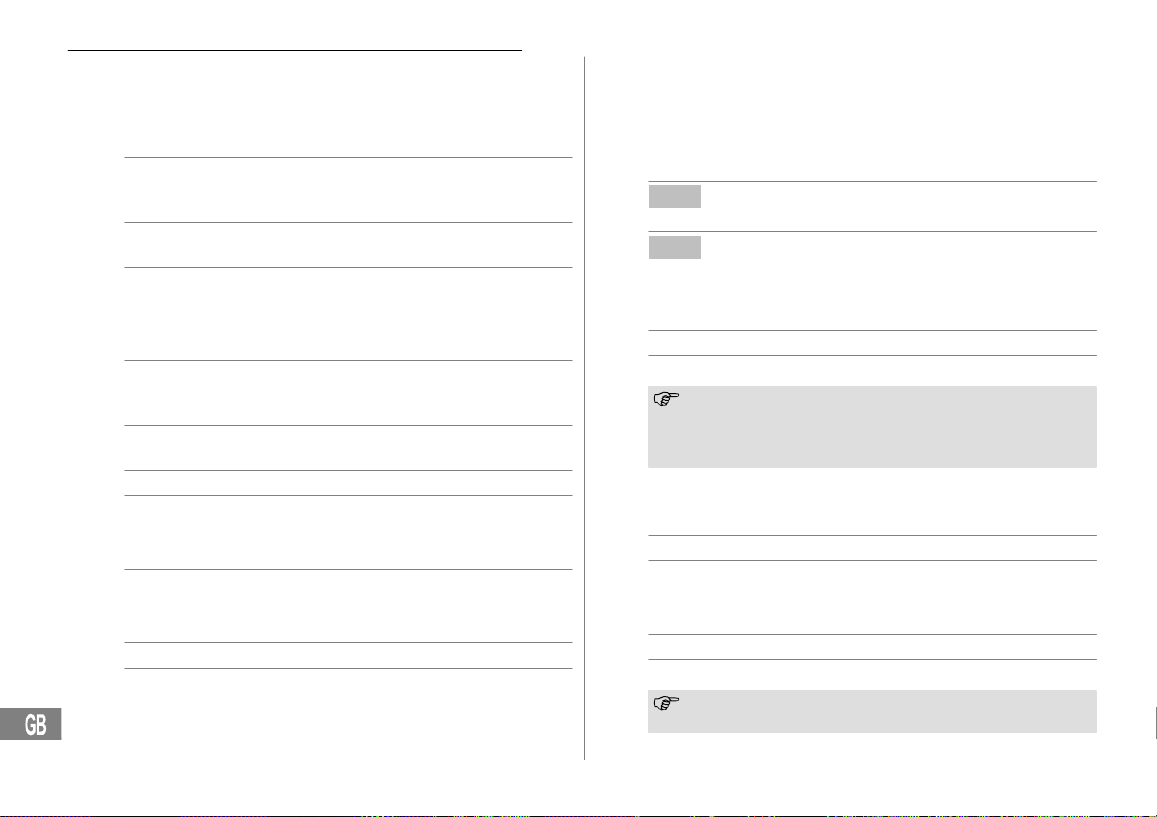
Telephoning
Holding a call / brokering
While a call is in progress, it is possible to dial another handset in
order to consult with someone. The external caller is put on hold while
you converse with the second, internal person called. You can repeat
this procedure as often as required.
HS1: ¹, e.g. 2 Dial the internal call number of the
HS2: ( Take the internal call on the other
HS1: ¹ Switch between callers
Making conference calls
An external call can be transferred to include another internal handset
for a conference call.
HS1: ¹, e.g. 2 Dial the internal call number of the
HS2: ( Take the internal call on the other
HS1: * Start the conference facility
HS1 / HS2: ) End the conference
Setting the receiver volume
The volume can be adjusted to one of 5 levels during a call.
« or ´ Select the volume required
Handsfree
70
This function is used to listen to the caller via the loudspeaker.
( Activate the handsfree facility
( Deactivate the handsfree facility
handset required during the
external call
handset
handset required during the
external call
handset
Displaying the duration of a call
The duration of a call is displayed in hours, minutes and seconds during the call.
Muting the microphone in the handset
The microphone in the handset can be activated and deactivated during a telephone conversation.
Mute
Mute
Key lock
72
The key lock feature prevents functions assigned to buttons being
activated accidentally.
3 sec. * Activate the key lock function.
3 sec. * Deactivate the key lock function
Incoming calls can still be taken in the normal way even
when the key lock function is activated. If another button is
pressed, you hear a long acoustic signal. The back−lighting
does not switch on.
71
Deactivate the microphone
(muting function)
Activate the microphone
Searching for the handset (Paging)
If you have mislaid your handset, you can locate it again with the aid
of a search tone.
{«} Start the search tone
or © End the search tone
Switching the handset off and on
You can switch the handset off to save the battery pack.
3 sec. ) Switch the handset off
3 sec. ) Switch the handset on
The back−lighting does not light up when the handset is swit-
ched on.
84
Page 85
6 PABX / Supplementary Services
R function in private branch exchanges
If the telephone is connected to a private branch exchange, functions
such as transferring calls and automatic call back can be used via the
Flash. Refer to the operating manual provided with your private
branch exchange as to which Flash time must be set in order to use
these functions. The sales outlet where you purchased the exchange
can provide information as to whether the telephone will work properly
with the exchange. The Flash time is set using the menu. Refer to
Page 86 for the sequence of menu option selections.
The Flash is available when a call is in progress on the
handset.
R function and supplementary services
Your telephone supports supplementary services provided by your
telephone network provider, such as brokering, call waiting and conference facilities. These supplementary services can be used by implementing the Flash. Please contact your telephone network provider regarding which Flash time must be set to use the
supplementary services. Contact your telephone network provider
with regard to enabling supplementary services. The Flash time is set
using the menu. Refer to Page 86 for the sequence of menu option
selections.
Caller number display (CLIP1)
The CLIP (caller number display) function is a supplemen-
tary service provided by your telephone network provider.
Contact your network provider for further information.
If this function is available with your telephone line, the number of the
caller appears in the display when the phone rings. If the caller has
suppressed transmission of his phone number, the corresponding
message appears in the display. The phone number is not displayed
and, as a result, is not stored in the CID book.
1
CLIP: Calling Line Identification Presentation = Display the cal-
ler’s phone number.
74
73
PABX / Supplementary Services
Dialling pause
When using private branch exchanges, it is necessary to dial an access code to obtain the dialling tone for an outside line. When using
some older private branch exchanges, it takes a little time before the
dialling tone becomes audible. In the case of such private branch exchanges, a dialling pause can be inserted after the number for an outside line in order to continue dialling directly without having to wait for
the dialling tone.
£ Insert a dialling pause
The actual phone number is dialled a certain time after the number for
an outside line.
The dialling pause can also be entered with the phone num-
bers in the phone book.
Answering machine in the telephone network
An answering machine in the telephone network is a supplementary
service offered by many telephone network providers. If your telephone network provider offers an answering machine in the telephone
network for you, you are informed of new messages received by an
icon (VMWI
network provider actually offers the service. Contact your network provider for further information.
2
new messages have been recorded.
2
). This function can only be used when your telephone
VMWI: Visual Message Waiting Indication = Visual indicator that
75
85
Page 86
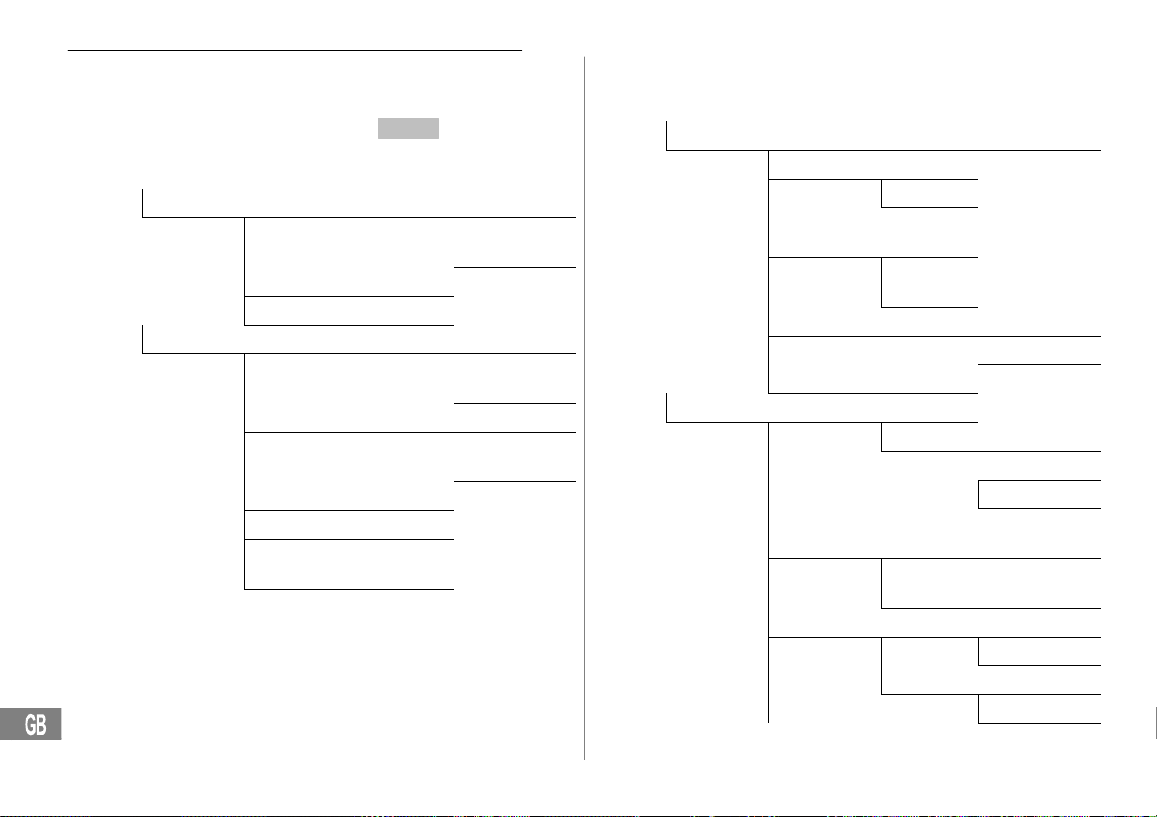
Menu Structure
7 Menu Structure
Main menu
Access the Main menu by pressing the
navigate through the menu and make entries and selections are described on Page 81.
CID Book
Phonebook New Name ? Number ?
1
The (CLIP2) feature is necessary to display and save phone num-
bers in various call lists (CID Book − caller identification lists). The
caller number display (CLIP) is a supplementary service offered by
your telephone network provider. Contact your network provider for
further information. For further information on the CLIP feature, refer
to Page 85.
2
CLIP: Calling Line Identification Presentation = Display the cal-
ler’s phone number.
86
Menu
softkey. The way to
76
1
Add to PB Name ? Number ?
Melody 1 −
Melody 10
Delete Confirm ?
Delete All Confirm ?
Melody 1 −
Melody 10
Edit Name ? Number ?
Melody 1 −
Melody 10
Delete Confirm ?
Delete All Confirm ?
PB Status
PB Status
(e.g.: 04/50)
BS Settings Terminate HS PIN ?
3
Dial Mode Tone
Pulse
Flash Time Flash−1
(100 ms)
Flash−2
(300 ms)
Modify PIN PIN ? New PIN
Repeat
BS Reset PIN ?
HS Settings Alarm Off
On hh:mm
Snooze On
Audio Setup Speaker V. Volume 1 −
Earpiece V. Volume 1 −
Ring Setup INT Ring Melody
EXT Ring Melody
Volume
3
The default PIN code is 0000".
HS 1 − HS 5
Snooze Off
Volume 5
Volume 5
Volume
Page 87
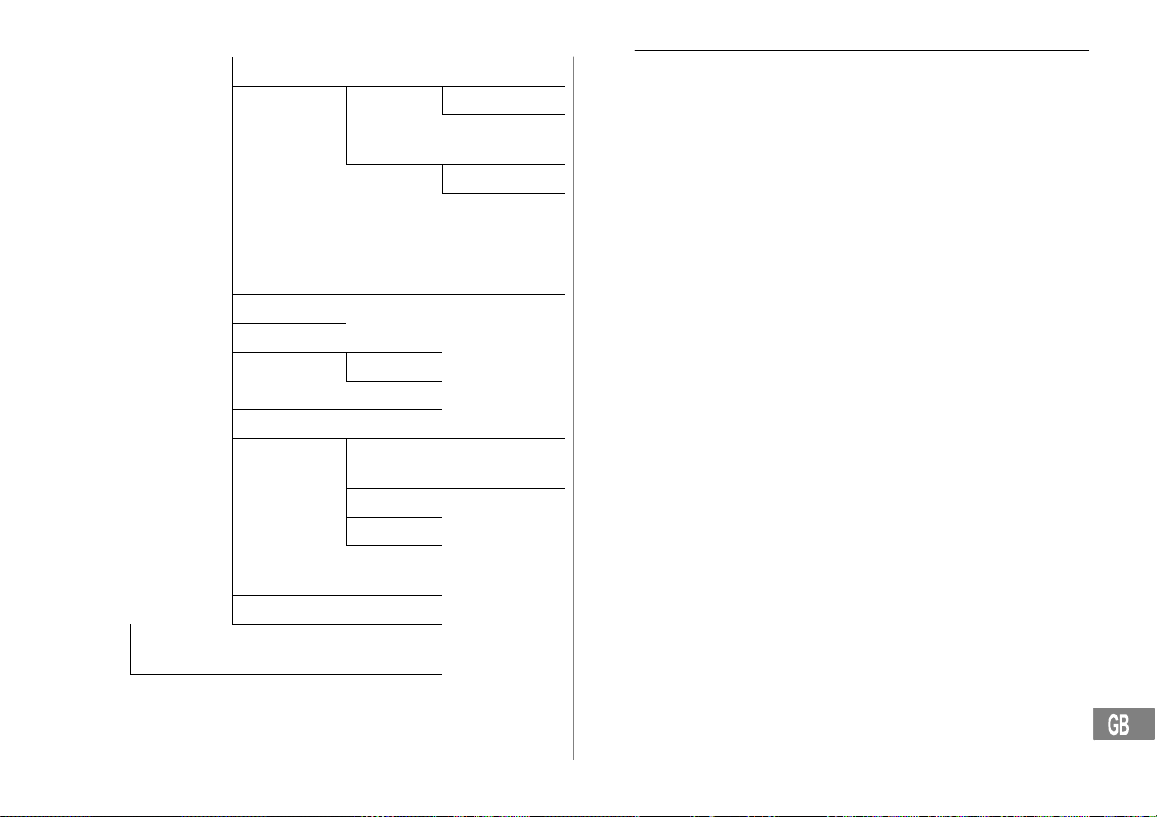
Tone Setup Key Tone Off
On
Range
Alarm
Off
On
Menu Structure
Language ENGLISH / FRANCAIS / ES-
HS Name
Auto Answer Off
LCD Contrast 00 − 16
Date & Time Date Format DD−MM/MM−DD
Select Base Base 1 −
HS Reset PIN ?
Registration Base 1 −
Base 4
77
PANOL / DEUTSCH / ITALIANO / NEDERLANDS /
SVENSKA
On
Time Format
Set Date
Set Time
Base 4
PIN ?
12 − Hour/
24 − Hour
87
Page 88
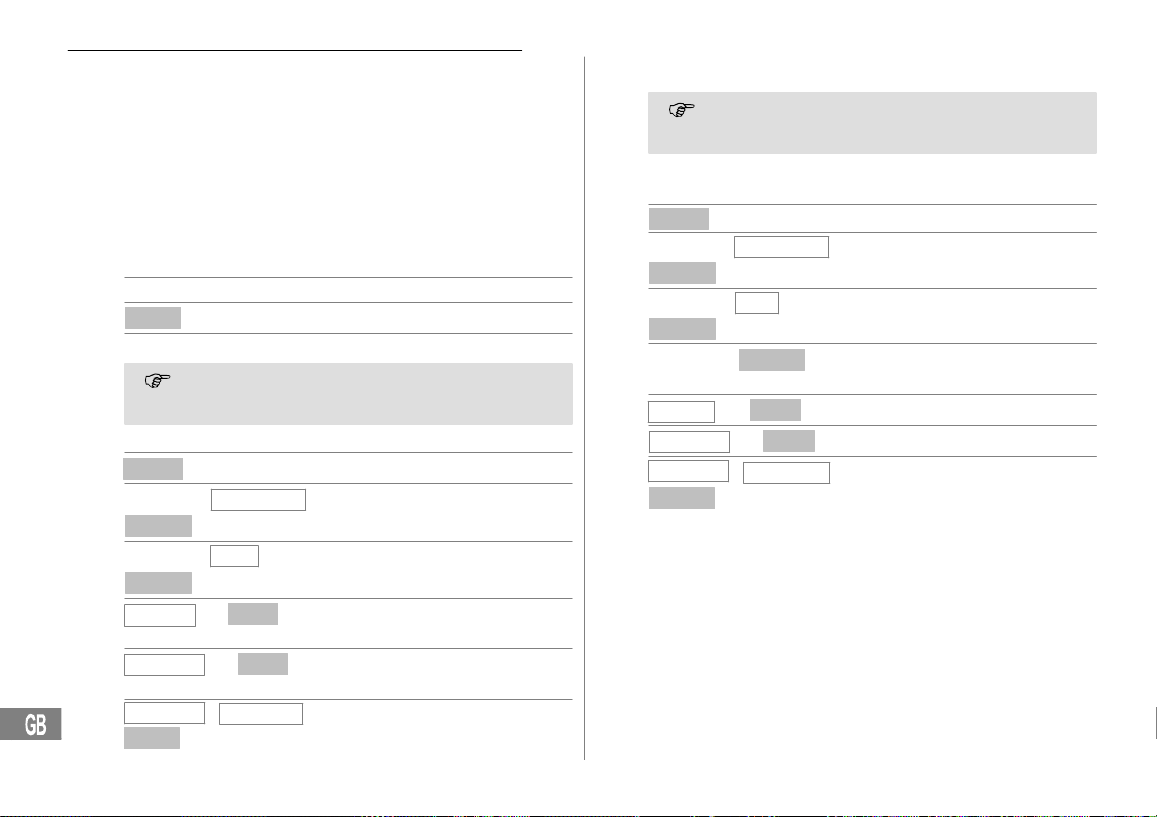
Phone Book
8 Phone Book
You can use the phone book to store up to 50 phone numbers together with the associated names.
The phone book entries are arranged alphabetically. To access
the required phone book entry directly, press the first letters of the
corresponding name.
Entering names
Letters are also imprinted on the digit keys. Letters, digits and special
characters are entered by pressing the relevant key the respective
number of times.
0 Enter a space
Erase
0 or 1 Enter the special character
To enter the same letter twice, press the button to enter the
letter. Wait until the cursor skips one position forwards. Enter
the letter again.
Creating phone book entries
Menu
« or ´
Select
« or ´
Select
Name ? , ,
Number ?
Melody 1
Save
Phonebook
New
, Select the submenu and
Next
Next
, ,
Melody 10
−
Delete
78
Open the main menu
, Select the phone book
confirm it
Enter the name (max. 12
characters) and confirm it
Enter the number (max. 20 digits)
and confirm it
, Select a ringing melody and
save it
You can view the number of phone book entries already sto-
red by using the Send CNTR menu. Refer to Page 86 for the
sequence of menu option selections.
Modifying phone book entries
Menu
« or ´
Select
« or ´ Edit , Select the submenu and
Select
« or ´,
Name ?
Number ? , ,
Melody 1
Save
Phonebook
Select
Next
, ,
Next
− Melody 10 , Select a ringing melody and
79
Open the main menu
, Select the phone book
confirm it
Select the phone book entry and
confirm it
Change the name and confirm it
Change the number and confirm it
save it
88
Page 89
Deleting phone book entries
Deleting an entry
Menu
« or ´
Select
« or ´
Select
« or ´,
Confirm ?
Phonebook
Delete
Select
Del
,
, Activate the deleting process
/
Deleting all entries
Menu
« or ´
Select
« or ´
Select
Confirm ?
Phonebook
Delete All
Del
All
,
/
Phone Book
Open the main menu
, Select the phone book
Select the phone book entry and
confirm it
Cancel Confirm the deleting process or
cancel it
Open the main menu
, Select the phone book
, Activate the deleting process
Cancel Confirm the deleting process or
cancel it
89
Page 90
CID Book
9 CID Book
A total of 40 phone numbers are stored in the CID book (caller identification log).
The caller number display (CLIP1) is a supplementary ser-
Messages in the display:
Display Description
Displaying numbers in the CID book
«, « or ´,
( Dial the phone number
Storing a phone number in the CID book in the phone book
A phone number in the CID book can be stored in the phone book directly.
Menu
1
CLIP: Calling Line Identification Presentation = Display the cal-
ler’s phone number.
80
vice offered by your telephone network provider. The caller’s
number appears in the display if the service is offered by
your telephone network provider. Contact your network provider for further information.
Constant: The entry is new in the CID book.
Flashing: The memory capacity is exhausted.
Out Of Area Information related to the phone number is not
Private The caller has suppressed the transmission of
available. This could signify an international call.
their phone number.
Select
Open the call log and select the
entry required
Open the main menu
, ,
,
−
CID Book
Add to PB
Next
Next
Melody 10
, Select the CID book
Open the function
, Activate the saving process
and confirm it
Enter the name (max. 12
characters) and confirm it
The phone number is displayed,
confirm it
, Select a ringing melody and
« or ´,
Select
« or ´ Select the entry
More
« or ´,
Select
Name ?
Number ?
Melody 1
Save save it
The phone number is stored in the phone book without a name.
Modifying phone book entries Page 88.
Deleting phone numbers from the CID book
Deleting individual phone numbers
Menu
« or ´
Select
« or ´ Select the entry required
More
« or ´
Select
Confirm ?
CID Book
Delete
Del
,
, Activate the deleting process
Cancel Confirm the deleting process or
/
Open the main menu
, Select the CID book
Open the function
and confirm it
cancel it
90
Page 91
Deleting all phone numbers
Menu
« or ´
Select
More
« or ´
Select
Confirm ?
CID Book
Delete All
Del
All
,
Open the main menu
, Select the CID Book
Open the function
, Activate the deleting process
and confirm it
/
Cancel Confirm the deleting process or
cancel it
CID Book
91
Page 92
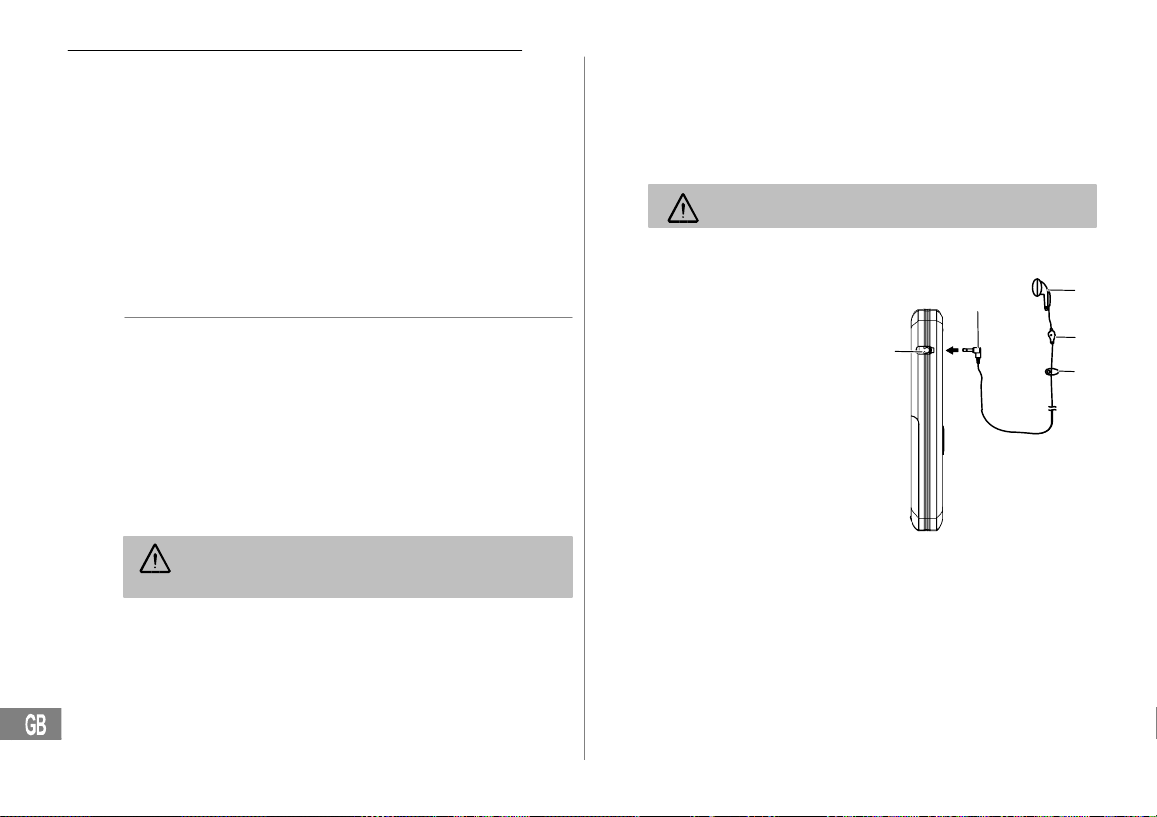
Special Functions
10 Special Functions
Dialling mode
The telephone can be operated in analogue exchanges (PULSE
mode) as well as new, digital exchanges (TONE/DTMF mode).
The dialling mode is controlled via the menu. Refer to Page 86 for the
sequence of menu option selections.
Temporary tone dialling
If you only operate the telephone using the PULSE dialling mode, you
can still make use of the advantages of the TONE dialling mode
(e.g.: remote access of the answering machine in the telephone network). You can temporarily switch to Tone dialling when a connection
has already been made.
1 sec. * Press when a connection has
been established
When the call is ended, the equipment automatically switches back to
Pulse dialling.
Alarm
The Alarm clock" function can be used so that you are alerted by the
handset at a specific time. You can either stop the alarm signal or use
the snooze function to stop the alarm and be reactivated 11 minutes
later to alert you again. Refer to Page 86 for the sequence of menu
option selections.
Press any button to stop the alarm signal. To deactivate the
snooze function while the alarm signal is in operation, press
the ) button.
Headset port (option)
The headset can be connected using a connection port located on the
left−hand side of the handset. Use a 2.5 mm phone jack to connect the
headset. There is no guarantee the headset will function properly.
After you have connected the headset, the microphone in
the headset is deactivated.
1 Receiver
2 Microphone
3 Clip
4 Phone jack
5 Headset connection port
5
4
1
2
3
92
Page 93
11 Extending the Telephone System
The internationally approved GAP1 standard regulates the compatibility of handsets and base stations from different manufacturers. As a
result, it is possible to integrate SWITEL devices and equipment from
other manufacturers together in one telephone system. It is possible,
however, that some functions are not available.
Multiple handsets
Up to 5 handsets can be registered on the base station.
Registering handsets
Before starting to register a handset, switch the base station to Registration mode. Press and hold the Paging button on the base station
until you hear an acoustic signal. The base station is then in Registration mode for the following 60 seconds. Continue with the handset.
5 sec. Activate Registration mode
Now register the handset; Page 87. The currently valid PIN code is
used for registration purposes; Page 86.
The handset is automatically assigned an internal call number follow-
ing registration.
To register handsets from other manufacturers, please refer
to the operating manual supplied with them.
Deregistering handsets
Each handset can be used to deregister other handsets
registered on this base station.
Handsets are deregistered via the menu. Refer to Page 86 for the sequence of menu option selections.
Extending the Telephone System
Multiple base stations
You can increase the range of your handset by registering it on several base stations. The handset can be registered on up to 4 different
base stations simultaneously. Each base station requires its own telephone line socket. Connections can be used with the same call
number or with different ones.
Calls in progress cannot be transferred from one base
station to another.
1
GAP: Generic Access Profile = Standard for the interoperation of
handsets and base stations from different manufacturers.
93
Page 94

In Case of Problems
12 In Case of Problems
Service hotline
Should problems arise with the telephone, please refer to the following information first. In the case of technical problems, you can contact our hotline service, Tel. 0900 00 1675 within Switzerland (cost via
Swisscom at time of going to print: CHF 2.60/min). In the case of
claims under the terms of guarantee, please contact your sales outlet.
There is a 2 year period of guarantee.
Problems and solutions
Problems Solutions
No connection to base
station possible
No telephone calls possible − The telephone is not connected
94
− Check that the handset has been
registered on the base station
with the correct PIN code;
Page 86.
properly or is defective. Only use
the telephone connection cable
supplied.
− Test whether the telephone connection is in order by using another telephone.
− The power adaptor plug is not
plugged in or there is a complete
power failure.
− The rechargeable battery pack is
empty or defect.
− The handset is too far from the
base station.
− The wrong dialling mode is set;
Page 86.
Connection is disturbed or
cut off
The system no longer
responds
The battery pack is empty
in a short time
The caller number display
1
(CLIP
) does not function
1
CLIP: Calling Line Identification Presentation = Display the cal-
ler’s phone number.
− The handset is too far from the
base station.
− The base station is in an unsuitable location.
− Return all the functions to their
default status using the Speaker
V." function; Page 86.
− Disconnect the power adapter
plug briefly from the power
socket.
− The battery pack is empty or
defect.
− Place the handset in the base
station properly. Clean the contact
surfaces on the handset and base
station with a soft, dry cloth.
− Place the handset in the base
station for 15 hours.
− The caller number display (CLIP)
is a supplementary service
offered by your telephone network
provider. Contact your network
provider for further information.
− The caller has suppressed the
transmission of their phone
number.
Page 95
13 Technical Properties
Technical data
Feature Value
Standard DECT1−GAP
Power supply (base station) Input: 100−240 V, 50/60 Hz
Power supply (charging station) Input: 100−240 V, 50/60 Hz
Range Outdoors: Approx. 300 m
Standby time Up to 45 h
Max. talk time Up to 7 h
Rechargeable battery pack NiMH 3.6 V 400 mAh
Dialling mode Tone dialling mode
Permissible ambient temperature Normal: 15 °C to 35 °C
Permissible relative humidity 0% to 90%
Flash times 100 ms, 300 ms
1
DECT: Digital Enhanced Cordless Telecommunication =
Standard for cordless telephones.
2
GAP: Generic Access Profile = Standard for the interoperation of
handsets and base stations from different manufacturers.
2
Output: 7.5 V 300 mA
Output: 7.5 V 300 mA
Indoors: Approx. 50 m
Pulse dialling mode
Extreme: 0 °C to 40 °C
Technical Properties
Default settings
Handset
The default settings can be restored via the menu.
Refer to Page 86 for the sequence of menu option selections.
Alarm Off
Audio Setup 3
INT Ring / EXT Ring Melody 1 / Volume 3
Key Tone On
Range Alarm On
Language DEUTSCH
HS Name SWITEL
Base station
The default settings can be restored via the menu.
Refer to Page 86 for the sequence of menu option selections.
Dial Mode Tone
Flash Time Flash−1
PIN−Code 0000
Declaration of Conformity
This device fulfils the requirements stipulated in the EU directive:
1999/5/EU directive on radio equipment and telecommuni-
cations terminal equipment and the mutual recognition of
their conformity. Conformity with the above mentioned
directive is confirmed by the CE symbol on the device.
To view the complete Declaration of Conformity, please
refer to the free download available on our web site
www.switel.com
.
95
Page 96

Maintenance / Guarantee
14 Maintenance / Guarantee
Maintenance
Clean the housing surfaces with a soft, fluff−free cloth.
Do not use any cleaning agents or solvents.
Guarantee
SWITEL equipment is produced and tested according to the latest production methods. The implementation of carefully chosen materials
and highly developed technologies ensure trouble−free functioning and
a long service life. The terms of guarantee do not apply where the
cause of equipment malfunction is the fault of the telephone network
operator or any interposed private branch extension system. The terms
of guarantee do not apply to the batteries or power packs used in the
products. The period of guarantee is 24 months from the date of purchase.
All deficiencies related to material or manufacturing errors within the
period of guarantee will be redressed free of charge. Rights to claims
under the terms of guarantee are annulled following tampering by the
purchaser or third parties. Damage caused as the result of improper
handling or operation, normal wear and tear, incorrect positioning or
storage, improper connection or installation or Acts of God and other
external influences are excluded from the terms of guarantee. In the
case of complaints, we reserve the right to repair defect parts, replace
them or replace the entire device. Replaced parts or devices become
our property. Rights to compensation in the case of damage are excluded where there is no evidence of intent or gross negligence by the
manufacturer.
If your device does show signs of a defect within the period of guarantee, please contact the sales outlet where you purchased the SWITEL
device, producing the purchase receipt as evidence. All claims under
the terms of guarantee in accordance with this agreement can only be
asserted at the sales outlet. No claims under the terms of guarantee
can be asserted after a period of two years from the date of purchase
and hand−over of the product.
96
Page 97

15 Index
A
Alarm, 92
Answering machine in the
telephone network, 85
B
Base station, 77, 93
Basis einstellen, 86
Battery charge status, 78
Brokering, 84
C
Call back, 83
Caller number display, 85, 90
Charging, 78
Charging station, 77
CID book, 86, 90
CLIP, 85
Conference calls, 84
D
Date, 78
Declaration of Conformity, 95
Default settings, 95
Deregistration, 93
Dialling, 83
Dialling mode, 92
Dialling pause, 85
Display, 80
Display icons, 80
Display messages, 90
E
ECO mode, 78
Ending a call, 83
Energy−save mode, 81
Entering names, 88
Entering text, 88
Extending, 93
F
Forwarding calls, 83
Functions, 92
G
GAP standard, 93
Guarantee, 96
H
Handset, 86, 93
Handsfree, 84
Headset port, 92
Holding a call, 84
I
Icons, 80
Inserting the battery pack, 78
Internal calls, 83
K
Key lock, 84
L
Low−radiation, 78
M
Main menu, 86
Maintenance , 96
Making a call, 83
Menu structure, 86
Muting, 84
Muting button, 84
N
Navigation buttons, 81
Notation, 80
O
Operating elements, 79
Operation, 80
P
Package contents, 77
Paging, 84
Phone book, 83, 86, 88
Phone book entries, 82, 88
Private branch exchanges, 85
Problems, 94
Problems and solutions, 94
Pulse dialling mode, 92
R
R function, 85
Receiver volume, 84
Redialling, 83
Registering, 93
Registration, 87
Replace receiver, 83
Index
S
Safety information, 76
Save, 82
Saving, 88, 90
Searching for the handset, 84
Service−Hotline, 94
Standby mode, 81
Starting up, 77
Supplementary services, 85
Switching off, 84
Switching on, 84
T
Taking a call, 78, 83
Talk time, 84
Technical data, 95
Telephoning, 83
Temporary tone dialling, 92
Time, 78
Tone dialling mode, 92
Transferring calls, 83
Troubleshooting, 94
V
VMWI, 85
97
Page 98

Notes
Notes
98
Page 99

Notes
Notes
99
Page 100
Declaration of Conformity
Diese Anlage entspricht der europäischen R&TTE Richtlinie.
Für die komplette Konformitätserklärung nutzen Sie bitte den kostenlosen Download von unserer Website www.switel.com
Cet équipement est conforme à la directive européenne R&TTE.
Pour obtenir la déclaration de conformité intégrale, veuillez vous servir du téléchargement gratuit de notre site Internet www.switel.com
Quest’apparecchiatura è conforme alla direttiva europea R&TTE.
Per la dichiarazione di conformità completa si prega di voler usufruire del servizio gratuito di download dal nostro sito Internet www.switel.com
This equipment complies with the European R&TTE directive.
To view the complete Declaration of Conformity, please refer to the free download available at our web site: www.switel.com
81
.
.
.
.
Service Hotline
Bei technischen Problemen können Sie sich an unsere Service−Hotline unter Tel. 0900 00 1675 innerhalb der Schweiz
S’il s’agit de problèmes techniques, vous pouvez vous adresser à notre hotline de service en Suisse en appelant le numéro 0900 00 1675
In caso di problemi tecnici è possibile rivolgersi alla nostra hotline di assistenza tecnica chiamando al numero 0900 00 1675 valido per la Svizzera
In the event of technical problems, you can contact our hotline service, Tel. 0900 00 1675 within Switzerland
(Kosten Swisscom bei Drucklegung: CHF 2.60/min) wenden.
(frais Swisscom à la date d’impression de ce manuel : CHF 2.60/min).
(spese da rete Swisscom alla data di stampa: CHF 2.60 / min).
(cost via Swisscom at time of going to print: CHF 2.60/min).
Version 1.1 − 30.07.2008
 Loading...