

Page 1
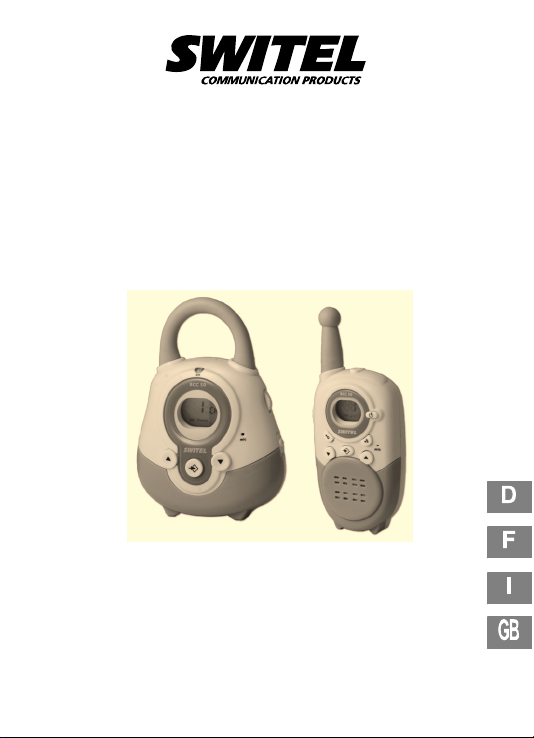
Babyphon mit Walkie−Talkie−Funktion
Interphone bébé avec fonctionnalité Walkie−Talkie
Sorveglia bebé con funzione walkie−talkie
Babyphone with Walkie−Talkie Function
BCC 50
Bedienungsanleitung
Mode d’emploi
Istrzioni per I’uso
Operating Instructions
Page 2
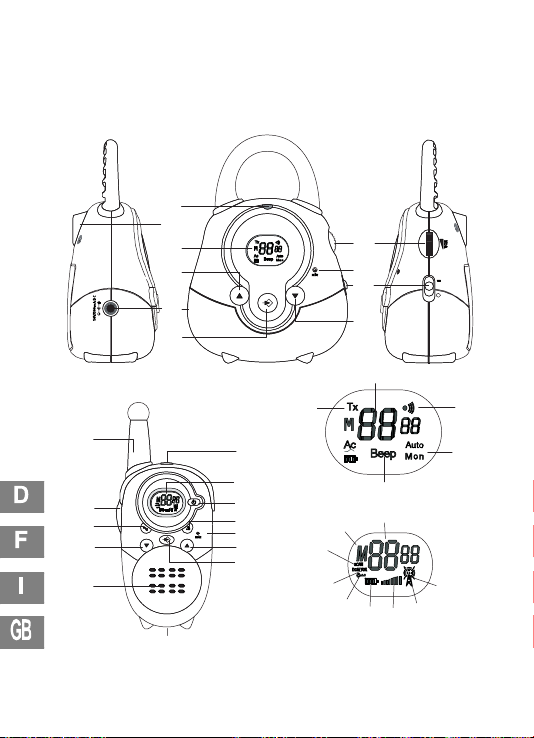
1 Übersicht, Vue d’ensemble, Panoramica,
Overview
I
10
9
8
7
6
5
BCC 50
SWITEL
1
2
3
4
E
II
23
BCC 50
22
21
SWITEL
20
III
D
11
12
13
IV
14
15
16
g
C
i
h
A
B
17
19
f
e
d
a
b
c
18
2
Page 3
6
H
I
K
18
J
3
Page 4

Deutsch Francais
I Baby−Einheit Unité bébé
II Eltern−Einheit Unité parents
III Display Baby−Einheit Écran unité bébé
IV Display Eltern−Einheit Écran unité parents
1 VOX−Empfindlichkeitsregler Régleur de sensibilité VOX
2 Mikrofon Microphone
3 Ein/Ausschalter Interrupteur
4 Menü−Down−Taste Touche de menu vers le bas
5 Menü−Taste Touche de menu
6 Stromversorgungsbuchse Prise d’alimentation
7 Menü−Up−Taste Touche de menu vers le haut
8 LC−Display Écran à cristaux liquides
9 Wandhalterung Fixation murale
10 Power LED Power DEL
11 Kopfhöreranschluss Raccord de casque
12 Display Ecran
13 Ein/Aus−Taste Touche Activé/Désactivé
14 Rufton−Taste Touche sonnerie
15 Mikrofon Microphone
16 Menü−Up−Taste Touche de menu vers le haut
17 Menü−Taste Touche de menu
18 Stromversorgungsbuchse Prise d’alimentation
19 Lautsprecher Haut−parleur
20 Menü−Down−Taste Touche de menu vers le bas
21 Tastensperre Verrouillage du clavier
22 Sprech−Taste (PTT) Touche vocale (PTT)
23 Antenne Antenne
A Alarmton Alarme
B Automatische Überwachung Surveillance automatique
C Signalton Signal sonore
D Senden Envoyer
E Kanalnummer Numéro de canal
a Senden Émission
b Empfangen Réception
c Lautstärke Volumesonore
d Batterielevel Niveau des piles
e Tastensperre Verrouillage du clavier
f VOX VOX
g Suchlauf Détection des canaux
h Symbol für Speicherkanal Icône du canal de mémoire
i Kanalnummer Numéro de canal
4
Page 5

Italiano English
I Unità bebè Transmitter unit
II Unità genitori Receiver unit
III Display unità bebè Display, transmitter unit
IV Display unità genitori Display, receiver unit
1 Regolatore di sensibilità VOX VOX sensitivity control
2 Microfono Microphone
3 Tasto di accensione/spegnimento On/Off switch
4 Tasto menu in basso Scroll down button
5 Tasto menu Menu button
6 Presa per alimentazione elettrica Power supply socket
7 Tasto menu in alto Scroll up button
8 Display LC LC display
9 Supporto per montaggio a parete Wall mounting fixture
10 LED di power Power LED
11 Collegamento per auricolare Earphone connection
12 Display Display
13 Tasto di accensione/spegnimento On/Off button
14 Tasto per segnale di chiamata Ringing tone button
15 Microfono Microphone
16 Tasto menu in alto Scroll up button
17 Tasto menu Menu button
18 Presa per alimentazione elettrica Power supply socket
19 Altoparlante Loudspeaker
20 Tasto menu in basso Scroll down button
21 Blocco tastiera Key lock
22 Tasto di conversazione (PTT) Talk button (PTT)
23 Antenna Antenna
A Tono di allarme Alert signal
B Sorveglianza automatica Automatic monitoring
C Segnale acustico Beep signal
D Trasmettere Transmitting
E Numero canale Channel number
a Trasmettere Transmitting
b Ricevere Receiving
c Volume Volume control
d Livello batterie Battery charge level
e Blocco tastiera Key lock
f VOX VOX
g Ricerca canale Scanning
h Simbolo per canale di memoria Icon for memory channel
i Numero canale Channel number
5
Page 6

2 Sicherheitsinformation
Lesen Sie diese Betriebsanleitung bitte sorgfältig durch. Öffnen Sie
die Geräte unter keinen Umständen selbst und führen Sie keine eigenen Reparaturversuche aus. Bei Gewährleistungsansprüchen wenden
Sie sich bitte an Ihren Fachhändler. SWITEL behält sich das Recht
vor, im Rahmen der Produktverbesserung technische und optische
Änderungen an den Geräten vorzunehmen.
1. Bestimmungsgemäße Verwendung
Dieses Babyphon ist zur Überwachung von Sprachsignalen, z. B. Kindergeräuschen entwickelt worden. Die Überwachung kann bei idealen
Bedingungen innerhalb eines Umkreises von 2 km erfolgen.
2. Installationsstandort
Platzieren Sie die Geräte auf eine ebene, rutschfeste Fläche. Die Gehäuse der Geräte hinterlassen auf der Aufstellfläche in der Regel
keine Spuren. Wegen der Vielzahl der verwendeten Lacke und Oberflächen kann jedoch nicht völlig ausgeschlossen werden, dass durch
die Gehäuse Spuren auf der Aufstellfläche entstehen.
3. Stromversorgung
Verwenden Sie nur die zum Lieferumfang gehörenden SWITEL−Netz−
adapter, da andere Netzteile das Babyphon beschädigen könnten.
Öffnen Sie die Netzadapter auf keinen Fall. Wenn ein Netzadapter
geöffnet wird, während er an der Stromversorgung angeschlossen ist,
besteht das Risiko einer tödlichen Verletzung.
Wenn Sie in der Eltern−Einheit nichtaufladbare Batterien benutzen
wollen, dürfen Sie nie den Netzadapter verwenden. Es besteht Explosionsgefahr.
4. Entsorgen des Geräts
Gemäß europäischer und internationaler Gesetze und
Richtlinien sind Sie verpflichtet, dieses Gerät ordnungsgemäß zu entsorgen. Dies dient sowohl dem Schutz von
Personen als auch der Umwelt. Das nebenstehende
Symbol zeigt an, dass nicht mehr benötigte elektronische
Geräte separat von Hausmüll entsorgt werden müssen.
6
Page 7

Geräte, die veraltet sind oder ihre Lebensdauer überschritten
haben, müssen an einem dafür vorgesehenen Sammelpunkt der öf-
fentlichen Abfallentsorgung entsorgt werden.
Akkus und Netzteile müssen vom Verkäufer oder an den dafür vor-
gesehenen Sammelpunkten der öffentlichen Abfallentsorgung entsorgt werden.
Verpackungsmaterialien müssen gemäß den lokalen Vorschriften
entsorgt werden.
5. Wichtig
Prüfen Sie vor der Verwendung des drahtlosen Babyphons die
Tonübertragung. Hierbei wird überprüft, ob die Einheiten in
Reichweite zueinander platziert sind. Die Tonübertragung sollte
in regelmäßigen Abständen wie folgt überprüft werden: Lassen
Sie einen Erwachsenen leise in die Baby−Einheit sprechen.
Die Töne aus dem Zimmer des Babys sollten über die
Eltern−Einheit in einem anderen Raum deutlich vernehmbar
sein.
Platzieren Sie die Baby− und die Eltern−Einheit während des
Betriebs nicht zu nah beieinander. Die Einheiten könnten
nachhallen oder es könnten Störgeräusche entstehen.
Wenn Sie einen Netzadapter verwenden, positionieren Sie
diesen nicht in der Nähe des Babys, sondern unter einem
Fenster oder an einer anderen Stelle, wo das Baby ihn nicht
ergreifen kann.
Akkuleistung, Wände, Funkwellen und Geländebeschaffenheit
können sich auf die Reichweite der Geräte auswirken. Um eine
bessere Leistung zu erzielen, wechseln Sie in einen anderen
Kanal oder platzieren Sie die Eltern−Einheit näher zur
Baby−Einheit.
6. Reinigung und Pflege
Reinigen Sie die Geräte nur mit einem leicht angefeuchteten
(Wasser) weichen Tuch.
Reinigungsmittel, die Lösungsmittel enthalten, dürfen auf keinen
Fall verwendet werden.
7
Page 8
Die Batteriekontakte nur mit einem trockenen Tuch reinigen.
Falls die Geräte feucht geworden sind, entfernen Sie die
Batterien und warten Sie, bis die Geräte vollständig getrocknet
sind.
3 Packungsinhalt
1 Eltern−Einheit mit dazugehörigem Netzadapter
1 Baby−Einheit mit dazugehörigem Netzadapter
1 Akkupack für Eltern−Einheit
1 Bedienungsanleitung
1 Gürtelclip
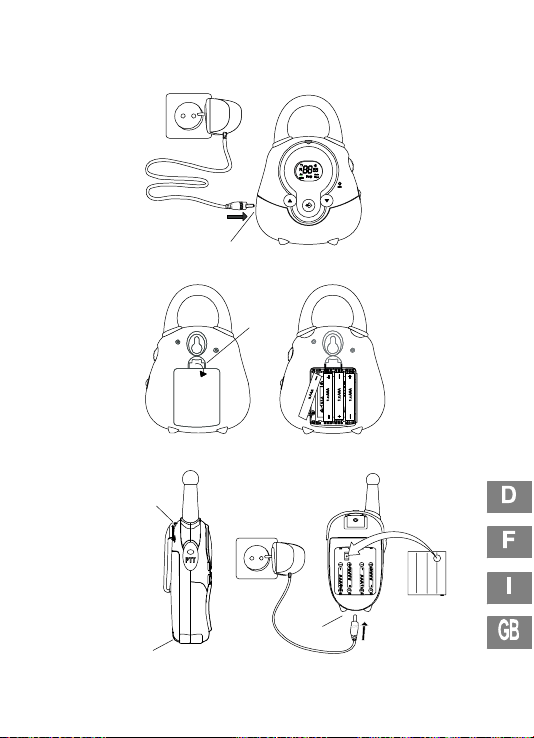
4 Inbetriebnahme / Installation
Nachfolgend werden häufig Positionsangaben z. B. (1)
oder (a) oder (H) angegeben. Wechseln Sie hierzu bitte auf
die Seiten 2 und 3.
1. Einsetzen des Akkupacks in die Eltern−Einheit
Verwenden Sie nur CE−zertifizierte Akkupacks.
Gürtelclip an Position (I) vom Gehäuse leicht wegdrücken und
nach oben schieben.
Akkufach an Position (J) entriegeln und Deckel entfernen.
Akkupack polrichtig einsetzen; der kreisrunde metallische
Ausschnitt (K) im Akkupack muss so eingelegt werden, dass er
unten liegt und Kontakt zu dem entsprechenden Gegenstück im
Akkufach hat.
Akkufach schließen, verriegeln und Gürtelclip montieren.
8
Page 9

Akkupack vor dem ersten Gebrauch vollständig (d.h.
mindestens 12−14 Std.) aufladen. Zum Laden muss der Akkupack nicht aus der Eltern−Einheit genommen werden.
Bei Betrieb mit Netzadapter wird er automatisch geladen.
Das Akku−Icon blinkt während des Ladevorgangs und hört
auf zu blinken, wenn der Ladevorgang abgeschlossen ist.
2. Anschließen des Netzadapters an die Eltern−Einheit
Schließen Sie den Netzadapter an die DC 7,5V−Buchse (18) der
Eltern−Einheit und an die Steckdose an.
3. Einsetzen der Batterien in die Baby−Einheit
Die Baby−Einheit kann mit 4 AAA" Batterien oder mit
wiederaufladbaren Akkus des gleichen Typs betrieben
werden. Bedenken Sie aber, dass mit dem mitgelieferten
Netzadapter keine Aufladung der Akkus vorgenommen
werden kann. Sie benötigen ein zusätzliches
Batteriefach (H) entriegeln und Deckel entfernen.
Batterien polrichtig einsetzen.
Batteriefach schließen.
handelsübliches Ladegerät.
4. Anschließen des Netzadapters an die Baby−Einheit
Schließen Sie den Netzadapter an die DC 10V−Buchse (6) der
Baby−Einheit und an die Steckdose an.
5. Wandmontage der Baby−Einheit
Sie können die Baby−Einheit an der Wand befestigen. Sie benötigen
nur eine geeignete Schraube, passend zum Langloch an der Rückseite der Baby−Einheit.
9
Page 10
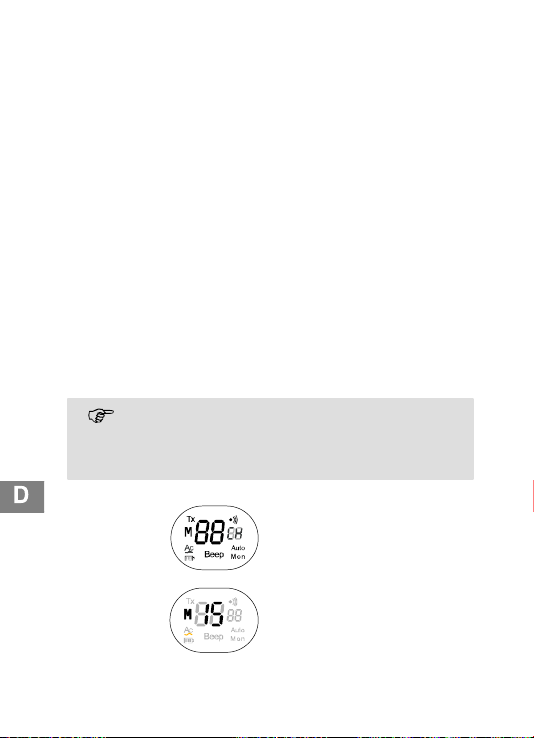
5 Betrieb
1. Baby−Einheit (Funksender)
Damit der Funksender (Baby−Einheit) und der Empfänger (Eltern−Einheit) miteinander kommunizieren können, müssen beide auf denselben Speicherkanal (M1−M15) eingestellt sein.
Empfindlichkeitsregler (VOX)
Mit dem Empfindlichkeitsregler wird eingestellt, ab welchem Geräuschpegel der Funksender mit dem Senden beginnen soll.
1 kHz Signalton
Damit Sie sicher sind, dass der Funksender funktioniert, können Sie
ihn so einstellen, dass er alle 30 Sekunden einen Signalton sendet.
Automatische Überwachung
Der Funksender kann so eingestellt werden, dass er alle 5 Minuten
das Mikrofon für 5 Sekunden aktiviert und die Geräusche an den
Empfänger überträgt.
Alarmton
Der Funksender kann so eingestellt werden, dass er vor dem Senden
der Geräusche einen Signalton erzeugt.
Während der nachfolgend beschriebenen Einstellungen
blinkt das Display; es wechselt nach einigen Sekunden in
eine konstante Anzeige. Danach ist die Einstellung gespeichert.
10
Einschalten
Ausschalten
Speicherkanal
einstellen
Schalter (3) in Position I".
Hinweis: Das Display zeigt den aktuellen Kanal oder Speicherkanal.
Schalter (3) in Position 0".
Hinweis: Das Display erlischt.
2x Menü−Taste (5) betätigen; mit
Taste (7,4) Speicherkanal
(M1−M15) wählen.
Hinweis: Das M" im Display erscheint.
Page 11
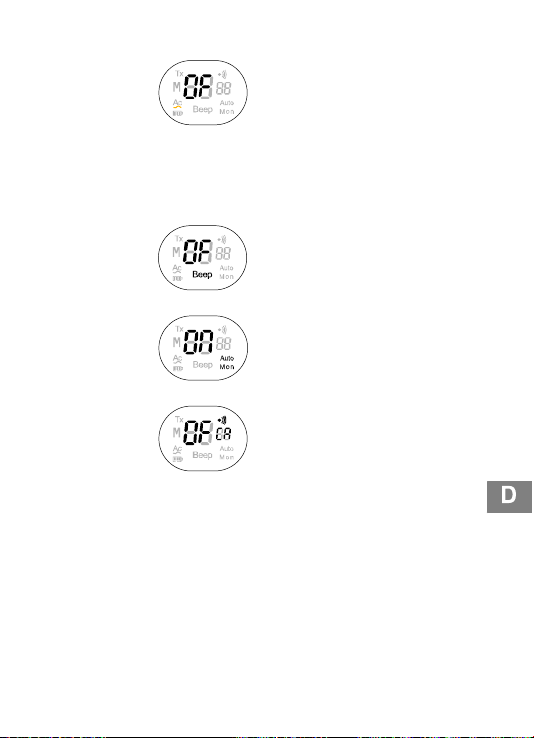
Speicherkanal
deaktivieren
2x Menü−Taste (5) betätigen; mit
Taste (7,4) OF" wählen.
Hinweis: Das M" im Display erlischt.
Übertragungsempfindlichkeit einstellen
(VOX)
1 kHz Signalton ein/aus
Automatische
Überwachung
ein/aus
Alarmton ein/
aus
Mit Regler (1) die Empfindlichkeit
einstellen, bei der die Baby−Einheit
zu senden beginnen soll.
Regler nach oben = empfindlich
Regler nach unten = weniger empfindlich
3x Menü−Taste (5) betätigen; mit
Taste (7) ON" oder mit Taste (4)
OF" wählen.
Signalton ein: = BEEP
Signalton aus: = keine Anzeige
4x Menü−Taste (5) betätigen; mit
Taste (7) ON" oder mit Taste (4)
OF" wählen.
Autom. Überwachung ein = AUTO MON
Autom. Überwachung aus = keine Anzeige
5x Menü−Taste (5) betätigen; mit
Taste (7) ON" oder mit Taste (4)
OF" wählen.
Bei eingeschaltetem Alarmton erscheint das
Alarm−Symbol im Display.
11
Page 12
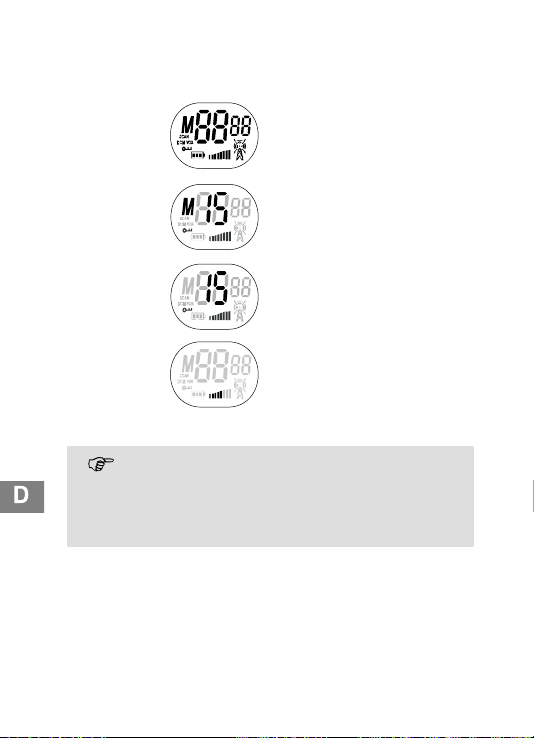
2. Eltern−Einheit (Empfänger)
Einschalten
Ausschalten
Speicherkanal
einstellen
Speicherkanal
deaktivieren
Lautstärke
einstellen
Ein/Aus−Taste (17) gedrückt halten, bis Signalton ertönt.
Hinweis: Das Display zeigt den aktuellen Kanal oder Speicherkanal. Beim Ausschalten
erlischt das Display.
2x Menü−Taste (17) betätigen; mit
Taste (16,20) Speicherkanal
(M1−M15) wählen.
Hinweis: Das M" im Display erscheint.
2x Menü−Taste (17) betätigen; mit
Taste (16,20) OF" wählen.
Hinweis: Das M" im Display erlischt.
Mit Taste (16) Lautstärke erhöhen;
mit Taste (20) verringern.
Hinweis: Die Balkenreihe verändert sich analog zur Lautstärke.
3. Eltern−Einheit als Walkie−Talkie nutzen
Sie können die Eltern−Einheit als Walkie−Talkie nutzen, um
mit anderen Teilnehmern zu kommunizieren, die auf demselben Kanal sind. Dazu müssen Sie den Speicherkanal−
Betrieb (M1−M15) verlassen und einen der acht verfügba-
VOX−Einstellung
Das Walkie−Talkie ist mit einer geräuschaktivierenden Elektronik ausgerüstet, die dazu führt, dass nur dann gesendet wird, wenn auch tatsächlich Geräusche vorhanden sind. Es ist nicht ratsam, VOX−Betrieb
einzuschalten, wenn Sie sich in einer geräuschreichen Umgebung befinden.
ren Kanäle einstellen.
12
Page 13

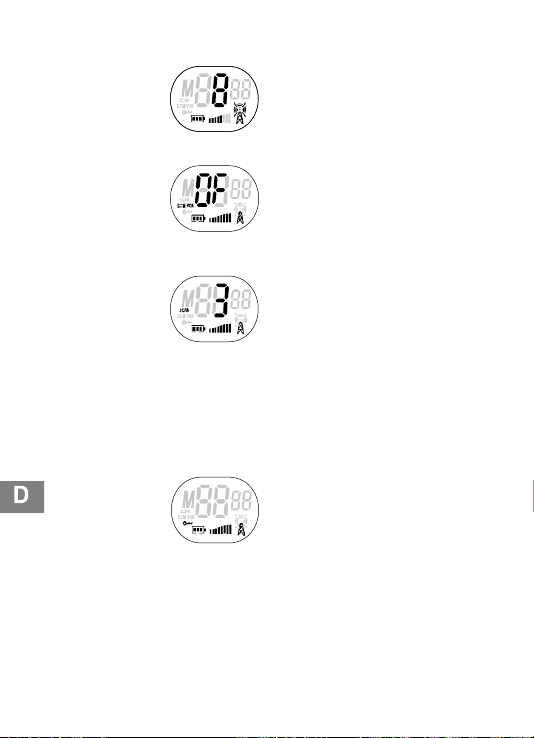
Rufton
Um anderen Teilnehmern zu signalisieren, dass Sie sprechen möchten, können Sie einen Rufton senden. Das geschieht durch Drücken
der Rufton−Taste.
Kanalüberwachung
Sie können die Funktion MONITORING" dazu benutzen, einen aktuellen Kanal nach schwachen Signalen zu durchsuchen.
Suchlauf
Der Suchlauf bewirkt das endlose Durchsuchen aller Kanäle (1−8).
Erst wenn ein aktives Signal erkannt wird, stoppt der Suchlauf und
Sie können −wenn Sie möchten− ein Gespräch führen, indem Sie die
PTT−Taste drücken. Sie können den Suchlauf aber auch fortsetzen
und gefundene Signale für den weiteren Suchlauf ausschließen.
Tastensperre
Sie können die Tasten Ihres Walkie−Talkies gegen unbeabsichtigtes
Auslösen von Funktionen sperren.
Speicherkanal
deaktivieren
Kanal
einstellen
Ein Signal
empfangen
2x Menü−Taste (17) betätigen; mit
Taste (16,20) OF" wählen.
Hinweis: Das M" im Display erlischt.
1x Menü−Taste (17) betätigen und
mit Taste (16,20) den gewünschten Kanal, z. B. 8 wählen.
Hinweis: Das M" im Display erlischt.
Die Eltern−Einheit ist permanent
auf Empfang, wenn sie eingeschaltet ist und gerade nicht sendet. Wenn ein Signal empfangen
wird, leuchtet das RX−Symbol auf.
13
Page 14
14
Ein Signal
senden
VOX−
Einstellung
Suchlauf
Tastensperre
Rufton
PTT−Taste (22) gedrückt halten,
um zu senden. Das TX−Symbol
leuchtet auf. Halten Sie das Walkie−Talkie senkrecht und sprechen
Sie in einem Abstand von 10 cm
in das Mikrofon.
3x Menü−Taste (17) betätigen; die
aktuelle VOX−Einstellung (1,2,3,
OF) blinkt und das VOX−Symbol
erscheint im Display.
Hinweis: Bei der Auswahl OF erlischt das
VOX−Symbol im Display.
Menü−Taste (17) und Taste (16)
gleichzeitig drücken, um den
Suchlauf zu starten. Alle Kanäle
(1−8) werden durchsucht. Wenn
ein Signal erkannt wurde, stoppt
der Suchlauf und Sie hören das
aktive Signal. PTT−Taste (22) betätigen, um auf diesen Kanal zu
wechseln.
Mit Menü−Taste (17) den Suchlauf
beenden. Mit Taste (16) kann der
Suchlauf fortgesetzt werden.
Taste (21) ca. 3 Sek. gedrückt halten, um die Tastensperre ein− oder
auszuschalten.
Hinweis: Das Schlüsselsymbol erscheint bei
aktivierter und erlischt bei deaktivierter
Tastensperre.
Rufton−Taste (14) drücken, um anderen Teilnehmern 3 Sek. lang zu
signalisieren, dass man sprechen
möchte.
Hinweis: Die anderen Teilnehmer hören den
Rufton, wenn sie auf demselben Kanal sind.
Page 15

Kanalüberwachung
(Monitoring)
Hintergrundbeleuchtung
Anschluss für
Kopfhörer
Menü−Taste (17) und Taste (16)
gleichzeitig drücken, um den aktuellen Kanal nach schwachen
Signalen zu durchsuchen.
Mit Menü−Taste (17) die Überwachung beenden.
Die Hintergrundbeleuchtung schaltet sich automatisch für 5 Sek. bei
Betätigung irgendeiner Taste ein.
Oben in der Eltern−Einheit befindet
sich ein Kopfhöreranschluss.
6 Fehlerbehebung
Service−Hotline / Garantie
Haben Sie Probleme mit Ihrem Überwachungsgerät, kontrollieren Sie
zuerst die folgenden Hinweise. Bei technischen Problemen können
Sie sich an unsere Service−Hotline unter Tel. 0900 00 1675 innerhalb
der Schweiz (Kosten Swisscom bei Drucklegung: CHF 2.00/min)
wenden. Bei Garantieansprüchen wenden Sie sich an Ihren Fachhändler. Die Garantiezeit beträgt 2 Jahre.
1. Kein Strom
Gerät ist ausgeschaltet. Schalten Sie das Gerät ein.
Überprüfen Sie, ob die Akkus korrekt eingelegt sind.
Überprüfen Sie, ob der Adapter korrekt am Gerät angeschlossen
ist.
Prüfen Sie den Akkustatus. Setzen Sie ggf. neue Akkus ein.
2. Keine Übertragung (Walkie−Talkie)
Drücken und halten Sie die PTT−Taste, bevor Sie sprechen.
Überprüfen Sie die Kanalaktivität und wählen Sie einen anderen
Kanal, wenn der aktuelle belegt ist.
15
Page 16

3. Kein Empfang
Überprüfen Sie die eingestellte Lautstärke.
Stellen Sie sicher, dass Sie sich innerhalb eines geeigneten
Empfangsbereichs befinden. Ändern Sie ggf. Ihren Standort.
4. Schlechter Empfang / Rauschen während der
Übertragung
Die Kommunikationsreichweite ist abhängig von der Umgebung.
Stahlkonstruktionen, Hochhäuser oder der Betrieb in Fahrzeugen
wirken sich negativ auf die Reichweite aus.
Versuchen Sie, in einer Umgebung mit möglichst wenig
Hindernissen zu kommunizieren.
Ändern Sie ggf. Ihren Standort.
5. Störungen
Sender und Empfänger sind zu dicht beieinander positioniert. Der
Mindestabstand beträgt 1,5 m.
16
Page 17

2 Information de sécurité
Veuillez lire très attentivement ce mode d’emploi. N’ouvrez en aucun
cas les appareils vous−même et n’effectuez aucun essai personnel de
réparation. Dans le cadre de l’amélioration de produit, SWITEL se réserve le droit d’effectuer des modifications techniques et d’optique sur
les appareils.
1. Utilisation conforme aux prescriptions
Cet interphone bébé a été conçu pour la surveillance de signaux vocaux, p. ex. de bruits d’enfants. Dans des conditions idéales, cette
surveillance peut s’effectuer dans un périmètre de 2 km.
2. Lieu d’installation
Placez les appareils sur une surface plane et antidérapante. Les boîtiers des appareils ne laissent en général aucune trace sur la surface
de pose. En raison du nombre de laques et de superficies utilisées, la
formation de traces par les boîtiers sur les surfaces de pose ne peut
toutefois pas être entièrement exclue.
3. Alimentation en courant
N’utilisez que l’adaptateur de réseau SWITEL faisant partie de la livraison, des adaptateurs d’autres marques pouvant endommager l’interphone. N’ouvrez en aucun cas cet adaptateur. Si vous l’ouvrez
pendant qu’il est raccordé à l’alimentation en courant, vous encourez
un danger de mort.
Si vous désirez utiliser des piles non chargeables dans
l’unité parents, vous ne devez jamais utiliser l’adaptateur.
Risque d’explosion.
4. Élimination de l’appareil
Conformément aux lois européennes et internationales,
vous êtes dans l’obligation d’éliminer cet appareil de façon réglementaire. Ceci sert tant à la protection des personnes que de l’environnement. L’icône ci−contre indique
que les appareils électroniques plus utilisés doivent être
éliminés séparément des ordures ménagères.
17
Page 18

Les appareils usagés ou ceux qui ont dépassé leur durée de vie,
doivent être éliminés dans un centre de collecte prévu à cet effet par
l’organisme public d’élimination des déchets.
Les piles rechargeables et les blocs d’alimentation doivent être
éliminés par le revendeur ou dans un centre de collectre prévu à cet
effet par l’organisme public d’élimination des déchets.
Les fournitures d’emballage doivent être éliminées conformément
au règlement local.
5. Important
Avant de vous servir du babyphone sans fil, contrôlez la
transmission du son. Vérifier si les unités sont bien placées à
portée l’une de l’autre. Vérifier la transmission du son à
intervalles réguliers : Faites parler doucement un adulte dans
l’unité bébé.
Les sons en provenance de la chambre du bébé doivent être
parfaitement audibles dans une autre pièce via l’unité parents.
Pendant le fonctionnement, ne pas placer les unités trop près
l’une de l’autre. Elle pourraient résonner ou créer des
perturbations.
Si vous utilisez un adaptateur réseau, ne le positionnez pas près
du bébé mais sous une fenêtre ou à un autre endroit où le bébé
ne puisse pas le saisir.
La puissance des piles rechargeables, les murs, les ondes
radioélectriques et la nature du terrain peuvent exercer une
influence sur la portée des appareils.
6. Nettoyage et entretien
Nettoyer les appareils uniquement avec un chiffon doux
légèrement humidifié avec de l’eau.
N’utiliser en aucun cas de produit d’entretien contenant un
solvant.
Nettoyer les contacts des piles uniquement avec un chiffon sec.
Au cas où les appareils se seraient humidifiés, retirer les piles et
attendre qu’il soient complètement secs.
18
Page 19

3 Contenu de l’emballage
1 unité parents avec un adaptateur réseau correspondant
1 unité bébé avec un adaptateur réseau correspondant
1 pack de piles rechargeables pour l’unité parents
1 mode d’emploi
1 clip de ceinture
4 Mise en service / Installation
Des indications de position seront souvent mentionnées
par la suite p. ex. (1) ou (a) ou (H). Passez alors aux pages
2 et 3.
1. Introduction du pack de piles rechargeables dans
l’unité parents
N’utilisez que des packs certifiés CE
Repousser légèrement du boîtier le clip de ceinture − position (I)
et le pousser vers le haut.
Déverrouiller le compartiment à piles rechargeables − position (J)
et retirer le couvercle.
Introduire le pack et veiller à une polarisation correcte ; l’encoche
métallique en forme de cercle (K) dans le pack doit être
introduite de sorte qu’elle se trouve en bas et qu’elle ait contact
avec la pile opposée.
Fermer le compartiment, le verrouiller et monter le clip de
ceinture.
19
Page 20

Charger complètement le pack (au moins 12 à 14 heures)
avant une première utilisation. Pour cela, vous n’avez pas
besoin de le retirer de l’unité parents. Il est chargé automatiquement s’il fonctionne avec un adaptateur réseau.
L’icône des piles rechargeables clignote pendant l’opération de chargement et s’arrête de clignoter quand celle−ci
est terminée.
2. Raccordement de l’adaptateur à l’unité parents
Raccordez l’adaptateur à la prise CC 7,5V(18) de l’unité parents
ainsi qu’à la prise de courant.
3. Introduction des piles dans l’unité bébé
L’unité bébé peut fonctionner avec 4 piles AAA" ou avec
des piles rechargeables du même type. Tenez compte cependant du fait que vous ne pouvez pas charger les piles
rechargeables avec l’adaptateur réseau fourni avec la livraison. Vous avez besoin d’un chargeur supplémentaire
Déverrouiller le compartiment à piles (H) et retirer le couvercle.
Introduire les piles en veillant à une polarité correcte.
Fermer le compartiment.
disponible en magasin.
4. Raccordement de l’adaptateur à l’unité bébé
Raccordez l’adaptateur à la prise CC 10V(6) de l’unité parents
ainsi qu’à la prise de courant.
5. Montage mural de l’unité bébé
Vous pouvez fixer l’unité bébé au mur. Vous n’avez besoin que d’une
vis adéquate convenant au trou oblong situé au dos.
5 Fonctionnement
1. Unité bébé (émetteur radio)
Afin que l’émetteur radio (unité bébé) et le récepteur (unité parents)
puissent communiquer entre eux, ils doivent être réglés tous les deux
20
Page 21

sur le même canal de mémoire (M1−M15).
Régleur de sensibilité (VOX)
Le régleur de sensibilité permet de régler à partir de quel niveau sonore l’émetteur radio doit commencer à émettre.
Signal sonore 1 kHz
Afin d’être sûr que l’émetteur radio fonctionne, vous pouvez le régler
de façon à ce qu’il émette un signal toutes les 30 secondes.
Surveillance automatique
L’émetteur radio peut être réglé de façon à ce qu’il active le microphone toutes les 5 minutes pendant 5 secondes et à ce qu’il transmette les bruits au récepteur.
Alarme
L’émetteur radio peut être réglé de façon à ce qu’il produise un signal
sonore avant l’émission des bruits.
L’écran clignote pendant les réglages décrits ci−dessous ;
il passe à un affichage permanent au bout de quelques secondes. Puis le réglage est mémorisé.
Activer
Désactiver
Régler le canal
de mémoire
Désactiver lecanal de
mémoire
Interrupteur (3) à la position I".
Remarque : L’écran affiche le canal ou le canal de mémoire actuel.
Interrupteur (3) à la position 0".
Remarque : L’éclairage de l’écran s’éteint.
2x Appuyer sur la touche de menu
(5) ; Sélectionner le canal
(M1−M15) avec la touche (7,4).
Remarque : Le M" s’affiche sur l’écran.
2x Appuyer sur la touche de menu
(5) ; Sélectionner OF" avec la
touche (7,4).
Remarque : Le M" s’efface de l’écran.
21
Page 22

Régler la sensibilité de
transmission
(VOX)
Signal sonore
1 kHz activé/
désactivé
Surveillance
automatique
activée/désactivée
Alarme activée/désactivée
Régler avec le régleur (1) la sensibilité à laquelle l’unité bébé doit
commencer à émettre.
Régleur vers le haut = grande sensibilité
Régleur vers le bas = sensibilité moins grande
3x Appuyer sur la touche de menu
(5) ; Sélectionner ON" avec la
touche (7) ou OF" avec la touche
(4).
Signal sonore activé : = BEEP
Signal sonore désactivé : = pas d’affichage
4x Appuyer sur la touche de menu
(5) ; Sélectionner ON" avec la
touche (7) ou OF" avec la touche
(4).
Surveillance automatique activée= AUTO
MON
Surveillance automatique désactivée= pas
d’affichage
5x Appuyer sur la touche de menu
(5) ; Sélectionner ON" avec la
touche (7) ou OF" avec la touche
(4).
Si l’alarme est branchée, l’icône d’alarme s’affiche sur l’écran.
22
Page 23

2. Unité parents (récepteur)
Activer
Désactiver
Régler le canal
de mémoire
Désactiver lecanal de
mémoire
Régler le volume sonore
Maintenir la touche Activer/désactiver(17) appuyée jusqu’à ce qu’un
signal sonore soit audible.
Remarque : L’écran affiche le canal ou le canal de mémoire actuel. L’éclairage de l’écran
s’éteint à la désactivation.
2x Appuyer sur la touche de menu
(17) ; Sélectionner le canal
(M1−M15) avec la touche (16,20).
Remarque : Le M" s’affiche sur l’écran.
2x Appuyer sur la touche de menu
(17) ; Sélectionner OF" avec la
touche (16,20).
Remarque : Le M" s’efface de l’écran.
Augmenter le volume avec la touche (16) ; Le diminuer avec la touche (20).
Remarque : La rangée de barres se modifie de
manière analogue au volume.
3. Utiliser l’unité parents comme Walkie−Talkie
Vous pouvez utiliser l’unité parents comme Walkie−Talkie
pour communiquer avec d’autres correspondants se trouvant sur le même canal. Pour cela, vous devez quitter le
fonctionnement canal de mémoire (M1−M15) et paramétrer
Réglage VOX
Le Walkie−Talkie est équipé d’une électronique activant les bruits qui
conduit à ce que des bruits ne sont émis que si l’en existe effectivement. Il n’est pas recommandé d’activer le fonctionnement VOX si
vous vous trouvez dans un environnement bruyant.
l’un des huits canaux disponibles.
23
Page 24

Sonnerie
Pour signaler à des correspondants que vous désirez leur parler, vous
pouvez leur émettre une sonnerie. Vous le faîtes en appuyant sur la
touche de sonnerie.
Surveillance du canal
Vous pouvez utiliser la fonctionnalité MONITORING" en vue de détecter les signaux faibles du canal actuel.
Détection des canaux
La détection des canaux entraîne l’exploration illimitée de tous les canaux (1−8). Ce n’est que lorsqu’un signal actif est reconnu que la détection s’arrête et vous pouvez alors communiquer − si vous le désirez − en appuyant sur la touche PTT. Mais vous pouvez également
continuer la détection et exclure des signaux trouvés.
Verrouillage du clavier
Vous pouvez verrouiller les touches de votre Walkie−Talkie pour le
protéger contre un déclenchement de fonctions.
24
Désactiver lecanal de
mémoire
Régler le canal
Recevoir un signal
2x Appuyer sur la touche de menu
(17) ; Sélectionner OF" avec la
touche (16,20).
Remarque : Le M" s’efface de l’écran.
1x Appuyer sur la touche de menu
(17) et sélectionner le canal souhaité, p. ex. 8, avec la touche
(16,20).
Remarque : Le M" s’efface de l’écran.
L’unité parents est constamment
sur réception s’il est activée et
n’est pas en train d’émettre. Lorsqu’un signal est reçu, l’icône RX
s’allume.
Page 25

Émettre un signal
Réglage de
VOX
Détection des
canaux
Verrouillage
du clavier
Sonnerie d’appel
Maintenir la touche PTT (22) appuyée pour émettre. L’icône TX
s’allume. Tenez le Walkie−Talkie à
la verticale et parlez à une distance de 10 cm du microphone.
3x Appuyer sur la touche de menu
(17) ; Le réglage de VOX actuel
(1,2,3, OF) clignote et l’icône de
VOX s’affiche à l’écran.
Remarque : À la sélection de OF l’icône de
VOX s’affiche à l’écran.
Appuyer simultanément sur la touche de menu (17) et la touche (16)
pour commencer la détection.
Tous les canaux sont (1−8)
détectés. Lorsqu’un signal est reconnu, la détection s’arrête et
vous entendez le signal actif.Appuyer sur la touche PTT (22) pour
passer sur ce canal.
Terminer la détection avec la touche de menu (17). Vous pouvez
continuer la détection avec la touche (16).
Maintenir la touche (21) appuyée
pendant env. 3 sec. pour activer
ou désactiver le verrouillage du
clavier.
Remarque : L’icône de la clé s’affiche si le
clavier est activé et disparaît s’il est désactivé.
Appuyer sur la touche de sonnerie
(14) pour signaliser à d’autres correspondants que vous désirez leur
parler.
Remarque : Les autres correspondants entendent la sonnerie s’ils sont sur le même canal.
25
Page 26

Surveillance
du canal
(Monitoring)
Eclairage de
fond
Raccordement
pour le casque
Appuyer simultanément sur la touche de menu (17) et la touche (16)
pour détecter les signaux faibles
du canal actuel.
Terminer la détection avec la touche de menu (17).
L’éclairage de fond se désactive
automatiquement pendant 5 secondes si vous appuyez sur une
touche quelconque.
En haut de l’unité parents se trouver un raccord de casque.
6 Élimination des erreurs
Hotline de service / Garantie
Si vous avez des problèmes avec votre appareil de surveillance,
contrôlez d’abord les remarques suivantes. En cas de problèmes
techniques, vous pouvez vous adresser à notre hotline de service en
Suisse au numéro de téléphone 0900 00 1675 (frais Swisscom à la
date d’impression de ce manuel : CHF 2.00/min). Si vous avez des
droits de garantie, adressez−vous à votre revendeur. La durée de la
garantie est de 2 ans.
1. Pas de courant
L’appareil est débranché. Branchez−le.
Contrôlez que les piles rechargeables sont insérées
correctement.
Vériiez que l’adaptateur est correctement raccordé à l’appareil.
Contrôlez l’état des piles rechargeables. Remplacez−les par des
neuves, le cas échéant.
2. Pas de transmission (Walkie−Talkie)
Appuyez sur la touche PTT et maintenez−la appuyée avant de
parler.
26
Page 27

Vérifiez l’activité du canal et sélectionnez un autre canal si
l’actuel est occupé.
3. Pas de réception
Vérifiez le volume réglé.
Assurez−vous que vous vous trouvez à l’intérieur de l’espace de
réception adéquat. Le cas échéant, changez de place.
4. Mauvaise réception / Bruit de fond pendant la
transmission
La portée de communication dépend de l’environnement.
Des constructions métalliques, des immeubles ou le
fonctionnement dans des véhicules ont des répercussions
négatives sur la portée.
Essayez de communiquer dans un environnement présentant
très peu d’obstacles.
Le cas échéant, changez de place.
5. Dérangements
Récepteur et émetteur sont trop près l’un de l’autre. La distance
minimum est de 1,5 m.
27
Page 28

2 Informazioni di sicurezza
Leggere attentamente le presenti istruzioni per l’uso. Non aprire per
nessun motivo gli apparecchi e non tentare di compiere riparazioni di
propria iniziativa. In caso di reclami entro il periodo di garanzia, rivolgersi al rivenditore autorizzato. SWITEL si riserva il diritto di compiere
modifiche tecniche e ottiche agli apparecchi in occasione di migliorie
eseguite sul prodotto.
1. Impiego conforme agli usi previsti
Il presente sorveglia−bebè è stato sviluppato per il rilevamento di segnali vocali come per es. quelli emessi da bambini. In condizioni ideali
è possibile compiere una sorveglianza entro un raggio d’azione di 2
km.
2. Luogo di ubicazione
Posizionare gli apparecchi su una superficie piana e antiscivolo. In linea generale le custodie degli apparecchi non lasciano tracce sulla rispettiva superficie di ubicazione. A causa dell’elevato numero di vernici e superfici non è comunque possibile escludere completamente
eventuali residui sulla superficie di ubicazione.
3. Alimentazione elettrica
Servirsi degli adattatori di corrente SWITEL forniti in dotazione, l’uso di altri
alimentatori di rete potrebbe infatti danneggiare il sorveglia−bebè. Non
aprire per nessun motivo gli adattatori di corrente. In caso di apertura di
un adattatore di corrente con alimentazione elettrica inserita sussiste pericolo di vita.
Utilizzando all’interno dell’unità genitori batterie non ricaricabili, non utilizzare mai l’adattatore di corrente. Pericolo di esplosione.
4. Smaltimento dell’apparecchio
Eseguire lo smaltimento dell’apparecchio in conformità
ed osservanza delle norme e direttive europee ed internazionali in vigore in materia. Ciò è rivolto alla protezione
sia delle persone sia dell’ambiente. Il simbolo raffigurato
qui accanto segnala che non è consentito procedere allo
smaltimento di apparecchi elettronici assieme ai rifiuti do-
28
Page 29

mestici, dovendo pertanto compiere uno smaltimento separato.
Apparecchi esauriti o al di là della vita utile prevista sono da consegnare a scopo di smaltimento presso un apposito centro di raccolta
della propria azienda comunale per il trattamento dei rifiuti.
Consegnare batterie ricaricabili e alimentatori per il rispettivo smal-
timento al venditore o presso gli appositi centri di raccolta istituiti dalla
propria azienda comunale per il trattamento dei rifiuti.
Prevedere lo smaltimento di confezioni ed imballaggi a rispetto
delle disposizioni locali in vigore in materia.
5. Importante
Verificare la trasmissione audio prima di utilizzare il
sorveglia−bebè senza filo. Posizionare a tale scopo le unità l’una
rispetto all’altra in osservanza della rispettiva portata. Si consiglia
di verificare regolarmente il corretto funzionamento della
trasmissione audio come segue: Fare parlare a bassa voce una
persona adulta rivolta verso l’ unità bebè.
I suoni e rumori registrati nella stanza del bebè dovranno essere
avvertibili dall’ unità genitori" dislocata in un’altra stanza.
Evitare di posizionare l’unità bebè e l’unità genitori durante
l’esercizio troppo vicine l’una all’altra. Le unità possono infatti
causare fenomeni di riverberazione o interferenze.
Utilizzando un adattatore di corrente, evitare di posizionarlo in
prossimità del bebè bensì sotto ad una finestra o in un altro
punto sufficientemente lontano dalla portata del bebè.
Stato di carica delle batterie ricaricabili, presenza di pareti, onde
radio e la conformazione dell’ambiente circostante possono
influenzare la portata degli apparecchi. Per ottenere migliori
prestazioni, passare ad un altro canale oppure avvicinare l’unità
genitori maggiormente all’unità bebè.
6. Pulizia e cura
Pulire gli apparecchi solo con un panno morbido leggermente
bagnato (acqua).
29
Page 30

Non è assolutamente consentito servirsi di detergenti a base di
solventi.
Pulire i punti di contatto delle batterie solo con un panno asciutto.
Nel caso di penetrazione di umidità all’interno degli apparecchi,
rimuovere le batterie e attendere fino a quando gli apparecchi
sono di nuovo completamente asciutti.
3 Contenuto della confezione
1 Unità genitori con rispettivo adattatore di corrente
1 Unità bebè con rispettivo adattatore di corrente
1 Accumulatore ricaricabile per l’unità genitori
1 Istruzioni per l’uso
1 Gancio per cintura
4 Messa in funzione / Installazione
Le indicazioni riguardo le posizioni sono qui di seguito indi-
cate per es. con (1) o (a) o (H). Passare in tal caso alle pagine 2 e 3.
1. Inserire il pacco batteria nell’unità genitori
Si consiglia di utilizzare solo pacchi batterie omologati e
Allontanare il gancio per cintura dalla posizione (I) sulla custodia,
Sbloccare il vano batterie indicato alla posizione (J) e rimuovere
Introdurre il pacco batteria osservando la giusta polarità;
Chiudere e bloccare il vano batterie, montare quindi il gancio per
contrassegnati dal marchio CE
sollevare e spingere leggermente.
il coperchio.
posizionare la parte rotonda metallica (K) del pacco batteria in
modo che risulti rivolta verso il basso entrando in contatto con la
rispettiva controparte presente all’interno del vano batterie.
cintura.
30
Page 31

Caricare completamente il pacco batteria prima del primo
impiego (vale a dire per minimo 12−14 ore). Durante la procedura di carica non è necessario estrarre il pacco batteria
dall’unità genitori. In modalità di funzionamento con adattatore di corrente, il caricamento avviene automaticamente.
Il simbolo raffigurante una batteria lampeggia durante la
carica e si spegne a conclusione del processo di caricamento.
2. Collegare l’adattatore di corrente all’unità genitori
Collegare l’adattatore di corrente alla presa DC 7,5V (18)
dell’unità genitori e alla presa di corrente.
3. Inserire le batterie nell’unità bebè
L’unità bebè è in grado di funzionare con 4 batterie di tipo
AAA" oppure con un pacco di batterie ricaricabili dello
stesso tipo. È importante tenere in considerazione che con
l’adattatore di corrente fornito in dotazione non è possibile
caricare le batterie ricaricabili. In tal caso è infatti necessario ricorrere ad un caricatore comunemente reperibile sul
Sbloccare il vano batterie (H) e rimuovere il coperchio.
Introdurre le batterie osservando la giusta polarità.
Chiudere il vano batterie.
mercato.
4. Collegare l’adattatore di corrente all’unità bebè
Collegare l’adattatore di corrente alla presa DC 10V (6) dell’unità
bebè e alla presa di corrente.
5. Montaggio a parete dell’unità bebè
L’unità bebè consente un montaggio a parete. A tale scopo è necessaria una vite adatta per il foro allungato presente sul retro dell’unità
bebè.
31
Page 32

5 Funzionamento
1. Unità bebè (trasmettitore radio)
In modo da consentire la comunicazione tra trasmettitore (unità bebè)
e ricevitore (unità genitori) è necessario aver precedentemente impostato lo stesso canale di memoria (M1−M15).
Regolatore di sensibilità (VOX)
Il regolatore di sensibilità regola il livello di rumorosità, raggiunto il
quale il trasmettitore inizierà la trasmissione di segnali.
Segnale acustico da 1 kHz
Per assicurarsi che il trasmettitore funzioni correttamente è possibile
impostare la trasmissione di un segnale acustico ogni 30 secondi.
Controllo automatico
Il trasmettitore può essere impostato in modo da attivare il microfono
ogni 5 minuti per una durata di 5 secondi trasmettendo eventuali rumori al ricevitore.
Suono di allarme
Il trasmettitore può essere impostato in modo da generare un segnale
acustico prima di dare inizio alla trasmissione dei rumori avvertiti.
Mentre sono svolte le impostazioni descritte qui di seguito
il display lampeggia; trascorsi alcuni secondi il display
passa infine ad una visualizzazione costante. Le impostazioni risultano in tal caso memorizzate.
32
Accendere
Spegnere
Impostare il
canale di memoria
Interruttore (3) in posizione I".
Nota: Il display indica il canale attuale ovvero
il canale di memoria.
Interruttore (3) in posizione 0".
Nota: Il display si spegne.
Premere 2x il tasto menu (5); scegliere con il tasto (7,4) il canale di
memoria (M1−M15).
Nota: Sul display appare l’indicazione M".
Page 33

Disattivare il
canale di memoria
Premere 2x il tasto menu (5); scegliere con il tasto (7,4) OF".
Nota: L’indicazione M" scompare dal display.
Impostare la
sensibilità di
trasmissione
(VOX)
Segnale acustico da 1 kHz
ON/OFF
Sorveglianza
automatica
ON/OFF
Suono di allarme ON/OFF
Impostare con il regolatore (1) la
sensibilità raggiunta la quale
l’unità bebè inizierà la trasmissione.
Regolatore in alto = sensibile
Regolatore in basso = meno sensibile
Premere 3x il tasto menu (5); scegliere con il tasto (7) ON" o con il
tasto (4) OF".
Segnale acustico ON: = BEEP
Segnale acustico OFF: = nessuna indicazione
Premere 4x il tasto menu (5); scegliere con il tasto (7) ON" o con il
tasto (4) OF".
Sorveglianza automatica ON = AUTO MON
Sorveglianza automatica OFF = Nessuna indicazione
Premere 5x il tasto menu (5); scegliere con il tasto (7) ON" o con il
tasto (4) OF".
Con suono di allarme inserito sul display appare il simbolo di allarme.
33
Page 34

2. Unità genitori (ricevitore)
Accendere
Spegnere
Impostare il
canale di memoria
Disattivare il
canale di memoria
Impostare il
volume
Tenere premuto il tasto ON/OFF
(17) fino a quando non si avverte
un segnale acustico.
Nota: Il display indica il canale attuale ovvero
il canale di memoria. Disattivando l’unità, il
display si spegne.
Premere 2x il tasto menu (17);
scegliere con il tasto (16,20) il canale di memoria (M1−M15).
Nota: Sul display appare l’indicazione M".
Premere 2x il tasto menu (17);
scegliere con il tasto (16,20) OF".
Nota: L’indicazione M" scompare dal display.
Aumentare il volume con il tasto
(16); per ridurre premere il tasto
(20).
Nota: Le barre di scorrimento cambiano in
base al volume impostato.
3. Utilizzare l’unità genitori come walkie−talkie
L’unità genitori è utilizzabile come walkie−talkie per comuni-
care con altri interlocutori in onda sullo stesso canale. A
tale scopo è necessario lasciare il canale di memoria
Impostazione VOX
Il walkie−talkie è dotato di un’elettronica sensibile ai rumori grazie alla
quale l’apparecchio inizia la trasmissione anche solo in presenza di
rumori. Non si consiglia pertanto di attivare la modalità VOX se ci si
trova in un ambiente particolarmente esposto a rumori.
(M1−M15) e impostare uno degli altri otto canali disponibili.
34
Page 35

Segnale di chiamata
Per segnalare ad altri interlocutori l’intenzione di voler comunicare è
possibile trasmettere un segnale di chiamata. Ciò avviene premendo
il tasto segnale di chiamata.
Sorveglianza canale
La funzione MONITORING" consente la scansione del canale attuale
allo scopo di individuare la presenza di eventuali segnali deboli.
Ricerca canale
Con la ricerca canale viene eseguita la continua scansione di tutti i
canali disponibili (1−8). La ricerca è interrotta solo dopo aver individuato un segnale attivo e per condurre una conversazione è in tal
caso sufficiente premere il tasto PTT. È ovviamente anche possibile
proseguire la ricerca canale escludendo i segnali individuati per la ricerca successiva.
Blocco tastiera
I tasti del walkie−talkie possono essere bloccati in modo da evitarne
l’attivazione involontaria.
Disattivare il
canale di memoria
Impostare
il canale
Ricevere un
segnale
Premere 2x il tasto menu (17);
scegliere con il tasto (16,20) OF".
Nota: L’indicazione M" scompare dal display.
Premere 1x il tasto menu (17) e
scegliere con il tasto (16,20) il canale desiderato, per es. 8.
Nota: L’indicazione M" scompare dal display.
Se inserita e se non impegnata a
trasmettere, l’unità genitori è impostata in modo da ricevere costantemente dei segnali. Non appena si riceve un segnale il simbolo RX appare sul display.
35
Page 36

Trasmettere
un segnale
Impostazione
VOX
Ricerca canale
Blocco tastiera
Tenere premuto il tasto PTT (22) per
trasmettere. Il simbolo TX appare
sul display. Mantenere il walkie−talkie
in posizione verticale e parlare rivolti
verso il microfono mantenendo una
distanza di 10 cm.
Premere 3x il tasto menu (17);
l’impostazione VOX attuale (1,2,3,
OF) lampeggia ed il simbolo VOX
appare sul display.
Nota: Selezionando l’opzione OF il simbolo
VOX scompare dal display.
Premere contemporaneamente il
tasto menu (17) ed il tasto (16)
per avviare la ricerca canale. La
ricerca interessa tutti i canali (1−8).
Non appena si rileva un segnale,
la ricerca canale è interrotta e l’apparecchio trasmette il segnale attivo. Premere il tasto PTT (22) per
passare a questo canale.
Il tasto menu (17) conclude la ricerca canale. Il tasto (16) prosegue la ricerca canale.
Tenere premuto il tasto (21) per
ca. 3 sec. per attivare o disattivare
il blocco tastiera.
Nota: Il simbolo raffigurante una chiave è visualizzato con blocco tastiera attivata e scompare di nuovo con funzione disattivata.
36
Page 37

Segnale di
chiamata
Sorveglianza
canale
(Monitoring)
Retroilluminazione
Premere il tasto segnale di chiamata
(14) per segnalare ad altri interlocutori per una durata di 3 sec. la disponibilità a voler comunicare.
Nota: Gli altri interlocutori avvertono a loro
volta il segnale di chiamata trovandosi sullo
stesso canale.
Premere contemporaneamente il
tasto menu (17) ed il tasto (16) in
modo da compiere la scansione
del canale attuale alla presenza di
segnali deboli.
Il tasto menu (17) conclude la sorveglianza.
La retroilluminazione si accende
automaticamente per 5 sec. premendo un tasto qualsiasi.
Collegamento
per auricolare
Nella parte superiore dell’unità genitori si trova un punto di collegamento per auricolari.
6 Eliminare guasti
Hotline di assistenza / Garanzia
In presenza di problemi con il dispositivo di sorveglianza, seguire le
indicazioni riportate qui di seguito. La nostra hotline di assistenza è a
vostra disposizione in caso di problemi tecnici chiamando al numero
telefonico 0900 00 1675 nell’ambito della Svizzera (costi da rete Swisscom in sede di stampa: CHF 2.00/min). In caso di reclami entro il
periodo di garanzia, rivolgersi al rivenditore autorizzato. Il periodo di
garanzia ricopre 2 anni.
1. Nessuna corrente elettrica
Apparecchio è spento. Inserire l’apparecchio.
Verificare il corretto inserimento delle batterie ricaricabili.
37
Page 38

Verificare il corretto collegamento dell’adattatore all’apparecchio.
Verificare lo stato di carica delle batterie ricaricabili. Inserire se
necessario delle batterie nuove.
2. Nessuna trasmissione (walkie−talkie)
Premere e tenere premuto il tasto PTT prima di parlare.
Verificare l’attività del canale e scegliere un altro canale nel caso
in cui quello attuale fosse occupato.
3. Nessuna ricezione
Verificare il volume impostato.
Assicurarsi di trovarsi nell’ambito di un’area di ricezione adatta.
Cambiare altrimenti la propria ubicazione.
4. Cattiva ricezione / Fruscio durante la trasmissione
La portata di comunicazione dipende dall’ambiente circostante.
Strutture in acciaio, grattacieli o l’impiego all’interno di veicoli
hanno un effetto negativo sulla portata degli apparecchi.
Si consiglia pertanto di svolgere la comunicazione in un
ambiente possibilmente privo di ostacoli.
Cambiare altrimenti la propria ubicazione.
5. Anomalie
Ricevitore e trasmettitore si trovano troppo vicini l’uno all’altro.
La distanza minima è 1,5 m.
38
Page 39

2 Safety Information
Please read this operating manual thoroughly. Under no circumstances open the devices yourself and never carry out any repair
work yourself. In the case of claims under the terms of guarantee,
please contact your sales outlet. SWITEL reserves the right to make
modifications to the technical specifications and design within the
scope of product improvement.
1. Intended use
This babyphone has been developed purely for monitoring voice signals, e.g. from children. Under ideal conditions, monitoring is possible
within a range of 2 km.
2. Installation location
Set the babyphone units down on a flat, non−slip surface. Normally,
these units do not leave marks on the surfaces where they are located. However, due to the number of paints and surfaces which
come into question, it cannot be fully ruled out that the housing will
leave marks on the surface where it is located.
3. Power supply
Only use the SWITEL power adapter plugs contained in the material
supplied since other power adapter plugs could damage the babyphone. Never open the power adapter plugs. If a power adapter plug
is opened when connected to the power supply socket, there is a risk
of fatal injury.
If you want to use the receiver unit with non−rechargeable batteries,
never connect the power adapter plug. This would bring the risk of
explosion!
4. Disposing of the device
You are obliged to dispose of the device properly in accordance with European and international laws and directives. This serves to protect both human beings and the
environment. The adjacent symbols indicate that electronic devices no longer required must be disposed of
separate from domestic waste.
39
Page 40

Equipment which is old or has exceeded its service life must be
disposed of at a corresponding collection point provided by the local
public waste authorities.
Batteries and power adapter plugs must be disposed of at the point
of sale or at a corresponding collection point provided by the local
public waste authorities.
Packing materials must be disposed of according to the applicable
local regulations.
5. Important
Check the sound reception before putting the remote babyphone
units into operation. This also checks whether the units have
been placed within range of each other. The sound transmission
should be checked at regular intervals: Let an adult speak quietly
into the transmitter unit.
It should be possible to hear the sound made in the baby’s room
clearly on the receiver unit" (unit for the adults) in another room.
During operation, do not place the transmitter and receiver units
too close to each other. The units could resonate or interference
noise could be produced.
If you use a power adapter plug, do not position it in the vicinity
of the baby but on a window sill or another location where the
baby cannot reach it.
Battery power, walls, radio waves and local characteristics can
affect the range of the devices. To achieve a better performance,
switch to a different channel or position the receiver unit nearer
to the transmitter unit.
6. Cleaning and upkeep
The units may only be cleaned with a soft cloth which has been
slightly moistened (with water).
Never use cleaning agents which contain solvents.
Only clean the battery contacts with a dry cloth.
If the units become damp, remove the batteries and wait until the
units are completely dry.
40
Page 41

3 Package Contents
1 receiver unit (unit for adult) with power adapter plug
1 transmitter unit (unit for baby) with power adapter plug
1 battery pack for the receiver unit
1 operating manual
1 belt clip
4 Starting Up / Installation
The following descriptions frequently refer to various
elements and positions, e.g. (1) or (a) or (H).
Please refer to Pages 2 and 3 to see their location.
1. Inserting the battery pack in the receiver unit
Only use batteries bearing the CE certificate
Force the belt clip carefully away from the housing at position (I)
and slide it upwards.
Unlock the battery compartment at position (J) and remove the
cover.
Insert the battery pack ensuring correct polarity; the round
metallic notch (K) in the battery pack must be positioned so that
it lies at the bottom and makes contact with the corresponding
counterpart in the battery compartment.
Close the battery compartment, lock it and replace the belt clip.
Charge the battery pack fully (i.e. for at least 12−14 hours.)
before using it for the first time. The battery pack must not
be removed from the receiver unit during the charging process. It is automatically recharged when the unit is operated using the power adapter plug. The battery icon flashes
during the charging process and stops flashing when the
charging process is completed.
41
Page 42

2. Connecting the power adapter plug to the
receiver unit
Connect the power adapter plug to the DC 7.5V socket (18) in
the receiver unit and to the power outlet.
3. Inserting the batteries in the
transmitter unit
The transmitter unit can be operated using 4 normal AAA"
batteries or rechargeable batteries of the same type.
Please remember that the batteries cannot be recharged
using the power adapter plug supplied. A commercially
Unlock the battery compartment (H) and remove the cover.
Ensure the correct polarity of the batteries.
Close the battery compartment.
available charging unit is required.
4. Connecting the power adapter plug to the
transmitter unit
Connect the power adapter plug to the DC 10V socket (6) in the
transmitter unit and to the power outlet.
5. Wall installation of the transmitter unit
The transmitter unit can be mounted on a wall. You only need a screw
which fits in the slot on the rear of the transmitter unit.
42
Page 43

5 Operation
1. Transmitter unit
In order that the transmitter (unit for the baby) and receiver (unit for
the adult) can communicate with each other, they must both be set to
the same memory channel (M1−M15).
Sensitivity control (VOX)
The sensitivity control is used to set the noise level at which the
transmitter should begin transmitting noises detected.
1 kHz beep signal
In order to be sure the transmitter is working properly, activate this
feature so that it sends a beep signal every 30 seconds.
Automatic monitoring
The transmitter can be set up so that it activates the microphone for
5 seconds every 5 minutes and transmits the noises detected to the
receiver.
Alert signal
The transmitter can be set up so that it sends an alert signal before
transmitting the noises detected.
The display flashes while completing the settings de-
scribed below; it returns to a constant display after a few
seconds. This means that the setting made has been
saved.
Switch on
Switch off
Set the memory channel
Set the switch (3) to I".
Note: The display indicates the current
channel or memory channel.
Set the switch (3) to 0".
Note: The display goes out.
Press the Menu button (5) twice;
use buttons (7,4) to select a mem−
ory channel (M1−M15).
Note: M" appears in the display.
43
Page 44

Deactivate the
memory channel
Press the Menu button (5) twice;
use buttons (7,4) to select OF".
Note: M" disappears from the display.
44
Set the transmission sensitivity (VOX)
1 kHz beep
signal on/off
Automatic
monitoring
on/off
Alert signal
on/off
Use the control knob (1) to set the
sensitivity at which the transmitter
unit should start to transmit.
Control upwards = increase sensitivity
Control downwards = decrease sensitivity
Press the Menu button (5) 3
times; define the setting with
button (7) ON" or button (4) OF".
Beep signal on: = BEEP
Beep signal off: = No indicator
Press the Menu button (5) 4
times; define the setting with
button (7) ON" or button (4) OF".
Automatic monitoring on = AUTO MON
Automatic monitoring off = No indicator
Press the Menu button (5) 5
times; define the setting with
button (7) ON" or button (4) OF".
When the alert signal is active, the alert icon
appears in the display.
Page 45

2. Receiver unit
Switch on
Switch off
Set the memory channel
Deactivate the
memory channel
Set the volume
Press and hold the On/Off button
(17) until you hear the Beep signal.
Note: The display indicates the current channel or memory channel. The display goes out
when the unit is switched off.
Press the Menu button (17) twice;
use buttons (16,20) to select a
memory channel (M1−M15).
Note: M" appears in the display.
Press the Menu button (17) twice;
use buttons (16,20) to select OF".
Note: M" disappears from the display.
Use button (16) to increase the
volume; use button (20) to lower
it.
Note: The bar alters according to the volume
setting.
3. Using the receiver unit as a walkie−talkie
You can use the receiver unit as a walkie−talkie in order to
communicate with other parties on the same channel. To
do this, exit from the memory channel mode (M1−M15) and
VOX setting
The walkie−talkie is equipped with noise−activated electronics which
ensure that the unit only transmits when noises are actually detected.
It is not advisable to activate VOX mode when you are in a noisy
environment.
select one of the eight available channels.
45
Page 46

Ringing tone
In order to alert other parties that you wish to speak to them, you can
send a ringing tone. To do this, simply press the ringing tone button.
Channel monitoring
You can use the MONITORING" function to scan the current channel
for weak signals.
Scanning
Scanning activates the continuous scanning of all channels (1−8). The
scanning process stops when an active signal is detected and you
can carry out a conversation, if so required, by pressing the PTT button. Otherwise, you can resume the scanning process and exclude
signals detected from the subsequent scan.
Key lock
You can prevent the functions assigned to the buttons on the walkie−
talkies from being activated inadvertently.
46
Deactivate the
memory channel
Set the channel
Receive call
signals
Send call
signals
Press the Menu button (17) twice;
use buttons (16,20) to select OF".
Note: M" disappears from the display.
Press the Menu button (17) once
and use buttons (16,20) to select
the required channel, e.g. 8.
Note: M" disappears from the display.
The receiver unit is permanently
on receive when it is switched on
and not currently transmitting.
When a signal is received, the RX
icon lights up.
Press and hold the PTT button
(22) to transmit. The TX icon
lights up. Hold the walkie−talkie
vertical and speak into the microphone at a distance of 10 cm.
Page 47

VOX mode
setting
Scanning
Key lock
Ringing tone
Channel
monitoring
Press the Menu button (17) 3
times; the current VOX setting
(1,2,3, OF) flashes and the VOX
icon appears in the display.
Note: The VOX icon disappears when OF is
selected.
Press the Menu button (17) and
button (16) simultaneously to start
scanning. All the channels (1−8)
are scanned. Scanning stops
when a signal is detected and you
hear the active signal. Press the
PTT button (22) to switch to this
channel.
Press the Menu button (17) to end
the scanning function. Press button (16) to resume scanning.
Press button (21) for approx. 3
seconds to switch the key lock
function on or off.
Note: The key icon appears when the key lock
function is on and disappears when it is off.
Press the ringing tone button (14)
to alert other parties for 3 seconds
you wish to speak to them.
Note: The other parties hear the ringing tone
when they are on the same channel.
Press the Menu button (17) and
button (16) simultaneously to scan
the current channel for weak signals.
Press the Menu button (17) to end
the scanning function.
47
Page 48

Back−lighting
Port for headphones
The back−lighting is switched on
automatically for 5 seconds after
pressing any button.
A headphone connection port is
provided at the top of the receiver
unit.
6 Troubleshooting
Service hotline / Guarantee
Should problems arise with the monitoring set, please refer to the following information first. In the case of technical problems, please contact our hotline within Switzerland under tel. 0900 00 1675 (cost with
Swisscom at time of going to print: CHF 2.00/min). In the case of
claims under the terms of guarantee, contact your sales outlet. There
is a 2 year period of guarantee.
1. No power
The unit is switched off. Switch the unit on.
Ensure that the batteries have been inserted correctly.
Check that the adapter plug is correctly connected to the device.
Check the battery charge status. Insert new batteries, if
necessary.
2. No transmission (walkie−talkie)
Press and hold the PTT button before starting to speak.
Check the channel activity and select a different channel if the
current one is in use.
3. No reception
Check the volume setting.
Check that you are in a suitable reception range. Move to a
different location, if necessary.
4. Poor reception / Noise during transmission
The communication range is dependent on the immediate
environment.
48
Page 49

Steel constructions, high−rise buildings or use in vehicles have a
negative effect on the range of operation.
Try to communicate in areas with as few obstacles as possible.
Move to a different location, if necessary.
5. Disturbance
Transmitter and receiver are too close together. Ensure a
minimum distance of 1.5 m.
49
Page 50

7 Technische Angaben, Données techniques,
Specifiche tecniche, Technical Specifications
Kanäle, Canaux,
Canali, Channels:
Sub−Code, Sub Code,
Sub−codice, Sub−code:
Frequenz, Fréquence,
Frequenza, Frequency:
Reichweite, Portée,
Portata, Range:
Batterien, Piles,
Batterie, Batteries:
Baby−Einheit, Unité bébé,
Unità bebè, transmitter unit:
Eltern−Einheit, Unité parents,
Unità genitori, receiver unit:
Sendeleistung,
Puissance d’émission,
Potenza di trasmissione,
transmission:
Modulation, Modulation,
Modulazione, Modulation:
Channel Spacing: 12,5 kHz
Netzadapter, Adaptateur
réseau, Adattatore di corrente, Power adapter plug:
Baby−Einheit, unité bébé,
Unità bebè, transmitter unit:
Eltern−Einheit, Unité parents,
Unità genitori, receiver unit:
8
CTCTSS
446.00625MHz−446.09375MHz
up to 2 km in open space
4xAAA (LR03) Alkaline batteries
Akkupack or 4xAAA (LR03) Alkaline batteries
or 4 rechargeable AAA
=<500mW ERP
FM − F3E
DC 10 V/300 mA
DC 7,5 V/200 mA
50
Page 51

Kanaltabelle, Tableau des canaux,
Channel table, Tabella canali
Speicherkanal
Canal de mémoire,
Canale di memoria,
Memory channel
M1 1 189.9 Hz
M2 2 189.9 Hz
M3 3 189.9 Hz
M4 4 189.9 Hz
M5 5 189.9 Hz
M6 6 189.9 Hz
M7 7 189.9 Hz
M8 8 189.9 Hz
M9 1 183.5 Hz
M10 2 183.5 Hz
M11 3 183.5 Hz
M12 4 183.5 Hz
M13 5 183.5 Hz
M14 6 183.5 Hz
M15 7 183.5 Hz
Walkie−Talkie
Kanalnummer,
Walkie−Talkie
Numéro de canal,
Numero canale
walkie−talkie,
Walkie−Talkie
channel number
CTCSS−Frequenz,
Fréquence CTCSS,
Fréquence CTCSS,
CTCSS frequency
51
Page 52

Declaration of conformity
g
WE TELGO AG
OF Route d’Englisberg 17
CH−1763 Granges−Paccot
Declare under our own responsibility that the product
MODEL: BCC 50
DESCRIPTION: Babyphone with Display
Is in conformity with directives: R&TTE Directive (1999/5/EC)
AUTHORISED BY:
Signed:
Name (printed): Selim Dusi
Position in company: Managing Director
Date of issue: 14 February, 2006
Copies of this document will be held on file for a period of 10 years after the
last production.
________________________
1
Supplier: TELGO AG, Route d’Englisberg 17
Product: BCC 50
CH−1763 Gran
es−Paccot
 Loading...