

Page 1
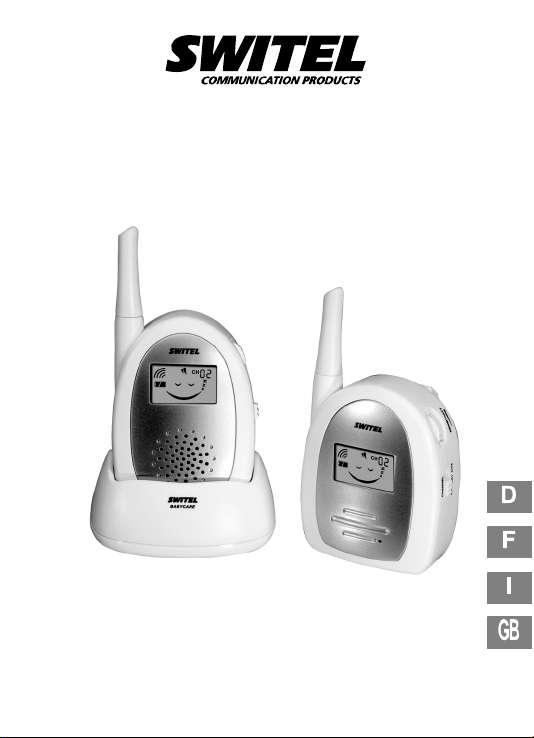
BCC 47
Bedienungsanleitung
Mode d’emploi
Istrzioni per I’uso
Operating Instructions
Babyphone
Interphone bébé
Sorveglia bebé
Babyphone
Page 2
1 Übersicht, Vue d’ensemble, Panoramica,
Overview
I
2X
II
III
2
Page 3
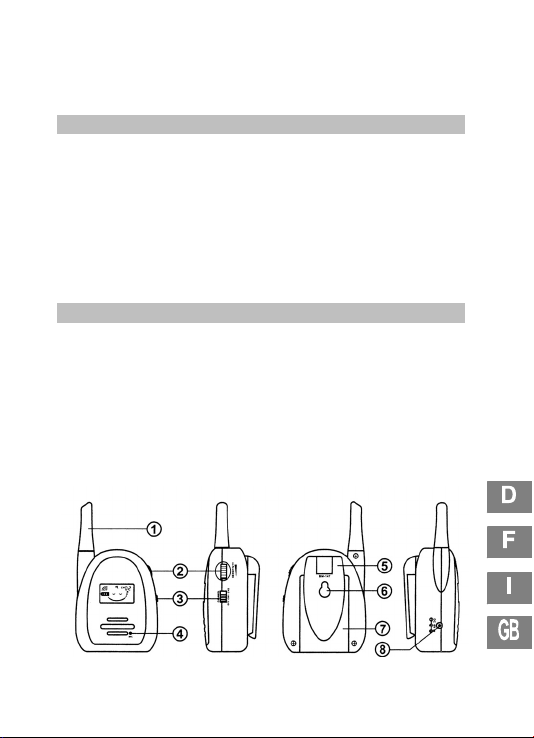
2 Sender, Émetteur, Trasmettitore,
Transmitter
Deutsch Francais
1 Soft−Antenne Antenne souple
2 Sensibilitätsregler Régulateur de sensibilité
3 Power / Kanal−Auswahlschalter:
OFF/CH1/CH2
4 Mikrofon Microphone
5 Gürtelclip Clip de ceinture
6 Aufhänger Fixation
7 Akkufach Compartiment à piles rechargeables
8 AC/DC Stromquellenbuchse C.A./C.C. douille source de courant
Italiano English
1 Antenna soft Soft antenna
2 Regolatore di sensitività Sensitivity control
3 Accensione / Interruttore di
scelta canale: OFF/CH1/CH2
4 Microfono Microphone
5 Gancio per cintura Belt clip
6 Rientranza per aggancio Hook
7 Vano batterie Battery compartment
8 Presa sorgente di corrente
AC/DC
Puissance / Sélecteur de canal :
OFF/CH1/CH2
Power / Channel selection switch:
OFF/CH1/CH2
AC/DC power supply socket
3
Page 4
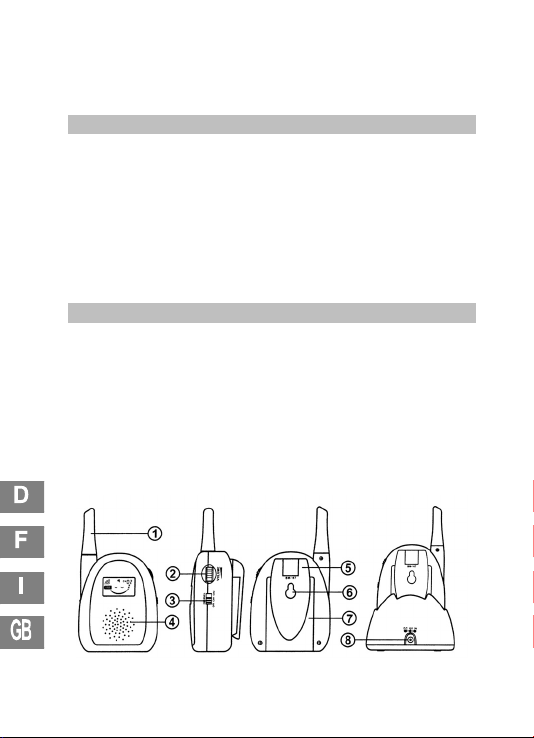
3 Empfänger, Récepteur, Ricevitore,
Receiver
Deutsch Francais
1 Soft−Antenne Antenne souple
2 Lautstärkeregler Régulateur de volume
3 Power / Kanal−Auswahlschalter:
OFF/CH1/CH2
4 Lautsprecher Haut−parleur
5 Gürtelclip Clip de ceinture
6 Aufhänger Fixation
7 Akkufach Compartiment à piles rechargeables
8 AC/DC Stromquellenbuchse C.A./C.C. douille source de courant
Italiano English
1 Antenna soft Soft antenna
2 Regolatore di volume Volume control
3 Accensione / Interruttore di
scelta canale: OFF/CH1/CH2
4 Altoparlante Loudspeaker
5 Gancio per cintura Belt clip
6 Rientranza per aggancio Hook
7 Vano batterie Battery compartment
8 Presa sorgente di corrente
AC/DC
Puissance / Sélecteur de canal :
OFF/CH1/CH2
Power / Channel selection switch:
OFF/CH1/CH2
AC/DC power supply socket
4
Page 5

4 Sicherheitsinformation
Lesen Sie diese Betriebsanleitung bitte sorgfältig durch. Öffnen Sie
die Geräte unter keinen Umständen selbst und führen Sie keine eigenen Reparaturversuche aus. Bei Gewährleistungsansprüchen wenden
Sie sich bitte an Ihren Fachhändler. SWITEL behält sich das Recht
vor, im Rahmen der Produktverbesserung technische und optische
Änderungen an den Geräten vorzunehmen.
1. Bestimmungsgemäße Verwendung
Dieses Babyphone ist zur Überwachung von Sprachsignalen, z. B.
Kindergeräuschen entwickelt worden.
2. Installationsstandort
Die Ladestation der Eltern−Einheit muss in der Nähe einer 230V−
Steckdose eingerichtet werden. Platzieren Sie die Geräte auf eine
ebene, rutschfeste Fläche. Die Gehäuse der Geräte hinterlassen auf
der Aufstellfläche in der Regel keine Spuren. Wegen der Vielzahl der
verwendeten Lacke und Oberflächen kann jedoch nicht völlig ausgeschlossen werden, dass durch die Gehäuse Spuren auf der Aufstellfläche entstehen. Wenn Sie den Gürtel−Clip nach unten schieben bis
er hörbar ausrastet und im 45° Winkel nach hinten klappen, dient er
als Aufstellhilfe.
3. Stromversorgung
Verwenden Sie nur den zum Lieferumfang gehörenden SWITEL−Netz−
adapter, da andere Netzteile das Babyphone beschädigen könnten.
Öffnen Sie den Netzadapter auf keinen Fall. Wenn der Netzadapter
geöffnet wird, während er an der Stromversorgung angeschlossen ist,
besteht das Risiko einer tödlichen Verletzung.
Verwenden Sie die Netzadapter nie mit nicht aufladbaren Batterien.
Es besteht Explosionsgefahr!
5
Page 6

4. Entsorgen des Geräts
Gemäß europäischer und internationaler Gesetze und
Richtlinien sind Sie verpflichtet, dieses Gerät ordnungsgemäß zu entsorgen. Dies dient sowohl dem Schutz von
Personen als auch der Umwelt.
Das nebenstehende Symbol zeigt an, dass nicht mehr
benötigte elektronische Geräte separat von Hausmüll
entsorgt werden müssen.
Geräte, die veraltet sind oder ihre Lebensdauer überschritten
haben, müssen an einem dafür vorgesehenen Sammelpunkt der öf-
fentlichen Abfallentsorgung entsorgt werden.
Akkus und Netzteile müssen vom Verkäufer oder an den dafür vor-
gesehenen Sammelpunkten der öffentlichen Abfallentsorgung entsorgt werden.
Verpackungsmaterialien müssen gemäß den lokalen Vorschriften
entsorgt werden.
5. Wichtig
Prüfen Sie vor der Verwendung des drahtlosen Babyphones die
Tonübertragung. Hierbei wird überprüft, ob die Einheiten außer
Reichweite voneinander platziert sind. Die Tonübertragung sollte
in regelmäßigen Abständen wie folgt überprüft werden: Lassen
Sie einen Erwachsenen leise in die Baby−Einheit sprechen.
Die Töne aus dem Zimmer des Babys sollten über die
Eltern−Einheit in einem anderen Raum deutlich vernehmbar
sein.
Platzieren Sie die Baby− und die Eltern−Einheit während des
Betriebs nicht zu nah beieinander. Die Einheiten könnten
nachhallen oder es könnten Störgeräusche entstehen.
Wenn Sie einen Netzadapter verwenden, positionieren Sie
diesen nicht in der Nähe des Babys, sondern unter einem
Fenster oder an einer anderen Stelle, wo das Baby ihn nicht
ergreifen kann.
6
Page 7

Der Netzadapter sollte unter keinen Umständen mit anderen
Geräten verwendet werden. Adapter anderer Produkte sind für
dieses System nicht geeignet.
Akkuleistung, Wände, Funkwellen und Geländebeschaffenheit
können sich auf die Reichweite der Geräte auswirken. Um eine
bessere Leistung zu erzielen, wechseln Sie in einen anderen
Kanal oder platzieren Sie die Eltern−Einheit näher zur
Baby−Einheit.
Baby−Einheit nicht im Badezimmer (Nähe Badewanne)
aufstellen.
5 Funktionen
Herzlichen Glückwunsch zum Erwerb unseres drahtlosen Babyphones. Es enthält eine Baby−Einheit (Sender), eine Eltern−Einheit
(Empfänger) und zwei Netzadapter sowie eine Ladestation wie in
Abb. I dargestellt.
1. Drahtlose HF−Übertragung
2. 2−Kanal−Auswahl
3. Sprachaktivierte Übertragung mit Sensibiltitätseinstellung
4. Baby−Einheit mit 6V−Netzadapter (im Lieferumfang enthalten)
oder mit 3 AAA−Akkus (im Lieferumfang enthalten)
5. Eltern−Einheit mit 3 AAA−Akkus (im Lieferumfang enthalten),
oder Netzadapter (im Lieferumfang enthalten). (6V, 200 mA,
Steckerbuchse, center negative (−))
6. Eltern−Einheit mit Lautstärkeregler
7. Akkustatusanzeige
8. Niedriger Spannungsverbrauch und niedrige HF−Strahlung
9. Baby−Einheit und Eltern−Einheit mit Gürtel−Clip
7
Page 8

6 Inbetriebnahme
1. Einsetzen der Akkus
Verwenden Sie nur CE−zertifizierte Akkus
Schieben Sie den Gürtel−Clip nach unten, bis er hörbar aus−
rastet. Gürtel−Clip im 45° Winkel vom Batteriefach nach hinten
wegklappen.
Öffnen Sie das Akkufach wie in Abb. II dargestellt.
Setzen Sie jeweils 3 AAA−Akkus in die Baby−Einheit und in die
Eltern−Einheit ein und achten Sie dabei auf die richtige Polung.
Schließen Sie das Akkufach.
Akkus bitte vor dem ersten Gebrauch vollständig (9 Std.)
aufladen. Zum Laden müssen diese nicht aus Baby−/Eltern−Einheit genommen werden, wenn sie mit Netzadapter
betrieben werden. Das Akku−Icon blinkt während des Ladevorgangs und hört auf zu blinken, wenn der Ladevorgang
abgeschlossen ist.
2. Betrieb mit Netzadapter
Verwenden Sie nur ein CE−zertifiziertes Netzteil
Schließen Sie das Netzteil an die DC 6V−Buchse der Baby−Ein−
heit und an die Steckdose an.
Schließen Sie die Ladestation an die Steckdose an und stellen
Sie die Eltern−Einheit in die Ladestation.
Setzen Sie die Kanalauswahl der Baby− und der Eltern−Einheit
auf denselben Kanal (CH1 oder CH2).
8
Page 9

Wenn die Einheiten für einen längeren Zeitraum nicht
verwendet werden, nehmen Sie alle Akkus heraus.
Diese könnten andernfalls auslaufen.
Sender und Empfänger verfügen über ein Akku−Icon.
Der aktuelle Ladezustand wird im Display angezeigt.
Es wird empfohlen, für beide Einheiten den 6V−Adapter,
200 mA Steckerbuchse, centre negative (−) zu verwenden.
Wenn beide Einheiten mit Akkus und angeschlossenem
Adapter ausgestattet sind, funktionieren beide Einheiten auch
bei einem Stromausfall weiter.
7 Betrieb
1. Baby−Einheit (Funksender)
Stellen Sie sicher, dass der Netzadapter angeschlossen bzw. die
Akkus ordnungsgemäß eingesetzt sind.
Platzieren Sie die Baby−Einheit in der Nähe des Babys und
stellen Sie sicher, dass das Mikrofon für eine optimale
Übertragung in Richtung des Babys zeigt. (Abb. III)
Stellen Sie sicher, dass sich die Einheit außerhalb der
Reichweite des Babys befindet. Platzieren Sie die Einheit
niemals im Bett oder im Laufstall des Babys!
Wenn das integrierte Mikrofon Töne empfängt (Reichweite 1 bis
2 m), startet die Baby−Einheit automatisch mit der
Signalübertragung an die Eltern−Einheit. Wenn keine Töne mehr
wahrgenommen werden, wird die Übertragung gestoppt.
2. Eltern−Einheit (Empfänger)
Stellen Sie sicher, dass die Akkus eingesetzt sind.
Platzieren Sie die Eltern−Einheit in der Näher der Eltern (Abb. III).
Positionieren Sie den Lautsprecherregler auf die gewünschte
Position.
9
Page 10

Wenn von der Baby−Einheit ein Tonsignal kommt, schaltet sich
die Hintergrundbeleuchtung des Displays der Eltern−Einheit ein
und das Baby ruft−Icon blinkt.
Einige Sekunden nachdem das Gerät keine Tonsignale mehr
empfängt, schaltet sich der Empfänger automatisch wieder in
den Energiesparmodus. Das Baby schläft−Icon erscheint im
Display und das Hintergrundlicht schaltet sich automatisch aus.
3. Kanal−Auswahl
Die Einheiten verfügen über einen Kanalwahlschalter (OFF, CH1
oder CH2) für die Übertragung der Funksignale. Wenn der
Empfang schlecht ist oder störende Funksignale auftreten,
wählen Sie für eine optimale Übertragung den anderen Kanal.
Die gewählten Kanäle werden oben rechts im Display angezeigt.
Stellen Sie sicher, dass beide Einheiten den selben Kanal
verwenden.
4. Optimieren der Empfindlichkeit bei Sprachaktivierung
Den Sensibilitäts−Regler auf die gewünschte Position an der
Baby−Einheit einstellen.
5. Pilotton
Durch einen nicht hörbaren Pilotton wird die störungsfreie
Übertragung wesentlich verbessert. Der Pilotton wird mit dem
Tonsignal der Baby−Einheit zusammen an die
Eltern−Einheit gesendet. Die Eltern−Einheit geht
nur dann auf Empfang, wenn genau von dieser
Baby−Einheit ein Tonsignal übertragen wird.
Es stehen dem Benutzer 16 verschiedene
Pilottöne zur Auswahl, die mit dem
DIP−Schalter (im Akkufach) eingestellt
werden können.
Stellen Sie sicher, dass beide Einheiten den selben Pilotton
verwenden. Sollte Ihr Empfänger trotzdem fremde Signale
empfangen, wechseln Sie den Kanal oder Pilotton.
10
Page 11

Pilotton Schalter 1 Schalter 2 Schalter 3 Schalter 4
Code 1 An An An An
Code 2 An An An Aus
Code 3 An An Aus An
Code 4 An An Aus Aus
Code 5 An Aus An An
Code 6 An Aus An Aus
Code 7 An Aus Aus An
Code 8 An Aus Aus Aus
Code 9 Aus An An An
Code 10 Aus An An Aus
Code 11 Aus An Aus An
Code 12 Aus An Aus Aus
Code 13 Aus Aus An An
Code 14 Aus Aus An Aus
Code 15 Aus Aus Aus An
Nr. Code Aus Aus Aus Aus
Aus: kein Pilotton wurde gewählt.
Wenn für den Empfänger kein Pilotton ausgewählt wurde, wird er
möglicherweise auch Signale empfangen, die von fremden
Geräten erzeugt werden.
11
Page 12

6. LC−Display
Icon Außerhalb der Reichweite
Kanal: CH1, CH2
Icon Baby schläft (Energie−
sparmodus)
Akku−Icon:
voll
halb
leer
Icon Baby ruft:
ständig wechselnde
Display−Anzeige
7. Außerhalb der Reichweite
Wenn sich der Empfänger außerhalb der Reichweite befindet,
teilt Ihnen ein blinkendes Reichweitenalarm−Icon im
Empfänger−Display dies mit. Zusätzlich ertönt ein sich
wiederholender BI BI−Alarm vom Empfänger. Dieser Alarm−Ton
ertönt immer, wenn die Verbindung zum Sender unterbrochen
wurde.
8. Alarm
Ein visueller und hörbarer Alarm geht vom Empfänger aus wenn:
die Verbindung zwischen Empfänger und Sender unterbrochen
oder der Sender ausgeschaltet ist.
der Sender auf einen anderen Kanal als der Empfänger
eingestellt ist.
der Sender auf einen anderen Pilotton eingestellt ist als der
Empfänger.
12
Page 13

der Sender oder der Empfänger mit zu schwachen Akkus
betrieben wird.
9. Gürtel−Clip
Baby−Einheit und Eltern−Einheit sind mit einem Gürtelclip
ausgestattet. Er dient auch als Aufstellhilfe.
8 Fehlerbehebung
1. Kein Strom
Gerät ist ausgeschaltet. Schalten Sie das Gerät am
OFF/CH1/CH2−Schalter auf die CH1 oder CH2 Position.
Überprüfen Sie, dass die Akkus korrekt eingelegt sind.
Überprüfen Sie, dass der Adapter korrekt am Gerät
angeschlossen ist.
Prüfen Sie den Akkustatus. Setzen Sie ggf. neue Akkus ein.
2. Kein Tonsignal und kein Licht für Poweranzeige
Lautstärkeregelung am Empfänger ist zu niedrig. Stellen Sie
höhere Lautstärke ein.
Sensibilitätsregelung des Senders ist zu niedrig. Stellen Sie
höhere Sensibilität ein.
Die Geräte sind außerhalb der Reichweite. Verringern Sie den
Abstand zwischen Sender und Empfänger.
Überprüfen Sie, dass beide Geräte auf den gleichen Kanal und
gleichen Pilotton eingestellt sind.
3. Hören von statischen oder Knistergeräuschen vom
Empfänger
Überprüfen Sie, dass beide Geräte auf den gleichen Kanal und
gleichen Pilotton eingestellt sind.
Verringern Sie den Abstand zwischen Sender und Empfänger.
Legen Sie die Akkus korrekt ein.
13
Page 14

4. Empfang von Unterhaltungen oder Tönen
Signalstörungen infolge anderer Babyphone auf dem gleichen
Kanal und Pilotton oder durch Schnurlostelefone. Wechseln Sie
Kanal und Pilotton, um Störungen zu reduzieren.
5. Hohe Töne (Rückkopplung)
Empfänger und Sender sind zu nah beieinander. Vergrößern Sie
den Abstand zwischen Sender und Empfänger.
Die Sensibilität ist zu hoch. Stellen Sie die Sensibilität des
Senders niedriger ein.
9 Technische Angaben
1. Stromversorgung
Sender (Baby−Einheit) / Empfänger (Eltern−Einheit)
3 AAA wiederaufladbare oder Alkaline−Batterien
AC 230V / DC 6V (center negative (−))
Adapter
AC 230V / DC 6V (center negative (−))
2. Kanal
2 Kanäle
3. Betriebsfrequenz
CH1 ˙ 864.85 MHz
CH2 ˙ 864.90 MHz
4. Betriebsreichweite
bis zu 800 Meter bei idealen Bedingungen
14
Page 15

4 Information de sécurité
Veuillez lire ce mode d’emploi attentivement et complètement. N’ouvrez en aucun cas les appareils vous−même et n’effectuez aucun essai personnel de réparation. En ce qui concerne les droits de garantie,
veuillez vous adresser à votre revendeur. SWITEL se réserve le droit,
dans le cadre de l’amélioratoin de produit, d’effectuer sur les appareils
des modifications techniques et d’optique.
1. Utilisation conforme aux prescriptions
Ce babyphone a été développé pour la surveillance de signaux vocaux, par ex. les bruits émis par les enfants.
2. Lieu d’installation
Le chargeur de l’ unité parents doit être installé près d’une prise de
courant de 230 V. Placez les appareils sur une surface plane et antidérapante. Les boîtiers des appareils ne laissent en général aucune
trace sur la surface de pose. En raison du nombre de laques et de superficies utilisées, la formation de traces par les boîtiers sur les surfaces de pose ne peut toutefois pas être entièrement exclue. Si vous
poussez le clip de ceinture vers le bas jusqu’à ce qu’il s’enclenche de
manière audible et que vous le rabattez de 45° vers l’arrière, il vous
sert de support de présentoir.
3. Alimentation en courant
Ne vous servez que de l’adaptateur réseau SWITEL livré avec l’appareil car d’autres blocs d’alimentation pourraient endommager le babyphone. N’ouvrez en aucun cas l’adaptateur réseau. Si vous l’ouvrez
pendant qu’il est raccordé à l’alimentation en courant, vous risquez
une blessure mortelle.
N’utilisez jamais l’adaptateur réseau avec des piles non rechargeables.
Il y a risque d’explosion !
15
Page 16

4. Élimination de l’appareil
Conformément aux lois et aux directives européennes et
internationales, vous êtes obligés d’éliminer cet appareil
comme il se doit. Cela sert tant à la protection des personnes qu’à celle de l’environnement.
Le symbole ci−contre indique que les appareils électroniques n’étant plus utilisés, ne doivent pas être éliminés
avec les ordures ménagères, mais séparément.
Les appareils usagés ou ceux qui ont dépassé leur durée de vie,
doivent être éliminés dans un centre de collecte prévu à cet effet par
l’organisme public d’élimination des déchets.
Les piles rechargeables et les blocs d’alimentation doivent être
éliminés par le revendeur ou dans un centre de collectre prévu à cet
effet par l’organisme public d’élimination des déchets.
Les fournitures d’emballage sont à éliminer conformément au règlement local.
5. Important
Avant de vous servir du babyphone sans fil, contrôlez la
transmission du son. En même temps, vous contrôlerez si les
unités sont placées hors de portée l’une de l’autre. La
transmission du son doit être contrôlée comme suit à intervales
réguliers : faites parler un adulte à voix basse dans "l’unité du
bébé".
Les sons provenant de la pièce du bébé doivent être rendus par
"l’unité parents" de sorte qu’ils soient clairement perceptibles
dans une autre pièce.
Ne placez pas l’unité bébé trop près de celle des parents
pendant qu’elles fonctionnent. Les unités pourraient réverbérer
produisant ainsi des parasites.
Si vous utilisez un adaptateur réseau, ne le positionnez pas près
du bébé mais sous une fenêtre ou à un autre endroit où le bébé
ne puisse pas le saisir.
16
Page 17

L’adaptateur réseau ne doit en aucun cas être utilisé avec
d’autres appareils. Des adaptateurs d’autres produits ne
conviennent pas pour ce système.
La puissance des piles rechargeables, les murs, les ondes
radioélectriques et la nature du terrain peuvent exercer une
influence sur la portée des appareils. Pour obtenir une meilleure
performance, changez de canal ou placez l’unité parents plus
près de celle du bébé.
Ne pas placer l’unité bébé dans la salle de bains (près d’une
baignoire).
5 Fonctions
Nous vous félicitons d’avoir acheté notre babyphone sans fil. Il comporte une unité bébé (émetteur), une unité parents (récepteur) et deux
adaptateurs réseau ainsi qu’un chargeur comme représenté sur la
fig. I.
1. Transmission sans fil par radiofréquences.
2. Sélection de 2 canaux
3. Transmission activée par la parole avec réglage de la sensibilité
4. Unité bébé avec adaptateur réseau de 6 V (livré avec l’appareil)
ou avec 3 piles rechargeables AAA (livrées avec l’appareil)
5. Unité parents avec 3 piles rechargeables AAA (livrées avec
l’appareil) ou adaptateur réseau (livré avec l’appareil)(6V,
200 mA, fiche femelle, center negative (−))
6. Unité parents avec régulateur de volume
7. Affichage de l’état des piles rechargeables
8. Faible consommation de courant et faible rayonnement
radioélectrique
9. Unité bébé et unité parents avec clip de ceinture
17
Page 18

6 Mise en service
1. Mise en place des piles rechargeables
N’utilisez que des piles rechargeables CE−certifiées
Poussez le clip de ceinture vers le bas jusqu’à ce qu’il se
désenclenche de manière audible.
Rabattre le clip de ceinture de 45° vers l’arrière pour l’éloigner du
compartiment à piles.
Ouvrez le compartiment à piles rechargeables comme
représenté sur la fig. II.
Insérez 3 piles rechargeables AAA dans l’unité bébé et 3 dans
l’unité parents et tenez compte de la polarisation correcte.
Fermez le compartiment à piles.
Veuillez charger entièrement (9 heures) les piles rechar-
geables avant le premier emploi. Pour les charger, vous
n’avez pas besoin de les retirer de l’unité bébé/parents si
elles fonctionnent avec un adaptateur réseau. L’icône des
piles rechargeables clignote pendant l’opération de chargement et s’arrête de clignoter quand celle−ci est terminée.
2. Fonctionnement avec adaptateur réseau
N’utilisez qu’un bloc d’alimentation CE−certifié
Raccordez le bloc d’alimentation à la prise 6 V C.C. de l’unité
bébé et à la prise de courant.
Raccordez le chargeur à la prise de courant et mettez l’unité
parents dans le chargeur.
Mettez le sélecteur de canal de l’unité bébé et de l’unité parents
sur le même canal (CH1 ou CH2).
18
Page 19

Si vous ne vous servez pas des unités pendant un certain
temps, retirez les piles rechargeables.
Sinon, celles−ci pourraient couler.
Émetteur et récepteur disposent d’une icône de piles
rechargeables.
L’état actuel de chargement est affiché sur l’écran.
Pour les deux unités, il est recommandé d’utiliser l’adaptateur
6V, 200 mA, la fiche femelle , le center negative (−).
Si les deux unités sont équipées de piles rechargeables et
d’un adaptateur raccordé, les deux unités continuent à
fonctionner même en cas de panne de courant.
7 Fonctionnement
1. Unité bébé (émetteur d’ondes)
Assurez−vous que l’adaptateur réseau est raccordé ou que les
piles rechargeables sont insérées comme il se doit.
Placez l’unité bébé près du bébé et assurez−vous que, pour une
transmission optimale, le microphone regarde en direction du
bébé. (Fig. III)
Assurez−vous que l’unité se trouve hors de la portée du
bébé. Ne placez jamais l’unité dans le lit ou dans le parc du
bébé !
Quand le microphone reçoit des sons (portée 1 à 2 m), l’unité
bébé commence automatiquement à transmettre les signaux à
l’unité parents. Quand plus aucun son n’est perçu, la
transmission est arrête.
19
Page 20

2. Unité parents (récepteur)
Assurez−vous que les piles rechargeables sont mises en place.
Placez l’unité parents près des parents (fig. III).
Positionnez le régulateur de volume en position désirée.
Si un signal sonore parvient de l’unité bébé, l’éclairage de fond
de l’écran de l’unité parents s’allume et l’icône Bébé appelle
clignote.
Quelques secondes après la réception du dernier signal sonore
par l’appareil, le récepteur se branche automatiquement en mode
économie d’énergie. L’icône Bébé dort apparaît à l’écran et la
lumière de fond d’écran s’éteint automatiquement.
3. Sélection de canal
Les unités disposent d’un sélecteur de canal (OFF, CH1 ou
CH2) pour la transmission des signaux radio. Si la réception est
mauvaise ou que des signaux radio brouilleurs se produisent,
sélectionnez l’autre canal pour obtenir une transmission
optimale.
Les canaux sélectionnés sont affichés en haut à droite à l’écran.
Assurez−vous que les deux unités utilisent bien le même
canal.
4. Optimisation de la sensibilité lors de l’activation de la
parole
Mettre le régulateur de sensibilité de l’unité bébé sur la position
désirée.
20
Page 21

5. Signal pilote
Un signal pilote non audible permet d’améliorer considéra−
blement la transmission sans parasites. Le signal pilote est
envoyé en même temps que le signal sonore de l’unité bébé à
l’unité parents. L’unité parents ne se met alors en
état de réception que si un signal sonore est
transmis exactement par l’unité bébé.
16 signaux pilotes différents réglables par
un interrupteur DIP (dans le compartiment
à piles rechargeables) sont à la disposition
de l’utilisateur.
Assurez−vous que les deux unités utilisent bien le même si-
gnal pilote. Si votre récepteur devait malgré tout recevoir
des signaux étrangers, changez le canal ou le signal pilote.
21
Page 22

Signal pi-
lote
Interrup-
teur 1
Interrup-
teur 2
Interrup-
teur 3
Interrup-
teur 4
Code 1 Marche Marche Marche Marche
Code 2 Marche Marche Marche Arrêt
Code 3 Marche Marche Arrêt Marche
Code 4 Marche Marche Arrêt Arrêt
Code 5 Marche Arrêt Marche Marche
Code 6 Marche Arrêt Marche Arrêt
Code 7 Marche Arrêt Arrêt Marche
Code 8 Marche Arrêt Arrêt Arrêt
Code 9 Arrêt Marche Marche Marche
Code 10 Arrêt Marche Marche Arrêt
Code 11 Arrêt Marche Arrêt Marche
Code 12 Arrêt Marche Arrêt Arrêt
Code 13 Arrêt Arrêt Marche Marche
Code 14 Arrêt Arrêt Marche Arrêt
Code 15 Arrêt Arrêt Arrêt Marche
N° de
Arrêt Arrêt Arrêt Arrêt
code
Arrêt : aucun signal pilote n’a été sélectionné.
Si aucun signal pilote n’a été sélectionné pour le récepteur, il est
possible qu’il reçoive également des signaux produits par des
appareils étrangers.
22
Page 23

6. Écran à cristaux liquides
Icône : Hors de portée"
Canal : CH1, CH2
Icône Bébé dort (mode
d’économie d’énergie)
Icône des piles rechargeables:
pleines
à moitié−pleines
vides
Icône Bébé appelle :
l’affichage de l’écran
se modifie constamment
7. Hors de portée
Si le récepteur se trouve hors de portée, une icône clignotante
d’alarme de portée vous le fait savoir sur l’écran du récepteur.
De plus, une alarme BI BI" répétitive du récepteur se fait
entendre. Ce son d’alarme se fait toujours entendre quand la
liaison avec l’émetteur a été interrompue.
8. Alarme
Une alarme visuelle et audible est émise par le récepteur quand :
la liaison entre le récepteur et l’émetteur est interrompue ou
quand l’émetteur est débranché.
l’émetteur est réglé sur un autre canal que le récepteur.
l’émetteur est réglé sur un autre signal pilote que le récepteur.
l’émetteur ou le récepteur fonctionne avec des piles
rechargeables trop faibles.
23
Page 24

9. Clip de ceinture
L’unité bébé et l’unité parents sont équipées d’un clip de
ceinture. Il sert aussi de support de présentoir.
8 Élimination des erreurs
1. Pas de courant
L’appareil est débranché. Mettez l’appareil en position CH1 ou
CH2 au niveau de l’interrupteur OFF/CH1/CH2
Contrôlez que les piles rechargeables sont insérées
correctement.
Contrôlez que l’adaptateur est correctement raccordé à
l’appareil.
Contrôlez l’état des piles rechargeables. Remplacez−les par des
neuves, le cas échéant.
2. Pas de signal sonore et pas de lumière pour
l’affichage de puissance
Le réglage du volume est trop bas au niveau du récepteur.
Augmentez le volume sonore.
La régulation de sensibilité de l’émetteur est trop faible.
Augmentez la sensibilité.
Les appareils se trouvent en dehors de la portée. Réduisez la
distance séparant l’émetteur du récepteur.
Contrôlez que les deux appareils sont réglés sur le même canal
et sur le même signal pilote.
3. Écoute de bruits statiques ou de grésillements du
récepteur
Contrôlez que les deux appareils sont réglés sur le même canal
et sur le même signal pilote.
Réduisez la distance séparant l’émetteur du récepteur.
Insérez correctement les piles rechargeables.
24
Page 25

4. Réception de conversations ou de signaux
Perturbation des signaux en raison d’autres babyphones réglés
sur le même canal et signal pilote ou par des téléphones sans fil.
Changez de canal et de signal pilote pour réduire les
perturbations.
5. Sons aigus (réaction)
Récepteur et émetteur sont trop près l’un de l’autre. Augmentez
la distance séparant l’émetteur du récepteur.
La sensibilité est trop forte. Baissez le niveau de sensibilité de
l’émetteur.
9 Données techniques
1. Alimentation en courant
Émetteur (unité bébé) / Récepteur (unité parents)
3 piles rechargeables AAA ou piles alcalines
C.A. 230V / C.C. 6V (center negative (−))
Adapter
C.A. 230V / C.C. 6V (center negative (−))
2. Canal
2 canaux
3. Fréquence de service
CH1 ˙ 864.85 MHz
CH2 ˙ 864.90 MHz
4. Portée de service
Jusqu’à 800 mètres dans des conditions idéales
25
Page 26

4 Informazioni di sicurezza
Leggere attentamente le presenti istruzioni per l’uso. Non aprire per
nessun motivo gli apparecchi e non tentare di compiere riparazioni di
propria iniziativa. In caso di reclami entro il periodo di garanzia, rivolgersi al rivenditore autorizzato. SWITEL si riserva il diritto di compiere
modifiche tecniche ed ottiche agli apparecchi in occasione di migliorie
eseguite sul prodotto.
1. Impiego conforme agli usi previsti
Il presente sorveglia−bebè è previsto per il rilevamento di segnali vocali come per es. quelli emessi da bambini.
2. Luogo di ubicazione
Prevedere il collegamento della stazione di carica dell’unità genitori in
prossimità di una presa di corrente da 230V. Posizionare il sorveglia−
bebè su una superficie piana e antiscivolo. In linea generale le custodie degli apparecchi non lasciano tracce sulla rispettiva superficie di
ubicazione. A causa dell’elevato numero di vernici e superfici non è
comunque possibile escludere completamente eventuali residui sulla
superficie di ubicazione. Spingendo il gancio per cintura verso il basso
fino a farlo scattare in posizione in maniera udibile e ribaltandolo all’indietro di 45° gradi esso funge da ausilio per il posizionamento.
3. Alimentazione elettrica
Servirsi dell’adattatore di corrente SWITEL fornito in dotazione, l’uso
di altri adattatori potrebbe infatti danneggiare il sorveglia−bebè. Non
aprire per nessun motivo l’adattatore di corrente. In caso di apertura
dell’adattatore di corrente con alimentazione elettrica inserita sussiste
pericolo di vita.
Non mettere mai in funzione l’adattatore di corrente con batterie ricaricabili. Pericolo di esplosione!
26
Page 27

4. Smaltimento dell’apparecchio
Eseguire lo smaltimento dell’apparecchio in conformità
ed osservanza delle norme e direttive europee ed internazionali in vigore in materia. Ciò è rivolto alla protezione
delle persone e dell’ambiente.
Il simbolo raffigurato qui accanto segnala che non è consentito procedere allo smaltimento di apparecchi elettronici assieme ai rifiuti domestici, dovendo pertanto compiere uno smaltimento separato.
Apparecchi esauriti o al di là della vita utile prevista sono da consegnare a scopo di smaltimento presso un apposito centro di raccolta
della propria azienda comunale per il trattamento dei rifiuti.
Consegnare batterie ricaricabili e alimentatori per il rispettivo smaltimento al venditore o presso gli appositi centri di raccolta istituiti dalla
propria azienda comunale per il trattamento dei rifiuti.
Prevedere lo smaltimento di confezioni ed imballaggi a rispetto
delle disposizioni locali in vigore in materia.
5. Importante
Verificare la trasmissione audio prima di utilizzare il
sorveglia−bebè senza filo. Posizionare a tale scopo le unità
lontane l’una dall’altra osservando la rispettiva portata. Per
verificare la corretta trasmissione audio, si consiglia di eseguire
delle prove in intervalli regolari facendo parlare un adulto in
sottovoce dentro all’ "unità bebè".
I suoni e rumori registrati nella stanza del bebè dovranno a
questo punto essere avvertibili dall’ "unità genitori" dislocata in
un’altra stanza.
Evitare di posizionare l’unità bebè e l’unità genitori durante
l’esercizio troppo vicine l’una all’altra. Le unità possono infatti
causare fenomeni di riverberazione o interferenze.
Utilizzando un adattatore di corrente, evitare di posizionarlo in
prossimità del bebè bensì sotto ad una finestra o in un altro
punto sufficientemente lontano dalla portata del bebè.
27
Page 28

Non utilizzare per nessun motivo l’adattatore di corrente in
combinazione con altri apparecchi. Allo stesso modo, gli
adattatori di altri apparecchi non si prestano all’uso con questo
sistema.
Stato di carica delle batterie ricaricabili, presenza di pareti, onde
radio e la conformazione dell’ambiente circostante possono
influenzare la portata degli apparecchi. Per ottenere migliori
prestazioni, passare ad un altro canale oppure avvicinare l’unità
genitori maggiormente all’unità bebè.
Non posizionare l’unità bebè nella stanza da bagno (in vicinanza
di vasche da bagno).
5 Funzioni
Congratulazioni per l’acquisto del nostro sorveglia−bebè senza filo. La
confezione comprende un’unità bebè (trasmettitore), un’unità genitori
(ricevitore) e due adattatori di corrente così come una stazione di
carica, vedi figura I.
1. Trasmissione HF senza filo
2. Scelta tra 2 canali
3. Trasmissione con attivazione vocale e impostazione della
sensitività
4. Unità bebè con adattatore di corrente da 6V (fornito in dotazione)
o 3 batterie ricaricabili tipo AAA (fornite in dotazione)
5. Unità genitori con 3 batterie ricaricabili tipo AAA (fornite in
dotazione) o adattatore di corrente (fornito in dotazione). (6V,
200 mA, connettore femmina, centre negative (−))
6. Unità genitori con regolatore di volume
7. Indicazione dello stato di carica delle batterie ricaricabili
8. Basso consumo energetico e bassa radiazione HF
9. Unità bebè e unità genitori con gancio per cintura
28
Page 29

6 Messa in funzione
1. Inserire le batterie ricaricabili
Utilizzare solo batterie ricaricabili contrassegnate dal mar-
chio CE.
Spingere il gancio per cintura verso il basso fino a farlo scattare
in posizione in maniera udibile.
Ribaltare il gancio per cintura all’indietro di 45° gradi rispetto al
vano batterie.
Aprire il vano batterie secondo quanto indicato in figura II.
Inserire 3 batterie ricaricabili tipo AAA rispettivamente nell’unità
bebè e nell’unità genitori osservando in particolare la corretta
polarità.
Chiudere infine il vano batterie.
Prima di utilizzare gli apparecchi per la prima volta, fare ca-
ricare completamente le batterie ricaricabili (9 ore). Servendosi di un adattatore di rete non è necessario estrarre
le batterie dall’unità bebè ovvero dall’unità genitori durante
la carica. Il simbolo raffigurante una batteria lampeggia durante la carica e si spegne a conclusione del processo di
caricamento.
2. Esercizio con adattatore di corrente
Utilizzare solo un alimentatore di rete contrassegnato dal
marchio CE.
Collegare l’alimentatore di rete sia alla presa DC da 6V dell’unità
bebè sia alla presa di corrente.
Collegare la stazione di carica alla presa di corrente e riporre
l’unità genitori nella stazione di carica.
Impostare durante la scelta del canale l’unità bebè e l’unità
genitori sullo stesso canale (CH1 o CH2).
29
Page 30

Si consiglia di estrarre le batterie ricaricabili non utilizzando le
unità per un intervallo di tempo prolungato.
Altrimenti potrebbero verificarsi delle perdite di acido.
Trasmettitore e ricevitore sono dotati di un simbolo batteria.
Lo stato di carica attuale è così visualizzato sul display.
Si consiglia di impiegare per entrambe le unità l’adattatore da
6V, connettore femmina 200 mA, centre negative (−).
Dal momento che entrambe le unità sono dotate di batterie
ricaricabili e adattatore collegato, le due unità continuano a
funzionare anche in caso di caduta di tensione.
7 Funzionamento
1. Unità bebè (trasmettitore radio)
Assicurarsi che l’adattatore di corrente sia collegato ovvero che
le batterie ricaricabili siano inserite correttamente.
Posizionare l’unità bebè nelle vicinanze del bebè rivolgendo il
microfono, per una trasmissione ottimale, in direzione del
bambino. (figura III)
Assicurarsi che l’unità si trovi fuori dalla portata del bebè.
Non posizionare mai l’unità nel letto o dentro al box del
bebè!
Non appena il microfono integrato riceve dei suoni (portata da 1
a 2 m), l’unità bebè avvia automaticamente la trasmissione di
segnali all’unità genitori. La trasmissione è interrotta quando
l’apparecchio non avverte più alcun rumore.
2. Unità genitori (ricevitore)
Verificare l’inserimento delle batterie ricaricabili.
Posizionare l’unità genitori in prossimità dei genitori (figura III).
Spostare il regolatore del volume in posizione desiderata.
30
Page 31

Non appena l’unità bebè avverte un segnale acustico, la
retroilluminazione del display dell’unità genitori si accende ed il
simbolo "Bebè chiama" lampeggia.
Trascorsi alcuni secondi in cui l’apparecchio non riceve più
segnali acustici, il ricevitore ritorna automaticamente in modalità
di risparmio energetico. Il simbolo "Bebè dorme" è visualizzato
sul display e la retroilluminazione dell’apparecchio si spegne
anch’essa automaticamente.
3. Scelta del canale
Le unità sono dotate di interruttore per la scelta del canale (OFF,
CH1 o CH2) sul quale compiere la trasmissione dei segnali
radio. Scegliere un altro canale in caso di cattiva qualità di
ricezione o in presenza di interferenze radio.
I canali selezionati sono visualizzati sul display in alto a destra.
È necessario sincerarsi che entrambi gli apparecchi utiliz-
zino lo stesso canale.
4. Migliorare la sensitività in sede di attivazione vocale
Impostare il regolatore della sensitività presente sull’unità bebè
sulla posizione desiderata.
31
Page 32

5. Suono pilota
Un segnale pilota non avvertibile acusticamente consente di
migliorare notevolmente la trasmissione riducendo eventuali
interferenze. Il segnale pilota è trasmesso assieme al segnale
acustico dall’unità bebè all’unità genitori. L’unità genitori attiva
a questo punto la ricezione solo nel momento
in cui l’unità bebè trasmette un segnale
acustico.
L’utente ha modo di scegliere tra
16 segnali pilota differenti impostabili
mediante interruttore DIP (situato nel vano
batterie).
È necessario sincerarsi che entrambi gli apparecchi utiliz-
zino lo stesso segnale pilota. Nel caso in cui il ricevitore ricevesse ugualmente segnali estranei, passare ad un altro
canale o cambiare il suono pilota.
32
Page 33

Suono pi-
Pulsante 1 Pulsante 2 Pulsante 3 Pulsante 4
lota
Codice 1 ON ON ON ON
Codice 2 ON ON ON OFF
Codice 3 ON ON OFF ON
Codice 4 ON ON OFF OFF
Codice 5 ON OFF ON ON
Codice 6 ON OFF ON OFF
Codice 7 ON OFF OFF ON
Codice 8 ON OFF OFF OFF
Codice 9 OFF ON ON ON
Codice 10 OFF ON ON OFF
Codice 11 OFF ON OFF ON
Codice 12 OFF ON OFF OFF
Codice 13 OFF OFF ON ON
Codice 14 OFF OFF ON OFF
Codice 15 OFF OFF OFF ON
No. codice OFF OFF OFF OFF
OFF: non è stato selezionato alcun suono pilota.
Non avendo scelto alcun segnale pilota per il ricevitore, è
probabile che l’apparecchio riceva anche segnali trasmessi da
altri apparecchi.
33
Page 34

6. Display LC
Simbolo "Fuori portata"
Canale: CH1, CH2
Simbolo "Bebè dorme" (moda-
lità di risparmio energetico)
Simbolo batteria:
carica
a metà
scarica
Simbolo "Bebè
chiama":
Sul display le indicazioni si alternano frequentemente
7. Fuori portata
Con ricevitore al di fuori della portata, il simbolo relativo alla
portata lampeggia sul display del ricevitore. In più si sente
ripetutamente l’allarme "BI BI" emesso dal ricevitore. Questo
suono di allarme si avverte ogni volta che il collegamento con il
trasmettitore si interrompe.
8. Allarme
Il ricevitore rilascia un allarme visivo e acustico se:
il collegamento tra ricevitore e trasmettitore si interrompe o il
trasmettitore è spento.
il trasmettitore è impostato su un canale diverso rispetto al
ricevitore.
il trasmettitore è impostato su un segnale pilota diverso rispetto
al ricevitore.
il trasmettitore o il ricevitore sono fatti funzionare con batterie
scariche.
34
Page 35

9. Gancio per cintura
Unità bebè e unità genitori sono fornite con un gancio per
cintura. Esso funge da ausilio per il posizionamento.
8 Eliminare guasti
1. Nessuna corrente elettrica
Apparecchio è spento. Inserire l’apparecchio mediante
interruttore OFF/CH1/CH2 scegliendo tra le posizioni CH1 o
CH2.
Verificare il corretto inserimento delle batterie ricaricabili.
Verificare il corretto collegamento dell’adattatore all’apparecchio.
Verificare lo stato di carica delle batterie ricaricabili. Inserire se
necessario delle batterie nuove.
2. Nessun segnale acustico e nessuna spia di
segnalazione dello stato di accensione
Regolazione del volume presso il ricevitore è troppo bassa.
Aumentare il volume.
Regolazione della sensitività del trasmettitore è troppo bassa.
Impostare una sensitività superiore.
Gli apparecchi sono fuori dalla portata. Ridurre la distanza tra
trasmettitore e ricevitore.
Verificare che per entrambi gli apparecchi siano impostati lo
stesso canale e lo stesso suono pilota.
3. Ricevitore trasmette rumori statici o fruscio
Verificare che per entrambi gli apparecchi siano impostati lo
stesso canale e lo stesso suono pilota.
Ridurre la distanza tra trasmettitore e ricevitore.
Inserire le batterie ricaricabili in modo corretto.
35
Page 36

4. Si ricevono colloqui o suoni estranei
Interferenze di segnale causate da altre unità bebè sintonizzate
sullo stesso canale o segnale pilota o causate da un telefono
senza fili. Cambiare canale e suono pilota onde evitare
interferenze.
5. Toni alti (retroazione)
Ricevitore e trasmettitore si trovano troppo vicini l’uno all’altro.
Aumentare la distanza tra trasmettitore e ricevitore.
La sensitività è troppo alta. Ridurre la sensitività del
trasmettitore.
9 Specifiche tecniche
1. Alimentazione elettrica
Trasmettitore (unità bebè) / Ricevitore (unità genitori)
3 batterie ricaricabili tipo AAA o alcaline
AC 230V / DC 6V (centre negative (−))
Adattatore
AC 230V / DC 6V (centre negative (−))
2. Canale
2 canali
3. Frequenza di esercizio
CH1 ˙ 864.85 MHz
CH2 ˙ 864.90 MHz
4. Portata di esercizio
fino a 800 metri in condizioni ideali
36
Page 37

4 Safety Information
Please read this operating manual thoroughly. Under no circumstances open the devices yourself and never carry out any repair
work yourself. In the case of claims under the terms of guarantee,
please contact your sales outlet. SWITEL reserves the right to make
modifications to the technical specifications and design within the
scope of product improvement.
1. Intended use
This Babyphone has been developed purely for monitoring voice signals, e.g. from children.
2. Installation location
The charging unit for the receiver must be installed in the vicinity of a
230 V power socket. Set the Babyphone units down on a flat, non−slip
surface. Normally, these devices do not leave marks on the surfaces
where they are located. However, due to the number of paints and
surfaces which come into question, it cannot be fully ruled out that the
housing will leave marks on the surfaces where they are located. By
sliding the belt clip down until it audibly snaps into place and then pivoting it 45° to the rear, it serves as a positioning aid.
3. Power supply
Only use the SWITEL power adapter plug contained in the material
supplied since other power adapter plugs could damage the Babyphone. Never open the power adapter plug. If the power adapter plug
is opened when connected to the power supply socket, there is a risk
of fatal injury.
Never use the power adapter plug with non−rechargeable batteries.
This would bring the risk of explosion!
37
Page 38

4. Disposing of the device
You are obliged to dispose of the device properly in
accordance with European and international laws and
directives. This serves to protect both human beings and
the environment.
The adjacent icon indicates that electronic devices no
longer required must be disposed of separate from domestic waste.
Equipment which is old or has exceeded its service life must be
disposed of at a corresponding collection point provided by the local
public waste authorities.
Batteries and power adapter plugs must be disposed of at the point
of sale or at a corresponding collection point provided by the local
public waste authorities.
Packing materials must be disposed of according to the applicable
local regulations.
5. Important
Check the sound reception before putting the remote Babyphone
units into operation. This also checks whether the units have
been placed out of range of each other. The sound transmission
should be checked at regular intervals as described below :
Allow an adult to speak quietly in the transmitter unit" (unit for
the baby).
It should be possible to hear the sound made in the baby’s room
clearly on the receiver unit" (unit for the adults) in another room.
During operation, do not place the transmitter and receiver units
too close to each other. The units could resonate or interference
noise could be produced.
If you use a power adapter plug, do not position it in the vicinity
of the baby but on a window sill or another location where the
baby cannot reach it.
Under no circumstances should the power adapter plug be
connected with other equipment. Adapters for other products are
not suitable for this system.
38
Page 39

Battery power, walls, radio waves and local characteristics can
affect the range of the devices. To achieve a better performance,
switch to a different channel or position the receiver unit nearer
to the transmitter unit.
Do not place the transmitter unit in the bathroom (near a
bathtub).
5 Functions
Congratulations on having purchased our remote Babyphone. It contains a transmitter unit, a receiver unit and two power adapter plugs
as well as a charging station, as illustrated in Fig. I.
1. Wireless HF transmission
2. 2−channel selection
3. Voice−activated transmission with sensitivity control
4. Transmitter unit operation with 6 V power adapter plug
(contained in material supplied) or 3 AAA batteries (contained in
material supplied)
5. Receiver unit operation with 3 AAA batteries (contained in
material supplied) or power adapter plug (contained in material
supplied) (6 V, 200 mA, socket, center negative (−))
6. Receiver unit with volume control
7. Battery status indicator
8. Low power consumption and low HF radiation
9. Transmitter unit and receiver unit each with a belt clip
39
Page 40

6 Starting Up
1. Inserting the batteries
Only use batteries bearing the CE certificate.
Slide the belt clip downwards until it audibly snaps into place.
Pivot the belt clip an angle of 45° back from the battery
compartment.
Open the battery compartment as illustrated in Fig. II.
Insert 3 AAA batteries each in the transmitter unit and in the
receiver unit, paying attention to the correct polarity.
Close the battery compartment.
Please charge the batteries fully (9 hours) before using the
equipment for the first time. During the charging process,
they must not be removed from the transmitter/receiver
unit when they are operated using the power adapter plugs.
The battery icon flashes during the charging process and
stop flashing when the charging process is completed.
2. Operating using the power adapter plug
Only use adapters which bear a CE certificate.
Connect the power adapter plug to the DC 6 V socket on the
transmitter unit and to the mains power socket.
Connect the charging station to the mains power socket and
insert the receiver unit in the charging station.
Set the channel selector on the transmitter and receiver units to
the same channel (CH1 or CH2).
40
Page 41

If you do not intend to use the units for a longer period of
time, remove all the batteries. Otherwise, they could leak.
The transmitter and receiver display a battery icon.
The current charge status is indicated in the display.
It is recommended to use the 6 V adapter, 200 mA socket,
centre negative (−) for both units.
When both units are equipped with batteries and the power
adapter plug is connected, both units continue to operate
even in the event of a power failure.
7 Operation
1. Transmitter unit
Ensure that the power adapter plug is connected or the batteries
have been inserted properly.
Position the transmitter unit near the baby and ensure that the
microphone is pointing towards the baby to enable optimum
transmission. (Fig. III)
Ensure that the unit is out of reach of the baby. Never place
the unit in the baby’s bed or playpen!
When the microphone integrated in the transmitter unit detects
noises (range 1 to 2 m), it automatically starts to transmit signals
to the receiver unit. When no further noise is detected,
transmission is stopped.
2. Receiver unit
Ensure that the batteries have been inserted.
Place the receiver unit near the supervising adults (Fig. III).
Move the loudspeaker control to the required setting.
When a signal is received from the transmitter unit, the
back−lighting of the receiver unit display lights up and the Baby
Calling" icon flashes.
41
Page 42

A few seconds after the device has no longer received acoustic
signals, the receiver automatically switches back to energy save
mode. The Baby Sleeping icon appears in the display and the
back−lighting switches off automatically.
3. Channel selection
Each of the units is equipped with a channel selector switch
(OFF, CH1 or CH2) for the transmission of the radio signals. If
reception is poor or interference occurs in the radio signals,
select the other channel for optimum transmission.
The channels selected are indicated at the top right of the
display.
Ensure that both units are set to the same channel.
4. Optimising the sensitivity of voice−activation
Set the sensitivity control to the required position on the
transmitter unit.
5. Pilot tone
Interference−free transmission is considerably improved by the
provision of an inaudible pilot tone. The pilot tone is transmitted
together with the acoustic signal from the transmitter unit to the
receiver unit. The receiver unit only switches to
receive when an acoustic signal is transmitted
from precisely this transmitter unit.
The are 16 different pilot tones available
for selection by the user which can be set
by means of the DIP switches (in the
battery compartment).
Ensure that both units are set to the same pilot tone. If your
receiver receives external signals despite this function,
change the channel or pilot tone.
42
Page 43

Pilot tone Switch 1 Switch 2 Switch 3 Switch 4
Code 1 On On On On
Code 2 On On On Off
Code 3 On On Off On
Code 4 On On Off Off
Code 5 On Off On On
Code 6 On Off On Off
Code 7 On Off Off On
Code 8 On Off Off Off
Code 9 Off On On On
Code 10 Off On On Off
Code 11 Off On Off On
Code 12 Off On Off Off
Code 13 Off Off On On
Code 14 Off Off On Off
Code 15 Off Off Off On
No. code Off Off Off Off
Off: No pilot tone selected.
If no pilot tone has been selected for the receiver, it is possible it
will receive signals generated by external equipment.
43
Page 44

6. LC display
Out of range" icon
Channel: CH1, CH2
Baby Sleeping" icon (energy
save mode)
Battery icon:
full
half full
empty
Baby Calling" icon:
constantly alternating
in display
7. Out of range
When the receiver is out of range, the flashing out of range alarm
icon appears in the receiver’s display. In addition, the receiver
also issues a recurrent acoustic signal. This acoustic alarm
always occurs when connection to the transmitter is interrupted.
8. Alarm
Visual and acoustic alarms are issued by the receiver when:
the connection between the receiver and transmitter is
interrupted or the transmitter is switched off.
the transmitter is set to a different channel from the receiver.
the transmitter is set to a different pilot tone from the receiver.
the batteries in the transmitter or receiver are too weak.
9. Belt clip
The transmitter unit and receiver unit are equipped with a belt
clip. It also serves as a positioning aid.
44
Page 45

8 Troubleshooting
1. No power
The device is switched off. Switch the device to position CH1 or
CH2 using the OFF/CH1/CH2 switch.
Ensure that the batteries have been inserted correctly.
Check that the adapter plug is correctly connected to the device.
Check the battery charge status. Insert the new batteries, if
necessary.
2. No acoustic signal and power−on lamp is off
Volume control on the receiver unit is set too low. Set a higher
volume.
Sensibility control on the transmitter unit is set too low. Set a
higher sensibility.
The devices are out of range. Reduce the distance between the
transmitter and receiver units.
Check that both devices are set to the same channel and pilot
tone.
3. Interference noise can be heard from the receiver
Check that both devices are set to the same channel and pilot
tone.
Reduce the distance between the transmitter and receiver units.
Insert the batteries correctly.
4. Other voices or noises are received
Signal disturbances resulting from other Babyphones transmitting
on the same channel and pilot tone or through cordless phones.
Change the channel and pilot tone to reduce interference.
5. High tones (acoustic feedback)
Receiver and transmitter units are too close together. Increase
the distance between the transmitter and receiver units.
The sensibility is too high. Reduce the transmitter sensibility
setting.
45
Page 46

9 Technical Specifications
1. Power supply
Transmitter / Receiver
3 AAA rechargeable or alkaline batteries
AC 230 V / DC 6 V (center negative (−))
Adapter
AC 230 V / DC 6 V (center negative (−))
2. Channel
2 channels
3. Operating frequency
CH1 ˙ 864.85 MHz
CH2 ˙ 864.90 MHz
4. Operating range
Up to 800 meters under ideal conditions
46
Page 47

Declaration of conformity
g
WE TELGO AG
OF Route d’Englisberg 17
CH−1763 Granges−Paccot
Declare under our own responsibility that the product
MODEL: BCC 47
DESCRIPTION: Babyphone with Display
Is in conformity with directives: R&TTE Directive (1999/5/EC)
COMPLIANCE IS ACHIEVED BY CONFORMITY TO THE FOLLOWING:
EN 60065:2002+Corr1
TEST REPORT NUMBERS: ET−R0522995(S1)
AUTHORISED BY:
Signed:
Name (printed): Selim Dusi
Position in company: Managing Director
Date of issue: 14 February, 2006
Copies of this document will be held on file for a period of 10 years after the
last production.
________________________
1
Supplier: TELGO AG, Route d’Englisberg 17
Product: BCC 47
CH−1763 Gran
es−Paccot
 Loading...