

Switek Electronics AI-7100ULS, AS-9100DLS, AS-9100ULS, AS-7100DLS, AI-9100ULS User Manual
...
LCD KVM SWITCH
User Manual
LCD KVM Console User Manual
2
Statement
United States Federal Communications Commission Interference Statement
This product has been tested and found to comply with FCC regulations Class B (Class B) digital device and
FCC specifications Details of Section 15.These specifications are intended to be used in a commercial
environment without harmful interference and to provide for the protection of regulated equipment. This
equipment generates, and can radiate radio, so if you do not have to install and use as specified in this manual,
may cause interference to radio communications. However, there is no guarantee that interference will not
occur in a particular installation. If the equipment is turned on or off causing interference to radio and television
reception, the user should try the following to reduce the interference.
Change the direction and move the receiving antenna.
Increase the distance between the equipment and the receiver.
Connect the device to the circuit outlet (not the interface to which the receiver is connected)
。
Consult the dealer and an experienced radio / TV technician for help.
FCC Warning: change and modify non-qualified party which is responsible for the equipment is made to void
the user's authority to operate the equipment.
CE WARNING: This product is a Class B product. In a domestic environment, this product may cause radio
interference, and the user may need to take appropriate precautions.
RoHS
This product is RoHS compliant.

LCD KVM Console User Manual
3
User Precautions
The manufacturer has the right to modify and alter the information, documentation and specifications contained
in this manual without prior notice. Manufactures makes no warranty, express, implied or statutory, disclaims
or specifically disclaims it's possibility of sale and applicability for a particular purpose. The same applies to
any sold and authorized manufacturer's software described in this manual. If the Software Program is found to
be defective after purchase, the purchaser (and any non-manufacturer, its distributor or its purchaser) will be
responsible for all necessary service, repair and any incidental or consequential damages resulting from the
Software defect. The manufacturer is not responsible for any unauthorized interference with the radio or
television caused by this equipment. The user must correct the interference personally. The manufacturer will
not be liable for any damage resulting from incorrect selection of the operating voltage before operation.
Please be sure that the voltage has been set correctly before use.
A typical LCD (liquid crystal display) has millions of pixels. A dead pixel is a defective pixel that does not
display the correct color. On the screen, it usually looks like a tiny black or white dot, which can also be any
other color. In the manufacturing process, even if a pixel on the tiny dust particles, or in the course of a slight
impact during transport, may have a dead pixel. In the ISO 13406-2 specification, four categories of acceptable
screen dead pixels are defined: the first is the best product, and the fourth is the worst. Almost all manufacturers
use the second level as a guarantee of the product, allowing a certain number of dead pixels exist, such as more
than the tolerance will change the screen. Since the manufacturer is of the opinion that this screen is permitted
by the ISO specification, we are not responsible for the replacement or warranty of the TFT LCD panel.

LCD KVM Console User Manual
4
Product Model Description
Single-rail Series
Configuration instructions
AS-7100ULS
VGA Single portKVM,17inch 4:3 LED Monitor, No OSD Menu, Can be cascaded
AS-7100DLS
DVI Single port KVM,17inch4:3 LCD Monitor, No OSD Menu
AI-7100ULS
VGA Single portKVM,17inch4:3 LCD Monitor, No OSD Menu, Can be cascaded, IP Remote Control
AS-9100ULS
VGA Single portKVM,19inch4:3 LCD Monitor, No OSD Menu, Can be cascaded
AS-9100DLS
DVI Single portKVM,19inch4:3 LCD Monitor, No OSD Menu
AI-9100ULS
VGA Single portKVM,19inch4:3 LCD Monitor, No OSD Menu, Can be cascaded, IP Remote Control
AS-7104ULS
VGA 4Ports KVM ,17inch4:3 LCD Monitor, OSD Menu, Demountable Structure, Can be cascaded
AS-7104TLS
CAT5 4Ports KVM ,17inch4:3 LCD Monitor, OSD Menu, Demountable Structure, Can be cascaded
AS-7104DLS
DVI 4Ports KVM ,17inch4:3 LCD Monitor, OSD Menu, Demountable Structure
AI-7104ULS
VGA 4Ports KVM ,17inch4:3 LCD Monitor, OSD Menu, Demountable Structure, Can be cascaded, IP
Remote Control
AI-7104TLS
CAT5 4Ports KVM ,17inch4:3 LCD Monitor, OSD Menu, Demountable Structure, Can be cascaded, IP
Remote Control
AS-9104ULS
VGA 4Ports KVM ,19inch4:3 LCD Monitor, OSD Menu, Demountable Structure, Can be cascaded
AS-9104TLS
CAT5 4Ports KVM ,19inch4:3 LCD Monitor, OSD Menu, Demountable Structure, Can be cascaded
AS-9104DLS
DVI 4Ports KVM ,19inch4:3 LCD Monitor, OSD Menu, Demountable Structure
AI-9104ULS
VGA 4Ports KVM ,19inch4:3 LCD Monitor, OSD Menu, Demountable Structure, Can be cascaded, IP
Remote Control
AS-7108ULS
VGA 8Ports KVM ,17inch4:3 LCD Monitor, OSD Menu, Demountable Structure, Can be cascaded
AS-7108TLS
CAT5 8Ports KVM,17inch4:3 LCD Monitor, OSD Menu, Demountable Structure, Can be cascaded
AS-7108DLS
DVI 8Ports KVM,17inch4:3 LCD Monitor, OSD Menu, Demountable Structure,
AI-7108ULS
VGA 8Ports KVM,17inch4:3 LCD Monitor, OSD Menu, Demountable Structure, Can be cascaded, IP
Remote Control
AI-7108TLS
CAT5 8Ports KVM,17inch4:3 LCD Monitor, OSD Menu, Demountable Structure, Can be cascaded, IP
Remote Control
AS-9108ULS
VGA 8Ports KVM,19inch4:3 LCD Monitor, OSD Menu, Demountable Structure, Can be cascaded
AS-9108TLS
CAT5 8Ports KVM,19inch4:3 LCD Monitor, OSD Menu, Demountable Structure, Can be cascaded
AS-9108DLS
DVI 8Ports KVM,19inch4:3 LCD Monitor, OSD Menu, Demountable Structure,
AI-9108ULS
VGA 8Ports KVM,19inch4:3 LCD Monitor, OSD Menu, Demountable Structure, Can be cascaded, IP
Remote Control
AI-9108TLS
CAT5 8Ports KVM,19inch4:3 LCD Monitor, OSD Menu, Demountable Structure, Can be cascaded, IP
Remote Control
AS-7116ULS
VGA 16Ports KVM,17inch4:3 LCD Monitor, OSD Menu, Demountable Structure, Can be cascaded
AS-7116TLS
CAT5 16Ports KVM,17inch4:3 LCD Monitor, OSD Menu, Demountable Structure, Can be cascaded
AI-7116ULS
VGA 16Ports KVM,17inch4:3 LCD Monitor, OSD Menu, Demountable Structure, Can be cascaded, IP
Remote Control

LCD KVM Console User Manual
5
AI-7116TLS
CAT5 16Ports KVM,17inch4:3 LCD Monitor, OSD Menu, Demountable Structure, Can be cascaded,
Remote Control
AS-9116ULS
VGA 16Ports KVM,19inch4:3 LCD Monitor, OSD Menu, Demountable Structure, Can be cascaded
AS-9116TLS
CAT5 16Ports KVM,19inch4:3 LCD Monitor, OSD Menu, Demountable Structure, Can be cascaded
AI-9116ULS
VGA 16Ports KVM,19inch4:3 LCD Monitor, SD Menu, Demountable Structure, Can be cascaded, IP
Remote Control
AI-9116TLS
CAT5 16Ports KVM,19inch4:3 LCD Monitor, OSD Menu, Demountable Structure, Can be cascaded, IP
Remote Control
Dual-rail Series
Model
Configuration instructions
AS-7100ULD
VGA Single port KVM ,17inch4:3 LCD Monitor, No OSD menu, Demountable Structure, Can be
cascaded
AI-7100ULD
VGA Single port KVM ,17inch4:3 LCD Monitor, No OSD menu, Demountable Structure, Can be
cascaded, IP Remote Control
AS-9100ULD
VGA Single port KVM ,19inch4:3 LCD Monitor, No OSD menu, Demountable Structure, Can be
cascaded
AI-9100ULD
VGA Single port KVM ,19inch4:3 LCD Monitor, No OSD menu, Demountable Structure, Can be
cascaded, IP Remote Control
AS-7104ULD
VGA 4Ports KVM,17inch4:3 LCD Monitor, OSD Menu, Demountable Structure, Can be cascaded
AS-7104TLD
CAT5 4Ports KVM,17inch4:3 LCD Monitor, OSD Menu, Demountable Structure, Can be cascaded
AI-7104ULD
VGA 4Ports KVM,17inch4:3 LCD Monitor, OSD Menu, Demountable Structure, Can be cascaded, IP
Remote Control
AI-7104TLD
CAT54Ports KVM,17inch4:3 LCD Monitor, OSD Menu, Demountable Structure, Can be cascaded, IP
Remote Control
AS-9104ULD
VGA 4Ports KVM,19inch4:3 LCD Monitor, OSD Menu, Demountable Structure, Can be cascaded
AS-9104TLD
CAT5 4Ports KVM,19inch4:3 LCD Monitor, OSD Menu, Demountable Structure, Can be cascaded
AI-9104ULD
VGA 4Ports KVM,19inch4:3 LCD Monitor, OSD Menu, Demountable Structure, Can be cascaded, IP
Remote Control
AI-9104TLD
CAT5 4Ports KVM,19inch4:3 LCD Monitor, OSD Menu, Demountable Structure, Can be cascaded, IP
Remote Control
AS-7108ULD
VGA 8Ports KVM,17inch4:3 LCD Monitor, OSD Menu, Demountable Structure, Can be cascaded
AS-7108TLD
CAT5 8Ports KVM,17inch4:3 LCD Monitor, OSD Menu, Demountable Structure, Can be cascaded
AI-7108ULD
VGA 8Ports KVM,17inch4:3 LCD Monitor, OSD Menu, Demountable Structure, Can be cascaded, IP
Remote Control
AI-7108TLD
CAT5 8Ports KVM,17inch4:3 LCD Monitor, OSD Menu, Demountable Structure, Can be cascaded, IP
Remote Control
AS-9108ULD
VGA 8Ports KVM,19inch4:3 LCD Monitor, OSD Menu, Demountable Structure, Can be cascaded
AS-9108TLD
CAT5 8Ports KVM,19inch4:3 LCD Monitor, OSD Menu, Demountable Structure, Can be cascaded
AI-9108ULD
VGA 8Ports KVM,19inch4:3 LCD Monitor, OSD Menu, Demountable Structure, Can be cascaded, IP
Remote Control

LCD KVM Console User Manual
6
AI-9108TLD
CAT5 8Ports KVM,19inch4:3 LCD Monitor ,OSD Menu, Demountable Structure, Can be cascaded, IP
Remote Control
AS-7116ULD
VGA 16Ports KVM,17inch4:3 LCD Monitor, OSD Menu, Demountable Structure, Can be cascaded
AS-7116TLD
CAT5 16Ports KVM,17inch4:3 LCD Monitor, OSD Menu, Demountable Structure, Can be cascaded
AI-7116ULD
VGA 16Ports KVM,17inch4:3 LCD Monitor, OSD Menu, Demountable Structure, Can be cascaded, IP
Remote Control
AI-7116TLD
CAT5 16Ports KVM,17inch4:3 LCD Monitor, OSD Menu, Demountable Structure, Can be cascaded, IP
Remote Control
AS-9116ULD
VGA 16Ports KVM,19inch4:3 LCD Monitor, OSD Menu, Demountable Structure, Can be cascaded
AS-9116TLD
CAT5 16Ports KVM,19inch4:3 LCD Monitor, OSD Menu, Demountable Structure, Can be cascaded
AI-9116ULD
VGA 16Ports KVM,19inch4:3 LCD Monitor, OSD Menu, Demountable Structure, Can be cascaded, IP
Remote Control
AI-9116TLD
CAT5 16Ports KVM,19inch4:3 LCD Monitor, OSD Menu, Demountable Structure, Can be cascaded, IP
Remote Control
LCD KVM Console User Manual
7
Package Contents
The LCD KVM switch package includes the following:
Name
Quantity/unit
Description
LCD KVM Console
1/pc
The LCD kit products
KVM Cables
N/pc
Cables quantities according to the standard
Port that selected
Power
1/pc
If it is built-in power supply products, power
built-in.
Power Cord
1/pc
Standard 1.8 m power cord
Instructions(CD)
1/pc
Using electronic data CD manual
Quick Installation Guide
1/pc
Quick installation manual
Mounting brackets
2/pcs
LCD KMV Single mounting bracket
Lock ear
2/pcs
LCD KVM fix the rear panel
Install the screw kit
1/pc
Screw the mounting bracket
Check that all parts are present and that they are not damaged in transit. If you encounter problems, contact
your dealer.
To prevent damage to the machine or equipment connected to the machine, please read this manual carefully
and follow the instructions to install and operate it.
* There may be additional product features since the publication of this manual. Please visit our website to
download the latest version of the user's manual.

LCD KVM Console User Manual
8
Contents
User Precautions...........................................................................................................................................................................3
Product Model Description...........................................................................................................................................................4
Single Slide Series................................................................................................................................................................4
Dual-rail Series.....................................................................................................................................................................5
Package Contents..........................................................................................................................................................................7
About this manual.......................................................................................................................................................................10
Description of Terms.................................................................................................................................................................. 11
Chapter 1.....................................................................................................................................................................................12
Introduction.................................................................................................................................................................................12
Production Introduction......................................................................................................................................................12
Product Features................................................................................................................................................................. 14
Hardware Requirements..................................................................................................................................................... 15
Console....................................................................................................................................................................... 15
Computer.................................................................................................................................................................... 15
Cables......................................................................................................................................................................... 15
Operation System....................................................................................................................................................... 18
Part......................................................................................................................................................................................19
Front View..................................................................................................................................................................19
Rear View................................................................................................................................................................... 20
Front view of the 4: 3 screen and 16: 9 screen .........................................................................................................22
Single Slide & Dual Slide LCD Display....................................................................................................................23
Overall Dimensions of the LCD KVM .................................................................................................................... 25
Chapter 2.....................................................................................................................................................................................27
Hardware Installation................................................................................................................................................................. 28
Stacking and Installation Precautions................................................................................................................................ 28
Standard Rack Mounting............................................................................................................................................28
KVM Modules’ Assembly & Removal......................................................................................................................31
Removal of the Keyboard Module.............................................................................................................................33
Expansion Module Installation...................................................................................................................................34
Single Device Installation.......................................................................................................................................... 37
Installation of Single Port LCD KVM Switch...........................................................................................................40
Cascade Device Connection.......................................................................................................................................42
Chapter3......................................................................................................................................................................................46
Basic Operation.......................................................................................................................................................................... 46
Hot Plug..............................................................................................................................................................................46
Hot - Plug Computer Connection...............................................................................................................................46
Hot - Plug Console Port..............................................................................................................................................46
Connection Port Selection..................................................................................................................................................46
Switch the Selection Manually...................................................................................................................................46
OSD Menu Screen Selection......................................................................................................................................47
Hotkey Selection........................................................................................................................................................ 48
Power Off and Restart........................................................................................................................................................ 48

LCD KVM Console User Manual
9
Open Way of LCD Screen ................................................................................................................................................ 49
Chapter4......................................................................................................................................................................................51
OSD Operating........................................................................................................................................................................... 51
OSD Introduction............................................................................................................................................................... 51
OSD Log in.........................................................................................................................................................................51
OSD Hot Key......................................................................................................................................................................51
OSD Main Menu................................................................................................................................................................ 52
OSD Main Menu Title........................................................................................................................................................52
OSDIntroduction of Function Keys................................................................................................................................... 53
F1 GOTO:................................................................................................................................................................53
F2 SCAN:................................................................................................................................................................ 54
F3 LIST:...................................................................................................................................................................54
F4 QV:..................................................................................................................................................................... 55
F5 EDIT:..................................................................................................................................................................55
F6 SET:....................................................................................................................................................................55
OSD ACTIVATING HOTKEY..........................................................................................................................56
SWITCH HOTKEY........................................................................................................................................... 57
CHANNEL DISPLAY MODE...........................................................................................................................57
CHANNEL DISPLAY DURATION..................................................................................................................58
CHANNEL DISPLAY POSITION.................................................................................................................... 58
SCAN DURATION............................................................................................................................................58
SET PASSWORD...............................................................................................................................................59
SET SUPER PASSWORD................................................................................................................................. 59
CLEAR THE NAME LIST................................................................................................................................59
RESTORE DEFAULT VALUE..........................................................................................................................59
LOCK CONSOLE..............................................................................................................................................60
Appendix.....................................................................................................................................................................................61
Safety Instructions..............................................................................................................................................................61
General........................................................................................................................................................................61
Rack mounting............................................................................................................................................................62
Product Specifications........................................................................................................................................................63
LCD Module Specifications...............................................................................................................................................66
Warranty Conditions...........................................................................................................................................................67

LCD KVM Console User Manual
10
About this manual
This User's Guide will assist you in the effective use of the product features, including the installation, setup
and operation of the equipment. You will find the following in this manual:
Chapter 1 Introduction - This chapter introduces the Rack KVM device system, including
its functions, features, and advantages, and describes and introduces the front and rear panel
components.
Chapter 2 Hardware Installation–This section describes how to install the product and the
necessary steps - including basic stand-alone installation, multi-switch level connection
installation, and IP module expansion installation.
Chapter 3 Basic Operation–Explain the basic operating concepts of the KVM switch.
Chapter 4 OSD Operation–Provides a complete KVM switch OSD (onscreen menu)
introduction and explains how to use it.
Appendix - Main specifications and other technical information about the associated KVM
switch.

LCD KVM Console User Manual
11
Description of Terms
Symbol Indicates the text information that should be entered
【】The parentheses indicate the keys that need to be entered. For example, [Enter] means to press the
Enter key. For keys that need to be entered at the same time, they are placed in the
same bracket, and the keys are joined by a plus sign. E.g:【Ctrl+Alt】
1.Numbers indicate the actual operating sequence numbers.
◆ The diamond symbol indicates that the information is provided for
reference, but is not relevant to the procedure.
The origin symbol indicates the sorting sub-item information, independent of the
operation steps.
Indicates the most important information.
Product Information
To find out more about KVM's products and how to use them more efficiently, please visit our website or
contact an authorized dealer for more contact information.

LCD KVM Console User Manual
12
Chapter 1
Introduction
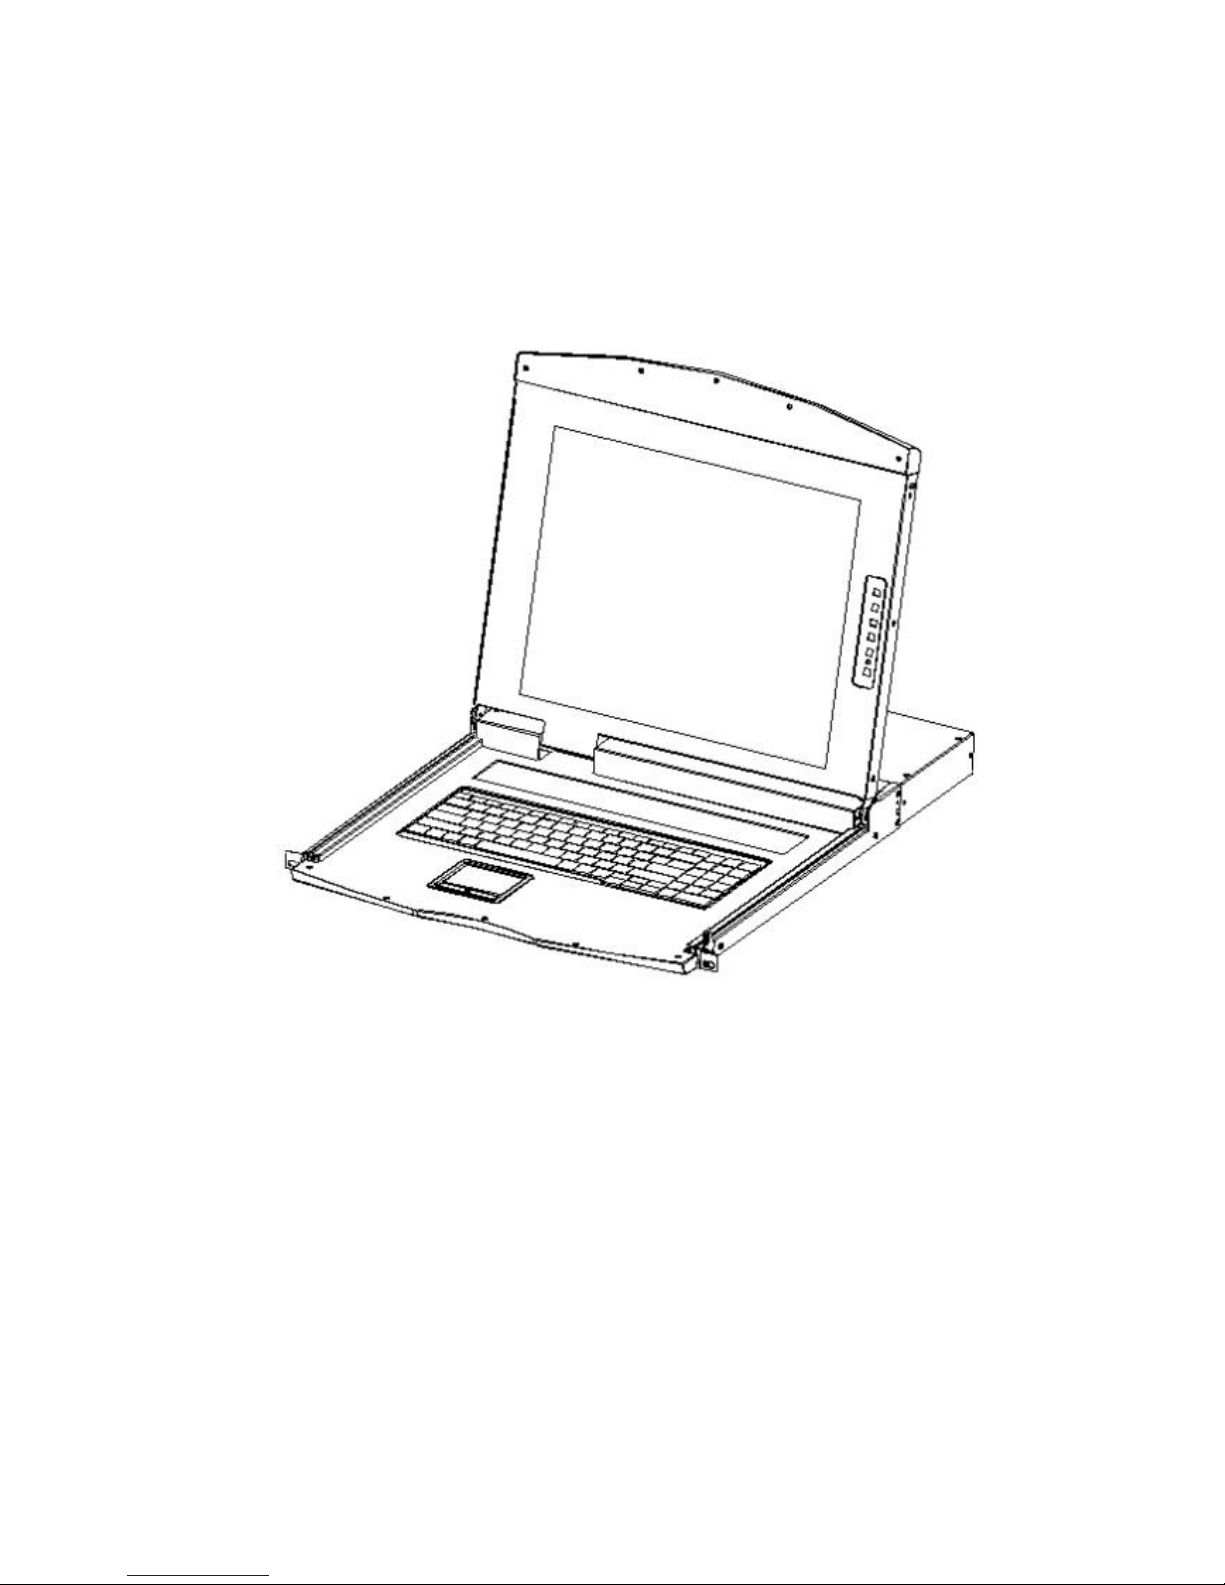
Products Introduction
4/8/16Ports USB/PS.2 LCD KVM Switch is a functional equipment that allows administrators to control
4/8/16pcs computers from a set of USB keyboards, mice, or a set of PS2 keyboards, mice. You can also use
a single port LCD KVM switch as the computer keyboard, mouse, monitor external devices use; front panel
also adds front USB expansion port, you can easily add an external USB mouse and keyboard operation;
support two-level cascade can be Single console to manage up to 256 computers;
In addition, according to the needs of users to expand the function, to KVM OVER IP transmission control
mode, only need to add the product in the expansion card slot IP KVM module card, you can upgrade to
remote network management digital KVM management device, user-friendly environment does not change
the existing circumstances quickly and quickly upgrade the advanced control mode applications.
There are four convenient ways to switch the computer in the installation: (1) Use the Port Select button on
the front panel of the switch; (2) Enter the hotkey combination from the keyboard; (3) From the On-Screen
Display (OSD) select. The auto-scan feature provides automatic scanning and monitors the computers in the
installation architecture one by one. (4) Through the expansion of the IP module of the network port for
remote network control operation even in the KVM above the computer.
This product is very fast and easy to install, just simply connect the cable to the appropriate connection Port ,
no software settings, no cumbersome installation procedures, and there will be no incompatibility issues. As
the device can directly access the keyboard input data, it can operate in a variety of operating platforms
(compatible PC, Mac, Sun, etc.).
As it allows a single console to manage the computers connected to it, a set of KVM installations,(1)
eliminates the cost of individual keyboards, monitors, and mice for each computer; and (2) saves the cost of
additional equipment that can be used by the additional devices. This allows for the installation of a set of
KVMs that can be managed from a single console. Space; (3) to save energy costs; (4) to avoid moving back
and forth between the various computers inconvenience and waste. (5) the rapid upgrade to IP control mode
remote network control mode.
The series of LCD liquid crystal display can be divided into three models for you to choose:17inch、19inch
、
19inch wide-screen
。
The series of products according to the use of LCD components can be divided into single-pull pull mode,
double-pull double pull mode, Which dual-rail design LCD display and keyboard / touchpad module can be

LCD KVM Console User Manual
13
individually sliding.To maximize the space in the data center, when not using the keyboard / touchpad, push
it back into the rack to "hide", allowing the administrator to monitor the status of the computers in the
device.
The modular design and installation of the product series, you can freely replace the actual needs of the
KVM components to facilitate the free combination of different applications. According to the module type
can be divided into three categories: VGA device type, DVI device type, CAT5 type, Port number can be
divided into 1, 4, 8, 16 .

LCD KVM Console User Manual
14
Product Features
A group of USB console can manage 1, 4, 8 or 16 VGA or DVI interface computer
control side supports USB and PS2 two interface types of keyboard, mouse device
Can control two cascades ,cascade control up to 256 computers
The front panel keypad, keyboard hotkey and on-screen menu (OSD) can be used to switch the
computer
connected with the accused device BIOS-level access, do not have to worry about the risk of viruses and
Trojans invasion
the accused computer does not need to install any software and the driver, the accused computer direct
recognition KVM
17 "and 19" LCD display and keyboard, mouse, KVM integrated into one chassis, reducing the volume
Front USB Port, convenient for user to extend USB peripheral keyboard and mouse
dual slide design, LCD display and keyboard, mouse control panel can be individually pulled
Unique single installation mode, more convenient technical staff to install
Control terminal lock function, close the LCD display Push into the track, can automatically limit the
lock, pull out the armrest automatically unlock
LCD power button, you can turn off the monitor when not in use, save power, extend the life of the
LCD monitor
LCD can rotate 0-110 degree elevation angle, it is convenient for you to adjust the suitable viewing
angle
It is compatible with other KVM switches of our company and can be cascaded and extended
Remote Control IP module, supports multiple browser applications to access Internet Explorer, Chrome,
Firefox, Safari, Opera, Mozilla, Netscape, etc.
You can upgrade the remote network control mode through the extended IP board
Support OSD to set user login mode and increase KVM login security requirements
Support high video resolution in local and remote IP mode - Support 480i, 480p, 720p, 1080i and 1080p
(1920 × 1200)
Support wide screen resolution
Extended IP remote control mode supports 1000M Ethernet control transmission requirements
Support remote firmware update
Remote can be based on the actual network bandwidth to transmit video frame rate, bit rate, the mouse
pointer movement rate adjustment
support DDC communication, to adapt to a variety of graphics devices
The Auto Scan function monitors all computer operations
Support cross-platform operation - Windows, Linux, Mac * and Sun *
PC connected to the keyboard and mouse using Keep Online simulation technology mouse and
keyboard, equipment security and stability, fast switching without delay
The remote IP control mouse is absolutely coincident and automatically follow
The remote video form can be adjusted freely to meet different display screen display requirements
Remote video support "one screen multi-display" function, you can watch a computer in a
multi-computer screen

LCD KVM Console User Manual
15
controlled display screen can be zoomed non-polar function, any proportion of the size of the show
Multi-window overlay technology can display multiple windows on the same remote console, and
select and control any windows.
IP expansion module uses plug and play is installed, customers do not need to disassemble, you can
quickly complete the expansion of equipment installation
Convenient and friendly remote login mode, through the browser for Web page access and related
settings and query
Three user-level settings, multi-user group settings, suitable for a variety of management requirements
Remote control desktop can be set according to user habits Two different mouse application mode
Hardware Requirements
Console
Rear two USB Type A keyboard and mouse
Pre-set a USB Type A type keyboard and mouse
A set of USB interface mouse
A set of USB interface keyboard
Single-ended extension cable (optional)
IP remote control terminal 1000M network interface (optional installation)
Computer
The following devices must be installed on each computer:
A VGA or DVI video display card
USB Type A connection port
PS2PS2 keyboard, mouse Port
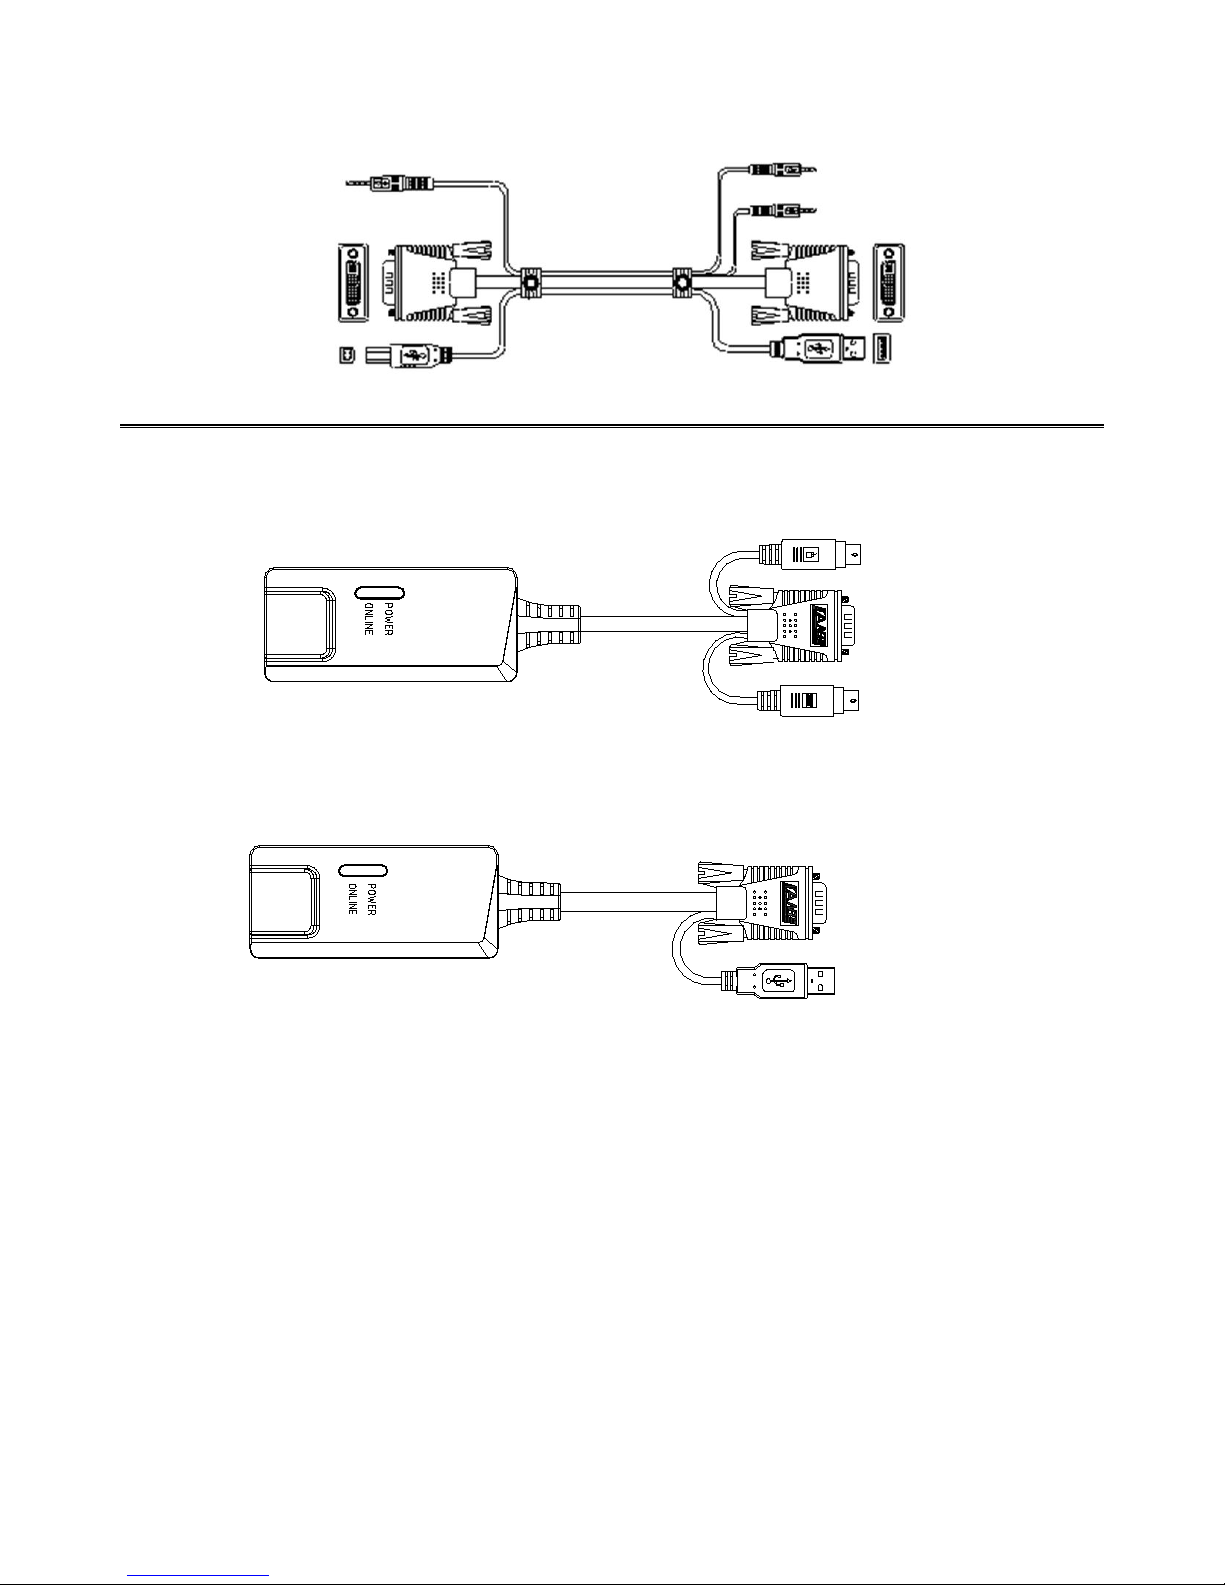
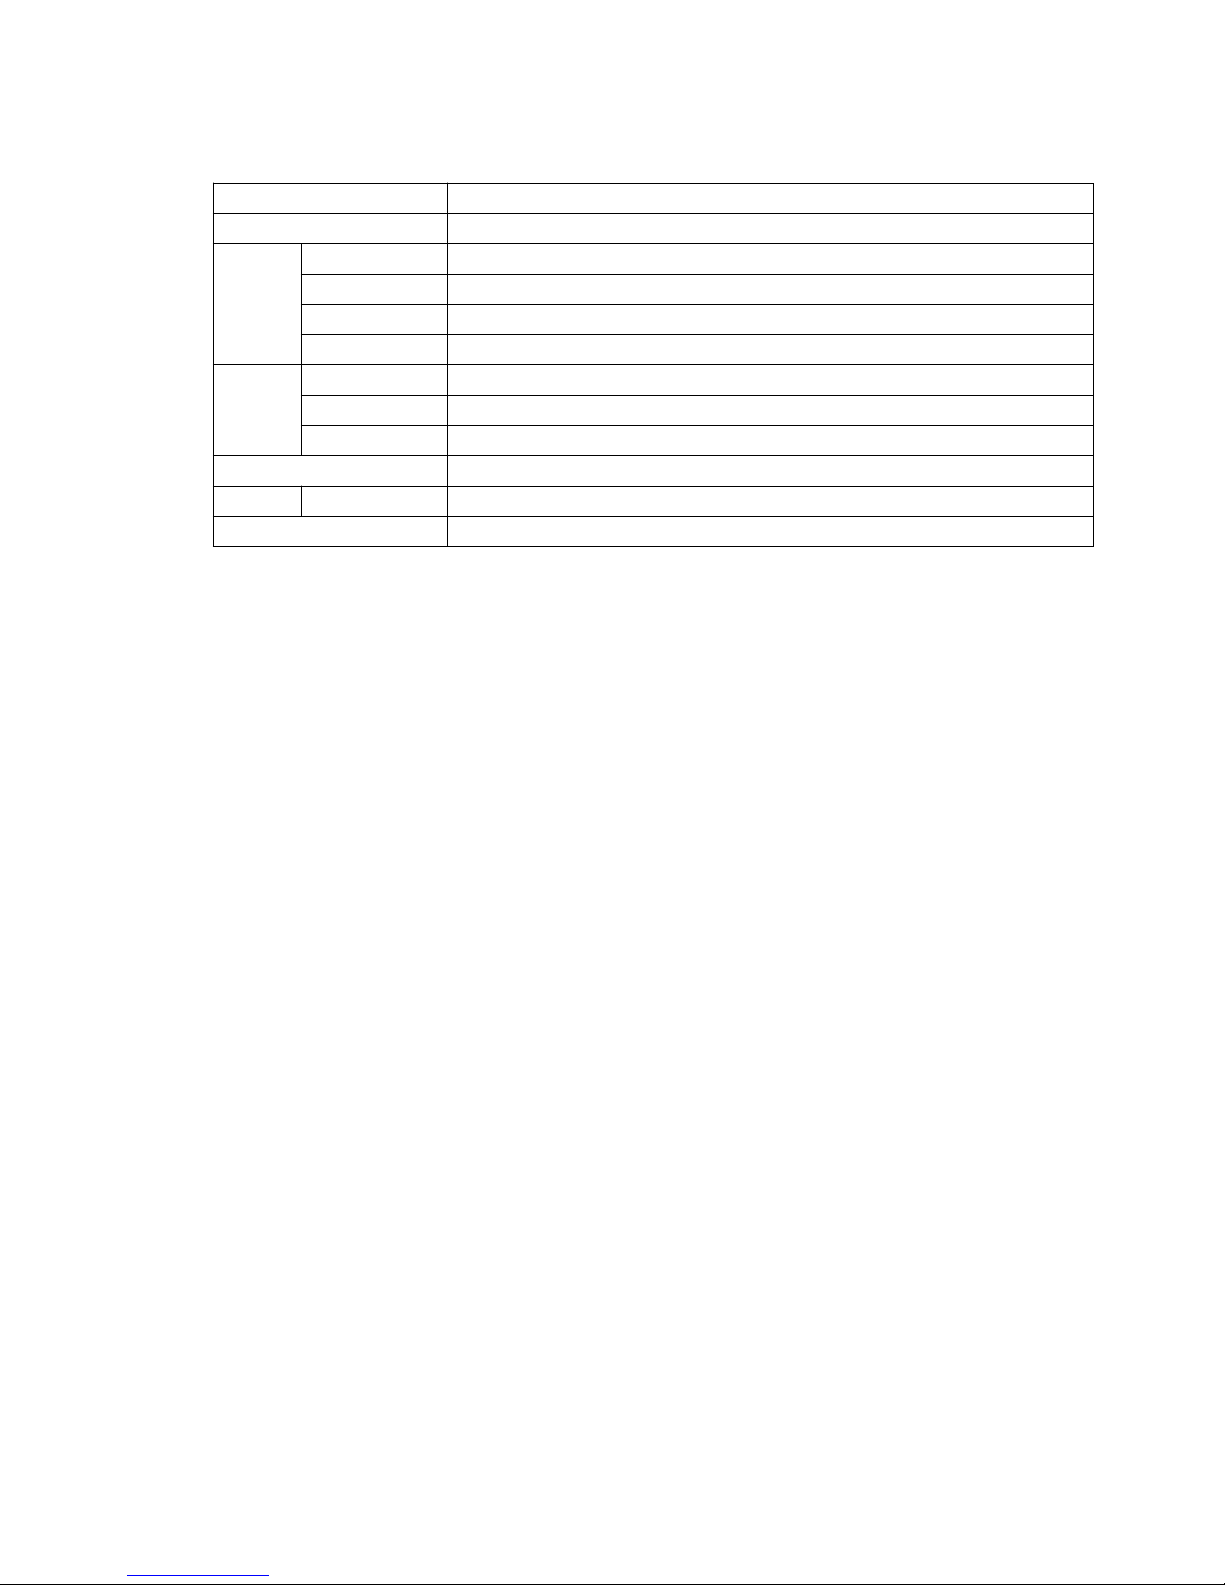
Cables
KVM equipment provides six kinds of connection cables according to the user's use to choose:
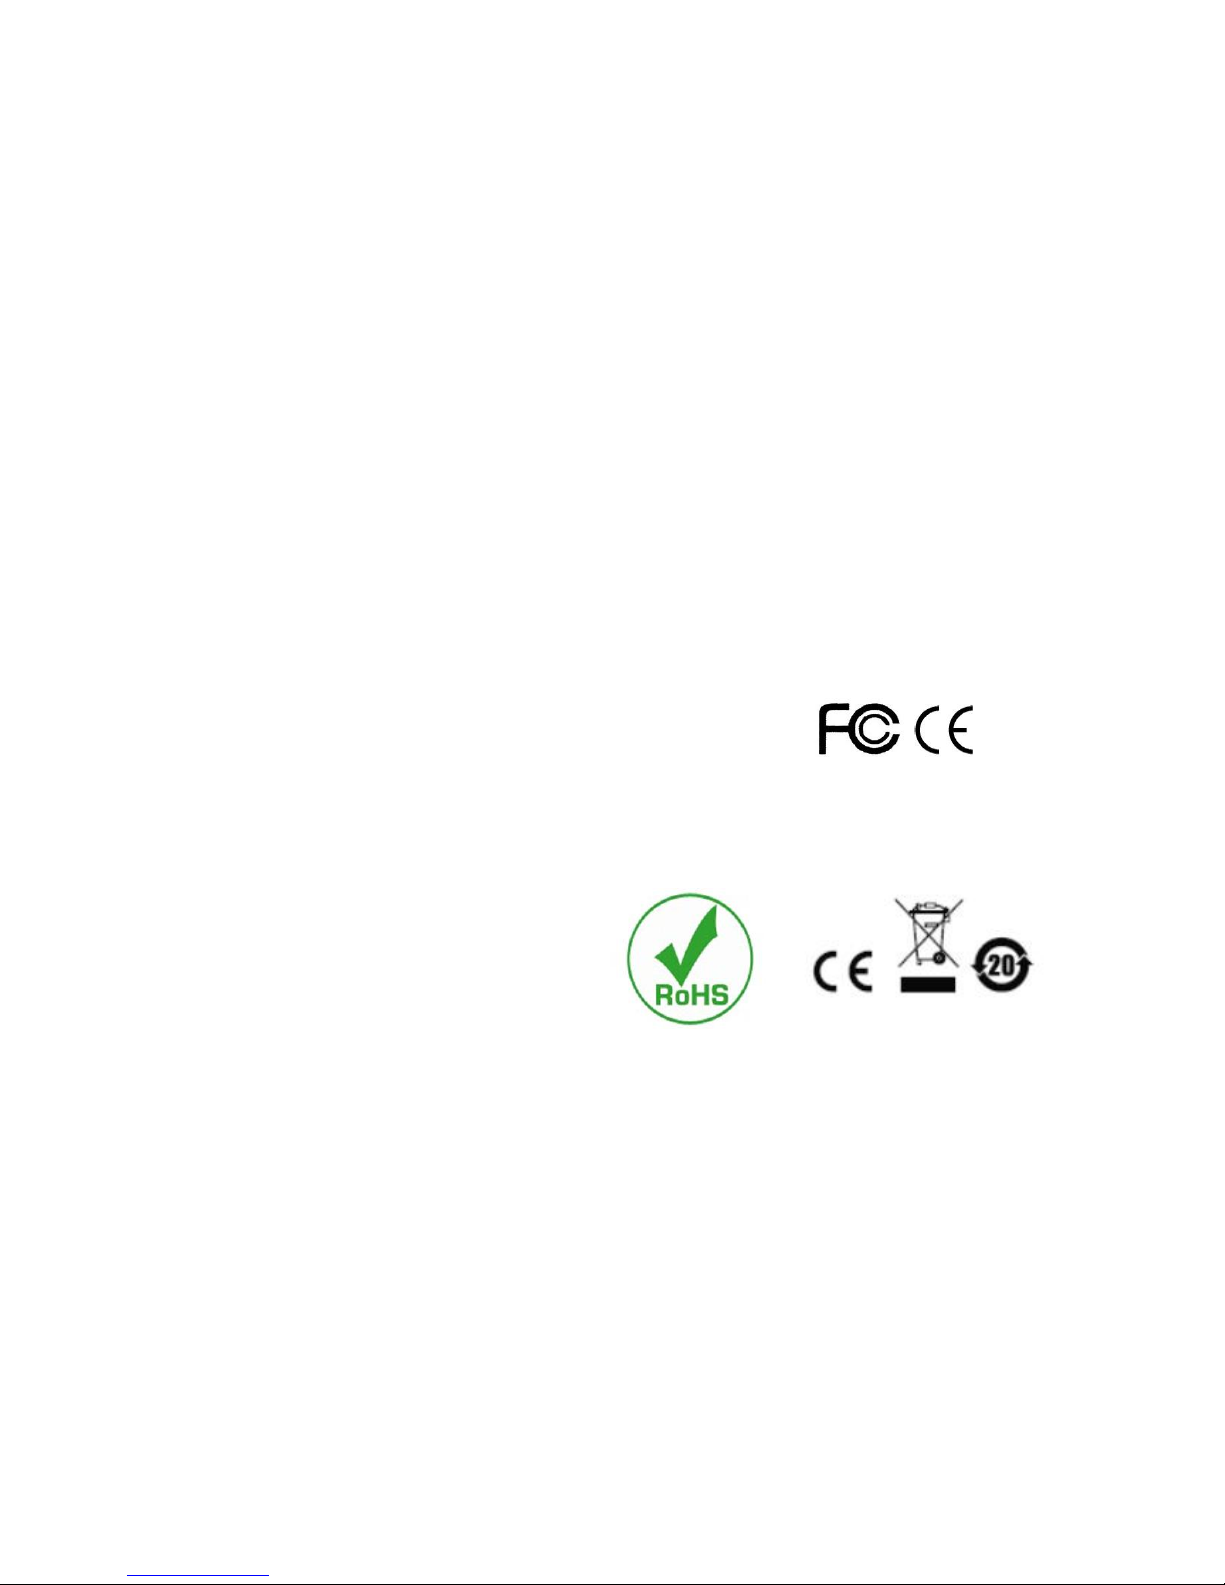
LCD KVM switch single port DVI cable
LCD Connector DB37P
LCD KVM Console User Manual
16
Computer-side DVI-I + USB (Type A)+ PS2 keyboard (purple) + PS2 mouse (green)
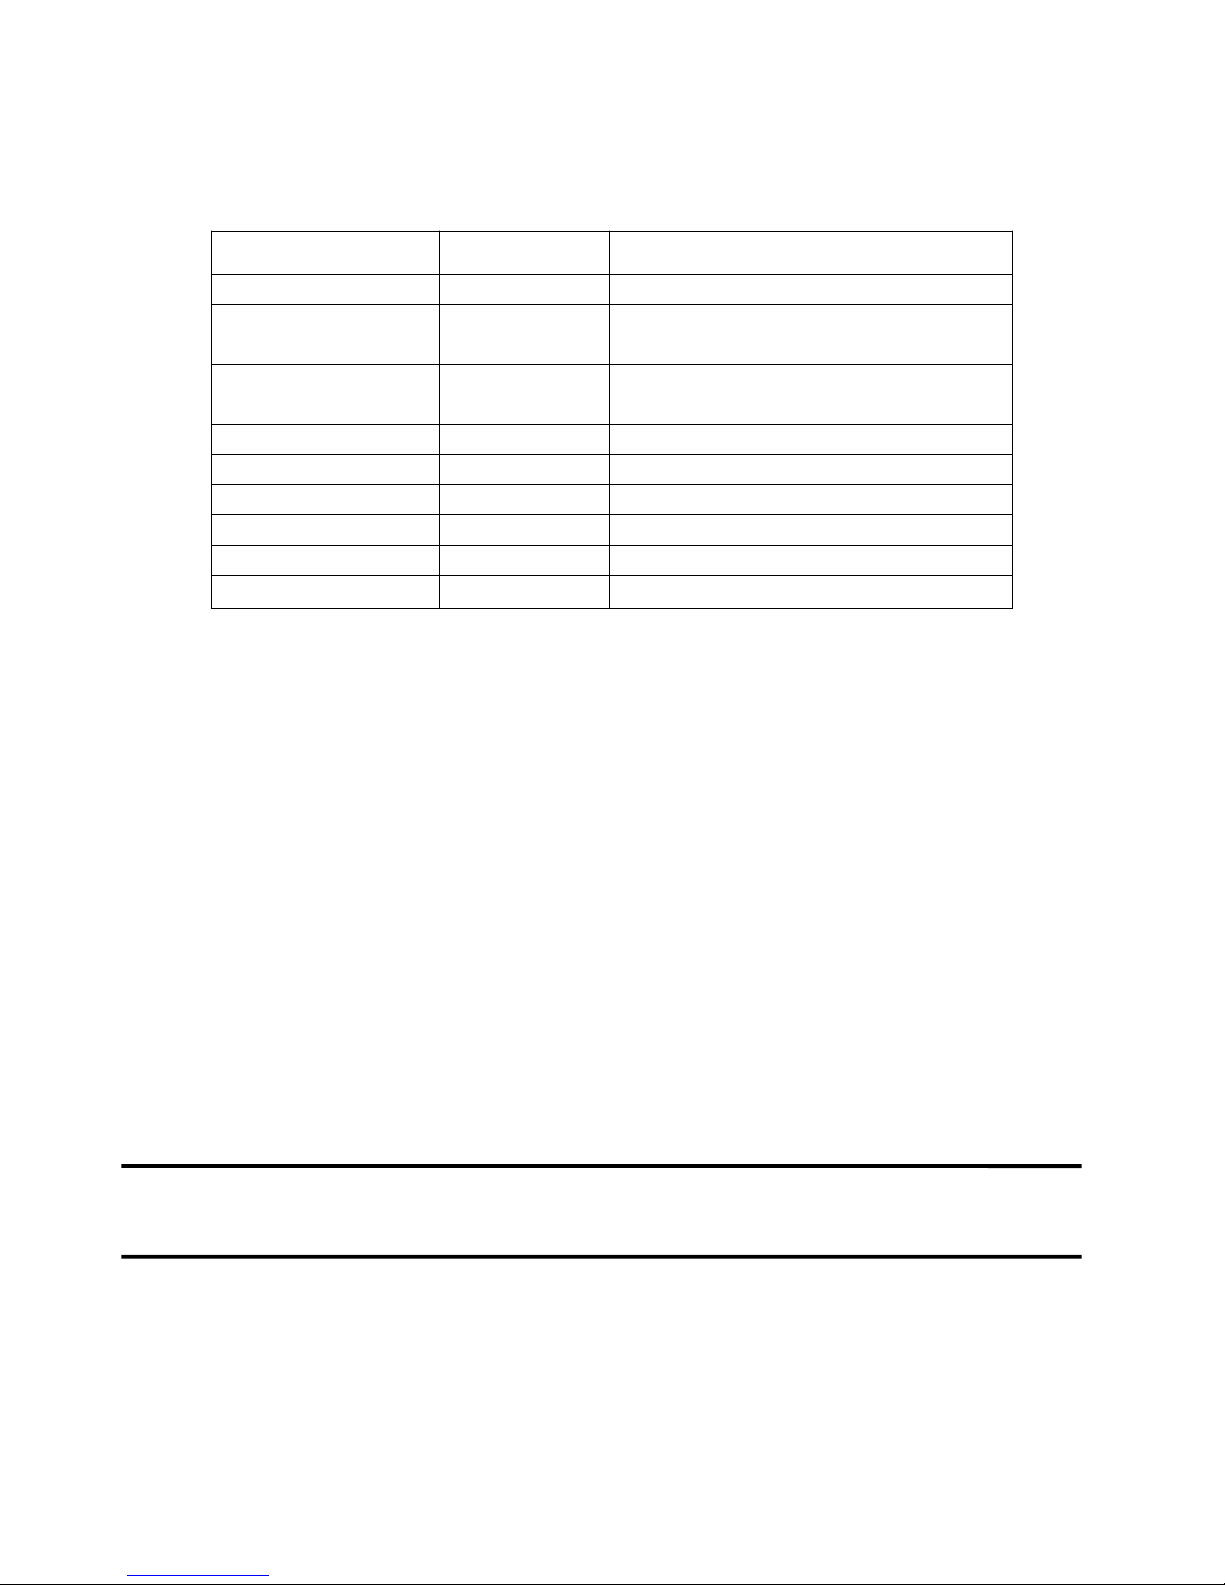
LCD KVM switch single port VGA cable
LCD Connector DB37P
Computer-side VGA + USB (Type A) + PS2 keyboard (purple) + PS2 mouse (green)
VGA + USB (Type A) + PS2 Keyboard (Purple) + PS2 Mouse (Green)
LCD KVM Console User Manual
17
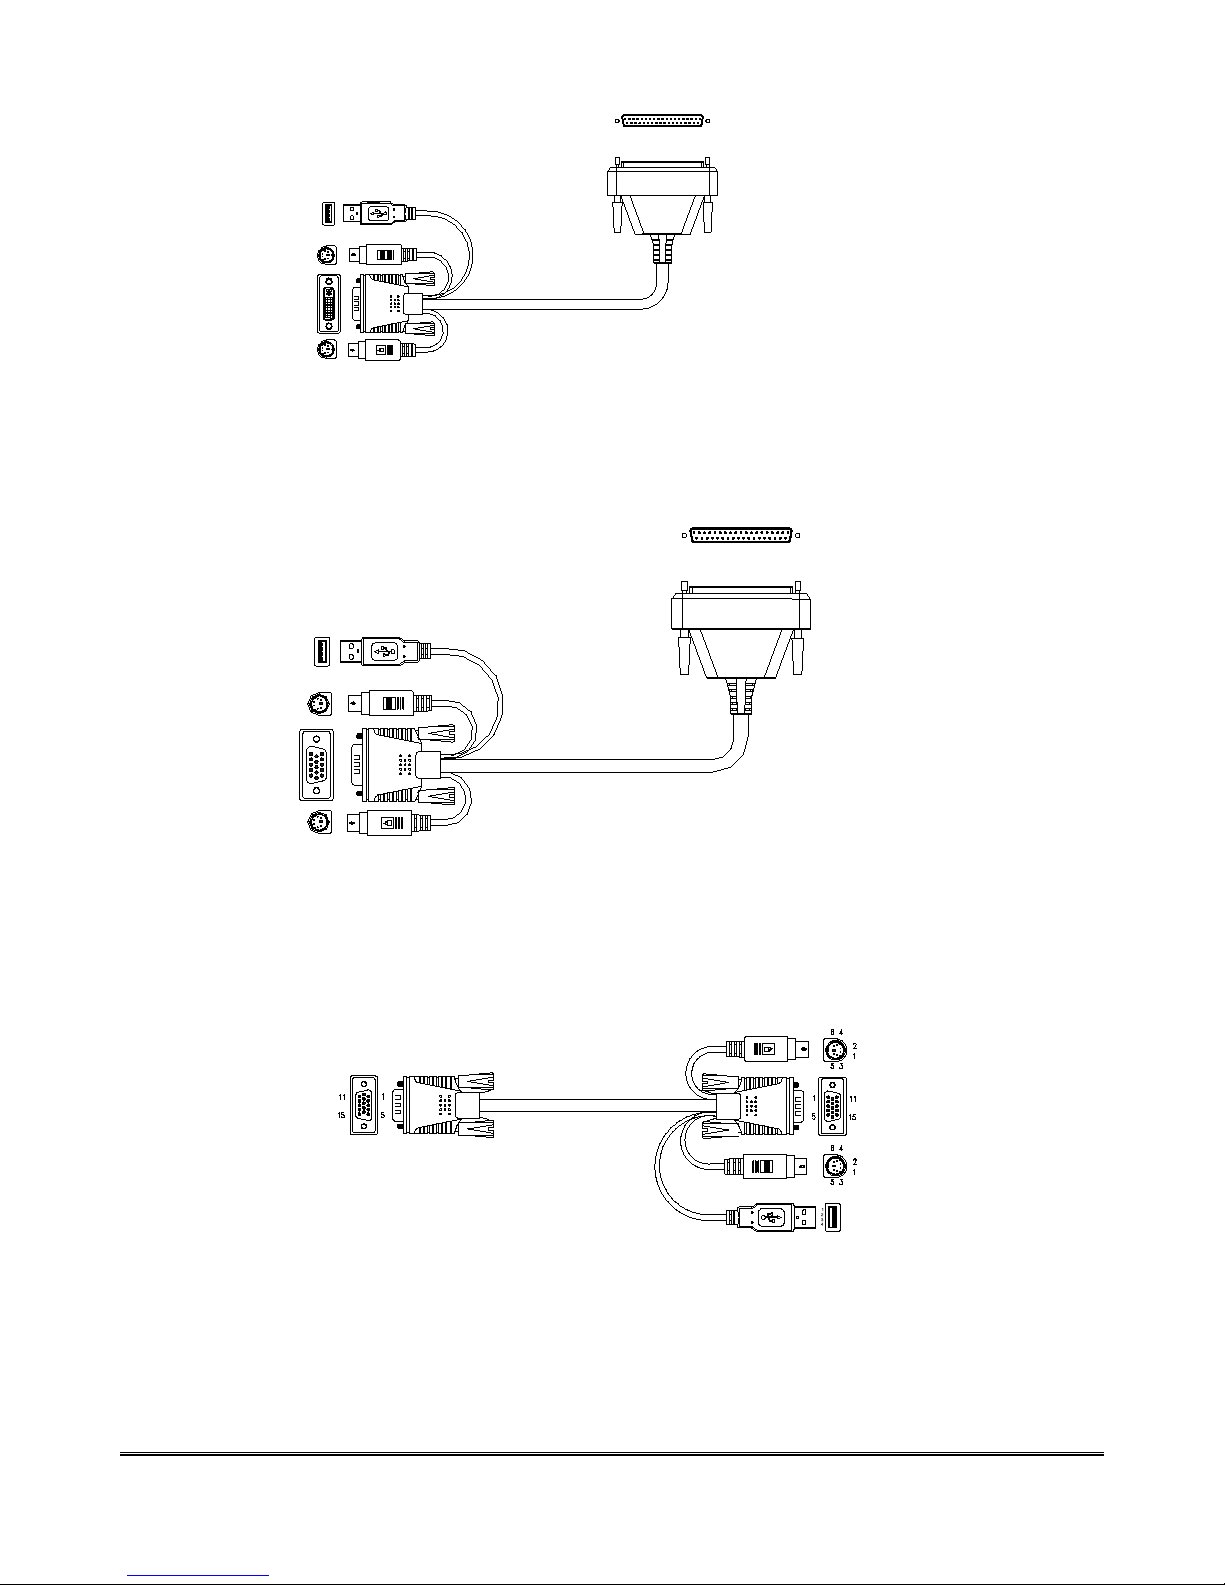
DVI-I + USB(Type A)+ Audio
KVM connection Computer connection
CAT5 connection Dongle VGA + PS2 keyboard (purple) + PS2 mouse (green)
CAT5 connection Dongle VGA + USB (Type A)
LCD KVM Console User Manual
18
Operation System
Operation System
Version
Windows
Windows 2000/XP/2003/2008/Vista/7/10
Linux
RedHat
9.0 or higher Fedora and above, RHEL AS 4, RHEL 5
SuSE
10/11.1、OpenSUSE 10.2; SLES 10 SP1
Debian
3.1/4.0
Ubuntu
7.04/7.10
UNIX
AIX
4.3 or higher
FreeBSD
5.5 or higher
Sun Solaris
8 or higher
Mac
OS 9.0 to 10.6 (Snow Leopard)
Novell
Netware
6.0 or higher
DOS
6.2 or later
More operating system support: please pay more attention to the latest version of the relevant product
compatibility.
LCD KVM Console User Manual
19
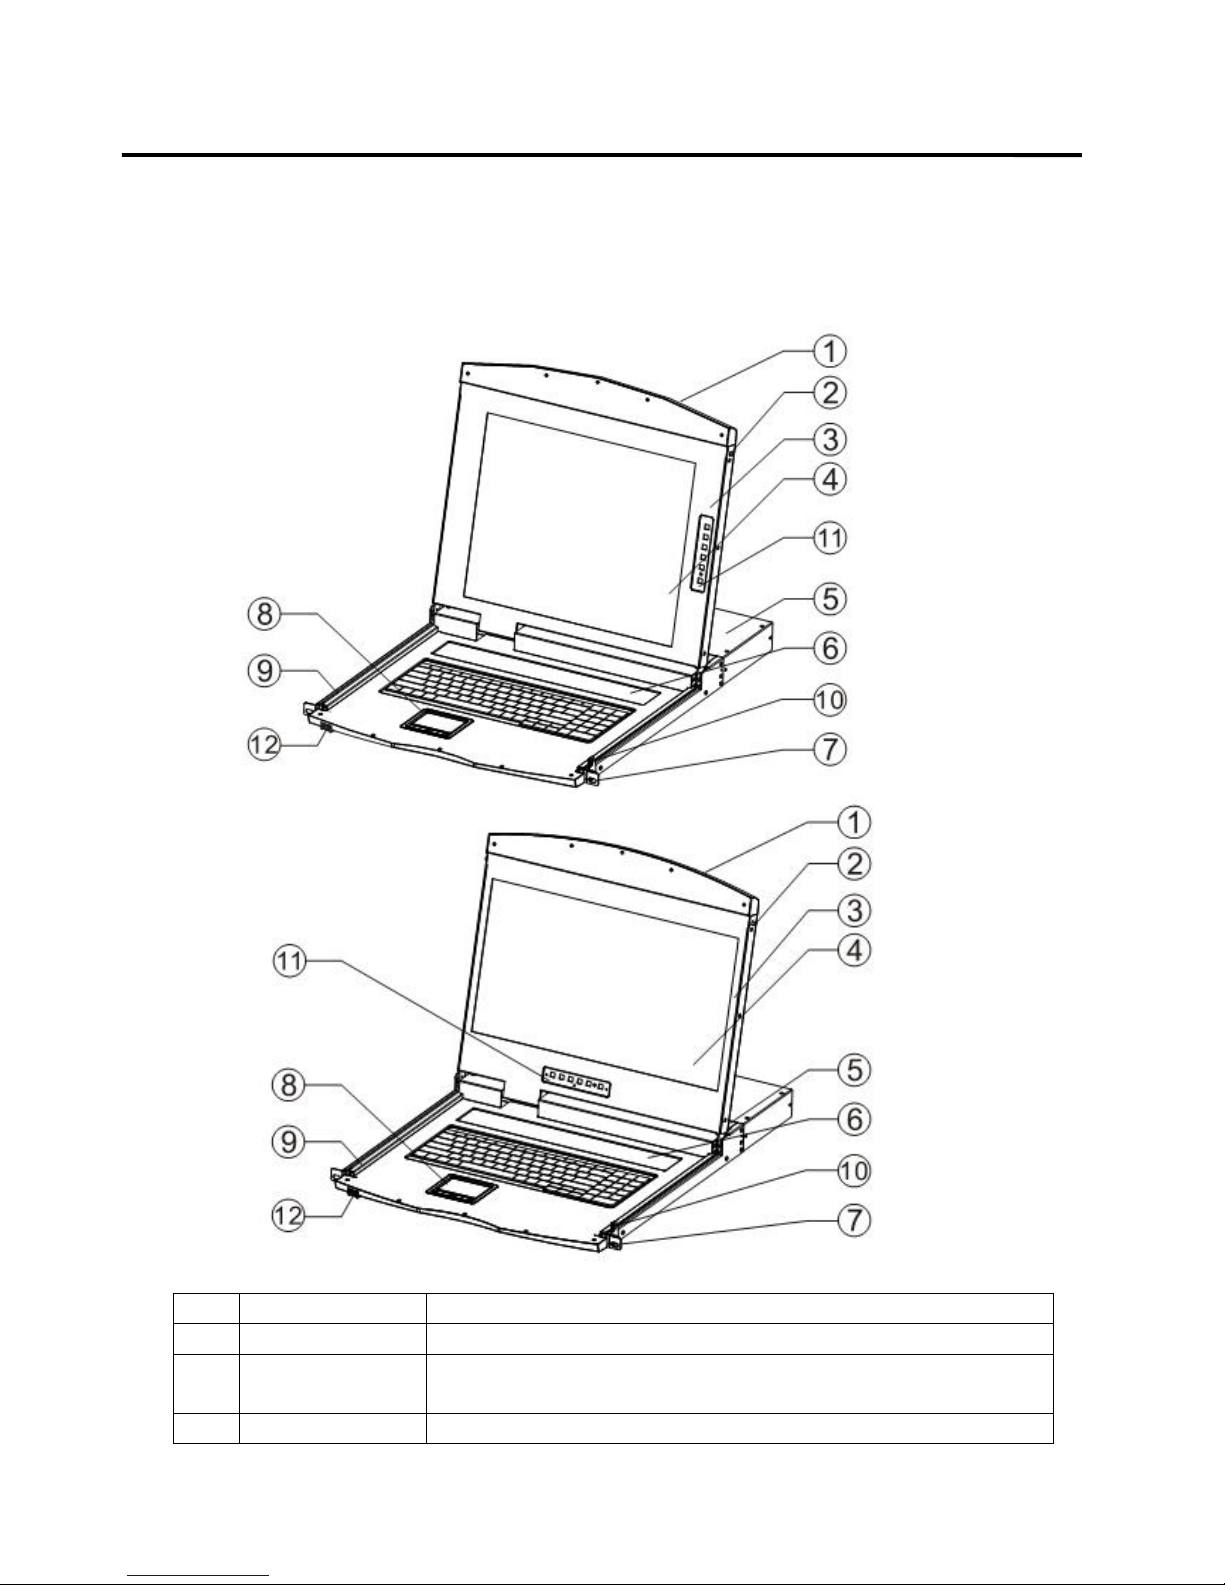
Parts
Front View
According to the size of the LCD screen is divided into two styles, as shown below, the components of the
description please see the figure after the serial number table describes the details.
No
Part
Function Description
1
Upper handle
Pull the handle, slide the LCD module out and push it in
2
Lock
Used to lock the LCD module, pull out the module must first
unlock, push into the automatic locking
3
LCD screen cover
Can be opened or closed with the handle, opening and closing

LCD KVM Console User Manual
20
angle of 0-110 degrees
4
LED screen
17 "or 19" LED LCD screen
5
KVM Module
KVM modules are free to replace and remove
6
KVM Key panel
The KVM Port manual switch function is completed by pressing
the key
7
Front mounting
brackets
The LCD KVM can be installed on the cabinet posts with screws
8
Touch Mouse Pad
KVM console mouse, can control the computer's computer
operation
9
Slide rails
LCD module sliding track, can be telescopic freely
10
Keyhole
Corresponds to the latch of the LCD module
11
LCD Keypad
Panel
Used to control the LED screen display adjustment and switch
12
Front USB
Used to access an external USB keyboard or mouse
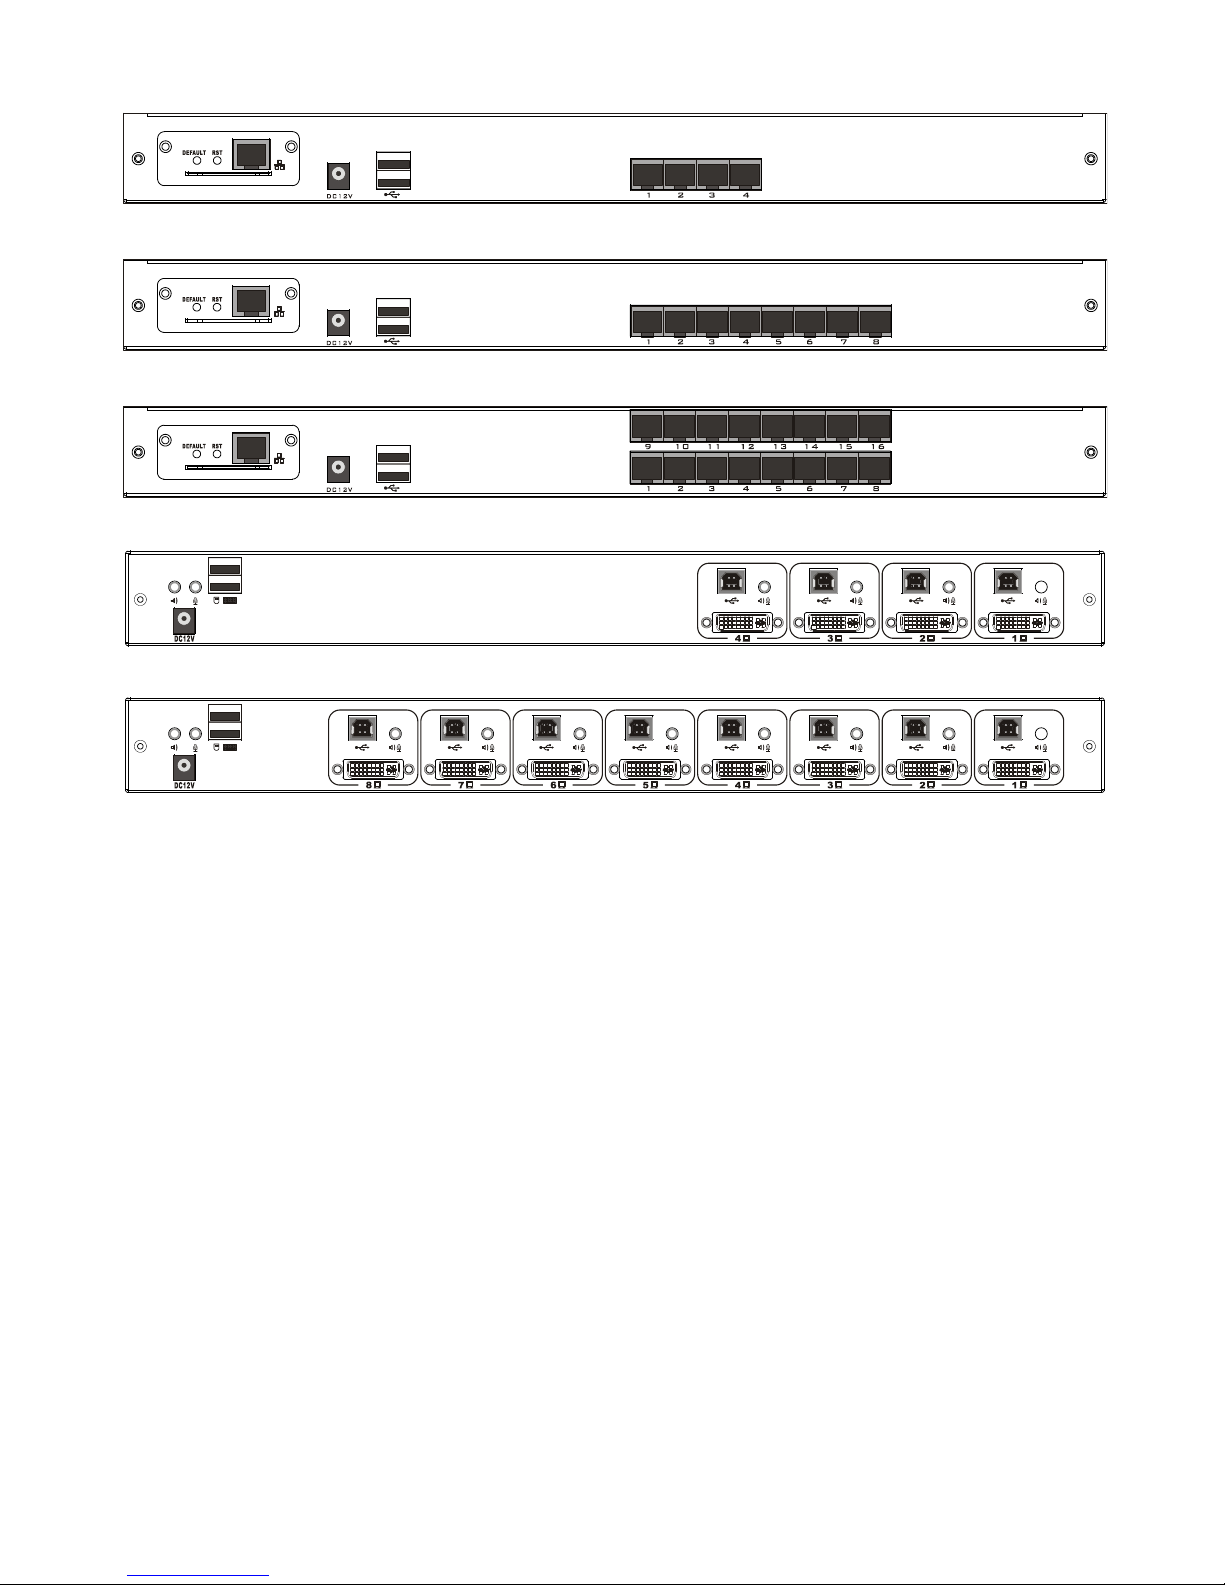
Rear view
The Rear View of this product series is a rear view of the Removable KVM Switch Module, and the
functional description of each Hardware Port (refer to the description of the corresponding KVM Switch
product brochure.)
LCD KVM Single port Rear View
LCD KVM 4 port VGA Rear View
LCD KVM 8 port VGA Rear View
LCD KVM 16 port VGA Rear View
LCD KVM Console User Manual
21
LCD KVM 4 port CAT5 Rear View
LCD KVM 8 port CAT5 Rear View
LCD KVM 16 port CAT5Rear View
LCD KVM 4 port DVI Rear View
LCD KVM 8 port DVI Rear View
According to the type of KVM ,the rear view of the product can be divided into three categories:
VGA Port
This type of LCD KVM switch can be divided into 4 models according to the number of ports: single
port, 4 ports, 8 ports, 16 ports. In addition, the control module of Remote Control IP can be selected
according to the needs.
CAT5 Port
This type of LCD KVM switch can be divided into 3 models according to the number of ports: 4 ports, 8
ports, 16 ports, in addition can be optional Remote Control IP control module.
DVI Port
This type of LCD KVM switch according to the number of Port can be divided into two models:
single-port, four, eight.
 Loading...