

Page 1
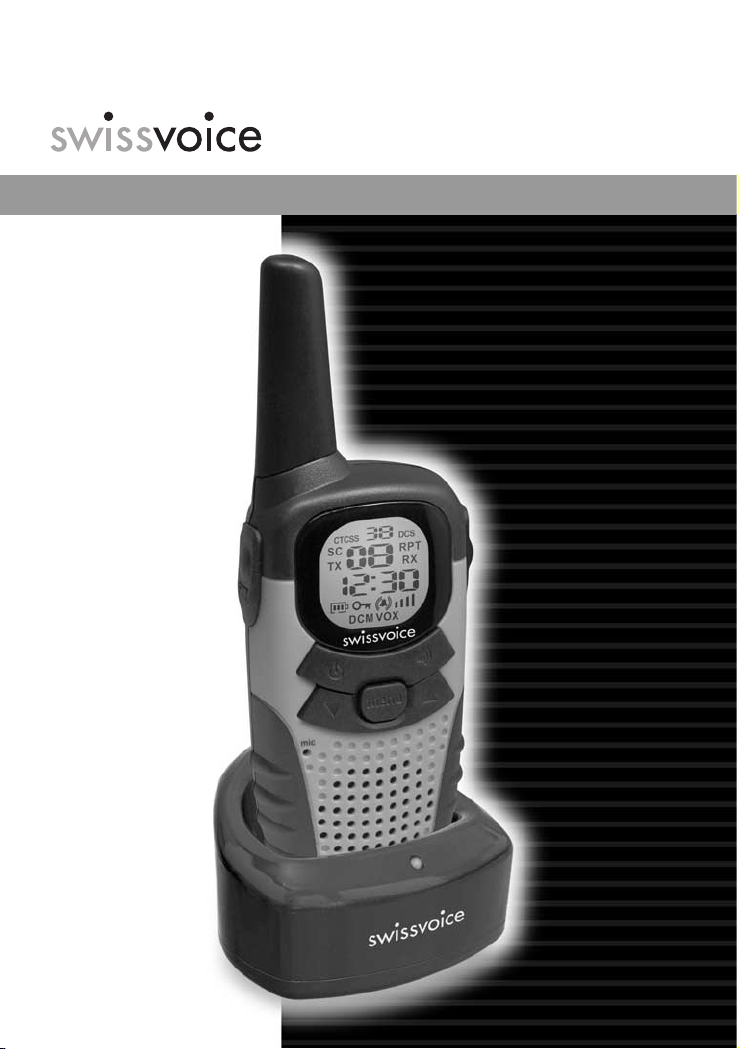
TwinTop 400/400-L
Private Mobile Radio PMR
Mode d’emploi
User Manual
Bedienungsanleitung
Istruzioni per l’uso
Manual de usuario
Instrukcja Obsługi
Page 2
Sécurité
AVERTISSEMENT – Antenne endommagée
N’utilisez en aucun cas votre TwinTop 400/400-L s’il a une antenne endommagée.
Une antenne endommagée en contact avec la peau peut causer une brûlure mineure.
Batteries
Toutes les batteries peuvent provoquer des dommages matériels et /ou corporels tels que des
brûlures si des matières conductrices telles que des bijoux ou des clés touchent les extrémités
du circuit. Le matériel pourrait alors former un circuit électrique (court-circuit) et devenir chaud.
Manipulez avec précaution les batteries chargées, en particulier si vous les placez dans une
poche, dans un porte-feuilles, ou toute autre chose comprenant du métal.
AVERTISSEMENT – Pour véhicules avec un airbag
Ne pas mettre votre appareil au-dessus d’un airbag ou dans la zone de déploie-
ment de celui-ci. Les airbags se gonflent avec une vitesse élevée. Si un PMR est
mis dans la zone de déploiement de l’airbag et que ce dernier se gonfle, votre appareil
pourrait être propulsé avec violence et causer une blessure grave aux occupants du véhicule.
Atmosphères potentiellement explosives
Eteindre votre TwinTop 400/400-L lorsque vous entrez dans toute zone à atmosphère
potentiellement explosive. Des étincelles dans de telles zones pourraient causer une explosion ou un incendie provoquant la blessure ou voire même la mort.
Batteries
Ne pas remplacer ou charger les batteries dans une atmosphère potentiellement explosive.
Des étincelles de contacts pourraient se produire au moment du changement de batteries
et pourraient causer une explosion.
Amorces et zones de distortion
Pour éviter d’éventuelles interférences avec les opération de distortion, veuillez éteindre votre
appareil près des amorces de distortion électriques ou dans une «zone de distortion» ou dans
des zones affichées: «Eteindre tout appareil radio.» Respecter tous les signes et instructions.
Nota Les zones avec des atmosphères potentiellement explosives sont souvent, mais
pas toujours, bien indiquées. Elles comprennent les zones où l’on manipule du
carburant telles que le pont inférieur sur les bateaux, des installations de
transfert ou du stockage de carburant ou de produits chimiques, des zones où
l’air contient des produits chimiques ou des particules, telles que des graines,
de la poussière, ou des poudres métalliques, et toute autre zone où il vous est
normalement conseillé d’éteindre le moteur de votre voiture.
Nettoyage et soin
Pour nettoyer votre appareil, utilisez un tissu souple et humide. Ne pas utiliser des agents de
nettoyage/du solvant, ceux-ci pourraient causer des dégats que la garantie ne couvrirait pas.
Elimination
Eliminez les batteries, la station d’accueil, le chargeur et l’appareil lui-même dans le
respect de l’environnement. Ils ne peuvent être éliminés avec les ordures ménagères.
Page 3

1
20405013xx_ba_b0
Français
Sommaire
Touches/Écran LCD ………………………………………………………………………2
Installation ………………………………………………………………………………3
Enlever le clip ceinture ……………………………………………………………………3
Installer le clip ceinture ……………………………………………………………………3
Installer les batteries ………………………………………………………………………3
Charger les batteries en utilisant le chargeur……………………………………………4
Charger les batteries en utilisant la station d’accueil (TwinTop 400 seulement) ……4
Niveau de batterie …………………………………………………………………………5
Fonctionnement …………………………………………………………………………6
Portée ………………………………………………………………………………………6
Allumer/éteindre votre TwinTop 400/400-L………………………………………………6
Régler le volume du haut-parleur ………………………………………………………6
Changer les canaux ………………………………………………………………………7
Régler le sous-canal CTCSS …………………………………………………………7
Régler le DCS code numérique avancé………………………………………………8
Transmettre et recevoir ……………………………………………………………………8
Transmettre ……………………………………………………………………………8
Monitoring ……………………………………………………………………………8
Régler la sensibilité de VOX (Voix activée) ………………………………………………9
Activer la recherche automatique de canal et de sous-canal …………………………9
Sonnerie d’appel …………………………………………………………………………10
Sélectionner une sonnerie d’appel …………………………………………………10
Vibreur (TwinTop 400 seulement) ………………………………………………………10
Activer le mode Vibreur ……………………………………………………………10
Régler le Bip Reçu ………………………………………………………………………11
Régler le bip de touche …………………………………………………………………11
Régler le mode Dual Watch ……………………………………………………………11
Fonctions auxiliaires …………………………………………………………………12
Verrouillage des touches…………………………………………………………………12
Rétro éclairage de l’écran ………………………………………………………………12
Prise Casque/Microphone/Alimentation ………………………………………………12
Spécifications/Tableau de fréquences par canal …………………………………13
Spécifications ……………………………………………………………………………13
Tableau de fréquences par canal ………………………………………………………13
Informations importantes ……………………………………………………………14
Homologation et conformité ……………………………………………………………14
Garantie …………………………………………………………………………………14
Bon de Garantie ………………………………………………………………………79
Déclaration de Conformité …………………………………………………………99
Page 4
2
20405013xx_ba_b0
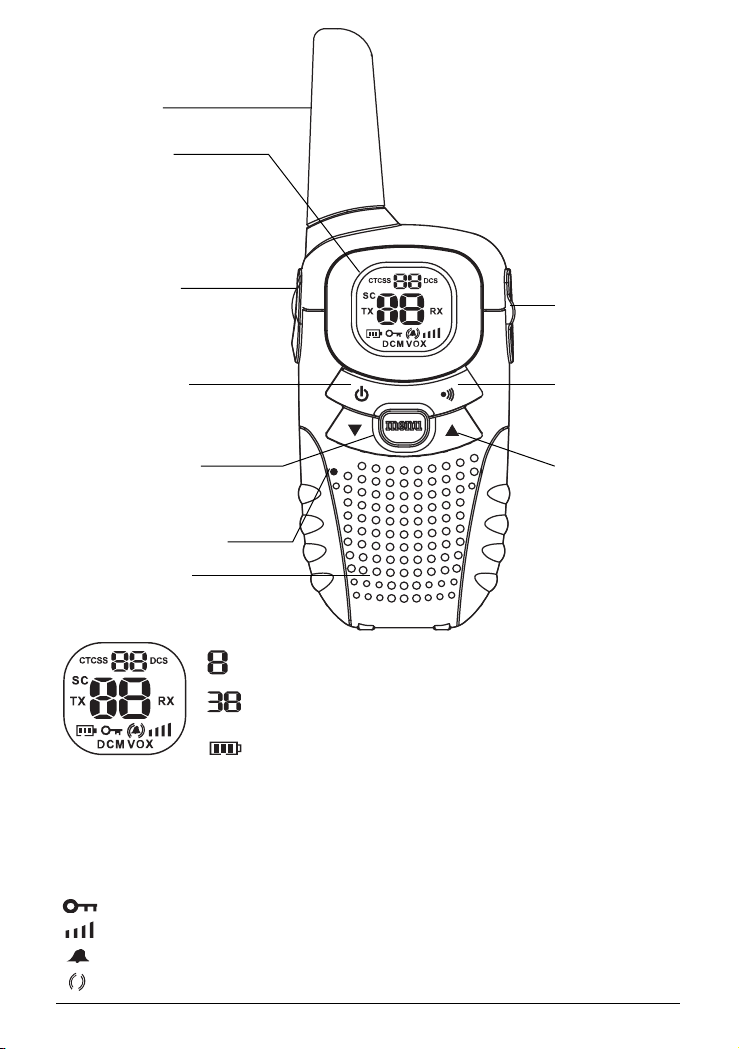
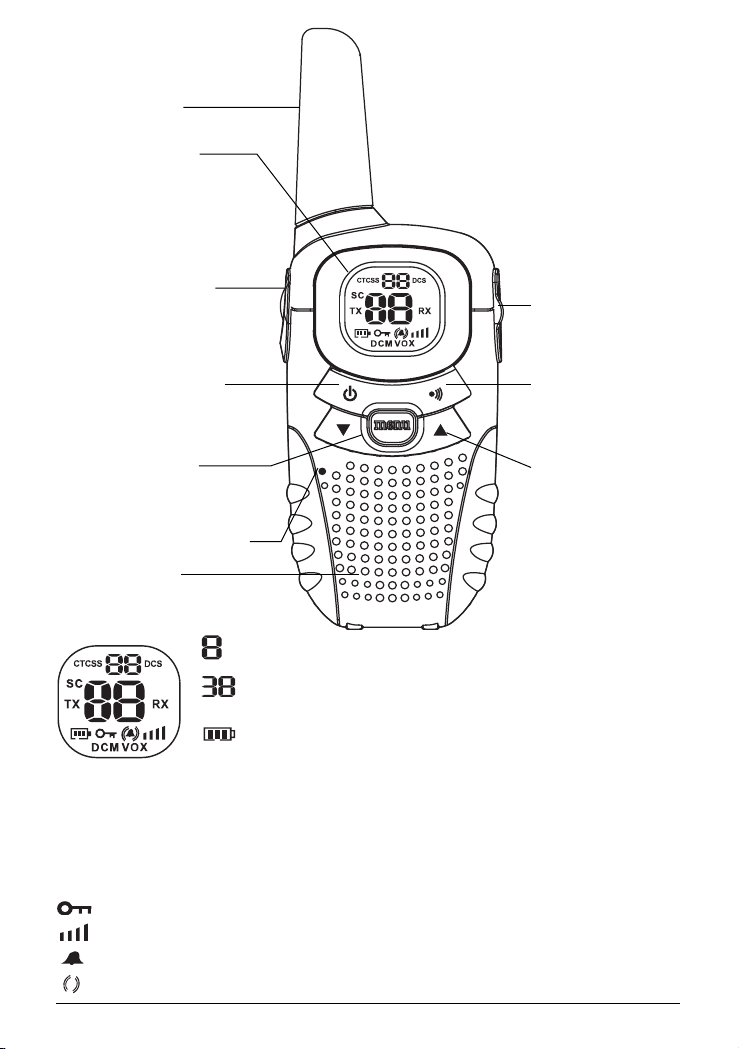
Touches/Écran LCD
mic
Prise casque/
Prise micro/
Alimentation
Écran LCD
Affiche le canal
choisi et autres
symboles radio
Touche PTT
(pousser pour parler)
Maintenez appuyé pour
transmettre
Antenne
Touche PWR
Appuyez pour allumer
ou éteindre
Touche Appeler
Appuyez pour envoyer
un appel à d’autres
appareils PMR
Touche haut/bas
Appuyez pour changer
de canal, régler le
volume et pour
effectuer vos réglages
Touche MENU
Appuyez pour
sélectionner le
mode à modifier
Haut-parleur
MIC (Microphone)
Numéro de canal. Choix de 8 canaux en fonction de la
sélection de l’utilisateur.
CTCSS Code. Choix de 38 fréquences en fonction de la
sélection de l’utilisateur.
Affiche le niveau de charge de la batterie.
TX Indique la transmission d’un signal
RX Indique la réception d’un signal
DCM Indique que la fonction Dual Watch est activée
VOX Indique que la fonction VOX est activée
SC Indique que l’appareil scanne tous les canaux
Indique que le clavier est verrouillé
Indique le volume du haut-parleur
Indique un appel entrant
Indique que le mode vibreur est sélectionné (TwinTop 400 seulement)
Page 5
3
20405013xx_ba_b0
Français
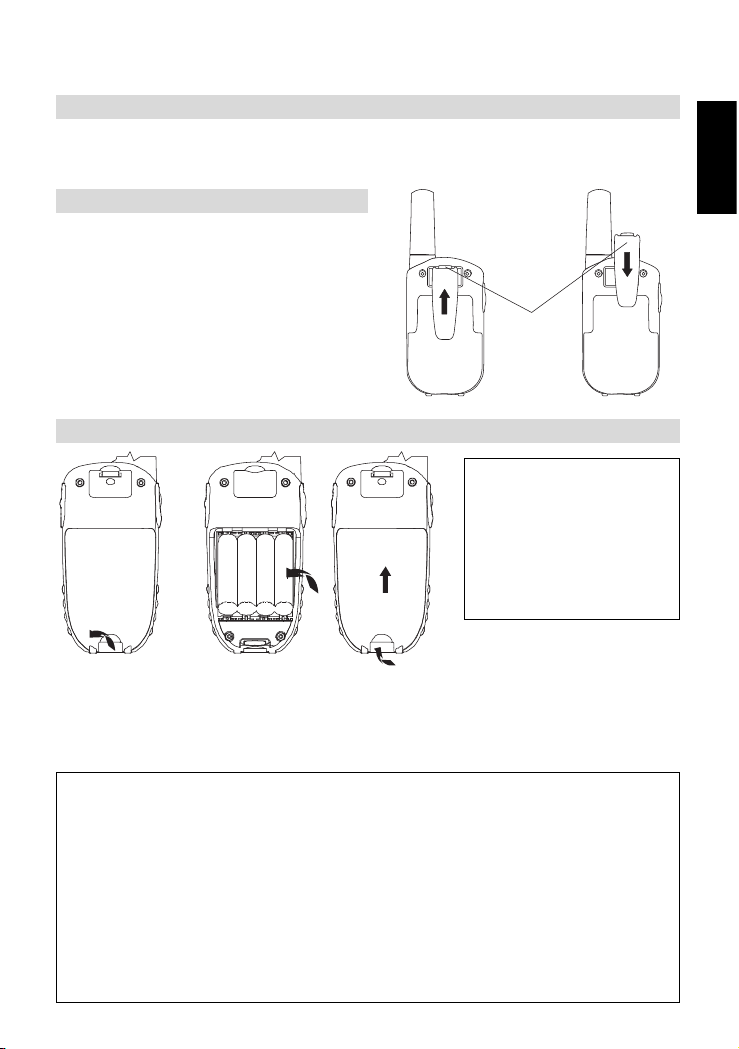
Enlever le clip ceinture
1. Soulever la languette en haut du clip ceinture.
2. Pousser simultanément le clip vers le haut (voir Figure 1).
Installer le clip ceinture
1. Glisser le clip ceinture dans la fente
comme indiqué en Figure 2.
2. Un «click» indique que le clip ceinture
est bien positionné.
Installation
Languette
Figure 1 Figure 2
Important
– Lire les avertissements de sécurité avant de charger vos batteries.
– Lors de la mise en chargement de votre TwinTop 400/400-L, utilisez uniquement
les batteries rechargeables fournies lors de votre achat.
– N’essayer pas de recharger des batteries non-rechargeables.
– Assurez-vous que le couvercle au dos de l’appareil est bien inséré quand vous
chargez les batteries.
– Jetez les batteries usagées en toute sécurité et d’une manière qui ne nuira pas
à l’environnement – n’essayez jamais de les brûler ou de les mettre n’importe où.
– Ne pas laisser les batteries usagées dans votre appareil. Elles pourraient fuir.
Installer les batteries
1. Ouvrir le loquet et enlever le couvercle au dos de l’appareil.
2. Insérer les batteries rechargeables suivant l’orientation montrée sur la Figure 3
(la flèche indiquant le haut)
3. Remettre le couvercle. Voir la Figure 4.
Avertissement
Veillez à respecter la
polarité des batteries lors
de leur installation.
Une mauvaise installation
peut endommager votre
TwinTop 400/400-L.
Figure 3 Figure 4
Page 6
4
20405013xx_ba_b0
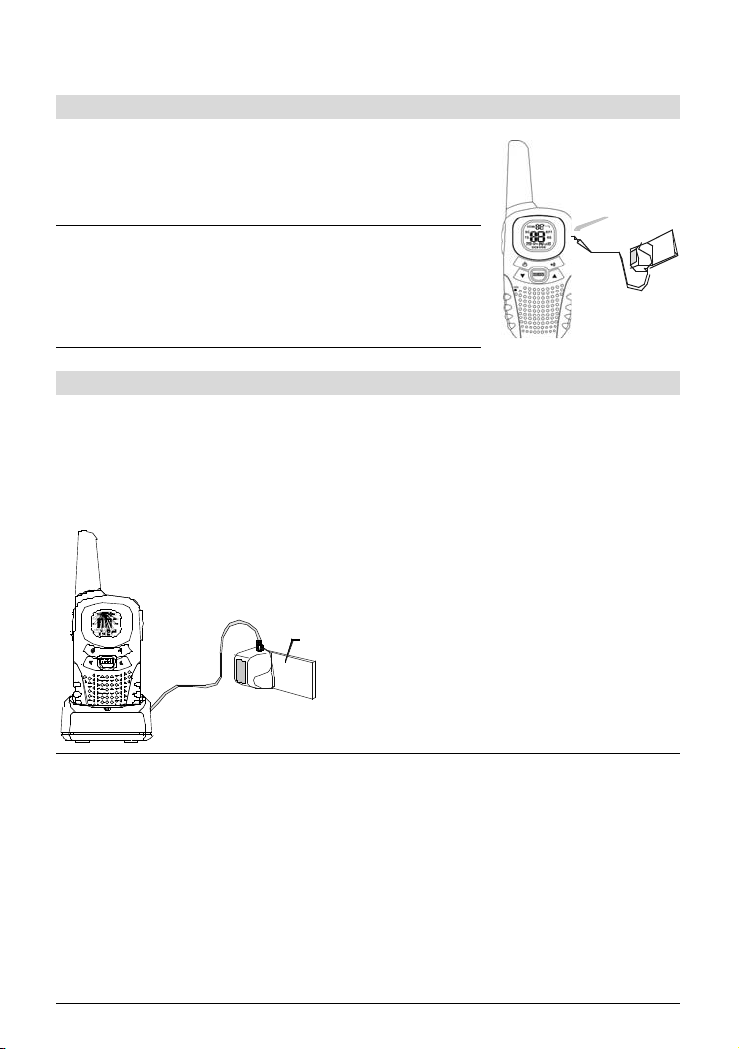
Charger les batteries en utilisant le chargeur
1. Lever le cache en haut à droite de l’appareil, insérer le
connecteur dans la prise adaptée (cf symbole).
2. Brancher le chargeur à une prise de 240 V/50 Hz.
Nota Une charge complète des batteries nécessite
environ 10 heures si elles sont complètement
déchargées. Des batteries neuves demandent
jusqu’à 14 heures pour être complètement
chargées.
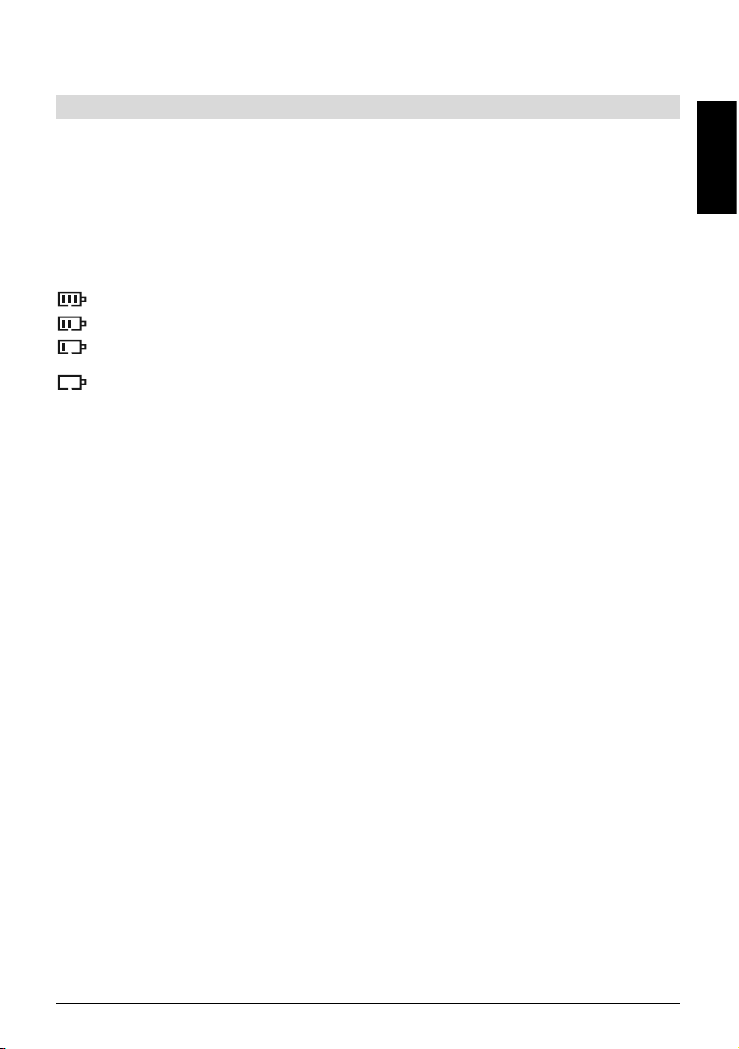
Charger les batteries en utilisant la station d’accueil (TwinTop 400 seulement)
1. Insérer le connecteur rond de l’adaptateur de 9.0 V/200 mA dans la prise prévue à
cet effet au dos de la station d’accueil.
2. Brancher la station d’accueil à une prise de 240 V/50 Hz.
3. Mettre votre TwinTop 400 debout dans la station d’accueil, face à l’extérieur.
Une LED rouge témoin de charge s’allumera.
Nota – Vos appareils doivent être chargés en utilisant l’adaptateur principal
fourni. L’utilisation d’autres adaptateurs causera la non-conformité
avec EN60065 et rendra votre garantie caduque.
– Une charge complète des batteries nécessite environ 10 heures si elles
sont complètement épuisées. Des batteries neuves demandent jusqu’à
14 heures pour être complètement chargées.
– Toujours éteindre vos appareils pendant le chargement. Cela réduira la
durée de chargement.
– Durant la charge de vos TwinTop 400/400-L, la transmission et la
réception sont désactivées.
Installation
Prise de
courant
Page 7
5
20405013xx_ba_b0
Français
Installation
Niveau de batterie
L’indicateur du niveau de batterie se trouve au coin supérieur gauche de l’écran.
Il s’affiche comme une batterie avec trois barres à l’intérieur. Ces dernières indiquent
la puissance disponible. Quand le niveau de batterie atteint son niveau minimal, l’appareil émettra deux bips et votre TwinTop 400/400-L s’éteindra automatiquement.
Votre appareil peut détecter 4 niveaux de charge:
– Charge pleine.
– Charge moyenne.
– Charge faible.
– Charge de la batterie à niveau très bas. Quand le niveau de batterie atteint
son niveau minimal, l’appareil émettra deux bips et votre TwinTop 400/400-L
s’éteindra automatiquement. Important: Charger l’appareil
pendant 10–14 heures.
Durée de vie de vos batteries
Votre TwinTop 400/400-L dispose d’un mode économie d’énergie intégré pour préserver la durée de vie des batteries. Cependant, quand vous n’utilisez pas vos appareils, éteignez-les pour conserver la charge des batteries et prolonger ainsi leur durée
de fonctionnement.
Page 8
6
20405013xx_ba_b0
Fonctionnement
Portée
La portée dépend de l’environnement et du terrain. Elle est la plus grande (jusqu’à
environ 10 km) dans les espaces étendus sans obstacle (tels que des collines ou des
bâtiments). Ne pas essayer d’utiliser deux appareils qui se trouvent à moins de 1,5 m
de distance. Si vous le faites, vous vous exposez aux interférences.
Allumer/éteindre votre TwinTop 400/400-L
Pour allumer
Appuyez et maintenez la touche PWR enfoncée jusqu’à ce que l’écran
LCD s’allume et affiche le canal sélectionné.
Pour éteindre
Appuyez et maintenez la touche PWR enfoncée jusqu’à ce que l’écran
LCD s’éteigne.
Vous pouvez entendre un bip à chacune de ces manipulations.
Régler le volume du haut-parleur
Le volume est affiché par des barres verticales sur l’écran LCD. Vous pouvez changer
le volume pendant que vous utilisez votre appareil, ou quand l’appareil est allumé
sans être utilisé.
Appuyez sur la touche Haut pour augmenter, ou appuyez sur la touche Bas pour
diminuer le volume du haut-parleur.
Avertissements de sécurité importants
– Pour réduire votre exposition aux ondes radio pendant que vous utilisez votre
appareil, maintenez-le à au moins 5 cm de votre visage.
– Ne jamais utiliser votre appareil à l’extérieur pendant un orage.
– Evitez d’utiliser votre appareil sous la pluie.
– Si votre appareil est mouillé, éteignez-le et enlevez les batteries. Séchez le
compartiment des batteries et laissez le couvercle ouvert pendant quelques
heures. N’utilisez pas l’appareil s’il n’est pas complètement sec.
– Conservez votre appareil hors de portée des jeunes enfants.
Page 9

7
20405013xx_ba_b0
Français
Fonctionnement
Changer les canaux
Votre appareil dispose de 8 canaux. Pour communiquer avec les autres utilisateurs se
trouvant à portée, tous les appareils doivent être connectés au même canal.
1. Appuyez une fois sur la touche MENU. Le numéro du canal se mettra
à clignoter sur l’écran LCD.
2. Appuyez sur la touche Haut ou Bas pour sélectionner le canal de
votre choix.
3. Appuyez sur la touche PTT pour confirmer le réglage du canal.
Nota Consulter le chapitre «Tableau de fréquences par canal» de ce mode
d’emploi pour une liste détaillée des fréquences.
Régler le sous-canal CTCSS
Chaque canal a également 38 sous-canaux pour que vous puissiez créer un groupe
d’utilisateurs sur le même canal pour une communication privée. Si vous réglez le
sous-canal, vous ne pouvez communiquer qu’avec les autres utilisateurs réglés sur le
même canal et sur le même sous-canal.
1. Appuyez sur la touche MENU deux fois, le numéro du sous-canal
CTCSS sélectionné clignote à l’écran.
2. Appuyez sur la touche Haut ou Bas pour sélectionner un des
38 CTCSS sous-canaux.
3. Appuyez sur la touche PTT pour confirmer le réglage du sous-canal.
Pour éteindre la fonction de sous-canal, réglez simplement le sous-canal à
0 (zéro). Vous pourrez alors communiquer avec tout utilisateur qui n’utilise pas non
plus la fonction sous-canal et qui est réglé sur le même canal que vous.
Page 10
8
20405013xx_ba_b0
Fonctionnement
Régler le DCS code numérique avancé
Chaque canal a également 83 codes numériques pour que vous puissiez créer un
groupe d’utilisateurs pour une communication privée plus sécurisée.
1. Appuyez sur la touche MENU 3 fois. Le code DCS clignote à l’écran.
2. Appuyez sur la touche Haut ou Bas pour sélectionner le code DCS de
votre choix.
3. Appuyez sur la touche PTT pour confirmer le réglage DCS.
Nota Une fois que vous réglez le code DCS, CTCSS sera automatiquement
réglé sur le mode off.
Transmettre et recevoir
La transmission de votre TwinTop 400/400-L est à sens unique.
Pendant que vous parlez, vous ne pouvez pas recevoir une transmission.
Votre appareil utilise une gamme de fréquences ouvertes. Identifiez-vous
toujours lorsque vous transmettez sur le même canal.
Transmettre
L’appareil est en mode Réception de façon continue quand il est allumé et ne transmet pas. Quand un signal est reçu sur le canal présent, «RX» s’affichera sur l’écran
et le signal Réception s’allume.
1. Maintenez la touche PTT appuyée (poussez pour parler) pour transmettre votre message. «TX» s’affichera sur l’écran LCD.
2. Maintenez l’appareil en position verticale avec le MIC (microphone) à
5 cm de votre bouche. En maintenant la touche PTT, parlez dans le
microphone.
3. Lâchez la touche PTT quand vous avez terminé la transmission.
Monitoring
Vous pouvez vérifier sur votre écran les signaux faibles sur le canal.
1. Appuyez sur les touches MENU et Bas en même temps, «RX»
s’affichera à l’écran LCD. Votre TwinTop 400/400-L prendra les signaux
sur le canal présent, y compris le bruit de fond.
2. Appuyez sur la touche PTT pour arrêter de surveiller le canal.
!
!
Page 11

9
20405013xx_ba_b0
Français
Fonctionnement
Régler la sensibilité de VOX (Voix activée)
En mode VOX, votre appareil transmettra un signal seulement quand il est activé par
votre voix ou par les bruits environnants. Le TwinTop 400/400-L continuera à transmettre pendant 2 secondes même si vous arrêtez de parler.
Le niveau de la sensibilité de VOX est indiqué par un numéro sur l’écran LCD. La sensibilité la plus élevée permettra au TwinTop 400/400-L de capter tous les bruits,
y compris les moins forts (bruit de fond); au niveau de sensibilité la plus basse, votre
appareil transmettra uniquement les bruits les plus forts.
1. Appuyez sur la touche MENU 4 fois, «VOX» s’affichera et «OF» cli-
gnote à l’écran LCD.
2. Appuyez sur la touche Haut pour régler le niveau de sensibilité VOX
(le niveau maximum est «3»). Pour désactiver la fonction VOX,
appuyez sur la touche Bas jusqu’à ce que «OF» s’affiche à l’écran
LCD.
3. Appuyez sur la touche PTT pour confirmer votre réglage. «VOX» s’af-
fichera à l’écran LCD tant que la fonction VOX est activée.
Nota L’utilisation de la fonction VOX n’est pas recommandée si vous utilisez
votre appareil dans un environnement bruyant ou venté.
Activer la recherche automatique de canal et de sous-canal
La recherche automatique de canal effectue les recherches pour les signaux actifs dans
une boucle infinie pour les 8 canaux, 38 sous-canaux CTCSS et les 83 codes DCS.
1. Appuyez sur la touche MENU 5 fois.
2. Appuyez sur la touche Haut ou Bas pour commencer à filtrer les
canaux. Quand un signal actif est détecté, la recherche s’arrête sur le
canal actif.
3. Appuyez de nouveau sur la touche MENU. CTCSS clignote à l’écran.
Appuyez sur la touche Haut ou Bas pour commencer à scanner les
canaux CTCSS de 1 à 38.
4. Appuyez de nouveau sur la touche MENU. DCS clignote à l’écran.
Appuyez sur la touche Haut ou Bas pour commencer à scanner les
canaux DCS de 1 à 83.
5. Appuyez sur la touche PTT pour valider votre réglage.
Page 12

10
20405013xx_ba_b0
Fonctionnement
Sonnerie d’appel
Votre appareil peut vous alerter d’un signal entrant en émettant une tonalité d’appel
et une vibration.
Vous pouvez envoyer une tonalité de sonnerie d’appel aux autres utilisateurs de PMR
pour les informer que vous voulez communiquer avec eux.
Appuyez sur la touche Appeler.
Vous entendez une sonnerie d’appel pendant environ deux secondes;
«TX» s’affiche à l’écran LCD. Tous les autres appareils à portée de transmission et réglés sur le même canal et sous-canal (si applicable) reçoivent
la sonnerie d’appel.
Sélectionner une sonnerie d’appel
Votre appareil est équipé de 5 types différents de sonnerie d’appel.
1. Appuyez sur la touche MENU 8 fois, l’écran LCD affichera l’icône
Appel et clignotera.
2. Appuyez sur la touche Haut ou Bas pour sélectionner la sonnerie
d’appel de votre choix.
3. Appuyez sur la touche PTT pour confirmer votre choix.
Vibreur (TwinTop 400 seulement)
Activer le mode Vibreur
1. Appuyez sur la touche MENU 9 fois; «0I» clignote à l’écran.
2. Appuyez sur la touche Haut ou Bas pour activer la fonction
vibreur.
3. Appuyez sur la touche PTT pour confirmer votre choix.
Page 13
11
20405013xx_ba_b0
Français
Fonctionnement
Régler le Bip Reçu
Le Bip Reçu est une tonalité qui est automatiquement transmise dès que la touche
PTT est lâchée. Ceci alerte la personne qui reçoit que vous avez volontairement terminé la transmission et que vous êtes maintenant en mode réception.
1. Appuyez sur la touche MENU 10 fois, «ON» clignote à l’écran.
2. Appuyez sur la touche Haut ou Bas pour activer («ON» s’affichera à
l’écran) ou désactiver («OFF» s’affichera à l’écran).
3. Appuyez sur la touche PTT pour confirmer votre réglage.
Régler le bip de touche
Cette caractéristique permet à votre TwinTop 400/400-L d’émettre une tonalité
quand vous appuyez sur les touches.
1. Appuyez sur la touche MENU 11 fois, «ON» clignote à l’écran.
2. Appuyez sur la touche Haut ou Bas pour activer («ON» s’affichera à
l’écran) ou désactiver («OFF» s’affichera alors à l’écran) le bip de
touche.
3. Appuyez sur la touche PTT pour confirmer votre réglage.
Régler le mode Dual Watch
Votre TwinTop 400/400-L est capable de surveiller deux canaux, celui sélectionné et
un autre canal (dual watch). Si l’appareil détecte un signal sur l’un ou l’autre canal,
il s’arrêtera et recevra le signal.
1. Appuyez sur la touche MENU 12 fois, «DCM» s’affichera pendant que
«OF» clignote à l’écran LCD.
2. Appuyez sur la touche Haut ou Bas pour sélectionner le canal Dual
Watch (1-8, sauf le canal déjà sélectionné).
3. Appuyez sur la touche MENU pour changer la fréquence CTCSS.
4. Appuyez sur la touche Haut ou Bas pour sélectionner le code CTCSS
de votre choix (de 1 à 38).
5. Appuyez sur la touche MENU pour changer le code DCS.
6. Appuyez sur la touche PTT pour confirmer votre réglage.
7. Appuyez sur la touche PTT pour quitter.
Page 14
12
20405013xx_ba_b0
Fonctions auxiliaires
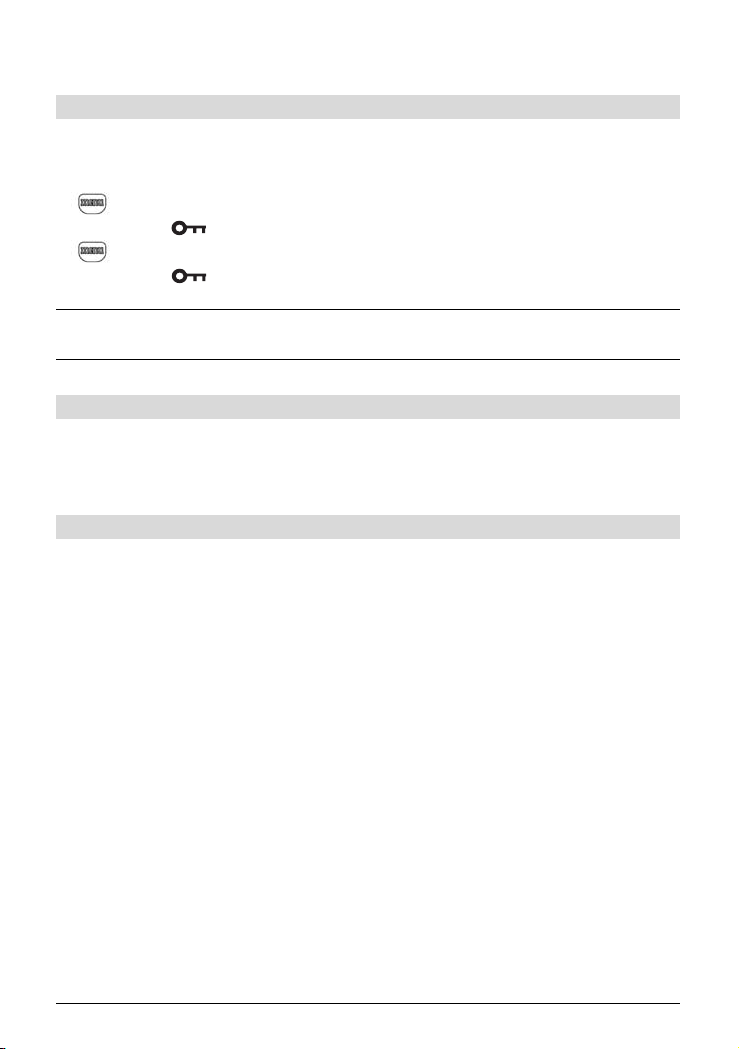
Verrouillage des touches
La fonction de verrouillage des touches permet à l’utilisateur de désactiver les
touches Haut, Bas et MENU pour que les réglages de votre TwinTop 400/400-L ne
soient pas modifiés de façon accidentelle.
1. Pour activer le verrouillage des touches, maintenez appuyé la touche
MENU jusqu’à ce que « » s’affiche à l’écran.
2. Pour désactiver cette fonction, maintenez appuyé la touche MENU
jusqu’à ce que « » disparaisse de l’écran.
Nota Les touches PTT et PWR resteront fonctionnelles même si le verrouillage
est activé.
Rétro éclairage de l’écran
Chaque fois qu’une touche est pressée (sauf PTT et Appeler), la lumière de fond de
l’écran s’allumera pendant 5 secondes.
Prise Casque/Microphone/Alimentation
Votre TwinTop 400/400-L est équipé d’une prise pour casque, microphone,
chargeur situé sur le côté opposé de la touche PTT.
Page 15
13
20405013xx_ba_b0
Français
Spécifications
Canaux disponibles 8 canaux
Sous-canal CTCSS 38 pour chaque canal
Sous-canal DCS 83 pour chaque canal
Puissance de sortie (TX) 0,5 W
Portée jusqu’à 10 km
Tableau de fréquences par canal
Canal Fréquence (MHz) Canal Fréquence (MHz)
1 446.00625 5 446.05625
2 446.01875 6 446.06875
3 446.03125 7 446.08125
4 446.04375 8 446.09375
Spécifications/Tableau de fréquences par canal
Page 16

14
20405013xx_ba_b0
Informations importantes
Homologation et conformité
Cet émetteur-récepteur privé est conforme aux exigences fondamentales de la Directive R&TTE 1999/5/CEE concernant les équipements hertziens et les équipements
terminaux de télécommunications et est destiné au fonctionnement dans le pays
membre indiqué sur l’appareil et/ ou l’emballage.
La déclaration de conformité se trouve à la fin de ce mode d’emploi.
La conformité de l’appareil à la directive mentionnée ci-dessus est
attestée par la marque CE sur l’appareil.
Garantie
Votre appareil bénéficie, à partir de sa date d’acquisition, d’une garantie conforme
aux dispositions légales en vigueur dans le pays dans lequel vous l’avez acheté.
Pour pouvoir prouver la date d’acquisition de votre appareil, veuillez donc conserver
précieusement votre ticket de caisse ou la carte de garantie qui aura été dûment
remplie par le responsable de votre point de vente. Pendant la durée de validité de la
garantie, tous les défauts de fabrication ou qui auront été constatés sur le matériel
seront résolus gratuitement. Cette prestation de garantie prendra la forme soit
d’une réparation, soit d’un échange standard de l’appareil défectueux, au choix du
fournisseur.
Sont exclus de la garantie les consommables (par exemple les accumulateurs), les
défauts réduisant de manière insignifiante la valeur ou l’utilisation de l’appareil ainsi
que les dommages causés par une utilisation non conforme de l’appareil, l’usure ou
l’intervention d’un tiers.
Les éventuels dommages consécutifs découlant de l’utilisation, de la défaillance ou
d’un défaut du produit et notamment toute responsabilité pour dommages pécuniaires sont expressément exclus de la présente garantie.
Pour toute prétention à garantie, veuillez vous adresser au point de vente dans lequel
vous avez acheté votre appareil.
Page 17

15
20405013xx_ba_b0
Français
Page 18
16
20405013xx_ba_b0
Safety precautions
CAUTION – Damaged antenna
Do not use any TwinTop 400/400-L that has a damaged antenna. If a damaged
antenna comes in contact with the skin, a minor burn may result.
Batteries
All batteries can cause property damage and/or bodily injury such as burns if conductive
material such as jewelry, keys or beaded chains touches exposed terminals. The material
may complete an electrical circuit (short circuit) and become quite hot. Exercise care in
handling any charged battery, particularly when placing it inside a pocket, purse, or other
container with metal objects.
WARNING – For vehicles with an air bag
Do not place your TwinTop 400/400-L in the area over an air bag or in the air bag
deployment area. Air bags inflate with great force. If a TwinTop 400/400-L is
placed in the air bag deployment area and the air bag inflates, it may be propelled with great force and cause serious injury to the occupants of the vehicle.
Potentially explosive atmospheres
Turn your TwinTop 400/400-L OFF when in any area with a potentially explosive atmosphere. Sparks in such areas could cause an explosion or fire resulting in injury or even death.
Batteries
Do not replace or charge batteries in a potentially explosive atmosphere. Contact sparking
may occur while installing or removing batteries and cause an explosion.
Blasting caps and areas
To avoid possible interference with blasting operations, turn your TwinTop 400/400-L OFF
near electrical blasting caps or in a “blasting area” or in areas posted: “Turn off the two
way radio.” Obey all signs and instructions.
Note Areas with potentially explosive atmospheres are often, but not always clearly
marked. They include fueling areas such as below deck on boats; fuel or chemical
transfer or storage facilities; areas where the air contains chemicals or particles
such as grain, dust, or metal powders; and any other area where you would
normally be advised to turn off your vehicle engine.
Cleaning and care
To clean your TwinTop 400/400-L, use a soft cloth dampened with water. Do not use
cleaners or solvent, which may cause damage that may not be covered by guarantee.
Disposal
Please dispose of batteries, direct chargers, desktop chargers and main units in
an ecological manner. Do not dispose of them in domestic waste.
Page 19

17
20405013xx_ba_b0
English
Keys/LCD Screen ………………………………………………………………………18
Installation ………………………………………………………………………………19
Installing the batteries……………………………………………………………………19
Removing the belt clip …………………………………………………………………19
Installing the belt clip ……………………………………………………………………19
Charging the batteries using direct charger …………………………………………20
Charging the batteries using desktop charger (TwinTop 400 only) …………………20
Battery status indication …………………………………………………………………21
Operation ………………………………………………………………………………22
Transmitting range ………………………………………………………………………22
Tur ning the TwinTop 400/400-L ON/OFF ………………………………………………22
Adjusting the speaker volume …………………………………………………………22
Changing channels ………………………………………………………………………23
Setting the CTCSS sub-channel ……………………………………………………23
Setting the DCS advanced digital code ……………………………………………24
Transmitting and receiving ………………………………………………………………24
Transmitting (sending a speech) ……………………………………………………24
Monitor ………………………………………………………………………………24
Setting the VOX sensitivity (Voice Activated) …………………………………………25
Activating the auto channel and sub-channel scan……………………………………25
Call-ring tone ……………………………………………………………………………26
Selecting a call-ring tone ……………………………………………………………26
Vibration mode (TwinTop 400 only) ……………………………………………………26
Activating the vibration mode………………………………………………………26
Setting the Roger beep …………………………………………………………………27
Setting the Key beep ON or OFF ………………………………………………………27
Setting the Dual Watch mode …………………………………………………………27
Auxiliary features………………………………………………………………………28
Key lock …………………………………………………………………………………28
LCD Screen backlight ……………………………………………………………………28
Microphone/Earphone/Charge Jack ……………………………………………………28
Specifications/Channel frequency table……………………………………………29
Specifications ……………………………………………………………………………29
Channel frequency table ………………………………………………………………29
General information …………………………………………………………………30
Approval and conformity ………………………………………………………………30
Warranty conditions ……………………………………………………………………30
Warranty Certificate …………………………………………………………………79
Déclaration of Conformity……………………………………………………………99
Contents
Page 20
18
20405013xx_ba_b0
mic
Ear/Mic/Charger
jack
LCD screen
Displays the current
channel selection
and other
radio symbols
PTT (PUSH to
TALK) key
Press and hold to
transmit
Antenna
POWER key
Press and hold to turn
the unit ON or OFF
MENU key
Press to switch
between modes
MIC (Microphone)
Speaker
CALL key
Press to send
ringing tone to
other PMR units
UP/DOWN key
Press to change
channels, volume,
and to select settings
during programming
Keys/LCD Screen
Channel number. Changes from 1 to 8 as selected by the user.
CTCSS Code. Changes from 1 to 38 as selected
by the user.
Displays the battery charge level. When the bars are
reduced, the batteries need to be charged
TX Displayed when transmitting a signal
RX Displayed when receiving a signal
DCM Displayed when the dual watch function is turned ON
VOX Displayed when the VOX feature is enabled
SC Displayed when the PMR is scanning all channels
Displayed when the key lock feature is activated
Displays the current speaker volume level
Displayed when the call signal is ON
Displayed when the vibration function is activated (TwinTop 400 only)
Page 21
19
20405013xx_ba_b0
English
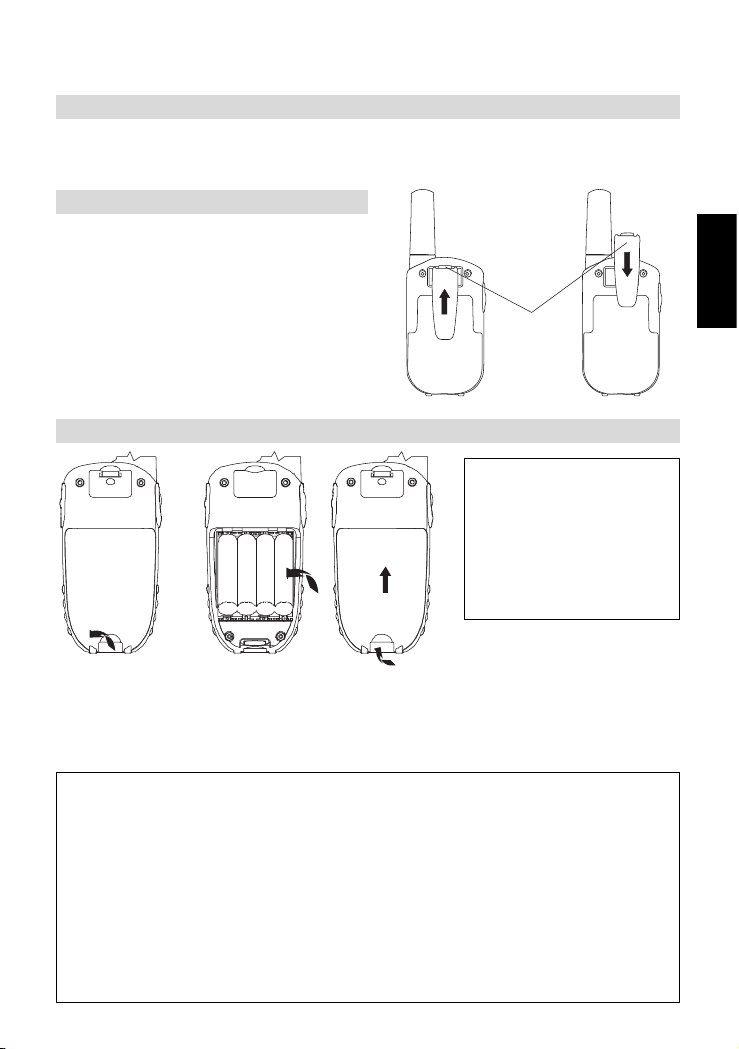
Removing the belt clip
1. Pull the belt clip latch forward (away from the TwinTop 400/400-L)
2. While pulling the belt clip latch, push up the belt clip as shown in Figure 1.
Installing the belt clip
1. Slide the belt clip into the slot as
shown in Figure 2.
2. A “click” indicates the belt clip is
locked into position.
Installation
Belt clip
latch
Figure 1 Figure 2
Installing the batteries
Caution
Observe the proper battery polarity orientation
when installing batteries.
Incorrect positioning can
damage both the batteries and the unit.
Figure 3 Figure 4
1. Pull up the battery cover latch, lift up battery compartment cover.
2. Install the rechargeable batteries by following the orientation as shown in Figure 3
(the arrow is showing and pointing upward.)
3. Replace the battery compartment cover. See Figure 4.
Important
– Read the safety warnings before you charge the batteries.
– When charging TwinTop 400/400-L, use only the rechargeable batteries supplied.
– Don’t try to recharge non-rechargeable batteries.
– Make sure the battery compartment cover is securely locked in place when you
are charging the batteries.
– Dispose of used batteries safely and in a way that will not harm the environment –
never try to burn them or put them anywhere, they could get burnt or punctured.
– Don’t leave dead batteries in your TwinTop 400/400-L units. They might leak if
you do.
Page 22
20
20405013xx_ba_b0
Installation
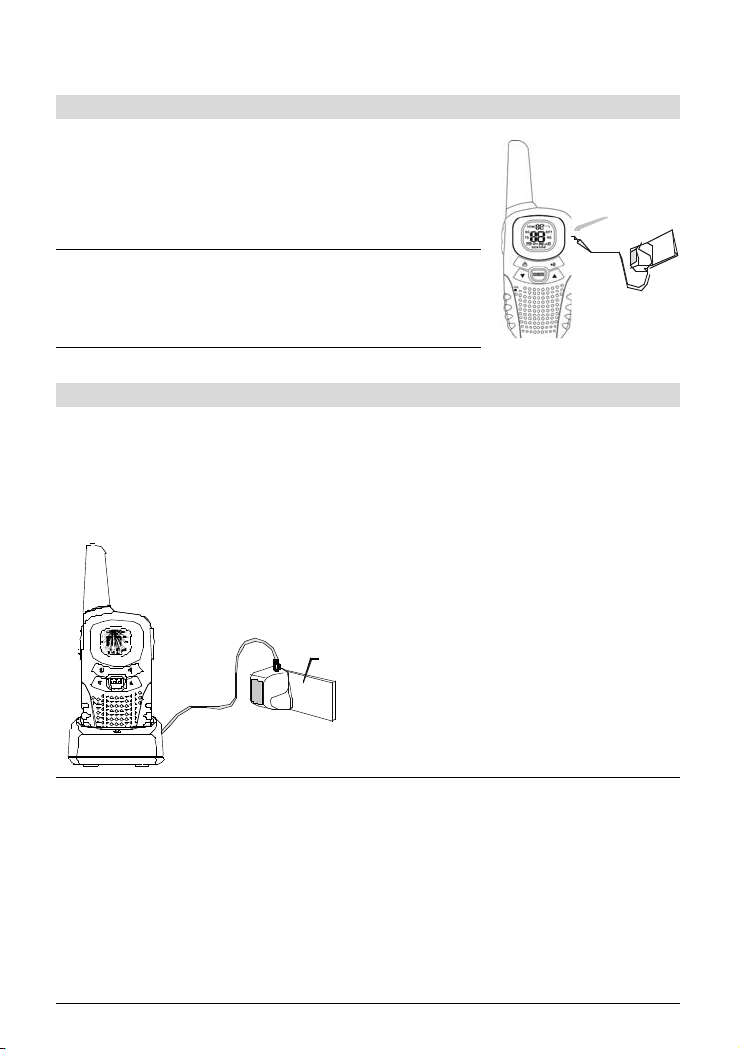
Charging the batteries using direct charger
1. Lift up the Mic/Ear/Charger cover, insert the round
connector at the side of the unit.
2. Plug in the mains adaptor into a 240 V/50 Hz
main socket.
Note It takes about 10 hours to fully recharge the
batteries if they are completely run down.
New batteries take up to 14 hours to fully
charge.
Charging the batteries using desktop charger (TwinTop 400 only)
1. Insert the small plug on the end of the mains adaptor into the power-in connection
jack at the back of the desktop charger.
2. Plug the mains adaptor into a 240 V/50 Hz main socket.
3. Place the TwinTop 400 unit in the charge cradle in an upright position and facing
outward. The charge LED indicator will light up.
Main socket
Nota – The TwinTop 400/400-L must be charged using the mains adaptor
provided. Using any other adaptor will result in non-compliance with
EN60065 and will invalidate any approvals and warranty.
– It takes about 10 hours to fully recharge the batteries if they are com-
pletely run down. New batteries take up to 14 hours to fully charge.
– Always turn off the PMR unit when charging. This will shorten the
charging .
– During PMR direct charging mode, the functions transmit and receive
are disabled.
Page 23
21
20405013xx_ba_b0
English
Battery status indication
The battery status indication is located on the upper left corner of the LCD screen.
It appears like a battery with three bars. This indicates the amount of power available.
When the battery level reaches its minimum level, the TwinTop 400/400-L emits two
beeps and the unit is automatically switched off.
The TwinTop 400/400-L can detect 4 levels:
– Battery charge at high level.
– Battery charge at medium level.
– Battery charge at low level.
– Battery charge at very low level. When the battery charge reaches its
minimum level, the TwinTop 400/400-L emits two beeps and the unit is
automatically switched off. Important: Charge the unit for 10–14 hours.
Battery durability
The TwinTop 400/400-L has a built-in power saver feature to make the batteries last
longer. But when you are not using the units, turn them OFF to conserve battery
power.
Installation
Page 24

22
20405013xx_ba_b0
Operation
Transmitting range
The talk range depends on the environmental and terrain. It should be longest (up to
about 10 km) in wide open spaces, without obstructions such as hills or buildings.
Don’t try to use two PMR units which are less than 1.5 m (5 feet) apart. If you do,
you may experience interference.
Turning the TwinTop 400/400-L ON/OFF
To turn ON
Press and hold the POWER key until the LCD screen turns ON and
displays the current channel.
To switch OFF
Press and hold the POWER key until the LCD screen turns blank.
You can hear a tone each time to confirm.
Adjusting the speaker volume
The volume level is shown by vertical bars on the LCD screen. You can change the
volume while using your TwinTop 400/400-L, or while the unit is idle (switched on
but not in use).
Press the UP key to increase, or press the DOWN key to decrease the speaker volume.
Important safety warning
–To reduce radio frequency exposure when you are using your TwinTop 400/
400-L, hold the unit at least 5 cm (2 inches) away from your face.
– Never use your TwinTop 400/400-L outdoors during a thunderstorm.
– Don’t use the TwinTop 400/400-L in the rain.
– If your TwinTop 400/400-L ever gets wet, turn it off and remove the batteries.
Dry the battery compartment and leave the cover off for a few hours. Don’t
use the unit until it is completely dry.
– Keep the TwinTop 400/400-L out of the reach of babies and young children.
Page 25
23
20405013xx_ba_b0
English
Operation
Changing channels
The TwinTop 400/400-L has 8 available channels. To communicate with other
TwinTop 400/400-L users within a range, you must all have your TwinTop 400/400-L
tuned in to the same channel.
1. Press the MENU key once, the current channel number flashes on the
LCD screen.
2. Press the UP or DOWN key to select the desired channel.
3. Press the PTT key to confirm the channel setting.
Note Refer to the “Channel Frequency Table” section of this user manual for
detailed information.
Setting the CTCSS sub-channel
Each channel also has 38 sub-channels to let you set up user groups within the same
channel for more private communication. If you have set the sub-channel, you can
only communicate with other PMR users tuned to the same channel and sub-channel.
1. Press the MENU key twice, the current CTCSS sub-channel number
flashes on the LCD screen.
2. Press the UP or DOWN key to select one of the 38 CTCSS sub-
channels.
3. Press the PTT key to confirm the sub-channel setting.
To switch off the sub-channel function, simply set the sub-channel to 0 (zero).
You can now communicate with any PMR user set to the same channel and which
has switched off the sub-channel operation.
Page 26
24
20405013xx_ba_b0
Operation
Setting the DCS advanced digital code
Each channel also has 83 digital codes to let you set up user groups for more
secured private communication.
1. Press the MENU key 3 times. The DCS code flashes on the LCD screen.
2. Press the UP or DOWN key to select the desired DCS code.
3. Press PTT key to confirm the DCS setting.
Note When you have set the DCS code, CTCSS will automatically set to off mode.
Transmitting and receiving
The TwinTop 400/400-L transmission is “one way-at-a-time.” While you
are speaking, you can not receive a transmission.
The TwinTop 400/400-L is an open-license band. Always identity yourself
when transmitting on the same channel.
Transmitting (sending a speech)
The unit is continuously in the receive mode when is switched ON and not transmitting. When a signal is received on the current channel, “RX” is displayed on the LCD
screen and the receiver LED lights up.
1. Press and hold the PTT (push to talk) key to transmit your voice.
“TX” is displayed on the LCD screen.
2. Hold the unit in a vertical position with the MIC (Microphone) 5 cm
away from your mouth. While holding the PTT key, speak into the
MIC (microphone).
3. Release the PTT key when you have finished transmitting.
Monitor
You can use the Monitor feature to search for weak signals on the current channel.
1. Press the MENU and DOWN keys at the same time, “RX” is displayed
on the LCD screen. Your TwinTop 400/400-L picks up signals on the
current channel, including background noise.
2. Press the PTT key to stop channel monitoring.
!
!
Page 27
25
20405013xx_ba_b0
English
Operation
Setting the VOX sensitivity (Voice Activated)
In VOX mode, the TwinTop 400/400-L transmits a signal only when it is activated by
your voice or other sounds around you. The unit continues to transmit for 2 seconds
even if you stop talking.
The level of VOX sensitivity is shown by a number on the LCD screen. At the highest
level, the unit picks up even weak noise (including background noise); at the lowest
level, it picks up only quite loud noise.
1. Press the MENU key 4 times, “VOX” is displayed and “OF” flashes on
the LCD screen.
2. Press the UP key to set the VOX sensitivity level (the maximum level is
“3”). To deactivate the VOX function, press the DOWN key until “OF”
appears on the LCD screen.
3. Press the PTT key to confirm your setting. “VOX” steadily appears on
the LCD screen as long as the VOX feature is activated.
Note VOX operation is not recommended if the TwinTop 400/400-L is used in a
noisy or windy environment.
Activating the auto channel and sub-channel scan
Channel scan performs searches for active signals in an endless loop for all 8 channels,
38 CTCSS codes and all 83 DCS codes.
1. Press the MENU key 5 times.
2. Press the UP or DOWN key to begin scanning channels. When an
active signal is detected, channel scan pauses on the active channel.
3. Press the MENU key again, CTCSS flashes on the LCD screen.
Press the UP or DOWN key to begin scanning CTCSS 1-38.
4. Press the MENU key again, DCS flashes on the LCD screen.
Press the UP or DOWN key to begin scanning DCS code 1-83.
5. Press the PTT key to confirm your setting.
Page 28
26
20405013xx_ba_b0
Operation
Call-ring tone
Incoming calls can be signalized by a call-ring tone or a vibration signal.
You can send a call-ring tone to other PMR users to give an alert that you want to
communicate with them.
Press the CALL key.
You hear a ring tone for about two seconds; “TX” appears on the LCD
screen. Any other units within the transmitting range and tuned to the
same channel and sub-channel (if applicable) will hear the call-ring tone.
Selecting a call-ring tone
The TwinTop 400/400-L is equipped with 5 different call-ring tones.
1. Press the MENU key 8 times, the LCD screen displays the Call icon and
starts blinking.
2. Press the UP or DOWN key to select the desired call-ring tone.
3. Press the PTT key to confirm your setting.
Vibration mode (TwinTop 400 only)
Activating the vibration mode
1. Press the MENU key 9 times; “0I” flashes on the LCD screen.
2. Press the UP or DOWN key to activate the vibration mode.
3. Press the PTT key to confirm your setting.
Page 29
27
20405013xx_ba_b0
English
Operation
Setting the Roger beep
The Roger beep is a tone which is automatically transmitted whenever the PTT key
is released. This informs the receiving party that you have intentionally ended the
transmission, and you are now in receive mode.
1. Press the MENU key 10 times, “ON” flashes on the LCD screen.
2. Press the UP or DOWN key (“ON” is displayed on the LCD screen) or
deactivate (“OFF” is displayed on the LCD screen).
3. Press the PTT key to confirm your setting.
Setting the Key beep ON or OFF
This feature allows the TwinTop 400/400-L to emit a brief confirmation beep
whenever a key is pressed.
1. Press the MENU key 11 times, “ON” flashes on the LCD screen.
2. Press the UP or DOWN key (“ON” is displayed on the LCD screen) or
deactivate (“OFF” is displayed on the LCD screen) the key beep
feature.
3. Press the PTT key to confirm your setting.
Setting the Dual Watch mode
Your TwinTop 400/400-L is capable of monitoring two channels, the current and
another channel (Dual Watch). If the unit detects a signal on one of the channels,
it will stop and receive the signal.
1. Press the MENU key 12 times, “DCM” is displayed while “OF” flashes
on the LCD screen.
2. Press the UP or DOWN key to select the Dual Watch channel
(1-8, except the current channel).
3. Press the MENU key to change the CTCSS code.
4. Press the UP or DOWN key to select the desired CTCSS code (1-38)
5. Press the MENU key to change the DCS code.
6. Press the PTT key to confirm your setting.
7. Press the PTT key to exit.
Page 30
28
20405013xx_ba_b0
Auxiliary features
Key lock
The key lock feature allows to disable the UP, DOWN and MENU keys so that
settings can not be modified accidentally.
1. To activate the key lock feature, press and hold the MENU key until
“” appears on the LCD screen.
2. To deactivate the key lock feature, press and hold the MENU key until
“” disappears on the LCD screen.
Note The PTT and POWER keys remains functional even if the key lock feature
is activated.
LCD Screen backlight
Every time a key is pressed (except PTT and CALL), the LCD screen backlight will
illuminate for 5 seconds.
Microphone/Earphone/Charge Jack
The TwinTop 400/400-L is equipped with an auxiliary microphone, earphone, and
charge jack located at the opposite side of the PTT key.
Page 31

29
20405013xx_ba_b0
English
Specifications/Channel frequency table
Specifications
Channels available 8 channels
CTCSS sub-channel 38 for each channel
DCS sub-channel 83 for each channel
Output power (TX) 0,5 W
Range up to 10 km
Channel frequency table
Channel Frequency (MHz) Channel Frequency (MHz)
1 446.00625 5 446.05625
2 446.01875 6 446.06875
3 446.03125 7 446.08125
4 446.04375 8 446.09375
Page 32

30
20405013xx_ba_b0
General information
Approval and conformity
This private sender-receiver PMR complies with the basic requirements contained in
the R&TTE Directive 1999/5/EC on radio equipment and telecommunications terminal
equipment and is suitable for operation in the member state indicated on the unit
and/or packaging.
The declaration of conformity may be viewed at the end of this manual.
The CE symbol confirms the conformity of the unit with the above
directive.
Warranty conditions
Your TwinTop 400/400-L is subject to a guarantee from the date of purchase in
accordance with the legal provisions of the country in which the PMR was purchased.
As evidence of the date of purchase, please keep the receipt or the warranty card
completed by the retailer. All defects attributable to material and manufacturing
faults will be corrected free of charge within the warranty period, either by repairing
or replacing the defective equipment.
The warranty does not cover expendable materials (battery cells), defects which
affect the value or use of the equipment only insignificantly, and damage caused by
incorrect use, ordinary wear and tear, or manipulation by third parties.
This warranty does not cover consequential damage caused by the use, failure or
defectiveness of the product. In particular, no liability whatsoever is accepted for
damage to property and pecuniary loss.
To claim under this warranty, please contact the retailer where you purchased your PMR.
Page 33

31
20405013xx_ba_b0
English
Page 34

32
20405013xx_ba_b0
Sicherheitshinweise
ACHTUNG – Beschädigte Antenne
Verwenden Sie Ihr TwinTop 400/400-L unter keinen Umständen, wenn die
Antenne beschädigt ist! Wenn eine beschädigte Antenne mit der Haut in
Berührung kommt, kann eine leichte Verbrennung die Folge sein.
Akkus
Akkus können Sachbeschädigung und/oder Körperverletzungen wie Verbrennungen verursachen, wenn leitfähiges Material wie Schmuck, Schlüssel oder Perlenketten die freigelegten Pole berühren. Das Material kann einen Stromkreislauf schliessen (Kurzschluss) und
relativ heiss werden. Seien Sie beim Umgang mit geladenen Akkus/Batterien vorsichtig, vor
allem wenn diese in einer Tasche, Handtasche oder einem anderen Behälter mit Metallgegenständen aufbewahrt werden.
WARNUNG – Fahrzeuge mit Airbag
Legen Sie Ihr TwinTop 400/400-L niemals in die Zone über einem Airbag oder in
dessen Entfaltungsbereich. Befindet sich ein Funkgerät im Entfaltungsbereich des
Airbags, kann es mit so grosser Wucht weggeschleudert werden, wenn dieser sich
öffnet, dass ernsthafte Verletzungen der Fahrzeuginsassen die Folge sein könnten.
Potentiell explosive Umgebungen
Schalten Sie Ihr TwinTop 400/400-L aus, wenn Sie sich in einer potentiell explosiven Umgebung befinden. Funken in potentiell explosiven Umgebungen können eine Explosion
oder ein Feuer verursachen mit Verletzungs- oder sogar Todesfolge.
Akkus/Batterien
Akkus/Batterien nicht in einer potentiell explosiven Umgebung entfernen oder aufladen.
Durch das Entfernen/Aufladen der Akkus/Batterien könnten Kontaktfunken entstehen und
eine Explosion verursachen.
Sprengzünder und -zonen
Um Störungen bei Sprengarbeiten zu vermeiden, müssen Sie Ihr Funkgerät in der Nähe von
elektrischen Zündern oder in «Sprenggebieten» ausschalten oder in Zonen, mit dem Hinweis:
«Zweiwegradio/Funkgerät ausschalten». Befolgen Sie alle Zeichen und Anweisungen.
Hinweis Bereiche mit potentiell explosiven Umgebungen sind häufig, aber nicht immer,
deutlich signalisiert. Dazu gehören Tankstellen, Unterdecks auf Schiffen, Transport- und Lagerstätten von Kraftstoffen oder Chemikalien, Bereiche, in denen
die Luft Chemikalien oder Partikel wie Getreide, Staub oder Metallpulver enthält, und alle anderen Bereiche, in denen Sie normalerweise aufgefordert werden, Ihren Fahrzeugmotor abzustellen.
Pflege und Wartung
Reinigen Sie Ihr TwinTop 400/400-L mit einem weichen, leicht feuchten Tuch. Verwenden
Sie keine Reinigungs- oder Lösungsmittel, um Beschädigungen des Gerätes zu vermeiden.
Derartige Beschädigungen sind durch die Garantie nicht gedeckt.
Entsorgung
Entsorgen Sie die Akkus, das Ladegerät, das Ladekabel und das Gerät selbst
umweltgerecht. Sie dürfen nicht über den Hausmüll entsorgt werden.
Page 35

33
20405013xx_ba_b0
Deutsch
Inhaltsverzeichnis
Tasten/LCD-Display ……………………………………………………………………34
Installation ………………………………………………………………………………35
Akkus einlegen …………………………………………………………………………35
Gürtelklip entfernen ……………………………………………………………………35
Gürtelklip einsetzen………………………………………………………………………35
Akkus mit Ladekabel aufladen …………………………………………………………36
Akkus mit Ladegerät aufladen (nur TwinTop 400) ……………………………………36
Ladezustand………………………………………………………………………………37
Bedienung ………………………………………………………………………………38
Reichweite ………………………………………………………………………………38
TwinTop 400/400-L ein-/ausschalten ……………………………………………………38
Lautsprecher-Lautstärke einstellen………………………………………………………38
Kanal auswählen …………………………………………………………………………39
CTCSS-Unterkanal auswählen………………………………………………………39
DCS-Code einstellen (Digital Coded Squelch) ……………………………………40
Senden und Empfangen…………………………………………………………………40
Senden ………………………………………………………………………………40
Kanalüberwachung (Monitoring) …………………………………………………40
VOX-Empfindlichkeit einstellen …………………………………………………………41
Automatische Suche von Kanälen/Unterkanälen ……………………………………41
Anrufton …………………………………………………………………………………42
Anrufton auswählen…………………………………………………………………42
Vibra-Funktion (nur TwinTop 400) ………………………………………………………42
Vibra-Funktion (Vibration) aktivieren ………………………………………………42
Roger-Signalton einstellen ………………………………………………………………43
Tastenton einstellen………………………………………………………………………43
Dual Watch-Modus einstellen …………………………………………………………43
Zusätzliche Funktionen ………………………………………………………………44
Tastensperre ………………………………………………………………………………44
Display-Hintergrundbeleuchtung ………………………………………………………44
Anschluss für Mikrophon/Kopfhörer/Ladegerät ………………………………………44
Spezifikationen/Kanalfrequenz-Liste ………………………………………………45
Spezifikationen …………………………………………………………………………45
Kanalfrequenz-Liste………………………………………………………………………45
Allgemeine Informationen……………………………………………………………46
Zulassung und Konformität ……………………………………………………………46
Garantiebestimmungen …………………………………………………………………46
Garantieschein …………………………………………………………………………79
Konformitätserklärung ………………………………………………………………99
Page 36

34
20405013xx_ba_b0
Tasten/LCD-Display
mic
Anschluss für
Kopfhörer/Mic/
Ladegerät
LCD-Display
Zeigt den ausgewählten Kanal
und weitere
Symbole an
PTT (Sprech)-Taste
Drücken und halten,
um zu übertragen
Antenne
Ein/Aus-Taste
Drücken und halten,
um das Gerät ein- oder
Auszuschalten
ANRUFEN-Taste
Drücken, um Rufzeichen an andere
PMR-Geräte zu senden
UP/DOWN-Taste
Drücken, um Kanäle/
Lautstärken zu ändern
und um Einstellungen
während Programmierung auszuwählen
MENÜ-Taste
Drücken, um gewünschten Modus
auszuwählen
Lautsprecher
MIC (Mikrophon)
Kanalnummer. Benutzer kann Kanal 1 bis 8 auswählen.
CTCSS-Code. Benutzer kann Frequenz 1 bis 38 auswählen.
Zeigt den Akku-Ladezustand an.
TX Wird angezeigt , wenn ein Signal übertragen wird
RX Wird angezeigt, wenn ein Signal empfangen wird
DCM Wird angezeigt, wenn die Funktion Dual Watch aktiviert ist
VOX Wird angezeigt, wenn die Funktion VOX aktiviert ist
SC Wird angezeigt, wenn das Gerät alle Kanäle durchsucht
Wird angezeigt, wenn die Funktion Tastensperre aktiviert ist
Zeigt die gegenwärtige Lautstärke des Lautsprechers an
Wird angezeigt, wenn das Anrufsignal aktiviert ist
Wird angezeigt, wenn die Vibra-Funktion (Vibration) aktiviert ist
(nur TwinTop 400)
Page 37

35
20405013xx_ba_b0
Deutsch
Gürtelklip entfernen
1. Gürtelklip-Halterung nach vorne ziehen (weg vom TwinTop 400/400-L).
2. Gürtelklip gleichzeitig nach oben schieben (siehe Figur 1).
Gürtelklip einsetzen
1. Gürtelklip in den dafür vorgesehenen
Schlitz schieben (siehe Figur 2).
2. Ein Klicken zeigt an, dass der Gürtelklip
korrekt eingerastet ist.
Installation
Gürtelklip-
Halterung
Figur 1 Figur 2
Akkus einlegen
Vorsicht
Achten Sie auf die richtige Polung der Akkus.
Falsch eingelegte Akkus
können das Gerät
beschädigen!
Figur 3 Figur 4
Wichtig – Lesen Sie die Sicherheitshinweise genau, bevor Sie die Akkus aufladen.
– Um Ihr TwinTop 400/400-L aufzuladen, benutzen Sie nur die mitge-
lieferten, wiederaufladbaren Akkus.
–Verwenden Sie niemals nicht-wiederaufladbare Batterien.
–Vergewissern Sie sich, dass der Akkufachdeckel korrekt verriegelt ist,
wenn Sie die Akkus aufladen.
– Gebrauchte Akkus sicher und umweltgerecht entsorgen – Akkus dür-
fen weder verbrannt noch über den Hausmüll weggeworfen werden.
– Entfernen Sie gebrauchte Akkus aus Ihrem Gerät, sie können aus-
laufen und das Gerät beschädigen.
1. Verriegelung öffnen und Akkufachdeckel abheben.
2. Wiederaufladbare Akkus einlegen, dabei Polung wie in Figur 3 gezeigt beachten
(Pfeil zeigt nach oben).
3. Akkufachdeckel schliessen (Figur 4).
Page 38

36
20405013xx_ba_b0
Installation
Akkus mit Ladekabel aufladen
1. Die Abdeckung für den Anschluss von Kopfhörer/Mic/
Ladegerät anheben, den Stecker des Ladekabels an
der Seite des Gerätes anschliessen.
2. Das Ladekabel in eine 240 V/50 Hz-Steckdose
einstecken.
Hinweis Es dauert ungefähr 10 Stunden, um entladene
Akkus vollständig aufzuladen. Neue Akkus
benötigen zum Aufladen ca. 14 Stunden.
Akkus mit Ladegerät aufladen (nur TwinTop 400)
1. Den runden Stecker des 9.0 V/200 mA-Adapters in die Rückseite des Ladegerätes
einstecken.
2. Das Ladegerät in eine 240 V/50 Hz-Steckdose einstecken.
3. Das TwinTop 400 in aufrechter Position in das Ladegerät stellen (nach aussen
gerichtet). Die rote Lade-LED beginnt zu leuchten.
Wandsteckdose
Hinweis – Das TwinTop 400/400-L muss mit dem mitgelieferten Ladegerät aufge-
laden werden. Die Verwendung anderer Ladegeräte führt zur Nichtübereinstimmung mit EN60065, alle Garantieansprüche werden dadurch ungültig.
– Es dauert ungefähr 10 Stunden, um entladene Akkus vollständig auf-
zuladen. Neue Akkus benötigen zum Aufladen ca. 14 Stunden.
– Um die Ladezeit zu verkürzen, schalten Sie Ihr TwinTop 400/400-L
während des Ladevorganges aus.
– Während des Aufladens können Sie weder senden noch empfangen.
Page 39

37
20405013xx_ba_b0
Deutsch
Ladezustand
Die Ladezustands-Anzeige befindet sich in der linken oberen Ecke des Displays. Sie
wird mit einem Batteriesymbol und drei Strichen dargestellt. Die Striche symbolisieren
die Menge der verfügbaren Energie. Wenn der Ladezustand sein tiefstes Niveau
erreicht, ertönen zwei Signaltöne und das Gerät schaltet sich automatisch aus.
Ihr Gerät kann 4 Ladezustände anzeigen:
– Ladezustand «voll».
– Ladezustand «mittel».
– Ladezustand «niedrig».
– Ladezustand «leer». Wenn die Akkus leer sind, ertönen zwei Signaltöne
und das Gerät schaltet sich automatisch aus. Wichtig: Akkus während
10–14 Stunden aufladen!
Lebensdauer der Akkus
Das Gerät verfügt über eine eingebaute Energiesparfunktion, um die Lebensdauer der
Akkus zu verlängern. Trotzdem empfehlen wir Ihnen, das Gerät bei Nichtgebrauch
auszuschalten, um Akkuleistung zu sparen.
Installation
Page 40

38
20405013xx_ba_b0
Bedienung
Reichweite
Die maximale Reichweite unter optimalen Bedingungen (ohne Hindernisse wie Hügel
oder Gebäude) beträgt bis zu 10 km im Freien. In Abhängigkeit von den Umgebungsbedingungen kann die Reichweite jedoch geringer werden.
Verwenden Sie nicht zwei PMR-Geräte, wenn der Abstand zwischen diesen kleiner
als 1,5 m ist, sonst können Interferenzen (Störungen) die Folge sein.
TwinTop 400/400-L ein-/ausschalten
Einschalten
Taste Ein/Aus drücken und halten, bis sich das Display einschaltet und
den gegenwärtig eingestellten Kanal anzeigt.
Ausschalten
Taste Ein/Aus drücken und halten, bis sich das Display ausschaltet.
Sie hören jeweils einen kurzen Signalton zur Bestätigung.
Lautsprecher-Lautstärke einstellen
Die Lautstärke wird durch senkrechte Balken auf dem Display angezeigt. Sie können
die Lautstärke während des Gebrauchs oder im Ruhezustand (eingeschaltet aber
nicht in Betrieb) einstellen.
Drücken Sie Taste UP, um die Lautstärke zu erhöhen oder Taste DOWN, um die
Lautstärke zu verringern.
Wichtige Sicherheitshinweise
– Halten Sie das Gerät während des Gebrauchs mindestens 5 cm weit von Ihrem
Gesicht entfernt, um die Strahlung möglichst gering zu halten.
–Verwenden Sie das Gerät niemals draussen während eines Gewitters.
–Verwenden Sie das Gerät nicht im Regen.
–Wenn Ihr Gerät nass wird, schalten Sie es aus und entfernen Sie die Akkus.
Trocknen Sie das Akkufach und lassen Sie es während einiger Stunden geöff-
net. Benutzen Sie das Gerät erst wieder, wenn es vollständig trocken ist.
– Bewahren Sie das Gerät ausserhalb der Reichweite von Babys und Kleinkindern
auf.
Page 41

39
20405013xx_ba_b0
Deutsch
Kanal auswählen
Ihr Gerät verfügt über 8 Kanäle. Um mit anderen Benutzern, die sich in Reichweite befinden, zu kommunizieren, müssen alle Geräte auf den gleichen Kanal eingestellt sein.
1. Taste MENU drücken. Der eingestellte Kanal blinkt auf dem Display.
2. Taste UP oder DOWN drücken, um den gewünschten Kanal auszu-
wählen.
3. Taste PTT drücken, um die Einstellung des Kanals zu bestätigen.
Hinweis Für genauere Angaben siehe Kapitel Kanalfrequenz-Liste.
CTCSS-Unterkanal auswählen
Jeder Kanal verfügt über 38 Unterkanäle, damit Sie für private Kommunikationen
eine Benutzer-Gruppe innerhalb des gleichen Kanals erstellen können. Wenn Sie
einen Unterkanal eingestellt haben, können Sie nur mit anderen PMR-Benutzern
kommunizieren, die den gleichen Kanal und Unterkanal eingeschaltet haben.
1. Taste MENU zweimal drücken, die Nummer des gegenwärtig einge-
stellten CTCSS-Unterkanals wird angezeigt.
2. Taste UP oder DOWN drücken, um einen der 38 CTCSS-Unterkanäle
auszuwählen.
3. Taste PTT drücken, um die Einstellung des Unterkanals zu bestätigen.
Um die Funktion Unterkanal zu deaktivieren, stellen Sie den Unterkanal einfach
auf 0 (null) ein. Sie können nun mit jedem PMR-Benutzer kommunizieren, der den
gleichen Kanal wie Sie eingestellt hat und der keinen Unterkanal aktiviert hat.
Bedienung
Page 42

40
20405013xx_ba_b0
Bedienung
DCS-Code einstellen (Digital Coded Squelch)
Jeder Kanal verfügt über 83 digitale Codes, um Benutzer-Gruppen für gesichertere
private Kommunikation zu erstellen.
1. Taste MENÜ dreimal drücken. DCS-Code blinkt auf dem Display.
2. Taste UP oder DOWN drücken, um den gewünschten DCS-Code aus-
zuwählen.
3. Taste PTT drücken, um die Einstellung des DCS-Codes zu bestätigen.
Hinweis Sobald Sie den DCS-Code einstellen, wird CTCSS automatisch auf OFF-
Modus eingestellt.
Senden und Empfangen
Die Übertragung Ihres TwinTop 400/400-L ist eine «Ein-Weg-Übertragung». Während Sie sprechen, können Sie nicht gleichzeitig empfangen.
Ihr TwinTop 400/400-L verwendet einen offenen Frequenzbereich. Sie sollten
sich daher beim Übertragen auf dem gleichen Kanal immer identifizieren.
Senden
Das Gerät befindet sich immer im Empfangs-Modus, wenn es eingeschaltet ist und
nicht gerade sendet. Wenn ein Signal auf dem eingestellten Kanal empfangen wird,
wird «RX» auf dem Display angezeigt und die entsprechende LED leuchtet.
1. Taste PTT drücken und halten, um Ihr Gespräch zu senden. «TX» wird
auf dem Display angezeigt.
2. Das Gerät in vertikaler Position halten, mit dem Mikrophon 5 cm weit
von Ihrem Mund entfernt. Halten Sie Taste PTT gedrückt währenddem
Sie in das Mikrophon sprechen.
3. Taste PTT loslassen, wenn Sie das Senden beendet haben.
Kanalüberwachung (Monitoring)
Sie können diese Funktion verwenden, um schwache Signale auf dem gegenwärtigen
Kanal zu überprüfen.
1. Taste MENÜ und DOWN gleichzeitig drücken, «RX» wird angezeigt.
Ihr TwinTop 400/400-L wird alle Signale auf dem gegenwärtigen Kanal
aufnehmen, einschliesslich aller Hintergrundgeräusche.
2. Taste PTT drücken, um die Überwachung des Kanals zu beenden.
!
!
Page 43

41
20405013xx_ba_b0
Deutsch
VOX-Empfindlichkeit einstellen
Im VOX-Modus wird ein Signal erst gesendet, wenn es durch Ihre Stimme oder
durch andere Umgebungstöne aktiviert wird. Das Gerät sendet weiterhin während
2 Sekunden, selbst wenn Sie aufhören zu sprechen.
Die VOX-Empfindlichkeit wird durch eine Zahl auf dem LCD-Display angezeigt.
Auf dem höchsten Niveau nimmt das Gerät alle Geräusche auf, auch wenn diese
sehr leise sind (z.B. Hintergrundgeräusche). Auf dem niedrigsten Niveau wird es nur
ziemlich laute Geräusche aufnehmen.
1. Taste MENÜ viermal drücken, «VOX» wird angezeigt und «OF» blinkt
auf dem Display.
2. Taste «UP» drücken, um das Niveau der VOX-Empfindlichkeit einzu-
stellen (das maximale Niveau ist «3»). Um die VOX-Funktion zu deaktivieren, drücken Sie die Taste DOWN bis «OF» auf dem Display
erscheint.
3. Taste PTT drücken, um Ihre Einstellung zu bestätigen. So lange die
VOX-Funktion aktiviert ist, wird «VOX» auf dem Display angezeigt.
Hinweis VOX-Betrieb wird nicht empfohlen, wenn Sie sich in einer lauten oder
windigen Umgebung befinden.
Automatische Suche von Kanälen/Unterkanälen
Die automatische Suche von Kanälen/Unterkanälen wird in einer Endlos-Schleife für
alle 8 Kanäle, 38 CTCSS-Codes und 83 DCS-Codes durchgeführt.
1. Taste MENÜ fünfmal drücken.
2. Taste UP oder DOWN drücken, um die Suche zu starten. Wird ein
aktives Signal gefunden, wird die Kanalsuche unterbrochen und Sie
hören das aktive Signal.
3. Taste MENÜ erneut drücken. CTCSS blinkt auf dem Display. Taste UP
oder DOWN drücken, um die CTCSS-Suche zu starten (1–38).
4. Taste MENÜ erneut drücken. DCS blinkt auf dem Display. Taste UP
oder DOWN drücken, um die DCS-Suche zu starten (1–83).
5. Taste PTT drücken, um Ihre Einstellung zu bestätigen.
Bedienung
Page 44

42
20405013xx_ba_b0
Bedienung
Anrufton
Ankommende Signale können mit Anrufton und per Vibra-Funktion (Vibration)
signalisiert werden.
Sie können einen Anrufton an andere PMR-Benutzer senden, um darauf hinzuweisen, dass Sie mit ihnen sprechen möchten.
Taste ANRUFEN drücken.
Sie hören einen Anrufton während ungefähr zwei Sekunden; «TX»
erscheint auf dem Display. Alle anderen Geräte, die sich in Reichweite
befinden und die den gleichen Kanal/Unterkanal eingestellt haben (falls
verfügbar) hören Ihren Anrufton.
Anrufton auswählen
Ihr TwinTop 400/400-L verfügt über 5 verschiedene Anruftöne.
1. Taste MENÜ achtmal drücken, das Anruf-Symbol blinkt auf dem
Display.
2. Taste UP oder DOWN drücken, um den gewünschten Anrufton auszu-
wählen.
3. Taste PTT drücken, um Ihre Einstellung zu bestätigen.
Vibra-Funktion (nur TwinTop 400)
Vibra-Funktion (Vibration) aktivieren
1. Taste MENÜ neunmal drücken; «0I» blinkt auf dem Display.
2. Taste UP oder DOWN drücken, um die Vibra-Funktion zu akti-
vieren.
3. Taste PTT drücken, um Ihre Einstellung zu bestätigen.
Page 45

43
20405013xx_ba_b0
Deutsch
Bedienung
Roger-Signalton einstellen
Der Roger-Signalton wird automatisch übertragen, sobald Sie Taste PTT loslassen.
Dem empfangenden Teilnehmer wird dadurch signalisiert, dass Sie absichtlich das
Senden beendet haben. Sie sind jetzt im Empfangen-Modus.
1. Taste MENÜ 10mal drücken, «ON» blinkt auf dem Display.
2. Taste UP oder DOWN drücken, um die Funktion zu aktivieren («ON»
wird auf dem Display angezeigt) oder zu deaktivieren («OFF» wird auf
dem Display angezeigt).
3. Taste PTT drücken, um Ihre Einstellung zu bestätigen.
Tastenton einstellen
Jedes Mal, wenn eine Taste gedrückt wird, ertönt ein kurzer Signalton.
1. Taste MENÜ 11mal drücken, «ON» blinkt auf dem Display.
2. Taste UP oder DOWN drücken, um die Funktion zu aktivieren («ON»
wird auf dem Display angezeigt), oder zu deaktivieren («OFF» wird auf
dem Display angezeigt).
3. Taste PTT drücken, um Ihre Einstellung zu bestätigen.
Dual Watch-Modus einstellen
Ihr TwinTop 400/400-L kann zwei Kanäle überwachen, den gegenwärtig eingestellten
und einen weiteren (Dual Watch-Funktion). Sobald das Gerät ein Signal auf einem
dieser Kanäle ermittelt, wird es stoppen und das Signal empfangen.
1. Taste MENÜ 12mal drücken, «DCM» wird angezeigt und «OF» blinkt
auf dem Display.
2. Taste UP oder DOWN drücken, um den Dual Watch-Kanal auszu-
wählen (1–8, ausser den bereits eingestellten Kanal).
3. Taste MENÜ drücken, um den CTCSS-Code zu ändern.
4. Taste UP oder DOWN drücken, um den gewünschten CTCSS-Code
auszuwählen(1–38).
5. Taste MENÜ drücken, um den DCS-Code zu ändern.
6. Taste PTT drücken, um Ihre Einstellung zu bestätigen.
7. Taste PTT drücken, um zu beenden.
Page 46

44
20405013xx_ba_b0
Zusätzliche Funktionen
Tastensperre
Die Funktion Tastensperre erlaubt es dem Benutzer, die Tasten UP, DOWN und
MENÜ zu deaktivieren, damit vorgenommene Einstellungen nicht versehentlich
geändert werden.
1. Um die Funktion Tastensperre zu aktivieren, drücken und halten Sie die
Taste MENÜ, bis « » auf dem Display erscheint.
2. Um die Funktion Tastensperre zu deaktivieren, drücken und halten Sie
die Taste MENÜ, bis « » vom Display verschwindet.
Hinweis Die Tasten PTT und Ein/Aus funktioneren auch bei eingeschalteter
Tastensperre.
Display-Hintergrundbeleuchtung
Jedes Mal, wenn eine Taste gedrückt wird (ausser PTT und Taste ANRUFEN), wird
die Hintergrundbeleuchtung des Displays während 5 Sekunden eingeschaltet.
Anschluss für Mikrophon/Kopfhörer/Ladegerät
Das TwinTop 400/400-L verfügt über einen Anschluss für Mikrophon, Kopfhörer und
Ladegerät. Dieser befindet sich auf der gegenüberliegenden Seite der Taste PPT.
Page 47

45
20405013xx_ba_b0
Deutsch
Spezifikationen/Kanalfrequenz-Liste
Spezifikationen
Verfügbare Kanäle 8 Kanäle
CTCSS-Unterkanal 38 für jeden Kanal
DCS-Unterkanal 83 für jeden Kanal
Ausgangsleistung (TX) 0,5 W
Reichweite bis zu 10 km
Kanalfrequenz-Liste
Kanal Frequenz (MHz) Kanal Frequenz (in MHz)
1 446.00625 5 446.05625
2 446.01875 6 446.06875
3 446.03125 7 446.08125
4 446.04375 8 446.09375
Page 48

46
20405013xx_ba_b0
Allgemeine Informationen
Zulassung und Konformität
Diese private Mobilfunkstation PMR entspricht den grundlegenden Anforderungen
der R&TTE Richtlinie 1999/5/EG über Funkanlagen und Telekommunikationsendeinrichtungen und ist geeignet zum Betrieb des auf dem Gerät und/oder der Verpackung angegebenen Mitgliedstaates.
Die Konformitätserklärung befindet sich am Schluss dieser Bedienungsanleitung.
Die Konformität des Geräts mit der obgenannten Richtlinie wird durch
das CE-Zeichen bestätigt.
Garantiebestimmungen
Auf Ihr Gerät wird Garantie ab Kaufdatum im Rahmen der gesetzlichen Bestimmungen des Landes, in dem Sie Ihr Gerät gekauft haben, gewährt.
Zum Nachweis des Kaufdatums bewahren Sie bitte den Kaufbeleg oder die durch die
Verkaufsstelle komplett ausgefüllte Garantiekarte auf. Innerhalb der Garantiezeit
werden unentgeltlich alle Mängel, die auf Material- und Herstellungsfehlern beruhen,
beseitigt. Die Garantieleistung erfolgt durch Reparatur oder Austausch des defekten
Gerätes nach Wahl des Lieferanten.
Von der Garantie ausgenommen sind Verbrauchsmaterialien (z.B. Akkuzellen),
Mängel, die den Wert oder Gebrauch des Gerätes nur unerheblich beeinträchtigen,
sowie Schäden, die auf unsachgemässen Gebrauch, auf Verschleiss oder auf Eingriffe
durch Dritte, zurückzuführen sind. Eventuelle Folgeschäden, hervorgerufen durch die
Nutzung, den Ausfall oder Mängel des Produktes, insbesondere jede Haftung für
Vermögensschäden sind von dieser Garantie ausgeschlossen.
Im Garantiefall wenden Sie sich bitte an die Verkaufsstelle, bei der Sie das Gerät
gekauft haben.
Page 49

47
20405013xx_ba_b0
Deutsch
Page 50

48
20405013xx_ba_b0
Avvertenze di sicurezza
PRECAUZIONE – Danneggiamento dell’antenna
Non utilizzare mai il vostro TwinTop 400/400-L con un’antenna danneggiata.
Se un’antenna danneggiata entra a contatto con la pelle, si possono verificare
ustioni di lieve entità.
Batterie
Tutte le batterie possono causare danni, ferimenti o ustioni se un materiale conduttore,
come gioielli, chiavi o collane di perle, entra in contatto con i terminali esterni. Il materiale
di cui questi oggetti sono composti può creare un circuito elettrico (cortocircuito) e surriscaldarsi. Maneggiare con cura le batterie cariche, soprattutto quando vengono custodite
in una tasca, una borsetta o in altri contenitori con parti metalliche.
PRECAUZIONE – Veicoli con airbag
Non appoggiare la ricetrasmittente nella zona sovrastante l’airbag o nella zona di
apertura dell’airbag. Il gonfiaggio dell’airbag avviene infatti in modo estremamente
energico. Se la ricetrasmittente si trova sulla zona di apertura dell’airbag nel
momento in cui questo si gonfia, è possibile che l’apparecchio venga proiettato in avanti
con rischio di lesioni per gli occupanti del veicolo.
Ambienti a rischio di esplosione
Negli ambienti a rischio di esplosione è consigliabile spegnere la ricetrasmittente.
L’emissione di scintille in tali aree può infatti dare origine a esplosioni o incendi con conseguente pericolo di ferimenti o di morte.
Batterie
Non sostituite o caricate le batterie in ambienti a rischio di esplosione. Durante la rimozione/
ricarica delle batterie si possono formare delle scintille da contatto che potrebbero causare
un’esplosione.
Detonatori elettrici e aree esplosive
Per evitare possibili interferenze con operazioni in cui viene impiegato materiale esplosivo,
spegnere la ricetrasmittente in prossimità di detonatori elettrici, in «aree potenzialmente
esplosive» o dove sia esposto il segnale di spegnimento degli apparecchi ricetrasmittenti.
Rispettare tutte le indicazioni e istruzioni.
Nota Gli ambienti potenzialmente esplosivi sono spesso, ma non sempre, segnalati in
modo chiaro. Tra questi: aree di rifornimento carburante (ad esempio sottocoperta
di un’imbarcazione) oppure impianti di trasferimento e stoccaggio di sostanze
combustibili o chimiche; ambienti contenenti prodotti chimici o particelle in
sospensione nell’aria, quali residui o polveri metalliche e in qualsiasi altro luogo
dove normalmente si richiede di spegnere il motore dei veicoli.
Cura e manutenzione
Se l’apparecchiatura è sporca utilizzate un panno morbido con acqua. Non utilizzare mai detergenti o solventi, i quali possono rovinare l’involucro esterno e penetrare all’interno dell’apparecchio causando danni. Danni di questo genere non sono coperti dalla garanzia.
Smaltimento
Smaltire le batterie, il caricatore, il cavo di ricarica e lo stesso TwinTop 400/
400-L nel rispetto dell’ambiente. Non gettarli con i rifiuti domestici.
Page 51

49
20405013xx_ba_b0
Italiano
Sommario
Tasti/Display LCD ………………………………………………………………………50
Installazione ……………………………………………………………………………51
Installazione batterie ……………………………………………………………………51
Rimuovere la clip da cintura ……………………………………………………………51
Inserire la clip da cintura…………………………………………………………………51
Caricare le batterie con il cavo di ricarica………………………………………………52
Caricare le batterie con il caricatore (solo TwinTop 400)………………………………52
Indicatore livello batterie ………………………………………………………………53
Utilizzo dell’apparecchio ……………………………………………………………54
Portata ……………………………………………………………………………………54
Accensione/spegnimento dell’apparecchio ……………………………………………54
Regolazione volume dell’altoparlante …………………………………………………54
Attivazione dei canali ……………………………………………………………………55
Selezionare il sottocanale CTCSS …………………………………………………55
Selezionare il codice DCS (Digital Coded Squelch) ………………………………56
Trasmettere e ricevere ……………………………………………………………………56
Trasmettere …………………………………………………………………………56
Monitoraggio del canale ……………………………………………………………56
Funzione VOX (attivazione vocale) ……………………………………………………57
Funzione Scan (scansione dei canali)……………………………………………………57
Suoneria …………………………………………………………………………………58
Selezionare la melodia della suoneria………………………………………………58
Funzione vibracall/vibrazione (solo TwinTop 400) ……………………………………58
Attivazione del vibracall ……………………………………………………………58
Tono di fine trasmissione (Roger Beep)…………………………………………………59
Toni della tastiera…………………………………………………………………………59
Monitoraggio contemporaneo di due canali (dual watch) ……………………………59
Funzioni supplementari ………………………………………………………………60
Blocco della tastiera ……………………………………………………………………60
Retroilluminazione del display …………………………………………………………60
Connettore per microfono/auricolari/caricatore ………………………………………60
Dati tecnici/Elenco frequenze canali ………………………………………………61
Dati tecnici ………………………………………………………………………………61
Elenco frequenze canali …………………………………………………………………61
Informazioni generali …………………………………………………………………62
Omologazione e conformità ……………………………………………………………62
Garanzia …………………………………………………………………………………62
Certificato di garanzia…………………………………………………………………79
Declaration of Conformity ……………………………………………………………99
Page 52

50
20405013xx_ba_b0
Tasti/Display LCD
mic
Connettore per
auricolari/
Microfono/
Connettore
Display LCD
Visualizza il canale
selezionato e altri
simboli
Ta sto di
comunicazione PTT
Premere e mantenere
premuto per trasmettere
Antenna
Tasto ON/OFF
Premere e mantenere
premuto per accendere o
spegnere l’apparecchio
Tasto CHIAMATA
Premere per far
squillare gli altri
apparecchi PMR
Tasto SU/GIU
Premere per
selezionare canali,
regolare il volume
e confermare
le impostazioni
effettuate
Tasto MENU
Premere per
selezionare la modalità
desiderata
Altoparlante
MIC (Microfono)
Numero del canale (da 1 a 8)
Codice CTCSS (da 1 a 38)
Indicatore livello di carica delle batterie
TX Trasmissione in corso
RX Ricezione in corso
DCM Funzione monitoraggio contemporaneo di due canali attivata
VOX Funzione VOX attivata
SC Funzione SCAN attivata
Blocco canale attivato
Indicatore livello del volume altoparlante
Segnale di chiamata attivato
VIBRACALL attivo (solo TwinTop 400)
Page 53

51
20405013xx_ba_b0
Italiano
Rimuovere la clip da cintura
1. Tirate in avanti il supporto della clip da cintura.
2. Spingete contemporaneamente la clip verso l’alto (vedi figura 1).
Inserire la clip da cintura
1. Introducete la clip da cintura nella
fessura prevista (vedi figura 2).
2. Uno scatto indica il corretto inserimento
della clip da cintura.
Installazione
Supporto
della clip
da cintura
Figura 1 Figura 2
Installazione batterie
Avvertenza
Prestate attenzione alla
corretta polarità delle
batterie.
L’inserimento scorretto
delle batterie può danneggiare l’apparecchio.
Figura 3 Figura 4
Nota
– Prima di ricaricare le batterie, leggete attentamente le avvertenze di sicurezza.
– Quando caricate il TwinTop 400/400-L utilizzate esclusivamente le batterie
ricaricabili in dotazione.
– Non utilizzate mai batterie non ricaricabili.
– Dopo l’installazione, assicuratevi di avere agganciato bene il coperchio.
–Smaltire le batterie nel rispetto dell’ambiente. Non bruciarle o gettarle con i
rifiuti domestici.
– Disinstallate le batterie scariche per evitare corrosioni e danneggiamenti alle
parti interne dell’apparecchio.
1. Sganciate la levetta e sollevate il coperchio del vano batterie.
2. Inserite le batterie ricaricabili prestando attenzione alla corretta polarità (Figura 3).
3. Chiudete il coperchio del vano batterie (Figura 4).
Page 54

52
20405013xx_ba_b0
Installazione
Caricare le batterie con il cavo di ricarica
1. Sollevate il tappo del connettore per auricolari/
microfono/caricatore e inserite il cavo di ricarica
sul lato dell’apparecchio.
2. Inserite il cavo di ricarica in una presa elettrica
240 V/50 Hz.
Nota Lasciate le batterie in carica per 10 ore.
Alla prima installazione, le batterie dovranno
essere ricaricate per circa 14 ore.
Caricare le batterie con il caricatore (solo TwinTop 400)
1. Inserite il connettore rotondo dell’adattatore 9.0 V/200 mA nell’apposita presa sul
retro dell’apparecchio.
2. Collegate il caricatore a una presa elettrica 240 V/50 Hz.
3. Collocate il vostro TwinTop 400 in posizione verticale nel caricatore
(lato anteriore rivolto all’esterno). Il LED rosso di ricarica si illumina.
Presa a muro
Nota – Il vostro TwinTop 400/400-L deve essere caricato con il caricatore in
dotazione. L’utilizzo di altri caricatori non è conforme alla norma
EN60065 e comporta la perdita di qualsiasi prestazione di garanzia.
– Lasciate le batterie in carica per 10 ore. Alla prima installazione,
le batterie dovranno essere ricaricate per circa 14 ore.
– Per ridurre il tempo di carica, spegnete il vostro TwinTop 400/400-L
durante la ricarica.
– In fase di ricarica la trasmissione e la ricezione sono disattivate.
Page 55

53
20405013xx_ba_b0
Italiano
Indicatore livello batterie
Quando l’apparecchio è acceso, l’indicatore è collocato alla sinistra del display.
Esso mostra graficamente il livello di carica delle batterie tramite delle barre.
Quando il livello di carica risulta insufficiente, si sentono due segnali acustici e
l’apparecchio si spegne automaticamente.
Il vostro apparecchio visualizza 4 livelli di carica:
– Livello di carica «alto»
– Livello di carica «medio».
– Livello di carica «basso».
– Livello di carica «vuoto». Quando le batterie sono scariche si sentono
due segnali acustici e l’apparecchio si spegne automaticamente.
Importante: Ricaricate le batterie per 10–14 ore!
Durata di vita delle batterie
Il vostro TwinTop 400/400-L dispone di una modalità a basso consumo, per aumentare
la durata di vita delle batterie.
Quando non utilizzate l’apparecchio vi consigliamo di spegnerlo per ottimizzare il
mantenimento della carica delle batterie.
Installazione
Page 56

54
20405013xx_ba_b0
Utilizzo dell’apparecchio
Portata
Il vostro TwinTop 400/400-L ha una portata fino a 10 km in un terreno aperto,
pianeggiante e libero da ostacoli (colline o edifici). Le condizioni atmosferiche e
ambientali possono limitare la portata.
Non utilizzate due apparecchi PRM a una distanza inferiore a 1,5 m per evitare
interferenze (disturbi).
Accensione/spegnimento dell’apparecchio
Accendere l’apparecchio
Per accendere l’apparecchio, premete e mantenete premuto il tasto
ON/OFF, finché il display si illumina e visualizza il canale selezionato.
Spegnere l’apparecchio
Per spegnere l’apparecchio premete nuovamente e mantenete premuto il
tasto ON/OFF, finché il display si spegne.
Un breve segnale acustico conferma lo spegnimento.
Regolazione volume dell’altoparlante
Il volume è visualizzato da barre verticali sul display. È possibile regolare il volume
dell’altoparlante durante l’uso o in standby (apparecchio acceso, ma non in
funzione).
Premete il tasto SU per aumentare il volume o il tasto GIU’ per diminuirlo.
Avvertenze di sicurezza
– Durante l’uso, tenete l’apparecchio a una distanza minima di 5 cm dal viso
per ridurre l’esposizione alle radiofrequenze.
– Non utilizzate mai l’apparecchio all’esterno durante un temporale.
– Non utilizzate l’apparecchio sotto la pioggia.
– Se il vostro apparecchio si bagna, spegnetelo e togliete le batterie. Asciugate il
vano batterie e lasciatelo aperto per alcune ore. Utilizzate di nuovo l’apparec-
chio soltanto quanto è completamente asciutto.
–Tenere il vostro Twin Top 400 sempre fuori dalla portata dei bambini.
Page 57

55
20405013xx_ba_b0
Italiano
Utilizzo dell’apparecchio
Attivazione dei canali
Il vostro apparecchio dispone di un totale di 8 canali. Per comunicare con altri utenti
che si trovano nell’area di portata, tutti gli apparecchi devono essere impostati sullo
stesso canale.
1. Premete il tasto MENU. Il numero del canale inizia lampeggiare sul
display.
2. Premete il tasto SU o GIU’ per selezionare il canale desiderato.
3. Premete il tasto di comunicazione PTT per confermare l’impostazione.
Nota Per maggiori dettagli consultare il capitolo «Elenco frequenze canali».
Selezionare il sottocanale CTCSS
Per ogni canale è possibile impostare anche uno dei 38 codici CTCSS, così da poter
creare un gruppo di utenti sullo stesso canale per comunicazioni private. Sentirete
soltanto le conversazioni degli apparecchi PMR impostati sul vostro stesso canale e
sottocanale CTCSS, tutte le altre conversazioni saranno filtrate.
1. Premete il tasto MENU per 2 volte. Il numero del codice CTCSS
impostato appare sul display.
2. Premete il tasto SU e GIU’ per selezionare il codice CTCSS desiderato
(1–38).
3. Premete il tasto di comunicazione PTT per confermare l’impostazione.
Per disattivare la funzione sottocanale, scegliete semplicemente lo 0 (zero) come
codice CTCSS, il filtro CTCSS sarà disattivato e potrete sentire tutte le comunicazioni
del canale scelto.
Page 58

56
20405013xx_ba_b0
Utilizzo dell’apparecchio
Selezionare il codice DCS (Digital Coded Squelch)
Per ogni canale è possibile impostare 83 codici digitali diversi per una comunicazione
più protetta.
1. Premete il tasto MENU per 3 volte. Il codice DCS lampeggia sul display.
2. Premete il tasto SU e GIU’ per selezionare il codice DCS desiderato.
3. Premete il tasto di comunicazione PTT per confermare l’impostazione.
Nota Una volta selezionato il codice DCS, il CTCSS è automaticamente
impostato sul modo OFF.
Trasmettere e ricevere
La trasmissione del vostro TwinTop 400/400-L è unidirezionale. Mentre
parlate non potete ricevere.
Il vostro TwinTop 400/400-L utilizza una gamma di frequenza aperta.
Quando trasmettete sullo stesso canale dovete pertanto sempre identificarvi.
Trasmettere
Quando è acceso e non trasmette, l’apparecchio è sempre in modalità ricezione.
Quando si riceve un segnale sul canale selezionato, sul display appare «RX» e il LED
corrispondente si illumina.
1. Premete e mantenete premuto il tasto di comunicazione PTT
(Comunicazione). «TX» appare sul display.
2. Parlate in direzione del microfono da una distanza di 5 centimetri
tenendo l’apparecchio in una posizione verticale.
3. Al termine della trasmissione, rilasciate il tasto di comunicazione PTT.
Monitoraggio del canale
Con questa funzione potrete ascoltare tutti i segnali (anche se molto deboli) del canale
sul quale siete sintonizzati.
1. Premete e mantenete premuti i tasti MENU e GIU’ contemporaneamente
«RX» appare sul display. Potete adesso ascoltare tutti i segnali (anche
se sono molto deboli) del canale sul quale siete sintonizzati.
2. Premete il tasto di comunicazione PTT per terminare il monitoraggio
del canale.
!
!
Page 59

57
20405013xx_ba_b0
Italiano
Utilizzo dell’apparecchio
Funzione VOX (attivazione vocale)
Con la funzione attivata, il vostro apparecchio rileva la vostra voce (o altro rumore)
ed attiva automaticamente la trasmissione. L’apparecchio continua a trasmettere per
altri 2 secondi dal momento che smettete di parlare.
Un numero sul display indica il livello di sensibilità. Con la funzione attivata con alta
sensibilità, l’apparecchio può ricevere tutti i segnali (anche se sono molto deboli),
con bassa sensibilità, solo rumori forti.
1. Premete il tasto MENU per 4 volte, «VOX» appare sul display e «OF»
inizia lampeggiare.
2. Premete il tasto SU per aumentare la sensibilità (il volume massimo è
«3»). Per disattivare la funzione, premete il tasto GIU’ fino a quando
«OF» appare sul display.
3. Premete il tasto di comunicazione PTT per confermare l’impostazione.
Sul display appare «VOX» finché la funzione VOX è attivata.
Nota La funziona VOX non è raccomandata quando vi trovate in un ambiente
rumoroso o ventoso.
Funzione Scan (scansione dei canali)
Questa funzione vi permette di controllare le comunicazioni su tutti gli 8 canali,
38 sottocanali e 83 codici DCS.
1. Premete il tasto MENU per 5 volte.
2. Premete il tasto SU e GIU’ per cominciare la scansione dei canali.
Quando l’apparecchio rileva un segnale, la scansione si fermerà sul
segnale trovato.
3. Premete di nuovo il tasto MENU. CTCSS lampeggia sul display. Premete
il tasto SU e GIU’ per cominciare la scansione dei sottocanali (1–38).
4. Premete di nuovo il tasto MENU. DCS lampeggia sul display. Premete il
tasto SU e GIU’ per cominciare la scansione dei codici digitali DCS
(1–83).
5. Premete il tasto di comunicazione PTT per confermare l’impostazione.
Page 60

58
20405013xx_ba_b0
Utilizzo dell’apparecchio
Suoneria
I segnali in entrata possono essere identificati con una suoneria o una vibrazione
(funzione vibracall).
Potete inviare una suoneria ad altri utenti PMR per informarli che desiderate
comunicare con loro.
Premete il tasto Chiamata.
Si sente una melodia di suoneria durante circa 2 secondi, «TX» appare
sul display. Tutti gli altri apparecchi regolati sullo stesso canale/sottocanale
(se disponibile) che si trovano nell’area di portata sentono la vostra
suoneria.
Selezionare la melodia della suoneria
Il vostro TwinTop 400/400-L dispone di 5 melodie diverse.
1. Premete il tasto MENU per 8 volte, il simbolo di chiamata appare sul
display.
2. Premete il tasto SU e GIU’ per selezionare la suoneria desiderata.
3. Premete il tasto di comunicazione PTT per confermare l’impostazione.
Funzione vibracall/vibrazione (solo TwinTop 400)
Attivazione del vibracall
1. Premete il tasto MENU per 9 volte, sul display lampeggerà «0I».
2. Premete il tasto SU o GIU’ per attivare o disattivare la funzione.
3. Premete il tasto di comunicazione PTT per confermare l’impostazione.
Page 61

59
20405013xx_ba_b0
Italiano
Utilizzo dell’apparecchio
Tono di fine trasmissione (Roger Beep)
Il «Roger Beep» è un tono che il vostro apparecchio emette ogni volta che rilasciate
il tasto di comunicazione PTT dopo la trasmissione. Questo tono segnala all’utente
ricevente che avete intenzionalmente terminato la trasmissione e che siete in modalità
ricezione.
1. Premete il tasto MENU per 10 volte. «ON» lampeggia sul display.
2. Premete il tasto SU o GIU’ per attivare («ON» appare sul display) o
disattivare il tono («OFF» appare sul display).
3. Premete il tasto di comunicazione PTT per confermare l’impostazione.
Toni della tastiera
Ogni volta che premete un tasto, il vostro apparecchio emette un tono.
1. Premete il tasto MENU per 11 volte. «ON» lampeggia sul display.
2. Premete il tasto SU o GIU’ per attivare («ON» appare sul display) o
disattivare i toni della tastiera («OFF» appare sul display).
3. Premete il tasto di comunicazione PTT per confermare l’impostazione.
Monitoraggio contemporaneo di due canali (dual watch)
Il vostro TwinTop 400/400-L vi permette di monitorare due canali nello stesso
momento; durante questa operazione l’apparecchio controlla continuativamente il
canale primario e secondario. Appena l’apparecchio rileva un segnale su uno dei
canali, l’apparecchio si ferma sul segnale trovato.
1. Premete il tasto MENU per 12 volte. «DCM» appare e «OF» lampeggia
sul display.
2. Premete il tasto SU o GIU’ per selezionare il canale desiderato (1–8).
3. Premete il tasto MENU per modificare il codice CTCSS.
4. Premete il tasto SU o GIU’ per selezionare il codice CTCSS desiderato
(1–38).
5. Premete il tasto MENU per modificare il codice DCS.
6. Premete il tasto di comunicazione PTT per confermare l’impostazione.
7. Premete il tasto di comunicazione PTT per uscire dalla modalità.
Page 62

60
20405013xx_ba_b0
Funzioni supplementari
Blocco della tastiera
Quando si porta il portatile in tasca, si può attivare il blocco tastiera. I tasti SU o GIU’
e MENU vengono disattivati. In tal modo si evita una modificazione accidentale delle
vostre impostazioni.
1. Per attivare il blocco della tastiera, premete e mantenete premuto il
tasto MENU fino a quando « » appare sul display.
2. Per disattivare il blocco della tastiera, premete e mantenete premuto il
tasto MENU fino a quando « » scompare dal display.
Nota I tasti PTT e ON/OFF funzionano anche con il blocco tastiera attivato.
Retroilluminazione del display
Ogni volta che premete un tasto (ad eccezione dei tasti PTT e CHIAMATA) si inserisce
la retroilluminazione del display per 5 secondi.
Connettore per microfono/auricolari/caricatore
Il vostro TwinTop 400/400-L dispone di un connettore per microfono, auricolari e
caricatore che si trova sul lato opposto del tasto PTT.
Page 63

61
20405013xx_ba_b0
Italiano
Dati tecnici/Elenco frequenze canali
Dati tecnici
Canali disponibili 8 canali
Sottocanali CTCSS 38 per canale
Sottocanali DCS 83 per canale
Potenza d’uscita 0,5 W
Portata fino a 10 km
Elenco frequenze canali
Canale Frequenza (MHz) Canale Frequenza (MHz)
1 446.00625 5 446.05625
2 446.01875 6 446.06875
3 446.03125 7 446.08125
4 446.04375 8 446.09375
Page 64

62
20405013xx_ba_b0
Informazioni generali
Omologazione e conformità
Questo apparecchio ricetrasmittente PMR è conforme ai requisiti fondamentali della
Direttiva R&TTE 1999/5/EG riguardante le apparecchiature radio e le apparecchiature
terminali di telecomunicazione ed è previsto per il funzionamento nello stato membro
riportato sulla ricetrasmittente e/o sull’imballaggio.
La dichiarazione di conformità può essere consultata alla fine di queste istruzioni
per l’uso.
La conformità con la direttiva sopra menzionata conservazione è confermata
dal marchio CE sull’apparecchio.
Garanzia
Il vostro apparecchio è coperto da garanzia a partire dalla data d’acquisto, nei limiti
delle disposizioni legali vigenti nel paese in cui è stato acquistato l’apparecchio.
Quale dimostrazione della data d’acquisto vi preghiamo di conservare la prova
d’acquisto oppure il foglio di garanzia dovutamente compilato da parte del venditore.
Nel periodo di garanzia, vengono eliminati gratuitamente tutti i guasti che derivano
da difetti di materiale o di fabbricazione. La prestazione di garanzia avviene tramite
riparazione o sostituzione dell’apparecchio guasto, su decisione del fornitore.
Non sono coperti dalla garanzia il materiale di consumo (ad esempio gli accumulatori),
difetti che riducono in modo irrilevante il valore o l’uso dell’apparecchio, nonché
guasti che derivano da uso improprio, usura o interventi effettuati da terzi. Sono
esclusi da questa garanzia eventuali danni conseguenti dovuti all’uso dell’apparecchio,
guasto o difetto del prodotto, in particolare viene esclusa ogni responsabilità per
danni patrimoniali.
In caso di guasto coperto da garanzia vi preghiamo di rivolgervi al punto vendita
presso il quale avete acquistato l’apparecchio.
Page 65

63
20405013xx_ba_b0
Italiano
Page 66

64
20405013xx_ba_b0
Consejos de seguridad
ADVERTENCIA – Antena dañada
No utilice su TwinTop 400/400-L si tiene la antena dañada. Una antena dañada
podría provocar quemaduras leves si entra en contacto con la piel.
Baterías
Todas las baterías pueden causar daños materiales y/o corporales, como quemaduras, si un
material conductor, como joyas, llaves o cadenas, entra en contacto con los terminales de
la batería. El material podría completar el circuito eléctrico (cortocircuito) y calentarse en
extremo. Una batería cargada debe manipularse con cuidado, especialmente si se coloca
en el interior de un bolsillo, cartera o cualquier otro lugar en el que pueda haber objetos
metálicos.
ADVERTENCIA – Vehículos equipados con airbag
No coloque su TwinTop 400/400-L sobre un airbag o sobre la zona de despliegue
de éste. Puesto que los airbags se inflan a gran velocidad, si se coloca el
TwinTop 400/400-L sobre la superficie de despliegue de un airbag, podría ser propulsado
con mucha fuerza y causar graves daños a los ocupantes del vehículo.
Zonas con riesgo de explosión
Apague el TwinTop 400/400-L en las zonas con riesgo de explosión. Cualquier chispa en
dichas zonas podría provocar una explosión o un incendio, y causar daños o incluso la
muerte.
Baterías
No sustituya ni cargue las baterías en una zona con riesgo de explosión. Se podrían
producir chispas al instalar o sustituir las baterías y provocar una explosión.
Detonadores y zonas de explosión
Para evitar posibles interferencias con operaciones de explosión, apague el TwinTop 400/400-L
si está cerca de detonadores eléctricos o en una «zona de explosión», o en zonas con una
señal que indique que «Debe apagar cualquier transceptor de radio». Respete todas las
señales e indicaciones.
Nota Normalmente (aunque no siempre) las zonas con riesgo de explosión están cla-
ramente indicadas. Incluyen zonas de manipulación de combustibles, como la
cubierta inferior de embarcaciones, instalaciones de traslado o almacenamiento
de combustible o productos químicos, zonas cuya atmósfera contiene partículas
o sustancias químicas como grano, polvo o polvos metálicos, y cualquier otra
zona en la que habitualmente se aconseja apagar el motor de un vehículo.
Limpieza y mantenimiento
Para limpiar el TwinTop 400/400-L utilice un paño suave humedecido en agua. No utilice
detergentes ni disolventes, ya que podría causar daños no cubiertos por la garantía.
Gestión de residuos
Para deshacerse de forma ecológica de baterías, cargadores directos, cargadores
de sobremesa y aparatos principales, no los deposite en el contenedor de basura
doméstica.
Page 67

65
20405013xx_ba_b0
Español
Índice
Teclas/Pantalla LCD ……………………………………………………………………66
Instalación ………………………………………………………………………………67
Instalar las baterías ………………………………………………………………………67
Retirar el clip para cinturón ……………………………………………………………67
Instalar el clip para cinturón ……………………………………………………………67
Cargar las baterías utilizando un cargador directo ……………………………………68
Cargar las baterías utilizando un cargador de sobremesa
(únicamente para TwinTop 400) ………………………………………………………68
Indicador del estado de las baterías ……………………………………………………69
Funcionamiento ………………………………………………………………………70
Alcance de transmisión …………………………………………………………………70
Encender/apagar el TwinTop 400/400-L ………………………………………………70
Ajustar el volumen del altavoz …………………………………………………………70
Cambiar de canal ………………………………………………………………………71
Configuración del subcanal CTCSS…………………………………………………71
Configuración del código digital avanzado DCS …………………………………72
Transmitir y recibir ………………………………………………………………………72
Transmitir (enviar un mensaje)………………………………………………………72
Comprobación ………………………………………………………………………72
Configurar la sensibilidad de VOX (activación por voz) ………………………………73
Activar el escaneo automático de canales y subcanales ………………………………73
Señal de llamada …………………………………………………………………………74
Seleccionar una señal de llamada …………………………………………………74
Modo vibración (únicamente para TwinTop 400) ……………………………………74
Activar el modo vibración …………………………………………………………74
Configurar el pitido de Recibido ………………………………………………………75
Encender y apagar la señal de pulsación de tecla ……………………………………75
Configurar el modo Dual Watch ………………………………………………………75
Funciones de ayuda……………………………………………………………………76
Bloqueo del teclado ……………………………………………………………………76
Retroiluminación de la pantalla LCD……………………………………………………76
Conector de Auriculares/Micrófono/Cargador…………………………………………76
Especificaciones/Tabla de frecuencias de canal …………………………………77
Especificaciones …………………………………………………………………………77
Tabla de frecuencias de canal …………………………………………………………77
Información general …………………………………………………………………78
Homologación y conformidad …………………………………………………………78
Condiciones de la garantía………………………………………………………………78
Certificado de Garantía ………………………………………………………………79
Declaración de conformidad …………………………………………………………99
Page 68

66
20405013xx_ba_b0
Teclas/Pantalla LCD
mic
Auriculares/
Micrófono/
Cargador
Pantalla LCD
Muestra el canal
actual y otros
símbolos de radio
Tecla PTT (pulsar
para hablar)
Mantenga pulsada esta
tecla para trasmitir
Antena
Tecla POWER
Pulse y mantenga
pulsada esta tecla para
encender o apagar el
aparato
Tecla CALL
Pulse esta tecla para
enviar una llamada a
otras PMR
Tecla arriba/abajo
Pulse esta tecla para
cambiar de canal,
ajustar el volumen y
seleccionar la configuración
Tecla MENU
Pulse esta tecla para
cambiar los modos
Altavoz
MIC (micrófono)
Número de canal. Seleccione del 1 al 8 dependiendo del
canal deseado.
Código CTCSS. Seleccione del 1 al 38 dependiendo de sus
preferencias.
Muestra el nivel de carga de las baterías. Cámbielas cuando
se reduzcan las barras.
TX Indica la transmisión de una señal
RX Indica la recepción de una señal
DCM Indica que la función Dual Watch está encendida
VOX Indica que la función VOX está activada
SC SC Indica que la PMR está escaneando todos los canales
Indica que la función de bloqueo de teclas está activada
Indica el nivel de volumen del altavoz
Indica que la señal de llamada está activada
Indica que la función de vibración está activada (únicamente para
TwinTop 400).
Page 69

67
20405013xx_ba_b0
Español
Retirar el clip para cinturón
1. Levante la lengüeta del clip para cinturón (alejándola del TwinTop 400/400-L).
2. A la vez que levanta la lengüeta, empuje el clip hacia arriba, tal y como se
muestra en la Imagen 1.
Instalar el clip para cinturón
1. Deslice el clip para cinturón hacia la ranura,
tal y como se muestra en la Imagen 2.
2. Un «clic» le indicará que el clip está
ajustado en su posición.
Instalación
Lengüeta
del clip para
cinturón
Imagen 1 Imagen 2
Instalar las baterías
Advertencia
Al instalar las baterías
asegúrese de respetar la
polaridad correcta. Una
colocación incorrecta de
las baterías podría causar
daños en éstas y en el
aparato.
Imagen 3 Imagen 4
Importante – Lea los consejos de seguridad antes de cargar las baterías.
– Para cargar su TwinTop 400/400-L, utilice únicamente las baterías
recargables suministradas.
– No intente recargar baterías no recargables.
– Asegúrese de que la cubierta del compartimento de las baterías
esté cerrada durante la carga de las baterías.
– Asegúrese de deshacerse de las baterías usadas de forma respe-
tuosa con el medio ambiente – nunca intente quemarlas ni las
tire donde podrían quemarse o romperse.
– No deje las baterías agotadas en su TwinTop 400/400-L.
Podrían sufrir pérdidas y dañar el aparato.
1. Desbloquee la tapa del compartimento de las baterías y levántela.
2. Instale las baterías recargables siguiendo la orientación, tal y como se muestra en
la Imagen 3 (la flecha indica la parte superior).
3. Vuelva a colocar la cubierta del compartimento de las baterías. Véase la Imagen 4.
Page 70

68
20405013xx_ba_b0
Instalación
Toma de corriente
Nota – El TwinTop 400/400-L debe cargarse utilizando el adaptador de corriente
suministrado. El uso de cualquier otro adaptador podría incumplir la norma
EN 60065 e invalidaría cualquier certificado o garantía.
– Se tarda unas 10 horas en cargar totalmente las baterías si éstas están com-
pletamente descargadas. Unas baterías nuevas tardan aproximadamente
14 horas en recargarse por completo.
–Apague siempre la PMR durante el proceso de carga. Esto acortará el
tiempo que tarda.
– Durante la carga de la PMR, las funciones de transmisión y recepción
estarán desactivadas.
Cargar las baterías utilizando un cargador directo
1. Levante la tapa de los Auriculares/Micrófono/Cargador,
inserte el conector redondo en el lateral del aparato.
2. Conecte el adaptador de corriente a una toma de
240 V/50 Hz.
Nota Se tarda unas 10 horas en cargar totalmente las
baterías si éstas están completamente descargadas.
Unas baterías nuevas tardan aproximadamente
14 horas en recargarse por completo.
Cargar las baterías utilizando un cargador de sobremesa
(únicamente para TwinTop 400)
1. Inserte el enchufito del adaptador de corriente en la toma de la parte posterior del cargador de sobremesa.
2. Conecte el adaptador a una toma de 240 V/50 Hz.
3. Coloque el TwinTop 400 en el soporte del cargador, en posición vertical y
hacia el frente. Se encenderá el indicador luminoso, que indicará que está
cargando.
Page 71

69
20405013xx_ba_b0
Español
Indicador del estado de las baterías
El indicador del estado de las baterías está situado en la parte superior izquierda de
la pantalla LCD. Aparece en forma de pila, con tres barras que indican la potencia
disponible. Cuando el nivel de batería llegue al mínimo, su TwinTop 400/400-L
emitirá dos pitidos y el aparato se apagará automáticamente.
TwinTop 400/400-L puede detectar 4 niveles:
– Nivel de carga de batería máximo.
– Nivel de carga de batería medio.
– Nivel de carga de batería bajo.
– Nivel de carga de batería muy bajo. Cuando el nivel de batería llegue al
mínimo, su TwinTop 400/400-L emitirá dos pitidos y el aparato se apagará
automáticamente. Importante: cargue el aparato durante 10–14 horas.
Duración de las baterías
El TwinTop 400/400-L cuenta con un dispositivo de ahorro de baterías incorporado
que le permite una mayor duración de éstas. No obstante, cuando no esté utilizando
el aparato, apáguelo para ahorrar batería.
Instalación
Page 72

70
20405013xx_ba_b0
Funcionamiento
Alcance de transmisión
El alcance de transmisión dependerá de las condiciones climatológicas y del terreno.
En espacios abiertos, donde no haya obstáculos como colinas o edificios, será
máximo (alrededor de 10 km). No utilice la PMR en distancias inferiores a 1,5 m ya
que podrían producirse interferencias.
Encender/apagar el TwinTop 400/400-L
Encender
Pulse y mantenga pulsada la tecla POWER hasta que la pantalla LCD se
encienda y muestre el canal seleccionado.
Apagar
Pulse y mantenga pulsada la tecla POWER hasta que la pantalla LCD
se apague. Oirá un pitido de confirmación cada vez que realice estas
operaciones.
Ajustar el volumen del altavoz
El nivel del volumen se muestra mediante barras verticales en la pantalla LCD.
Puede cambiar el volumen mientras esté utilizando su TwinTop 400/400-L o cuando
el aparato esté encendido pero no en uso.
Pulse la tecla ARRIBA para subir el volumen, o la tecla ABAJO para bajarlo
Advertencia importante de seguridad
– Para reducir la exposición a las ondas de radio cuando utilice su TwinTop 400/
400-L, mantenga el aparato a una distancia mínima de 5 cm de la cara.
– No utilice nunca su TwinTop 400/400-L en el exterior durante una tormenta.
– No utilice su TwinTop 400/400-L bajo la lluvia.
– Si su TwinTop 400/400-L se moja, apáguelo y retire las baterías. Seque el com-
partimento de las baterías y déjelo abierto durante un par de horas. No utilice
el aparato hasta que esté completamente seco.
– Mantenga el TwinTop 400/400-L fuera del alcance de los niños.
Page 73

71
20405013xx_ba_b0
Español
Cambiar de canal
El TwinTop 400/400-L tiene 8 canales disponibles. Para comunicarse con otros usuarios
de TwinTop 400/400-L dentro de su alcance, deberá tener su TwinTop 400/400-L
conectado en el mismo canal que ellos.
1. Pulse una vez la tecla MENU, el número del canal seleccionado
parpadeará en la pantalla LCD.
2. Pulse la tecla ARRIBA o ABAJO para seleccionar el canal
deseado.
3. Pulse la tecla PTT para confirmar el canal.
Nota Véase la sección de la «Tabla de frecuencias de canal» de este manual
para obtener información más detallada.
Configuración del subcanal CTCSS
Cada canal posee a su vez 38 subcanales que le permitirán establecer grupos de
usuarios dentro del mismo canal para establecer una comunicación más privada.
Si ha configurado el subcanal, podrá comunicarse con otros usuarios de PMR que
tengan configurados el mismo canal e idéntico subcanal.
1. Pulse dos veces la tecla MENU, el número de subcanal CTCSS
seleccionado parpadeará en la pantalla LCD.
2. Pulse la tecla ARRIBA o ABAJO para seleccionar uno de los 38 subca-
nales CTCSS.
3. Pulse la tecla PTT para confirmar el subcanal.
Para apagar la función de subcanal, simplemente configure el subcanal a 0 (cero).
Así podrá ponerse en contacto con cualquier usuario de PMR que esté conectado en
el mismo canal y que haya apagado la selección de subcanal.
Funcionamiento
Page 74

72
20405013xx_ba_b0
Funcionamiento
Configuración del código digital avanzado DCS
Cada canal posee a su vez 83 códigos digitales que le permitirán establecer grupos
de usuarios para mantener una comunicación más privada.
1. Pulse tres veces la tecla MENU. El código DCS parpadeará en la
pantalla LCD.
2. Pulse la tecla ARRIBA o ABAJO para seleccionar el código DCS
deseado.
3. Pulse la tecla PTT para confirmar la configuración del DCS.
Nota Cuando configure el código DCS, CTCSS se pondrá automáticamente en
modo apagado.
Transmitir y recibir
La transmisión de su TwinTop 400/400-L es de «sentido único».
Mientras esté hablando, no podrá recibir una transmisión.
El TwinTop 400/400-L utiliza frecuencias abiertas. Identifíquese siempre
que esté transmitiendo en el mismo canal.
Transmitir (enviar un mensaje)
Cuando esté encendido y no esté transmitiendo, el aparato permanecerá en modo
recepción. Cuando se reciba una señal en el canal seleccionado, aparecerá «RX» en
la pantalla LCD y se encenderá el indicador luminoso de recepción.
1. Pulse y mantenga pulsada la tecla PTT (pulsar para hablar) para hablar.
Aparecerá «TX» en la pantalla LCD.
2. Mantenga el aparato en posición vertical, con el MIC (micrófono) a
unos 5 cm de la boca. Mientras mantiene pulsada la tecla PTT, hable
directamente al MIC.
3. Suelte la tecla PTT cuando haya terminado de hablar.
Comprobación
Puede utilizar la función de comprobación para buscar señales débiles en el canal
seleccionado.
1. Pulse las teclas MENU y ABAJO al mismo tiempo, aparecerá «RX» en
la pantalla LCD. Su TwinTop 400/400-L detectará las señales dentro del
canal seleccionado, incluido el ruido de fondo.
2. Pulse la tecla PTT para dejar de comprobar el canal.
!
!
Page 75

73
20405013xx_ba_b0
Español
Configurar la sensibilidad de VOX (activación por voz)
En el modo VOX, el TwinTop 400/400-L transmite únicamente la señal cuando lo
activan su voz u otros ruidos de fondo. El aparato sigue transmitiendo durante 2
segundos más, incluso si ha dejado de hablar.
El nivel de sensibilidad de VOX se muestra en la pantalla LCD mediante un número.
En el nivel máximo, el aparato detecta cualquier ruido por mínimo que sea (incluido
el ruido de fondo); en el nivel más bajo, únicamente detectará los ruidos más fuertes.
1. Pulse cuatro veces la tecla MENU, aparecerá «VOX» y parpadeará
«OF» en la pantalla.
2. Pulse la tecla ARRIBA para configurar el nivel de sensibilidad de VOX
(el nivel máximo es «3»). Para desactivar la función VOX, pulse la tecla
ABAJO hasta que aparezca «OF» en la pantalla LCD.
3. Pulse la tecla PTT para confirmar su selección. En la pantalla aparecerá
«VOX» siempre que la función VOX esté activada.
Nota El uso de VOX no está recomendado si utiliza su TwinTop 400/400-L en
un ambiente ruidoso o con viento.
Activar el escaneo automático de canales y subcanales
El escaneo de canales se utiliza para buscar en bucle señales activas para los 8 canales,
38 códigos CTCSS y 83 códigos DCS.
1. Pulse cinco veces la tecla MENU.
2. Pulse la tecla ARRIBA o ABAJO para iniciar el escaneo de canales.
Cuando se detecta una señal activa, el escaneo de canales se detiene
en el canal activo.
3. Pulse de nuevo la tecla MENU, parpadeará CTCSS en la pantalla LCD.
Pulse la tecla ARRIBA o ABAJO para iniciar el escaneo de los códigos
CTCSS 1 a 38.
4. Pulse de nuevo la tecla MENU, parpadeará DCS en la pantalla LCD.
Pulse la tecla ARRIBA o ABAJO para iniciar el escaneo de los códigos
DCS 1 a 83.
5. Pulse la tecla PTT para confirmar su selección.
Funcionamiento
Page 76

74
20405013xx_ba_b0
Funcionamiento
Señal de llamada
Las llamadas entrantes pueden indicarse con una señal de llamada o por vibración.
Puede enviar una señal de llamada a otros usuarios de PMR para informarles de que
desea comunicarse con ellos.
Pulse la tecla de LLAMADA.
Oirá un tono de llamada durante dos segundos y aparecerá «TX» en la
pantalla LCD. Todos los aparatos que se encuentren dentro del alcance
de transmisión y que estén dentro del mismo canal y el mismo subcanal
(si fuese el caso) recibirán la señal de llamada.
Seleccionar una señal de llamada
El TwinTop 400/400-L cuenta con 5 señales de llamada posibles.
1. Pulse ocho veces la tecla MENU, en la pantalla aparecerá el icono de
llamada parpadeando.
2. Pulse la tecla ARRIBA o ABAJO para seleccionar la señal de llamada
deseada.
3. Pulse la tecla PTT para confirmar su selección.
Modo vibración (únicamente para TwinTop 400)
Activar el modo vibración
1. Pulse nueve veces la tecla MENU, en la pantalla LCD parpadeará «0I».
2. Pulse la tecla ARRIBA o ABAJO para activar el modo vibración.
3. Pulse la tecla PTT para confirmar su selección.
Page 77

75
20405013xx_ba_b0
Español
Funcionamiento
Configurar el pitido de Recibido
El pitido de Recibido es un tono que se transmite automáticamente al soltar la tecla
PTT, para informar al receptor de que usted ha finalizado la transmisión intencionadamente y de que está ahora en modo de recepción.
1. Pulse 10 veces la tecla MENU, parpadeará «ON» en la pantalla LCD.
2. Pulse la tecla ARRIBA o ABAJO para activar el pitido (aparecerá «ON»
en la pantalla LCD) o desactivarlo (aparecerá «OFF»).
3. Pulse la tecla PTT para confirmar su selección.
Encender y apagar la señal de pulsación de tecla
Esta función permite a su TwinTop 400/400-L emitir un breve pitido de confirmación
siempre que pulse una tecla.
1. Pulse 11 veces la tecla MENU, parpadeará «ON» en la pantalla LCD.
2. Pulse la tecla ARRIBA o ABAJO para activar la señal de pulsación de
tecla (aparecerá «ON» en la pantalla LCD) o desactivarla (aparecerá
«OFF»).
3. Pulse la tecla PTT para confirmar su selección.
Configurar el modo Dual Watch
Su TwinTop 400/400-L puede comprobar habitualmente dos canales, el seleccionado
y otro (Dual Watch). Si el aparato detecta una señal en alguno de los canales, se
detendrá para recibir la señal.
1. Pulse 12 veces la tecla MENU, aparecerá «DCM» en la pantalla LCD y
parpadeará el icono «OF».
2. Pulse la tecla ARRIBA o ABAJO para seleccionar el canal Dual Watch
(del 1 al 8, exceptuando el canal seleccionado).
3. Pulse la tecla MENU para cambiar el código CTCSS.
4. Pulse la tecla ARRIBA o ABAJO para seleccionar el código CTCSS
deseado (1–38).
5. Pulse la tecla MENU para cambiar el código DCS.
6. Pulse la tecla PTT para confirmar su selección.
7. Pulse la tecla PTT para salir.
Page 78

76
20405013xx_ba_b0
Funciones de ayuda
Bloqueo del teclado
La función de bloqueo del teclado le permite bloquear las teclas ARRIBA, ABAJO y
MENU para que no se pueda modificar la configuración de forma accidental.
1. Para activar el bloqueo de las teclas, pulse y mantenga pulsada la tecla
MENU hasta que aparezca « » en la pantalla LCD.
2. Para desactivar el bloqueo del teclado, pulse y mantenga pulsada la
tecla MENU hasta que « » desaparezca de la pantalla LCD.
Nota Las teclas PTT y POWER siguen estando activas aunque la función de
bloqueo del teclado esté activada.
Retroiluminación de la pantalla LCD
Al pulsar cualquier tecla (excepto PTT y LLAMADA), la pantalla LCD se iluminará
durante 5 segundos.
Conector de Auriculares/Micrófono/Cargador
El TwinTop 400/400-L está equipado con una conexión para micrófono, auriculares y
cargador situada en el extremo opuesto a la tecla PTT.
Page 79

77
20405013xx_ba_b0
Español
Especificaciones/Tabla de frecuencias de canal
Especificaciones
Canales disponibles 8 canales
Subcanales CTCSS 38 para cada canal
Subcanales DCS 83 para cada canal
Potencia de salida (TX) 0,5 W
Alcance hasta 10 km
Tabla de frecuencias de canal
Canal Frecuencia (MHz) Canal Frecuencia (MHz)
1 446.00625 5 446.05625
2 446.01875 6 446.06875
3 446.03125 7 446.08125
4 446.04375 8 446.09375
Page 80

78
20405013xx_ba_b0
Información general
Homologación y conformidad
Esta unidad transceptora de uso privado PMR cumple las cláusulas básicas establecidas
en la Directiva 1999/5/CE R&TTE sobre equipos radioeléctricos y equipos terminales
de telecomunicación, y está destinada para su uso en el país indicado en el aparato
y/o el embalaje.
La declaración de conformidad se encuentra al final del presente manual.
La marca CE confirma la conformidad del aparato con respecto a la
Directiva mencionada.
Condiciones de la garantía
Su TwinTop 400/400-L está sujeto a garantía a partir de la fecha de compra, de
acuerdo con las cláusulas legales del país en el que haya sido adquirido. Como
prueba de la compra, le aconsejamos que conserve el recibo o la tarjeta de garantía
cumplimentada por su proveedor. Dentro del periodo de validez de la garantía, se
corregirá, de forma gratuita, cualquier defecto de los materiales o de fabricación, ya
sea reparando o sustituyendo el aparato. Quedan excluidos de la garantía cualquier
material consumible (baterías), los defectos que afecten al valor o al uso del aparato
de forma insignificante y cualquier daño causado por un uso incorrecto del aparato,
el desgaste natural o la manipulación del aparato por parte de un tercero.
Asimismo, queda excluido de la garantía cualquier daño o fallo causado por el uso,
o si el problema está provocado por un equipo defectuoso. De manera particular,
el fabricante no será responsable de ningún daño a la propiedad o de pérdida de
capital.
Para cualquier reclamación incluida en la presente garantía, póngase en contacto con
el punto de venta en que adquirió su PMR.
Page 81

79
✄
device type: (Gerätetyp, type d’appareil, tipo di apparecchio, toesteltype, laitetyyppi, maskintype,
apparattyp, apparattype, modelo del aparato, modelo do aparelho):
serial number: (Seriennummer, numéro de série, numero di serie, serienummer, sarjanumero, serienummer,
serienummer, serienummer, número de serie, número de série):
dealer’s stamp: (Händlerstempel, sceau du vendeur, timbro del rivenditore, stempel van de dealer,
kauppiaan leima, forhandlerens stempel, försäljarens stämpel, forhandlerstempel,
sello del comerciante, carimbo do vendedor):
dealer’s signature: (Unterschrift des Händlers, signature du vendeur, firma del rivenditore, handtekening
van de dealer, kauppiaan allekirjoitus, forhandlerens underskrift, försäljarens underskrift,
forhandlers underskrift, firma del comerciante, assinatura do vendedor):
date of purchase: (Kaufdatum, date d’achat, data d’acquisto, datum van aankoop, ostopäiväys, kjøpsdato,
datum för köpet, salgsdato, fecha de adquisición, data de compra):
Warranty Certificate
Garantieschein, Bon de garantie, Certificato di garanzia,
Garantiebewijs, Takuutodistus, Garantibevis, Garantisedel,
Garantibevis, Certificado de Garantía, Talão de garantia
Warranty Certificate
Page 82

80
20405013xx_ba_b0
Uwagi na temat bezpieczeństwa
UWAGA – Uszkodzona antena
Nie używaj radiotelefonu jeśli jego antena jest uszkodzona. Użytkowanie radiotelefonu z uszkodzoną anteną grozi poparzeniem.
Akumulatory/baterie
Każdy typ baterii i akumulatorów może spowodować szkody w mieniu oraz obrażenia jeżeli
ich styki będą miały kontakt z metalowymi przedmiotami (biżuteria, klucze). Baterie i akumulatory rozgrzeją się i mogą spowodować oparzenia. Zachowaj ostrożność przy posługiwaniu
się nimi a zwłaszcza gdy przenosisz je w kieszeni lub torebce wraz z innymi przedmiotami.
UWAGA – Samochody wyposażone w poduszki powietrzne
Nie pozostawiaj radiotelefonu na powierzchni poduszek powietrznych ani w strefie
ich napełniania. Poduszki powietrzne napełniają się z wielkim impetem a pozostawiony w ich strefie działania radiotelefon może zostać wyrzucony z wielką siłą i spowodować poważne obrażenia wśród pasażerów.
Gazy wybuchowe
Wyłącz radiotelefon jeśli przebywasz w rejonach zagrożonych wybuchem gazów. Iskrzenie
może spowodować eksplozję a co za tym idzie obrażenia lub nawet śmierć.
Wymiana baterii lub akumulatorów
Nie wymieniaj baterii/akumulatorów w rejonach zagrożonych wybuchem gazów. Iskrzenie
styków, które może wystąpić podczas wymiany baterii/akumulatorów może spowodować
eksplozję a co za tym idzie obrażenia lub nawet śmierć.
Rejony prac strzałowych
Aby uniknąć przypadkowego wpływu radiotelefonu na urządzenia do prowadzenia prac
strzałowych, wyłącz radiotelefon w rejonie prac strzałowych oraz w każdym innym obszarze
z wystawionymi znakami zakazu używania tego typu urządzeń. Przestrzegaj zakazów oraz
wskazówek kompetentnego personelu.
Uwaga Rejony o niebezpiecznej (wybuchowej) atmosferze są zazwyczaj (choć nie zawsze)
wyraźnie oznakowane. Do takich obszarów zaliczają się:
– instalacje paliwowe (także na statkach)
– instalacje do transportowania i składowania chemikaliów
– pomieszczenia których atmosfera zawiera związki chemiczne, pyły, cząsteczki
metali
Jeśli w danym obszarze nakazane jest wyłączenie silnika pojazdu, zazwyczaj nie
można (nie jest wskazane) użytkowanie radiotelefonów.
Czyszczenie
Do czyszczenia obudowy radiotelefonu używaj miękkiej wilgotnej sciereczki. Nigdy nie
używaj ropuszczalnika, benzyny ani innych agresywnych środków. Mogą one spowodować
uszkodzenie obudowy radiotelefonu oraz utratę gwarancji.
Utylizacja
Wszystkie elementy radiotelefonu należy utylizować w sposób niezagrażający
środowisku naturalnemu. Nie wolno wyrzucać ich do zwykłego kosza na śmieci.
Page 83

81
20405013xx_ba_b0
Polski
Spis treści
Przyciski/Wyświetlacz …………………………………………………………………82
Przygotowanie do użytkowania ……………………………………………………83
Wkładanie akumulatorów ………………………………………………………………83
Zdejmowanie klipsa do paska …………………………………………………………83
Zakładanie klipsa do paska………………………………………………………………83
Ładowanie akumulatorów przy użyciu ładowarki przenośnej ………………………84
Ładowanie akumulatorów przy użyciu ładowarki stacjonarnej (tylko TwinTop 400) 84
Wskaźnik akumulatorów ………………………………………………………………85
Użytkowanie ……………………………………………………………………………86
Zasięg nadawania ………………………………………………………………………86
Włączanie/wyłączanie radiotelefonu ……………………………………………………86
Regulacja głośności głośnika ……………………………………………………………86
Zmiana kanału ……………………………………………………………………………87
Wybieranie podkanałów CTCSS ……………………………………………………87
Wybieranie podkanałów cyfrowych (DCS)…………………………………………88
Nadawanie i odbieranie …………………………………………………………………88
Nadawanie……………………………………………………………………………88
Monitorowanie ………………………………………………………………………88
Ustawianie czułości systemu VOX (aktywacji głosem)…………………………………89
Włączanie funkcji skanowanie kanałów i podkanałów ………………………………89
Sygnał wywołania ………………………………………………………………………90
Wybieranie sygnału wywołania ……………………………………………………90
Przywołanie wibracyjne (tylko TwinTop 400) …………………………………………90
Włączanie powiadomienia wibracyjnego …………………………………………90
Wybieranie sygnału zakończenia (roger) ………………………………………………91
Włączanie i wyłączanie dźwięku przycisków …………………………………………91
Korzystanie z funkcji Dual Watch ………………………………………………………91
Funkcje dodatkowe ……………………………………………………………………92
Blokada przycisków………………………………………………………………………92
Podświetlenie wyświetlacza ……………………………………………………………92
Gniazdo wielofunkcyjne …………………………………………………………………92
Dane techniczne/Tabela cz´stotliwoÊci …………………………………………………93
Dane techniczne …………………………………………………………………………93
Tabela częstotliwości ……………………………………………………………………93
Dodatek …………………………………………………………………………………94
Potwierdzenie zgodności ………………………………………………………………94
Warunki Gwarancji ……………………………………………………………………95
Potwierdzenie Zgodności ……………………………………………………………99
Page 84

82
20405013xx_ba_b0
Przyciski/Wyświetlacz
mic
Gniazdo
wielofunkcyjne
Wyświetlacz
Wyświetla bieżący
kanał oraz szereg
innych informacji.
Przycisk PTT
(PUSH to TALK)
Naciśnij i trzymaj aby
nadawać
Antena
Włącznik
Naciśnij i przytrzymaj
aby włączyć/wyłączyć
radiotelefon
Przycisk przywołania
Naciśnij by wysłać
sygnał dźwiękowy
do innych radiotelefonów
Przyciski góra/dół
Użyj ich do zmiany
kanału oraz innych
parametrów pracy
radia.
Przycisk MENU
Służy do zmiany
parametrów pracy
radia
Głośnik
Mikrofon
Numer kanału. Wskazuje aktualnie używany kanał
(od 1 do 8).
Kod CTCSS. Wskazuje aktualnie używany podkanał CTCSS
(od 1 do 38).
Wskazuje aktualny poziom naładowania akumulatorów.
TX Ten wskaźnik jest wyświetlany podczas nadawania
RX Ten wskaźnik jest wyświetlany podczas odbierania
DCM Ten wskaźnik wskazuje, że aktywna jest funkcja Dual Watch
VOX Ten wskaźnik wskazuje, że aktywna jest funkcja VOX
SC Ten wskaźnik jest wyświetlany podczas skanowania kanałów
Ten wskaźnik jest wyświetlany gdy klawiatura jest zablokowana
Ten wskaźnik wskazuje aktualny poziom głośności głośnika
Ten wskaźnik wskazuje, że jest aktywny sygnał wywołania
Ten wskaźnik wskazuje, że jest aktywny alarm wibracyjny
(tylko TwinTop 400)
Page 85

83
20405013xx_ba_b0
Polski
Zdejmowanie klipsa do paska
1. Naciśnij zatrzask klipsa w kierunku od obudowy
2. W tym samym czasie wypchnij klips do góry
Zakładanie klipsa do paska
1. Wsuń klips w gniazdo na obudowie
2. Słyszalne zatrzaśnięcie oznacza że klips
jest umocowany na swoim miejscu
Przygotowanie do użytkowania
Zatrzask
klipsa
Uwaga – Przeczytaj uważnie poniższe informacje zanim przystąpisz
do ładowania akumulatorów
– Przed podłączeniem radiotelefonu do ładowania upewnij się, że w radiotelefonie
znajdują się akumulatory.
– Nigdy nie próbuj ładować baterii jednorazowych.
– Upewnij się, że komora baterii jest zamknięta podczas ładowania.
– Zużyte akumulatory należy oddać do odpowiedniego punktu utylizacji.
Nigdy nie wyrzucaj ich do zwykłego kosza na śmieci.
– Nie przekłuwaj akumulatorów ani nie wrzucaj ich do ognia.
– Nie pozostawiaj zużytych akumulatorów w komorze radiotelefonu.
1. Naciśnij zatrzask pokrywy baterii po czym zdejmij pokrywę.
2. Umieść baterie w komorze zgodnie z oznaczeniami wewnątrz komory.
3. Załóż i zatrzaśnij pokrywę komory.
Uwaga
Zwróć szczególną uwagę
na poprawną polaryzację
akumulatorów.
Niewłaściwe umieszczenie
akumulatorów w radiotelefonie może uszkodzić
akumulatory a także
radiotelefon.
Wkładanie akumulatorów
Page 86

84
20405013xx_ba_b0
Przygotowanie do użytkowania
Ładowanie akumulatorów przy użyciu ładowarki przenośnej
1. Zdejmij zaślepkę gniazda wielofunkcyjnego a następnie
włóż końcówkę ładowarki do gniazda.
2. Podłącz ładowarkę do gniazda sieciowego – radiotelefon
powinien być wyłączony.
Uwaga Potrzeba ok.10 godzin by naładować w pełni
rozładowane akumulatory. Nowe akumulatory
powinny być ładowane nie krócej niż przez
14 godzin.
Ładowanie akumulatorów przy użyciu ładowarki stacjonarnej (tylkoTwinTop 400)
1. Włóż wtyczkę ładowarki do gniazda podstawki stacjonarnej.
2. Podłącz ładowarkę do gniazda sieciowego.
3. Umieść radiotelefon w podstawce biurkowej anteną do góry oraz przodem w
swoim kierunku. Ładowanie będzie sygnalizowane świeceniem diody na
korpusie ładowarki.
Gniazdo sieciowe
Uwaga –Twój radiotelefon może być ładowany tylko przy użyciu ładowarki
dostarczonej w komplecie. Użycie innych ładowarek powoduje niezgodność
z dyrektywą EN60065 a także unieważnia aprobaty techniczne i gwarancję.
– Potrzeba ok. 10 godzin by naładować w pełni rozładowane akumulatory.
Nowe akumulatory powinny być ładowane nie krócej niż przez 14 godzin.
– Zawsze wyłączaj radiotelefon przed ładowaniem – skróci to czas
wymagany do naładowania akumulatorów.
– Podczas ładowania akumulatorów nie jest możliwe nadawanie ani
odbieranie.
Page 87

85
20405013xx_ba_b0
Polski
Wskaźnik akumulatorów
Wskaźnik akumulatorów znajduje się w lewym rogu wyświetlacza. Liczba wyświetlanych
pionowych kresek ilustruje stopień naładowania akumulatorów. Kiedy akumulatory
zostaną wyczerpane, zostanie wyemitowany sygnał dźwiękowy i radiotelefon wyłączy
się samoczynnie.
Wskaźnik pokazuje 4 poziomy naładowania akumulatorów:
– Akumulatory w pełni naładowane.
– Akumulatory naładowane w ok. 50%.
– Akumulatory bliskie wyczerpania.
– Akumulatory rozładowane – radionadajnik wyemituje sygnał dźwiękowy po
czym się samoczynnie wyłączy. Pełne ładowanie powinno trwać
10–14 godzin.
Czas pracy na akumulatorach
Twój radiotelefon ma wbudowany nowoczesny układ oszczędzania energii. Jednak
jeśli nie korzystasz z radionadajnika – wyłącz go. Przedłużysz w ten sposób żywotność
akumulatorów.
Przygotowanie do użytkowania
Page 88

86
20405013xx_ba_b0
Użytkowanie
Włączanie/wyłączanie radiotelefonu
Aby włączyć radiotelefon
Naciśnij i przytrzymaj Włącznik do chwili kiedy wyświetlacz się uaktywni
i wyświetli aktywny kanał.
Aby wyłączyć radiotelefon
Naciśnij i przytrzymaj Włącznik do chwili kiedy wyświetlacz zgaśnie.
Każda z tych operacji jest dodatkowo potwierdzana sygnałem dźwiękowym.
Regulacja głośności głośnika
Głośność jest reprezentowana na wyświetlaczu poprzez poziome paski. Głośność
można regulować podczas gdy radiotelefon jest włączony i w stanie gotowości.
Naciśnij przycisk GÓRA aby podwyższyć poziom głośności lub przycisk DÓŁ aby
obniżyć poziom głośności.
Istotne uwagi na temat bezpieczeństwa
– Aby zminimalizować narażenie na fale radiowe, trzymaj radiotelefon nie bliżej
niż 5 cm od twarzy.
– Nigdy nie używaj radiotelefonu podczas burzy z wyładowaniami
atmosferycznymi.
– Nigdy nie używaj radiotelefonu podczas opadów deszczu.
– Jeśli radiotelefon zamoknie, wyłącz go niezwłocznie i wyjmij akumulatory.
Wysusz akumulatory a komorę akumulatorów pozostaw otwartą na kilka
godzin celem wyschnięcia. Radiotelefon może być ponownie używany dopiero
po całkowitym wyschnięciu.
–Trzymaj radiotelefon poza zasięgiem dzieci.
Zasięg nadawania
Zasięg nadawania jest uzależniony od warunków panujących w otoczeniu i ukształtowania terenu. Największy zasięg (do około 10 km) uzyskasz w otwartej przestrzeni
bez przeszkód takich jak wzgórza czy budynki. Nie korzystaj z radiotelefonów
znajdujących się bardzo blisko siebie (mniej niż 1,5 m) ponieważ może to
doprowadzić do sprzężenia i generowania głośnych i nieprzyjemnych zakłóceń.
Page 89

87
20405013xx_ba_b0
Polski
Użytkowanie
Zmiana kanału
Radiotelefon TwinTop 400/400-L może pracować na jednym z 8 dostępnych kanałów.
Aby łączność była możliwa, inne radiotelefony muszą być ustawione na ten sam kanał.
1. Naciśnij przycisk MENU, bieżący numer kanału będzie pulsował na
wyświetlaczu.
2. Naciskaj przyciski GÓRA lub DÓŁ aby wybrać żądany kanał.
3. Naciśnij przycisk PTT aby zatwierdzić numer kanału.
Uwaga Zajrzyj do “Tabeli kanałów” zawartej w instrukcji aby zapoznać się z
dokładnymi informacjami na temat używanych częstotliwości.
Wybieranie podkanałów CTCSS
Każdy z 8 kanałów obejmuje 38 podkanałów dzięki którym na pojedynczym kanale
można prowadzić równolegle wiele rozmów bez wzajemnego przeszkadzania.
Po wybraniu jednego z podkanałów będziesz mógł się komunikować tylko z tymi
użytkownikami, którzy ustawili ten sam numer podkanału.
1. Naciśnij dwa razy przycisk MENU, bieżący numer podkanału będzie
pulsował na wyświetlaczu.
2. Naciskaj przyciski GÓRA lub DÓŁ aby wybrać jeden z 38 subkanałów.
3. Naciśnij przycisk PTT aby zatwierdzić numer podkanału.
Aby wyłączyć korzystanie z funkcji podkanałów, ustaw numer podkanału
na 0 (zero). Od teraz możesz rozmawiać z użytkownikami którzy również używają
podkanału 0 a także z tymi, których radiotelefony nie obsługują funkcji podkanałów.
Page 90

88
20405013xx_ba_b0
Użytkowanie
Wybieranie podkanałów cyfrowych (DCS)
Każdy z 8 kanałów można podzielić na 83 cyfrowe podkanały.
1. Naciśnij przycisk MENU 3 razy. Bieżący numer DCS będzie pulsował
na wyświetlaczu.
2. Naciskaj przyciski GÓRA oraz DÓŁ aby wybrać numer DCS.
3. Naciśnij przycisk PTT aby zatwierdzić wybór.
Uwaga Jeśli skorzystasz z podkanału DCS, funkcja podkanałów CTCSS zostanie
samoczynnie wyłączona.
Nadawanie i odbieranie
TwinTop 400/400-L nadaje w trybie simpleks (jedna osoba w jednej
chwili) – podczas gdy nadajesz nie możesz jednocześnie odbierać.
TwinTop 400/400-L korzysta z ogólnodostępnego pasma radiowego.
Zawsze przedstawiaj się gdy podejmujesz rozmowę na użytkowanym kanale.
Nadawanie
Twój radiotelefon standardowo znajduje się w trybie odbioru kiedy jest włączony.
W tym czasie na wyświetlaczu wyświetlony jest symbol “RX” oraz świeci się dioda na
obudowie.
1. Naciśnij przycisk PTT aby rozpocząć nadawanie. Na wyświetlaczu
wyświetli się symbol “TX”.
2. Trzymaj radiotelefon pionowo w odległości 5 cm od twarzy.
Trzymając przycisk PTT mów do mikrofonu z normalną głośnością.
3. Puść przycisk PTT aby zakończyć nadawanie.
Monitorowanie
Funkcja Monitor służy do wyszukiwania transmisji o słabej sile sygnału na bieżącym
kanale.
1. Naciśnij przyciski MENU oraz DÓŁ w tej samej chwili, symbol “RX”
będzie widoczny na wyświetlaczu. Od tej chwili w głośniku będą
słyszalne wszelkie dźwięki z bieżącego kanału łącznie z szumem
otoczenia.
2. Naciśnij przycisk PTT aby zakończyć monitorowanie.
!
!
Page 91

89
20405013xx_ba_b0
Polski
Użytkowanie
Ustawianie czułości systemu VOX (aktywacji głosem)
W trybie VOX radiotelefon będzie automatycznie przechodził w tryb nadawania po
aktywowaniu go głosem lub dźwiękami otoczenia. Nadawanie zakończy się 2 sekundy
po zaniku głosu lub dźwięków otoczenia.
Poziom czułości systemu VOX jest wyświetlany jako cyfra na wyświetlaczu.
Na najwyższym poziomie radiotelefon będzie się przełączał w tryb nadawania nawet
dzięki cichym dźwiękom, podczas gdy na najniższym poziomie będzie reagował tylko
na dźwięki głośne.
1. Naciśnij przycisk MENU 4 razy; ukaże się symbol “VOX” oraz napis
“OF” będzie pulsował na wyświetlaczu.
2. Naciśnij przycisk GÓRA aby ustawić czułość systemu (maksymalny
poziom to 3). Aby wyłączyć system naciskaj przycisk DÓŁ aż symbol
“OF” zostanie wyświetlony.
3. Naciśnij przycisk PTT aby zatwierdzić wybór. Symbol “VOX” będzie
widoczny na wyświetlaczu w czasie gdy system będzie aktywny.
Uwaga Korzystanie z systemu VOX nie jest zalecane w głośnym lub wietrznym
środowisku.
Włączanie funkcji skanowanie kanałów i podkanałów
Funkcja skanowania kanałów umożliwia automatyczne wyszukiwanie kanałów na
których odbywa się transmisja. Skanowanie odbywa się sekwencyjnie dla wszystkich
8 kanałów, 38 podkanałów CTCSS oraz 83 podkanałów DCS.
1. Naciśnij przycisk MENU 5 razy.
2. Naciśnij przycisk GÓRA lub DÓŁ aby rozpocząć skanowanie.
Jeśli skanowanie wykryje kanał zajęty rozmową, skanowanie zostanie
wstrzymane.
3. Naciśnij przycisk MENU ponownie – symbol CTCSS będzie pulsował
na wyświetlaczu. Naciśnij przycisk GÓRA lub DÓŁ aby rozpocząć
skanowanie podkanałów CTCSS.
4. Naciśnij przycisk MENU ponownie – symbol DCS będzie pulsował
na wyświetlaczu. Naciśnij przycisk GÓRA lub DÓŁ aby rozpocząć
skanowanie podkanałów DCS.
5. Naciśnij przycisk PTT aby zatwierdzić wybór.
Page 92

90
20405013xx_ba_b0
Użytkowanie
Sygnał wywołania
Twój radiotelefon może sygnalizować wywołania dźwiękowo i wibracyjnie.
Istnieje możliwość wysłania przywołania dźwiękowego do innych użytkowników aby
przywołać ich uwagę przed rozpoczęciem nadawania.
Naciśnij przycisk Przywołania.
Usłyszysz sygnał przywołania trwający około 2 sek.; symbol “TX” pojawi
się na wyświetlaczu. Wszystkie radiotelefony w zasięgu i odbierające na
tym samym kanale i subkanale odbiorą Twój sygnał przywołania.
Wybieranie sygnału wywołania
W radiotelefonie TwinTop 400/400-L można wybrać 1 z 5 dostępnych sygnałów
wywołania.
1. Naciśnij przycisk MENU 8 razy. Na wyświetlaczu będzie pulsował
symbol wywołania.
2. Naciśnij przycisk GÓRA lub DÓŁ aby wybrać jeden z sygnałów.
Sygnał będzie odtwarzany przez głośnik podczas wybierania.
3. Naciśnij przycisk PTT aby zatwierdzić wybór.
Powiadomienie wibracyjne (tylko TwinTop 400)
Włączanie powiadomienia wibracyjnego
1. Naciśnij przycisk MENU 9 razy; “0I” będzie pulsować na wyświetlaczu.
2. Naciśnij przycisk GÓRA lub DÓŁ aby włączyć powiadomienie
wibracyjne.
3. Naciśnij przycisk PTT aby zatwierdzić wybór.
Page 93

91
20405013xx_ba_b0
Polski
Użytkowanie
Wybieranie sygnału zakończenia (roger)
Sygnał zakończenia (roger beep) to sygnał dźwiękowy, który będzie emitowany na
zakończenie transmisji (po puszczeniu przycisku PTT). Dzięki temu Twój rozmówca
będzie pewny, że już zakończyłeś i może rozpocząć nadawanie.
1. Naciśnij przycisk MENU 10 razy, napis “ON” będzie pulsował na
wyświetlaczu.
2. Naciśnij przycisk GÓRA lub DÓŁ aby włączyć (“ON”) lub wyłączyć
(“OFF”) funkcję.
3. Naciśnij przycisk PTT aby zatwierdzić wybór.
Włączanie i wyłączanie dźwięku przycisków
Dzięki tej funkcji, radiotelefon może emitować krótki dźwięk potwierdzający naciskanie
przycisków.
1. Naciśnij przycisk MENU 11 razy, znak “ON” będzie pulsował na
wyświetlaczu.
2. Naciśnij przycisk GÓRA lub DÓŁ aby włączyć (“ON”) lub wyłączyć
(“OFF”) funkcję.
3. Naciśnij przycisk PTT aby zatwierdzić wybór.
Korzystanie z funkcji Dual Watch
Radiotelefon TwinTop 400/400-L ma możliwość monitorowania dwóch różnych
kanałów – bieżącego oraz dodatkowego. Jeśli na jednym z kanałów zostanie wykryta
transmisja, radiotelefon przełączy się na ten kanał i zatrzyma monitorowanie.
1. Naciśnij przycisk MENU 12 razy, znak “DCM” zostanie wyświetlony na
wyświetlaczu a symbol “OF” będzie pulsował.
2. Naciśnij przycisk GÓRA lub DÓŁ aby wybrać kanał dodatkowy
(od 1 do 8 z wyjątkiem bieżącego).
3. Naciśnij przycisk MENU aby przejść do wyboru podkanału CTCSS.
4. Użyj przycisków GÓRA lub DÓŁ aby wybrać numer podkanału CTCSS
(1–38).
5. Naciśnij przycisk MENU aby przejść do wyboru podkanału DCS i
ponownie przyciskami GÓRA/DÓŁ wybierz numer podkanału DCS.
6. Naciśnij przycisk PTT aby zatwierdzić wybór.
7. Naciśnij przycisk PTT aby powrócić do stanu gotowości.
Page 94

92
20405013xx_ba_b0
Funkcje dodatkowe
Blokada przycisków
Blokada przycisków dezaktywuje przyciski GÓRA, DÓŁ oraz MENU dzięki czemu
nie będzie możliwe przypadkowa zmiana ustawień radiotelefonu.
1. Aby włączyć blokadę, naciśnij i przytrzymaj przycisk MENU aż na
wyświetlaczu ukaże się symbol “ ”.
2. Aby wyłączyć blokadę, naciśnij i przytrzymaj przycisk MENU aż
symbol “ ” zniknie z wyświetlacza.
Uwaga Przyciski PTT i Włącznik pozostają aktywne niezależnie od blokady.
Podświetlenie wyświetlacza
Podświetlenie wyświetlacza działa przez 5 sekund po naciśnięciu każdego z
przycisków poza PTT i Przywołania.
Gniazdo wielofunkcyjne
Gniazdo wielofunkcyjne radiotelefonu służy do podłączania zewnętrznego mikrofonu,
słuchawki oraz ładowarki. Mieści się ono po przeciwnej stronie przycisku PTT.
Page 95

93
20405013xx_ba_b0
Polski
Dane techniczne
Liczba kanałów 8
Liczba podkanałów CTCSS 38 na każdym kanale
Liczba podkanałów DCS 83 na każdym kanale
Moc wyjściowa 0,5 W
Zasięg Do 10 km
Tabela częstotliwości
Kanał Częstotliwość (MHz) Kanał Częstotliwość (MHz)
1 446.00625 5 446.05625
2 446.01875 6 446.06875
3 446.03125 7 446.08125
4 446.04375 8 446.09375
Dane techniczne/Tabela częstotliwości
Page 96

94
20405013xx_ba_b0
Potwierdzenie zgodności
Osobisty radiotelefon przenośny TwinTop 400/400-L spełnia podstawowe
wymagania stawiane w dyrektywie 1999/5/EC o urządzeniach radiowych i
końcowych urządzeń telekomunikacyjnych i dzięki temu może być użytkowany
w krajach członkowskich Unii.
Deklaracja zgodności jest załączona do tej instrukcji.
Zgodność urządzenia z wymogami dyrektywy pozwala mu nosić
znak CE.
Dodatek
Page 97

95
20405013xx_ba_b0
Polski
Warunki Gwarancji
Szanowny Kliencie,
Dziękujemy za zakup naszego produktu. Urządzenia firmy Swissvoice są zaprojektowane i
wyprodukowane według najnowszych technologii, reprezentują europejskie standardy
jakości i niezawodności oraz oferują najwyższą funkcjonalność i niepowtarzalną stylistykę.
Przed rozpoczęciem korzystania ze sprzętu należy zapoznać się z procedurami instalacji
oraz warunkami eksploatacyjnymi urządzenia szczegółowo opisanymi w jego Instrukcji
Obsługi. W przypadku jakichkolwiek problemów prosimy o zwrócenie się do Autoryzowanego Serwisu firmy Swissvoice Polska pod bezpłatnym numerem telefonu 0 800 301 749.
Nasi konsultanci służą Państwu pomocą w zakresie porad technicznych i eksploatacyjnych
oraz realizacji uprawnień gwarancyjnych.
Warunki gwarancji
Swissvoice Polska Sp. z o.o.
zwana dalej jako „Swissvoice Polska”
udziela niniejszym kupującemu gwarancji na urządzenie, opisane szczegółowo w fakturze
oraz karcie gwarancyjnej, co do jego dobrej jakości i wykonania. Okres gwarancji wynosi
24 miesiące począwszy od daty odbioru urządzenia, potwierdzonej podpisem i pieczęcią
sprzedawcy, zaś gwarancja zostaje udzielona zgodnie z wymienionymi niżej warunkami.
Do uznania roszczenia gwarancyjnego w imieniu Swissvoice Polska w Polsce uprawniony
jest wyłącznie Autoryzowany Serwis Swissvoice Polska zwany dalej
„Autoryzowanym Serwisem”.
§ 1 Zakres gwarancji
1. Gwarancja dotyczy uszkodzeń urządzeń i oprogramowania. Wraz z niniejszą gwarancją
Swissvoice Polska potwierdza, iż urządzenie jest wolne od wad zarówno tkwiących w
materiale jak i związanych z niewłaściwym jego wykonaniem (wady powstałe z przyczyny
tkwiącej w produkcie), które mogłyby pogarszać lub zakłócać działanie urządzenia w
stosunku do danych zawartych w Instrukcji Obsługi dołączonej w momencie jego nabycia.
2. Postępowanie gwarancyjne jest przeprowadzane w taki sposób, że zgodnie z decyzją
Swissvoice Polska, urządzenie lub jego poszczególne części zostaną wymienione lub
naprawione.
3. Kupującemu przysługuje wymiana urządzenia na nowe, jeżeli:
–w okresie gwarancji Autoryzowany Serwis dokona trzech napraw gwarancyjnych,
a urządzenie nadal będzie wykazywało wady, które uniemożliwiają jego użytkowanie
zgodne z przeznaczeniem,
– Autoryzowany Serwis stwierdzi na piśmie, że usunięcie wady nie jest możliwe.
Page 98

96
20405013xx_ba_b0
Warunki Gwarancji
4. Własność wymienionych na nowe części zamiennych przysługuje Swissvoice Polska
bez zwrotu ich wartości.
5. Swissvoice Polska zobowiązana jest wywiązać się z obowiązków wynikających z
gwarancji w terminie 21 (dwudziestu jeden) dni roboczych, a w wyjątkowych
przypadkach, w szczególności związanych z koniecznością sprowadzenia niezbędnych
części z zagranicy, w terminie do 31 (trzydziestu jeden) dni roboczych.
6. W przypadku uznania roszczeń reklamacyjnych koszty materiałów i robocizny (materiały
dostarczone przez Swissvoice Polska oraz robocizna wykonana przez Swissvoice Polska)
ponoszone są przez Swissvoice Polska.
§ 2 Okres gwarancji
1. Okres gwarancji rozpoczyna się począwszy od dnia wydania kupującemu urządzenia
przez sprzedawcę (data sprzedaży wpisana na karcie gwarancyjnej musi być zgodna z
datą faktury/paragonu). Wszystkie roszczenia gwarancyjne zostaną rozpatrzone pod
warunkiem, że zostaną zgłoszone w okresie gwarancji w formie pisemnej do Swissvoice
Polska. Okres gwarancji dla sprzętu kończy się z upływem 24 miesięcy licząc od dnia
wydania urządzenia.
§ 3 Postępowanie gwarancyjne
1. Kupujący, który wykonuje uprawnienia wynikające z gwarancji, obowiązany jest
skontaktować się ze sprzedawcą w celu dokonania diagnostyki (zarówno Klient jak i
Sprzedawca powinni korzystać z pomocy telefonicznej konsultanta Swissvoice Polska
pod bezpłatnym numerem Infolinii 0 800 301 749).
Zgłoszenia reklamacji oraz uzgodnienia optymalnego sposobu przekazania
urządzenia do naprawy dokonuje sprzedawca u konsultanta Autoryzowanego
Serwisu pod bezpłatnym numerem Infolinii 0 800 301 749.
Autoryzowany Serwis Swissvoice
Bezpłatna Infolinia 0 800 301 749
(poniedziałek-piątek 8.30–16.30)
2. W wypadku uznania roszczeń reklamacyjnych koszty związane z transportem urządzenia
od i do kupującego i ubezpieczeniem ponosi Swissvoice Polska.
3. Do uznania roszczenia gwarancyjnego w imieniu Swissvoice Polska uprawniony jest w
Polsce wyłącznie Autoryzowany Serwis.
Page 99

97
20405013xx_ba_b0
Polski
Warunki Gwarancji
4. Z zastrzeżeniem ust.5 roszczenia gwarancyjne zostaną uznane tylko wtedy, jeżeli urządzenie
zostało zapakowane w oryginalne opakowanie producenta oraz jeżeli została dołączona
poprawnie i w całości wypełniona karta gwarancyjna wraz z fakturą/paragonem zakupu.
Egzemplarz karty gwarancyjnej winien wskazywać wszystkie niezbędne dane dotyczące daty
sprzedaży urządzenia, nazwy i numeru seryjnego urządzenia oraz dane dotyczące odbiorcy.
5. Jeżeli urządzenie zostanie przesłane do Autoryzowanego Serwisu w innym opakowaniu
niż zostało określone w § 3 ust.4, kupujący ponosi całkowitą odpowiedzialność za
przesłane urządzenie, w szczególności za uszkodzenia mechaniczne powstałe w
transporcie i może zostać w związku z tymi uszkodzeniami pozbawiony gwarancji na to
urządzenie w zakresie spowodowanym tymi uszkodzeniami.
UWAGA!
Do przesłanego urządzenia należy dołączyć krótki opis stwierdzonego uszkodzenia w tym:
objawy zewnętrzne, środowisko pracy, w jakim się ujawnia, a także czas pracy, po upływie
którego zazwyczaj występuje. Ponadto zaleca się podać dokładne dane kontaktowe osoby
bezpośrednio korzystającej z urządzenia w celu ewentualnej konsultacji co do charakteru
uszkodzenia.
§ 4 Wyłączenie gwarancji
1. Gwarancja nie obejmuje przypadków, gdy:
– urządzenie zostało uszkodzone lub zniszczone na skutek działania siły wyższej lub
wpływów środowiska (pożar, powódź, wilgoć, wyładowania atmosferyczne, przepięcie
w sieci telefonicznej lub energetycznej, itp.)
– uszkodzenie spowodowane jest niewłaściwym użytkowaniem urządzenia, w
szczególności w sposób niezgodny z Instrukcją Obsługi;
– urządzenie zostało otwarte lub było naprawiane przez nieautoryzowany punkt
serwisowy lub inną osobę;
– urządzenie wykazuje jakiegokolwiek rodzaju uszkodzenia mechaniczne, zarówno
wewnętrzne jak i zewnętrzne;
– urządzenie było niewłaściwie transportowane i/lub składowane.
2. Gwarancją nie są objęte takie części jak akumulatory, obudowy, przewody oraz pozostałe
elementy posiadające z natury określony czas zużycia, lub innego rodzaju wyposażenie
dodatkowe.
3. Gwarancją nie są objęte czynności należące do normalnej obsługi eksploatacyjnej np.:
zainstalowanie sprzętu, sprawdzenie działania, logowanie słuchawek, przypisywanie
MSN itp.
4. Ponadto, żadne roszczenia gwarancyjne nie zostaną uznane w przypadku, gdy urządzenie
nie posiada widocznego numeru seryjnego nadanego przez producenta.
Page 100

98
20405013xx_ba_b0
Warunki Gwarancji
§ 5 Warunki ogólne
1. Niniejsza gwarancja stanowi podstawę stosunku prawnego między kupującym a
Swissvoice Polska. Prawa i obowiązki stron reguluje wyłącznie treść postanowień
ujętych w niniejszej gwarancji, a z którymi kupujący obowiązany jest zapoznać się
przed zawarciem umowy kupna urządzenia. Zawarcie umowy kupna jest jednoznaczne
z przyjęciem warunków niniejszej gwarancji.
2. Sądem właściwym dla wszystkich sporów bezpośrednio i pośrednio związanych
z niniejszą gwarancją, w takim zakresie jak jest dozwolone, jest sąd właściwy dla
siedziby Swissvoice Polska w Warszawie.
3. Gwarancja nie wyłącza, nie ogranicza ani nie zawiesza uprawnień Klienta wynikających
z niezgodności towaru z umową (Ustawa z dn. 27.07.2002, Dz. U. Nr 141, poz. 1176).
Dane adresowe Autoryzowanego Serwisu produktów Swissvoice:
Autoryzowany Serwis Swissvoice Polska:
ul. Annopol 4a, Budynek „A”
03-236 Warszawa
Bezpłatna infolinia 0 800 301 749
e-mail: info@swissvoice.pl
 Loading...