

Swiss Legend 10005G-BB-01-SB, 10005A-YG-010-W, 10005A-02S-W, 10005G-03, 10006-02-SB User Manual
...
Customer Service
Toll Free: 1-866-746-7794
Fax: 1-954-985-1828
www.swisslegend.com

3
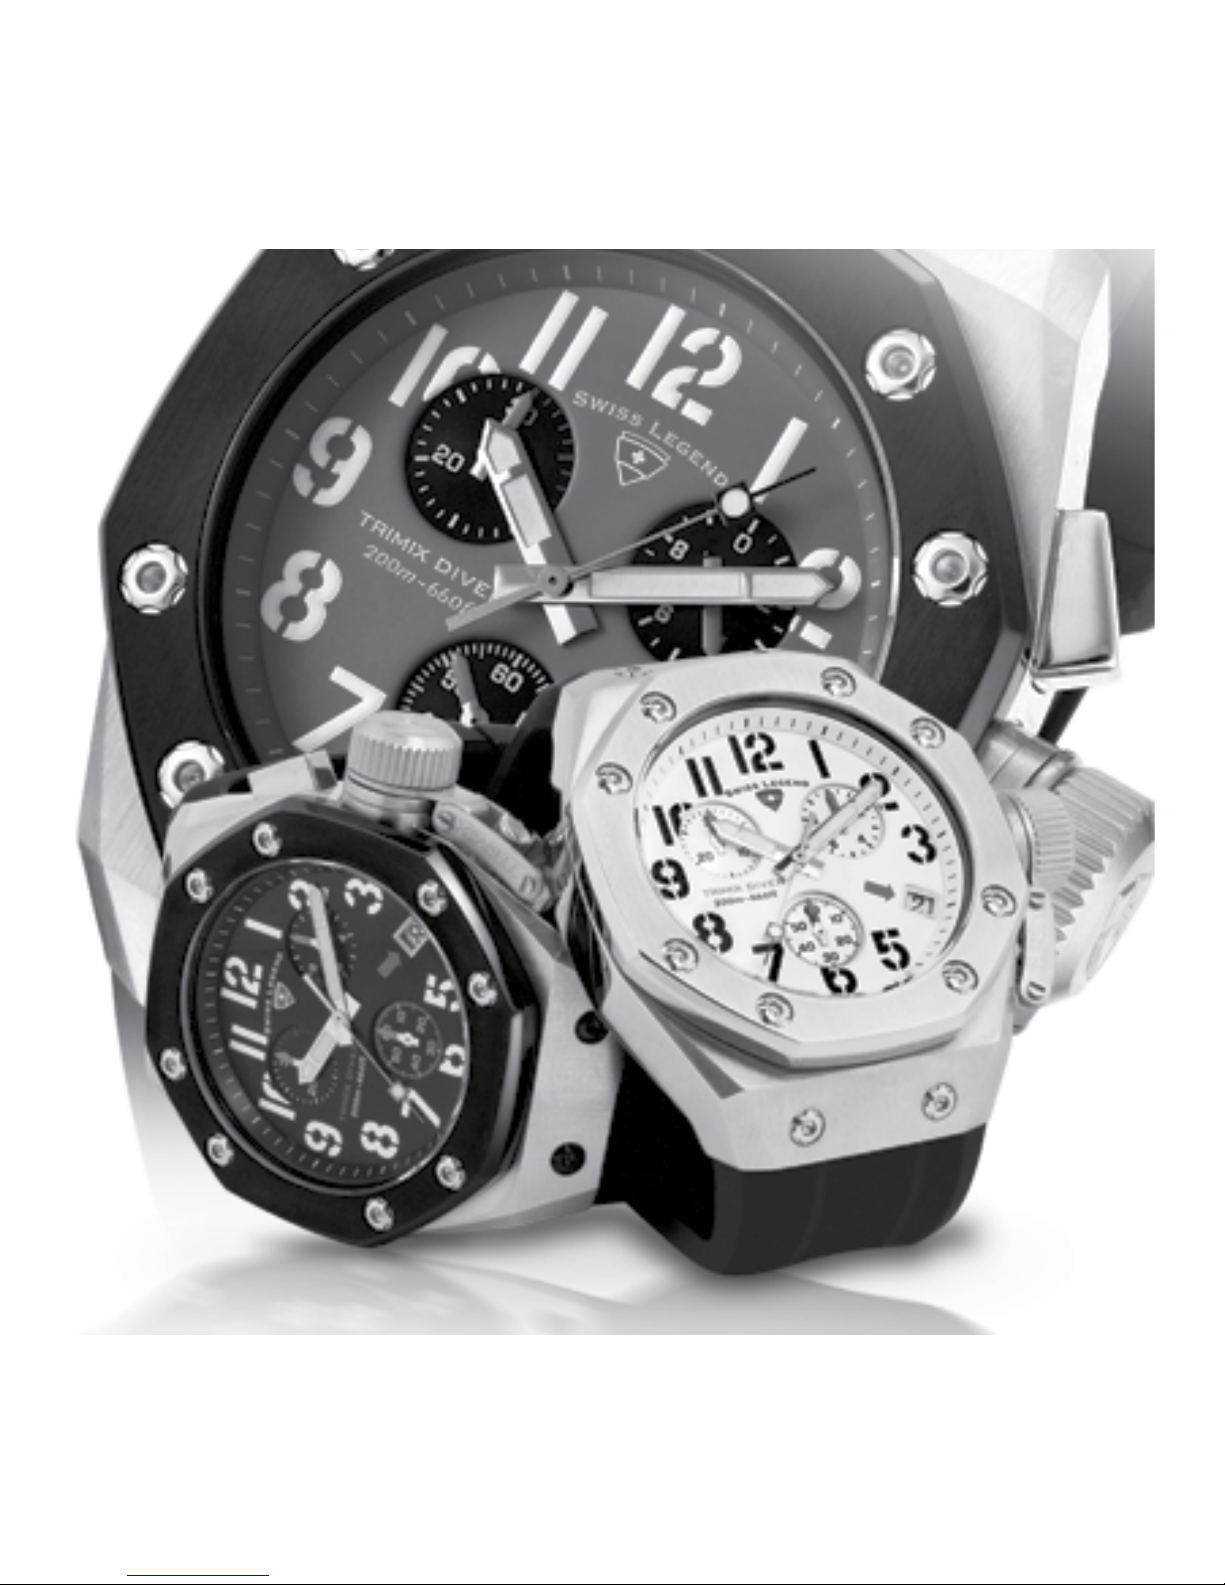
THE SWISS LEGEND STORY
The word “Legend” was rst used in the English language in
the 14th Century and has its origins in the medieval Latin
language. A Legend is a story about mythical events whose
heroes and heroines produce extraordinary results that inspire.
For over a quarter of a century the makers of Swiss Legend
have created their own legendary reputation by bringing their
loyal customers timepieces steeped in tradition, design and
versatility.
Swiss Legend is a brand unlike any other. It is dynamic. It is
modern. It is alive.
At the very core of the Swiss Legend design philosophy rests our
commitment to stylish, distinctive timepieces that harmoniously
balance cutting edge style with old world precision and accuracy.
All Swiss Legend watches are meticulously crafted to exacting
standards and feature the highest quality Swiss Movements.
Combine this with over 2,000 combinations of styles, materials
and functions, and you have a watch collection that offers
unparalleled quality, variety, style and functionality.
Watches tick. Legends inspire.

4
Contents
5 English
31 Español
Please activate your warranty at
www.swisslegend.com

English
5
GENERAL INSTRUCTIONS FOR MAINTAINING
ALL SWISS LEGEND WATCHES
General Instructions:
PLEASE NOTE: Failure to follow these general
instructions may void your 5 year warranty.
1. For timepieces with a screw down crown you must rst
gently rotate the crown counter-clockwise until it
springs out. The crown must then be gently pulled out
to the appropriate position for time or date setting.
2. Never correct date between 9:00 PM and 1:00 AM.
3. It is very important after setting your timepiece that
you push in and screw down the crown rmly to ensure
water resistance. Not doing so will void the warranty.
4. Not screwing down the crown will cause water damage
and void warranty.
5. Please make sure you register and activate your
warranty at www.swisslegend.com.

6
INSTRUCTIONS FOR 2 OR 3 HANDS
QUARTZ AND AUTOMATIC MOVEMENTS
PLEASE NOTE: For timepieces with a screw down crown
you must rst gently rotate the crown counter-clockwise
until it springs out. The crown must then be gently pulled
out to the appropriate position for time or date setting.
TIME SETTING FOR MODELS WITHOUT CALENDAR
1. Unscrew and/or pull out the crown all the way to Position 2.
(Fig A.)
2. Adjust the time by turning the crown in the desired direction.
3. Push in and/or screw down the crown back into Normal
Position. (Position 1 Fig A.)
TIME SETTING FOR MODELS WITH CALENDAR
1. Unscrew and/or pull out the crown to Position 2. (Fig B.)
2. Turn the crown until the previous day’s date appears in the
calendar frame.
3. Pull out the crown to Position 3, and advance the hour
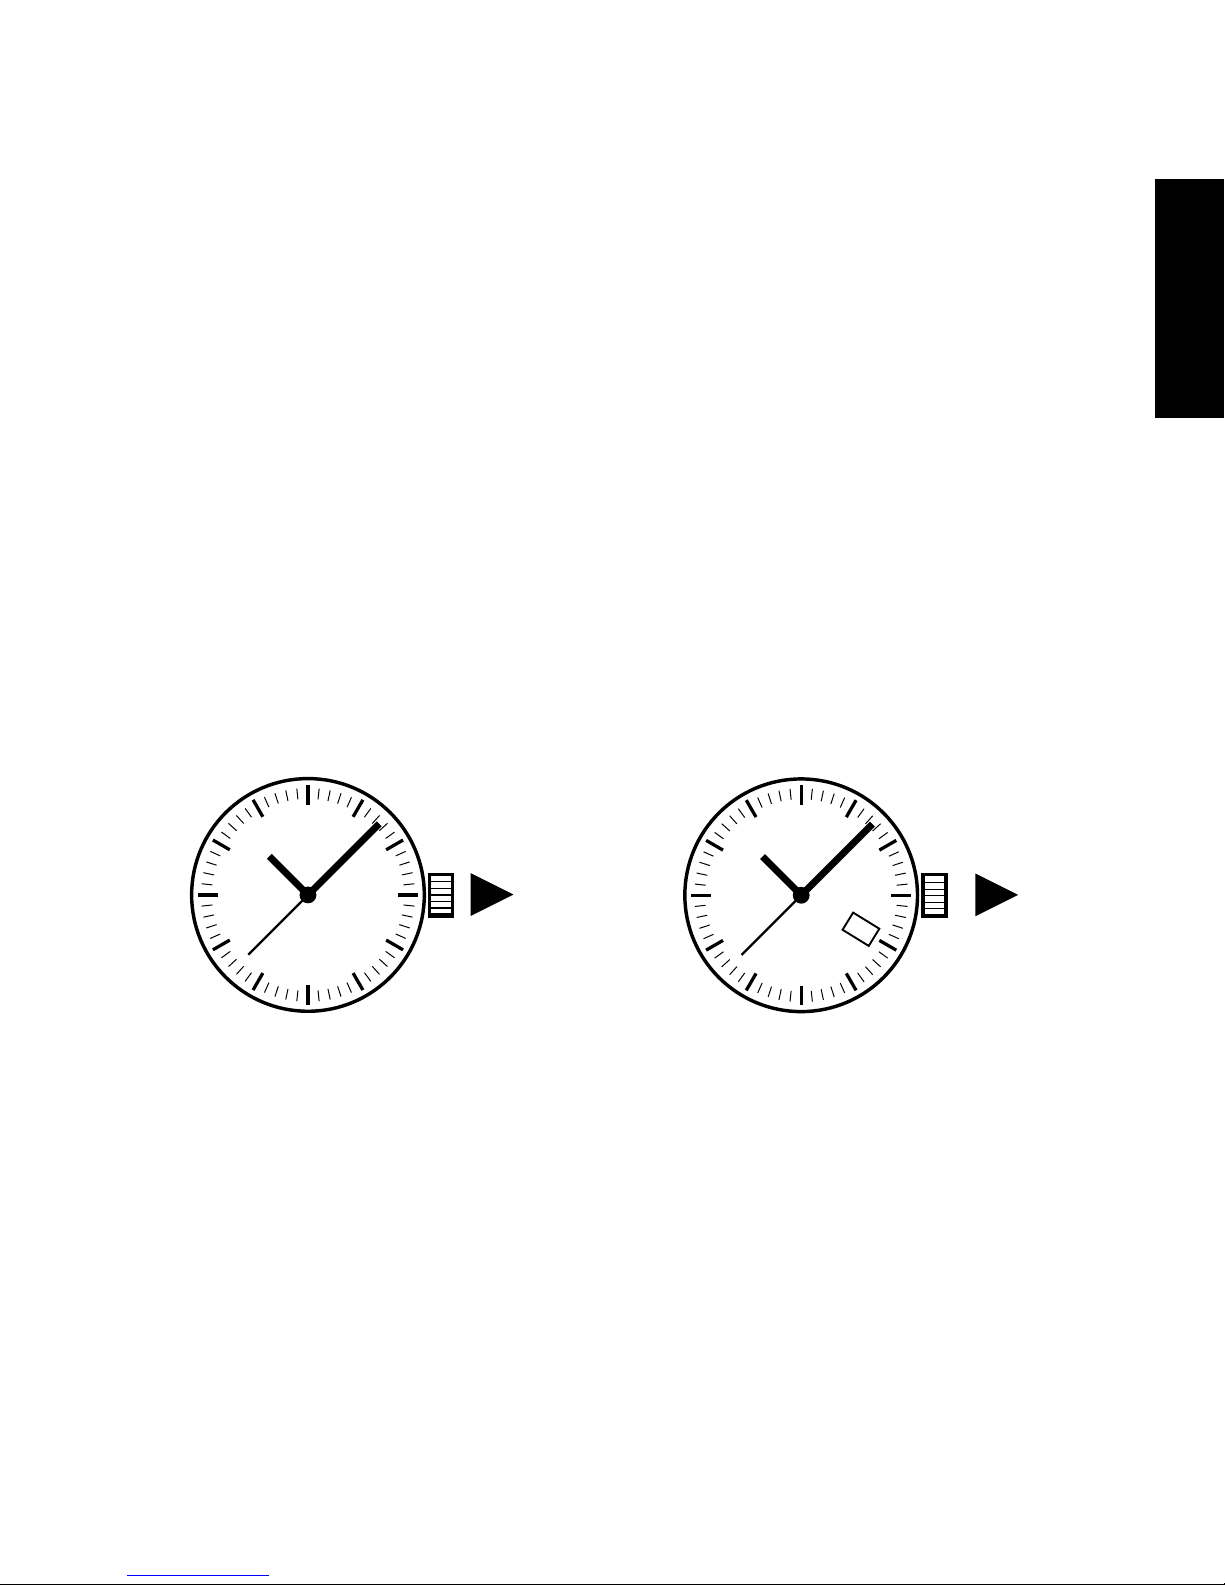
English
7
and the minute hands until the desired date appears.
(Please set time according to AM or PM).
4. Adjust the time by turning the crown in the desired direction.
5. Push in and/or screw the crown back into Normal Position.
(Position 1 Fig B.)
PLEASE NOTE: For best accuracy when setting your
timepiece. If your watch has three hands, pull out the
crown when the second hand points at 12 o’clock or “00”
seconds.
PLEASE NOTE: It is very important after setting your
timepiece that you push in and screw down the crown
rmly to ensure water resistance. Not doing so will void
the warranty.
Model without calendar Model with calendar
1 - 2
18
1 - 2 - 3
(1 = Normal Position 2 = Calendar Position 3 = Time Setting Position)
Fig A. Fig B.

8
INSTRUCTIONS FOR 3 HAND
AUTOMATIC MOVEMENT
PLEASE NOTE: For timepieces with a screw down crown
you must rst gently rotate the crown counter-clockwise
until it springs out. The crown must then be gently pulled
out to the appropriate position for time or date setting.
Instructions:
Wind watch manually by turning the crown in the closed
position approximately 25 to 35 times for a full wind.
If your watch will be worn daily your watch will only need to be
manually wound once a week to ensure better accuracy on
your timepiece.
If not worn daily watch should be kept on a watch winder.
Please refer to www.swisslegend.com for automatic winding
chart on winding directions.
Link : http://www.swisslegend.com/, under Instructions and
Catalog.

English
9
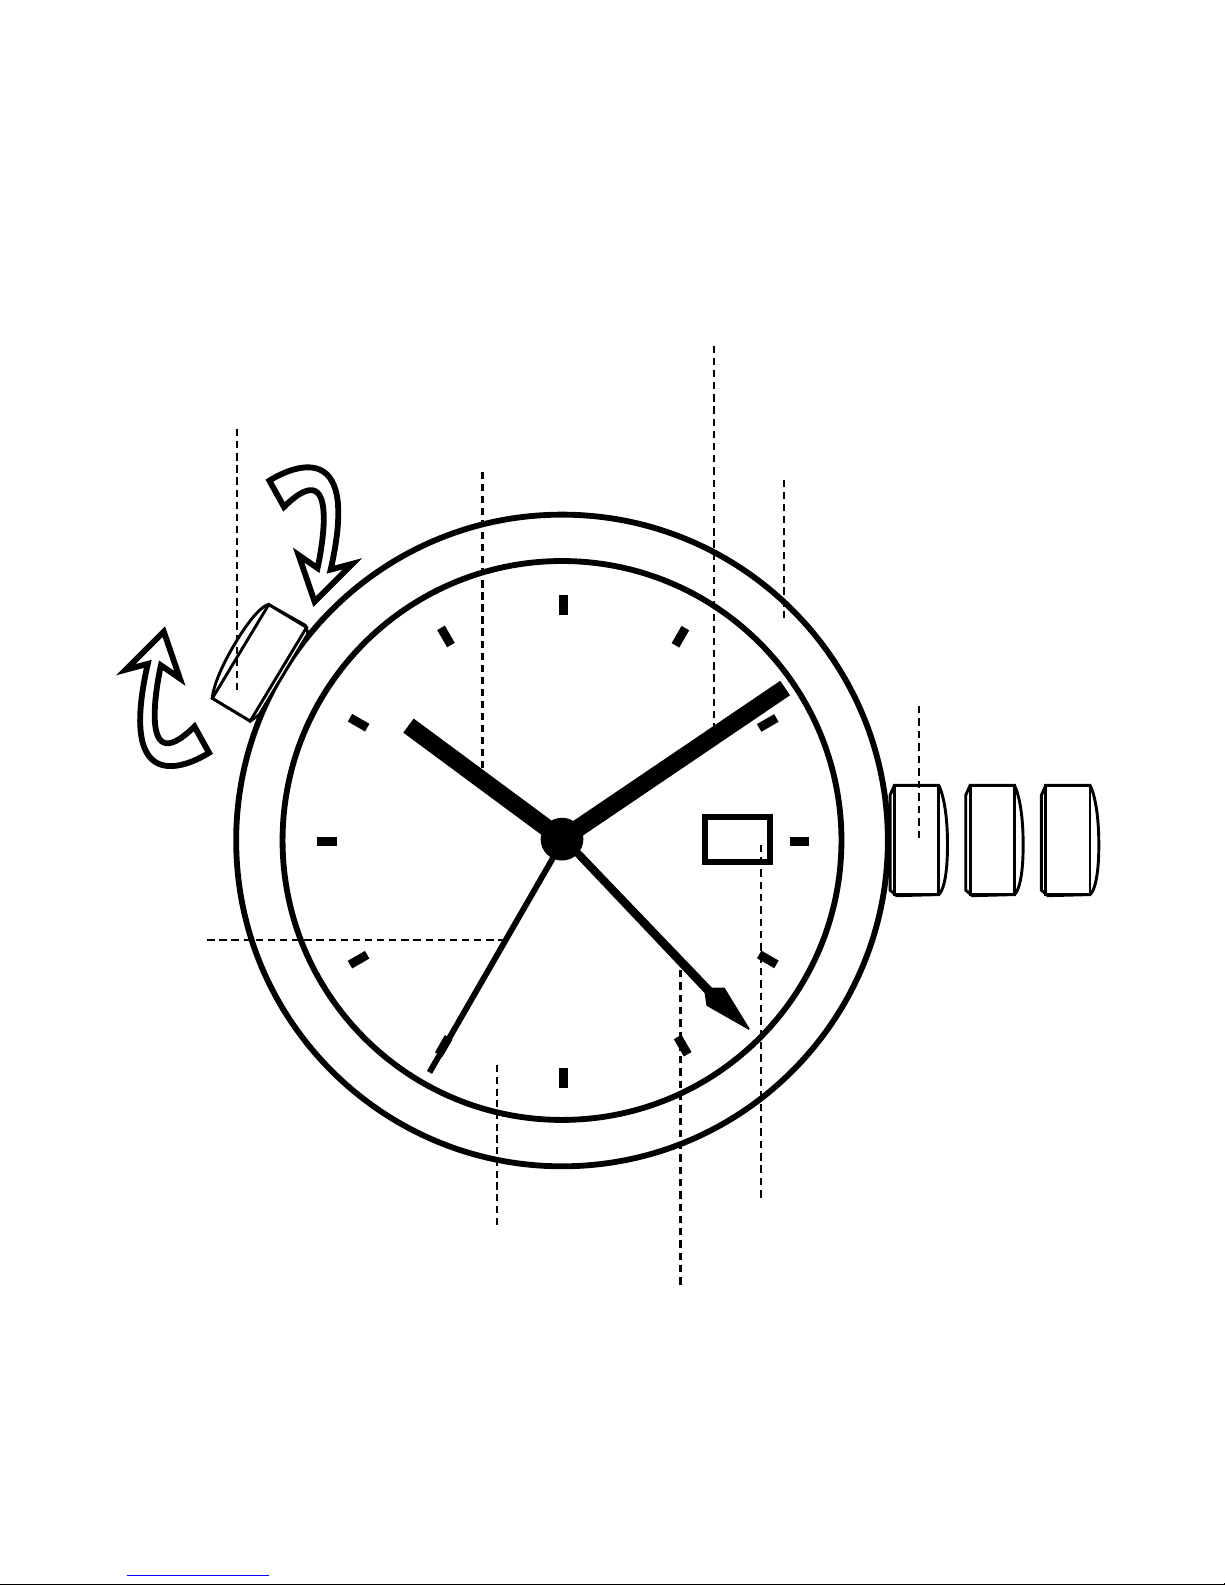
SWISS LEGEND
CHRONOGRAPH INSTRUCTIONS
(ETA-G10.211, ETA 251.272, Ronda 5030D, or similiar)
PLEASE NOTE: You must rst gently rotate the crown
counter-clockwise until it springs out. The crown must
then be gently pulled out to the appropriate position for
time, date and/or chronograph setting.
Instructions:
Watch Functions:
Display by means of hands: Hours, minutes, small second at
6 o’clock. Mechanical date showing through aperture in dial.
Counters 1/10 second, 60 seconds, 30 minutes and day.
Functions: ADD, Split.
The crown has three positions:
Normal Position, when worn: the crown pushed in and screwed
tightly against the case assures water resistance.
Date Setting:
Unscrew and/or pull the crown out to Position 2. Rotate the

10
crown counter-clockwise to designate date. Push in and screw
down crown to set the date.
(Please set time according to AM or PM).
Time Setting:
Hours, minutes and seconds. Unscrew and/or pull the crown
out to Position 3. The second hand will stop. Turn the crown
clockwise to the designated time and push and screw crown in.
Chronograph Functions:
Push-button A: Start & Stop Chronograph Functions.
Push-button B: Reset Chronograph Functions.
30
20 10
60
40 20
18
28
46
64
82
1 - 2 - 3
Minutes
Hour Hand
Minute Hand
Pusher B
Pusher A
Chronograph
Second Hand
The crown has 3 positions:
1 = Normal Position 2 = Calendar Position 3 = Time Setting Position
Seconds
Date
1/10 Second

English
11
SWISS LEGEND
RESETTING CHRONOGRAPH INSTRUCTIONS
(ETA-G10.211, ETA 251.272, Ronda 5030D or similiar)
Instructions:
*Refer to Illustration Pg. 10
To Reset Split Second (1/10):
Unscrew and/or pull out the crown to Position 2 and press down
on top pusher (A). Use the pusher to adjust (by repeatedly
pressing or press and hold down for quick setting until set to
“00” seconds) and push crown in and screw down gently.
To Reset Chronograph Second Hand:
Unscrew and/or pull out the crown to Position 2 and press down
on bottom pusher (B). Use the pusher to adjust (by repeatedly
pressing or press and hold down for quick setting until set to
“00” seconds) and push crown in and screw down gently.
To Adjust Minute Counter:
Unscrew and/or pull out the crown to Position 3 and press down
on top pusher (A). Use the pusher to adjust (by repeatedly
pressing or press and hold down for quick setting until set to
“00” seconds) and push crown in and screw down gently.

12
SWISS LEGEND
CHRONOGRAPH INSTRUCTIONS
(ISA 8172 or similiar)
Instructions:
Watch Functions:
Display by means of hands: Hours, minutes and seconds.
Mechanical date showing through aperture in dial. Analog
chronograph with 30 mintue counter, day and date.
Time Setting:
Unscrew and/or pull the crown out to Position 3. Turn
clockwise or counter-clockwise to reach the desired time. Push
crown back to Position 1 and screw the crown in.
Day Of The Week Setting:
Unscrew and/or pull the crown to Position 3. Turn counterclockwise the neccessary revolutions to change the day. This
should always be done before setting the date.
(Please set time according to AM or PM).
Date Setting:
Unscrew and/or pull the crown to Position 2. Turn crown

English
13
clockwise to set date. Push crown back to Position 1 and
screw the crown in.
Reset Chronograph Second Hand & Minute Counter:
Press and hold down Pusher A and B simultaneously for
2-3 seconds. Then set the minute counter to 30 by pressing
down on Pusher B. Once set push down on Pusher A to
set the chronograph second hand. Press Pusher A and B
simultaneously to complete the setting.
PLEASE NOTE: Never correct date between 9:00 PM and 1:00 AM.
CHRONOGRAPH (* Please refer to instructions on Pg. 12)
The crown has 3 positions:
1 = Normal Position 2 = Calendar Position 3 = Time Setting Position
1 - 2 - 3
18
30
20 10
60
SUN
SAT
FRI
THU
WED
TUE
MON
40 20
Date
Day
Seconds
Chronograph Second
Hand
Minute Counter
Hour Hand
Pusher A
Pusher B
Crown
Minute Hand

14
SWISS LEGEND
GMT INSTRUCTIONS
(ISA 8176 or similiar)
Instructions:
Watch Functions:
Display by means of hands: Hours, minutes, small second at 2
o’clock and 24 time zone. Date disc showing through aperture
in dial.
Functions: GMT or Second Time Zone in 24 hour display.
Time Setting:
Hours, minutes and seconds. Unscrew and/or pull the crown
out to Position 3. The second hand will stop. Turn the crown
clockwise to the designated time and push and screw down
crown in gently.
Date Setting:
Unscrew and/or pull the crown out to Position 2. Rotate the
crown counter-clockwise to the designated date. Push in and
screw down crown gently to Position 1.

English
15
2nd Time Zone Function:
Pull the crown out to Position 2. Press Pusher A : to set 24H
hand. Push in and/or screw the crown back into Normal
Position.
GMT Functions
1 - 2 - 3
24
12
10
8
14
16
2
4
6
22
20
18
1 - 2 - 3
18
24
12
10
8
14
16
2
4
6
22
20
18
60
40 20
Second Hand
Hour Hand
24hr Dual Time Hand
Hour Track
Minute Track
24hr Dual Time Hand
2nd Time Zone Functions
Date
Minute Hand
Pusher A
Pusher A
Crown
Crown
24hr Dual Time Ring
16
GMT – TRIPLE TIME ZONE MOVEMENT
09
01
03
05
07
11
13
15
17
19
21
23
18
G
M
T
R
O
M
E
/
P
A
R
I
S
M
O
S
C
O
W
K
A
R
A
C
H
I
B
A
N
G
K
O
K
T
O
K
Y
O
N
O
U
M
E
A
M
I
D
W
A
Y
A
N
C
H
O
R
A
G
E
D
E
N
V
E
R
N
E
W
Y
O
R
K
R
I
O
D
E
J
A
N
E
I
R
O
D
S
T
L
O
N
D
O
N
C
A
I
R
O
D
U
B
A
I
D
H
A
K
A
H
O
N
G
K
O
N
G
S
Y
D
N
E
Y
W
E
L
L
I
N
G
T
O
N
H
O
N
O
L
U
L
U
L
O
S
A
N
G
E
L
E
S
C
H
I
C
A
G
O
C
A
R
A
C
A
S
S
T
D
Crown B
Turns Clockwise &
Counter-Clockwise
Crown A
World Cities Ring
24hr Dual Time Hand
Date
24hr Dual Display
Second
Hand
Hour Hand
Minute Hand
1 2 3

English
17
TO SET LOCAL TIME
1. Unscrew and/or pull out the crown to Position 3.
2. Turn crown clockwise or counter-clockwise.
3. 24 Hour Dual Time Hand will move in sync with local time.
4. Push crown back to Position 1 and screw it down.
PLEASE NOTE: NOT SCREWING DOWN THE CROWN WILL
CAUSE WATER DAMAGE AND VOID THE WARRANTY.
TO SET LOCAL DATE
1. Unscrew and/or pull out the crown to Position 2.
2. Turn crown clockwise.
3. Push crown back into Position 1 and screw it down.
4. Do not set the date between 9:00pm and 1:00am as this
may affect the accurate turning of the date disc the next day.
TO SET DUAL TIME
You can set your watch to another Time Zone, which will run
simultaneously as the Local Time.
1. Unscrew and/or pull out the crown to Position 2.
2. Turn the crown counter-clockwise.
3. Set the Dual Time 24 Hour Hand to the corresponding
dual time you wish to see. The Hand should match the

18
timings on the inner 24-hour dual time ring on the dial.
4. When setting the dual time zone, for best accuracy it is
recommended to set the time on the hour, eg 1:00pm,
8:00pm (00 minutes). Set the corresponding time on the
hour by adjusting the 24 Hour Hand to the corresponding
time zone.
5. Push crown to Position 1. The Dual Time 24 Hour Hand
will run in sync with Local Time reading.
(Please set time according to AM or PM).
TO READ THIRD TIME ZONE (Refer Illustration Fig A. on Pg. 19
and Fig B. on Pg 20)
Using the World Cities dial ring, it is possible to read a third
time zone from your watch and at a glance read all the major
Time Zones around the world.
1. Using Crown B turning clockwise or counter-clockwise, align
the corresponding time on the 24 hour dual display to the
city that matches the timezone of your corresponding local
city.
2. The other cities will line up with their corresponding time on
the 24 hour chapter ring.

English
19
09
01
03
05
07
11
13
15
17
19
21
23
18
G
M
T
R
O
M
E
/
P
A
R
I
S
M
O
S
C
O
W
K
A
R
A
C
H
I
B
A
N
G
K
O
K
T
O
K
Y
O
N
O
U
M
E
A
M
I
D
W
A
Y
A
N
C
H
O
R
A
G
E
D
E
N
V
E
R
N
E
W
Y
O
R
K
R
I
O
D
E
J
A
N
E
I
R
O
D
S
T
L
O
N
D
O
N
C
A
I
R
O
D
U
B
A
I
D
H
A
K
A
H
O
N
G
K
O
N
G
S
Y
D
N
E
Y
W
E
L
L
I
N
G
T
O
N
H
O
N
O
L
U
L
U
L
O
S
A
N
G
E
L
E
S
C
H
I
C
A
G
O
C
A
R
A
C
A
S
S
T
D
Example: You are in London (GMT), and it is 12:06 (midnight)
align the World Cities ring to line up GMT to 24 (midnight). You
can now read off other cities (timezones) at their respective
times. (NYC 19:06, London is 5 hours ahead of NYC).
Crown B
(12:06am)
NYC
(19:06
or
7:06pm)
LOS ANGELES
(16:06 or 4:06pm)
Fig A.
GMT
LONDON
Crown A
24hr Dual Display
1 2 3
24hr Dual Time
Hand

20
G
M
T
R
O
M
E
/
P
A
R
I
S
M
O
S
C
O
W
K
A
R
A
C
H
I
B
A
N
G
K
O
K
T
O
K
Y
O
N
O
U
M
E
A
M
I
D
W
A
Y
A
N
C
H
O
R
A
G
E
D
E
N
V
E
R
N
E
W
Y
O
R
K
R
I
O
D
E
J
A
N
E
I
R
O
D
S
T
L
O
N
D
O
N
C
A
I
R
O
D
U
B
A
I
D
H
A
K
A
H
O
N
G
K
O
N
G
S
Y
D
N
E
Y
W
E
L
L
I
N
G
T
O
N
H
O
N
O
L
U
L
U
L
O
S
A
N
G
E
L
E
S
C
H
I
C
A
G
O
C
A
R
A
C
A
S
S
T
D
09
01
03
05
07
11
13
15
17
19
21
23
30
20 10
60
40 20
18
28
46
64
82
Example: You are in London (GMT), and it is 12:06 (midnight)
– align the World Cities ring to line up GMT to 24 (midnight).
You can now read off other cities (timezones) at their
respective times. (Hong Kong 8:06am, London is 7 hours
behind of HK). (Please observe that HK does not account for
Daylight Saving Time).
Fig B.
GMT
LONDON
Crown A
24hr Dual Display
1 2 3
Crown B
HONG KONG
(8:06am)
(12:06am)
LOS ANGELES
(16:06 or 4:06pm)
NYC
(19:06
or
7:06pm)

English
21
Water Resistance:
Watches are ranked I through V for water resistance. Check
the ranking of your watch in the following chart to determine
proper use.
Notes
I Not water-resistant. Avoid all moisture.
II Do not operate buttons underwater.
III If watch is exposed to salt water, wash thoroughly and
dry.
IV Usable while scuba diving (except at depths that require
helium-oxygen gas).
Rank
Case Designation
Splashes,
Rain etc
Swim,
car-wash
Snorkeling
Scuba
Diving
I
II
III
IV
V
No water resistance
30m Water Resistant
50m Water Resistant
100m Water Resistant
200m Water Resistant
or greater
NO NO
NO
NO
NO
NO
NO
NO
NO
NO
YES
YES
YES
YES
YES
YES
YES
YES YES
YES

22
Push Button Deployment Clasp (Bracelet)
1. Push the 2 Clasp Release Buttons
on either side of the bracelet to
release the clasp.
2. The Bracelet will release
and open in an upward and
outward motion as illustrated.
Clasp Release Button
Note: If links need to be removed, please go to an Authorized Red Line
Repair Center or reputable jeweler. The SWI Group and red line will not
be liable for damages carried out by anyone other than ourselves.

English
23
Push Button Hidden Clasp (Strap)
1. Push the 2 Clasp Release
Buttons on either side of
the Buckle to release the
clasp.
Clasp Release Button
Buckle
Buckle
Buckle
Buckle Clip
Hinges
Hinge
Strap
Strap
Strap
Strap
Pin
Pin
2. The Buckle will release
and open in an upward and
outward motion on small
hinges.
3. When opened, the Buckle Clip
may be popped open to allow
insertion of the loose strap
end to be pushed through and
locked in place by the Pin.
4. Once the strap is positioned
the buckle clip may be locked
in place. You may then put the
watch on and fold both ends of
the buckle back down until they
lock into place.

24
5 YEAR WARRANTY
1. This guarantee is valid only at Swiss Legend and not at
the place of purchase.
2. Swiss Legend guarantees your new watch movement
for ve years from the date of purchase against defects in
material and workmanship. This guarantee does not
cover the watch case, bracelet, strap, crystal, battery or
crown, pushers or stem of the watch. If your watch is in
need of a battery change, it is recommended that you
take it to a Authorized Swiss Legend Repair Center. For
further advice on battery changes, please contact us. This
warranty gives you specic legal rights, and you may
have other rights which vary from state to state.
3. If your watch should require service during the period of
waranty, please complete the following:
• Include a copy of your original bill of purchase to validate
the date of purchase.
• $10.00 check or money order (DO NOT SEND CASH)
made payable to The SWI Group to cover shipping and

English
25
handling (Excludes Alaska and Hawaii). If $10.00 is
not included your return will not be processed. Additional
insurance charges may apply.
• Please insure your timepiece for the full purchase price.
• Please do not include the original gift box because it may
not be returned.
4. Swiss Legend may at its discretion replace your
timepiece for one with the same or greater value if yours
is no longer available.
5. This warranty will no longer be valid if this watch has
been tampered with, taken apart, wet, or repaired by
anyone but a Swiss Legend Authorized Repair Center.
In the case of water resistant watches, cracking of the
crystal glass or loosening of the watch case back and/or
the watch crown, will invalidate this warranty. Please refer
to paragraph 2 of this warranty in the case of battery
changes.

26
Package your watch carefully, enclose the neccessary
documents, and return to:
SWISS LEGEND
101 South State Road 7, Suite 201
Hollywood, Florida 33023.
Toll Free: 1-866-746-7794
Fax: 1-954-985-1828
Please activate your warranty at
www.swisslegend.com


29
LA HISTORIA DE SWISS LEGEND
La palabra “Leyenda” se utilizó por primera vez en el Siglo XIV
en el idioma Inglés. Es de origen Latín Medieval. Una leyenda
es una historia acerca eventos míticos en la cual heroes y
heroínas producen eventos inspiradores. Por más de un cuarto
de siglolos fabricantes de Swiss Legend hand creado una
reputación legendaria a través de una tradición de diseño y
versatilidad.
Swiss Legend es una marca como ninguna otra. Es una marca
dinámica. Una marca moderna
En la esencia losócadel diseño de Swiss Legend se
encuentra nuestro compromiso a la elegancia y distinción de
relojes que balancean armoniosamente el estilo vanguardísta
con la precision y exactitude del viejo mundo.
Los relojes de Swiss Legend son meticulosamente realizados
bajo los rigurosos estándares de exactitud y calidad Suiza.
Uniendo esto a más de 2000 combianciones de estilos,
materiales, funciones, y obtiene una colección de relojes con
una calidad imprecedente, variedad, estilo y funcionalidad.
Los relojes marcan, las leyendas inspiran.

30
Contenidos
31 Español
Por favor active su garantía en
www.swisslegend.com

Español
31
INSTRUCCIONES GENERALES DE MANTENER
TODOS LOS SWISS LEGEND RELOJES
Instucciones Generales:
NOTA: El incumplimiento de estas instrucciones
generales puede anular su garantía de 5 años.
1. Para los relojes con una corona de rosca en primer
lugar debe girar suavemente la corona en sentido
antihorario hasta que brota. La corona debe entonces
ser suavemente hacia afuera en la posición adecuada
para su tiempo o de ajuste de la fecha.
2. Nunca ajuste la fecha correcta entre las 9:00 pm y
1:00 am.
3. Es importante que despues de ajustar su reloj la
corona sea ajustada a su posicion original
(enroscada) para asegurar la resistencia al agua del
reloj. De no seguir las instrucciones aqui indicadas, la
garantia quedara nula.
4. No enroscar la corona hacia abajo puede causar daños
de agua y anular la garantía.
5. Por favor, asegúrese de registrarse y activar su garantía
en www.swisslegend.com.

32
INSTRUCCIONES PARA 2 Y 3 MANOS
CUARZO Y MOVIMIENTOS AUTOMATICOS
AJUSTE HORARIO PARA MODELOS SIN EL CALENDARIO
1. Extraiga la corona completamente a Posición 2 (Fig A.).
2. Ajuste la hora girando la corona en la dirección deseada.
3. Empuje la corona a su Posición Normal. (Posición 1 Fig A.)
AJUSTE HORARIO PARA MODELOS CON EL CALENDARIO
1. Extraiga la corona hasta el primer cambio. (Fig B.)
2. Gire la corona hasta que la fecha del día anterior aparezca
en el marco del calendario.
3. Extraiga la corona hasta el segundo cambio, y avance las
agujas de la hora y de los minutos hasta que aparezca la
fecha deseada. Favor de ajustar la hora según AM ó PM.
4. Ajuste la hora girando la corona en la dirección deseada.
5. Empuje la corona a su posición normal. (Posición 1 Fig B.)
Favor de notar lo siguiente:
Para mayor exactitud, cuando programe su reloj, si éste tiene
tres (3) agujas, extraiga la corona cuando el segundero indique
12:00 o “00” segundos.

Español
33
NOTA: PARA CORONAS DE TIPO “ROSCA”
Primero tiene que “delicadamente” girar la corona en
sentido contrario a las agujas del reloj hasta que la misma
salga. Despues, la corona tiene que ser delicadamente
extraida a la posicion apropiada para ajustar la hora o la
fecha.
NOTA: Muy importante que despues de ajustar su reloj la
corona sea ajustada a su posicion original (enroscada)
para asegurar la resistencia al agua del reloj. De no seguir
las instrucciones aqui indicadas, la garantia quedara nula.
Modelo sin el calendario Modelo con el calendario
1 - 2
18
1 - 2 - 3
Fig A.
1 = Posición Normal 2 = Posición Calendario
Fig B.
1 = Posición Normal 2 = Posición Calendario 3 = Posición Horas
Fig A. Fig B.

34
INSTRUCCIONES PARA RELOJES
AUTOMATICO DE 3 MANOS
NOTA: PARA CORONAS DE TIPO “ROSCA”
Primero tiene que “delicadamente” girar la corona en sentido
contrario a las agujas del reloj hasta que la misma salga.
Después, la corona tiene que ser delicadamente extraída a la
posición apropiada para ajustar la hora ó la fecha.
Intrucciones:
Para dar cuerda a su reloj, gire la corona hacia la derecha
aproximadamente 25 a 30 veces.
Si usara el reloj diariamente, solo necesitará cuerda
manualmente una vez por semana para garantizar una mejor
precisión en su reloj.
Si no se usara diaramente su reloj se debe mantener en un
equipo de reloj para dar cuerda.
Por favor referir a www.swisslegend.com para ver la direccion
en que debe ser programado su equipo para dar cuerda.
Enlace: http://swisslegend.com, bajo Intrucciones y Catálogo.

Español
35
INSTRUCCIONES PARA SU SWISS LEGEND
CRONOGRAFO
(ETA-G10.211, ETA 251.272, Ronda 5030D or similar)
Instrucciones:
Funciones del reloj:
Exhibición por medio de las agujas: Horas, minutos, y el segundero en la posición de las 6:00 en punto.
Fecha mecánica que demuestra a través de abertura en
esfera.
Contadores 1/10, 60 segundos, 30 minutos.
Funciones: ADD, aguja ratrapante.
La corona tiene tres posiciones:
Posición Normal: la corona atornillada rmemente contra la
caja asegura resistencia de agua.
Ajuste de la fecha:
Extraiga la corona hasta la Posición 2. Gíre la corona en la direccíon contraria a la fecha señalada. Empuje la corona hacia
adentro a su posición inicial.
Ajuste del tiempo:
Horas, minutos y segundos. Extraiga la corona hasta la

36
Posición 3. La aguja de los segundos se detendrá. Gire la corona hacia adelante a la hora designada y presione la corona
hacia adentro.
(Favor de ajustar la hora según AM ó PM.)
Funciones del cronógrafo:
Presionando el Botón A: Inicia y detiene las funciones del
cronógrafo.
Presionando el Botón B: Reajustan las funciones del
cronógrafo.
30
20 10
60
40 20
18
28
46
64
82
1 - 2 - 3
Minutos
Hora De Mano
Minuto De Mano
Boton B
Boton A
Cronografo
Segundos
Segundos
Fecha
1/10 Segundos
La corona tiene 3 Posiciones:
1 = Posición Normal 2 = Posición Calendario 3 = Posición Horas

Español
37
SWISS LEGEND
INSTRUCCIONES PARA AJUSTAR CRONOGRAFO
(ETA-G10.211, ETA 251.272, Ronda 5030D or similar)
Instrucciones:
*Por favor referir illustracion Pg. 36
Para ajustar el 1/10 Segundo:
Extraiga la corona a la Primera Posición. Presione el boton A.
Use el boton A para llevar la aguja al lugar preciso. Cierre la
corona.
Para ajustar los Segundos:
Extraiga la corona a la Primera Posición. Presione el boton B.
Use el boton B para llevar la aguja al lugar preciso. Cierre la
corona.
Para ajustar los Minutos:
Extraiga la corona a la Segunda Posición. Presione el boton
A. Use el boton A para llevar la aguja al lugar preciso. Cierre
la corona.

38
SWISS LEGEND
INSTRUCCIONES PARA EL CRONOGRAFO
(ISA 8172 or similar)
Instrucciones:
Para ajustar la hora:
Extraiga la corona a la Posicion 3. Gire la corona hacia la
derecha o izquierda hasta llegar a la hora desada. Regrese la
corona a la Posicion 1.
Para ajustar el dia de la semana:
Extraiga la corona a la Posicion 3. Gire la corona hacia la
izquierda dos veces para avanzar el dia. Este paso siempre
deberia de hacerse antes ajustar la fecha.
Para ajustar la fecha:
Extraiga la corona a la Posicion 2. Gire la corona hacia la
derecha hasta llegar a la fecha deseada. Regrese la corona a
la Posicion 1 y empuje la corona hasta dentro.
Para ajustar cronografo:
Presione y mantenga pulsado Boton A y B simultaneamente

Español
39
por 2-3 segundos. A continuación, ajuste el contador de
minuto a 30 por presionando el Botón B. Una vez ajustado
presione el Botón A para ajustar el cronógrafo de segunda
mano.
Presione el Boton A y B simultáneamente para completar este
ajuste.
Nota: Nunca ajuste la fecha entre las 9:00 pm y 1:00 am.
CRONOGRAFO (*Por favor referir a la instrucciones de Pg. 38)
La corona tiene 3 Posiciones:
1 = Posición Normal 2 = Posición Calendario 3 = Posición Horas
1 - 2 - 3
18
30
20 10
60
SUN
SAT
FRI
THU
WED
TUE
MON
40 20
Fecha
Dia
Segundos
Cronografo Segundos
Minutos
Hora De Mano
Boton A
Boton B
Corona
Minuto De Mano

40
SWISS LEGEND
INSTRUCCIONES DE GMT
(ISA 8176 or similar)
Instrucciones:
Funciones del reloj:
Exhibición por medio de las agujas: Horas, minutos, y el
segundero en la posición de las 2:00 en punto y 24 zona
horaria. Fecha mecánica que demuestra a través de abertura
en esfera.
Funciones: GMT o Segundo de zona horaria en la pantalla de
24 horas.
Ajuste del tiempo:
Horas, minutos y segundos. Extraiga la corona hasta la
Posición 3. La aguja de los segundos se detendrá. Gire la
corona hacia adelante a la hora designada y presione la
corona hacia adentro.
Ajuste de la fecha:
Extraiga la corona hasta la Posición 2. Gíre la corona en la
direccíon contraria a la fecha señalada. Empuje la corona
hacia adentro a su posición inicial.

Español
41
Funciones Segunda Zona Horaria:
Extraiga la corona hasta la Posición 2. Presionando el boton
A: para establecer las 24H a mano. Empuje la corona a su
posición normal.
Funciones GMT
Funciones Segunda Zona Horaria
Aro De 24 Horas De Sgunda
Hora
1 - 2 - 3
24
12
10
8
14
16
2
4
6
22
20
18
1 - 2 - 3
18
24
12
10
8
14
16
2
4
6
22
20
18
60
40 20
Segundos
Hora De Mano
Manecilla De 24 Horas
De Segunda Hora
Manecilla De 24 Horas
De Segunda Hora
Pista De Hora
Pista De Minuto
Fecha
Minuto De Mano
Boton A
Boton A
Corona
Corona

42
GMT – MOVIMIENTO PARA TERCERA HORA
09
01
03
05
07
11
13
15
17
19
21
23
18
G
M
T
R
O
M
E
/
P
A
R
I
S
M
O
S
C
O
W
K
A
R
A
C
H
I
B
A
N
G
K
O
K
T
O
K
Y
O
N
O
U
M
E
A
M
I
D
W
A
Y
A
N
C
H
O
R
A
G
E
D
E
N
V
E
R
N
E
W
Y
O
R
K
R
I
O
D
E
J
A
N
E
I
R
O
D
S
T
L
O
N
D
O
N
C
A
I
R
O
D
U
B
A
I
D
H
A
K
A
H
O
N
G
K
O
N
G
S
Y
D
N
E
Y
W
E
L
L
I
N
G
T
O
N
H
O
N
O
L
U
L
U
L
O
S
A
N
G
E
L
E
S
C
H
I
C
A
G
O
C
A
R
A
C
A
S
S
T
D
Corona A
Aro De Cuidades Del
Mundo
Manecilla De 24 Horas De Segunda Hora
Fecha
Aro De 24 Horas De Segunda Hora
Segundos
Hora De Mano
Minuto De Mano
1 2 3
Corona B
Gire a la derecha hacia la
derecha y la Contrarreforma

Español
43
PARA AJUSTAR LA HORA LOCAL
1. Extraiga la corona A a la Posición 3.
2. Gire la corona hacia la izquierda o derecha.
3. La manecilla de 24 horas de la Segunda Hora se movera
al mismo tiempo que la hora local.
4. Regrese la corona a la Posición 1.
NOTA: No enroscar la corona hacia abajo puede causar
daños de agua y anular la garantía.
PARA AJUSTAR LA FECHA LOCAL
1. Extraiga la corona A a la Posición 2.
2. Gire la corona hacia la derecha.
3. Regrese la corona a la Posición 1.
4. No ajuste la fecha entre las 9:00 PM y la 1:00 AM ya que
esto puede afectar el cambio de fecha del dia siguiente.
PARA AJUSTAR LA SEGUNDA HORA
Puede ajustar su reloj a otro horario que se movera
simultaneamente a la hora local.

44
1. Extraiga la corona B a la Posición 2.
2. Gire la corona hacia la izquierda.
3. Ajuste la manecilla de 24 horas a la hora que desee ver. La
manecilla debe coincidir con los horarios en el aro de 24
horas de la esfera.
4. Ajuste la Segunda hora a la hora para tener el horario más
preciso. Por ejemplo, cuando sea la 1:00pm, 3:00pm,
8:00pm etc… ajuste la segunda hora al horario que desea
para esta.
5. Regrese la corona a la Posición 1. La manecilla de la
Segunda hora se movera al mismo tiempo que la hora local.
(Favor de ajustar la hora según AM ó PM.)
PARA LEER LA TERCERA HORA
(Referir a illustracion Fig A. en
Pg. 45 y Fig B. en Pg. 46)
Utilizando el aro de Ciudades del Mundo en la esfera, es
posible leer una tercera hora en su reloj y aprimera vista.
1. Girando la Corona B hacia la izquierda o derecha, se alinea
la ciudad correpondiente a su zona horaria con la hora
correspondiente en el aro de 24 horas de su reloj.
2. Las ciudades en el aro de 24 horas estaran alineadas con la
hora correspondiente a cada ciudad.

Español
45
Ejemplo: Usted está en London (GMT), y son las 12:06 (media
noche) – alinee el aro de las Ciudades del Mundo a las 24
(media noche). Ahora puede leer en las zonas horarias otras
ciudades en sus respectivos tiempos. Ahora podra ver la hora
en otras ciudades (Nueva York 19:06, London esta 5 horas por
delante de NYC).
09
01
03
05
07
11
13
15
17
19
21
23
18
G
M
T
R
O
M
E
/
P
A
R
I
S
M
O
S
C
O
W
K
A
R
A
C
H
I
B
A
N
G
K
O
K
T
O
K
Y
O
N
O
U
M
E
A
M
I
D
W
A
Y
A
N
C
H
O
R
A
G
E
D
E
N
V
E
R
N
E
W
Y
O
R
K
R
I
O
D
E
J
A
N
E
I
R
O
D
S
T
L
O
N
D
O
N
C
A
I
R
O
D
U
B
A
I
D
H
A
K
A
H
O
N
G
K
O
N
G
S
Y
D
N
E
Y
W
E
L
L
I
N
G
T
O
N
H
O
N
O
L
U
L
U
L
O
S
A
N
G
E
L
E
S
C
H
I
C
A
G
O
C
A
R
A
C
A
S
S
T
D
Corona B
(12:06am)
Fig A.
GMT
LONDON
Corona A
Aro De 24 Horas De
Segunda Hora
1 2 3
Manecilla De 24
Horas De Segunda
Hora
NYC
(19:06
or
7:06pm)
LOS ANGLES
(16:06 or 4:06pm)

46
Ejemplo: Usted está en London (GMT), y son las 12:06 (media
noche) – alinee el aro de las Ciudades del Mundo a las 24
(media noche). Ahora puede leer en las zonas horarias otras
ciudades en sus respectivos tiempos. Ahora podra ver la hora
en otras ciudades (Hong Kong 8:06, London esta 7 horas por
detrás de HK). (Tenga en cuenta que HK no tiene en cuenta el
horario de verano).
G
M
T
R
O
M
E
/
P
A
R
I
S
M
O
S
C
O
W
K
A
R
A
C
H
I
B
A
N
G
K
O
K
T
O
K
Y
O
N
O
U
M
E
A
M
I
D
W
A
Y
A
N
C
H
O
R
A
G
E
D
E
N
V
E
R
N
E
W
Y
O
R
K
R
I
O
D
E
J
A
N
E
I
R
O
D
S
T
L
O
N
D
O
N
C
A
I
R
O
D
U
B
A
I
D
H
A
K
A
H
O
N
G
K
O
N
G
S
Y
D
N
E
Y
W
E
L
L
I
N
G
T
O
N
H
O
N
O
L
U
L
U
L
O
S
A
N
G
E
L
E
S
C
H
I
C
A
G
O
C
A
R
A
C
A
S
S
T
D
09
01
03
05
07
11
13
15
17
19
21
23
30
20 10
60
40 20
18
28
46
64
82
Corona B
Fig B.
GMT
LONDON
Corona A
Aro De 24 Horas De
Segunda Hora
1 2 3
(12:06am)
HONG KONG
(8:06am)
LOS ANGELES
(16:06 or 4:06pm)

Español
47
Resistencia al Agua:
Los relojes tienen rangos desde el I hasta el V de acuerdo a
su resistencia al agua. Revise el rango de su reloj en
el siguiente recuadro para determinar el uso apropiado.
Notas
I No es resistente al agua. Evite toda humedad.
II No opere ningun boton debajo del agua.
III Si el reloj es expuesto a agua salada, lavelo y sequelo.
IV Utilizable en buceo (exepto a profundidades que requi
eran gas de Helio-Oxigeno).
Rango
Descripción de
la caja
Salpicadu-
ras
lluvias, etc.
Nadar,
lavar
autos
Esnor
quel,
clavados
Buceo
I
II
III
IV
V
No Resistente al agua
Resistente al agua
50m Resistente al agua
100m Resistente al agua
200m Resistente al
agua o mas
NO NO
NO
NO
NO
NO
NO
NO
NO
NO
SI
SI
SI
SI
SI
SI
SI
SI
SI
SI

48
Cierre Con Botones (Pulsera)
1. Para abrir el cierre, presione
los dos botones del cierre en
los dos lados de la pulsera.
2. La pulsera se abrirá hacia
arriba y hacia afuera como
muestra la ilustración.
Botón para abrir cierre
Nota: Si necesita remover eslabones, por favor envie al
centro de reparaciones de Swiss Legend o lleve su reloj a un
joyero conable. The SWI Group y Swiss Legend no se haran
responsables por daños causados al reloj por reparaciones
hechas por alguien que no sea Swiss Legend.

Español
49
Botón para abrir cierre
Cierre Invisible con
Botones (Correa)
1. Para abrir el cierre,
presione los dos
botones a ambos lados
de la hebilla.
Hebilla
Hebilla
Hebilla
Hebilla Clip
Bisagra
Bisagras
Correa
Correa
Correa
Pasador
Pasador
2. La hebilla se soltará
y abrira hacia arriba
y hacia afuera en las
pequeñas bisagras.
3. Cuando este suelta, la
hebilla puede ser abierta
para pasar la correa y
cerrar con el pasador.
4. Cuando la correa este
posicionada la hebilla puede
ser cerrada. Entonces se
podra poner el reloj y doblar
los dos lados de la hebilla
hacia abajo hasta que este
jado.

50
GARANTÍA DE 5 AÑOS
1. Esta garantía es válida solamente en Swiss Legend, no en
el lugar de su compra.
2. Swiss Legend garantiza el movimiento de su reloj por cinco
años, desde el dia de su compra contra defectos de
manufactura o materiales. Esta garantía no cubre la caja de
su reloj, correa, pulso, cristal, bateria, pulsadores o corona.
Si usted necesita cambiar la bateria de su reloj se
recomienda que lo lleve a una joyeria con experiencia, o
podria comunicarse con nosotros para más infomación.
Esta garantía le da especícos derechos legales que podrian
variar segun el estado en que se encuentre.
3. Si su reloj necesita servicio durante este periodo debe
seguir los siguientes pasos:
• Incluya la copia de su recibo para validar la fecha de su
compra.
• Mande un cheque o Money Order (NO DINERO EN
EFECTIVO) a nombre de SWI GROUP para cubrir el envio
y manejo (no esta incluido Alaska y Hawai).

Español
51
Si no incluye los diez dólares su reparación no será
procesada, un cargo por seguro podría ser aplicado.
• Favor de asegurar su reloj por el monto completo de la
compra.
• Favor de no incluir la caja original porque podría no ser
devuelta.
4. Esta garantía no será valida si su reloj fue manipulado,
desarmado, mojado o reparado por otro que no sea Swiss
Legend.
En el caso de los relojes resistentes al agua, rotura del
cristal o que se aoje la tapa trasera del reloj resultará en
que la garantía quede anulada.
5. Favor de empacar su reloj con mucho cuidado no olvidando
la documentacion requerida.

52
Enviarlo a la siguente direccion:
SWISS LEGEND
101 South State Road 7, Suite 201
Hollywood, Florida 33023.
Toll Free: 1-866-746-7794
Fax: 1-954-985-1828
Por favor active su garantía en
www.swisslegend.com

53


55
NOTES :

56
Customer Service
Toll Free: 1-866-746-7794
Fax: 1-954-985-1828
www.swisslegend.com
 Loading...