

Swiss Legend 10005G-BB-01-SB, 10005A-YG-010-W, 10005A-02S-W, 10005G-03, 10006-02-SB User Manual
...
Customer Service
Toll Free: 1-866-746-7794
Fax: 1-954-985-1828
www.swisslegend.com


3
THE SWISS LEGEND STORY
The word “Legend” was rst used in the English language in
the 14th Century and has its origins in the medieval Latin
language. A Legend is a story about mythical events whose
heroes and heroines produce extraordinary results that inspire.
For over a quarter of a century the makers of Swiss Legend
have created their own legendary reputation by bringing their
loyal customers timepieces steeped in tradition, design and
versatility.
Swiss Legend is a brand unlike any other. It is dynamic. It is
modern. It is alive.
At the very core of the Swiss Legend design philosophy rests our
commitment to stylish, distinctive timepieces that harmoniously
balance cutting edge style with old world precision and accuracy.
All Swiss Legend watches are meticulously crafted to exacting
standards and feature the highest quality Swiss Movements.
Combine this with over 2,000 combinations of styles, materials
and functions, and you have a watch collection that offers
unparalleled quality, variety, style and functionality.
Watches tick. Legends inspire.

4
Contents
5 English
31 Español
Please activate your warranty at
www.swisslegend.com

English
5
GENERAL INSTRUCTIONS FOR MAINTAINING
ALL SWISS LEGEND WATCHES
General Instructions:
PLEASE NOTE: Failure to follow these general
instructions may void your 5 year warranty.
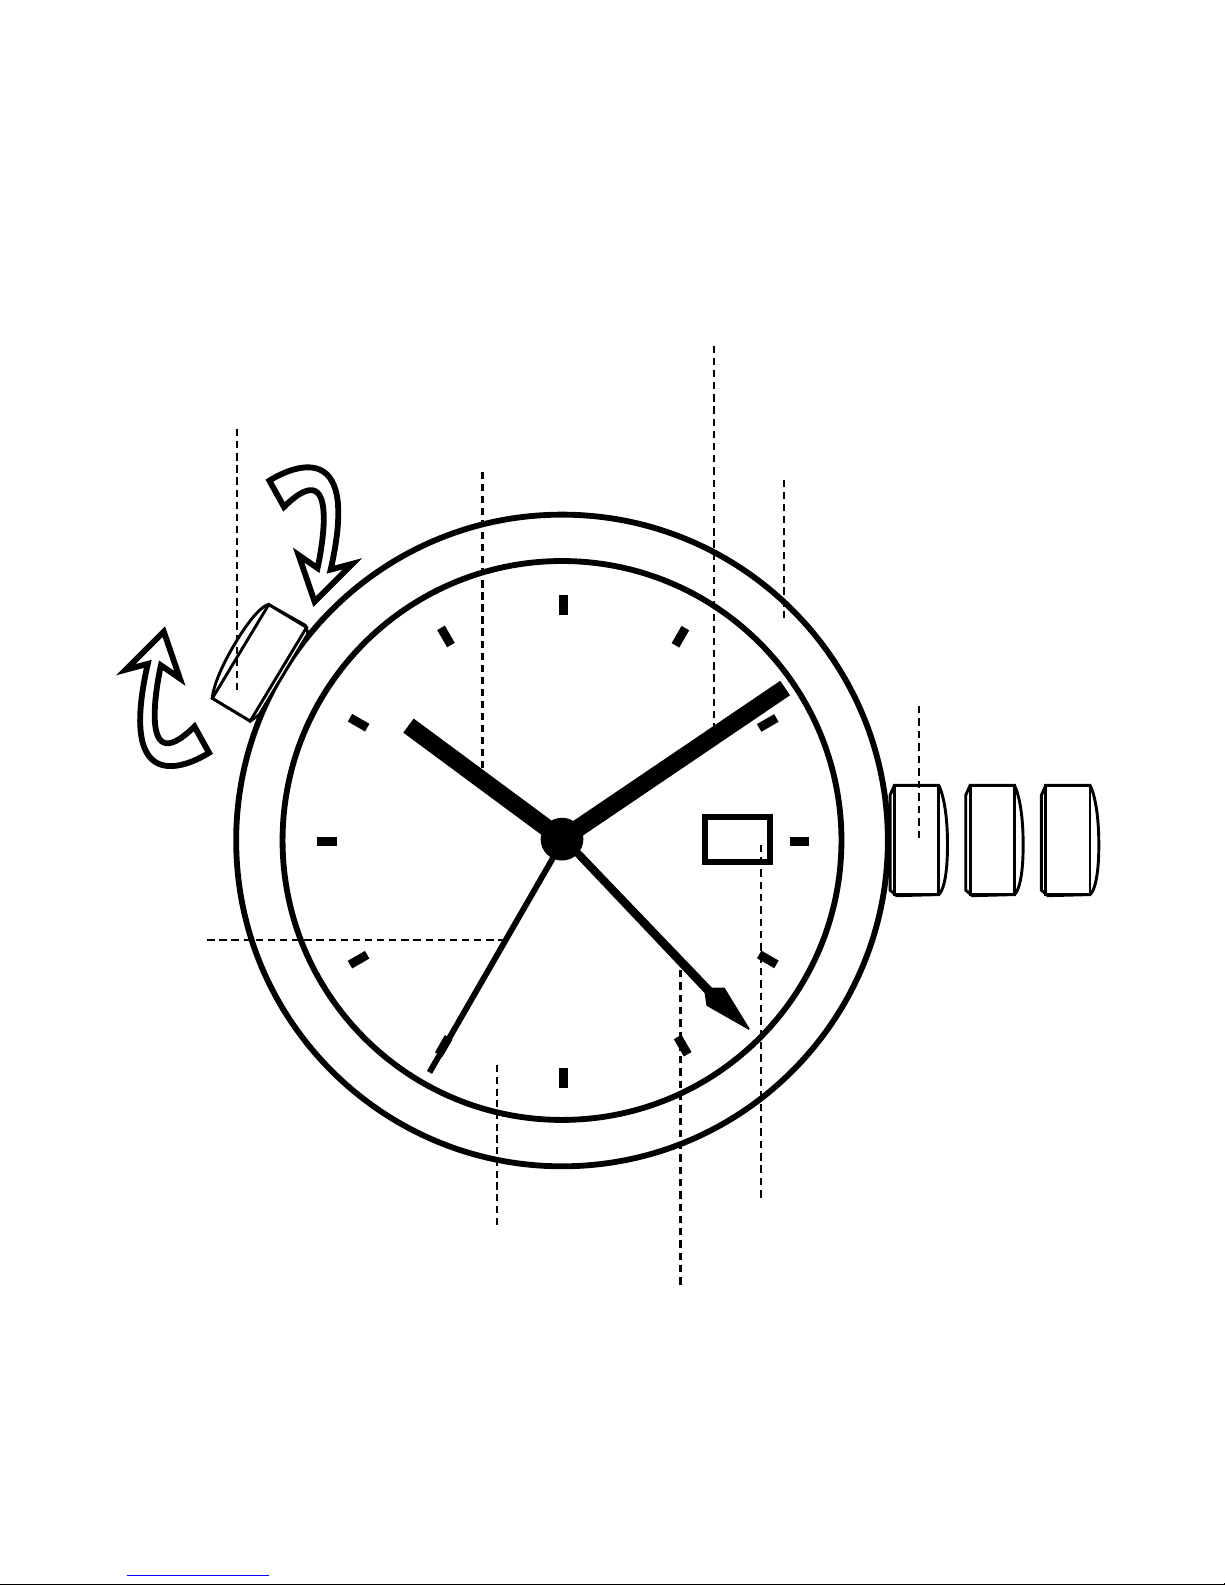
1. For timepieces with a screw down crown you must rst
gently rotate the crown counter-clockwise until it
springs out. The crown must then be gently pulled out
to the appropriate position for time or date setting.
2. Never correct date between 9:00 PM and 1:00 AM.
3. It is very important after setting your timepiece that
you push in and screw down the crown rmly to ensure
water resistance. Not doing so will void the warranty.
4. Not screwing down the crown will cause water damage
and void warranty.
5. Please make sure you register and activate your
warranty at www.swisslegend.com.

6
INSTRUCTIONS FOR 2 OR 3 HANDS
QUARTZ AND AUTOMATIC MOVEMENTS
PLEASE NOTE: For timepieces with a screw down crown
you must rst gently rotate the crown counter-clockwise
until it springs out. The crown must then be gently pulled
out to the appropriate position for time or date setting.
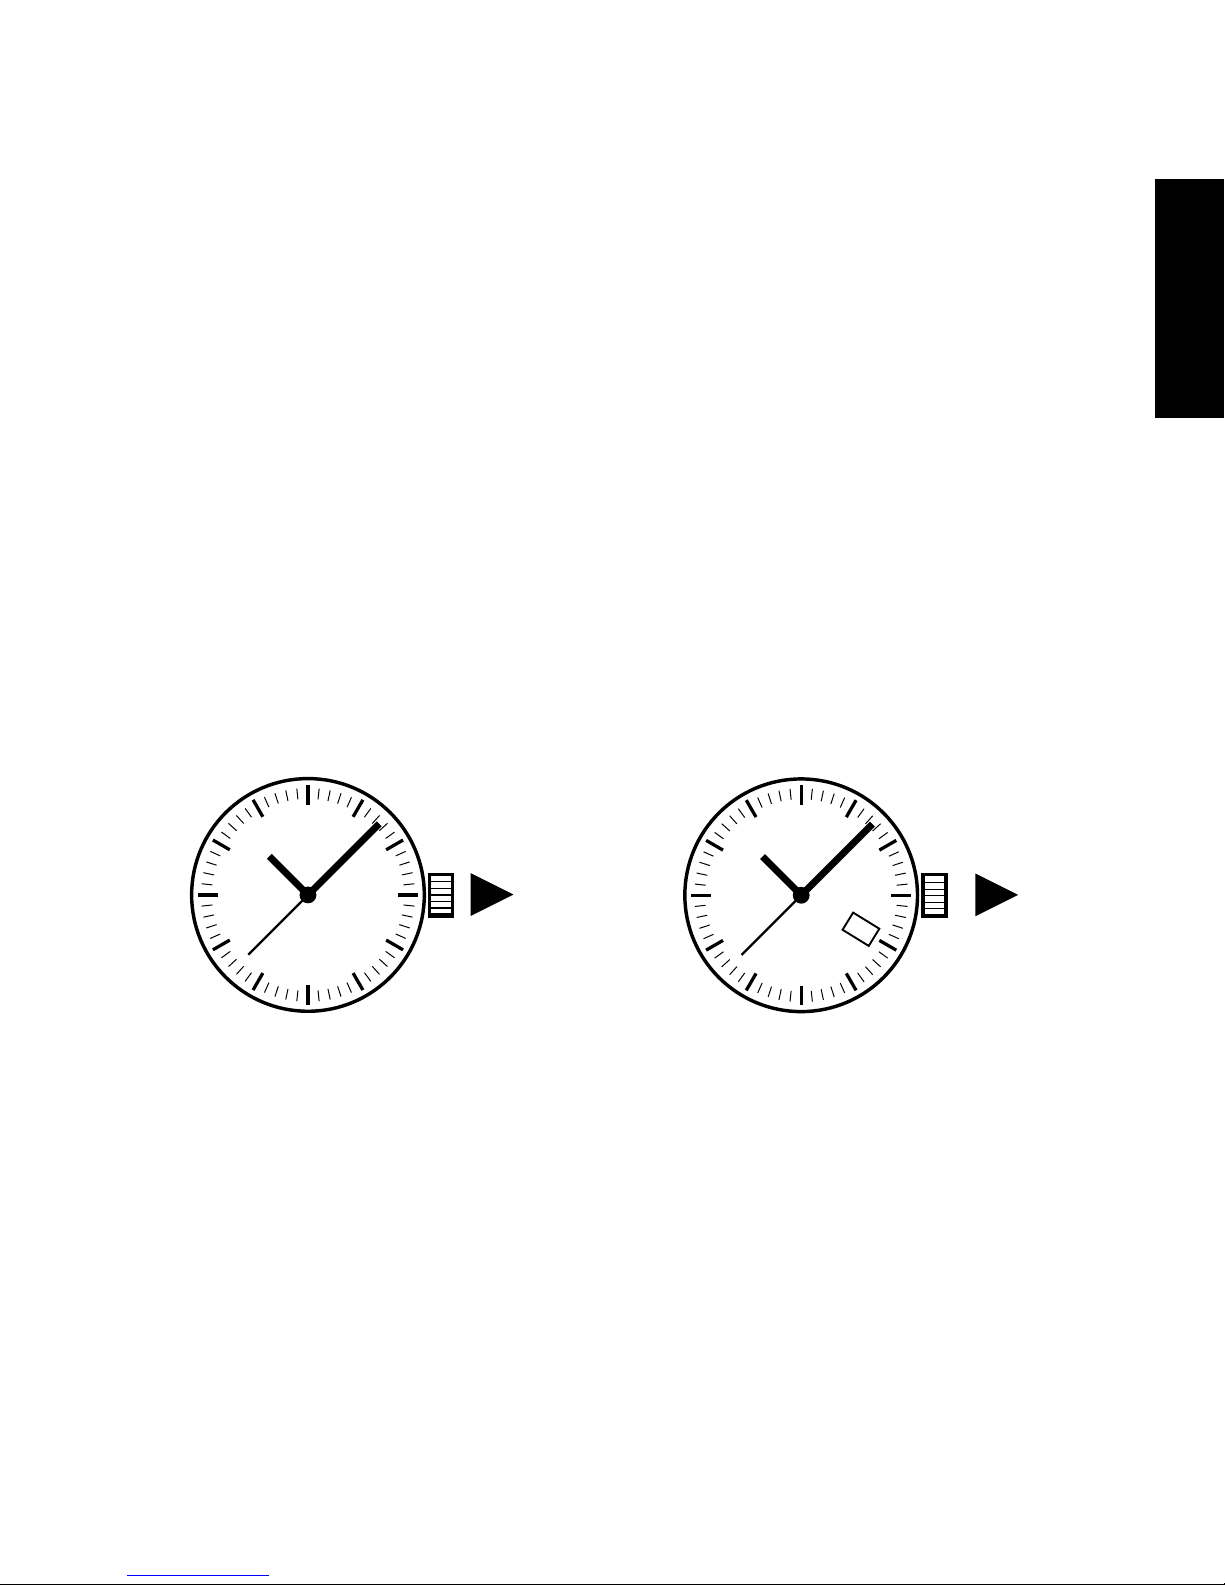
TIME SETTING FOR MODELS WITHOUT CALENDAR
1. Unscrew and/or pull out the crown all the way to Position 2.
(Fig A.)
2. Adjust the time by turning the crown in the desired direction.
3. Push in and/or screw down the crown back into Normal
Position. (Position 1 Fig A.)
TIME SETTING FOR MODELS WITH CALENDAR
1. Unscrew and/or pull out the crown to Position 2. (Fig B.)
2. Turn the crown until the previous day’s date appears in the
calendar frame.
3. Pull out the crown to Position 3, and advance the hour
English
7
and the minute hands until the desired date appears.
(Please set time according to AM or PM).
4. Adjust the time by turning the crown in the desired direction.
5. Push in and/or screw the crown back into Normal Position.
(Position 1 Fig B.)
PLEASE NOTE: For best accuracy when setting your
timepiece. If your watch has three hands, pull out the
crown when the second hand points at 12 o’clock or “00”
seconds.
PLEASE NOTE: It is very important after setting your
timepiece that you push in and screw down the crown
rmly to ensure water resistance. Not doing so will void
the warranty.
Model without calendar Model with calendar
1 - 2
18
1 - 2 - 3
(1 = Normal Position 2 = Calendar Position 3 = Time Setting Position)
Fig A. Fig B.

8
INSTRUCTIONS FOR 3 HAND
AUTOMATIC MOVEMENT
PLEASE NOTE: For timepieces with a screw down crown
you must rst gently rotate the crown counter-clockwise
until it springs out. The crown must then be gently pulled
out to the appropriate position for time or date setting.
Instructions:
Wind watch manually by turning the crown in the closed
position approximately 25 to 35 times for a full wind.
If your watch will be worn daily your watch will only need to be
manually wound once a week to ensure better accuracy on
your timepiece.
If not worn daily watch should be kept on a watch winder.
Please refer to www.swisslegend.com for automatic winding
chart on winding directions.
Link : http://www.swisslegend.com/, under Instructions and
Catalog.

English
9
SWISS LEGEND
CHRONOGRAPH INSTRUCTIONS
(ETA-G10.211, ETA 251.272, Ronda 5030D, or similiar)
PLEASE NOTE: You must rst gently rotate the crown
counter-clockwise until it springs out. The crown must
then be gently pulled out to the appropriate position for
time, date and/or chronograph setting.
Instructions:
Watch Functions:
Display by means of hands: Hours, minutes, small second at
6 o’clock. Mechanical date showing through aperture in dial.
Counters 1/10 second, 60 seconds, 30 minutes and day.
Functions: ADD, Split.
The crown has three positions:
Normal Position, when worn: the crown pushed in and screwed
tightly against the case assures water resistance.
Date Setting:
Unscrew and/or pull the crown out to Position 2. Rotate the

10
crown counter-clockwise to designate date. Push in and screw
down crown to set the date.
(Please set time according to AM or PM).
Time Setting:
Hours, minutes and seconds. Unscrew and/or pull the crown
out to Position 3. The second hand will stop. Turn the crown
clockwise to the designated time and push and screw crown in.
Chronograph Functions:
Push-button A: Start & Stop Chronograph Functions.
Push-button B: Reset Chronograph Functions.
30
20 10
60
40 20
18
28
46
64
82
1 - 2 - 3
Minutes
Hour Hand
Minute Hand
Pusher B
Pusher A
Chronograph
Second Hand
The crown has 3 positions:
1 = Normal Position 2 = Calendar Position 3 = Time Setting Position
Seconds
Date
1/10 Second

English
11
SWISS LEGEND
RESETTING CHRONOGRAPH INSTRUCTIONS
(ETA-G10.211, ETA 251.272, Ronda 5030D or similiar)
Instructions:
*Refer to Illustration Pg. 10
To Reset Split Second (1/10):
Unscrew and/or pull out the crown to Position 2 and press down
on top pusher (A). Use the pusher to adjust (by repeatedly
pressing or press and hold down for quick setting until set to
“00” seconds) and push crown in and screw down gently.
To Reset Chronograph Second Hand:
Unscrew and/or pull out the crown to Position 2 and press down
on bottom pusher (B). Use the pusher to adjust (by repeatedly
pressing or press and hold down for quick setting until set to
“00” seconds) and push crown in and screw down gently.
To Adjust Minute Counter:
Unscrew and/or pull out the crown to Position 3 and press down
on top pusher (A). Use the pusher to adjust (by repeatedly
pressing or press and hold down for quick setting until set to
“00” seconds) and push crown in and screw down gently.

12
SWISS LEGEND
CHRONOGRAPH INSTRUCTIONS
(ISA 8172 or similiar)
Instructions:
Watch Functions:
Display by means of hands: Hours, minutes and seconds.
Mechanical date showing through aperture in dial. Analog
chronograph with 30 mintue counter, day and date.
Time Setting:
Unscrew and/or pull the crown out to Position 3. Turn
clockwise or counter-clockwise to reach the desired time. Push
crown back to Position 1 and screw the crown in.
Day Of The Week Setting:
Unscrew and/or pull the crown to Position 3. Turn counterclockwise the neccessary revolutions to change the day. This
should always be done before setting the date.
(Please set time according to AM or PM).
Date Setting:
Unscrew and/or pull the crown to Position 2. Turn crown

English
13
clockwise to set date. Push crown back to Position 1 and
screw the crown in.
Reset Chronograph Second Hand & Minute Counter:
Press and hold down Pusher A and B simultaneously for
2-3 seconds. Then set the minute counter to 30 by pressing
down on Pusher B. Once set push down on Pusher A to
set the chronograph second hand. Press Pusher A and B
simultaneously to complete the setting.
PLEASE NOTE: Never correct date between 9:00 PM and 1:00 AM.
CHRONOGRAPH (* Please refer to instructions on Pg. 12)
The crown has 3 positions:
1 = Normal Position 2 = Calendar Position 3 = Time Setting Position
1 - 2 - 3
18
30
20 10
60
SUN
SAT
FRI
THU
WED
TUE
MON
40 20
Date
Day
Seconds
Chronograph Second
Hand
Minute Counter
Hour Hand
Pusher A
Pusher B
Crown
Minute Hand

14
SWISS LEGEND
GMT INSTRUCTIONS
(ISA 8176 or similiar)
Instructions:
Watch Functions:
Display by means of hands: Hours, minutes, small second at 2
o’clock and 24 time zone. Date disc showing through aperture
in dial.
Functions: GMT or Second Time Zone in 24 hour display.
Time Setting:
Hours, minutes and seconds. Unscrew and/or pull the crown
out to Position 3. The second hand will stop. Turn the crown
clockwise to the designated time and push and screw down
crown in gently.
Date Setting:
Unscrew and/or pull the crown out to Position 2. Rotate the
crown counter-clockwise to the designated date. Push in and
screw down crown gently to Position 1.

English
15
2nd Time Zone Function:
Pull the crown out to Position 2. Press Pusher A : to set 24H
hand. Push in and/or screw the crown back into Normal
Position.
GMT Functions
1 - 2 - 3
24
12
10
8
14
16
2
4
6
22
20
18
1 - 2 - 3
18
24
12
10
8
14
16
2
4
6
22
20
18
60
40 20
Second Hand
Hour Hand
24hr Dual Time Hand
Hour Track
Minute Track
24hr Dual Time Hand
2nd Time Zone Functions
Date
Minute Hand
Pusher A
Pusher A
Crown
Crown
24hr Dual Time Ring
16
GMT – TRIPLE TIME ZONE MOVEMENT
09
01
03
05
07
11
13
15
17
19
21
23
18
G
M
T
R
O
M
E
/
P
A
R
I
S
M
O
S
C
O
W
K
A
R
A
C
H
I
B
A
N
G
K
O
K
T
O
K
Y
O
N
O
U
M
E
A
M
I
D
W
A
Y
A
N
C
H
O
R
A
G
E
D
E
N
V
E
R
N
E
W
Y
O
R
K
R
I
O
D
E
J
A
N
E
I
R
O
D
S
T
L
O
N
D
O
N
C
A
I
R
O
D
U
B
A
I
D
H
A
K
A
H
O
N
G
K
O
N
G
S
Y
D
N
E
Y
W
E
L
L
I
N
G
T
O
N
H
O
N
O
L
U
L
U
L
O
S
A
N
G
E
L
E
S
C
H
I
C
A
G
O
C
A
R
A
C
A
S
S
T
D
Crown B
Turns Clockwise &
Counter-Clockwise
Crown A
World Cities Ring
24hr Dual Time Hand
Date
24hr Dual Display
Second
Hand
Hour Hand
Minute Hand
1 2 3

English
17
TO SET LOCAL TIME
1. Unscrew and/or pull out the crown to Position 3.
2. Turn crown clockwise or counter-clockwise.
3. 24 Hour Dual Time Hand will move in sync with local time.
4. Push crown back to Position 1 and screw it down.
PLEASE NOTE: NOT SCREWING DOWN THE CROWN WILL
CAUSE WATER DAMAGE AND VOID THE WARRANTY.
TO SET LOCAL DATE
1. Unscrew and/or pull out the crown to Position 2.
2. Turn crown clockwise.
3. Push crown back into Position 1 and screw it down.
4. Do not set the date between 9:00pm and 1:00am as this
may affect the accurate turning of the date disc the next day.
TO SET DUAL TIME
You can set your watch to another Time Zone, which will run
simultaneously as the Local Time.
1. Unscrew and/or pull out the crown to Position 2.
2. Turn the crown counter-clockwise.
3. Set the Dual Time 24 Hour Hand to the corresponding
dual time you wish to see. The Hand should match the
 Loading...