

Swiss Diamond IP10, IP10S User Manual

User guide
IP10S / IP10
Corded IP phone

Contents
Contents
For your safety...................................................................................................................................3
Certification information...................................................................................................................3
Operating conditions........................................................................................................................3
Location...........................................................................................................................................3
Connection ......................................................................................................................................4
Security ...........................................................................................................................................4
Care ................................................................................................................................................4
Qualified service..............................................................................................................................4
Your phone......................................................................................................................................... 5
Introduction......................................................................................................................................5
Keys version A.................................................................................................................................5
Keys version B.................................................................................................................................7
Indicators.........................................................................................................................................8
Getting started ................................................................................................................................. 10
Package contents ..........................................................................................................................10
Installation.....................................................................................................................................10
Call functions...................................................................................................................................12
Making a call .................................................................................................................................12
Making a call using the phone book ...............................................................................................12
Speed dialing a phone number ......................................................................................................13
Last number redialing....................................................................................................................13
Dialing using the call lists...............................................................................................................13
Making a call with a headset..........................................................................................................15
Answering a call ............................................................................................................................15
Options during a call......................................................................................................................16
Telephony services.......................................................................................................................... 17
Using services during a call ...........................................................................................................17
Using services in standby mode ....................................................................................................18
Phone book ......................................................................................................................................21
Saving names and phone numbers................................................................................................21
Searching for names and phone numbers .....................................................................................22
Scrolling in the phone book............................................................................................................22
Modifying names and phone numbers ...........................................................................................23
Erasing names and phone numbers ..............................................................................................23
IP10S / IP10 user guide 1 02P182000Aen

Memory keys....................................................................................................................................24
Save memory keys........................................................................................................................24
Speed dialing using memory keys .................................................................................................25
Call lists............................................................................................................................................ 26
Unanswered calls ..........................................................................................................................26
Erase call lists................................................................................................................................27
Using the menu................................................................................................................................28
Accessing a menu function............................................................................................................28
List of menu functions....................................................................................................................29
Configuring user parameters .......................................................................................................... 31
Ringing tones ................................................................................................................................31
Language ......................................................................................................................................32
Display ..........................................................................................................................................32
Headset.........................................................................................................................................33
Voice mail number.........................................................................................................................34
Password.......................................................................................................................................34
Reset.............................................................................................................................................35
Clock .............................................................................................................................................35
Viewing administrator parameters..................................................................................................36
Configuring through a Web browser ..............................................................................................37
Connecting to the IP phone Web server.........................................................................................37
General information .......................................................................................................................38
User settings .................................................................................................................................39
Phone books .................................................................................................................................40
Appendix ..........................................................................................................................................41
Troubleshooting.............................................................................................................................41
Warranty conditions.......................................................................................................................41
Declaration of conformity for the European Community .................................................................42
Compliance and safety information................................................................................................42
IP10S / IP10 user guide 2 02P182000Aen

For your safety
Please read the following safety precautions before setting up your phone.
Certification information
This equipment has been tested and found to comply with the limits for a Class A digital device,
pursuant to part 15 of the Federal Communications Commission Rules. These limits are designed to
provide reasonable protection against harmful interference when the equipment is operated in a
commercial environment. This equipment generates, uses, and can radiate radio frequency energy
and, if not installed and used in accordance with the instruction manual, may cause harmful
interference to radio communications. Operation of this equipment in a residential area is likely to
cause harmful interference in which case the user will be required to correct the interference at his
own expense.
Modifying the equipment without Swissvoice’s written authorization may result in the equipment no
longer complying with FCC requirements for Class A digital devices. In that event, your right to use the
equipment may be limited by FCC regulations, and you may be required to correct any interference to
radio communications at your own expense.
Operating conditions
This telephone is to be operated on a local area network. The calls are handled by a call manager
using MGCP, H323 or SIP signalling protocol. The telephone must be equipped with the appropriate
software version.
Location
Place your telephone in a safe place, on a non-slip surface.
Do not expose the telephone to direct sunlight or other sources of heat. Keep it in an ambient
temperature between +5°C and +35°C.
Keep the telephone dry.
Avoid wet or dusty locations.
Avoid locations where your telephone is exposed to aggressive liquids or vapours.
Avoid locations in the immediate vicinity of hi-fi and video equipment, domestic appliances, monitors,
and electric motors (influence of electromagnetic fields). If your telephone is connected to a PC, the
monitor may cause electromagnetic interference.
IP10S / IP10 user guide 3 02P182000Aen

For your safety
Connection
Plug the telephone’s connecting cables into the appropriate sockets only. Never try to change the
plugs on the connecting cables.
Only a Swissvoice power adaptor must be used with the IP10S and IP10 phones.
Swissvoice power adaptor references are:
For US: 02P175500A
For Europe: 20314471, 02P175600A
For UK: 02P183100A
For Australia: 02P183200A
Use of a third party power adaptor would be improper. Consequently, in case of product defect or flaw
caused by this improper use, the guarantee will not apply.
Security
The plug-in power supply is used as a disconnection device.
The network and power supply accesses of the phone are classified SELV (Safety Extra Low Voltage).
The mains access of the plug-in power supply is classified Dangerous voltage.
Care
Never carry the telephone by its connecting cord.
Clean the set with a soft, slightly damp or anti-static cloth. Do not use any detergents or chemicals to
clean the set.
Qualified service
Do not attempt to open the phone. Only qualified personnel may repair phone equipment. Changes or
modifications not expressly approved by Swissvoice could void the user’s authority to operate the
equipment. If your telephone is faulty or defective, please contact your supplier.
Information regarding the products in this manual is subject to change without notice. This guide is
believed to be accurate but is presented without warranty of any kind, express or implied. The usable
services and features on the phone depend on the installed software release and on the call manager.
Therefore, the conformity of the user guide cannot be guaranteed.
IP10S / IP10 user guide 4 02P182000Aen
Your phone
Introduction
Your IP phone is a full-feature telephone that provides voice communication over an IP (Internet
Protocol) network. You can use it as a traditional analog phone, allowing you to make and receive
telephone calls. It also offers features that you have come to expect from a telephone, such as call
transfer, voice mail access, redial key. Furthermore, your IP phone offers you new features because it
is part of an IP network. For example, you can customize its settings using the Web based interface.
Your IP phone can be either the IP10S or the IP10. The only difference consists in a mini-switch for a
PC connection which is offered on the IP10S.
Your IP phone is compliant with three signaling protocols: Media Gateway Control Protocol (MGCP),
Session Internet Protocol (SIP) and H323 v4. Depending on the software loaded in your phone, this
user guide may not describe the exact phone behaviour.
Typographical convention: words and messages displayed in the phone are printed in bold and red
color in this user guide.
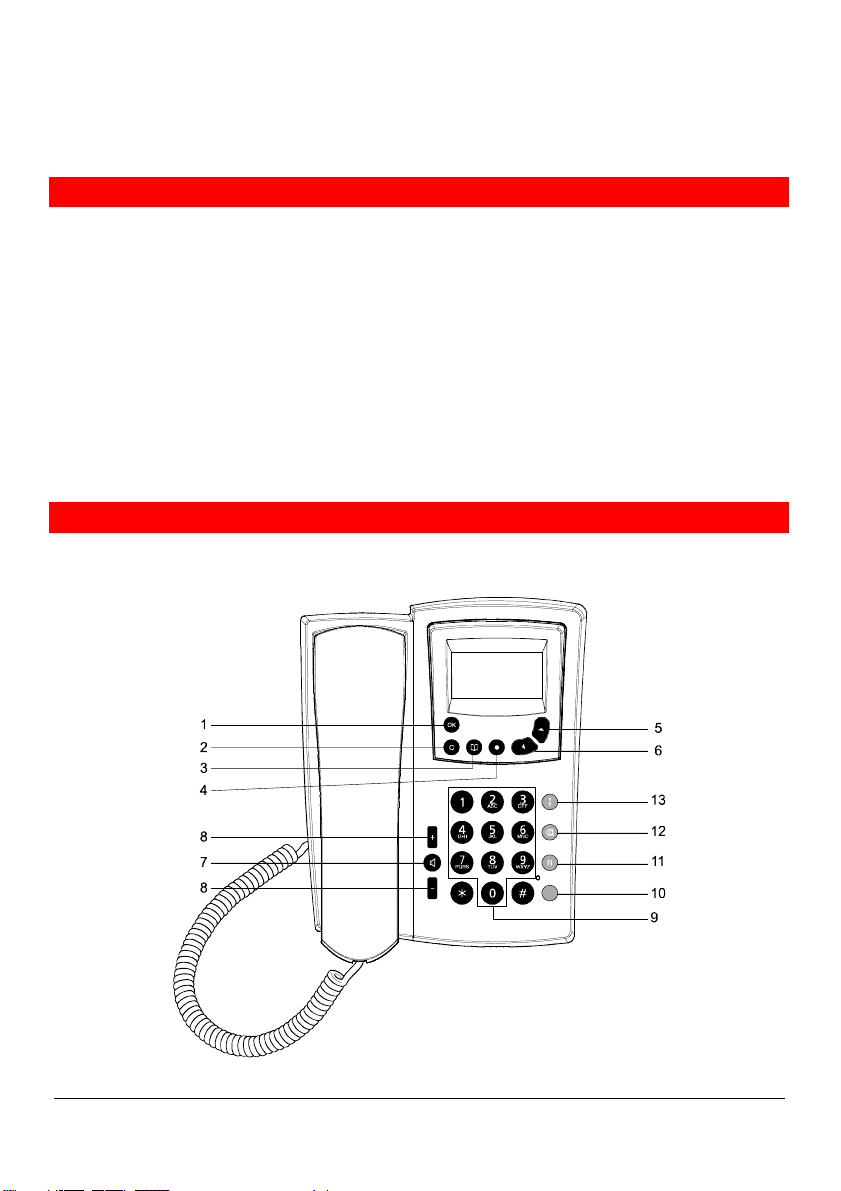
Keys version A
Two key-board models are available. Version A offers programmed function keys while version B
offers feature keys (see "Version B", page 7).
Version A
IP10S / IP10 user guide 5 02P182000Aen

Your phone
Display keys
1
2
3
4
5-6
5
6
Audio keys
7
8
Dialing keys
9
OK
C
- +
to
Confirmation key: enables access to the menu in standby mode, performs
a setting option, a service or a call.
Clear key: exits to higher-level menu (short click) or to the standby display
(long click).
Deletes the last character in editing mode.
Phone book key: offers direct access to name search in the phone books.
Service key: offers a list of available services (short click) or performs a
pre-programmed call number or service (long click).
Scrolling keys: enable browsing through menus and setting options.
In standby mode, shows the most recently called numbers.
In standby mode, scrolls in the phone books.
Loudspeaker key: activates loudspeaker or hands-free function.
Volume keys: are used to adjust the volume.
Keypad: is used to key in numbers and letters.
Pressing and holding one key calls the pre-programmed number or function.
10
Feature key is used to program a call number or a service. e.g. Voice Mail
number. Blinks slowly to indicate that voice messages are present.
11
12
13
IP10S / IP10 user guide 6 02P182000Aen
R
Flashing key: enables activation of a service by its code.
Mute key: disables the microphone.
Redial key: shows the most recently called numbers.
Your phone
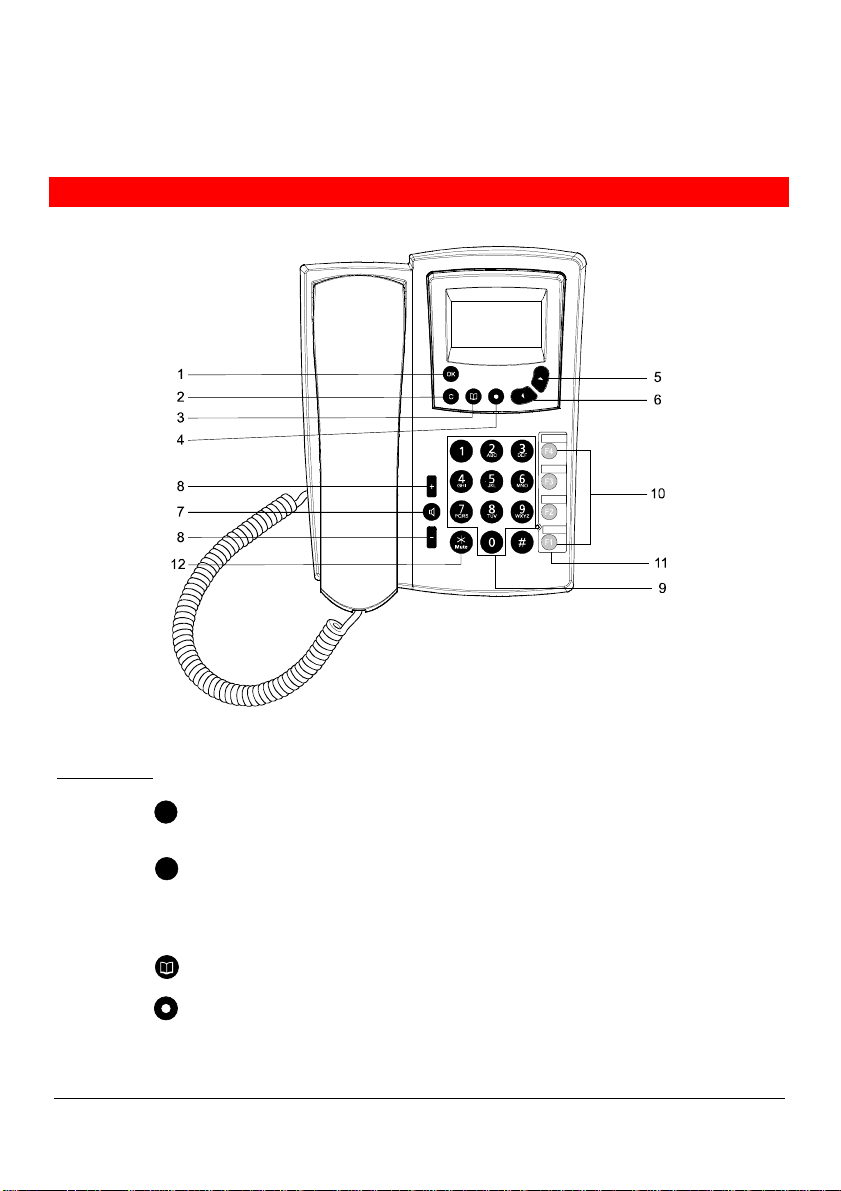
Keys version B
Version B
Display keys
1
2
OK
C
Confirmation key: enables access to the menu in standby mode, performs
a setting option, a service or a call.
Clear key: exits to higher-level menu (short click) or to standby display (long
click).
Deletes the last character in editing mode.
3
4
Phone book key: offers direct access to name search in the phone books.
Service key: offers a list of available services (short click) or gives access
to Memory keys menu (long click).
IP10S / IP10 user guide 7 02P182000Aen
Your phone
5-6 Scrolling keys: enable browsing through menus and setting options.
5
6
In standby mode, shows the most recently called numbers.
Scrolls in the phone books.
Audio keys
7
8
- +
Loudspeaker key: activates loudspeaker and hands-free functions.
Volume keys: are used to adjust the volume.
Dialing keys
9
to
Keyboard: is used to key in numbers and letters.
Pressing and holding one key calls the pre-programmed number or function.
10
11
12
F2F1
Feature keys: are backlighted keys used for speed dialing, line
F3
F4
appearances, feature access.
Label for programmable keys.
In a call, a long click performs the mute function. The microphone is off.
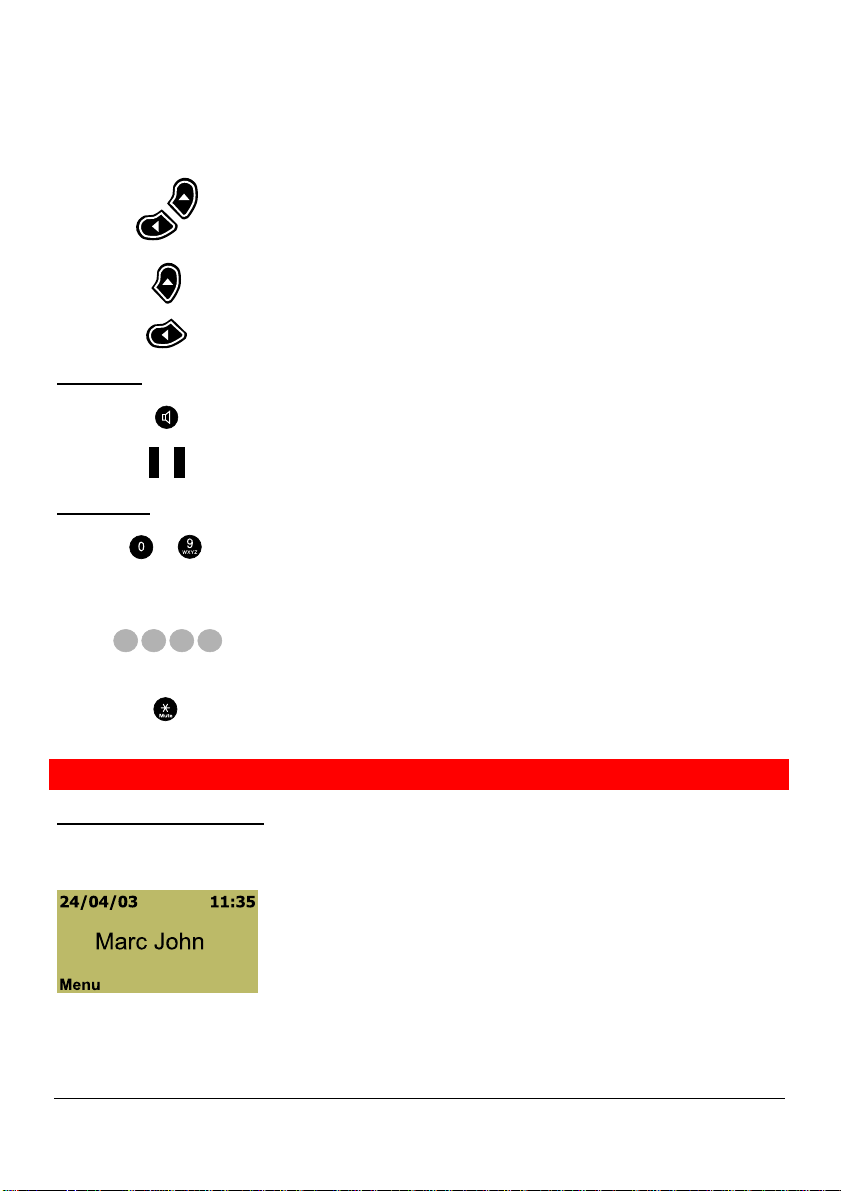
Indicators
Indicators in standby mode
When the phone is ready for use and no characters have been keyed in by the user, the phone is in
the mode. Example of display:
One or more of the following icons may be shown when a service or function is activated.
IP10S / IP10 user guide 8 02P182000Aen
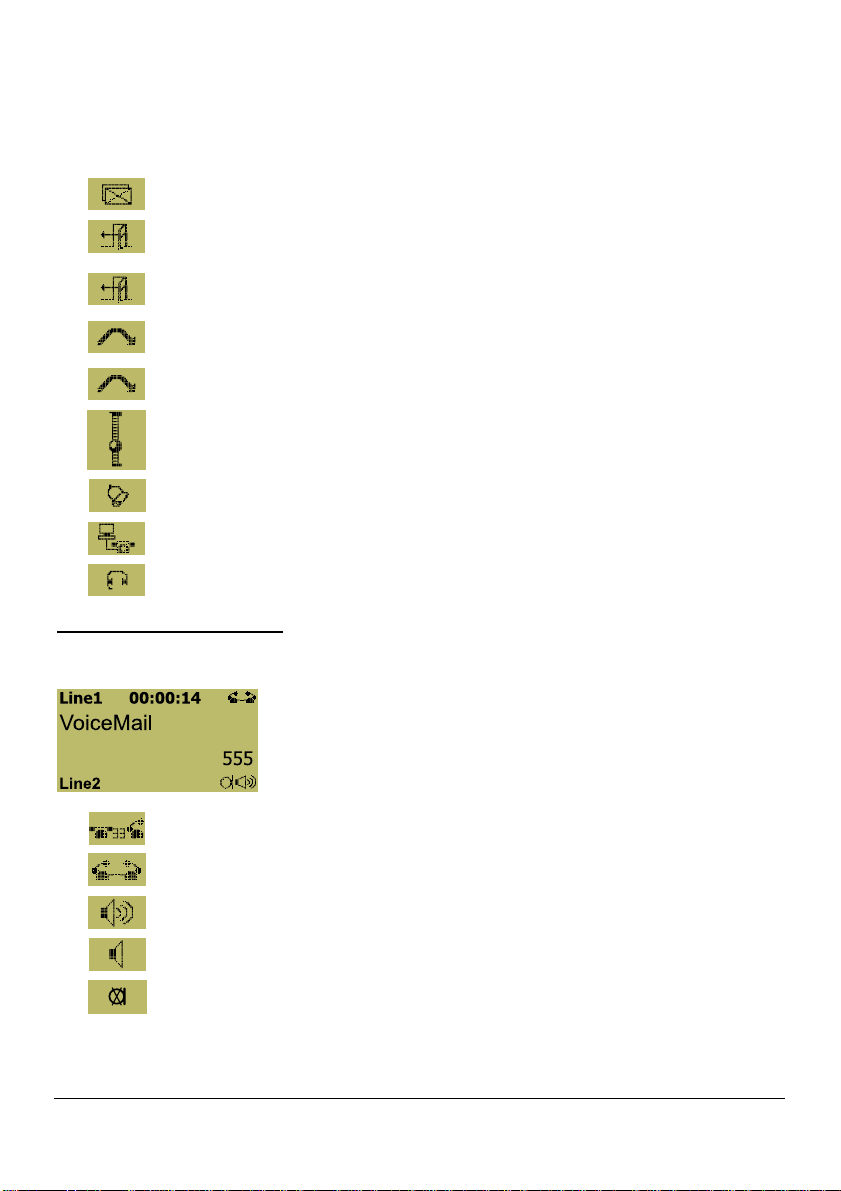
Your phone
This icon is blinking. You have received one or more voice messages.
Do not disturb service. All your calls are forwarded to your voice mail.
All your calls are forwarded to the number you have chosen.
If there is no reply, your calls are forwarded to your voice mail or to another
number.
If busy, your calls are forwarded to your voice mail or to another number.
Ranking indicator when scrolling in sub-menus.
Dynamic alarm indicator.
Waiting for call manager. The phone is not yet connected.
Headset indicator.
Indicators in connected mode
Example of display:
Ready for dialing.
Connection is done.
Handsfree.
Loudspeaker on.
Microphone off (mute).
IP10S / IP10 user guide 9 02P182000Aen

Getting started
Package contents
1 telephone set
1 handset
1 spiral handset connecting cable
1 Ethernet cable (100 base T)
1 wall mounting kit
1 short operating instruction (A5 paper sheet)
1 non-printed sticker for feature keys (version B only)
Separately delivered:
1 power supply.
Not included:
An additional Ethernet cable to connect any PC to the telephone through its PC-switch.
Installation
Your IP phone is designed to be connected to an Ethernet IP (Internet Protocol) network. Its
connection to the network has to be done by your system administrator. If that is not the case, follow
the above instruction for connecting your phone, and then ask to your system administrator for its
configuring.
Connecting the handset: insert the straight end of the spiral connecting cable into the
the base of the telephone (1). By gently pulling, check that the cable connector is in place. Insert the
other end of the cable into the handset (2).
You may use a headset instead of the handset.
Powering the telephone*: insert the power cable jack into the
a standard power outlet (4). Swissvoice is displayed a few seconds followed by Waiting for call
manager…
If your system administrator delivered your phone without a power supply, your phone probably
receives power through the Ethernet connection.
Connecting to the local area network: insert the Ethernet cable connector into the "LAN" socket at
the bottom of the terminal (5). By gently pulling, check that the cable connector is in place. Insert the
other end of the cable into the LAN connection socket (6).
Shared network connection: This capability is offered on the IP10S model. If you have a single
Ethernet port in your workspace with your desktop computer already connected to it, disconnect the
Ethernet cable from the computer and attach it to the "LAN" port on the back of your phone (5). Next,
use the Ethernet cable included with your phone to connect the "PC" port (7) on the back of your
phone to your desktop computer (8). The IP10S phone has an integral switch.
* Only a Swissvoice power adaptor must be used. For references, see "Connection" page 4.
IP10S / IP10 user guide 10 02P182000Aen
socket (3) and plug the other end in
socket on

Getting started
Wall mounting option: you have the possibility to fix your telephone in wall mounting position. Place
the plastic part on the base of the telephone (9). Place two screws distants of 126 mm, to hang the
telephone (10).
The message "Waiting for call manager…" will disappear once the IP address of the phone and the
address of the call manager will be set. Otherwise, contact your system administrator.
IP10S / IP10 user guide 11 02P182000Aen

Call functions
Making a call
Key in the phone number you want to call.
C
OK
Press the Clear key to delete the character to the left of the cursor or press and
hold to delete all and abort the dialing preparation.
Press the OK key to Call the number,
or
press the loudspeaker key,
or
lift the handset.
Making a call using the phone book
Press the phone book key.
Press the scrolling keys to move the cursor to the phone book you want to
search in. You may specifically scroll in your Private phone book or in the
Common phone book managed by the administrator. You can also indifferently
search in both, by selecting All .
OK
Press the OK key to select the phone book.
Enter the first letter of the name.
OK
Press the OK key.
Press the scrolling keys to move the cursor to the name you want.
Info enables to display the phone number.
Press the Loudspeaker key,
or
Lift the handset.
IP10S / IP10 user guide 12 02P182000Aen
 Loading...