

Page 1

Gigaset S100 / SWZ dt / A31008-S100-F102-1-2X19 / cover_0.fm / 13.10.2003
Top S324
ISDN
User Manual
Page 2

Gigaset S100 / SWZ dt / A31008-S100-F102-1-2X19 / cover_0.fm / 13.10.2003
2
Page 3
Gigaset SX100isdn / englisch / A31008-X150-B102-1-7619 / SAG_covers_I-II.fm / 13.10.2003
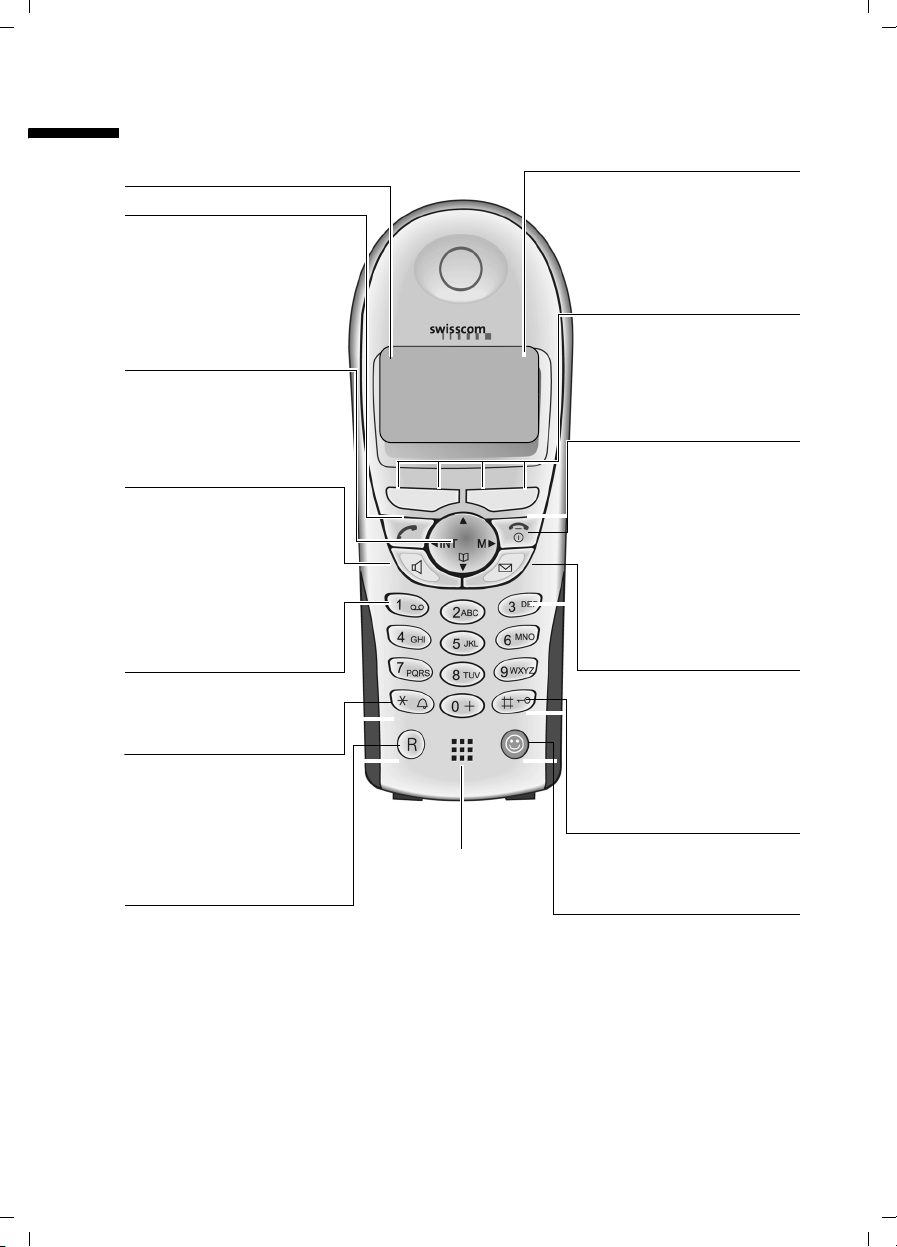
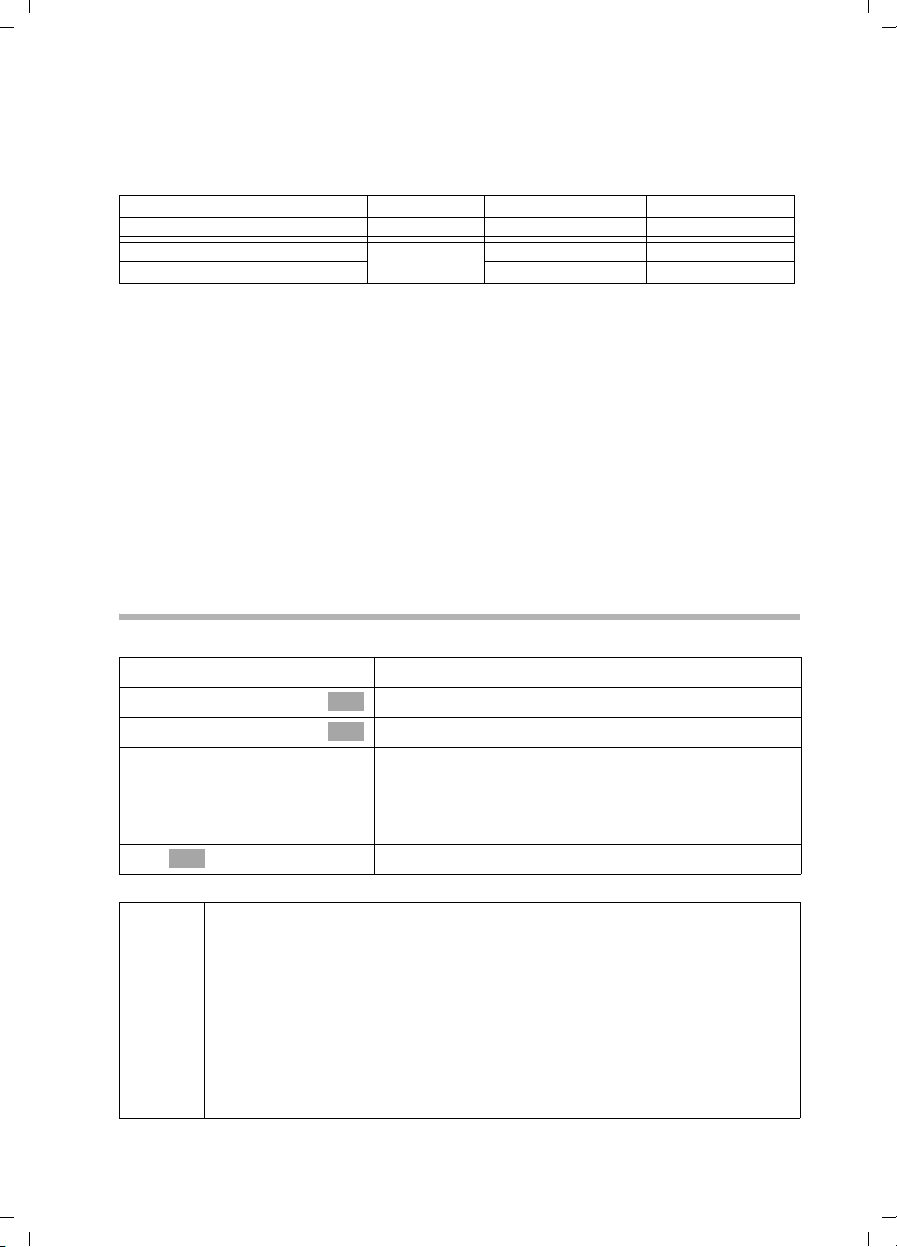
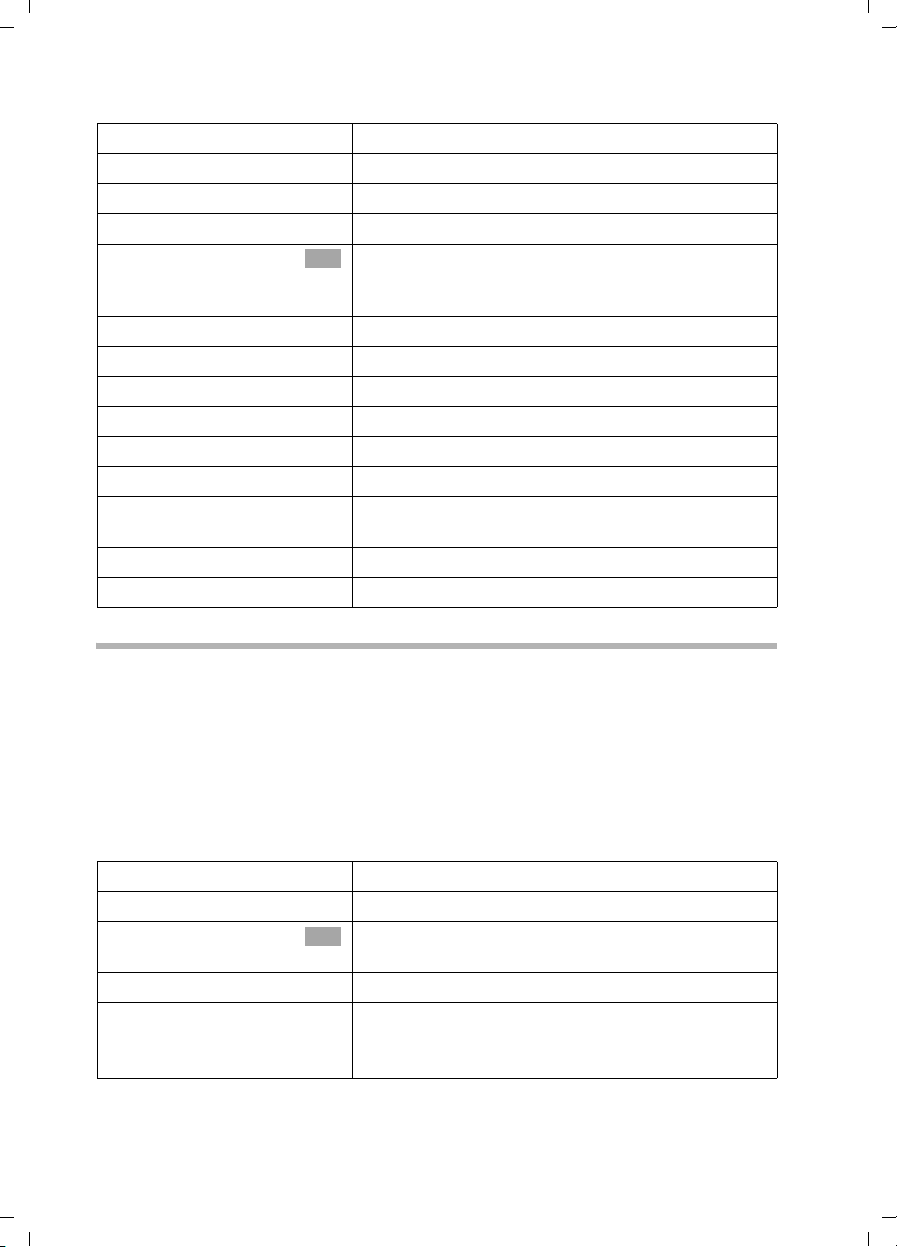
The handset at a glance
The handset at a glance
Reception strength
Tal k key
◆ Answer a call
◆ Initiate dialling
◆ Switch from handsfree
to "earpiece" mode
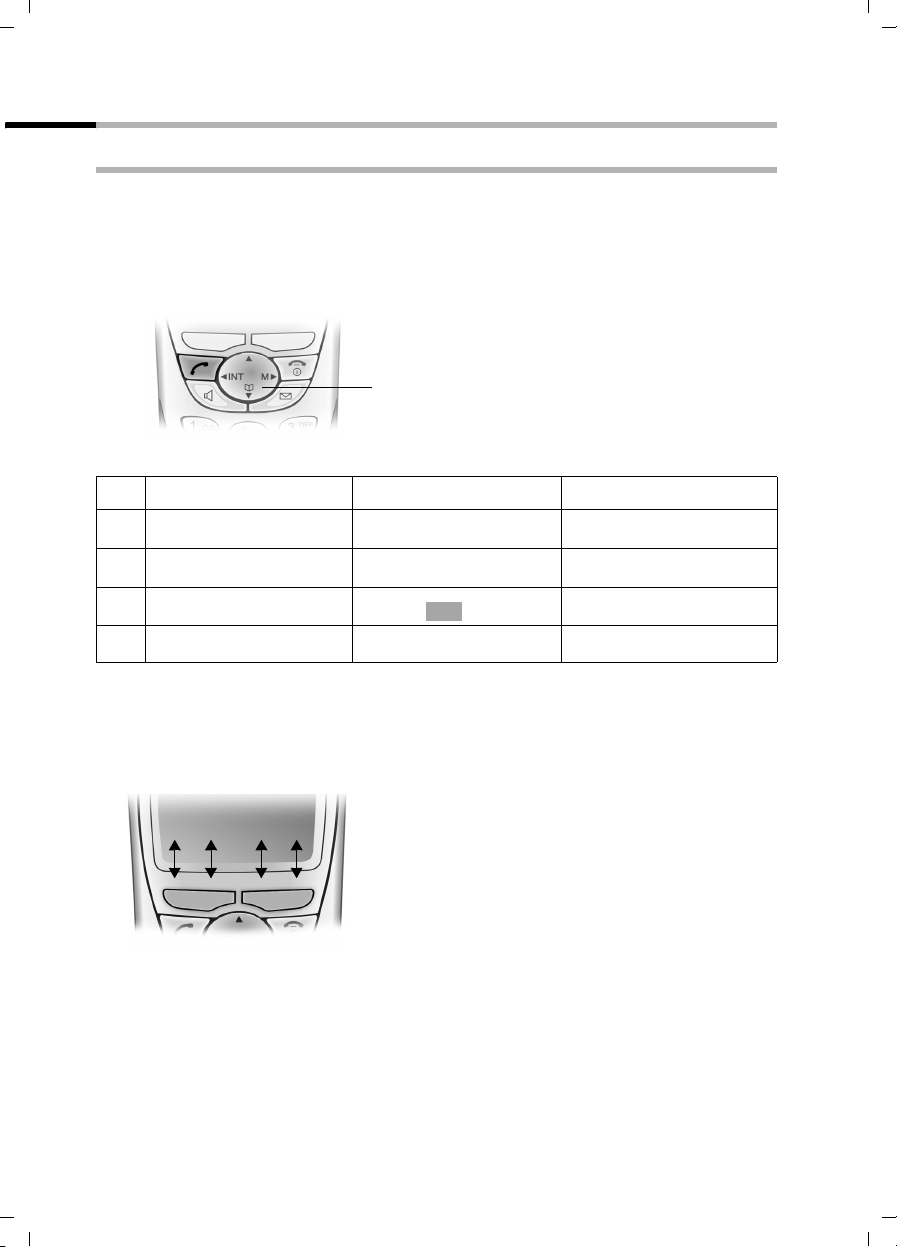
Control key
Opens the menu,
directory, internal list,
voice selection. Navigation
in the input field
Handsfree key
◆ Switch from "earpiece"
to handsfree mode
◆ Lights up: Handsfree
is activated
◆ Flashes: incoming call,
automatic last number
redial
Key 1
fixnetbox
®
(hold down)
Charge status
e flat ¤ fully
charged
e flashes: battery is
almost flat or is charging
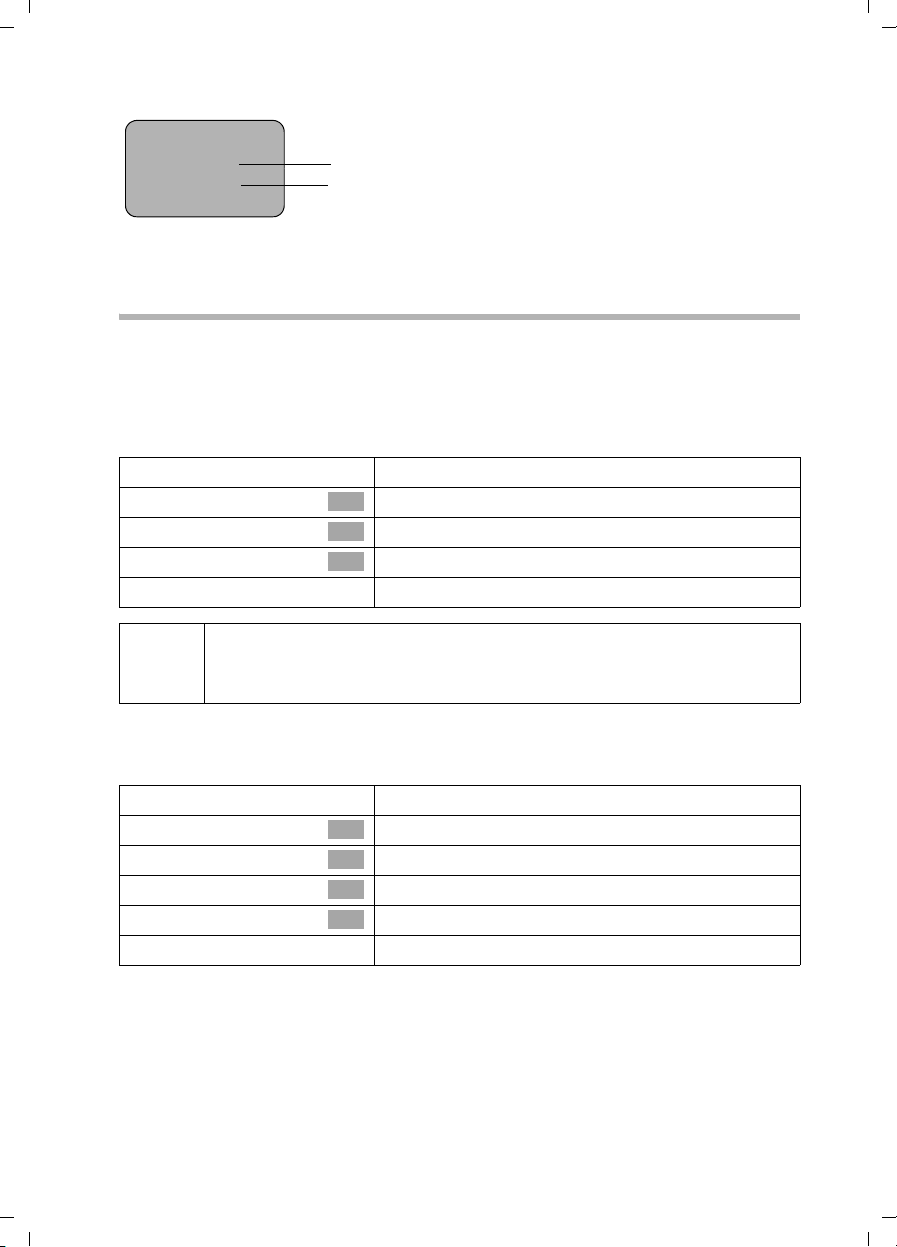
Current functions and
display keys
The display keys give you
ÐU
Internal 11
20.09.03 09:45
access to the functions
shown in the display.
End call key, On/Off key
◆ End call
◆ Cancel function
◆ Return to idle status
◆ Handset on/off (in idle
Message key
◆ Access to calls list
◆ Flashes: new calls
(hold down)
status, hold down)
Star key
◆ Ringer on/off (press for
approx. 2 seconds)
◆ Toggles between upper/
lower case and digits
Recall key
Initiate enquiry call
Microphone
Hash key
Keypad lock on/off
(hold down)
Swisscom key
for spec. directory
open: short press
1
Page 4

Gigaset SX100isdn / englisch / A31008-X150-B102-1-7619 / SX_150isdnIVZ.fm / 13.10.2003
The handset at a glance . . . . . . . . . . . . . . . . . . . . . . 1
Safety precautions . . . . . . . . . . . . . . . . . . . . . . . . . . 5
Preparing to use your phone . . . . . . . . . . . . . . . . . . 7
Package contents . . . . . . . . . . . . . . . . . . . . . . . . . . . . . . . . . . . . . . . . . . . . . . . . . . . . . . 7
Installing the base . . . . . . . . . . . . . . . . . . . . . . . . . . . . . . . . . . . . . . . . . . . . . . . . . . . . . 7
Connecting the base . . . . . . . . . . . . . . . . . . . . . . . . . . . . . . . . . . . . . . . . . . . . . . . . . . . 8
Operating the handset . . . . . . . . . . . . . . . . . . . . . . . . . . . . . . . . . . . . . . . . . . . . . . . . . . 9
Using the handset – and menus . . . . . . . . . . . . . . . . . . . . . . . . . . . . . . . . . . . . . . . . . 12
Operating the base – Getting started wizard . . . . . . . . . . . . . . . . . . . . . . . . . . . . . . . 14
Making calls . . . . . . . . . . . . . . . . . . . . . . . . . . . . . . . 19
Making and ending external calls . . . . . . . . . . . . . . . . . . . . . . . . . . . . . . . . . . . . . . . . 19
Making and ending internal calls . . . . . . . . . . . . . . . . . . . . . . . . . . . . . . . . . . . . . . . . . 19
Answering a call . . . . . . . . . . . . . . . . . . . . . . . . . . . . . . . . . . . . . . . . . . . . . . . . . . . . . . 20
Withholding Calling Line Identification . . . . . . . . . . . . . . . . . . . . . . . . . . . . . . . . . . . . 20
Handsfree talking . . . . . . . . . . . . . . . . . . . . . . . . . . . . . . . . . . . . . . . . . . . . . . . . . . . . . 22
Picking up a call during ring delay (Call PickUp) . . . . . . . . . . . . . . . . . . . . . . . . . . . . . 22
Rejecting a call . . . . . . . . . . . . . . . . . . . . . . . . . . . . . . . . . . . . . . . . . . . . . . . . . . . . . . . 23
Reserving a line . . . . . . . . . . . . . . . . . . . . . . . . . . . . . . . . . . . . . . . . . . . . . . . . . . . . . . 23
Defining the outgoing MSN for the next call . . . . . . . . . . . . . . . . . . . . . . . . . . . . . . . . 24
Ringback when busy (CCBS) . . . . . . . . . . . . . . . . . . . . . . . . . . . . . . . . . . . . . . . . . . . . 24
Identify caller . . . . . . . . . . . . . . . . . . . . . . . . . . . . . . . . . . . . . . . . . . . . . . . . . . . . . . . . 25
Functions during a call . . . . . . . . . . . . . . . . . . . . . . 26
Muting the handset . . . . . . . . . . . . . . . . . . . . . . . . . . . . . . . . . . . . . . . . . . . . . . . . . . . 26
Making calls with multiple parties . . . . . . . . . . . . . . . . . . . . . . . . . . . . . . . . . . . . . . . . 26
Forwarding an incoming call – CD (Call Deflection) . . . . . . . . . . . . . . . . . . . . . . . . . . 29
Transferring calls . . . . . . . . . . . . . . . . . . . . . . . . . . . . . . . . . . . . . . . . . . . . . . . . . . . . . 29
Working with call waiting for an external call – CW (Call Waiting) . . . . . . . . . . . . . . . 30
Call hold . . . . . . . . . . . . . . . . . . . . . . . . . . . . . . . . . . . . . . . . . . . . . . . . . . . . . . . . . . . . 31
Parking/continuing a call . . . . . . . . . . . . . . . . . . . . . . . . . . . . . . . . . . . . . . . . . . . . . . . 31
Using the directory and other lists . . . . . . . . . . . . 32
Directory and speed dial list . . . . . . . . . . . . . . . . . . . . . . . . . . . . . . . . . . . . . . . . . . . . . 32
Voice-activated dialling . . . . . . . . . . . . . . . . . . . . . . . . . . . . . . . . . . . . . . . . . . . . . . . . 40
Display available memory . . . . . . . . . . . . . . . . . . . . . . . . . . . . . . . . . . . . . . . . . . . . . . 42
Last number redial list . . . . . . . . . . . . . . . . . . . . . . . . . . . . . . . . . . . . . . . . . . . . . . . . . 42
Opening lists with the Message key . . . . . . . . . . . . . . . . . . . . . . . . . . . . . . . . . . . . . . 44
Calls lists . . . . . . . . . . . . . . . . . . . . . . . . . . . . . . . . . . . . . . . . . . . . . . . . . . . . . . . . . . . . 44
2
Page 5

Gigaset SX100isdn / englisch / A31008-X150-B102-1-7619 / SX_150isdnIVZ.fm / 13.10.2003
Making cost-effective calls . . . . . . . . . . . . . . . . . . 47
Displaying call charges . . . . . . . . . . . . . . . . . . . . . . . . . . . . . . . . . . . . . . . . . . . . . . . . 47
Using several handsets . . . . . . . . . . . . . . . . . . . . . 49
Using a handset as a room monitor . . . . . . . . . . . . . . . . . . . . . . . . . . . . . . . . . . . . . . 49
Setting the Walk and Talk mode . . . . . . . . . . . . . . . . . . . . . . . . . . . . . . . . . . . . . . . . . 52
Date and Time . . . . . . . . . . . . . . . . . . . . . . . . . . . . . 54
Setting the date and time . . . . . . . . . . . . . . . . . . . . . . . . . . . . . . . . . . . . . . . . . . . . . . 54
Setting the alarm clock . . . . . . . . . . . . . . . . . . . . . . . . . . . . . . . . . . . . . . . . . . . . . . . . 54
Setting appointments . . . . . . . . . . . . . . . . . . . . . . . . . . . . . . . . . . . . . . . . . . . . . . . . . 56
Displaying missed appointments, and anniversaries . . . . . . . . . . . . . . . . . . . . . . . . . 57
Night service . . . . . . . . . . . . . . . . . . . . . . . . . . . . . . . . . . . . . . . . . . . . . . . . . . . . . . . . 58
Security settings . . . . . . . . . . . . . . . . . . . . . . . . . . . 61
Changing the System PIN . . . . . . . . . . . . . . . . . . . . . . . . . . . . . . . . . . . . . . . . . . . . . . 61
Defining authorisation . . . . . . . . . . . . . . . . . . . . . . . . . . . . . . . . . . . . . . . . . . . . . . . . 61
Emergency numbers . . . . . . . . . . . . . . . . . . . . . . . . . . . . . . . . . . . . . . . . . . . . . . . . . . 62
Setting the system . . . . . . . . . . . . . . . . . . . . . . . . . 64
Changing the name for an internal party . . . . . . . . . . . . . . . . . . . . . . . . . . . . . . . . . . 64
Setting up/deleting ISDN phone numbers (MSN) . . . . . . . . . . . . . . . . . . . . . . . . . . . . 65
Assigning a phone number (MSN) . . . . . . . . . . . . . . . . . . . . . . . . . . . . . . . . . . . . . . . 66
Setting up the list of outgoing MSN for the next call . . . . . . . . . . . . . . . . . . . . . . . . . 67
Setting up a busy signal when the MSN is being used (Busy on Busy) . . . . . . . . . . . 68
Assigning an MSN a ringer melody . . . . . . . . . . . . . . . . . . . . . . . . . . . . . . . . . . . . . . . 68
Setting up rejecting for the entire MSN group . . . . . . . . . . . . . . . . . . . . . . . . . . . . . . 69
Forwarding calls . . . . . . . . . . . . . . . . . . . . . . . . . . . . . . . . . . . . . . . . . . . . . . . . . . . . . 69
Pre-assigning the call deflection destination – CD (Call Deflection) . . . . . . . . . . . . . 73
Setting up automatic call forwarding when not reaching a handset . . . . . . . . . . . . . 74
Setting up an internal group call group . . . . . . . . . . . . . . . . . . . . . . . . . . . . . . . . . . . 75
Setting up ring delay . . . . . . . . . . . . . . . . . . . . . . . . . . . . . . . . . . . . . . . . . . . . . . . . . . 75
Activating/deactivating call waiting – CW . . . . . . . . . . . . . . . . . . . . . . . . . . . . . . . . . 76
Setting an external/internal enquiry call . . . . . . . . . . . . . . . . . . . . . . . . . . . . . . . . . . . 77
Setting up the waiting melody . . . . . . . . . . . . . . . . . . . . . . . . . . . . . . . . . . . . . . . . . . 78
Changing the long distance prefix . . . . . . . . . . . . . . . . . . . . . . . . . . . . . . . . . . . . . . . 78
Restoring the factory settings . . . . . . . . . . . . . . . . . . . . . . . . . . . . . . . . . . . . . . . . . . . 79
Checking the status . . . . . . . . . . . . . . . . . . . . . . . . . . . . . . . . . . . . . . . . . . . . . . . . . . . 80
Checking the software version . . . . . . . . . . . . . . . . . . . . . . . . . . . . . . . . . . . . . . . . . . 80
Registering/de-registering further handsets . . . . 81
Handset settings . . . . . . . . . . . . . . . . . . . . . . . . . . . 84
Changing the display language . . . . . . . . . . . . . . . . . . . . . . . . . . . . . . . . . . . . . . . . . . 84
Deactivating/activating auto answer . . . . . . . . . . . . . . . . . . . . . . . . . . . . . . . . . . . . . . 84
Changing the name of the base . . . . . . . . . . . . . . . . . . . . . . . . . . . . . . . . . . . . . . . . . 85
3
Page 6

Gigaset SX100isdn / englisch / A31008-X150-B102-1-7619 / SX_150isdnIVZ.fm / 13.10.2003
Adjusting the loudspeaker volume . . . . . . . . . . . . . . . . . . . . . . . . . . . . . . . . . . . . . . . 85
Changing the ringer tone . . . . . . . . . . . . . . . . . . . . . . . . . . . . . . . . . . . . . . . . . . . . . . . 86
Activating/deactivating advisory tones . . . . . . . . . . . . . . . . . . . . . . . . . . . . . . . . . . . . 88
Restoring the handset to factory settings . . . . . . . . . . . . . . . . . . . . . . . . . . . . . . . . . . 89
Operating with other devices . . . . . . . . . . . . . . . . 90
Data modules Gigaset M101 Data and M105 Data . . . . . . . . . . . . . . . . . . . . . . . . . . . 90
Gigaset repeater . . . . . . . . . . . . . . . . . . . . . . . . . . . . . . . . . . . . . . . . . . . . . . . . . . . . . . 90
Using with a PABX . . . . . . . . . . . . . . . . . . . . . . . . . . 91
Access code (outside line code) . . . . . . . . . . . . . . . . . . . . . . . . . . . . . . . . . . . . . . . . . . 91
Dialling options . . . . . . . . . . . . . . . . . . . . . . . . . . . . . . . . . . . . . . . . . . . . . . . . . . . . . . 91
Appendix . . . . . . . . . . . . . . . . . . . . . . . . . . . . . . . . . 94
Care . . . . . . . . . . . . . . . . . . . . . . . . . . . . . . . . . . . . . . . . . . . . . . . . . . . . . . . . . . . . . . . 94
Contact with liquid . . . . . . . . . . . . . . . . . . . . . . . . . . . . . . . . . . . . . . . . . . . . . . . . . . . 94
Questions and Answers . . . . . . . . . . . . . . . . . . . . . . . . . . . . . . . . . . . . . . . . . . . . . . . . 94
Guarantee/maintenance/repair/approval . . . . . . . . . . . . . . . . . . . . . . . . . . . . . . . . . . . 96
Specifications . . . . . . . . . . . . . . . . . . . . . . . . . . . . . . . . . . . . . . . . . . . . . . . . . . . . . . . . 97
Character set chart . . . . . . . . . . . . . . . . . . . . . . . . . . . . . . . . . . . . . . . . . . . . . . . . . . . . 99
Predictive text . . . . . . . . . . . . . . . . . . . . . . . . . . . . . . . . . . . . . . . . . . . . . . . . . . . . . . . 100
Compatibility . . . . . . . . . . . . . . . . . . . . . . . . . . . . . 101
Menu table . . . . . . . . . . . . . . . . . . . . . . . . . . . . . . . 102
Main menu . . . . . . . . . . . . . . . . . . . . . . . . . . . . . . . . . . . . . . . . . . . . . . . . . . . . . . . . . 102
Submenu "Base Settings" . . . . . . . . . . . . . . . . . . . . . . . . . . . . . . . . . . . . . . . . . . . . . . 103
Directory key and speed dial list key . . . . . . . . . . . . . . . . . . . . . . . . . . . . . . . . . . . . . 105
Accessories . . . . . . . . . . . . . . . . . . . . . . . . . . . . . . . 106
ISDN glossary . . . . . . . . . . . . . . . . . . . . . . . . . . . . . 108
Index . . . . . . . . . . . . . . . . . . . . . . . . . . . . . . . . . . . . 115
4
Page 7

Gigaset SX100isdn / englisch / A31008-X150-B102-1-7619 / sec_hints.fm / 13.10.2003
Safety precautions
Safety precautions
Only use the power supply unit supplied, as indicated on the underside of
O
the device.
Only insert the recommended, rechargeable batteries (page 97) of the
same type! Use no other types of batteries or non-rechargeable batteries, as
they could damage health and cause personal injury.
‹
Œ
Ensure correct polarity when fitting rechargeable batteries, and use the
battery type according to these instructions (you will see polarity symbols in
the handset's
The operation of medical appliances may be affected. Be aware of the
technical conditions within the particular environment (e.g. doctor's practice).
The handset may cause an intrusive 'hum' in hearing aids.
Do not install the base in bathrooms or shower rooms (see page 7 and
page 94). The handset and base are not watertight.
Drivers must not use their phones while driving (Walk and Talk function).
battery compartments)
!
.
ƒ
Switch off your phone while on board an aircraft (Walk and Talk function).
Ensure that it cannot be switched on again accidentally.
Do not use the phone in environments subject to explosion hazard
(e.g. auto paint shops).
Ensure that your device is accompanied by these instructions when you give it
to others to use.
Dispose of the batteries and phone in accordance with environmental
regulations.
5
Page 8

Gigaset SX100isdn / englisch / A31008-X150-B102-1-7619 / sec_hints.fm / 13.10.2003
Safety precautions
◆ This product does not support SMS (Short Message Service).
i
◆ Not all of the functions described in these instructions are available in
all countries.
6
Page 9

Gigaset SX100isdn / englisch / A31008-X150-B102-1-7619 / starting.fm / 13.10.2003
Preparing to use your phone
Preparing to use your phone
Package contents
The package contains:
◆ one base station,
◆ one handset,
◆ one power supply unit with power cord,
◆ one ISDN cable,
◆ one battery compartment cover for the handset,
◆ one belt clip for the handset,
◆ two batteries,
◆ operating instructions (in 3 languages: German, French, Italian).
Installing the base
Notes on installation
The base is designed to be used in enclosed, dry areas at temperatures ranging from
+5 °C to +45 °C. Install the base at a central location in your home, e.g. in the hall.
◆ Never expose the telephone to the following: heat sources, direct
W
sunlight, other electrical equipment.
◆ Protect your Gigaset from moisture, dust, corrosive liquids and
vapours.
Range and reception strength
The base has a range of approx. 250 m outdoors and up to 40 m indoors. The reception
strength shows the quality of the radio contact between the base and handset:
Ð Reception strength 100 % i Reception strength 75 %
Ñ Reception strength 50 % Ò Low reception strength
| No reception (flashes)
7
Page 10
Gigaset SX100isdn / englisch / A31008-X150-B102-1-7619 / starting.fm / 13.10.2003
Preparing to use your phone
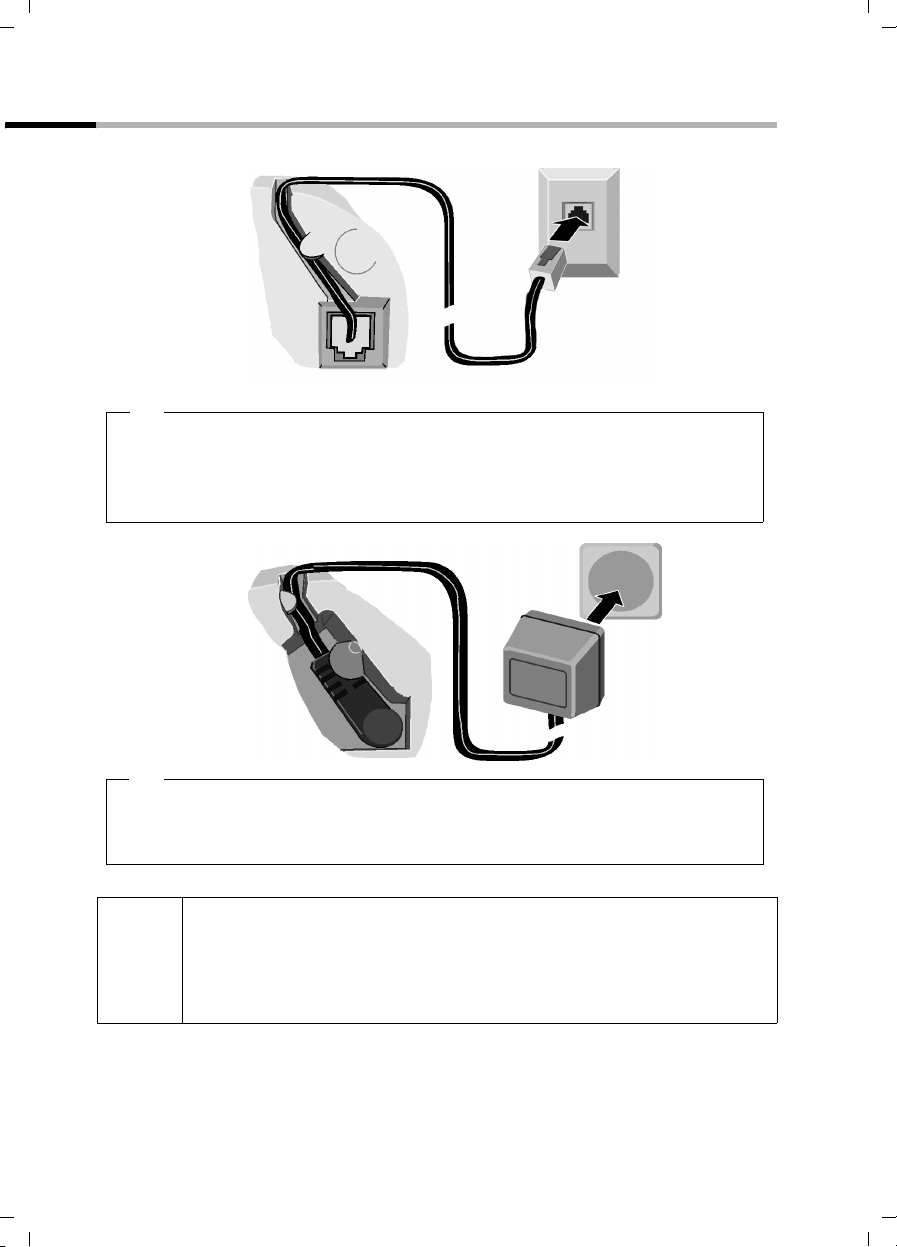
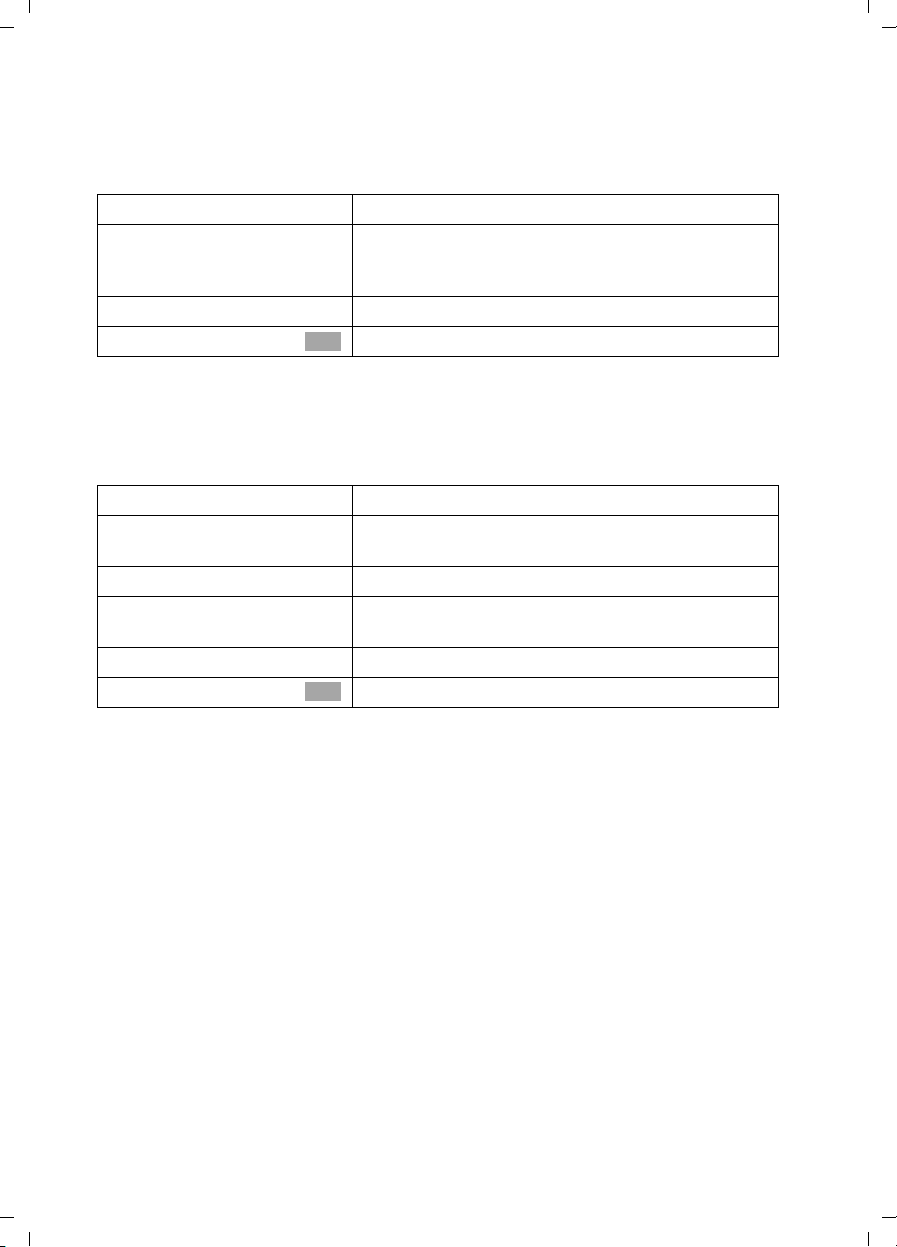
Connecting the base
ISDN connection
(NTBA)
1.
Tel epho ne pl ug
with ISDN cable
Underside of
base (enlarged
view)
Cable duct
1.
◆ Plug in the small plug on the ISDN cable into the socket (it clips into place),
◆ Place cable in the cable duct,
◆ Insert second plug of the ISDN cable into the NTBA (ISDN connection)
.
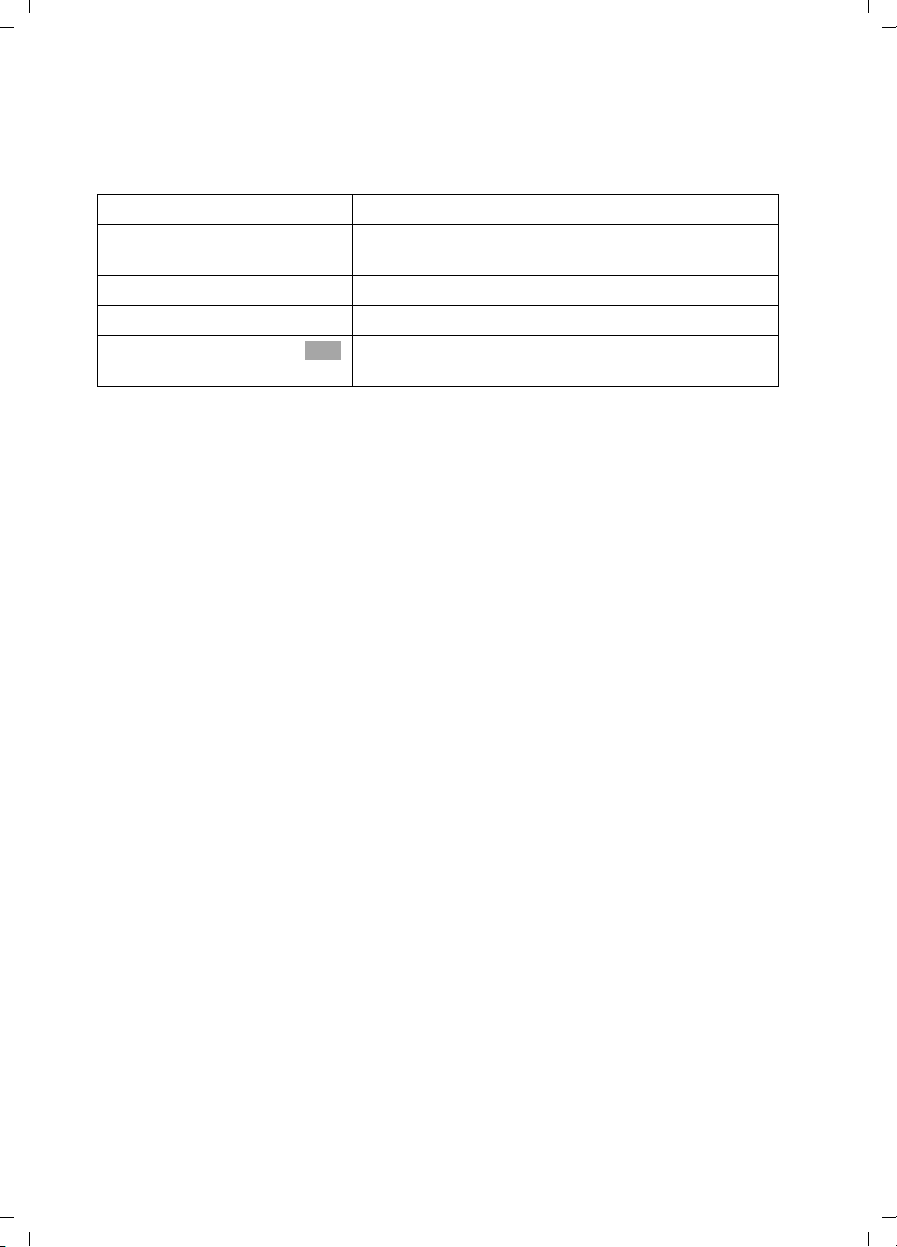
Socket
Cable duct
Underside of
base (enlarged
view)
2.
◆ Insert the small jack on the power cord into the socket on the underside of the
base,
◆ Place cable in the cable duct,
2.
Mains unit with
mains cable
◆ Keep the mains unit plugged in at all times to ensure your phone is
ready for use whenever you need it.
i
The base and the registered handset are not operational if there is
power failure. However, all settings and stored items (messages,
directory entries, etc.) are retained indefinitely.
8
Page 11
Gigaset SX100isdn / englisch / A31008-X150-B102-1-7619 / starting.fm / 13.10.2003
Preparing to use your phone
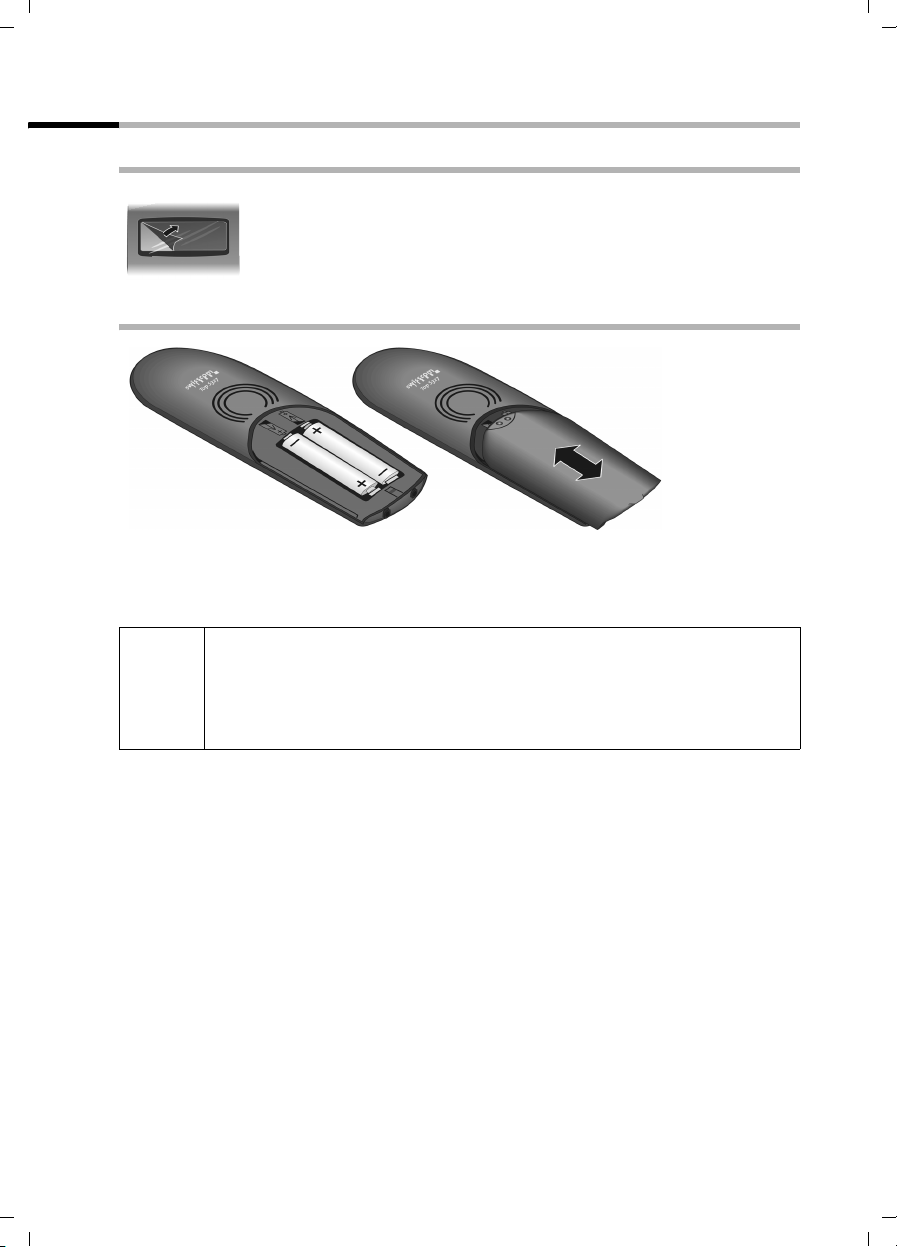
Operating the handset
Removing the protective film
The display is protected by a plastic film.
Please remove the protective film!
Inserting the batteries
◆ Insert the batteries ensuring correct polarity (see figure on left).
◆ Position the battery cover so that it is open by around 3 mm, then slide up until it
closes with a click.
Use only the rechargeable batteries recommended on page 97! Never use
conventional batteries (non-rechargeable) or other battery types as this
W
Opening the battery compartment
Press on the grooved area of the cover and slide back.
may cause significant damage to health and property. For example, the
jacket of the battery could be destroyed (hazardous). The phone could
also malfunction or be damaged.
9
Page 12
Gigaset SX100isdn / englisch / A31008-X150-B102-1-7619 / starting.fm / 13.10.2003
Preparing to use your phone
Registering the handset and charging the batteries
When you place the handset into the base, it automatically registers. This can be done
as follows:
1. Place the handset turned off in the base with the display up.
2. Wait till the handset has automatically registered with the base (page 81): This takes
about one minute. You will now see "Time not activated" in the display. The
handset is assigned the internal number 11 (the first valid internal number for
handsets) and the internal name Internal 11 appears in the display. You can change
the handset name (page 64).
If automatic registration is interrupted, you must register the handset manually as
described starting on page 81. There is a table of the most important questions and
answers to help you (page 94).
Now leave the handset in the base for the batteries to charge – the batteries are supplied
uncharged. The charging is indicated in the upper right of the display where the
charging status
e The batteries are (almost) flat U Batteries
V Batteries
U flashes:
1
/
charged ¤ Batt. fully charged
3
2
/3 charged
i
If you want to register further handsets, please turn to page 81.
Note
Your telephone is now ready for use. To correctly record the time of calls you must now
set the date and time. Depending on the network provider, the date and time are
updated automatically by the telephone network with every outgoing call. All the
settings necessary for operating the telephone can be set up easily with the Getting
started wizard (page 14).
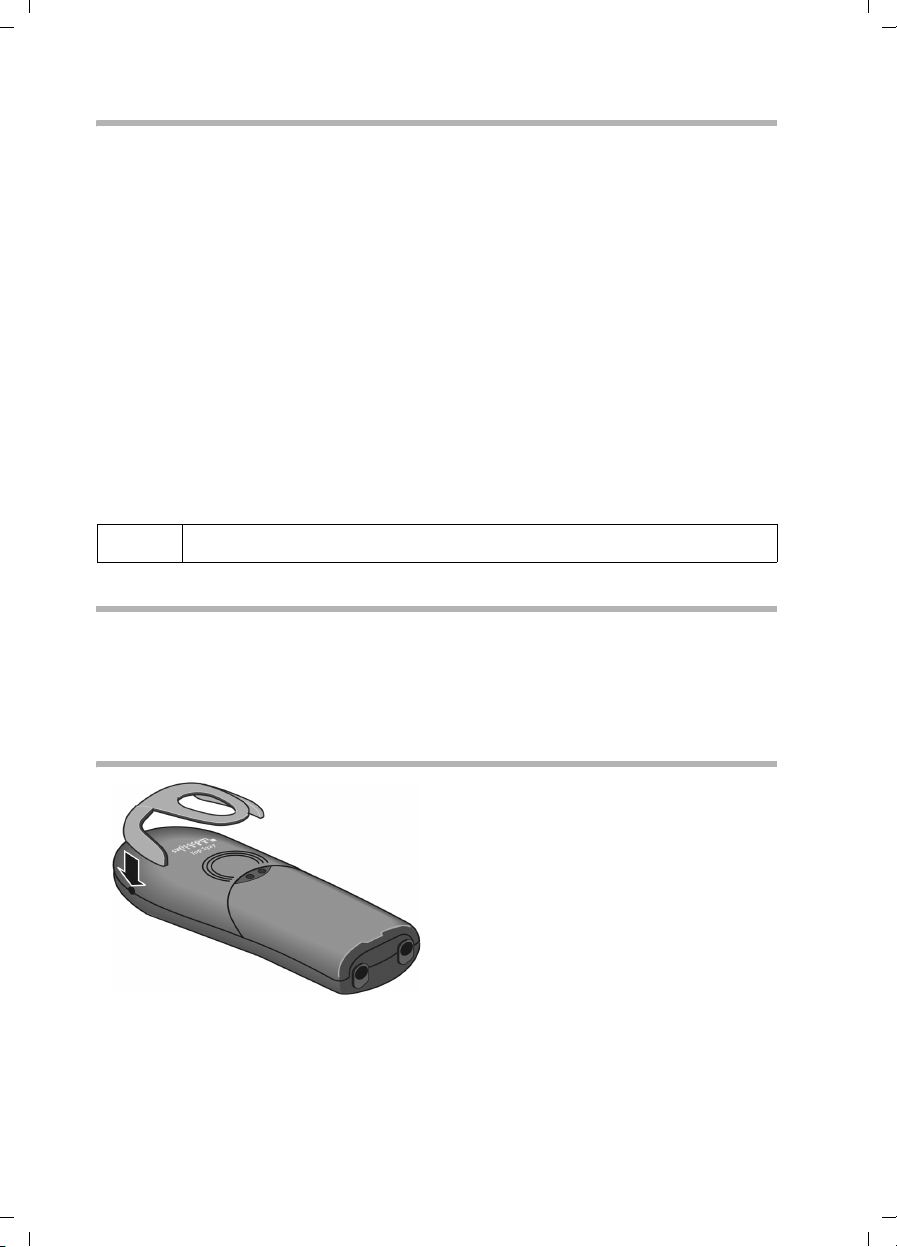
Attaching the belt clip
Push the belt clip onto the back of the handset until the lugs click into the recesses on
either side of the handset.
10
Page 13
Gigaset SX100isdn / englisch / A31008-X150-B102-1-7619 / starting.fm / 13.10.2003
Preparing to use your phone
Activating/deactivating the handset
To activate the handset, press the end call key a and hold. You will hear a
confirmation tone (rising tone sequence).
To deactivate the handset while in the idle status, press the end call key
hold (confirmation tone).
a again and
i
The deactivated handset activates automatically when placed in the base
or charger.
Activating/deactivating the keypad lock
You can 'lock' the keys on your handset, e.g. when carrying the unit in your pocket or
bag. This protects the keypad against inadvertent activation.
Hold down the hash key R. You will hear a confirmation tone and the icon Ø
appears in the display.
To deactivate the keypad lock, press the hash key
tone).
◆ The keypad lock deactivates automatically when you receive a call. It
re-activates when the call is finished.
i
◆ When the keypad lock is active, you cannot even call emergency
numbers.
◆ The keypad lock is still indicated if you have installed a logo as display
graphic (page 72).
R again and hold (confirmation
11
Page 14
Gigaset SX100isdn / englisch / A31008-X150-B102-1-7619 / starting.fm / 13.10.2003
Preparing to use your phone
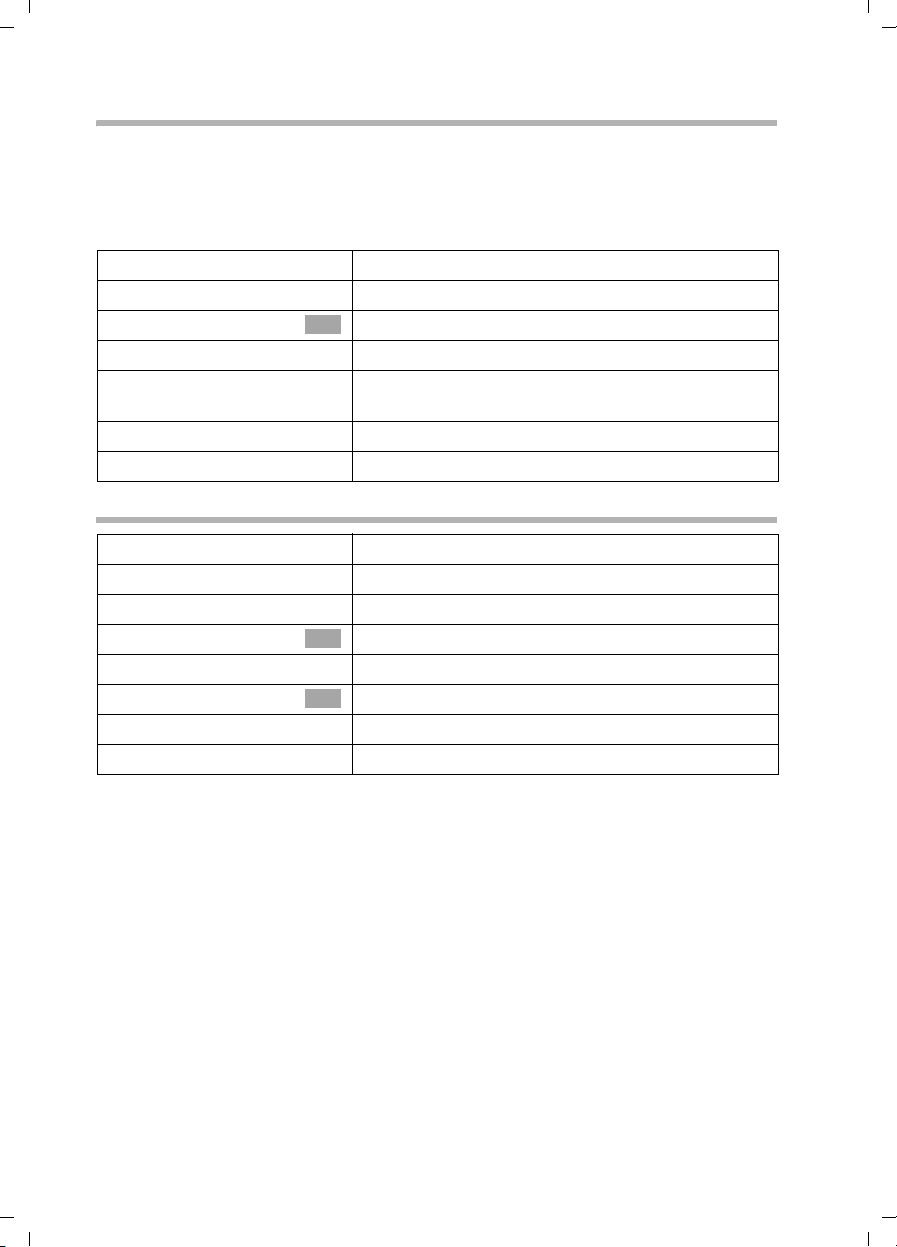
Using the handset – and menus
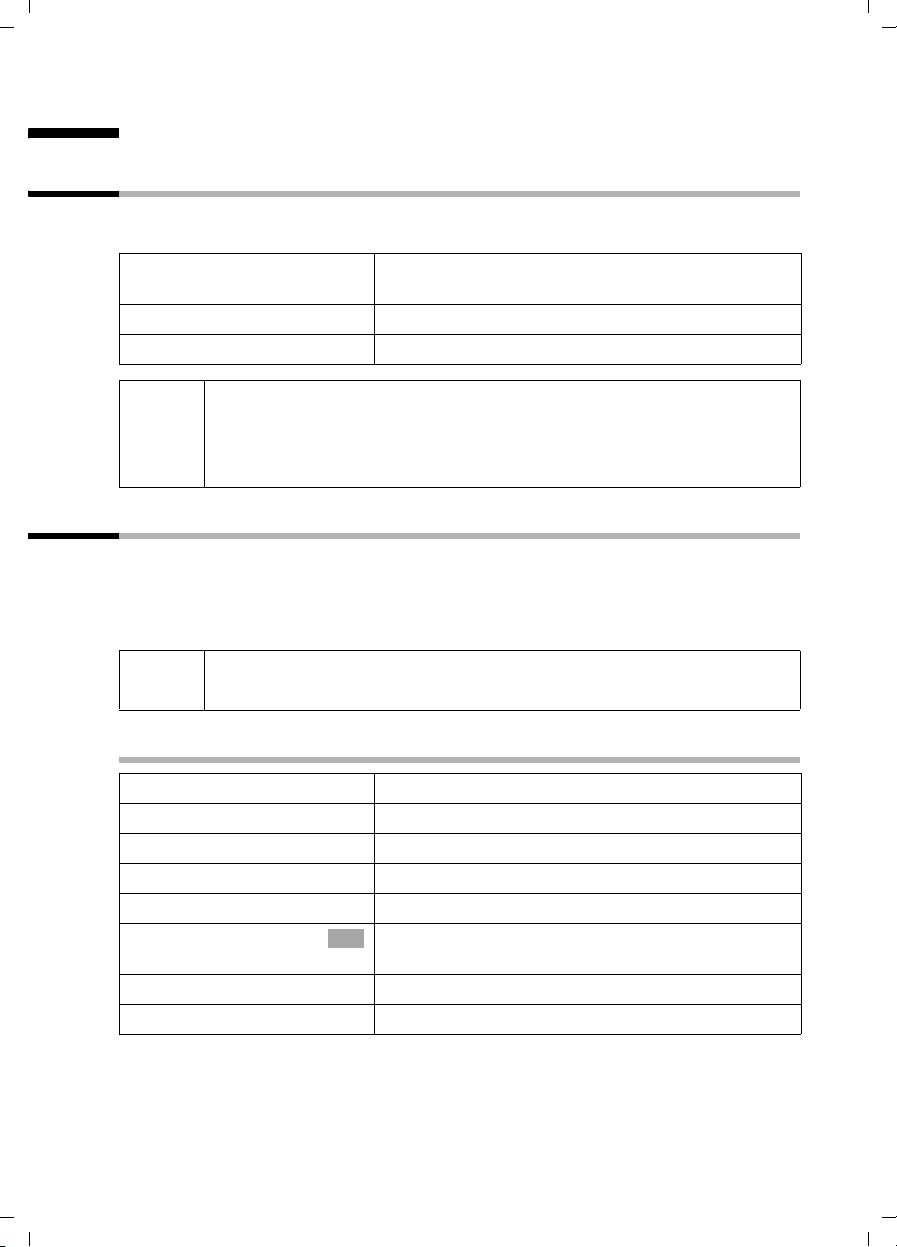
Special keys
Control key
The control key is the central operating element. It has four black arrows and the
corresponding icons. Pressing the various icons (up, down, right, or left) opens a
different function. The side you have to press is shown by a black triangle in the
operating instructions, e.g.:
Example:
Different functions of the control key:
In the idle status In lists and menus In an input field
Voice-activated dialling
t
(hold key down)
Open directory Scroll down Move the cursor one line
s
Open menu Confirm the selected entry
v
Initiate an internal call Go back one menu level, or
u
v key for right = open menu.
Control key
Scroll up Move the cursor one line up
down
(same as )
cancel
OK
Move the cursor to the right
Move the cursor to the left
Display keys
The display keys are the horizontal buttons just below the display. Their functions
depend on the operating situation. The current function is shown directly above the
button in the display.
Example:
Functions of the display keys
(depending on the operating situation)
Display keys
12
Page 15
Gigaset SX100isdn / englisch / A31008-X150-B102-1-7619 / starting.fm / 13.10.2003
Preparing to use your phone
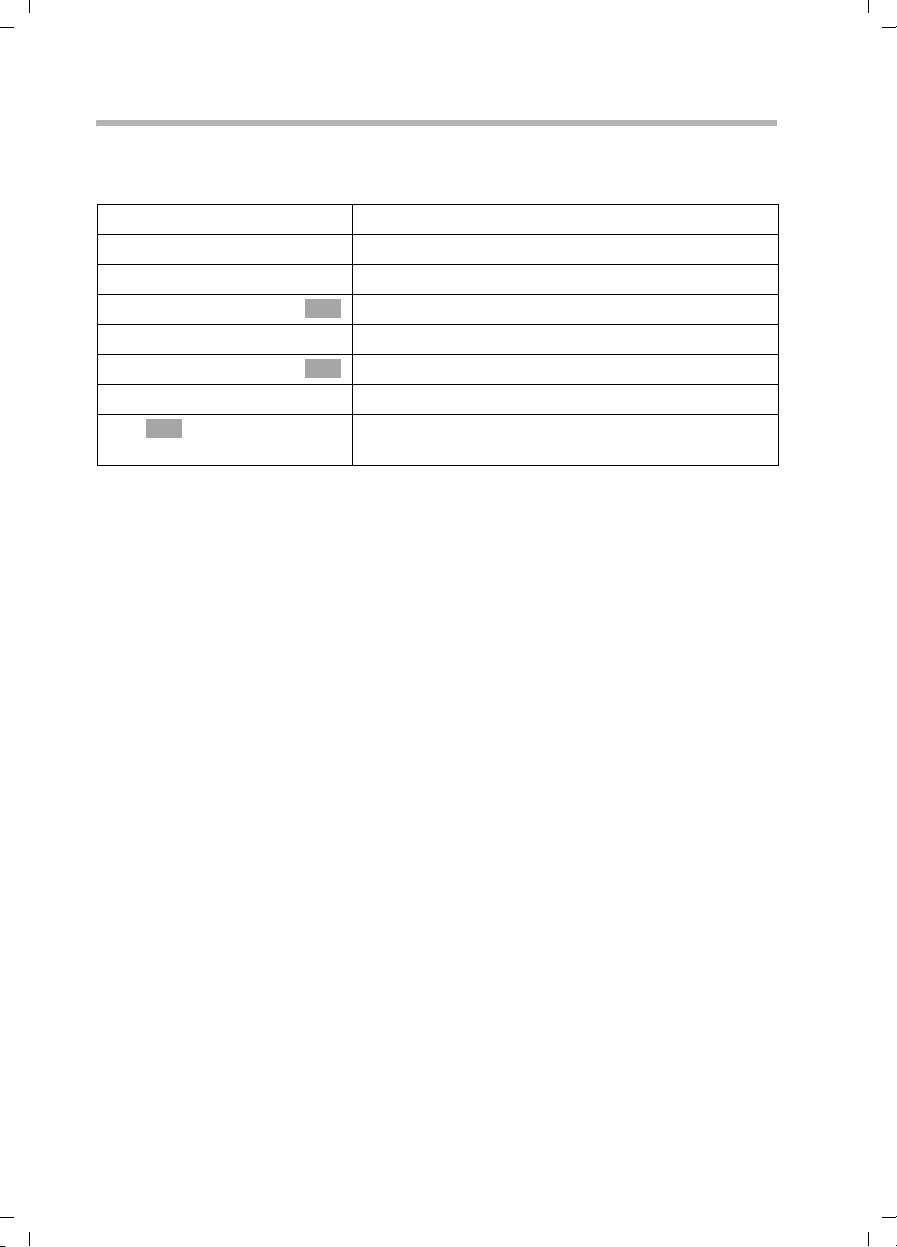
The various displays have the following meaning:
Display
If you press the key
icon
Þ
OK
à
f
Ý
C
Last number redialkey: Open the list of the last 10 phone numbers you dialled.
OK key: Confirm menu function or confirm entry and save.
Menu key: Open the main menu when in idle status.
Opens context sensitive menu while making a call.
Menu+ key: Open submenu, e. g. in input fields.
Delete key: Delete input character by character from right to left.
Escape key: One menu level back (cancel).
Correcting entries
After a correct entry you will hear a confirmation tone (rising tone sequence), an
incorrect entry is indicated by an error tone (falling tone sequence). You can repeat the
entry.
If you have entered the wrong character in the text, you can correct it as follows:
f
Deleting characters to the left of the cursor with .
To correct a phone number or text, move the cursor to the right of the incorrect
character with the control key. Then press the display key . This deletes the
character. Now enter the correct character.
Inserting characters to the left of the cursor
If you have left out a character, use the control key to move the cursor to where you
want to insert the character, and then enter it.
Overwriting characters
When entering
Date/Time the number of digits is fixed and there is a default entry in the
field. Use the control key to move the cursor to the wrong digit and overwrite it.
Overwriting characters to the right of the cursor
When entering Cost per Unit: the number of digits is fixed and there is a default entry
in the field. Use the control key to move the cursor to the left of the wrong digit and
then overwrite it.
C
f
C
Idle status
Display in idle status (example)
ÐU
Two lines with context dependent
Internal 11
20.09.03 09:45
•
à
system information
(Date and time have already been set)
Returning to idle status from anywhere in the menu:
◆ Hold down the End call key a for about 1 second or
◆ do not press any key: After about 2 minutes the display automatically returns to idle
status.
13
Page 16
Gigaset SX100isdn / englisch / A31008-X150-B102-1-7619 / starting.fm / 13.10.2003
Preparing to use your phone
OK
Changes you have not confirmed or saved by pressing ,
OK
will be discarded.
Yes, Save, Send or with Save
Example of menu operation: "Setting Handsfree Volume"
1.
v
2.
s
3.
v or
4. v or Confirm the first display entry, Handset Volume, using the right
5.
r
6.
[RRRRRRRRRRRRRRRRRRRRRRRRRR ]
Save
7.
a
Press right side of the control key. This opens the menu.
Keep pressing the lower part of the control key until you see Audio
Settings marked in the display (by the frame).
Use the right side of the control key or the display key to
OK
confirm.
OK
side of the control key or with the display key .
Press the left or right side of the control key to select the required
volume (1–5).
Press the display key to save the setting.
Press and hold the End call key to return to the idle status.
OK
OK
Operating the base – Getting started wizard
A few settings are necessary before using your telephone. The Getting started wizard is
designed to help you with this. It can be opened anytime using your handset. The
following settings can be set one after the other.
◆ Date and time
◆ Find enter the MSN of your connection
◆ Set the device type for the connected device
◆ Set the incoming MSN
◆ Set the outgoing MSN
◆ Outside line code (when using a PABX)
What is an MSN?
MSN = Multiple Subscriber Number. Up to ten different phone numbers can be applied
for to utilise the ISDN multi-device connection (MultiLine). An MSN is one of the phone
numbers without the area code assigned by you.
Your telephone uses the MSN according to your preferences. There are two types:
◆ Incoming MSN: phone numbers which can be used to call you. You can assign the
incoming MSN to specific internal parties (handsets). Incoming calls are only routed
to the handsets assigned the respective incoming MSN.
◆ Outgoing MSN: phone numbers identified to the person called. The outgoing MSNs
are used for invoicing by the network provider. Each internal party can be assigned
a fixed outgoing MSN.
Potential internal parties are:
◆ Handsets, which can be assigned the internal phone number 11 to 16.
◆ Data modules (page 90), which can be assigned the internal phone numbers 41 to
46.
14
Page 17
Gigaset SX100isdn / englisch / A31008-X150-B102-1-7619 / starting.fm / 13.10.2003
Preparing to use your phone
Examples for assigning MSNs:
You have ordered four MSNs, two for business use (MSN1, MSN2) and two for private
use (MSN3, MSN4). Four handsets are connected to one base. Two handsets (Int.11 and
12) are for business use, two handsets (Int.13 and 14) are for private use.
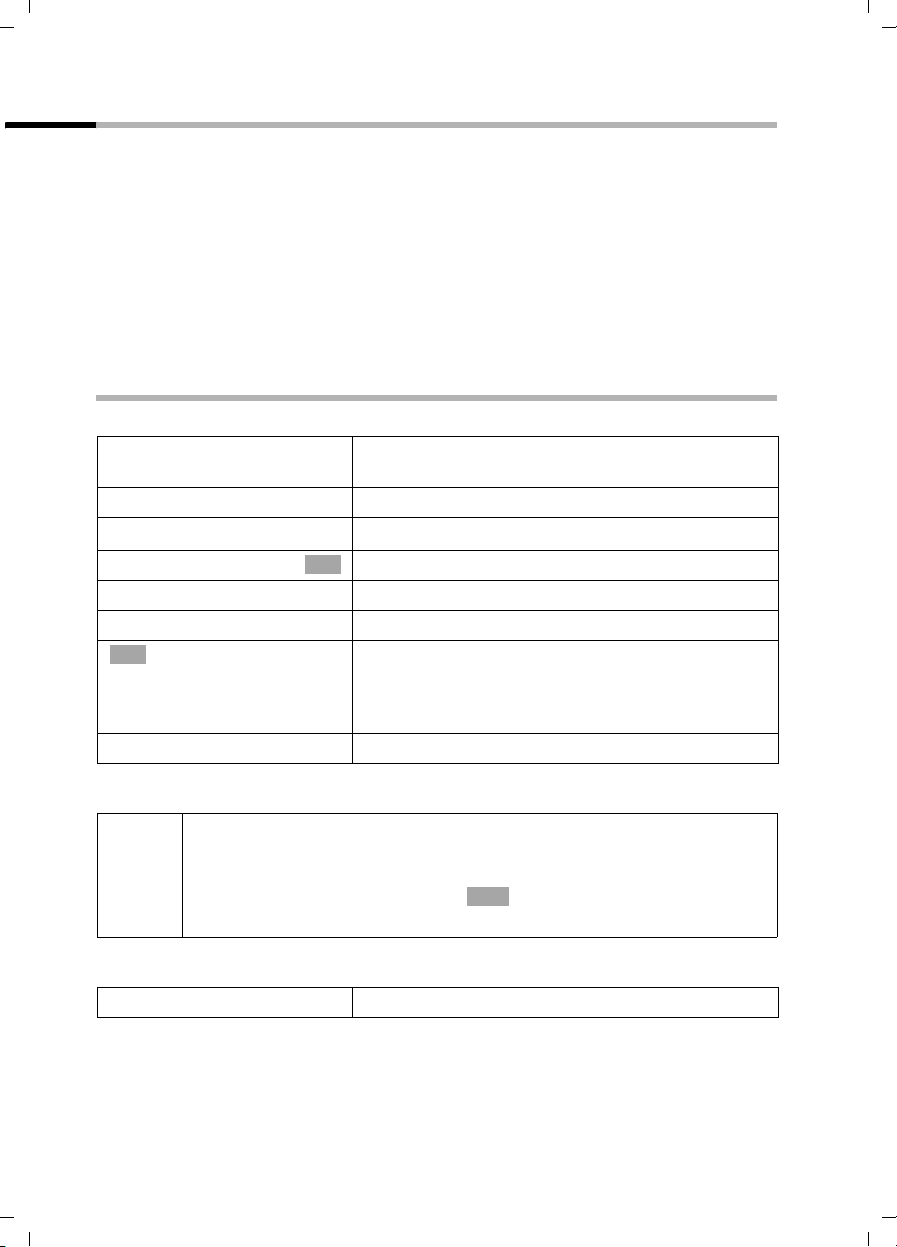
Internal parties Usage Incoming MSN Outgoing MSN
Handsets Int.11 , 12 Business
Handset Int.13 Private MSN3 MSN3
Handset Int.14 MSN4 MSN4
The following applies to Comfort handsets:
Because internal 11 and internal 12 handsets are assigned two (receiving) MSNs each,
they can use the MSN next call performance feature (page 75). They can change to
(sending) MSN2 during each outgoing external call. The internal 13 and 14 handsets
cannot do this.
Ring delay
When ring delay is active, the signal for an incoming call is delayed on the handset (e. g.
after 5 rings – the number can be set). Ring delay can be set individually for each
handset and for each incoming MSN (page 66).
As an example, an incoming call should be signalled to MSN1 Int.11 when Int.12 does
not answer the call. To do this, activate the ring delay for Int.11 and MSN1 (e.g., to
5 rings). The call is signalled directly to Int.12 , but Int.11 is signalled after the 5th ring.
MSN1, MSN2 MSN1
Launching the Getting started wizard and setting the basic
Launching the Getting started wizard:
v
s Base Settings
s Installation
[RRRRRRRRRRRRRRRRRRRRRRRRRR ]
YES
OK
~
◆ The Getting started wizard cannot be used simultaneously by multiple
handsets.
◆ If there is already settings data (factory default or previous settings),
this data is shown at the appropriate positions in the display and can
i
be modified there.
◆ To cancel the Getting started wizard, press the end call key and hold.
All changes you have already saved using Save entry
retained. The handset returns to idle status.
◆ To skip a setting, press the display key §§NO§§.
Open the menu.
Select the menu item and confirm.
OK
Select the menu item and confirm.
OK
Press the display key to launch the Getting started
wizard.
If you already have set a system PIN (not 0000)
(page 61), you will be asked to enter it.
If required, enter the system PIN and confirm.
§§OK§§ are
15
Page 18
Gigaset SX100isdn / englisch / A31008-X150-B102-1-7619 / starting.fm / 13.10.2003
Preparing to use your phone
Setting the date and time:
Depending on the network provider, the date and time are adopted automatically from
the telephone network during the first outgoing call.
The display shows: Enter time?
[RRRRRRRRRRRRRRRRRRRRRRRRRRR]
YES
~
s Save entry
If the time should be displayed in 12-hour mode, you can modify the setting later
(page 54).
Entering your phone numbers (MSNs) manually and entering names for the MSNs:
The display shows: Find own numbers (MSN)?
[RRRRRRRRRRRRRRRRRRRRRRRRRRR]
YES
[RRRRRRRRRRRRRRRRRRRRRRRRRRR]
YES
~
s~
s Save entry
Press the display key to set the date and time.
Enter the date (6-digit) and time (4-digit in 24-hour
mode) in series, e.g. 200903 0945 for 9/29/03
9:45 a.m.
Press the display key to open the submenu.
Select the menu item and confirm.
OK
Press the display key to confirm the prompt.
Press the display key to confirm the "MSN 1 MSN %f?"
prompt.
Enter name. Entering a name for an MSN is optional.
If necessary, scroll to the line <Nummer> and enter
the MSN
Press the display key to open the submenu.
Select the menu item and confirm.
OK
.
The MSNs entered will automatically be assigned to all handsets as incoming and
outgoing MSNs.
This sequence will then be repeated for MSN2 to MSN10.
16
Page 19

Gigaset SX100isdn / englisch / A31008-X150-B102-1-7619 / starting.fm / 13.10.2003
Preparing to use your phone
Setting the incoming MSN
The display shows: Set incoming MSN?
The incoming MSN is used to answer incoming calls. The MSNs allocated to your ISDN
connection can be allocated to various end devices according to your preferences. You
can assign an end device multiple incoming MSNs.
[RRRRRRRRRRRRRRRRRRRRRRRRRR ]
YES
[RRRRRRRRRRRRRRRRRRRRRRRRRR ]
YES
s MSN 1:12345678
Ý
This sequence is repeated for all handsets registered for your telephone.
Setting the outgoing MSN:
The display shows: Set outgoing MSN?
Each internal party can be assigned exactly one of the available outgoing MSNs. It is
identified to the person called and the network provider bills the call charges to this
MSN. Each end device can be assigned exactly one of the available outgoing MSNs.
[RRRRRRRRRRRRRRRRRRRRRRRRRR ]
YES
[RRRRRRRRRRRRRRRRRRRRRRRRRR ]
YES
s MSN 1:12345678
Ý
Press the display key to confirm the prompt.
Press the display key to confirm the "Set allocation
Internal 11 ?" prompt.
The list of entered MSNs is displayed.
Select the MSN which should be assigned to this end
OK
device, and confirm.
Repeat this sequence for all MSNs which should be
assigned to this end device as an incoming MSN.
Press the display key to end this assignment for this
end device.
Press the display key to confirm the prompt.
Press the display key to confirm the "Set allocation
Internal 11 ?" prompt.
The list of entered MSNs is displayed.
Select the MSN which should be assigned to this end
OK
device, and confirm.
Press the display key to end this assignment for this
end device.
This sequence will be repeated for all handsets registered for your telephone.
17
Page 20
Gigaset SX100isdn / englisch / A31008-X150-B102-1-7619 / starting.fm / 13.10.2003
Preparing to use your phone
Using with a PABX:
Only carry out the following steps if you want to connect your telephone to a private
PABX (not directly to a NTBA).
The display shows: Operate behind PABX?
[RRRRRRRRRRRRRRRRRRRRRRRRRRR]
YES
[RRRRRRRRRRRRRRRRRRRRRRRRRRR]
YES
~
s Save entry
Press the display key to confirm the prompt.
Press the display key to confirm the "Set access
code?" prompt.
Enter the access code (outside line code).
Press the display key to open the submenu.
Select the menu item and confirm. The Getting
OK
started wizard is closed.
The display shows "Installation completed". Press the end call key
idle status of the handset.
a, to return to the
18
Page 21
Gigaset SX100isdn / englisch / A31008-X150-B102-1-7619 / telephony.fm / 13.10.2003
Making calls
Making calls
Making and ending external calls
External calls are calls into the public telephone network. Two external calls can be
made at the same time on your base.
~c
a
◆ You can also first press the talk key c (you will hear the dial tone)
i
and then enter the phone number.
◆ You can cancel the dialling operation with the end call key a.
◆ You can also end a call by putting the handset in the base.
Making and ending internal calls
Internal calls are calls between handsets which are registered on the same base. They
are toll-free. Three internal calls can be made at the same time on your base.
You can either call a specific handset or all other registered internal parties at the same
time ("group call").
Enter the phone number and press the talk key. The
phone number is dialled.
Ending a call:
Press the end call key.
i
If you receive a call during an internal call or group call, the call is not
interrupted. You will hear a call waiting tone.
Calling a specific handset
u
either ...
~
or ...
[RRRRRRRRRRRRRRRRRRRRRRRRRR ]
LIST
s Int.11
... then
OK
a
Initiate an internal call.
Enter the number of the internal party you want.
Press the display key.
Select and confirm the internal number you want,
e.g., Int.11 .
Ending a call:
Press the end call key.
19
Page 22
Gigaset SX100isdn / englisch / A31008-X150-B102-1-7619 / telephony.fm / 13.10.2003
Making calls
Starting a group call to all internal parties
You can make a group call from any handset to all other registered internal parties
entered for group calls (page 75). By factory default, this option is activated.
u
either ...
[RRRRRRRRRRRRRRRRRRRRRRRRRRR]
LIST
s Collective call
or ...
P
The first internal party who answers the call is connected to you.
Initiate an internal call.
Press the display key.
Select the menu item and confirm.
OK
Press the star key.
Answering a call
Your handset rings, the call is shown in the display and the handsfree key d flashes.
Press the talk key
call. If the handset is in the base/charger and the Auto Answer function is activated
(page 84), then you just need to lift the handset out of the base/charger to answer the
call.
i
c, the display key Accept or the handsfree key d, to accept the
If the ringer is intrusive, press the display key Silence. You can take the call
as long as it is shown in the display.
Withholding Calling Line Identification
Prerequisite: The "Withholding Calling Line Identification" performance feature is
supported by your network provider.
The factory default setting for this displays your phone number on the called handset
(CLIP – for outgoing connections) or the call number of the caller is displayed on your
handset (COLP – for incoming connections).
You can withhold this Calling Line Identification (CLIR – for outgoing connections/COLR
– for incoming connections). CLIP/CLIR is coupled with COLP/COLR: If Calling Line
Identification is withheld, both CLIR and COLR are activated.
Explanations about the abbreviations used can be found in the Glossary on page 109.
Displaying the phone number of the caller
When you get a call, you will see the caller's phone number or name (CNIP) shown on
your display.
Prerequisite: The phone number of the caller is transferred.
Display with CLIP
With Calling Line Identification, the caller's phone number is shown on the handset
display. If you have stored an entry for this number in your phonebook, then that entry
will be displayed instead of the phone number, e.g. "Anna".
20
Page 23
Gigaset SX100isdn / englisch / A31008-X150-B102-1-7619 / telephony.fm / 13.10.2003
Making calls
ÐU
Ext. call from
0891234567
Private
REJECT RNG OFF
Unavailable will be displayed in the display if the phone number of the caller is not
transferred.
Phone number or "Anna"
Incoming MSN, receiving a call
Withholding transfer of the phone number
You would like for your phone number to not be identified to the other party. You can
block the transfer of your phone number. The identification of your phone number can
be withheld for the next call or continuously withheld. In the continuous setting, the
phone number is withheld for outgoing calls (CLIR), as well as for incoming calls (COLR).
Withholding transfer of the phone number only for the next call
v
s Base Settings
s Call preparat.
s Temp.withhold
a
After the call, the setting is reset again. Your phone number will be
i
Withholding or permitting transfer of the phone number continuously
By factory default, Withhold no.
identified to your next caller. When you call the selected phone number
from the last number redial list again, this call is also not anonymous.
v
s Base Settings
s Settings
s ISDN settings
s Withhold no.
a
Open the menu.
Select the menu item and confirm.
OK
Select the menu item and confirm.
OK
Select the menu item and confirm (‰ = activated).
OK
Hold down (return to idle status).
is not activated.
Open the menu.
Select the menu item and confirm.
OK
Select the menu item and confirm.
OK
Select the menu item and confirm.
OK
Select the menu item and confirm (‰ = activated).
OK
Hold down (return to idle status).
21
Page 24
Gigaset SX100isdn / englisch / A31008-X150-B102-1-7619 / telephony.fm / 13.10.2003
Making calls
Handsfree talking
Activating/deactivating handsfree talking
Activating while dialling:
~ d
d
c
As soon as you end handsfree talking you switch to "earpiece mode" for the rest of the
call.
Enter the phone number and press the handsfree key
(instead of the talk key
Activating during a call:
Press the handsfree key.
Deactivating handsfree talking:
Press the talk key
c).
i
If you want to place the handset back in the base during a call, keep the
handsfree key
d pressed while you do so.
Changing the volume during handsfree talking
You are making a call and handsfree talking d is activated.
d
r
[RRRRRRRRRRRRRRRRRRRRRRRRRRR]
Save
Press the handsfree key again.
Decrease or increase the volume.
Press the display key to save the setting.
Picking up a call during ring delay (Call PickUp)
You can pick up a call despite any set ring delay (page 75).
Prerequisites:
◆ The party picking up must be authorised with at least Incoming only status
(page 61).
◆ Both parties must be assigned the same incoming MSN (page 66).
c
[RRRRRRRRRRRRRRRRRRRRRRRRRRR]
YES
Press the talk key. Accept? is shown.
Confirm to pick up the call.
22
Page 25
Gigaset SX100isdn / englisch / A31008-X150-B102-1-7619 / telephony.fm / 13.10.2003
Making calls
Rejecting a call
You get an external call or you are making a call and receive an external call. The call is
signalled acoustically as well as is shown in the display on all handsets of this MSN
group. You can reject this external call.
Press the display key
Depending on the setting (page 69) the call is only rejected on the handset rejecting the
call (handsets with the same incoming MSN continue to ring) or is rejected for the entire
MSN group (the caller hears the busy tone).
REJECT.
Reserving a line
Your ISDN connection offers you 2 simultaneously usable telephone lines (B channels).
Prerequisite: You want to make calls externally, but both telephone lines of your
connection are busy (used by other internal parties).
Press the display key
You handset rings as soon as an external line is free.
CALLBCK. The next available free line will be reserved for you.
either ...
c
or ...
[RRRRRRRRRRRRRRRRRRRRRRRRRR ]
DELETE
i
Use a free line:
Press the talk key. You can now enter the phone
number as usual.
Delete the reservation:
Press the display key. The reservation is cancelled.
If the reservation is neither accepted or deleted, it will be deleted
automatically after 30 sec.
23
Page 26
Gigaset SX100isdn / englisch / A31008-X150-B102-1-7619 / telephony.fm / 13.10.2003
Making calls
Defining the outgoing MSN for the next call
Even if you have defined an individual outgoing MSN for the handset (page 67), you can
select another MSN as outgoing MSN before each call, e.g., for individual recording of
charges.
By factory default, MSN next call
is not activated for an MSN.
v
s Base Settings
s Call preparat.
s MSN next call
s MSN
a
i
You can set up your handset so that after pressing the Talk key
d a list of all available outgoing MSNs is displayed (page 67).
key
The temporary outgoing MSN is transferred to the person called as phone
number information.
Open the menu.
Select the menu item and confirm.
OK
Select the menu item and confirm.
OK
Select the menu item and confirm.
OK
Select the required MSN and confirm
OK
‰ = is activated).
(
The next call uses this MSN.
Hold down (return to idle status).
c or the handsfree
Ringback when busy (CCBS)
Prerequisite: The telephone exchange supports this performance feature.
Ringback when busy – CCBS (Completion of calls to busy subscriber)
The party you have called is now making a call. Automatic ringback saves you repeated
attempts to reach this party.
Activating ringback
The party you have called is busy or does not answer.
[RRRRRRRRRRRRRRRRRRRRRRRRRRR]
CALLBCK
24
Press the display key.
Wait for confirmation by the telephone exchange.
Page 27
Gigaset SX100isdn / englisch / A31008-X150-B102-1-7619 / telephony.fm / 13.10.2003
Making calls
Answering a ringback
The handset rings with a special ring and the display shows the ringback number.
c
Press the talk key. The connection is established.
Checking and deleting a ringback
Deleting the ringback while it is incoming
The handset rings and the display shows the ringback number.
[RRRRRRRRRRRRRRRRRRRRRRRRRR ]
DELETE
Checking or deleting the ringback before it is incoming
v
s Base Settings
s Status
s Callback
either ...
[RRRRRRRRRRRRRRRRRRRRRRRRRR ]
BACK
or ...
[RRRRRRRRRRRRRRRRRRRRRRRRRR ]
DELETE
Press the display key. The ringback is deleted.
Open the menu.
Select the menu item and confirm.
OK
Select the menu item and confirm. The status list is
OK
displayed (
Select the menu item and confirm. The current
OK
ringback number is shown on the display.
To check:
Press the display key. The ringback remains active.
To d elete :
Press the display key. The ringback is deleted.
‰ = is activated).
Identify caller
Identify caller is used to identify annoying or threatening callers.
Prerequisite: This service feature can only be requested from your network provider in
justified cases.
Activate this function during the call or immediately after the caller has hung up. You
must not end the call yourself.
i
v
s Identify caller
The caller is identified in the telephone exchange and is recorded by phone number,
time and date. A printout of the list is sent later by your network provider.
You must not press the end call key!
Open the menu.
Select the menu item and confirm.
OK
25
Page 28
Gigaset SX100isdn / englisch / A31008-X150-B102-1-7619 / during.fm / 13.10.2003
Functions during a call
Functions during a call
Muting the handset
You can mute your handset during a call, e.g. if you wish to talk co nfidenti ally to anot her
person in the room. Your party on the line cannot hear your conversation during this
time. But you can continue to hear him/her.
[RRRRRRRRRRRRRRRRRRRRRRRRRRR]
MUTE
[RRRRRRRRRRRRRRRRRRRRRRRRRRR]
AUDIBLE
Press the display key. The call is "on hold".
Cancel muting:
Press the display key.
i
When redialling or when performing other functions such as an internal
enquiry call, the muting is cancelled.
Making calls with multiple parties
You initiate making calls with multiple parties using an enquiry call. You can either
speak with the other parties in alternation ("toggling", page 28) or at the same time
("Conference switching", page 29).
External enquiry call
You would like to call another external party during an external or internal call.
The enquiry call from an external call to another external call can be set
i
Initiating an external enquiry call:
either ...
so (page 77) that both ISDN lines are occupied (hold connection
internally), or so that your second ISDN line remains free (hold
connection externally – HOLD).
v
s Enquiry call
or ...
S
Open the menu.
Select the menu item and confirm.
OK
Press R key.
The connection with the first party is now on hold. If the connection is on hold internally
(page 77), the first party hears the set waiting melody (page 78).
26
Page 29
Gigaset SX100isdn / englisch / A31008-X150-B102-1-7619 / during.fm / 13.10.2003
Functions during a call
Establishing a connection to a second external party:
~
[RRRRRRRRRRRRRRRRRRRRRRRRRR ]
BACK
either ...
ts
or ...
[RRRRRRRRRRRRRRRRRRRRRRRRRR ]
CONF.
Enter the second party's phone number.
The connection can also be established using the
directory or other lists (page 32).
Second external party dialled is busy:
Press the display key to return to the first party.
The second external party has answered:
Toggling (page 28):
Switch between persons on the lines.
Conference switching (page 29):
Press the display key to establish conference
switching.
Internal enquiry call
You would like to call an internal party during an external call.
Initiating an internal enquiry call:
either ...
u
or ...
[RRRRRRRRRRRRRRRRRRRRRRRRRR ]
CONSULT
u
or ...
S
u
Initiate an internal call.
Press the display key.
Initiate an internal call.
Press R key.
Initiate an internal call.
The connection with the first party is now on hold. The first (external) party hears the
set up waiting melody (page 78), when the connection is on hold internally (page 77).
27
Page 30
Gigaset SX100isdn / englisch / A31008-X150-B102-1-7619 / during.fm / 13.10.2003
Functions during a call
Establishing a connection to an internal party:
either ...
~
or ...
[RRRRRRRRRRRRRRRRRRRRRRRRRRR]
LIST
s Int.11
[RRRRRRRRRRRRRRRRRRRRRRRRRRR]
BACK
either ...
ts
or ...
[RRRRRRRRRRRRRRRRRRRRRRRRRRR]
CONF.
or ...
Enter the number of the internal party you want.
Press the display key.
Select the required internal number,
OK
e.g., Int.11 , and confirm.
The connection to the internal party is established.
The internal party dialled is busy:
Press the display key to return to the external party.
The internal party has answered:
Toggling (page 28):
Switch between persons on the lines.
Conference switching (page 29):
Press the display key to establish conference
switching.
Transfer call (page 29).
Tog gli ng
Prerequisite: You have established an enquiry call (page 26 or page 27).
There is an active connection (the one established with the enquiry call) and one on
hold (the first). You can alternate talking with both persons.
ts to switch between the persons on the lines.
Use
An external party hears the the set-up waiting melody in a connection on hold (page 78)
when the connection is on hold internally (page 77). An internal party in a connection
on hold does not hear a waiting melody.
Ending an enquiry call/toggling
either ...
v
s End
or ...
a
End the currently active call:
Open the menu.
Select the menu item and confirm. You will return to
OK
the waiting party.
Hold down (return to idle status).
The active connection is ended. You will
automatically be called back by the person on hold.
28
Page 31

Gigaset SX100isdn / englisch / A31008-X150-B102-1-7619 / during.fm / 13.10.2003
Functions during a call
Conference switching
Prerequisite: You have established an enquiry call (page 26 or page 27).
There is an active connection (the one established with the enquiry call) and one on
hold (the first). In conference switching, you speak with both parties at the same time.
You can establish conference switching with
i
Two conference switchings can be made at the same time on one base.
Setting up a conference call
You are making an enquiry call. The first party is on hold.
Press the display key
Ending a conference call
There are many ways to end a conference call:
◆ two external parties or
◆ with one internal party and an external party.
CONF. to establish conference switching.
either ...
a
or ...
[RRRRRRRRRRRRRRRRRRRRRRRRRR ]
INDIV.
You end the conference call:
Hold down (return to idle status).
You change the conference call to an enquiry call:
Press the display key to change the conference
switching to an enquiry call (page 26 or page 27).
The connection that was active right before
establishing the conference call is made active
again.
Forwarding an incoming call – CD (Call Deflection)
CD enables an incoming call to be forwarded to any phone number while it is ringing,
without having to answer the call.
You can pre-set a forwarding destination (page 73), dial a phone number from the
directory or enter a new number.
v
s Forward
Open the menu.
Select the menu item and confirm.
OK
The pre-set forwarding destination is dialled.
Transferring calls
Transferring a call to another handset
You are making an external call and would like to transfer this to another internal
handset.
Establish an internal enquiry call (page 27) and press the end call key a (also before
notifying), to transfer the call.
29
Page 32

Gigaset SX100isdn / englisch / A31008-X150-B102-1-7619 / during.fm / 13.10.2003
Functions during a call
Working with call waiting for an external call – CW (Call Waiting)
Prerequisite: CW (Call Waiting) set up, see page 76.
You hear the call waiting tone (short beep) if you receive an external call while
conducting a call (internal or external). The caller's phone number or name will appear
in the display if Calling Line Identification is enabled.
There are four ways to work with call waiting for an external call:
Accept call waiting – enquiry call:
Press the display key
hold. Both parties are shown on the display, the current one is marked.
To toggle both parties see page 28, for conference switching see page 29.
Reject call waiting
Press the display key
ACCEPT. You answer the call waiting call, and the first call is put on
REJECT to reject a call on call waiting.
i
Changing parties
a
c
Forward call waiting internally
You can forward the call waiting call internally without answering the call.
v
s Forward
s Int.11
either ...
or ...
i
If you reject the call waiting tone on your handset, it can still be heard on
other registered handsets.
End the current call. The call on call waiting will
become a normal call.
Press the talk key to answer the call.
Open the menu.
Select the menu item and confirm.
OK
Select and confirm the internal number you want,
OK
e.g., Int.11 .
The call waiting tone ceases. The call on call waiting
was successfully forwarded.
Continue the active call.
You continue to hear the call waiting tone. The call
on call waiting could not be forwarded.
Forwarding is only possible to internal parties who are not already being
called.
30
Page 33

Gigaset SX100isdn / englisch / A31008-X150-B102-1-7619 / during.fm / 13.10.2003
Functions during a call
Call hold
Hold external party
You are conducting an external call.
Press the display key INT. The external party is on hold. The waiting external party hears
the waiting melody (page 78), when the connection is on hold internally (page 77). You
can initiate an internal enquiry call (page 27).
Internal parties on hold
You are making an internal call.
Press the display key
CONSULT. The internal party is on hold.
Parking/continuing a call
You are making an external call and would like to transfer this to another telephone of
your ISDN connection, for example.
v
s Call park
OK
~
OK
a
"De-parking" a call before talking
v
s Base Settings
s Call preparat.
s Canc. call park
OK
~
OK
OK
OK
c
"De-parking" a call after talking
c
v
s Canc. call park
OK
~
OK
Open the menu.
Select the menu item and confirm.
Enter a one or two digit park number and confirm.
Wait for the positive response Call parked.
Hold down (return to idle status).
Open the menu.
Select the menu item and confirm.
Select the menu item and confirm.
Select the menu item and confirm.
Enter previously assigned park number and confirm.
Press the talk key
Press the talk key
Open the menu.
Select the menu item and confirm.
Enter previously assigned park number and confirm.
31
Page 34

Gigaset SX100isdn / englisch / A31008-X150-B102-1-7619 / directories.fm / 13.10.2003
à
Using the directory and other lists
Using the directory and other lists
Directory and speed dial list
You can store up to 200 phone numbers in the directory and the speed dial list,
depending on the size of individual entries, and on the number of entries in the speed
dial list.
The directory makes dialling easier for you. You open the directory in idle status using
s key. You can store an anniversary/birthday for every directory entry and mark
the
the entry as 'VIP'.
The speed dial list is a special directory, where you can store particularly important
phone numbers. You open the speed dial list using the
You create the directory and speed dial list for your individual handset. You can send the
lists/individual entries to the other handsets if you want them to be available at other
handsets as well (page 38).
The speed dial list is used the same way as the directory, except for the way in which
entries are stored.
◆ The EATONI predictive text helps you input names (page 100, this
feature is deactivated when you purchase your phone).
◆ Please refer to the Character Set Chart (page 99) to see how to enter
i
text correctly.
◆ You can enter up to 32 digits for a number and up to 16 letters for a
name.
◆ When entering a number you can insert the required pause with ,
s Insert Pause or by pressing S for about 2 seconds.
OK
C key.
32
Page 35

Gigaset SX100isdn / englisch / A31008-X150-B102-1-7619 / directories.fm / 13.10.2003
Using the directory and other lists
Storing a phone number in the directory
s Open the directory.
OK
New Entry
~
s~
either ...
à
Save
or ...
s
[RRRRRRRRRRRRRRRRRRRRRRRRRR ]
Save
... then
a
Storing a phone number in the speed dial list
Confirm.
Create an entry
Enter the phone number.
Scroll to the next line and enter the name.
Save the entry:
Press the display key to open the menu.
Confirm. The entry is stored.
OK
Before saving, enter the anniversary:
Scroll to the Annivers.: line to enter the anniversary
if necessary, as is described on page 39. Now:
Press the display key to save the setting.
Hold down (return to idle status).
You can assign one of the digits 0, 2–9 to up to nine entries on your speed dial list.
Already assigned digits are no longer offered. When you press and hold one of these
digits with the handset in the idle status, then press the Talk key
number assigned to that digit is dialled immediately.
The maximum number of entries in the speed dial list is dependent on the number of
entries in the directory.
c, the phone
C Open the speed dial list.
Confirm.
New Entry
~
s ~
either ...
à
Save
or ...
OK
Create an entry:
Enter the phone number.
Scroll to the line PublicKey: and enter the name.
Store a phone number:
Press the display key to open the menu.
Confirm. The entry is stored.
OK
Store a speed dial digit:
33
Page 36

Gigaset SX100isdn / englisch / A31008-X150-B102-1-7619 / directories.fm / 13.10.2003
Using the directory and other lists
sr Scroll to the Enter key: line and select a digit (0, 2–
9) for this phone number.
[RRRRRRRRRRRRRRRRRRRRRRRRRRR]
Save
... then
a
◆ Already assigned speed dial digits are no longer offered.
i
Dialling with the directory/speed dial list
◆ Sorting order: entries with speed dial digits are at the beginning of the
list.
Press the display key to save the setting.
Hold down (return to idle status).
s or C
either ...
s
c
or ...
~
~
c
Defining the MSN for the next call
You can select a valid outgoing MSN only for this call even when dialling from the
directory. Prerequisite: MSN next call must be activated (page 67). Select an entry and
open the submenu with . Using Dial number the list of MSNs is displayed.
à
Open the directory or speed dial list.
Scroll to the entry:
Select entry.
Press the talk key The number is dialled.
Enter the first letter:
Enter the first letter of the name you want, such as
"N".
You can also enter the next few letters. In line
directly over the display keys (input field) is an "N".
Enter the 2nd letter, e.g., "i". The name having this
letter combination comes next and appears. In the
input field is now "Ni". Enter letters (max. 10) until
the name you are looking for appears.
Press the talk key. The number is dialled.
OK
Displaying an entry from the directory/ speed dial list and editing it
s or C
R[RRRRRRRRRRRRRRRRRRR ]
s View
[RRRRRRRRRRRRRRRRRRRRRRRRRRR]
Edit
Open the directory or speed dial list.
Select the entry and press the display key.
Press the display key to initiate changes.
Proceed as described on page 33 (directory) or page 33 (speed dial list) under
"Create entry".
34
Page 37

Gigaset SX100isdn / englisch / A31008-X150-B102-1-7619 / directories.fm / 13.10.2003
Using the directory and other lists
Copying and changing a directory entry
So that you do not have to enter a similar entry twice, you can create a copy and then
edit that entry.
s
sv
s Copy and Edit
Open the directory.
Select an entry and open the menu.
Select the menu item and confirm.
OK
~ Change the phone number.
s~
either ...
à
Save
or ...
R[RRRRRRRRRRRRRRRRRRRR]
s Edit
OK
~ Change the anniversary (page 39) and confirm.
[RRRRRRRRRRRRRRRRRRRRRRRRRR ]
Save
... then
[RRRRRRRRRRRRRRRRRRRRRRRRRR ]
Yes
Scroll to the next line and change the name.
Save the changes:
Press the display key to open the menu.
Confirm. The entry is stored.
OK
Before saving, change the anniversary:
Scroll to the Annivers.: line and press the display
key.
Press the display key to save the entry.
If you do not change the phone number, you will see
a message telling you that the phone number
already exists. Press the display key to confirm the
prompt.
a Press key (return to idle status).
i
Voice pattern and VIP settings are not copied.
35
Page 38
Gigaset SX100isdn / englisch / A31008-X150-B102-1-7619 / directories.fm / 13.10.2003
Using the directory and other lists
Marking a directory entry as VIP
You can mark directory entries of callers who are particularly important to you as 'VIP'
(Very Important Person) using the
numbers, so you can tell who is calling by their ringer. The VIP melody sounds after the
first ring tone.
Prerequisite: The phone number of the caller is transferred (page 20).
s
sv
VIP Entry
r
sr
[RRRRRRRRRRRRRRRRRRRRRRRRRRR]
Save
a
Æ key. You can also assign a particular melody to VIP
Open the directory.
Select an entry and open the menu.
Select the menu item and confirm.
OK
In the VIP: line, activate the function.
Move one line down. The current melody rings, their
digit is at the end of the line. Select a melody (1-10).
Press the display key to save the setting.
Hold down (return to idle status).
Deleting a single entry or directory/speed dial list
s or C
sv
either ...
s Delete Entry
or ...
s Delete Calls List
[RRRRRRRRRRRRRRRRRRRRRRRRRRR]
Yes
a
Open the directory or speed dial list.
Select an entry and open the menu.
Delete a single entry:
Select the menu item and confirm.
OK
Delete the entire directory/speed dial list:
Select the menu item and confirm.
OK
Press the display key to confirm the prompt.
Hold down (return to idle status).
36
Page 39

Gigaset SX100isdn / englisch / A31008-X150-B102-1-7619 / directories.fm / 13.10.2003
Using the directory and other lists
Adding a displayed phone number to the directory
When a phone number appears in the display (CLIP) you can add it to your directory. This
can be done while dialling from the last number redial list, from the calls list or during
a call.
v
s Copy to Directory
Open the menu.
Select the menu item and confirm.
OK
s~ If you do not have a CNIP, scroll to the name line and
enter the name.
either ...
à
Save Entry
or ...
s
[RRRRRRRRRRRRRRRRRRRRRRRRRR ]
Save
Save entry
Press the display key to open the menu.
Confirm. The entry is stored.
OK
Enter the anniversary
Scroll to the Annivers.: line to enter the anniversary
if necessary, as is described on page 39. Now:
Press the display key to save the entry.
i
If you have CNIP (page 20) as well as CLIP, then the name that goes with
the phone number will also be displayed (up to 16 characters long).
Adding a phone number from the directory
If you are prompted to enter an external phone number while you are operating your
telephone, you can use the directory of your handset to do this.
Prerequisite: The input field for external phone numbers is displayed.
either ...
à
s Directory
OK
s Select the entry and confirm.
or ...
s
OK
s Select the entry and confirm.
The phone number of the entry is added to the entry field.
Press the display key to open the menu.
Select the menu item and confirm.
OK
Open the directory.
37
Page 40
Gigaset SX100isdn / englisch / A31008-X150-B102-1-7619 / directories.fm / 13.10.2003
Using the directory and other lists
Sending a single entry or complete list to a handset
You can send single entries or the complete list to another handset that is registered on
the same base. This avoids entering information twice. VIP settings, stored voice
patterns and speed dial digits are not sent.
s or C
sv
either ...
s Copy Entry
or ...
s Copy List
... then
OK
~ Enter the internal number of the receiving handset
After an entry has been sent you are asked if you want to send another entry. If you
confirm with the display key
finished sending, press the display key
The successful transfer of data is confirmed with a message and with the confirmation
tone at the receiving handset. Existing entries in the receiving handset are retained.
Entries with identical numbers are not overwritten. The number of entries that are
stored in the receiving handset may therefore differ from the number of entries that you
have sent to it.
The transfer is cancelled if the phone rings or if the memory of the receiving handset is
full. The last entry to be transferred appears in the display.
Open the directory or speed dial list.
Select an entry and open the menu.
Send a single entry:
Select the menu item and confirm.
OK
Send complete list:
Select the menu item and confirm.
OK
and confirm. Sending is initiated.
Yes you can select more entries to send; once you have
No to end it.
38
Page 41

Gigaset SX100isdn / englisch / A31008-X150-B102-1-7619 / directories.fm / 13.10.2003
Using the directory and other lists
Saving an anniversary to a phone number
You can save anniversaries, such as a birthday in the directory and be reminded of this
(reminder call). So that the anniversary can be signalled with a ringer melody, you must
enter a time.
Prerequisite: You have opened a directory entry (page 33).
R[RRRRRRRRRRRRRRRRRRRR]
s Edit
~
s~
sr
OK
Scroll to the Annivers.: line and press the display
key.
In the Date: line, enter the day/month (4-digit).
Scroll to the Time: line and enter the hour/minute
(4-digit) when the signalling (reminder) should take
place.
Scroll to the Prompt: line and select a signal (melody
1–10 or "visual").
Confirm. The directory entry is displayed again. Now
save the entry as described on page 33.
To delete an anniversary, press the display key
the directory entry, then when the display changes press the display key
finally after another display change press
Anniversary reminder call
The handset signals a reminder call with the selected ringer melody. The display shows
the directory entry with
... then
[RRRRRRRRRRRRRRRRRRRRRRRRRR ]
Silence
‚ ‚ ‚.
Switch off the reminder call ahead of time:
Press the display key.
Edit in the field for the anniversary in
Delete and
Save.
39
Page 42
Gigaset SX100isdn / englisch / A31008-X150-B102-1-7619 / directories.fm / 13.10.2003
Using the directory and other lists
Voice-activated dialling
With voice-activated dialling, you can dial a phone number by simply speaking the name
of the party in your handset you wish to call. First you have to create a directory entry
and say the name one time for this entry, i.e., a voice pattern of the name must be
stored in your handset.
The voice patterns are saved in voice directories. You can create up to four different,
user-specific voice directories. They are named by factory default, User 1 to User 4. Each
user must say his own voice pattern and store this in his voice directory.
The voice directory contains all directory entries. Entries which already have a voice
pattern saved for the set user are marked with a
You can save up to 29 voice patterns, distributed among users.
Recording a voice pattern for an existing directory entry
Record your voice pattern in quiet surroundings.
Step 1: Open the directory for voice-activated
dialling:
s
R[RRRRRRRRRRRRRRRRRRR ]
s Voic e
s User 2
[RRRRRRRRRRRRRRRRRRRRRRRRRRR]
record.
OK
a
Open the directory.
Select the entry and press the display key.
Select and confirm, e.g. User 2.
OK
Step 2: Begin recording:
Press the display key.
Confirm the display prompt. Speak the name when
prompted to do so by the display. Repeat the name
when prompted again to do so. Your recording is
stored automatically.
Hold down (return to idle status).
´.
To change the voice pattern, you must delete it (page 41) and record it again.
◆ If your two recordings are too different from each other, you will be
prompted to repeat them.
i
Using voice-activated dialling
t
The display prompts you to speak. Speak the voice pattern, e.g. Anna. If the name
matches the recorded voice pattern, it is repeated. The phone number is dialled.
◆ A message tells you if your speech pattern is too much like another
user's. Close this message with , go back to the start of the voice
pattern recording sequence and repeat the recording.
Hold down.
Ý
40
Page 43

Gigaset SX100isdn / englisch / A31008-X150-B102-1-7619 / directories.fm / 13.10.2003
Using the directory and other lists
Announcing the caller's name
When you receive an external call, you hear the ringer and the telephone announces the
caller's name. Prerequisite: Calling Line Identification is active (page 20) and you have
recorded a voice pattern for the incoming number (page 40).
Activating/deactivating the name announcement
v
s Audio Settings
s Ringer Settings
Ext. Calls
Open the menu.
Select the menu item and confirm.
OK
Select the menu item and confirm.
OK
Confirm. You hear the current volume.
OK
sr Scroll to the Announce line and activate/deactivate
the name announcement.
[RRRRRRRRRRRRRRRRRRRRRRRRRR ]
Save
a
Playing the voice pattern
Open the directory for voice-activated dialling (see Step 1, page 40). Now:
s
[RRRRRRRRRRRRRRRRRRRRRRRRRR ]
Play
a
Press the display key to save the setting.
Hold down (return to idle status).
Select the marked entry with ´.
Press the display key.
Hold down (return to idle status).
Deleting the voice pattern
You can delete a particular user's voice pattern for an entry. This does not affect the
voice patterns of the other users.
Open the directory for voice-activated dialling (see Step 1, page 40). Now:
sv
s Delete Name
a
Deleting a voice pattern for an entry does not affect its number or name
i
– they are retained. The voice patterns of other users for the same entry
are also unaffected.
Select an entry (marked with ´) and open the
menu.
Select the menu item and confirm. The entry is
OK
displayed without
Hold down (return to idle status).
´.
41
Page 44
Gigaset SX100isdn / englisch / A31008-X150-B102-1-7619 / directories.fm / 13.10.2003
Using the directory and other lists
Changing a user name
You can change the user names (User 1 to User 4).
s
R[RRRRRRRRRRRRRRRRRRR ]
s Voic e
s User 2
[RRRRRRRRRRRRRRRRRRRRRRRRRRR]
Edit
R[RRRRRRRRRRRRRRRRRRR ]
~ Save
a
Open the directory.
Select an entry and press the display key.
Select the user and confirm,
OK
e.g., User 2.
Press the display key to initiate changes.
Enter the new name and save.
Hold down (return to idle status).
Display available memory
The memory space is divided up between the directory and the speed dial list (page 32).
The available memory of all these lists is displayed.
s
sv
s Available Memory
Open the directory.
Select any entry and open the menu.
Select the menu item and confirm.
OK
a
Hold down (return to idle status).
Last number redial list
The last number redial list contains the ten last dialled numbers on your handset. If
names have been saved for these numbers in the directory, then these names will be
displayed. Only the newest entry of multiple identical entries is displayed. If the last
number redial list is full, the oldest entry is deleted with the next call. You can use the
last number redial list to redial the phone numbers.
Manual last number redial
Þ
sc
i
42
◆ To add or change the phone number, press , s Display
Number
◆ When displaying a name, you can have the respective phone number
displayed by using the display key
◆ You can add the phone numbers to your directory from the last
number redial list (page 37).
OK
Open the last number redial list.
Select the entry and press the talk key.
The phone number is dialled.
à
.
View.
Page 45

Gigaset SX100isdn / englisch / A31008-X150-B102-1-7619 / directories.fm / 13.10.2003
Using the directory and other lists
Defining the MSN for the next call
You can select a valid outgoing MSN only for this call even when dialling from the last
number redial list. Prerequisite: MSN next call must be activated (page 67). Select an
entry and open with
displayed.
à
the submenu. Using Dial number, the list of MSNs is
OK
Automatic redial
With this function the phone number of a party you haven't yet reached is automatically
dialled every 20 seconds. The handsfree key flashes and "open listening" is activated. If
the party answers, press the talk key
party does not answer, the call is cancelled after approx. 30 seconds. The function
becomes deactivated after twelve unsuccessful dialling attempts.
Prerequisites:
◆ The party cannot be reached.
◆ To be able to use automatic redial from the last number redial list, MSN next call
must be deactivated for the handset (page 67).
a
Þ
v
Automatic Redial
OK
c. "Open listening" remains activated. If the
Press the end call key.
Open the last number redial list.
The party who could not be reached is selected.
Open the menu.
Confirm.
To cancel automatic redial, press the display key CANCEL or any key.
i
A call in the meantime deactivates the automatic redial. You must
activate it again afterwards.
Deleting a single phone number or the entire last number redial list
Þ
sv
either ...
s Delete Entry
a
or ...
s Delete Calls List
Open the last number redial list.
Select an entry and open the menu.
Delete a single phone number:
Select the menu item and confirm.
OK
Hold down (return to idle status).
Delete the entire last number redial list:
Select the menu item and confirm.
OK
43
Page 46

Gigaset SX100isdn / englisch / A31008-X150-B102-1-7619 / directories.fm / 13.10.2003
Using the directory and other lists
Opening lists with the Message key
You can use the Message key f to open the following lists if there is a new entry
there:
1. List of missed calls Missed calls (page 44)
In the lists, the calls are displayed which belong to the incoming MSN assigned to the
handset.
As soon as a new entry (calls ) were received, the key
tone is heard.
If the flashing key
◆ If only one list has new entries, you will see the first new entry in that list.
Open entry:
If the key f is pressed, and it is not blinking, the following is displayed:
The message No new messages is displayed. Then the list of missed calls are opened.
f is pressed, the following is displayed:
s (select entry) OK
f flashes and an advisory
Calls lists
There are two calls lists:
◆ the list of missed calls
You receive all calls that were not answered, were rejected.
◆ the list of answered calls
It contains all calls answered by a handset.
In these lists, the calls to an incoming MSN which are assigned to the handset are
displayed. The phone numbers of the last 20 calls are saved. The oldest entry is deleted
when the calls list is full and new entries are added. The newest entry is at the beginning
of the list, and the oldest is at the end.
A caller is entered in the appropriate calls list at the end of the call. If his phone number
is transferred and this phone number is entered in the directory, his name is inserted.
Only the newest entry of multiple identical entries is displayed in both lists. If an
outgoing connection with a caller is established who is entered in the list of missed calls,
this entry is transferred to the last number redial list and removed from the list of missed
calls.
The following is displayed for each entry:
◆ the number of calls for this caller,
◆ the phone number of the caller or his name (if it exists as a directory entry) or
unknown, if the phone number was not transferred,
◆ the incoming MSN
◆ the date and time of the last call
44
Page 47

Gigaset SX100isdn / englisch / A31008-X150-B102-1-7619 / directories.fm / 13.10.2003
Using the directory and other lists
Opening calls lists
You can open both calls lists using the menu. The list of missed calls can also be opened
using the
are signalled by the
v
s Base Settings
s Accepted calls
s Missed calls
f key, if it is a new entry (page 44). New entries in the list of missed calls
f key flashing and by a confirmation tone.
Open the menu.
Select the menu item and confirm.
OK
either ...
Select the menu item and confirm.
OK
or ...
Press.
OK
i
If the calls list is already open by another internal party, you cannot open
it.
Calling back a caller
Prerequisite: The caller's number has been identified (page 20).
Open the list of missed or answered calls (page 45). Now:
s
either ...
c
or ...
v
Dial number
The ringback is initiated immediately. The phone number is deleted from the calls list
and entered in the last number redial list.
i
Defining the MSN for the next call
Even when dialling from the directory, you can
◆ select a valid outgoing MSN only for this call.
Prerequisite: MSN next call must be activated (page 67).
Select an entry and open with the submenu. Using Dial number, the list
of MSNs is displayed.
For PABX: The access code (outside line code) is automatically put before
the phone numbers (page 91).
Select entry.
Press the talk key
Open the menu.
Select.
OK
à
OK
45
Page 48
Gigaset SX100isdn / englisch / A31008-X150-B102-1-7619 / directories.fm / 13.10.2003
Using the directory and other lists
Displaying the entry
Open the list of missed or answered calls (page 45). Now:
s v
s Display entry
Select an entry and open the submenu.
Select the menu item and confirm.
OK
Changing the phone number of the caller
Open the list of missed or answered calls (page 45). Now:
s v
s Change number
~
Delete entry
Select an entry and open the submenu.
Select the menu item and confirm. You will now see
OK
the number.
Change the number.
Press the display key to open the submenu.
Confirm.
OK
Adding an entry from the calls list to the directory
Open the list of missed or answered calls (page 45). Now:
s v
s Copy to dir.
s ~
à
Save Entry
a
Select an entry and open the submenu.
Select the menu item and confirm.
OK
Scroll to the line Name and enter the name (for text
entry see page 99).
Press the display key to open the menu.
Confirm. The entry is saved.
OK
Hold down (return to idle status).
Deleting an entry from the calls list
Open the list of missed or answered calls (page 45). Now:
either ...
s v
s Delete entry
or ...
v
s Delete list
[RRRRRRRRRRRRRRRRRRRRRRRRRRR]
YES
a
Delete the entry:
Select an entry and open the submenu.
Select the menu item and confirm. The entry is
OK
deleted.
Delete the calls list:
Open the submenu.
Select the menu item and confirm.
OK
Confirm the prompt.
Return to idle status.
46
Page 49

Gigaset SX100isdn / englisch / A31008-X150-B102-1-7619 / charges.fm / 13.10.2003
Making cost-effective calls
Making cost-effective calls
Displaying call charges
The costs displayed on the handset and the charges made by the network
i
Charges are transmitted automatically from the exchange. The factor is CHF 0.10. If a
factor is entered (e.g. 0.20) it will be overwritten by the factor of 0.10 transmitted by
the exchange with every outgoing call.
You can check the ongoing units /total charges and the charges of the last call made
(depending on setting, see page 48) on each Comfort handset. The total charges
includes the charges accrued by this handset. If you don't receive any rate information
from your network provider, the call duration is displayed.
Displaying and deleting the cost overview
The handset displays the charges for each internal user, for each MSN that has been set
up and for the whole system.
provider may differ. It is always the network provider's charges which
must be paid.
v
s Call Charges
Cost overview
s
s
s Delete amount
Total and individual charges must be deleted separately. I.e., if you delete
i
the amount of an MSN, the individual charges of the handsets are
retained, and must be deleted separately.
Open the menu.
Select the menu item and confirm.
OK
Confirm. The total amount (for all internal parties) is
OK
displayed.
Scroll to the accounts of the individual internal
parties or set-up MSNs.
If necessary, delete the amount from the cost
overview:
Scroll to the required cost overview (total amount,
account of an internal party or an MSN).
Press the display key to open the submenu.
Select the menu item and confirm.
OK
47
Page 50

Gigaset SX100isdn / englisch / A31008-X150-B102-1-7619 / charges.fm / 13.10.2003
Making cost-effective calls
Activating/deactivating the charges of the last call
You can display the total charges and the charges of the last call for this handset on the
handset.
By factory default, Last charge
is deactivated.
v
s Call Charges
s Last charge
a
After activating the function, the call charges are displayed on the handset when you
press the talk key
after ending the call.
c. If the connection was not successful, the charges are displayed
Open the menu.
Select the menu item and confirm.
OK
Select the menu item and confirm (‰ = activated).
OK
Press the end call key.
48
Page 51

Gigaset SX100isdn / englisch / A31008-X150-B102-1-7619 / several_handsets.fm / 13.10.2003
Using several handsets
Using several handsets
Using a handset as a room monitor
With this function, a previously stored internal or external phone number is called when
a set noise level in the room is reached (the baby cries). When you answer the call you
hear the noise in the baby's room. The remains activated on the handset even after
you hang up.
The handset should be between 1 and 2 metres away from the baby. The microphone
must be directed towards the baby.
When the room monitor is activated, incoming calls to the handset which is near the
baby are indicated without a ring tone, they are just shown on the display. The display
and the key pad are not illuminated.
When entering an external phone number, make sure that:
◆ the handset must have the authorisation Unrestricted (page 61).
◆ the number where the room monitor call is forwarded must not be blocked by an
activated answering machine.
W
i
Always check the settings of the room monitor before you leave
home, e.g. sensitivity and phone line.
◆ If you redirect your room monitor to an external phone number, then
you should tell that number's owner.
◆ Attempts for the room monitor to call an external phone number are
terminated after approximately 90 seconds. Attempts for the room
monitor to call an internal phone number (handset) are terminated
after approximately 3 minutes.
◆ After the room monitor makes a call, the room monitor is blocked for
2 minutes.
◆ The room monitor function severely curtails the handset's operating
time. Place the handset located near the baby in the charger. This will
ensure that the battery will not become flat.
◆ The room monitor function can also be used in Walk and Talk mode
(page 53).
49
Page 52

Gigaset SX100isdn / englisch / A31008-X150-B102-1-7619 / several_handsets.fm / 13.10.2003
Using several handsets
Activating the room monitor function and entering the 'call to' number for the first time
Step 1: Open the input field for the room monitor:
v
s Add. Features
Room Monitor
r
R[RRRRRRRRRRRRRRRRRRR ]
s Edit
either ...
[RRRRRRRRRRRRRRRRRRRRRRRRRRR]
INT
R[RRRRRRRRRRRRRRRRRRR ]
~ Save
or ...
Open the menu.
Select the menu item and confirm.
OK
Confirm. The input field is opened.
OK
Step 2: Activate room monitor:
In the Room M.: line, choose On.
Step 3: Enter the 'call to' number:
Scroll to the Call to: line and press the display key.
The input field for the phone number is opened.
Enter an internal phone number as the 'call to'
number:
Press the display key.
Enter the internal phone number and press the
display key. If the room monitor should call all
registered handsets, then enter
internal phone number (group call).
Enter an external phone number as the 'call to'
number:
P instead of an
~ Enter the phone number.
à
Save Entry
... then
sr
[RRRRRRRRRRRRRRRRRRRRRRRRRRR]
Save
Press the display key.
Confirm. The entry is stored.
OK
Step 4: Set the sensitivity:
If necessary, scroll to the Level: line and set the
sensitivity for the noise level (Low or High).
Press the display key. The room monitor function is
now activated.
Once the room monitor is activated, switch directly to the room monitor setting with
v (open menu).
◆ If you would like to copy the external phone number from the
directory press the lower side of the control key
i
directory) while in the input field for the phone number. Use
select an entry and confirm with .
◆ If you enter an external phone number as the 'call to' number, only
the last 4 digits will appear in the input panel.
OK
s (open the
s
to
50
Page 53

Gigaset SX100isdn / englisch / A31008-X150-B102-1-7619 / several_handsets.fm / 13.10.2003
Using several handsets
Changing previously set external 'call to' numbers
Prerequisite: You are in the input field for the room monitor (step 1, page 50).
R[RRRRRRRRRRRRRRRRRRRR]
s Edit
Û
either ...
Scroll to the Call to: line and press the display key.
Delete the existing phone number.
Enter the external 'call to' number:
~ Enter a new phone number.
à
Save Entry
or ...
[RRRRRRRRRRRRRRRRRRRRRRRRRR ]
INT
R[RRRRRRRRRRRRRRRRRRRR]
~ Save
Continue as is described on page 50 starting with step 4.
Changing previously set internal 'call to' numbers
The previously set internal phone number must first be deleted.
Prerequisite: You are in the input field for the room monitor (step 1, page 50).
R[RRRRRRRRRRRRRRRRRRRR]
s Edit
[RRRRRRRRRRRRRRRRRRRRRRRRRR ]
Delete
either ...
[RRRRRRRRRRRRRRRRRRRRRRRRRR ]
Save
[RRRRRRRRRRRRRRRRRRRRRRRRRR ]
Edit
Press the display key to open the menu.
Confirm. The entry is stored.
OK
Enter the internal 'call to' number:
Press the display key.
Enter the internal phone number or P (hold
down = group call) and press the display key.
Scroll to the Call to: line and press the display key.
Deleting the internal phone number:
Press the display key to delete the phone number.
Enter a new external phone number:
Press the display key to confirm the delete.
Press the display key.
~ Enter the phone number.
à
Save Entry
or ...
R[RRRRRRRRRRRRRRRRRRRR]
~ Save
Press the display key to open the menu.
Confirm. The entry is stored.
OK
Enter the new internal phone number:
Enter the new internal phone number and press the
display key.
Continue as is described on page 50 starting with step 4.
51
Page 54
Gigaset SX100isdn / englisch / A31008-X150-B102-1-7619 / several_handsets.fm / 13.10.2003
Using several handsets
Deactivating the room monitor
Press the OFF display key on the room monitor handset to deactivate the room monitor
function.
i
To reactivate the room monitor function with the same phone number,
you must turn on the activation again and save with
Save.
Setting the Walk and Talk mode
The Walk and Talk function allows two handsets to communicate with each other no
matter how far they are from the base.
Example: You go on holiday and take two handsets with Walk and Talk functionality
with you. Set the Walk and Talk function on both handsets. You can now communicate
using the handsets.
Prerequisite:
◆ Both handsets have been registered to the same base or
◆ Both handsets are registered to different bases and both are set to Best Base
(page 83) or
◆ One of the handsets is not registered to any base and the registered handset is set
to Best Base or
◆ Neither handset is registered to a base.
In Walk and Talk mode
i
◆ The maximum range between handsets is 250 metres outdoors,
◆ The handsets cannot be reached by incoming calls,
◆ Handset operating times are severely curtailed.
52
Page 55

Gigaset SX100isdn / englisch / A31008-X150-B102-1-7619 / several_handsets.fm / 13.10.2003
Using several handsets
Activating/deactivating the Walk and Talk mode
v
s Add. Features
s Walk and Talk
[RRRRRRRRRRRRRRRRRRRRRRRRRR ]
Off
When you are in Walk and Talk mode and you press on the talk key c or handsfree
d, the call goes to all handsets in Walk and Talk mode. The connection is made
key
with the first handset to answer the Walk and Talk call.
◆ "Selecting the ringer" (page 86), "Activating/deactivating ringer or
advisory tones" (page 88) and "Activating/deactivating keypad lock"
i
(page 11) are available in Walk and Talk mode.
◆ To open the menu, press the display key ©.
◆ The Walk and Talk mode is retained even when you switch your
handset off and back on.
Open the menu.
Select the menu item and confirm.
OK
Select the menu item and confirm.
OK
Deactivate the Walk and Talk mode:
Press the display key.
Using a handset in Walk and Talk mode as a room monitor
The room monitor function can also be used in Walk and Talk mode.
à
s Room Monitor
Press the display key.
Select the menu item and confirm.
OK
sr Scroll to the Room M.: line and activate the room
monitor.
sr
[RRRRRRRRRRRRRRRRRRRRRRRRRR ]
Save
If necessary, scroll to the Level: line and set the
sensitivity for the noise level (Low or High).
Press the display key. The room monitor function is
now activated.
The room monitor will call all handsets that are in Walk and Talk mode.
W
Press the display key
The handset returns to the normal Walk and Talk mode.
Always check the settings of the room monitor before you leave
home, e.g. sensitivity and phone line.
Off on the room monitor handset to deactivate the room monitor.
53
Page 56

Gigaset SX100isdn / englisch / A31008-X150-B102-1-7619 / time_calendar.fm / 13.10.2003
Date and Time
Date and Time
Setting the date and time
The date and time are transferred from the telephone exchange when you make your
first call with your device.
You can choose between the 12 hour and the 24 hour display (factory setting) for the
time (a.m. = 1st half of the day; p.m. = 2nd half of the day).
v
s Calendar/Clock
s Date/Time
~
s~
sr
[RRRRRRRRRRRRRRRRRRRRRRRRRRR]
Save
Open the menu.
Select the menu item and confirm.
OK
Select the menu item and confirm.
OK
Enter the date:
In the Date: line, enter the day/month/year.
Enter the time:
Scroll to the Time: line and enter the hours/minutes
in a 4-digit format
Select display mode:
Scroll to the Time Mode: line if you want to choose
between 12-hour and 24 hour mode.
Press the display key to save the entry.
.
In 12-hour mode you can scroll to the Time: line and then use the display key am/pm to
switch between am and pm.
Setting the alarm clock
You can use your handset as an alarm clock.
Prerequisite: You have set the date and time.
Activating and setting the alarm clock
If you want to use your handset as an alarm clock, you have to set the alarm time,
choose a melody and activate the alarm clock.
v
s Calendar/Clock
s Alarm Clock
r
54
Open the menu.
Select the menu item and confirm.
OK
Select the menu item and confirm.
OK
The current setting is displayed.
Switching the alarm clock on:
In the Room M.: line, select On.
Enter the time for wake-up call:
Page 57

Gigaset SX100isdn / englisch / A31008-X150-B102-1-7619 / time_calendar.fm / 13.10.2003
Date and Time
s~
[RRRRRRRRRRRRRRRRRRRRRRRRRR ]
am/pm
[RRRRRRRRRRRRRRRRRRRRRRRRRR ]
Save
a
i
◆ The alarm clock will only ring if the handset is in the idle status. The
alarm clock will not ring if the room monitor function is activated, a
call is being made, or during automatic redial.
◆ How to change the volume and melody is explained on page page 86.
Scroll to the Time: line and enter the hours/minutes
in a 4-digit format, e.g.,
"7:15 a.m.".
When in 12-hour mode (page 54):
press the display key if you want to switch between
am and pm.
Press the display key to save the entry.
Hold down (return to idle status). You will see the ¼
icon.
QM15 for
Switching the alarm clock off
The alarm clock is set for a particular time but you do not want it to ring.
v
s Calendar/Clock
s Alarm Clock
r
[RRRRRRRRRRRRRRRRRRRRRRRRRR ]
Save
a
Open the menu.
Select the menu item and confirm.
OK
Select the menu item and confirm.
OK
In the Room M.: line, select Off.
Press the display key to save the setting.
Hold down (return to idle status).
Deactivating the wake-up call
A wake-up call with deactivated ringer melody is signalled on the handset. The display
shows Alarm Clock. Press the display key
The wake-up call will ring for 30 seconds if it is not answered sooner.
Silence or any key to turn off the wake-up call.
55
Page 58
Gigaset SX100isdn / englisch / A31008-X150-B102-1-7619 / time_calendar.fm / 13.10.2003
Date and Time
Setting appointments
You can have your handset remind you of up to five appointments. To do this, you have
to save the times.
Activating and setting appointments
v
s Calendar/Clock
Set Appoints.
s Appoint. 2
OK
OK
OK
r
s~
s~
[RRRRRRRRRRRRRRRRRRRRRRRRRRR]
am/pm
R[RRRRRRRRRRRRRRRRRRR ]
s Edit
OK
~
[RRRRRRRRRRRRRRRRRRRRRRRRRRR]
Save
a
Open the menu.
Select the menu item and confirm.
Confirm.
Select the appointment (1-5) and confirm.
Activating the appointment:
In the Room M.: line, select On.
Enter the date:
Scroll to the Date: line and enter the day/month in a
4-digit format. Example: For 20.05. enter
2QQ5.
Enter the time:
Scroll to the Time: line and enter the hours/minutes
in a 4-digit format. Example: For 9:05 enter
QOQ5.
If in 12-hour mode (page 54): you can switch
between am and pm.
Specifying the appointment:
Scroll to the Notes: line and press the display key.
Enter a name (max. 16 characters) (for entering
letters and characters see page 99) and confirm.
Press the display key to save the entry.
Hold down (return to idle status). You will see
the icon
¼.
56
◆ If you do not enter a name, the display will then show
"Appointment…".
◆ How to change the volume and melody is explained starting on
i
page 87.
◆ An appointment will be displayed only if the handset is in idle status.
It will not be displayed if the room monitor function is activated, a call
is being made, or during automatic redial.
Page 59

Gigaset SX100isdn / englisch / A31008-X150-B102-1-7619 / time_calendar.fm / 13.10.2003
Date and Time
Cancelling an appointment
v
s Calendar/Clock
Set Appoints.
s Appoint. 2
r
[RRRRRRRRRRRRRRRRRRRRRRRRRR ]
Save
Open the menu.
Select the menu item and confirm.
OK
Confirm.
OK
Select the appointment (1-5) and confirm.
OK
Select setting Off.
Press the display key to save the setting.
Switching off or answering an appointment alarm
An appointment is signalled with the selected ringer melody (page 87). In the display
you will see for example Appoint. 2. Press the display key
appointment alarm. The appointment alarm will ring for 30 seconds if it is not answered
sooner.
Silence , to switch off the
Displaying missed appointments, and anniversaries
If you do not accept an appointment or anniversary alarm when it rings (page 39), it will
be saved in a list.
v
s Calendar/Clock
s Missed Dates
s
either ...
[RRRRRRRRRRRRRRRRRRRRRRRRRR ]
Go Back
or ...
either ...
a
or ...
[RRRRRRRRRRRRRRRRRRRRRRRRRR ]
Delete
... then
a
Open the menu.
Select the menu item and confirm.
OK
Select the menu item and confirm. The list of
OK
appointments/anniversaries will open.
Select appointment/anniversary.
This will display information about the appointment/
anniversary. A missed appointment is marked with
¼, a missed anniversary with ‚.
Closing the list:
Press the display key.
Deleting an appointment/anniversary:
Closing the list:
Press briefly.
Deleting an appointment/anniversary:
Press the display key.
Hold down (return to idle status).
57
Page 60

Gigaset SX100isdn / englisch / A31008-X150-B102-1-7619 / time_calendar.fm / 13.10.2003
Date and Time
◆ If there is a new appointment/anniversary in the list, the display
Appoint. You can also use this display key to open the list of
shows
appointments/anniversaries. Once you have looked at all the new
i
appointments, Appoint will disappear from the display.
◆ If the handset is deactivated at the time of an appointment/
anniversary, the appointment/anniversary will be saved in the list.
◆ If the list doesn't contain any appointments/anniversaries, you can
close it with
Go Back.
Night service
You can set up call forwarding for each incoming MSN which forwards all incoming calls
to an external phone number or to another internal party. This can be done daily for a
specified period of time (Start time to End time) and on weekends (Sat/Sun all day)
automatically. For example, when a business might normally be closed (from 6:00 p.m.
to 8:00 a.m.) all calls from the office could be forwarded to a private number.
When forwarding a call externally, only the MSN which is assigned to the handset as the
incoming MSN can be forwarded from the handset.
By factory default, Night service is deactivated. To switch on Night service, first the
forward destination must be defined.
If extern al call forwarding to an external phone n umber is activated using
Immediately (page 70) at the time when Night service is supposed to
start, the following applies:
◆ The call is forwarded to another phone number:
i
Call forwarding remains active until it is explicitly deactivated.
◆ The call is forwarded to the same phone number:
Call forwarding is deactivated until the end time of Night service is
reached.
The same applies when call forwarding is set up during Night service.
Setting the forward destination
Prerequisite: Night service is deactivated (page 60).
v
s Base Settings
s Night service
s
s Forward. dest.
either ...
s External
~
Open the menu.
Select the menu item and confirm.
OK
Select the menu item and confirm (‰ = Night
OK
service is activated). The list of MSNs is displayed.
Select and confirm MSN, e.g. MSN1: Anna.
OK
Select the menu item and confirm.
OK
Set the external forward destination:
Select the menu item and confirm.
OK
Enter the external destination phone number.
58
Page 61

Gigaset SX100isdn / englisch / A31008-X150-B102-1-7619 / time_calendar.fm / 13.10.2003
Date and Time
or ...
s Internal
s Internal 11
... then
Save entry
OK
a
◆ Night service, internal: If the internal party is not registered or cannot
i
be reached (e.g. handset deactivated), the call is not signalled and the
caller receives the busy signal.
Set the internal forward destination:
Select the menu item and confirm.
OK
Select the internal number, e.g., Internal 11.
Press the display key to open the submenu.
Confirm.
Return to idle status.
Entering the start and end time for Night service
By factory default, the Start time is pre-set to 20:00 or 8:00 pm, and 08:00 or 8:00 am
for the End time.
v
s Base Settings
s Night service
s
either ...
s Start time
~
or ...
s End time
~
... then
Save entry
OK
a
Open the menu.
Select the menu item and confirm.
OK
Select the menu item and confirm.
OK
Select and confirm MSN, e.g. MSN1: Anna.
OK
Enter the start time:
Select the menu item and confirm.
OK
Enter the start time (4-digit).
Enter the end time:
Select the menu item and confirm.
OK
Enter the end time (4-digit).
Press the display key to open the submenu.
Confirm.
Return to idle status.
59
Page 62

Gigaset SX100isdn / englisch / A31008-X150-B102-1-7619 / time_calendar.fm / 13.10.2003
Date and Time
Activating/deactivating Saturday/Sunday all day Night service:
If Sat/Sun all day is set, then Night service is active between the indicated start and
end times from M-F, and all day on weekends. If Sat/Sun all day
calls are forwarded on the weekend between the set start and end time.
By factory default,
Sat/Sun all day is activated.
is deactivated, then
v
s Base Settings
s Night service
s
s Sat/Sun all day
a
Open the menu.
Select the menu item and confirm.
OK
Select the menu item and confirm.
OK
Select and confirm MSN, e.g. MSN1: Anna.
OK
Select the menu item and confirm (‰ = activated).
OK
Return to idle status.
Activating/deactivating Night service
You can only activate Night service when you have entered a forward destination for the
incoming MSN and when there is no forward destination currently activated for it.
v
s Base Settings
s Night service
s
either ...
s Activate?
or ...
s Deactivate?
a
If Night service is activated for an MSN, Night service is marked with ‰.
Open the menu.
Select the menu item and confirm.
OK
Select the menu item and confirm.
OK
Select and confirm MSN, e.g. MSN1: Anna.
OK
Activating Night service:
Select the menu item and confirm.
OK
Deactivating Night service:
Select the menu item and confirm.
OK
Return to idle status.
60
Page 63

Gigaset SX100isdn / englisch / A31008-X150-B102-1-7619 / security.fm / 13.10.2003
Security settings
Security settings
Changing the System PIN
The system PIN (Personal Identification Number) is used to protect the following
settings from unauthorised access:
◆ Call charge settings (v / Call Charges)
◆ Internal and external call forwarding
v Base Settings / Ext. call forw. or Int. call forw.)
(
◆ Party configurations, security, ISDN, and system settings (v / Base Settings /
Settings)
◆ Getting started wizard (v / Base Settings / Installation)
The system PIN is only effective when it is not 0000.
The system PIN is pre-set to 0000 at the factory.
v
s Base Settings
s Settings
OK
~
Security
s Change PIN
OK
~
OK
~
a
Do not forget the new system PIN! If you forget it, the device will require
!
technical intervention for which a charge will be made. In this case,
contact the Swisscom Hotline.
Open the menu.
Select the menu item and confirm.
OK
Select the menu item and confirm.
OK
If the current PIN is not 0000: Enter PIN and confirm.
Confirm.
OK
Select the menu item and confirm.
OK
Enter new system PIN (max. 8 digits, 0 to 9) and
confirm.
Repeat the new system PIN and confirm.
Return to idle status.
Defining authorisation
You can set different authorisations for all registered devices:
◆ Unrestricted (set as factory default)
All devices can answer incoming calls and make external/internal outgoing calls.
◆ Incoming only
The devices can only answer incoming calls. External calls cannot be made. Internal
calls can be made. Emergency numbers can be dialled.
61
Page 64

Gigaset SX100isdn / englisch / A31008-X150-B102-1-7619 / security.fm / 13.10.2003
Security settings
◆ Internal only
The devices can only make and answer internal calls. Emergency numbers can be
dialled.
v
s Base Settings
s Settings
OK
~
Security
s Authorisation
s Internal 11
s Internal Only
a
Open the menu.
Select the menu item and confirm.
OK
Select the menu item and confirm.
OK
If required, enter the PIN and confirm.
Confirm.
OK
Select the menu item and confirm.
OK
Select the internal number, e.g., Internal 11.
Press the display key to open the submenu.
Select authorisation, e.g., Internal Only, and confirm.
OK
The set authorisation is marked with a
Return to idle status.
‰
Emergency numbers
By default, the country-specific emergency numbers are entered (117, 118 and 144).
These cannot be changed or deleted. You can enter five of your own emergency
numbers.
i
Setting up, changing, reading, and deleting your own emergency numbers
The emergency number can also be dialled by a handset with restricted
authorisation (e.g., Internal only).
v
s Base Settings
s Settings
OK
~
Security
s Emergency nos.
s <no entry>
either ...
Change number
62
Open the menu.
Select the menu item and confirm.
OK
Select the menu item and confirm.
OK
If required, enter the PIN and confirm.
Confirm.
OK
Select. Emergency number list is opened.
Select the list entry, e.g., <no entry>.
Press the display key to open the submenu.
Set up and change an emergency number:
Confirm.
OK
Page 65

Gigaset SX100isdn / englisch / A31008-X150-B102-1-7619 / security.fm / 13.10.2003
Security settings
~
Save entry
or ...
s Display number
or ...
s Delete number
a
If your phone is connected to a PABX you may have to enter the applicable
access code (outside line code, e.g., 0; see page 91) before the
i
emergency number. That also applies to default emergency numbers, for
which you have to re-enter them completely, e.g., "0117", "0118" and
"0144".
Enter a new emergency number (up to 32 digits) or
change the existing emergency number. You can
pick the number from the directory
C.
list
Press the display key to open the submenu.
Confirm.
OK
View the emergency number:
Select the menu item and confirm.
OK
Delete the emergency number:
Select the menu item and confirm.
OK
Return to idle status.
s or speed dial
Dialling emergency numbers
Prerequisite: The handset is blocked for external dialling (page 61).
c
[RRRRRRRRRRRRRRRRRRRRRRRRRR ]
EMERG.
... then
~
If the dialled number does not match the emergency number entered, the call is
rejected with the display "Number is not emergency no.".
Press the talk key
Press the display key.
Dial the emergency number:
Enter the emergency number.
63
Page 66

Gigaset SX100isdn / englisch / A31008-X150-B102-1-7619 / settings_bs.fm / 13.10.2003
Setting the system
Setting the system
The abbreviations in parentheses after the titles stand for the respective ISDN
performance feature. Some performance features can only be used if it is enabled by the
network provider (possible additional costs).
All the settings for the base are made with a registered S 1 handset.
Changing the name for an internal party
By factory default, all internal numbers are given the names Int.11 , Int.12 , etc.,
according to their numbering. You can change these entries to suit your individual
needs.
v
s Base Settings
s Settings
OK
~
s Setup user
s Setup device
s Int.11
v
s Name
~
s Save entry
Since names are saved in the base station, another name can be allocated
i
to a handset when registering to a different base. This makes it possible
to recognise which base the handset is currently connected to.
Open the menu.
Select the menu item and confirm.
OK
Select the menu item and confirm.
OK
Enter system PIN, if needed (page 61).
Select the menu item and confirm.
OK
Select the menu item and confirm.
OK
Select the internal number, e.g., Int.11 .
Open the submenu.
Select the menu item and confirm.
OK
Change the name and open the menu.
Select the menu item and confirm. The name will
OK
now be shown in the internal list, even for internal
calls from this internal number.
64
Page 67

Gigaset SX100isdn / englisch / A31008-X150-B102-1-7619 / settings_bs.fm / 13.10.2003
Setting the system
Setting up/deleting ISDN phone numbers (MSN)
Your ISDN connection offers you two simultaneously usable telephone lines (B
channels). Up to ten phone numbers (MSN) can be set up on your base station.
Setting up ISDN phone numbers (MSN) / changing the name
If you haven’t saved all the phone numbers with the Installation wizard (page 14), you
can enter them now. All phone numbers saved later are automatically assigned to
all registered handsets.
Each newly set up phone number automatically gets its own ringer melody, which can
be changed to suit your individual requirements (page 68).
v
s Base Settings
s Settings
OK
~
s ISDN settings
s Set up MSN
s
v
s Edit entry
~
s~
v
s Save entry
Open the menu.
Select the menu item and confirm.
OK
Select the menu item and confirm.
OK
Enter system PIN, if needed (page 61).
Select the menu item and confirm.
OK
Select the menu item and confirm.
OK
Select MSN, e.g. MSN1: Anna.
Open the submenu.
Select the menu item and confirm.
OK
Enter a name (up to 16 characters – optional) (for
inputting text see page 99).
Scroll to the line <Number> and enter the phone
number.
Open the submenu.
Select the menu item and confirm.
OK
65
Page 68

Gigaset SX100isdn / englisch / A31008-X150-B102-1-7619 / settings_bs.fm / 13.10.2003
Setting the system
Deleting ISDN phone numbers (MSN)
v
s Base Settings
s Settings
OK
~
s ISDN settings
s Set up MSN
s
v
s Delete entry
If the deleted MSN was the outgoing MSN (page 67) of an internal party,
i
this internal party is automatically assigned a new outgoing MSN (the
MSN with the lowest position number).
Open the menu.
Select the menu item and confirm.
OK
Select the menu item and confirm.
OK
Enter system PIN, if needed (page 61).
Select the menu item and confirm.
OK
Select the menu item and confirm.
OK
Select MSN, e.g. MSN1: Anna.
Open the submenu.
Select the menu item and confirm.
OK
Assigning a phone number (MSN)
You can assign specific phone numbers (MSNs) to the registered devices. Here, define
◆ which phone number the registered end device uses to ring (incoming MSN),
◆ which phone number an internal party dials (outgoing MSN).
Assigning the incoming MSN
By default, a newly registered handset rings for all set up phone numbers.
If you only want to assign the handset specific incoming MSNs:
v
s Base Settings
s Settings
OK
~
s Setup user
s Setup device
s Int.11
v
s Receive MSN
s
66
Open the menu.
Select the menu item and confirm.
OK
Select the menu item and confirm.
OK
Enter system PIN, if needed (page 61).
Select the menu item and confirm.
OK
Select the menu item and confirm.
OK
Select the internal number of the handset, e.g.,
Int.11 .
Open the submenu.
Select the menu item and confirm.
OK
Select and confirm MSN, e.g. MSN1: Anna.
OK
Page 69

Gigaset SX100isdn / englisch / A31008-X150-B102-1-7619 / settings_bs.fm / 13.10.2003
Setting the system
Assigning the outgoing MSN
By default, no outgoing MSN is entered. The telephone exchange adds the outgoing
MSN.
You can define one outgoing MSN per internal party. This MSN will be displayed to your
partner when you call and the call will be billed to this MSN.
v
s Base Settings
s Settings
OK
~
s Setup user
s Setup device
s Int.11
v
s Send MSN
s
Open the menu.
Select the menu item and confirm.
OK
Select the menu item and confirm.
OK
Enter system PIN, if needed (page 61).
Select the menu item and confirm.
OK
Select the menu item and confirm.
OK
Select the internal number, e.g., Int.11 .
Open the submenu.
Select the menu item and confirm.
OK
Select and confirm MSN, e.g. MSN1: Anna.
OK
Setting up the list of outgoing MSN for the next call
You can set up your handset so that after pressing the Talk key c or the handsfree
d a list of all available outgoing MSNs is displayed.
key
By factory default, MSN next call is not activated.
v
s Base Settings
s Settings
OK
~
s Setup user
s Setup device
s Int.11
MSN next call
a
Open the menu.
Select the menu item and confirm.
OK
Select the menu item and confirm.
OK
Enter system PIN, if needed (page 61).
Select the menu item and confirm.
OK
Select the menu item and confirm. The list of
OK
entered internal numbers is displayed.
Select and confirm the internal number you want,
OK
e.g., Int.11 .
Press the display key to open the submenu.
Select the menu item and confirm (‰ = activated).
OK
Hold down (return to idle status).
67
Page 70

Gigaset SX100isdn / englisch / A31008-X150-B102-1-7619 / settings_bs.fm / 13.10.2003
Setting the system
Setting up a busy signal when the MSN is being used (Busy on Busy)
This setting allows callers to get a busy signal immediately when an external call is
already being made on this MSN, independent of the setting Call waiting.
By factory default, the function is not set.
v
s Base Settings
s Settings
OK
~
s ISDN settings
s Busy on busy
Open the menu.
Select the menu item and confirm.
OK
Select the menu item and confirm.
OK
Enter system PIN, if needed (page 61).
Select the menu item and confirm.
OK
Select and confirm (‰ = activated).
OK
Assigning an MSN a ringer melody
Each incoming MSN is assigned a ringer melody when setting up. You can change this
assignment for each incoming MSN individually. For an incoming MSN, you can
◆ select one of the available ringer melodies. All handsets then ring with this ringer
melody for an incoming call to this incoming MSN.
◆ set the external ringer melody. Then the handsets assigned to the incoming MSN
ring with the ringer melody set for external calls on the handset (page 86).
v
s Base Settings
s Settings
OK
~
s ISDN settings
s Set up MSN
s
v
r Ringer Melody: 5
Open the menu.
Select the menu item and confirm.
OK
Select the menu item and confirm.
OK
Enter system PIN, if needed (page 61).
Select the menu item and confirm.
OK
Select the menu item and confirm.
OK
Select MSN, e.g. MSN1: Anna.
Open the submenu.
Select melody and confirm, e.g. Ringer Melody: 5
OK
‰ = activated).
(
68
Page 71
Gigaset SX100isdn / englisch / A31008-X150-B102-1-7619 / settings_bs.fm / 13.10.2003
Setting the system
Setting up rejecting for the entire MSN group
You can reject an external call not only on your handset, but for all members of an MSN
group. Pressing
entire group will no longer be called. Someone using call waiting can also be rejected
during a call. The call is added to the calls list.
By factory default, the function is not activated.
REJECT will give the caller a busy signal instead of a ringing tone. The
v
s Base Settings
s Settings
OK
~
s ISDN settings
s Reject all
Open the menu.
Select the menu item and confirm.
OK
Select the menu item and confirm.
OK
Enter system PIN, if needed (page 61).
Select the menu item and confirm.
OK
Select the menu item and confirm (‰ = activated).
OK
Forwarding calls
Forwarding internal calls
◆ Only one forward destination can be selected for internal call
forwarding.
i
By factory default, internal call forwarding is deactivated.
Setting up the forward destination
v
s Base Settings
s Forward. base
~
s Forward. dest.
s Int.11
◆ Only one single-stage call forwarding is supported: If you are
forwarding to a party who has activated internal call forwarding
himself, this will no longer work. The forwarded call will ring at the
party you forwarded it to.
Open the menu.
Select the menu item and confirm.
OK
Select the menu item and confirm.
OK
OK
Enter system PIN, if needed (page 61).
Select the menu item and confirm.
OK
Select the internal number, e.g., Int.11
‰ = is activated).
(
69
Page 72

Gigaset SX100isdn / englisch / A31008-X150-B102-1-7619 / settings_bs.fm / 13.10.2003
Setting the system
Activating/deactivating internal call forwarding
Prerequisite: Internal call forwarding can only be activated if the forward destination is
set up.
v
s Base Settings
s Int. call forw.
OK
~
either ...
Activate?
or ...
Deactivate?
Defining the number of rings
When ring delay is used, the number of rings before the call is forwarded must be
defined. Between 0 (= immediate call forwarding) and 9 rings can be set. There are
5 seconds between rings.
The factory default setting is 0 rings (= immediate call forwarding).
v
s Base Settings
s Forward. base
OK
~
s No. of rings
OK
~
a
Open the menu.
Select the menu item and confirm.
OK
Select the menu item and confirm.
OK
Enter system PIN, if needed (page 61).
Activate:
Confirm.
OK
Deactivate:
Select the menu item and confirm.
OK
Open the menu.
Select the menu item and confirm.
OK
Select the menu item and confirm.
OK
Enter system PIN, if needed (page 61).
Select the menu item and confirm.
OK
Enter the number of rings and confirm.
Hold down (return to idle status).
Forwarding external calls – CF (Call Forwarding)
For each incoming MSN, you can save a 'call to' number for each of the three following
conditions:
Immediately – On busy – On no reply
◆ If call forwarding is sent to the base station (internal) (page 73), the
condition
i
All executed external call forwarding is entered in a list. Active call forwarding is marked
in this list.
By factory default, external call forwarding is not activated.
◆ The three conditions can be activated simultaneously.
◆ If Night service was set up for an incoming MSN (page 58), external
call forwarding cannot be set up or changed for this incoming MSN.
On busy is not available.
70
Page 73

Gigaset SX100isdn / englisch / A31008-X150-B102-1-7619 / settings_bs.fm / 13.10.2003
Setting the system
Setting up the forward destination
v
s Base Settings
s Ext. call forw.
OK
~
s New entry
OK
s
s Immediately
~
s Save entry
[RRRRRRRRRRRRRRRRRRRRRRRRRR ]
YES
Activating/deactivating external call forwarding
v
s Base Settings
s Ext. call forw.
OK
~
s
v
either ...
s Activate?
or ...
s Deactivate?
Open the menu.
Select the menu item and confirm.
OK
Select the menu item and confirm.
OK
Enter system PIN, if needed (page 61). The list of set
up call forwarding is displayed.
Press the display key to open the menu.
Select the menu item and confirm.
OK
Select and confirm the incoming MSN, e.g. MSN1:
Anna.
Select the condition and confirm, e.g. Immediately.
OK
You will be warned if you have chosen an MSN that
another internal party has already set up for call
forwarding. You can either return using BACK to
select another setting or use NEXT to continue.
Enter a phone number and open the menu.
Select the menu item and confirm.
OK
Confirm to set up call forwarding.
Open the menu.
Select the menu item and confirm.
OK
Select the menu item and confirm.
OK
Enter system PIN, if needed (page 61).
Select call forwarding number, e.g.,
MSN1 to 22222.
Open the submenu.
Activate:
Select the menu item and confirm.
OK
Deactivate:
Select the menu item and confirm.
OK
You will be warned if you have chosen a call
forwarding number that another internal party has
already set up. You can either return using BACK to
select another setting or use NEXT to continue.
71
Page 74

Gigaset SX100isdn / englisch / A31008-X150-B102-1-7619 / settings_bs.fm / 13.10.2003
Setting the system
Changing an entry
v
s Base Settings
s Ext. call forw.
OK
~
OK
OK
s
v
s Edit entry
OK
~
s Save entry
[RRRRRRRRRRRRRRRRRRRRRRRRRRR]
YES
Deleting external call forwarding
OK
v
s Base Settings
s Ext. call forw.
OK
~
OK
OK
s
v
s Delete entry
OK
Open the menu.
Select the menu item and confirm.
Select the menu item and confirm.
Enter system PIN, if needed (page 61).
Select call forwarding number, e.g.,
MSN1 to 22222.
Open the submenu.
Select the menu item and confirm.
You will be warned if you have chosen a call
forwarding number that another internal party has
already set up. You can either return using BACK to
select another setting or use NEXT to continue.
Enter a new phone number and open the menu.
Select the menu item and confirm.
Confirm to set up call forwarding.
Open the menu.
Select the menu item and confirm.
Select the menu item and confirm.
Enter system PIN, if needed (page 61).
Select call forwarding number, e.g.,
MSN1 to 22222.
Open the submenu.
Select the menu item and confirm.
You will be warned if you have chosen a call
forwarding number that another internal party has
already set up. You can either return using BACK to
select another setting or use NEXT to continue.
72
Page 75
Gigaset SX100isdn / englisch / A31008-X150-B102-1-7619 / settings_bs.fm / 13.10.2003
Setting the system
Switching external call forwarding internal/external
Your ISDN connection offers you two simultaneously usable telephone lines (B
channels).
You can set up your telephone so that:
◆ the call forwarding is done at the telephone exchange (external), so that your
second ISDN line remains free.
◆ the call forwarding is done in your base (internal), so that both ISDN lines are used.
Any resulting connection charges will be charged to you.
By factory default, Forward. netw. is activated.
v
s Base Settings
s Settings
OK
~
s ISDN settings
either ...
s Forward. base
or ...
s Forward. netw.
Open the menu.
Select the menu item and confirm.
OK
Select the menu item and confirm.
OK
Enter system PIN, if needed (page 61).
Select the menu item and confirm.
OK
Select the menu item and confirm (‰ = set).
OK
Select the menu item and confirm (‰ = set).
OK
Pre-assigning the call deflection destination – CD (Call Deflection)
The call forwarding destination for incoming calls are pre-set here. This 'call to' number
is offered as a pre-set when forwarding manually (page 29).
v
s Base Settings
s Settings
OK
~
s ISDN settings
s Forward. dest.
~
s Save entry
Open the menu.
Select the menu item and confirm.
OK
Select the menu item and confirm.
OK
Enter system PIN, if needed (page 61).
Select the menu item and confirm.
OK
Select the menu item and confirm.
OK
Enter 'call to' number and confirm.
Select the menu item and confirm.
OK
73
Page 76

Gigaset SX100isdn / englisch / A31008-X150-B102-1-7619 / settings_bs.fm / 13.10.2003
Setting the system
Setting up automatic call forwarding when not reaching a handset
If your handset is out of the radio range of the base station, the battery is flat, or the
handset has been deactivated, a call will be forwarded to one of the external phone
numbers you specify (e.g., a mobile phone).
Prerequisites:
◆ You have exclusively assigned the handset its own incoming MSN (page 66). This
MSN must not be assigned as the incoming MSN for any other device, not even the
ISDN bus!
◆ Call forwarding can only be set up for one incoming MSN on the base.
By factory default, automatic call forwarding is not set up.
v
s Base Settings
s Settings
OK
~
s ISDN settings
s Auto.forwarding
s
v
~
s Save entry
The line set up for automatic call forwarding is marked in the list of set-up call
forwarding lines.
Open the menu.
Select the menu item and confirm.
OK
Select the menu item and confirm.
OK
Enter system PIN, if needed (page 61).
Select the menu item and confirm.
OK
Select the menu item and confirm.
OK
Select call fowarding line, e.g., MSN1: Anna.
Open the submenu.
Enter 'call to' number and open the submenu.
Select the menu item and confirm. Automatic call
OK
forwarding is activated (
‰ = on).
74
Page 77
Gigaset SX100isdn / englisch / A31008-X150-B102-1-7619 / settings_bs.fm / 13.10.2003
Setting the system
Setting up an internal group call group
You can make a group call from any handset to all other registered internal party
(page 20).
In the basic settings, all registered parties of device type "telephone" or "Neutral" are set
up in the group call group.
v
s Base Settings
s Settings
OK
~
s Setup user
s Setup device
s Int.11
v
s Hunt group
Open the menu.
Select the menu item and confirm.
OK
Select the menu item and confirm.
OK
Enter system PIN, if needed (page 61).
Select the menu item and confirm.
OK
Confirm.
OK
Select the internal number, e.g., Int.11 .
Open the submenu.
Select the menu item and confirm (‰ = activated).
OK
Setting up ring delay
Ring delay can be used to individually set up a party per incoming MSN to ring later.
During this ring delay time, the handset can take the call using the function "Accept?"
without hearing a ring. The ring delay time is given in rings. There are 5 seconds
between rings.
The factory default setting is 0 rings (= not activated).
For each programmed MSN, at least one party must be able to be called immediately.
Therefore, a party set up for ring delay will be called immediately if he is the only one
on this incoming MSN, or no one else can be reached on this incoming MSN.
75
Page 78
Gigaset SX100isdn / englisch / A31008-X150-B102-1-7619 / settings_bs.fm / 13.10.2003
Setting the system
Picking up a call during ring delay see page 22.
v
s Base Settings
s Settings
OK
~
s Setup user
s Setup device
s Int.11
v
s Ring delay
s
OK
~
Open the menu.
Select the menu item and confirm.
OK
Select the menu item and confirm.
OK
Enter system PIN, if needed (page 61).
Select the menu item and confirm.
OK
Select the menu item and confirm.
OK
Select the internal number, e.g., Int.11 .
Open the submenu.
Select the menu item and confirm.
OK
Select incoming MSN, e.g., MSN11: Anna, and
OK
confirm.
No. of rings should be entered, e.g., 2, and confirm.
Activating/deactivating call waiting – CW
Th is f unction c an b e set up i ndi vid ual ly for ea ch p arty. Wh en c all wai tin g is set , the cal ler
hears the phone ringing while you are talking on the telephone. The call is signalled
acoustically as well as is shown in the display on your handset.
When call waiting is deactivated, the caller hears the phone ringing while you are
talking on the telephone and other devices are assigned to this MSN.
When call waiting is deactivated, the caller hears the busy signal while you are talking
on the telephone and you are the only party assigned to this MSN.
By factory default, the function is activated. For call waiting with an external call see
page 30.
v
s Base Settings
s Settings
OK
~
s Setup user
s Setup device
s Int.11
v
s Call waiting
76
Open the menu.
Select the menu item and confirm.
OK
Select the menu item and confirm.
OK
Enter system PIN, if needed (page 61).
Select the menu item and confirm.
OK
Select the menu item and confirm.
OK
Select the internal number, e.g., Int.11 .
Open the submenu.
Select the menu item and confirm (‰ = activated).
OK
Page 79
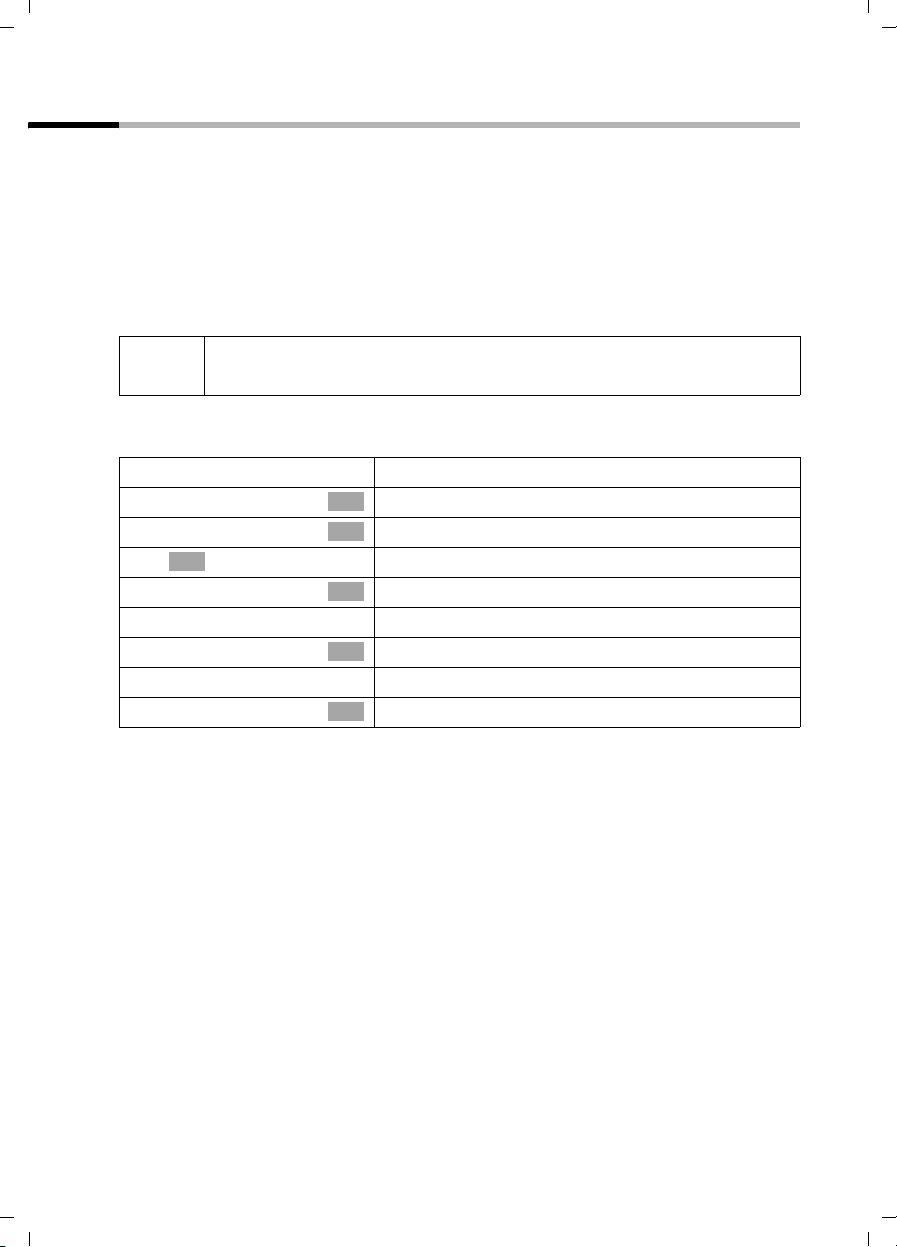
Gigaset SX100isdn / englisch / A31008-X150-B102-1-7619 / settings_bs.fm / 13.10.2003
Setting the system
Setting an external/internal enquiry call
Your ISDN connection offers you two simultaneously usable telephone lines (B
channels).
You can set up your telephone so that:
◆ when an enquiry call is made during an external call to another external party, the
"hold" is d one at the telephone exchange s o that your second ISDN line remains free.
◆ when an enquiry call is made during an external call to another external party, the
"hold" is done in your base, and both ISDN lines are used.
By factory default, Ext. enq. call is activated.
i
Initiating a enquiry call see page 26 or page 27.
v
s Base Settings
s Settings
~
s ISDN settings
either ...
s Int. enq. call
or ...
s Ext. enq. call
If Int. enq. call is set and the second B-channel is being used, the "Hold"
takes place automatically in the telephone exchange.
Open the menu.
Select the menu item and confirm.
OK
Select the menu item and confirm.
OK
OK
Enter system PIN, if needed (page 61).
Select the menu item and confirm.
OK
Set the Int. enq. call:
Select the menu item and confirm (‰ = activated).
OK
Set the Ext. enq. call:
Select the menu item and confirm (‰ = activated).
OK
77
Page 80

Gigaset SX100isdn / englisch / A31008-X150-B102-1-7619 / settings_bs.fm / 13.10.2003
Setting the system
Setting up the waiting melody
An external party hears the set waiting melody when the connection is on hold in the
base (internal) (page 77). An external party whose connection is on hold in the
telephone exchange (external), and an internal party who is on hold, will not hear a
waiting melody.
The following settings can be chosen:
Internal
Off
By factory default, Internal is activated.
The party on hold hears the waiting melody of
the base.
When the waiting melody is deactivated, a setting
cannot be made.
v
s Base Settings
s Settings
OK
~
s System settings
s Music on hold
s Internal
Open the menu.
Select the menu item and confirm.
OK
Select the menu item and confirm.
OK
Enter system PIN, if needed (page 61).
Select the menu item and confirm.
OK
Select the menu item and confirm.
OK
Select and confirm the desired setting, e.g.,
OK
Internal (
‰ = on).
Changing the long distance prefix
Long distance prefixes are the first few digits required when dialling another city
(national) or to another country (international). The factory default is:
0 For connections to other towns (national)
00 For connections abroad (international)
78
Page 81

Gigaset SX100isdn / englisch / A31008-X150-B102-1-7619 / settings_bs.fm / 13.10.2003
Setting the system
In other countries, different long distance prefixes could be used. In this case you need
to change this setting.
Otherwise, you wouldn't be able to make some calls, such as ringbacks, from the call
list.
v
s Base Settings
s Settings
OK
~
s ISDN settings
s Lg.-dist. code
s National : 0
v
s Change number
~
s Save entry
Open the menu.
Select the menu item and confirm.
OK
Select the menu item and confirm.
OK
Enter system PIN, if needed (page 61).
Select the menu item and confirm.
OK
Select the menu item and confirm.
OK
Select type of long distance prefix,
e.g., National : 0.
Open the submenu.
Select the menu item and confirm.
OK
Enter a new or changed long distance prefix and
open the menu.
Select the menu item and confirm.
OK
Restoring the factory settings
You can select which type of reset should be performed:
Operational – All MSNs and access codes (outside line code) are deleted. The
authorisations are reset to "dial and answer".
Reset all – All functions are reset to their factory defaults. The system PIN is reset to
"0000". All entries (calls list, charges) are deleted.
i
The following applies to both functions: Before resetting, switch all active
call forwardings off! The handsets remain registered.
v
s Base Settings
s Settings
OK
~
s System settings
s Spec. function
s Factory setting
Open the menu.
Select the menu item and confirm.
OK
Select the menu item and confirm.
OK
Enter system PIN, if needed (page 61).
Select the menu item and confirm.
OK
Select the menu item and confirm.
OK
Select the menu item and confirm.
OK
79
Page 82
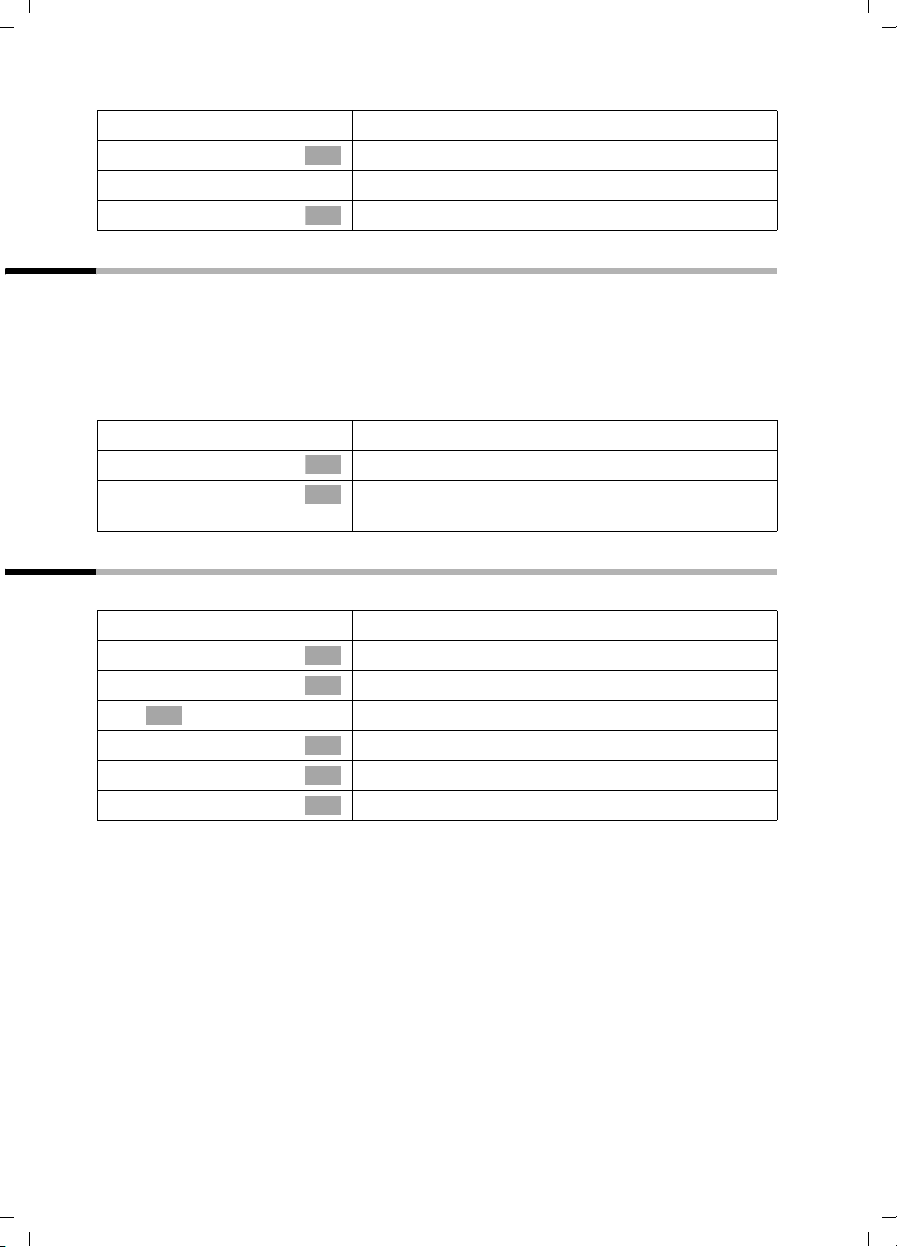
Gigaset SX100isdn / englisch / A31008-X150-B102-1-7619 / settings_bs.fm / 13.10.2003
Setting the system
either ...
s Operational
or ...
s Reset all
Restore the functionality:
Select the menu item and confirm.
OK
Restore factory settings:
Select the menu item and confirm.
OK
Checking the status
The status of the following settings can be checked:
◆ Ringback
◆ Unknown call
◆ Forwarding
◆ External connections
v
s Base Settings
s Status
Open the menu.
Select the menu item and confirm.
OK
Select the menu item and confirm. The status list is
OK
displayed (
‰ = is activated).
Checking the software version
You can check the version of the software for the base:
v
s Base Settings
s Settings
OK
~
s System settings
s Spec. function
s SW version
Open the menu.
Select the menu item and confirm.
OK
Select the menu item and confirm.
OK
Enter system PIN, if needed (page 61).
Select the menu item and confirm.
OK
Select the menu item and confirm.
OK
Select the menu item and confirm.
OK
80
Page 83
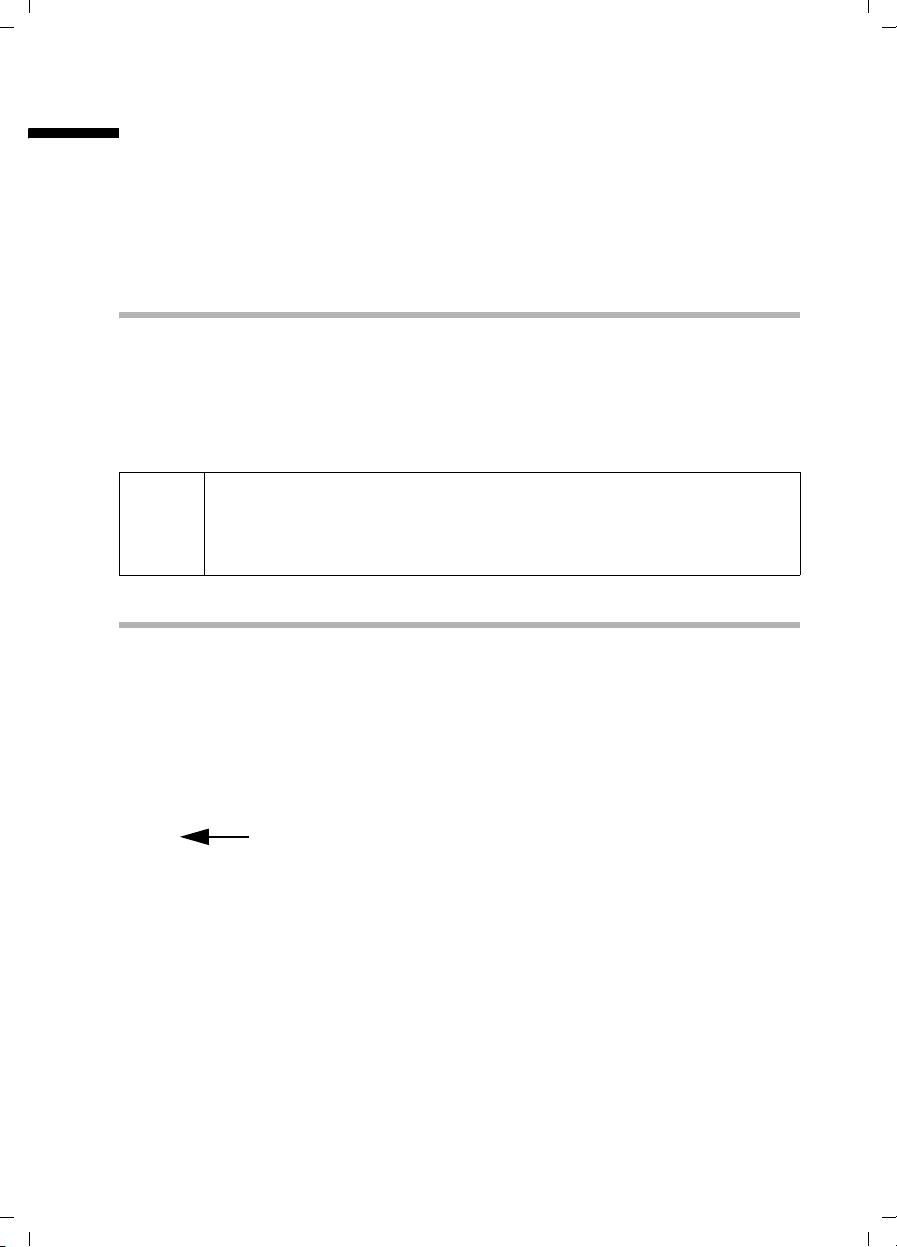
Gigaset SX100isdn / englisch / A31008-X150-B102-1-7619 / registering_hs.fm / 13.10.2003
Registering/de-registering further handsets
Registering/de-registering further handsets
You can register up to six wireless devices to your base (handsets or data modules
M101data, M105data).
A Classic S127 or Top S327 handset that is not yet registered on a base is registered
automatically. Older handsets of the same make and handsets of other manufacturers
must be registered manually.
Your handset can be registered on up to four bases.
Automatic registration: Handsets Classic S127 and Top S327
To register your handset for the first time, place the deactivated handset in the base
with the display up. Registration takes around 1 minute. The handset will be
automatically assigned the lowest unassigned internal number from the range Int.11
to Int.16. This will appear in the display after registration is complete.
If the internal numbers Int.11 to Int.16 have already been assigned, please de-register
another handset beforehand (page 83).
◆ Automatic registration is only possible when the handset, base, and
i
integrated answering machine are in idle status.
◆ A registered handset can be assigned a different internal name
(page 64).
Manual registration: Handsets Classic S127 and Top S327
If the internal numbers Int.11 to Int.16 on your telephone have already been assigned,
please de-register another handset which is no longer needed before registering
(page 83).
You must initiate handset registration on the base and on the handset.
1. On the base
Press the Registration/Paging key on the base for approximately 3 seconds. Registration
is initiated.
$
Registration/paging key
81
Page 84

Gigaset SX100isdn / englisch / A31008-X150-B102-1-7619 / registering_hs.fm / 13.10.2003
÷
Registering/de-registering further handsets
2. On the handset (within 30 seconds)
v
s Settings
s Register H/Set
s Base 1
OK
~ Enter the system PIN of the base (Factory default:
s Int.11
The handset returns to idle status after registration is complete. The internal number of
the handset appears in the display.
Open the menu.
Select the menu item and confirm.
OK
Select the menu item and confirm.
OK
Select base (1–4) and confirm, e.g. Base 1.
OK
0000) and confirm. In the display are
Regstr.Procedure and the name of the base (e.g.,
Base 1).
If the handset has found the base, the list of available
internal numbers is shown in the display.
Select and confirm the internal number, e.g., Int.11 .
OK
i
The handset cancels the base search after 60 seconds. If registration has
not completed within this time period, repeat the process.
Manual registration: Older handsets of the same make and other GAP-capable handsets
The following describes how to register older handsets or handsets of other GAPcapable devices.
GAP Generic Access Profile = European standard for the interaction of handsets and
bases of other manufacturers.
If the internal numbers Int.11 to Int.16 on your telephone have already been assigned,
please de-register another handset which is no longer needed before registering
(page 83).
1. On the handset
Start to register the handset as described in its operating instructions.
2. On the base
The handset is automatically assigned the lowest unassigned internal number from the
number range Int.11 to Int.16.
Press the Registration/Paging key on the base for
approximately 3 seconds. Registration is initiated.
82
Page 85

Gigaset SX100isdn / englisch / A31008-X150-B102-1-7619 / registering_hs.fm / 13.10.2003
Registering/de-registering further handsets
De-registering handsets
You can de-register any registered handset from any registered Classic S127 and
Top S327 handset.
v
s Base Settings
s Settings
OK
~
s Setup user
s De-reg. device
s Int.16
a
Open the menu.
Select the menu item and confirm.
OK
Select the menu item and confirm.
OK
Enter system PIN, if needed (page 61).
Select the menu item and confirm.
OK
Select the menu item and confirm.
OK
Select and confirm handset to be de-registered, e.g.
OK
Int.16.
Return to idle status.
Page handset ("Paging")
If you have mislaid your handset you can 'page' it with the help of the base.
To do this, press the Registration/paging key on the base for 1 second. All handsets will
ring together ("Paging").
$
End paging:
Either press the Registration/paging key on the base for 1 second or press the talk key
Registration/paging key
c on a handset.
Changing the base
The following settings may be made if your handset is registered with more than one
base:
◆ Set to one specific base, e.g. the base at home or the base at the office.
◆ Set to the base with the best reception: Best Base. This setting will automatically
select whichever base has the best reception.
v
s Settings
s Select Base
OK
s Select one of the registered bases or Best Base and
a
Open the menu.
Select the menu item and confirm.
OK
Select the menu item and confirm.
OK
confirm.
Hold down (return to idle status).
83
Page 86
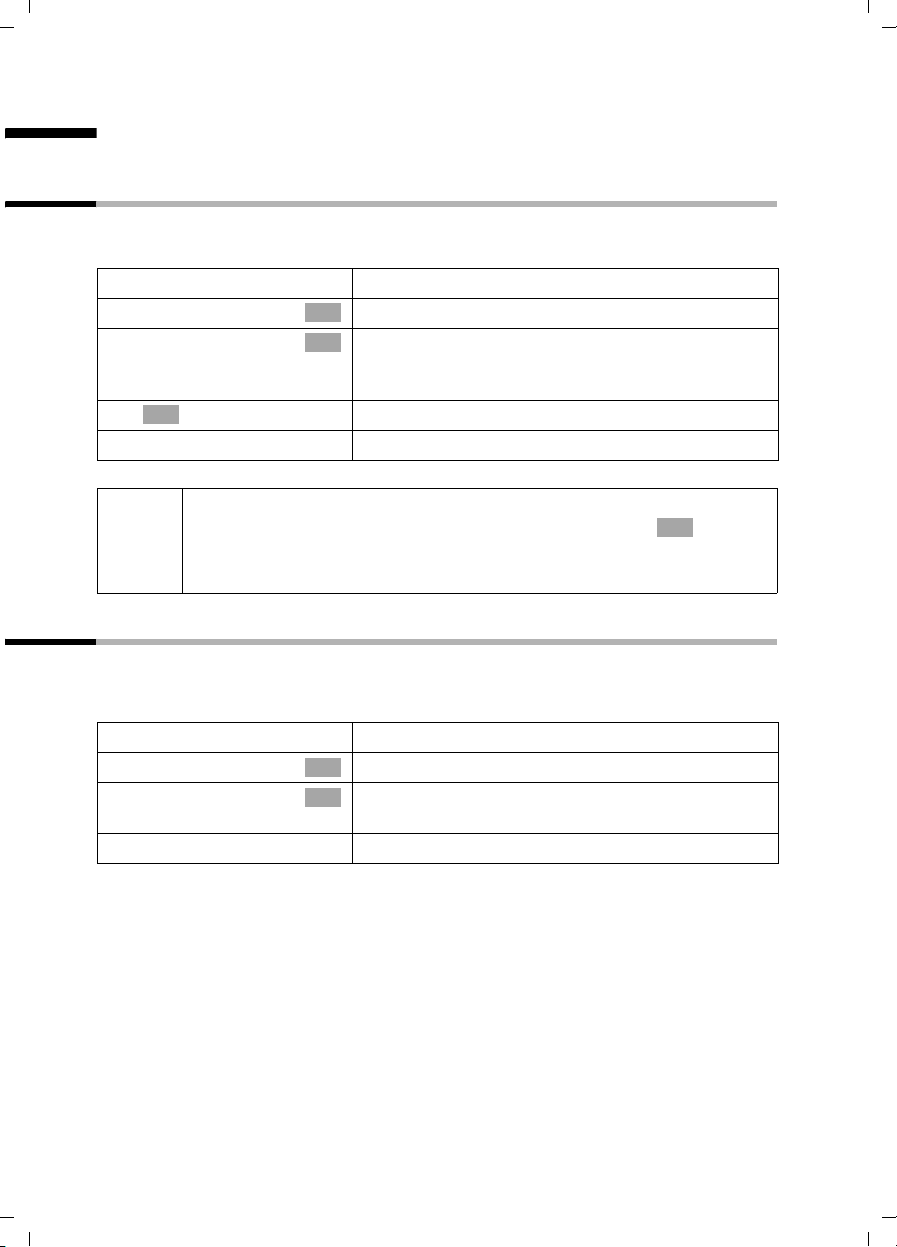
Gigaset SX100isdn / englisch / A31008-X150-B102-1-7619 / settings_hs.fm / 13.10.2003
Handset settings
Handset settings
Your handset is pre-set. You can change the settings to suit your requirements.
Changing the display language
You can view the display texts in different languages.
v
s Settings
s Language
OK
s Select a language and confirm.
a
◆ If you set the wrong language in error, press v M 2. Now
i
select the correct language with
◆ When you change the display language the character set can change
too, e.g. for Russian.
Open the menu.
Select the menu item and confirm.
OK
Select the menu item and confirm. The current
OK
language is checked
German).
Hold down (return to idle status).
‰ (the default setting is:
s and confirm with .
OK
Deactivating/activating auto answer
If you have activated this function, when you get a call you can simply lift the handset
out of its base or the charger without having to press the Talk key
setting is on).
v
s Settings
Auto Answer
a
Open the menu.
Select the menu item and confirm.
OK
Confirm to deactivate or activate the function
OK
‰ =activated).
(
Hold down (return to idle status).
c (the default
84
Page 87
Gigaset SX100isdn / englisch / A31008-X150-B102-1-7619 / settings_hs.fm / 13.10.2003
Handset settings
Changing the name of the base
The names "Base 1? to "Base 4" are assigned automatically. You can change the name of
your base.
The name of the base is handset-specific, i.e. the base receives the name
i
which was assigned by the handset. The same base can have different
name on different handsets.
v
s Settings
s Select Base
R[RRRRRRRRRRRRRRRRRRRR]
s Edit
Open the menu.
Select the menu item and confirm.
OK
Select the menu item and confirm.
OK
Select the base and press the display key.
~ Enter a new name (up to 16-characters)
(for inputting text see page 99).
[RRRRRRRRRRRRRRRRRRRRRRRRRR ]
Save
Press the display key to save the setting.
Adjusting the loudspeaker volume
You can adjust the handsfree volume on five levels and the earpiece volume on three
levels – you can even do this while an external call is in progress.
v
s Audio Settings
Handset Volume
r
Open the menu.
Select the menu item and confirm.
OK
Confirm. You hear the current volume setting for
OK
handsfree talking.
Set the volume for handsfree talking (1-5) in the
input field.
sr Scroll one line lower and set the earpiece volume (1–
3).
[RRRRRRRRRRRRRRRRRRRRRRRRRR ]
Save
a
Press the display key to save the setting.
Hold down (return to idle status).
Ringer echo
In certain situations, the sound quality could be less than what you are used to. You can
enhance the sound quality of the long ringer melodies (4-10).
v
s Audio Settings
Ringer Echo
a
Open the menu.
Select the menu item and confirm.
OK
Confirm (‰ = activated).
OK
Hold down (return to idle status).
85
Page 88
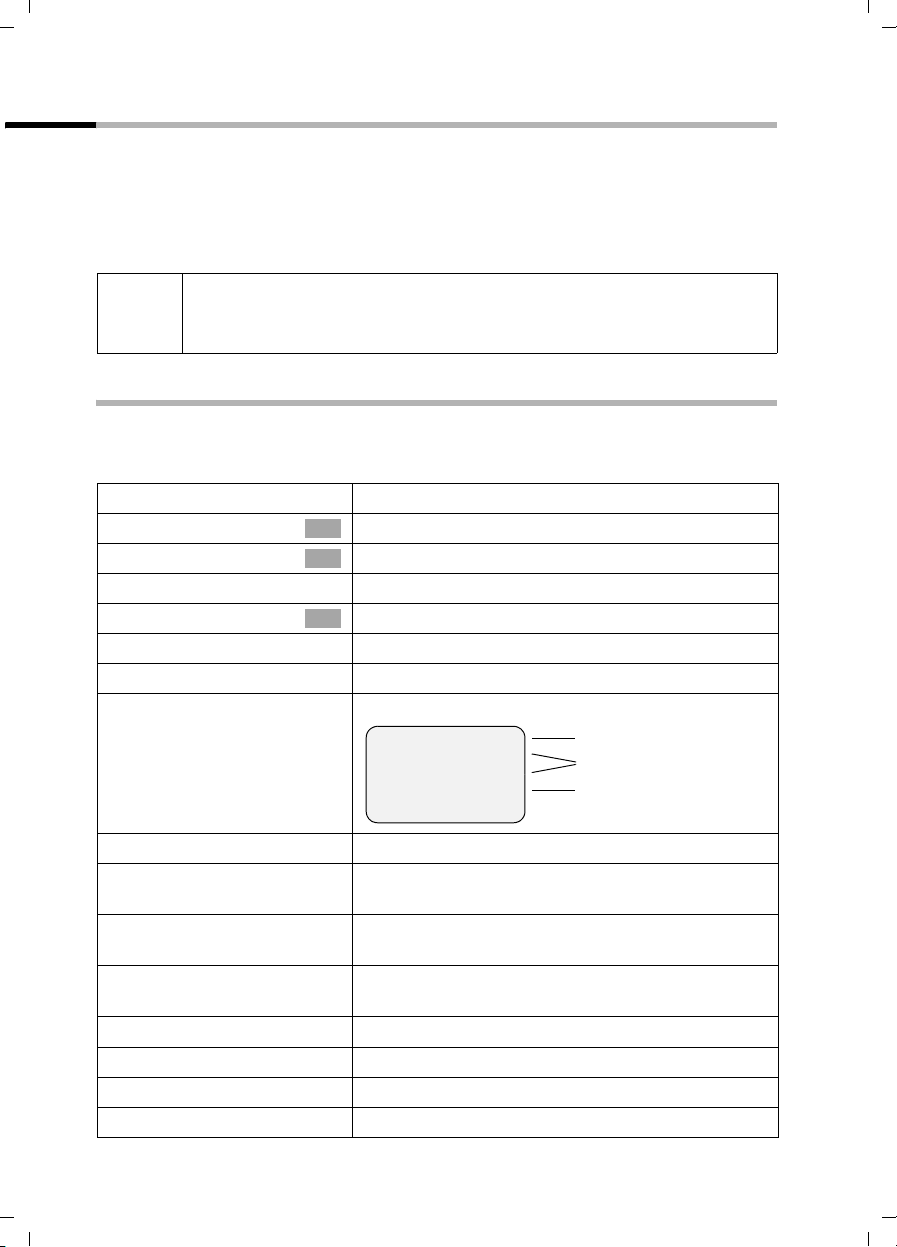
Gigaset SX100isdn / englisch / A31008-X150-B102-1-7619 / settings_hs.fm / 13.10.2003
Handset settings
Changing the ringer tone
A range of options are available:
◆ Six volume levels:
– Five volume levels (1–5; e.g. volume level 2 =
– 'Crescendo' call (6; the volume increases with each ring =
◆ Ten melodies (1–10; melodies 1–3 are the "classic ringer tones").
Setting the ringer melody on the handset is only effective, if the external
i
ringer MT is set instead of a ringer melody (page 68) for the incoming
MSN of the handset.
ˆ),
‰).
Settings for external calls, time control and name announcement
Set the volume and melody depending on the type of ringing. You can also set the
volume of a cal l to be dependent on the time it is recei ved (e .g., ni ghts quieter as during
the day).
v
s Audio Settings
s Ringer Settings
Ext. Calls
Open the menu.
Select the menu item and confirm.
OK
Select the menu item and confirm.
OK
Setting the melody and volume:
Confirm. You hear the current volume.
OK
r Select the desired volume in the input field.
If necessary, activate time control:
[RRRRRRRRRRRRRRRRRRRRRRRRRRR]
Time C.
Press the display key.
Time ctrl:
From: 20:00
Until: 08:00
Ö‡
Save
fOng
On or off status
Period of time for "On"
Ringer volume
r
s~
s~
In the Time ctrl: line, select On.
Scroll to the From: line and enter the beginning of
the time period (4-digit format).
Scroll to the Until: line and enter the end of the time
period (4-digit format).
s~ Scroll to the next line and set the ringer volume for
this time period.
[RRRRRRRRRRRRRRRRRRRRRRRRRRR]
Save
[RRRRRRRRRRRRRRRRRRRRRRRRRRR]
Save
... then
a
86
Press the display key to save the time control.
Press the display key to save the setting.
Hold down (return to idle status).
Page 89
Gigaset SX100isdn / englisch / A31008-X150-B102-1-7619 / settings_hs.fm / 13.10.2003
Handset settings
Individual settings for internal calls, wake-up and appointments
You can set the ringer individually for an internal call, wake-up call, or appointment. You
can also set all calls the same.
v
s Audio Settings
s Ringer Settings
either ...
s Internal Calls
or ...
s Appointments
or ...
s Alarm
or ...
s All
... then
Open the menu.
Select the menu item and confirm.
OK
Select the menu item and confirm.
OK
For internal calls:
Select the menu item and confirm.
OK
For set appointments (page 56):
Select the menu item and confirm.
OK
For a pre-set wake-up call (page 54):
Select the menu item and confirm.
OK
To set all functions to ring the same:
Select the menu item and confirm.
OK
r Set the volume (1-6) in the input field.
sr Scroll to the next line and select the ringer melody.
The current melody rings, the digits at the end of the
line indicate the current setting. Enter the melody (1-
10).
[RRRRRRRRRRRRRRRRRRRRRRRRRR ]
Save
[RRRRRRRRRRRRRRRRRRRRRRRRRR ]
Yes
... then
a
Now press the display key to store the setting.
For the setting All press the display key again to
confirm the prompt.
Hold down (return to idle status).
Activating/deactivating the ringer
All handsets ring when there is an incoming call. You can cancel the ringer on your
handset before you answer a call or when the handset is in idle status; the ringer can be
cancelled permanently or just for the current call.
Cancelling the ringer permanently:
P
P
Press the star key and hold until the ringer cannot be
heard any longer. The ringer is now permanently
cancelled. The
Re-activating the ringer:
Press the star key and hold.
Ú icon appears in the display.
87
Page 90
Gigaset SX100isdn / englisch / A31008-X150-B102-1-7619 / settings_hs.fm / 13.10.2003
Handset settings
To deactivate the ringer in the idle status, press the key and hold until the
Ú icon appears. The ringer cannot be re-activated while an external call is in
the
progress.
Deactivating the ringer for the current call:
[RRRRRRRRRRRRRRRRRRRRRRRRRRR]
Silence
Press the display key.
P key until
Activating/deactivating the alert tone
When you activate and deactivate the ringer you can activate an alert tone. When you
get a call, you will hear a short tone (beep) instead of the ring tone.
P
[RRRRRRRRRRRRRRRRRRRRRRRRRRR]
Beep on
P
Press and hold the star key and within 3 seconds:
Press the display key. A call is now signalled by one
brief alert tone. You will now see
Deactivating the alert tone:
Press the star key and hold. The ringer is activated
again.
º in the display.
Activating/deactivating advisory tones
Your handset uses 'advisory tones' to tell you about different activities and statuses. The
following advisory tones can be activated and deactivated individually (the default
setting is on).
◆ Key click: Every press of the key is confirmed.
◆ Acknowledge tones:
– Confirmation tone (rising tone sequence): at the end of an input/setting, when
the handset is placed in the base and when a new entry arrives in the calls list
– Error tone (a falling tone sequence): with incorrect inputs
– End of menu tone: when scrolling at the end of a menu
◆ Battery tone: The batteries must be charged.
v
s Audio Settings
s Advisory Tones
r
Open the menu.
Select the menu item and confirm.
OK
Select the menu item and confirm.
OK
In the Key Tones: line, activate or deactivate the key
click.
sr Scroll to the Confirm.: line to activate or deactivate
the confirmation tones.
sr Scroll to the Battery: line and choose On, Off, or
in Verb.. The battery warning tone is activated or
deactivated or only rings during a call.
[RRRRRRRRRRRRRRRRRRRRRRRRRRR]
Save
a
Press the display key to save the setting.
Hold down (return to idle status).
88
Page 91
Gigaset SX100isdn / englisch / A31008-X150-B102-1-7619 / settings_hs.fm / 13.10.2003
Handset settings
Restoring the handset to factory settings
You can reset individual settings and changes you have made. This will not affect entries
in the directory, the calls list or the speed dial list and the handset's registration to the
base that you have installed.
a to cancel the reset.
Press
v
s Settings
s Reset Handset
[RRRRRRRRRRRRRRRRRRRRRRRRRR ]
Yes
a
Factory settings of the handset
Base selection "Best base" page 83
Earpiece volume 1 page 85
Handsfree volume 3 page 85
Ringer volume 5 page 86
Time control for ringer deactivated page 86
Ringer melody 1 page 86
Name announcement deactivated page 86
Auto answer activated page 84
Battery tone/Key click/Confirmation tone activated page 88
Display language german page 84
Character set standard page 99
Alarm clock/appointment deactivated page 54/
Appointment name deleted page 56
Last number redial list empty page 42
Room monitor/room monitor sensitivity deactivated/high page 50
Open the menu.
Select the menu item and confirm.
OK
Select the menu item and confirm.
OK
Press the display key to confirm the prompt.
Hold down (return to idle status).
page 56
89
Page 92

Gigaset SX100isdn / englisch / A31008-X150-B102-1-7619 / devices.fm / 13.10.2003
Operating with other devices
Operating with other devices
Data modules Gigaset M101 Data and M105 Data
Using Gigaset M101 Data with V24 interface and Gigaset M105 Data with USB interface,
you can establish a wireless connection from your PC to the base station, e.g., for
Internet access.
For installation, see the installation instructions on the CD-ROM enclosed with the data
module.
Gigaset repeater
The Gigaset repeater can be used to increase the range of your handsets. You can use
up to 6 repeaters on your base. To successfully install the repeater, the repeater
capability of the base must be activated.
Activating/deactivating repeater capability
This function is used to activate or deactivate the repeater capability.
By factory default, this repeater capability is deactivated.
v
s Base Settings
s Settings
OK
~
s System settings
s Spec. function
s Repeater
[RRRRRRRRRRRRRRRRRRRRRRRRRRR]
NEXT
Open the menu.
Select the menu item and confirm.
OK
Select the menu item and confirm.
OK
Enter system PIN, if needed (page 61).
Select the menu item and confirm.
OK
Select the menu item and confirm.
OK
Select the menu item and confirm.
OK
Press the display key to save the setting. The handset
goes off briefly (
‰ = activated).
Registering the repeater
Prerequisite: Gigaset repeater is deactivated (power connector unplugged).
1. Press the illuminated registering key on the base station. The key flashes. The base
station is ready for registering only when the key is flashing.
i
2. Plug in the power connector on the Gigaset repeater. The LED on the Gigaset
repeater flashes. After a brief time period, the LED is lit continuously which displays
that registering is complete and that it is ready for operation.
Please refer to the operating instructions of the Gigaset repeater for further
information.
Make sure that during this process, no other base stations in registering
mode are located near the Gigaset repeater.
90
Page 93
Gigaset SX100isdn / englisch / A31008-X150-B102-1-7619 / pabx.fm / 13.10.2003
Using with a PABX
Using with a PABX
Access code (outside line code)
Prerequisite: If your phone is connected to a PABX you may have to enter an access
code (outside line code) for external calls when first getting started, depending on the
PABX. See the operating instructions for your PABX. You can enter an access code (one
to four digits).
The access code (outside line code) is automatically put in front of the phone number
of the caller in the display and in the call list for incoming calls and also when copying
into the directory. The saved phone number can then be dialled directly from the calls
list (page 44).
v
s Base Settings
s Settings
OK
~
s System settings
s Access code
~
s Save entry
i
When dialling manually and when entering directory and emergency/
direct phone numbers, the access code must also be entered.
Open the menu.
Select the menu item and confirm.
OK
Select the menu item and confirm.
OK
Enter system PIN, if needed (page 61).
Select the menu item and confirm.
OK
Select the menu item and confirm.
OK
Enter access code and open the menu.
Confirm.
OK
Dialling options
The KEYPAD function is used to control specific services by entering strings of characters
and digits.
The KEYPAD function must be set when connecting your device to an ISDN PABX or to a
telephone exchange which uses KEYPAD protocol for controlling. The digits/characters
0–9, *, # are sent as keypad information elements. To find out which information and
codes can be sent, contact your service provider.
Options
You can switch between the settings Standard dial (factory default setting), Auto
keypad and Dial * and #.
Standard dial
After activating Standard dial, * and # are not sent while dialling, and entering * and
# will not switch to keypad.
91
Page 94

Gigaset SX100isdn / englisch / A31008-X150-B102-1-7619 / pabx.fm / 13.10.2003
Using with a PABX
Auto keypad
This setting automatically changes the signalling to keypad while dialling after * or # are
entered. This automatic changeover is required for commands made to the telephone
exchange or PABX.
Dial * and #
After activating Dial * and # the characters * and # are sent as commands to the
telephone exchange or PABX while dialling.
Independent of the above setting options, it is automatically switched over to tone
dialling (DTMF) after dialling or during the call e.g., to remotely control an answering
machine.
v
s Base Settings
s Settings
OK
~
s System settings
s Spec. function
s Dial properties
s Standard dial
Open the menu.
Select the menu item and confirm.
OK
Select the menu item and confirm.
OK
Enter system PIN, if needed (page 61).
Select the menu item and confirm.
OK
Select the menu item and confirm.
OK
Select the menu item and confirm.
OK
Select and confirm the desired setting, e.g.,
OK
Standard dial (
‰ = on).
Activating/deactivating the keypad during a call
In addition to the ongoing settings described above, you can also switch over
temporarily to the keypad.
The setting is only applicable to the current external call and is automatically
deactivated after the call is ended.
v
either ...
s Keypad on?
~
or ...
s Keypad off?
Open the menu.
Activate the keypad:
Select the menu item and confirm.
OK
Enter the keypad code.
Deactivate the keypad:
Select the menu item and confirm.
OK
92
Page 95

Gigaset SX100isdn / englisch / A31008-X150-B102-1-7619 / pabx.fm / 13.10.2003
Using with a PABX
Activating the keypad for the next connection
All dialling characters (0–9, *, #) will be sent as a string of keypad characters with the
next connection (dial and call). In the connection status, the keypad is retained and is
not automatically switched over to tone dialling (DTMF).
v
s Base Settings
s Call preparat.
s Temp. keypad
Open the menu.
Select the menu item and confirm.
OK
Select the menu item and confirm.
OK
Select the menu item and confirm (‰ = activated).
OK
93
Page 96
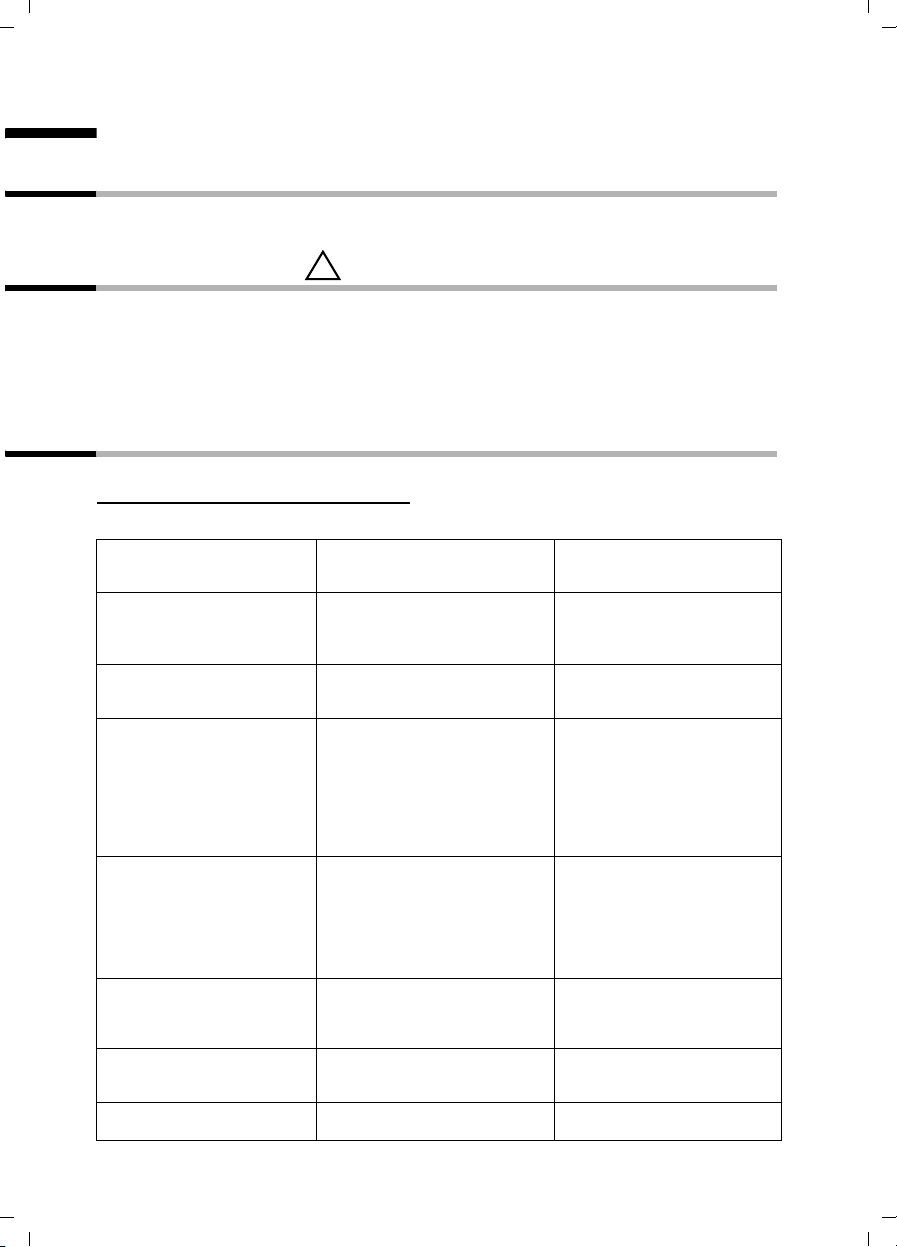
Gigaset SX100isdn / englisch / A31008-X150-B102-1-7619 / appendix.fm / 13.10.2003
Appendix
Appendix
Care
Wipe the base and handset with a damp cloth (use no solvent) or an antistatic cloth.
Never use a dry cloth. This can cause static.
Contact with liquid
!
If the handset should come into contact with liquid, on no account switch the device
on. Remove all batteries immediately.
Allow the liquid to drain out of the device, and then pat all parts of the device dry.
Keep the handset with the batteries removed in a warm, dry place for at least 72 hours.
In many cases, you will then be able to use it again.
Questions and Answers
If you have any questions about the use of your phone, you can contact us 24/7 at
www.my-siemens.com
questions and answers below.
What has happened
when …
… the display is blank? The handset is not switched on.
… the handset fails to respond
to a key press?
… "Base x" or Base Search
flashes in the display?
… the handset does not ring? The ringer is switched off.
… the phone number of the
caller is not displayed even
though CLIP is set?
… the handset does not ring
after setting up the ISDN
phone number (MSN)?
… You don't hear anything? The
/customercare. You will find the most frequently asked
Possible cause Possible solution
Hold down the End call key
The batteries are flat.
The keypad lock is activated. Press the hash key
The handset is outside the range
of the base.
The handset is not registered.
The base is not switched on.
Internal call forwarding is set to 0
rings (= immediate call
forwarding).
Night service is active.
Calling line identification is
blocked.
Area prefix (town/city code) was
saved with the MSN.
u key was pressed – the
microphone has been muted.
a for about 2 seconds.
Charge or replace the batteries
(page 9).
around 2 sec. to deactivate
the lock (page 11).
Move the handset nearer to the
base.
Register the handset (see
page 9 and see page 81).
Check the power connector at
the base (page 8).
Activate the ringer of the
handset (page 87).
Increase the number of rings
for the internal call forwarding
(page 70).
Deactivate Night service
(page 58).
The caller must ask his network
provider to enable the
transmission of his number
(CLI).
Save the MSN without the
area prefix (page 65).
Press to return to the call.
R
for
94
Page 97
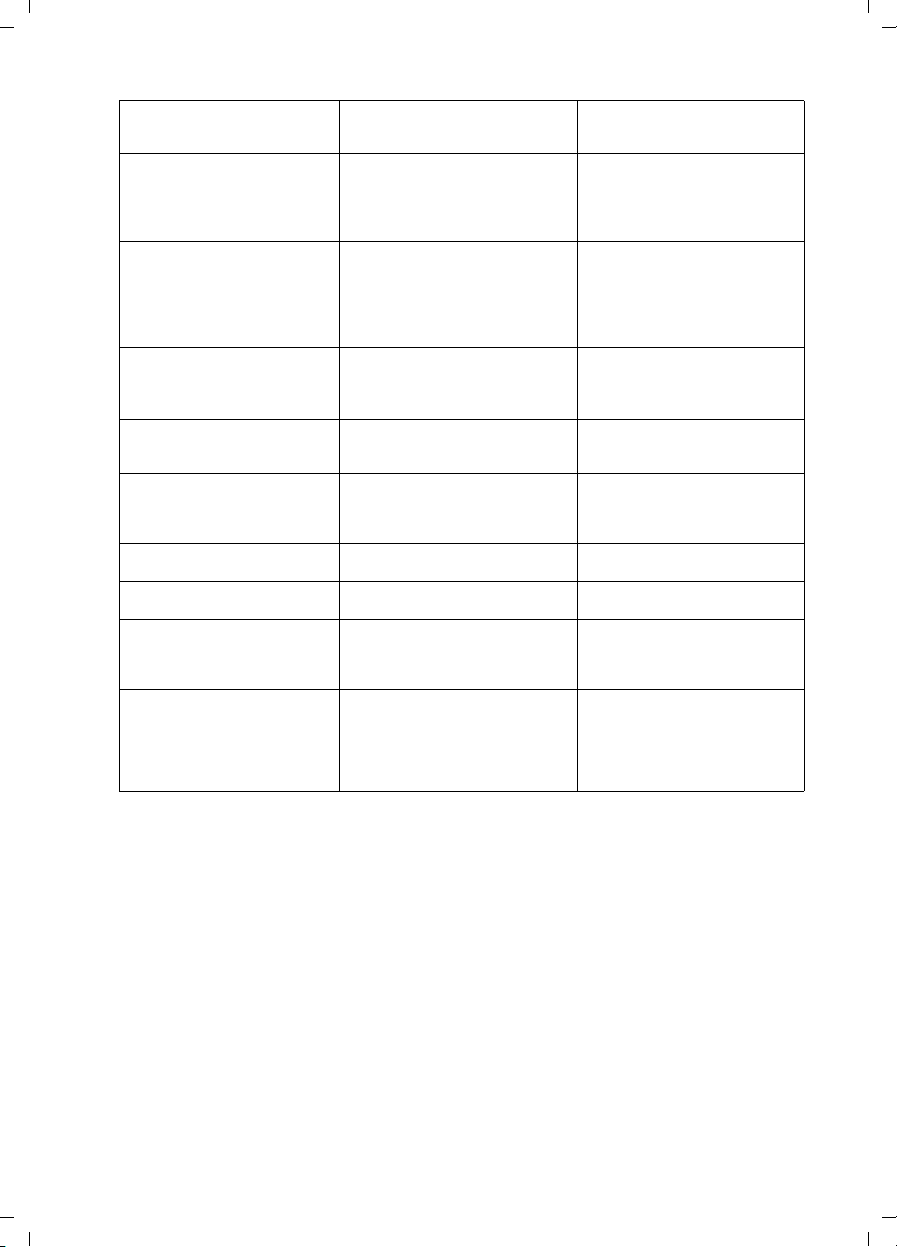
Gigaset SX100isdn / englisch / A31008-X150-B102-1-7619 / appendix.fm / 13.10.2003
Appendix
What has happened
Possible cause Possible solution
when …
… You can't dial a phone
number any longer?
… don't receive any calls? Call forwarding Immediately is
… during call forwarding the
forwarding conditions are
not displayed?
… the telephone also rings for
fax-PC calls?
… when dialling with the
PABX no connection can be or
the wrong connection is
established?
… … the handset does not
ring as set?
… a few of the ISDN functions
do not operate as indicated?
… another telephone on the
So bus does not ring?
… the caller hears the phone
ringing although the MSN is
busy?
The long distance prefix has
changed.
The telephone is blocked.
activated.
The assignment of the MSN to
the internal party is missing.
The authorisation Internal only
is set.
Internal call forwarding is
activated.
The phone number is in the
phone number list of the base
telephone.
The prefix code is either no
entered or is incorrectly entered.
There is a different setting for
the ringer melody for the MSN.
The ISDN function is not
enabled.
The same MSN was assigned to
the telephones. One of the
telephones also has internal call
forwarding activated.
The MSN was saved in devices
also used on the ISDN
connection.
Check the long distance prefix
and correct it (page 78).
Check the status display,
unlock the telephone if
necessary (page 11).
Switch off call forwarding
Immediately (page 70).
Define the incoming MSN
(page 66).
Change the authorisation
(page 61).
Activate external call
forwarding (page 70).
Apply to have this activated by
the network provider.
Delete the corresponding
phone number (MSN) in the list
(page 66).
Check and correct the prefix
code (page 91).
Change the ringer tone melody
(page 68).
Contact the network provider.
Deactivate internal call
forwarding or set external call
forwarding (page 69).
The phone number which is
supposed to be used for call
protection during a call should
be deleted from the list of
phone numbers for each
individual additional device.
95
Page 98

Gigaset SX100isdn / englisch / A31008-X150-B102-1-7619 / appendix.fm / 13.10.2003
Appendix
Guarantee/maintenance/repair/approval
Guarantee
The guarantee period is two years from the date of purchase.
For repairs to be carried out under the guarantee, the defective item must be
accompanied by a completed guarantee card that has been stamped by the dealer at the
time and place of purchase.
The guarantee does not cover any defects or damage caused by improper use or wear
and tear or third-party intervention. The guarantee does not cover consumables or
defects which only have a minor effect on the value or operability of the phone.
If a defect occurs please contact your dealer.
Repair/maintenance
Leased phones
If your phone is not functioning correctly please contact the Repair Service Team
(Tel. 175).
The actual repair
Purchased phones
Within the guarantee period, repairs to the phone will be carried out free of charge in
accordance with the provisions of the guarantee
returned to the original place of purchase for repair.
Where the Repair Service Team is called out (including during the guarantee period), the
repair process will be chargeable (travel costs and time spent). Beyond the guarantee
period the incurred will also be chargeable.
Battery
A battery is a consumable good and is therefore not covered by the guarantee. There
will be a charge for replacing defective batteries. This applies to both leased and
purchased phones.
Assistance
If you have any general enquiries about our products or services please contact the
Swisscom information helpline (Freephone 0800 800 ).
*
) and repair process are free of charge.
*
. The defective phone must be
Approval and conformity
This handset can be used throughout the Swiss ISDN network.
Country-specific requirements have been taken into consideration. Should you have any
queries relating to differences between the public telephone networks please contact
your service provider or specialist dealer.
* excluding damage to spare parts such as cables, marking labels and batteries
and damage through improper use caused by dropping the phone
or ingress of moisture
96
.
Page 99

Gigaset SX100isdn / englisch / A31008-X150-B102-1-7619 / appendix.fm / 13.10.2003
Excerpt from the original declaration
"We, Siemens AG, declare that the above mentioned product is manufactured according to our Full
Quality Assurance System certified by CETECOM ICT Services GmbH in compliance with ANNEX V
of the R&TTE Directive 99/05/EC. The presumption of conformity with the essential requirements
regarding Council Directive 99/5/EC is ensured"
Senior Approvals Manager
The Declaration of Conformity (DoC) has been signed. In case of need a copy of the original DoC
can be made available via the company hotline.
The Declaration of Conformity can be viewed on: www.swisscom.com under the
heading eShop, Telephones, Declarations of Conformity, or can be ordered by post from
the following address:
Swisscom Fixnet AG
Retailbusiness
Customer Premises Equipments (CPE)
3050 Bern
Appendix
Specifications
Recommended batteries
Nickel-metal-hydride (NiMH):
◆ Sanyo Twicell 700
◆ Sanyo Twicell 650
◆ Panasonic 700 mAh
◆ GP 700 mAh
◆ YDT AAA SUPER 700
◆ VARTA PhonePower AAA 700 mAh
Handset operating times/charging times
Capacity
(mAh)
700 approx. 170 (7 days) approx. 13 approx. 5
These operating and charging times apply only when using the recommended batteries.
Power consumption
◆ In standby status (without charging): approximately 2.8 watts.
◆ In standby status (device charging): approximately 5.2 watts.
◆ While calling (without charging): approximately 3.2 watts.
Standby time
(hours)
Calling time
(hours)
Charging time
(hours)
97
Page 100

Gigaset SX100isdn / englisch / A31008-X150-B102-1-7619 / appendix.fm / 13.10.2003
Appendix
General Specifications
Feature Value
DECT standard is supported
GAP standard is supported
No. of channels 60 duplex channels
Radio frequency range 1880–1900 MHz
Duplex method time multiplex, 10 ms frame length
Channel grid 1728 kHz
Bit rate 1152 kbit/s
Modulation GFSK
Language code 32 kbit/s
Transmission power 10 mW, average power per channel
Range up to 250 m outdoors, up to 40 m indoors
Power supply/Base 220/230 V ~/ 50 Hz
ISDN socket ISDN multi-device connection
Environmental conditions for operation +5 °C to +45 °C;
Dialling mode DTMF (tone dialling)
Dimensions/Base approx. 129 x 114 x 63 mm (L x W x H)
Dimensions/Handset approx. 146 x 55 x 27 mm (L × W × H)
Weight Base 160 g
Length of the cords Telephone connecting cord approx. 1.85 m
(Power supply unit C39280-Z4-C373)
20 % to 75 % humidity
Handset with battery cells approx. 131 g
Mains cable approx. 1.85 m
98
 Loading...