

Page 1
Simply in touch.
Top M48 / Top M58
User manual
Page 2

1 General 5
1.1 Safety precautions 5
1.2 Using the headset 6
1.3 Using the 230 V adapter 6
1.4 Compliance / Environmental impact 7
2 Functions of the phone 9
2.1 Characteristics 9
2.2 Description of the display in standby mode 10
2.3 Description of the menu icons 10
2.4 Description of the keys and options 11
3 Installation 15
3.1 Unpacking 15
3.2 Assembly 15
3.3 Location 15
3.4 Default settings 16
4 Using the phone 17
4.1 Receiving calls 17
4.1.1 Using the receiver 17
4.1.2 Using the hands-free function 17
4.1.3 Using the headset 17
4.2 Making calls in standby modus 17
4.2.1 Using the receiver 17
4.2.2 Using the hands-free function 17
4.2.3 Using the headset 18
4.2.4 Pre-dialing 18
4.3 Alarm and reminders 18
4.3.1 Alarm 18
4.3.2 Reminders 18
4.4 Call list 19
4.4.1 Missed calls / Incoming calls/Dialed numbers 19
4.4.2 Last call duration 20
4.4.3 Help for call lists 21
4.5 Messages 21
4.5.1 New messages 22
4.5.2 Inbox 23
4.5.3 Outbox 24
4.5.4 Templates 25
Contents
1
Page 3

6 Using the Top M58 automatic
answering machine 45
6.1 Switching on/Programming the answering
machine 45
6.1.1 Programming the number of rings 46
6.1.2 Programming the remote access code 46
6.1.3 Programming the recording time 46
6.1.4 Programming the outgoing message
(OGM option) 47
6.1.5 Delete all messages 47
6.2 Recording and listening to a memo 48
6.3 Recording and listening to a conversation 48
6.4 Recording and listening to OGM messages 48
6.4.1 Recording a message 49
6.4.2 Listening to a message 49
6.5 Listening to a received message 49
6.6 Remote control 50
6.6.1 Leaving a message 50
6.6.2 Dialling into and managing the answering
machine 50
3
4.5.5 Help for messages 26
4.5.6 Help for using private SMS box 27
4.6 Phone book 28
4.6.1 Browse through the phone book 28
4.6.2 Browse the phone book by name or number 28
4.6.3 Add record 30
4.6.4 SIM to phone book 30
4.6.5 Delete all 31
4.6.6 Help for the phone book 31
4.7 Games 31
4.7.1 Tetris 32
4.7.2 Greedy Snake 32
4.7.3 Auto Funny I-go (Reversi) 32
4.7.4 Both Funny I-go (Reversi) 33
4.7.5 Help for the games 33
4.8 Alarm and reminders 34
4.8.1 Alarm 34
4.8.2 Reminders (Notes) 34
4.8.3 Mode 35
4.8.4 Help for alarm and reminders 35
4.9 Calculator 35
4.10 System configuration 36
4.10.1 Clock settings 36
4.10.2 Phone settings 36
4.10.3 SMS settings 39
4.10.4 Message settings 40
4.10.5 Language 41
4.10.6 Restore defaults 41
4.10.7 Help 41
4.11 Help 42
5 Use in conjunction with a private
branch exchange (PBX) 43
5.1 Ringtones 43
5.2 Dialout prefix 43
5.3 Dialing tone detection 43
5.4 Calling Line Identity Presentation (CLIP) 44
5.5 Sending and receiving SMS messages 44
2
Page 4

The Top M48/Top M58 has been designed to allow emergency calls to be made
in the event of a mains failure. Under these circumstances, it will only be possible to
make calls by dialling out manually.
In the event of a mains failure (230 V), you can still use your telephone to make
outgoing calls:
ó
Pick up the receiver
ó
Wait until the reset procedure is complete; the display will indicate
standby mode
ó
Dial the required number
ó
Have your conversation
ó
Hang up
Please note that although this backup function is available for outgoing calls,
that ability to receive incoming calls during a mains power failure cannot be
guaranteed.
1.1 Safety precautions
ó
Do not expose the telephone to humidity or any types of liquid. To avoid the
risk of electrocution, do not open the telephone. Please note the information
on the adapter concerning the required voltage for this telephone.
ó
This telephone should not be used in areas where there is a risk of explosion
or gas leaks. There is a slight possibility that this telephone may be damaged
by electrical storms. We therefore recommend unplugging the telephone
from the mains during thunderstorms.
ó
Your telephone may interfere with other electrical equipment such as televisions, radios, radio alarms or computers if placed too close to them.
We recommend keeping it at least a meter away from such equipment.
1 General
54
Page 5

1.4 Compliance / Environmental impact
Compliance
The
CEsymbol indicates that this product complies with European Parliament
and European Council Directive number 1999/ 5/CE on radio and telecommunications terminal equipment for the protection of users and electromagnetic
compatibility. Furthermore, it makes efficient use of the spectrum allocated to
terrestrial and space radio communication to avoid harmful interference.
The declaration of conformity may be consulted at the following site:
www.swisscom.com/onlineshop under Telephones, Declaration
of Conformity and may be requested from the following address:
Swisscom Fixnet Ltd.
Retail Business
Customer Premises Equipment (CPE)
CH-3050 Berne
Environmental impact
At the end of its working life this device must not under any circumstances
be disposed of as normal waste. It must be taken to a point of sale or central
collection point for electronic and electrical devices in accordance with the Swiss
Ordinance on the Return, Taking Back and Disposal of Electrical and Electronic
Appliances (ORDEA).
The individual materials are recyclable as indicated. By reutilizing, recycling or
re-using them in any other form, you are making a major contribution towards
environmental protection.
7
1.2 Using the headset
When connected to the Top M48/Top M58, your headset will provide you with
hands-free communication. Only use our headset. For purchasing, servicing or
replacement, please see our contact information in the user manual or visit our
website at http://www.swisscom.com.
Pull out the headset jack cover and insert the small plug into the headset jack
on the right-hand side of your telephone. Proceed as described in “Using the
headset” to make and receive calls.
NOTE: When you plug the headset into the headset jack, it automatically
mutes the receiver and microphone. Unplug the headset to return the receiver
to normal use.
1.3 Using the 230 V adapter
Plug the adapter into a socket outlet which is near to your telephone and easily
accessible.
6
Page 6

2.1 Characteristics
ó
Graphic display
ó
Back lighting
ó
Adjustable contrast
ó
Menu in four languages (German, French, Italian and English)
ó
Phone book for up to 240 entries (names and numbers)
ó
Copy of a SIM card in the phone book
ó
Call lists (outgoing, incoming, missed) with 160 entries
ó
Caller ID (name/number)
ó
Visual signals for new calls, new messages and loudspeaker
ó
Pre-dialling
ó
Sending and receiving of SMS messages
ó
Archive of SMS messages received and sent
ó
Sub-addressing for SMS messages
ó
Ringtones standard, polyphonic and composable
ó
Ringtone volume control
ó
Hands-free function (half duplex)
ó
Hands-free kit (headset with 2.5mm jack)
ó
Loudspeaker volume control
ó
Mute function
ó
Flash function
ó
Dialing pause
ó
Call duration displayed (appears automatically a few seconds into each call)
ó
Emergency call function
ó
Games
ó
Alarm
ó
Calculator
Top M58 only:
ó
Automatic answering machine (minimum recording time 20 minutes)
ó
Pre-recorded messages (OGM1 and OGM2)
2 Functions of the phone
98
Page 7
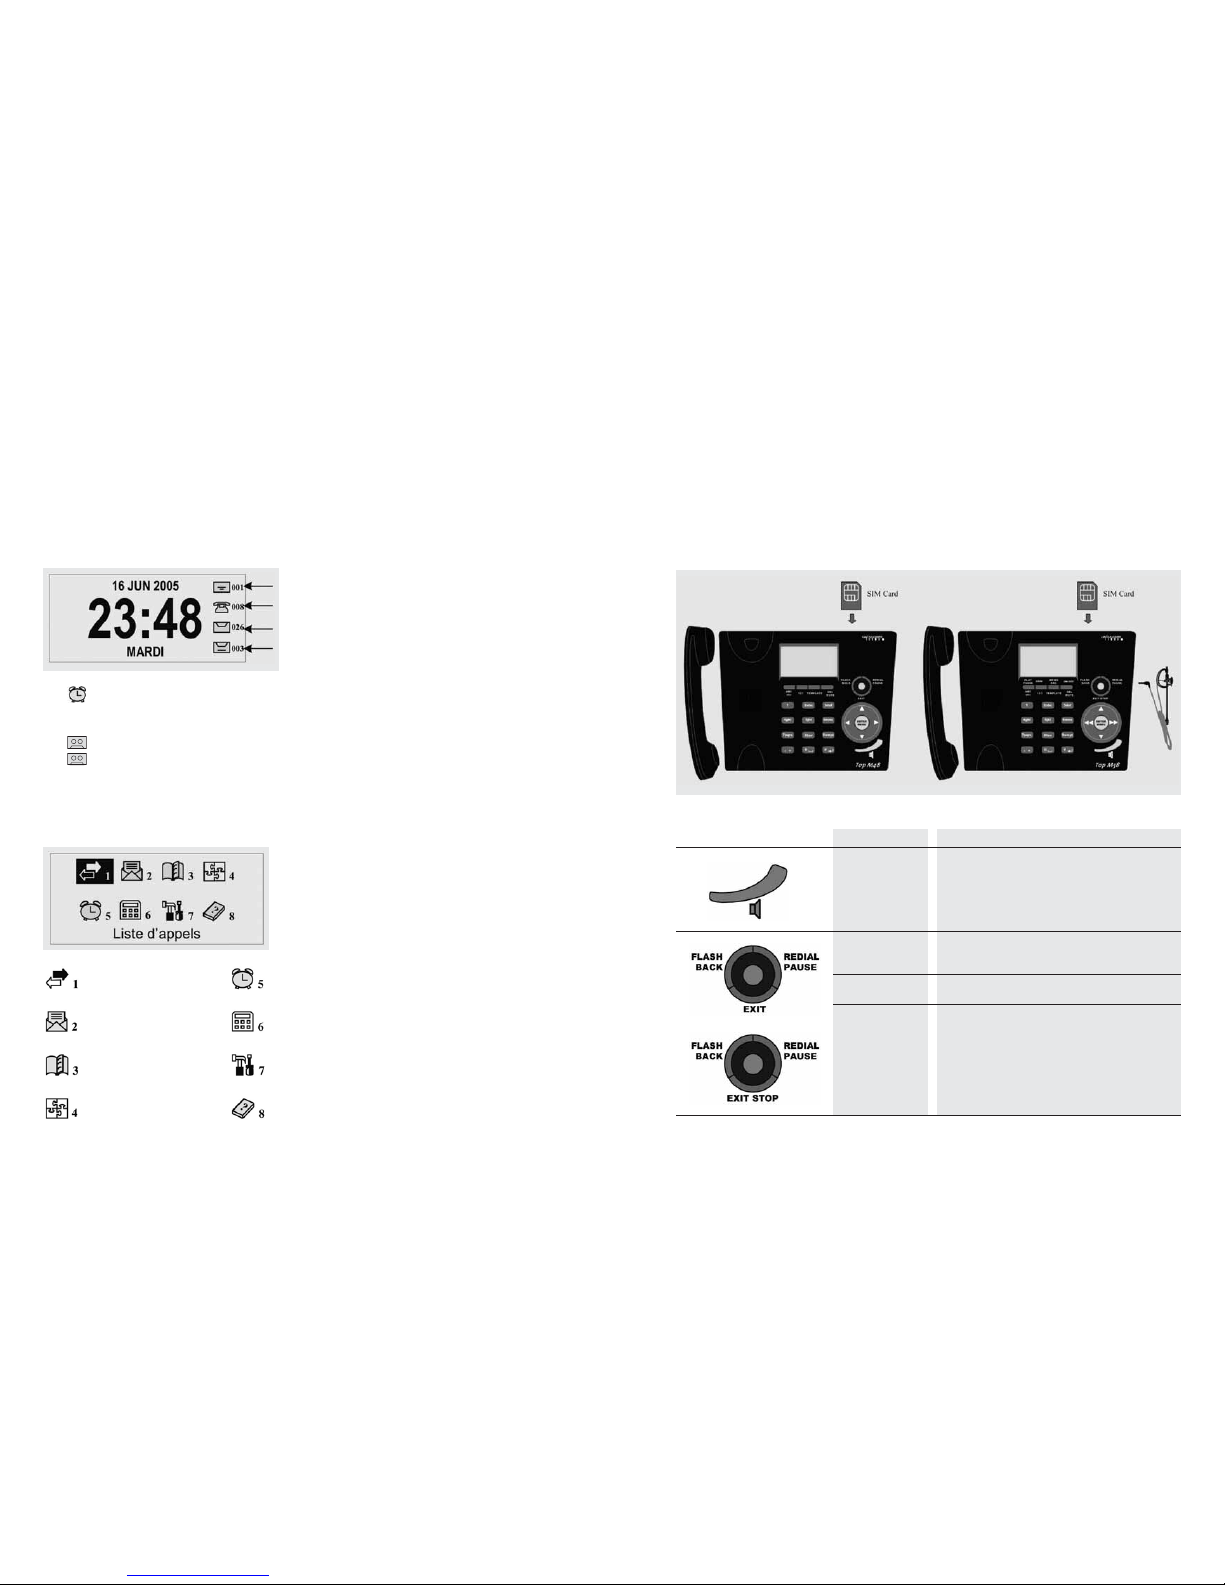
2.4 Description of the keys and options
Key Function Description
LOUDSPEAKER/ No headset connected:
HEADSET
ó
Hands-free use in standby mode or
ó
during an incoming call
ON/OFF
ó
Loudspeaker on during a call
Headset connected:
ó
ON/ OFF for calls via a headset
Top M48: REDIAL
ó
Redials last number, if pressed directly
PAUSE
ó
Pause after entering a number
ó
Delete text in SMS edit mode
FLASH
ó
Signal flash, if receiver off-hook
BACK
ó
Delete, if receiver on-hook
EXIT
ó
Quit menu, submenu or function
Top M58: STOP
ó
Stop listening to a message/memo or
an OGM recording
11
2.2 Description of the display in standby mode
Number of SMS messages received
and saved
Number of missed calls
Number of new SMS messages received
Number of unsent SMS messages
The symbol indicates an active alarm.
Top M58 only:
The symbol indicates that the automatic answering machine is switched on.
The
Full
symbol indicates that the automatic answering machine’s memory is full.
2.3 Description of the menu icons
Call list Alarm and Notice
Messages Calculator
Phonebook System Settings
Games Help
10
Page 8

Key Function Description
1, 2abc, 3def … 9wxyz 1 – 9 Number keys
abc … wxyz Letter keys
* + * Control key for activating for example call
diversion
+ Special character key for SMS messages and
phone book
+ ”Plus” key for the calculator
0 0 Number key
Space key for SMS messages
# # Control key for validating call diversion,
for example
Return key for SMS messages
LED Description
Lights up if the hands-free function or the headset are in use
Top M58 only:
Flashes to indicate that a new message has been received
Flashes to signal the arrival of a new SMS
Flashes to signal a new incoming call
13
Key Function Description
Top M48: MENU
ó
Access to the menu in standby mode
ENTER
ó
Enter/ OK within a menu
ó
Accesses the SMS inbox, if pressed directly
ó
Scrolls upwards through a menu
ó
Increases the loudspeaker volume
ó
Accesses the phone book, if pressed directly
ó
Scrolls downwards through a menu
ó
Reduces the loudspeaker volume
Top M58: or
ó
Accesses dialed numbers list, if pressed directly
ó
Moves left in a menu
ó
Rewind once messages have been listened to
or
ó
Accesses missed calls list, if pressed directly
ó
Moves right in a menu
ó
Fast forward once messages have been
listened to
Top M48: ABC
ó
Toggles between capitals and small letters
abc
ó
during input
123
ó
Toggles between letters and numbers during
input
TEMPLATE
ó
Accesses templates during input.
Choose template using and
Top M58: DEL
ó
Delete, if receiver on-hook
MUTE
ó
Turns off the microphone, if receiver
off-hook
PLAY
ó
From standby mode, press to listen to or
PAUSE
ó
pause messages
OGM
ó
From standby mode, press to listen to or record
messages (OGM) on the answering machine
MEMO
ó
From standby mode, press to record a memo
REC
ó
Press to record a conversation in progress
ON/ OFF
ó
From standby mode, press to switch the
answering machine on or off
12
Page 9

3.1 Unpacking
The package contains the following:
ó
1 base
ó
1 receiver
ó
1 230 V mains adapter
ó
1 receiver cable
ó
1 telephone cable
ó
1 user manual
ó
1 headset with 2.5 mm jack (hands-free kit)
3.2 Assembly
1.Connect one end of the power cable to the underside of the base and
the other end to a 230 V mains supply.
2.Connect one end of the telephone cable to the underside of the base,
the other to the telephone socket in your wall.
3.Connect one end of the receiver cable to the underside of the base,
the other to the receiver.
WARNING:
Use only the 230 V mains adapter supplied with this telephone. Different adapters
could damage your telephone.
3.3 Location
Keep the phone on a non-slip surface. Varnish and other synthetic finishes can
attack and soften the plastic feet on the phone. If the feet become damaged
in this way, they can leave marks on surfaces. Swisscom Fixnet Ltd declines all
responsibility for such damage.
3 Installation
1514
Page 10

4.1 Receiving calls
ó
The display shows the caller’s telephone number (unless blocked by
the caller) and name (if stored in the phone book), the date and time.
ó
The blue LED blinks.
4.1.1 Using the receiver
ó
Pick up the receiver.
ó
The call duration is displayed while the call is in progress.
ó
To end the call, replace the receiver.
4.1.2 Using the hands-free function
ó
Press the LOUDSPEAKER key.
ó
The call duration is displayed while the call is in progress.
ó
To end the call, press the LOUDSPEAKER key.
4.1.3 Using the headset
ó
Ensure the headset is plugged in correctly.
ó
Press the LOUDSPEAKER key.
ó
The call duration is displayed while the call is in progress.
ó
To end the call, press the LOUDSPEAKER key.
4.2 Making calls in standby mode
4.2.1 Using the receiver
ó
Pick up the receiver.
ó
Wait for a dialing tone, then dial the required number.
ó
The call duration is displayed while the call is in progress.
ó
To end the call, replace the receiver.
4.2.2 Using the hands-free function
ó
Press the LOUDSPEAKER key.
ó
Wait for a dialing tone, then dial the required number.
ó
The call duration is displayed while the call is in progress.
ó
To end the call, press the LOUDSPEAKER key.
4 Using the phone
17
3.4 Default settings
The factory configuration of your device Top M48/Top M58 is as follows:
Function Default
Language German
Display contrast 50 %
Phone book Empty
Incoming calls list Empty
Missed calls list Empty
Dialed numbers list Empty
Alarm and reminders Off
Pause 3 sec.
Flash 100ms
Password 0000
SMS inbox Empty
SMS outbox Empty
Incoming SMS alert On
SMS number (for incoming SMS messages) 06221000
SMS call nos. 1 & 2 (for outgoing SMS messages) 06221000
Tel. no. for outgoing SMS messages (SMS) 06221000
Terminal no. 0
Top M58 only:
Function Default
Automatic answering machine OFF
Memo Empty
Recording time 20 minutes (high)
Number of rings before answer 6 rings
Answering machine message Factory default OGM 1
Remote access code 0000
16
Page 11

4.4 Call list
When the phone is in standby mode you can access the lists of missed calls,
incoming calls, outgoing calls, the duration of your last call, and the Help
function.
ó
Press the MENU/ENTER key.
ó
Select the symbol using the , , and keys.
ó
Press the MENU/ENTER key to access the Call list menu:
1. Missed calls
2. Incoming calls
3. Dialed numbers
4. Last call duration
5. Help
ó
Select the required function using the and keys.
ó
Press the MENU/ENTER key to access the required function.
4.4.1 Missed calls / Incoming calls/Dialed numbers
ó
The list of numbers appears. If the list is empty, the message “Sorry, no
content” appears in the display.
ó
Select the required number using the , , and keys.
ó
Press the MENU/ENTER key to access the submenu of options:
1. Details
2. HF dialing
3. Pre-dial
4. Send message
5. Save to phone book
6. Delete
7. Delete all
ó
Select the required function using the , , and keys.
ó
Press the MENU/ENTER key to access the required function.
4.4.1.1 Details
ó
The display shows the contact’s name (if it is stored in your phone book)
and telephone number, and the time and date of the call.
ó
Lift the receiver or press the LOUDSPEAKER key.
ó
Dialing commences.
ó
Make your call.
ó
Replace the receiver or press the LOUDSPEAKER key to end the call.
19
4.2.3 Using the headset
ó
Ensure the headset is plugged in correctly.
ó
Press the LOUDSPEAKER key.
ó
Wait for a dialing tone, then dial the required number.
ó
The call duration is displayed while the call is in progress.
ó
To end the call, press the LOUDSPEAKER key.
4.2.4 Pre-dialing
ó
You can also enter a number before making a call. This function helps
cut down dialing errors.
ó
If you make a mistake while pre-dialing, simply press the FLASH BACK key
once to delete the last digit or several times to delete several digits.
ó
The phone begins dialing the moment you lift up the receiver or press
the LOUDSPEAKER key if using the hands-free function or a headset.
ó
The call duration is displayed while the call is in progress.
ó
To end the call, either replace the receiver or press the LOUDSPEAKER key.
4.3 Alarm and reminders
4.3.1 Alarm
ó
The alarm will ring when the phone is in standby mode if an alarm has been
programmed. The symbol also appears on the display.
ó
Press the EXIT key to stop the signal tone.
4.3.2 Reminders
ó
At the preset time and date for a reminder, the alarm signal sounds and
the relevant reminder appears on the display.
ó
Press the EXIT key to stop the signal tone.
ó
Press the EXIT key again to return to standby mode.
ó
The reminder will also be deleted from the list of programmed events.
18
Page 12

4.4.3 Help for call lists
1. Missed calls
Shows missed calls. This list contains the caller’s number, name (if stored in
the phone book), the Call back, Send message, Saved to phone, and Delete
functions.
2. Incoming calls
Shows calls received by the user (same options as for point 1).
3. Dialed numbers
Shows calls made by the user (same options as for point 1).
4. Last call duration
Shows information about the last call: Number dialed, time, date, and
duration.
4.5 Messages
When the phone is in standby mode, you can send new SMS messages, access
the SMS inbox and outbox, use message templates, and obtain help.
ó
Press the MENU/ENTER key.
ó
Select the symbol using the , , and keys.
ó
Press the MENU/ENTER key to access the Messages menu:
1. New messages
2. Inbox
3. Outbox
4. Templates
5. Help
ó
Select the required function using the and keys.
ó
Press the MENU/ENTER key to access the required function.
ó
Press the EXIT key to return to the menu.
21
4.4.1.2 Dial
ó
The hands-free function or the headset is activated automatically.
ó
Dialing commences.
ó
Make your call.
ó
Press the LOUDSPEAKER key to end the call.
4.4.1.3 Pre-dial
ó
The number is shown.
ó
To change the telephone number, select the digit to change using the , ,
and keys.
ó
Press the FLASH/BACK key to delete the digit, and then enter the correct
one.
ó
Lift the receiver or press the LOUDSPEAKER key.
ó
Dialing commences.
ó
Make your call.
ó
Replace the receiver or press the LOUDSPEAKER key to end the call.
4.4.1.4 Send message
ó
This is done from the SMS message edit screen. Please refer to
Section 4.5 MESSAGES.
4.4.1.5 Save to phone book
ó
This is done from the new entry edit screen. Please refer to
Section 4.6 PHONE BOOK.
4.4.1.6 Delete
ó
The message “Permanently delete?” appears on the display.
ó
Press the MENU/ENTER key to confirm and initiate deletion of the number
from the relevant call list.
4.4.1.7 Delete all
ó
The message “Permanently delete?” appears on the display.
ó
Press the MENU/ENTER key to confirm and initiate deletion of all numbers
from the relevant call list.
4.4.2 Last call duration
ó
The display shows the number dialed, the date, time, and duration of
the call.
ó
The phone returns to the previous menu after 3 seconds.
20
Page 13

4.5.1.3 Save as template
ó
The message “Save successful!” appears on the display.
ó
The phone returns to the previous menu after 3 seconds.
4.5.2 Inbox
ó
The list of public and private folders is shown.
ó
Select the required folder using the and keys.
ó
Press the MENU/ENTER key.
ó
Enter your 4-digit password (Private folders only).
ó
Press the MENU/ENTER key to choose one of the following 3 options:
1. Browse
2. Change password (Private folders only)
3. Delete all
ó
Select the required function using the and keys.
ó
Press the MENU/ENTER key.
4.5.2.1 Browse
ó
If the folder is empty, the message “Sorry, no content” appears on
the screen.
ó
If not, the display shows the list of stored incoming messages.
ó
Select the required message using the and keys.
ó
Press the MENU/ENTER key.
ó
Details of the message are shown.
ó
Press the MENU/ENTER key to choose one of the following 3 options:
1. Reply
2. Forward
3. Delete
ó
Select the required function using the and keys.
ó
Press the MENU/ENTER key.
Reply
ó
Follow the steps in 4.5.1.
Continue
ó
Follow the steps in 4.5.1.
Delete
ó
The message “Permanently delete?” appears on the display.
ó
Press the MENU/ENTER key to confirm.
23
4.5.1 New messages
ó
The message editor appears.
ó
Press the TEMPLATE key to access the list of message templates.
ó
Select the required message using the and keys.
ó
Press the MENU/ENTER key.
ó
Compose/edit your message using the keyboard keys.
ó
Press the ABC/abc key to toggle between capitals and small letters.
ó
Press the 123 key to toggle between letters and numbers.
ó
To insert special characters, press the * key. The phone will present you
with a list of available characters.
ó
You can choose other special characters using the and keys.
ó
Then choose the required special character using the number shown
below it.
ó
Once you have finished writing your message, press the MENU/ENTER key
to choose between one of the following three options:
1. Send SMS
2. Save in outbox
3. Save as template
ó
Select the required function using the and keys.
ó
Press the MENU/ENTER key.
4.5.1.1 Send SMS
ó
Enter the telephone number of the recipient or press the key to access
the phone book.
ó
If you use the phone book, select the recipient's name using the and
keys.
ó
Once you have entered the number or selected the recipient, press the
MENU/ ENTER key.
ó
If the line is engaged or there is a fault, the message “Callee’s busy, try later”
appears on the screen.
ó
After 3 seconds, the phone suggests you send or modify your message.
ó
Select the required function using the and keys.
ó
Press the MENU/ENTER key.
4.5.1.2 Save in outbox
ó
The message “Save successful!” appears on the display.
ó
The phone returns to the previous menu after 3 seconds.
22
Page 14

Continue
ó
Follow the steps in 4.5.1.
Delete
ó
The message “Permanently delete?” appears on the display.
ó
Press the MENU/ENTER key to confirm.
4.5.3.2 Delete all
ó
If the folder is empty, the message “Sorry, no content” appears on
the screen.
ó
If not, the message “Permanently delete?” appears on the display.
ó
Press the MENU/ENTER key.
ó
The message “Processing wait…” appears on the display.
ó
The phone returns to the previous menu after 1 second.
4.5.4 Templates
ó
The display shows the 3 following options:
1. Browse
2. Add template
3. Delete template
ó
Select the required function using the and keys.
ó
Press the MENU/ENTER key.
4.5.4.1 Browse
ó
The list of templates is shown.
ó
Select the required template using the and keys.
ó
Press the MENU/ENTER key to access the Send message (Send SMS) function.
ó
Choose one of the following 2 options:
1. Send SMS
2. Save in outbox
Send SMS
ó
Follow the steps in 4.5.1
Save in outbox
ó
Follow the steps in 4.5.2
25
4.5.2.2 Change password (Private folders only)
ó
Enter your password.
ó
Confirm your password.
ó
Press the MENU/ENTER key.
ó
The message “Change successful!” appears on the display.
4.5.2.3 Delete all
ó
If the folder is empty, the message “Sorry, no content” appears on
the screen.
ó
If not, the message “Permanently delete?” appears on the display.
ó
Press the MENU/ENTER key.
ó
The message “Processing wait…” appears on the display.
ó
The phone returns to the previous menu after 1 second.
4.5.3 Outbox
ó
The display shows the 3 following options:
1. Browse
2. Delete all
ó
Select the required function using the and keys.
ó
Press the MENU/ENTER key.
4.5.3.1 Browse
ó
If the folder is empty, the message “Sorry, no content” appears on
the screen.
ó
If not, the display shows the list of stored outgoing messages.
ó
Select the required message using the and keys.
ó
Press the MENU/ENTER key.
ó
Details of the message are shown.
ó
Press the MENU/ENTER key to choose one of the following 3 options:
1. Repeat
2. Forward
3. Delete
ó
Select the required function using the and keys.
ó
Press the MENU/ENTER key.
Repeat
ó
Follow the steps in 4.5.1.
24
Page 15

Templates may be added, deleted, modified or sent. 14 such messages are
fixed, 16 may be defined by the user.
Special character lists
List 1 ä ö йьатмщи@
List 2 ! ” # & ´ ( ) * + ,
List 3 - ./:;<=>?%
List 4 Ä Ü Ö
Corresponding
number 1234567890
Select the required list using the and keys.
4.5.6 Help for using private SMS box
In order for an SMS to be received in the shared box and each personal box,
you must first have sent at least one SMS from your shared box and from each
personal box as well.
To do this, set your terminal number to 0 (default setting) and send an SMS to
your own telephone number, followed by the set terminal number. Repeat this
procedure for terminal numbers 1 to 9. This sets up your shared box and all the
personal boxes as well.
At the end of the procedure, we recommend that you reset your terminal
number to 0, as your fixed and mobile network communication partners will
not know which terminal number you have chosen unless you tell them.
Nevertheless, incoming SMS messages with a different terminal number will still
be delivered to the correct personal box.
27
4.5.4.2 Add template
ó
The editor appears if fewer than 30 templates have been defined.
ó
Enter your template.
ó
Press the MENU/ENTER key to return to the previous menu.
ó
If the list already contains 30 templates, the messages “Mem. full.
Please organize” appears on the display.
ó
The phone returns to the previous menu after 2 seconds.
ó
Delete one or more templates.
4.5.4.3 Delete template
ó
If the folder is empty, the message “Sorry, no content” appears on
the screen.
ó
If not, the message “Permanently delete?” appears on the display.
ó
Press the MENU/ENTER key.
ó
The message “Processing…” appears on the display. Only templates you
have edited yourself may be deleted.
ó
The phone returns to the previous menu after 1 second.
4.5.5 Help for messages
You can enter new messages, insert special characters or use message templates.
The maximum length of messages is 140 characters. Edited messages may be
sent and saved either in the Outbox or as a template.
The telephone supports 1 public user account and 9 private, password-protected
user accounts. Each account can hold up to 16 messages.
If someone sends an SMS message directly to your telephone number, the SMS
will arrive in your public folder. If he adds the number “1” at the end of the
telephone number, the SMS will arrive in your first private folder. If he adds a “2”,
it will arrive in your second private folder, etc.
You can save up to 32 message before sending them, search for a stored message,
resend or delete it.
26
Page 16

By number
ó
The list of entries in the telephone directory is displayed with the
corresponding numbers.
ó
Scroll through the list using the and keys.
ó
Press the MENU/ENTER key to show the details of a given entry.
ó
Move from the details of one entry to those of the next using the and
keys.
ó
Press the MENU/ENTER key to access the Entry editor menu :
1. HF dialing
2. Send message
3. Delete
4. Pre-dial
5. Reedit
4.6.2.1 HF dialing
ó
The number is dialed automatically.
ó
The call duration is displayed while the call is in progress.
ó
To end the call, press the LOUDSPEAKER key.
4.6.2.2 Send message
ó
The Message editor screen appears automatically.
ó
Proceed as described in Section 4.5.1 To send a new message there is no
need to select the telephone number anew.
4.6.2.3 Delete
ó
The message “Permanently delete?” appears on the display.
ó
Press the MENU/ENTER key to delete the entry.
4.6.2.4 Pre-dial
ó
The number is shown.
ó
Choose the digits you wish to modify using the and keys.
ó
Delete the digit to the left of the cursor by pressing FLASH BACK or
the one to the right of the cursor by pressing DEL MUTE.
ó
The phone begins dialing the moment you lift the receiver or press
the LOUDSPEAKER key if using the hands-free function or a headset.
ó
The call duration is displayed while the call is in progress.
ó
To end the call, either replace the receiver or press the LOUDSPEAKER key.
29
4.6 Phone book
When the telephone is in standby mode, you can access the phone book
(to edit, modify, or use entries) and a Help function.
ó
Press the MENU/ENTER key.
ó
Select the symbol using the , , and keys.
ó
Press the MENU/ENTER key to access the Phone Book menu :
1. Browse
2. By name
3. By number
4. Add record
5. SIM to phonebook
6. Delete all
7. Help
ó
Select the required function using the and keys.
ó
Press the MENU/ENTER key to access the required function.
4.6.1 Browse through the phone book
ó
The first entry in the phone book is shown in detail.
ó
Move from the details of one entry to those of the next using the and
keys.
ó
Press the MENU/ENTER key to access the Entry editor menu.
ó
Then follow the instructions given in Section 4.6.2.
4.6.2 Browse the phone book by name or by number
By name
ó
Use keys 2–9 to search for names beginning with the desired letter.
ó
The list of entries in the telephone directory is displayed with the
corresponding names.
ó
If there is no entry beginning with the desired letter, the list of entries in
the telephone directory will start with the names beginning with the next
available letter.
ó
If there is no entry beginning with the desired or subsequent letters, the list
of entries in the telephone directory will start with the names beginning with
the next available letter.
28
Page 17

Some accented letters may appear without an accent or be replaced by special
characters like $ or ?. If this occurs, please correct the relevant entries using the
phone book edit function.
4.6.5 Delete all
ó
If the phone book is empty, the message “Sorry, no content” appears on
the display.
ó
If the phone book is not empty, the message “Permanently delete?” appears
on the display.
ó
Press the MENU/ENTER key to confirm deletion.
ó
The message “Processing…” appears on the display.
ó
When the entries have been deleted, the phone returns to the menu.
4.6.6 Help for the phone book
This telephone can store up to 240 phone book entries, each consisting of a
number, a name and a ringtone. You can consult the details of each entry, send
an SMS to it or delete it. Select the phone book to show the list of numbers.
Use the and keys to select an entry, and then press the MENU/ENTER key
to access the other functions.
4.7 Games
When the phone is in standby mode, you can access the four games and a Help
function explaining how to play them.
ó
Press the MENU/ENTER key.
ó
Select the symbol using the , , and keys.
ó
Press the MENU/ENTER key to access the Phone Book menu :
1. Tetris
2. Greedy Snake
3. Auto Funny I-go
4. Both Funny I-go
5. Help
ó
Select the required game or function using the and keys.
ó
Press the MENU/ENTER key.
31
4.6.2.5 Reedit
ó
The phone book entry editor screen appears in detail.
ó
Modify the name and then press MENU/ENTER.
ó
Modify the number and then press MENU/ENTER.
ó
Modify the ringtone using the and keys.
ó
Press the MENU/ENTER key to save the entry and return to the menu.
4.6.3 Add record
ó
The phone book entry editor screen appears in detail.
ó
Enter the name and then press the MENU/ENTER key.
ó
Enter the number and then press the MENU/ENTER key.
ó
Select the required ringtone using the and keys.
ó
Press the MENU/ENTER key to save the entry and return to the menu.
4.6.4 SIM to phone book
NOTE: If there is not enough space in the phonebook, none of the entries on
the SIM card will be copied. In this case, you will need to delete the entries you
are no longer using from your Top M48/ Top M58 and copy the SIM card again.
The names copied might not be displayed when incoming calls are received.
ó
The message “Please insert SIM card, Enter or exit?” appears on the display.
ó
Press the EXIT key to quit the function.
or
ó
Hold the SIM card with the bevelled corner towards you and the copper
contacts facing up.
ó
Insert the card in the relevant slot on the back of the phone.
ó
Press the MENU/ENTER key to start copying.
ó
The message “Reading SIM card. Please wait…” appears on the display
as well as the total number of entries being copied and a progress bar.
ó
If the entries are copied successfully, the message “Read successful!” appears
on the display. You are then asked to remove the card.
ó
Press the EXIT key to quit the function.
ó
If an error occurs, the phone asks you to check the card and restart copying.
NB: Before you insert the SIM card in the phone, please delete the PIN protection
of the SIM card.
30
Page 18

4.7.4 Both Funny I-go (Reversi)
ó
The game starts immediately. You play against yourself or another player.
ó
Player 1 uses the black pieces ( ), player 2 the white ones ( ).
ó
Use the , , and keys to place your black ( ) or white ( ) pieces
so that they “surround” your opponent’s pieces either vertically, horizontally,
or diagonally.
ó
Press the 9 key to take your turn.
ó
If your piece isn’t placed, you have chosen an incorrect position.
Reposition your piece and play again.
ó
Take turns to play.
ó
The winner is the player with the most pieces on the board at the end of
the game.
ó
You can end the game at any time by pressing the EXITkey.
4.7.5 Help for the games
1. Tetris
Rotate the shape
Drop the shape
Move the shape right
Move the shape left
Press the EXIT key to return to the menu.
2. Greedy Snake
Object: To make the snake eat the apples in order to grow.
Use the , , and keys to move the snake around. You cannot stop
the snake or make it go backwards. The snake mustn’t touch either the walls
or its own tail.
Press the EXIT key to return to the menu.
3. Funny I-go
If the pieces at the two ends of one direction [ or ] are the same colour,
the player with this colour takes the pieces in between. The winner is the player
with the most pieces on the board at the end. Use the , , and to
move your piece and press the MENU/ENTER key to place it.
Press the EXIT key to return to the menu.
33
4.7.1 Tetris
ó
By default, the game is set to level 4. This can be changed to any level
between 1 and 10.
ó
Select the required level using the , , and keys.
ó
Press the MENU/ENTER key to start the game.
ó
Key commands:
Rotate the shape
Drop the shape
Move the shape right
Move the shape left
EXIT End the game
4.7.2 Greedy Snake
ó
By default, the game is set to level 4. This can be changed to any level
between 1 and 10.
ó
Select the required level using the , , and keys
ó
Press the MENU/ENTER key to start the game.
ó
Key commands:
Move the snake downwards
Move the snake upwards
Move the snake right
Move the snake left
EXIT End the game
4.7.3 Auto Funny I-go (Reversi)
ó
The game starts immediately. You play against the phone.
ó
Use the , , and keys to place your black pieces ( ) so that
they “surround” your opponent’s pieces either vertically, horizontally,
or diagonally.
ó
Press the 9 key to take your turn.
ó
If your piece isn’t placed, you have chosen an incorrect position. Reposition
your piece and play again.
ó
The phone plays against you, placing its white pieces ( ) automatically.
ó
Now it’s your turn to play again.
ó
The winner is the player with the most pieces on the board at the end of
the game.
ó
You can end the game at any time by pressing the EXITkey.
32
Page 19

4.8.3 Mode
ó
You can set the alarm to ring once or daily.
ó
Select the required alarm option using the and keys.
ó
Press the MENU/ENTER key to confirm the setting.
4.8.4 Help for alarm and reminders
You can set one alarm and store up to 10 reminders. The alarm can be daily or
once-only. Each reminder can be set to display a note. At the preset date and
time of an alarm or a reminder, a context menu appears. Press any key to stop
the alarm (It stops automatically after one minute).
4.9 Calculator
When the phone is in standby mode, you can access a simple calculator with
basic functions.
ó
Press the MENU/ENTER key.
ó
Select the symbol using the , , and keys.
ó
Press the MENU/ENTER key.
ó
The display changes to calculator mode.
ó
Key commands:
0 – 9: Digits
#: Decimal point
*: + - * / =
FLASH BACK: Delete last digit
DEL MUTE: Delete entire number
ó
Press the EXIT key to return to the menu.
NB: The “=” function is automatically activated whenever you press the * key.
35
4.8 Alarm and reminders
When the phone is in standby mode, you can access the alarm, write 10 short
reminders (notes) to appear at preset times, or access the Help function on how
to use them.
ó
Press the MENU/ENTER key.
ó
Select the symbol using the , , and keys.
ó
Press the MENU/ENTER key to access the Phone Book menu.
1. Alarm
2. Reminders
3. Mode
4. Help
ó
Select the required function using the and keys.
ó
Press the MENU/ENTER key to access the required function.
4.8.1 Alarm
4.8.1.1 Set alarm
ó
Select ON using the and keys.
ó
Press the MENU/ENTER key.
ó
Enter the required time.
ó
Press the MENU/ENTER key to confirm the setting.
4.8.1.2 Turn off alarm
ó
Select OFF using the and keys.
ó
Press the MENU/ENTER key to confirm the setting.
4.8.2 Reminders (Notes)
ó
The list of previously stored reminders and available times/dates is shown.
ó
Select the required alarm time/date using the and keys.
ó
Press the MENU/ENTER key.
ó
Enter the required time and date.
ó
Press the MENU/ENTER key.
ó
Enter the required text.
ó
Press the MENU/ENTER key to return to the list.
34
Page 20

7. Pause time
8. LCD setting
9. Set dial out number
ó
Select the required function using the and keys.
ó
Press the MENU/ENTER key to access the required function.
4.10.2.1 Ring type
ó
You can choose between modifiable ringtones, classic ringtones, polyphonic
ringtones, and one incoming SMS tone.
ó
Select the required ringtone using the and keys.
ó
Press the MENU/ENTER key to confirm.
4.10.2.2 Ring volume
ó
Select the required volume using the and keys.
ó
Press the MENU/ENTER key to confirm.
4.10.2.3 Edit ring
ó
You can compose ringtones yourself.
ó
First enter a note using the letters C, D, E, F, G, A, and B
(See diagram below).
ó
Enter the duration of the note using the numbers 1 to 5.
(Please note that ringtones are played back approx. five times as quickly
as while composing.)
ó
Press the DEL MUTE or FLASH BACK keys to make corrections.
ó
Press 0 to listen to your tune.
ó
Press the # key to stop the tune.
ó
Press the MENU/ENTER key to automatically save the tune in one of the free
positions indicated by [BLANK] in the list of the phone’s ringtones.
ó
If the memory is full, the phone will indicate this and ask you to reorganize
the memory by deleting any composed tunes you no longer use.
ó
To delete a ringtone, select the required ringtone using the and keys.
ó
Press DEL MUTE, the message “Permanently delete?” appears on the display.
ó
Press the MENU/ENTER key to delete the entry.
37
4.10 System configuration
The phone is delivered configured with the default settings (See Section 3.3).
Some of these relate to the Swisscom Fixnet telephone network. However,
you may change or adapt the settings to suit your needs.
Warning: Incorrect configuration of a parameter, for instance of the SMS
settings, could prevent your phone working properly.
The settings are accessed when the phone is in standby mode:
ó
Press the MENU/ENTER key.
ó
Select the symbol using the , , and keys.
ó
Press the MENU/ENTER key to access the Phone Book menu :
1. Clock setting
2. Phone setting
3. SMC setting
4. Message setting
5. Language setting
6. Restore default
7. Help
ó
Select the required function using the and keys.
ó
Press the MENU/ENTER key to access the required function.
4.10.1 Clock settings
ó
Enter the complete date or move the cursor using the and keys.
ó
Enter the complete time or move the cursor using the and keys.
ó
Press the MENU/ENTER key to confirm.
NB: The date and time are lost after a power cut. They can be reset manually
or automatically during the next incoming call.
4.10.2 Phone settings
ó
The display shows the following 9 options:
1. Ring type
2. Ring volume
3. Edit ring
4. Validity period
5. Local area code
6. Flash time
36
Page 21

4.10.2.9 Dialout prefix
ó
Enter the number required to access an external line.
ó
Press the MENU/ENTER key to store this.
NB: Dialout prefixes (consisting of one or more digits) are used by private telephone exchanges. If in doubt, contact your installation engineer.
4.10.3 SMC settings
ó
The display shows the following 4 options:
1. SMS number
2. SMS call No. 1
3. SMS call No. 2
4. Terminal number
ó
Select the required function using the and keys.
ó
Press the MENU/ENTER key to access the required function.
4.10.3.1 SMC number
ó
The SMC number is the telephone number of the SMS server from which
⁄you receive your SMS messages The number shown is that of the Swisscom
server (See Section 3.3 Default settings).
ó
Delete and replace the existing number, if necessary.
ó
Press the MENU/ENTER key to store this.
NB: The default SMS number is the number for Swisscom fixed line network.
If in doubt, contact your service provider.
4.10.3.2 SMC call Nos. 1 and 2
ó
An SMC call number is the telephone number of the SMS server used to send
your SMS messages. The number shown is that of the Swisscom server (See
Section 3.3 Default settings).
ó
Delete and replace the existing number, if necessary.
ó
Press the MENU/ENTER key to store this.
NB: The SMS call numbers 1 and 2 are identical and are set to the Swisscom
fixed line network by default. If in doubt, contact your service provider.
39
4.10.2.4 Validity period
ó
The validity period can be set to either three days, one day, 12 hours, or
one hour. This period relates to the length of time the SMS server stores and
attempts to send your messages if it cannot do so immediately.
ó
Select the required period using the and keys.
ó
Press the MENU/ENTER key to⁄ confirm.
4.10.2.5 Area code
ó
You can programme the local dialing code (e.g. 031, 026, 044, etc.) of your
telephone number. This way, country codes (e.g. 0033, 0049, 0039, etc.)
will not be shown during international calls.
ó
Enter the area code using the keys 0 to 9.
ó
Press the MENU/ENTER key to confirm.
4.10.2.6 Flash time
ó
The default flash length is 100ms.
ó
You can set it to between 100ms and 900ms using the and keys.
ó
Press the MENU/ENTER key to confirm.
NB: 100ms corresponds to the Swisscom fixed line network and most private
phone exchanges. Do not change this length unless absolutely necessary.
To do so, please contact the provider of your telephone connection or private
exchange.
4.10.2.7 Pause time
ó
The default pause length is 3 seconds.
ó
You can set it to between 1 and 6 seconds using the and keys.
ó
Press the MENU/ENTER key to confirm.
NB: Dialing pauses are required only by older private telephone exchanges.
New ones no longer require them. If in doubt, contact your installation engineer.
4.10.2.8 LCD setting
ó
The default display contrast is 50 %.
ó
You can set it to between 5% and 100% using the and keys.
ó
Press the MENU/ENTER or EXIT key to confirm the setting.
38
Page 22

4.10.4.3 Autosave sent SMS messages
ó
Press the 123 key to set whether sent SMS messages are saved automatically.
ó
Press the MENU/ENTER key to store the setting.
ó
The function is activated if the ⻬ symbol appears at the end of the submenu.
4.10.4.4 Incoming SMS alert
ó
Press the 123 key to activate or deactivate an acoustic signal to indicate an
incoming SMS messages.
ó
Press the MENU/ENTER key to store the setting.
ó
The function is activated if the ⻬ symbol appears at the end of the submenu.
4.10.5 Language
ó
The display shows the following 4 options:
1. German
2. English
3. French
4. Italian
ó
The default language is German. Select the required language using
the and .
ó
Press the MENU/ENTER key to confirm.
4.10.6 Restore defaults
ó
This function resets the telephone to its default configuration. However,
the phone book is not deleted.
ó
The message “Delete all data?” appears on the display.
ó
Press the MENU/ENTER key to confirm.
4.10.7 Help
1. Clock settings
Sets the time and the date.
2. Phone settings
Sets the ringtone, volume, area code, flash and pause lengths, LCD contrast,
etc.
3. SMS settings
The SMS number is provided by the service center (See Section 3.3 Default
settings). Activates an SMS number and two SMS call numbers.
41
4.10.3.3 Terminal number
ó
The default terminal number is 0.
ó
Press the keys 1 to 9 to modify the number.
ó
Press the MENU/ENTER key to store this.
NB: The terminal number identifies each phone with an SMS function on the
recipient’s telephone line. The default number is 0. This should not be changed
unless you know your recipient’s terminal number.
Changing the terminal number may affect your ability to send SMS messages.
Your recipient may not receive an SMS if an incorrect terminal number is
entered.
4.10.4 Message settings
ó
The display shows the following 4 options:
1. Send report
2. SMS inbox full
3. Autosave sent SMS
4. New SMS alert
ó
Select the required function using the and keys.
ó
Press the MENU/ENTER key to confirm.
4.10.4.1 Send report
ó
Press the 123 key to choose to display or hide reports on whether an SMS
message has been successfully sent.
ó
Press the MENU/ENTER key to store the setting.
ó
The function is activated if the ⻬ symbol appears at the end of the submenu.
NOTE: This function is not supported by the Swiss telephone network.
We recommend that you do not activate it.
4.10.4.2 SMS inbox (memory) full
ó
Press the 123 key to choose whether to display or hide reports on the SMS
inbox status (full or not).
ó
Press the MENU/ENTER key to store the setting.
ó
The function is activated if the ⻬ symbol appears at the end of the submenu.
40
Page 23

You can use your Top M48 in conjunction with a private branch exchange (PBX).
In this case, please note the following remarks.
5.1 Ringtones
Most branch exchanges currently use a single tone to indicate an internal call
and a double one for external calls. In order to benefit from this function,
please use only ringtones 1 through 5, and not polyphonic ones or those you
have programmed yourself.
5.2 Dialout prefix
Most branch exchanges use the number “0” to access an outside line. For this
reason you must
ó
either programme the dialout prefix (see Phone settings).
ó
or add the digit “0” in front of all phone book entries relating to external
partners. The “0” prefix should not, however, be added to the numbers of
internal partners on the same PBX.
If you need to programme another number or several numbers to access an
external line, or if in doubt, please contact your installation engineer.
5.3 Dialing tone detection
Most modern PBXs automatically detect the dialing tone. If this is not the case,
please insert a pause between the dialout prefix and the telephone number.
If in doubt, contact your installation engineer.
5 Use in conjunction with a private
branch exchange (PBX)
43
4. Message settings
Report function (return receipt), inbox overlay, autosave function and incoming
SMS sound.
5. Restore defaults
Restores the telephone’s configuration to its default values (Deletes all stored
data and settings!!).
4.11 Help
When the phone is in standby mode, you can access the Help function on
the keys and display as well as about the symbols.
ó
Press the MENU/ENTER key.
ó
Select the symbol using the , , and keys.
ó
Press the MENU/ENTER key to access the Help file.
ó
Scroll through the text using the and keys.
Help:
Hotkey: Press directly on the symbol in standby mode to access the
Inbox
Phone book
Dialed numbers (call list)
Missed calls
Key to the 4 icons on the screensaver:
Total messages in inbox
Total missed calls
Total unread messages
Total unsent messages.
42
Page 24

Your Top M58 features an automatic answering machine which supports
the following options:
ó
Combined answering machine/ recorder or answering machine only.
ó
Pre-recorded messages for answering/recording mode or answering only.
ó
Programmable number of rings before answer.
ó
Programmable recording quality (20 minutes high, 50 minutes low).
ó
Programmable password for controlling the answering machine remotely.
(the default password 0000 cannot be used to access this function).
ó
Recording of memos or a conversation in progress.
Your Top M58 features various alert tones to let you know its status or that
of a function currently in progress.
Prolonged tone: Starting to record a message, a memo or a new OGM1
or OGM2 outgoing message
Short tone: Starting a function
Two short tones: Function completed successfully
Three short tones: Function failed or not available
6.1 Switching on/Programming the answering machine
The answering machine is factory-configured by default (see Section 3.3).
However, you can modify these settings and adapt them to meet your requirements.
The answering machine must be in standby mode in order for its configuration
settings to be accessed.
ó
Press ON / OFF.
ó
The required parameters or functions will appear on the display.
1. Programming the number of rings
2. Programming the remote access code
3. Programming the recording time
4. Programming the outgoing message (OGM options)
5. Delete all messages
6 Using the Top M58 automatic
answering machine
45
5.4 Calling Line Identity Presentation (CLIP)
Most modern PBXs transmit the caller’s telephone number to the receiving phone.
If your Top M48 does not show this number, the function may be blocked by
the PBX.
If in doubt, contact your engineer.
5.5 Sending and receiving SMS messages
More and more modern PBXs allow users to send and receive SMS messages.
ó If you have programmed a dialout prefix, you should not modify the SMS
call Nos. 1 and 2.
ó If you have not programmed a dialout prefix, you should add the dialout
prefix to the front of SMS call Nos.1 and 2.
If in doubt, contact your installation engineer or service provider.
44
Page 25

ó
Use the or keys to select the duration you require.
ó
Press MENU / ENTER to confirm your selection.
ó
The device will go back to the previous menu.
ó
Press EXIT to exit programming mode and apply the new settings.
ó
The symbol will appear on the display to indicate that the answering
machine has been switched on.
6.1.4 Programming the outgoing message (OGM option)
ó
You can select either combined answering machine/recorder (OGM1)
or answering machine only (OGM2) mode.
ó
Use the or keys to select the mode you require.
ó
Press MENU / ENTER to confirm your selection.
ó
The device will go back to the previous menu.
ó
Press EXIT to exit programming mode and apply the new settings.
ó
The symbol will appear on the display to indicate that the answering
machine has been switched on.
6.1.5 Delete all messages
ó
You can delete all messages recorded on your answering machine.
ó
Use the or keys to select this function.
ó
Press MENU / ENTER to confirm your selection.
ó
The device will display “Delete all data?”.
ó
Press MENU / ENTER to confirm your selection.
ó
All messages will be deleted and the device will go back to the previous menu.
ó
Press EXIT to exit programming mode and apply the new settings.
ó
The symbol will appear on the display to indicate that the answering
machine has been switched on.
47
ó
Use the or keys to select the parameter or function you require.
ó
Press MENU / ENTER to access the function you require
or
ó
Press EXIT to exit programming mode and save the current settings.
ó
The symbol will appear on the display to indicate that the answering
machine has been switched on.
6.1.1 Programming the number of rings
ó
You can set the number of rings before a call is answered to 2, 4 or 6.
ó
Use the or keys to select the number you require.
ó
Press MENU / ENTER to confirm your selection.
ó
The device will go back to the previous menu.
ó
Press EXIT to exit programming mode and apply the new settings.
ó
The symbol will appear on the display to indicate that the answering
machine has been switched on.
6.1.2 Programming the remote access code
ó
The remote access code is 0000. In order to be able to control your
answering machine remotely, you MUST change the access code.
ó
Use keys 0 to 9 to enter the new code.
ó
Press MENU / ENTER.
ó
Use keys 0 to 9 to enter the new code again.
ó
Press MENU / ENTER to confirm your selection.
ó
The device will display “Change successful!” and go back to the previous
menu after approximately 2 seconds.
ó
Press EXIT to exit programming mode and apply the new settings.
ó
The symbol will appear on the display to indicate that the answering
machine has been switched on.
6.1.3 Programming the recording time
ó
You can choose between HIGH (maximum duration 20 minutes, 162s per
message) and LOW (maximum duration 50 minutes, 433 s per message)
recording quality.
46
Page 26

6.4.1 Recording a message
ó
Press OGM.
ó
Use the or keys to select the outgoing message you require.
ó
Press and hold down OGM.
ó
After the tone, dictate your outgoing message (“Record” will appear on
the display).
ó
When you have finished speaking, release OGM.
ó
Your outgoing message will be played back (“Listen” will appear on
the display).
ó
Press DEL / MUTE to delete your outgoing message.
ó
The device will go back to the previous menu.
6.4.2 Listening to a message
ó
Press OGM.
ó
Use the or keys to select the outgoing message you require.
ó
Press PLAY/PAUSE.
ó
Your outgoing message will be played back (“Listen” will appear on
the display).
ó
Press DEL / MUTE to delete your message.
6.5 Listening to a received message
You can listen to new and old messages you have received when the device is
in standby mode.
ó
Press PLAY/PAUSE to start or continue listening.
ó
“Listen” appears on the display if there are messages pending or a tone
will sound if the answering machine is empty.
ó
Whilst you are listening to your messages, press PLAY/PAUSE to pause
(“Pause” will appear on the display).
ó
Whilst you are listening to your messages, press to repeat the current
message.
ó
Whilst you are listening to your messages, press twice to repeat the
last message.
49
6.2 Recording and listening to a memo
You can use your Top M58 to record and listen to memos.
ó
Press and hold down MEMO/REC.
ó
After the tone, dictate your memo (“Record” will appear on the display).
ó
When you have finished speaking, release MEMO/REC.
ó
Your memo will be played back (“Listen” will appear on the display).
ó
Press DEL / MUTE to delete your memo.
ó
The device will return to standby mode.
ó
To listen to your memo again, press PLAY/PAUSE in standby mode.
6.3 Recording and listening to a conversation
You can use your Top M58 to record a conversation in progress and play it back
subsequently.
ó
Press MEMO / REC when a conversation is in progress.
ó
The “REC” symbol will appear on the display.
ó
Press EXIT / STOP or end the conversation to stop recording.
ó
Your conversation will be played back (“Listen” will appear on the display).
ó
Press DEL / MUTE to delete your conversation.
ó
The device will return to standby mode.
ó
To listen to the conversation again, press PLAY/PAUSE in standby mode.
6.4 Recording and listening to OGM messages
Your Top M58 features a number of pre-recorded messages: OGM1 for combined answering machine/ recorder mode and OGM2 for answering machine
mode only. If you wish, you can customise these messages.
48
Page 27

You can choose from the following functions.
ó
Press 1 to listen to new messages.
ó
Press 2 to listen to all messages.
ó
Press 3 to delete :
– All messages if you are not currently listening to a message.
– The message you are currently listening to.
ó
Press 4 to listen to the last message again.
ó
Press 5 to repeat a message.
ó
Press 6 to skip to the next message.
ó
Press 7 to record a new OGM outgoing message after the long tone.
ó
Press 8 to listen-in to what is going on in the location of your Top M58
for approximately 30 seconds.
ó
Press * to:
– Pause a message you are currently listening to or restart a message
– you were listening to previously.
– Listen to what is going on in a particular location for another 30 seconds.
ó
Press # to:
– Stop listening to a message.
– Stop recording an outgoing message.
– Stop listening-in to a location.
– Stop, the device will return to standby mode.
ó
Press or replace the receiver to stop remote control.
51
ó
Whilst you are listening to your messages, press to listen to the next
message.
ó
Whilst you are listening to your message, press DEL/MUTE to delete current
playing message.
ó
Continue to play next message.
or
ó
Press EXIT / STOP if you do not wish to listen to the next message(s).
ó
The device will return to standby mode.
IMPORTANT: The
Full
symbol will appear to indicate that the automatic
answering machine's memory is full. In this case, you must delete any messages
you do not need to keep.
6.6 Remote control
You can listen to or delete messages you have received, record new messages
and check the location of your Top M58 remotely.
6.6.1 Leaving a message
ó
Dial your telephone number.
ó
Your Top M58 will answer after the number of rings you have defined.
ó
You will hear your outgoing message.
ó
As soon as the message has finished, a long tone will sound and you
can then leave your message (if the Top M58 is in combined answering
machine/ recorder mode).
6.6.2 Dialling into and managing the answering machine
ó
Dial your telephone number.
ó
Your Top M58 will answer after the number of rings you have defined.
ó
You will hear the outgoing message.
ó
Enter your password whilst the message is playing.
ó
The Top M58 will switch to remote control mode.
50
 Loading...