

Page 1
Top E604
ISDN
User guide
Page 2

2
Page 3

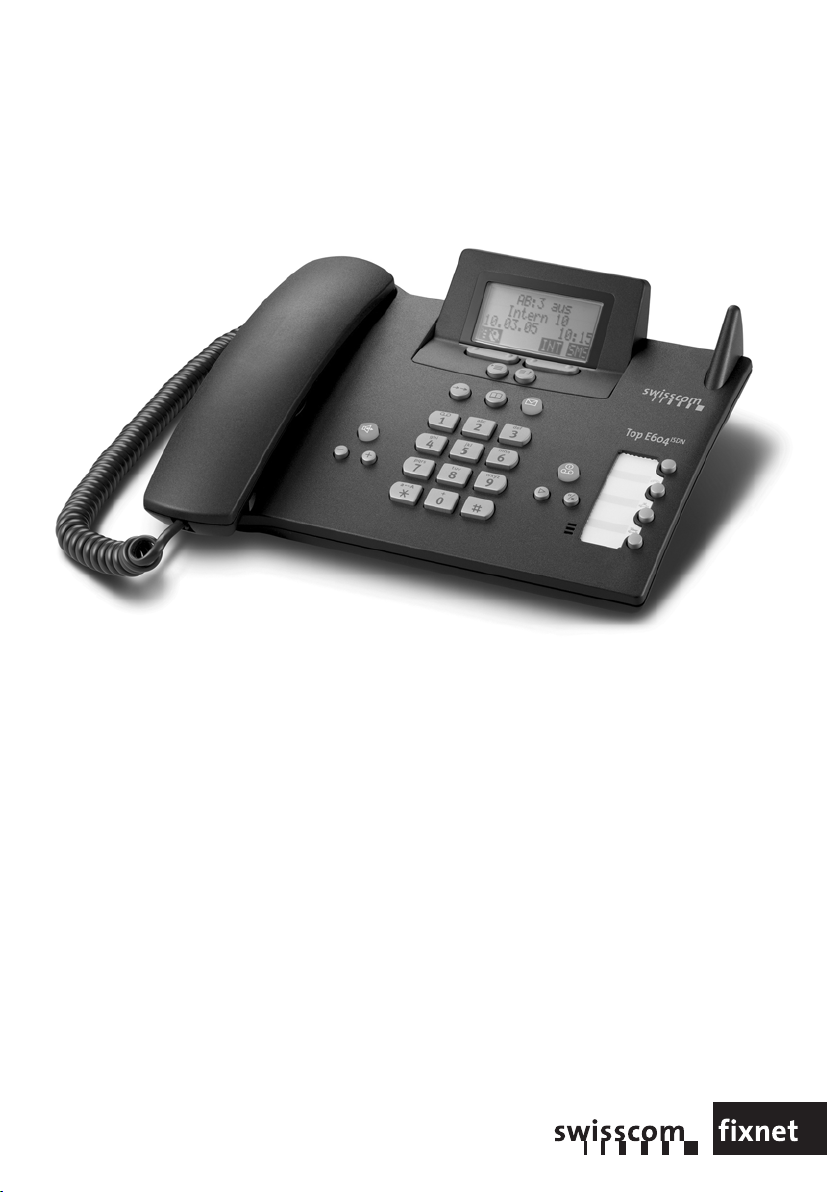
Brief overview of base station
Exit menu key
back to previous
Antenna
Display keys
menu
Message key
flashes: New message, new
Function keys
entries in call list
Brief overview of base station
Pause / end playback
Microphone
of messages
Answering machine key
Playing back messages
Lit: AM activated
Enter menu key
Opens the main menu
Handsfree
on/off
Volume
Adjust
Number keys
Phonebook
Open
Last number redial
Enter text
1
Page 4

Contents
Contents
Brief overview of base station . . . . . . . . . . . . . . . . . 1
Safety precautions . . . . . . . . . . . . . . . . . . . . . . . . . . 6
Display explanation . . . . . . . . . . . . . . . . . . . . . . . . . . 7
Preparing the base station for use . . . . . . . . . . . . . 8
Pack contents . . . . . . . . . . . . . . . . . . . . . . . . . . . . . . . . . . . . . . . . . . . . . . . . . . . . . . . . . 8
Installing the base station . . . . . . . . . . . . . . . . . . . . . . . . . . . . . . . . . . . . . . . . . . . . . . . 8
Connecting the base station . . . . . . . . . . . . . . . . . . . . . . . . . . . . . . . . . . . . . . . . . . . . . 9
Operating the base station – menu system . . . . . . . . . . . . . . . . . . . . . . . . . . . . . . . . . 11
Using the base station via handset . . . . . . . . . . . . . . . . . . . . . . . . . . . . . . . . . . . . . . . 13
Preparing the base station for use – Getting started wizard . . . . . . . . . . . . . . . . . . . . 14
Making calls . . . . . . . . . . . . . . . . . . . . . . . . . . . . . . . 20
Making external calls and ending a call . . . . . . . . . . . . . . . . . . . . . . . . . . . . . . . . . . . . 20
Making an internal call . . . . . . . . . . . . . . . . . . . . . . . . . . . . . . . . . . . . . . . . . . . . . . . . . 20
Answering a call . . . . . . . . . . . . . . . . . . . . . . . . . . . . . . . . . . . . . . . . . . . . . . . . . . . . . . 21
Withholding Calling Line Identification . . . . . . . . . . . . . . . . . . . . . . . . . . . . . . . . . . . . 22
Activating/deactivating handsfree and open listening . . . . . . . . . . . . . . . . . . . . . . . . 23
Picking up a call during ring delay (Call PickUp) . . . . . . . . . . . . . . . . . . . . . . . . . . . . . 24
Rejecting a call . . . . . . . . . . . . . . . . . . . . . . . . . . . . . . . . . . . . . . . . . . . . . . . . . . . . . . . 24
Reserving a line . . . . . . . . . . . . . . . . . . . . . . . . . . . . . . . . . . . . . . . . . . . . . . . . . . . . . . 24
Defining the send MSN for the next call . . . . . . . . . . . . . . . . . . . . . . . . . . . . . . . . . . . 25
Callback when the number is busy (CCBS) . . . . . . . . . . . . . . . . . . . . . . . . . . . . . . . . . 25
Functions during a call . . . . . . . . . . . . . . . . . . . . . . 27
Muting the base station . . . . . . . . . . . . . . . . . . . . . . . . . . . . . . . . . . . . . . . . . . . . . . . . 27
Making a call to several users . . . . . . . . . . . . . . . . . . . . . . . . . . . . . . . . . . . . . . . . . . . 27
Forwarding an incoming call – CD (Call Deflection) . . . . . . . . . . . . . . . . . . . . . . . . . . 30
Working with call waiting for an external call – CW (Call Waiting) . . . . . . . . . . . . . . . 31
Call hold . . . . . . . . . . . . . . . . . . . . . . . . . . . . . . . . . . . . . . . . . . . . . . . . . . . . . . . . . . . . 32
Parking/continuing a call . . . . . . . . . . . . . . . . . . . . . . . . . . . . . . . . . . . . . . . . . . . . . . . 32
Using the Phonebook and other lists . . . . . . . . . . 33
Phonebook and speed dial list . . . . . . . . . . . . . . . . . . . . . . . . . . . . . . . . . . . . . . . . . . . 33
Display available memory . . . . . . . . . . . . . . . . . . . . . . . . . . . . . . . . . . . . . . . . . . . . . . 37
Last number redial list . . . . . . . . . . . . . . . . . . . . . . . . . . . . . . . . . . . . . . . . . . . . . . . . . 37
Opening lists with the message key . . . . . . . . . . . . . . . . . . . . . . . . . . . . . . . . . . . . . . 38
Caller lists . . . . . . . . . . . . . . . . . . . . . . . . . . . . . . . . . . . . . . . . . . . . . . . . . . . . . . . . . . . 39
2
Page 5

Contents
Making cost-effective calls . . . . . . . . . . . . . . . . . . 42
Displaying the call duration . . . . . . . . . . . . . . . . . . . . . . . . . . . . . . . . . . . . . . . . . . . . . 42
SMS (text messages) . . . . . . . . . . . . . . . . . . . . . . . 44
General . . . . . . . . . . . . . . . . . . . . . . . . . . . . . . . . . . . . . . . . . . . . . . . . . . . . . . . . . . . . 44
Before you can send and receive text messages . . . . . . . . . . . . . . . . . . . . . . . . . . . . . 44
Managing SMS service centres . . . . . . . . . . . . . . . . . . . . . . . . . . . . . . . . . . . . . . . . . . 45
Entering, editing or deleting phone numbers for SMS centres . . . . . . . . . . . . . . . . . 46
Activating/deactivating SMS send centre . . . . . . . . . . . . . . . . . . . . . . . . . . . . . . . . . . 47
Registering/de-registering with an SMS centre . . . . . . . . . . . . . . . . . . . . . . . . . . . . . . 48
Memory . . . . . . . . . . . . . . . . . . . . . . . . . . . . . . . . . . . . . . . . . . . . . . . . . . . . . . . . . . . . 48
Sending a text message and the outgoing message list . . . . . . . . . . . . . . . . . . . . . . . 48
Sending a text message to an e-mail address . . . . . . . . . . . . . . . . . . . . . . . . . . . . . . . 52
Receiving text messages, incoming message list . . . . . . . . . . . . . . . . . . . . . . . . . . . . 53
Text messages to a PABX . . . . . . . . . . . . . . . . . . . . . . . . . . . . . . . . . . . . . . . . . . . . . . . 58
Errors when sending and receiving a text message . . . . . . . . . . . . . . . . . . . . . . . . . . 59
Operating the answering machine . . . . . . . . . . . . 61
Selecting an answering machine . . . . . . . . . . . . . . . . . . . . . . . . . . . . . . . . . . . . . . . . 61
Activating/deactivating the answering machine . . . . . . . . . . . . . . . . . . . . . . . . . . . . 62
Selecting announce only and AM mode . . . . . . . . . . . . . . . . . . . . . . . . . . . . . . . . . . . 62
Recording/changing announcements . . . . . . . . . . . . . . . . . . . . . . . . . . . . . . . . . . . . . 63
Playing back/deleting announcements . . . . . . . . . . . . . . . . . . . . . . . . . . . . . . . . . . . . 63
Recording memos . . . . . . . . . . . . . . . . . . . . . . . . . . . . . . . . . . . . . . . . . . . . . . . . . . . . 64
Two-way recording . . . . . . . . . . . . . . . . . . . . . . . . . . . . . . . . . . . . . . . . . . . . . . . . . . . 64
Picking up a call from the answering machine . . . . . . . . . . . . . . . . . . . . . . . . . . . . . . 65
Playing messages . . . . . . . . . . . . . . . . . . . . . . . . . . . . . . . . . . . . . . . . . . . . . . . . . . . . . 65
Returning a call during playback . . . . . . . . . . . . . . . . . . . . . . . . . . . . . . . . . . . . . . . . . 66
Playing a message to another caller . . . . . . . . . . . . . . . . . . . . . . . . . . . . . . . . . . . . . . 67
Playing back memos . . . . . . . . . . . . . . . . . . . . . . . . . . . . . . . . . . . . . . . . . . . . . . . . . . 67
Setting the playback speed . . . . . . . . . . . . . . . . . . . . . . . . . . . . . . . . . . . . . . . . . . . . . 68
Deleting messages/memos . . . . . . . . . . . . . . . . . . . . . . . . . . . . . . . . . . . . . . . . . . . . . 68
Marking an old message or memo as "new" . . . . . . . . . . . . . . . . . . . . . . . . . . . . . . . . 69
Adding a number to the Phonebook . . . . . . . . . . . . . . . . . . . . . . . . . . . . . . . . . . . . . . 69
Remote control . . . . . . . . . . . . . . . . . . . . . . . . . . . . . . . . . . . . . . . . . . . . . . . . . . . . . . 70
Setting the answering machine
(on Top E604 ISDN) . . . . . . . . . . . . . . . . . . . . . . . . . 74
Setting a different language . . . . . . . . . . . . . . . . . . . . . . . . . . . . . . . . . . . . . . . . . . . . 74
Assigning a receive MSN . . . . . . . . . . . . . . . . . . . . . . . . . . . . . . . . . . . . . . . . . . . . . . . 74
Hiding/showing an answering machine . . . . . . . . . . . . . . . . . . . . . . . . . . . . . . . . . . . 75
Specifying the number of rings before the answering machine starts . . . . . . . . . . . 76
Activating/deactivating voice announcement of date and time . . . . . . . . . . . . . . . . . 76
Setting the recording time and recording quality . . . . . . . . . . . . . . . . . . . . . . . . . . . . 77
Activating/deactivating automatic pause . . . . . . . . . . . . . . . . . . . . . . . . . . . . . . . . . . 78
3
Page 6

Contents
Locking the answering machine, defining AM PIN . . . . . . . . . . . . . . . . . . . . . . . . . . . 78
Setting time control . . . . . . . . . . . . . . . . . . . . . . . . . . . . . . . . . . . . . . . . . . . . . . . . . . . 79
Activating/deactivating automatic call screening on a handset . . . . . . . . . . . . . . . . . 81
Activating/deactivating automatic pick up . . . . . . . . . . . . . . . . . . . . . . . . . . . . . . . . . 82
Date and Time . . . . . . . . . . . . . . . . . . . . . . . . . . . . . 83
Setting the date and time . . . . . . . . . . . . . . . . . . . . . . . . . . . . . . . . . . . . . . . . . . . . . . 83
Setting appointments . . . . . . . . . . . . . . . . . . . . . . . . . . . . . . . . . . . . . . . . . . . . . . . . . 84
Night service . . . . . . . . . . . . . . . . . . . . . . . . . . . . . . . . . . . . . . . . . . . . . . . . . . . . . . . . 85
Security settings . . . . . . . . . . . . . . . . . . . . . . . . . . . 89
Changing the system PIN . . . . . . . . . . . . . . . . . . . . . . . . . . . . . . . . . . . . . . . . . . . . . . . 89
Defining authorisation . . . . . . . . . . . . . . . . . . . . . . . . . . . . . . . . . . . . . . . . . . . . . . . . . 90
Emergency numbers . . . . . . . . . . . . . . . . . . . . . . . . . . . . . . . . . . . . . . . . . . . . . . . . . . 90
System settings . . . . . . . . . . . . . . . . . . . . . . . . . . . . 93
Changing the name for an internal user . . . . . . . . . . . . . . . . . . . . . . . . . . . . . . . . . . . 93
Setting up/deleting ISDN phone numbers (MSN) . . . . . . . . . . . . . . . . . . . . . . . . . . . . 93
Assigning a phone number (MSN) . . . . . . . . . . . . . . . . . . . . . . . . . . . . . . . . . . . . . . . . 95
Setting up the list of send MSNs for the next call . . . . . . . . . . . . . . . . . . . . . . . . . . . . 96
Setting up a busy signal when the MSN is being used (Busy on Busy) . . . . . . . . . . . . 97
Assigning an MSN a ringer melody . . . . . . . . . . . . . . . . . . . . . . . . . . . . . . . . . . . . . . . 97
Setting up rejecting for the entire MSN group . . . . . . . . . . . . . . . . . . . . . . . . . . . . . . 98
Diverting calls . . . . . . . . . . . . . . . . . . . . . . . . . . . . . . . . . . . . . . . . . . . . . . . . . . . . . . . . 98
Activating/deactivating handsfree dialling . . . . . . . . . . . . . . . . . . . . . . . . . . . . . . . . 102
Pre-assigning the call diversion destination – CD (Call Deflection) . . . . . . . . . . . . . . 103
Setting up automatic call diversion when not reaching a terminal . . . . . . . . . . . . . 103
Setting up an internal group call group . . . . . . . . . . . . . . . . . . . . . . . . . . . . . . . . . . . 104
Setting up ring delay . . . . . . . . . . . . . . . . . . . . . . . . . . . . . . . . . . . . . . . . . . . . . . . . . 105
Activating/deactivating call waiting – CW . . . . . . . . . . . . . . . . . . . . . . . . . . . . . . . . . 106
Setting an external/internal enquiry call . . . . . . . . . . . . . . . . . . . . . . . . . . . . . . . . . . 106
Setting up the waiting melody . . . . . . . . . . . . . . . . . . . . . . . . . . . . . . . . . . . . . . . . . 107
Changing the long distance prefix . . . . . . . . . . . . . . . . . . . . . . . . . . . . . . . . . . . . . . . 108
Restoring the factory settings . . . . . . . . . . . . . . . . . . . . . . . . . . . . . . . . . . . . . . . . . . 108
Checking the status . . . . . . . . . . . . . . . . . . . . . . . . . . . . . . . . . . . . . . . . . . . . . . . . . . 109
Checking the software version . . . . . . . . . . . . . . . . . . . . . . . . . . . . . . . . . . . . . . . . . 109
Setting the volume, display and keys . . . . . . . . . 110
Setting the display . . . . . . . . . . . . . . . . . . . . . . . . . . . . . . . . . . . . . . . . . . . . . . . . . . . 110
Adjust volume . . . . . . . . . . . . . . . . . . . . . . . . . . . . . . . . . . . . . . . . . . . . . . . . . . . . . . 111
Changing the ringer tone . . . . . . . . . . . . . . . . . . . . . . . . . . . . . . . . . . . . . . . . . . . . . . 112
Activating/deactivating advisory tones . . . . . . . . . . . . . . . . . . . . . . . . . . . . . . . . . . . 113
Using function keys . . . . . . . . . . . . . . . . . . . . . . . . . . . . . . . . . . . . . . . . . . . . . . . . . . 113
4
Page 7

Contents
Operating with other devices . . . . . . . . . . . . . . . 116
Registering handsets . . . . . . . . . . . . . . . . . . . . . . . . . . . . . . . . . . . . . . . . . . . . . . . . . 116
De-registering handsets . . . . . . . . . . . . . . . . . . . . . . . . . . . . . . . . . . . . . . . . . . . . . . 120
Gigaset Repeater . . . . . . . . . . . . . . . . . . . . . . . . . . . . . . . . . . . . . . . . . . . . . . . . . . . . 120
Operating when connected to a PABX . . . . . . . . 122
Access code . . . . . . . . . . . . . . . . . . . . . . . . . . . . . . . . . . . . . . . . . . . . . . . . . . . . . . . . 122
Dialling options . . . . . . . . . . . . . . . . . . . . . . . . . . . . . . . . . . . . . . . . . . . . . . . . . . . . . 122
Appendix . . . . . . . . . . . . . . . . . . . . . . . . . . . . . . . . 125
Care . . . . . . . . . . . . . . . . . . . . . . . . . . . . . . . . . . . . . . . . . . . . . . . . . . . . . . . . . . . . . . 125
Contact with liquid . . . . . . . . . . . . . . . . . . . . . . . . . . . . . . . . . . . . . . . . . . . . . . . . . . 125
Guarantee/maintenance/repair/approval . . . . . . . . . . . . . . . . . . . . . . . . . . . . . . . . . 127
Specifications . . . . . . . . . . . . . . . . . . . . . . . . . . . . . . . . . . . . . . . . . . . . . . . . . . . . . . 129
Character set chart . . . . . . . . . . . . . . . . . . . . . . . . . . . . . . . . . . . . . . . . . . . . . . . . . . 130
Compatibility . . . . . . . . . . . . . . . . . . . . . . . . . . . . . 131
Menu Tree . . . . . . . . . . . . . . . . . . . . . . . . . . . . . . . 132
Main menu . . . . . . . . . . . . . . . . . . . . . . . . . . . . . . . . . . . . . . . . . . . . . . . . . . . . . . . . 132
"Set base" submenu . . . . . . . . . . . . . . . . . . . . . . . . . . . . . . . . . . . . . . . . . . . . . . . . . . 133
"Answering mach." submenu . . . . . . . . . . . . . . . . . . . . . . . . . . . . . . . . . . . . . . . . . . 136
Phonebook key and last number redial key . . . . . . . . . . . . . . . . . . . . . . . . . . . . . . . 138
Accessories . . . . . . . . . . . . . . . . . . . . . . . . . . . . . . 139
Handsets . . . . . . . . . . . . . . . . . . . . . . . . . . . . . . . . . . . . . . . . . . . . . . . . . . . . . . . . . . 139
Glossary . . . . . . . . . . . . . . . . . . . . . . . . . . . . . . . . . 143
Index . . . . . . . . . . . . . . . . . . . . . . . . . . . . . . . . . . . 151
5
Page 8
Safety precautions
Safety precautions
Only use the power supply unit supplied, as indicated on the underside of
O
the telephone.
The operation of medical appliances may be affected. Be aware of the
technical conditions within the particular environment (e.g. doctor's practice).
Do not install the telephone in bathrooms or shower rooms (see page 9 and
page 125). The handset and base station are not watertight.
Do not use the phone in environments subject to explosion hazard
(e.g. auto paint shops).
Ensure that your device is accompanied by this user guide when you give it to
ƒ
others to use.
Please dispose of the telephone in an environmentally friendly manner.
◆ Not all of the functions described in this manual are available in all
i
countries.
◆ All SMS functions are dependent on the network provider.
!
6
Page 9

Display explanation
Display explanation
A table below a heading specifies the base station or handsets on which the function is
available.
Example: Phonebook or speed dial list: Sending a single entry or complete list to a
handset
To handset:
Top S328/S326i/E6x4i
Example: Set answering machine in network for fast access
On Base:
Top E604 ISDN
7
Page 10
Preparing the base station for use
Preparing the base station for use
Pack contents
The pack contains:
◆ one base station,
◆ one handset and a coiled handset cord,
◆ one power supply unit with power cord,
◆ one ISDN connection cable,
◆ one label card,
◆ one tab cover,
◆ one user guide (3 languages, German, French, Italian).
Installing the base station
Installation instructions
The base station is designed to be operated in enclosed, dry areas at temperatures
ranging from +5 °C to +45 °C. Install the base station at a central location in your home,
e.g., in the hall.
◆ Never expose the telephone to: heat sources, direct sunlight or other
W
electrical appliances.
◆ Protect your device from moisture, dust, corrosive liquids and
vapours.
Range and signal strength for operation with handset
The base has a range of approx. 250 m outdoors and up to 40 m indoors. The signal
strength display indicates the quality of the radio contact between the base station and
the handset:
Ð Reception strength 100 % i Reception strength 75 %
Ñ Reception strength 50 % Ò Low reception strength
| No reception (flashes)
8
Page 11
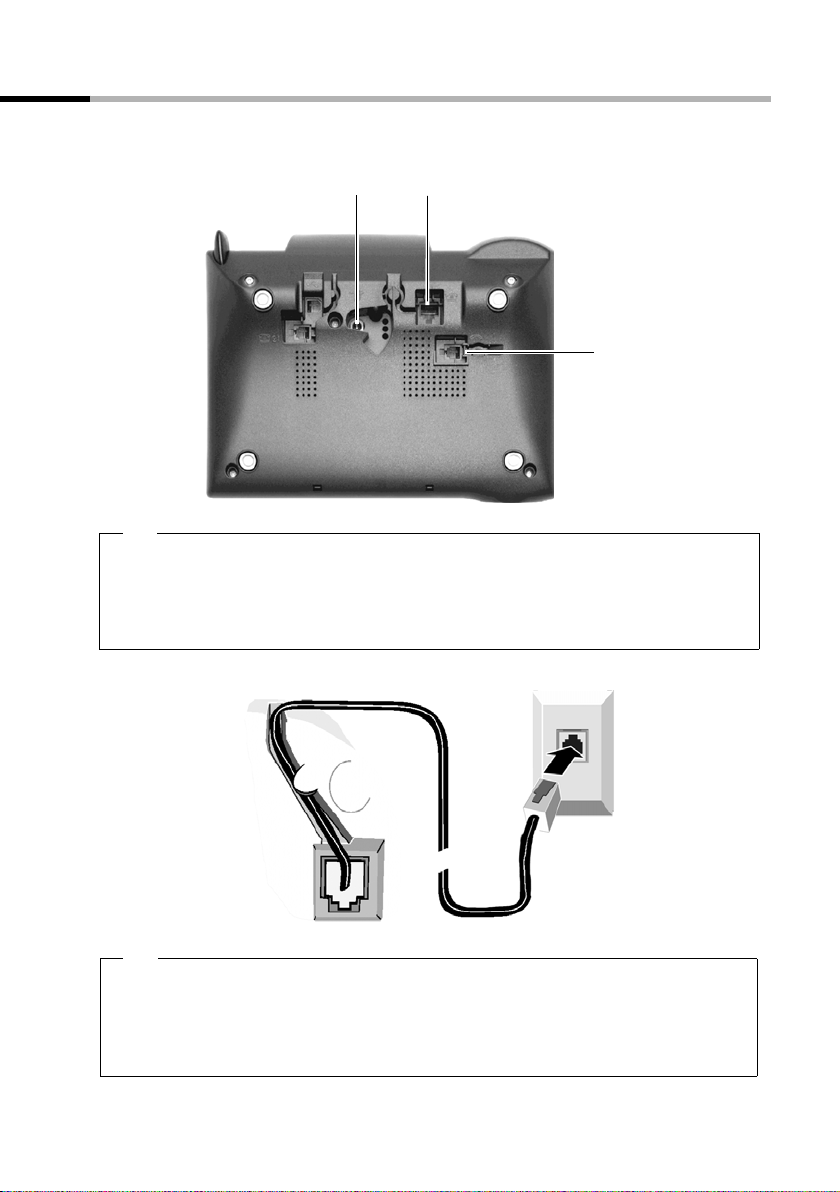
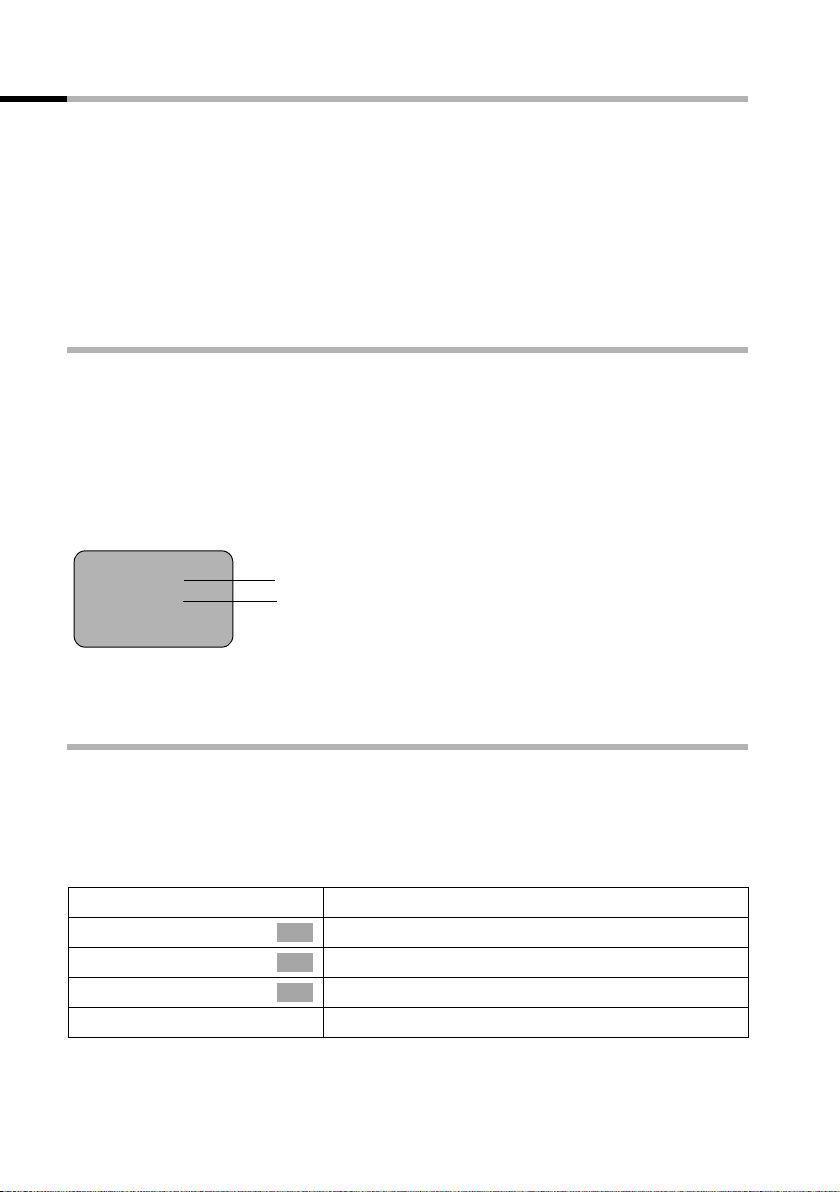
Connecting the base station
Note the specified sequence
Preparing the base station for use
Socket for
power cord
1
.
◆ Insert the plug on the long end of the coiled receiver cord into the socket on the
base station
◆ Place the receiver cord in the cable recess
◆ Plug the other end of the receiver cord into the receiver
Socket for ISDN
connection cable
Socket for coiled
receiver cord
Schematic illustration
ISDN connection
cable (NT2a/b)
Underside of
base station
(enlarged view)
2
.
◆ Plug one of the ISDN connecting cable jacks into the socket on the base station
(it clicks into place)
◆ Position cable in the cable recess
◆ Insert the second ISDN connecting cable jack into the NT2a/b (ISDN connection).
1.
Tel epho ne pl ug
with ISDN cable
9
Page 12
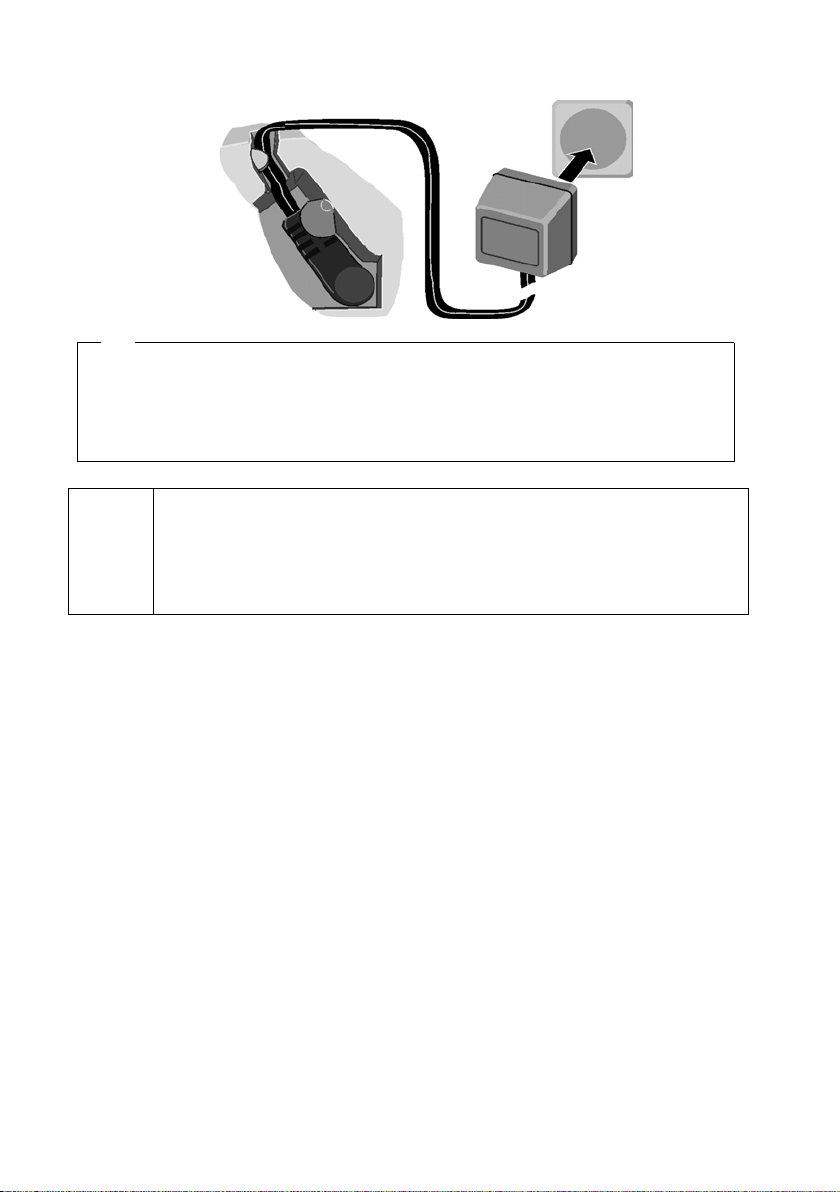
Preparing the base station for use
Cable recess
Outlet
Underside of
base station
(enlarged view)
3
.
◆ Insert the small jack on the power cord into the socket on the base station
◆ Position cable in the cable recess
◆ Ensure that the receiver is positioned correctly on the base station!
Plug the power supply unit into your power outlet.
Keep the power supply unit plugged in at all times to ensure your phone
is ready for use whenever you need it.
i
Neither the base station nor the registered handsets will operate in the
event of a power failure. However, all the settings and stored information
(messages, Phonebook entries etc.) are retained indefinitely.
2.
Power sup ply unit
with power cord
10
Page 13

Preparing the base station for use
)
Operating the base station – menu system
Display keys
The display keys are the horizontal rocker keys just below the display. Their function
changes depending on the particular operating situation. The current function is shown
in the display directly above the key to which it relates.
Example:
Display key functions
(depending on the operating situation
YZ
The various display symbols have the following meanings:
{
Display keys
Display
Meaning when pressed
Symbol
OK
W
X
{
stuv
OK key: confirm menu function or confirm an input and store.
Menu+ key: Open submenu, e.g. in input fields.
Delete key: Delete input from right to left one character at a time.
Escape key: Go back one menu level, or cancel the operation.
Arrow keys
Correcting incorrect inputs
After a correct input you will hear a confirmation tone (rising tone sequence). An
incorrect input is indicated by an error tone (descending tone sequence). You can repeat
the input.
If you have entered the wrong character in the text, you can correct it as follows:
Delete characters to the left of the cursor with
To correct a phone number or text, use the display keys to move the cursor to the right
of the incorrect character. Then press the display key . The character is deleted.
Now enter the correct character.
Inserting characters to the left of the cursor
If you have left out a character, use the display keys to move the cursor to where you
want to insert the character, and then enter it.
Overwriting characters
When entering Date/time the number of digits is fixed and there is a default entry in the
field. Using the display keys, position the cursor on the digit that is to be changed and
overwrite it.
ß
ß
11
Page 14
Preparing the base station for use
Overwriting characters
For pre-configured fields with fixed number, position the cursor on the wrong digit and
overwrite it using the display keys.
For pre-configured fields with a fixed number of digits, position the cursor on the wrong
digit and overwrite it using the display keys.
Idle status
Display in idle status (example)
Top E604 ISDN
Two lines with situation specific
system information
(Date and time have already
been set)
AM:
Internal 11
20.09.03 09:45
Ÿ
INT SMS
Reverting to idle status from anywhere in the menu:
◆ Press the exit menu key j for around 1 second or
◆ do not press any key: The display automatically reverts to idle status after 1 minute.
OK
Changes which you have not confirmed or saved by pressing ,
with Store will be lost.
OK
YES, Store, Send or
Menu operation, with "Setting Handsfree Volume" as an example
1.
i
2.
3.
4.
5. Now press the display key to confirm the setting.
6.
OK
s
OK
v Press the display key until Vol.Loudspeaker is marked in the display
uv
OK
j
Press the enter menu key. The menu opens.
Press the display key until Audio is marked in the display (by the
frame) and then use the display key to confirm.
(by the frame) and then use the display key to confirm.
OK
OK
Press the display keys to select the volume (1-5).
Hold down the exit menu key to return to idle status.
12
Page 15
Preparing the base station for use
Using the base station via handset
The base E604 ISDN supports the Top S328/S326i/E6x4i handsets. Your base and
handset offer you a multitude of features. Depending on handset used, you can use a
specific number of these features; page 140 shows which feature can be used with
which handset.
The user guide for the handsets is included. The user guide can be found on the internet
under www
For "Assigning an MSN a ringer melody" a comfort handset is used for illustration in the
following examples of operating the base station.
Operating the base using a comfort handset
As a central operating element, the handsets have a control key p which has four black
direction arrows and the accompanying symbols. Pressing the various icons (up, down,
right, or left) opens a different function. In the operating instructions, the side you must
press is marked with a black triangle, e.g. key v for right = Open Menu.
Example:"Assigning an MSN a ringer melody"
v
ì
s Base
s Settings
~
s ISDN settings
s Set up MSN
s
v
r Ringer Melody: 5
.swisscom.com/eShop/Alle Bedienungsanleitungen.
Open the menu.
Select the menu item and confirm.
Select the menu item and confirm.
OK
Select the menu item and confirm.
OK
OK
Enter system PIN if required (page 89).
Select the menu item and confirm.
OK
Select the menu item and confirm.
OK
Select MSN, e.g. MSN1: Anna.
Open the submenu.
Select melody and confirm,
OK
e.g., Ringer Melody: 5 (
‰ = set).
13
Page 16

Preparing the base station for use
Preparing the base station for use – Getting started wizard
A few settings are necessary before using your base station. The Getting started wizard
is designed to help you with this. It can be opened at any time using the display of your
base station (page 16) or a comfort handset (see user guide of handset). The following
settings can be set one after the other.
◆ Date and time
◆ Show/hide answering machine 1… 3
◆ Find out/enter the MSN for your connection
◆ Set the device type for the connected device
◆ Set the receive MSN
◆ Set the send MSN
◆ Outside line code (when using a PABX)
What is an MSN?
MSN = Multiple Subscriber Number. You can apply for up to ten different telephone
numbers for one multiple ISDN connection. An MSN is one of the phone numbers
assigned to you without an area code.
You telephone uses the MSN entirely as you require. The following differentiation is
made:
◆ Receive MSN: Phone numbers you may be called on. You can assign the receive
MSNs to specific internal users (terminals) (page 95). Incoming calls are only
forwarded to the terminals to which the relevant MSN has been assigned. Terminals
can be e.g. handsets or answering machines.
◆ Send MSN: Phone numbers that are identified to the person you are calling. The
network operator calculates charges based on the send MSN's. You can assign a
fixed send MSN to each internal user (page 96).
Internal users
You r base station is assigned the fixed internal number 10.
14
Page 17

Preparing the base station for use
Potential internal parties are:
◆ Handsets which can be assigned the internal call numbers 11 to 16.
◆ The integrated answering machines, which are assigned the internal phone
numbers 91 to 93.
Example of how to assign an MSN:
You have applied for four MSN's, two for business use (MSN1, MSN2) and two for private
purposes (MSN3, MSN4). Four handsets are connected to a base station. Two handsets
(Int.11 and 12) and the answering machine AM 91 are intended for business use, and
two handsets (Int.13 and 14) and the answering machine AM 92 are intended for
private use.
Internal users Use Receive MSN Send MSN
handsets Int.11 , 12 Business
Answering
machine
Handset Int.13 Private MSN3 MSN3
Handset Int.14 MSN4 MSN4
Answering
machine
AM 91
AM 92
Ring delay
When ring delay is active, the signal for an incoming call is delayed on the base station
(e.g. after 5 rings – the number can be set). Ring delay can be set individually for each
internal subscriber and for each incoming MSN (page 105).
As an example, an incoming call should be signalled to MSN1 Int.11 when Int.12 does
not answer the call. To do this, activate the ring delay for Int.11 and MSN1 (e.g., to
5 rings). The call is signalled directly to Int.12 , but Int.11 is signalled after the 5th ring.
MSN1, MSN2 MSN1
MSN1, MSN2 ---
MSN3, MSN4 ---
15
Page 18
Preparing the base station for use
Launching the Getting started wizard and setting the basic settings
You can operate the Getting started wizard of your base station either directly using the
base station or via the handsets.
Launching the Getting started wizard:
i
s Set base
s Installation
[RRRRRRRRRRRRRRRRRRRRRRRRRRR]
YES
OK
~
◆ The Getting started wizard cannot be used simultaneously by multiple
internal users.
◆ If there is already settings data (factory default or previous settings),
this data is shown at the appropriate positions in the display and can
i
be modified there.
◆ To cancel the Getting started wizard, press the exit menu key and
hold. All changes you have already saved using Save entry
retained. The base station returns to idle status.
◆ To skip a setting, press the display key §§NO§§.
Open the menu.
Select the menu item and confirm.
OK
Select the menu item and confirm.
OK
Press the display key to launch the Getting started
wizard.
If you already have set a system PIN (not 0000)
(page 89), you will be asked to enter it.
If required, enter the system PIN and confirm.
§§OK§§ are
Setting the date and time:
The date and time are transferred automatically from the telephone network during the
first outgoing call.
The display shows: Enter time?
[RRRRRRRRRRRRRRRRRRRRRRRRRRR]
YES
~
W
Save entry
If the time should be displayed in 12-hour mode, you can modify the setting later
(page 83).
Press the display key to set the date and time.
Enter the date (6-digit) and time (4-digit in 24-hour
mode) in series, e.g. 200903 0945 for 9/20/03
9:45 a.m..
Press the display key to open the submenu.
Select the menu item and confirm.
OK
16
Page 19

Preparing the base station for use
Showing/hiding answering machines:
The answering machines AM1, AM2, and AM3 are available. You can use the answering
machine when it is shown. By factory default, only AB1 is shown (only AB1 is displayed
in the menus).
The display shows: Suppress display of AM1?
Respond with
◆ YES, if you want to hide AM1,
◆ with NO, if you want to use AM1.
This sequence will then be repeated for AM2 and AM3.
i
Entering your phone numbers (MSNs) and names for MSNs:
The feature Find own numbers (MSN)? is not supported by Swisscom ISDN network.
Programming the MSN.
[RRRRRRRRRRRRRRRRRRRRRRRRRR ]
YES
[RRRRRRRRRRRRRRRRRRRRRRRRRR ]
YES
~
s~
W
Save entry
The MSNs entered will automatically be assigned to all handsets as incoming and
outgoing MSNs.
This sequence will then be repeated for MSN2 to MSN10.
i
An answering machine can only be hidden if there are no messages/
memos stored in it (page 75).
Press the display key to confirm the prompt.
Press the display key, to confirm query
MSN1 MSN %f?.
Enter name. Entering a name for an MSN is optional.
If necessary, scroll to the line <Number> and enter
the MSN
numbers will already be entered.
Press the display key to open the submenu.
Select the menu item and confirm.
OK
The MSN must be programmed without the area code (e.g. 031).
. If the MSNs were found automatically, the
17
Page 20
Preparing the base station for use
Setting the receive MSN
The display shows: Set incoming MSN?
The receive MSN is used to answer incoming calls. The MSNs allocated to your ISDN
connection can be allocated to various end devices according to your preferences. You
can assign an end device multiple receive MSNs.
[RRRRRRRRRRRRRRRRRRRRRRRRRRR]
YES
[RRRRRRRRRRRRRRRRRRRRRRRRRRR]
YES
s MSN 1:12345678
j
This sequence is repeated for all handsets registered for your telephone and for the
integrated answering machine.
When setting the receive MSN for an answering machine, only the MSNs
i
are offered in the MSN list which have not yet been assigned to another
answering machine.
Press the display key to confirm the prompt.
Press the display key to confirm the Set allocation
Internal 11 ? prompt.
The list of entered MSNs is displayed.
Select the MSN which should be assigned to this end
OK
device, and confirm.
Repeat this sequence for all MSNs which should be
assigned to this end device as a receive MSN.
Briefly press the exit menu key, to complete the
assignment for this terminal.
Setting the send MSN:
The display shows: Set outgoing MSN?
Each internal user can be assigned exactly one of the available send MSNs. It is
identified to the person called and the network provider bills the call charges to this
MSN. Each end device can be assigned exactly one of the available send MSNs.
[RRRRRRRRRRRRRRRRRRRRRRRRRRR]
YES
[RRRRRRRRRRRRRRRRRRRRRRRRRRR]
YES
s MSN 1:12345678
j
This process is repeated for all handsets registered on your base station.
i
The MSN must be programmed without the area code (e.g. 031).
Press the display key to confirm the prompt.
Press the display key to confirm the Set allocation
Internal 11 ? prompt.
The list of entered MSNs is displayed.
Select the MSN which should be assigned to this end
OK
device, and confirm.
Press the display key to end this assignment for this
terminal.
18
Page 21

Preparing the base station for use
Using with a PABX:
Only carry out the following steps if you want to connect your telephone to a private
PABX (not directly to a NT2a/b).
The display shows: Operate behind PABX?
[RRRRRRRRRRRRRRRRRRRRRRRRRR ]
YES
[RRRRRRRRRRRRRRRRRRRRRRRRRR ]
YES
~
W
Save entry
The display shows Installation completed. The base station returns to idle status.
Press the display key to confirm the prompt.
Press the display key to confirm the Set access
code? prompt.
Enter the access code (outside line code).
Press the display key to open the submenu.
Select the menu item and confirm. The Getting
OK
started wizard is closed.
19
Page 22
Making calls
Making calls
Making external calls and ending a call
External calls are calls using the public telephone network. Two external calls can be
made at the same time on your base station.
either ...
c
~
or ...
~
c
a
i
◆ Replace the receiver to cancel dialling.
◆ If Dial handsfree is activated (page 102), you can also dial and make
calls without lifting the receiver. Dial the number and handsfree mode
is activated.
◆ If you have previously assigned a function key accordingly (page 114),
you can also use that function key to dial.
◆
Immediate dialling:
Lift the receiver.
Enter the telephone number. The phone number is
dialled.
Block dialling:
Enter the telephone number.
Lift the receiver. The phone number is dialled.
End the call:
Replace the receiver.
Making an internal call
Internal calls are calls
◆ between the base station and a terminal registered on the base station.
◆ between terminals registered on the same base station.
They are toll-free. Three internal calls can be made at the same time on your base
station.
You can either call a specific terminal or call all the other registered internal users at the
same time ("group call").
i
20
If you receive a call during an internal call or group call, the call is not
interrupted. You will hear a call waiting tone.
Page 23
Calling a specific handset
Making calls
c
[RRRRRRRRRRRRRRRRRRRRRRRRRR ]
INT
either ...
~
or ...
[RRRRRRRRRRRRRRRRRRRRRRRRRR ]
LIST
s Int.11
... then
a
i
◆ If Dial handsfree is activated (page 102), you can also dial and make
calls without lifting the receiver. Dial the number and handsfree mode
is activated.
◆ If you have previously assigned a function key accordingly (page 114),
you can also use that function key to dial.
Lift the receiver.
Press the display key to initiate the internal call.
Enter the number of the internal user you want.
Press the display key.
Select and confirm the internal number you want,
OK
e.g. Int.11 .
End the call:
Replace the receiver.
Starting a group call to all internal users
You can make a group call from your base station to all other registered internal users
entered for group calls (page 104). By factory default, this option is activated.
[RRRRRRRRRRRRRRRRRRRRRRRRRR ]
INT
either ...
[RRRRRRRRRRRRRRRRRRRRRRRRRR ]
LIST
s Collective call
or ...
P
Press the display key to initiate the internal call.
Press the display key.
Select the menu item and confirm.
OK
Press the star key.
The first internal user who answers the call is connected to you.
Answering a call
Your base station rings, the call is shown in the display and the handsfree key d
flashes. Lift the receiver or press the handsfree key d to answer the call.
21
Page 24
Making calls
Withholding Calling Line Identification
Precondition: The "Withhold Calling Line Identification" feature is supported by your
network provider.
When supplied, your phone number is displayed on the phone of the person you are
calling (CLIP – for outgoing connections) and a caller's phone number is displayed on
your handset (COLP – for incoming connections).
You can withhold this Calling Line Identification (CLIR – for outgoing connections/ COLR
– for incoming connections). CLIP/CLIR are paired with COLP/COLR: if you withhold
Calling Line Identification both – CLIR and COLR – are activated.
You will find explanations for the abbreviations used in the glossary on page 145.
Displaying caller's phone number
When you get a call, you will see the caller's number and/or name displayed on the
screen.
Precondition: Calling Line Identification is activated for the caller.
Screen display with CLIP
With Calling Line Identification, the caller's telephone number is displayed on the
handset screen. If you have stored an entry for this number in your Phonebook, then
that entry will be displayed instead of the number, e.g. "Anna".
Ext. call from
0891234567
for private
REJECT RNG OFF
Ext. call from unknown is displayed on the screen if the caller's phone number is not
identified.
Telephone number or "Anna"
Receive MSN that is being called
Withholding phone number identification
If you do not wish your phone number to be revealed to the person you are speaking
to you can stop your number being identified. You can withhold identification of your
phone number specifically for the next call or else for all calls. If set for all calls, the
phone number is withheld both for outgoing calls (CLIR) and for incoming calls (COLR).
Withholding identification of the phone number for the next call only:
i
s Set base
s Call preparat.
s Temp.withhold
j
Open the menu.
Select the menu item and confirm.
OK
Select the menu item and confirm.
OK
Select the menu item and confirm (‰ = activated).
OK
Hold down (back to idle status).
22
Page 25
Making calls
After the call, the setting is reset again. Your phone number will be
i
Withholding or permitting identification of your phone number for all calls:
When the phone is supplied Withhold no.
identified to your next caller. When you call the selected phone number
from the last number redial list again, this call is also not anonymous.
is not activated.
i
s Set base
s Settings
s ISDN settings
s Withhold no.
j
Open the menu.
Select the menu item and confirm.
OK
Select the menu item and confirm.
OK
Select the menu item and confirm.
OK
Select the menu item and confirm (‰ = activated).
OK
Hold down (back to idle status).
Activating/deactivating handsfree and open listening
The function of the handsfree key d depends on the current status of your base
station:
Your base station is in idle status:
Activate handsfree while dialling:
~d
You are making a call using the receiver or
you are making a call using the receiver and you have activated open listening:
d
d + c
a
Enter the number and press the handsfree key.
Activating/deactivating open listening:
Press the handsfree key.
Activating handsfree during a call:
Hold down handsfree key and replace receiver.
End the call:
Replace the receiver.
You are making a call using the handsfree function:
Deactivate handsfree:
c
d
i
You can adjust volume during handsfree operation using ð und ñ.
Lift the receiver.
End the call:
Press the handsfree key.
23
Page 26
Making calls
Picking up a call during ring delay (Call PickUp)
You can pick up a call despite any set ring delay (page 105).
Preconditions:
◆ The party picking up must be authorised with at least Incoming only status
(page 90).
◆ Both parties must be assigned the same receive MSN (page 95).
c
[RRRRRRRRRRRRRRRRRRRRRRRRRRR]
YES
Lift the receiver. Accept? is displayed.
Confirm to pick up the call.
Rejecting a call
You get an external call or you are making a call and receive an external call. The call is
signalled acoustically and also shown in the display on all telephones or handsets in this
MSN group. You can reject this external call.
Press the display key
Depending on the setting (page 98) the call can be rejected on the base station rejecting
the call only (telephones or handsets with the same receive MSN continue to ring) or it
can be rejected for the entire MSN group (the caller hears the busy tone).
REJECT.
Reserving a line
Your ISDN connection offers you 2 simultaneously usable telephone lines (B channels).
Precondition: You want to make calls externally, but both telephone lines of your
connection are busy (being used by other internal users).
Press the display key
You base station rings as soon as an external line is free.
either ...
c
or ...
[RRRRRRRRRRRRRRRRRRRRRRRRRRR]
DELETE
CALLBCK. The next available free line will be reserved for you.
Use a free line:
Lift the receiver. You can now enter the phone
number as usual.
Delete the reservation:
Press the display key. The reservation is cancelled.
24
i
If the reservation is neither accepted or deleted, it will be deleted
automatically after 30 sec.
Page 27

Making calls
Defining the send MSN for the next call
Even if you have defined an individual send MSN for the base station (page 96), you can
select another MSN as the send MSN before each call, e.g. for individual recording of
charges.
By factory default, MSN next call
is not activated for an MSN.
i
s Set base
s Call preparat.
s MSN next call
s MSN
j
◆ The temporary send MSN is transferred to the person called as phone
i
You can set up your base station so that after lifting the receiver or pressing the
handsfree key d a list of all available send MSNs is displayed (page 96).
number information.
◆ To make this function easier to use, you can also set one of the
function keys accordingly (page 115).
Open the menu.
Select the menu item and confirm.
OK
Select the menu item and confirm.
OK
Select the menu item and confirm.
OK
Select the required MSN and confirm
OK
‰ = activated).
(
The next call uses this MSN.
Hold down (back to idle status).
Callback when the number is busy (CCBS)
Precondition: The exchange supports this service.
Callback on busy – CCBS (Completion of calls to busy subscriber)
The user you are calling is currently making a call. Automatic callback saves you making
repeated attempts to dial the number.
Activating callback
The number you are calling is busy or your call is not answered:
[RRRRRRRRRRRRRRRRRRRRRRRRRR ]
CALLBCK
Press the display key.
Wait for confirmation from the exchange.
Accepting a callback
The base station rings with a special ringer tone and the display shows the callback
number.
c
Lift the receiver. The connection is established.
25
Page 28
Making calls
Checking and deleting a callback
Deleting the callback while it is incoming
The base station rings and the display shows the callback number.
[RRRRRRRRRRRRRRRRRRRRRRRRRRR]
DELETE
Checking or deleting the callback before it is incoming
i
s Set base
s Status
s Callback
either ...
[RRRRRRRRRRRRRRRRRRRRRRRRRRR]
BACK
or ...
[RRRRRRRRRRRRRRRRRRRRRRRRRRR]
DELETE
Press the display key. The callback function is
cancelled.
Open the menu.
Select the menu item and confirm.
OK
Select the menu item and confirm. The status list is
OK
displayed (
Select the menu item and confirm. The current
OK
callback number is shown on the screen.
Check:
Press the display key. The callback remains active.
Cancel:
Press the display key. The callback function is
cancelled.
‰ = activated).
26
Page 29
Functions during a call
Functions during a call
Muting the base station
You can mute your base station during a call, e.g. if you wish to talk confidentially to
another person in the room. Your party on the line cannot hear your conversation
during this time. But you can continue to hear him/her.
[RRRRRRRRRRRRRRRRRRRRRRRRRR ]
MUTE
[RRRRRRRRRRRRRRRRRRRRRRRRRR ]
AUDIBLE
Press the display key. The call is put on hold.
To cancel muting:
Press the display key.
i
When redialling or when performing other functions such as an internal
enquiry call, the muting is cancelled.
Making a call to several users
You initiate a call to several users through an enquiry call. You can then speak to the
other parties either one at a time ("toggling", page 29) or at the same time ("conference
call", page 30).
External enquiry call
You wish to call another external user during an external or internal call.
i
Initiate enquiry call:
i
Enquiry call
The call to the first user is now put on hold. If the connection is on hold internally
(page 106), the first party hears the set waiting melody (page 107).
The enquiry call from an external call to another external call can be set
so (page 106) that both ISDN lines are occupied (hold connection
internally), or so that your second ISDN line remains free (hold
connection externally – HOLD).
Open the menu.
Select the menu item and confirm.
OK
27
Page 30
Functions during a call
Make a call to the second external user:
~
Enter the second user's telephone number.
You can also make a call via the Phonebook or other
lists (page 33).
If the second external user you have dialled is
busy:
[RRRRRRRRRRRRRRRRRRRRRRRRRRR]
BACK
Press the display key to return to the first party.
If the second external user rings:
either ...
st
or ...
[RRRRRRRRRRRRRRRRRRRRRRRRRRR]
CONF.
Tog gle (p a ge 29):
Switch between call parties using display keys.
Conference call (page 30):
Press the display key to establish conference
switching.
or ...
Transfer the call (page 30).
Internal enquiry call
You would like to call an internal user during an external call.
Initiate an internal enquiry call:
either ...
[RRRRRRRRRRRRRRRRRRRRRRRRRRR]
INT
or ...
i
CONSULT
[RRRRRRRRRRRRRRRRRRRRRRRRRRR]
INT
Initiate an internal call.
Open the menu.
Press the display key.
OK
Initiate an internal call.
The call to the first user is now put on hold. The first (external) party hears the set up
waiting melody (page 107), when the connection is on hold internally (page 106).
28
Page 31

Make a call to the internal user:
either ...
~
or ...
[RRRRRRRRRRRRRRRRRRRRRRRRRR ]
LIST
s Int.11
[RRRRRRRRRRRRRRRRRRRRRRRRRR ]
BACK
either ...
OK
st
or ...
[RRRRRRRRRRRRRRRRRRRRRRRRRR ]
CONF.
or ...
Tog gli ng
Functions during a call
Enter the number of the internal user you want.
Press the display key.
Select the required internal number,
e.g. Int.11 , and confirm.
The connection to the internal user is established.
The internal user dialled is busy:
Press the display key to return to the external party.
The internal user has answered:
Tog gle (page 29):
Switch between call parties using display keys.
Conference call (page 30):
Press the display key to establish conference
switching.
Transfer the call (page 30).
Precondition: You have established an enquiry call (page 27 and page 28).
There is both an active call (the one established with an enquiry call) and a held call (the
first). You can speak to both callers one at a time.
Use st to switch between the two callers.
An external party hears the set-up waiting melody in a connection on hold (page 107)
when the connection is on hold internally (page 106). An internal user in a connection
on hold does not hear a waiting melody.
Ending an enquiry call/toggling
either ...
i
s End
or ...
a
End the call that is currently active:
Open the menu.
Select the menu item and confirm. You return to the
OK
waiting caller.
Replace the receiver (return to idle status).
The active connection is ended. You will
automatically be called again by the person on hold.
29
Page 32

Functions during a call
Conference call
Precondition: You have established an enquiry call (page 27 and page 28).
There is both an active call (the one established with an enquiry call) and a held call (the
first). In a conference call you can speak to both other callers at the same time.
You can make a conference call with
i
It is possible to conduct two conference calls at the same time on your base station.
Establishing a conference
You are making an enquiry call. The first caller is put on hold.
Press the display key
Ending a conference
You have several options for ending a conference call:
◆ two external users or
◆ with one internal user and one external user.
CONF. to establish conference switching.
either ...
a
or ...
[RRRRRRRRRRRRRRRRRRRRRRRRRRR]
INDIV.
You end the conference:
Replace the receiver (return to idle status).
You change the conference to an enquiry call:
Press the display key to change the conference
switching to an enquiry call (page 27 or page 28).
The connection that was active immediately before
the conference was established becomes the active
call again.
Forwarding an incoming call – CD (Call Deflection)
CD enables an incoming call to be diverted to any phone number while it is ringing,
without having to answer the call.
You can pre-set a divert destination (page 103), dial a phone number from the
Phonebook or enter a new number.
i
s Forward
Forwarding a call to another terminal
You are making an external call and would like to transfer it to another internal
+terminal.
Establish an internal enquiry call (page 28) and replace the receiver (before answer), to
forward the call.
Open the menu.
Select the menu item and confirm.
OK
The pre-set divert destination is dialled.
30
Page 33

Functions during a call
Working with call waiting for an external call – CW (Call Waiting)
Precondition: CW (Call Waiting) set up, see page 106.
You hear the call waiting tone (short beep) if you receive an external call while
conducting another call (internal or external). The caller's number or name will appear
in the display if Calling Line Identification is enabled.
There are four ways to work with call waiting for an external call:
Accept the waiting call – enquiry call:
Press the display key
hold. Both parties are shown on the display, the current one is marked.
To toggle between both callers see page 29, for a conference call see page 30.
Reject the waiting call
Press the display key
ACCEPT. You answer the call waiting call, and the first call is put on
REJECT to reject a call on call waiting.
i
Changing parties
a
c
Forward call waiting internally
You can forward the call waiting call internally without answering the call.
i
s Forward
s Int.11
either ...
or ...
i
If you reject the call waiting tone on your base station, it can still be heard
on other registered terminals.
End your current call. The waiting call becomes a
normal call.
Lift the receiver to answer the call.
Open the menu.
Select the menu item and confirm.
OK
Select and confirm the internal number you want,
OK
e.g., Int.11 .
The call waiting tone ceases. The call on call waiting
was successfully forwarded.
Continue the active call.
You continue to hear the call waiting tone. The call
on call waiting could not be forwarded.
Forwarding is only possible to internal users who are not already being
called.
31
Page 34

Functions during a call
Call hold
Hold external party
You are conducting an external call.
Press the display key INT. The external caller is put on hold. The waiting external party
hears the waiting melody (page 107), when the connection is on hold internally
(page 106). You can initiate an internal enquiry call (page 28).
Internal users on hold
You are conducting an internal call.
Press the display key
CONSULT. The internal user is on hold.
Parking/continuing a call
You are making an external call and would like to transfer this to another terminal on
your ISDN connection.
i
s Call park
OK
~
a
"De-parking" a call before lifting receiver
i
s Set base
s Call preparat.
s Canc. call park
OK
~
c
"De-parking" a call after lifting receiver
c
i
s Canc. call park
OK
~
Open the menu.
Select the menu item and confirm.
OK
Enter a one or two digit park number and confirm.
Wait for the positive response Call parked.
Replace the receiver (return to idle status).
Open the menu.
Select the menu item and confirm.
OK
Select the menu item and confirm.
OK
Select the menu item and confirm.
OK
Enter previously assigned park number and confirm.
Lift the receiver.
Lift the receiver.
Open the menu.
Select the menu item and confirm.
OK
Enter previously assigned park number and confirm.
32
Page 35

Using the Phonebook and other lists
Using the Phonebook and other lists
Phonebook and speed dial list
You can store up to 100 phone numbers in the Phonebook. You can store up to 10
phone numbers in the speed dial list.
The Phonebook makes dialling easier for you. You open the Phonebook in idle status
i
h key.
◆ Please refer to the Character Set Chart (page 130) to see how to
enter text correctly.
◆ You can enter up to 32 digits for a number and up to 16 letters for a
name.
using the
The speed dial list is a special Phonebook, where you can store particularly important
phone numbers, e.g. private phone numbers. You open the speed dial list using the
Ÿ key.
You create an individual Phonebook and speed dial list for your base station. If you want
the lists/individual entries to be available to handsets, you can send the list/entries to
those handsets (page 36).
The speed dial list is operated in just the same way as the Phonebook, except for the way
in which entries are stored.
Storing a telephone number in the Phonebook
h
W
sNew entry
~
s~
W
Save entry
j
Open the Phonebook.
Open the menu.
OK
Select the menu item and confirm.
Create an entry
Enter name.
Scroll to the next line and enter the name.
Press display key to open menu.
Select the menu item and confirm. The entry is
OK
stored.
Hold down (back to idle status).
33
Page 36

Using the Phonebook and other lists
Storing a telephone number in the speed dial list
The maximum number of entries in the speed dial list is dependent on the number of
entries in the directory.
Ÿ
New entry
~
s ~
W
Save entry
j
Open the speed dial list.
Confirm.
OK
Create an entry:
Enter name.
Scroll to the next line and enter the name.
Press display key to open menu.
Confirm. The entry is stored.
OK
Hold down (back to idle status).
Dialling with the Phonebook/speed dial list
h Ÿ
either ...
s
or ...
~
st
... then
either ...
cd
W
s Display Number
or ...
W
Dial number
Defining the MSN for the next call
You can select a valid send MSN for this call only even when dialling from the
Phonebook. Precondition: MSN next call must be activated (page 96). Select an
entry and press W
MSNs.
to open the submenu. Using Dial number displays the list of
Open the Phonebook or speed dial list.
Scroll to the entry:
Select entry.
Enter the first letter:
Enter the first letter of the name you are searching
for, e .g. "N", to scroll to the first entry beginning
with that letter.
Select the desired user.
Dial after line seizure
Lift the receiver or press the handsfree key.
Open the menu.
Select the menu item and confirm.
OK
Dial before line seizure (block dialling)
Open the menu.
Confirm.
OK
The call is initiated immediately. If you do not lift the
receiver, the handsfree function is activated
automatically.
OK
34
Page 37

Using the Phonebook and other lists
Viewing and editing an entry in the Phonebook/speed dial list
h Ÿ
s
either ...
sDisplay entry
[RRRRRRRRRRRRRRRRRRRRRRRRRR ]
BACK
or ...
sEdit entry
Proceed as described on page 33 (Phonebook) or page 34 (speed dial list) under
"Create entry".
Open the Phonebook or speed dial list.
Scroll to the entry.
Display the entry:
Select the menu item and confirm.
OK
Press the display key to exit the display.
Changing an entry:
Select and confirm to start making changes.
OK
Deleting a single entry or Phonebook/speed dial list
h Ÿ
s W
either ...
s Delete entry
or ...
s Delete list
[RRRRRRRRRRRRRRRRRRRRRRRRRR ]
YES
j
Open the Phonebook or speed dial list.
Select entry and open the submenu.
Delete a single entry:
Select the menu item and confirm.
OK
Delete the entire Phonebook/speed dial list:
Select the menu item and confirm.
OK
Press the display key to confirm the prompt.
Hold down (back to idle status).
Adding a displayed telephone number to the Phonebook
When a phone number appears in the display (CLIP) you can add it to your Phonebook.
This can be done while dialling from the last number redial list, from the calls list/
answering machine list, or during a call.
W
s Copy to dir.
s~
W
Save entry
i
If you have CNIP as well as CLIP, then the name that goes with the
telephone number will also be displayed (up to 16 characters long).
Open the menu.
Select the menu item and confirm.
OK
If you do not have a CNIP, scroll to the name line and
enter the name.
Press display key to open menu.
Confirm. The entry is stored.
OK
35
Page 38

Using the Phonebook and other lists
Selecting a phone number from the Phonebook
If you are prompted to enter an external phone number while you are operating your
telephone, you can use the Phonebook from your base station to do this.
Precondition: The input field for external telephone numbers is displayed.
h
OK
s
The phone number of the entry is added to the entry field.
Open the Phonebook.
Select entry and confirm.
Sending a single entry or complete list to a handset
to MT:
You can send single entries or the complete list to another handset that is registered on
your base station. This avoids entering information twice.
h Ÿ
s W
either ...
s Send entry
or ...
s Send list
... then
OK
~
After an entry has been sent you are asked if you want to send another entry. If you
confirm with the display key
finished sending, press the display key
The successful transfer of data is confirmed with a message and with the confirmation
tone at the receiving handset. Existing entries in the receiving handset are retained.
Entries with identical numbers are not overwritten. The number of entries that are
stored in the receiving handset may therefore differ from the number of entries that you
have sent to it.
The transfer is cancelled if the phone rings or if the memory of the receiving handset is
full. The last entry to be transferred appears in the display.
If an entry with no name is sent to a handset, the last 16 digits of the phone number are
entered as the name.
Top S328/S326i/E6x4i
OK
OK
YES you can select more entries to send; once you have
Open the Phonebook or speed dial list.
Select an entry and open the menu.
Send a single entry:
Select the menu item and confirm.
Send complete list:
Select the menu item and confirm.
Enter the internal number of the receiving handset
and confirm. Sending is initiated.
NO to end it.
36
Page 39

Using the Phonebook and other lists
Display available memory
The memory is divided between the Phonebook and the speed dial list (page 33). The
available memory of all these lists is displayed.
h
s W
s Available memory
j
Open the Phonebook.
Select any entry and open the menu.
Select the menu item and confirm.
OK
Hold down (back to idle status).
Last number redial list
The last number redial list contains the last ten numbers dialled (on your base station).
If there are several identical entries only the most recent will be displayed. If the last
number redial list is full, the oldest entry is deleted when you next make a call. You can
use the last number redial list to redial the telephone numbers.
Manual last number redial
k
sc
◆ To add or change the phone number, press WsDisplay Number
OK
.
i
Defining the MSN for the next call
You can select a valid send MSN for this call only even when dialling from the last
number redial list. Precondition: MSN next call must be activated (page 96).
Select an entry and press W
the list of MSNs.
◆ When a name is displayed, you can press W s Display entry
to display the associated phone number.
◆ You can add the phone numbers to your Phonebook from the last
number redial list (page 35).
Open the last number redial list.
Select an entry and lift the receiver.
The phone number is dialled.-{}-
to open the submenu. Using Dial number displays
OK
OK
37
Page 40

Using the Phonebook and other lists
Automatic redial
With this function, the phone number of a party you did not reach is redialled
automatically every 20 seconds. The handsfree key flashes and "Open listening" is
activated. If the party answers, press the talk key c. "Open listening" remains activated.
If the party does not answer, the call is terminated after approx. 30 seconds. The
function switches itself off after twelve unsuccessful dialling attempts.
Precondition: For the base station, MSN next call must be deactivated (page 96).
a
k
v
Automatic Redial
Press end call key.
Open the last number redial list.
The party who could not be reached is selected.
Open the menu.
Confirm.
OK
To cancel automatic redial, press the display key
i
A call in the meantime deactivates the automatic redial. You must
activate it again afterwards.
CANCEL or any key.
Deleting a single phone number
k
s W
s Delete entry
j
Open the last number redial list.
Select an entry and open the menu.
Select the menu item and confirm.
OK
Hold down (back to idle status).
Opening lists with the message key
Providing a new entry is present in the relevant list, you can open the following lists
using the message key f:
1. List of missed calls Missed calls (page 39)
2. Answering machine lists AM1 , AM2 , AM3 (to base station Top E604 ISDN, page 65)
These lists display the calls and messages belonging to the receive MSNs assigned to the
base station.
As soon as a new entry (calls, messages on an integrated answering machine) is added
to one or more lists, the f key flashes and an advisory tone is heard.
If the flashing key f is pressed, the following is displayed:
◆ If only one list has new entries, you will see the first new entry in that list.
Open entry: s (select entry)
◆ If several lists have new entries, those lists are offered for your selection.
Open entry: s (select list)
If the key f is pressed, and it is not blinking, the following is displayed:
The message No new messages is displayed. Then the list of missed calls are opened.
OK
OK, s (select entry) OK
38
Page 41

Using the Phonebook and other lists
Caller lists
There are two caller lists:
◆ the list of missed calls
It contains all calls that have not been answered or have been rejected and all calls
answered by an answering machine for which there is no message.
◆ the list of answered calls
This contains all the calls answered by an internal user or answering machine.
These lists show the calls on a receive MSN assigned to the base station. In each case
the phone numbers for the last 20 calls are stored. The oldest entry is deleted if a caller
list is full and new entries are added. The most recent entry is at the top of the list and
the oldest at the bottom.
A caller is entered in the relevant caller list at the end of a call. If his phone number is
transferred and this phone number is entered in the Phonebook, his name is inserted.
If there are several identical entries only the most recent will be displayed in the two
lists. If an outgoing call is made to a caller who is entered in the list of missed calls, then
this entry is transferred to the last number redial list and deleted from the list of missed
calls.
The following is displayed for each entry:
◆ the number of calls for this caller,
◆ the phone number of the caller or his name (if it exists as a Phonebook entry) or
unknown, if the phone number was not transferred,
◆ the receive MSN
◆ the date and time of the last call
Opening caller lists
You can open both caller lists via the menu. The list of missed calls can also be opened
using the f-key, providing there is a new entry present (page 38). New entries in the
list of missed calls are signalled by the f key flashing.
i
s Set base
either ...
s Accepted calls
or ...
s Missed calls
i
If another internal user has already opened a caller list you cannot open it.
Open the menu.
Select the menu item and confirm.
OK
Select the menu item and confirm.
OK
Select the menu item and confirm.
OK
39
Page 42

Using the Phonebook and other lists
Calling back a caller
Precondition: The caller's number has been identified (page 22).
Open the list of missed or answered calls (page 39). Now:
s
either ...
cd
W
s Display Number
or ...
W
Dial number
The phone number is deleted from the caller list and entered in the last number redial
list.
Select entry.
Dial after line seizure
Lift the receiver or press the handsfree key.
Open the menu.
Select the menu item and confirm.
OK
Dial before line seizure (block dialling)
Open the menu.
Confirm.
OK
Callback begins at once. If you do not lift the
receiver, the handsfree function is activated
automatically.
i
Defining the MSN for the next call
You can select a valid send MSN for this call only for callback. Precondition: MSN next
call must be activated (page 96). Select an entry and press W
Using Dial number displays the list of MSNs.
To a PABX: The access code (outside line code) is automatically put before
the phone number (page 122).
to open the submenu.
OK
Displaying an entry
Open the list of missed or answered calls (page 39). Now:
s W
s Display entry
Select entry and open the submenu.
Select the menu item and confirm.
OK
Changing the caller's phone number
Open the list of missed or answered calls (page 39). Now:
s W
s Change number
~
W
Save entry
Select entry and open the submenu.
Select the menu item and confirm. You will now see
OK
the number.
Change the number.
Press the display key to open the submenu.
Confirm.
OK
40
Page 43

Using the Phonebook and other lists
Adding an entry to the Phonebook from the caller list
Open the list of missed or answered calls (page 39). Now:
s W
s Copy to dir.
~
W
Save entry
j
Select entry and open the submenu.
Select the menu item and confirm.
OK
Enter names in the line marked by <Name>
(for details of entering text see page 130).
Press the display key to open the submenu.
Confirm. The entry is stored.
OK
Hold down (back to idle status).
Deleting an entry from the caller list
Open the list of missed or answered calls (page 39). Now:
either ...
s W
s Delete entry
or ...
W
s Delete list
[RRRRRRRRRRRRRRRRRRRRRRRRRR ]
YES
j
Delete a single entry:
Select entry and open the submenu.
Select the menu item and confirm. The entry is
OK
deleted.
Delete all entries:
Open the submenu.
Select the menu item and confirm.
OK
Confirm the prompt.
Hold down (back to idle status).
41
Page 44

Making cost-effective calls
Making cost-effective calls
You can manage entries in the speed dial list in exactly the same way as
i
Displaying the call duration
i
You can check the total charges and the charges of the last call made (depending on
setting, see page 43) on each terminal. The total charges include the charges accrued
by this terminal.
Displaying and deleting the cost overview
entries in the Phonebook. You will find instructions on storing, editing
and deleting entries starting on page 33.
Charges are transmitted automatically by the central office. The factor is
CHF 0.10. If a factors is entered (e.g. CHF 0.20) this factor is overwritten
by the factors transmitted from the central office by CHF 0.10 during
every call.
The charges between display and invoice of the network provider can be
different.
The invoice from the network provider is always legally binding.
Depending on the setting, call charge units for each internal party, for each set-up MSN,
and for the entire system are displayed.
i
s Costs
Cost overview
s
W
s Delete amount
Total and individual charges must be deleted separately, i .e. if
i
for ex amp le you de lete the amo unt for an MS N, t he i ndi vid ual cha rges fo r
the terminals are retained, and must be deleted separately.
Open the menu.
Select the menu item and confirm.
OK
Confirm. The total amount (for all internal users) is
OK
displayed.
Scroll to the accounts for the individual internal
users or MSNs set up.
If necessary, delete the amount from the cost
overview:
Press the display key to open the submenu.
Select the menu item and confirm.
OK
42
Page 45

Making cost-effective calls
Activating/deactivating the charges of the last call
You can display the total charges and the charges of the last call for this handset on the
terminal.
By factory default, Last charge
is deactivated.
i
s Costs
s Last charge
j
Once the function has been activated, the call charges are displayed on the terminal
when you lift the receiver. If the connection was not successful, the charges are
displayed after ending the call.
Open the menu.
Select the menu item and confirm.
OK
Select the menu item and confirm (‰ = activated).
OK
Hold down (back to idle status).
43
Page 46

SMS (text messages)
SMS (text messages)
You can use your base station to send and receive SMS text messages (Short Message
Service). You ca send an SMS to any fixed network or mobile phone network number.
Your SMS can be received as a text message by any device with SMS functionality
(mobile phone, PC, another telephone). If the recipient of your SMS does not have a
phone with SMS functionality, then the SMS is played back (SMS 2phone).
i
All SMS functions are dependent on the network provider.
General
Text messages are exchanged between SMS centres that are operated by service providers. The telephone number of the SMS centres through which you wish to send and
receive text messages must be entered in your phone (page 46). Up to ten SMS centres
can be entered. You can change the phone numbers of the SMS centres.
You can receive text messages via any of the SMS centres whose number you have entered. Of course you must be registered to receive text messages with those SMS centres
(page 48).
Your text message is sent through the SMS centre that is entered as the active send
service centre.
i
The mobile phone is delivered with the access number (062 210 00 00)
of the Swisscom SMS Center already pre-programmed.
Before you can send and receive text messages
◆ Calling Line Identification may not be permanently deactivated for the MSN used
(page 23).
◆ To receive text messages you must be registered with your service provider
(page 48).
◆ You must not allow the network provider to bar the phone numbers you have
entered for SMS centres.
If the telephone of a receiver cannot receive an SMS in the fixed network, the SMS is
automatically read as a voice message. Between 7.00 and 22.00 hrs, these text
messages are delivered immediately in the form of a telephone call. Text messages sent
after 22.00 hrs are stored and delivered the next day.
If you have concluded a preselection contract with a network provider, ask whether they
support the "Fixed line SMS" feature. (Preselection means you are bound contractually
to a network provider.)
44
Page 47

SMS (text messages)
Ask your service provider,
◆ what charges are billed for sending and receiving a text message,
◆ which mobile phone operators you ca send text messages to and which mobile
phone operators you ca receive text messages from,
◆ which functions your SMS service offers,
◆ how you are registered with SMS centres for which your phone may already be pre-
configured – automatically by sending a message or by a special registration
procedure.
Managing SMS service centres
SMS messages are exchanged through SMS service centres. To send and receive a text
message, you require the phone number for your service provider's SMS centre. You
have to store this phone number in your telephone.
You may enter up to ten SMS centres in your telephone.
Sending an SMS – send centre
You must enter the phone number of the SMS centre via which you want to send the
SMS in your telephone and activate it as the "send centre" (page 46 and page 47). This
phone number will be used for sending all SMS messages.
You can activate another SMS centre as your send centre. The send centre that was
activated previously is then automatically deactivated.
Receiving an SMS
Text messages can be received via all SMS centres entered, assuming you are registered
with these SMS centres as an SMS recipient (for information about registering, see
page 48).
i
The mobile phone is delivered with the access number (062 210 00 00)
of the Swisscom SMS Center already pre-programmed.
45
Page 48

SMS (text messages)
Entering, editing or deleting phone numbers for SMS centres
You can enter up to ten SMS centres.
Before entering or editing the number, please obtain information about special features
and what the SMS service provider offers.
i
s Set base
s Settings
s Service centres
s
W
either ...
Edit entry
~
W
Save entry
or ...
s Delete entry
j
◆ If you delete the phone number of a send centre, then you must
activate another SMS centre to be the send centre in order to be able
to continue sending text messages.
i
◆ If your telephone is connected to a PABX, you may have to prefix the
phone number with an access code (number with which you obtain
an exchange line, usually "0") (this depends on your PABX), see
page 58.
Open the menu.
Select the menu item and confirm.
OK
Select the menu item and confirm.
OK
Select the menu item and confirm. The phone
OK
number list appears.
Select entry, e.g. <empty>.
Open the submenu.
Changing an entry:
Confirm.
OK
Enter the phone number of the SMS centre.
Press the display key to open the submenu.
Confirm.
OK
Delete an entry:
Select the menu item and confirm.
OK
Hold down (back to idle status).
46
Page 49

SMS (text messages)
Activating/deactivating SMS send centre
To send an SMS you must activate the phone number for the required SMS centre as the
send centre. By doing this you determine via which SMS centre the text message is to
be sent. Text messages can be received via all SMS centres entered, as long as you have
previously been through the registration procedure (see the next chapter) as an SMScapable connection.
i
s Set base
s Settings
s Service centres
s
W
either ...
s Serv.centre on?
j
or ...
s Serv.centre off?
j
◆ When the Service centres phone number list is opened, the display
jumps immediately to the send centre.
i
◆ If you have not activated an SMS send centre you will not be able to
send an SMS, but you will be able to receive text messages from all
the SMS centres you have entered.
Open the menu.
Select the menu item and confirm.
OK
Select the menu item and confirm.
OK
Select the menu item and confirm. You will now see
OK
the phone number list.
Select the required telephone number.
Open the submenu.
Activate SMS centre as the send centre:
Select the menu item and confirm. The display
OK
switches to Serv.centre off?
Quick press (back to list of send centres).
The SMS centre is activated as the send centre. In the
list the phone number of the SMS centre is marked
‰. The previous active send service centre is
with a
deactivated automatically.
Deactivate SMS centre:
Select the menu item and confirm. SMS centre is
OK
deactivated.
Quick press (back to list of send centres).
47
Page 50

SMS (text messages)
Registering/de-registering with an SMS centre
In order to be able to receive text messages on your phone you must first register your
phone number with an SMS service provider. You can find out from the service provider
concerned which information you need to send to register and de-register.
The phone number of the SMS centre must be entered and activated as the active send
service centre in order to register with them.
After you have registered, remember to re-activate the SMS centre as the send centre
via which you wish to send text messages.
Make sure that you register the phone number (MSN) that is assigned to
the base station as the send MSN (page 96), and with which you are
i
sending the text message. If you also want to send and receive text
messages using other registered handsets with different send MSNs,
then you must also have these phone numbers registered.
Memory
The number of text messages that can be stored by the base station depends on the size
of the messages (around 11 text messages of up to 160 characters each). The memory
is used for the incoming and outgoing message list. If the memory is full, the message
Text list full! Please delete entries is displayed. Delete text messages you no longer
require from the incoming and outgoing message lists.
You can check how much capacity your SMS memory has left (in %).
i
OK
SMS
s Available memory
[RRRRRRRRRRRRRRRRRRRRRRRRRRR]
Back
Open the menu.
Confirm.
Select the menu item and confirm. The available
OK
memory will be displayed (in %).
Press (back to idle display).
Sending a text message and the outgoing message list
Notes on writing and sending an SMS message
If you are interrupted as you are writing (by a call, an incoming SMS or because the
handset changes to idle status because of prolonged inactivity), the SMS is
automatically stored in the outgoing message list. You can continue writing the SMS
later (page 51).
Tex t mess ages th at cannot be sent are assigned an error status (page 59) and are placed
in the incoming message list.
Text messages are only stored automatically if sending is interrupted. If you wish to
store a message then you must do so before it is sent.
i
48
Remember that some service providers will bill you for a cancelled call
to the SMS centre.
Page 51

SMS (text messages)
Writing text messages
A text message can be up to 160 characters long.
Remember that the service provider cannot deliver a text message that contains Greek
or Cyrillic characters.
Write text messages as follows:
i
SMS
Write message
~
tomorrow with
< >XW
◆ Please refer to the Character Set Chart (page 130) to see how to
enter text correctly.
◆ Use Q to insert a space, and P to toggle between upper case, lower
i
case and digits (page 130).
◆ You can find out how to correct text on page 11.
◆ If you receive a text message that is incomplete (e.g. because your
phone memory is full), you will see a message.
Open the menu.
Confirm.
OK
Confirm. The input field opens.
OK
Input your text (for text input see page 130).
Saving text messages
Precondition: You have written a text message (page 49) and the input field is open.
W
s Store
The message is stored in the outgoing message list. It can be retrieved and sent at a
later time (page 51).
Press the display key to open the submenu.
Select the menu item and confirm. You can then
OK
send the text message (page 49).
Sending a text message without saving it
Precondition: You have written a text message (page 49) and the input field is open.
W
Send
either ...
Press display key to open menu.
Confirm.
OK
49
Page 52

SMS (text messages)
~
or ...
W
s No.from dir.
OK
s
... then
W
Send
i
Examples of phone number inputs:
0623456789 A national telephone number within the fixed network
07x1234567 A number within the mobile phone network
The recipient's number must always include the area code (prefix), even
if you are in that area.
Enter the recipient's number (with prefix).
Dest.call no.
089123456
< >XW
Select a number from the Phonebook:
Press the display key to open the submenu.
Open the Phonebook.
OK
Select entry and confirm. The number appears in the
display.
Press the display key to open the submenu.
Confirm.
OK
50
Page 53

SMS (text messages)
Opening the outgoing message list
The outgoing message list shows you:
◆ Text messages which you saved before you sent them (page 49).
◆ Text messages you could not send, e.g. you were interrupted by an incoming call
while you were writing the message.
However, the list only shows text messages that are assigned to the same send MSN as
the base station.
These messages are stored until you delete them.
i
SMS
s Outbox 4
Open the menu.
Confirm.
OK
Select the menu item and confirm. The figure shown
OK
indicates how many text messages are stored in the
outgoing message list.
Saved 2/ 4
19.03.03 09:45
Z Y{W
Use Z Y to scroll through the list.
The total number of SMS saved
in the outgoing message list
Number of the text message
displayed
i
When the memory is full, you are prompted to delete messages
(page 48).
Reading and deleting text messages in the outgoing message list
Precondition: You have opened the outgoing message list (page 51).
s
W
either ...
Read textmessage
or ...
s Delete textmess.
Select SMS.
Open the submenu.
Read SMS:
Confirm. Use s to vi ew t he co ntinuation of the tex t
OK
message in the display.
Delete SMS:
Select the menu item and confirm.
OK
51
Page 54

SMS (text messages)
Deleting the entire outgoing message list
This function deletes all the messages in the outgoing message list.
Precondition: You have opened the outgoing message list (page 51).
W
s Delete list
[RRRRRRRRRRRRRRRRRRRRRRRRRRR]
YES
j
Open the submenu.
Confirm.
OK
Press the display key to confirm the prompt.
Hold down (back to idle status).
Sending or editing text messages in the outgoing message list
Precondition: You have opened a text message in the outgoing message list to read
(page 51).
W
either ...
Write message
or ...
s Use text
Open the submenu.
Write and send a new text message:
Confirm. The input field is opened (page 49).
OK
You can write a new text message.
Edit and send a stored text message:
Select the menu item and confirm. The input field is
OK
opened with the contents of the stored text
message. You can edit the text.
You can now send the message as described on page 49.
Sending a text message to an e-mail address
You ca send a text message to an e-mail address. To do this you should write the
recipient's e-mail address at the start of the text message and send this text message to
the call number of the e-mail service of your SMS send centre.
i
Entering the e-mail address at the start of the text message
Enter the recipient's e-mail address at the start of your text message. Separate the email
address from the text of the message by a space or a colon (this depends on the
provider).
Enter the "@" character using the hash key R (press x 2), the colon using the Q key
(press x8), and the space with 1 (press once).
Use W , s Store to save temporarily.
Precondition: You are writing a text message (page 49) and the input field is open.
~
52
Varies according to the network provider.
Not yet possible in the Swisscom network.
OK
Enter the full e-mail address and end it with a space
or a colon.
Page 55

Entering the text of the message
~
SMS (text messages)
Enter the SMS text.
mustermann@name.ch
Hello Peter
Email address, space, SMS
text (example)
< >XW
W
Send
Press the display key to open the submenu.
Confirm.
OK
Sending a text message as an e-mail
You must send the text messages to the number for the e-mail service of your send
centre.
~
Enter the number of the e-mail service.
Dest.call no.
6245
< >XW
W
Send
Press the display key to open the submenu.
Confirm.
OK
Receiving text messages, incoming message list
Notes on receiving a text message
New text messages are signalled by a message in the display, flashing of the message
key f and a confirmation tone. The date and time (transferred from the SMS centre)
are indicated for each SMS received.
In the receiving list the new (unread) messages are before the old messages. New and
old messages are sorted according to their time of arrival:oldest new message, ...,
newest message, oldest old message, ..., newest old message.
Linked text messages are displayed as one SMS. If an incoming linked message is too
long or has not transferred completely, it will be split into individual messages and
stored in the incoming message list.
Opening the incoming message list
The incoming message list shows you:
◆ all received messages,
◆ messages that could not be sent despite several attempts. These messages are all
stored with an error status (page 59).
53
Page 56

SMS (text messages)
The message list is displayed, e.g. follows:
Number of new text messages in the list
Inbox 2/ 5
Opening with the message key
Precondition: There is at least one new message in the list.
f
[RRRRRRRRRRRRRRRRRRRRRRRRRRR]
SMS
s Inbox 2/ 5
Opening with the menu
i
SMS
s Inbox 2/ 5
A new text message is displayed, e.g. as follows:
Text message status:
New, Old, Error
Phone number of the sender
Number of old, read text messages in the list
Press the message key.
If there are no new calls/messages in the other lists,
then the first new text message is opened
immediately. Otherwise:
Press the display key.
If necessary, select and confirm. The incoming
OK
message list is opened and the first new message is
displayed.
Open the menu.
Confirm.
OK
Select the menu item and confirm.
OK
New textm. 1/ 2
1234567890
12.07.03 09:45
Y ZXW
Total number of new SMS
Number of the text
message displayed
If the SMS memory is full and the SMS centre is unable to transfer any more, an
appropriate message will appear on the screen. Press
OK to confirm and delete text
messages you no longer need from the incoming and outgoing message list (see also
page 51 and page 55). The SMS centre will then re-transmit the text message.
54
Page 57

SMS (text messages)
Reading and deleting text messages in the incoming message list
Precondition: You have opened the incoming message list (page 53).
s
W
either ...
Read textmessage
or ...
s Delete textmess.
j
Once you have opened a new message it acquires the status Old textm..
Select SMS.
Open the submenu.
Read SMS:
Confirm. Use s to vi ew t he co ntinuation of the tex t
OK
message in the display.
Delete SMS:
Select the menu item and confirm.
OK
Hold down (back to idle status).
Deleting the entire incoming message list
This function deletes all new and old text messages in the incoming message list.
Precondition: You have opened the incoming message list (page 53).
W
s Delete list
[RRRRRRRRRRRRRRRRRRRRRRRRRR ]
YES
j
Press the display key to open the submenu.
Select the menu item and confirm.
OK
Press the display key to confirm the prompt.
Hold down (back to idle status).
55
Page 58

SMS (text messages)
Replying to or forwarding text messages
While you read a text message you can use the following functions:
W
either ...
Reply
or ...
s Answer: Yes
or ...
s Answer: No
or ...
s Use text
~
... then
W
Send
or ...
s Store
Press the display key to open the submenu.
Reply to an incoming message:
Confirm. You can reply to the message immediately
OK
in the input field.
Answer 'Yes':
Select the menu item and confirm.
OK
Answer 'No':
Select the menu item and confirm.
OK
Edit the incoming message and return it:
Select the menu item and confirm.
OK
Edit text.
Press the display key to open the submenu.
Confirm and then send the message as described on
OK
page 49. The sender’s phone number is provided
automatically.
Select and confirm to store the entry.
OK
To forward a text message, open the menu with W and select the Send option. Now
send the message as described on page 49.
56
Page 59

SMS (text messages)
Calling back the text message sender
Open the SMS incoming message list (page 53). Now:
s
either ...
c
or ...
W
Dial number
or ...
W
s NET list
OK
s
... then
OK
s
Callback begins at once. The phone number is deleted from the caller list and entered
in the last number redial list.
Select entry.
Press the talk key.
Press the display key to open the submenu.
Select.
OK
Dial using network provider's prefix:
Press the display key to open the submenu.
Open the speed dial list.
OK
Select entry and confirm. The network provider's
prefix is put in front of the phone number.
If MSN next call is set for the handset (page 96),
select the outgoing MSN and confirm.
i
To a PABX: The access code (outside line code) is automatically put before
the phone number (page 122).
Copying a phone number from the SMS text into the Phonebook
You telephone can "detect" phone numbers in a received SMS. It displays these by
highlighting the string of digits (max. 32 characters). If the SMS text contains multiple
strings of digits, the first string of digits is highlighted. Scrolling the SMS text with s
will automatically highlight the next string of digits etc..
Precondition: You have opened a text message in the incoming message list to read
(page 55).
Hello Sabine, here is my
new number
1234567890
Y ZXW
The string of digits is
highlighted in black.
57
Page 60

SMS (text messages)
W
s Copy to dir.
s~
W
Store
j
Press display key to open menu.
Select the menu item and confirm.
OK
Go to the Name line and enter the name
(max. 16-digits) (for entering text, see page 130).
Press display key to open menu.
Confirm. The entry is stored.
OK
Hold down (back to idle status).
i
The phone number must be stored in the Phonebook together with its
area code (prefix) so that it can also be used for sending text messages.
Adding a text message sender's telephone number to the Phonebook
Precondition: You have opened the incoming message list and selected a message
(page 53).
W
s Copy to dir.
s~
W
Store
j
Press display key to open menu.
Select the menu item and confirm.
OK
Go to the Name line and enter the name
(max. 16-digits) (for entering text, see page 130).
i
You can create a special Phonebook for SMS within your main Phonebook
by putting an star (*) before the names.
Press display key to open menu.
Confirm. The entry is stored.
OK
Hold down (back to idle status).
Tex t messages to a PABX
You can only receive a text message when the Calling Line Identification is
forwarded to the extension of the PABX (CLIP).
The CLIP of the phone number of the SMS centre is evaluated in your telephone.
If your phone is connected to a PABX, you may have to prefix the number of the SMS
centre with an access code (this depends on your PABX). You can store the access code
on your base station (page 122).
If in doubt, you can test your PABX by sending a text message e.g. to your own number
and putting the access code before the number of the SMS centre. If you do not receive
the message, send another one, this time without the access code.
When you send messages, your sender number may be sent without your extension
number. The recipient cannot reply to you directly in this case.
58
Page 61

SMS (text messages)
Errors when sending and receiving a text message
Errors when sending a text message
Tex t messag e s that cannot be sent are assigned an error status e .g. FD error: and are
stored in the incoming message list.
The following error codes are displayed:
Error code Description
E0 Calling Line Identification is permanently deactivated (page 23).
FE Error occurred during message transfer.
FD Connection to SMS centre failed.
Text messages cannot be sent or received if the number of an SMS
centre is missing or incorrectly stored. Check that the number of the
SMS centre has been correctly stored.
C3 Wrong recipient phone number
You can display information about the cause of errors on the screen.
Precondition: You have opened the incoming message list (page 53).
s
W
s Error status
[RRRRRRRRRRRRRRRRRRRRRRRRRR ]
BACK
Scroll to the text message you were unable to send.
Open the submenu.
Select the menu item and confirm. The cause of the
OK
error appears in the display.
Now press the display key to return to the incoming
message list.
Errors when receiving a text message
A message appears on the screen if your phone cannot receive any more text messages.
You cannot receive text messages under the following conditions:
◆ call diversion has been activated with Immediately,
◆ the memory (incoming and outgoing message lists) is full.
59
Page 62

SMS (text messages)
Self-help with error messages
Error Message Possible Cause Remedy
You cannot send messages. The "Calling Line Identification"
You receive a message whose
text is incomplete.
The message is played back. Your terminal is stored in the
Messages are only received
during the day.
No send centre available! SMS
only saved.
(CLIP) is permanently withheld.
Message transmission was
interrupted (e.g. by an
incoming call).
No number or an invalid
number is entered for the SMS
centre activated as the send
centre.
Your phone's memory is full. Delete some old messages
database of your SMS provider
as having no fixed network
SMS functionality, i. e. you are
no longer registered with the
provider.
If your SMS network provider's
database does not yet know
that your terminal supports
fixed network SMS
functionality, then it will only
attempt to deliver messages
during the day.
You have not entered an SMS
centre.
Permit Calling Line
Identification (CLIP) again
(page 23).
Re-send the message.
Enter phone number
(page 46).
(page 55).
Register the terminal (again)
for SMS reception.
Register the terminal (again)
for SMS reception to get it reassigned in the database.
Activate an SMS centre
(page 47).
If you have set up an SMS centre but have not yet registered with the centre, Sending
text notification appears in the display. The message is stored in the incoming message
list FD error: .
60
Page 63

Operating the answering machine
Operating the answering machine
The device has three answering machines (AB1, AB2, AB3), which can be used
independently of each other. You can operate the answering machines either directly
via the base station, a registered handset or by remote control (internal or external call
to the answering machine, see page 70).
Answering machines are not assigned an MSN (factory default).
◆ AM1 answers all calls.
◆ Each answering machine can be set, operated and played back from each handset/
terminal.
One or more MSNs are assigned to each answering machine:
Each answering machine can only be set and played back using handsets/terminals with
the same receive MSN.
Exception: If a receive MSN is exclusively assigned to an answering machine, then this
answering machine can be used from all internal users.
If an answering machine is being used by a user (directly or via remote
i
The date and time of each message is logged, provided these items have been set
correctly (page 83).
You can hide answering machines you do not wish to use, see page 75.
Definitions of terms used below:
Message Message that a caller leaves on the answering machine.
Memos "Spoken notes" that you can leave on the answering machine for
AM mode Answer and record or announce only.
Answer and record
mode
Announce only mode The caller hears the announcement but cannot leave a message.
operation), no other user can access the answering machine during this
time.
members of your family or office colleagues, for example.
The caller hears the announcement and may then leave a message.
Selecting an answering machine
i
s Answering mach.
s AM1
OK
~
The list only contains the shown answering machines. If only one answering machine
is shown, the list is skipped.
Open the menu.
Select the menu item and confirm.
OK
If necessary, select answering machine and confirm,
OK
e.g. AM1 .
If AM lock is set (page 78): enter the answering
machine PIN and confirm.
61
Page 64

Operating the answering machine
Activating/deactivating the answering machine
You can only activate/deactivate an answering machine when time control is not active
(page 79).
Precondition: You have selected an answering machine (page 61).
either ...
s Activate?
or ...
s Deactivate?
When activating, the remaining memory time (in %) is shown on the display.
Which AM mode the answering machine assumes after activation (answer and record
mode or announce only mode) depends on the announcement selected (page 62).
You can only activate an answering machine in answer and record mode if there is
memory still available. If the remaining memory is less than 60 seconds, you will be
prompted to delete old messages. When the remaining memory is less than 10 seconds,
the answering machine is started in announce only mode.
If the answering machine is activated the ö key is illuminated.
Activate the answering machine:
Select the menu item and confirm.
OK
Deactivate the answering machine:
Select the menu item and confirm.
OK
Selecting announce only and AM mode
You can act i vate Announcement 1 , Anno uncement 2 or Announce m. only for each
answering machine. As supplied, the three announcements already contain standard
announcements. You can delete the pre-recorded announcement and record your own
announcement.
When you select an announcement you also determine in which AM mode the
answering machine is to run (page 61).
◆ Announcement 1 , Announcement 2: Answer and record mode
◆ Announcem. only: announce only mode
In answer and record mode a Concl.announcem is given automatically at the end of a
recording provinding you have recorded a concluding announcement (page 63).
When the phone is supplied Announcement 1 is selected. The Concl.announcem
contains nothing.
Precondition: You have selected an answering machine (page 61).
s Announcements
s Announcement 2
W
Select
62
Select the menu item and confirm.
OK
Select announcement, e.g. Announcement 2
‰ = activated).
(
Press the display key to open the submenu.
Confirm. The previously set announcement is
OK
automatically deactivated.
Page 65

Operating the answering machine
The answering machine switches automatically from recording mode to
announce only mode when the memory is full. As soon as memory space
i
is made available (e.g., because you have deleted some messages) the
answering machine automatically switches back to answer and record
mode.
Recording/changing announcements
You can record the following announcements: Announcement 1 , Announcement 2,
Announcem. only and Concl.announcem.
Precondition: You have selected an answering machine (page 61).
Select the menu item and confirm.
s Announcements
s Announcement 2
W
s Record
[RRRRRRRRRRRRRRRRRRRRRRRRRR ]
START
[RRRRRRRRRRRRRRRRRRRRRRRRRR ]
STOP
Recording is automatically terminated if:
◆ if you pause for more than 8 seconds when recording your announcement
◆ the memory is full. Delete old messages or announcements you no longer require.
The announcement will not be stored if you press the end call key during the recording
or repeat playback.
OK
Select announcement, e.g. Announcement 2
‰ = activated).
(
Press the display key to open the submenu.
Select the menu item and confirm.
OK
Press the display key to start recording.
Say the announcement message.
Press the display key to end the recording. The
announcement is repeated for you to check.
Playing back/deleting announcements
Precondition: You have selected an answering machine (page 61). You can only delete
announcements you have recorded yourself. The default announcement cannot be
deleted.
Select the menu item and confirm.
s Announcements
s Announcement 2
W
either ...
s Play back
or ...
s Delete
[RRRRRRRRRRRRRRRRRRRRRRRRRR ]
YES
OK
Select announcement, e.g. Announcement 2
‰ = activated).
(
Press the display key to open the submenu.
Play back the announcement:
Select the menu item and confirm.
OK
Delete the announcement:
Select the menu item and confirm.
OK
Press the display key to confirm the prompt.
63
Page 66

Operating the answering machine
Recording memos
Memos are "spoken notes" recorded, for example, for members of your family. A memo
is played back, saved and deleted in the same way as a message. If there is a new memo,
the message key f flashes on all handsets assigned to the answering machine.
You can also record memos when the answering machine is deactivated.
When the memory is full, and when there are pauses in the recording longer than 8
seconds, the recording of the memo is cancelled automatically.
Precondition: You have selected an answering machine (page 61).
Select the menu item and confirm.
s Memos
s Record memo
[RRRRRRRRRRRRRRRRRRRRRRRRRRR]
START
[RRRRRRRRRRRRRRRRRRRRRRRRRRR]
STOP
OK
Select the menu item and confirm.
OK
Press the display key to start recording.
Say the memo message.
Press the display key to end the recording.
To cancel the recording, press the display key
BACK.
Two -way re co rd in g
You can make a two-way recording of a call. The two-way recording can then be played
back or deleted like a message.
During a call:
i
s Record
s AM1
[RRRRRRRRRRRRRRRRRRRRRRRRRRR]
STOP
i
The two-way recording is also ended when the call ends or when the
memory is full. You should inform the person you are speaking to in
advance that you are making a two-way recording.
Open the menu.
Select the menu item and confirm.
OK
Select an answering machine and confirm,
OK
e.g. AM1 . The two-way recording starts at once.
Press the display key to end the two-way recording.
64
Page 67

Operating the answering machine
Picking up a call from the answering machine
You can pick up a call, even if the answering machine has already switched itself on (the
ö key is flashing), your announcement is running or the caller is already leaving a
message. When you pick up the call the recording stops.
Precondition:To pick up an answering machine call, the minimum authorisation
"Answer only" is required (page 90).
Automatic call pick up is activated (see page 82,
factory default):
c
/ d
Press the talk or handsfree key. You pick up the call.
Automatic pickup is deactivated:
c
/ d
Press the talk or handsfree key.
either ...
[RRRRRRRRRRRRRRRRRRRRRRRRRR ]
OP.LIST
Press the display key to screen the call.
The caller cannot hear you.
or ...
[RRRRRRRRRRRRRRRRRRRRRRRRRR ]
ACCEPT
Press the display key to pick up the call.
In order to call another external party while the answering machine is recording a call
you must deactivate the automatic pickup (page 82).
Playing messages
New messages are indicated by the flashing message key f. Pressing the message
key f gives you direct access to the new messages.
You can also open the lists of messages via the menu.
Precondition: You have selected an answering machine (page 61).
Confirm. Playback starts with the newest message.
Messages
OK
When all the messages have been played back you will be asked whether you wish to
delete the messages.
The following is shown on the screen for each message:
Date and time of call
Caller's phone number
12.09.03 09:45
1234567890
1/15
ZY Ï W
Number of the message displayed
Total number of messages in the list
If automatic pause is activated the answering machine switches to pause mode after
playing back a message. Press the display key Ï or the ô key to continue playback.
65
Page 68

Operating the answering machine
Jumping to the next or previous message during playback
s
t
Ï
Switching to pause mode during playback, ending pause mode
v
Continue
Go to the next message.
Jump to the previous message.
Repeat the last 5 seconds of the current message.
If less than 5 seconds have elapsed, the current
message is played back from the beginning.
Switch to pause mode.
Confirm. Continue playback.
OK
Returning a call during playback
You can call back a caller immediately while a message is being played. Precondition:
The caller's number has been identified.
During playback:
W
either ...
s Call back
or ...
s NET list
OK
s
Press the display key to open the submenu.
Call back:
Select the menu item and confirm.
OK
Call back using the network provider's phone
number:
Select the menu item and confirm.
OK
Select the network provider's number and confirm.
66
Page 69

Operating the answering machine
Playing a message to another caller
During an external call you can play messages from the answering machine to the
person you are calling.
Precondition: The same receive MSN is assigned to the handset and the answering
machine.
During the call:
W
s Play message
s AM1
OK
~
s W
s Playback
W
s Exit
Press the display key to open the submenu.
Select the menu item and confirm.
OK
If necessary, select answering machine and confirm,
OK
e.g. AM1 .
If AM lock is set (page 78): enter the answering
machine PIN and confirm.
Information about the oldest message is displayed
on the screen. The message is not played back.
Select message and open the submenu.
Select the menu item and confirm. The playback
OK
starts. The other party can hear the message being
played.
End playback:
Press the display key to open the submenu.
Select the menu item and confirm. The playback
OK
stops. You can speak to the caller again.
Playing back memos
Precondition: You have selected an answering machine (page 61).
Select the menu item and confirm.
s Memos
s Play memo
st
OK
Select the menu item and confirm.
OK
Jump to the next or previous memo.
67
Page 70

Operating the answering machine
Setting the playback speed
You can set the playback speed of messages/memos in four levels: Slow, Normal
speed, Fast or Very fast. When the phone is supplied Normal speed is set for all
answering machines.
During playback:
W
s Speed
s Fast
Playback continues at the new speed. All subsequent messages/memos are played back
at this speed until you make another change.
Press the display key to open the submenu.
Select the menu item and confirm.
OK
Select the speed level and confirm,
OK
e.g. Fast (
‰ =set).
Deleting messages/memos
You can delete messages or memos individually or all together. Only messages and
memos that have been listened to for at least 3 seconds can be deleted. These
recordings are then designated as "old".
Deleting single messages/memos
Precondition: You have selected an answering machine (page 61).
either ...
Messages
st
W
s Delete message
or ...
s Memos
s Play memo
st
W
s Delete curr.memo
Delete a single message:
Confirm. Message playback begins.
OK
Select message.
Press the display key to open the submenu.
Select the menu item and confirm. The current
OK
message is deleted.
Delete a single memo:
Select the menu item and confirm.
OK
Select the menu item and confirm.
OK
Select memo.
Press the display key to open the submenu.
Select the menu item and confirm. The current
OK
memo is deleted.
68
Page 71

Operating the answering machine
Deleting all old messages/memos
Precondition: You have selected an answering machine (page 61).
either ...
Messages
W
s Del.old messages
[RRRRRRRRRRRRRRRRRRRRRRRRRR ]
YES
or ...
s Memos
s Play memo
W
s Delete old memos
[RRRRRRRRRRRRRRRRRRRRRRRRRR ]
YES
Delete all old messages:
Confirm. Message playback begins.
OK
Press the display key to open the submenu.
Select the menu item and confirm.
OK
Confirm.
Delete all old memos:
Select the menu item and confirm.
OK
Select the menu item and confirm.
OK
Press the display key to open the submenu.
Select the menu item and confirm.
OK
Confirm.
Marking an old message or memo as "new"
You can mark messages/memos you have already played back as "new". This will display
this message/memo on the handset as a new entry by flashing the message key f or
by text in the display.
Pressing the messages key f gives you direct access to the message/memo once more.
During playback:
W
s Status to 'new'
Press the display key to open the submenu.
Select the menu item and confirm. The current
OK
recording is given the status "new".
If other recordings are available, playback continues.
Adding a number to the Phonebook
While a message is being played back you can display the caller's phone number and
store it in the Phonebook.
Precondition: The caller's number has been identified.
During playback:
W
s Save number
~
W
Store
Press the display key to open the submenu.
Select the menu item and confirm.
OK
Enter name.
Press the display key to open the submenu.
Confirm.
OK
69
Page 72

Operating the answering machine
Remote control
You can control your answering machine remotely from a registered handset or any
external connection or mobile telephone, e.g., to play back and delete messages. Apart
from the first step, the procedure is the same for both kinds of remote control.
Precondition:
◆ Remote control from an external connection is only possible if you have defined an
AM PIN (page 78). You must always enter the AM PIN when operating from an
external device.
◆ To be able to operate an answering machine from an external device fully (change
settings, delete messages) you must enable remote control and remote delete (see
below).
Notes on remote control
If a function requires two keys to be pressed, then you must press both keys within
4 seconds. Otherwise the entry is terminated or only the function of the second key is
carried out. If you press the wrong key first you can press E to cancel the wrong entry.
You can call up voice-guided help for some functions:
0;
:;
F;
9;
Help with deletion
Help with new messages/phrases
Help with recording
Help with different operating modes
Enabling remote control and remote delete
When the phone is supplied, remote control and remote delete are deactivated.
You must enter the settings for each of the three answering machines you wish to
operate remotely.
Preconditions:
◆ You have selected an answering machine (page 61).
◆ To a ctivate Remote control: You have assigned a PIN to the selected answering
machine (page 78).
Select the menu item and confirm.
s Settings
s Remote options
Remote control
s Remote delete
OK
Select the menu item and confirm.
OK
Set remote control:
Select the menu item and confirm
OK
‰ = activated).
(
If required, set remote delete:
Select the menu item and confirm
OK
‰ = activated).
(
70
Page 73

Operating the answering machine
Introduction to remote operation while you are away from home
For remote control you need a telephone that transmits DTMF tones (tone dialling). It is
important to enter the AM PIN immediately while the announcement is being played. In
addition Remote control and, if required, Remote delete must be activated.
~
~
If the AM PIN is entered three times incorrectly in succession, the connection is
interrupted.
After this you can operate the answering machine using the key commands (page 72).
Dial your own telephone number.
When the announcement starts, enter the AM PIN at
once.
Introduction to remote operation from a handset (internal)
Comfort handset
INT
u
[RRRRRRRRRRRRRRRRRRRRRRRRR]
LIST
s
~
Handset made by another manufacturer (GAP mode)
Lift the handset and if necessary, press another key to initiate an internal call.
~
~
Press INT.
Press the display key.
Select an confirm the internal phone number for the
OK
answering machine: 91 for AM1, 92 for AM2 or 93
for AM3.
If the AM lock has been set (page 78), enter the
AM PIN.
Enter internal phone number for the answering
machine: 91 for AM1, 92 for AM2 or 93 for AM3.
If the AM lock has been set (page 78), enter the
AM PIN.
Cordless phone adapter and normal telephone
Automatic line seizure must be activated. As supplied, automatic line seizure is
activated!
Lift the receiver and then:
~
~
Enter internal phone number for the answering
machine: 91 for AM1, 92 for AM2 or 93 for AM3.
If the AM lock has been set (page 78), enter the
AM PIN.
71
Page 74

Operating the answering machine
Key sequences for remote control
Once you have initiated remote control of the answering machine, the functions of the
keys are the same for all telephones.
AB3
Pause/Stop Record
DEF
Announcemen
t On/Off O perating mode
GH9
New Delete Status/Help
:0;
Playing back messages and memos
All messages
New messages only
Pause/Stop
Continue playback
End playback
Skipping messages and memos
To start of message
To t he prev ious mess age
To t he next me ssage
Deleting messages and memos
Single message during playback
All messages after playback
B
:B
E
B
E E
A
AA
3
0B
0B
72
Page 75

Recording an announcement
Announcement 1
Announcement 2
Announcement
Concluding announcement
Playing back an announcement
Announcement 1
Announcement 2
Announcement
Concluding announcement
Selecting an announcement
Announcement 1
Announcement 2
Announcement
Concluding announcement
Recording internal memos
Begin recording
End recording
Activating/deactivating the answering machine
Activate/deactivate
Help
Check settings
Check functions requiring one key to be
pushed
Check functions requiring two keys to be
pushed
End check
FGA
FGB
FG3
FGD
GA
GB
G3
GD
9A
9B
93
9D
FB
E
H
;
;;
see page 70
E
Operating the answering machine
73
Page 76

Setting the answering machine (on Top E604 ISDN)
Setting the answering machine
(on Top E604 ISDN)
Once you have connected your telephone your answering machine is ready for use.
Answering machine AM1 is set to be shown and activated. It records all messages (on
all receive MSNs). AB1 can be played back and set from all handsets (factory default).
All phrases in the answering machine are in English (default setting).
AB2 and AB3 are hidden by factory default (page 75) and deactivated. To use them, they
must be shown and all shown answering machines must be assigned their own incoming MSN.
You can configure AM1, AM2 and AM3 separately.
Setting a different language
You can change the language for voice prompt and the pre-recorded announcement.
Requirement: You have selected an answering machine.
Comfort handset Top S328/S326i/E6x4i
v
æ
s Settings
s AM language
OK
s
Open the menu.
Select the answering machine and confirm.
OK
Select the menu item and confirm.
OK
Select the menu item and confirm.
OK
Select the language.
Assigning a receive MSN
You can assign one or more receive MSN's to each (shown) answering machine (AM1,
AM2, AM3). However, each MSN can only be assigned to one answering machine (only
one recording can be running at any one time).
i
s Set base
s Settings
s Setup user
Setup device
s
W
s Receive MSN
Open the menu.
Select the menu item and confirm.
OK
Select the menu item and confirm.
OK
Select the menu item and confirm.
OK
Confirm.
OK
Select answering machine, INT 91: AM 91 for AM1,
INT 92: AM 92 for AM2 or INT 93: AM 93 for AM3.
Open the submenu.
Select the menu item and confirm.
OK
74
Page 77

Setting the answering machine (on Top E604 ISDN)
Select the receive MSN and confirm, e.g. MSN1:
s
j
Once an answering machine has been assigned to a receive MSN it can only be set and
operated via handsets/terminals to which the same receive MSN is assigned.
OK
Anna. Only the MSN's that are still not assigned to
an answering machine are offered.
Repeat this process for all receive MSNs you want to
assign to the answering machine (‰ = activated).
Hold down (back to idle status).
Hiding/showing an answering machine
If you only want to use one or two answering machines for your connection, you can
hide the other answering machine(s) from all displays and menus. By default, AM1 is
shown, AM2 and AM3 are hidden.
When hidden there must be no messages or memos remaining in the answering
machine:
◆ If there are new messages/memos you have not yet played back on the answering
machine, you will be notified when you try to hide it. The answering machine will
continue to be shown.
◆ If, when you wish to hide an answering machine, it still contains old messages/
memos that have already been played back, you will be asked if you wish to delete
the old recordings. The answering machine is only hidden if you confirm with
YES.
i
s Set base
s Settings
s Setup user
Setup device
s
W
either ...
s Hide AM?
or ...
s Show AM?
j
When an activated answering machine is hidden it is deactivated. When it is set to show
again, the answering machine returns to the status it had before it was hidden.
Open the menu.
Select the menu item and confirm.
OK
Select the menu item and confirm.
OK
Select the menu item and confirm.
OK
Confirm. The list of internal numbers is displayed.
OK
Select the internal numbers for the answering
machine (INT 91, INT 92 or INT 93).
Open the submenu.
Hide answering machine:
Select the menu item and confirm.
OK
Show answering machine:
Select the menu item and confirm.
OK
Hold down (back to idle status).
75
Page 78

Setting the answering machine (on Top E604 ISDN)
Specifying the number of rings before the answering machine starts
You can set when you want the answering machine to activate (after how many rings).
The options are: 1 ring tone, 2 ring tone, ..., 9 ring tone. Instead of a set number of
rings, you can also choose the cost saving setting Automatic 2/4 (factory default). In
this setting the answering machine activates automatically:
◆ after 2 rings if there are new messages;
◆ after 4 rings if there are no new messages.
When operating remotely (page 70) by the third ring you will know that there are no
new messages (otherwise the answering machine would have already activated). There
will be no call charges if you hang up now.
Precondition: You have selected an answering machine (page 61).
Select the menu item and confirm.
s Settings
s No. of rings
s Automatic 2/4
j
OK
Select the menu item and confirm.
OK
Select the number of rings or Automatic 2/4 and
OK
confirm (
Hold down (back to idle status).
‰ = set).
Activating/deactivating voice announcement of date and time
You can have the recording date and time (time stamp) announced when each
message/memo is played back (activated when supplied).
Precondition: You have selected an answering machine (page 61).
s Settings
Message/Memo
s Time stamp
j
76
Select the menu item and confirm.
OK
Confirm.
OK
Select the menu item and confirm (‰ = activated).
OK
Hold down (back to idle status).
Page 79

Setting the answering machine (on Top E604 ISDN)
Setting the recording time and recording quality
You can set the maximum length of a message and its recording quality. The recording
quality determines the total recording time of your answering machine.
On the High quality setting the total recording time is up to 12 min, on Long
recording (standard quality, generally adequate) up to 25 min. The Long recording
recording quality and the Maximum recording time are set by factory default.
The recording of a call ends:
◆ after a pause in speaking lasting more than 8 seconds;
i
Setting the recording time
You can limit the maximum length of a message to 1 minute, 2 minutes or 3 minutes.
If you set
the memory is full).
Precondition: You have selected an answering machine (page 61).
s Settings
Message/Memo
Message length
s Maximum
j
◆ at the end of a call; the caller terminates the connection;
◆ after the maximum set recording time has elapsed, if the setting
Maximum was used, when the memory is full.
Maximum for the recording time (factory setting) then it is "unlimited" (until
Select the menu item and confirm.
OK
Confirm.
OK
Confirm.
OK
Select the recording time and confirm,
OK
e.g. Maximum (
Hold down (back to idle status).
‰ = activated).
When the recording duration is reached, the concluding announcement
i
is played automatically, if recorded. Then the connection is closed down.
There is no limit to the duration of memo recordings.
Setting recording quality
Precondition: You have selected an answering machine (page 61).
Select the menu item and confirm.
s Settings
s AM quality
either ...
High quality
or ...
s Long recording
j
OK
Select the menu item and confirm.
OK
Set high quality:
Confirm (‰ = activated).
OK
Set long recording:
Select the menu item and confirm (‰ = activated).
OK
Hold down (back to idle status).
77
Page 80

Setting the answering machine (on Top E604 ISDN)
Activating/deactivating automatic pause
If automatic pause is activated the answering machine switches to pause mode after
playing back a message or memo. The next message will not be played back until you
press the Ð display key or the ô key.
When the phone is supplied automatic pause is deactivated.
Precondition: You have selected an answering machine (page 61).
Select the menu item and confirm.
s Settings
s Automatic pause
j
OK
Select the menu item and confirm (‰ = activated).
OK
Hold down (back to idle status).
Locking the answering machine, defining AM PIN
You can protect your answering machine against unauthorised access. To do this, define
an AM PIN (Personal Identification Number) and activate the AM- lock. The settings may
then only be changed and the messages played back after the PIN has been entered.
i
The answering machine can only be controlled remotely if you have
defined an AM PIN.
Entering and changing the AM PIN
When supplied, the AM PIN is preconfigured to 0000.
Precondition: You have selected an answering machine (page 61).
Select the menu item and confirm.
s Settings
s Change AM-PIN
OK
~
OK
~
If you make an error when keying in the AM PIN you can delete your entry using the
ß key and enter it again.
OK
Select the menu item and confirm.
OK
Enter new AM PIN (max. 8 digits) and confirm.
Repeat the new AM PIN and confirm.
Activating/deactivating the AM lock
When the phone is supplied the answering machine lock is deactivated.
Precondition: You have selected an answering machine (page 61).
Select the menu item and confirm.
s Settings
s AM lock
OK
Select the menu item and confirm (‰ = activated).
OK
78
Page 81

Setting the answering machine (on Top E604 ISDN)
Setting time control
You can set the answering machine so that it is activated or deactivated depending on
the time of day, as well as using different announcements depending on the time of
day.
You can define (for the 24-hour day) up to four time sections with different settings for
the answering machine. You must specify a start time for each time section. The start
time of the 2nd time section is the end time of the 1st time section, etc.. The start time
of the 1st time section is the end time of the last defined time section. For each section,
you can set if the answering machine should be activated/deactivated and which
announcement or announcement only should be used.
You specify the time control for work days (Monday to Friday). At the weekend
(Saturday and/or Sunday), either the time control for working days can be used, one of
the announcements is activated for the entire day, or the answering machine is
deactivated for the entire day.
Example:
The answering machine in your office should be deactivated during normal office hours
(8:00 to 5:00 p.m.). The answering machine should only be activated during the lunch
hour (12:00 to 1:00 p.m.) using announcement 1. After office hours (5:00 to 8:00 p.m.)
the answering machine should use announcement only. The following time sections
must be defined:
1. Start time 08:00, AM off
2. Start time 12:00, announcement 1
3. Start time 13:00, AM off
4. Start time 5:00 p.m., announce only
Defining start times and announcements for Monday to Friday
Precondition: You have selected an answering machine (page 61).
Select the menu item and confirm.
s Settings
s Time control
s Mon - Fri
OK
s
s Select ann.
s Announcement 1
{
OK
Select the menu item and confirm.
OK
Select the menu item and confirm. ‰ = at least one
OK
start time is entered.
Select entry for the time section,
e.g. **:** Announcement 1, and confirm.
Select the menu item and confirm.
OK
Announcement 1, Announcement 2, Select
OK
Announcem. only or AM off and confirm.
Press the display key.
79
Page 82

Setting the answering machine (on Top E604 ISDN)
Select the menu item and confirm.
s Start time
~
W
Save entry
j
OK
Enter the start time (4-digit). The start time specifies
the end of the previous time section.
Press the display key to open the submenu.
Confirm.
OK
Hold down (back to idle status).
Setting time control for Saturday or Sunday
With the factory default, the time control for working days is used: As for Mon-Fri.
Precondition: You have selected an answering machine (page 61).
Select the menu item and confirm.
s Settings
s Time control
either ...
s Saturday
or ...
s Sunday
... then
s As for Mon-Fri
j
OK
Select the menu item and confirm.
OK
Select the menu item and confirm.
OK
Select the menu item and confirm.
OK
Select As for Mon-Fri, Ann. 1 24h, Ann. 2 24h,
OK
Ann. only 24h or AM off and confirm.
Hold down (back to idle status).
Activating/deactivating time control
By factory default, time control is deactivated.
Precondition: You have at least set a start time (page 79) and have selected an
answering machine (page 61).
Select the menu item and confirm.
s Settings
s Time control
either ...
Activate?
or ...
Deactivate?
OK
Select the menu item and confirm (‰ = activated).
OK
Activate time control:
Confirm.
OK
Deactivate time control:
Select the menu item and confirm.
OK
80
Page 83

Setting the answering machine (on Top E604 ISDN)
Activating/deactivating automatic call screening on a handset
You can set your answering machine to switch a handset assigned to it automatically to
listen in when a message is recorded.
By default, automatic listen in is deactivated.
Assigning a handset
Only one handset may be assigned to an answering machine. You can choose a handset
to which one of the answering machine's receive MSN's is assigned. Only terminals that
support handsfree mode are displayed. Auto answer (page 82) must be activated.
Precondition: You have selected an answering machine (page 61).
Select the menu item and confirm.
s Settings
s Aut. listen in
s Select HS
s Internal 11
Activating/deactivating listen in
You can only activate the listen in function if a handset has been assigned to the
answering machine.
Precondition: You have selected an answering machine (page 61).
s Settings
s Aut. listen in
either ...
Activate?
or ...
Deactivate?
OK
Select the menu item and confirm.
OK
Select the menu item and confirm.
OK
Select the handset and confirm, e.g. Internal 11.
OK
Select the menu item and confirm.
OK
Select the menu item and confirm.
OK
Activate listen in:
Confirm.
OK
Deactivate listen in:
Confirm.
OK
81
Page 84

Setting the answering machine (on Top E604 ISDN)
Activating/deactivating automatic pick up
With automatic call pick up, you can pick up the call from the answering machine
directly (announcement or call recording is running) on any handset that has been
assigned the same incoming MSN as the answering machine. You just need to press the
talk key c on the handset. The recording of the call will then stop.
As supplied, automatic pickup is activated.
Requirements:
◆ To pick up a call, the minimum authorization Incoming only is required for the
handset (page 90).
◆ The answering machine and the handset have the same incoming MSN assigned to
them.
i
If automatic listen in is activated for a handset (page 81) then the call can
only be taken on this handset.
i
s Set base
s Settings
s System settings
s AM auto. pickup
Open the menu.
Select the menu item and confirm.
OK
Select the menu item and confirm.
OK
Select the menu item and confirm.
OK
Select the menu item and confirm (‰ = activated).
OK
82
Page 85

Date and Time
Date and Time
Setting the date and time
The first time you make a call on your phone, the date and time are transmitted by the
exchange.
You can choose between the 12 hour and the 24 hour display (factory setting) for the
time (a.m. = 1st half of the day; p.m. = 2nd half of the day).
i
s Set base
s Settings
s System settings
s Date/time
either ...
s 12 hours
s Date DD.MM
or ...
Set time
~
W
Save entry
Open the menu.
Select the menu item and confirm.
OK
Select the menu item and confirm.
OK
Select the menu item and confirm.
OK
Select the menu item and confirm.
OK
Select display modes:
If necessary, choose between 12 hours- and 24 hours
OK
display (‰ =on).
If necessary, choose between Date DD.MM (Day-
OK
Date) and
Setting the date and time:
Select the menu item and confirm.
OK
Enter the date and time. If necessary skip settings
that are already correct using uv.
If necessary, in the
keys
Press the display key to open the submenu.
Select and confirm to store the setting.
OK
Date MM.DD (Date-Day) display (‰ =on).
12 hoursdisplay use the display
AM and PM to switch between AM and PM.
Activating/deactivating time display
You can activate and deactivate the display of the date and time in your base station’s
idle display.
i
s Settings
s Time display
j
Open the menu.
Select the menu item and confirm.
OK
Select the menu item and confirm (‰ = on).
OK
Hold down (back to idle status).
83
Page 86

Date and Time
Setting appointments
You can use your base station to remind yourself of an appointment. To do this, you
have to save the times.
Setting an appointment
i
s Reminder
W
Change reminder
OK
~
OK
~
OK
OK
j
◆ If you do not enter a message, Reminder will appear in the display at
the relevant time.
◆ How to change the volume and melody is explained starting on
page 111.
◆ An appointment will only be displayed only if the base station is in idle
i
status. During a call or automatic last number redial, the appointment
is not displayed. In this case, the appointment alarm is made once the
base station has returned to idle status.
◆ The appointment cannot be signalled during a power failure. In this
case, the appointment alarm is made as soon as the time has been
reset on the system (page 83).
Open the menu.
Select the menu item and confirm.
Press the display key to open the submenu.
Select the menu item and confirm.
Enter the date and time. If necessary skip settings
that are already correct using uv.
If necessary, in the
AM and PM to switch between AM and PM.
keys
Confirm.
Enter message (up to 16 characters) and confirm.
The entry is stored.
Hold down (back to idle status).
12 hoursdisplay use the display
Cancelling an appointment
i
s Reminder
W
Delete reminder
OK
OK
j
84
Open the menu.
Select the menu item and confirm.
Press the display key to open the submenu.
Select the menu item and confirm. The entry is
deleted.
Hold down (back to idle status).
Page 87

Date and Time
Switching off or answering an appointment alarm
An appointment is signalled with the selected ringer melody (page 112). The stored
message (page 84) or Reminder is shown in the display. Press the display key
switch off the appointment alarm. The appointment alarm will ring for 30 seconds if it
is not answered sooner. Expired appointments remain in the memory. In order to be
able to set a new appointment, you must first delete the expired appointment.
Off to
Night service
You can set up call diversion for each incoming MSN. This can be done daily for a
specified period of time (Start time to End time) and if required, on the weekend (Sat/
Sun all day), automatically for all incoming calls to an external call number, to another
internal subscriber, or via Top E604 ISDN to an answering machine. For example, when
a business is closed (from 6:00 p.m. to 8:00 a.m.) all calls from the office can be
diverted to a private number.
When forwarding a call externally, only the MSN which is assigned to the base station
as the incoming MSN can be forwarded from the base station.
By default, night service is deactivated. To switch on Night service, first the forward destination must be defined.
If external call diversion to an external phone number is activated using
Immediately (page 99) at the time when Night service is supposed to
start, the following applies:
◆ The call is forwarded to another phone number:
i
Call diversion remains active until it is explicitly deactivated.
◆ The call is forwarded to the same phone number:
Call diversion is deactivated until the end time of Night service is
reached.
The same applies when call diversion is set up during Night service.
85
Page 88

Date and Time
Setting the forward destination
Precondition: Night service is deactivated (page 88).
i
s Set base
s Night service
s
s Forward. dest.
either ...
External
~
W
Save entry
or ...
s Internal
s Internal 11
or ...
s Answering mach.
s AM2
... then
j
Open the menu.
Select the menu item and confirm.
OK
Select the menu item and confirm (‰ = Night
OK
service is activated). The list of MSNs is displayed.
Select MSN and confirm, e.g. MSN1: Anna.
OK
Select the menu item and confirm (‰ = set).
OK
Set the external forward destination:
Select the menu item and confirm.
OK
Enter the external destination phone number.
Press the display key to open the submenu.
Select the menu item and confirm.
OK
Set the internal forward destination:
Select the menu item and confirm.
OK
Select internal number, e .g. Internal 11.
Select the answering machine:
Select the menu item and confirm.
OK
Select the answering machine you would like e.g.
AM2 . The calls are forwarded to the selected
answering machine.
Hold down (back to idle status).
86
◆ Night service, internal: If the internal user is not registered or cannot
be reached (e.g. terminal deactivated), the call is not signalled and
the caller receives the busy signal.
i
◆ Night service to an answering machine: Even if the answering
machine is deactivated, a call is signalled on the answering machine
and the answering machine takes the call after the set number of
rings (page 76).
Page 89

Date and Time
Entering the start and end time for Night service
By default, the Start time is pre-set to 20:00 or 8:00 pm, and 08:00 or 8:00 am for the
End time.
i
s Set base
s Night service
s
either ...
s Start time
~
or ...
s End time
~
... then
W
Save entry
j
Open the menu.
Select the menu item and confirm.
OK
Select the menu item and confirm.
OK
Select MSN and confirm, e.g. MSN1: Anna.
OK
Enter the start time:
Select the menu item and confirm.
OK
Enter the start time (4-digit).
Enter the end time:
Select the menu item and confirm.
OK
Enter the end time (4-digit).
Press the display key to open the submenu.
Confirm.
OK
Hold down (back to idle status).
Activating/deactivating Saturday/Sunday all day Night service:
If Sat/Sun all day is set, then Night service is active between the indicated start and
end times from M-F, and all day on weekends. If Sat/Sun all day
calls are forwarded on the weekend between the set start and end time.
By factory default, Sat/Sun all day
i
s Set base
s Night service
s
s Sat/Sun all day
OK
OK
OK
OK
j
is activated.
Open the menu.
Select the menu item and confirm.
Select the menu item and confirm.
Select MSN and confirm, e.g. MSN1: Anna.
Select the menu item and confirm (‰ = activated).
Hold down (back to idle status).
is deactivated, then
87
Page 90

Date and Time
Activating/deactivating Night service
You can only activate Night service when you have entered a forward destination for the
incoming MSN and when there is no forward destination currently activated for it.
i
s Set base
s Night service
s
either ...
Activate?
or ...
Deactivate?
j
If Night service is activated for an MSN, Night service is marked with ‰.
Open the menu.
Select the menu item and confirm.
OK
Select the menu item and confirm.
OK
Select MSN and confirm, e.g. MSN1: Anna.
OK
Activating Night service:
Select the menu item and confirm.
OK
Deactivating Night service:
Select the menu item and confirm.
OK
Hold down (back to idle status).
88
Page 91

Security settings
Security settings
Changing the system PIN
You can protect the following settings against unauthorised access using the system PIN
(Personal Identification Number):
◆ Call charge settings (i / Costs)
◆ Internal and external call diversion
◆ (i Set base/ Ext. call forw. or Int. call forw .)
◆ Subscriber configurations, security, ISDN, and system settings (i / Set base /
Settings)
◆ Getting started wizard (i / Set base / Installation)
The system PIN will not work with the number 0000.
When supplied, the system PIN is preconfigured to 0000.
i
s Set base
s Settings
OK
~
Security
Change PIN
OK
~
OK
~
j
Memorise the new system PIN! If you forget it, the device will require
!
technical intervention (there is a charge for this). If this happens, contact
the Swisscom Hotline.
Open the menu.
Select the menu item and confirm.
OK
Select the menu item and confirm.
OK
Providing you choose a number other than 0000:
Enter PIN and confirm.
Confirm.
OK
Select the menu item and confirm.
OK
Enter new system PIN (up to 8 digits, 0 to 9) and
confirm.
Repeat the new system PIN and confirm.
Hold down (back to idle status).
89
Page 92

Security settings
Defining authorisation
You can set different authorisations for all registered devices:
◆ Unrestricted (set as factory default)
All devices can answer incoming calls and make internal/external calls.
◆ Incoming only
The devices can only answer incoming calls. External calls are not possible. Internal
calls can be made. Emergency numbers can be dialled.
◆ Internal only
The devices can only make and answer internal calls. Emergency numbers can be
dialled.
i
s Set base
s Settings
OK
~
Security
s Authorisation
s Int.11
W
s Internal only
j
Open the menu.
Select the menu item and confirm.
OK
Select the menu item and confirm.
OK
If required, enter the PIN and confirm (page 89).
Confirm.
OK
Select the menu item and confirm.
OK
Select internal number, e .g. Int.11 .
Press the display key to open the submenu.
Select authorisation and confirm (‰ = set),
OK
Internal only.
e.g.
Hold down (back to idle status).
Emergency numbers
By default, the country-specific emergency numbers are entered (No. 117, 118, and
144). You cannot change or delete these. You can enter five emergency numbers of
your own.
i
The emergency number can also be dialled by a handset with restricted
authorisation (e .g. Internal only).
90
Page 93

Security settings
Setting up, editing, reading and deleting personal emergency numbers
i
s Set base
s Settings
OK
~
Security
s Emergency nos.
s <no entry>
W
either ...
Change number
~
W
Save entry
or ...
s Display number
or ...
s Delete number
j
Open the menu.
Select the menu item and confirm.
OK
Select the menu item and confirm.
OK
If required, enter the PIN and confirm (page 89).
Confirm.
OK
Select. The emergency numbers list is opened.
Select list entry, e .g. <no entry>.
Press the display key to open the submenu.
Set up or edit emergency number:
Confirm.
OK
Enter new emergency number (up to 32 digits) or
edit existing emergency number. You can transfer
the number from the Phonebook h .
Press the display key to open the submenu.
Confirm.
OK
View emergency number:
Select the menu item and confirm.
OK
Delete emergency number:
Select the menu item and confirm.
OK
Hold down (back to idle status).
If your phone is connected to a PABX you may have to enter the applicable
access code (outside line code, e.g. 0; see page 122) before the
i
emergency number. This also applies to preset emergency numbers for
which you need to re-enter e.g. "0117", "0118" and "0144" as an
alternative.
91
Page 94

Security settings
Dialling emergency numbers
Precondition: The base station is blocked for external dialling (page 90).
c
[RRRRRRRRRRRRRRRRRRRRRRRRRRR]
EMERG.
... then
~
If the dialled number does not match the emergency number entered, the call is
rejected with the display "Number is not emergency no.".
The following emergency numbers for Switzerland are programmed ex works:
117 Police
118 Fire department
144 Sanitation department
Lift the receiver.
Press the display key.
Dial the emergency number:
Enter the emergency number.
92
Page 95

System settings
System settings
The abbreviations in brackets after the titles indicate the ISDN service concerned. Some
features may only be used if they have been authorised by the network provider (there
may be an extra charge).
Changing the name for an internal user
By factory default, all internal numbers are given the names Int.11 , Int.12 , etc.,
according to their numbering. You can change these entries to suit your individual
needs.
i
s Set base
s Settings
OK
~
s Setup user
s Setup device
s Int.11 W
Name
~ W
Save entry
Since names are saved in the base station, another name can be allocated
i
to a terminal when registering to a different base. This makes it possible
to identify which base the terminal is currently connected to.
Open the menu.
Select the menu item and confirm.
OK
Select the menu item and confirm.
OK
Enter system PIN if required (page 89).
Select the menu item and confirm.
OK
Select the menu item and confirm.
OK
Select internal number and open submenu,
e.g.Int.11 .
Confirm.
OK
Change the name and open the submenu.
Confirm. The name is now shown in the internal list,
OK
including when an internal call is made from this
internal number.
Setting up/deleting ISDN phone numbers (MSN)
Your ISDN connection offers you two telephone lines (B channels) that you can use at
the same time. You can set up a maximum of ten individual phone numbers (MSNs) on
your base station.
The MultiLine connection provides three call numbers. All further numbers must be
activated.
93
Page 96

System settings
Setting up an ISDN phone number (MSN) / changing the name
If you have not saved all the phone numbers with the Getting started wizard (page 16),
you can enter them now. All phone numbers that are subsequently stored are
automatically assigned to all registered terminals.
i
Each newly set up phone number automatically gets its own ringer melody, which can
be changed to suit your individual requirements (page 97).
i
s Set base
s Settings
~
s ISDN settings
Set up MSN
s W
Edit entry
~
s~
W
Save entry
The MSN must be programmed without the area code (e.g. 031).
Open the menu.
Select the menu item and confirm.
OK
Select the menu item and confirm.
OK
OK
Enter system PIN if required (page 89).
Select the menu item and confirm.
OK
Confirm.
OK
Select MSN and open submenu, e.g. MSN1: Anna.
Confirm.
OK
Enter a name (up to 16 characters – optional) (for
inputting text see page 130).
Scroll to the line <Number> and enter the phone
number.
Press the display key to open the submenu.
Confirm.
OK
Cancelling ISDN phone numbers (MSN)
i
s Set base
s Settings
OK
~
s ISDN settings
Set up MSN
s W
s Delete entry
Open the menu.
Select the menu item and confirm.
OK
Select the menu item and confirm.
OK
Enter system PIN if required (page 89).
Select the menu item and confirm.
OK
Confirm.
OK
Select MSN and open submenu, e.g. MSN1: Anna.
Select the menu item and confirm.
OK
94
If the MSN you have cancelled was the send MSN (page 96) of an internal
i
user then a new send MSN (the MSN with the lowest ranked number) will
automatically be assigned to this internal user.
Page 97

System settings
Assigning a phone number (MSN)
You can assign particular individual phone numbers (MSN's) to registered terminals.
When doing this determine
◆ which phone number makes a registered terminal ring (receive MSN),
◆ under which number an internal user dials (send MSN).
Assigning a receive MSN
As supplied, a newly registered handset will ring whenever a phone number you have
set up is dialled.
If you only want to assign the terminal specific receive MSNs:
i
s Set base
s Settings
OK
~
s Setup user
s Setup device
OK
OK
OK
OK
s Int.11 W
s Receive MSN
s
OK
OK
j
Open the menu.
Select the menu item and confirm.
Select the menu item and confirm.
Enter system PIN if required (page 89).
Select the menu item and confirm.
Select the menu item and confirm.
Select internal number of the terminal and open the
submenu, e.g. Int.11 .
Select the menu item and confirm.
Select MSN and confirm, e.g. MSN1: Anna
(‰ =set).
Hold down (back to idle status).
95
Page 98

System settings
Assigning a send MSN
When the phone is supplied no send MSN has been entered. The telephone exchange
adds the send MSN.
You can define one send MSN per internal user. This MSN is shown to the person you
call and the call is also charged to this MSN.
i
s Set base
s Settings
OK
~
s Setup user
s Setup device
s Int.11
W
s Send MSN
s
j
Open the menu.
Select the menu item and confirm.
OK
Select the menu item and confirm.
OK
Enter system PIN if required (page 89).
Select the menu item and confirm.
OK
Select the menu item and confirm.
OK
Select internal number, e .g. Int.11 .
Press the display key to open the submenu.
Select the menu item and confirm.
OK
Select MSN and confirm, e.g. MSN1: Anna
OK
(‰ = set).
Hold down (back to idle status).
Setting up the list of send MSNs for the next call
You can set up your base station so that after lifting the receiver or pressing the
handsfree key d a list of all available send MSNs is displayed.
By factory default, MSN next call is not activated.
i
s Set base
s Settings
OK
~
s Setup user
s Setup device
s Int.11 W
s MSN next call
j
96
Open the menu.
Select the menu item and confirm.
OK
Select the menu item and confirm.
OK
Enter system PIN if required (page 89).
Select the menu item and confirm.
OK
Select the menu item and confirm. The list of
OK
entered internal numbers is displayed.
Select internal number of the terminal and open the
submenu, e .g. Int.11 .
Select the menu item and confirm (‰ = activated).
OK
Hold down (back to idle status).
Page 99

System settings
Setting up a busy signal when the MSN is being used (Busy on Busy)
This setting allows callers to get a busy signal immediately when an external call is
already being made on this MSN, independent of the setting Call waiting.
By factory default, the function is not set.
i
s Set base
s Settings
OK
~
s ISDN settings
s Busy on busy
j
Open the menu.
Select the menu item and confirm.
OK
Select the menu item and confirm.
OK
Enter system PIN if required (page 89).
Select the menu item and confirm.
OK
Select and confirm (‰ = activated).
OK
Hold down (back to idle status).
Assigning an MSN a ringer melody
Each receive MSN is assigned a ringer melody when setting up. You can change this
assignment for each receive MSN individually. This means that all terminals will use this
ringer melody to indicate an incoming call to a receive MSN.
i
s Set base
s Settings
OK
~
s ISDN settings
Set up MSN
s W
s Ringer melody
uv
j
Open the menu.
Select the menu item and confirm.
OK
Select the menu item and confirm.
OK
Enter system PIN if required (page 89).
Select the menu item and confirm.
OK
Confirm.
OK
Select MSN and open submenu, e.g. MSN1: Anna.
Select the menu item and confirm.
OK
Select melody and confirm, e.g. Ringer Melody: 5.
Hold down (back to idle status).
97
Page 100

System settings
Setting up rejecting for the entire MSN group
You can reject an external call not only on your base station, but for all members of an
MSN group. Pressing
The entire group will no longer be called. A waiting call can also be rejected during a
call. The call is added to the caller list.
By factory default, the function is not activated.
REJECT will give the caller a busy signal instead of a ringing tone.
i
s Set base
s Settings
OK
~
s ISDN settings
s Reject all
j
Open the menu.
Select the menu item and confirm.
OK
Select the menu item and confirm.
OK
Enter system PIN if required (page 89).
Select the menu item and confirm.
OK
Select the menu item and confirm (‰ = activated).
OK
Hold down (back to idle status).
Diverting calls
i
Diverting internal calls
i
By factory default, internal call diversion is deactivated.
Setting up the forward destination
To make this function easier to use, you can also set one of the function
keys accordingly (page 114).
◆ Only one forward destination can be selected for internal call
diversion.
◆ Only one-level call diversion is supported: If the subscriber to whom
you divert your calls has activated their own call diversion, this is no
longer effective. The forwarded call will ring at the party you diverted
it to.
i
s Set base
s Forward. base
OK
~
s Forward. dest.
s Int.11
98
Open the menu.
Select the menu item and confirm.
OK
Select the menu item and confirm.
OK
Enter system PIN if required (page 89).
Select the menu item and confirm.
OK
Select internal number, e .g. Int.11 .
‰ = activated).
(
 Loading...