

Page 1

Top A47
ISDN
Operating Instructions
Page 2

I
Dear Customer
Many thanks for choosing a Swisscom product.
These operating instructions will help you take full advantage of your Top A47
ISDN
telephone.
You will find the following features particularly useful:
– Up to 5 users on the same set, with individual settings
Because the Top A47
ISDN
can handle up to 5 numbers, it is an ideal telephone for households with several members.
The user button enables effortless switching between users. Everyone can immediately
find his or her own number with customised settings.
Each number can be programmed with its own settings, including: ringing melody and
volume, charge accounting per user, various call forwarding options etc.
– Phonebook
100 numbers and names can be stored in the phonebook.
– Caller list
This list stores the numbers of the last 30 callers who have tried to reach you. The display
indicates the number of unanswered calls.
– Short Message Service
The telephone can receive and send SMS messages.
– Automatic provider selection
If you want to choose from several providers for telephoning, the Top A47
ISDN
is the right
telephone for you. For example, you can programme national prefixes or numbers in
your phonebook with the provider prefix, so that the calls are always routed via the relevant provider.
– A raft of features
The Top A47
ISDN
offers 3-way conferencing, callback on busy, and SMS.
Added to this, your telephone supports all other ISDN supplementary services.
Please read the safety precautions before setting up your telephone, and keep the
operating instructions in a safe place!
Page 3
II
13845 76
12
1415161718
9
19
2
11
10
13
21
20
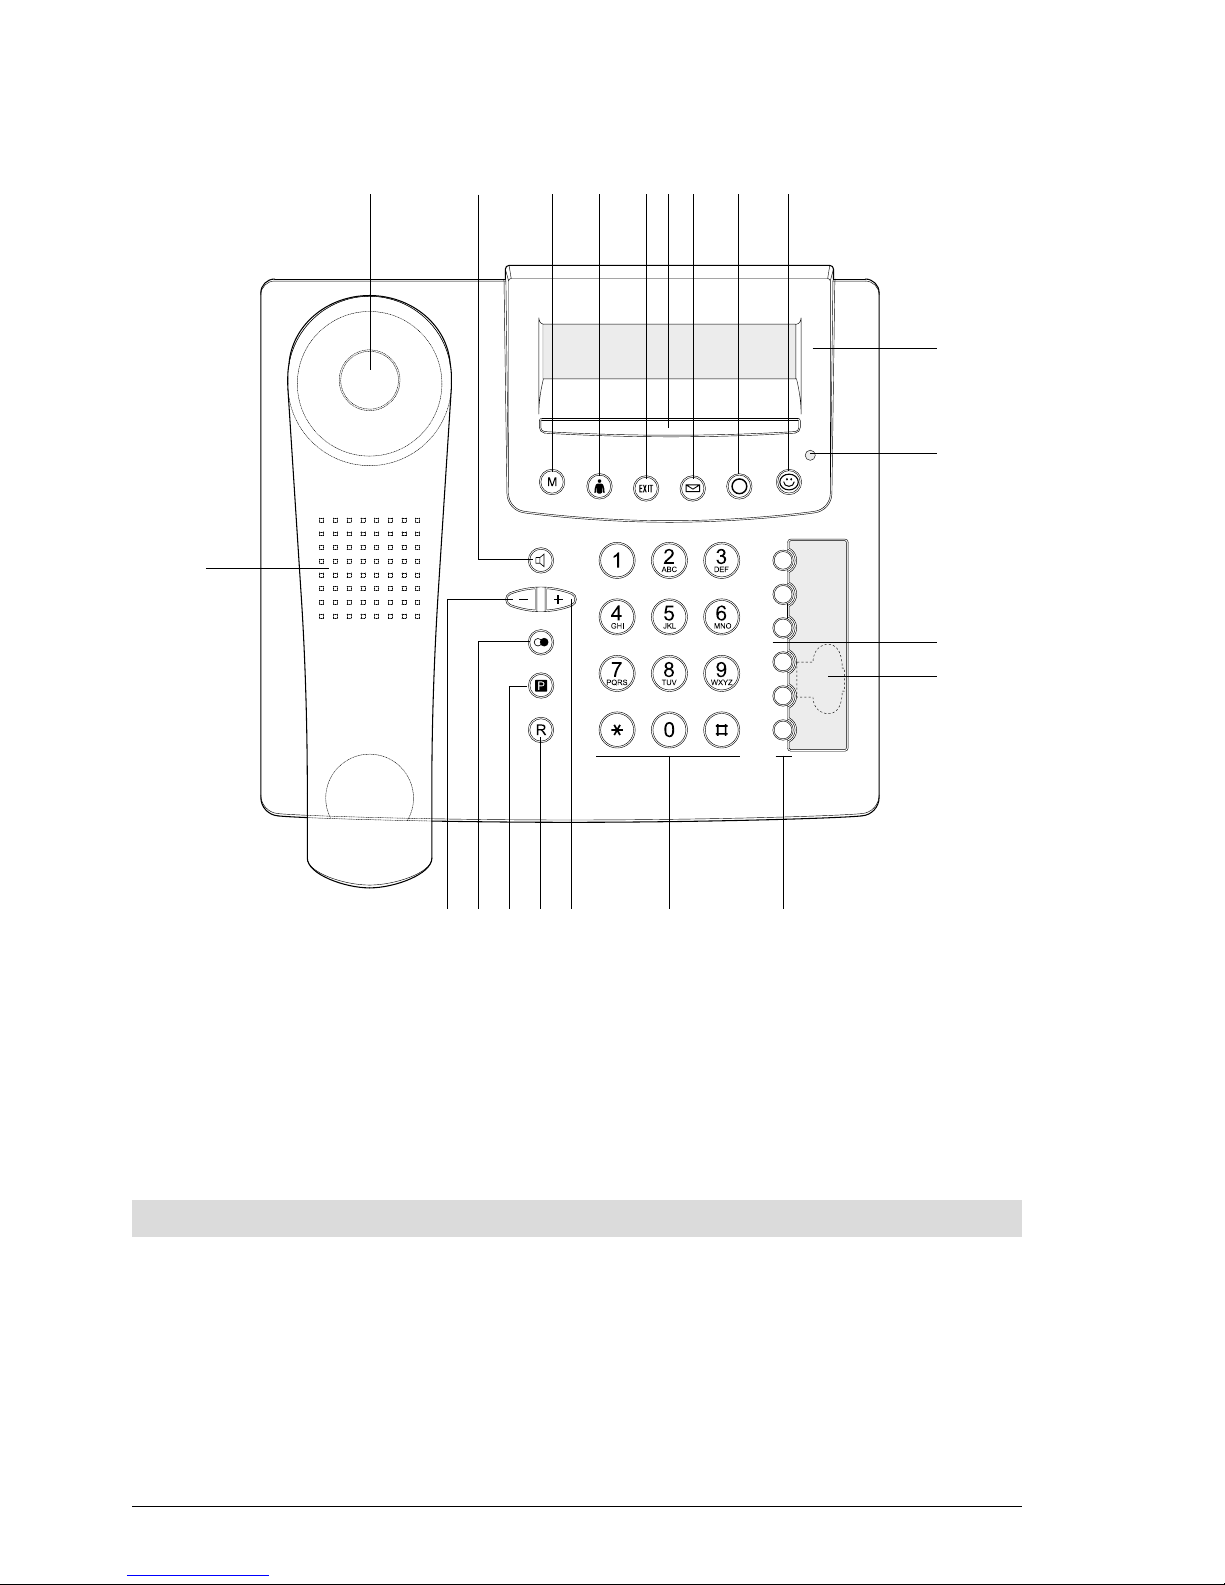
LED status display
The LED indicates the status of your telephone.
LED lit: »Unconditional call forwarding« or »ringing tone off« (ringing volume set
to zero) has been activated by at least one user.
LED flashing: Signals an incoming call when the volume is set to zero (»ringing tone off«)
or an incoming SMS.
LED unlit: Normal mode.
General view and operating field
Page 4

III
General view and operating field
1 Handset
2 Loudspeaker button
3 Menu button
Opens access to function menu.
4 User button
Change user.
5 EXIT button
Aborts functions, switches to standby mode.
6 Soft button
Direct access to functions.
7 Call log button
Shows the list of answered calls.
8 COMBOX
®
button
Accesses and plays back new user-specific messages on the COMBOX
®
.
(For information on installing the COMBOX
®
, see Appendix on »Supplementary tel-
ephone services«.)
9 Smiley button
ETV
®
Online queries.
10 Two-line display for menu functions, prompts and texts
11 LED status display
12 Speakerphone
13 Emergency mode switch
14 Speed dialling buttons
15 Dialling keypad, alphanumeric
16 Plus button
Loudspeaker volume up, scroll down text.
17 R button (enquiry button)
18 Park button
Park call e.g. for moving the phone to another socket.
19 Autodial button
20 Minus button
Loudspeaker volume down, scroll up text.
21 Loudspeaker
Page 5

1
20322071en_ba_a0
Contents
Top A47
ISDN
In purchasing the Top A47
ISDN
you have selected a Swiss-quality product.
Thank you for your confidence.
The Top A47
ISDN
is designed for connection to the public ISDN network.
If you plan to use the Top A47
ISDN
in conjunction with a PBX, please refer to the Chapter
»PBX Operation«.
Please read these operating instructions carefully to familiarise yourself with and take full
advantage of the benefits of your new Top A47
ISDN
.
Keep these operating instructions in a safe place!
Important information on your ISDN connection
These operating instructions describe all the functions you need to apply for from
Swisscom. Some of these functions are subject to a charge.
The range of services available to you depends on the connection type.
For further information on the services available via your ISDN connection, contact your
Swisscom information centre.
Contents
General view and operating field ........................................................................................ II
LED status display..................................................................................................................II
Contents ................................................................................................................................. 1
Introduction ........................................................................................................................... 5
The telephone ...................................................................................................................... 5
Operating instructions ..........................................................................................................5
How to proceed ................................................................................................................... 6
Startup.................................................................................................................................... 7
Unpacking the telephone ..................................................................................................... 7
Positioning the telephone..................................................................................................... 8
Connecting the telephone.................................................................................................... 8
Label field ............................................................................................................................ 9
The display ......................................................................................................................... 10
Display symbols.................................................................................................................. 11
Using the function menu.................................................................................................... 12
Setting up the Multiple Subscriber Numbers (MSN)............................................................. 13
Page 6

2
20322071en_ba_a0
Contents
Telephoning ......................................................................................................................... 15
User concept ...................................................................................................................... 15
Manual dialling .................................................................................................................. 16
Callback / autodial.............................................................................................................. 17
Dialling from the phonebook.............................................................................................. 19
Dialling numbers in the caller list ........................................................................................ 21
Dialling numbers in the call log........................................................................................... 23
Speed dialling..................................................................................................................... 25
Provider selection ...............................................................................................................25
Handsfree/speakerphone.................................................................................................... 27
Listening by loudspeaker .................................................................................................... 28
Setting the volume ............................................................................................................. 28
Microphone mute .............................................................................................................. 29
Park ................................................................................................................................... 29
ETV
®
Online ....................................................................................................................... 31
Incoming calls .................................................................................................................... 33
COMBOX
®
basic playback .................................................................................................. 35
Additional call/switching between calls............................................................................... 35
Call transfer ....................................................................................................................... 38
Three-way conferencing ..................................................................................................... 39
Call forwarding .................................................................................................................. 40
Call forwarding with keypad .............................................................................................. 42
Hotline (direct call) ............................................................................................................. 43
Outgoing call barring (OCB) ............................................................................................... 44
Phonebook ........................................................................................................................... 45
Enter number and name only ............................................................................................. 46
Assigning attributes to numbers ......................................................................................... 47
Editing entries ....................................................................................................................50
Deleting entries.................................................................................................................. 53
Additional settings .............................................................................................................. 54
Entering additional users (MSN).......................................................................................... 54
Programming speed dial buttons, ....................................................................................... 57
Set date and time...............................................................................................................59
Interception circuit (Malicious Call ID)................................................................................. 59
CLIR Calling Line Identification Restriction .......................................................................... 60
Suppress call waiting .......................................................................................................... 61
Setting autodial.................................................................................................................. 62
Setting the ringing melody and volume .............................................................................. 63
Setting the language .......................................................................................................... 64
Page 7

3
20322071en_ba_a0
Individual user charges, call charge total............................................................................. 64
Setting the contrast............................................................................................................65
Alarms ............................................................................................................................... 66
Text message...................................................................................................................... 67
Short Message Service (SMS) ............................................................................................. 68
Incoming SMS message signalling ...................................................................................... 69
Handling SMS messages..................................................................................................... 69
Create, send or save SMS ................................................................................................... 71
Retrieve, send or delete saved SMS..................................................................................... 72
Using Info services.............................................................................................................. 74
SMS functions on speed dial buttons.................................................................................. 75
PBX operation ...................................................................................................................... 76
PBX operation on/off.......................................................................................................... 76
EAC ................................................................................................................................... 77
Entering EAC for incoming calls.......................................................................................... 78
Internal number length....................................................................................................... 79
Setting the transfer type..................................................................................................... 79
Keypad information............................................................................................................ 81
Send automatic keypad on/off............................................................................................ 82
Appendix.............................................................................................................................. 83
Renumbering .....................................................................................................................83
Emergency operation ......................................................................................................... 84
Resetting the telephone ..................................................................................................... 85
Headset connection............................................................................................................ 85
Software version ................................................................................................................86
PC dialling option (PC Dialer III) .......................................................................................... 86
Remote download of device software................................................................................. 87
Troubleshooting .................................................................................................................88
Care................................................................................................................................... 88
Summary of default settings............................................................................................... 89
Technical Data .................................................................................................................... 90
Safety tips .......................................................................................................................... 90
Repair/maintenance............................................................................................................ 91
Assistance .......................................................................................................................... 91
Disposal ............................................................................................................................. 91
Approval and CE code........................................................................................................ 91
Declaration of Conformity.................................................................................................. 92
Menu structure ..................................................................................................................93
Write-on labels................................................................................................................... 95
Contents
Page 8

4
20322071en_ba_a0
Key words ............................................................................................................................97
Notes .................................................................................................................................... 99
Contents
Page 9

5
20322071en_ba_a0
Introduction
The telephone
Connection type
Your telephone is designed for use with an ISDN basic access (DSS1 protocol, Euro-ISDN) and
can be operated at the subscriber connection (NT+2ab), the ISDN bus (S-Bus) or in conjunction
with a PBX. The telephone is powered via the NT+2ab power supply or the PBX. In the event of
a power failure, a backup supply powers the telephone via the local exchange (for PBX operation, refer to the PBX documentation).
User concept
Every user can define his or her own settings. Call charges are recorded separately for every user
(for details on the user concept, see »User concept« under the Chapter »Telephoning«).
Advanced features
You can store up to 100 numbers in the dynamically managed phonebook.
Six speed dial buttons, each for two numbers, allow you to dial numbers simply by pressing a
button.
A wide range of user-friendly features make your new telephone easy to operate and enhance
calling comfort. For a summary of these features, see the contents list.
Operating instructions
These operating instructions will help you get to know all the functions of your ISDN telephone.
Keep the instructions near your telephone.
The register, contents list and comprehensive list of key words will help you to find what your
are looking quickly.
Structure of operating instructions
The individual chapters contain a full description of the functions. There is no need to leaf
through the entire book to find out about an operating procedure.
Firstly, general information on the function is given. Then the procedure is described step by
step. The left margin displays the buttons to be activated. To the right of this you will find information on the procedure and the associated display.
The following additional comment field may appear in the text:
➭ This provides information of a general nature or in the form of tips and tricks which can
further simplify the use of your telephone.
Page 10

6
20322071en_ba_a0
Introduction
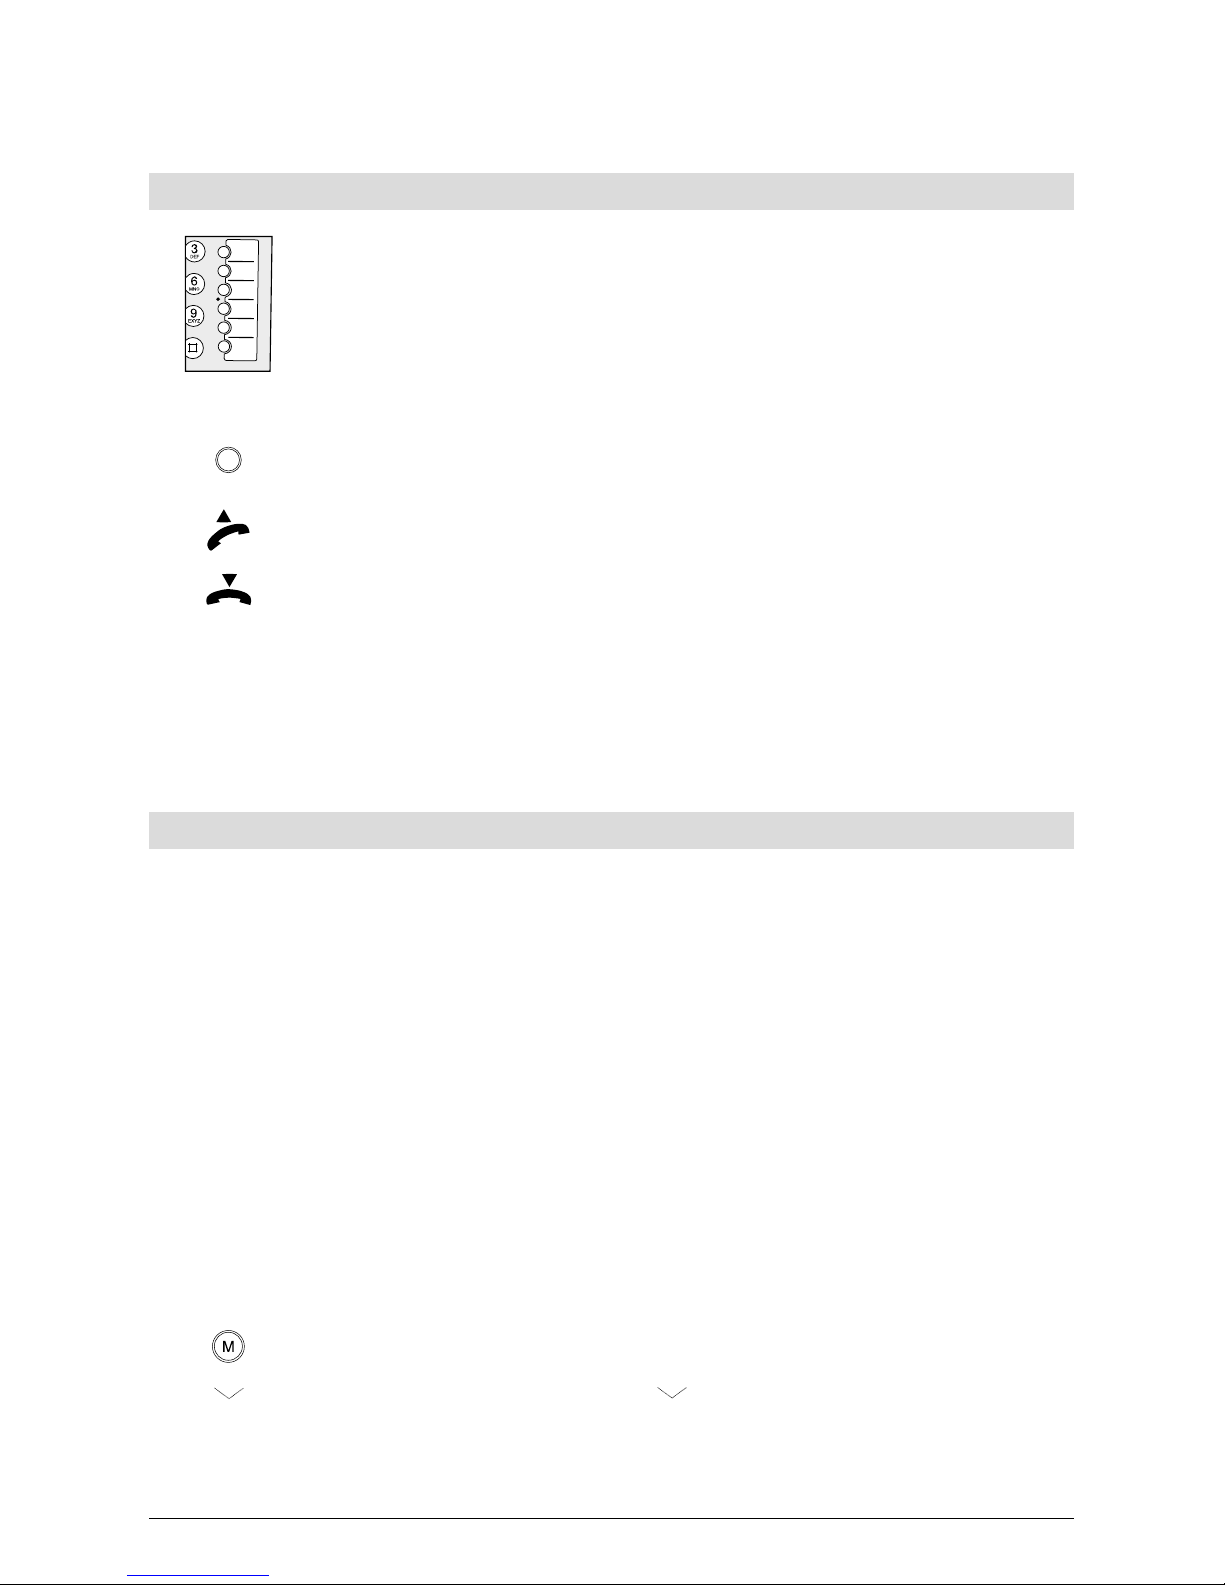
Pictograms for operation
In general, the operating steps are accompanied by the buttons you need to activate or the symbol under which the softkey needs to be pressed. For procedures which do not require buttons
or where the button covers several functions, the following pictograms are used:
This symbol stands for any keypad entry.
This symbol indicates that you should lift the handset.
This symbol indicates that you should replace the handset.
This symbol indicates that you should press the softkey under the function
shown in the second line of the display.
Or… This comment appears in the button activation column to indicate alternatives
for operation.
…Continue This appears in the left button margin after an alternative action to indicate
that the procedure should be continued from this point.
How to proceed
Read the chapter »Startup« first.
If you plan to use the telephone in conjunction with a PBX, please refer to the Chapter »PBX
Operation«.
You can then find the procedure/function in the contents or key words list. Go to the relevant
page and perform the operating steps described.
If you encounter problems, press the EXIT button briefly to go back one step in the menu or
hold the EXIT button down longer to abort the function. Repeat the step again or refer to the
chapter »Troubleshooting«.
Now you can enjoy getting to know your telephone!
Page 11
7
20322071en_ba_c0
Startup
Your feature-rich Top A47
ISDN
telephone will only function to your satisfaction if you meet all the
requirements for startup.
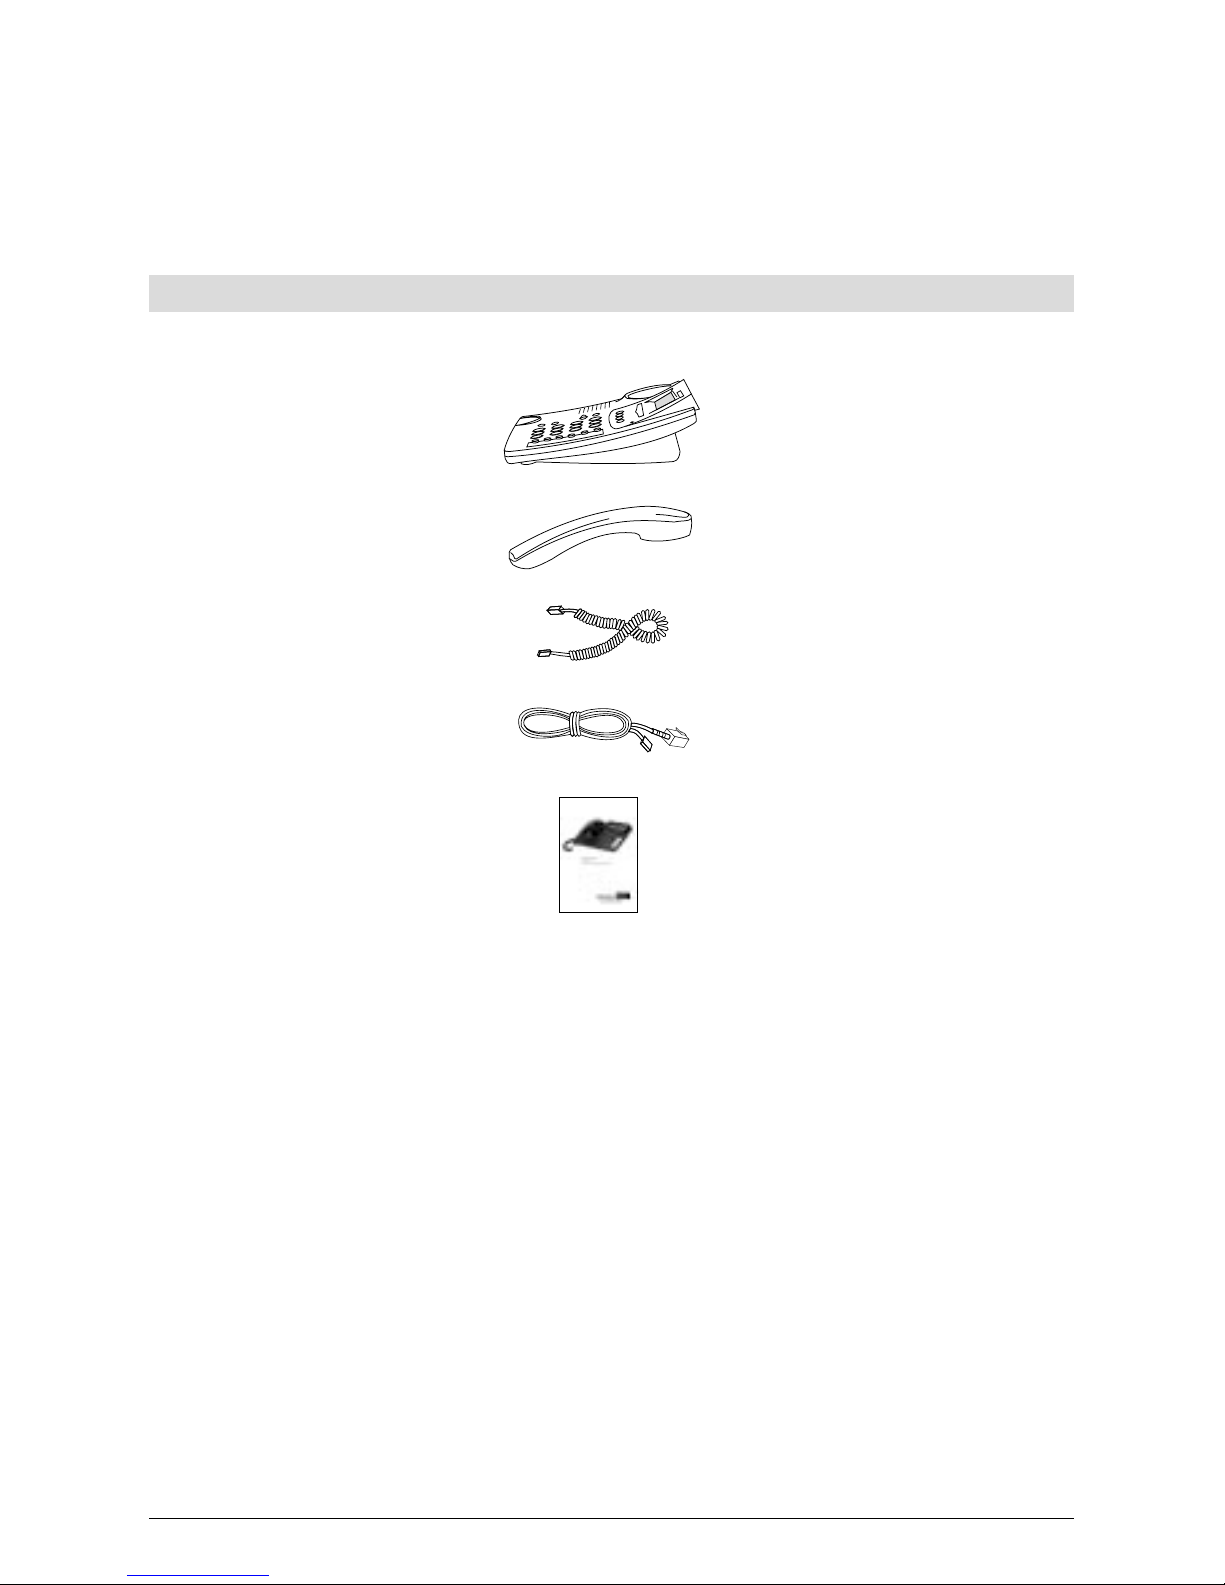
Unpacking the telephone
Contents of the package
1 Top A47
ISDN
telephone
1 Handset
1 Handset spiral cord
1 Telephone connection cord
1 Operating manual in German,
French, English and Italian
Checking the contents of the package
Before you set up and connect your Top A47
ISDN
, check the contents of the package carefully for
damage
• to the actual packaging, which may indicate that the telephone has been damaged in transit!
• visible damage to the handset or telephone!
• damage to the connection cords, e.g. to the connectors or cable cladding!
➭ Under no circumstances must the telephone be put into operation if damaged! If in
doubt, contact the Swisscom Information Service (freephone 0800 800 800).
➭ Please keep the original packaging. You can use it for transporting the telephone during
moves or to send the telephone.
Page 12
8
20322071en_ba_a0
Startup
Positioning the telephone
Place the Top A47
ISDN
on an even, dry surface within range of the connection socket (NT+2ab or
wall socket). If the selected position is too far from the connection socket, use an approved extension cable which you can buy at any Swisscom shop or specialist outlet.
The telephone is designed for normal conditions of use. Modern furniture features a wide range
of varnishes and plastic veneers and is treated with a large number of different polishes. Some
of these agents may contain ingredients that corrode and soften the plastic feet of the telephone. If this happens, it may leave undesirable marks on the furniture surface. Understandably, Swisscom cannot accept any liability for such damage.
➭ Make sure the telephone connection cord is safely stowed to prevent accidents.
➭ Do not plug the connection cord in sockets other than the one for which it is intended.
Connecting the telephone
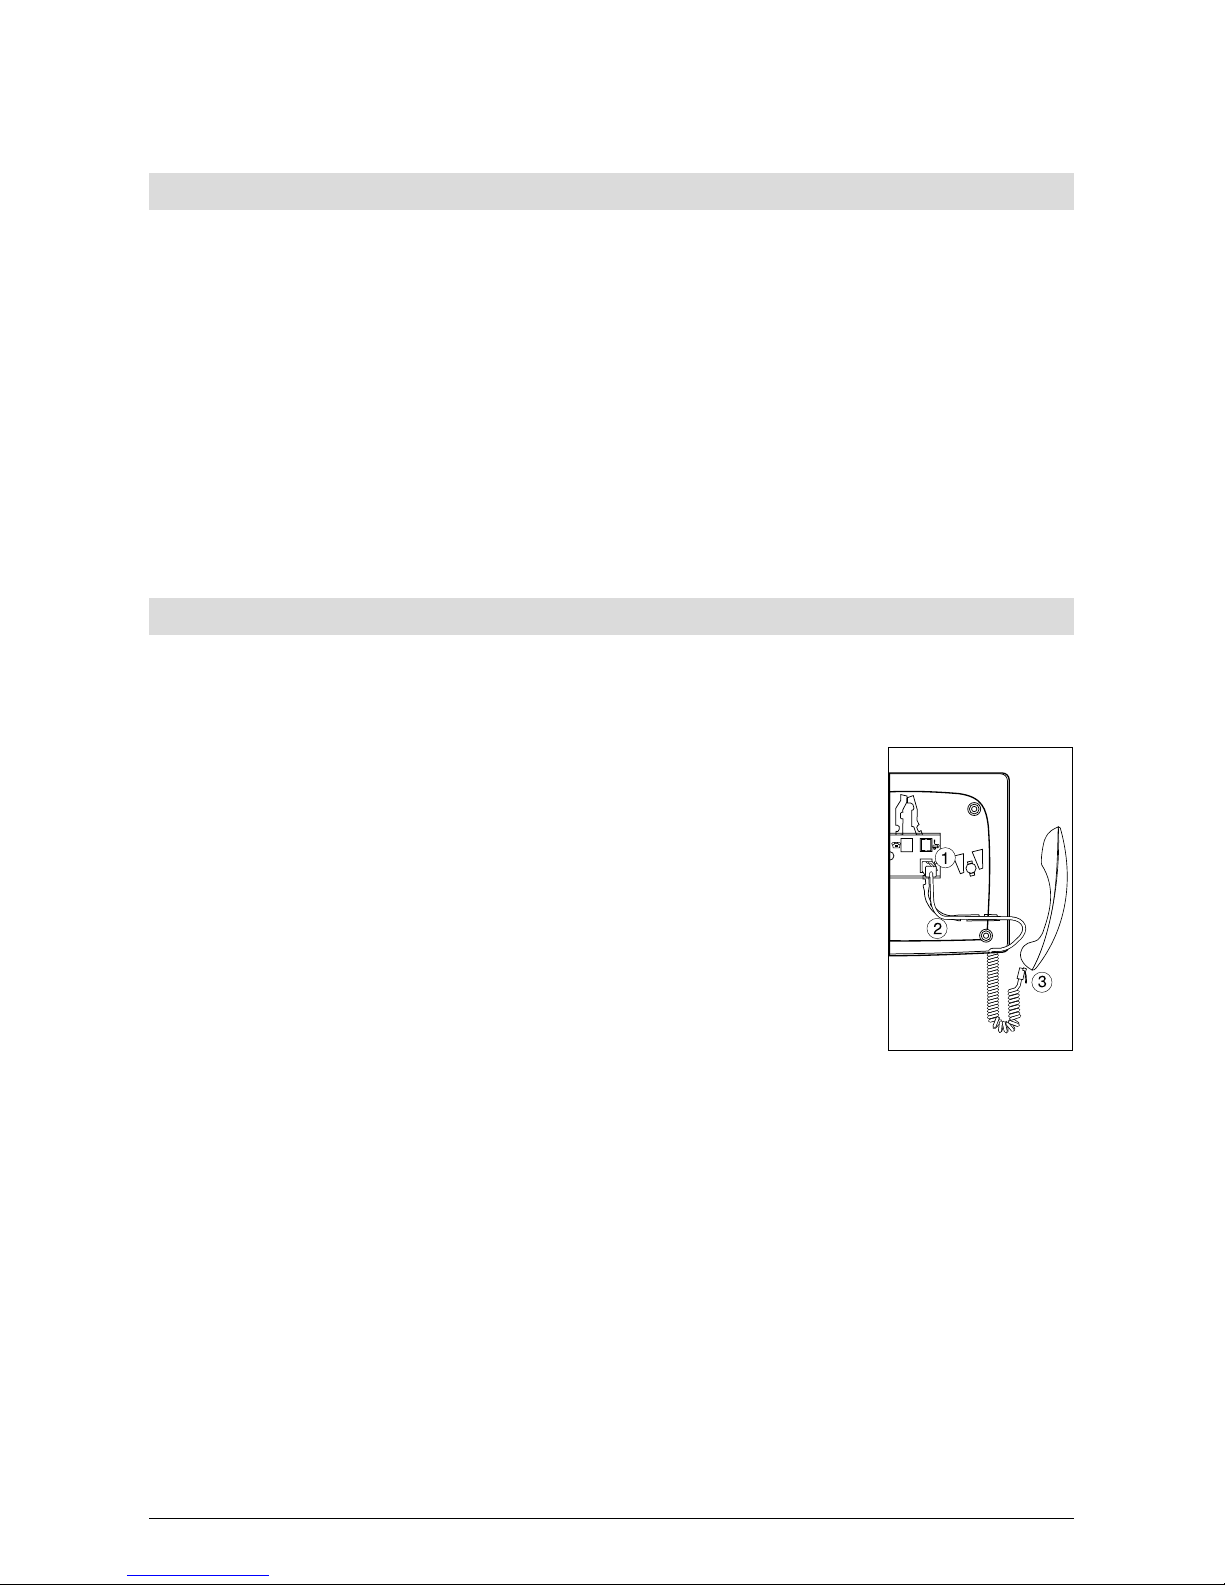
The connection sockets for the handset and connection cord are located on the base of the telephone. Connect the handset first, then plug the telephone in to the jack.
Connecting the handset
The connectors at both ends of the spiral cord are the same size.
Plug the connector at the longer, straight end of the cord into the
socket on the telephone based (1) marked with the handset symbol.
Press the cable into the cable duct (2). To do this, use a flat, thin
object to press the cord under the grips.
Plug the connector at the other end of the spiral cord into the
socket on the handset (3).
Page 13
9
20322071en_ba_a0
Startup
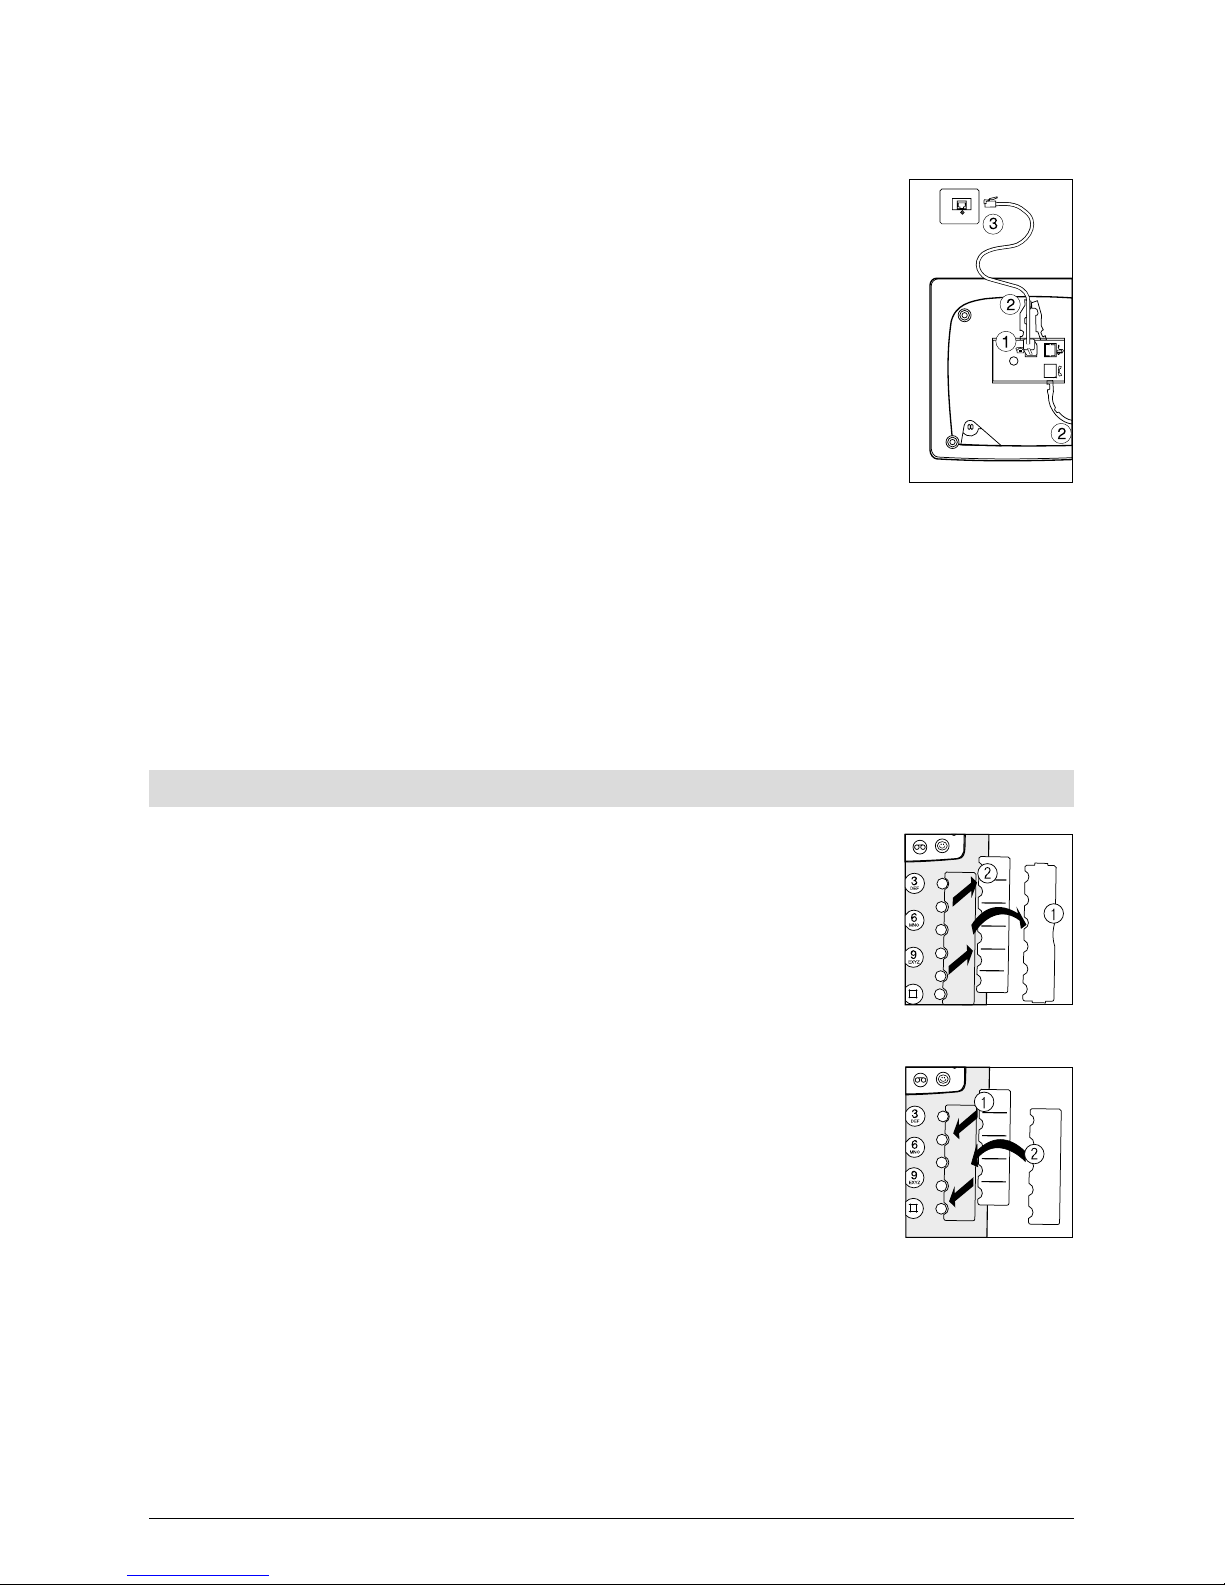
Connecting the telephone
Plug the smaller of the two connectors on the telephone connection
cord into the socket on the telephone base (1) marked with the telephone symbol.
Press the cable into the cable duct (2). To do this, use a flat, thin object to press the cord under the grips.
Turn the telephone over again and set it on its feet. Replace the
handset.
Plug the larger connector at the other end of the telephone connection cord into the wall socket (3) or NT+2ab.
The display shows »Please enter at least one MSN (Multiple Subscriber Number) with code«. To
set up multiple subscriber numbers or MSNs, see »Setting up Multiple Subscriber Numbers
(MSN)«.
Lift the handset. You will hear the dialling tone. You can now telephone!
➭ Do not plug the connection cord in sockets other than the one for which it is intended.
➭ Make sure the telephone connection cord is safely stowed to prevent accidents.
Label field
The telephone is delivered with the label field already inserted.
The last page of these operating instructions contains additional labels for
the autodial buttons. Cut a new label out whenever you need one.
To enter numbers in the label field, first remove the transparent cover. To
do this, place a fingernail under the notch (1) and lift the cover off.
For easier entry of numbers, remove the label (2) and place it on an even,
hard surface.
Use a pencil to enter the numbers since it is easier to erase them if repro-
gram the buttons.
To re-affix the label field, replace the label (1).
Push the tabs at the narrow sides of the transparent cover into the slots on
the upper and lower edge of the label field recess and let go (2).
➭ If you want to add other numbers or do not know at startup which numbers you will be
using, you can easily remove the transparent cover for subsequent modification. Lift the
cover by placing a fingernail under the notch at its edge. Add the number(s) and replace
the cover as described above.
Page 14
10
20322071en_ba_a0
Startup
The display
The display is always active and shows menu/status symbols and/or text messages on two lines.
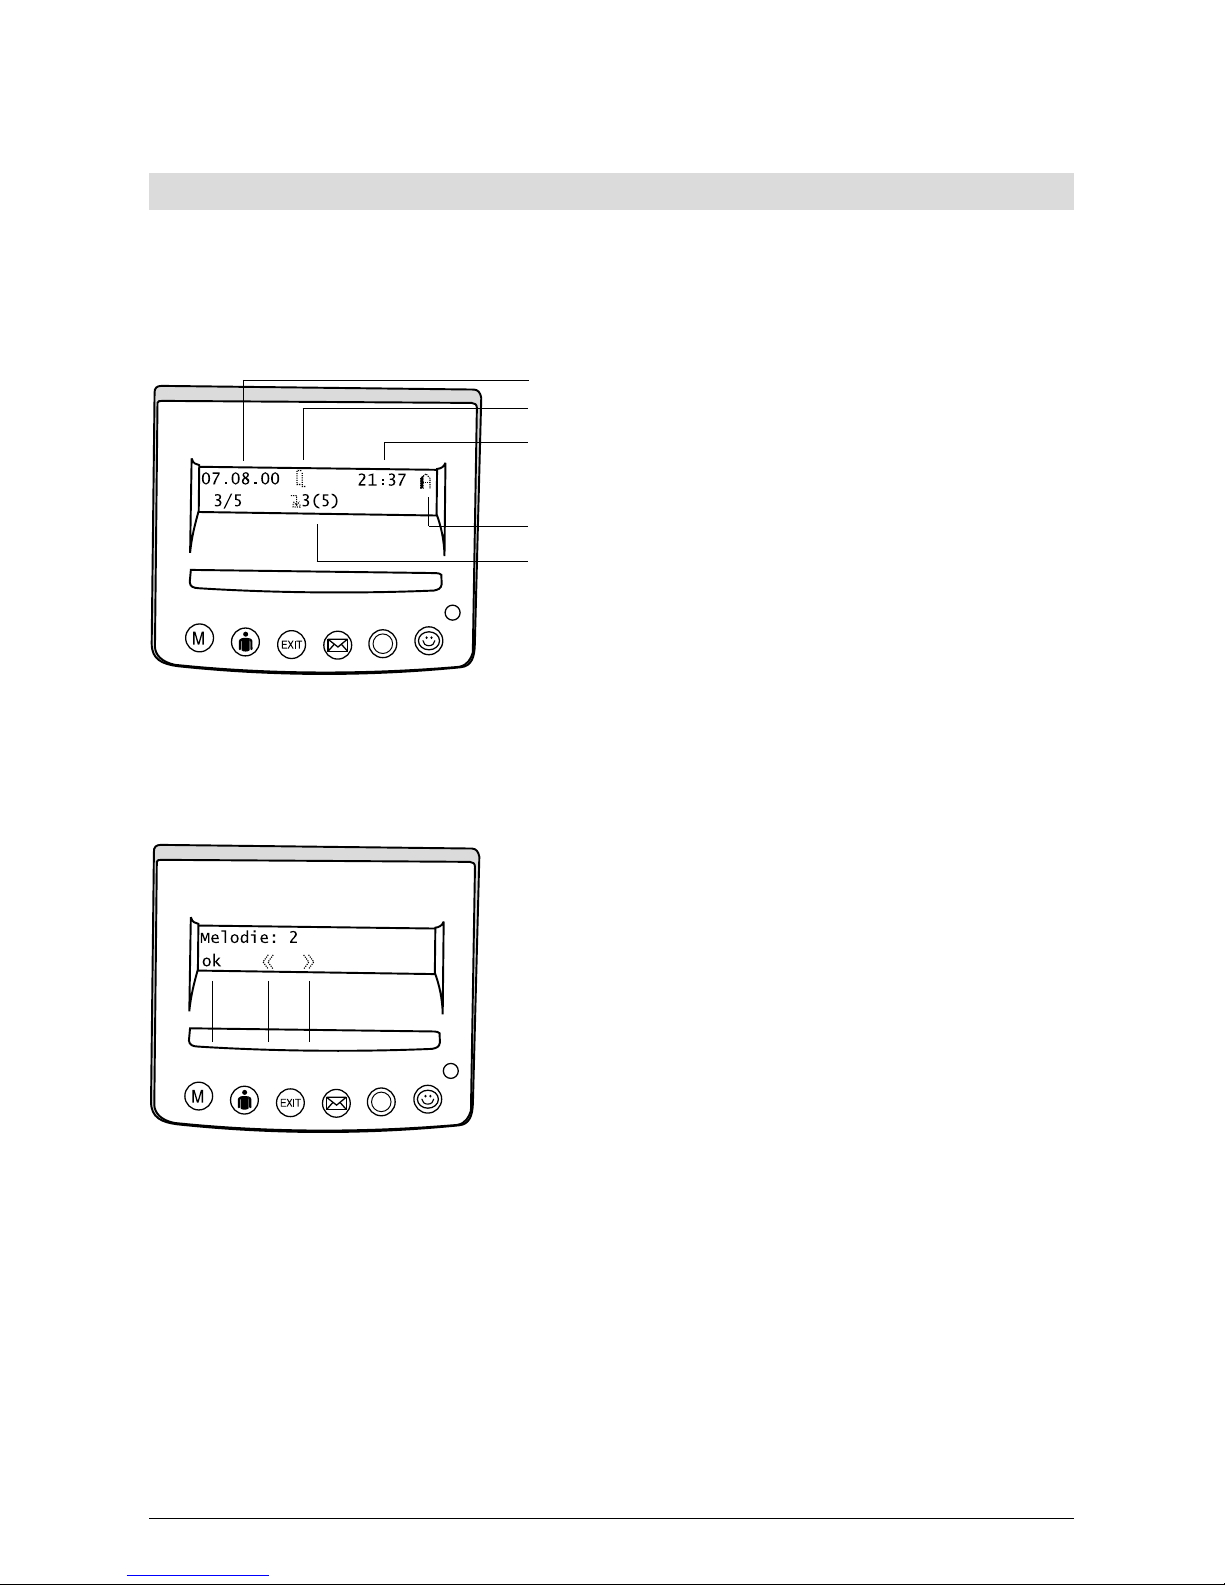
Standby display
The standby display indicates the status of your telephone.
Date
Available status symbols
Time
User code
Unanswered calls
If more than 8 status symbols are active, these are shown right-justified next to the time. The
date is not shown.
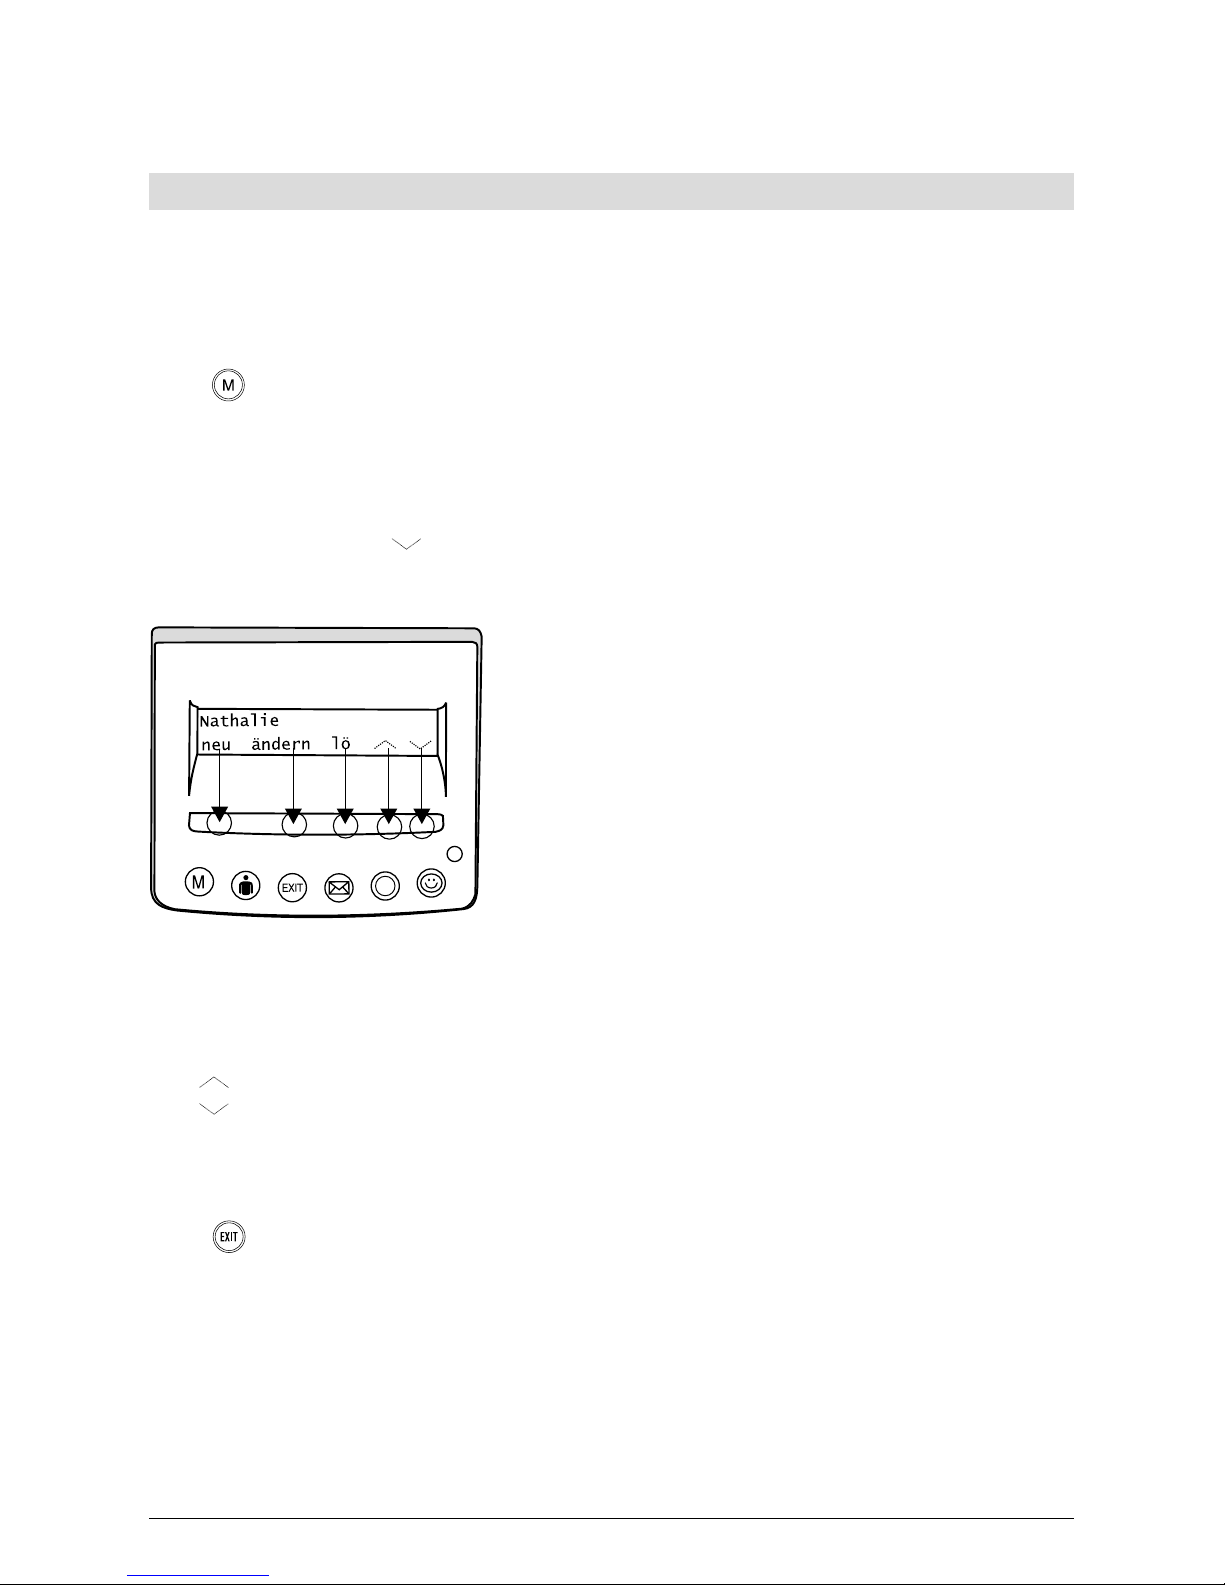
Status/function display
The function display in the first line shows the current
function, menu or sub-menu. The second line shows up
to six options which you can select using the softkey.
Press the softkey at the relevant spot under the display.
The options in the second display line can be arranged
over the entire width. Always take note of the function
options in the second display line.
Page 15

11
20322071en_ba_a0
Startup
Display symbols
Some symbols may appear in the first and second display line. When they appear in the second
line, the symbols indicate the point at which the softkey should be pressed to activate the function.
➭ For the description of operating steps, the column listing the button functions shows the
symbol under which you need to press the softkey.
Press the softkey to display the next submenu
Press the softkey to display the previous submenu
Messages waiting (calls, SMS messages)
Calling line ID suppressed
Display previous selection
Display next selection
Phonebook
Save entry in phonebook
Read entry from phonebook
Reject call
Unconditional call forwarding
Call forwarding on busy
Call forwarding on no reply
Call back on busy
Direct call (hotline) active
Call filter active
Alarm active
Loudspeaker on
Microphone/speakerphone on
Mute
Ringing signal off
Headset connected
Information
User codes from A to E
Provider
SMS
Incoming SMS
Unsent SMS
˙
Page 16
12
20322071en_ba_a0
Startup
Using the function menu
Operation of your Top A47
ISDN
is menu-guided.
To call up menus and scroll through sub-menus, you have two options:
Menu button
If the display is in default mode (standby) and the handset is on-hook, press the
menu button to access the first main menu »Phonebook«. Press the menu button again repeatedly to scroll through the main menus.
Once you reach the end of the main menu list, press the menu button again to go back to the
top.
Press the softkey under »
« to confirm the selected main menu.
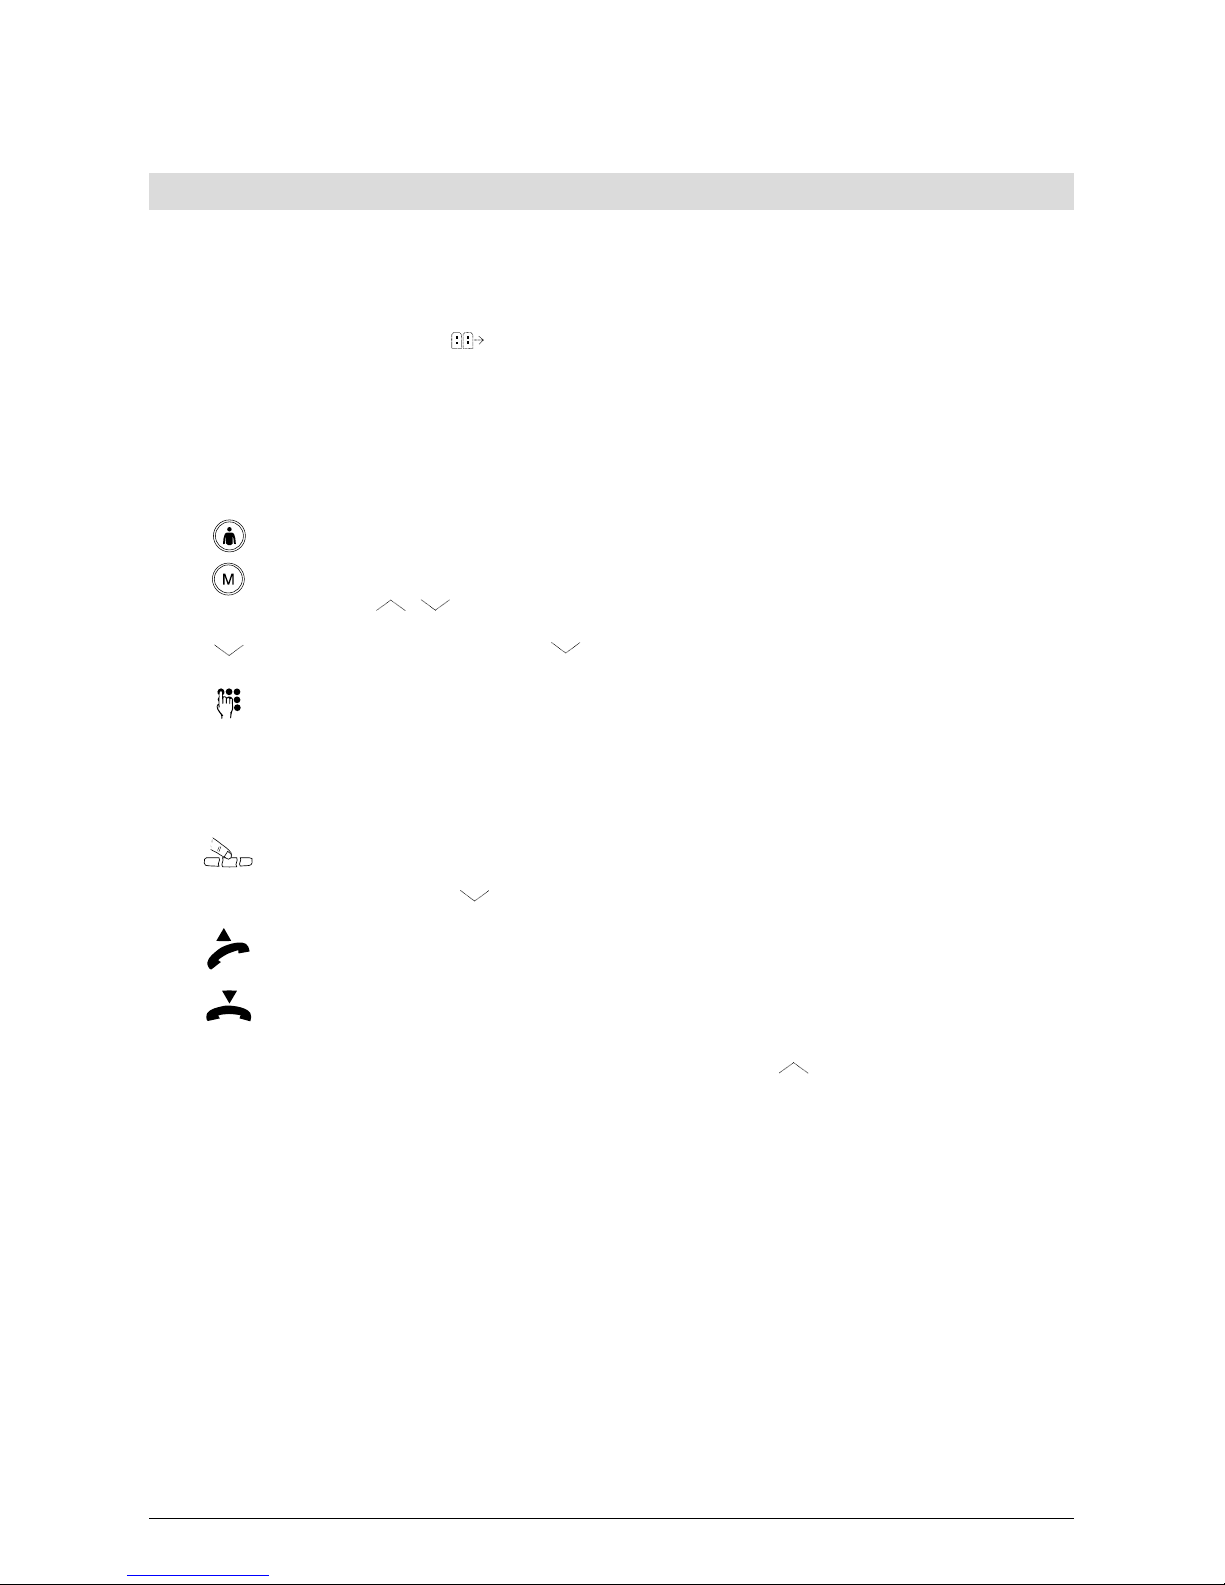
Softkey
The softkey is the long button under the display.
Up to six different options can be selected using this
key.
The softkey activates the functions and submenu op-
tions shown in the second display line. To activate a
function, press the softkey at roughly the point corresponding to the descriptive text in the second line. The
button will be depressed only at this point and activate
the function.
Example:
For »new«, press the far-left of the softkey.
For »edit«, press the mid-left of the softkey.
For »del«, press the middle of the softkey.
For »
«, press the middle right of the softkey.
For »
«, press the far-right of the softkey.
To return to the menu, press the menu button in this mode.
EXIT button
Press the EXIT button briefly to switch back one menu level, hold down to exit
the selected menu or abort a function. The display returns to the default mode
(standby).
➭ Menus or functions you are currently in are aborted by incoming calls or can be exited by
lifting the handset or pressing the loudspeaker button.
Page 17

13
20322071en_ba_a0
Setting up the Multiple Subscriber Numbers (MSN)
When applying for your ISDN connection from Swisscom or another network provider, you will
have received at least three numbers for your connection. These numbers can be assigned to
different telephones or programmed on your Top A47
ISDN
as individual numbers for different us-
ers (MSN). You can program the telephone with a different ringing signal for each MSN.
The Top A47
ISDN
supports five multiple subscriber numbers (MSN).
To get the best out of your Top A47
ISDN
, you must set at least one user. See the chapter »Pro-
gramming MSNs (number, user)« for how to assign other users.
➭ If no MSN is programmed on your telephone, it will ring for all the numbers.
➭ You cannot assign the same MSN to several users.
Programming the multiple subscriber number (MSN) on startup
The display shows »Please enter at least one MSN with code
«.
Press the softkey under »
«. The display shows »MSN with << code on, ok«.
ok Press the softkey under »ok«. »Set MSN« is displayed.
change Press the softkey under »change«. »Set MSN A« is displayed.
change Press the softkey under »change«. The display shows »Set MSN A:_« with the
cursor.
Using the keypad, enter one of the MSNs assigned to you by Swisscom or your
network provider. Enter the number with area code.
If you have entered an incorrect number, press the minus button until the cursor reaches the error. Press the softkey under »del« to delete the number.
Make your correction. Press the plus button until you reach the end of the entry.
ok Press the softkey under »ok«. The display shows »MSN A:_« with the cursor.
The telephone is now in text mode.
You can enter the name of user A.
Text mode
To enter text, keep pressing the button containing the letter or character you
wish until the letter appears, e.g. for N, press button 6 twice. Press the softkey
under »A->a« to switch between upper and lower case lettering.
In the case of double letters or if the following letter is on the same button,
wait for a moment until the cursor advances to the next position. Press the button again. Proceed as above for every letter you need.
Or…
If you have entered a letter incorrectly, press the minus button until the cursor
reaches the error. Press the softkey under »del« to delete the letter. Make your
correction. Press the plus button until you reach the end of the entry.
Startup
Page 18

14
20322071en_ba_a0
Startup
The following letters and characters are available on the buttons in text mode:
- . ? ! , : ; ' "
A B C a b c Ä Ã Å Æ Ç ä à á â ã å æ ç
D E F d e f É è é ê ë
G H I g h i ì í î ï
J K L j k l
M N O m n o Ö Ñ Ø ö ñ ò ó ô õ ø
P Q R S p q r s
T U V t u v Ü ü ù ú û
W X Y Z w x y z ÿ
+ 0
* / ( ) < = > % & @ $ €
Space #
…Continue
Once you have entered a name or if you do not wish to enter a name, press the
softkey under »ok«. »Set MSN A« appears in the display. If you want to assign
another MSN to your telephone, proceed from the fourth step above.
If you do not wish to assign additional MSNs or program other users, press the
EXIT button. The display returns to default mode.
➭ If you have not entered any user names, the number is regarded as the user name.
➭ Once the MSN has been set, your telephone only rings when this number is called.
Page 19

15
20322071en_ba_a0
Telephoning
This chapter describes the various options your Top A47
ISDN
offers. All options listed here are
valid for all users you have assigned to the telephone. See the chapter »Programming additional
MSNs (number, user)« for how to assign other users. This also describes how different users can
program the telephone for their needs.
Your Top A47
ISDN
can also be operated in conjunction with a PBX with the same options as listed
below. The range of additional features available to you and how you use them is dependent on
the PBX type. See »PBX operation« for how to connect your phone to a PBX.
➭ All options listed below assume that at least one MSN (Multiple Subscriber Number) and
one user has been set, as described in the chapter »Startup«.
User concept
The Top A47
ISDN
allows you to assign five different users to a single telephone. For example, at
home you can set it for »Mother«, »Father«, and »Daughter«, or for business and other applications e.g. »Company«, »Club« and »Private«. You can switch from one user to another by
pressing the user button. The display shows the active user’s code (A, B, C, D, E).
Once you have defined the relevant settings for each user, your Top A47
ISDN
handles various
functions individually depending on the set user.
For every call the active user makes, his number is presented to the called party. Incoming calls
are distinguished from outgoing calls and displayed in the caller list. The telephone calculates
the charges separately for each user. Calls can be forwarded according to the user’s requirements etc.
➭ The detailed procedure for setting different users is described in the Chapter »Basic set-
tings« under »Entering additional users«.
Page 20

16
20322071en_ba_a0
Telephoning
Manual dialling
➭ If only one user is assigned to your Top A47
ISDN
or if your code is already displayed, there is
no need to press the user button before making a call.
Direct dialling (dialling off-hook)
Select the user.
Lift the handset.
Enter the number with area code. The telephone immediately begins dialling.
Wait for the connection and make your call.
Replace the handset to terminate the call.
Dialling preparation (on-hook dialling)
Select the user.
Enter the number with area code. If you have entered a wrong number, see instructions below.
Lift the handset. The telephone dials the number entered. Wait for the connection and make your call.
Replace the handset to terminate the call.
➭ For both dialling modes: If you make a call while a user code other than your own is dis-
played, the call is made with the displayed user’s attributes and at his cost.
➭ For both dialling modes: For handsfree (speakerphone) operation, press the loud-
speaker button instead of lifting the handset. Press the loudspeaker button again to terminate the call.
➭ On-hook dialling only: If you have entered a number incorrectly, press the minus button
until the cursor reaches the error. Press the softkey under »del« to delete the number.
Make your correction. Use the plus button to go to the end of your entry.
Page 21

17
20322071en_ba_a0
Telephoning
Callback / autodial
You call someone and hear the busy signal. This first line of the display shows »Subscriber busy«
and underneath this »callback, autodial,
«. Your Top A47
ISDN
offers the following options:
– Automatic redial of this number as soon as the user has replaced the handset.
– Automatic redial after a set time and for a set number of attempts. To make the settings for
autodial, see »Setting autodial«.
Called party is busy:
Callback Press the softkey under »Callback« if you want your telephone to signal you
when the user is free.
Or…
Autodial Press the softkey under »Autodial« if you wish your telephone to repeat after a
set time.
Replace the handset.
The display shows the symbol »
« to indicate active callback.
➭ Callback remains active for approximately 45 minutes. After this it is automatically can-
celled by the exchange.
➭ One MSN can activate several callbacks. Up to 5 callbacks can be activated for all users.
Cancelling callback
If you want to cancel »callback« before the person you were calling is free, proceed as follows:
The display returns to default mode. Press the softkey under »
« until the sec-
ond line shows »Callback«.
Callback Press the softkey under »Callback«. The display shows all active callbacks, in-
cluding those activated by other users.
Press the softkey button under »
« until the relevant number is displayed.
del Press the softkey under »del« to delete the callback to this number.
Page 22

18
20322071en_ba_c0
Telephoning
Autodial
Your Top A47
ISDN
contains a repeat memory which registers the last 20 numbers dialled. This
memory is user-independent. Once more than 20 numbers have been dialled, the oldest is deleted from memory.
Select the user.
Press the repeat button until the relevant number is displayed.
Or…
If you do not want to dial this number or if you first want to see all the called
numbers, press the softkey under »
« or » « to scroll through the list.
Or…
To obtain information on the call charges and length of the call, press the
softkey under »i«.
…Continue
You have selected one of the numbers on the repeat list. Lift the receiver to
have your telephone automatically dial the number. Wait for the connection
and make your call.
Replace the handset to terminate the call.
➭ For handsfree (speakerphone) operation, press the loudspeaker button instead of lift-
ing the handset. Press the loudspeaker button again to terminate the call.
➭ If you press the repeat button after lifting the handset or pressing the loudspeaker button,
your phone autodials the last dialled number.
Deleting the number from the autodial memory
Press the autodial button until the relevant number is displayed.
del Press the softkey under »del«. The entry is deleted from the autodial memory.
To exit the function, press the EXIT button.
Page 23
19
20322071en_ba_a0
Telephoning
Dialling from the phonebook
Your Top A47
ISDN
has an electronic phonebook for storing 100 names and numbers. The
phonebook is available to all users.
The example describes on-hook dialling. To make a call with the handset lifted (off-hook), press
the softkey under this symbol »
« and proceed from Step 3 below.
To set up the phonebook, see »Phonebook«.
To dial from the phonebook, you have two options:
Alphabetic search for the number
Select the user.
Press the menu button. »Phonebook« appears in the display, and underneath
»new,
, «.
Press the softkey under »
« to show the first entry in the phonebook.
Keep pressing the button containing the first letter of the name you are looking
for until the first entry beginning with this letter is displayed.
Example: You want to call »Natalie«: Press button 6 twice. On the first press,
the first name beginning with M is shown. On the second press, the first name
beginning with N is shown.
If the name you are looking for is still not shown i.e. because it is alphabetically
arranged behind the first entry (»Natalie« comes after »Naomi«), press the
softkey under »
« to scroll down until you have found the name.
Lift the handset. The telephone automatically dials the number. Wait for the
connection and make your call.
Replace the handset to terminate the call.
➭ If you have scrolled down too far, press the softkey under » « to scroll up.
Page 24

20
20322071en_ba_a0
Telephoning
Using the softkey to scroll
Select the user.
Press the menu button. »Phonebook« appears in the display, and underneath
»new,
, «.
Press the softkey under »
« to scroll down the directory, and under » « to
scroll up.
Once you have found the name, lift the handset. The telephone automatically
dials the number. Wait for the connection and make your call.
Replace the handset to terminate the call.
➭ For both search modes: If you make a call while a user code other than your own is dis-
played, the call is made with the displayed user’s attributes and at his cost.
➭ For both search modes: For handsfree (speakerphone) operation, press the loudspeaker
button instead of lifting the handset. Press the loudspeaker button again to terminate the
call.
Page 25

21
20322071en_ba_a0
Telephoning
Dialling numbers in the caller list
Swisscom supports Calling Line Identification Presentation (CLIP) in the ISDN network. This allows your Top A47
ISDN
to register all calls not answered by you. This caller list can contain up to
30 numbers.
For numbers registered in the caller list, the display shows »
« as well as two numbers separated by brackets. The number before the brackets indicates the call count for the set user (code
in the right upper corner), the number after the brackets indicates the total number of unanswered calls. Only the set user can see these numbers.
Select the user.
Press the softkey under the call count. The display shows the number of the
most recent incoming call or, if this is stored in the phonebook, the caller’s
name. The second line shows »del, No, i,
, «.
Or…
Press the softkey under »
« or » « to scroll through the caller list.
Or…
To obtain information on the date and time of the call, press the softkey under
»i«.
…Continue
You have selected one of the numbers on the caller list. Lift the receiver to have
your telephone automatically dial the number. Wait for the connection and
make your call.
Replace the handset to terminate the call.
➭ For handsfree (speakerphone) operation, press the loudspeaker button instead of lift-
ing the handset. Press the loudspeaker button again to terminate the call.
➭ If your Ihr Top A47
ISDN
is connected to a PBX, the PBX must also support the CLIP function
in order to register caller’s numbers and keep a caller list.
Page 26

22
20322071en_ba_a0
Telephoning
Saving numbers in the caller list
You can transfer the numbers in the caller list directly to your phonebook.
The caller list is open and the number is shown in the first line of the display
Press the softkey under the symbol »
«. The display shows »Name:«.
Lift the handset if you want to dial the number, or press the EXIT button to exit
the function.
To enter the name, press the button containing the letter or character you wish
until it appears, e.g. for K, press button 5 twice. Press the softkey under A->a
to switch between upper and lower case lettering.
➭ For further information, see »Text mode«.
ok Press the softkey under »ok«. The display shows »No.:« and the caller’s
number, and underneath »ok, Attributes«.
ok Press the softkey under »ok«. The display shows »Reaction: none« and under-
neath »ok« and »
, « .
Press the softkey under »
« or » « if you want to set conditions (filters) for
signalling the caller.
ok Press the softkey under »ok« to store the entry.
Deleting numbers in the caller list
You have opened the caller list as described above.
Press the softkey under »
« or » « to scroll down the caller list until you
have found the number.
del Press the softkey under »del« to delete the entry.
To exit the function, press the EXIT button.
Page 27
23
20322071en_ba_a0
Telephoning
Dialling numbers in the call log
The last 10 calls answered on the Top A47
ISDN
are stored in the call log. This list is available to all
users. After ten calls, the oldest number is deleted from the list.
Select the user.
Press the log button. The display shows the number of the last call made or the
name if stored in the phonebook. The second line shows »del, No., i,
, «.
Or…
If you do not want to dial this number or if you first want to see all the called
numbers, press the softkey under »
« or » « to scroll through the log.
Or…
To obtain information on the date and time of the call, press the softkey under
»i«.
…Continue
You have selected one of the numbers in the log. Lift the receiver to autodial
the number. Wait for the connection and make your call.
Replace the handset to terminate the call.
➭ For handsfree (speakerphone) operation, press the loudspeaker button instead of lift-
ing the handset. Press the loudspeaker button again to terminate the call.
➭ If you press the log button after lifting the handset or pressing the loudspeaker button,
your phone autodials the last dialled number.
Page 28

24
20322071en_ba_a0
Saving numbers in the call log
You can transfer the numbers in the call log directly to your phonebook.
The log is open and the number is shown in the first line of the display
Press the softkey under the symbol »
«. »Name:« appears in the display.
Enter the name.
ok Press the softkey under »ok«. The display shows »No:« and the caller’s
number, and underneath »ok, Attributes«.
ok Press the softkey under »ok«. The display shows »Reaction: None« and under-
neath »ok« and »
, « .
Press the softkey under »
« or » « if you want to set conditions (filters) which
signal the caller.
ok Press the softkey under »ok« to store the entry.
Deleting numbers in the call log
Press the log button. The display shows the number of the last call made or the
name if stored in the phonebook. The second line shows »del, No, i«.
Press the softkey under »
« or » « to scroll down the log until you have
found the number.
del Press the softkey under »del«. The entry is deleted from the call log.
To exit the function, press the EXIT button.
Telephoning
Page 29
25
20322071en_ba_a0
Telephoning
Speed dialling
For speed dialling, the relevant speed dial button must be programmed with a
telephone number or a function/service. See »Programming speed dial buttons«.
Six speed dial buttons are available for storing 12 frequently used numbers or
functions/services. By pressing the relevant button once or twice, you can automatically dial the numbers or functions/services stored under this button.
Press the button once to display the first stored number or function/service.
Press twice to display the second stored number or function/service.
Lift the handset. The telephone automatically dials the number. Wait for the
connection and make your call.
Replace the handset to terminate the call.
➭ For handsfree (speakerphone) operation, press the loudspeaker button instead of lifting
the handset. Press the loudspeaker button again to terminate the call.
➭ Your Top A47
ISDN
is delivered with the first speed dial button programmed for »SMS send«
(F51).
Provider selection
You can also telephone via another provider if you subscribe to their service. You have the following options for automatic provider selection:
– Provider prefix dialling
All outgoing calls with this prefix are always routed through this provider (e.g. prefix »0« for
long distance, »00« for abroad, »0033« for France, etc.). If no prefix is entered, all calls not
otherwise programmed are made via this provider.
– Linking phonebook entries with the provider (see »Phonebook«): Outgoing calls with this
number are always routed through this provider. Unlike the above, this option is prioritised.
➭ Automatic provider selection functions only for on-hook dialling or dialling from a list or
the phonebook. It does not function off-hook.
Editing the provider list
If you want to use different providers, you can enter these in the provider list. You may program
up to 6 providers.
Press the menu button repeatedly until the display shows »Installation«.
Press the softkey repeatedly under »
« until the display shows »˙ Provider«.
change Press the softkey under »change«. The display shows »Provider list«.
Page 30

26
20322071en_ba_a0
change Press the softkey under »change«. The display again shows »1: no entry« (if no
provider is set) or »1: xxx (yyy)«, where xxx corresponds to the provider name
and yyy to the provider code.
Press the softkey under »
« until the desired provider appears (a consecutive
number is shown in front of the name).
change Press the softkey under »change«. »Name:« and the cursor are shown.
You can now enter or change the provider name. If you delete the entire name,
the entry is removed from the list.
ok Press »ok« to confirm. »No.:« and the cursor are shown.
Enter the provider’s code.
ok Press »ok« to confirm.
To enter more providers (2,3,4,5,6), repeat the above procedure.
Automatic provider selection
You can program the phone to route all outgoing calls with this prefix through a specific provider (e.g. prefix »0« for long distance, »00« for abroad, »0033« for France, etc.). If no prefix is
entered, all calls not otherwise defined are made through this provider.
Press the menu button repeatedly until the display shows »Installation«.
Press the softkey repeatedly under »
« until the display shows »Provider«.
change Press the softkey under »change«. The display shows »Provider list«.
Press the softkey under »
«. The display shows »Auto. provider choice«.
change Press the softkey under »change«. The display again shows »1: no entry« (if no
provider is set) or »1: xxx (yyy)«, where xxx corresponds to the provider name
and yyy to the provider code.
Press the softkey repeatedly under »
« until the display shows the entry.
change Press the softkey under »change«. »No.:« and the cursor are shown.
You can now enter or edit the prefix. If no prefix is entered, all calls not otherwise defined are routed through this provider.
ok Press »ok« to confirm. The display shows either »Provider: no provider« (if no
provider has yet been assigned) or »Provider: xxx«, where xxx corresponds to
the provider name.
Press the softkey under »
« or » « until the display shows the provider via
which calls with the preset area code are to be routed.
ok Press »ok« to confirm.
Telephoning
Page 31

27
20322071en_ba_a0
Handsfree/speakerphone
Your Top A47
ISDN
has a built-in microphone and loudspeaker. You can conduct calls with the
handset on-hook and allow others present in the room to take part in the call.
On-hook dialling
Select the user.
Enter the number with area code. If you have entered a wrong number, see in-
structions below.
Press the loudspeaker button. Wait for the connection and make your call over
the loudspeaker and built-in microphone. Everyone in the room can listen in
and talk to the person being called.
Press the loudspeaker button to terminate the call.
➭ If you have entered a number incorrectly, press the minus button until the cursor reaches
the error. Press the softkey under »del« to delete the number. Use the plus button to go
to the end of your entry.
Accepting incoming calls with handset on-hook
Your phone rings to indicate an incoming call.
Press the loudspeaker button to accept the call. Conduct your call over the
loudspeaker and built-in microphone. Everyone in the room can listen in and
talk to the person being called.
Or…
accept Press the softkey under »accept«. Conduct your call over the loudspeaker and
built-in microphone. Everyone in the room can listen in and talk to the person
being called.
…Continue
To terminate the call, press the loudspeaker button or the softkey under
»terminate«.
Telephoning
/
terminate
Page 32

28
20322071en_ba_a0
Telephoning
Switching a call from handset to speakerphone
You are conducting a call on the handset but want to switch to speakerphone mode so that
others in the room can listen in and take part.
Press the loudspeaker button and hold down.
Replace the handset and release the loudspeaker button. You can now con-
tinue in speakerphone mode.
To terminate the call, press the loudspeaker button or the softkey under
»terminate«.
Switching a call from speakerphone to handset
You are conducting a call on the speakerphone but want to switch to the handset so that others in the room cannot listen in and take part.
Lift the handset. This immediately deactivates the microphone and loudspeaker.
Continue your call
Replace the handset to terminate the call.
Listening by loudspeaker
Unlike the speakerphone, the microphone is switched off for listening by loudspeaker. Others in
the room can listen in to the call but the person you are calling cannot hear them.
You are talking on the handset and want others in the room to listen in.
Press the loudspeaker button to activate the loudspeaker.
Press the loudspeaker button again to deactivate the loudspeaker.
Replace the handset to terminate the call.
Setting the volume
You can adjust the handset and loudspeaker volumes.
Press the plus button. The volume is increased each time you press the button.
Press the minus button. The volume is decreased each time you press the but-
ton.
ok Press the softkey under »ok«. The volume setting is saved and used for all sub-
sequent calls.
➭ If you do not confirm the volume setting by pressing »ok«, the setting is only valid for the
current call.
/
terminate
Page 33

29
20322071en_ba_a0
Telephoning
Microphone mute
If you do not want your call partner to hear you e.g. if you want to ask a question or talk to
someone in the room, you can switch the handset microphone or the built-in microphone off.
You can still hear the call partner.
You are conducting a call:
Press the softkey under »
«.
Mic off Press the softkey under »Mic off«. The microphone is switched off.
Mic on Press the softkey under »Mic on«. The microphone is switched on again.
➭ If you want to switch the microphone on and off by simply pressing a button, you can
program the »Microphone mute« function on a speed dial button.
Park
You are conducting a call and want to transfer the phone to another place with a telephone
socket.
You can park the call i.e. put it on hold while you do this. Advise your call partner that the call is
being parked – he will hear nothing while the procedure is being performed. You now have
around 3 minutes’ time within which to unplug the phone, transfer it to another place and plug
it in again.
Call parking is not to be confused with »Hold« which you can activate with the R button.
To move the telephone while conducting a call:
Press the Park button.
You have around 3 minutes to unplug the phone, transfer it to another place
and plug it in again.
Once the phone is plugged in at the new location, press the Park button again
to resume the call.
➭ If the phone is not plugged in within the three minutes, the call is cleared.
Page 34

30
20322071en_ba_a0
Telephoning
Entering the park code
The phone is delivered with the park code set at »1«.
The park code is user-specific.
Select the user.
Press the menu button until »Settings« is displayed.
Press the softkey repeatedly under »
« until the display shows »Suppl. serv-
ices«.
change Press the softkey under »change«. The display shows »CLIR« with the current
status.
Press the softkey under »
« until »Park code« appears with the actual code
(default: 1).
change Press the softkey under »change«. The cursor appears under the code.
del Press the softkey under »del« to delete the park code.
Enter your own park code (max. 2-digit from 00 to 98).
ok Press the softkey under »ok«. An acoustic signal indicates that the new park
code is saved.
To exit the menu, press the EXIT button.
➭ If you have several phones and terminal devices connected to the ISDN network (S-Bus)
and may need them to be parked simultaneously, you need to set additional park codes.
Page 35

31
20322071en_ba_a0
Telephoning
ETV® Online
ETV
(r)
Online is a new service provided by your Top A47
ISDN
which gives you direct access to the
Swisscom electronic directory (ETV
®
= Elektronisches Teilnehmer Verzeichnis, Swisscom Directo-
ries AG). As soon as an unknown number appears on your display, you can access the ETV
®
and
within a few seconds obtain the caller’s name and address.
You can access the ETV
®
directly:
– while the telephone is ringing and before you pick up
– during a call
– when entering numbers with handset on-hook (dialling preparation)
You can call up the ETV
®
indirectly from the following lists:
– Caller list
– Call log (list of answered calls)
– Autodial list
➭ You can also access the ETV
®
directly by pressing the Smiley button.
➭ You can also access the ETV
®
directly by pressing the softkey under »ETV«.
➭ ETV
®
enquiries are subject to a charge.
Installing ETV
®
Online
ETV
®
Online is delivered ready to use on your Top A47
ISDN
. No installation is necessary.
The ETV
®
Online access number 081 286 61 30 is pre-installed.
➭ If you need to change the ETV
®
Online access number, proceed as follows: Press the menu
button until »Installation« appears. Press the softkey repeatedly under »
« until the dis-
play shows »ETV access number«. Press the softkey under »change«. Change the ETV
®
ac-
cess number and press under »ok« to save it.
ETV
®
Online queries for incoming calls
The telephone is ringing and a number is displayed.
Press the Smiley button.
In a few seconds the corresponding name is displayed.
ETV
®
Online queries during calls
Press the Smiley button during the call.
In a few seconds the corresponding name is displayed.
Page 36

32
20322071en_ba_a0
Telephoning
ETV® Online queries during on-hook dialling
Always enter the area code along with the number (handset on-hook).
Press the Smiley button.
In a few seconds the corresponding name is displayed.
ETV
®
Online queries from lists (caller list, call log, autodial list)
Select the number from the relevant list. The number is displayed.
Press the Smiley button.
In a few seconds the corresponding name is displayed.
ETV
®
Online query via the menu
Press the menu button until »Functions« appears.
Press the softkey repeatedly under »
« until the display shows »ETV«.
ok Press the softkey under »ok«.
Enter the number with area code.
Execute ETV
Press the softkey under »Execute ETV«.
In a few seconds the relevant name is displayed.
Saving ETV
®
Online information in your phonebook
Once you have obtained the information from the ETV
®
Online, you have the option of directly
inserting the number and name in your phonebook.
The name obtained from ETV
®
Online is displayed.
Press the softkey under » «.
ok Press the softkey under »ok« three times.
The number and name are saved to your telephone phonebook.
Page 37

33
20322071en_ba_a0
Telephoning
Incoming calls
If you have not entered a Multiple Subscriber Number (MSN) i.e. no user is programmed, your
telephone will ring for every incoming call to any of your MSNs.
If several users have been defined and each assigned an MSN, you can program an individual
ringing tone for each user. This allows you to determine the person being called.
The Swisscom ISDN network supports the CLIP function. This enables the caller’s number to be
displayed on your telephone. If the number is stored in the phonebook, the caller’s name is automatically displayed.
The second line shows the user for whom the call is intended (A, B, C, D or E).
Call acceptance
Lift the handset and make your call.
Or…
Press the loudspeaker button to activate speakerphone mode. Everyone in the
room can listen in and talk to the person being called.
Or…
accept Press the softkey under »accept«. Conduct your call over the loudspeaker and
built-in microphone. Everyone in the room can listen in and talk to the person
being called.
To terminate the call, replace the handset if you have been speaking off-hook, or for
speakerphone mode press the loudspeaker or the softkey under »terminate«.
Reject call
If you do not wish to talk to the caller on the display, you can reject the call.
The display shows the caller’s number/name. Press the softkey repeatedly under
»
« until the display shows »reject, forward, «.
reject Press the softkey under »reject«. The call is cleared. The caller’s number is
stored in the relevant user’s caller list.
Page 38

34
20322071en_ba_a0
Telephoning
Reject all anonymous calls
You can universally reject anonymous incoming calls (where the user has suppressed the
number). Once this service is activated, no anonymous calls are forwarded to your Top A47
ISDN
.
To activate/deactivate this service, enter the following button sequence:
Activate »Reject anonymous calls«
99
Deactivate »Reject anonymous calls« 99
Forward call
If you do not wish to talk to the caller on the display, you can forward the call to another line.
The display shows the caller’s number/name. Press the softkey repeatedly under
»
« until the display shows »reject, forward, «.
forward Press the softkey under »forward«. The display shows »No:« with the cursor
and underneath »ok« and »
«.
Enter the number with area code to which the call is to be forwarded.
Or…
To forward a call to a number stored in the phonebook.
Press the softkey under »
«. The first entry in the phonebook is displayed.
Press the softkey button under »
« or » « until the relevant number is dis-
played.
…Continue
ok Press the softkey under »ok«. The call is forwarded to the specified number.
Page 39

35
20322071en_ba_a0
COMBOX® basic playback
You can play back your COMBOX
®
basic messages at the touch of a button.
First you need to program your COMBOX
®
basic (see Appendix »Supplementary Telephone Serv-
ices«) and store the code 086 along with your number and area code under the COMBOX
®
but-
ton.
Press the COMBOX
®
button once to enter the code on the first level. Press
twice to enter on the second level of this button.
The display shows »Z« with the number of the button.
Enter the code 086 and your telephone number with area code.
ok Press the softkey under »ok« to save the function. The code is now saved under
the COMBOX
®
button.
COMBOX
®
basic playback
Select the user.
Press the COMBOX
®
button.
Lift the handset.
Replace the handset to terminate COMBOX
®
playback.
Additional call/switching between calls
ISDN allows you to conduct two calls on your telephone simultaneously.
➭ The following description covers calls made over the ISDN basic access. For information on
operating your phone with a PBX, refer to your PBX documentation and the section on
»PBX operation« in this manual.
You are talking on the handset or speakerphone and hear the call waiting signal.
Accept, reject or forward the call
While conducting a call, you receive a second call. The display shows the caller’s number or
name if stored in the telephone phonebook. The second line indicates the user for whom the
call is intended.
accept Press the softkey under »accept«. The existing call is put on hold. Since your call
partner hears nothing while on hold, advise him that you need to make another
call quickly. You can now talk to the second caller. The call status (off-hook or
speakerphone) remains unchanged.
Or…
Telephoning
Page 40

36
20322071en_ba_a0
Telephoning
To reject the call:
Press the softkey under »
« until the second line shows »reject«.
reject Press the softkey under »reject«. The incoming call is rejected and the caller
hears the busy signal.
Or…
To forward the call:
forward Press the softkey under »forward«. The display shows »No:« with the cursor
and underneath »ok«.
Enter the number with area code to which the call is to be forwarded.
Or…
To forward the call to a number stored in the phonebook.
Press the softkey under »
«. The first entry in the phonebook is displayed.
Press the softkey button under »
« or » « until the relevant number is dis-
played.
ok Press the softkey under »ok«. The call is forwarded to the specified number.
Initiating a second call, enquiry call
During a call you wish to call another subscriber, for example to ask a question or switch between calls. Inform your call partner that he will hear nothing during the time required for you
to make the enquiry call, even if he is still connected.
Press the R button. The active call is put on hold and the display shows
»Dial:_«. The call partner hears nothing.
Enter the subscriber’s number with area code. Conduct your enquiry call.
Or…
To forward the call to a number stored in the phonebook.
Press the softkey under »
«. The first entry is displayed.
Press the softkey button under »
« or » « until the relevant number is dis-
played.
ok Press the softkey under »ok«. Conduct your enquiry call.
➭ You can terminate the second call, see »Terminating calls«, or switch between both calls,
see »Switching between calls«.
Page 41

37
20322071en_ba_a0
Switching between calls
You can switch between two active calls.
One call is on hold as described under »Call acceptance«.
Press the R button. The existing call is put on hold. The previously held call is reactivated and you can resume talking.
Press the R button to switch from one call partner to the other.
Terminating calls individually
You wish to terminate one of the active calls.
terminate Press the softkey under »terminate«. The active call is terminated and the call
on hold is reactivated.
Terminating all calls
You can terminate all simultaneous calls one after the other as described in the section on »Ter-
minating individual calls«. Terminate the last call by pressing the softkey under »terminate«. The
line is again seized and the dialling tone can be heard.
➭ If you have replaced the handset or, for speakerphone mode, pressed the loudspeaker
button while a call is on hold, the Top A47
ISDN
sends an acoustic signal. The display shows
»—Call active—«. Lift the handset or press the loudspeaker button to resume the call on
hold and terminate it.
Telephoning
Page 42

38
20322071en_ba_a0
Call transfer
You can transfer a call from your phone to another number.
➭ This service is not yet available from Swisscom. Swisscom will gladly advise you on the
dates for introduction of this service.
➭ If your telephone is connected to a PBX, you can transfer calls internally. See »PBX opera-
tion«.
Transferring an existing call
Your telephone has two active calls between which you have been switching. You want to connect one party with the other but no longer wish to take part in the discussion.
Press the softkey under »
« until the second line shows »transfer«.
transfer Press the softkey under »transfer«. Your call partners are connected with each
other. You will hear the busy tone. Both public lines required for the calls become free again.
Transferring a call to a new connection
During a call you want your call partner to speak to another person.
Press the R button. The active call is put on hold.
Enter the number with area code. Wait for the call to be answered and advise
the person that you wish to transfer a call to them.
Press the softkey under »
« until the second line shows »transfer«.
transfer Press the softkey under »transfer«. Your call partners are connected with each
other. Both public lines required for the calls become free again.
Telephoning
Page 43

39
20322071en_ba_a0
Telephoning
Three-way conferencing
➭ The following description covers calls made over the ISDN basic access. For information on
operating your phone with a PBX, refer to your PBX documentation and the section on
»PBX operation« in this manual.
Three-way conference
You are conducting a call and want to bring in a third person. Inform your call partner that he
will hear nothing during the time required for you to call the third person, even if he is still connected.
Press the R button. The active call is put on hold and the display shows »Dial_«.
The call partner hears nothing.
Enter the subscriber’s number with area code. Wait for him to pickup and ask
him to participate in a three-way conference call.
Press the softkey under »
« until the second line shows »Conference«.
Conference Press the softkey under »Conference«. All connections are linked up. Everyone
can hear and speak to each other.
Three-way conference with existing connections
Your telephone has two active calls between which you have been switching.
Press the softkey under »
« until the second line shows »Conference«.
Conference Press the softkey under »Conference«. All connections are linked up. Everyone
can hear and speak to each other.
Terminating a three-way conference
You wish to terminate a three-way conference call and, for example, only switch alternately between your call partners.
terminate Press the softkey under »terminate«. You are connected with the last active call
partner and the other is on hold.
Terminating calls individually
You wish to terminate one of the two active calls between which you are switching.
Press the softkey under »
« until the second line shows »terminate«.
terminate Press the softkey under »terminate«. The active call is terminated and the call
on hold is reactivated.
Page 44

40
20322071en_ba_a0
Terminating all calls
You can terminate all simultaneous calls one after the other as described in the section on «Ter-
minating individual calls«. Terminate the last call by pressing the softkey under »terminate«. The
line is again seized and the dialling tone can be heard.
➭ If you have replaced the handset or, for speakerphone mode, pressed the loudspeaker
button while a call is on hold, the Top A47
ISDN
sends an acoustic signal. The display shows
»—Call active—«
«
. Life the handset or press the loudspeaker button to resume the call on
hold and terminate it.
Call forwarding
You can program your telephone to forward calls to specific users to another telephone. To do
this you must enter the other number. The following call forwarding options are available:
–»unconditional«: The incoming call for a user is immediately forwarded to the programmed
number and the telephone does not ring.
–»busy« If the user’s number is busy, the call is forwarded to the programmed number and no
call waiting signal is heard.
–»no reply« If the user does not answer the call and the call signalling time (ring time) has ex-
pired, the call is forwarded to the programmed number.
➭ Call forwarding can only be activated if at least one user is programmed for this function.
➭ Every user can program one of the three call forwarding options under any speed-dial
button (several call forwarding types can be activated simultaneously).
➭ When call forwarding is active, a symbol is shown and the LED remains lit if unconditional
(direct) forwarding is active.
➭ The caller pays only the cost of the connection from his telephone to yours. Connection
charges for forwarding calls to an alternative telephone are charged to you.
Call forwarding setup
Select the user.
Press the menu button until »Functions« is displayed.
Press the softkey repeatedly under »
« until the display shows
»Call FWD: off«.
change Press the softkey under »change«. The display shows »Call FWD« with the user
code.
The second line of the display shows »ok,
, unconditional, «.
If you do not want calls to be forwarded unconditionally, press the softkey under »
« to scroll down to the options »busy« and »no reply«.
Telephoning
Page 45

41
20322071en_ba_a0
unconditional
Press the softkey under the call forwarding function you wish to activate (in this
example, »unconditional.«. The display shows »No.:« and the second line
shows »back« and »
«.
Enter the number with area code to which the call is to be forwarded.
Or…
Press the softkey under »
« if the number is stored in your phonebook.
Press the softkey under one of the arrows to scroll through the phonebook until you reach the number.
…Continue
back Press the softkey under »back« to confirm your entry.
ok Press the softkey under »ok« to activate call forwarding.
Deactivating call forwarding
Select the user.
Press the menu button until »Functions« is displayed.
Press the softkey under »
« until the display shows »Call FWD« with the cur-
rent status.
change Press the softkey under »Change«. The display shows »Call FWD« with the
user code.
The second line of the display shows »ok,
(next possible function), «.
Press the softkey repeatedly under »
«until the display shows the option
»off«.
off Press the softkey under »off«. The function is again displayed.
ok Press the softkey under »ok« to confirm your entry.
➭ The number you have entered for call forwarding remains stored after deactivation. This
number is available again when you re-activate call forwarding.
➭ To forward calls to another number, delete the set number: Press the minus button until
you reach the start of the number and delete it by pressing the softkey under »del«. Enter
the new number with area code.
➭ When call forwarding is active, a symbol is displayed and the LED is lit.
Telephoning
Page 46

42
20322071en_ba_a0
Call forwarding with keypad
If call forwarding is unable to be activated as described on the previous page, this means your
exchange does not support the new protocol. Introduction of the new protocol in the public
network is currently under way and depends on the extension phase of your local exchange.
However, you can also program call forwarding by means of button sequences (keypad protocol):
Unconditional forwarding
Activate:
21 forwarding number
Deactivate: 21
Interrogate: 21
Forwarding on no reply
Activate:
61 forwarding number
Deactivate: 61
Interrogate: 61
Forwarding on busy
Activate:
67 forwarding number
Deactivate: 67
Interrogate: 67
Telephoning
Page 47

43
20322071en_ba_a0
Hotline (direct call)
You can program a hotline (direct call) number on your Top A47
ISDN
. This means that when you
lift the handset and press any button on the phone’s keypad, the number you have programmed is automatically dialled.
The hotline is user-specific.
Your telephone is delivered with hotline deactivated and no number set.
Activating hotline and entering the hotline number.
The hotline is deactivated.
Press the menu button until »Functions« is displayed.
Press the softkey button under »
« until »Hotline« is displayed.
change Press the softkey under »change«. The first line of the display shows the cur-
rent status i.e. default »off«.
Enter the hotline number with area code.
on Press the softkey under »on« to activate the function.
ok Press the softkey under »ok«.
To exit the menu, hold down the EXIT button.
➭ When hotline is activated and you lift the handset, the display shows »——Hotline——«.
Pressing any button (apart from the menu button) will automatically dial the hotline
number.
➭ The hotline number you have entered remains stored until you replace it with another or
delete it.
Deactivating hotline
The hotline is active.
Press the menu button until »Functions« is displayed.
Press the softkey button under »
« until »Hotline« is displayed.
change Press the softkey under »change«. The first line of the display shows the cur-
rent status »on«.
off Press the softkey under »off« to deactivate the function.
ok Press the softkey under »ok«.
To exit the function, hold down the EXIT button.
➭ After hotline is deactivated the hotline number remains stored and is available for re-use.
Telephoning
Page 48

44
20322071en_ba_d0
Outgoing call barring (OCB)
If you subscribe the OCB supplementary service, you can block certain outgoing calls (dependent
on the blocking set). A personal code is required to activate and deactivate this service. You will
receive this code when you subscribe to the service.
Activating OCB
Lift the handset.
Enter
code .
Deactivating OCB
Lift the handset.
Enter
code .
Checking the status of OCB service
Lift the handset.
Enter
.
Telephoning
Page 49

45
20322071en_ba_a0
Phonebook
Your Top A47
ISDN
contains a phonebook which is
– dynamically managed and can store up to 100 numbers (max. 24 digits) along with names
(max. 24 letters), and
– is available to all users.
You can save new entries (name and number), and edit and delete existing ones.
To dial numbers from the phonebook, see »Dialling from the phonebook«.
For new entries you can enter attributes in addition to the name and number. These attributes
define how your phone responds when dialling or accepting calls from this number.
Calling Line ID (CLIP) You can choose whether or not to send your number to the called
party (CLIP or CLIR respectively). (Displayed as attribute »C«).
Reaction You can define how your telephone should react to incoming calls:
»none«: Every call is signalled as normal.
»no filter«: Calls are signalled even with an active filter.
»busy« Every call from this number is rejected with a
busy signal.
Provider You can programme a number with provider preselection.
(Displayed as attribute »P«).
Subadress You can enter additional digits (subaddress) after the number.
Subaddresses are used for remotely controlling equipment that supports subaddresses. The Top A47
ISDN
does not evaluate
subaddresses. (Displayed as attribute »Z«).
EAC For PBX operation you can enter the exchange access code (EAC), if
required. (Displayed as attribute »X«).
Control functions For operation with a PBX, you can enter control functions (keypad)
before the number to access additional ISDN services.
Your PBX documentation will advise you on the attributes.
(Displayed as attribute »K«).
Page 50

46
20322071en_ba_a0
Phonebook
Enter number and name only
Entries in the phonebook are user-independent. Even if you enter numbers and names using
your code, all other users can access and use them.
Press the menu button. »Phonebook« appears in the display, and underneath
»new,
, «.
new Press the softkey under »new«. The display shows »Name:« and the cursor.
The phone is in text mode.
To enter the name, press the button containing the letter or character you wish
until it appears (see »Text mode«), e.g. for K, press button 5 twice. Press the
softkey under A->a to switch between upper and lower case lettering.
For further information, see »Text mode«.
To enter the name,
ok Press the softkey under »ok«. The display shows »No.:« and the cursor, and
underneath »ok, Attributes«.
Enter the number with area code.
ok Press the softkey under »ok«. The display shows »Reaction:«
“
with the setting
»none«.
ok Press the softkey under »ok«. Your number is stored and the display shows the
name entered and user code, and underneath »new, change, del,
, «.
Or…
If you do not wish to make another entry, hold down the EXIT button.
Or…
new To enter another number, press the softkey under »new« and proceed as de-
scribed above.
Or…
change To edit an existing entry, press the softkey under »change« and proceed as de-
scribed under »Editing entries«.
Or…
del To delete an existing entry, press the softkey under »del« and proceed as de-
scribed under »Deleting entries«.
Or…
Press the softkey under »
« or » « to scroll up and down in this menu.
Page 51

47
20322071en_ba_a0
Phonebook
Assigning attributes to numbers
This section is based on the previous chapter »Enter number and name only«.
As described in the previous section, enter a name and confirm. »No.:« and the cursor is shown.
and underneath »ok, Attributes, del«.
➭ If you have made a mistake you can correct it by pressing the minus button until you
reach the error. Press the softkey under »del« to delete the incorrect letter/number. Make
your correction. Use the plus button to go to the end of your entry.
Keypad (ISDN control functions).
All other attributes apart from »Subaddress« must be entered before entering the number.
Keypad entry
The second line of the display shows »No:« and the cursor, and underneath
»ok, Attributes«. You have not yet entered any phone number.
Attributes Press the softkey under »Attributes«.
Press the softkey button under »
« until »Keypad« is displayed.
Keypad Press the softkey under »Keypad«. The second line of the display shows »No.:«
along with a »K«.
Enter the keypad code. If necessary, press the star button, enter the code and
then, if required, the hash button. Repeat this procedure if several attributes
are available.
Continue from »Continue entering numbers«.
Enter provider
The first line of the display shows »No.:« and the cursor, and underneath »ok, Attributes«. You
have not yet entered any phone number.
Attributes Press the softkey under »Attributes«.
Press the softkey button under »
« until »Provider« is displayed.
Provider Press the softkey under »Provider«. The second line of the display shows »No.:«
along with a »P«.
Enter the provider number (1, 2, 3, 4, 5 or 6). To program a provider number
along with the provider, see »Automatic provider preselection«.
Continue from »Continue entering numbers«.
Page 52

48
20322071en_ba_a0
Phonebook
Suppress number or enter EAC
The first line of the display shows »No.:« and the cursor, and underneath »ok,
Attributes«. You have not yet entered any phone number.
Attributes Press the softkey under »Attributes«.
Press the softkey button under »
« until the attribute you wish to enter is
showed.
Press the softkey button under the attribute you wish to enter.
EAC »EAC«: An »X« is shown after »No.:«.
Suppress No.
»Suppress No.«: An »C« is shown after »No.:«.
Press the softkey to access the next attribute.
➭ You can define the exchange access code in the »PBX« menu (see »PBX operation«). The
exchange access code is inserted only when the phone is connected to a PBX.
Continue entering numbers
Enter the number of the exchange with area code.
ok Press the softkey under »ok«. Your number is stored and the display shows the
name entered and user code, and underneath »new, change, del,
, «.
ok The display shows »Reaction:« with the setting »none«. Press the softkey under
»ok«.
Or…
If you do not wish to make another entry, hold down the EXIT button.
Or…
new To enter another number, press the softkey under »new« and proceed as de-
scribed above.
Or…
change To edit an existing entry, press the softkey under »change« and proceed as de-
scribed under »Editing entries«.
Or…
del To delete an existing entry, press the softkey under »del« and proceed as de-
scribed under »Deleting entries«.
Or…
Press the softkey under »
« or » « to scroll up and down in this menu.
Page 53

49
20322071en_ba_a0
Phonebook
Enter subaddress
The display shows »No.:« and the cursor, and underneath »ok, Attributes,
«.
If you have already entered a keypad function, this is shown in the display.
Enter the number with area code.
Attributes Press the softkey under »Attributes«.
Press the softkey button under »
« until »Subaddress« is displayed.
Subaddress Press the softkey under »Subaddress«. A »Z« is displayed.
Enter the subaddress.
ok Press the softkey under »ok«. The display shows »Reaction:« with the setting
»none«.
ok Press the softkey under »ok«. Your number is stored and the display shows the
name entered and user code, and underneath »new, change, del,
, «.
Or…
If you do not wish to make another entry, hold down the EXIT button.
Or…
new To enter another number, press the softkey under »new« and proceed as de-
scribed above.
Or…
change To edit an existing entry, press the softkey under »change« and proceed as de-
scribed under »Editing entries«.
Or…
del To delete an existing entry, press the softkey under »del« and proceed as de-
scribed under »Deleting entries«.
Or…
Press the softkey under »
« or » « to scroll up and down in this menu.
Or…
ok To enter filters, press the softkey under »ok«.
Page 54

50
20322071en_ba_a0
Phonebook
Entering filter reactions
You have completed entering the number by pressing the softkey under »ok«.
The display shows »Reaction:« with the setting »none«.
Press the softkey button under »
« or » « until the reaction you wish to as-
sign to this number is shown.
»none«: No filtering of calls.
»no filter«: A call is signalled even if the filter function is active.
»busy« The caller from this number always hears the »busy« signal.
ok Press the softkey under »ok«. The entry is completed.
Return to standby display
If you do not wish to make any more entries, exit this menu by holding down
the EXIT button.
Editing entries
Press the menu button. »Phonebook« appears in the display, and underneath
»new,
, «.
Press the softkey under »
« to show the first entry in the phonebook.
Keep pressing the button containing the first letter of the name you are looking
for until the first entry beginning with this letter is displayed.
Example: You want to call »Natalie«: Press button 6 twice. On the first press,
the first name beginning with M is shown. On the second press, the first name
beginning with N is shown.
If the name you are looking for is still not shown i.e. because it is alphabetically
arranged behind the first entry (»Natalie« comes after »Naomi«), press the
softkey under »
« to scroll down until you have found the name.
Or…
Searching for the entry in steps
Press the menu button. »Phonebook« appears in the display, and underneath
»new,
, «.
Press the softkey under »
« to show the first entry in the phonebook.
Press the softkey under »
« to scroll down the directory, and under » « to
scroll up.
…Continue
Page 55

51
20322071en_ba_a0
Phonebook
On reaching the relevant entry,
change Press the softkey under »change«. The name to be edited is displayed. The cur-
sor is positioned under the first character.
If you do not wish to edit the name, press the softkey immediately under
»ok«.
To edit the name, press the plus button until you reach the letter or number to
changed and press the softkey under »del«. Make your correction. To delete
the entire name, press the softkey repeatedly under »del« until the name is
fully deleted. Enter the new name.
ok Press the softkey under »ok« to save the edited name. The number is displayed
and underneath »ok, Attributes,
«. The cursor is positioned under the first
character.
Press the plus button until you reach the letter or number to be changed and
press the softkey under »del«. Make your correction. To delete the entire
number, press the softkey repeatedly under »del« until the name is fully deleted. Enter the new number with area code.
If you do not wish to change the number, continue to the next step.
Attributes Press the softkey button under »Attributes« if you want to edit or add at-
tributes.
ok Press the softkey under »ok«. The display shows »Reaction:« with the setting
»none«.
ok Press the softkey button under »ok« if you have finished editing. The edited
name is shown. To edit other entries, proceed as described above
To exit the menu, press the EXIT button.
Or…
You wish to insert or edit attributes and have not yet saved the entry.
Press the softkey under »
« to scroll through the available attributes if the at-
tribute you wish has not yet been shown.
Press the softkey button under the attribute you wish to edit. If the attribute is
not yet available, the attribute code is inserted. If this attribute requires entry of
a number and if you wish to add this attribute, see »Keypad (ISDN control functions)«.
Or…
Page 56

52
20322071en_ba_a0
Phonebook
To delete attributes.
del Press the softkey under »del« to delete the attribute.
Or…
You want to change something in a number with attributes.
Press the plus button until you reach the letter or number to be changed, press
the softkey under »del« and make your correction.
To edit/delete several attributes, proceed from the first »Or…« step above.
…Continue
You have now completed editing the attributes.
ok Press the softkey under »ok«. The display shows »Reaction:« with the setting
»none«.
Or…
To edit reactions to calls.
You have completed entering the number by pressing the softkey under »ok«.
The display shows »Reaction:« with the setting »none«.
Press the softkey button under »
« or » « until the reaction you wish to as-
sign to this number is shown.
»none«: No call filtering.
»no filter«: A call is signalled even if the filter function is active.
«busy« The caller from this number always hears the «busy« signal.
ok Press the softkey under »ok«. The entry is completed.
Return to standby display
If you do not wish to make any more entries, exit this menu by holding down
the EXIT button.
Page 57

53
20322071en_ba_a0
Phonebook
Deleting entries
You can delete specific entries, even those set for other users.
Press the menu button. »Phonebook« appears in the display, and underneath
»change, new,
, «.
Press the softkey under »
« to show the first entry in the phonebook.
Keep pressing the button containing the first letter of the name you are looking
for until the first entry beginning with this letter is displayed.
Example: You are looking for »Natalie«: Press button 6 twice. On the first
press, the first name beginning with M is shown. On the second press, the first
name beginning with N is shown.
If the name you are looking for is still not shown i.e. because it is alphabetically
arranged behind the first entry (»Natalie« comes after »Naomi«), press the
softkey under »
« to scroll down until you have found the name.
Or…
Searching for the entry in steps
Press the menu button. »Phonebook« appears in the display, and underneath
»new,
, «.
Press the softkey under »
« to show the first entry in the phonebook.
Press the softkey under »
« to scroll down the directory, and under » « to
scroll up.
…Continue
On reaching the relevant entry,
del Press the softkey under »del«. A confirmation message is briefly shown and the
entry is deleted. The next phonebook entry is displayed.
➭ To delete additional entries, proceed as described above.
If you wish to exit this menu, hold down the EXIT button.
Page 58

54
203220671en_ba_a0
A dditional settings
This chapter lists additional settings which can be made on your Top A47
ISDN
:
– Enter additional users (MSN),
– Program speed dial buttons,
– Set date and time,
– Interception circuit (Malicious Call ID),
– CLIR Calling Line Identification Restriction,
– Suppress call waiting,
– Autodial,
– Set ringing tone melody and volume,
– Set language,
– Individual user charges, call charge total,
– Set display contrast,
– Alarm,
– Text message.
Entering additional users (MSN)
To programme a Multiple Subscriber Number (MSN) i.e. a user, refer to the chapter »Startup«.
You can use any MSN you have obtained from Swisscom or your network provider for any of
the five users.
You cannot assign the same MSN to several users.
If you assign a user an MSN which has already been assigned to another device, make sure this
does not cause overlaps.
Example: You have a fax which must be available to all users. Assign this fax its own number.
Or: You have a dedicated fax (no handset) for a specific user. Give the user and fax the same
number.
Page 59

55
203220671en_ba_a0
Assigning MSNs (number, user)
In the following description »X« stands for any user code A, B, C, D or E.
Press the menu button until »Installation« is displayed.
Press the softkey repeatedly under »
« until the display shows »Set MSN«.
change Press the softkey under »change«. »Set MSN A« is displayed.
Press the softkey repeatedly under »
« until the display shows »Set MSN X«
with the code letter you want to assign to the new user.
change Press the softkey under »change«. The display shows »MSN X:_« and the cur-
sor.
If a number is already set, press the softkey under »del« until it is deleted. Us-
ing the keypad, enter one of the MSNs assigned to you by Swisscom or your
network provider. Enter the number without area code. If you have entered a
number incorrectly, press the minus button until the entry mark reaches the error. Press the softkey under »del«. Make your correction. Press the plus button
until you reach the end of the entry.
ok Press the softkey under »ok«. The display shows »MSN X:_« with the cursor.
The telephone is now in text mode.
You can enter the name of user X. Press the button containing the letter or
character you wish until the letter appears, e.g. for K, press button 5 twice.
Press the softkey under »A->a« to switch between upper and lower case lettering.
For further information, see »Text mode«.
ok If you do not wish to enter a name or have completed entering a name, press
the softkey under »ok«. »Set MSN X« appears again in the display. If you want
to assign another MSN to your telephone, proceed from the fourth step above.
If you do not wish to assign additional MSNs or program other users, hold
down the EXIT button. The display returns to the normal mode.
➭ If you merely want to change an existing user but do not wish to enter any new users, use
the arrow buttons to position the cursor under the number/name to be corrected. Press
the softkey under »del« to delete the number/name. Keep pressing to delete several letters/digits. Make your correction.
➭ If you have not entered any user names, the number is regarded as the user name.
➭ Once the MSN has been set, your telephone only rings when this number is called.
A dditional settings
Page 60

56
203220671en_ba_a0
A dditional settings
Deleting an MSN (user)
You can delete any of the set users.
Press the menu button until »Installation« is displayed.
Press the softkey repeatedly under »
« until the display shows »Set MSN«.
change Press the softkey under »change«. »Set MSN A« is displayed.
Press the softkey repeatedly under »
« until the display shows »Set MSN X«
with the code letter of the user you want to delete.
change Press the softkey under »change«. The display shows »MSN X« and the associ-
ated number.
del Press the softkey under »del« until the entire MSN is deleted.
ok Press the softkey under »ok«. »Delete user?« is displayed.
Yes No Press the softkey under »Yes« to delete the user, or under »No« to abort the
procedure.
The display shows »Set MSN X« for the code you have just deleted. To delete
another user, proceed from Step 2.
To exit the menu, hold down the EXIT button.
Page 61

57
203220671en_ba_a0
A dditional settings
Programming speed dial buttons
Your telephone offers the option of dialling frequently used numbers or functions by simply pressing a speed dial button. There are six buttons available for
this purpose. Each can be programmed twice to give a total of 12 numbers or
functions/services.
The numbers or functions/services stored under speed dial buttons are available
to all users.
➭ Your TOP A47
ISDN
is delivered with the first speed dial button programmed for
»Send SMS«.
Press the menu button repeatedly until the display shows »Settings«.
Press the softkey repeatedly under »
« until the display shows »Speed dial«.
change Press the softkey under »change«. The display shows »Press speed dial but-
ton«.
Press the relevant speed dial button once to enter a number under the first
level of this button. Press twice to enter a number on the second level of this
button.
The display shows »Z« with the number of the button.
Enter the number with area code. You can also enter attributes along with the
number.
ok Press the softkey key under »ok« if you want to save the number without at-
tributes.
Or…
To assign a function to the speed dial button,
Press the softkey under »
«.
The display shows »ok, Function,
, «.
Function Press the softkey under »Function«. In the first line of the display »Z« is shown
followed by »F«.
Enter the function code obtained from the functions list.
ok Press the softkey under »ok« to save the function.
Page 62

58
203220671en_ba_a0
A dditional settings
Functions list
F01 Manual rejection of incoming calls
F02 xx..xx Send DTMF
F03 xx..xx Send keypad
F04 xx Park/fetch active call via Code xx
F05 MCID
F06 Three-party conference
F07 Connect
F08 Microphone off (Mic Mute) and on
F11 xx..xx Direct dial
F21 xx..xx Unconditional call forwarding to number xx..xx
F22 xx..xx Call forwarding to number xx..xx on no answer
F23 xx..xx Call forwarding to number xx..xx on busy
F25 Activates and deactivates the call filter for the active user
F31 Activate user A
F32 Activate user B
F33 Activate user C
F34 Activate user D
F35 Activate user E
F51 Send SMS (with editing option)
F52 Send SMS directly
➭ You can also save these functions in the phonebook. Follow the same procedure de-
scribed in the chapter »Phonebook« under »Assigning attributes to numbers« but enter a
function instead of an attribute.
Changing the speed dial settings
Press the menu button repeatedly until the display shows »Settings«.
Press the softkey repeatedly under »
« until the display shows »Speed dial«.
change Press the softkey under »change«.
Press the speed dial button whose setting you want to change once for the first
number or function or twice for the second number or function.
The number or function is displayed. The cursor is positioned under the first
character.
del To delete the entire number or function, press the softkey repeatedly under
»del« until the number or function is fully deleted.
Enter the function or the new number with area code.
ok Press the softkey under »ok« to save the entry.
Page 63

59
203220671en_ba_a0
A dditional settings
Set date and time
Normally there is no need to set the date and time since these are automatically updated by the
network with every outgoing call. If the time display is flashing following a power cut or on
startup, the first outgoing call you make will update the date and time.
You can also set the date and time manually:
Press the menu button until »Installation« is displayed.
Press the softkey repeatedly under »
« until the display shows »Date/Time«.
change Press the softkey repeatedly under »change« until the date is displayed.
Enter the date in ddmmyy format without separating dots.
Example: 20. January 2001 = 200101.
ok Press the softkey under »ok« to show the time.
Enter the time in 24-hour hhmm format without separating dots.
Example: 4.08 p.m. = 1608.
ok Press the softkey repeatedly under »ok« to show »Date/Time« again.
To exit the menu, press the EXIT button.
➭ The time will be updated again by the network with the next outgoing call.
Interception circuit (Malicious Call ID)
This service is available on request. It allows calls to be monitored during the connection and the
data retained up to 20 seconds after the handset is replaced. The exchange registers the calling
number, date and time, even if the caller has suppressed his number (CLIR).
If you subscribe to this service you can activate it at the touch of a speed dial button, see
»Programming speed dial buttons«.
The display shows that a caller has suppressed his number.
Lift the handset.
Press the softkey repeatedly under »
« until »MCID« is shown.
MCID Press the softkey under »MCID«. MCID is activated.
Page 64

60
203220671en_ba_a0
A dditional settings
CLIR Calling Line Identification Restriction
This service must be ordered from Swisscom.
When you make a call, your number is shown on the other person’s phone if it supports this
function.
Top A47
ISDN
users can suppress their number.
Select the user.
Press the menu button until »Settings« is displayed.
Press the softkey repeatedly under »
« until the display shows »Suppl. serv-
ices«.
change Press the softkey under »change«. The display shows »CLIR« The current status
»off« or »on« is shown.
change Press the softkey under »change«. The second line shows which status you can
select.
Press the softkey under the active status to change it.
If you do not want to change the status, proceed to the next step.
ok Press the softkey under »ok« to save the status.
To exit the menu, press the EXIT button.
➭ If you have selected »on«, your number is not shown to any calling partners.
➭ To suppress your number on the other person’s phone for a single call, press the softkey
under »
«. The display shows »Suppress No.«. Your number is suppressed for this call.
Page 65

61
203220671en_ba_a0
A dditional settings
Suppress call waiting
If a second call comes in while you are making a call, you hear a call waiting signal.
Every user can deactivate call waiting in order to avoid being disturbed during calls.
Select the user.
Press the menu button until »Settings« is displayed.
Press the softkey repeatedly under »
« until the display shows »Suppl. serv-
ices«.
change Press the softkey under »change«. The display shows »CLIR«
Press the softkey repeatedly under »
« until the display shows »Call waiting«
appears. The current status »off« or »on« is shown.
change Press the softkey under »change«. The second line shows which status you can
select.
Press the softkey under the active status to change it.
If you do not want to change the status, proceed to the next step.
ok Press the softkey under »ok« to save the status.
To exit the menu, press the EXIT button.
Page 66

62
203220671en_ba_a0
A dditional settings
Setting autodial
If the person you are calling is busy, you can set »Callback on busy« or autodial, see »Callback/
autodial«.
For autodial you need to program the number of dialling attempts and the interval between
them.
These settings apply to all users.
Press the menu button until »Installation« is displayed.
Press the softkey repeatedly under »
« until the display shows »Autodial«.
change Press the softkey under »change«. The current autodial setting is shown.
change Press the softkey under »change«.
Enter the number of times you want to autodial. This overwrites the existing
setting.
ok Press the softkey under »ok« to save the setting.
Press the softkey under »
«. The display shows the interval between autodial
attempts in seconds.
change Press the softkey under »change«.
Enter the interval in seconds between autodial attempts. This overwrites the
previous setting.
ok Press the softkey under »ok« to save the setting.
To exit the menu, press the EXIT button.
➭ Autodial: 1 to 99, interval: 5 to 240 seconds.
Page 67

63
203220671en_ba_a0
A dditional settings
Setting the ringing melody and volume
You can set the melody and volume of the ring for individual users.
Select the user.
Press the menu button until »Settings« is displayed.
Press the softkey repeatedly under »
« until the display shows »Ringing
tone«.
change Press the softkey under »change« until the display shows »Melody 1:«. The
melody is played.
Press the softkey under »
« to display and play other melodies.
ok Once you have decided on a melody, press the softkey under »ok«. The display
then shows »Volume«.
Set the volume by pressing the softkey under »
« for lower and » « for
higher.
ok Press the softkey under »ok« to confirm your selection. From now on your
phone will ring with this melody for the set user.
To exit this menu, hold down the EXIT button.
➭ The volume can also be set to »0«. In this case you hear no ringing melody, the symbol
»Ringing tone off«
is displayed and the LED is lit.
➭ The LED flashes to indicate an incoming call.
Page 68

64
203220671en_ba_a0
Setting the language
Your Top A47
ISDN
is delivered with German as the display language. You have the choice of the
following languages: German, French, Italian or English.
The language setting is user-independent. You cannot set different languages for different users
i.e. German for User A and English for User B.
Press the menu button until »Installation« is displayed.
Press the softkey repeatedly under »
« until the display shows »Language«.
change Press the softkey under »change«. The current language setting is shown in the
first line, following by all language options in the second line.
Press the softkey under the language you want to set.
ok Press the softkey under »ok«. All displays are now in the set language.
Individual user charges, call charge total
Advice of charge
You can display the charges per user as well as the charge total for all calls made from the telephone.
Select the user.
Press the menu button until »Functions« is displayed.
Press the softkey repeatedly under »
« until the display shows »Taxes:«. This
is followed by the total charged to the active user.
Info Press the softkey under »Info«. The display shows the taxes charged to the ac-
tive user.
ok Press the softkey under »ok«. The display shows the total taxes charged to the
phone.
ok Press the softkey under »ok«. »Taxes« is again displayed.
To exit the menu, hold down the EXIT button.
Deleting user charges
Select the user.
Press the menu button until »Functions« is displayed.
Press the softkey repeatedly under »
« until the display shows »Taxes:« ap-
pears. This is followed by the total charged to the active user.
change Press the softkey under »change«. The display shows the taxes charged to the
active user.
A dditional settings
Page 69

65
203220671en_ba_a0
del Press the softkey under »del«. »Are you sure?« is displayed
Yes Press the softkey under »Yes« to delete the active user’s taxes.
To exit the menu, press the EXIT button.
➭ The overall amount is the total amount of taxes charged to all users and cannot be de-
leted directly. Only if you delete all user-specific tax totals will the overall amount be deleted.
➭ Note that for technical reasons the displayed charges may differ from the amount billed.
The amount indicated on your telephone bill is binding.
➭ To display charges for the last 20 calls in the autodial list, press »i« next to each number.
Setting the contrast
To enhance the legibility of the display to changing light conditions in your room or office, you
can set the display contrast.
Press the menu button until »Installation« is displayed.
Press the softkey repeatedly under »
« until the display shows »Contrast«.
change Press the softkey under »change«. The current set contrast is shown.
Press the softkey under »
« or » « to change the contrast. You will immedi-
ately see the change.
ok Press the softkey under »ok«. »Contrast« is again displayed.
To exit the menu, press the EXIT button.
A dditional settings
Page 70

66
203220671en_ba_a0
Alarms
You can program your Top A47
ISDN
to remind you of a specific appointment (once-only or daily).
Setting alarms
Alarms can be set for individual users.
Select the user.
Press the menu button until »Functions« is displayed.
Press the softkey key under »
« until »Alarm« is displayed with the current
status.
change Press the softkey under »change«. The display shows »Interval« and the status.
Press the softkey key under the interval you wish to set.
»Daily«: Every day you will be reminded at the set time.
»Once«: You will be reminded of the appointment on the date you have set.
ok Press the softkey under »ok«. The display shows »Time:« and the actual time.
The cursor is positioned under the first digit.
Enter the time of the appointment. If you have made a mistake, press the mi-
nus key to return and overwrite the error.
ok Press the softkey under »ok«.
To exit the menu, hold down the EXIT button.
Deleting an alarm
Press the menu button until »Functions« is displayed.
Press the softkey key under »
« until »Alarm« is displayed with the current
status.
change Press the softkey under »change«. The display shows »Interval« and the status.
off Press the softkey under »off«.
ok Press the softkey under »ok«.
To exit the menu, hold down the EXIT button.
A dditional settings
Page 71

67
203220671en_ba_a0
A dditional settings
Text message
You can send text messages to other persons with an ISDN phone which supports UUS (User-toUser Signalling service). This is not the same as SMS messaging.
Since not all ISDN phones support UUS signalling, check with the other party before sending a
message.
Press the menu button until »Functions« appears.
Press the softkey key under »
« until »Mail (UUS)« is displayed.
send Press the softkey under »send«. The display shows »Text«.
Write your message. Press the softkey under »A->a« to switch between upper
and lower case lettering.
ok Press the softkey under »ok«. The display shows »Dial:«.
Enter the number to which the message is to be sent.
You can also send to a number in the phonebook.
Press the softkey under »
« to select any attributes for the number.
Lift the handset to establish the connection and send your message.
Page 72

68
20322071en_ba_c0
Short Message Service (SMS)
Options
Your telephone can receive, write and send SMS messages.
A single SMS can be up to 160 characters in length.
Connections
SMS messaging is possible with the following:
• Mobile phone: send/receive
• Fixed telephone network
(device-dependent): send/receive
• Information services*: receive only
(information such as railway schedules, stock market prices etc.)
* These services are not yet available!
The launch date will be sent to you by SMS.
Storage capacity
The storage capacity for (received) SMS messages is limited: Your phone can store up to 15 SMS
messages. The oldest is overwritten as soon as this limit is exceeded!
➭ Delete SMS messages once you have read or sent them, to save on storage space! Only
save very important messages or drafts!
➭ For technical reasons (e.g. charging), every SMS message must be delivered to MSNs, even
if you have suppressed them.
➭ SMS messaging is subject to a charge.
SMS gateway number
All SMSs you send are always first sent via a gateway. The gateway number (081 286 61 30) is
already programmed in your telephone.
➭ If you need to change the SMS gateway number, enter the new number in the
"Functions/Messages/SMS gateway number" menu.
!!!
Page 73

69
20322071en_ba_a0
Short Message S ervice (SMS)
Incoming SMS message signalling
Incoming, unread SMS messages are signalled by a flashing LED, the SMS symbol »
« on the
display and the number of messages received. The number outside the brackets is the number
of SMS messages for the active user. The number inside brackets is the total number of SMS
messages received. An acoustic signal sounds twice to alert you to a new incoming SMS message.
You can switch this signal on or off as follows:
Press the menu button again. »Functions« appears in the display.
Press the softkey repeatedly under »
«. »Messages (SMS)« appears in the
display.
change Press the softkey under »change«.
Press the softkey repeatedly under »
«. »SMS Tone:« appears in the display.
along with the current status, »on« or »off« and, in the second line, »change,
, «.
change Press the softkey under »change«. The second line shows which status you can
select.
off Press the softkey under »off« or »on«.
ok Press the softkey under »ok«. The signal tone is deactivated/activated.
To exit the menu, hold down the EXIT button.
Handling SMS messages
Read SMS
Select the user. Incoming calls/SMS messages (» «) are displayed for the active
user outside the brackets.
Press the softkey under the SMS symbol »
« or the number of incoming calls/
SMS messages. The display shows the name or number of the caller/sender. If
an SMS has been received, the SMS pictogram »
« is shown in the second line.
Press the softkey under the SMS symbol »
«. The message is displayed. Use the
softkey under »
, « to scroll down/up the text.
If you want to know the date and time the SMS was received, press the softkey
under »i« rather than under the SMS symbol »
«. The date and time are dis-
played.
Page 74

70
20322071en_ba_a0
Short Message S ervice (SMS)
Delete, reply to, forward or save SMS
ok You have read the SMS and pressed the softkey under »ok«. »process mes-
sage« appears in the display.
To delete the SMS:
del Press the softkey under »del«. »delete SMS?« appears in the display. If you
want to delete the SMS, press the softkey under »Yes«, if not press under
»No«.
Or…
You have read the SMS and want to reply:
respond Press the softkey under »respond«. The display shows the sender’s SMS. Delete
unnecessary text by pressing the softkey under »del«.
delete all To delete the entire text, press the softkey under »delete all«.
Enter your message (see also »Entering number and name«).
ok Press the softkey twice under »ok«. »in process« appears in the display.
Or…
You have read the SMS and want to forward it:
Press the softkey under »
«. »forward« appears in the display.
forward Press the softkey under »forward«. The display shows the sender’s SMS.
ok Press the softkey under »ok«. »No.:_« appears in the display.
Enter the number with area code or, if the number is in your phonebook, press
the softkey under »
«.
Keep pressing the softkey under »
, « until you find the number.
ok Press the softkey under »ok«.
ok Press the softkey again under »ok«. The SMS is sent.
Or…
You have read the SMS and want to save it:
Press the softkey under »
«. »save« appears in the display.
save Press the softkey under »save«. The SMS is saved.
➭ The storage capacity of your phone is limited (see also »Storage capacity«).
➭ The SMS is removed from the caller list after saving and can now be found in the »Mes-
sages« / Submenu »Saved SMS« menu.
Page 75

71
20322071en_ba_a0
Short Message S ervice (SMS)
Create, send or save SMS
Select the user.
Press the menu button until »Functions« is displayed.
Press the softkey repeatedly under »
«. »Messages (SMS)« appears in the
display.
change Press the softkey under »change«.
Press the softkey under »
«. »SMS« appears in the display.
send Press the softkey under »send«.
To send the SMS to a mobile phone or an ISDN phone which supports SMS:
Write your message.
ok Press the softkey under »ok«. »No.:_« appears in the display.
Enter the number with area code or, if the number is in your phonebook, press
the softkey under »
«.
Keep pressing the softkey under »
, « until you find the number.
ok Press the softkey under »ok«.
ok Press the softkey again under »ok«. The SMS is sent.
Or…
To save the SMS for sending at a later stage:
save Press the softkey under »save«. The SMS is saved.
…Continue
To exit the menu, hold down the EXIT button.
➭ The last-written message appears in the entry field ready for re-sending.
Page 76

72
20322071en_ba_a0
Short Message S ervice (SMS)
Retrieve, send or delete saved SMS
To retrieve saved SMS messages:
Select the user.
Press the menu button repeatedly. »Functions« appears in the display.
Press the softkey repeatedly under »
«. »Messages (SMS)« appears in the
display.
change Press the softkey under »change«.
Press the softkey repeatedly under »
«. »Saved SMS« appears in the display.
change Press the softkey under »change«. The display shows the first saved SMS.
Keep pressing the softkey under »
, « to scroll through all saved SMS
messages.
➭ The SMS symbol with arrow indicates whether the message was received
»
« (Info function »i« available ) or whether it is an unsent » « SMS.
• Read SMS
Press the softkey under the SMS symbol. The message is displayed.
Use the softkey under »
, « to scroll down/up the text. At the end of the
text the second display line shows »
, ok«.
ok Press the softkey under »ok«. »Send message?« appears in the display.
No Press the softkey under »No«
Or…
• Check the date/time of receipt
Press the softkey under »i«. The display shows the date/time when the saved
SMS was received.
back Press the softkey under »back«.
Or…
• Send SMS
ok You have read the SMS and see » , ok« in the second display line. Press the
softkey under »ok«. »Send message?« appears in the display.
Yes Press the softkey under »Yes«. The message is displayed.
ok Press the softkey under »ok«. »No.:_« appears in the display.
Enter the number with area code or, if the number is in your phonebook,
press the softkey under »
«.
Page 77

73
20322071en_ba_a0
Short Message S ervice (SMS)
Keep pressing the softkey under » , « until you find the number.
ok Press the softkey twice under »ok«. The SMS is sent.
Or…
• Delete SMS
del Press the softkey under »del«. The SMS is deleted.
…Continue
To exit the menu, hold down the EXIT button.
Page 78

74
20322071en_ba_a0
Short Message S ervice (SMS)
Using Info services
These info services are not yet available.
The launch date will be sent to you by SMS.
You can access various information services via SMS e.g. to check on train connections, stock
market prices etc.
Some service numbers
Service No. Code
SBB timetable 222 Place_Place
Share prices (CH) 305 (acc. to share)
Weather forecast 309 METEO
Examples: Checking train connections or share prices
To find out the next train from Zurich to Berne or the current price of Swisscom shares:
Press the menu button repeatedly. »Functions« appears in the display.
Press the softkey repeatedly under »
«. »Messages (SMS)« appears in the
display.
change Press the softkey under »change«.
Press the softkey under »
«. »Send SMS« appears in the display.
ok Press the softkey under »ok«. »Text:_« appears in the display.
Enter »Zürich Bern« (separated by a space) for the route.
Or…
Enter »SCMN« for the share price index.
…Continue
ok Press the softkey under »ok«. »No.:« appears in the display.
Enter »222« (for train connection) or »305« (for share prices).
ok Press the softkey under »ok«.
To exit the menu, hold down the EXIT button.
After a brief interval you will receive an SMS with the answer to your query.
!!!
Page 79

75
20322071en_ba_a0
Short Message S ervice (SMS)
SMS functions on speed dial buttons
For faster, simpler access to frequently used services you can program a speed dial button (with
function F51 or F52), see »Programming speed dial buttons«.
➭ Your TOP A47
ISDN
is delivered with the first speed dial key programmed for »Send SMS«
(F51).
Examples: Using functions F51 and F52
To program a speed dial button for accessing the »SBB timetable« service:
Save the function and service number e.g. »F51222#« under the speed dial
button. To access this service rapidly, press the speed dial button.
Enter the text e.g. »Zürich Bern«.
ok Press the softkey under »ok«. The SMS query is sent.
Or…
To program a speed dial button to dial a service and receive a response without
entering a query:
Save the function and service number e.g. »F52305#SCMN« under the speed
dial button. To access this service rapidly, press the speed dial button.
…Continue
After a brief interval you will receive a reply via SMS.
To exit the menu, hold down the EXIT button.
Page 80

76
20322071en_ba_a0
PBX operation
You can also connect your Top A47
ISDN
to a PBX. The attributes may vary dependent on your
PBX. Please refer to your PBX user manual before connecting the telephone.
You can also program several users when connected to a PBX and assign them different exten-
sion numbers.
PBX operation on/off
Operation with a PBX is user-independent.
Check whether PBX operation is activated and activate it if necessary:
Press the menu button repeatedly until the display shows »Installation«.
Press the softkey key under »
« until »PBX« is displayed.
change Press the softkey under »change«. The first line of the display shows »PBX op-
eration« with the current setting (on/off, default: off), while the second line
shows »ok« and the opposite of the current status.
Press the softkey under the status in the second line.
ok Press the softkey under »ok«. The setting is saved.
To exit the menu, hold down the EXIT button.
➭ To connect your Top A47
ISDN
to an ISDN PBX, generally you need to merely activate PBX
mode. All system settings (e.g. EAC, automatic keypad sending etc.) are activated.
➭ Should your phone fail to operate to your satisfaction, check the following system set-
tings.
Page 81

77
20322071en_ba_a0
PBX operation
EAC
Most system require the EAC to be set to access a public line for external calls from your PBX. If
your PBX does not automatically insert the EAC, you need to program it:
Press the menu button repeatedly until the display shows »Installation«.
Press the softkey key under »
« until »PBX« is displayed.
change Press the softkey under »change«. The display shows »PBX operation« with the
current setting (on/off, default: off).
Press the softkey key under »
« until »Outgoing EAC« is displayed.
change Press the softkey under »change«. The cursor is positioned under the first EAC
digit.
del If a number is already set, delete it by pressing the softkey under »del« until it
is deleted.
Enter the new EAC (up to 4 digits) as instructed by your PBX manual. 0, 9 or 99
are frequently used.
ok Press the softkey under »ok«. The setting is saved.
To exit the menu, press the EXIT button.
Page 82

78
20322071en_ba_a0
PBX operation
Entering EAC for incoming calls
External calls which are sent to your phone via the PBX are also stored in your call log. To reply
to these numbers, the EAC must be inserted. Some PBXs automatically insert the EAC, in which
case you need to make no changes to the default setting.
Press the menu button repeatedly until the display shows »Installation«.
Press the softkey key under »
« until »PBX« is displayed.
change Press the softkey under »change«. The display shows »PBX operation« with the
current setting (on/off).
Press the softkey key under »
« until »Incoming EAC« is displayed with the
current EAC.
change Press the softkey under »change«. The second line shows the inactive status.
del If a number is already set, delete it by pressing the softkey under »del« until it
is deleted.
Enter the new EAC (up to 4 digits) as instructed by your PBX manual. 0, 9 or 99
are frequently used.
ok Press the softkey under »ok«. The setting is saved.
To exit the menu, press the EXIT button.
➭ You can conduct a test to check on the settings you need:
After connecting your phone, have an external person call you. If the display shows the
EAC e.g. 0 in front of the caller’s number, the phone must be set to »on«.
Do not confuse the 0 of an area code (e.g. 031) with the EAC. Such area codes must still
be prefixed with 0 for the EAC.
Page 83

79
20322071en_ba_a0
Internal number length
For PBX operation, the length of internal numbers (number of digits) must be programmed to
enable internal calls to be distinguished from external calls (the phone is delivered with the internal number length set to 4 digits).
Press the menu button repeatedly until the display shows »Installation«.
Press the softkey key under »
« until »PBX« is displayed.
change Press the softkey under »change«. The display shows »PBX operation« with the
current setting (on/off).
Press the softkey under »
« until »Int. no. length« appears with the actual
setting (default: 4 digits).
change Press the softkey under »change«.
Press the softkey under »
« or » « to change the setting.
ok Press the softkey under »ok«. The new internal number length is saved.
To exit the menu, press the EXIT button.
➭ For further information on internal number lengths, refer to your PBX documentation.
Setting the transfer type
To transfer calls within the PBX system, you need to set the transfer type. This obligatory switching type setting (functional or disconnect) depends on your PBX.
Press the menu button repeatedly until the display shows »Installation«.
Press the softkey key under »
« until »PBX« is displayed.
change Press the softkey under »change«. The display shows »PBX operation« with the
current setting.
Press the softkey key under »
« until »Connect« is displayed with the active
status (default: EURO).
change Press the softkey under »change«. The second line shows the inactive status.
Press the softkey under the inactive status to activate it.
ok Press the softkey under »ok«. The setting is saved.
To exit the menu, press the EXIT button.
➭ You can conduct a test to check on the settings you need:
During a call, set up a second call with »Enquiry« and try to connect both call partners,
see »Transferring calls«. If this fails, you need to change the transfer type.
PBX operation
Page 84

80
20322071en_ba_a0
PBX operation
Call transfer on-hook
You can transfer a call within the PBX system or externally (your network provider must support
this service) by replacing the handset. You need to program the phone for this function:
Press the menu button repeatedly until the display shows »Installation«.
Press the softkey key under » « until »PBX« is displayed.
change Press the softkey under »change«. The display shows »PBX operation« with the
current setting.
Press the softkey key under »
« until »Transfer on-hook« is displayed with
the active status (default: off).
change Press the softkey under »change«. The second line shows the inactive status.
Press the softkey under the inactive status to activate it.
ok Press the softkey under »ok«. The setting is saved.
To exit the menu, press the EXIT button.
➭ For »Transfer on-hook:: off«, the active call is terminated when the receiver is replaced,
and the held call is signalled.
➭ For »Transfer on-hook:: on«, the active call is transferred to the held call when the re-
ceiver is replaced.
Page 85

81
20322071en_ba_a0
PBX operation
Keypad information
Keypad information is data which converts keypad codes (e.g. numbers) to specific functions in
the PBX. Normally the star or hash key are used to switch to keypad information.
Your PBX documentation will advise you which keypad functions are available.
Keypad before dialling
On-hook dialling:
or Press the star or hash key first. The phone switches to »Keypad transfer«.
Enter the relevant keypad function. Complete the function by pressing the star
or hash key again.
Lift the handset or press the loudspeaker key if on speakerphone mode. The
keypad information is sent to the PBX.
Send keypad during a call
You are conducting a call and the display shows the calling partner’s number:
Press the softkey key under »
« until »Keypad« is displayed.
Keypad Press the softkey under »Keypad«.
Enter the relevant keypad function. The information is sent to the PBX.
➭ Frequently used keypad functions can be activated via speed dial buttons, see »Program-
ming speed dial buttons«.
Page 86

82
20322071en_ba_a0
PBX operation
Send automatic keypad on/off
If the asterisk or hash button is pressed before dialling, the telephone automatically switches to
»Keypad signalling« (default setting: on). In some PBXs e.g. those in which automatic EAC selection is activated, you need to deactivate automatic keypad sending to initiate internal calls by
pressing the star key.
Press the menu button repeatedly until the display shows »Installation«.
Press the softkey key under »
« until »PBX« is displayed.
change Press the softkey under »change«. The display shows »PBX operation« with the
current setting.
Press the softkey key under »
« until »Keypad auto.« is displayed with the
current setting (on/off).
change Press the softkey under »change«. The second line shows the inactive status.
Press the softkey under the inactive status to activate it.
ok Press the softkey under »ok«. The setting is saved.
To exit the menu, press the EXIT button.
Page 87

83
20322071en_ba_a0
Appendix
Renumbering
If a country introduces renumbering (national access code changed), you can preprogram the
national prefix for Switzerland and the international prefix for calls abroad:
Setting the national prefix (TSD)
The national prefix is the first digit of a prefix. In Switzerland this is »0«. The Swiss Office for
Communications BAKOM may change this digit in future.
This preprogrammed number must only be changed or deleted if you are unable to make inland
calls from the log or caller list. If you encounter this problem and are connected to a PBX, please
refer to the chapter on »PBX operation«.
Press the menu button until »Installation« appears.
Press the softkey repeatedly under »
« until »Location« is shown.
change Press the softkey under »change«. »National TSD« appears.
change Press the softkey under »change«. The display shows the preprogrammed na-
tional TSD and the cursor.
Enter the relevant national TSD (the preset »0« is overwritten).
ok Press »ok« to confirm.
Setting the international TSD
The international TSD is the international prefix you need to dial before the national/regional
prefix. The Swiss Office for Communications BAKOM may change this prefix in future.
This pre-programmed number must only be changed or deleted if you are unable to make international calls from the log or caller list. If you encounter this problem and are connected to a
PBX, please refer to the chapter on »PBX operation«.
Press the menu button until »Installation« appears.
Press the softkey repeatedly under »
« until »Location« is shown.
change Press the softkey under »change«. »National TSD« appears.
Press the softkey repeatedly under »
« until the display shows »International
TSD«.
change Press the softkey under »change«. The display shows the preprogrammed in-
ternational TSD 00 and the cursor.
Enter the relevant international TSD (the preset »0« is overwritten).
ok Press »ok« to confirm.
Page 88

84
20322071en_ba_a0
Appendix
Emergency operation
Your phone can still be operated in emergency mode during power failures. How you activate
emergency mode depends on your phone connection.
Emergency operation on network termination unit (NT+2ab)
If your phone is directly connected to the NT+2ab bus, the emergency power is supplied directly
by the exchange. This provides sufficient power for one phone. Not all the features are available
in emergency mode. However, you can still make and receive calls.
To set a telephone for emergency operation:
Remove the cover of the speed-dial label field by slipping a fingernail under
the edge and lifting the cover and label field.
A snap-in key is revealed:
Press it in until it snaps into position. Emergency
mode is activated.
Release the snap-in key with your finger nail or a
hard object e.g. a small coin or the tip of a screwdriver. Emergency mode is deactivated.
➭ If you set more than one telephone for emergency operation, none of the telephones are
able to function.
Emergency operation on a PBX
If your phone is connected to a PBX, the system supplies the emergency power. The type of PBX
dictates which features are available during emergency operation and how many phones are capable of emergency operation. Refer to your PBX documentation.
For PBX operation you still need to enable your phone for emergency operation (see previous
section).
Page 89

85
20322071en_ba_c0
Appendix
Resetting the telephone
You can reset the telephone to default status as follows:
Press the menu button repeatedly until the display shows »Installation«.
Press key 1. The display shows »Service menu«.
Press the softkey repeatedly under »
« until the display shows »Reset full«.
execute Press the softkey under »execute«. The phone is reset to the factory setting.
➭ »Full reset« deletes all settings e.g. call transfer procedure, EAC etc., and all the data you
have stored e.g. phonebook entries, speed dial buttons etc.
Headset connection
You can fit your Top A47
ISDN
with a headset instead of the handset (optional accessory: headset
and microphone).
The headset is only available from specialist outlets. If you buy the headset in a specialist outlet,
make sure it is compatible with your Top A47
ISDN
.
For details on how to connect and operate the headset, refer to the headset instructions.
The following settings need to be made before you operate the headset:
Press the menu button until »Installation« appears.
Press the softkey repeatedly under »
« until the display shows »Headset«.
change Press the softkey under »change«. The first display line shows the current sta-
tus: on or off.
Press the softkey under the alternative status in the second display line. The sta-
tus is activated.
ok Press the softkey under »ok«. The setting is saved.
To exit the menu, hold down the EXIT button.
➭ To conduct calls via the headset, press the loudspeaker button on your phone.
➭ To make calls, dial the number then press the loudspeaker button.
➭ Refer also to the instructions for your headsest.
Page 90

86
20322071en_ba_a0
Appendix
Software version
You can display the name and checksum of the software version installed in your Top A47
ISDN
.
Press the menu button until »Installation« appears.
Press the softkey repeatedly under »
«until the display shows »Software«.
Info Press the softkey under »Info«. The first display line shows the installed soft-
ware version.
Press the softkey repeatedly under »
« until the display shows »Checksum«.
execute Press the softkey under »execute«. The checksum is calculated and displayed.
This may take several seconds.
To exit the menu, hold down the EXIT button.
➭ You need to give the software version and checksum when you contact Swisscom with a
problem.
PC dialling option (PC Dialer III)
The PC Dialer III is an add-on for the Top A47
ISDN
that enables Computer Telephone Integration
(CTI).
The software delivered with the PC Dialer II contains a TAPI driver and a program for configuring
the Top A47
ISDN
and downloading phonebook entries from the PC to the Top A47
ISDN
. Calls are
then automatically shown on the screen and stored in the PC.
The TAPI driver allows you to connect certain database programs directly to your Top A47
ISDN
.
Since the PC-Dialer III software is subject to continual further development, the latest developments cannot always be included in the CD-Rom delivered with the phone.
However, you can download a free software update from
www.estos.de/euritelpro/. Once
you have accessed this site, select
Download Updates and start the download by clicking on
EuriTel Pro Version 1.0. Information on the specific software modifications is also available un-
der
EuriTel Pro Releasenotes.
To perform an update via your computer, download and execute the update file from the home
page given above. The setup is started, automatically recognises an existing installation and performs a correct update.
Page 91

87
20322071en_ba_c0
Appendix
Remote download of device software
The Top A47
ISDN
software is continually adapted to the state of the art. You can download the
latest software to your phone in a matter of minutes via the telephone line. If you already have
the most recent software version installed in your phone, the connection is cleared within a few
seconds. The access number (0800 855 515) for remote download is saved in the phone.
Press the menu button repeatedly until the display shows »Installation«.
Press the softkey repeatedly under »
« until the display shows »Software«.
Info Press the softkey under »Info«. The display shows »Version« with the current
software version.
Press the softkey repeatedly under »
« until the display shows »SW Update«.
change Press the softkey under »change«. The display shows the set access number for
remote download, and underneath »ok«.
ok Press the softkey under »ok«. The display shows »Execute?« and underneath
»No« and »Yes«.
Yes Press the softkey under »Yes«. The download is started.
The display shows the percentage progress of the download (0% to 100%).
The download process is completed when the display shows »Update successful«.
ok Press the softkey under »ok« to return to standby mode.
If the remote download fails, a new access number may need to be set. If in
doubt, contact the Swisscom Information Service (freephone 0800 800 800).
Under no circumstances unplug the connection cable from the telephone
during a download.
!!!
!!!
Page 92

88
20322071en_ba_a0
Appendix
Troubleshooting
If your telephone is not functioning as it should, try at first to find the fault in the following table.
The following tips should help you correct the fault:
Problem Possible Cause Remedy
No dialling tone. The connection cord is not Unplug the cord and plug it in
correctly plugged in. again.
No ringing tone heard after The connection type For PBX operation, make sure
dialling. (PBX operation) is not correctly your phone is set to the right
set. connection type.
Full functionality is not The phone is set to emergency Deactivate emergency mode.
available. mode.
No connection or wrong The connection type has not For PBX operation, make sure
number when dialling from yet been set. your phone is set to the correct
memory. connection type.
No dialling tone heard. Faulty ISDN installation, no Contact Swisscom or call your
Display shows terminating resistance on the network operator’s hotline.
»Faulty install.«. S bus, or network fault.
➭ Even if you have followed all the instructions correctly, faults may occur which are caused
by the exchange or installation errors.
Care
Your telephone is designed to provide a long, maintenance-free life.
Please note
• Do not dismantle the phone and try to repair it yourself. Swisscom is responsible for repairs.
Contact the fault service (Tel 175).
• Clean the outside of the phone at regular intervals, using a damp, soft cloth. For heavy soil-
ing, dab a little washing-up liquid on the cloth. Do not use abrasive agents or solvents since
they may damage the housing surface. Make sure no liquid penetrates the phone during
cleaning.
Page 93

89
20322071en_ba_a0
Appendix
Summary of default settings
Your phone is delivered ready for general-purpose use, to enable you to use and connect it
straight away. These settings can be changed to your personal needs and connection requirements. Refer to the relevant function description.
The following is a list of default settings which remain valid even after a reset (see »Reset«):
Function default Options
Display language German German, French,
Italian, English
Autodial buttons First speed dial button set for 6 dual-programmable
»Send SMS«. Remaining
buttons not programmed.
Date/time Setting dependent on Automatically updated by
Software status network
Ringing melody Melody 1, volume 4 1 to 7 and ringing tone off
Telephone phonebook No entries up to 100 entries
Autodial list No entries —
Caller list No entries —
Connection type ISDN basic access PBX, ISDN basic access
Incoming/outgoing access code
None (no entry) User-specific entry
CLIR Off On, off
Call waiting On On, off
Alarm Off On, off
Park code 1 User-specific entry
MSN Non User-specific entry
Display contrast medium User-specific entry
Call forwarding Off On, off
PBX operation Off On, off
Internal number length 4 0 to 20
Call transfer on-hook Off On, off
On-hook transfer Off On, off
Send keypad automatically On On, off
Direct call (hotline) Off, no number On, off
Call filter Off On, off
Headset Off On, off
Smiley button ETV® Online preprogrammed
Page 94

90
20322071en_ba_a0
Appendix
Technical Data
Model Top A47
ISDN
ISDN phone
Connection Basic access
Protocol DSS1 (Euro-ISDN)
Ambient temperatures Operation +5º C to +45º C
Transport -25º C to +70º C
Storage -25º C to +55º C
Data storage approx. 10 years (no battery required)
Dimensions (LxBxH) 215 mm x 189 mm x 53 mm
Safety tips
Note the following precautions to protect yourself from physical harm:
Never
– open the telephone yourself.
– Touch contacts with sharp, metallic objects
Stow connection cables carefully to avoid tripping over them.
Note the following tips for positioning, connecting and operating the telephone.
• Position the telephone away from:
– heat sources,
– direct sun,
– other electrical equipment.
• Protect your telephone against dust and avoid getting it wet or exposing it to aggressive liq-
uids and steam.
• Do not plug the connection cord in sockets other than the one for which it is intended.
• Connect only authorised accessories.
• Clean the telephone with a soft, damp cloth. Abrasive cleaning agents or solvents are not
suitable.
• The telephone may only be repaired by authorised service personnel.
Swisscom accepts no liability for damage resulting from inappropriate use.
Page 95

91
20322071en_ba_c0
Appendix
Repair/maintenance
If your Top A47
ISDN
is not functioning as it should, notify the fault service (Tel. 175).
Repairs are free of charge on rented telephones.
1)
The repair procedure is free of charge for
rented telephones.
For purchased telephones, repairs are free of charge within the guarantee period.
1)
A purchased
telephone must be returned to the sales outlet for repair. If the fault service is called on to repair
a purchased telephone (even during the guarantee period), a flat rate plus an hourly rate is
charged for the repair work.
1)
with the exception of damage due to improper use and parts subject to wear and tear (cables
etc.)
Assistance
For general questions on products, services etc., contact the Swisscom information desk
(freephone 0800 800 800).
Disposal
– Sort the packaging material and dispose of it at your local recycling depot. Do not allow chil-
dren to play with the packaging material.
– Make sure the telephone is disposed of correctly.
Approval and CE code
The Top A47
ISDN
is designed for operation in the Swiss ISDN network.
Country-specific provisions are taken into account. For questions on discrepancies between public telephone networks, contact your specialist dealer or network operator.
The CE symbol signifies conformity with the applicable directives for telephones connected to
the public network:
Page 96

92
20322071en_ba_b0
Appendix
Declaration of Conformity
Page 97

93
20322071en_ba_a0
Appendix
Phonebook
Settings
Functions
Taxes
Call FWD
Installation
Name Number
Attributes / Functions
Reaction
Type
User
Interval
No.
Total
Time
No.
Suppl. services
Ringing tone
Alarm
Hotline
Call waiting On / Off
Park Code Adjust
CLIR On / Off
Melody Volume
Call filter On / Off
Speed dial No. / Function / Attributes
see next page
Messages (SMS)
Saved SMS SMS list
SMS Tone On / Off
SMS Text
Gateway No No.
No.
Text
No.ETV
Text DialMail (UUS)
Menu structure
Page 98

94
20322071en_ba_a0
Appendix
Installation Set MSN
Date / Time
PBX
Headset
Contrast
Set MSN X
TimeDate
PBX operation
Outgoing EAC -
Incoming EAC
On / Off
MSN User
Adjust
On / Off
Outgoing EAC: _
Reset full Yes / No
1
Incoming EAC: _
On / OffTransfer on-hook
Service menu
On / OffKeypad auto.
Connect EURO / Disconnect
Autodial Sprache <DEUTSCH>
Dial interval Adjust
AdjustRedial
Language Adjust
Software Sprache <DEUTSCH>
Checksum ####
Version
SW Update Host No.
Provider Provider list Name
Auto. provider choice Prefix
Number
Provider
Location Sprache <DEUTSCH>
International TSD Adjust
AdjustNational TSD
Int. no. length 4 Adjust
ETV access number No.
-
Page 99

95
20322071en_ba_a0
Appendix
Write-on labels
Page 100

96
20322071en_ba_a0
Appendix
 Loading...