

Page 1
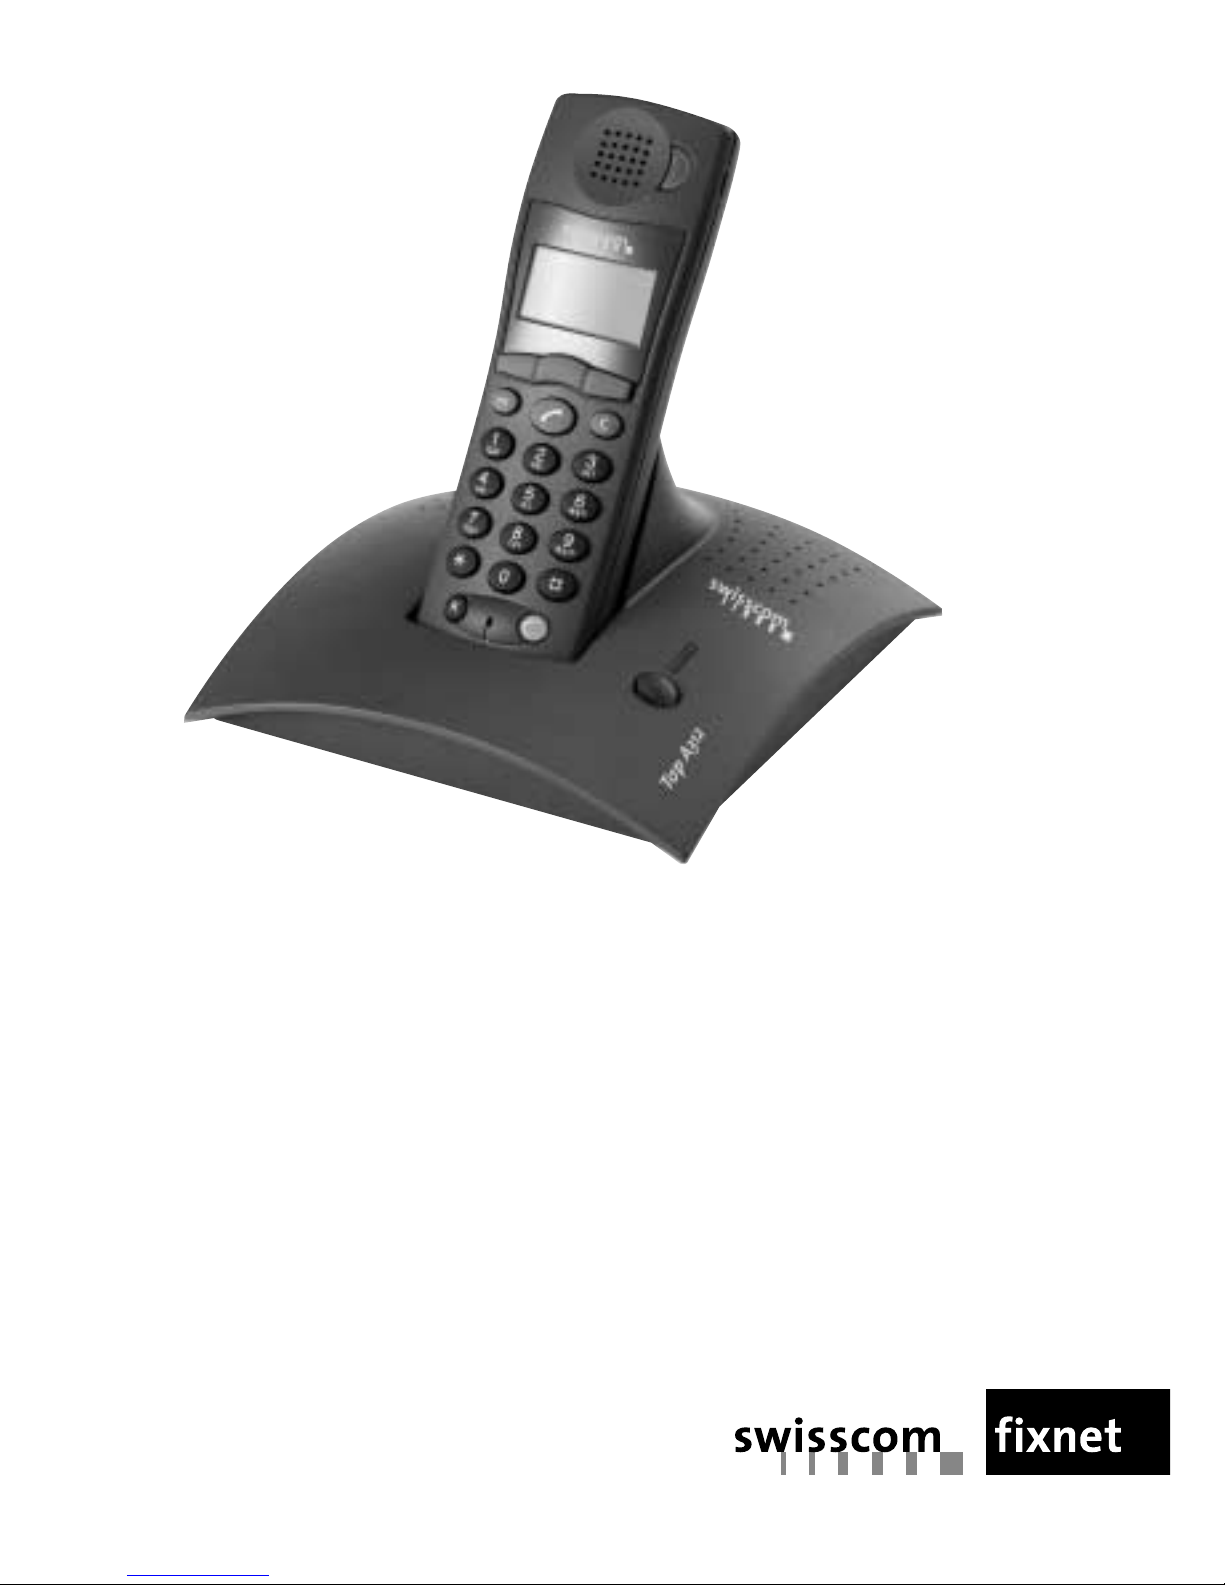
Top A312 / Top A412
User guide
Page 2

Dear customer
Thank you for purchasing one of our products.
About the set
In choosing the Top A312/Top A412 you have acquired a cordless telephone for analogue
connections that combines the advantages of flexibility with the user comfort of highquality telephones. The set itself features modern digital technology to the European
standard for cordless telephones (DECT). DECT technology features speech encryption
that provides a high level of security against unauthorised interception as well as crystalclear transmission.
In addition to the usual telephone features the Top A312/ Top A412 also offers:
• Menu guidance for all functions
• Directory (storage of up to 150 names and numbers)
• Adjustable charge meter
• Last number redial for the last 15 numbers
• Expansion option to a telephone system:
– operating up to 6 handsets on a base station
– free internal calls between 2 handsets
– Operating a handset on up to 4 base stations (option for extending the range)
• Hands-free operation
• Direct call/babyphone feature
• Digital answering machine (Top A412 only)
Safety notes
Please read all the safety notes before putting the set into operation:
• Safety notes
Operating the set
To make good use of all the features of your new telephone we recommend that you
read the following sections in particular:
• Setting up the telephone and putting it into service
• Basic settings and operation
• Setting the dialling method
• Setting the answering machine (Top A412 only)
Note:
This user guide describes the maximum extent of functions the Top A312/ Top A412 can
provide. Due to applicable country regulations or circumstances relating to the network
operator or provider, there may be some differences or limits to the functions or operation as described in this user guide.
If you have any questions, please contact the Swisscom Information Service
(freephone 0800 800 800).
A1
Page 3
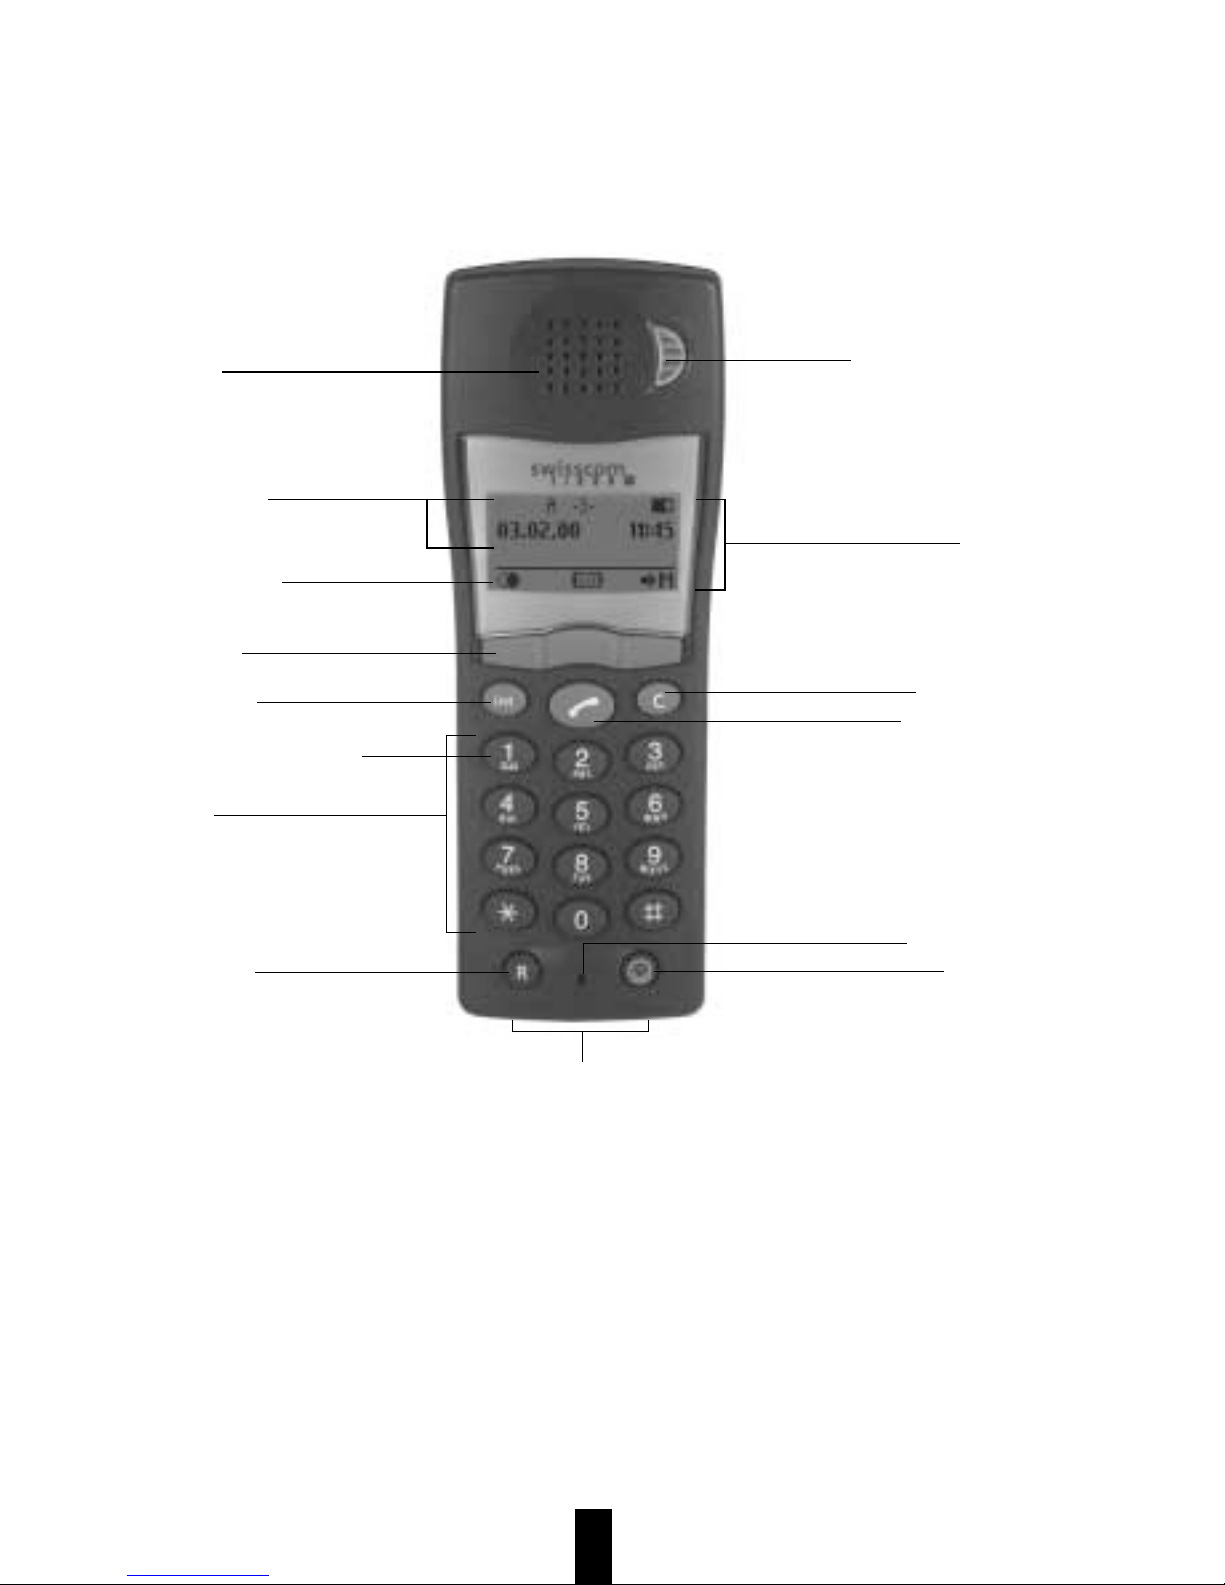
Explanations
Handset
Receiver
Display
Cancel key
Microphone
Battery charge contacts
A2
Display icons
Connect key
t Answering machine is on
ti New message on answering
machine
ABCD Base station indicator
Menu key
Keypad
(numbers and letters)
Display icons
Blue key
Internal key
Control key
a Battery indicator
1 Display of handset number
(internal 1-6)
u Ringer off
Multifunction key
(hands-free operation
Soft key icons
Combox direct access
Page 4
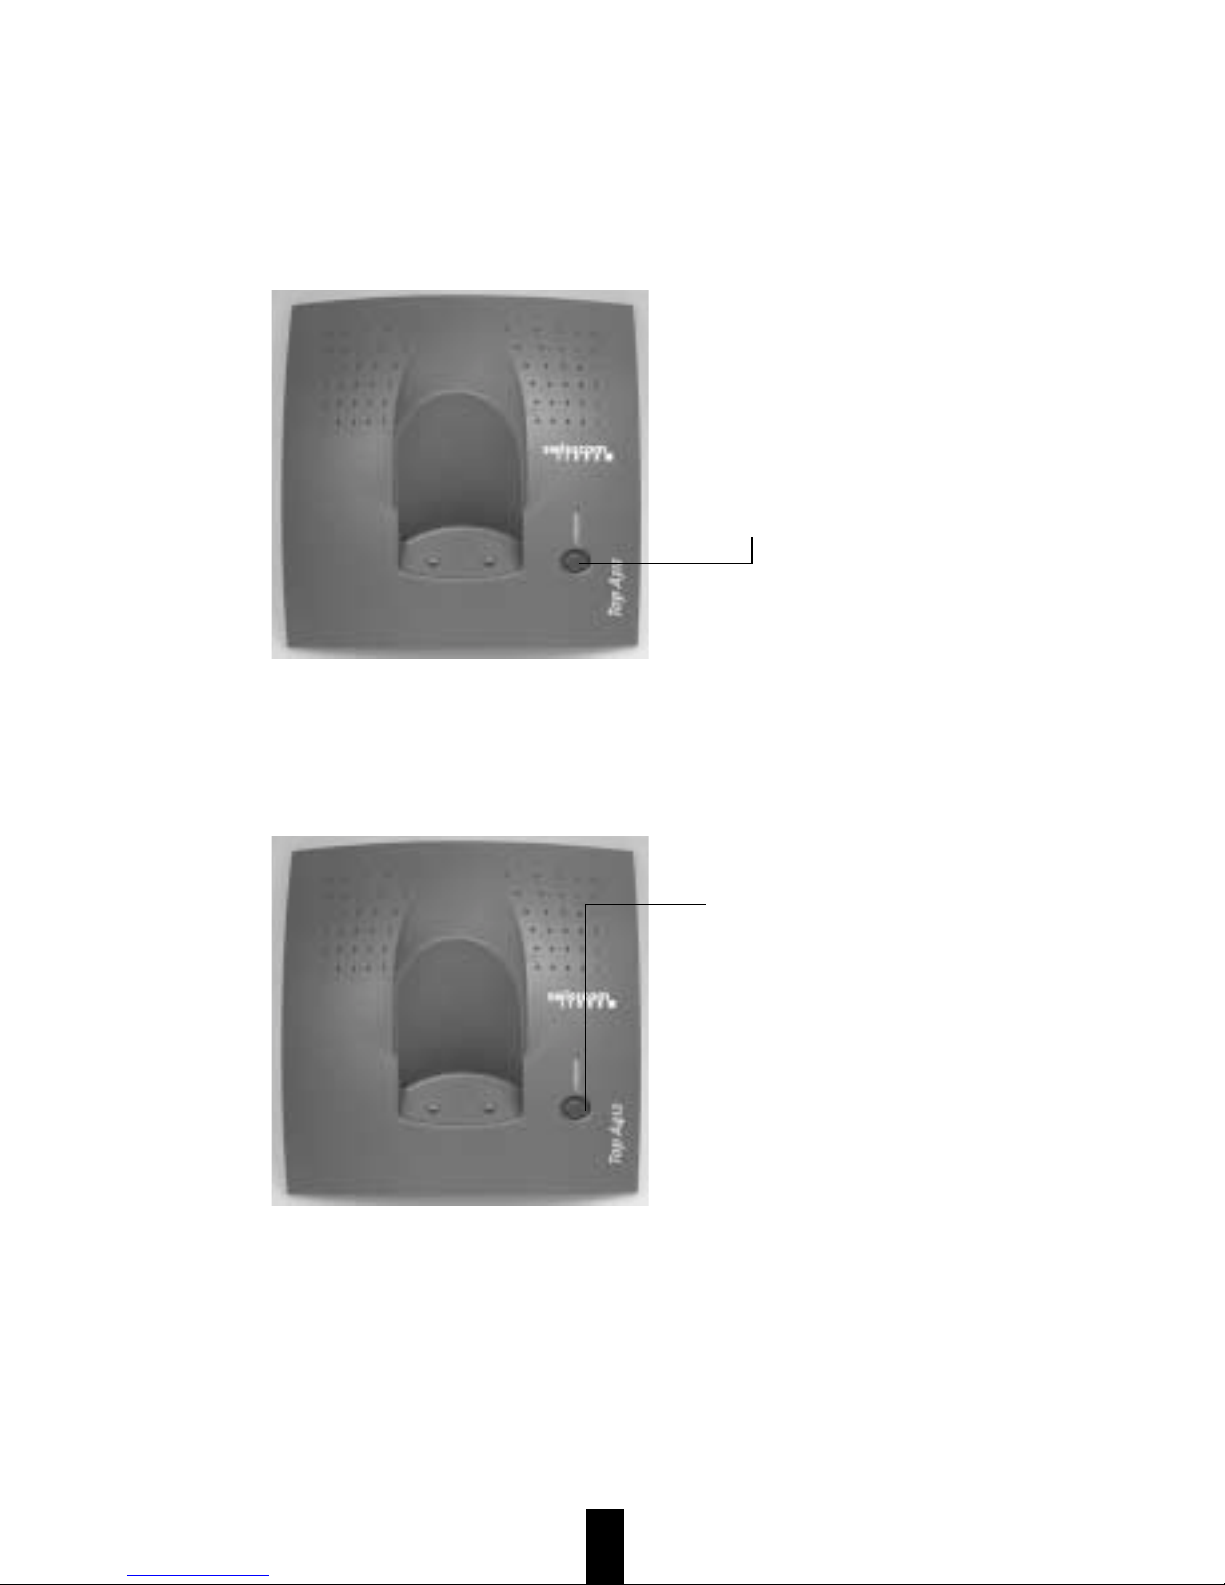
A3
Explanations
Base station without answering machine
Internal key/
paging key
– flashes slowly to indicate
incoming calls, internal and
external connections and
group calls (paging)
–
flashes rapidly to indicate
handset log-on
Base station with answering machine ( Top A412 only)
Internal key/paging key
Light red:
– continual fast flash to
indicate incoming message
(answering machine)
– continual double-flash to
indicate full answering
machine memory or PIN
alarm (remote operation)
– lit if answering machine
is on
– flashes slowly to indicate
incoming calls, internal and
external connections and
group calls (paging)
– flashes rapidly to indicate
handset log-on
Answering machine
On/Off key
Page 5

20400025en_ba_a0
1
Quick Reference User Guide
This guide covers the main operating sequences. For further information please
refer to the detailed User Guide.
After pressing the menu key below "Pm"
you have the following choice:
Main menu in standby state
Answer. machine (Top A412 only)
Key lock
Ringer On/Off
Handset settings
BaseStat. settings
Service function
Charges
Prov. services
Menu in the communication state
Volume (hands-free operation only)
Loudspeaker (Top A412 only)
Provider services
Handset volume
Send DTMF/keypad
Directory
Recording on/off (Top A412 only)
Listening 2nd handset
Logging the handset on
1. On the base station keep
●
pressed
until the LED flashes.
2. In the menu of the handset under
"BaseStat. setting" – "Log on" – "On
base station" prepare the handset for
log on.
Logging the handset onto another
base station
1. Prepare the other base station.
2. In the menu of the handset under
"BaseStat. setting" – "Log on" – "On
other system" prepare the handset for
log on.
Last number redial
1. Press W.
2. V, v Select entry.
3. Press b.
Dialling from the directory
1. Press t.
2. Enter initial letters.
3. V, v Select entry.
4. Press b.
Directory entry
1. Enter the number.
2. Press Pt.
3. Enter name.
4. Press OK.
5. Enter any required options.
Babyphone
You can use your handset as a babysitter
(monitoring handset) and monitor a room
e.g. a child’s bedroom for noises. To do this
you need two handsets, both logged on to
the base station.
As soon as the preset noise level is
exceeded, the monitoring handset automatically makes an internal call to the destination handset. You can select one of three
noise levels.
Page 6

20400025en_ba_a0
2
Quick Reference User Guide
Speed dialling
The numerical keys can be used to program
a speed-dial number for a directory entry.
Only one key can be programmed per
directory entry.
1. Press Pm.
2. Select "Handset settings".
3. Press OK.
4. Select "Speed dialling.
5. Press OK.
6. Press i.
7. Select the t.
8. Press OK.
Making an internal call between two
handsets
1. Press I.
2. Press 1…6.
3. Make your call.
4. b End your call.
Transferring a call internally
You are in the middle of an external call.
1. Press I.
2. Enter 1…6 internal number.
3. Press OK.
4. b End your call.
The external call partner is now
connected to the second internal
call partner.
Transferring a call externally
You are in the middle of an internal call.
1. Press I.
2. Enter zero (for external) plus the
external number.
3. Press OK.
4. b End your call.
The internal call partner is now
connected to the external call
partner.
Switching hands-free operation on
You are in the middle of a call.
1. Press the multifunction key on the
handset.
2. Put the handset down.
3. Continue the call in hands-free
mode.
Switching hands-free operation off
Hands-free operation is on.
1. Press the multifunction key on the
handset.
2. Hold the handset to your ear.
3. Continue the call.
Page 7

20400025en_ba_a0
3
Top A412
Quick Reference Guide for remote operation of the answering machine
1. 2.Dial your number.
While the outgoing message is playing, key in your personal remote access PIN.
Remote initiating procedure:
or (the answering machine is off)
1.
2.
3.
Dial your numer and wait for approx. 10–12 rings.
Answering machine switches itself on for 8 seconds without playing an outgoing message.
When the ready beep sounds, enter your remote access PIN.
=
Rewind
Select outgoing msg. A
=
Record
=
Cancel procedure
(from handset only)
=
Show recording time remaining
(from handset only)
=
=
On/Off
=
Select time-over message
=
Delete all messages
=
Delete messages
=
Forward (message B)
Play back message
Stop
Quick Reference User Guide
Switching the answering machine
On/Off at the base station
Press
●
until the signal tone is heard.
The answering machine is switched
on.
The answering machine is on.
Press
●
until the signal tone is heard.
The answering machine is now off.
✄
Page 8

20400025en_ba_a0
4
Messages
From the handset and by remote access
• Play back
• Jump forward
• Jump back
• Stop
• All messages from remote
• Outgoing message A
• Outgoing message A
• Outgoing message B
• Time-over message
• Outgoing message B
• Time-over message
• Switch answering machine on/off
•
Delete individual messages (during playback)
Recording
Delete (the answering machine is off)
Page 9

20400025en_ba_a0
5
Table of contents
Quick Reference User Guide ............. 1
Safety notes .......................................8
Contents of the package ................... 8
Accessories ........................................8
Setting up the telephone and
putting it into service ........................ 9
Suitable location ................................9
Range ................................................ 9
Protection against listening-in............. 9
Connecting the base station ............. 10
Disconnecting the cables from the base
station .............................................10
Inserting the batteries in the handset 11
Charging the batteries .....................12
Battery endurance between charging12
Battery indicator ............................... 12
Disposal ........................................... 12
Basic settings and operation .......... 13
Finding your way around in the user
guide ............................................... 15
Calling up a menu function (navigation)
15
Selecting a setting ............................16
Switch functions on/off ....................16
Important basic settings ................... 16
External calls .................................... 17
Dialling out with the numeric keypad17
Accepting a call ................................ 17
Speed dialling ..................................17
Ending a call ....................................17
Off-line call preparation.................... 17
Dialling from the redial register ........ 18
Further dialling options ....................18
Editing the redial register.................. 18
Directory........................................... 19
Storing an entry in the directory .......19
Setting/changing options .................19
Editing a directory entry ................... 20
Dialling from the directory ................ 20
Deleting a directory entry .................20
Using a directory entry for
off-line call preparation ....................20
During a call ..................................... 21
Hands-free mode ............................. 21
Menu in communication state ..........21
Adjusting the handset volume ..........22
Send keypad/DTMF .......................... 22
Directory ..........................................22
Mute switch .....................................22
Recording a telephone call
(Top A412 only) ................................ 22
Listening with a second handset ....... 23
Provider services ...............................23
Internal calls ..................................... 24
Making calls between two handsets . 24
Paging from the handset ..................24
Paging from the base station ............ 24
Local switching functions ...............25
Internal call waiting ..........................25
Inquiry .............................................25
Alternating between calls (brokering)25
Three-party conference .................... 26
Return to brokering/end
three-party conference .....................26
End brokering .................................. 26
Call handover/connect .....................26
Shortcuts to functions ..................... 27
Programming ...................................27
Taking a shortcut .............................. 27
Provider services .............................. 28
Call forwarding ................................28
Activating call forwarding................. 28
Deactivating call forwarding ............. 29
Showing call forwarding................... 29
Adapting (programming)
provider services ............................... 29
Using more services .......................... 31
Page 10

20400025en_ba_a0
6
Table of contents
Brief description of services
(during a connection) .......................31
Brief description of services
(without a connection) .....................32
Combox ...........................................33
Blue key ...........................................33
Advice of charge and call duration 34
Setting the factor .............................34
Setting the currency .........................34
Displaying/deleting totals .................35
Display type .....................................35
Using several handsets ...................36
Preparing the base station
for log on ......................................... 36
Logging a handset on ......................36
Logging a handset onto another
base station (GAP) ............................ 37
Logging another handset
onto the base station (GAP) .............37
GAP uses .........................................38
Logging a handset off from a
base station .....................................38
Application example ......................... 39
Selecting a base station ....................39
Direct call (babyphone feature)...... 40
Activating direct call .........................40
Initiating a direct call ........................40
Deactivating direct call ..................... 40
Keypad lock/ringer off ....................41
Keypad lock on ................................ 41
Keypad lock off ................................41
Ringer off ......................................... 41
Ringer on .........................................41
Handset settings .............................. 42
Setting the language ........................42
Switching the handset on/off ........... 42
Selecting the battery type ................. 42
Keyclick ............................................ 43
Range beep ...................................... 43
General settings ...............................43
Charging beep .................................43
Direct accept ....................................43
Backlight ..........................................43
Handset ringer ................................. 44
Increasing......................................... 44
Handset PIN ..................................... 45
Base station settings ....................... 46
Base station ringer ...........................46
Time and date ..................................46
Base station PIN ...............................47
Call allocation .................................. 47
Public access code ............................48
PBX ..................................................48
Setting the dial pause ....................... 48
Service function ............................... 49
Programming the babyphone ...........49
Babyphone ....................................... 49
Switching babyphone on .................. 49
Switching babyphone off ................. 50
Transferring directory entries to
other handsets .................................51
Before the transfer ...........................51
Transmitting entries .......................... 51
Receiving entries .............................. 51
Selecting providers ...........................52
Resetting the handset to the
default setting .................................. 53
Resetting the directory ..................... 53
Resetting the base station to
the default setting ............................ 53
Software version .............................. 53
Setting the answering machine .....54
Introduction .....................................54
Functions ......................................... 54
Characteristics .................................. 54
Date and time ..................................54
Setting the number of rings .............55
Activating/deactivating message
monitoring .......................................55
Time limit .........................................55
Page 11

20400025en_ba_a0
7
Table of contents
Operating modes ............................. 56
Selecting an operating mode ............ 56
Setting the language of the standard
message (plug & play) ...................... 56
Time-over message ..........................57
Operating the answering machine
from the handset ............................. 58
Introduction .....................................58
Switching the answering
machine on/off................................. 58
Recording an outgoing message....... 58
Changing the operating mode/
monitoring the outgoing message .... 59
Deleting an outgoing message .........59
Displaying new messages .................59
Playing back recorded messages ....... 60
During playback ...............................60
Deleting messages ...........................60
Active answering machine
("Pick up") .......................................61
Temporary call screening ..................61
Recording telephone calls ................. 61
Checking the time left for recording . 61
Operating the answering machine
from the base station ...................... 62
Answering machine on/off ...............62
Operating the answering machine
by remote access ............................. 63
Introduction .....................................63
Remote access PIN ...........................63
Access via remote access .................. 64
PIN alarm ......................................... 64
Switching the answering machine
on/off............................................... 64
Playing back recorded messages ....... 65
During playback ...............................65
Functions with the answering
machine switched on ....................... 65
Functions with the answering
machine off...................................... 66
General information ........................ 67
Troubleshooting ...............................67
Repair and Maintenance ..................68
Batteries ........................................... 68
Help .................................................68
Cleaning – when it is necessary ........68
Approval ..........................................68
Technical Data .................................. 69
CE mark ...........................................69
Menu structure in standby state ....70
Key words ........................................ 74
Declaration of Conformity ..............77
Page 12

20400025en_ba_a0
8
Safety notes/Contents of the package
The DECT cordless telephone is used for
transmitting voice via the analogue telephone network.
The User Guide and its safety notes are an
integral part of the equipment and must
be handed over to the new owner when
reselling the equipment.
Safety notes
Warning!
Use only nickel metal hydride (Ni-MH AAA)
batteries, preferably with more than
650 mAh.
Using other types of rechargeable batteries or ordinary batteries (i.e. non-rechargeable) can be dangerous and also lead to
malfunctions of and/or damage to the set.
The manufacturer accepts no liability in
such cases.
• Make sure the correct battery type is set
and the batteries are fitted correctly.
• Do not dip the batteries in water; do
not throw them into the fire.
• Batteries can become warm when
being charged; this is a normal and
harmless process.
• To avoid damage to the batteries, do
not use charging stations from other
manufacturers.
• For the base station and the charging
bay use only the power supply unit
supplied.
• Before using the telephone, hearing-
aid users should note that radio
signals interfere with hearing aids and
cause an unpleasant humming noise if
sufficiently loud.
Warning!
Please note that the ringtone for incoming
calls as well as alert tones, handsfree and
listening by loudspeaker tones are also
emitted on the handset. Do not therefore
hold the handset close to your ear while
one of these functions is on, otherwise your
hearing may be affected.
Contents of the package
The package contains the following items:
• Handset
• 3 NiMH (AAA) battery cells
• Base station
• Mains adapter
• Connection cord
• User manual incl. Quick Reference
Guide
Accessories
The following accessories are available from
Swisscom outlets:
• Additional handsets with base station
• Additional base stations
Page 13

20400025en_ba_a0
9
Setting up the telephone and putting it into service
Suitable location
Your telephone is designed for normal use
in domestic and office buildings. Keep the
following points in mind when selecting a
location for it:
Suitable
• In the centre of your radius of action
• At least 1 m distance between the
base station resp. handset or telephone and other electronic devices
Unsuitable
• On a metallic surface or an underlay
prone to slipping
• Near electronic devices (e.g. HiFi
equipment, TV, microwaves)
• Near sources of radiation (e.g.
radiators, direct sunlight)
• Behind steel doors, or glass doors with
metal mesh
• In niches or shielded rooms
• Without an underlay on painted or
lacquered furniture or on plastics
Range
The operating range is as follows:
• Outdoors approx. 250 m
• Indoors approx. 40 m, depending on
ambient conditions and buildingrelated factors
Outside the operating range:
• Range warning beep sounds (if
switched on)
• Disconnection of the call
Note:
Silent zones within the operating range,
depending on the structural environment,
may cause brief interruptions to a call or
loss of the connection.
Protection against listening-in
Between the base station and the handset, calls are transmitted in encrypted form
to prevent the possibility of listening in with
other cordless telephones, radio receivers
or scanners.
Page 14
20400025en_ba_a0
10
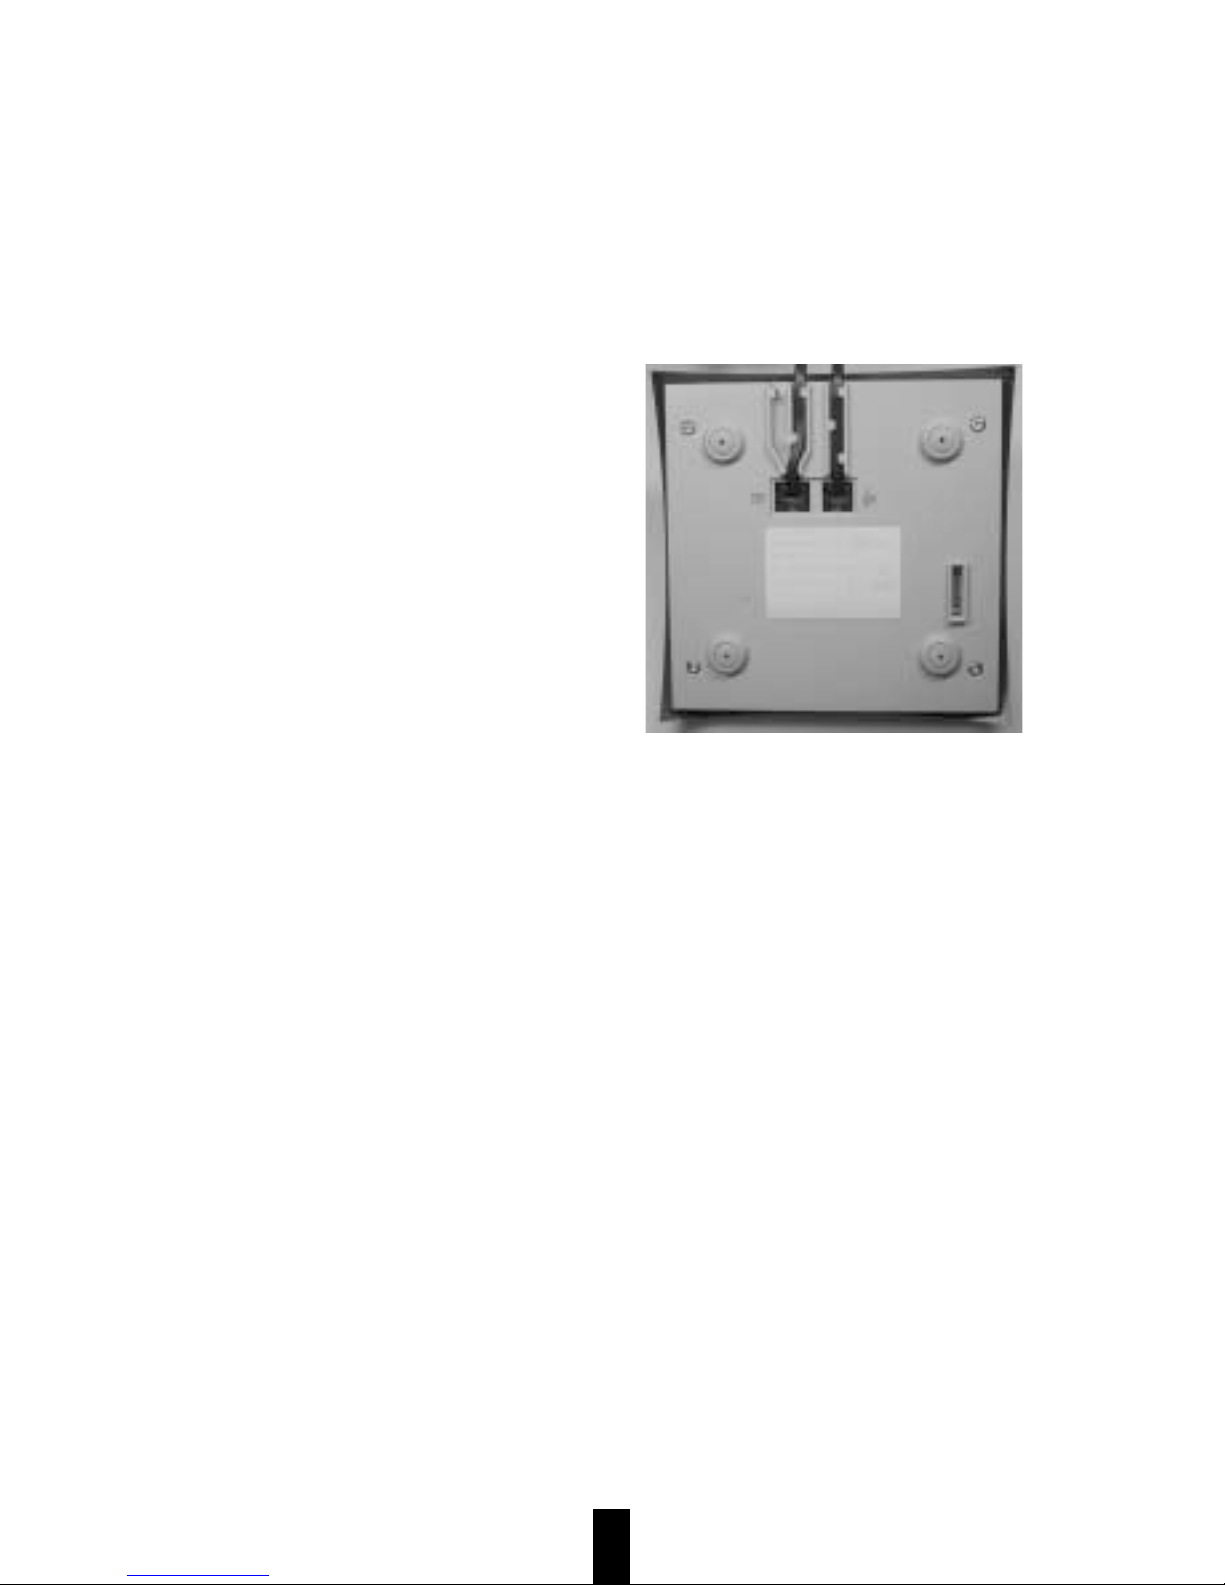
Setting up the telephone and putting it into service
Connecting the base station
Warning:
Make sure you do not confuse the plugs
of the telephone line cable and the plug-in
power supply cord on the base station.
• If you do connect the plugs the wrong
way round, the base station will not
function and may be damaged.
Telephone line cable
The telephone line cable has two different
plugs:
1. Insert the smaller plug into the socket
(telephone icon) underneath your
telephone until the plug snaps firmly
into place.
2. Feed the cord through the moulded
cable duct provided.
3. Connect the larger plug to your
telephone socket.
Power supply cable
1. Insert the plug of the power supply
cable into the socket marked with the
power supply icon until the plug clicks
into place.
2. Feed the cable through the cable duct
provided.
3. Connect the plug-in power supply to a
230V outlet.
Note:
Your telephone will not function if the
power supply is not plugged in or if the
power fails. The telephone may only be
used in conjunction with a power supply
SNG 6 af, tested in compliance with
EN60950 Protection Class 2.
Base station
Disconnecting the cables from
the base station
1. First unplug the power supply from the
230V mains socket.
2. To release the plugs, press the snap-in
clip towards the plug body (e.g. using
a small screwdriver) and at the same
time pull the plug out by the cable.
Note:
New cable layout
The new cable layout complies with the
European standard. Please note that
previous Swisscom telephones have a
different cable layout.
Please use the enclosed cable for this
telephone.
The following cables are suitable for new
installations with RJ 45 connection sockets:
Length 3m: Art. No. 522.733.5.
You can exchange the enclosed cagble for
an RJ 454 cable in the Swisscom Shop.
Telephone line
(cable)
Power supply cable
(electricity)
Page 15
20400025en_ba_a0
11
Setting up the telephone and putting it into service
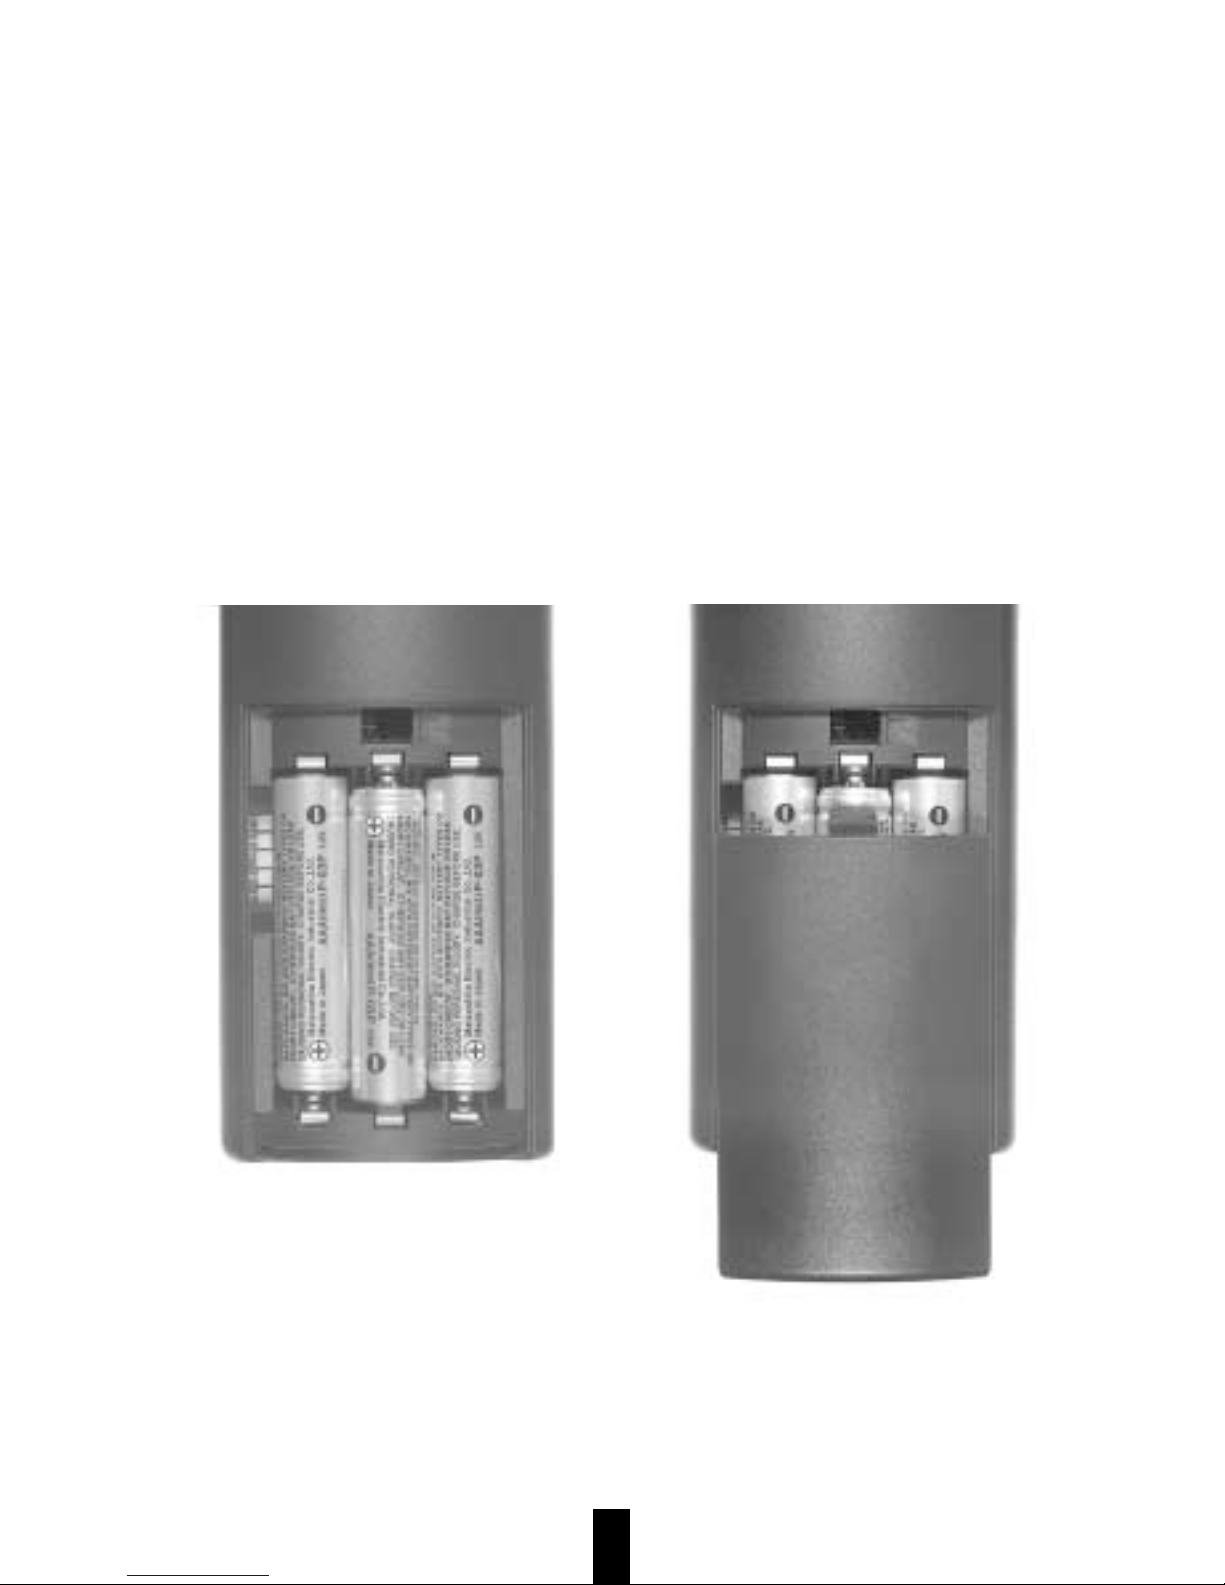
Inserting the batteries in the
handset
1. Remove the battery compartment
cover by pressing it lightly and sliding
it downwards.
2. Insert the 3 batteries in the battery
compartment (as shown). Make sure
the polarity is correct.
3. Slide the battery compartment cover
back until it clicks into place.
Note:
If the batteries are inserted incorrectly, the
handset will not function; damage might
result.
Only use the same type or brand of batteries in the compartment at any given time.
Page 16

20400025en_ba_a0
12
Setting up the telephone and putting it into service
Charging the batteries
The batteries are in a discharged state when
supplied; they will first need to be charged:
1. Place the handset in the base station
or the charging bay.
An acknowledgement sound indicates
that the handset is correctly positioned.
Note:
Do not use ordinary batteries.
Do not place the handset in the charging
bay if the batteries have not been fitted.
Before initial use, batteries have to be
charged without interruption for at least
12 hours in the case of NiMH batteries.
Only remove the batteries from the handset to replace them with new ones.
Do not charge the batteries out of the
handset.
Battery endurance between
charging
A set of NiMH batteries provides approx.:
• 150 hrs standby
• 15 hrs talk time
Note:
Make sure you select the correct battery
type. See section "Handset settings".
Charging contacts must not come into contact with metallic or greasy parts.
After long periods out of operation with
the power switched off (e.g. during holidays) the batteries will need recharging
before the set can be operated again.
Battery indicator
When the batteries are first inserted, the
battery status is unclear. A correct indication in the display is obtained only after a
complete charging cycle.
a flowing: battery charging
a continuous: battery between 70%
and 100%
b continuous: battery between 50%
and 70%
c continuous: battery between 30%
and 50%
d continuous: battery between 5%
and 30%
e continuous: battery below 5%
e flashing: battery almost
discharged
f continuous: battery status unclear
f flashing: battery status unclear
and almost discharged
Note:
If the charge state of the batteries approaches 5%, a warning beep sounds.
Disposal
Please dispose of rechargeable batteries
in an environmentally friendly manner (no
household waste).
Page 17

20400025en_ba_a0
13
Basic settings and operation
Icon/text Function
Pm Select main menu
i Info on an entry in the call register/directory/redial register
W Redial register
t Directory
Pt Edit directory
ABCb Edit an entry
PL Delete an entry
Å / å Change case
X Y Choose from list
x o Switch function on/off
b Delete last character (backspace)
<, >, V, v Call up further menu items (navigate)
≤ / ≥ Select settings (ringer melody)
9 Reject call waiting during a call
M / n Microphone ➔ mute on/off
1≥2 / 2≥1 Alternate between call partners 1 to 2 / 2 to 1 (brokering)
OK NEW Confirm selection
YES NO Answer dialogue
≥G Accept a second call (call waiting) during a call
« / » Jump forward/back when playing
OPT Determine options for each directory entry
END Back from directory entry
ON / OFF Switch available functions on/off
Controls
(Keys + display see fold-out page A2)
Switching the handset on to standby
state
Press the connect key to switch the handset on.
Display
In the standby state the following are
shown:
Internal number of the handset, base station, charge state and date/time.
The following functions are available:
last number redial, directory and main
menu.
Note:
There may be some differences in the text
between the user guide and the display.
Softkey icons (functions of the menu key)
The following icons/texts may be displayed/selected in the bottom display line:
Page 18

20400025en_ba_a0
14
Keys When you first Alphanumeric entry, Alphanumeric entry,
press the key upper case lower case
1 Number 1 . , ? ! : ; - ' " 1 . , ? ! : ; - ' " 1
2 Number 2 A B C 2 Ä À Á Å Æ Ç a b c 2 ä à á å æ ç
3 Number 3 D E F 3 È É Ê d e f 3 è é ê
4 Number 4 G H I 4 Ì Î Í ˙ı ˇG g h i 4 ì î í ı ˘g
5 Number 5 J K L 5 j k l 5
6 Number 6 M N O 6 Ö Ò Ó Ø Ñ m n o 6 ö ò ó ø ñ
7 Number 7 P Q R S 7 ¸S p q r s 7 ß ¸s
8 Number 8 T U V 8 Ü Ù Ú t u v 8 ü ù ú
9 Number 9 W X Y Z 9 w x y z 9 ÿ
0 Number 0 + 0 + 0
* Number * * ( ) = % @ & € $ * ( ) = % @ & € $
# Number # blank space # blank space #
Basic settings and operation
Menu key
• Functions are carried out by pressing
the fox key directly below the icon in
the display
Cancel key
• Every time you press this key you take
one step back in the menu
• Keep the key pressed to get to the
standby state
Internal key
• For making calls to other handsets
(internal calls)
Blue key
• Call Back on Busy (CCBS)
Control key
• For inquiries to the exchange
(for example hold)
Connect key
• To dial an external number
• To accept or end incoming calls
• To switch the handset on to standby
• In the menu: cancel the procedure and
return to the standby state
Numeric keys
• To enter numbers and letters
• Direct access to functions (shortcuts)
Numeric key 1
• To show the combox (long press)
Multifunction key
• To switch hands-free operation on/off
Keying in names
Below the numbers of the keypad there are
letters. To select a letter press the respective key once or several times.
After you have entered an upper case letter the system automatically switches to
lower case; after a blank space to upper
case.
Page 19
20400025en_ba_a0
15
Keypad lock
Answer. machine
➊
Ringer off/on
Handset settings
BaseStat. setting
Service function
Charges
Provider services
Basic settings and operation
Finding your way around in the
user guide
• Basically, each section or each function
is explained with a brief introduction.
• Menu graphics show you where in the
menu you need to be in order to call
up a function (navigation).
• The instructions therefore only
describe the steps within the selected
function.
• The steps are consecutively numbered,
starting with 1.
• Intermediate results following a step
are shown in italics.
• Some steps are visualised by a display
graphic.
• Always observe the notes on a
particular function.
Calling up a menu function
(navigation)
The many functions provided allow you to
set up the telephone for your particular
requirements. These functions are divided
into menus and submenus.
The handset is in standby state
1. Press Pm.
You are now in the main menu
where the following functions are
available.
Press "<" or ">" to navigate horizontally;
"V" or "v" to navigate vertically in the
menu.
➊ Top A412 only
Page 20
20400025en_ba_a0
16
Handset settings
OK
<>
Handset settings
Select station
Language
OK
Vv
Language
Y Deutsch
Y English
X
Vv
Settings
o Range beep
o Keyclick
x
Vv
Basic settings and operation
• If the menu contains submenus (e.g.
"Handset settings"), press OK to get
to the submenu.
• To get to further submenus (e.g.
"Language") repeat these steps.
• Press the cancel key to return to the
previous menu level.
• By keeping the cancel key pressed
down, by pressing the connect key, or
if a call arrives, you return to the
standby state without any settings
having changed.
Note:
For an example, see the function "Select
language" in the section "Handset settings".
Selecting a setting
• Click X to select from a list of settings
(e.g. "Language").
Note:
Only one selection from a list can be made
at any given time.
Switch functions on/off
• Click x / o to switch a function on/off
(e.g. keyclick).
Note:
Several functions can be on or off at any
given time.
Important basic settings
• Set time/date and dialling type see
"Base station settings".
Page 21

20400025en_ba_a0
17
t
Pt b
0439_
Making calls externally means calling via
the telephone network (exchange).
Dialling out with the numeric
keypad
Handset is in standby state
1. Press b.
The dialling tone sounds.
2. Key in the number.
Make your call…
Accepting a call
The ringing tone sounds on the base station and the red light 1 flashes slowly.
The set melody sounds on the handset.
The display shows "Incoming Call". If the
number is stored in the directory, the corresponding name appears.
1. Press b.
Make your call…
Speed dialling
Numerical keys can be programmed for
speed-dialling directory entries. When the
relevant key is held down, the directory
entry is speed-dialled.
Only one key can be programmed per
directory entry.
1. Press Pm.
2. Select "Handset settings".
3. Press OK.
4. Select "Speed dialling".
5. Press OK.
6. Press i.
7. Select the t.
8. Press OK.
External calls
Note:
Deleting the directory entry also deletes the
corresponding speed-dial setting.
Once you have programmed speed-dialling
you can directly dial the speed-dial number
by holding down the relevant key.
Speed-dial key 1 is reserved for the Combox
number (see "Services").
Ending a call
During a call:
1. Press b.
or Place the handset on the base
station or the charging station.
Off-line call preparation
Before dialling, a number can be entered
via the keypad, or an entry can be taken
over or adapted from the directory, the call
register or the redial register.
Pt Store/edit the number in the
directory.
t Add a directory entry to the
number entered.
b To edit the number.
b Dial.
Note:
If the line has already been in use by another internal handset, the busy tone
sounds.
Page 22
20400025en_ba_a0
18
OK
ABCbPL
2435381_
t
Pt b
2435381_
Redial register
2435381
i
Vv
John Brown
External calls
Dialling from the redial register
The last 15 names or numbers dialled are
stored automatically and can be redialled
using the redial register. If the memory is
full, the oldest entry will be overwritten.
1. Press W.
The last number or name dialled is
shown.
2. V, v Select entry from the redial
register.
3. Press b.
The number is dialled.
Further dialling options
• Dialling from the directory, see section
"Directory".
• Combox dialling, see section "Provider
services" "Combox".
• Blue key dialling, see section "Provider
services" "Blue key".
Editing the redial register
You have selected an entry from the redial
register:
1. Press i.
2. You now have the following
options:
ABCb Edit the entry.
Pt Enter in the directory.
PL Delete an entry in the redial
register.
b Dial.
OK Take over the entry for editing in
the redial register.
After you have pressed OK:
You now have the following options:
Pt Store the entry in the directory.
t Provide a directory entry for the
number entered.
b Edit the number.
b Dial.
Page 23

20400025en_ba_a0
19
t
Pt b
0439_
Directory
saved
Entry
OPT BACK
Directory
Storing an entry in the directory
You can compile your personal directory
with up to 150 names and numbers:
1. Enter the desired number
(max. 24 characters).
2. Press Pt.
3. Enter the desired name
(max. 16 characters).
4. Press OK.
The entry has been saved.
5. You now have the following
options:
BACKBack to the idle mode.
OPT Set options.
Note:
New entries can also be entered via t
and NEW.
Setting/changing options
For every entry you can set the following
options:
Select The entry is always dialled
provider via this provider
Others:
IdentificationYour own number is always
restriction suppressed (CLIR).
External The exchange identification
numbers code is automatically placed
in front of the number
(function for PABXs).
1. Press OPT.
2. Select option.
3. Set option.
Note:
The "Anonymous calling" supplementary
service is not available for all lines.
The caller must be connected to an exchange which supports this service.
For operation behind a PABX, the exchange
identification code need not be entered in
the directory.
See section "Base station settings – exchange identification code".
Program provider – see "Service function –
Provider".
Page 24
20400025en_ba_a0
20
OK
b
0561288
Directory
Peter Jones
George Smith
i
Vv
OK
ABC
bPL
0561288
George Smith
OK
Åb
George Smith
Name:
Enter name
Directory
Dialling from the directory
1. Press t.
2. V, v Find entry in the directory
or
by keying in up to three initial
letters (via the keypad) select the
desired name.
3. Press b.
The number is now dialled.
Editing a directory entry
1. Press t.
2. V, v Find entry in the directory.
3. Press i.
4. Press ABCb.
The number is displayed.
5. Press b to edit the number from
right to left.
6. Press OK.
The name is displayed.
7. Press b to edit the name from
right to left.
8. Press OK.
The entry is saved.
Deleting a directory entry
1. Press t.
2. V, v Find entry in the directory.
3. Press i.
4. Press PL.
"Delete entry?" is displayed.
5. Press YES/NO.
YES = deletes directory entry.
Using a directory entry for
off-line call preparation
1. Press t.
2. V, v Find entry in the directory.
3. Press i.
4. Press OK.
The entry is used in off-line call
preparation.
5. You now have the following
option:
PtSave entry in the directory.
b Change the entry.
t Find a further entry in the directory.
b Dial.
Page 25
20400025en_ba_a0
21
Volume
➊
Services
Handset volume
Keypad/send DTMF
Directory
Listening 2nd HS
Recording on/off
➊
During a call
Menu in communication state
During a call the following functions are
available from "Pm":
➊ In hands-free mode only
Hands-free mode
The "hands-free" function allows you to
make a call via the handset without having
to hold it.
Switch hands-free on
1. Dial the number.
2. Press b.
3. Press the multifunction key.
The multifunction key flashes;
hands-free mode is now on.
4. Press Pm.
5. Select "Volume".
6. Press OK.
7. ≤, ≥ Set volume.
8. Press OK.
9. Make your call.
Note:
If the hands-free mode is on, you should
not hold the handset at your ear to provide
from any enjury caused by the volume.
The hands-free mode is also working during the battery is charging.
Switch hands-free off
1. Hold the handset.
2. Press the multifunction key.
Page 26

20400025en_ba_a0
22
During a call
Adjusting the handset volume
To better hear your call partner, you can
increase the handset volume during a call:
1. Press Pm.
2. Select "Handset volume".
3. ≤, ≥ Select your setting.
4. Press OK.
Repeat steps 1-4 to reset the
handset volume.
Note:
Please note that full volume may damage
your hearing. The handset volume remains
saved.
Send keypad/DTMF
By switching to temporary DTMF dialling
you can use the special keys "star" * and
"hash" # to transmit information during a call, e.g. for voicemail, answering machine etc.:
1. Press Pm.
2. Select "Send DTMF".
Note:
After completion of a call, temporary DTMF
dialling is automatically switched off.
Directory
You can access numbers in the directory
(see section "Directory").
Mute switch
If you do not want your call partner to hear
you (for instance when you confer with
someone in the room) you can switch the
handset microphone to mute:
1. Press M.
Your call partner cannot hear you.
2. Press n .
Your call partner can hear you
again.
Recording a telephone call
(Top A412 only)
When making a call, you have the option
of recording the entire call or parts of it.
This function can only be activated from
the handset to prevent uncontrolled recording from the base station.
To start/stop recording
You are in the middle of a call:
1. Press Pm.
2. Select "Recording".
Note:
Switching on the recording function is signalled to your call partner by a brief acknowledgement beep.
Recording automatically ends if the amount
of storage space available is exceeded during recording.
At the end of the call, recording automatically comes to an end. The recording can
be played back as a message on the answering machine.
Page 27

20400025en_ba_a0
23
During a call
Listening with a second handset
If at least two handsets are logged on, you
can listen in to the call of the other handset from your handset, without participating. The selection as to which handset can
listen in is made at the handset making the
call.
You are in the middle of a call:
1. Press Pm.
2. Select "Listening 2nd HS".
3. Press OK.
4. Select handset 1-6.
5. Press OK.
The ringer of the selected handset
sounds.
On the selected handset:
6. Press b.
The call can be listened to.
Note:
Listening in is only possible on one handset.
During listening in, local switching functions are deactivated.
Provider services
With this feature you can use the following provider services during a call, if they
have previously been programmed:
1. Press Pm.
2. Select "Provider services".
3. Press OK.
Available provider services may
include the following:
4. V, v Select service 1-10 (e.g
brokering).
5. Press OK.
Note:
Depending on your country and provider,
different services may be available.
For programming provider services, see section "Adapting provider services".
3pty conference
End active call 1
End active call 2
Reject
Take over/Hold
Take over/End
Activate call back
Brokering
Inquiry
…
Page 28

20400025en_ba_a0
24
Internal calls
Making calls between two
handsets
You can make free internal calls between
two handsets, provided you have logged
on at least one additional handset (up to
max. 6 handsets are possible).
On handset 1:
1. Press I.
2. Key in the internal call number,
e.g. 2.
On handset 2:
The internal ringing tone sounds
and the caller’s number is displayed.
3. Press b.
Make your call…
Paging from the handset
From the handset you can page (i.e. send
a global call to) all logged-on handsets.
From the handset:
1. Press I.
2. Press 9.
On all handsets the internal ringing
tone sounds and the multifunction
key flashes.
The display shows "Internal call
from HS..".
To end paging from the handset
At the logged-on handsets:
1. Press b.
At the particular handset the
internal ringing tone stops; you are
now connected to the calling
handset.
Paging from the base station
From the base station you can page (i.e.
send a global call to) all logged-on handsets.
From the base station:
1. Briefly press
●
on the base
station.
On all handsets the internal ringing
tone sounds and the multifunction
key flashes.
The display shows "—PAGING—".
To end paging from the base station
At the base station:
1. Press
●
.
On all handsets internal ringing
stops
or
at the logged-on handsets:
1. Press 9.
At the respective handsets the
internal ringing tone stops.
Note:
The paging function activates paging on
all logged-on handset.
Page 29

20400025en_ba_a0
25
OK
Call
6242424
unknown
PG
9
Local switching functions
The following pages describe the most often used switching functions available with
the base station Top A312 /Top A412.
Internal call waiting
You are in the middle of an internal call
when an external call arrives. This external
call is signalled by a call waiting tone.
1. You have the following options:
9 Reject the call and continue the
current call.
OK Accept the call; the first call is
placed on hold.
PG Accept the call; the first call is
terminated.
Note:
A call is only rejected for good if it has been
rejected by all logged-on handsets.
Inquiry
You are in the middle of an internal call
and interrupt it to make an inquiry with
another call partner.
1. Press I.
The active call partner is placed on
hold.
2. Dial the internal call number (1-6)
3. Press OK.
The inquiry is initiated.
The first call partner is placed on
hold.
Alternating between calls
(brokering)
You have initiated an inquiry and the display offers 1≥2 / 2≥1.
You can now alternate (broker) between
two calls as required:
1. Press 1≥2 / 2≥1.
You alternate between call partners.
Connected to
2: Intern 2
1:
PM
1≥2 M
Page 30

20400025en_ba_a0
26
Local switching functions
Three-party conference
You are alternating between calls
(brokering) and wish to set up a three-party
conference (one external and two internal
calls or three internal calls). This will allow
all three call partners to confer with each
other:
1. Press Pm.
2. Select "3pty conference".
3. Press OK.
Return to brokering/end
three-party conference
1. Press 1≥2 / 2≥1.
You are now connected with the
last call partner again.
End brokering
1. Press Pm.
2. Select "End active call".
3. Press OK.
The connection to the selected call
partner is terminated. You are
connected to the other call partner
again.
Call handover/connect
You are in the middle of a call and have
initiated an inquiry to another call partner
(see "Inquiry"):
If you are connected to the second
call partner (inquiry).
1. Press b.
The call is handed over
or
if your are not yet connected to the
second call partner.
1. Press b.
The call is connected.
Page 31

20400025en_ba_a0
27
Shortcuts to functions
You can program up to 9 shortcuts. E.g.
with the numeric keys 1–9, a shortcut is
possible for a function selected by you, provided the function does not require any
editing (entry of numbers or letters) or value
settings, such as showing call-charges etc.
In this way there is no need to find the function via the menu structure (navigating).
The application is primarily intended for
frequently-used functions and/or functions
located in the lower menu levels.
In the default setting, five shortcuts are preprogrammed:
– on number 1: Keypad lock
(direct activation)
– on number 2: Handset off
– on number 3: Ringer off
– on number 4: Direct call on
– on number 5: Show charges
You can program your own shortcuts on
numeric keys 6 to 9 or you can overwrite
the already programmed numbers (1–5).
Programming
The handset is in standby state:
1. Press Pm.
2. Press V, v or <, > to select the
desired function.
3. Keep the numeric key (1–9) which
you wish to program, pressed for
approx. 3 seconds.
The shortcut is now programmed
to this number and the old function
is overwritten.
Taking a shortcut
The handset is in the standby state:
1. Press Pm.
2. Press the desired numeric key.
You are now in the respective
submenu (function).
Please make a note of your shortcuts (functions) and the numbers (1–9) assigned to
them.
Page 32

20400025en_ba_a0
28
Prov. services
Call forwarding
Unconditional
No reply
Busy
Activate
Deactivate
Show
Activate
Deactivate
Show
Activate
Deactivate
Show
Your Top A312 /Top A412 makes it easier
for you to use network services. This refers
to supplementary services available from
the provider (e.g. call waiting). You can use
these provider services by assigning the necessary codes as a function (services 1-10)
in your telephone.
Please contact your provider for information as some supplementary services need
to be applied for and may attract fees.
Via menu guidance you can activate or
deactivate those provider services programmed by you either before or during a
call. The most common provider services
are pre-programmed.
Call forwarding
This service has already been integrated in
the menu guidance. Call forwarding allows
you to be within reach even if you are not
near your own telephone.
You have the choice of three types of call
forwarding:
Unconditional Incoming calls are for-
(CFU) warded immediately.
No reply Incoming calls are for-
(CFNR) warded after a delay
(fixed time or number
of rings).
Busy Calls are forwarded if
(CFB) the line is busy.
Provider services
Activating call forwarding
1. Select type of call forwarding.
2. Press OK.
3. Select "Activate".
4. Press OK.
5. Enter destination number for call
forwarding.
6. Press OK.
Page 33

20400025en_ba_a0
29
Prov. services
Adapt
During conn.
Service 1
Name
Command
...
Provider services
Deactivating call forwarding
1. Select type of call forwarding.
2. Press OK.
3. Select "Deactivate".
4. Press OK.
Showing call forwarding
For each type of call forwarding (Unconditional, No reply, Busy) you can check
whether it is activated.
1. E.g. select "Unconditional".
2. Press OK.
3. Select "Show".
4. Press OK.
A respective message is played if
call forwarding is activated.
5. Press b.
The telephone returns to standby
state.
Adapting (programming)
provider services
For provider services during connection or
services without connection, 10 programming locations (services 1-10) are available
which you can program yourself. To do so
consult your provider. The most commonly
used services are already pre-programmed
but they can be adapted as required.
Provider services during a connection
1. Select "During conn.".
2. Press OK.
3. Select a service 1-10
4. Press OK.
5. Select "Name".
6. Press OK.
7. Enter the name of the function.
(e.g. 3pty conference).
8. Select "Command".
9. Press OK.
10. Enter code for the function "3pty
conference".
11. Press OK.
Page 34

20400025en_ba_a0
30
Prov. services
Adapt
Without conn.
Service 1
Name
Activate
Deactivate
Show
...
Provider services
Provider services without a connection
1. Select "Without conn.".
2. Press OK.
3. Select a service 1-10.
4. Press OK.
5. Select "Name".
6. Press OK.
7. Enter the name of the function.
(e.g. call waiting).
8. Select "Activate".
9. Press OK.
10. Enter code for the function "Activate" (e.g. *43# call waiting on).
11. Select "Deactivate".
12. Press OK.
13. Enter code for the function
"Deactivate" (e.g. #43# call
waiting off).
14. Select "Show".
15. Press OK.
16. Enter code for the function
"Show" (e.g. *#43# show call
waiting).
Note:
Contact your provider for information on
available services and their codes for programming.
To change a service already programmed,
follow the steps shown in "Provider services" "Adapt" by overwriting existing
information.
The telephone is delivered with the
following pre-programmed services
(without a connection):
Service 1 – Call waiting
Service 2 – Callback on busy
Service 3 – free
Service 4 – free
Service 5 – free
Service 6 – free
Service 7 – free
Service 8 – free
Service 9 – free
Service 10 – free
The telephone is delivered with the
following pre-programmed services
(during a connection):
Service 1 – Enquiry call
Service 2 – Call switching
Service 3 – 3-way conference
Service 4 – End call 1
Service 5 – End call 2
Service 6 – Reject
Service 7 – Accept-Hold
Service 8 – Accept-End
Service 9 – Callback on busy
Service 10 – free
Page 35

20400025en_ba_a0
31
Provider services
Using more services
Use your adapted services as follows:
Activate/deactivate/show services
without connection
You will need to activate services without
a connection before a call, to be able to
use them during a call. After the call you
can deactivate the service or have it shown
at any time.
Handset must be in standby mode:
1. Select "More services".
2. Press OK.
3. Select a service (e.g. "Call waiting").
4. Press OK.
5. Select "Activate", "Deactivate" or
"Show".
6. Wait for acknowledgement tone or
message from the network.
7. Press b.
A respective message is played or
an acknowledgement tone sounds.
Provider services during a connection
See section "During a call".
Prov. services
More Services
Service 1
Activate
Deactivate
Show
...
Brief description of services
(during a connection)
Enquiry call
You are conducting an internal call and
make an enquiry call to a second person.
The first call partner is put on hold.
Call switching
You have initiated an enquiry call and can
now switch between the first and second
call partners.
3-way conference
You are switching between calls and want
to set up a 3-way conference call.
All three call partners can now speak to
each other. A 3-way conference can only
be activated by the calling party.
End call 1
You are conducting a 3-way conference or
switching between calls and want to end
the call with the first call partner.
End call 2
You are conducting a 3-way conference or
switching between calls and want to end
the call with the second call partner.
Reject
This service can only be used if "Call waiting" (without a connection) is activated.
If a second call partner tries to call you while
you are conducting another call, a signal
tone is emitted for 20 seconds to alert you
to the second call. You can choose to reject
the waiting call.
Page 36

20400025en_ba_a0
32
Provider services
Accept-Hold
This service can only be used if "Call
waiting" (without a connection) is activated.
If a second call partner tries to call you while
you are conducting another call, a signal
tone is emitted for 20 seconds to alert you
to the second call. You can accept the
waiting call. The first call partner is put on
hold.
Accept-End
This service can only be used if "Call waiting" (without a connection) is activated. If
a second call partner tries to call you while
you are conducting another call, a signal
tone is emitted for 20 seconds to alert you
to the second call. You can accept the
waiting call. The first call is ended.
Callback on busy
If the line you are trying to call is busy, you
can program an automatic callback while
you hear the busy tone. If the line becomes
free within the next 30 minutes, the
network automatically calls you back and
offers to connect you to the number you
dialled originally.
See also under "Blue key".
Brief description of services
(without a connection)
Call waiting
You can check whether you have activated
"Call waiting" and can deactivate this
service again.
Callback on busy
You can check whether you have activated
"Callback on busy" and can deactivate this
service again.
Note:
You can use the blank services to program
your preferred services or overwrite services
already programmed. All services can be
activated or deactivated according to your
requirements. For further information,
contact freephone 0800 800 800 or ask
for documentation on Swisscom supplementary services.
Page 37

20400025en_ba_a0
33
Provider services
Prov. services
Combox
Number
Combox
Depending on your provider, an answering
machine on the network is available to you.
If you use it, you can save its access number.
Programming
1. Select "Combox".
2. Press OK.
3. Select "Number".
4. Press OK.
5. Enter the respective number.
6. Press OK.
Note:
Once you have finished programming, you
can directly dial Combox by holding down
key 1.
Speed-dial key 1 is reserved for the Combox
(see above for programming).
Blue key
If the line you are trying to call is busy, you
can program an automatic callback by
pressing the blue key. The network will
automatically call you back when the line
becomes free.
Activating
Busy tone is heard:
1. Press s.
"Callback on busy" is activated.
Programming
1. Select "Blue key".
2. Press OK.
3. Enter the relevant number.
4. Press OK.
Note:
The "Callback on busy" supplementary
service is not universally available. Both
the caller and the called party must be
connected to an exchange that supports
this supplementary service.
Services
Blue key
Page 38

20400025en_ba_a0
34
Advice of charge and call duration
During outgoing calls your telephone displays the charge and duration of each call
provided your provider supplies the tax
pulses. For technical reasons the details on
your telephone bill may differ from the values displayed on your telephone. The
amount billed by the network operator is
binding.
Setting the factor
Set the factor for a time unit per handset
and for the exchange (system):
1. Select "Line" or "Handset
1–6".
2. Press OK.
3. Enter factor (insert decimal point
using * or # key).
4. b Correct if necessary.
5. Press OK.
Charges
Factor
Line
Handset 1
...
Setting the currency
Set the currency in which you wish
charges to be displayed:
1. Select "Currency".
2. Press OK.
3. Enter "Currency" (e.g. Fr.).
4. Press OK.
Note:
When the currency is entered for the first
time or changed, the individual entry (last
call) and total are deleted.
Charges
Currency
Page 39

20400025en_ba_a0
35
Advice of charge and call duration
Displaying/deleting totals
The total for all calls as well as the amount
of the last call can be displayed or deleted
at any time.
1. Select e.g. "Handset 1".
2. Press OK.
Amount is displayed.
3. Press OK.
Display is cancelled.
or
4. Press PL.
Amount reset to zero.
Charges
Last call
All calls
Total line
Handset 1
...
Display type
You can select whether to display charges
and/or call duration:
1. Select "Type of display".
2. Press OK.
3. Select "Charges" or "Duration".
4. Press x.
Charges
Type of display
o Charges
o Duration
Page 40

20400025en_ba_a0
36
BaseStat. setting
Log on
On base station
Using several handsets
The telephone allows you to operate up to
6 handsets on one base station. You can
make two internal calls between two handsets and at the same time one subscriber
can also make an outside call. Each additional handset must be logged onto the
base station and allocated an internal
number. Each internal subscriber number
(1-6) can only be allocated once. It is shown
on the handset display in standby state.
Note:
If during operation with several handsets
one of the handsets has already seized the
external line, the busy tone sounds in the
second handset. You can still make internal calls. Each handset can be logged on
at up to 4 base stations (A–D).
Preparing the base station for
log on
●
Press the internal key at the base
station for five seconds.
The connection indicator on the
base station (red light 1) starts
flashing.
For 60 seconds the base station is
now ready to enable you to log on
a handset.
Logging a handset on
If the base station has been prepared, you
can log the handset on the base station:
1. Key in the base station PIN or
"0000" (default setting).
2. Key in the new internal call number
(1–6) for the handset.
3. Determine the designation of the
base station (A–D).
4. Press YES.
If log on was successful, the respective letter (A–D) appears on the base station display.
Note:
If the internal call number is seized a second time, the handset first logged onto it
is logged off.
If the logging-on process fails, the respective letter on the base station display continues to flash.
In order to log a handset on you need to
be within range of the base station.
Logging on via paging key, Top A412
To log on via the paging key, you must hold
the key down for at least 5 seconds until
the second signal tone is heard (in the case
of the Top A312, after the first signal tone
is heard) and the LED is flashing rapidly.
The base station switches to log-on mode.
Page 41

20400025en_ba_a0
37
BaseStat. setting
Log on
On other system
BaseStat. setting
Log on
Other handset
Using several handsets
Logging a handset onto another
base station (GAP)
To log your handset onto a third-party base
station (other base station), the handset
must support the GAP generic access profile.
Follow the manufacturer’s instructions
when preparing the other base station for
log on.
Prepare the handset:
1. Enter the 4-8 digit access code (AC)
of the previously prepared base
station (e.g. 12345).
2. Key in the designation of the base
station (A–D).
3. Press YES.
4. Log the other handset on according
to its instructions.
Note:
The base station assigns the internal
number for the handset automatically.
The base station letter (e.g. A) appears in
the display to confirm that log on was successful.
If log on was unsuccessful, an error tone
sounds and the letter A flashes.
GAP functions are described in the section
"GAP uses".
Logging another handset onto
the base station (GAP)
A third-party handset (other handset) must
support the GAP generic access profile in
order to be logged onto your base station.
Prepare the base station using the handset:
1. Specify a 4 to 8 digit access code
(AC), (e.g. 12345).
2. Key in the new internal number
(1–6) of the other handset.
3. Press YES.
4. Log the other handset on according
to its instructions.
Note:
If the internal number used has previously
been allocated for logging on, the handset first logged on will be logged off.
Page 42

20400025en_ba_a0
38
BaseStat. setting
Log off
Using several handsets
GAP uses
Your telephone supports the multi-vendor
DECT GAP protocol (GAP = Generic Access
Profile). To be able to log it onto another
base station, the latter must support the
GAP protocol.
Among others the following functions are
available:
• Outgoing calls from the handset
• Taking incoming calls
• Internal calls from handset to handset
Logging a handset off from a
base station
To log a handset off from a base station:
1. Select the handset which you want
to log off.
2. Press OK.
Successful log off is signalled in the
display.
Note:
To log a handset off, you must be in the
vicinity of the base station. You can only
log off other handsets using the handset
Top A312/Top A412, not using the other
handset itself.
Page 43

20400025en_ba_a0
39
Using several handsets
In addition to your own base station, you
can operate your handset on up to three
further base stations.
Application example
You have a telephone at home and use an
identical handset at your workplace. You
can now also use the handset from the
cordless telephone at work on the base station at home and vice versa. Of course, incoming and outgoing calls are possible only
within the range of the particular base station. There is no handover to another base
station (Roaming).
Specifying the configuration
The handsets must be logged onto the base
station at home and onto the base station
at work. Specify one letter (A, B, C or D) in
each case for the base station at home and
one for the base station at work. Next allocate one internal subscriber number (1 to
6) to each of your handsets.
Note:
The radio cells can overlap partly.
Incoming calls will only be forwarded to
your handset if the corresponding base station is selected.
If the handset is not in radio contact with
the base station, the corresponding letter
will flash in the display.
Selecting a base station
Outgoing calls can be made from any of
the base stations.
If the radio cells overlap, the connection is
established with the base station shown on
the handset. You can always only be contacted via the base station shown in the
display.
Automatic
In the default setting the handset always
automatically dials up via that base station
in whose range it is located.
Base station A, B, C or D
You have the option of setting your handset to a particular base station. The handset will then always dial only via this particular base station and you can only be
reached via this base station.
Handset settings
Select station
Automatic
Base station A
……
Page 44

20400025en_ba_a0
40
Handset settings
Direct call
6242424
OK
tb
1
–––DIRECT CALL–––
10.03.00 12:18
OFF
aA
Direct call (babyphone feature)
When direct call (babyphone feature) is
activated, a destination number is dialled
by pushing any key except for the menu
key. When direct call is activated, calls can
be taken in the usual way.
Activating direct call
1. Select "Direct call".
2. Press OK.
3. Enter destination number.
4. Press OK.
The display shows
"———DIRECT CALL———"
Note:
If a number is already stored it will be displayed.
Initiating a direct call
1. Press any key, except for the menu
key.
The direct call number stored is
dialled automatically.
Make your call…
3. Press b.
The call is terminated.
After a few seconds
"———DIRECT CALL———" appears
in the display again.
Note:
We recommend that you check the number
you have keyed in by making a test call.
Deactivating direct call
1. Press OFF.
2. Press YES.
Direct call is deactivated.
Page 45

20400025en_ba_a0
41
Keypad lock
Ringer on/off
Keypad lock/ringer off
In standby state under Pm you can use
the following two handset functions
Keypad lock on
You can switch the keypad lock on to prevent unintended pressing of keys having
an effect:
1. Select "Keypad lock".
2. Press OK.
The keypad is locked.
Incoming calls are signalled and can
be taken by pressing the connect
key.
Keypad lock off
For outgoing calls, the handset must be
switched from the lock state to the standby
state:
1. Press OFF.
2. Press YES.
The keypad lock is off.
Ringer off
You can switch the ringer off on the respective handset so as not to be disturbed:
1. Select "Ringer off".
2. Press OK.
The ringer on the handset is
switched off. u appears in the
display and the multifunction key
flashes. A call is only signalled in
the display and can be answered in
the usual way.
Note:
The ringers of the base station and of other
handsets remain on.
Ringer on
1. Select "Ringer on".
2. Press OK.
The ringer on the handset is
switched on again.
Page 46

20400025en_ba_a0
42
Handset settings
Handset off
Handset settings
Language
Y English
…
Handset settings
Battery type
Y NiMH
Y NiCd
Handset settings
You can set your handset to meet your
personal requirements, as follows:
Switching the handset on/off
You can switch your handset off to maintain the capacity of the batteries for a
longer period:
1. Select "Handset Off".
2. Press OK.
The handset is off. Incoming calls
are not signalled.
The display is inactive.
3. Press b.
The handset is now on again.
Note:
The base station signals incoming calls
whether the handset is on or off.
Setting the language
For menu guidance you can select your
preferred language:
1. Select "Language".
2. Press OK.
3. V, v Select the desired language.
4. Press X.
Menu guidance changes to the
new language.
Selecting the battery type
The telephone is supplied with three rechargeable batteries. If you use different
batteries from those supplied, be sure that
the battery type is set to NiMH or NiCd as
appropriate.
If you change the type of batteries used,
you will need to select the applicable battery type:
1. Select "NiMH" or "NiCd".
2. Press X.
Note :
If the handset is programmed to the wrong
battery type, the batteries may be damaged
or their available capacity may not be used.
The capacity of NiMH batteries is greater
than that of NiCd batteries.
Page 47

20400025en_ba_a0
43
Handset settings
Settings
o Keyclick
o Range beep
o Charging beep
o Direct accept
o Backlight
o Missed calls*
Handset settings
General settings
The following handset settings can be
switched on or off.
Select the respective function and switch
it on or off by pressing the menu key below
x / o.
Keyclick
Each keystroke on the handset is confirmed
by an click. In the default setting, keyclick
is on.
Range beep
If the range beep is on, a warning beep
sounds if you leave the radio range.
If this happens, move back towards the
base station or out of the blind spot until
the warning beep stops, otherwise the telephone link will be cut.
*Note:
Functions only in specific PBXs with
activated CLIP.
Note:
If the range is inadequate, relocation of the
base station may bring about an improvement. See the section "Setting up the telephone and putting it into service" for information about the optimum location.
Charging beep
In the default setting, the charging beep is
on; an acknowledgement beep sounds
when the handset is replaced in the charging bay.
Direct accept
Incoming calls are accepted directly, simply
be lifting the handset from the base station or from the charging bay.
Note:
If the handset is neither in the base station
nor in the charging bay the calls can be
accepted by pressing the connect key.
While the answering machine is recording
a message, direct accept is temporarily deactivated.
Backlight
The function "Backlight" can be switched
on or off. If it is on, the display is backlit as
soon as any key is pressed or a call arrives.
If no key is pressed for several seconds,
backlight switches off automatically.
Page 48

20400025en_ba_a0
44
Handset settings
Handset ringer
Volume
Melody
Internal melody
Name dialling
Increasing
Volume
OK
≤
≥
Handset settings
Handset ringer
You can select the volume and the melody.
1. E.g. select "Volume".
2. Press OK.
3. ≤,≥ Select your settings.
The selected setting is played back
continuously for you to check.
4. Press OK.
The settings are saved.
Note:
Please note that full volume may damage
your hearing.
Increasing
You can set the volume to "Increasing",
i.e. the ringer starts at the lowest volume
level, increasing to the set level:
1. Select "Increasing".
2. Press OK.
Note:
Please note that full volume may damage
your hearing.
If the volume is set to 3 or higher an the
function "Increasing" is disactivated, the
fist and second ring starts at level 3 and up
from the third ring with the set volume.
Page 49

20400025en_ba_a0
45
Handset settings
Handset settings
Handset PIN
Handset PIN
The handset PIN (personal identification
number) is required if you want to disable
individual operating options (resetting to
the default settings, deleting the directory
etc.) and to protect them against unauthorised access. In the default setting (factory
setting) the handset PIN is switched off
("0000").
1. Select "Handset PIN".
2. Press OK.
3. Enter 4-digit PIN.
4. Press OK.
5. Repeat 4-digit PIN.
The handset PIN is activated.
Note:
Please remember your handset PIN. If you
forget it the services of your dealer will be
required at your expense.
Page 50

20400025en_ba_a0
46
Volume
OK
≤
≥
BaseStat. setting
Basest. ringer
Volume
Melody
Increasing
Base station settings
Base station ringer
You can select the volume and the melody
1. Select "Volume" or "Melody" or
"Increasing".
2. Press OK.
3. ≤, ≥ select your setting.
4. Press OK.
Note:
If the procedure is terminated with the connect key or the cancel key, the old setting
is retained.
Please note that full volume may damage
your hearing.
BaseStat. setting
Time and date
Time and date
When you first operate the telephone or
after a power failure, date and time will
not be correct. You can set them manually:
1. Enter the time (e.g. 18:54).
2. Enter date (DD.MM.YY).
Page 51

20400025en_ba_a0
47
BaseStat. setting
Base station PIN
BaseStat. setting
Call allocat.
Base station settings
1. Select "Base station PIN".
2. Press OK.
3. Enter 4-digit PIN.
4. Press OK.
5. Repeat 4-digit PIN.
The base station PIN is activated.
Note:
Please remember your base station PIN,
otherwise the services of your dealer will
be required at your expense.
Call allocation
An incoming external call arrives at the base
station. The external call is only switched
to those handsets where call allocation is
on. The other handsets can only be reached
internally. By default, call allocation is on.
1. Select "Call allocation".
2. Press OK.
3. Enter system PIN if necessary.
4. Select handset 1–6.
5. Press x.
Call allocation for this handset is on
or off.
Base station PIN
The base station PIN (personal identification number)is required if you want to protect individual user options from unauthorised access (e.g. logging off handset etc.).
By default, base station PIN is off ("0000"):
Page 52

20400025en_ba_a0
48
Base station settings
Setting the dial pause
You can specify the pause required after
the exchange code. Please refer to the operating instructions for your PBX.
1. Select "Dial pause".
2. Press OK.
3. Specify the dial pause.
4. Press X.
Your telephone will now automatically insert a dial pause after the exchange identification code, provided no dial tone is
recognised.
BaseStat. setting
PBX
Public access
Dial pause
PBX
When operating the telephone on a private branch exchange (PBX), its characteristics must be taken into account. For further information consult the operating instructions for your PBX.
Public access code
The public access code is dialled before the
telephone number if the telephone number
is at least 6 digits long.
In the case of direct dialling (without dialling
preparation), no additional public access
code is dialled.
1. Select "Public access".
2. Press OK.
3. Enter up to 4 digits.
4. Press OK.
The public access code is now
stored.
Page 53

20400025en_ba_a0
49
Service function
Babyphone
On
Level
Target
Service function
Babyphone
You can use one handset as a babysitter
(monitoring handset) and monitor a room,
i.e. a child’s bedroom, for noises. To do this
you need two handsets, both logged onto
the base station.
As soon as the preset noise level is exceeded, the monitoring handset automatically makes an internal call to the destination handset. You can select one of 3 noise
levels.
The destination handset automatically takes
the call. The noise can be heard via the
speaker of the destination handset.
For external destination handsets the call
must be manually accepted.
Programming the babyphone
1. Press Pm.
2. Select "Service functions".
3. Press OK.
4. Select "Babyphone".
5. Press OK.
6. Select "Destination".
7. Press OK.
8. Select "Internal destination" or
"External destination".
9. Press OK.
10. Select the internal destination
(handset 1–6)
Press X or enter an external number.
11. Press OK.
12. Select "Level".
13. Press OK.
14. Set noise level (1–3)
1 = low, 2 = medium, 3 = loud
15. Press OK.
Note:
The interval between one monitoring call
and the next is at least 7 minutes if the
noise is still above the set level.
Switching babyphone on
1. Press Pm.
2. Select "Service functions".
3. Press OK.
4. Select "Babyphone".
5. Press OK.
6. Select "On".
Monitoring via the babyphone
feature is on.
-Babyphone-
OFF
15.08.01 12:18
Page 54

20400025en_ba_a0
50
Service function
Switching babyphone off
On the monitoring handset:
1. Press OFF.
Babyphone monitoring is off.
Note:
Place the monitoring handset within
approximately 1–3 meters of the child. Only
one destination handset can be defined.
Incoming calls are not displayed on the
monitoring handset if the destination is
defined as internal.
If the external destination number is busy,
it is redialled after a defined time.
The call must be terminated by the external
user.
Both handsets must be within range and
the battery cells must be charged up.
Recommendation:
The "Babyphone" function should be simulated every time before it is used.
On the monitoring handset all acoustic signals need to be off (e.g. radio signals). If
both handsets are in the same room, this
may produce undesirable feedback.
Warning:
Swisscom accepts no liability in case of a
malfunction of the babyphone feature.
Page 55

20400025en_ba_a0
51
Service function
Directory transf.
To handset 2
Directory
Single entry
Service function
Transferring directory entries to
other handsets
When you have logged on two or more
handsets to your base station you can transfer the entire directory or individual entries
from one handset to another. This exchange is only possible within the maximum limit of 6 handsets (Top A312/Top
A412) on your base station.
Before the transfer
Before you start the transfer you should
ensure that the receiving handset which is
to receive the data:
• is switched on
• is logged on
• is within range of the mutual base
station
• is not maintaining an active connection
Transmitting entries
At the transmitting handset:
1. Select "Directory transf."
2. Select the number of the receiving
device.
3. Select "Entry" to transmit a single
entry only, or "Directory" to
transmit all entries.
The connection is established.
The message "Prepare handset 2"
appears.
4. V, v Select an entry.
5. Press OK.
Transfer starts.
Receiving entries
At the receiving handset:
• The handset must be on.
1. Within 60 seconds reply YES to the
message "Directory transf., from
handset 1".
Note:
• If you have sent an individual entry
you can immediately select a further
entry and transfer it.
• If necessary enter the PIN of the
receiving handset.
• Already existing entries are not
overwritten; they are stored twice.
• During transfer of the entire directory,
the message "Delete the directory?
YES/NO" appears.
– If you press YES, first your entire
present directory content is deleted;
then the transfer commences.
– If you press NO, the transfer ends
and the handset returns to the
standby state.
Page 56

20400025en_ba_a0
52
Service function
Providers
Provider 1
…
Service function
Selecting providers
Your telephone supports you with several
options when selecting the most economical connection.
In the menu "Providers" you can store up
to 5 service providers with names and network prefixes (provider numbers).
1. Select "Providers".
2. Press i.
3. Enter the network prefix.
4. Press OK.
5. Enter the name of the provider.
6. Press OK.
7. Select one of the following options:
Nothing The provider is only acquired
and has no function. The
provider can be associated
with a directory entry.
Always Unless other provider func-
tions are defined, all call
numbers will be selected via
this provider.
Conditional Enter a prefix, e.g. 00 for
international calls. All call
numbers starting with these
numbers will be directed via
this provider.
Note:
If several providers are active, the provider
is selected according to the following priority:
1. Option specified in the directory
entry.
2. Destination prefix for certain
numbers (e.g. 079, 0171, 00).
3. Provider option "Always", can only
be activated for one provider.
Via the option of joining numbers in offline call preparation, you can determine for
each individual call which provider is to be
dialled (see section "Off-line call preparation").
Page 57

20400025en_ba_a0
53
Service function
Resetting the handset to the
default setting
This procedure resets all settings on the
handset to the default setting.
Directory entries, PIN code, and the log on
of the handset remain saved:
1. Select "Handset".
2. Press OK.
3. If necessary, enter PIN.
4. Press OK.
5. Select "Default setting".
6. Press OK.
7. Press YES.
Resetting the directory
This procedure deletes the directory entirely:
1. Select "Handset".
2. Press OK.
3. If necessary enter PIN.
4. Press OK.
5. Select "Directory".
6. Press OK.
7. Press YES.
Resetting the base station to
the default setting
This procedure resets all settings on the
base station to the default setting.
1. Select "Base station".
2. Press OK.
3. If necessary enter PIN.
4. Press OK.
5. Press YES.
The handsets remain logged on.
Software version
Shows the software version of handset and
base station:
1. Select "Software version".
2. Press OK.
3. Select "Handset" or
"Base station".
4. Press OK.
Service function
Reset
Handset
Base station
Directory
Default setting
Software version
Page 58

20400025en_ba_a0
54
Introduction
This section applies only if you have
an Top A412 (with answering machine).
The answering machine is controlled exclusively via the handset.
It can only be switched on or off from the
base station.
Thanks to the standard outgoing message
(plug & play) your answering machine is
immediately operational. All you need to
do is to switch it on.
The answering machine can be operated
from the base station, the handset or by
remote access via the network. If the answering machine is operated from the
handset, the display indicates the number
of the incoming message stored, the time
and date it was left, and the telephone
number of the caller.
Functions
• There are two different operating modes:
– Outgoing message with recording
– Answer only without recording
• The number of rings after which the
answering machine switches itself on
can be set to between 2 and 9 rings
or to "Economy funcion"
• Enable or disable operation of the answering machine using remote access
• Standard outgoing message (preprogrammed outgoing message)
• Monitoring of incoming messages
• Adjustable length of incoming messages
Note:
Recording of the outgoing message is
limited to 30 seconds.
Setting the answering machine
Characteristics
• Total recording time up to 22 minutes
• Automatic recording quality, i.e. the
recording quality drops as the length
of the recording time increases.
• Digital recording
• No maintenance required
Note:
Your answering machine cannot work if
there is a power failure; however, the messages previously left and the outgoing
messages remain saved.
Date and time
Your telephone registers time and date of
the recorded messages and shows this information in the handset display. To set time
and date, see the section "Base station settings".
Page 59

20400025en_ba_a0
55
Answer. machine
Settings
Number of rings
Y Economy func.
Y 2 rings
.
.
.
Y 9 rings
Answer. machine
Settings
Time limit
Y None
Y 60 seconds
Y 120 seconds
Y 180 seconds
Setting the answering machine
Setting the number of rings
You can set the number of rings after which
the answering machine switches itself on
to between 2 and 9 rings or to "Economy
function".
1. Select the desired number of rings.
2. Press X.
In "Economy function" (default) the answering machine switches itself on after:
• Four rings if no new messages have
been recorded
• Two rings if new messages have been
recorded
Note:
When polling your answering machine
from a distance (remote access), you can
hang up after the third ring because no
new messages have been recorded. This
helps you save telephone charges
("Economy function" setting).
Activating/deactivating message monitoring
You can listen to all incoming messages via
the loudspeaker on the base station.
1. Select handset 1-6
2. Press X.
Listening in is activated for the
corresponding handset.
Note:
See also the section "Listening to/taking
over incoming calls" (handset).
Time limit
The duration of each incoming message
can be set as follows:
Press X.
Answer. machine
Settings
Listening
Handset 1–6
Page 60

20400025en_ba_a0
56
Answer. machine
Greeting msgs.
Choice
Y Message A
Y Message B
Y Standard msg.
Answer. machine
Greeting msgs.
Language gr. msg.
Y Deutsch
...
Setting the answering machine
Operating modes
You can use the answering machine in two
modes by selecting the respective outgoing message:
• Record messages
Following outgoing message A or the
standard outgoing message, the caller can
leave a message.
• Answer only
Only a brief comment is played (outgoing
message B), e.g. saying that you are presently unavailable. The caller cannot leave a
message.
Selecting an operating mode
The operating mode selected remains set
until you select another outgoing message.
Record messages
1. Select "Message A" or "Standard
msg.".
2. Press X.
The set outgoing message is
played.
Answer only
1. Select "Message B".
2. Press X.
Outgoing message B is played.
Note:
When the memory is full the answering
machine automatically switches itself off
and "Answ. mach. Full" appears in the display.
In the "Recording" mode, the time-over
message, if recorded and switched on, is
played after a set period.
Setting the language of the
standard message (plug & play)
You can set the programmed message in a
language of your choice:
1. Select "Language gr. msg.".
2. Press OK.
3. Select the desired language.
4. Press X.
Page 61

20400025en_ba_a0
57
Answer. machine
Settings
Y On
Time-over msg.
Y Off
Setting the answering machine
Time-over message
You can record a time-over message (e.g.
"Thank you for calling") and switch it on
or off. If it is on, it will be played after expiry of the time limit set for a message.
1. Select "Time-over msg.".
2. Press OK.
3. Press "On" or "Off".
4. Press X.
Page 62

20400025en_ba_a0
58
Operating the answering machine from the handset
Introduction
You can operate your answering machine
from any logged on Top A312/Top A412
handset:
• Switch on/off
• Record/change your outgoing
messages
• Play back and delete messages
Switching the answering
machine on/off
Depending on the functions, the answering machine must be switched on or off.
If no outgoing message has been recorded,
the standard message (plug & play text) is
activated when the answering machine is
switched on.
Recording an outgoing message
You can record your own outgoing messages.
The answering machine must be off:
1. Select "Message A" or
"Message B" or
"Time-over msg.".
2. Press X.
3. Press START.
After the beep, record the text …
(min. 5 sec., max. 3 min.). Speak
without making long pauses (max.
4 sec.) otherwise recording will end.
4. Press STOP.
The recording procedure is now
finished. The text you have just
recorded is saved and replayed for
you to check.
Note:
Choosing an outgoing message see
"Changing the operating mode/monitoring
the outgoing message".
Answer. machine
On/Off
Answer. machine
Greeting msgs.
Recording
Y Message A
...
and speak
Press start
Message A
START
Page 63

20400025en_ba_a0
59
Answer. machine
Greeting msgs.
Choice
Y Message A
...
OK
message
1 new
Answer. machine
New message 1
10.03.00 10:32
PL
«
»
Playback
Operating the answering machine from the handset
Deleting an outgoing message
The answering machine must be off:
1. Select "Message A" or
"Message B" or
"Time-over msg.".
2. Press X.
The outgoing message is now
cleared.
Changing the operating mode/
monitoring the outgoing
message
You can monitor your outgoing message
and also keep changing it. Whenever the
outgoing message is changed, the message
you have just set is played back for confirmation.
1. Select the desired outgoing
message.
2. Press X.
The respective outgoing message is
played.
Note:
To finish monitoring, press the "Cancel"
key c.
Displaying new messages
As soon as any new incoming messages
have been recorded on your answering
machine, this is shown in the display.
1. Press OK.
The first new message is played.
The icon Ti disappears from the
display
or
Press c.
The handset returns to standby
state. The icon Ti in the display
indicates that there are new
messages on the answering
machine.
Answer. machine
Greeting msgs.
Delete
Message A
...
Page 64

20400025en_ba_a0
60
New message 1
10.03.00 10:32
PL
«
»
Playback
Operating the answering machine from the handset
Playing back recorded messages
You can play back new messages or previously played back messages on the answering machine as follows:
1. Select "Playback".
2. Press OK.
The messages are played back.
Instead of New message 1, the following messages may appear:
• New message 2 if new message 1
has already been played back
• Old message 1, if there are no new
messages
1. Press ».
The messages are played through
the handset. If there are new
messages, first the oldest new
message is played back. If there are
only messages which have already
been played back, the machine
begins by playing back the oldest
message.
During playback
Jump forward to the next message
1. Press » (Forward).
Repeat current message
1. Press « (Rewind)
Jump back to the previous message
1. Press « (Rewind) twice in quick
succession.
End playback
1. Press c (Cancel).
Answer. machine
Playback
Answer. machine
Delete messages
Deleting messages
Deleting individual messages
An individual message can only be deleted
while that message is being played back.
You are playing back a message and want
to delete it:
1. Press PL.
This message is now deleted.
Playback continues with the next
message.
Deleting all played back messages
With this procedure you can delete all completely played back messages together.
The answering machine must be off:
1. Select "Delete messages".
2. Press YES.
All completely played back messages are now deleted.
Page 65

20400025en_ba_a0
61
Operating the answering machine from the handset
Active answering machine
("Pick up")
If the answering machine has accepted an
incoming call and the handset is not
engaged, the two devices switch to "pickup" mode. In this mode the call can be
directly picked up:
The answering machine is switched on. The
outgoing message is played or the caller
leaves a message.
1. Press the Talk key or ≥G.
Note:
If "Call screening" is activated, the outgoing message as well as the caller’s
message are played over the loudspeaker.
Pressing the C key (or the 9 key) returns
the machine to standby and call screening
is aborted. The answering machine continues to record the message.
Temporary call screening
Even if “Call screening” is switched off, you
can listen to incoming messages over the
handset without the caller hearing you.
The outgoing announcement is played and
the caller speaks his message.
1. Press H.
2. Press 9.
Call screening is switched off.
Note:
The message is saved even if call screening
is on.
Recording telephone calls
When making a call you have the option
of recording the entire call or parts of it.
See section "During a call".
Checking the time left for
recording
You can check the recording time left until
the memory is full:
1. Select "Time left".
The time left for recording is
shown.
2. Press OK.
Answer. machine
Time left
Page 66

20400025en_ba_a0
62
Operating the answering machine from the base station
Answering machine on/off
On
Answering machine is off.
Press
●
until the signal tone is heard.
The red lamp is on.
The answering machine is switched
on.
Note:
If the answering machine cannot be
switched on, the memory may be full. This
is indicated by the red lamp double-flashing
rapidly (delete at least one message).
Off
The answering machine is switched on.
The red lamp is on.
Press
●
until the signal tone is heard.
Answering machine is off.
Page 67

20400025en_ba_a0
63
Answer. machine
Settings
Remote PIN
Operating the answering machine by remote access
Introduction
You can remotely control your answering
machine from any telephone or mobile
phone:
• Switch on/off
• Record/modify/select your outgoing
messages
• Play back and delete messages
DTMF signals are required for remote control of your answering machine. Remote
control can be via a telephone with tone
dialling (DTMF), a mobile phone or a code
transmitter (manual transmitter).
Note:
Remote access is automatically cut off if
no function is carried out within 24 seconds.
Remote access PIN
Your remote access PIN is required if you
want to activate remote access on your
answering machine.
1. Select "Remote PIN".
2. Press OK.
3. Enter 4-digit PIN.
4. Press OK.
Note:
In the default setting, remote access is deactivated. Please remember your new remote access PIN. If you forget it the services of Swisscom will be required at your
expense.
To bar the remote access PIN, enter "0000".
Points to remember when using
remote access
All functions can be cancelled or stopped
with numeric key 2.
To end remote access, replace the receiver
or disconnect the call on your mobile
phone.
Page 68

20400025en_ba_a0
64
Operating the answering machine by remote access
Access via remote access
With the answering machine on
1. Dial the number of your telephone.
2. Temporarily switch the telephone to
tone dialling (DTMF), if not already
set, or place a DTMF code transmitter up to the mouthpiece.
The outgoing message is now
played back.
3. During the outgoing message enter
your personal remote access PIN.
The message is now interrupted.
The ready beep sounds.
4. You can now operate the answering machine by pressing the
numeric keys.
With the answering machine off
1. Dial the number of your telephone.
2. After 10 to 12 rings the answering
machine switches itself on (warning
beep) for 8 seconds without
playing an outgoing message.
3. Enter your remote access PIN.
The ready beep sounds.
4. You can now operate the answering machine by pressing the
numeric keys.
PIN alarm
If you enter the remote access PIN incorrectly, an error tone sounds. You will then
need to key in your remote access PIN once
again. Remote access is always protected,
i.e. if you enter the remote access PIN incorrectly three times in succession, your
telephone will automatically disconnect the
line. The PIN alarm is then activated (indicated by rapid flashing of the red light).
It is now impossible to remote access your
answering machine until the PIN alarm has
been reset by pressing the On/Off key at
the base station.
Note:
If the red light continues to flash rapidly,
the answering machine is full (delete at
least one message).
Switching the answering
machine on/off
Press ⁄.
The answering machine is now on
and the outgoing message is
played.
Press ⁄.
The answering machine is now off
and an acknowledgement beep
sounds.
Note:
If no outgoing message is played, the answering machine was unable to switch itself on because the memory is full (delete
at least one message) or message B (play
back message) was not recorded properly.
Page 69

20400025en_ba_a0
65
Operating the answering machine by remote access
Playing back recorded messages
Press ‹.
The recorded messages are played
back. New messages are played
first. If there are no new messages,
the machine begins by playing back
the oldest message.
During playback
Repeat current message
Press ∞.
Jump back to the previous message
Press ∞∞.
Jump forward to the next message
Press ‹.
End playback
Press ”.
Delete the current message
Press Ú.
Functions with the answering
machine switched on
Select the operating mode/outgoing
message
The answering machine is off:
Press ⁄.
The answering machine is switched
on and the current outgoing
message is played back for
checking purposes.
During the playback:
Press ∞ (message A)
or
Press ‹ (message B)
or
Press ] (standard message)
or
Press Ô (time-over message)
The respective outgoing message is
set and played back.
Note:
If you press Ô the time-over message is
activated and played back without any
change in the operating mode. By pressing Ô again the time-over message is deactivated.
Page 70

20400025en_ba_a0
66
Operating the answering machine by remote access
Functions with the answering
machine off
If necessary switch the answering machine
off:
Press ⁄.
Delete all played back messages
Press Ú\Ú.
Record an outgoing message
Press [∞ (message A)
or
Press [‹ (message B)
or
Press [Ô (time-over message).
After the beep, record the text
(min. 5 sec., max. 3 min.). Speak
without making long pauses (max.
4 sec.) between words, otherwise
recording will end.
End recording
Press ”.
The text just recorded is played
back for you to check.
End monitoring
Press ”.
Delete an outgoing message
The answering machine is off:
Press Ú.
A warning tone sounds.
Press ∞ within 3 seconds.
Message A is now cleared.
or
Press ‹ within 3 seconds.
Message B is now cleared.
or
Press Ô within 3 seconds.
The time-over message is now
cleared.
Page 71

20400025en_ba_a0
67
General information
Troubleshooting
Most malfunctions will not be the result of a defect in your telephone. You can often
correct minor faults yourself by switching off/on the plug-in power supply of the base
station or removing the batteries of the handset and inserting them again.
The following tips are intended to help you do this.
Symptom Cause Remedy
No display. Handset not switched on. Press connect key.
Batteries discharged or Charge handset/ batteries.
inserted incorrectly.
No radio link to the Handset not logged on. Log handset on.
base station.
Cannot get a line, Telephone connector plug Check the plug at both
no dial tone. plug not correctly inserted. the telephone socket and
the base station; if necessary
remove and reconnect.
Plugs of the AC adaptor Check the plug at both
not correctly inserted. the telephone socket and
the mains plug at the 230V
socket. If necessary remove
and reconnect.
Handset and/or base Ringer de-activated or Adjust ringer volume.
station not ringing. set too low.
On PBXs only: Exchange identification Enter exchange identification
No connection or wrong code not entered. code.
number when dialling
from speed-dial memory.
Handset not ringing Ringer is switched off. Switch ringer on.
when an external call Volume is on minimum. Adjust volume.
arrives. Babyphone is switched on. Switch babyphone off.
Call allocation is switched Switch call allocation on.
off.
Important: Problems or faults can only be corrected if you take the complete
device (base station, handset and connection cable) to the sales
outlet!
Page 72

203400025en_ba_a0
68
General information
Repair and Maintenance
Leased device
In the event your telephone does not
function properly, please contact our repair
service (telephone number 175). Repair and
travel to make repairs are free.
Purchased device
Within the guarantee period, repairs are
carried out without charge in accordance
with the conditions of the guarantee.
Excepted is damage due to parts subject
to wearing (cables, labels, batteries, etc.)
and damage due to improper use (damage
due to dropping, water damage, batteries,
etc.). If a repair is necessary, the device must
be brought to the point of sale.
If the repair service is required (also during
the guarantee period), a flat-rate travel fee
and the time needed will be charged.
Beyond the guarantee period the cost of
materials will be added.
Batteries
Batteries constitute consumable materials
that are not included in the guarantee.
Defective batteries are not replaced free
of charge. This applies to leased and purchased devices.
Help
If you have general questions about matters
such as products and services, please
contact Swisscom’s call center (free number
0800 800 800).
Cleaning – when it is necessary
Simply wipe the telephone with a slightly
damp cloth or with an anti-static pad. Never
use a dry cloth. Please avoid using cleaning
agents and abrasives.
Approval
This equipment is intended for operation
on the Swiss ISDN network.
Country specific characteristics are taken
into account. For inquiries concerning
differences between public telephone
networks, please contact your local dealer
or network provider. This device complies
with the fundamental requirements for
terminal guidelines and is confirmed by the
CE mark.
This DECT cordless telephone complies with
the fundamental requirements of R&TTE
Directive 99/5/EC and is suitable for
connection and operation in the member
country specified on the base station and/
or packaging.
Page 73

20400025en_ba_a0
69
Technical Data
DECT
Standard: DECT/GAP
Frequency
range: 1880 MHz to 1900 MHz
Transmit
output: 10 mW, mean output per
channel
Range: up to 250 m outdoors
up to 40 m inside
buildings
Dialling mode: Dual Tone MultiFrequency
dialling
Power supply
Power supply: SNG 6 af
primary: 220/230 V~/50 Hz
secondary: 7,5 V/500 mA
Rechargeable
batteries: 3 x 1.2 V
NiMH battery type AAA
or NiCd battery type
AAA
Battery endurance
With NiMH: standby approx. 150 hrs
talk time approx. 15 hrs
with NiCd: standby approx. 70 hrs
talk time approx. 7 hrs
Permissible ambient conditions
for operation: 5 °C to 40 °C
5% to 85% relative
humidity
Permissible storage temperature:
– 25 °C to + 70 °C
Dimensions
Base station: approx. 135 x 125 x 125 mm
Handset: approx. 145 x 51 x 30 mm
Weight
Base station: approx. 200 g
Handset: approx. 140 g
Warning:
Circuit can be
destroyed by electrostatic
discharge!
CE mark
The telephone complies with the requirements of the following European Directives:
EN 301 489-1/6 "Electromagnetic
compatibility".
EN 60950 "Electrical equipment
for use within specific
voltage limits".
Compliance of the
telephone with the
aforementioned directives is confirmed by
the CE mark.
Page 74

203400025en_ba_a0
70
Menu structure in standby state
Y Français
Answer. machine
Delete messages
Time left
Settings
Greeting msgs.
Number of rings
Remote PIN
Recording
Choice
Time limit
Y None
Y 60 seconds
Y 120 seconds
Y 180 seconds
Y Economy func.
Y 2 rings
Y 3 rings
Y 4 rings
Y 5 rings
Y 6 rings
Y 7 rings
Y 8 rings
Y 9 rings
Y Message A
Y Message B
Y Final message
Y Message A
Y Message B
Y Final message
Delete
Language gr. msg.
Y Deutsch
Y English
…
Keypad lock
Ringer off/on
Listening on/off
Playback
Time-over msg.
Y On
Y Off
Y Off
Y Handset 1
Listening
…
Y Italiano
Message A
Message B
Time-over msg.
Page 75

20400025en_ba_a0
71
…
Handset settings
BaseStat. setting
BaseStat. ringer
Time and Date
Handset ringer
Handset off
Settings
Direct call
o Keyclick
o Range beep
o Charging beep
o Direct accept
o Backlight
Volume
Melody
Internal melody
Name dialling
o Missed calls
Increasing
Select station
Handset PIN
Y Automatic
Language
Y English
Y Deutsch
Volume
Increasing
Melody
Time
Date
Log on
Log off
Call allocat.
PBX
Base station PIN
On base station
On other syst.
Other handset
Public access
Dial pause
Y Base station A
…
…
…
Battery type
Speed dialling
Y NiMH
Y NiCd
o Handset 1
Y 3 seconds
Menu structure in standby state
Page 76

203400025en_ba_a0
72
Service function Babyphone
Provider
On
Level
Target
Provider 1
o Handset 1–6
Default setting
Directory
Directory transf.
Handset 1
Reset
Handset
Handset
Base station
Base station
…
…
Software version
Charges
Total line
Handset 1
…
…
Last call
All calls
o Charges
o Duration
Type of display
Line
Handset 1
Factor
Currency
Menu structure in standby state
Page 77

20400025en_ba_a0
73
Prov. services Call forwarding Unconditional Activate
Deactivate
No reply Activate
Deaktivieren
Busy
Adapt
During conn. Service 1
Activate
Deactivate
…
Without conn. Service 1
…
Show
Deactivate
Show
Show
Combox
Blue key
More services Service 1
…
Activate
Deactivate
Show
Number
Delete
Menu structure in standby state
Page 78

203400025en_ba_a0
74
Key words
A
Accept a call ....................................... 25
Acknowledgement sound ................... 43
Anonymous calling (CLIR) ...................19
Answering machine on/off ................. 62
B
Babyphone .................................... 1, 49
Programming ...................................49
Switching on ....................................49
Backlight ............................................43
Basic settings and operation ...............13
Batteries .............................................12
Battery endurance ....................... 12, 69
Battery indicator .................................12
Beeps .................................................43
Blue key .............................................33
Brief description of services................. 31
C
Cables, connect/disconnect ................ 10
Call forwarding .................................. 28
Calls ....................................... 2, 17, 24
Make an external call ....................... 17
Make an internal call ........................24
Calls, free, internal ............................. 24
Cancel key.................................. A2, 14
Cause ................................................. 67
CE mark .............................................69
Charge status of batteries................... 12
Charges....................................... 34, 35
Charging batteries .............................. 12
Charging beep ................................... 43
Combox .............................................33
Connect base station .......................... 10
Connect key ............................... A2, 14
Contents of the package ...................... 8
Control key ................................ A2, 14
D
Date ...................................................46
Declaration of Conformity .................. 77
DECT .......................................... A1, 69
Default setting, factory setting............ 53
Default state, resetting to ................... 53
Dial externally ..................................... 17
Dial from the directory........................ 20
Dimensions......................................... 69
Direct accept ......................................43
Direct call ...........................................40
Directory entry.................................... 20
Display .............................................. A2
Display icons............................... A2, 13
DTMF (temporary) .............................. 22
E
Exchange identification code ..............19
F
Faults ................................................. 67
G
GAP ...................................................38
H
Hands-free mode........................... 2, 21
Handset
Log off .............................................38
Logging on ......................................36
Switch on/off ................................... 42
Page 79

20400025en_ba_a0
75
Key words
I
Icon .................................................... 13
Identification restriction (CLIR) ............ 19
Inquiry ................................................ 25
Inserting batteries ............................... 11
Internal key ........................................14
K
Keyclick ..............................................43
Keypad ....................................... A2, 22
Keypad lock........................................ 41
L
Language ...........................................42
Listening............................................. 55
Location, suitable .................................9
Log off ...............................................38
Log on.................................... 1, 36, 37
Loudspeaker ....................................... 55
M
Main menu......................................... 13
Menu .................................................13
Microphone....................................... A2
Microphone mute............................... 22
Monitoring outgoing message ............ 59
Multifunction key ....................... A2, 14
Mute switch ................................ 13, 22
N
New cable layout ................................ 10
Numeric keys ...................................... 14
O
Off-line call preparation ...................... 20
Other handset, logging on.................. 37
P
PABX ..................................................19
Paging ................................................ 24
Personal identification number .... 45, 47
Pick up ...............................................61
PIN .............................................. 45, 47
Base station .....................................47
Handset ........................................... 45
Plug & Play .........................................56
Power switched off............................. 12
Protection against listening-in ............... 9
Provider ....................................... 19, 52
Provider services .................................28
Q
Quick Reference User Guide .................1
R
Range.............................. 9, 36, 43, 69
Receiver............................................. A2
Record................................................ 22
Recording a call .................................. 56
Reject a call ........................................25
Remaining within reach ...................... 28
Remedy ..............................................67
Remote access .................................... 63
Ringer
Base station .....................................46
Handset ........................................... 44
Ringer off (do not disturb) ..................41
Ringer on/off ......................................41
Page 80

203400025en_ba_a0
76
Key words
S
Select a base station ...........................39
Setting
Answering machine .........................54
Base station .....................................46
Handset ........................................... 42
Several base station ............................39
Several handsets ................................. 36
Shortcuts ..................................... 14, 27
Software version................................. 53
Speed dialling ................................ 2, 17
Standard message ..............................56
Switching on in standby state .............13
Symptom............................................ 67
T
Technical Data .................................... 69
Temporary call screening ..................... 61
Three-party conference....................... 26
Time ................................................... 46
Time and date ....................................46
Tones, clicks and beeps .......................43
Total recording time ............................ 54
Transfer ..............................................51
Transfer directory entries.....................51
Troubleshooting..................................67
U
Unplugging/plugging in ...................... 10
V
Volume............................................... 44
W
Warning beep ........................ 9, 43, 58
Weight ............................................... 69
Page 81

20400025en_ba_a0
77
Declaration of Conformity
Declaration of Conformity
Swisscom Fixnet AG, Customer Premises Equipments (CPE)
Alte Tiefenaustrasse 6, CH-3050 Bern
declares that the Products
Swisscom Top A312
Swisscom Top A412
(DECT Cordless Telephones, Fixed and Mobile
Part for PSTN-Interface)
corresponds to this declaration, with the following standards,
technical requests and normative Documents
Safety: EN 60 950 (equivalent to 73/23/EC)
EMC EN 301 489-1/6 (equivalent to 89/336/EC)
Radio EN 301 406 (DECT)
The presumption of conformity with essential requirements
regarding Council Directive 99/05/EC is ensured.
Bern, 03.02.2003
Christian Maître Beat Schüpbach
Head of Productmanagement Product Manager
Page 82

Page 83

Page 84

SV 20400025en_ba_a0 K.102
 Loading...