

Page 1

TeleAlarm® S12
User Guide
Page 2

Page 3

Dear customer,
Thank you for purchasing this Swisscom product. This instruction manual shall
assist you in handling your TeleAlarm
®
S12.
Please take some time to become familiar with the product so that you can fully
profit from its entire range of service features.
Please keep this instruction manual in a safe place.
All rights reserved.
Swisscom reserves the right to make changes in the information contained in
this document at any time without prior notice. Great care has been given to the
contents of this document; however Swisscom cannot be held liable for the consequences of any errors or omissions contained herein or for consequential or
incidental damages incurred as a result of acting on information contained in
the document.
TeleAlarm
®
is a registered trade mark of TeleAlarm SA.
The TeleAlarm
®
S12 is manufactured in La Chaux-de-Fonds (Switzerland) by Te-
leAlarm SA.
Page 4

TABLE OF CONTENTS
4
Brief description......................................................................................... 6
TeleAlarm® S12.......................................................................................6
Methods of transmitting your call for help ..................................................7
Automatic monitoring............................................................................... 8
Overview .................................................................................................. 9
TeleAlarm® S12.......................................................................................9
Wrist transmitter S37..............................................................................10
Further available accessories .................................................................. 10
Installation .............................................................................................. 11
Positioning the TeleAlarm® S12............................................................... 11
Installation on a piece of furniture........................................................11
Wall mounting ...................................................................................11
Connecting the TeleAlarm® S12.............................................................. 11
AC adaptor .......................................................................................11
Telephone network cord .....................................................................12
Telephone connection cord.................................................................12
Getting started ........................................................................................12
Initial use .............................................................................................. 12
Operation...............................................................................................16
Triggering a call for help ........................................................................16
The pre-alarm .......................................................................................16
Contacting a private individual ...............................................................16
Cancelling the call for help..................................................................... 16
Receiving alarms via telephone ...............................................................17
Presence control (daily report).................................................................18
Turning the presence control on ..........................................................18
Turning the presence control off ..........................................................18
Triggering an automatic call for help ...................................................18
Back-lit coloured buttons........................................................................18
Priority switching ....................................................................................18
Taking phone calls through the transmitter...............................................19
Locking the keyboard .............................................................................19
Automatic monitoring............................................................................... 20
Ready mode..........................................................................................20
Signals of the LCD display ......................................................................20
Signals of the LED indicator ....................................................................21
Loudspeaker signals...............................................................................21
Page 5

TABLE OF CONTENTS
5
Programming.......................................................................................... 22
Keyboard overview ................................................................................ 22
Programming or deleting a radio transmitter............................................ 23
Programming a silent alarm ................................................................... 24
Programming an alarm recipient ............................................................ 24
Monitoring centres ................................................................................ 26
Recording voice messages ..................................................................... 26
Programming general parameters........................................................... 27
Programming the language of the TeleAlarm® S12 .................................. 28
Programming presence control............................................................... 29
Programming the keyboard illumination .................................................. 30
Programming the Prealarm period and Prealarm sound signal .................. 31
Programming the prealarm stop ............................................................. 32
Checking the system and troubleshooting .................................................. 34
Checking the radio range ...................................................................... 34
Periodical alarm transmission test ........................................................... 35
After programming alarm transmission test .............................................. 35
Warnings and conditions ......................................................................... 36
Important safety instructions ................................................................... 36
Battery maintenance instructions............................................................. 36
Disposal of the batteries......................................................................... 37
Environmental impact ............................................................................ 37
Important information.............................................................................. 38
Licence and conformity .......................................................................... 38
Repair / Maintenance............................................................................ 38
Rented units ...................................................................................... 38
Purchased units ................................................................................. 38
Storage battery .................................................................................. 38
Help ................................................................................................. 38
General information .......................................................................... 38
Page 6

GENERAL PRESENTATION
6
Brief description
Tel e A l a rm
®
S12
In case of an emergency, the
TeleAlarm
®
S12 calls private individuals or a monitoring centre to ensure
your security around the clock. The
TeleAlarm
®
S12 can store up to eight
telephone numbers of the people or
services of your choice.
In an emergency, just press the call for
help key on the radio transmitter,
which you always wear, and your contacts will be called automatically.
The transmitter uses radio signals to
forward your call for help to the
TeleAlarm
®
S12 base unit, which
automatically calls the people you
have chosen. If the TeleAlarm
®
S12
gets no answer from the first person it
calls, it dials the next number.
Once the unit has established a phone
connection, the TeleAlarm
®
S12 will
play a previously recorded mes-
sage that gives your contact information, for example, information on how
to contact you.
The built-in microphone and loudspeaker allow you to talk to your contact at a distance from the
TeleAlarm
®
S12 without having to pick
up the receiver (« hands-free » com-
munication). Your contact can assess
your situation precisely and provide
you with the specific help you need.
The display gives current information about the actions carried out by
the TeleAlarm
®
S12.
The TeleAlarm
®
S12 also offers addi-
tional features to make your tele-
phone easier to use:
You can receive incoming telephone
calls via the radio transmitter without having to go to the telephone.
Important:
How long does it take for the TeleAlarm® S12 to dial the next programmed number?
After the dialing of a number, the
TeleAlarm
®
S12 waits approximately
30 seconds for the called person to
confrim through key [4] on his telephone. Without a confirmation within
these 30 seconds (no answer, no
pressing on key [4], Combox, etc.), the
S12 hangs up automatically and dials
the next number. When only one
number is programmed, the S12 waits
for one minute before it dials the
number again. If the number is occupied, the S12 dials immediately the
next number without waiting for 30
seconds.
When a Combox or an answering machine picks up, does the TeleAlarm
®
S12 call the next number?
As mentioned above, without a confirmation within 30 seconds following
the dialing of the number, the S12
hangs up and dials the next number.
Page 7

GENERAL PRESENTATION
7
When a programmed number is diverted, for example towards a mobile
telephone, what happens?
The 30 seconds restart after the dialing of the final destination number. If
the diversion lasts less than 30 seconds, then the mobile telephone (for
example) rings and the call can be
taken. If the diversion lasts longer than
30 seconds, then the call recipient is
considered as unreachable and the
TeleAlarm
®
S12 dials automatically
the next number.
When 8 numbers are programmed
and no-one has picked up and acknowledged the call, what happens
then?
The TeleAlarm
®
S12 tries again to
reach the first number, then the second number, and so on. The total
number of calls is however limited to
24 (3 cycles of 8 numbers, or 4 cycles
of 6 numbers, etc.), and at maximum
4 complete cycles (if, for example, 4
numbers are registered, then each
number will be dialed at most 4 times,
thus 16 calls in total). If none of the
registered numbers answers, the call
for help is lost. The user should then
press his wrist transmitter S37 again to
trigger a new call for help.
Methods of transmitting
your call for help
The TeleAlarm® S12 can contact:
Private individuals (neighbours,
relatives, nurses, etc.)
Monitoring centres.
You can choose people you know
(neighbours, relatives, friends, etc.) or
medical services which are active in
the area to receive your calls for help.
To be sure that your call for help will
be answered both day and night, you
can include the services of a monitoring centre. Swisscom works with operators of call monitoring centres.
The people whose telephone numbers
are entered in the
TeleAlarm
®
S12
must know that you are relying on their
help, and they are obligated to provide assistance. These people should
know your needs and have keys to
your home so they can enter if necessary.
The programming of a monitoring
centre is only possible via remote programming.
The emergency numbers 144, 117
and 118 may not be programmed into
your TeleAlarm® S12; the telephone
numbers of hospitals, doctors, etc.
may not be programmed without getting permission to do so first.
Page 8

GENERAL PRESENTATION
8
Automatic monitoring
The AC adaptor connects the
TeleAlarm
®
S12 to your household
current (230 Volts). If there is a power
failure, a backup battery will ensure the power supply of the device for
about 120 hours
The radio transmitter uses a lithium
battery that can handle more than
3,000 transmissions.
The power supply and telephone line,
the TeleAlarm
®
S12 backup battery
and the wrist transmitter battery are
monitored.
If there is a loss of power or if one of
the batteries runs low, the failure message will be shown on the
TeleAlarm
®
S12 display. This information can be relayed to a monitoring
centre.
Page 9
GENERAL PRESENTATION
9
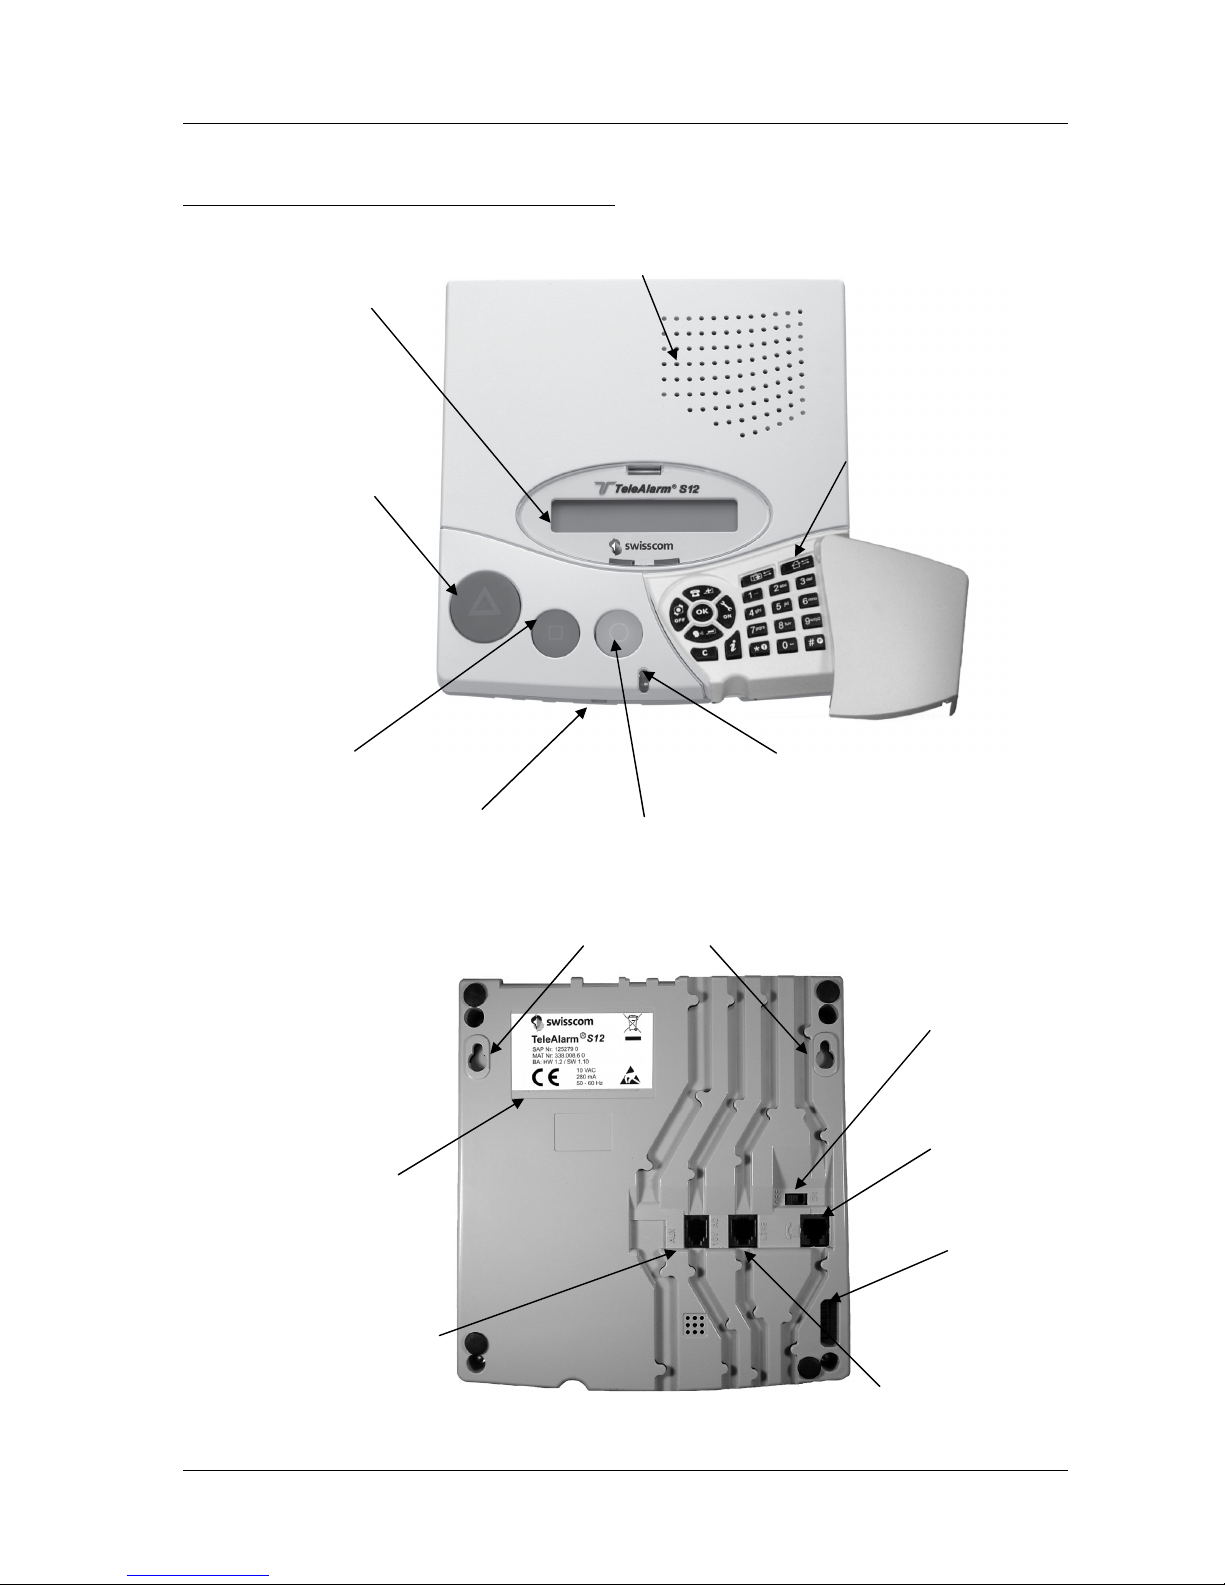
Overview
Tel e A l a rm
®
S12
Bottom view:
Red button for
help call
Loud
s
p
eake
r
Green reset
button
Mic
rop
hon
e
Programming
keyboard
LED indi
c
ator
LCD d
i
s
play
Yellow butto
n
« 10V AC » plug
(AC adaptor input jack)
T+T Telephone
cord socket
«
LINE »
ON/OFF switc
h
Series N
o
ID labe
l
Wall mounting
s
Telephone
connector
socket
Page 10

GENERAL PRESENTATION
10
Wrist transmitter S37
Your TeleAlarm
®
S12 includes the following accessories:
TeleAlarm
®
S12 call for help unit;
Wrist transmitter S37 ;
Clip for wrist transmitter S37 ;
AC adaptor ;
Telephone network cord ;
Telephone connection cord ;
Instruction manual (this manual).
Further available accessories
For your TeleAlarm® S12 other accessories can be supplied. (Please contact
your Swisscom
dealer for further de-
tails).
For example:
Additional wrist transmitters S37 ;
Clip for wrist transmitter S37 ;
LED indicato
r
Call for help
button
Page 11
INSTALLATION
11
Installation
Positioning the
Tel e A l a rm® S12
Installation on a piece of furniture
We recommend placing the
TeleAlarm
®
S12 on a slip-proof surface.
However, do not place anything (blanket,
etc.) on top of the unit (loudspeaker!).
Wall mounting
Mount the TeleAlarm® S12 to a smooth
wall surface using two screws set 157 mm
apart. The power cord and the telephone
cords should be placed inside the channels on the bottom of the
TeleAlarm
®
S12.
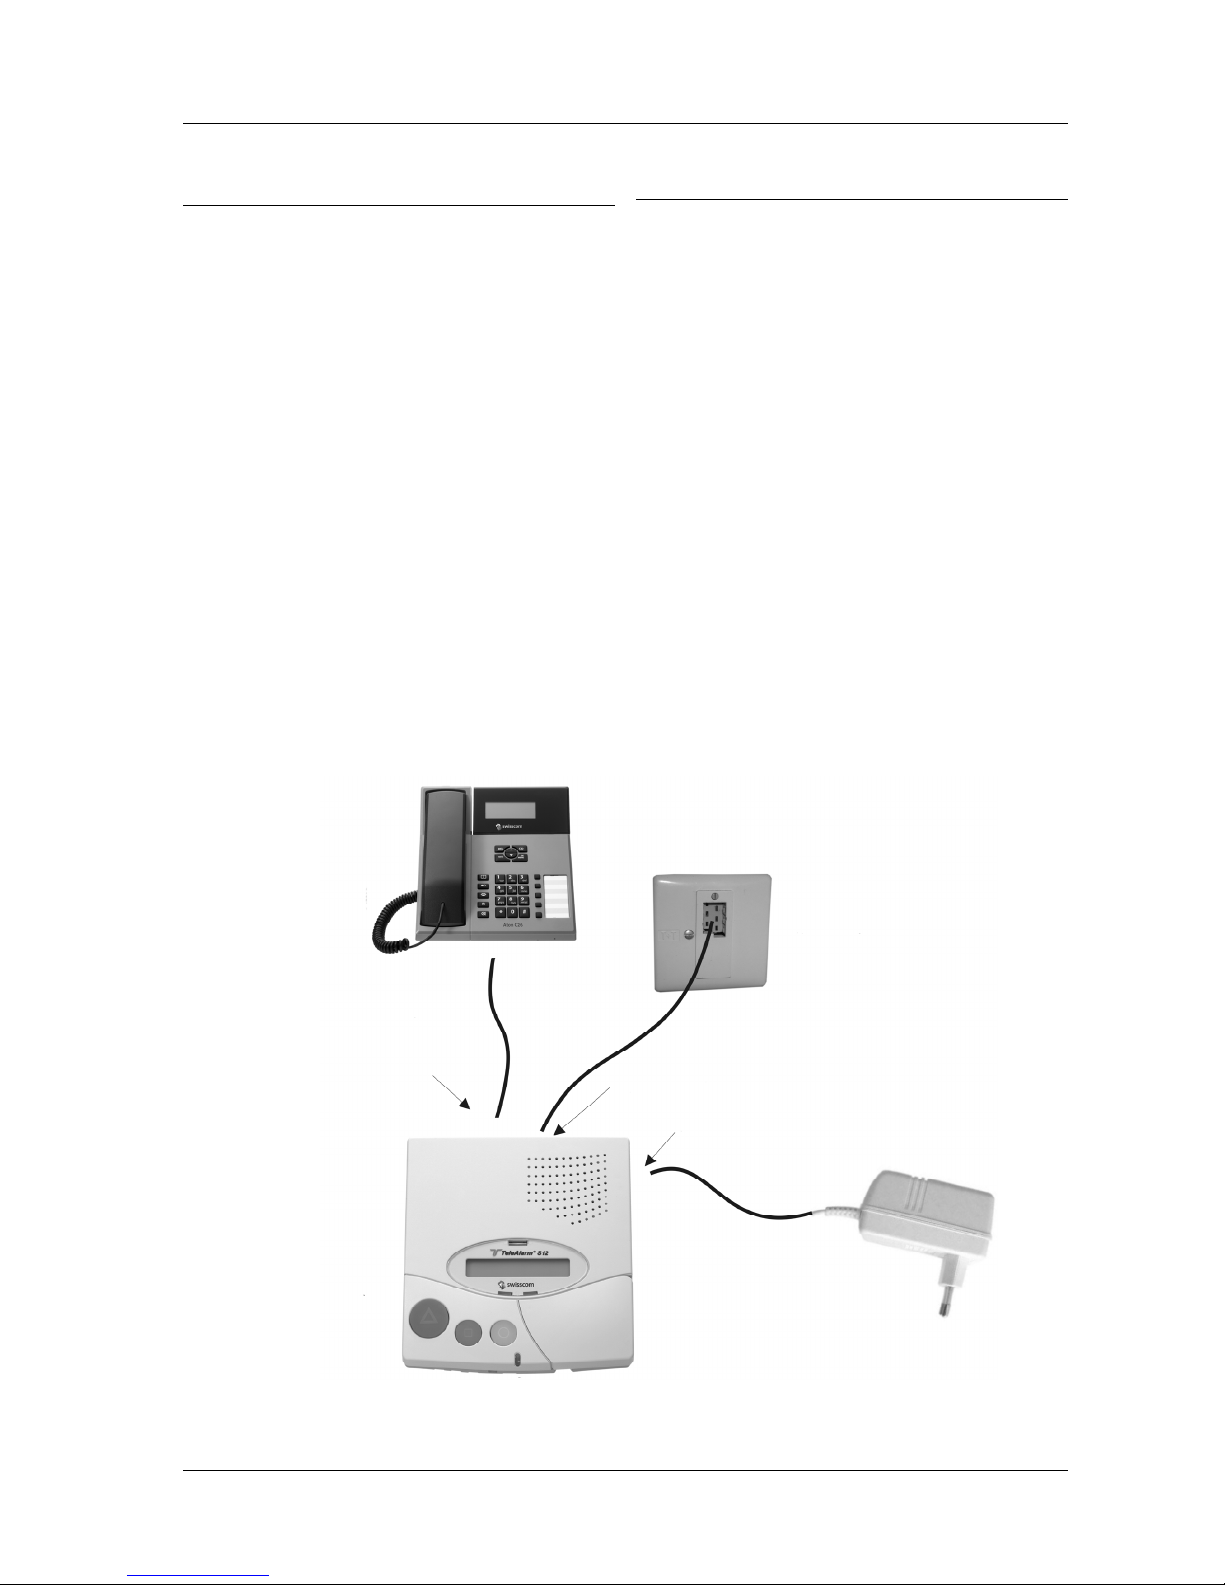
Connecting the
Tel e A l a rm® S12
AC adaptor
Connect the TeleAlarm® S12 to the 230V
household current. Insert the AC adaptor
into the AC adaptor input jack
« 10V
AC »
of the TeleAlarm® S12 and plug the
AC adaptor into a 230V outlet. For safety
reasons, we recommend that you use an
outlet in close proximity to the
TeleAlarm
®
S12 unit. The AC adaptor
should be easy to reach
.
Telephone wall jac
k
Telephone line cabl
e
Telephone connection cabl
e
To
socke
t
To « LINE » socket
To the
«
10V A
C
» socke
t
AC ad
a
ptor
Local te
l
e
phone se
t
Tel
e
A
lar
m® S12
Page 12

GETTING STARTED
12
Telephone network cord
The TeleAlarm® S12 has a serial telephone connection and does not interfere with normal telephone use. However, the unit will not work on ISDN
lines. Insert the small telephone connection plug into the telephone connection socket « LINE » and insert the
large telephone connection plug into
the telephone jack on the wall.
Telephone connection cord
Insert one of the telephone connection
cord plugs into the telephone connector socket
and insert the plug at
the other end of the telephone connection cord into the phone for “serial” use with the unit.
Getting started
Initial use
This section concerns only the initial
programming of the unit with default
factory settings (without centre programming). For future or additional
programming operations, please refer
to « PROGRAMMATION » section.
Turn the ON/OFF switch on the
bottom side of TeleAlarm
®
S12 to
the ON-position.
After the unit has been turned on, the
TeleAlarm
®
S12 will prompt you to select a language, to program an alarm
recipient, a radio transmitter and a
voice message.
When the unit is turned on, the display
will show the following welcome message for a few seconds:
* TELEALARM S12 *
Swisscom
The display will show the message:
¬ Sprache 0
Deutsch £
Important note:
If you do not see this display at this
point, it means that the unit has already been programmed. If this is the
case, you can simply skip this section
and follow the instructions in later sections for adding to or changing the
programming.
Page 13

GETTING STARTED
13
Select English using the keys
and
(up and down).
Confirm your selection by pressing
.
The display will show the message:
° Destination Nr. 1
Program
Confirm that you wish to save the
recipient as target 1 by pressing .
° Phone Nr.
»
Enter the first alarm recipient’s tele-
phone number (up to 20 digits).
Each digit can be one figure (0-9),
an interval or an identification of a
new dialling tone.
Note:
Dial tone identification (T) and intervals (P) can be entered by “doubleclicking" the
(identification of a
free telephone line) and
keys (time
delay 6 seconds, before dialling is
continued).
The emergency numbers 144, 117
and 118 may not be programmed into
your TeleAlarm® S12; the telephone
numbers of hospitals, doctors, etc.
may not be programmed without getting permission to do so first.
Note:
At least one telephone number must
be registered. If several telephone
numbers are entered, please proceed
afterwards to the section « Programming an alarm recipient ».
° Phone Nr.
0123456789
Use
to delete an entry if you
have made a mistake or confirm
your selection by pressing
.
The display will show the message:
° Destination
stored !
The display will show the message:
¯ Radio Nr. 01
Program
Confirm that you wish to save the
radio transmitter No. 1 by pressing
.
Note:
At least one radio transmitter must be
registered. If several radio transmitters
are entered, please proceed afterwards to the section « Programming a
radio transmitter ».
The display will show the message:
¯´ Press Radio
Button
Press the call for help button on
your wrist transmitter S37.
Page 14

GETTING STARTED
14
When the transmitter code is accepted, the following display will temporarily appear.
¯ Transmitter code
accepted
Programming a silent alarm
The TeleAlarm S12 will invite you to
assign an alarm type to the radio
transmitter: select the alarm type “Assistance Alarm” for standard alarms.
¯ Alarm type: 00
Assistance Alarm £
Or do the following:
Select “Generic silent Alm” (Alarm
type 39) for silent alarm by scrolling
the display with the
and keys.
¯ Alarm type: 39
Generic silent Alm ¢
Confirm by pressing the
key. The
following display will temporarily appear.
¯ Transmitter
Stored !
then:
® OK:Program
Confirm your selection by pressing
.
The display will show the message:
® Talk after BEEP
Wait until the countdown has
reached 0 and then start to speak
after the beep tone to record the
desired message.
Sample of a recorded voice
message:
« This is a TeleAlarm call for help from
Mr. Walter, press key four (4) on your
telephone or call me back on 012
345 67 89. Before the conversation is
ended, press key zero [0]. »
.
A bar will show the recording progress.
®´ Recording…
············
Press to cancel the recording
before its maximum duration or wait
until the end.
Page 15

GETTING STARTED
15
The display will show the message:
Voice message
stored !
then:
S12
is ready
The TeleAlarm
®
S12 is now in the
ready mode, ready to call someone
on your behalf if you trigger a call for
help. The above stated “ready” message will be shown on the display
screen, either on a continuous basis or
alternating with warning messages if
technical problems are detected
(backup battery is dead, loss of power,
telephone line is unplugged , etc.).
The TeleAlarm S12 can be programmed for silent dialling so that an
alarm can be transmitted without any
sound from the unit. This includes silent dialling and silent communication
(voice channel from the TeleAlarm
S12 to the receiver).
Note:
When the silent alarm mode is active,
you can switch to the normal alarm
mode by pressing twice key nine [9] on
the telephone (see the Telephone key
table on page 14).
The silent alarm can be activated
separately for each programmed
transmitter. (see “Programming Description” hereunder)
Page 16

OPERATION
16
Operation
In case of emergency, the
TeleAlarm® S12 will call people
for you who can assist you.
Triggering a call for help
Via the S37 wrist transmitter: press
the red call for help button.
Via the TeleAlarm
®
S12: press the
red button.
The pre-alarm
(Duration programmable from 1 to
254 seconds)
Notice:
This function is not available in «silent
alarm» mode.
You will hear sound signals and the
LED indicator will blink red.
The display will show the message:
Prealarm
During the pre-alarm you can cancel
the call for help:
Via the TeleAlarm
®
S12: press the
green button.
If the TeleAlarm
®
S12 has been
programmed correspondingly (see
page 28), you can also cancel the
call for help by pressing again the
red button of your radio transmitter,
after the red LED has turned off.
Contacting a private individual
If the pre-alarm period has expired,
the LED indicator will change to a continuous red signal and the call for help
unit will call the alarm recipient.
The display will show the message:
Calling Receiver XX
Assistance Alarm
The TeleAlarm® S12 will establish a
telephone connection ;
The TeleAlarm
®
S12 play the re-
corded voice message several
times ;
Cancelling the call for help
By pressing the green button of the
TeleAlarm
®
S12, it is possible to can-
cel the call for help anytime.
Page 17

OPERATION
17
Receiving alarms via telephone
Notice:
Each touch-tone telephone can serve
as a simple call for help receiver. The
same applies to fixed network telephones as well as cell phones.
The telephone set will ring, your
contact will pick up the receiver ;
Your contact will listen to the
TeleAlarm
®
S12 Identification melody (see description in this document) and the recorded voice message, which are alternately played ;
Your contact will press the key four
(4) on the telephone ;
He/she will hear a beep tone ;
Notice:
When the “silent Alarm” is activated, it
is only possible to “Listen”. It is not
possible to establish a duplex communication with the caller.
He/she can speak to you for three
minutes and assess the situation.
Each time he/she presses the key
four (4), he/she can speak to you
for another three minutes.
Use key three (3) to turn the volume
up, key one (1) to turn it down.
He/she ends the call and acknowledges the call for help by pressing the
key zero (0). Then he/she will hang up
again.
He/she will do whatever is possible
to help as quickly as possible.
Telephone
key.
Action on the
TeleAlarm® S12
0 Interrupts the connec-
tion
1 Turns the volume down
3 Turns the volume up
4 For Assistance Alarms:
Answers the call
Extends the conversa-
tion time by 3 minutes
Returns to hands-free
communication
For Silent Alarms
Answers the call
Extends the hearing
time by 3 minutes
7 Listening only (not in
“silent Alarm” mode)
8 Speaking only (not in
“silent Alarm” mode)
The TeleAlarm
®
S12 can acknowledge the alarms by waiting for a
callback. This is useful for certain
old phone types.
The TeleAlarm
®
S12 waits for incoming calls between the attempted
calls for help. The LED indicator
shows the alarm status. If a call
comes within one minute, after a recipient has hanged up without
pressing a key, the TeleAlarm
®
S12
will answer the call automatically. It
will consider this as an acknowledgement on the part of the caller
and arranges a hands-free communication.
Page 18

OPERATION
18
Presence control
(daily report)
Via the presence control, you will also
obtain help if you cannot press the call
for help button. The TeleAlarm
®
S12
automatically initiates a call for help if
no keys are pressed on the
TeleAlarm® S12 for a certain preset
amount of time.
Note:
Presence control can only be turned
on and off if the presence time is not
set to zero (see the Programming section).
Turning the presence control on
Press the yellow button (or ).
The display will show the message :
Activity
Monitoring ON ª
Alternate with the « ready mode ».
Turning the presence control off
(For cases where you are absent for a
longer period of time than the set
presence time, such as visits, a vacation, etc..)
Press the yellow button (or
) and
hold it pressed for some time. The
following message will be deleted:
Activity
Monitoring ON ª
Triggering an automatic call for
help
A call for help will be triggered automatically if the following conditions
are met:
Presence control is on.
No key is pressed during the pro-
grammed time period.
The call sequence (calling your contacts) is the same as in
« Contacting a private individual ».
Back-lit coloured buttons
The three coloured buttons of the
TeleAlarm
®
S12 are back-lit.
Therefore it is easier for the user to
find the buttons in darkness and
he/she will be informed about the actions possible in the corresponding
situation under any circumstances.
Priority switching
Your TeleAlarm® S12 features an integrated circuit to terminate a local telephone connection if a call for help
transmission is required. This means
that if your telephone is already being
used, the connection will be interrupted to enable the call for help to be
transmitted.
Ensure that the wiring and the plug
connection of your call for help unit
and the local telephone set has been
executed properly.
Page 19

OPERATION
19
Taking phone calls through
the transmitter
Each programmed radio transmitter
allows you to take a phone call from
anywhere in your home without having
to go to the telephone.
If your telephone rings, the message
will appear on your display :
Incoming ©
Call X
Press the call for help button on the
assigned radio transmitter.
The TeleAlarm
®
S12 now enables
you to speak to the calling person in
a « hands-free » communication.
Locking the keyboard
The programming keyboard can be
locked to prevent that a key is pressed
by mistake.
Briefly press the
key and then
the
key to lock or unlock the
keyboard.
The symbol for the locked keyboard
½
will appear on the LCD display, as
soon as the keyboard is locked.
Page 20

AUTOMATIC MONITORING
20
Automatic monitoring
Ready mode
In the ready mode the TeleAlarm® S12
will effect automatic monitoring operations as follows :
Power supply from the mains ;
Telephone line ;
Integrated radio transmitter ;
Internal backup battery ;
Radio transmitter (battery and ser-
vice).
The TeleAlarm
®
S12 constantly displays the current status (in the event of
failures t and/or special modes) and
uses the integrated LCD display, the
LED indicator and the loudspeaker to
this end..
Signals of the
LCD display
Examples of a failure :
Main power ²©
Error
The following table shows the complete list of the symbols on the LCD
display :
Symbols of the operating mode
ª
Presence control activated
½
Programming keyboard
locked
©¨§¦
Status of the backup battery
Symbols of the failure diagnosis
°
Telephone line faulty
²
Power supply faulty
¯
Radio transmitter battery
¥
Backup battery dead
³
Backup battery defect
Page 21

AUTOMATIC MONITORING
21
Signals of the LED indicator
The LED indicator provides quick information on status and failures according to the following table:
Status LED indicator
No failure
detected
GREEN
(continuous)
Failure detected
GREEN
(blinking)
Pre-alarm
RED
(blinking)
Call for help
RED
(continuous)
Programming
mode
ORANGE
(blinking)
Loudspeaker signals
As soon as a failure is detected or as
soon as another unusual process occurs, the loudspeaker will inform you
of this according to the following table
via a sequence of sound signals:
Event Tone
At the start-up
=i=X=f=i=h=v
At a hardware failure or in the
programming mode as warning beep tone
=V=ÕU=U=
Immediately prior to the prealarm sound signal
=T=V=Y=
Pre-alarm sound signal (ringing)
=[=x=…
Pre-alarm sound signal (twotone siren)
=f=i=f=i=f=i=…
TeleAlarm® S12
identification
=f=i=h=
At the end of the alarm
=Y=V=T=r=
At a telephone line fault (continuous mode)
=F=F=;=F=F=;…
At a power supply failure
(continuous mode)
=ÕE==;=ÕE=;…
At a valid testing of the radio
transmitter range
=d=f=i=
Before starting the recording
of the voice message or at the
successful reprogramming in
the programming mode
=R=y=
After the end of the recording
of the voice message
=Y=r=
Page 22

PROGRAMMING
22
Programming
Most of the parameters required for
the normal operation can be programmed directly on the TeleAlarm
®
S12 unit. The independent programming is done via the programming keyboard and the LCD display of
the TeleAlarm
®
S12.
The next sections contain simple examples of the most important setting
options, which are available for independent programming.
Warning:
As long as the TeleAlarm® S12 is in
the programming mode, it is not possible to transmit any alarm messages.
This mode regularly generates a beep
tone. If invalid keys are pressed, a
beep tone will indicate a mistake. After
4 minutes without any keys pressed,
the TeleAlarm
®
S12 will leave the programming mode and return to the
ready mode.
To leave the programming mode at
once, press the
key (delete key)
several times until the display shows :
S12
is ready
(you are now in the ready mode).
The above message will be shown on
the display screen, either on a continuous basis or alternating with warning messages if technical problems are
detected (backup battery is dead, loss
of power, no telephone connection,
etc.).
Keyboard overview
Alarm receivers programming key
Scroll up to the next parameter
Increase the audio level
Triggers programming key
Turn OFF an “ON/OFF” function
Access to special functions
Turn ON an “ON/OFF” function
Voice message programming key
Scroll down to the previous parameter
Decrease the audio level
Confirmation key
Cancel key
Status query key (information)
“Home-Away” control
Not Used
Page 23

PROGRAMMING
23
Programming or deleting a
radio transmitter
Each (wireless) radio transmitter must
be registered separately to enable the
transmission of a call for help.
Your TeleAlarm
®
S12 is fitted with 20
storage positions for the registration of
20 radio transmitters.
This section describes the registration
of additional radio transmitters.
Press
(radio transmitter pro-
gramming key) on the programming
keyboard.
The display will show the message:
¯ OK:Program
0:Erase ¤:Info
Press to start the registration of
a new radio transmitter.
The display will show the message:
¯ Radio Nr. 02
Program
Press to confirm that you wish to
save the new radio transmitter in
position 2.
The display will show the message:
¯´ Press Radio
Button
Press the alarm key on your radio
transmitter key on your wrist transmitter S37.
Programming a silent alarm
When the transmitter code is accepted, the following display will temporarily appear.
¯ Transmitter code
accepted
The TeleAlarm S12 will invite you to
assign an alarm type to the radio
transmitter: select the alarm type “Assistance Alarm” for standard alarms.
¯ Alarm type: 00
Assistance Alarm £
Or do the following:
Select “Generic silent Alm” (Alarm
type 39) for silent alarm by scrolling
the display with the
and keys.
¯ Alarm type: 39
Generic silent Alm ¢
Confirm by pressing the
key. The
following display will temporarily appear.
¯ Transmitter
Stored !
then:
¯ OK:Program
0:Erase ¤:Info
Page 24

PROGRAMMING
24
Your TeleAlarm
®
S12 is now ready to
program another radio transmitter.
Press
to save a new radio
transmitter or
to end the pro-
gramming and to return to the
ready mode.
The display will show the message:
S12
is ready
Note:
To delete a radio transmitter, press
and then the key (0).
Programming a silent
alarm
The S12 has the possibility to send silent alarms. This means that all alarms
will be generated without any sound.
The programming of this type of alarm
can be done at initial use or when
programming of a radio transmitter.
Programming an alarm recipient
To receive a call for help from the
TeleAlarm
®
S12 the alarm recipient’s
telephone number must be programmed in the unit.
Up to 8 recipients can be programmed in the TeleAlarm
®
S12.
Each recipient is identified via his telephone number, which is programmed
in a storage position. In the event of
an alarm, the telephone numbers are
called one after the other, until one of
the recipients acknowledges the call.
This section describes how to program
an alarm recipient, e.g.:
The recipient’s target : target 2
Telephone number : 069 123 4566
Press
(the recipient’s pro-
gramming key) on the programming
keyboard.
The display will show the message:
° OK:Program
0:Erase ¤:Info
Press to start the programming
of a new recipient.
The display will show the message:
° Destination Nr. 2
Program
Page 25

PROGRAMMING
25
Press
to confirm that you wish to
save the new recipient as target 2.
The display will show the message:
° Phone Nr.
»
Enter the alarm recipient’s tele-
phone number (up to 20 digits).
Each digit can be one figure (0-9),
an interval or an identification of a
new dialling tone.
Note:
Calling tone identification (T) and intervals (P) can be entered by « doubleclicking » the
(identification of a
free telephone line) and
(time de-
lay 6 seconds, before dialling is continued) keys.
The emergency numbers 144, 117
and 118 may not be programmed into
your TeleAlarm® S12; the telephone
numbers of hospitals, doctors, etc.
may not be programmed without getting permission to do so first.
The display will show the message:
° Phone Nr.
0691234566
Use to delete an entry if you
have made a mistake or confirm
your selection by pressing
.
The display will show the message:
° Destination
stored !
and then:
° OK:Program
0:Erase ¤:Info
Your TeleAlarm
®
S12 is now ready to
program another alarm recipient.
Use
to proceed without chang-
ing the preset values.
Press
(delete key) to end the
programming and to return to the
ready mode.
The display will show the message:
S12
is ready
Note:
It is critical that you fill out and send
the enclosed tear-off postcards with instructions to each person programmed
into your TeleAlarm system. The cards
contain useful information about what
to do when a call for help comes in.
Write your telephone number and address on the left side and put the contact’s telephone number and address
on the right.
Don’t forget to provide your contacts
with a set of keys to your home.
Page 26

PROGRAMMING
26
Monitoring centres
If you would like to be connected with
a (24-hour) monitoring centre, please
contact Swisscom, or contact a monitoring centre of your choice directly to
learn more about getting connected.
Recording voice messages
In the TeleAlarm® S12 one voice message of maximum 16 seconds can be
programmed.
This message shall contain all information required by the person called
to know who you are and how you
can be reached.
Sample of a recorded voice
message :
« This is a TeleAlarm call for help from
Mr. Walter, press key four (4) on your
telephone or call me back on 012
345 67 89 »
.
This section describes how to program
voice messages for this call for help
system.
Press
(programming key for
voice messages) on the programming keyboard.
The display will show the message:
® OK:Program
0:Erase ¤:Info
Press to start the recording of a
new message.
The display will show the message:
® Position in use !
OK:Continue C:Abort
Press to confirm that you wish to
record the message.
Page 27

PROGRAMMING
27
The display will show the message:
® Talk after BEEP
Wait until the countdown has rea-
ched (0) and then start to speak after the beep tone.
®´ Recording….
············
A bar will show the recording progress.
Press
to cancel the recording
before its maximum duration or wait
until the end.
The display will show the message:
® Voice message
Stored !
and then:
® OK:Program
0:Erase ¤:Info
Your TeleAlarm
®
S12 is now ready
again to change the voice message.
Press
(delete key) to end the
programming and to return to the
ready mode.
The display will show the message:
S12
is ready
Programming general parameters
The operation of the TeleAlarm® S12
depends on the values of general parameters.
These are set to standard values during the production; they can, however,
be changed to adapt the TeleAlarm
®
S12 to the users’ specific needs.
The following table contains the parameters which can be programmed
using the LCD display and the programming keyboard :
Code
No
Global parameters
00
Programming language of the
TeleAlarm® S12
02 Passive alarm
23 Button lights
24 Prealarm time
25 Prealarm sound
29 Prealarm stop
Page 28

PROGRAMMING
28
Programming the language of the TeleAlarm
®
S12
Press
(programming key for pa-
rameters) on the programming key.
The display will show the message:
¬ OK:Program
¤:Info
Press to edit the parameter val-
ues.
The display will show the message:
¬ Parameter Nr. 00
Language
Press to confirm this selection.
The display will show one of those
messages:
¬ Language 0
Deutsch £
or:
¬ Language 1
Francais ¡
or:
¬ Language 2
Italiano ¡
or:
¬ Language 3
English ¢
Select the language using the keys
and (Up and down)
Press
to confirm the respective
language.
The display will show the message:
¬ Parameter
Stored !
and then ;
¬ Parameter Nr. 00
Language £
Your TeleAlarm
®
S12 is now ready to
program further parameters.
Press the
key (delete key) twice to
end the programming and to return to
the ready mode.
The display will show the message:
S12
is ready
Page 29

PROGRAMMING
29
Programming presence
control
Via the daily report (presence control)
you will also obtain help if you cannot
press the call for help button. The
TeleAlarm
®
S12 automatically initiates
a call for help if no keys are pressed
on the TeleAlarm
®
S12 for a certain
preset amount of time.
Press
programming key for pa-
rameters) on the programming keyboard.
The display will show the message:
¬ OK:Program
¤:Info
Press to edit the parameter val-
ues.
The display will show the message:
¬ Parameter Nr. 00
Language
Enter 02 via the programming key-
board to edit the daily report.
Note :
You can also move the list up and
down using
and (up and
down).
The display will show the message:
¬ Parameter Nr. 02
Passive Alarm ¡
Press to confirm this selection.
The display will show the message:
¬ Passive Alarm
Value: 00 hr
Note :
The time period can be set from 0 to
99 hours.
Enter for example 24 via the pro-
gramming keyboard and press
to confirm this.
The display will show the message:
¬ Parameter
stored !
and then ;
¬ Parameter Nr. 02
Passive Alarm ¡
Your TeleAlarm® S12 is now ready to
program further parameters.
Press
(delete key) twice to end
the programming and to return to
the ready mode.
The display will show the message:
S12
is ready
Page 30

PROGRAMMING
30
Programming the keyboard
illumination
Press
(programming key for pa-
rameters) on the programming keyboard.
The display will show the message:
¬ OK:Program
¤:Info
Press to edit the parameter val-
ues.
The display will show the message:
¬ Parameter Nr. 00
Language
Enter 23 via the programming key-
board to edit the daily report.
Note :
You can also move the list up and
down using
and (up and
down).
The display will show the message:
¬ Parameter Nr. 23
Button Lights ¡
Press to confirm this selection.
The display will show the message:
¬ Button Lights 1
ON
Enter 0 via the programming key-
board.
The display will show the message:
¬ Button Lights
OFF
Press to confirm this.
The display will show the message:
¬ Parameter
Stored !
and then ;
¬ Parameter Nr. 23
Button Lights ¡
Your TeleAlarm
®
S12 is now ready to
program further parameters.
Press the
key (delete key) twice
to end the programming and to return to the ready mode.
The display will show the message:
S12
is ready
Note :
If the illumination of the functional
keys is switched off, no key will continuously be illuminated in the ”ready
mode“. During a call for help, the
functional illumination of these keys
will nevertheless be maintained.
Page 31

PROGRAMMING
31
Programming the Prealarm
period and Prealarm
sound signal
To change the duration and the sound
signal of the pre-alarm mode, you can
proceed as in the following example:
Prealarm period: 6 seconds
Prealarm sound signal: Two-
tone siren
Press
(programming key for
global parameters) on the programming keyboard.
The display will show the message:
¬ OK:Program
¤:Info
Press to edit the values of the
global parameters.
The display will show the message:
¬ Parameter Nr. 00
Language £
Enter 24 via the programming key-
board to edit the pre-alarm period.
Note :
You can also move the list up and
down using
and (up and
down).
The display will show the message:
¬ Parameter Nr. 24
Prealarm Time ¡
Press
to edit this parameter.
The display will show the message:
¬ Prealarm Time
Value: 010 s
Enter the new duration 6 or 006
(example for 6 seconds) via the
programming keyboard and press
to confirm this.
The display will show the message:
¬ Parameter
Stored !
and then:
¬ Parameter Nr. 24
Prealarm Time ¡
Your TeleAlarm® S12 is now ready to
program further global parameters.
Enter 25 via the programming key-
board to edit the Prealarm sound
signal.
Note :
You can also move the list up and
down using
and (up and
down).
The display will show the message:
¬ Parameter Nr. 25
Prealarm Sound ¡
Press to edit this parameter.
The display will show the message:
¬ Prealarm Sound 0
Chime £
Page 32

PROGRAMMING
32
Enter 1 via the programming key-
board to set the sound signal of the
« two-tone siren ».
Note :
You can also move the list up and
down using
and (up and
down).
The display will show the message:
¬ Prealarm Sound 1
Two-Tones Siren ¢
Press
to confirm this.
The display will show the message:
¬ Parameter
Stored !
and then:
¬ Parameter Nr. 25
Prealarm Sound ¡
Your TeleAlarm
®
S12 is now ready to
program another parameter.
Press the
key (delete key) twice
to end the programming and to return to the ready mode.
The display will show the message:
S12
is ready
Programming the prealarm
stop
Stopping a call for help via the transmitter during the prealarm period.
Press (programming key for pa-
rameters) on the programming keyboard.
The display will show the message:
¬ OK:Program
¤:Info
Press to edit the parameter val-
ues.
The display will show the message:
¬ Parameter Nr. 00
Language
Enter 29 via the programming key-
board to edit the pre-alarm stop.
Note :
You can also move the list up and
down using
and (up and
down).
The display will show the message:
¬ Parameter Nr. 29
Prealarm Stop ¢
Press to edit this parameter.
The display will show the message:
¬ Prealarm Stop 0
OFF
Enter 1 via the programming key-
board.
Page 33

PROGRAMMING
33
The display will show the message:
¬ Prealarm Stop 1
ON
Press to confirm this.
The display will show the message:
¬ Parameter
Stored !
and then:
¬ Parameter Nr. 29
Prealarm Stop ¢
Your TeleAlarm
®
S12 is now ready to
program further parameters.
Press
(delete key) twice to end
the programming and to return to
the ready mode.
The display will show the message:
S12
is ready
Page 34

CHECKING THE SYSTEM AND TROUBLESHOOTING
34
Checking the system
and troubleshooting
TeleAlarm® specially recommends carrying out a check of the alarm transmission to each recipient after having
installed or reprogrammed the TeleAlarm
®
S12.
In addition, a check of the radio range
should be effected to ensure that the
radio transmitters are heard everywhere at the site of installation.
Finally it is especially recommended to
carry out the check of the alarm
transmission regularly.
Checking the radio range
Your TeleAlarm® S12 is fitted with an
integrated function which allows you
to perform a radio range check for a
wireless unit (wrist transmitter) without
initiating a call for help.
To proceed, you must enter the secured mode of the TeleAlarm
®
S12.
Press quickly three times
on the
programming keyboard to enter the
secure mode.
The TeleAlarm
®
S12 will prompt you
to enter a 6-digit code which corresponds to the secured function you
wish to use.
Enter code
Enter the following code : 194159.
The LCD display will confirm that you
have started a radio range check
Radio Range Check
The TeleAlarm
®
S12 will generate a
loud beep whenever a registered radio
transmitter is received.
Walk through the rooms and push
the call for help button on your wrist
transmitter to ensure that you can
hear the TeleAlarm
®
S12 beep sig-
nal.
This will allow you to determine the
area which is covered by the radio
transmitter.
Leave the radio range check mode
by pressing
and then leave the
secured mode by pressing
again.
Your TeleAlarm
®
S12 is now in the
ready mode and ready for operation.
Warning :
Your TeleAlarm® S12 will not be able
transmit any alarm messages as long
as it is in the secured mode.
Page 35

CHECKING THE SYSTEM AND TROUBLESHOOTING
35
Periodical alarm transmission test
Carry out this test on a regular basis.
Trigger a call for help via your wrist
transmitter S37 and wait for a connection in order to be able to talk
with the person who received your
call. This person will acknowledge
the call for help and your
TeleAlarm
®
S12 will return to the
ready mode.
This simple procedure allows you to
check that the basic functions and the
wiring of your system work properly.
After programming alarm
transmission test
After initial installation or after any
change of programmed parameters, it
is specially recommended to perform a
transmission test to each alarm recipient in order to ensure that it is received correctly.
To check the programming, each
contact can be called individually.
The TeleAlarm
®
S12 will then carry
out this call only.
Press the call for help button of the
wrist transmitter S37 or the red key
of the TeleAlarm
®
S12.
Select one of the possible eight con-
tacts using the keys one (1) to eight
(8) of the programming keyboard
(during the pre-alarm period).
Make sure the contact reacts cor-
rectly to the call for help. Check all
contacts programmed into the unit.
If you cannot contact one recipient,
check the programming to make
sure that the telephone number has
been entered properly.
Page 36

WARNINGS AND CONDITIONS
36
Warnings and conditions
Important safety instructions
Carry out a test alarm regularly to
make sure that your TeleAlarm
®
S12
will work properly. (Follow the procedure which is described in this
manual).
Operate the TeleAlarm® S12 on
230V AC, 50 Hz with using the provided AC adaptor.
If you intend not to use the unit for a
longer period of time, make sure
that the AC adaptor is plugged out
from any 230V outlet; that the telephone jack is disconnected and the
unit is switched off.
Do not use the TeleAlarm® S12 in
the immediate vicinity of water.
Do not block any ventilation out-
puts.
Install it in compliance with the
manufacturer’s instructions.
Do not place the unit in the imme-
diate vicinity of heat sources or direct sun light.
Avoid excess dust and mechanical
shock.
Occasionally wipe off your TeleA-
larm
®
S12 with a dry cloth. Avoid
cleaning agents.
Battery maintenance instructions
Charge your battery completely over
24 hours before using your
TeleAlarm
®
S12 for the first time, after
having replaced the battery or after a
longer power interruption.
The battery will charge correctly in a
temperature range from +5ºC to
+45ºC.
A new battery or a battery which has
not been used for a longer period of
time, might show a reduced capacity
in its first application.
A rechargeable battery can be
charged and discharged more than a
hundred times. It will, however, wear
out sometime and this is no defect
TeleAlarm
®
recommends replacing a
battery which is no longer capable of
ensuring a minimum energy accumulation of 60 hours in the ready mode
and a minimum autonomy of half an
hour in the alarm mode with “handsfree” speech communication.
Page 37

WARNINGS AND CONDITIONS
37
Disposal of the batteries
Please check your local regulations
with respect to the disposal of batteries
or call your Swisscom dealer to obtain
the corresponding information.
The batteries must not be thrown into
normal waste. If available, use a disposal facility.
CAUTION:
There is a risk of explosion if the batteries are replaced with wrong types.
The batteries should be replaced by
qualified personnel only.
Dispose of used batteries according to
Instructions and regulations.
Environmental impact
At the end of its working life this device
must not under any circumstances be
disposed of as normal waste. It must
be taken to a reseller or central collection point for electronic and electrical
devices in accordance with the Swiss
Ordinance on the Return, Taking Back
and Disposal of Electrical and Electronic Appliances (ORDEA).
The individual materials are recyclable
as indicated. By reutilizing, recycling or
re-using them in any other form, you
are making a major contribution towards environmental protection.
Page 38

IMPORTANT INFORMATION
38
Important information
Licence and conformity
This unit has been designed for operation within the analog Swiss network.
Country-specific characteristics have
been considered. In case of inquiries
with respect to differences in the public
telephone network, please contact
your specialist dealer and/or your
network operator.
The compliance of the unit with the
basic requirements of the R&TTE directive is certified via the CE mark.
The integrated radio receiver complies
with class 1 as specified in EN 300
220 V2.1.1, duty cycle < 0.1%.
The declaration of conformity can be
found on the internet at:
www.swisscom.com/onlineshop
under the heading of telephone, declarations of conformity
Repair / Maintenance
Rented units
If your telephone does not work properly, inform the fault clearing service
(telephone number 0800 800 800).
The repair
1)
and the fault deployment
are free of charge.
Purchased units
The repair services are carried out free
of charge within the warranty period
pursuant to the provisions of the warranty certificate
1)
. If a repair must be
carried out, the unit must be returned
to the point of purchase. If the fault
clearing service is required, even during the warranty period, the fault deployment will be charged (distance
lump-sum as well as time expenses).
After the warranty period has expired,
the material costs will be charged additionally.
Storage battery
Storage battery packs are included in
the consumption parts which are not
included in the warranty services. Defective accumulators are not replaced
free of charge.
This applies to rented and purchased
units.
Help
If you have general questions about
e.g. products, services, etc. please
contact the Swisscom information office (telephone number 0800 800
800).
General information
1)
with the exception of damage to
wear parts (cables, inscription plates,
storage battery, etc.) and damage
caused by improper handling (damage
due to dropping, entered liquids, etc.).
Page 39

Page 40

en 10.2010
 Loading...