

Page 1
Top A321
ISDN
/Top A421
ISDN
User Manual
Page 2

Safety precautions
This cordless DECT telephone is designed for connection to the Swiss public ISDN network.
Any other use whatsoever is not permitted and is regarded as in violation of the provisions.
The user manual with safety precautions is a part of the product package and must be passed
on to the new owner on reselling.
Caution!
Use only approved rechargeable batteries: Nickel-metal-hydride (Ni-MH AAA 800mAh).
Using other rechargeable batteries or non-rechargeable batteries/primary cells can be dangerous and cause malfunctions in or damage to the telephone.
To insert the batteries, please follow the instructions in the chapter entitled “Setting up the
handsets”.
Please note that the ringer for incoming calls as well as signal tones are emitted
on the handset loudspeaker.
Do not therefore hold the handset close to your ear while one of these functions
is on, otherwise your hearing may be affected.
Please note:
➭ Do not immerse batteries in water or throw in the fire.
➭ Rechargeable batteries can become warm while recharging. This is a normal occurrence and
is not dangerous.
➭ Do not use any other type of charging unit since this may damage the batteries.
➭ Before using the telephone, wearers of hearing aids should note that radio signals can
be picked up by the hearing aid and cause an unpleasant buzzing noise.
➭ Do not use your DECT cordless telephone in environments at risk from explosion (e.g. paint-
works, petrol stations etc.)
➭ Do not position the base station or charging station in bathrooms or showers.
➭ The radio signals may influence the working of medical equipment.
➭ In the event of a power cut or if the batteries are discharged, your DECT cordless telephone
will not function!
➭ The handset must not be charged up without batteries or the battery cover in place.
➭ Do not touch open contacts!
➭ Use only the mains units supplied for the base station or charging unit.
Disposal
Please dispose of batteries, base station, handset, charging unit and mains units in
an ecological manner. Do not dispose of them in domestic waste.
Page 3

1
20402773en_ba_e0
Contents
Safety precautions
Setting up the telephone……………………………………………………………………9
Contents of the package ……………………………………………………………………9
Accessories ……………………………………………………………………………………9
Picture and ringtone manager ………………………………………………………………9
Location ………………………………………………………………………………………10
Repeater ………………………………………………………………………………………10
Setting up the base station or charging unit ………………………………………………11
Listening protection …………………………………………………………………………11
Connecting the phone ………………………………………………………………………12
Setting up the handsets ……………………………………………………………………13
Inserting the rechargeable batteries ……………………………………………………13
Charging the batteries …………………………………………………………………14
Installation assistant …………………………………………………………………………15
Multiple Subscriber Numbers (MSN) ………………………………………………………16
Changing users …………………………………………………………………………16
Your Top A321
ISDN
/Top A421
ISDN
is designed for connection to the Swiss public ISDN
network. The Top A421
ISDN
offers the additional feature of an integrated answer
machine. Please read these operating instructions carefully to familiarise yourself with
and take full advantage of the benefits of your new Top A321
ISDN
/Top A421
ISDN
.
Keep this user manual in a safe place!
Note: These operating instructions describe the full range of functions provided by
the Top A321
ISDN
/Top A421
ISDN
. The functions and instructions described in this user
manual may differ or be limited by the characteristics of your network operator or
provider. For detailed information on the services available with your ISDN connection,
contact your network provider.
Page 4

2
20402773en_ba_e0
Contents
Getting to know your telephone ………………………………………………………17
Handset keys …………………………………………………………………………………17
Handset display symbols ……………………………………………………………………19
About the menus ……………………………………………………………………………20
Main menu ………………………………………………………………………………20
Menu navigation …………………………………………………………………………20
Back to previous menu …………………………………………………………………20
End menu …………………………………………………………………………………20
Top A421
ISDN
base station with answer machine……………………………………………21
Top A321
ISDN
base station ……………………………………………………………………22
Telephoning …………………………………………………………………………………23
Making an external call ………………………………………………………………………23
Call preparation …………………………………………………………………………23
Ending a call ……………………………………………………………………………23
Accepting a call ………………………………………………………………………………23
Reject call ……………………………………………………………………………………23
Send DTMF/keypad information ……………………………………………………………23
Handsfree operation …………………………………………………………………………24
Handset / handsfree volume …………………………………………………………………24
Handset secrecy ………………………………………………………………………………24
Redial …………………………………………………………………………………………25
Redialling a number from the list ………………………………………………………25
Copying numbers from the redial list …………………………………………………25
Deleting individual entries/entire redial list ……………………………………………25
Sending SMS messages from the redial list* …………………………………………26
Group call (paging) …………………………………………………………………………26
Keypad lock …………………………………………………………………………………26
Internal calls …………………………………………………………………………………27
* Function dependent on network operator.
Contact your network operator to find out whether this service is supported.
Page 5

3
20402773en_ba_e0
Contents
Enquiries ………………………………………………………………………………………28
Internal enquiry call ……………………………………………………………………28
External enquiry call ……………………………………………………………………28
Brokering (switching between two calls) …………………………………………………28
Call transfer …………………………………………………………………………………29
Internal call transfer ……………………………………………………………………29
External call transfer ……………………………………………………………………29
Three-way conference ………………………………………………………………………30
Directory………………………………………………………………………………………31
Directory entries ………………………………………………………………………………31
Adding a new entry ……………………………………………………………………31
Tips for entering names/numbers ………………………………………………………31
Editing entries ……………………………………………………………………………32
Deleting directory entries/entire directory ……………………………………………32
Dialling numbers from the directory ………………………………………………………32
Sending SMS messages from the directory* ………………………………………………32
Copying directory entries ……………………………………………………………………33
Copying entries/entire directory to another handset …………………………………33
SIM card ………………………………………………………………………………………34
Copying to the SIM card ………………………………………………………………34
Copying from the SIM card ……………………………………………………………34
ETV
®
Online …………………………………………………………………………………35
ETV
®
Online query ……………………………………………………………………………35
ETV
®
queries ……………………………………………………………………………35
Saving ETV
®
information in your directory ……………………………………………35
* Function dependent on network operator.
Contact your network operator to find out whether this service is supported.
Page 6

4
20402773en_ba_e0
Contents
Calls list* ……………………………………………………………………………………36
Viewing/dialling a number from the calls list ………………………………………………36
Sending SMS messages from the calls list* ………………………………………………36
Saving numbers from the calls list to the directory ………………………………………37
Deleting individual entries/entire calls list …………………………………………………37
Audio …………………………………………………………………………………………38
Handset/base station ringer …………………………………………………………………38
Beeps …………………………………………………………………………………………39
Key beeps …………………………………………………………………………………39
Range beeps ……………………………………………………………………………39
Charging beep ……………………………………………………………………………39
Accu beep ………………………………………………………………………………39
Confirmation beep ………………………………………………………………………39
Ringer melodies ………………………………………………………………………………39
Personal ringer melodies ………………………………………………………………39
Recording ringer melodies ………………………………………………………………39
Family …………………………………………………………………………………………40
Direct call (baby call) …………………………………………………………………………40
Room monitoring (baby surveillance) ………………………………………………………41
Games …………………………………………………………………………………………41
Call costs ……………………………………………………………………………………42
Cost of last call ………………………………………………………………………………42
Total calls ……………………………………………………………………………………42
Settings ………………………………………………………………………………………42
Type of display ……………………………………………………………………………42
Charge factor ……………………………………………………………………………42
Currency …………………………………………………………………………………42
* Function dependent on network operator.
Contact your network operator to find out whether this service is supported.
Page 7

5
20402773en_ba_e0
Contents
Calendar/clock ………………………………………………………………………………43
Appointments ………………………………………………………………………………43
Alarm …………………………………………………………………………………………43
Time/date ……………………………………………………………………………………43
Network functions (supplementary services) …………………………………………44
Call forwarding ………………………………………………………………………………44
Unconditional ……………………………………………………………………………44
No reply …………………………………………………………………………………44
Busy ………………………………………………………………………………………44
Call anonymously (Identification restriction) ………………………………………………45
Conference assistant …………………………………………………………………………45
Parking ………………………………………………………………………………………45
Park/unpark ………………………………………………………………………………45
Park code …………………………………………………………………………………45
Recall …………………………………………………………………………………………46
Call back on busy (Completion of Calls to Busy Subscriber/CCBS) …………………46
Delete call back …………………………………………………………………………46
Malicious Call Identification (MCID) ………………………………………………………46
Combox ………………………………………………………………………………………47
Provider ………………………………………………………………………………………47
Access to voice portal………………………………………………………………………48
SMS ……………………………………………………………………………………………49
SMS – Short Messaging Service ……………………………………………………………49
Writing SMS messages ………………………………………………………………………49
Inbox …………………………………………………………………………………………50
Drafts …………………………………………………………………………………………50
Outbox ………………………………………………………………………………………50
Templates ……………………………………………………………………………………51
SMS memory full ……………………………………………………………………………51
Page 8

6
20402773en_ba_e0
Contents
Settings ………………………………………………………………………………………51
SMS service centre ………………………………………………………………………51
Send service ………………………………………………………………………………51
SMS alert on/off …………………………………………………………………………51
Answer machine (Top A421
ISDN
only) ……………………………………………………52
Select MSN (answer machine is in standby): …………………………………………52
The following settings can be defined per MSN ………………………………………52
Operating the answer machine from the handset …………………………………………53
On/off ……………………………………………………………………………………53
Outgoing messages ……………………………………………………………………53
Recording/playing back an outgoing message ………………………………………53
Deleting an outgoing message …………………………………………………………54
Selecting an outgoing message …………………………………………………………54
Memo ……………………………………………………………………………………54
Message playback ………………………………………………………………………54
Delete messages …………………………………………………………………………55
Listening over the handset ………………………………………………………………55
Recording a call …………………………………………………………………………55
Remaining time …………………………………………………………………………55
VIP number* ……………………………………………………………………………55
SMS notification* ………………………………………………………………………56
Operating the answer machine on the base station ………………………………………56
On/off ……………………………………………………………………………………56
Playing, repeating, deleting and skipping messages …………………………………56
Delete all listened messages ……………………………………………………………56
Listening over the base station …………………………………………………………56
* Function dependent on network operator.
Contact your network operator to find out whether this service is supported.
Page 9

7
20402773en_ba_e0
Contents
Answer machine settings ……………………………………………………………………57
Answer delay and time saver mode ……………………………………………………57
Time limit …………………………………………………………………………………57
Language …………………………………………………………………………………57
Remote access ………………………………………………………………………………57
Remote access PIN ………………………………………………………………………57
Remote activation of answer machine …………………………………………………58
PIN alarm …………………………………………………………………………………58
Operating the answer machine from an external telephone …………………………58
Settings ………………………………………………………………………………………59
Language ……………………………………………………………………………………59
Presentation …………………………………………………………………………………59
Wallpaper …………………………………………………………………………………59
Keypad lighting …………………………………………………………………………59
Display ……………………………………………………………………………………60
Telephony ……………………………………………………………………………………60
Automatic DTMF …………………………………………………………………………60
Auto Talk …………………………………………………………………………………60
System PIN ……………………………………………………………………………………61
PBX ……………………………………………………………………………………………61
Range …………………………………………………………………………………………62
Repeater Mode …………………………………………………………………………62
Eco Mode (antenna off) …………………………………………………………………62
MSN settings …………………………………………………………………………………63
Assigning an MSN ………………………………………………………………………63
Allocating an MSN ………………………………………………………………………63
Additional handsets/base stations ………………………………………………………64
Registering additional handsets ……………………………………………………………64
Deregistering a handset ……………………………………………………………………64
Selecting the base station ……………………………………………………………………64
Page 10

8
20402773en_ba_e0
Contents
PBX access ……………………………………………………………………………………65
Compatibility …………………………………………………………………………………65
Exchange Access Code EAC …………………………………………………………………65
Entering the EAC ………………………………………………………………………65
Incoming EAC on/off ……………………………………………………………………65
Maintenance …………………………………………………………………………………66
Reset …………………………………………………………………………………………66
Faults and trouble-shooting …………………………………………………………………66
Important information ……………………………………………………………………67
Approval and conformity ……………………………………………………………………67
CE symbol ……………………………………………………………………………………67
Guarantee ……………………………………………………………………………………68
Repairs/maintenance …………………………………………………………………………68
Leased telephones ………………………………………………………………………68
Purchased telephones ……………………………………………………………………68
Rechargeable batteries …………………………………………………………………69
Help ……………………………………………………………………………………………69
Cleaning – when necessary …………………………………………………………………69
Page 11

9
20402773en_ba_e0
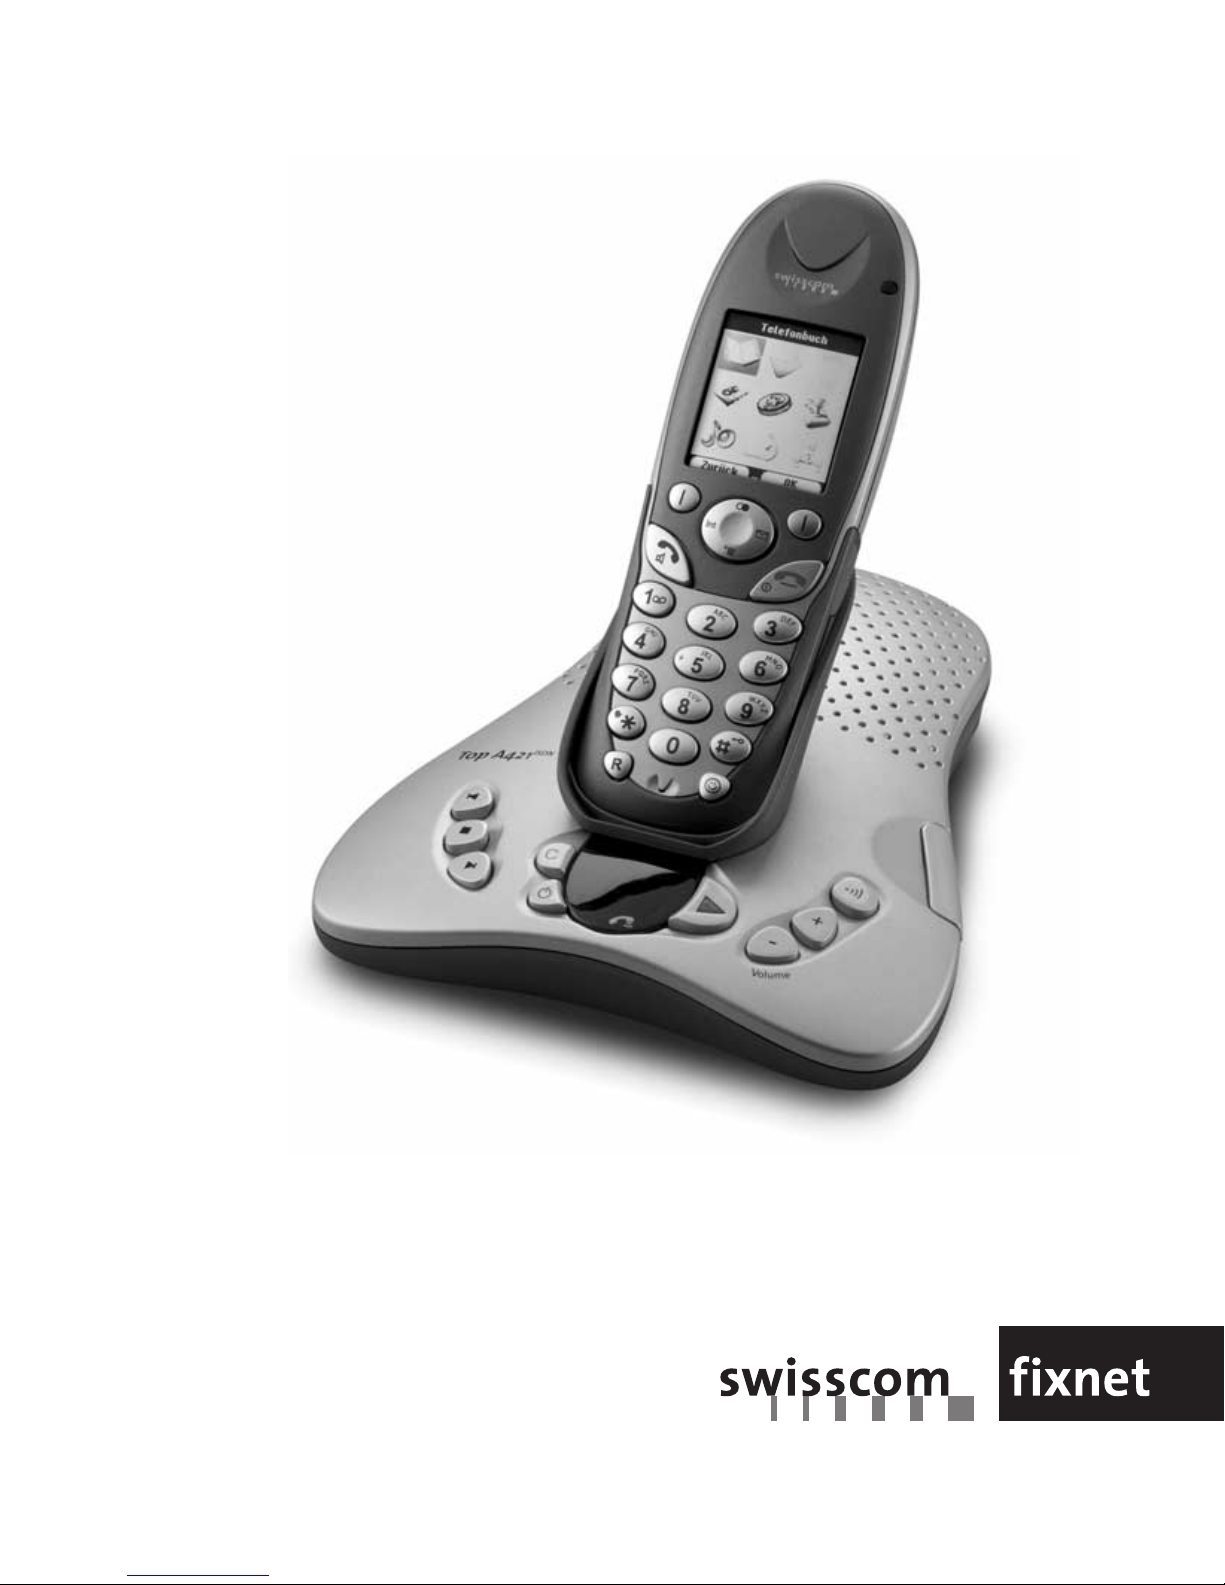
Contents of the package
Top A321
ISDN
/Top A421
ISDN
➭ 1 base station ➭ 1 user manual (3 languages: German, French, Italian)
➭ 1 connector cable ➭ 1 belt clip (mounted)
➭ 1 mains unit ➭ 1 USB cable
➭ 1 handset ➭ 1 CD (for downloading the picture and ringtone manager)
➭ 2 rechargeable batteries ➭ 1 headset
Accessories
The following accessories are available:
➭ Additional handsets/charging units
➭ Repeater
Note Connect only authorised accessories.
Picture and ringtone manager
To install the picture and ringtone manager:
1. Insert the CD into your CD-ROM drive.
2. When the InstallShield Wizard screen appears, follow the instructions.
3. If the InstallShield Wizard screen does not appear automatically, click “Start” on your
Windows taskbar, and then select “Run”. Type D:\setup.exe and confirm with OK
(where D is the letter of your CD-ROM drive).
The following system requirements are required to operate the picture and ringtone manager:
–Windows 98/ME/2000/XP
– Functioning and available USB 1.1 Port
Please refer also to the help file on your CD.
Setting up the telephone
Page 12

10
20402773en_ba_e0
Location
To obtain the best possible range, we recommend positioning the telephone in a location
central to your sphere of activity. Avoid positioning the telephone in niches, recesses and
behind steel doors.
The maximum range between the base station and handset is approximately 40 meters
indoors and 250 meters outdoors. Depending on the surrounding conditions as well as
spatial and structural factors, the range may be smaller. Silent zones can occur due to the
digital transmission in the frequency range used – even within the range, depending on
the structural environment. In this case the transmission quality may be reduced through
the increased incidence of short breaks in transmission. Normal call quality can be restored if you move slightly out of the silent zone. If the range is exceeded, the call will be
disconnected unless you move back into range within five seconds.
To avoid radio signal interference from other electronic equipment, we recommend that
the base station and handset are situated at the greatest possible distance (min. 1 meter)
from other equipment.
Repeater
You can use a repeater to extend the range and receiving power of your base station.
The repeater must first be registered and activated on the base station. (Your telephone
is delivered with the default setting “off”).
Setting up the telephone
Page 13

11
20402773en_ba_e0
Setting up the base station or charging unit
➭ Do not expose the base station or charging unit to direct sunlight.
➭ Protect the base station or charging unit against moisture. Do not position the base
station or charging unit in rooms exposed to condensation, corrosive steam or excessive
dust. Condensation can be present in basements, garages, conservatories or sheds.
➭ The ambient temperature must be between 5 °C and 40 °C.
Position the base station and charging unit in a clean, dry and well-aired location. Choose
a place which is stable, level, and not subject to vibrations. To avoid mutual interference,
do not position the base station or charging unit in the immediate vicinity of electronic
equipment such as hi-fi systems, office equipment or microwave ovens. Avoid positioning
the telephone near heat sources such as heating elements or near obstacles such as
metal doors, thick walls, niches and cupboards.
There is no mains switch on the base station or charging unit. For this reason the socket
to which it is connected must be easy to access.
Listening protection
When you are on the telephone, the base station and handset are connected to each
other over a radio link. The base station handles switching between the telephone network and the handset. To ensure that no-one can eavesdrop or telephone at your cost,
the base station and handset exchange codes. If the codes do not match, the connection
with third-party handsets cannot be set up.
Setting up the telephone
Page 14

12
20402773en_ba_e0
Setting up the telephone
Connecting the phone
Before you can start using your telephone you must plug in the telephone connector
cable and the mains cable.
Safety note
Use only the mains units supplied for the base station or charging unit.
➀ Telephone connector cable
The telephone connector cable has two different plugs. Insert the smaller plug in the
socket marked with the telephone symbol on the base station, and fit the cable into the
corresponding cable duct. Insert the larger plug in your telephone connection socket.
➁ Mains cable
First, insert the mains cable in the socket marked with the mains connector symbol on
the base of the base station or charging unit, and fit the cable in the moulded cable
duct. Then insert the mains plug in the 230 V socket.
Note Your telephone will not function if the mains connector is not plugged in or
during a power failure.
➀ Socket for telephone connector cable➁ Socket for mains cable
Page 15
13
20402773en_ba_e0
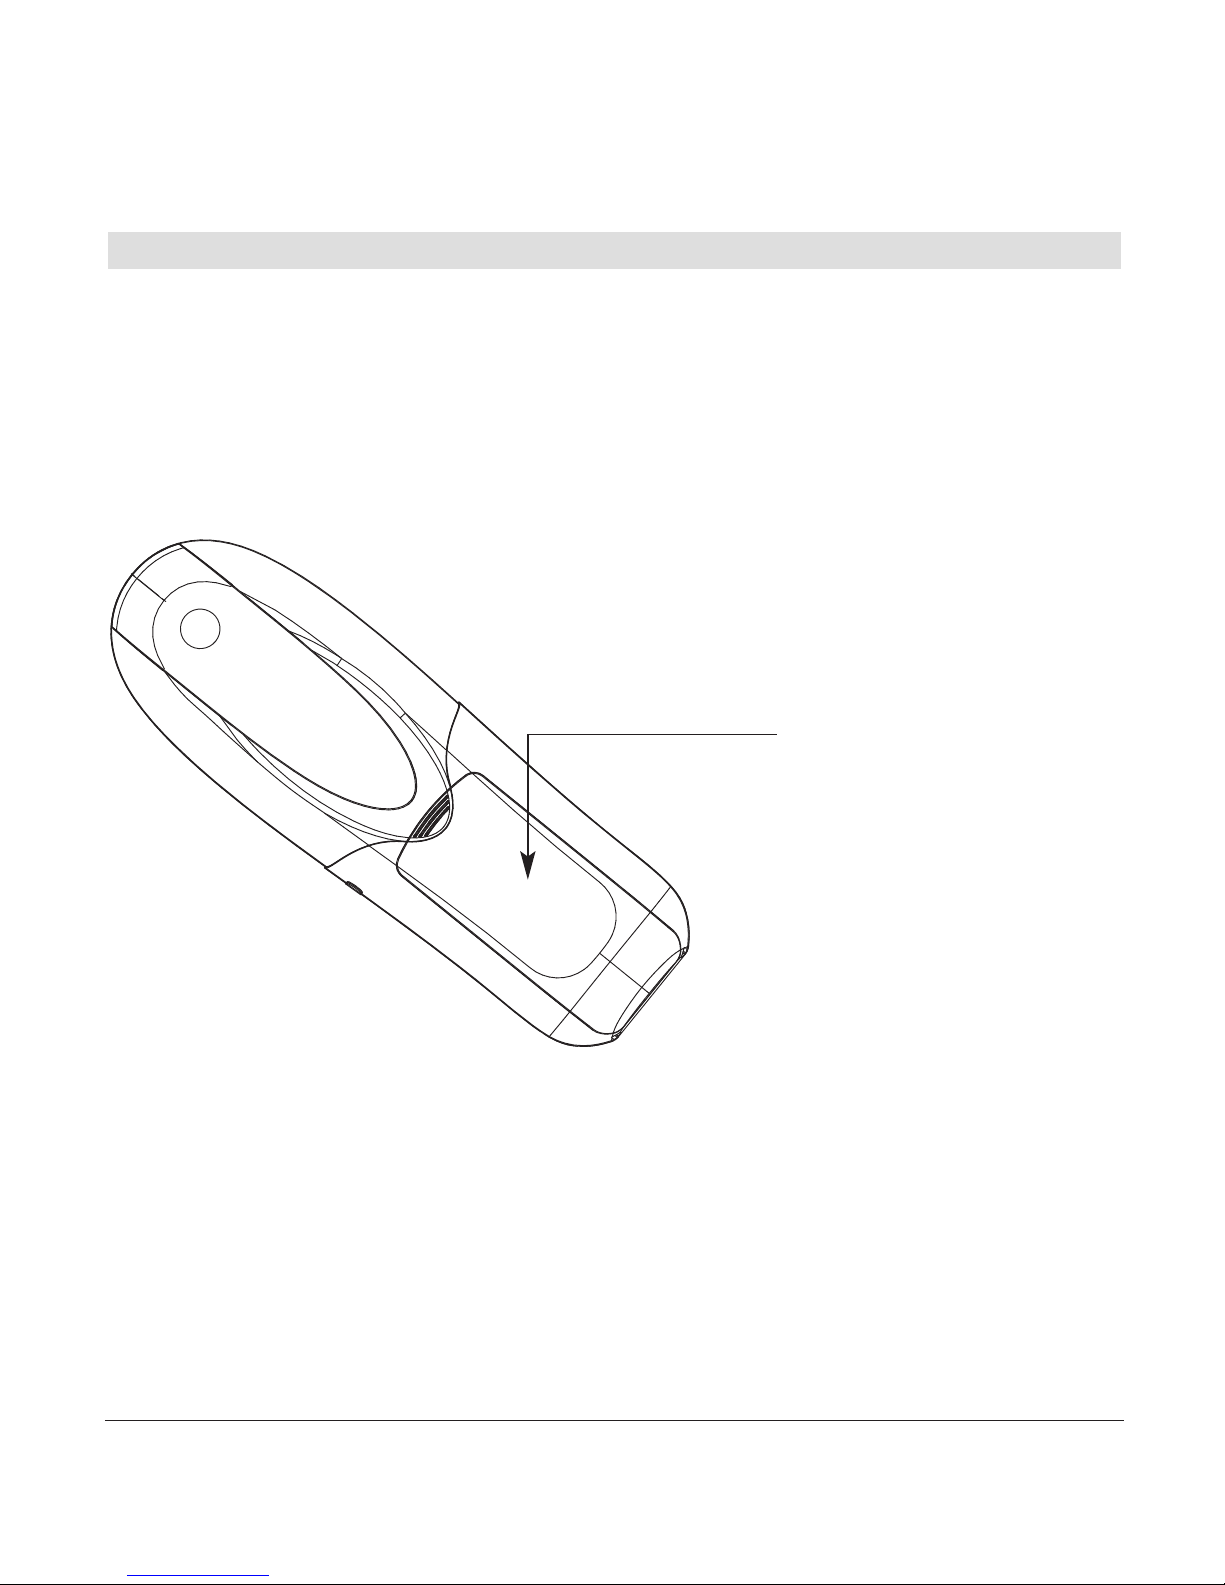
Setting up the handsets
Your handsets will be ready for operation (for making or accepting calls) only once the
batteries have been fully charged for the first time.
Inserting the rechargeable batteries
The bottom part of the handset contains a battery compartment for housing two type
AAA batteries (microcells).
Removing the battery
compartment cover:
Slide the battery compartment cover downwards
(approx.3 mm) and lift.
Inserting the two rechargeable batteries (note the polarity!):
Insert the batteries in the battery compartment. Make sure the polarity is correct. Insert
the batteries so that the flat end (negative polarity) of the battery is pressing against the
spring. The handset will not function if the batteries are incorrectly inserted. This may
result in damage. Replace the compartment cover by placing it approximately 3 mm offset and slide it upwards until it clicks into place.
Setting up the telephone
Page 16

14
20402773en_ba_e0
Setting up the telephone
Charging the batteries
The batteries are not yet charged when you first unpack the telephone. Insert the handset in the base station or charging unit for charging. The flashing battery symbol on the
handset shows the charging status. The batteries will take around 13 hours to fully charge.
Note • Do not insert the handset in the base station or charging unit without
batteries.
• Do not use any other type of charging unit since this may damage the
batteries.
The following symbols indicate the charging status on the handset display:
Charging status “full”
Charging status “1/2”
Charging status “empty”
Once the new batteries have been inserted, the display on the handset indicates the
actual charging status only after a complete charging cycle.
Your telephone is now ready to use.
Important!
Please note: after you have inserted the batteries for the first time, the battery display will indicate the correct information on the charging status only
after a complete charging cycle.
Use only NiMH rechargeable batteries. Never use disposable batteries/primary
cells.
!
Page 17

15
20402773en_ba_e0
Setting up the telephone
Note You can replace the handset in the charging/base station after every call.
Charging is electronically controlled to ensure optimal charging of batteries in
different charge states. Avoid removing the batteries from the handset for no
good reason, since this affects the optimum charging cycle.
Because your telephone is fitted with a low-radiation mechanism, the antenna automatically switches off in standby mode and cannot therefore emit any
radiation. Your telephone is delivered with this function switched off.
You can telephone for up to 12 hours with fully charged batteries.
The handset has a standby time of up to 120 hours.
If the battery charge status has reached its lower limit, the battery symbol
() flashes in the display and a warning signal is heard. You have 10 minutes of talk time left.
Installation assistant
An installation assistant simplifies things for you by guiding you step by step through the
setup procedure for your telephone.
Follow the displayed instructions and enter the preferred language, all MSN numbers
along with user name, as well as time and date.
Note • The installation assistant will re-appear following a reset of the telephone
(reset to default settings).
•You can also enter the preferred language, MSNs, time and date in the
corresponding menus.
Page 18

16
20402773en_ba_e0
Setting up the telephone
Multiple Subscriber Numbers (MSN)
When you ordered your ISDN connection, your network operator will have assigned you
several Multiple Subscriber Numbers (MSN). You can assign these numbers to different
devices or assign individual numbers to different users. Every MSN (user) can then define
individual settings for the number assigned to him or her.
Your telephone can manage up to 5 MSNs. To use all the functions, you must set up at
least one MSN with user name (see section on “Assigning an MSN”).
Changing users
To change users, press the softkey under MENU. Use to scroll to
CHANGE USER
and
select the relevant user. The current user is displayed. You can now access the activated
user’s call lists, charge displays and individual settings. To find out how to set preferences
for individual MSNs, refer to the section on “MSN settings”.
Note The
CHANGE USER
menu can only be accessed if more than one MSN has
been programmed.
Page 19
17
20402773en_ba_e0
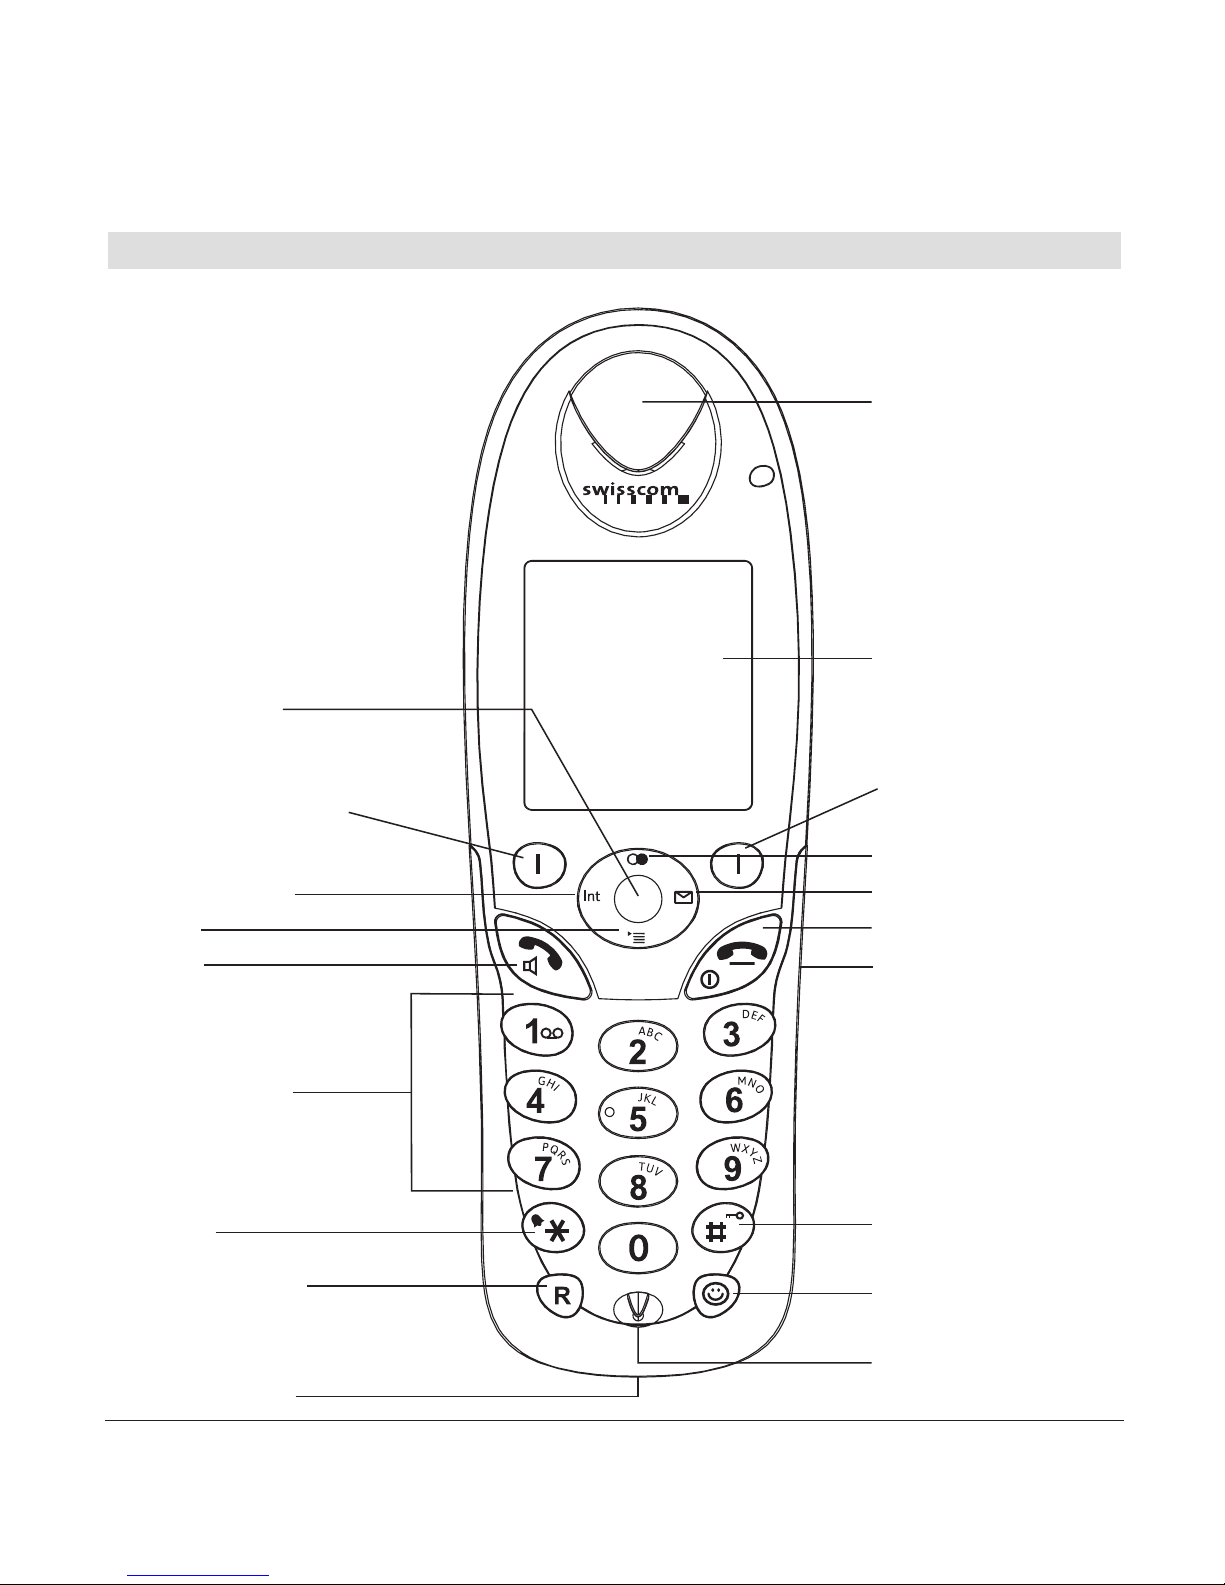
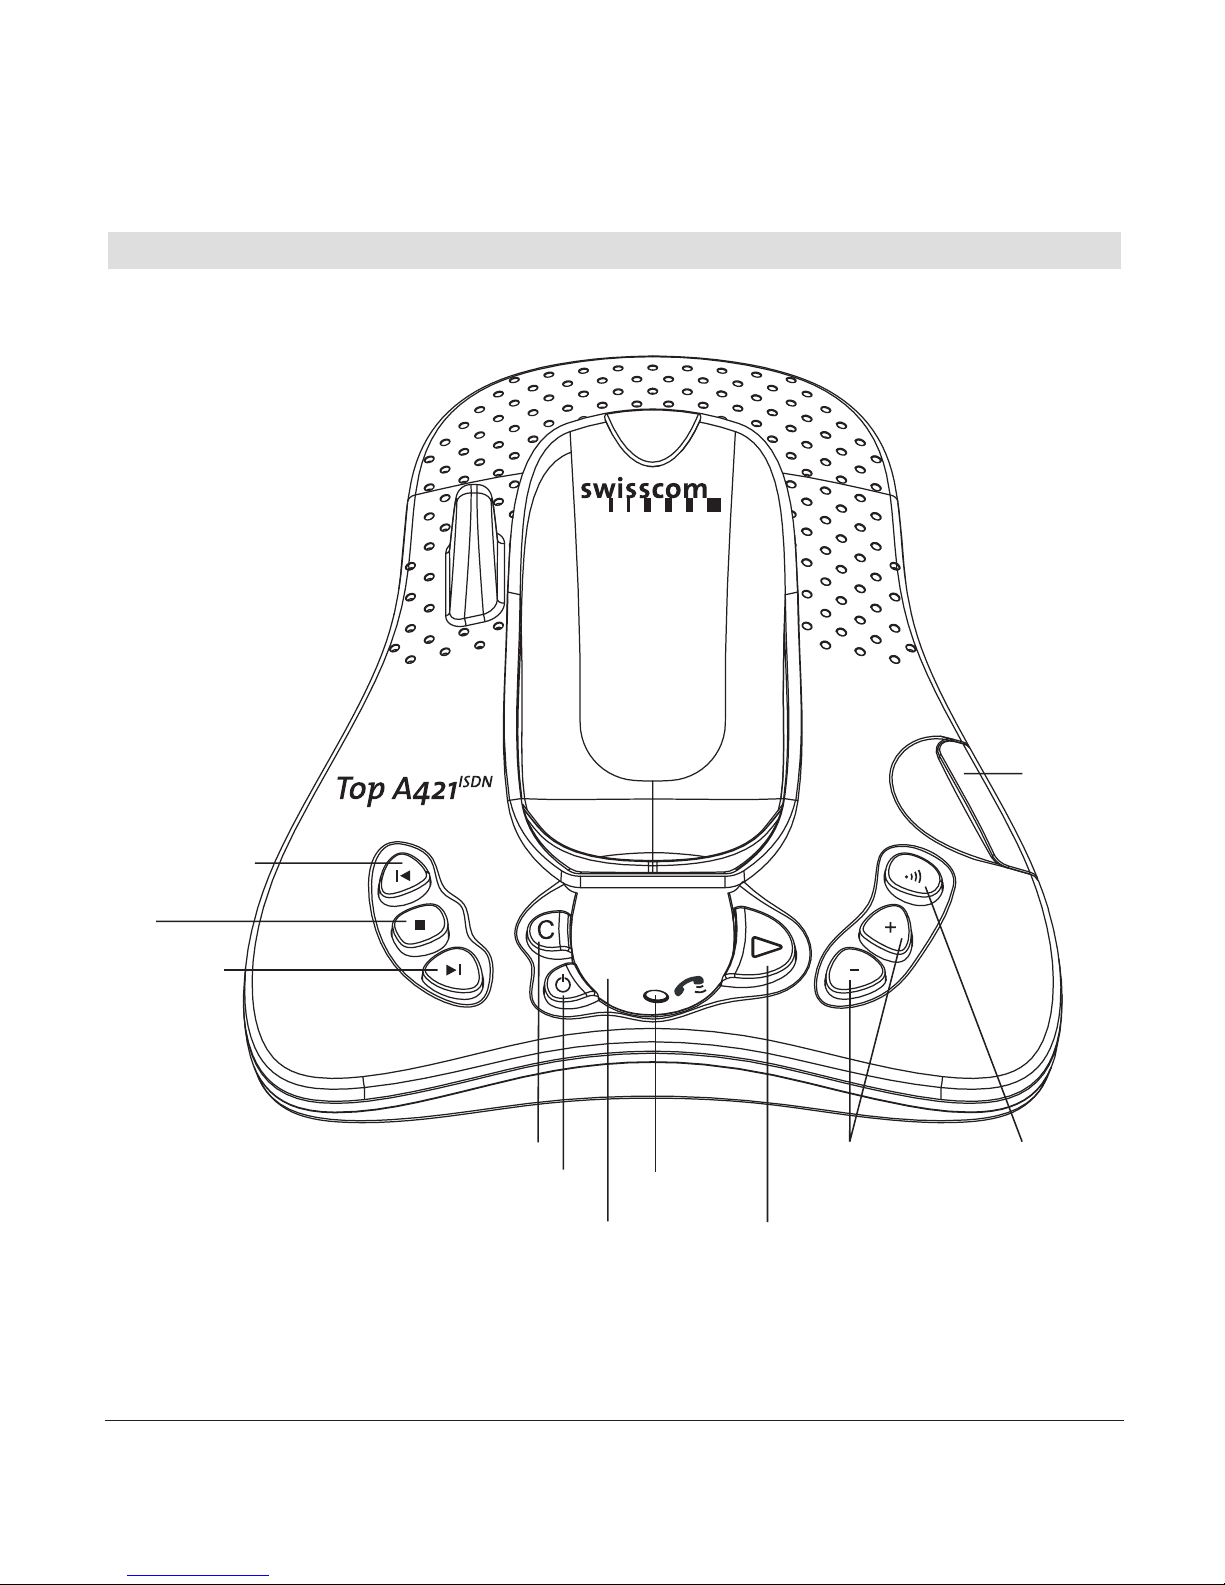
Getting to know your telephone
Backlit display
Earpiece
Hash key
Headset connectivity
Alphanumerical
keypad
Talk key
Enquiry key with
flash function
“End call” key
ETV
®
Online
Microphone
Softkey
(multifunctional key)
Softkey
(multifunctional key)
Internal call key
Navigation key
Activating
the key lock
Handset keys
Redial
Message key
Call list
USB connection
Page 20

18
20402773en_ba_e0
Getting to know your telephone
Softkeys (multifunctional keys)
Right softkey: Choose menu options, confirms entries/settings. Left softkey: returns to previous menu step.
Navigation key For scrolling up/down or right/left.
In answer machine mode, message playback: right = skip forward,
left = replay message; double click = skip back.
Redial Open redial list.
Message key Access to new unanswered calls, SMS or answer machine
messages.
Opens calls list*.
Internal call key For conducting handset-to-handset calls.
Call key For conducting and accepting calls and switching to hands-
free.
“End call” key Press briefly to end a call or return to standby mode.
Press and hold down to switch the handset on/off.
Alphanumerical keypad For dialling telephone numbers. Letters
printed on housing. Press and hold down “0” when entering a telephone
number to insert a dialling pause between two digits.
Combox Press and hold down for direct access to network answer
machine messages.
Call back on busy Press and hold if called party is busy: Activate call
back on busy.
Call anonymously Press and hold down to suppress caller ID for next call.
Park/ unpark Press and hold during call: Park. Press and hold in
standby mode: Unpark.
Asterisk key For entering asterisks. Press and hold down to switch
handset ringer on/off.
Hash key For entering the hash symbol. Press and hold down to
switch keylock on.
…
INT
*Function dependent on network operator. CLIP is transferred in the Swisscom ISDN network.
Page 21
19
20402773en_ba_e0
Getting to know your telephone
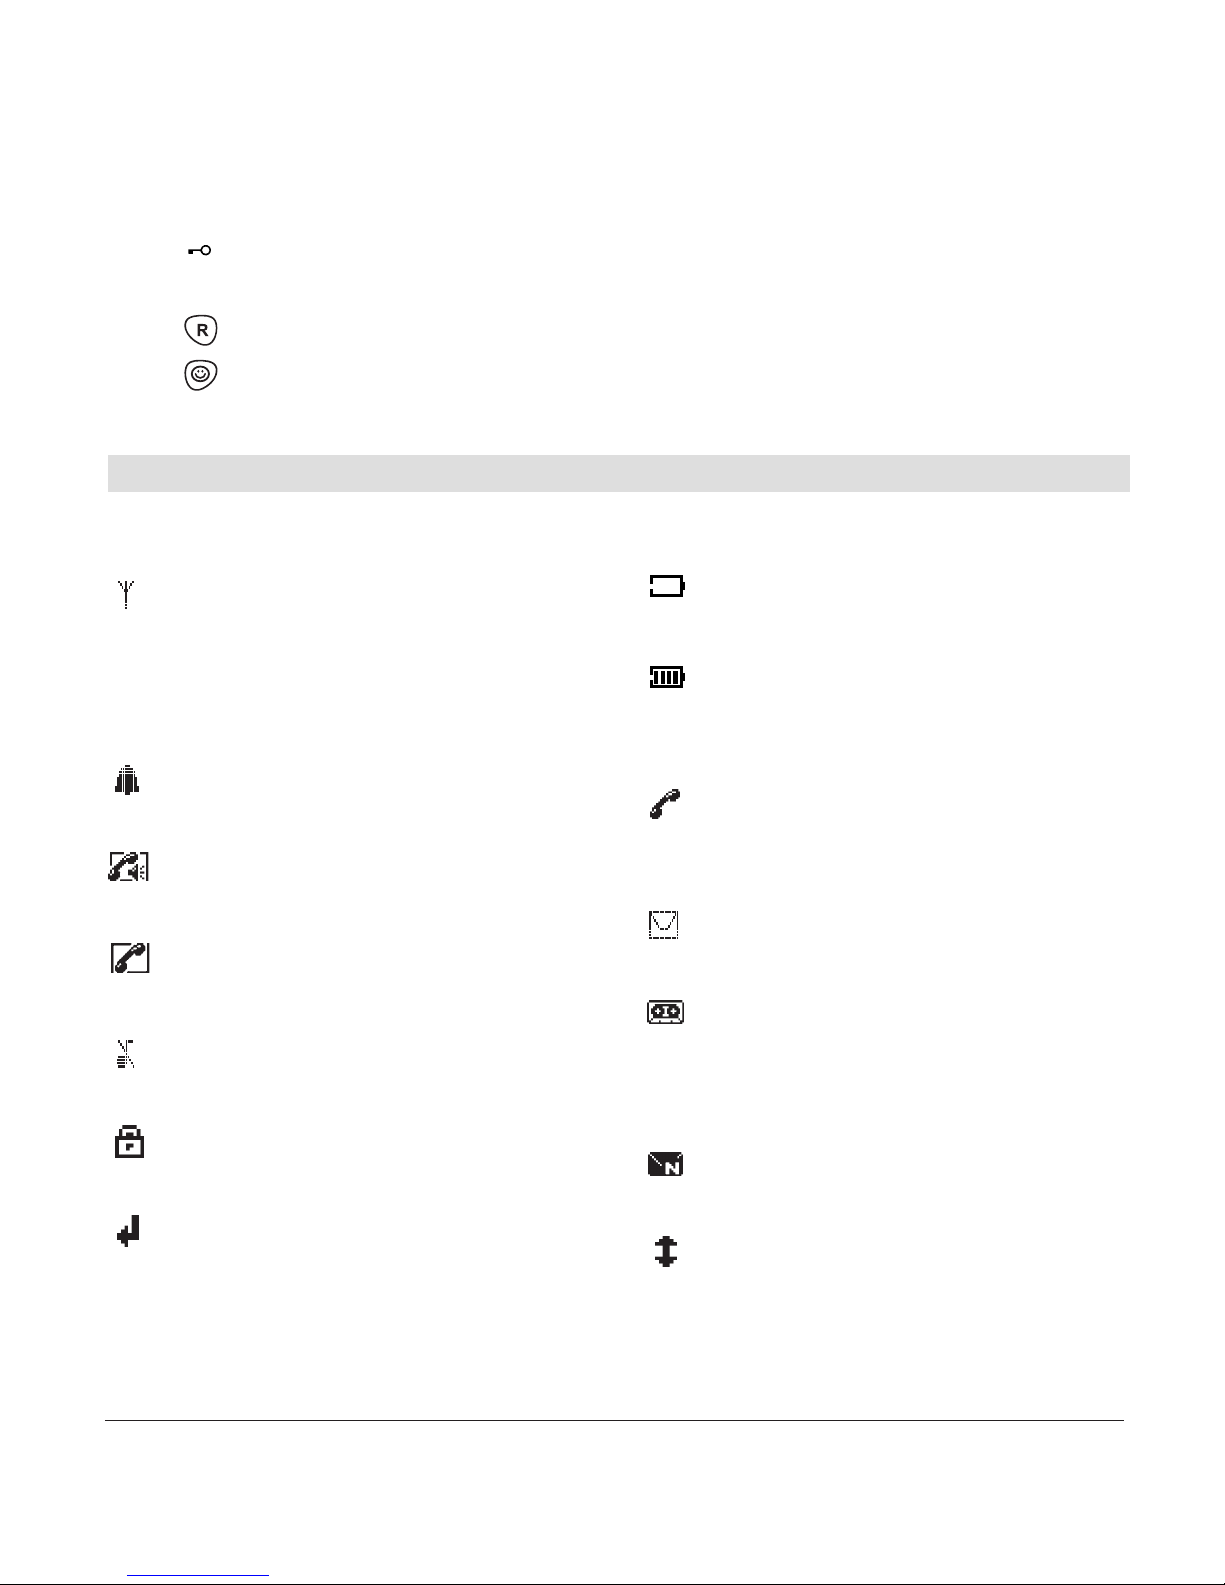
Handset display symbols
The following symbols are displayed on your handset.
* Function dependent on network operator.
Contact your network operator to find out whether this service is supported.
Coverage symbol
Reception displayed when the handset is
within range of the base station.
Flashes when out of range of the base station
or not registered with the base station.
Alarm set
Indicates that the alarm is set.
Handsfree on
Indicates that handsfree speaking is activated.
Active call
Indicates that a call is in progress.
Ringer off
Indicates that the ringer is switched off.
Keypad lock
Indicates that the keypad is locked.
Call forwarding activated
Indicates that call forwarding is activated.
Battery full
Indicates that the batteries are fully charged.
Battery empty
Indicates that the batteries are almost
discharged.
Unanswered calls*
Displayed if you have unanswered calls in the
calls list.
You have new SMS messages*
Indicates that you have new SMS messages.
You have new answer machine
messages
Indicates that you have new answer machine
messages.
You have Combox messages
Displayed if you have new Combox messages.
Recall
Offers you the option of “call back on busy”.
Keypad locked A locked keypad prevents numbers being dialled
inadvertently.
Enquiry key with flash function.
Smiley key Open ETV
®
Online.
Page 22

20
20402773en_ba_e0
Getting to know your telephone
About the menus
Main menu
The main menu of the telephone shows the available submenus as symbols on the display.
Use the navigation key to select the relevant symbol (up/down, right/left). The title of the
selected menu (e.g. directory) appears as text in the upper display line.
Menu navigation
Your handset provides you with an easy-to-follow menu. As a rule, every menu offers a
list of options. To select main menu, sub-menu and options, press the softkey below the
corresponding display text.
With the handset switched on and ready for use, press the softkey under MENU to open
the main menu and use the navigation key to scroll to the option you are seeking.
Press OK to open the options list, use the navigation key to scroll down the list to the
preferred option, and confirm the option by pressing OK.
Back to previous menu
Press BACK to return to the previous menu.
End menu
To exit a menu, press the softkey under BACK. If you want to return to standby mode,
confirm by pressing .
Page 23
21
20402773en_ba_e0
Getting to know your telephone
Top A421
ISDN
base station with answer machine
Group call
on handsets
(paging)
Switches the answer machine
on or off
Delete
Next
Stop
Previous
Playback/
replay
Adjust
loudspeaker
volume
Message counter/
status indicator
SIM card
reader
“In
operation”
display
Page 24

22
20402773en_ba_e0
Getting to know your telephone
Top A321
ISDN
base station
Group call on handsets
(paging)
SIM card
reader
“In operation” display
Page 25

23
20402773en_ba_e0
Making an external call
Press , wait for the dialling tone and dial the number.
Call preparation
First, enter the number. If you enter an incorrect number, you can delete the entry.
Press to dial the number.
Ending a call
Press or replace the handset in the charging unit/base station.
Accepting a call
The caller's number or name (if stored in the directory) are displayed only if your network
operator supports caller line ID (Caller Line ID Presentation/CLIP*).
Press to accept the call.
Reject call
You can reject an incoming call. Press to reject the call.
Send DTMF/ keypad information
By switching to temporary DTMF you can press the softkey under OPTION, DTMF to
send control signals, e.g. for the Combox, during a call.
Note If you have activated “Autom. DTMF” in the
SETTINGS, TELEPHONY
menu,
there is no need to switch to temporary DTMF. Temporary DTMF is automatically deactivated when you end the call.
* Function dependent on network operator.
CLIP is transferred in the Swisscom ISDN network.
Telephoning
Page 26

24
20402773en_ba_e0
Telephoning
Handsfree operation
You can use the handsfree function to conduct calls without holding the handset in your
hand and allow others present in the room to take part in the call.
Activating handsfree before a call:
1. Press . The display shows . Press again. The display shows and you
can hear the ringing signal over the handset loudspeaker.
2. Press to deactivate handsfree speaking.
Switching to handsfree speaking during a call:
Press . To deactivate handsfree speaking, press again.
Handset / handsfree volume
You can adjust the handset and handsfree loudspeaker volume in 5 steps. Press
during a call to adjust the volume. The selected setting is saved after the end of the call.
Note The handset and handsfree loudspeaker volumes are independent but the
setting procedure is identical.
Handset secrecy
During a call you can talk to someone else in the room without the caller hearing.
1. Press the softkey under SECRECY during a call. This switches handset secrecy on and
your caller cannot hear you.
2. Press the softkey under OFF to return to the call.
Page 27

25
20402773en_ba_e0
Telephoning
Redial
The 20 last-dialled numbers are saved in a redial list. If a name and number are already
stored in the directory, the name is shown instead of the number.
Redialling a number from the list
Press to open the redial list and press to scroll through the list. Press as soon
as you have reached the number you are seeking.
Note If the redial list is empty, a message to this effect appears.
Copying numbers from the redial list
You can copy a number from the redial list to the directory.
Press to open the redial list. Use to scroll through the list to find the number you
are seeking, and press the softkey under OPTION. Enter the name and number and define
your individual settings. Assign the entry to the relevant user and save.
Note If the number is already in the directory, the Save function is not displayed.
Deleting individual entries/entire redial list
Press to open the redial list. Scroll through until you reach the entry you are seeking.
Press the softkey under OPTION and delete the entry or the entire list.
Page 28

26
20402773en_ba_e0
Telephoning
Sending SMS messages from the redial list*
1. Press the softkey under . Use to scroll through the list to find the entry you are
seeking, and press the softkey under OPTION.
2. Write and send your SMS message.
Group call (paging)
You can activate a group call to locate a mislaid handset.
1. Press on the base station. The mislaid handset rings.
2. Press again to end the ringing signal or press on the handset.
Keypad lock
If you want to carry the handset around in your pocket, you can activate the key lock.
This prevents you inadvertently dialling a number.
1. Press and hold down . The display shows
KEYPAD LOCKED
.
2. To unlock the keypad, press the softkey under UNLOCK then press .
Note If the keypad is locked,
• you can dial the emergency numbers 112, 117, 118, 144 (in call
preparation only) and incoming calls can still be accepted.
• you cannot dial a number or access menus.
* Function dependent on network operator.
Contact your network operator to find out whether this service is supported.
Page 29

27
20402773en_ba_e0
Telephoning
Internal calls
You can call other handsets which are registered with your base station. This allows you
to make internal calls free of charge.
1. Press
INT, dial the relevant handset number and press OK to confirm. Pressing INT
automatically dials the second handset if only two handsets are registered with the
base station.
2. Press to end the call.
Note • If you receive an external call while conducting an internal call, every hand-
set which is not in use will ring.
• If a handset is in use, you will hear a signal alerting you to the incoming
external call. Press the softkey under OPTION, ACCEPT/END to end the
internal call and accept the external call. Or press the softkey under OPTION,
ACCEPT/HOLD to put the internal call on hold or under OPTION, REJECT
to reject the external call.
Page 30

28
20402773en_ba_e0
Telephoning
Enquiries
Internal enquiry call
You are conducting a call and want to call an internal party without ending the external
call. Internal enquiries are managed by the base station and are not dependent on your
network operator's available services.
External enquiry call
Procedure:
1. You are conducting a call and want to call another external party without ending the
active external call.
2. Press the enquiry key to start the external enquiry.
Brokering (switching between two calls)
You have two active calls (1 internal and 1 external), one of which is on hold. You can
switch between the two by brokering.
1. You are conducting two calls, one of which is on hold.
2. Press the softkey under OPTION, BROKERING to switch between the call partners.
Note You can connect all call partners together by pressing the softkey under
OPTION, JOIN.
Page 31

29
20402773en_ba_e0
Telephoning
Call transfer
Internal call transfer
You can transfer the call you are conducting to another handset (= switching).
1. Press
INT and dial the handset to which you wish to transfer the call. The external
caller is put on hold.
2. If the second handset answers, you can talk to the internal call partner without the
external caller hearing you. Press to transfer the call.
Note • You cannot use the INT key if the call duration is not displayed.
• If the second handset does not answer, you can end the ringing signal and
return to the original call by pressing the softkey under END.
External call transfer
You can transfer an incoming call to another telephone directly by pressing the softkey
under OPTION, CD.
Page 32

30
20402773en_ba_e0
Telephoning
Three-way conference
You can use the conference assistant to set up a three-way conference with 2 external
call parties.
1. Scroll to
NET FUNCTIONS, CONFERENCE ASSISTANT
and press OK to confirm.
2. Dial the number of the call partner or search for it in the directory. Once the connection
is set up, tell the call partner that you are setting up a three-way conference call.
The call partner is put on hold.
3. Dial the number of the second call partner or search for it in the directory.
The three-way conference call is activated as soon as the second call partner accepts
the call.
Note If the second call partner does not answer, you can return to the first call
partner by pressing the softkey under END.
Page 33

31
20402773en_ba_e0
Directory
You can store up to 200 names and numbers in the directory on each handset. Every
entry contains a name and telephone number. Names can be up to 16 letters long and
numbers up to 24 digits long.
Directory entries
Adding a new entry
If the telephone is in standby mode:
1. Press the softkey under DIRECTORY. All entries are displayed in alphabetical order.
2. Press the softkey under OPTION. Enter the new name and number and define your
individual settings. Assign the entry to the relevant user and save.
Note If the directory is empty, a message to this effect is displayed.
Tips for entering names/numbers
•Press to insert a space, or to enter a symbol.
• The available special characters appear in the lower display line. Press the relevant key
to scroll through the characters.
• When entering names, you can press to switch between upper and lower case
lettering.
Page 34

32
20402773en_ba_e0
Directory
Editing entries
1. Press the softkey under DIRECTORY. Use to scroll through the list to find the entry
you are seeking, and press the softkey under OPTION.
2. Edit the name and/or number and save the entry.
Deleting directory entries/entire directory
You can delete individual entries or the entire directory.
1. Press the softkey under DIRECTORY. Use to scroll through the list to find the entry
you are seeking, and press the softkey under OPTION.
2. Delete the entry or the entire list.
Dialling numbers from the directory
1. Press the softkey under DIRECTORY. All entries are displayed in alphabetical order.
2. Use to scroll through the directory, select the entry you are seeking and press .
The number is displayed and dialled.
You can also search by name: press the first letters of the name and press to confirm.
Sending SMS messages from the directory*
1. Press the softkey under DIRECTORY. Use to scroll through the list to find the entry
you are seeking, and press the softkey under OPTION.
2. Write and send your SMS message.
* Function dependent on network operator.
Contact your network operator to find out whether this service is supported.
Page 35

33
20402773en_ba_e0
Directory
Copying directory entries
If you operate several handsets, you can copy entries from one handset to another. This
way, you only have to enter names and numbers once.
While you are copying entries from one handset to another, you can make external calls
on another handset registered with the base station.
If the entire directory is copied, it overwrites all entries on the other handset. If the directory on the handset to which you are copying is full, a message to this effect is displayed.
Copying entries/entire directory to another handset
You can copy individual entries or the entire directory from one handset to another provided both handsets are registered with the base station.
1. Press the softkey under DIRECTORY and to select the entry you wish to copy. Press
the softkey under OPTION. Select the submenu you are seeking and press OK to confirm.
2. Select the number of the destination handset and press OK to confirm.
Note • The copy procedure is aborted if an incoming call is received.
•If you are copying an entire directory, all entries transferred before the call
are saved.
•You cannot perform the copy procedure if the handset to which you wish
to copy is conducting a call.
Page 36

34
20402773en_ba_e0
Directory
SIM card
Copying to the SIM card
You can copy entries from your mobile phone SIM card to your telephone (and vice versa).
Copied entries are added to entries already saved. You can copy entries individually or
in their entirety.
Note Names can be up to 16 letters long and numbers up to 24 digits long.
Longer names and numbers are “truncated” when copied over.
Copying from the SIM card
1. Insert the SIM card in the SIM card reader on the base station.
2. Press the softkey under DIRECTORY, followed by OPTION.
3. Scroll to
COPY SIM
and press OK to confirm.
4. Enter the SIM card PIN and copy individual entries or all entries.
Note • If you choose to copy only individual entries, a confirmation message is
displayed. You can now copy additional entries. If the entire directory is to
be copied, every entry is displayed and copied until the procedure is completed or the directory is full.
• If you enter a SIM card PIN incorrectly twice in succession, an error message
is displayed and the telephone returns to standby mode. You can only
use your SIM card again once you have inserted it into your mobile phone
and entered the correct SIM card PIN.
•Your device functions with all SIM cards except USIM (UMTS).
Page 37

35
20402773en_ba_e0
ETV®Online
ETV®Online query
ETV
®
Online is a service which gives you direct access to the Swisscom electronic directory
(ETV
®
= Elektronisches Teilnehmer-Verzeichnis, Swisscom Directories AG). As soon as an
unknown number appears on your display, you can press to access the ETV
®
and
within a few seconds obtain the caller’s name and address.
ETV
®
queries
You can call up the ETV
®
directly:
– while the phone is ringing (incoming call)
– during a call
– when entering a number in dialling preparation
You can also consult the ETV
®
while in the following lists:
– Caller lists (answered/unanswered)
– Redial list
Note • ETV®queries are subject to a charge.
•The ETV
®
Online access number is pre-installed. If you need to change the
access number*, you can reprogram it in the
NET FUNCTIONS, ETV®-Online
menu.
Saving ETV®information in your directory
Once you have obtained the information from the ETV
®
, you have the option of directly
saving the number and name to your directory (press the softkey under SAVE).
*Your telephone is delivered with the Swisscom access number, 081 286 61 30,
preprogrammed.
Page 38

36
20402773en_ba_e0
Calls list*
If your network operator supports caller line ID* (CLIP), the caller's number (unless withheld) is displayed before you accept the call.
If you have received new calls, a message to this effect appears in the display. A list is
kept of answered and unanswered calls.
The calls list can hold up to 30 entries. If the list is full, the oldest entry is overwritten by
the most recent entry.
Note If the calls list is empty, a message to this effect is displayed.
Viewing/dialling a number from the calls list
Press to open the calls list. Press to scroll through the list. Press to dial the
number.
Sending SMS messages from the calls list*
1. Press to open the calls list. Use to scroll through the list to find the entry you are
seeking, and press the softkey under OPTION.
2. Write and send your SMS message.
* Function dependent on network operator.
CLIP is transferred in the Swisscom ISDN network.
Page 39

37
20402773en_ba_e0
Saving numbers from the calls list to the directory
1. Press . Scroll through until you reach the entry you are seeking.
2. Press the softkey under OPTION,
SAVE NUMBER
. Enter the name for the associated
number and define your individual settings. Assign the entry to the relevant user and
save.
Deleting individual entries/entire calls list
1. Press . Scroll through until you reach the entry you are seeking.
2. Press the softkey under OPTION and delete the entry or the entire list.
Calls list*
* Function dependent on network operator.
CLIP is transferred in the Swisscom ISDN network.
Page 40

38
20402773en_ba_e0
Procedure:
1. Press the softkey under MENU. Press to scroll to
AUDIO
ad press OK to confirm.
2. Scroll to the relevant submenu and make the relevant settings:
Handset/base station ringer
You can programme different ringer melodies for each MSN on the handset and base
station, to signal external and internal calls. Choose from the 5 standard ringer melodies
and 10 polyphonic ringer melodies (handset only).
Set the preferred ringer melodies and associated volume for external/internal calls.
You can also set an ascending volume.
Use the possibility to assign the melody/picture you want to an entry in the directory.
When you get a call from this participant, you hear the personalised melody and see the
defined picture in the display.
Note • The enclosed CD contains software which you can use to download
polyphonic ringer to your computer and transfer them to your telephone
using the accompanying USB cable.
• System requirements see chapter “picture and ringtone manager”.
Audio
Page 41

39
20402773en_ba_e0
Audio
Beeps
Your telephone supports various tones which you can activate or deactivate:
Key beeps
Every time a key is pressed, a brief beep is heard.
Range beeps
A warning beep is sounded if you exceed the maximum range. Move closer to the base
station.
Charging beep
When you insert your handset in the charging unit/base station, the batteries are automatically charged up. A short beep is heard.
Accu beep
Sounds when the batteries are running low.
Confirmation beep
Settings and entries are confirmed by a short beep.
Ringer melodies
Personal ringer melodies
You can manage up to 10 personal ringer melodies.
Recording ringer melodies
You can record personal melodies or noises on your telephone.
Page 42

40
20402773en_ba_e0
Family
Procedure:
1. Press the softkey under MENU. Press to scroll to
FAMILY
and press OK to confirm.
2. Scroll to the relevant submenu and make the relevant settings:
Direct call (baby call)
If you activate direct call on your telephone, the handset dials a preprogrammed number
when any handset key is pressed. “Direct call” can be very useful, especially for parents
with young children. If the parents are not at home, the children can reach their parents
(or neighbour) simply by pressing any key on the handset. The direct call number must
be preprogrammed by the parents beforehand.
Note • You must deactivate the direct call function to restore your telephone’s
normal functions.
• Please note that direct call may not function in exceptional cases, e.g. if
the preprogrammed number is busy, if the preprogrammed mobile
phone number has no reception, in case of a power outage or when the
recheargable batteries are empty.
Page 43

41
20402773en_ba_e0
Family
Room monitoring (baby surveillance)
You can set a baby call/noise alarm. Once this function is set, your phone monitors noises
in its immediate vicinity and triggers a call to the programmed number if the noise
exceeds a set level (defined by the user). The person called hears the noises and is alerted
to the fact that, for instance, a child is crying in the room.
Note • If room monitoring is active, incoming calls are not signalled.
• If the answer machine is activated, an incoming call is forwarded to it.
•You must deactivate the room monitoring function to restore your
telephone’s normal functions.
• Please note that room monitoring may not function in exceptional cases,
e.g. if the preprogrammed number is busy, if the preprogrammed mobile
phone number has no reception, in case of a power outage or when the
recheargable batteries are empty.
Games
Your telephone offers a choice of two games:
• Adder
• Boats battle
Press the softkey under MENU, use to scroll to
FAMILY, GAMES
and press OK to
confirm. Select the game you wish to play.
Please note the rules of the game and follow the operating instructions on your telephone.
Note You can still be reached while playing a game.
Page 44

42
20402773en_ba_e0
Call costs
Procedure:
1. Press the softkey under MENU. Press to scroll to
CHARGES
and press OK to confirm.
2. Scroll to the relevant submenu and make the relevant settings:
Cost of last call
You can display the cost of the last call as well as call charges per MSN or handset.
Total calls
You can display the total for all MSNs (total charges).
Settings
Type of display
You can display the cost or duration of a call. The following settings must be made before you can display costs:
Charge factor
The factor for the Swisscom ISDN network is FR. 0.10. This factor is automatically transmitted for every outgoing call.
Currency
To display costs accurately, you may need to set the currency (Switzerland: FR.).
Note • Note that for technical reasons the displayed charges may differ from the
amount billed. The amount indicated on your phone bill is binding.
• If you are using a provider, charge information may not be available.
Page 45

43
20402773en_ba_e0
Calendar/clock
Procedure:
1. Press the softkey under MENU. Press to scroll to
CALENDAR/CLOCK
and press OK
to confirm.
2. Scroll to the relevant submenu and make the relevant settings:
Appointments
Your telephone also acts as an appointments reminder: You can set 5 different appointment reminders. A signal is heard on the handset at the defined time.
Alarm
To set the alarm, you need to activate the alarm function and enter the time and preferred alarm melody. You can choose from 5 standard and 10 polyphonic alarm melodies.
Note The alarm only sounds on the handset on which it has been set.
Time/date
The time and date are automatically set when an outgoing call is made.
Note • If the power supply is cut, the settings are lost and must be reprogram-
med.
•You can also set the time format (12/24 hours).
Page 46

44
20402773en_ba_e0
Network functions (supplementary services)
Network functions are dependent on your network operator. Find out about availability
and charges, if applicable.
Procedure:
1. Press the softkey under MENU. Press to scroll to
NET FUNCTIONS
and press OK to
confirm.
2. Scroll to the relevant submenu and make the relevant settings:
Call forwarding
Call forwarding allows callers to reach you even if you are not near your own telephone.
Activate call forwarding for each MSN and choose one of the three following options:
Unconditional
Incoming calls are forwarded immediately.
No reply
Incoming calls are forwarded after a delay (fixed time or number of rings).
Busy
Calls are forwarded if the line is busy.
Once you have defined the call forwarding option, enter the forwarding number (i.e. the
number to which calls are to be forwarded).
At any time you can:
• check the call forwarding status
• edit or delete the forwarding number
• deactivate call forwarding.
Page 47

45
20402773en_ba_e0
Network functions (supplementary services)
Call anonymously (Identification restriction)
When you call someone, your number is shown on the other person's phone if it supports this function.
You can program your MSN so that your calling line ID is suppressed (see section on
“MSN settings”). “Anonymous call” for the next call only can also be activated in the
relevant menu or by pressing and holding down the key . “Anonymous call” can
also be assigned to a directory entry.
Conference assistant
See section on “Three-way conference”.
Parking
Park/unpark
You can park an external call for 3 minutes and retrieve it on another telephone with the
same connection.
Press and hold during the call: Park.
Press and hold in standby mode: Unpark.
Park code
Your telephone is delivered with the park code preset to 1. You can change the park
code in the relevant menu. Press SAVE to confirm. The park code is used to clearly
identify the parked connection, and must be entered when unparking.
Page 48

46
20402773en_ba_e0
Network functions (supplementary services)
Recall
This service is dependent on your network operator.
Call back on busy (Completion of Calls to Busy Subscriber/ CCBS)
If a number you have dialled is busy, you can activate call back by pressing the softkey
under CCBS or by pressing and holding down (the acitvated call back is signalled in
the display with ). If call back on busy is activated, a special signal is heard as soon as
the called party has replaced the receiver i.e. as soon as his or her line becomes free.
Delete call back
An activated callback can be deactivated (= deleted) in the relevant menu.
Malicious Call Identification (MCID)
This service is available from Swisscom on request. Once Swisscom has activated the service, malicious calls are registered during the call and up to 20 seconds after the receiver
is replaced. The exchange registers the calling number, date and time, even if the caller
has withheld his or her number.
Page 49

47
20402773en_ba_e0
Network functions (supplementary services)
Combox
Swisscom offers the option of setting up a network answer machine (Combox).
Check whether this network function is available, the associated charges (if applicable)
and the functions provided by this service.
is displayed to alert you to new messages (if provided by network operator).
To access new messages quickly and simply, press and hold down for around 2 seconds
to automatically dial the access number of your network answer machine.
Note • You can edit the network answer machine access number (Voicebox) in the
submenu
COMBOX, SETTINGS
.
•To use the network answer machine, you need to send certain codes to the
network. Ask your network operator for details.
Provider
You can also make calls over another provider.
Under
PROVIDER LIST
, enter the names and prefixes of the providers (max. 5) to whose
service you have subscribed. You can link every directory entry to one of the providers in
this list.
If you want to make all calls over a single provider, scroll to
DEFAULT PROVIDER
in the
submenu
SETTINGS
and enter the relevant provider's prefix. The default provider prefix
is then automatically inserted before every number you call from lists (even if you have
not saved a provider prefix in the directory entries).
Note The default provider prefix is only inserted automatically if you dial from a list
(directory, calls list, redial).
Page 50

48
20402773en_ba_e0
Access to voice portal
The access to the voice portal of Swisscom Fixnet AG is preprogrammed in the directory
with «Voice Portal» (access number 0848 849 850).
Select:
•Directory
•«Voice Portal»
•Press
• The access number of the voice portal is dialled.
Note Supplementary services as call forwarding (service 21, 61 or 67), call waiting
(service 43) or three-way conference can easily be activated with voice commands in the Swisscom voice portal. With a simple voice command you have
also access to up-to-date information in the areas of sports, news and
weather.
Page 51

49
20402773en_ba_e0
SMS
SMS – Short Messaging Service
Sending and receiving SMS messages is a network function. To send and receive SMS
messages, your telephone line must have active Caller Identification Presentation (CLIP)
and Connected Line Presentation (COLP)*. Check with your network operator to find out
whether the SMS network function is available and about charges, if applicable.
Your telephone supports SMS messages up to 160 characters in length. You can save up
to 40 SMS messages in your lists.
Note • Find out from your network operator whether you need to send an SMS
message to subscribe to or unsubscribe from the SMS service.
•To be able to send SMS messages, your number must not be withheld.
•To be able to write SMS messages, your telephone must not be connected
to a private branch exchange.
Procedure:
1. Press the softkey under MENU. Press to scroll to
SMS
and press OK to confirm.
2. Scroll to the relevant submenu and make the relevant settings:
Writing SMS messages
Write your message. Refer to the chapter on “Directory entries” for tips on writing. You
can also use symbols and templates in the menu
SMS, WRITE MESSAGE
.
* Function dependent on network operator.
Contact your network operator to find out whether this service is supported.
Page 52

50
20402773en_ba_e0
SMS
Inbox
New SMS messages are signalled in the display by and saved in the inbox. Press the
softkey under INBOX to read new SMS messages. Or BACK, to read SMS messages later.
Once you have read the SMS messages, you can answer, forward, save or delete them or
call the sender.
Note If you have no SMS messages in your inbox, a message to this effect is dis-
played.
Drafts
You can create and save a draft SMS for subsequent sending, and edit and send it whenever you wish.
Outbox
Sent SMS messages are automatically saved in your outbox. You can edit and forward
SMS messages in the outbox or call the recipient.
Note • You can accept calls while writing an SMS.
• If the SMS is not transmitted, a message to this effect is displayed and the
SMS is saved in the outbox. You can delete the unsent SMS message to
return to standby mode, or select “read” to open the SMS message and
re-send it.
Page 53

51
20402773en_ba_e0
SMS
Templates
To simplify writing SMS messages, you can create up to 5 templates. You can edit and
delete these templates or create a new SMS message template.
SMS memory full
If the SMS memory is full, the warning message “Memory Full” is displayed together
with the flashing “envelope” symbol.
New SMS messages will be sent as voice messages. Only if SMS messages have been
deleted from the memory, new SMS messages are received as “normal” messages again.
Settings
SMS service centre
Before you can send and receive SMS messages, an SMS service centre must be programmed with the associated access number*. Your phone is delivered with this number
preset. Ask your network operator for details of these service numbers.
Send service
Select which service centre you want to use for sending SMS messages.
SMS alert on/off
If activated, a brief beep is heard every time a new SMS message is received.
*Your telephone is delivered with the Swisscom access number, 081 286 61 30,
preprogrammed.
Page 54

52
20402773en_ba_e0
Answer machine (Top A421
ISDN
only)
You can operate your answer machine:
from the base station
from the handset
remotely from an external DTMF telephone
Your telephone is delivered with the answer machine switched on (default setting).
Select MSN (answer machine is in standby):
Press or on the base station, the current MSN is displayed. Press or again
(if necessary several times) to select the MSN you want (only possible if more than one MSN
has been programmed).
The following settings can be defined per MSN
Switch answer machine on/off
Select outgoing message
Record/delete outgoing message, message mode and end message
Set answer delay time
Standard outgoing message in a selectable language
Play back/delete messages
Program personal remote PIN
Enter personal destination number to receive an SMS alerting you to a new answer
machine message.
Page 55

53
20402773en_ba_e0
Answer machine (Top A421
ISDN
only)
Operating the answer machine from the handset
You can switch your answer machine on and off, listen to messages and program settings from any registered handset.
On/off
1. Press the softkey under MENU. Press to scroll to
ANSWER MACHINE
and press OK to
confirm.
2. Scroll to
ANSWER ON/OFF
and select the setting.
Outgoing messages
Choose from two standard pre-programmed outgoing messages in various languages or
record your own outgoing messages.
Answer & record: Callers can leave a message.
Answer only: Callers cannot leave a message.
End message: Your caller will hear the End message (e. g. “Thank you for calling”) at the
end of his message.
Procedure:
1. Press the softkey under MENU, press to scroll to
ANSWER MACHINE
and press OK
to confirm.
2. In the submenu
OUTGOING MESSAGE
, define your preferences in the corresponding mode.
Recording/playing back an outgoing message
Record your message after the prompt and save it to end the recording. Old messages
are marked and not recorded over.
Page 56

54
20402773en_ba_e0
Answer machine (Top A421
ISDN
only)
Deleting an outgoing message
Select the relevant outgoing message and delete it. The message can only be deleted if it
has been played back.
Selecting an outgoing message
Select your preferred message mode and the outgoing message which will greet your
callers.
Memo
You can leave a message behind for other internal users by recording a memo.
Message playback
If you have new messages, the display of the handset shows and the key on
the base station flashes respectively.
1. Press the softkey under MENU, press to scroll to
ANSWER MACHINE
and press OK
to confirm.
2. You can play back and delete messages in the menu
PLAY MESSAGES
.
3. To
•replay a message, press
INT.
• listen to the next message, press .
• listen to the previous message, press
INT twice.
Note New messages are displayed on the base station per MSN. If, for example,
A – 3 – B – 2 flashes in the display, this means that MSN A has got three and
MSN B two new messages.
Page 57

55
20402773en_ba_e0
Answer machine (Top A421
ISDN
only)
Delete messages
1. Press the softkey under MENU, press to scroll to
ANSWER MACHINE
and press OK
to confirm.
2. Select
DELETE MESSAGES
and press YES to confirm. This deletes all old messages.
Listening over the handset
Press the softkey under LISTEN as soon as the answer machine accepts a call.
Note To talk to the caller, press . The recording is automatically
terminated.
Recording a call
While you are on the telephone you can record the call via the handset.
Note For privacy protection reasons you are obliged to inform your call partner that
the call is being recorded.
Remaining time
To check whether your answer machine has sufficient capacity for recording messages,
you can view the remaining recording time.
VIP number*
In the menu
ANSWER MACHINE
, scroll to
VIP NUMBER
and enter the number of the telephone from which you regularly remote-access your answer machine. You now have
direct access to your messages without the need for a remote access PIN. Important: VIP
playback allows you only to listen to messages.
* Function dependent on network operator.
Contact your network operator to find out whether this service is supported.
Page 58

56
20402773en_ba_e0
Answer machine (Top A421
ISDN
only)
SMS notification*
If this function is activated and you have entered a destination number, an SMS is sent to
alert that you have received a new answer machine message.
Operating the answer machine on the base station
On/off
Press .
Playing, repeating, deleting and skipping messages
All recorded messages and memos are shown on the display.
Press . Messages are played, starting with the most recent message.
During playback, press:
once to delete the active message.
once to repeat the active message, and twice to return to the previous message.
to play the next message.
to end playback.
Delete all listened messages
Press and hold down key to delete all listened messages.
Listening over the base station
If the answer machine accepts a call, you can use to adjust the volume and listen to
the caller while he is recording a message. To talk to the caller, press on the
handset. The recording is automatically terminated. You can also adjust the loudspeaker
volume in standby mode.
* Function dependent on network operator.
Contact your network operator to find out whether this service is supported.
Page 59

57
20402773en_ba_e0
Answer machine (Top A421
ISDN
only)
Answer machine settings
Procedure:
1. Press the softkey under MENU. Press to scroll to
SETTINGS
in the
ANSWER MACHINE
menu and press OK to confirm.
2. Make the settings in the relevant submenu:
Answer delay and time saver mode
The answer delay function allows you to specify the delay, in seconds (0, 5, 10, 15, 20,
25 or 30), before the answer machine accepts the call.
Time saver mode helps you to save on costs for remote access: If your answer machine responds after a short time, this means there are new messages. If you continue to hear the
ring signal, you have no new messages. You can then replace the receiver to save costs.
Time limit
You can set the time allowed for incoming messages The longer incoming messages are,
the fewer can be recorded (max. recording capacity of your answer machine = 20 minutes).
Language
Set the preferred language for standard outgoing messages and remote access confirmations.
Remote access
Remote access PIN
You can operate your answer machine from any modern telephone by calling your
number and entering your 4-digit remote access PIN. The preprogrammed PIN is 0000.
To remote access your telephone you have to enter your personal
SECURITY PIN
in the
menu
ANSWER MACHINE, SETTINGS
before the first remote access.
Page 60

58
20402773en_ba_e0
Answer machine (Top A421
ISDN
only)
Remote activation of answer machine
If you have forgotten to switch your answer machine on, you can do this remotely from
an external telephone. Dial your number and let it ring 12 times. Enter your 4-digit
security PIN and press to switch on the answer machine.
PIN alarm
If you enter the remote access PIN incorrectly three times in succession, your telephone
will automatically disconnect the line. The PIN alarm is then activated (indicated by rapid
flashing of the “in operation” display). It is now impossible to remote access your
answering machine until the PIN alarm has been reset by pressing the On/Off key at the
base station.
Operating the answer machine from an external telephone
1. Dial your number. When you hear your outgoing message, press .
2. Enter your 4-digit security PIN. If there are new messages, these are played back.
You can remotely operate your answer machine using the following keys:
return to main menu
play messages
delete all messages
switch answer machine on/off
select outgoing message
record new outgoing messages
play menu again
Page 61

59
20402773en_ba_e0
Settings
Language
Procedure:
1. Press the softkey under MENU. Press to scroll to
LANGUAGE
in the
SETTINGS
menu
and press OK to confirm.
2. Set the preferred display language. Display texts will appear in the set language (EN,
DE, FR, IT).
Presentation
Procedure:
1. Press the softkey under MENU. Press to scroll to
PRESENTATION,DISPLAY
in the
SETTINGS
menu and press OK to confirm.
2. Scroll to the relevant submenu and make the following display settings:
Wallpaper
The enclosed CD contains software which you can use to download pictures (and polyphonic ringer) to your computer and transfer them to your telephone using the accompanying USB cable.
Select wallpaper for your display from the list.
Use the possibility to assign the melody/picture you want to an entry in the directory.
When you get a call from this participant, you hear the personalised melody and see the
defined picture in the display.
Note System requirements see chapter “picture and ringtone manager”.
Keypad lighting
Activate or deactivate keypad lighting.
Page 62

60
20402773en_ba_e0
Settings
Display
• Font
You can choose between large and small fonts. If you select “large”, fewer characters
will appear on the display (the rest are “cut off”).
• Contrast
To optimise legibility, you can adjust the display contrast.
• Menu colour
Define the preferred colour.
• Backlight
You can activate or deactivate backlighting for the display.
• Screensaver
Activate or deactivate the screensaver.
Telephony
Procedure:
1. Press the softkey under MENU. Press to scroll to
TELEPHONY
in the
SETTINGS
menu and press OK to confirm.
2. Scroll to the relevant submenu and make the following settings:
Automatic DTMF
Activate “Automatic DTMF” to switch automatically to DTMF dialling during an active
call.
Auto Talk
An incoming call can be accepted by pressing the talk key. If you activate Auto Talk, you can
accept a call simply by lifting the handset from the base station without pressing any key.
Page 63

61
20402773en_ba_e0
Settings
System PIN
Procedure:
1. Press the softkey under MENU. Press to scroll to
SYSTEM PIN
In the
SETTINGS
menu and press OK to confirm.
2. Change the existing system PIN as required.
Note • If you wish to register/deregister new handsets with the base station, you
must enter the base station's 4-digit system PIN (default setting: 000).
•We recommend that you change the system PIN to protect your telephone
against unauthorised access.
• Attention: Please take good note of your new system PIN! If you forget it,
Swisscom will need to intervene and will charge you for this service.
PBX
See “PBX access”.
Page 64

62
20402773en_ba_e0
Settings
Range
You can use up to 6 repeaters to extend the range and receiving power of your base station. The repeaters must first be registered and activated on the base station.
Procedure:
1. Press the softkey under MENU. Press to scroll to
RANGE
in the
SETTINGS
menu and
press OK to confirm.
2. Scroll to the relevant submenu and make the following settings:
Repeater Mode
You can use a repeater to increase the range of your handset. Repeater mode must be
activated on your telephone. You can activate up to 6 repeaters per base station.
Per repeater, up to 2 handsets can conduct a call simultaneously.
Note For details on setting up repeaters, please follow the repeater user manual.
Eco Mode (antenna off)
When you replace the handset in the base station, the antenna automatically switches to
low-emission mode. This function is switched off when the telephone is delivered.
Note • To activate eco mode, only a single handset must be operated on
the base station.
• Other cordless DECT products in range may interfere with the eco mode.
Page 65

63
20402773en_ba_e0
Settings
MSN settings
Assigning an MSN
Your telephone can manage up to 5 Multiple Subscriber Numbers (MSN). You must have
at least one MSN programmed in order to use your telephone.
1. Press the softkey under MENU. Press to scroll to
SETTINGS
and press OK to confirm.
2. Select the relevant MSN in the menu
MSN SETTINGS, ASSIGN MSN
. Program the MSNs
and associated user names, and activate/deactivate the functions “Anonymous call”
and “Call waiting”. If you are already on the telephone, the “Call waiting” function
emits an acoustic signal to alert you to an incoming call.
Note • You can also use the installation assistant to set up your MSNs and define
the associated settings.
• The MSNs must be programmed without a prefix (e.g. 031).
Allocating an MSN
This menu item allows you to change the allocation of MSNs to handsets. Incoming calls to
an MSN ring only on the allocated handsets.
Page 66

64
20402773en_ba_e0
Additional handsets/base stations
Registering additional handsets
You can register up to 6 handsets with the base station. The base station must be within
range.
Note If you purchase additional handsets for your base station,
• the batteries must first be fully charged!
• the handsets must be registered with the base station before use!
Procedure:
1. Press the softkey under MENU. Scroll to
REGISTRATION
in the
SETTINGS
menu. Select
the base station and enter the base station system PIN (default on delivery: 0000).
2. Press and hold down on the base station for around 10 seconds.
3. Release when you hear a beep on the base station. The handset is automatically
assigned the next available handset number.
Deregistering a handset
You can deregister a handset from the base station. The base station must be within
range.
Press the softkey under MENU. Scroll to
REGISTRATION
in the
SETTINGS
menu and
deregister the handset in the relevant submenu.
Selecting the base station
Press the softkey under MENU. Scroll to
REGISTRATION
in the
SETTINGS
menu and
select the base station in the relevant submenu.
Note This submenu only appears if the handset is registered with more than one
base station.
Page 67

65
20402773en_ba_e0
PBX access
Compatibility
You can also connect your telephone to an ISDN private branch exchange.
The functionality is dependent on your PBX type. Contact your network operator
for further information.
Exchange Access Code EAC
You may need to enter an exchange access code (e.g. 0) to allow the public exchange to
assign an external line for external calls or for calling back numbers in the calls list.
Entering the EAC
Procedure:
1. Press the softkey under MENU. Scroll to
PBX
in the
SETTINGS
menu and press OK to
confirm.
2. Enter the exchange access code.
Note • After having programmed an exchange access code you do not have to
enter it again in a directory entry. However, if you dial off-hook or in call
preparation you still have to enter the exchange access code manually.
•To give the exchange sufficient time to assign a public line, you may need
to program a “pause” after the exchange access code by pressing and
holding down .
• For further information, refer to your PBX operating instructions.
Incoming EAC on/off
Some exchanges automatically insert the EAC. Make the necessary setting (on or off) in
the menu
PBX, FUNCTIONS
.
Page 68

66
20402773en_ba_e0
Maintenance
Reset
You can reset the telephone to default status as follows:
Procedure:
1. Press the softkey under MENU. Scroll to
MAINTENANCE
in the
SETTINGS
menu.
Press OK to confirm.
2. Select the handset or base station, press
RESET
and press OK to confirm. The default
settings are restored.
Note • A reset deletes all preferences and lists except the directory and your
personal outgoing messages.
• The messages on your answering machine
–are kept if no MSN is programmed,
–are deleted if you have programmed at least one MSN.
• After a reset, the installation assistant re-appears.
Faults and trouble-shooting
Not every malfunction results from a defect in your telephone. Sometimes you only need
to briefly interrupt the power supply on the base station (unplug the mains unit and plug
it in again) or remove and re-insert the batteries in the handset.
Important: Problems or faults can only be corrected if you take the complete device
(base station, handset and connector cable) to the sales outlet!
Page 69

67
20402773en_ba_e0
Important information
Approval and conformity
This DECT cordless ISDN telephone complies with the basic requirements contained in the
R&TTE Guidelines 99/5/EC and is suitable for connection and operation in the member
states indicated on the base station and/or packaging.
This device is designed for operation on the Swiss ISDN network.
The declaration of conformity may be viewed at:
www.swisscom.com under Online Shop, Telephones, Declarations of Conformity, or can
be ordered from the following address:
Swisscom Fixnet AG
Retail Business
Customer Premises Equipments (CPE)
3050 Berne
CE symbol
The telephone complies with the requirements of the following EU guidelines:
Directive 99/5/EC on radio equipment and telecommunications terminal
equipment and the mutual recognition of their conformity,
The CE symbol confirms the conformity of the telephone with the above
guidelines.
Page 70

68
20402773en_ba_e0
Important information
Guarantee
The guarantee period is 2 years from the date of purchase.
In the event of repairs under guarantee, the defective product must be accompanied by a
guarantee card completed and stamped by the sales outlet.
The guarantee does not cover damage resulting from inappropriate use, normal wear
and tear, or intervention by third parties. In addition, the guarantee does not cover material or defects which have only a minimal impact on the use or value of the telephone.
In the event of a fault, please contact your sales outlet.
Repairs/maintenance
Leased telephones
If your telephone is not functioning as it should, notify the fault service (Tel. 175).
Repairs* and fault reporting are free of charge.
Purchased telephones
Under the terms of the guarantee, repairs are carried out free of charge during the guarantee period. The guarantee does not cover damage to parts subject to wear and tear
(cable, printed labels, rechargeable battery etc.) or inappropriate handling (accidental
damage, exposure to liquids etc.). If a repair is required, the telephone must be returned
to the sales outlet.
If the field repair service is called out (also during the guarantee period*), a charge is
levied for the fault location procedure (travel expenses plus labour). Material costs are
payable outside the guarantee period.
* The guarantee does not cover damage resulting from inappropriate use, normal wear
and tear, or intervention by third parties.
Page 71

69
20402773en_ba_e0
Important information
Rechargeable batteries
Rechargeable batteries are classified as consumables and are therefore not included
under the terms of the guarantee. Defective batteries are not replaced free of charge.
This applies to leased and purchased telephones.
Help
For general questions on products, services etc., contact the Swisscom information desk
(freephone 0800 800 800).
Cleaning – when necessary
Clean the telephone with a slightly damp cloth or an antistatic cloth. Never use a dry
cloth. Avoid using other cleaning and abrasive agents.
Page 72

70
20402773en_ba_e0
Page 73

71
20402773en_ba_e0
Page 74

72
20402773en_ba_e0
Page 75

Page 76

dt 04.05 FX-RB-PS-CPE-PM SV 20402773en_ba_e0
 Loading...