

Page 1

Classic A21
ISDN
User Manual
Page 2

Safety precautions
This corded DECT telephone is designed for connection to the Swiss public ISDN network.
Any other use whatsoever is not permitted and is regarded as in violation of the provisions.
The user manual with safety precautions is a part of the product package and must be passed
on to the new owner on reselling.
Please note:
➭ Position the phone away from:
– heat sources,
– direct sun,
– other electrical equipment.
➭ Protect your telephone against dust and avoid getting it wet or exposing it to aggressive
liquids and steam.
➭ Do not plug the connection cord in sockets other than the one for which it is intended.
➭ Connect only authorised accessories.
➭ Clean the phone with a soft, damp cloth. Do not use abrasive cleaning agents or solvents.
➭ Do not position the telephone in bathrooms or showers.
➭ Do not touch open contacts!
Disposal
Please dispose of telephone and gift boxes in an ecological manner.
Do not dispose of them in domestic waste.
Page 3

1
20402856en_ba_a0
Contents
Safety precautions
Setting up the telephone……………………………………………………………………7
Contents of the package ……………………………………………………………………7
Location ………………………………………………………………………………………7
Connecting the telephone ……………………………………………………………………8
Connecting the handset …………………………………………………………………8
Connecting the telephone ………………………………………………………………9
Installation assistant ……………………………………………………………………………9
Write-on label ………………………………………………………………………………10
Multiple Subscriber Numbers (MSN) ………………………………………………………11
Changing users …………………………………………………………………………11
Your Classic A21
ISDN
is designed for connection to the Swiss public ISDN network.
Please read these operating instructions carefully to familiarise yourself with and take
full advantage of the benefits of your new Classic A21
ISDN
.
Keep this user manual in a safe place!
Note: These operating instructions describe the full range of functions provided by
the Classic A21
ISDN
. The functions and instructions described in this user manual may
differ or be limited by the characteristics of your network operator or provider.
For detailed information on the services available with your ISDN connection, contact
your network provider.
Page 4

2
20402856en_ba_a0
Contents
Getting to know your telephone ………………………………………………………12
Overview and operating elements …………………………………………………………12
Display symbols ………………………………………………………………………………14
About the menus ……………………………………………………………………………15
Menu navigation …………………………………………………………………………15
Back to previous menu …………………………………………………………………15
End menu …………………………………………………………………………………15
Telephoning …………………………………………………………………………………16
Call preparation ………………………………………………………………………………16
Accepting a call ………………………………………………………………………………16
Reject a call …………………………………………………………………………………16
Send DTMF/keypad information ……………………………………………………………16
Speed dialling …………………………………………………………………………………17
Handsfree/speakerphone ……………………………………………………………………17
Handsfree during a call …………………………………………………………………17
Listening by loudspeaker ……………………………………………………………………18
Handset volume ………………………………………………………………………………18
Telephone secrecy ……………………………………………………………………………18
Redial …………………………………………………………………………………………19
Redialling a number from the list ………………………………………………………19
Copying numbers from the redial list …………………………………………………19
Deleting individual entries/entire redial list ……………………………………………19
Sending SMS messages from the redial list* …………………………………………20
Keypad lock …………………………………………………………………………………20
Enquiries ………………………………………………………………………………………20
External enquiry call ……………………………………………………………………20
Brokering (switching between two calls) …………………………………………………21
Three-way conference ………………………………………………………………………21
* Function dependent on network operator.
Contact your network operator to find out whether this service is supported.
Page 5

3
20402856en_ba_a0
Contents
Directory………………………………………………………………………………………22
Directory entries ………………………………………………………………………………22
Adding a new entry ……………………………………………………………………22
Tips for entering names/numbers ………………………………………………………22
Editing entries ……………………………………………………………………………23
Deleting directory entries/entire directory ……………………………………………23
Dialling numbers from the directory ………………………………………………………23
Sending SMS messages from the directory* ………………………………………………23
ETV
®
Online …………………………………………………………………………………24
ETV
®
Online query ……………………………………………………………………………24
Saving ETV
®
information in your directory ……………………………………………24
Calls list* ……………………………………………………………………………………25
Viewing/dialling a number from the calls list ………………………………………………25
Sending SMS messages from the calls list* ………………………………………………25
Saving numbers from the calls list to the directory ………………………………………25
Deleting individual entries/entire calls list …………………………………………………26
Audio …………………………………………………………………………………………27
Ringer …………………………………………………………………………………………27
Beeps …………………………………………………………………………………………27
Key beeps …………………………………………………………………………………27
Confirmation beep ………………………………………………………………………27
Family …………………………………………………………………………………………28
Direct call (baby call) …………………………………………………………………………28
* Function dependent on network operator.
Contact your network operator to find out whether this service is supported.
Page 6

4
20402856en_ba_a0
Contents
Call costs ……………………………………………………………………………………29
Cost of last call ………………………………………………………………………………29
Total calls ……………………………………………………………………………………29
Settings ………………………………………………………………………………………29
Type of display ……………………………………………………………………………29
Charge factor ……………………………………………………………………………29
Currency …………………………………………………………………………………29
Calender/clock ………………………………………………………………………………30
Appointments ………………………………………………………………………………30
Alarm …………………………………………………………………………………………30
Time/date ……………………………………………………………………………………30
Network functions (supplementary services) …………………………………………31
Call forwarding ………………………………………………………………………………31
Unconditional ……………………………………………………………………………31
No reply …………………………………………………………………………………31
Busy ………………………………………………………………………………………31
Call anonymously (Identification restriction) ………………………………………………32
Conference assistant …………………………………………………………………………32
Parking ………………………………………………………………………………………32
Park/unpark ………………………………………………………………………………32
Park code …………………………………………………………………………………32
Recall …………………………………………………………………………………………33
Call back on busy (Completion of Calls to Busy Subscriber/CCBS) …………………33
Delete call back …………………………………………………………………………33
Malicious Call Identification (MCID) ………………………………………………………33
Call transfer …………………………………………………………………………………33
Combox ………………………………………………………………………………………34
Provider ………………………………………………………………………………………34
Page 7

5
20402856en_ba_a0
Contents
SMS ……………………………………………………………………………………………35
SMS – Short Messaging Service ……………………………………………………………35
Writing SMS messages ………………………………………………………………………35
Inbox …………………………………………………………………………………………36
Drafts …………………………………………………………………………………………36
Outbox ………………………………………………………………………………………36
Templates ……………………………………………………………………………………37
Settings ………………………………………………………………………………………37
SMS service centre ………………………………………………………………………37
Send service ………………………………………………………………………………37
SMS alert on/off …………………………………………………………………………37
Settings ………………………………………………………………………………………38
Language ……………………………………………………………………………………38
Display …………………………………………………………………………………………38
Contrast …………………………………………………………………………………38
Backlight …………………………………………………………………………………38
Telephony ……………………………………………………………………………………38
Automatic keypad ………………………………………………………………………38
Speed dial keys ………………………………………………………………………………39
Programming speed dial keys …………………………………………………………39
Changing a programmed speed dial key ………………………………………………39
System PIN ……………………………………………………………………………………39
PBX ……………………………………………………………………………………………40
MSN settings …………………………………………………………………………………40
Assigning an MSN ………………………………………………………………………40
PBX access ……………………………………………………………………………………41
Compatibility …………………………………………………………………………………41
Exchange Access Code EAC …………………………………………………………………41
Entering the EAC ………………………………………………………………………41
Page 8

6
20402856en_ba_a0
Contents
Functions ……………………………………………………………………………………42
Entering EAC on/off ……………………………………………………………………42
Automatic ECT …………………………………………………………………………42
Maintenance …………………………………………………………………………………43
Reset …………………………………………………………………………………………43
Faults and trouble-shooting …………………………………………………………………43
Software version and update ………………………………………………………………44
Software version …………………………………………………………………………44
Software update …………………………………………………………………………44
Emergency operation ………………………………………………………………………45
Emergency operation on network termination unit …………………………………45
Emergency operation on a PBX …………………………………………………………45
Important information ……………………………………………………………………46
Approval and conformity ……………………………………………………………………46
CE symbol ……………………………………………………………………………………46
Guarantee ……………………………………………………………………………………47
Repairs/maintenance …………………………………………………………………………47
Leased telephones ………………………………………………………………………47
Purchased telephones ……………………………………………………………………47
Help ……………………………………………………………………………………………48
Cleaning – when necessary …………………………………………………………………48
Write-on label ………………………………………………………………………………49
Page 9

7
20402856en_ba_a0
Contents of the package
Classic A21
ISDN
➭ 1 telephone Classic A21
ISDN
➭ 1 handset
➭ 1 handset spiral cord
➭ 1 telephone connection cord
➭ 1 user manual (three languages: German, French, Italian)
Location
Place the Classic A21
ISDN
on an even, dry surface within range of the connection socket.
If the selected position is too far from the connection socket, use an approved extension
cable which you can buy at any Swisscom shop or specialist outlet.
➭ Make sure the telephone connection cord is safely stowed to prevent accidents.
➭ Do not plug the connection cord in sockets other than the one for which it is intended.
➭ Do not expose the telephone to direct sunlight.
➭ Protect the telephone against moisture. Do not position the telephone in rooms
exposed to condensation, corrosive steam or excessive dust. Condensation can be
present in basements, garages, conservatories or sheds.
➭ The ambient temperature must be between 5 °C and 40 °C.
Position the telephone in a clean, dry and well-aired location. Choose a place which is
stable, level, and not subject to vibrations.
To avoid mutual interference, do not position the telephone in the immediate vicinity of
electronic equipment such as hi-fi systems, office equipment or microwave ovens. Avoid
positioning the telephone near heat sources such as heating elements or near obstacles.
Setting up the telephone
Page 10
8
20402856en_ba_a0
Setting up the telephone
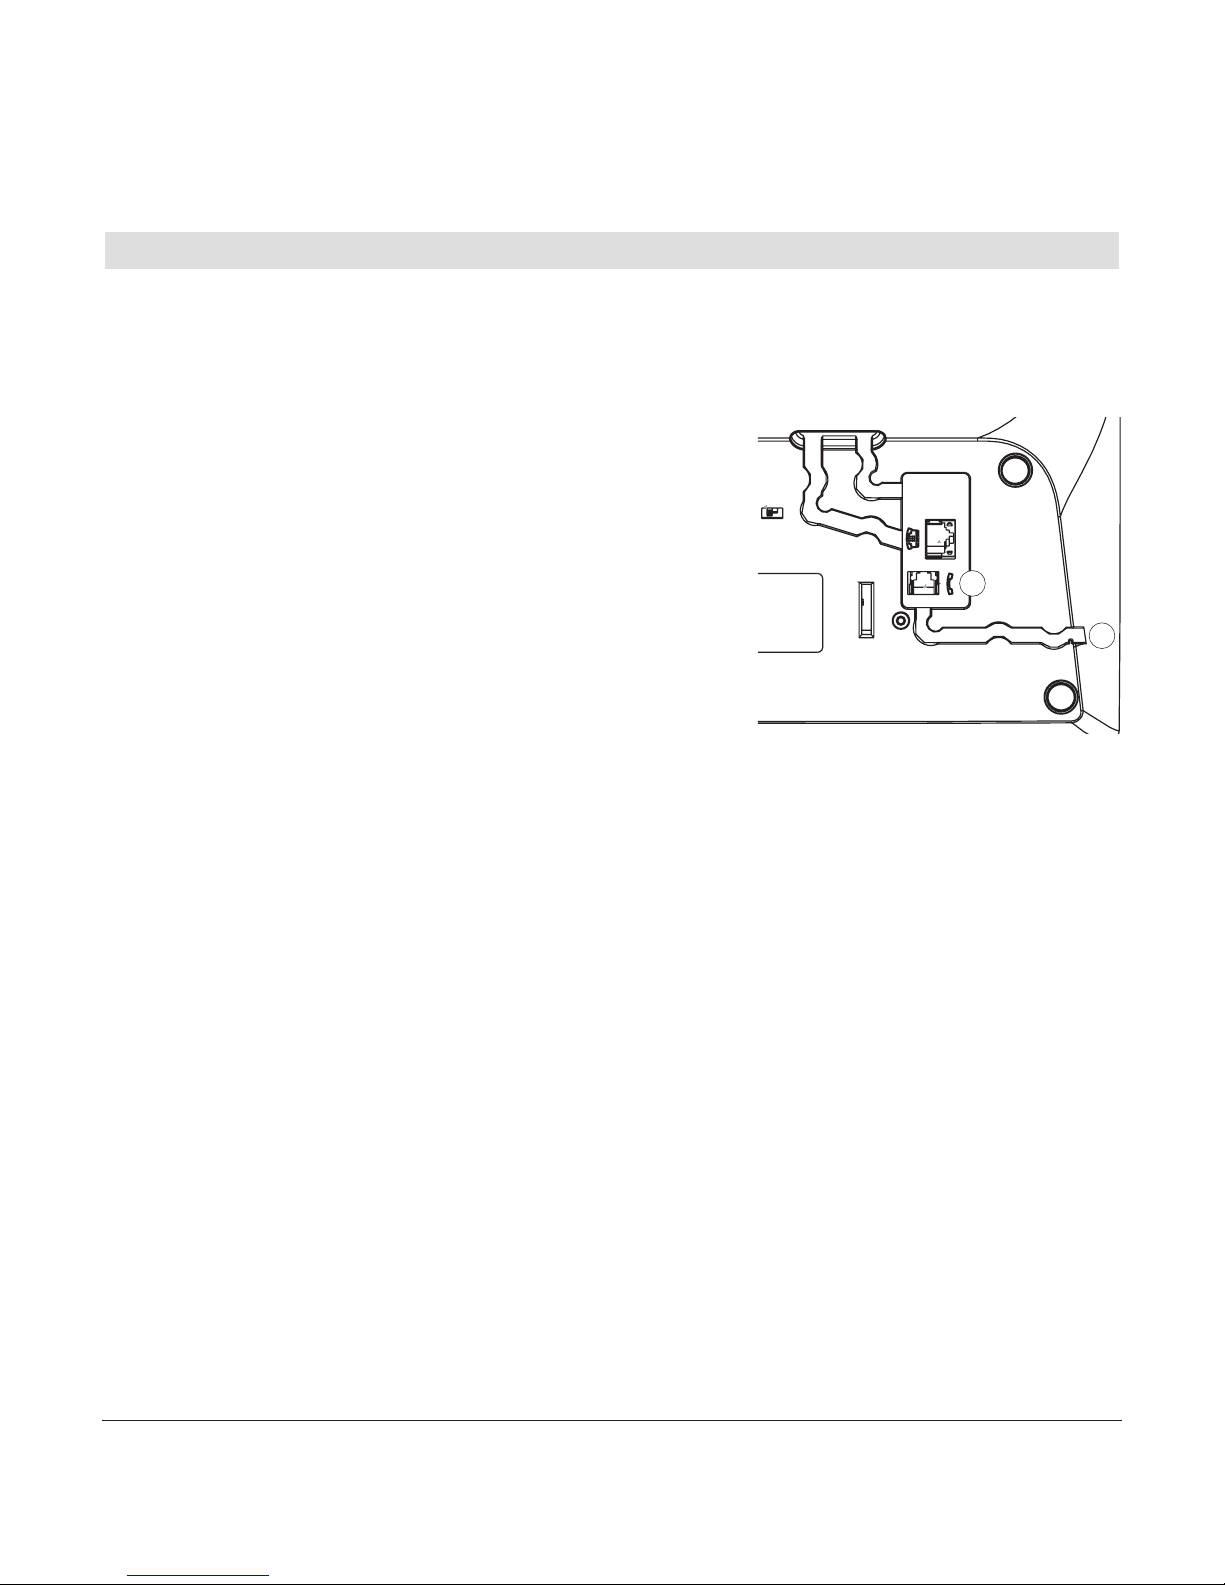
Connecting the telephone
The connection sockets for the handset and connection cord are located on the base of
the telephone. Connect the handset first, then plug the telephone in to the jack.
Connecting the handset
The connectors at both ends of the spiral cord are the
same size.
Plug the connector at the longer, straight end of the
cord into the socket on the telephone based ➀ marked
with the handset symbol.
Press the cable into the cable duct ➁. To do this, use a
flat, thin object to press the cord under the grips.
Plug the connector at the other end of the spiral cord into the socket on the handset.
2
1
Page 11
9
20402856en_ba_a0
Setting up the telephone
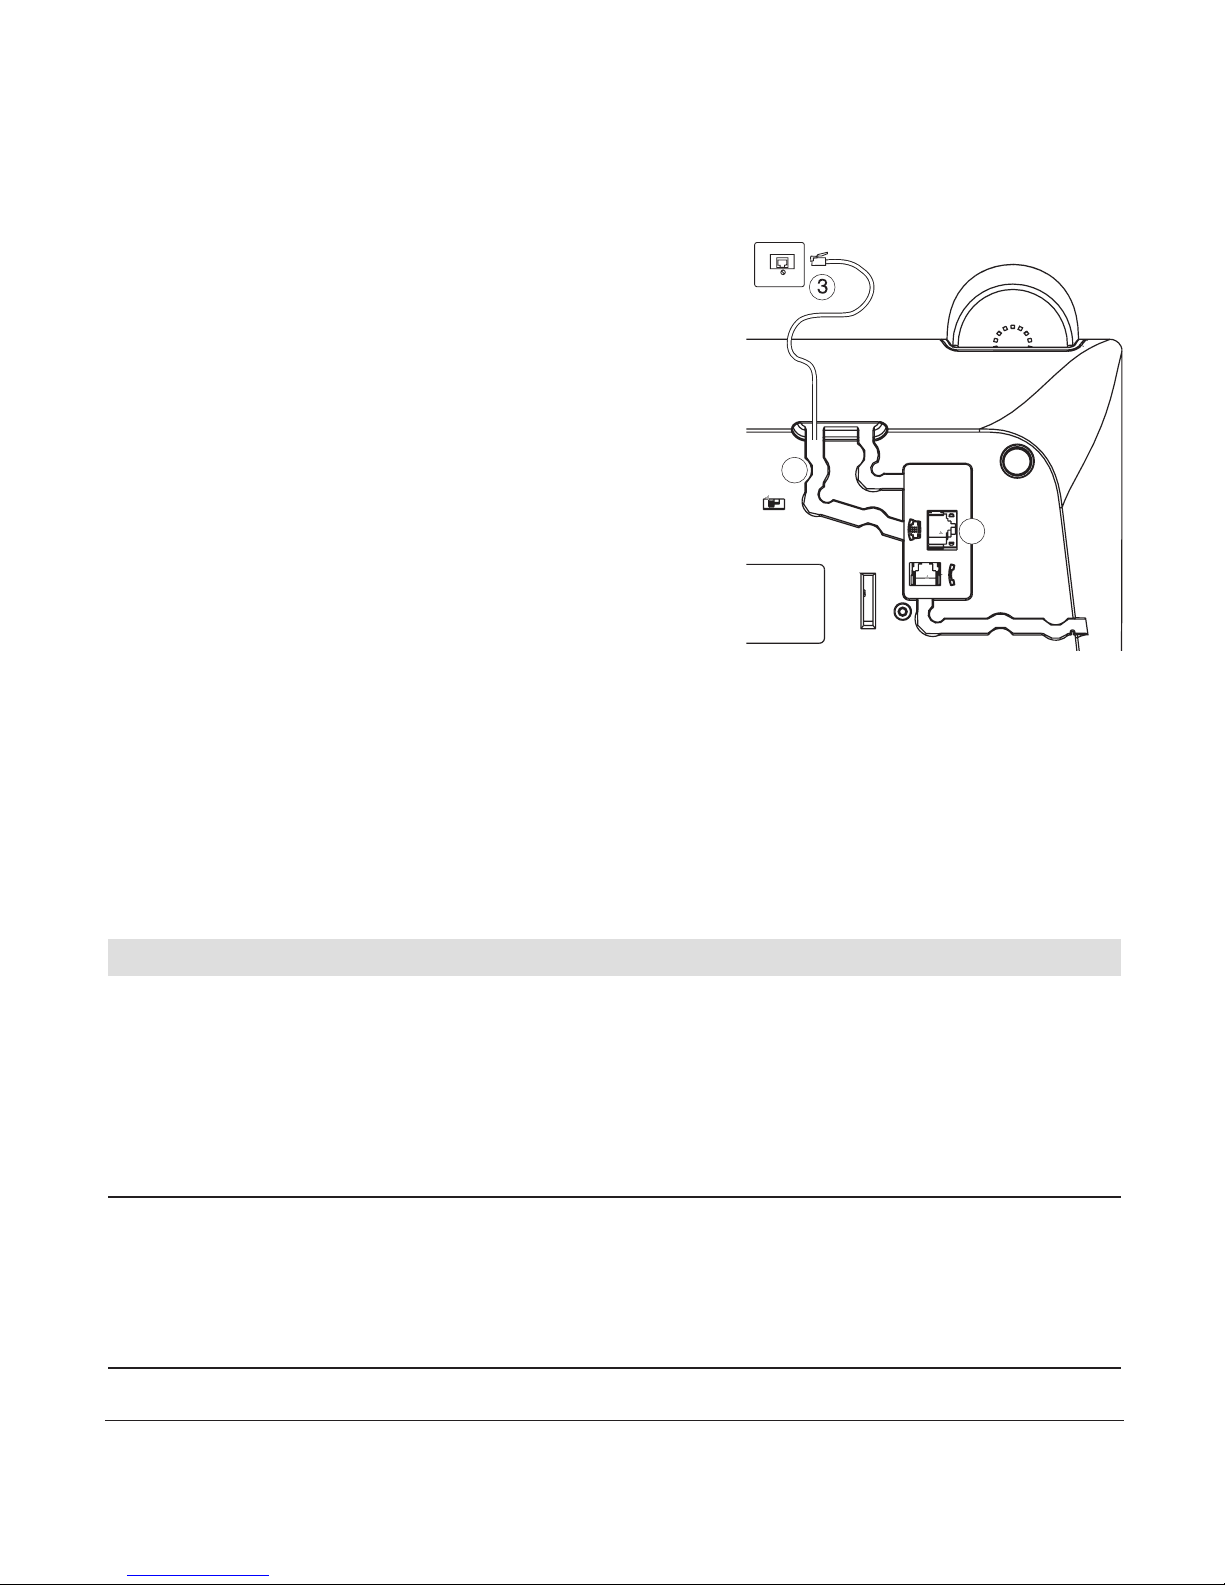
Connecting the telephone
Plug the smaller of the two connectors on the
telephone connection cord into the socket on the
telephone base ➀ marked with the telephone
symbol.
Press the cable into the cable duct ➁. To do this, use
a flat, thin object to press the cord under the grips.
Turn the telephone over again and set it on its feet.
Replace the handset.
Plug the larger connector at the other end of the
telephone connection cord into the wall socket ➂.
Lift the handset. You will hear the dialling tone. You can now telephone!
➭ Do not plug the connection cord in sockets other than the one for which it is intended.
➭ Make sure the telephone connection cord is safely stowed to prevent accidents.
Installation assistant
An installation assistant simplifies things for you by guiding you step by step through the
setup procedure for your telephone.
Follow the displayed instructions and enter the preferred language, all MSN numbers
along with user name, as well as time and date.
Note • The installation assistant will re-appear following a reset of the telephone
(reset to default settings).
•You can also enter the preferred language, MSNs, time and date in the
corresponding menus.
2
1
Page 12

10
20402856en_ba_a0
Setting up the telephone
Write-on label
The phone is delivered with the write-on label already
inserted.
The last page of this user manual contains additional
labels for the speed dial keys.
Cut a new label out whenever you need one.
Insert the cut-out label into the recess near the speed
dial keys ➀. If you already know which numbers are to
be assigned to these keys, you can complete the label
now.
Place the Perspex cover on the label field into the
recess ➁ and press lightly until it fits into position.
➭ If you want to add other numbers or do not know at startup which numbers you will
be using, you can easily remove the Perspex cover for subsequent modification.
Lift the cover by placing a fingernail under the notch at its edge. Add the number(s)
and replace the cover as described above.
2
1
Page 13

11
20402856en_ba_a0
Setting up the telephone
Multiple Subscriber Numbers (MSN)
When you ordered your ISDN connection, your network operator will have assigned you
several Multiple Subscriber Numbers (MSN). You can assign these numbers to different
devices or assign individual numbers to different users. Every MSN (user) can then define
individual settings for the number assigned to him or her.
Your telephone can manage up to 5 MSNs. To use all the functions, you must set up at
least one MSN with user name (see section on “Assigning an MSN”).
Changing users
To change users, press the softkey under MENU. Use to scroll to
CHANGE USER
and
select the relevant user. The current user is displayed. You can now access the activated
user’s call lists, charge displays and individual settings. To find out how to set preferences
for individual MSNs, refer to the section on “MSN settings”.
Note The
CHANGE USER
menu can only be accessed if more than one MSN has
been programmed.
Page 14
12
20402856en_ba_a0
Getting to know your telephone
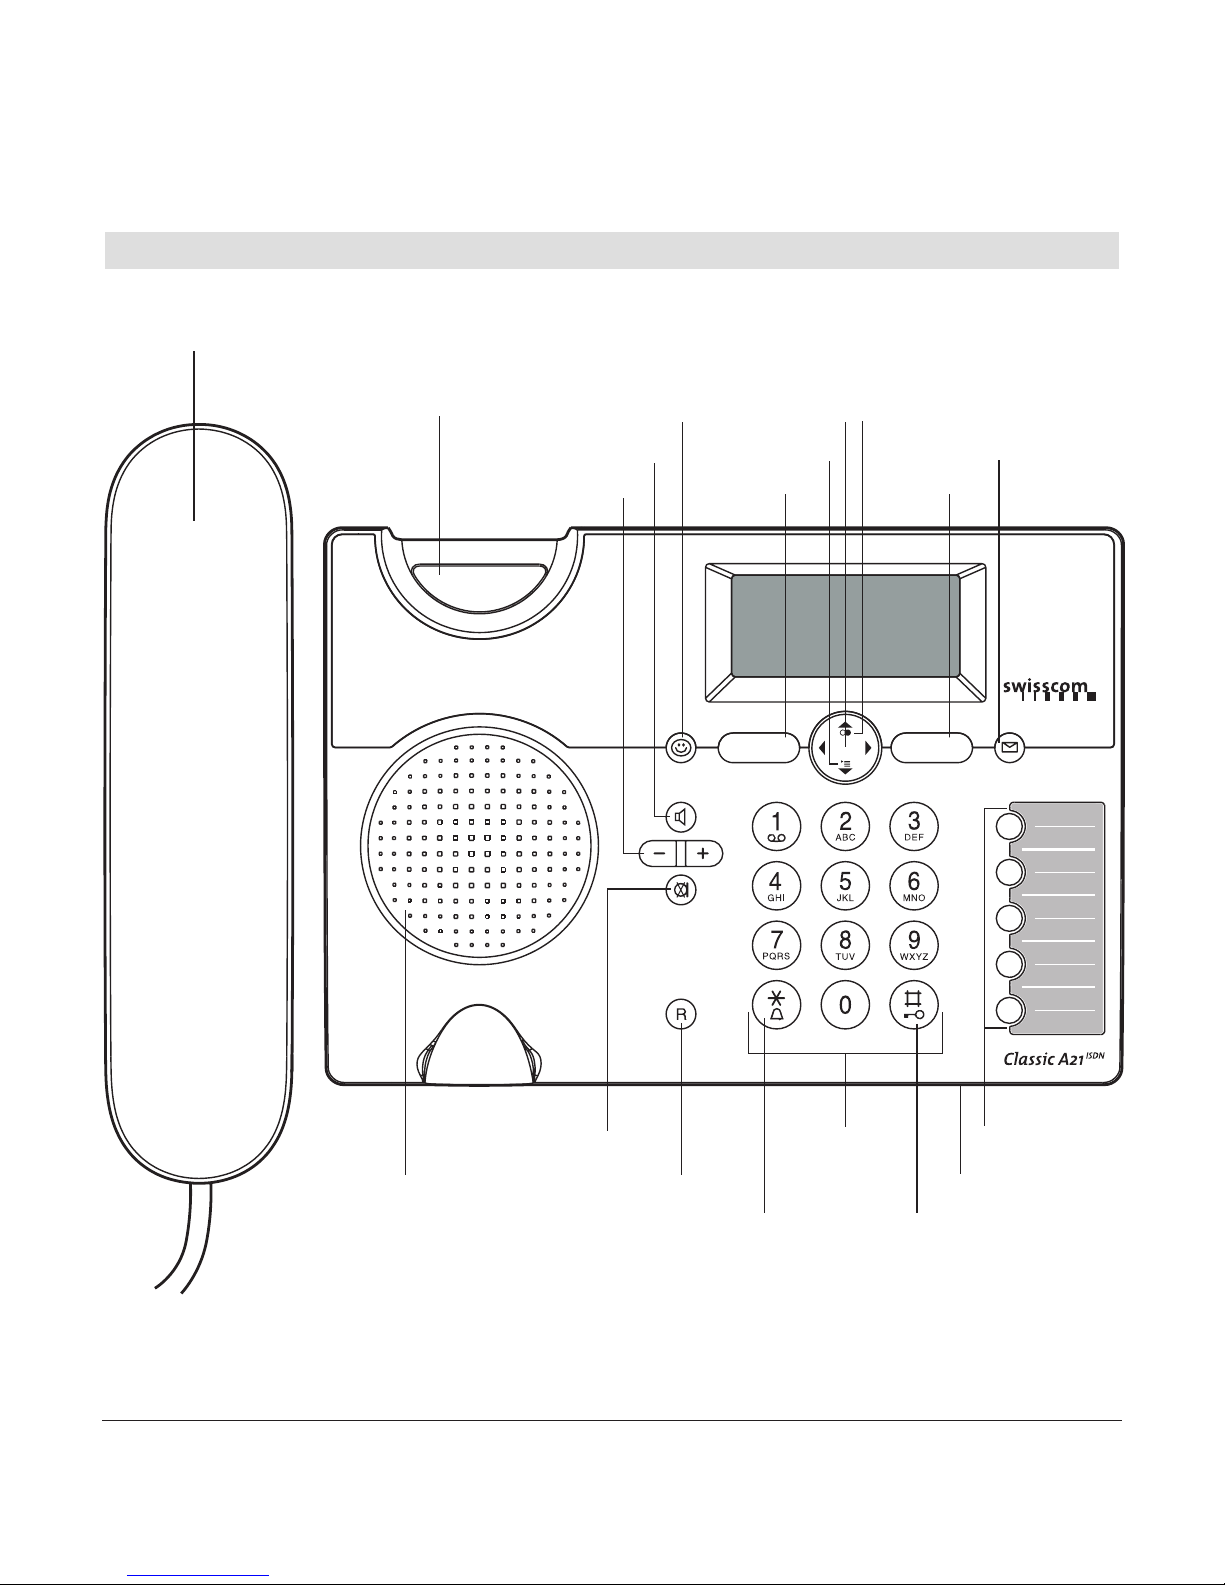
Overview and operating elements
Handset
Handset hook
Smiley key
Softkey
Calls list
Redial
Mute key Speed dial keys
Alphanumerical
keypad
Enquiry key
Loudspeaker
Minus/Plus key
Loudspeaker key
Softkey
Navigation key
Message key
Asterisk key/
Ringer on/off
Hash key/
Activating
the key lock
Speakerphone
Page 15

13
20402856en_ba_a0
Getting to know your telephone
Softkeys (multifunctional keys)
Right softkey: Choose menu options, confirm entries/settings.
Left softkey: return to previous menu step.
Navigation key For scrolling up/down or right/left
Redial Open redial list.
Opens calls list*.
Message key Access to new unanswered calls or new SMS messages.
Loudspeaker key Listening by loudspeaker: Activate loudspeaker
during a call for others in the room to listen in.
Minus/Plus key Loudspeaker volume up/down.
Mute key Deactivate microphone to ask a question in the room
without your partner hearing you.
Alphanumerical keypad For dialling telephone numbers. Letters
printed.
Press and hold down “0” when entering a telephone number to insert
a dialling pause between two digits.
Combox Press and hold down for direct access to network answer
machine messages.
Call back on busy Press and hold if called party is busy: Activate call
back on busy.
Call anonymously Press and hold down to suppress caller ID for next
call.
Park/ unpark Press and hold during call: Park. Press and hold in
standby mode: Unpark.
Asterisk key For entering asterisks. Press and hold down to switch
ringer on/off.
Hash key For entering the hash symbol. Press and hold down to
switch keylock on.
…
*Function dependent on network operator. CLIP is transferred in the Swisscom ISDN network.
Page 16
14
20402856en_ba_a0
Getting to know your telephone
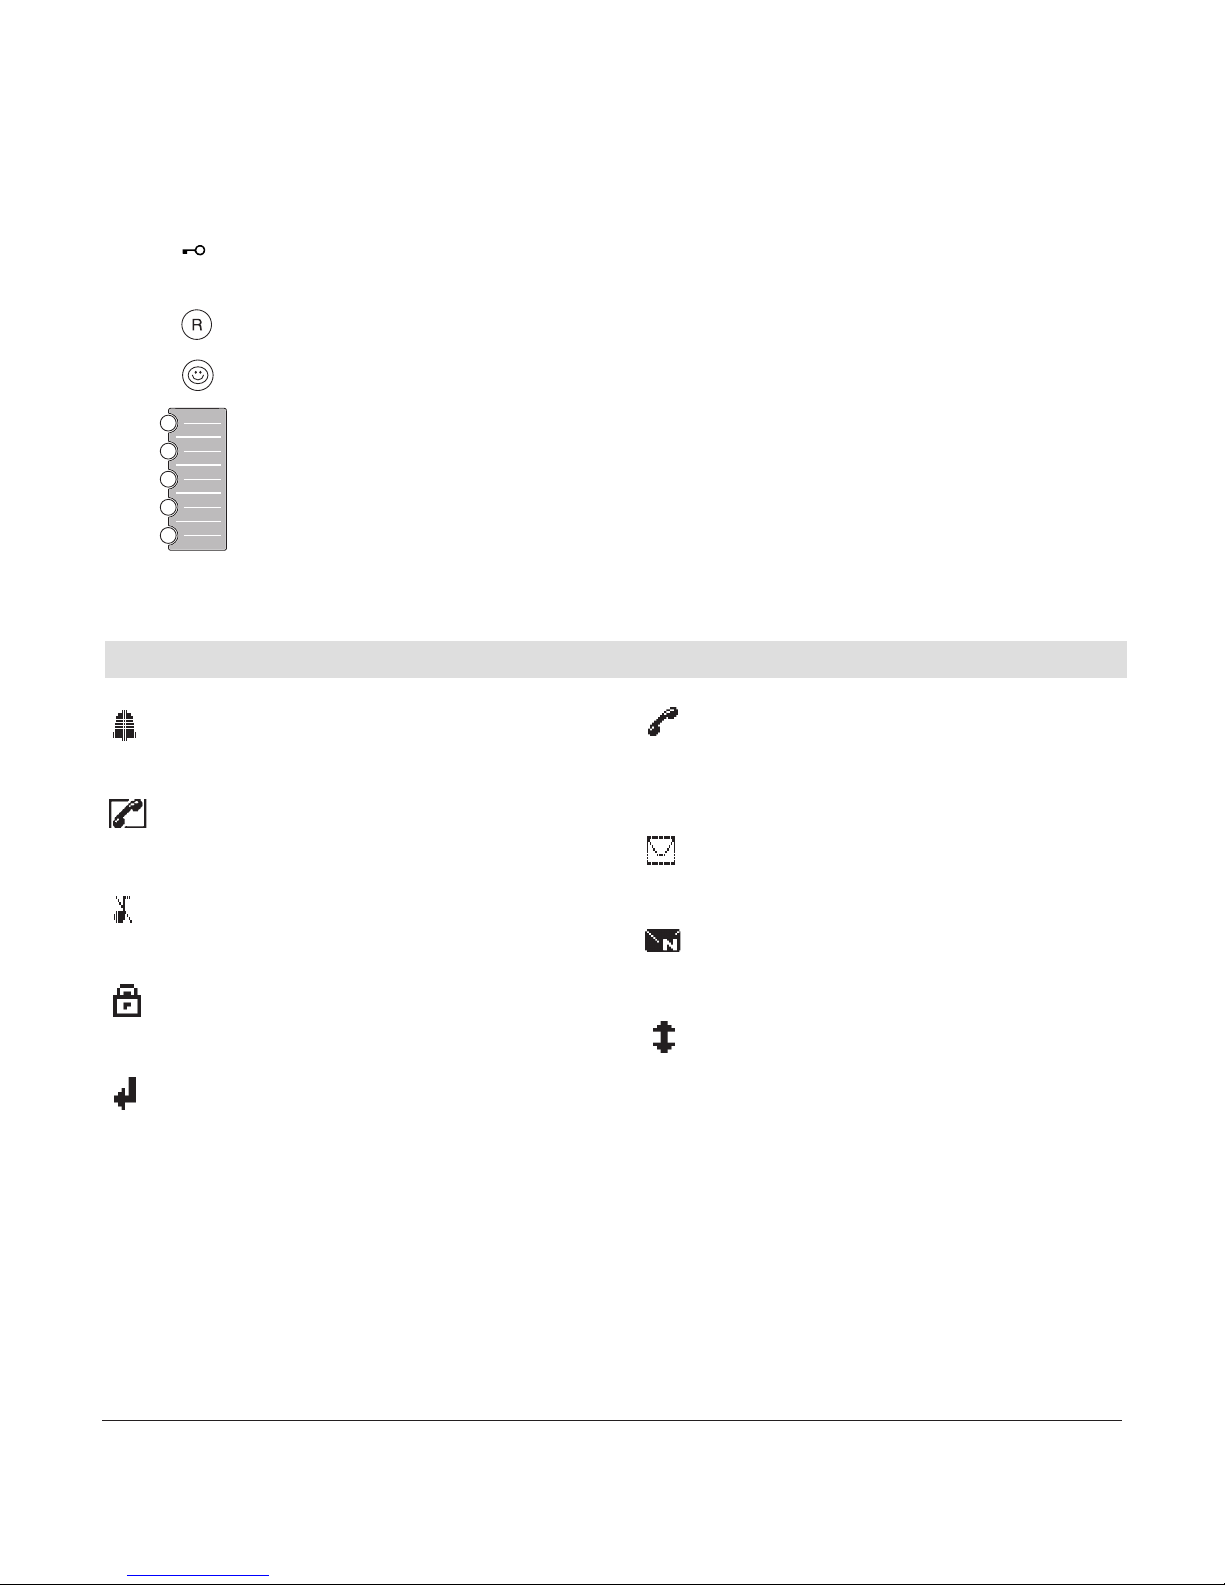
Display symbols
*Function dependent on network operator. CLIP is transferred in the Swisscom ISDN network.
Alarm set
Indicates that the alarm is set.
Active call
Indicates that a call is in progress.
Ringer off
Indicates that the ringer is switched off.
Keypad lock
Indicates that the keypad is locked.
Call forwarding activated
Indicates that call forwarding is activated.
Unanswered calls*
Displayed if you have unanswered calls in the
calls list.
You have new SMS messages*
Indicates that you have new SMS messages.
You have Combox messages
Displayed if you have new Combox messages.
Recall
Offers you the option of “call back on busy”.
Keypad locked A locked keypad prevents numbers being dialled
inadvertently.
Enquiry key with flash function.
Smiley key Open ETV
®
Online.
5 Speed dial keys (dual-programmable).
Page 17

15
20402856en_ba_a0
Getting to know your telephone
About the menus
Menu navigation
Your handset provides you with an easy-to-follow menu. As a rule, every menu offers
a list of options. To select main menu, sub-menu and options, press the softkey below
the corresponding display text.
Press the softkey under MENU to open the main menu and use the navigation key to
scroll to the option you are seeking. Press OK to open the options list, use the
navigation key to scroll down the list to the preferred option, and confirm the option
by pressing OK.
Back to previous menu
Press BACK to return to the previous menu.
End menu
To exit a menu, press the softkey under BACK. If you want to return to standby mode,
press BACK again.
Page 18

16
20402856en_ba_a0
Call preparation
First, enter the number. If you enter an incorrect number, you can delete the entry.
Lift the handset to dial the number.
Accepting a call
The caller's number or name (if stored in the directory) are displayed only if your network
operator supports caller line ID (Caller Line ID Presentation/CLIP*).
Lift the handset to accept the call.
Reject a call
You can reject an incoming call. Press the softkey under OPTION, REJECT, the caller is
rejected.
Send DTMF/ keypad information
By switching to temporary DTMF you can press the softkey under OPTION, DTMF to
send control signals, e.g. for the Combox, during a call.
Note If you have activated “Autom. DTMF” in the
SETTINGS, TELEPHONY
menu,
there is no need to switch to temporary DTMF. Temporary DTMF is automatically deactivated when you end the call.
* Function dependent on network operator.
CLIP is transferred in the Swisscom ISDN network.
Telephoning
Page 19

17
20402856en_ba_a0
Telephoning
Speed dialling
Your telephone offers the option of dialling frequently used numbers by simply pressing a
speed dial key. There are 5 keys available for this purpose. Each can be programmed
twice to give a total of 10 numbers.
The numbers stored under speed dial keys are available to all users.
For speed dialling, the relevant speed dial key must be programmed with a telephone
number.
Press the speed dial key .
Lift the handset. The telephone automatically dials the number. Wait for the connection
and make your call.
Note • Press the speed dial key once to display the first stored telephone number.
Press the speed dial key twice to display the second stored number.
•To programm speed dial keys, see chapter “Settings / Speed dial keys”.
Handsfree/speakerphone
You can conduct calls with the handset on-hook and allow others present in the room to
take part in the call.
Your phone rings to indicate an incoming call: Press to accept the call and conduct
the call over the loudspeaker. Press again to terminate the call.
Handsfree during a call
Press and hold down during an active call. Replace the handset and release the loudspeaker key now. Press again to terminate the call.
Page 20

Telephoning
18
20402856en_ba_a0
Listening by loudspeaker
Unlike handsfree, others present in the room can listen in the call, your caller however
only hears what is said through the handset (not what is said in the room).
You are talking on the handset and want others in the room to listen in.
Press to activate the loudspeaker.
Press again to deactivate the loudspeaker.
Replace the handset to terminate the call.
Handset volume
You can adjust the handset loudspeaker volume in 5 steps. Press during a call to
adjust the volume. The selected setting is saved after the end of the call.
Telephone secrecy
During a call you can talk to someone else in the room without the caller hearing.
1. Press during a call. This switches handset secrecy on and your caller cannot hear
you.
2. Press to return to the call.
Page 21

19
20402856en_ba_a0
Telephoning
Redial
The 15 last-dialled numbers are saved in a redial list. If a name and number are already
stored in the directory, the name is shown instead of the number.
Redialling a number from the list
Press to open the redial list and press to scroll through the list. Lift the handset as
soon as you have reached the number you are seeking.
Note If the redial list is empty, a message to this effect appears.
Copying numbers from the redial list
You can copy a number from the redial list to the directory.
Press to open the redial list. Use to scroll through the list to find the number you
are seeking, and press the softkey under OPTION. Enter the name and number and define
your individual settings. Assign the entry to the relevant user and save.
Note If the number is already in the directory, the Save function is not displayed.
Deleting individual entries/entire redial list
Press to open the redial list. Scroll through until you reach the entry you are seeking.
Press the softkey under OPTION and delete the entry or the entire list.
Page 22

20
20402856en_ba_a0
Telephoning
Sending SMS messages from the redial list*
1. Press the softkey under . Use to scroll through the list to find the entry you are
seeking, and press the softkey under OPTION.
2. Write and send your SMS message.
Keypad lock
1. Press and hold down . The display shows
LOCKED
.
2. To unlock the keypad, press the softkey under UNLOCK then press .
Note If the keypad is locked,
• you can dial the emergency numbers 112, 117, 118, 144 (in call
preparation only) and incoming calls can still be accepted.
• you cannot dial a number or access menus.
Enquiries
External enquiry call
Procedure:
1. You are conducting a call and want to call another external party without ending the
active external call.
2. Press the enquiry key to start the external enquiry.
* Function dependent on network operator.
Contact your network operator to find out whether this service is supported.
Page 23

21
20402856en_ba_a0
Telephoning
Brokering (switching between two calls)
You have two active calls (one is hold), one of which is on hold. You can switch between
the two by brokering.
1. You are conducting two calls, one of which is on hold.
2. Press the softkey under OPTION, BROKERING to switch between the call partners.
3. Press the softkey under END, to end one of the calls. The remaining call partners are
automatically connected with each other.
Note You can connect all call partners together by pressing the softkey under
OPTION, JOIN.
Three-way conference
You can use the conference assistant to set up a three-way conference with 2 external
call parties.
1. Scroll to
NET FUNCTIONS, CONFERENCE ASSISTANT
and press OK to confirm.
2. Dial the number of the call partner or search for it in the directory. Once the connection
is set up, tell the call partner that you are setting up a three-way conference call.
The call partner is put on hold.
3. Dial the number of the second call partner or search for it in the directory.
The three-way conference call is activated as soon as the second call partner accepts
the call.
Note If the second call partner does not answer, you can return to the first call
partner by pressing the softkey under END.
Page 24

22
20402856en_ba_a0
Directory
You can store up to 100 names and numbers in the directory. Every entry contains
a name and telephone number. Names can be up to 16 letters long and numbers up
to 24 digits long.
Directory entries
Adding a new entry
If the telephone is in standby mode:
1. Press the softkey under DIRECTORY. All entries are displayed in alphabetical order.
2. Press the softkey under OPTION. Enter the new name and number and define your
individual settings. Assign the entry to the relevant user and save.
Note If the directory is empty, a message to this effect is displayed.
Tips for entering names/numbers
•Press to insert a space, or to enter a symbol.
• The available special characters appear in the lower display line. Press the relevant key
to scroll through the characters.
• When entering names, you can press to switch between upper and lower case
lettering.
Page 25

23
20402856en_ba_a0
Directory
Editing entries
1. Press the softkey under DIRECTORY. Use to scroll through the list to find the entry
you are seeking, and press the softkey under OPTION.
2. Edit the name and/or number and save the entry.
Deleting directory entries/entire directory
You can delete individual entries or the entire directory.
1. Press the softkey under DIRECTORY. Use to scroll through the list to find the entry
you are seeking, and press the softkey under OPTION.
2. Delete the entry or the entire list.
Dialling numbers from the directory
1. Press the softkey under DIRECTORY. All entries are displayed in alphabetical order.
2. Use to scroll through the directory, select the entry you are seeking and lift the
handset. The number is displayed and dialled.
You can also search by name by entering the first letter of the name.
Sending SMS messages from the directory*
1. Press the softkey under DIRECTORY. Use to scroll through the list to find the entry
you are seeking, and press the softkey under OPTION.
2. Write and send your SMS message.
* Function dependent on network operator.
Contact your network operator to find out whether this service is supported.
Page 26

24
20402856en_ba_a0
ETV®Online
ETV®Online query
ETV
®
Online is a service which gives you direct access to the Swisscom electronic directory
(ETV
®
= Elektronisches Teilnehmer-Verzeichnis, Swisscom Directories AG). As soon as an
unknown number appears on your display, you can press to access the ETV
®
and
within a few seconds obtain the caller’s name and address.
You can call up the ETV
®
directly:
– while the phone is ringing (incoming call)
– during a call
– when entering a number with handset on-hook (call preparation)
You can also consult the ETV
®
while in the following lists:
– Calls lists (answered/unanswered)
– Redial list
Note • ETV®queries are subject to a charge.
•The ETV
®
Online access number is pre-installed. If you need to change the
access number*, you can reprogram it in the
NET FUNCTIONS, ETV®-Online
menu.
Saving ETV®information in your directory
Once you have obtained the information from the ETV
®
, you have the option of directly
saving the number and name to your directory (press the softkey under SAVE).
*Your telephone is delivered with the Swisscom access number, 081 286 61 30,
preprogrammed.
Page 27

25
20402856en_ba_a0
Calls list*
If your network operator supports caller line ID* (CLIP), the caller's number (unless withheld) is displayed before you accept the call.
If you have received new calls, a message to this effect appears in the display. A list is
kept of answered and unanswered calls.
The calls list can hold up to 30 entries. If the list is full, the oldest entry is overwritten by
the most recent entry.
Note If the calls list is empty, a message to this effect is displayed.
Viewing/dialling a number from the calls list
Press to open the calls list. Press to scroll through the list. Lift the handset to dial
the number.
Sending SMS messages from the calls list*
1. Press to open the calls list. Use to scroll through the list to find the entry you are
seeking, and press the softkey under OPTION.
2. Write and send your SMS message.
* Function dependent on network operator.
CLIP is transferred in the Swisscom ISDN network.
Page 28

26
20402856en_ba_a0
Saving numbers from the calls list to the directory
1. Press . Scroll through until you reach the entry you are seeking.
2. Press the softkey under OPTION,
SAVE NUMBER
. Enter the name for the associated
number and define your individual settings. Assign the entry to the relevant user and
save.
Deleting individual entries/entire calls list
1. Press . Scroll through until you reach the entry you are seeking.
2. Press the softkey under OPTION and delete the entry or the entire list.
Calls list*
* Function dependent on network operator.
CLIP is transferred in the Swisscom ISDN network.
Page 29

27
20402856en_ba_a0
Procedure:
1. Press the softkey under MENU. Press to scroll to
AUDIO
ad press OK to confirm.
2. Scroll to the relevant submenu and make the relevant settings:
Ringer
You can programme different ringer melodies for each MSN. Choose from 10 standard
ringer melodies.
Set the preferred ringer melodies and associated volume. You can also set an ascending
volume.
Beeps
Your telephone supports various tones which you can activate or deactivate:
Key beeps
Every time a key is pressed, a brief beep is heard.
Confirmation beep
Settings and entries are confirmed by a short beep.
Audio
Page 30

28
20402856en_ba_a0
Family
Direct call (baby call)
If you activate direct call on your telephone, the telephone dials a preprogrammed
number when any key is pressed. “Direct call” can be very useful, especially for parents
with young children. If the parents are not at home, the children can reach their parents
(or neighbour) simply by pressing any key on the telephone. The direct call number must
be preprogrammed by the parents beforehand.
Note You must deactivate the direct call function to restore your telephone’s
normal functions.
Procedure:
1. Press the softkey under MENU. Press to scroll to
FAMILY
and press OK to confirm.
2. Scroll to the relevant submenu and make the relevant settings:
Page 31

29
20402856en_ba_a0
Call costs
Procedure:
1. Press the softkey under MENU. Press to scroll to
CHARGES
and press OK to confirm.
2. Scroll to the relevant submenu and make the relevant settings:
Cost of last call
You can display the cost of the last call as well as call charges per MSN.
Total calls
You can display the total for all MSNs (total charges).
Settings
Type of display
You can display the cost or duration of a call. The following settings must be made before
you can display costs:
Charge factor
The factor for the Swisscom ISDN network is FR. 0.10. This factor is automatically transmitted for every outgoing call.
Currency
To display costs accurately, you may need to set the currency (Switzerland: FR.).
Note • Note that for technical reasons the displayed charges may differ from the
amount billed. The amount indicated on your phone bill is binding.
•If you are using a provider, charge information may not be available.
Page 32

30
20402856en_ba_a0
Calender/clock
Procedure:
1. Press the softkey under MENU. Press to scroll to
CALENDAR/CLOCK
and press OK
to confirm.
2. Scroll to the relevant submenu and make the relevant settings:
Appointments
Your telephone also acts as an appointments reminder: You can set 5 different appointment reminders. A signal is heard on the telephone at the defined time.
Alarm
To set the alarm, you need to activate the alarm function and enter the time and preferred alarm melody. You can choose from 10 standard alarm melodies.
Time/date
The time and date are automatically set when an outgoing call is made.
Note • If the power supply is cut, the settings are lost and must be reprogrammed.
•You can also set the time format (12/24 hours).
Page 33

31
20402856en_ba_a0
Network functions (supplementary services)
Network functions are dependent on your network operator. Find out about availability
and charges, if applicable.
Procedure:
1. Press the softkey under MENU. Press to scroll to
NET FUNCTIONS
and press OK to
confirm.
2. Scroll to the relevant submenu and make the relevant settings:
Call forwarding
Call forwarding allows callers to reach you even if you are not near your own telephone.
Activate call forwarding for each MSN and choose one of the three following options:
Unconditional
Incoming calls are forwarded immediately.
No reply
Incoming calls are forwarded after a delay (fixed time or number of rings).
Busy
Calls are forwarded if the line is busy.
Once you have defined the call forwarding option, enter the forwarding number (i.e. the
number to which calls are to be forwarded).
At any time you can:
• check the call forwarding status
• edit or delete the forwarding number
• deactivate call forwarding.
Page 34

32
20402856en_ba_a0
Network functions (supplementary services)
Call anonymously (Identification restriction)
When you call someone, your number is shown on the other person's phone if it supports this function.
You can program your MSN so that your calling line ID is suppressed (see section on
“MSN settings”). “Anonymous call” for the next call only can also be activated in the
relevant menu or by pressing and holding down the key . “Anonymous call” can
also be assigned to a directory entry.
Conference assistant
See section on “Three-way conference”.
Parking
Park/unpark
You can park an external call for 3 minutes and retrieve it on another telephone with the
same connection.
Press and hold during the call: Park.
Press and hold in standby mode: Unpark.
Park code
Your telephone is delivered with the park code preset to 1. You can change the park
code in the relevant menu. Press SAVE to confirm. The park code is used to clearly
identify the parked connection, and must be entered when unparking.
Page 35

33
20402856en_ba_a0
Network functions (supplementary services)
Recall
This service is dependent on your network operator.
Call back on busy (Completion of Calls to Busy Subscriber/ CCBS)
If a number you have dialled is busy, you can activate call back by pressing the softkey
under CCBS or by pressing and holding down (the acitvated call back is signalled in
the display with ). If call back on busy is activated, a special signal is heard as soon as
the called party has replaced the receiver i.e. as soon as his or her line becomes free.
Delete call back
An activated callback can be deactivated (= deleted) in the relevant menu.
Malicious Call Identification (MCID)
This service is available from Swisscom on request. Once Swisscom has activated the service, malicious calls are registered during the call and up to 20 seconds after the receiver
is replaced. The exchange registers the calling number, date and time, even if the caller
has withheld his or her number.
Call transfer
You can transfer an incoming call to another telephone directly by pressing the softkey
under OPTION, CD.
Page 36

34
20402856en_ba_a0
Network functions (supplementary services)
Combox
Swisscom offers the option of setting up a network answer machine (Combox).
Check whether this network function is available, the associated charges (if applicable)
and the functions provided by this service.
is displayed to alert you to new messages. To access new messages quickly and
simply, press and hold down for around 2 seconds to automatically dial the access
number of your network answer machine.
Note • You can edit the network answer machine access number (Voicebox) in the
submenu
COMBOX, SETTINGS
.
•To use the network answer machine, you need to send certain codes to the
network. Ask your network operator for details.
Provider
You can also make calls over another provider.
Under
PROVIDER LIST
, enter the names and prefixes of the providers (max. 5) to whose
service you have subscribed. You can link every directory entry to one of the providers in
this list.
If you want to make all calls over a single provider, scroll to
DEFAULT PROVIDER
in the
submenu
SETTINGS
and enter the relevant provider's prefix. The default provider prefix is
then automatically inserted before every number you call from lists (even if you have not
saved a provider prefix in the directory entries).
Note The default provider prefix is only inserted automatically if you dial from a list
(directory, calls list, redial).
Page 37

35
20402856en_ba_a0
SMS
SMS – Short Messaging Service
Sending and receiving SMS messages is a network function. To send and receive SMS
messages, your telephone line must have active Caller Identification Presentation (CLIP)
and Connected Line Presentation (COLP)*. Check with your network operator to find out
whether the SMS network function is available and about charges, if applicable.
Your telephone supports SMS messages up to 160 characters in length. You can save up
to 25 SMS messages in your lists.
Note • Find out from your network operator whether you need to send an SMS
message to subscribe to or unsubscribe from the SMS service.
•To be able to send SMS messages, your number must not be withheld.
•To be able to write SMS messages, your telephone must not be connected
to a private branch exchange.
Procedure:
1. Press the softkey under MENU. Press to scroll to
SMS
and press OK to confirm.
2. Scroll to the relevant submenu and make the relevant settings:
Writing SMS messages
Write your message. Refer to the chapter on “Directory entries” for tips on writing.
You can also use symbols and templates in the menu
SMS, WRITE MESSAGE
.
* Function dependent on network operator.
Contact your network operator to find out whether this service is supported.
Page 38

36
20402856en_ba_a0
SMS
Inbox
New SMS messages are signalled in the display by and saved in the inbox. Press the
softkey under INBOX to read new SMS messages. Or BACK, to read SMS messages later.
Once you have read the SMS messages, you can answer, forward, save or delete them or
call the sender.
Note If you have no SMS messages in your inbox, a message to this effect is dis-
played.
Drafts
You can create and save a draft SMS for subsequent sending, and edit and send it whenever you wish.
Outbox
Sent SMS messages are automatically saved in your outbox. You can edit and forward
SMS messages in the outbox or call the recipient.
Note • You can accept calls while writing an SMS.
• If the SMS is not transmitted, a message to this effect is displayed and the
SMS is saved in the outbox. You can delete the unsent SMS message to
return to standby mode, or select "read" to open the SMS message and
re-send it.
Page 39

37
20402856en_ba_a0
SMS
Templates
To simplify writing SMS messages, you can create up to 5 templates. You can edit and
delete these templates or create a new SMS message template.
Settings
SMS service centre
Before you can send and receive SMS messages, an SMS service centre must be programmed with the associated access number*. Your phone is delivered with this number
preset. Ask your network operator for details of these service numbers.
Send service
Select which service centre you want to use for sending SMS messages.
SMS alert on/off
If activated, a brief beep is heard every time a new SMS message is received.
*Your telephone is delivered with the Swisscom access number, 081 286 61 30,
preprogrammed.
Page 40

38
20402856en_ba_a0
Settings
Language
Procedure:
1. Press the softkey under MENU. Press to scroll to
LANGUAGE
in the
SETTINGS
menu
and press OK to confirm.
2. Set the preferred display language. Display texts will appear in the set language.
Display
Procedure:
1. Press the softkey under MENU. Press to scroll to
DISPLAY
in the
SETTINGS
menu
and press OK to confirm.
2. Scroll to the relevant submenu and make the following display settings:
Contrast
To optimise legibility, you can adjust the display contrast.
Backlight
You can activate or deactivate backlighting for the display.
Telephony
Automatic keypad
If the asterisk or hash key is pressed before dialling, the telephone automatically switches
to “keypad signalling” (default setting: on). In some PBXs e.g. those in which automatic
EAC selection is activated, you need to deactivate automatic keypad sending to initate
internal calls by pressing the asterisk key.
Page 41

39
20402856en_ba_a0
Settings
Speed dial keys
Programming speed dial keys
Press the relevant speed dial key once to enter a telephone number on the first level.
Press twice to enter a number on the second level.
Enter name and number and define your individual settings. Assign the entry to the relevant user and save.
Changing a programmed speed dial key
Press the softkey under MENU. Scroll to
SPEED DIAL KEYS
in the
SETTINGS
menu and
press OK to confirm. Change the relevant speed dial entry and save the entry.
Note Your telephone is delivered with none of the speed dial keys preprogrammed.
System PIN
Procedure:
1. Press the softkey under MENU. Press to scroll to
SYSTEM PIN
In the
SETTINGS
menu and press OK to confirm.
2. Change the existing system PIN as required.
Note • We recommend that you change the system PIN to protect your telephone
against unauthorised access.
• Attention: Please take good note of your new system PIN! If you forget it,
Swisscom will need to intervene and will charge you for this service.
Page 42

40
20402856en_ba_a0
Settings
PBX
See “PBX access”.
MSN settings
Assigning an MSN
Your telephone can manage up to 5 Multiple Subscriber Numbers (MSN). You must have
at least one MSN programmed in order to use your telephone.
1. Press the softkey under MENU. Press to scroll to
SETTINGS
and press OK to confirm.
2. Select the relevant MSN in the menu
MSN SETTINGS
. Program the MSNs and associated
user names, and activate/deactivate the functions “Anonymous call” and “Call waiting”.
If you are already on the telephone, the “Call waiting” function emits an acoustic signal
to alert you to an incoming call.
Note • You can also use the installation assistant to set up your MSNs and define
the associated settings.
• The MSNs must be programmed without a prefix (e.g. 031).
Page 43

41
20402856en_ba_a0
PBX access
Compatibility
You can also connect your telephone to an ISDN private branch exchange.
The functionality is dependent on your PBX type. Contact your network operator
for further information.
Exchange Access Code EAC
You may need to enter an exchange access code (e.g. 0) to allow the public exchange to
assign an external line for external calls or for calling back numbers in the calls list.
Entering the EAC
Procedure:
1. Press the softkey under MENU. Scroll to
PBX,ACCESS CODE
in the
SETTINGS
menu
and press OK to confirm.
2. Enter the exchange access code.
Note • After having programmed an exchange access code you do not have to
enter it again in a directory entry. However, if you dial off-hook or in call
preparation you still have to enter the exchange access code manually.
•To give the exchange sufficient time to assign a public line, you may need
to program a “pause” after the exchange access code by pressing and
holding down .
• For further information, refer to your PBX operating instructions.
Page 44

42
20402856en_ba_a0
PBX access
Functions
Entering EAC on/off
If the EAC automatically is set for connected line presentation, you have to activate this
function to be able to call back from the calls list directly. Make the relevant settings
(on or off) in the
PBX, FUNCTIONS
menu.
Automatic ECT
To transfer calls internally over the PBX network, you may need to set a transfer type.
The type of transfer (functional or with disconnect) depends on your PBX.
The telephone is delivered with ECT on (functional).
Refer to the
PBX, FUNCTIONS
menu to make the relevant settings (“ECT on” for functio-
nal and “ECT off” for disconnect).
Page 45

43
20402856en_ba_a0
Maintenance
Reset
You can reset the telephone to default status as follows:
Procedure:
1. Press the softkey under MENU. Scroll to
MAINTENANCE
in the
SETTINGS
menu. Press
OK to confirm.
2. Press
RESET
and press OK to confirm. The default settings are restored.
Note • A reset deletes all the preferences and lists except the directory and the
speed dial keys.
• After a reset, the installation assistant re-appears.
Faults and trouble-shooting
Not every malfunction results from a defect in your telephone. Sometimes you only need
to briefly interrupt the power supply (unplug the mains and plug it in again).
Important: Problems or faults can only be corrected if you take the complete device
(base station, handset, connection cord) to the sales outlet.
Page 46

44
20402856en_ba_a0
Software version and update
Procedure:
1. Press the softkey under MENU. Scroll to
SPEED DIAL KEYS
in the
SETTINGS
menu
and press OK to confirm.
2. Scroll tho the relevant submenu and make the relevant settings.
Software version
You can display the name and the latest software version installed in your phone.
Software update
The software of your telephone is continually adapted to the state of the art. You can
download the latest software to your phone in a matter of minutes via the telephone
line. If you already have the most recent software version installed in your phone, the
connection is cleared within a few seconds. The access number (0800 855 515) for
remote download is saved in the phone. You can change the access number in the
SETTINGS
submenu.
Note • If the remote download fails, a new access number may need to be set.
If in doubt, contact the Swisscom Information Service
(freephone 0800 800 800).
• Under no cicumstances unplug the connection cable from the telephone
during a download.
Maintenance
Page 47

45
20402856en_ba_a0
Maintenance
Emergency operation
One of your phones can still be operated in emergency mode during power failures
(emergency operation).
You have to switch ON the emergency operation on the base of the telephone that is
used for emergency operation.
Your telephone is delivered with the emergency operation deactivated (OFF).
Emergency operation on network termination unit
The emergency power is supplied directly by the
exchange and provides sufficient power for just
one telephone. Not all features are available in
emergency mode. However, you can still make and
receive calls.
To set a telephone for emergency operation,
switch ON the emergence operation on the base of
the telephone.
Note You may set only one telephone for emergency operation: If you set more
than one telephone for emergency operation, none of the telephones are
able to function!
Emergency operation on a PBX
If your phone is connected to a PBX, the system supplies the emergency power. The type
of PBX dictates which features are available during emergency operation and how many
phones are capable of emergency operation. Refer to your PBX documentation.
Note For PBX operation you still need to enable your phone for emergency
operation (emergency operation switched ON).
On Off
Emergency operation
switch
Page 48

46
20402856en_ba_a0
Important information
Approval and conformity
This DECT corded ISDN telephone complies with the basic requirements contained in the
R&TTE Guidelines 99/5/EC and is suitable for connection and operation in the member
states indicated on the base station and/or packaging.
This device is designed for operation on the Swiss ISDN network.
The declaration of conformity may be viewed at:
www.swisscom.com under Online Shop, Telephones, Declarations of Conformity, or can
be ordered from the following address:
Swisscom Fixnet AG
Retail Business
Customer Premises Equipments (CPE)
3050 Berne
CE symbol
The telephone complies with the requirements of the following EU guidelines:
Directive 99/5/EC on radio equipment and telecommunications terminal
equipment and the mutual recognition of their conformity,
The CE symbol confirms the conformity of the telephone with the above guidelines.
Page 49

20402856en_ba_a0
Important information
Guarantee
The guarantee period is 2 years from the date of purchase.
In the event of repairs under guarantee, the defective product must be accompanied by a
guarantee card completed and stamped by the sales outlet.
The guarantee does not cover damage resulting from inappropriate use, normal wear
and tear, or intervention by third parties. In addition, the guarantee does not cover material or defects which have only a minimal impact on the use or value of the telephone.
In the event of a fault, please contact your sales outlet.
Repairs/maintenance
Leased telephones
If your telephone is not functioning as it should, notify the fault service (Tel. 175).
Repairs* and fault reporting are free of charge.
Purchased telephones
Under the terms of the guarantee, repairs are carried out free of charge during the guarantee period. The guarantee does not cover damage to parts subject to wear and tear
(cable, printed labels, rechargeable battery etc.) or inappropriate handling (accidental
damage, exposure to liquids etc.). If a repair is required, the telephone must be returned
to the sales outlet.
If the field repair service is called out (also during the guarantee period*), a charge is
levied for the fault location procedure (travel expenses plus labour). Material costs are
payable outside the guarantee period.
* The guarantee does not cover damage resulting from inappropriate use, normal wear
and tear, or intervention by third parties.
47
Page 50

48
20402856en_ba_a0
Important information
Help
For general questions on products, services etc., contact the Swisscom information desk
(freephone 0800 800 800).
Cleaning – when necessary
Clean the telephone with a slightly damp cloth or an antistatic cloth. Never use a dry
cloth. Avoid using other cleaning and abrasive agents.
Page 51

49
20402856en_ba_a0
Write-on label
Page 52

50
20402856en_ba_a0
Page 53

51
20402856en_ba_a0
Page 54

52
20402856en_ba_a0
Page 55

53
20402856en_ba_a0
Page 56

54
20402856en_ba_a0
Page 57

55
20402856en_ba_a0
Page 58

56
20402856en_ba_a0
Page 59

Page 60

dt 04.05 FX-RB-PS-CPE-PM SV 20402856en_ba_a0
 Loading...