

Page 1
Aton CL302
User manual
Simply in touch.
Page 2

2
Quick guide 5
Keys-definition 5
Keys-overview 6
Display symbols for handset 7
Getting started 8
Safety Precautions 8
Contents of the package 9
Accessories 9
Environmental impact 9
Basic Steps to Install 10
Switching the handset on and off 10
How to use this phone 10
Switching Keypad Lock on and off 11
General functions 12
Making an external call 12
Dialling with pre-dialling 12
Dialling without pre-dialling 12
Answering an external call 12
Displaying the telephone number 13
Displaying the talk time 13
Switching to tone dialling 13
Handsfree mode 13
Receiver and speaker volume 14
Adjusting the receiver volume 14
Adjusting the speaker volume 14
Notebook 14
Combox 14
Voice Portal 15
Out of range warning 15
Paging 15
1
Content
Page 3

Services 30
Set Combox number 30
Activation of the Combox 30
Set call forwarding 31
Status of call forwarding (Combox and number) 32
Call waiting 32
Several handsets 33
Registering handsets 33
De-registering handsets 33
Making an internal call 34
Answering an internal call 34
Transferring a call 34
Call brokering 35
Conference call 35
Making a conference call 35
Ending a conference call 35
Handset settings 36
Ringer volume for general calls 36
Ringer melody for general calls 36
VIP volume 36
VIP Melody 37
Key beep 37
Alarm clock 37
Activating the alarm clock 37
Choosing the ringer melody for the alarm call 38
Deactivating the alarm clock 38
Contrast 38
Wall Paper 38
Automatic answering 39
Selecting base station 39
Handset name 39
Language 40
3
Redialling & redial list 16
Dialling a number from redialling list 16
Redialling number – and change 16
Copy a number to the phone book 16
Deleting a number from the redial list 17
Deleting the redial list 17
Phonebook 18
Entering names 18
Storing an entry 19
Dialling a number from the phone book 19
Displaying a number from the phone book 19
Editing an entry 20
Deleting an entry 20
Deleting the phone book 20
Displaying the memory status 20
Phonebook and SIM-Card reader 21
Copy entries from SIM-Card to the handset 21
Copy from Handset to SIM-Card 21
Message (SMS) 23
Explanation for the service “SMS over the fixed network” 23
Setting the number for service centre (Send) 24
Setting the number for service centre (Receive) 24
Receiving message 24
SMS Alert On / Off 25
Writing and sending message 25
Editing and deleting stored SMS 26
Delete SMS memory 27
Copying a number into the phonebook 27
Caller list 28
Dialling a number from the caller list 28
Copying a number into the phonebook 28
Caller list and deleting 29
2
Page 4
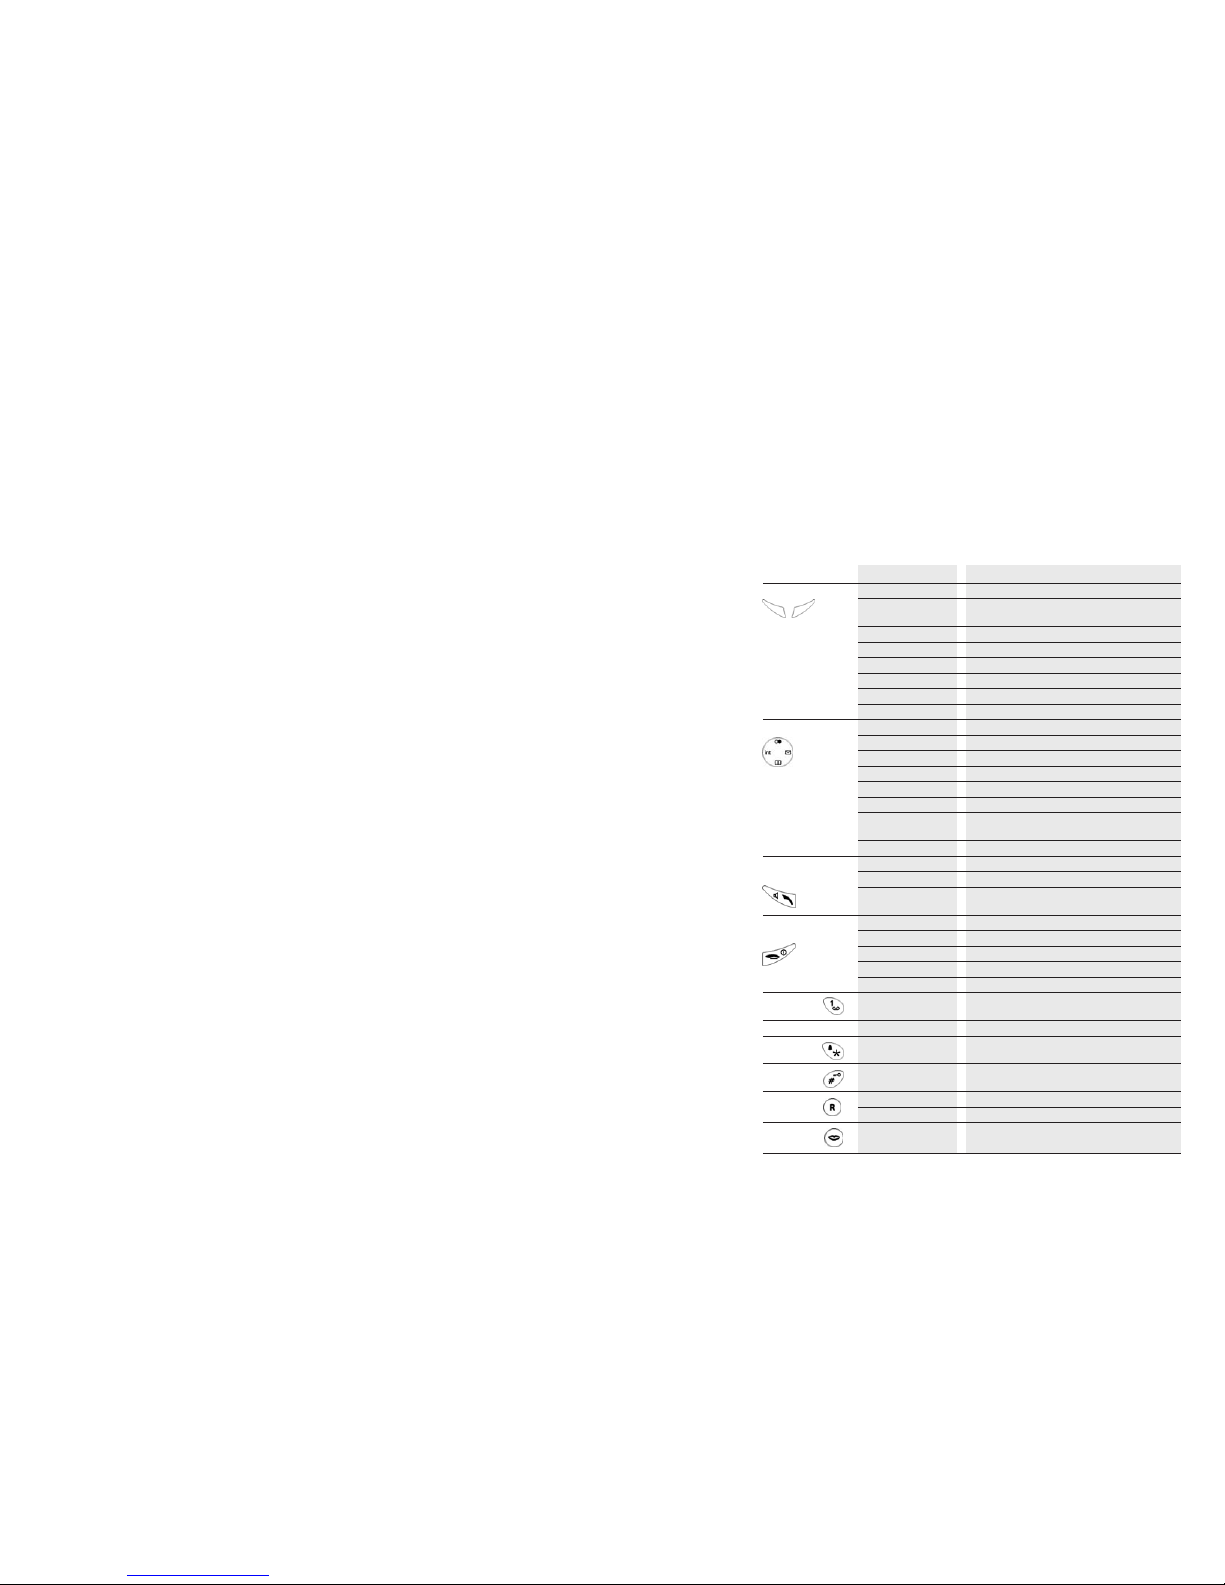
Keys-definition
Key Status Function
Softkeys Menu Call the menu or sub-menu
OK Confirm menu item function and
select menu item
Option Call the option menu
Read Read SMS entry
Back Back to the previous menu or status
Clear Delete the digit (used at edit state)
Mute Temporary mute of ring tone
Redial Redialling of last numbers
Navigation key At idle mode: Up Redialling of last numbers
At idle mode: Down Open phonebook
At idle mode: Right Menu messages: (cal list and SMS)
At idle mode: Left Internal call
Menu: Up /Down Scroll
Menu: Right /left Cursor left / right
During call:
Up /Down Setting of speaker volume during call
In conference: Left Control internal calling partner
Off-hook key/ Press once Make a call
Pick-up call /phone
During call Switch on handsfree operation
During handsfree
operation Back to normal mode
On-hook key / During call End call
End call
At menu: short Back to the previous menu
At menu: long Back to the idle mode
At idle mode: long Switch off the device
Phone is off: Switch on the device
Key 1 At idle mode: Dial Combox
long (Condition: Combox number must be defined)
Keys 1…0, *, # Depend on status Enter numbers or characters
Star-key At idle mode: Ring tone On /Off
long (VIP still active)
Hash-key At idle mode:
long Keypad lock On /Off
R-key Short Send flash signal (R)
Long Insert pause (P)
Voice Portal
key At idle mode Dial Swisscom Voice Portal
5
Quick guide
Area-Code 40
Changing the handset PIN 40
Factory settings for the handset 41
Base station settings 42
Ring priority 42
Assigning the specific handset 42
Setting the number of rings 42
Call barring 42
Setting call barring mode 43
Setting barred numbers 43
Access code 44
Recall time 44
Emergency number 45
Dialling mode 45
Date and time 46
Base PIN 46
Factory settings for the base station 47
Reference 48
Trouble shooting 48
Technical specifications 49
Maintenance / Warranty 50
Conformity 51
4
Page 5
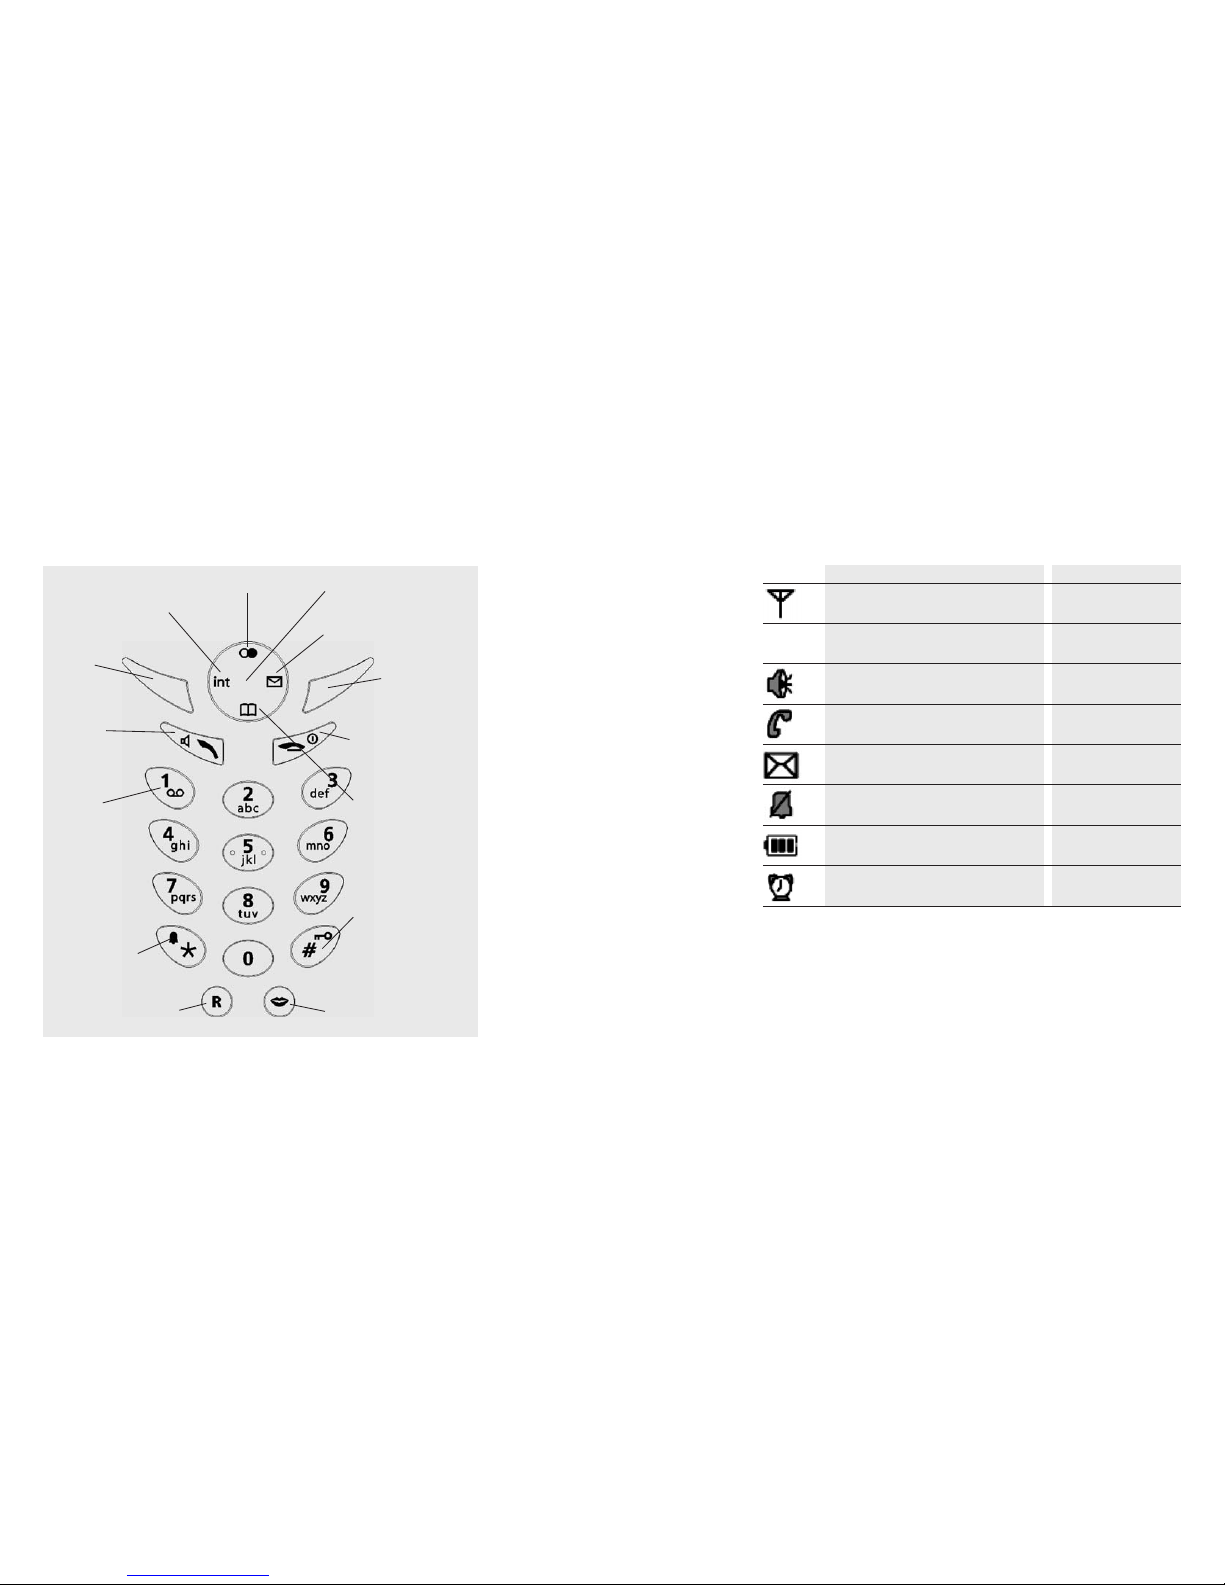
Display Symbole
Symbols On Flashing
Connected to a base station Finding a base station
Internal call is made Internal call is held
Speaker phone is activated –
External call is made External call is held
New call during absence /New SMS –
Bell switched off on incoming call –
Battery status –
Alarm clock is activated –
7
Keys-overview
6
Navigation-key
(Up /Down/ Right/ Left
Redial
Internal calls
SMS /Call list
Softkey
On-Hook /End call /
one menu level back /
Switch on (short press)
Switch off/ back to idle
mode (long press)
Phonebook
Long press:
Keypad lock on /off
Call Voice PortalRegister Recall /Pause
Long press:
Ring tone off/on
(Standard, not VIP)
Long press:
Combox
direct call
Off-Hook/
Handsfree
Softkey
INT
Page 6

Contents of the package
Aton CL302
ó
1 Base station
ó
1 power supply
ó
1 telephone connector
ó
1 handset
ó
3 rechargeable batteries
ó
3 Manuals (German, French and Italian)
Accessories
The following accessories are available:
ó
Additional Handset with charging bay
ó
Additional rechargeable batteries
Environmental impact
At the end of its working life this device must not under any circumstances be
disposed of as normal waste. It must be taken to a point of sale or central
collection point for electronic and electrical devices in accordance with the Swiss
Ordinance on the Return, Taking Back and Disposal of Electrical and Electronic
Appliances (ORDEA).
The individual materials are recyclable as indicated. By reutilizing, recycling or
re-using them in any other form, you are making a major contribution towards
environmental protection.
9
Getting started
Safety Precautions
CAUTION
NOTE FOR EMERGENCY CALLS:
Telephone calls are impossible if the main power fails.
The battery must also be charged to make a call.
CAUTION
Use only the original power supply of this telephone. Incorrect adapter polarity
or voltage can seriously damage the unit.
Input: 230 VAC 50Hz /Output: 9VDC 300mA
CAUTION
RISK OF EXPLOSION IF BATTERY IS REPLACED BY AN INCORRECT TYPE.
Never use non-rechargeable batteries; use recommended type supplied with this
telephone. NiMH batteries must be disposed of in accordance with applicable
waste disposal regulations.
Rechargeable batteries became warm during loading (charging the handset);
this is a normal process and harmless.
Do not use in the rain, near a bath or with wet hands.
Do not allow the charging contacts to come into contact with conductive materials.
It is recommended that you disconnect the base unit from the main power and
telephone line socket during a thunderstorm.
It is normal that a certain amount of heat will be generated in its day to day
operation. It is recommended that this product shall not be placed on antique,
veneered or wooden surfaces.
To clean the product, use a damp (not wet) cloth or antistatic wipe. Never use a
dry cloth as this may cause a static shock. Never spray cleaning fluid directly onto
the handset and base unit.
8
Page 7

Switching Keypad Lock on and off
You can lock the handset keypad if you are carry the handset in your pocket
or bag. This prevents numbers being dialled by accident.
If there is an incoming call, the keypad is automatically unlocked and locked
again after the call has ended.
To lock and unlock, press for more than 2 sec.
Note: Emergency numbers can be dialled also if the keypad lock is activated.
11
Basic Steps to Install
ó
Connect the output plug of the power adapter to the adapter socket on
the back of the base unit and the main adapter to the wall power supply.
ó
Connect the telephone line cord to the phone cord socket on the back of
the base unit and to the line phone socket to the wall.
ó
Place the 2 AAA batteries, observing their polarities, into the battery com-
partment on the handset.
ó
Slide the battery door firmly into place.
ó
Place the handset on the base unit and let the batteries charge for a full
14 hours before using.
Switching the handset on and off
The handset is activated as soon as the batteries have been installed.
To switch on press the end key.
To switch off make a long press - you will hear the beep sound.
The handset also is switched on automatically when it is placed in the base
station. If the handset is switched on by placing in the base station, the charging
status symbol will display.
How to use this phone
Your telephone will be operated with a menu. The menu offers access to all
setting procedures and all of the telephone functions. Some menu items open
a sub-menu after the selection of menu item. The menu will be controlled by
the navigation key and by the softkeys. The exact functionality of every key is
described on page 9.
10
Page 8

Displaying the telephone number
If the network provider supports caller line identification (CID), the caller’s telephone number is displayed on an incoming call. If the Provider sends also the
name, then the name will be displayed. If the caller’s number is included in your
handset phone book, the corresponding name will be displayed.
Note: The caller list shows the number or name of the phonebook.
Displaying the talk time
During an external call, the handset displays the talk time.
Switching to tone dialling
If your phone is set to pulse dialling, you can switch temporarily to tone dialling
during the call (e. g. to control an answering machine).
During the call:
ó
Press MENU, select the menu item Tone.
ó
Press OK to activate tone dialling.
Handsfree mode
In handsfree mode, other persons in the room can listen and you can you put
down the handset and have your hands free.
ó
By pressing you switch to handsfree or back to normal during the call.
When you switch from normal to handsfree, the mode is displayed. The speaker
symbol is also visible in handsfree mode.
The handsfree mode is possible during an internal and also during an external call.
Note: The handsfree mode is only possible, if the battery signal shows at least
one line.
13
General functions
Making an external call
Dialling with pre-dialling
For Pre-Dialling enter the number you want to call and then press .
Using the phone book
ó
Press MENU, select Phonebook and press OK.
(If you press in standby mode, the phone book is opened directly)
ó
If not empty, you can see entries in the phone book.
ó
Scroll with the navigation key to select a name/number.
ó
Press . The number will be dialled.
ó
Press to end the call.
Dialling without pre-dialling
ó
Press and wait for the dial tone.
ó
Dial the number.
ó
Press to finish the call.
Answering an external call
Your handset rings and the on-line status LED on
the base station flashes.
ó
To answer the call, press any key except Silent
soft key, or take the handset from the base
station (automatic answering function).
ó
Press to end the call.
ó
If you do not want to answer the call, you can
switch off the ring tone by pressing Silent
soft key. You can press if you still want
to answer the call.
12
Page 9

Voice Portal
This key allows you direct access to the Swisscom Voice Portal, where you can
activate additional service s such as call diversion (Service 21, 61 or 67), call
waiting (Service 43) or three-party conference with simple voice command. You
can also use voice command to access current sport, news and weather information.
ó
Press key.
ó
The number 0848849850 will be automatically dialled.
ó
You will be connected to the Swisscom Voice Portal.
Out of range warning
If the handset is out of range from the base station during the call,
you will hear a warning tone.
Paging
The base station has a search function to page the handsets:
ó
Press the PAGE key on the base station. All registered handsets will ring
for about 30 seconds.
ó
To end paging, press the PAGE key on the base station again or press
any key on the handset.
15
Receiver and speaker volume
Receiver and speaker volume can be adjusted. Three volume levels for the receiver
and six volume levels for speaker are possible.
Adjusting the receiver volume
With the Navigation-Key you can adjust the receiver volume during the call.
The selected receiver volume is stored.
Adjusting the speaker volume
With Navigation-Key you can adjust the speaker volume during the call in
handsfree mode. The selected handsfree volume is stored.
Notebook
You can enter a number during the call. This number will be stored in the
redial memory.
ó
Press MENU, select the menu item Notebook.
ó
Press OK to confirm.
ó
Enter the number.
ó
Press Option.
ó
Select Save and press OK to store.
Combox
The telephone supports the possibility to get direct access to your combox in
the public network:
ó
Press key more than 2 seconds.
ó
The combox number will be automatically dialled.
ó
You will be connected to the combox.
In order to use this service you must set your combox number in the service menu.
14
Page 10

Deleting a number from the redial list
ó
Press or Redial key to open the redial list.
If not empty, last number will be displayed.
ó
Select the desired phone number.
ó
Press Option to open sub-menu.
ó
Select Delete Entry.
ó
Press OK to delete.
Deleting the redial list
ó
Press or Redial to open the redialling list.
If not empty, last number will be displayed.
ó
Press Option to open sub-menu.
ó
Select Delete List and press OK.
ó
Display “Delete All Entries?”.
ó
Press OK to delete all entries.
17
Redialling & redial list
The handset automatically saves the last 10 dialled phone numbers.
Dialling a number from redialling list
ó
Press or Redial key to open the redialling list.
If not empty, the last number will be displayed.
ó
Select the desired phone number.
ó
Press to dial the selected number.
Redialling number – and change
ó
Press or the softkey Redial to open the redial list in standby mode.
If not empty, the last number will be displayed.
ó
Select the desired phone number.
ó
Press key to dial the number.
or to edit the number
ó
Press Option to open sub-menu.
ó
Select Display Number and press OK.
ó
Edit number and press key to dial the number.
Copy a number to the phone book
ó
Press or Redial key to open the redial list.
If not empty, last number will be displayed.
ó
Select the desired number.
ó
Press Option to open sub-menu.
ó
Select Copy to PhoneBk.
ó
Press OK to confirm. The input field is opened
in which you can enter a name.
ó
Enter the name.
ó
Press Option.
ó
Select Save and press OK to store.
16
Page 11

Storing an entry
ó
Press MENU, select Phonebook and press OK.
(If you press in standby mode, the phone
book will be opened directly)
ó
Press Option to open sub menu.
ó
Select Add Entry and press OK.
Type name and then press to go down
and enter the telephone number.
ó
Press Option.
ó
Select Save and press OK to store.
Dialling a number from the phone book
ó
Press MENU, select Phonebook and press OK.
(If you press in standby mode, the phone book will be opened directly)
ó
Select entry.
ó
Press .
ó
The number will be dialled.
Displaying a number from the phone book
The number of the entry is displayed with pre-dialling mode.
ó
Press MENU, select Phonebook and press OK.
(If you press in standby mode, the phone book will be opened directly)
ó
Select entry.
ó
Press Option to open sub menu.
ó
Select Display Number.
ó
Press OK to display the number with pre-dialling mode.
19
Phonebook
You can store up to 100 telephone numbers. One entry in the phone book consists of
15 characters for the name and 30 digits for the number.
Entering names
Use the numeric keys to enter names.
To insert lower letters, press the # key. To revert to upper case letters, press the # key again.
Press the corresponding key repeatedly:
1x 2x 3x 4x 5x 6x 7x 8x 9x 10x 11x 12x 13x
0 SP0?!¿¡.,“‘:;|
1 1@? £$¥xo&§Ì ° ÷
2 ABC2 ÑÁà ÅÆÄÇ
abc2абаеждЗ
3 DEF 3¢ÉÈÊË
def3´ éèêë
4 GHI4⁄ÍÌ‹îÏ
ghI4 íÌ‹îÏ
5 JKL5¸
jkl5∏
6 MN O6 ¡ С УЦТФШ
mno6ƒсуцтфш
7 PQRS7Âfiß
pqrS7Êflß
8 T UV8 ÜÚùû
t uv 8üúùû
9 WX Y Z 9 ? ˚ è
wxyz9˘˝ê
* *#+- / %=( ) <>\ _
18
Page 12

With the SIM-Card Read/Write on the bottom of the base you can read or
write entries from or to your SIM Card.
Copy entries from SIM-Card to the handset
ó
Press MENU, select Phonebook and press OK.
(You can also select the symbol on the navigation key for direct access)
ó
Press Option.
ó
Select Copy from SIM and press OK for confirmation.
ó
Enter the PIN of your SIM-Card.
Copy one entry:
ó
Select the entry you whish to copy and press Option.
ó
Select Copy Entry and confirm by pressing OK.
Copy all entries:
ó
Press Option.
ó
Select Copy all and confirm by pressing OK.
Copy from Handset to SIM-Card
ó
Press MENU, select Phonebook and press OK.
(You can also select the symbol for direct access.)
ó
Press Option.
ó
Select Copy to SIM and press OK for confirmation.
ó
Enter the PIN-Code of your SIM-Card.
Set the Area-Code:
ó
Press Option.
ó
Select Area-Code and confirm by pressing OK.
ó
Enter your Area-Code, including the needed 0 (zero).
ó
Press OK for confirmation.
21
Phonebook and SIM-Card reader
Editing an entry
ó
Press MENU, select Phonebook and press OK.
(If you press in standby mode, the phone book will be opened directly)
ó
Select entry.
ó
Press Option to open sub menu.
ó
Select Edit Entry and press OK.
Now you can change the entry.
ó
Press Option.
ó
Select Save and press OK to store.
Deleting an entry
ó
Press MENU, select Phonebook and press OK.
(If you press in standby mode, the phone book will be opened directly)
ó
Select entry.
ó
Press Option to open sub menu.
ó
Select Delete Entry.
ó
Press OK to delete.
Deleting the phone book
ó
Press MENU, select Phonebook and press OK.
(If you press in standby mode, the phone book will be opened directly)
ó
Press Option to open sub menu.
ó
Select Delete List and press OK.
ó
Display “Delete All Entries?”.
ó
Press OK to delete all entries.
Displaying the memory status
ó
Press MENU, select Phonebook and press OK.
(If you press in standby mode, the phone book is opened directly)
ó
Press Option to open sub menu.
ó
Select Memory Status.
ó
Press OK.
The number of phone book entries is displayed.
20
Page 13

Explanation for the service “SMS over the fixed network”
Note: The network operator must support the SMS function.
The SMS service allows the transmission or reception of text messages to other
devices. One message can have up to 160 characters. SMS service can only be
used, if the device supports the display of the subscriber number (CLIP).
In order to receive a SMS it is necessary that you have already sent
at least one SMS.
The sending number 062 210 00 0 for SMS centre 1 and receiving number
062 210 00 0 for SMS centre 2 are already preinstalled for Swisscom.
If the phone is connected to a PBX do not forget to enter the access code
(e. g. 0) before the number of the SMS centre 1.
You can send and receive the SMS (Short Message
Service) messages. You can write, read, edit and
delete messages.
Note: To send and receive a message, you have to
enter the call number of the service centre of your
service provider.
At delivery state the number of the service centre of
Swisscom is pre-programmed
(sending and receiving: 062 210 00 0).
23
Message (SMS)
Copy one entry:
ó
Select the entry you whish to copy and press Option.
ó
Select Copy Entry and confirm by pressing OK.
Copy all entries:
ó
Press Option.
ó
Select Copy all and confirm by pressing OK.
22
Page 14

SMS Alert On / Off
ó
Press MENU, select the menu item Message and press OK.
(If you press in standby mode, the message menu will be
opened directly)
ó
Select SMS and press OK.
ó
Select SMS Alert and press OK.
ó
Select On or Off and press OK.
Writing and sending message
ó
Press MENU, select the menu item Message
and press OK.
(If you press in standby mode, the message
menu will be pened directly)
ó
Select SMS and press OK.
ó
Select the menu item Write Message.
ó
Edit text message.
ó
Press Option to open sub menu.
ó
By selection Save, the text message will be saved
in Saved directory with display “Saving Message”.
ó
Select Send To and press OK.
ó
Enter the recipient’s number (with the digits on
the keypad or by selecting Option and getting a
number from the Phonebook).
ó
Press Option.
ó
Select Send and press OK.
The message will be sent by displaying
“Sending Message”.
OR
ó
Receive call number from phone book by
pressing Option, selecting Phone book list
and confirming with OK.
25
Setting the number for service centre (Send)
ó
Press MENU, select the menu item Message and press OK.
(If you press in standby mode, the message menu will be
opened directly)
ó
Select SMS and press OK.
ó
Select Service Centre and press OK.
ó
Select Send and press OK.
ó
Enter the number.
ó
Press OK to confirm.
Setting the number for service centre (Receive)
ó
Press MENU, select the menu item Message and press OK.
(If you press in standby mode, the message menu will be
opened directly)
ó
Select SMS and press OK.
ó
Select Service Centre and press OK.
ó
Select Receive and press OK.
ó
Enter the number.
ó
Press OK to confirm.
Receiving message
During receiving a message, the display shows “Receiving Message”.
If the message is received successful, the display shows the -icon.
24
Page 15

Delete SMS memory
ó
Press MENU, select the menu item Message and press OK.
(If you press in standby mode, the message menu will be
opened directly)
ó
Select SMS and press OK.
ó
Select Delete Memory and press OK.
ó
Display “Delete All Entries”.
ó
Press OK.
Copying a number into the phonebook
ó
Press MENU, select the menu item Message and press OK.
(If you press in standby mode, the message menu will be
opened directly)
ó
Select SMS and press OK.
ó
Select Inbox and press OK.
ó
Select entry and press OK.
The message will be displayed.
ó
Press Option to open sub menu.
ó
Select Copy to PhoneBk and press OK to confirm.
An input field will be opened in which you can enter a name.
ó
Enter the Name and change with the Navigation-Key to the Number.
ó
Correct the number if necessary.
ó
Select VIP-field On or Off.
ó
Press Option.
ó
Select Save and press OK to store.
27
Editing and deleting stored SMS
Following boxes for SMS are available:
Inbox 01 (Numbers of Inbox messages)
Outbox 02 (Numbers of Outbox messages)
Saved 01 (Numbers of Saved messages)
ó
Press MENU, select the menu item Message and press OK.
(If you press in standby mode, the message menu will be
opened directly)
ó
Select SMS and press OK.
ó
Select Inbox, Outbox or Saved and press OK.
ó
Select entry and press Read.
ó
The message will be displayed.
ó
Press Option.
To edit and/ or use entry:
ó
Select Use and press OK.
ó
Edit text message.
ó
Press Option (by selecting Save, the text message will be saved).
ó
Select Send To and press OK.
ó
Edit the recipient’s number.
OR delete the number and
ó
Select Option and then Phonebook List.
ó
Select the desired entry and press OK.
ó
Press Option.
ó
Select Send and the message will be sent.
To delete entry:
ó
Select Delete entry and press OK.
To delete all entries in the box:
ó
Select Delete List and press OK.
Display “Delete All Entries?”.
ó
Press OK.
26
Page 16

Caller list and deleting
ó
Press MENU, select the menu item Message and press OK.
(If you press in standby mode, the message menu will be
opened directly)
ó
Select Caller List and press OK.
ó
Select New Calls or All Calls, and press OK.
ó
Scroll to the desired number.
ó
Press Option to open sub-menu.
To delete an entry:
ó
Select Delete Entry and then press OK to delete.
To delete the caller list:
ó
Select Delete List and press OK.
ó
Display “Delete All Entries?”.
ó
Press OK.
29
Caller list
The telephone numbers for the last 30 incoming calls are copied to the caller list.
Dialling a number from the caller list
ó
Press MENU, select the menu item Message and press OK.
(If you press in standby mode, the message menu will be
opened directly)
ó
Select Caller List and press OK.
ó
Select New Calls or All Calls, and press OK.
ó
Scroll to the desired number.
ó
Press dial the number.
Copying a number into the phonebook
ó
Press MENU, select the menu item Message and press OK.
(If you press in standby mode, the message menu will be
opened directly)
ó
Select Caller List and press OK.
ó
Select New Calls or All Calls and press OK.
ó
Select entry and press Option to open sub menu.
ó
Select Copy to Phoneb and press OK to confirm.
An input field is opened in which you can enter a name.
ó
Enter the Name and change with the Navigation-Key to the Number.
ó
Correct the number if necessary.
ó
Select VIP-field On or Off.
ó
Press Option.
ó
Select Save and press OK to store.
28
Page 17

ó
Select fixed, when busy or when no answer and press OK.
Fixed means: The call will be forwarded immediately to your
Combox.
When busy means: The call will be forwarded to your Combox only
when your line is busy.
When no answer means: The call will be forwarded to your Combox only
when you are not able to answer the call.
ó
Press OK to confirm.
ó
Select Activate or Deactivate.
ó
Press OK to confirm.
You will hear a confirmation of the activation/deactivation over the earpiece
of your handset.
Note: If you did not set the number for the Combox you will get
an error message.
Set call forwarding
ó
Press MENU, select Services and press OK.
ó
Select Call forwarding and press OK.
ó
Select fixed, when busy or when no answer and press OK.
Fixed means: Calls will be forwarded immediate to the entered
number.
When busy means: Calls will be forwarded to the entered number
only when your line is busy.
When no answer means: Calls will be forwarded to the entered number
only when you are not able to answer the call.
ó
Press OK to confirm.
ó
Select Activate or Deactivate and press OK (by pressing OK after
selecting Deactivate the deactivation will start immediately).
ó
Enter the destination number (keypad or phonebook via Option Menu).
ó
Press Option.
ó
Select Send to and press OK.
Your Call forwarding is activated/deactivated. (You will hear a confirmation
of the activation/ deactivation over the earpiece of your handset.
31
Services
With this menu you have the possibility to use the supplementary services of
the network in an easy way. To activate the Combox Service please use the user
manual “combox basic” from Swisscom.
Note: The Combox is a service of the network provider. The activation will be
done by a call forwarding functionality. This functionality is the same as the
normal call forwarding function. You can set a call forwarding for the line. That
means, the activation of call forwarding is similar to the normal call forwarding
to an entered number. If you ask for the status of call forwarding to the network,
it is only possible to get a message like “The Service is activated”. You will not
get an information if the forwarding to the Combox or to an entered number
has been activated. You have to remind this by yourself. If you are unsure you
have the possibility to deactivate the forwarding and set the desired kind of
forwarding again.
Set Combox number
By pressing for more than 2 sec. the telephone is dialling the combox
number automatically. The condition is that the combox number is stored:
ó
Press MENU, select Services and press OK.
ó
Select Combox and press OK.
ó
Select Combox number and press OK.
ó
Enter your Combox number (086.. followed by your own telephone number
including the area code and the zero).
ó
Press OK to save.
Activation of the Combox
ó
Press MENU, select Services and press OK.
ó
Select Combox and press OK.
30
Page 18

You can operate up to six handsets on your base station.
In addition to an internal call between 2 handsets an external call can be held
simultaneously with a third handset.
Registering handsets
In order to connect a handset to a base station, the handset must be registered
at the base station. One handset can be registered up to 4 base stations.
ó
Press MENU, select Settings and press OK.
ó
Select Handset Settings and press OK for confirmation.
ó
Select Register and press OK.
ó
Select the base station you want to register the handset and press OK.
ó
Press the paging button on the base station (more than 8 seconds) until
you see the blink LED on base unit.
ó
Enter the base station PIN and press OK (Factory setting for PIN: 0000).
ó
Wait until the free handset numbers are displayed.
ó
Select the handset number with the appropriate numeric keys.
Now, the handset is registered to the selected base station.
Note: To connect the handset at other base stations please look at the manual
of the desired one.
De-registering handsets
ó
Press MENU, select Settings and press OK.
ó
Select Base Settings and press OK for confirmation.
ó
Select Deregister and press OK.
ó
Enter the base station PIN (Factory setting for PIN: 0000).
ó
Select the handset to be de-registered and press OK.
ó
Press OK to de-register.
33
Several handsets
Status of call forwarding (Combox and number)
ó
Press MENU, select Services and press OK.
ó
Select Combox or Call forwarding and press OK.
ó
Select fixed, when busy or when no answer and press OK.
ó
Select Status and press OK.
You will hear the status of the chosen call forwarding over the earpiece
of your handset.
Call waiting
ó
Press MENU, select Services and press OK.
ó
Select Call Waiting and press OK.
ó
Select Activate, Deactivate or Status and press OK.
(You will hear a confirmation/ state of the activation/ deactivation over
the earpiece of your handset.)
32
Page 19

Call brokering
Even though your handset is connected to the external party, you can toggle to
an internal handset and get back to the external party.
ó
Press INT.
ó
Enter the handset number.
You will be connected to the internal partner and
the external is set on hold.
ó
Press INT again.
You will be connected to the external caller again.
Conference call
A conference call is possible between one external and two internal parties.
Making a conference call
You must make an external call first.
ó
Press INT.
The external partner will be set on hold.
ó
Enter the handset number.
ó
The internal partner picks up.
Now the both internal partners are connected.
ó
Press Conf. to make a conference call.
Ending a conference call
ó
If you press C.End to end the conference call, the connection to the external
party is maintained and the internal call is placed on hold.
ó
If you press to end the conference call, your handset returns to the
standby mode and the connection to the external party is maintained with
the other internal party.
35
Making an internal call
ó
Press INT.
ó
Enter the handset number.
If you want to call all handset, press All.
Answering an internal call
Your handset rings.
ó
To answer the call, press any key except or remove the handset
from the base station (Auto Talk function).
ó
Press to end the call.
Transferring a call
You can transfer an external call to another handset.
ó
Press INT.
ó
Enter the handset number.
If you want to call all handsets, press the All key.
ó
When the called party answers, press to transfer the call.
ó
Instead of announcing the call, you can immediately press .
If the called party does not answer the call will get back automatically
to you.
34
Page 20

VIP Melody
To differentiate the incoming calls, you can select single melodies to
a single entry. The defined entries are selected by VIP ON.
ó
Press MENU, select Settings and press OK.
ó
Select Handset Settings and press OK.
ó
Select Ringer Set and press OK.
ó
Select VIP Melody and press OK for confirmation.
ó
Select the desired melody with the Navigation-Key (From 1~17).
ó
Confirm by pressing OK.
Key beep
Key click is the sound you hear each time you press a key.
This feature can be enabled or disabled.
ó
Press MENU, select Settings and press OK.
ó
Select Handset Settings and press OK for confirmation.
ó
Select Ringer Set and press OK.
ó
Select Key Beep and press OK.
ó
Select On or Off and press OK to confirm.
Alarm clock
You can use your handset as an alarm clock.
If you have set a time for the alarm call, this is indicated by the symbol
in the display. To switch off the alarm during signalling press any key.
Activating the alarm clock
You can set the alarm clock with once mode or everyday mode.
ó
Press MENU, select Settings and press OK.
ó
Select Handset Settings and press OK for confirmation.
ó
Select Alarm Clock and press OK.
ó
Select Alarm Set and press OK.
ó
Select Once or Everyday.
ó
Enter the hours/ minutes and press OK to confirm.
37
Handset settings
Ringer volume for general calls
Five ringer volumes are possible for the handset. Ringer off also is available.
ó
Press MENU, select Settings and press OK.
ó
Select Handset Settings and press OK for confirmation.
ó
Select Ringer Set and press OK.
ó
Select Ringer Volume and press OK.
ó
Select the desired volume with the Navigation-Key (Off, 1~5).
ó
Press OK to save.
Ringer melody for general calls
ó
Press MENU, select Settings and press OK.
ó
Select Handset Settings and press OK for confirmation.
ó
Select Ringer Set and press OK.
ó
Select Ringer Melody and press OK.
ó
Select the desired melody with the Navigation-Key (From 1~17).
ó
Press OK to save.
VIP volume
To give the possibility to distinguish special entries in the phone book the VIPdefined entries have their own volume. Example: the VIP´s will ring loud
and the normal ones will ring low or can also be muted. Five ringer volumes
are possible for the VIP´s. Ringer off also is available.
ó
Press MENU, select Settings and press OK.
ó
Select Handset Settings and press OK for confirmation.
ó
Select Ringer Set and press OK.
ó
Select VIP Volume and press OK.
ó
Select the desired volume with the Navigation-Key (Off, 1~5).
ó
Press OK to save.
36
Page 21

Automatic answering
When this function is activated you can remove the handset from the base
station to answer a call.
ó
Press MENU, select Settings and press OK.
ó
Select Handset Settings and press OK for confirmation.
ó
Select Auto Answer and press OK.
ó
Select On or Off.
ó
Press OK to save.
Selecting base station
If the handset is registered at several base stations, you can set to select
a base station automatically or specify a base station to connect.
ó
Press MENU, select Settings and press OK.
ó
Select Handset Settings and press OK for confirmation.
ó
Select Select Base and press OK.
ó
Select the desired base station or Any Base and press OK to confirm.
Handset name
You can assign a name of 8 characters for the handset.
If the name is entered, the name is displayed on standby mode.
ó
Press MENU, select Settings and press OK.
ó
Select Handset Settings and press OK for confirmation.
ó
Select Handset Name and press OK.
ó
Enter the name.
ó
Press OK to store.
39
Choosing the ringer melody for the alarm call
If the ringer volume is off, one desired melody is selected for the ringer volume
for the alarm call.
ó
Press MENU, select Settings and press OK.
ó
Select Handset Settings and press OK for confirmation.
ó
Select Alarm Clock and press OK.
ó
Select Alarm Melody and press OK.
ó
Select the desired melody and press OK to confirm.
Deactivating the alarm clock
ó
Press MENU, select Settings and press OK.
ó
Select Handset Settings and press OK for confirmation.
ó
Select Alarm Clock and press OK.
ó
Select Alarm Cancel.
ó
Press OK to deactivate the alarm clock with display the “Alarm Canceled”.
Contrast
ó
Press MENU, select Settings and press OK.
ó
Select Handset Settings and press OK for confirmation.
ó
Select Contrast and press OK.
ó
Select the contrast with the navigation key.
ó
Press OK to save.
Note: The illumination of the handset can be only lighted up when the battery
symbol has at least one segment.
Wall Paper
You can select the wall paper.
ó
Press MENU, select Settings and press OK.
ó
Select Handset Settings and press OK for confirmation.
ó
Select Wall Paper and press OK.
ó
Select with the Navigation-Key and press OK to save.
38
Page 22

Factory settings for the handset
The phone book and the handset name are not deleted when you reset
the handset.
ó
Press MENU, select Handset Set and press OK.
ó
Select Default Set and press OK.
ó
Enter the handset PIN (factory setting: 0000).
ó
Display „Reset all Setting?“.
ó
Press OK.
ó
Display „All Settings Reset“.
Function After Reset
Registered base stations Also registerd
Phone book Not deleted after reset
Delete in phone book menu
Combox number Not deleted
Handset name INT (X)
Receiver volume 2
Handsfree volume 4
Ringer volume 4
Ringer melody (general and VIP) 3
Key click On
Automatic answering Off
Language English
Handset PIN 0000
41
Language
ó
Press MENU, select Settings and press OK.
ó
Select Handset Settings and press OK for confirmation.
ó
Select Language and press OK.
ó
Select the desired language and press OK to confirm.
Area-Code
This setting is needed for reading from the SIM-Card and adapting to the
Swiss network. If you have a country code on the SIM-Card it will be replaced
by a 0 (zero). If you have a foreign number with “+” this will be replaced
by 00 (two zero’s). The phone’s default setting is prepared for the Swiss network.
ó
Press MENU, select Settings and press OK.
ó
Select Handset Settings and press OK for confirmation.
ó
Select Area-Code and press OK.
ó
Select the Country-Code, Int. Prefix or Nat. Prefix and press OK.
ó
Enter the Number needed and press OK to store.
Changing the handset PIN
To protect the handset settings from unauthorized access you should change
the handset PIN (factory setting: 0000) to a PIN that only you know.
ó
Press MENU, select Settings and press OK.
ó
Select Handset Settings and press OK for confirmation.
ó
Select Handset PIN and press OK.
ó
Enter the current handset PIN (factory setting: 0000).
ó
Enter the new handset PIN (4 digits).
ó
Re-enter the new handset PIN to verify. If match the new handset PIN is saved.
40
Page 23

Setting call barring mode
Each handset has call barring mode separately.
ó
Press MENU, select Settings and press OK.
ó
Select Base Settings and press OK.
ó
Select Call Barring and press OK.
ó
Enter the base station PIN (factory setting: 0000).
ó
Select the handset you want to set.
ó
Select Barring Mode:
Barring Off means: call barring is deactivated
Barred Numbers means: call barring is activated with barred numbers
Internal Call means: external call cannot be made
ó
Press OK to confirm.
Setting barred numbers
You can enter three numbers of up to 8 digits for call barring. You can also
record the prefix of numbers to be barred, for instance the prefix for some
expensive services, or the prefix for international numbers. All calls to numbers
with this prefix will be barred.
ó
Press MENU, select Settings and press OK.
ó
Select Base Settings and press OK.
ó
Select Call Barring and press OK.
ó
Enter the base station PIN (factory setting: 0000).
ó
Select the Handset and press OK.
ó
Select Barring Number and press OK.
ó
Select the area to enter the number and press OK.
ó
Enter the barred number (up to 8 digits).
ó
Press OK to confirm.
43
Base station settings
Ring priority
By setting this functionality one handset will ring first.
Assigning the specific handset
ó
Press MENU, select Settings and press OK.
ó
Select Base Settings and press OK.
ó
Select Ring Priority and press OK.
ó
Select Priority and press OK.
ó
Select the handset number or Disable:
Disable means all the handsets ring at the same time.
ó
Press OK to confirm.
Setting the number of rings
You can also set the number of times the specific handset rings before
all other handsets start to ring.
ó
Press MENU, select Settings and press OK.
ó
Select Base Settings and press OK.
ó
Select Ring Priority and press OK.
ó
Select Ring Count and press OK.
ó
Enter the number by using the Navigation-Key up and down.
ó
Press OK to confirm.
Call barring
You can prevent certain numbers from being called from a handset by blocking
those numbers in the base station. You can also restrict a handset to calling on
an external line. You can still receive incoming calls.
Note: The emergency numbers can not be barred (see also “Emergency
numbers”).
42
Page 24

Emergency number
You can enter three numbers of up to 10 digits for emergency number.
The emergency numbers are valid for all handsets.
You can dial the emergency numbers even if your handset is barred for
external calling and active keypad lock.
ó
Press MENU, select Settings and press OK.
ó
Select Base Settings and press OK.
ó
Select Dial Set and press OK.
ó
Enter the base station PIN (factory setting: 0000).
ó
Select Emer. Number and press OK.
ó
Select the area to enter the number and press OK.
ó
Press Option.
ó
Select Save and press OK to confirm.
Dialling mode
Some telephone networks use pulses to dial a number.
ó
Press MENU, select Settings and press OK.
ó
Select Base Settings and press OK.
ó
Select Dial Set and press OK.
ó
Enter the base station PIN (factory setting: 0000).
ó
Select Dialling Mode and press OK.
ó
Select Tone or Pulse.
ó
Press OK to confirm.
45
Access code
The access code must be pre-dialled to dial into the public telephone network
on PABX’s. The telephone inserts the pause automatically if the access code has
been programmed.
ó
Press MENU, select Settings and press OK.
ó
Select Base Settings and press OK.
ó
Select Dial Set and press OK.
ó
Enter the base station PIN (factory setting: 0000).
ó
Select Access Code and press OK.
ó
Enter the access code (up to 4 digits).
ó
Press OK to confirm.
Recall time
You can set different recall times to use special network or PABX-functionalities:
98, 270, 380 and 600 ms.
ó
Press MENU, select Settings and press OK.
ó
Select Base Settings and press OK.
ó
Select Base Set and press OK.
ó
Select Dial Set and press OK.
ó
Enter the base station PIN (factory setting: 0000).
ó
Select Recall Time and press OK.
ó
Select the recall time.
ó
Press OK to confirm.
44
Page 25

Factory settings for the base station
ó
Press MENU, select Base Set and press OK.
ó
Select Default Set and press OK.
ó
Enter the base station PIN (factory setting: 0000).
ó
Display „Reset all Setting?“.
ó
Press OK.
ó
Display „All Settings Reset“.
Function After reset
Registered handsets Also registered
Dialling mode Tone
Flash time Local (300ms)
Access code Deleted
Emergency Number Own numbers keep stored
Ring Priority Disable
The number of rings for priority ringing 5
Base station PIN 0000
Call barring Deactivated
Caller list Deleted
SMS memories Deleted
SMS alert Off
47
Date and time
The base station contains a built-in date and time. The date and time can
be also set if the calling line identification is received with date and time.
Note: The year must be set manually.
ó
Press MENU, select Settings and press OK.
ó
Select Base Settings and press OK.
ó
Select Date/ Time and press OK.
ó
Enter the day/ month/ year and press OK.
ó
Enter the hours/ minutes.
ó
Press OK to confirm.
Base PIN
ó
Press MENU, select Base Set and press OK.
ó
Select Base PIN and press OK.
ó
Enter the base station PIN (factory setting: 0000).
ó
Enter the new base station PIN.
ó
Enter the new base station PIN again.
ó
Display „New PIN Stored“.
46
Page 26

Technical specifications
Base station and handset
Standard DECT/GAP
Number of channels 120 duplex channels
Channel spacing 1.728MHz
Bit rate 1152kbit / sec
Duplex procedure TDMA (time division multiple access procedure)
Voice coding ADPCM (32kbit/s)
Modulation GFSK
Radio frequency range 1.880 GHz to 1.900 GHz
Average transmission power Approx. 10 mW (per channel)
Range Up to 250 m outdoors
Up to 40 m indoors
Power supply
Base station Input: 230 V, 50 Hz
Output: AC 9 V, 300 mA
Handset Rechargeable Ni-MH 1.2V, 600 mAh, AAA(x 3)
Handset operating time with full battery Talk time: up to 10 hours
Standby time: up to 100 hours
Permissible ambient temperature 0 °C to 40°C
Permissible storage temperature – 20°C to 60 °C
Dimensions (length x width x height)
Handset (D) 28.0 x (W) 46.5 x (H) 115.0mm
Base station (D) 133.0 x (W) 81.5 x (H) 52.5 mm
Weight 111 g (Battery included)
Handset 148 g
Base station
Dialling procedure DTMF and Pulse
Recall key function Flash
Line cord 2 Meter Tel-line cord
49
Reference
Trouble shooting
Symptom Cause Remedy
No display Handset not switched on Switches handset on
Battery empty Put handset on the base
unit for charging batteries
No allocation of The telephone connection Plug in the telephone line
the switched line cable is not correctly put cable into the base unit
and also check the wall
socket connection
The power connection Plug in the power ADAPTOR
cable is not correctly put into the base unit
The switched line is occupied Wait until the switched line
by another handset is free
No radio communication Handset not registered Handset need to be
to the base unit or the bell at Base-station registered at base unit
of the handset is not ringing
The power connection Plug in the power ADAPTOR
cable is not correctly put into the base unit
into base
Handset is not ringing Ringing volume is too low Set the ringing volume high
the bell on the handset
When dialling, the switched Lock mode enable Check lock mode, and
line disconnected disable lock mode
48
Page 27

Conformity
This device is intended to be operated on the analogue Swiss network. Countryspecific conditions have to be taken into account. If you have any questions
about the differences between the public phone networks, please contact your
specialist dealer or network provider.
Swisscom hereby declares that this device meets the essential requirements and
other relevant regulations laid down in Directive 1999/5/EC.
The Declaration of Conformity can be found the following web site:
www.swisscom.com/onlineshop under the rubric, Phone, Declaration of
Conformity or can be ordered from the following postal address:
Swisscom Fixnet Ltd
Residential
Customer Premises Equipment (CPE)
3050 Bern
51
Maintenance / Warranty
Rental devices
If your phone does not operate properly, notify Technical Assistance (phone
number 175). The repair
1)
and the fault action are free of charge.
Purchased devices
Repair services are performed frees of charge within the warranty period in
accordance with the regulation of the warranty certificate. If a repair is necessary,
the device must be returned to the place of purchase.
If Technical Assistance is made available (during the warranty period a well),
the fault action is charged (route lump sum price as well as time expenses). The
repair costs are additional outside the warranty period.
Batteries
Battery cells are considered material, which is not covered by the warranty service.
Defective batteries are not replaced free of charge. This applies to rental and
purchased devices.
Help
If you have any general questions about products, services, etc., please contact
your Swisscom Information Centre (toll free number 0800 800 800).
General remark
1)
except for damage to wearing parts (cables, labels, batteries etc.) and damage
arising from incorrect handling such as dropping it or allowing fluid to penetrate
into handset etc.
50
 Loading...