

Page 1

Aton C30
Manual
Bedienungsanleitung
Mode d’emploi
Istruzioni per l’uso
Page 2
1
2
3
4
5
6
7
8
21
20
19
18
17
16
10
13
14
15
9
11
12
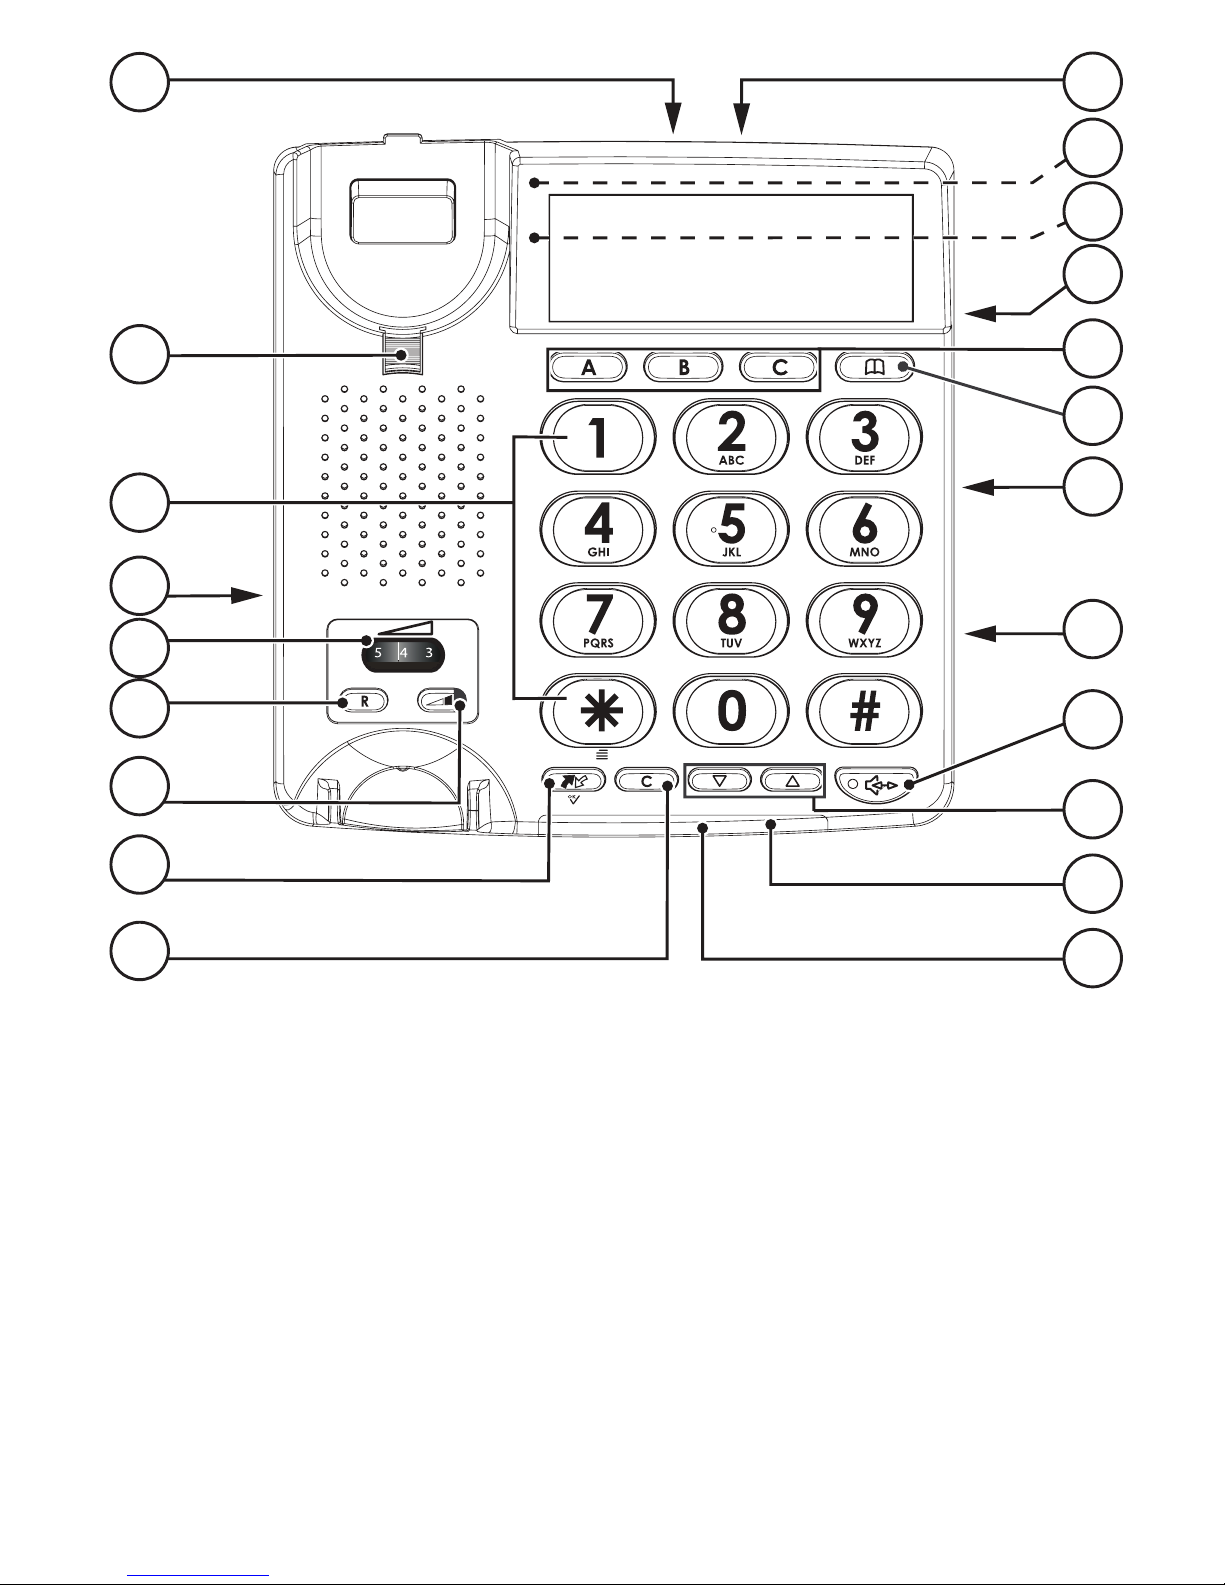
1. Telephone line socket
2. Handset hook
3. Keypad
4. Handset cord socket
5. Handset volume
6. Recall
7. Volume boost
8. Call memory / OK
9. Delete
10. Mains adapter socket
11. Ring tone
12. Ring melody
13. Ring volume
14. Speed dial keys
15. Phone book
16. Handset tone
17. Speaker volume
18. Speakerphone
19. UP/DOWN
20. New call indicator
21. Ringer indicator
English
Page 3

1. Prise de ligne téléphonique
2. Languette de support du
combiné
3. Clavier
4. Prise du cordon du combiné
5. Volume du combiné
6. Touche R
7. Amplication du volume
8. Journal des appels / OK
9. Effacer
10. Prise du bloc d'alimentation
11. Tonalité d'appel
12. Mélodie
13. Volume de la sonnerie
14. Touches mémoires directes
15. Répertoire
16. Tonalité du combiné
17. Volume du haut-parleur
18. Mode mains libres
19. HAUT/BAS
20. Témoin d’appel en absence
21. Témoin de la sonnerie
Français
1. Presa linea telefonica
2. Gancio cornetta
3. Tastiera
4. Presa cavo cornetta
5. Volume cornetta
6. Recall (funzione richiamata)
7. Volume amplicato
8. Ultime chiamate / OK
9. Elimina
10. Presa adattatore di rete
11. Suoneria
12. Melodia suoneria
13. Volume suoneria
14. Tasti composizione rapida
15. Rubrica telefonica
16. Tono cornetta
17. Volume microfono
18. Vivavoce
19. FRECCIA SU/FRECCIA GIÙ
20. Indicatore nuova chiamata
21. Indicatore suoneria
Italiano
1. Buchse für das Telefonkabel
2. Hörerhaken für Wandmontage
3. Zahlenfeld
4. Buchse für Hörerspiralkabel
5. Hörerlautstärke
6. R-Taste
7. Lautstärkeanhebung
8. Anruiste / OK
9. Löschen
10. Buchse für Netzteil
11. Klingeltöne (an der Unterseite)
12. Klingelmelodie (an der
Unterseite)
13. Klingellautstärke
14. Direktwahltasten
15. Telefonbuch
16. Hörerklang
17. Lautsprecherlautstärke
18. Lautsprecher
19. NACH OBEN/NACH UNTEN
20. Anzeige neue Anrufe
21. Optische Anrufsignalisierung
Deutsch
Page 4

1
English
Description
Aton C30
This product can be used as a desktop or wall-mounted
telephone. Handset tone control, volume boost, enhanced ring
volume and visual call indication make the telephone well
suited for people with hearing difficulties.
The extra-large keypad and easy to read display with large
characters make the telephone easy to use even with impaired
eyesight.
The built-in phonebook can store up to 30 names and
numbers. Three one touch memory keys can be programmed
for frequently used numbers or emergency numbers. A call
memory logs the 15 most recently incoming and outgoing
calls.
A speakerphone function allows you to talk hands-free with
the simple press of a button.
Page 5

2
English
Installation
Connection
1. Connect the curly cord to the handset and to the socket
marked
y
on the telephone.
2. Connect the telephone line cord to a network wall socket
and to the
K
socket on the back of the telephone.
3. Connect the mains adapter* to the mains power wall
socket and to the DC 9V socket on the telephone.
4. Lift the handset and listen for the dial tone.
Batteries
Four AA alkaline batteries are needed for the call memory and
speakerphone in the event of a power cut. When
BATT. LOW
is displayed, replace all 4 batteries. Use only AA alkaline
batteries of good quality (not included).
Note!
Before installing or changing the batteries, make sure
that the telephone is not connected to the telephone
network.
1. Remove the battery cover and insert the batteries ensuring
correct battery polarity is observed.
2. Replace the battery cover and reconnect the telephone
line cord.
* Note: Only use the enclosed mains adapter.
Page 6
3
English
Basic setup
Before using the telephone the first time, the following basic
settings should be made. After confirming a setting, the next
setting is automatically displayed. To skip to the next setting,
press .
The phone will return to standby mode after 30 seconds of
inactivity or when pressing .
On first setup the display clock will show
00:00
.
1. Press and hold * for about 5 seconds until the hour
flashes.
2. Use
v / V
to change the value and confirm with .
3. Repeat steps 1–2 to set the minutes, day and month.
ENGLISH
is displayed.
Use
v / V
to select the desired language, then confirm with
.
Page 7
4
English
-2- CONTRAST
Use
v / V
to set the display contrast setting
(1–4), and confirm with .
KEYT. ON
Use
v / V
to set key tone ON/OFF, and confirm with .
-100- FLASH
Use
v / V
to set the flash key time (100/300/600 ms) and
confirm with .
The standard setting is 100 for Switzerland.
LED OFF
Use
v / V
to enable/disable the LED indicator for new
calls, and confirm with .
TONE
Use
v / V
to select either tone or pulse dialling mode, and
confirm with .
Note!
If unsure of which mode to use, select TONE as this
works in most locations.
Page 8
5
English
Wall mounting
The telephone can be wall mounted by using the included
wall mount bracket and two screws (not included).
Warning!
Make sure that no cables, water pipes or gas pipes are
located inside the wall before drilling into it.
1. Drill two holes in the wall, vertically 83 mm apart.
2. Insert the screws, allowing them to project
~5 mm out from the wall.
3. Unplug and remove the handset.
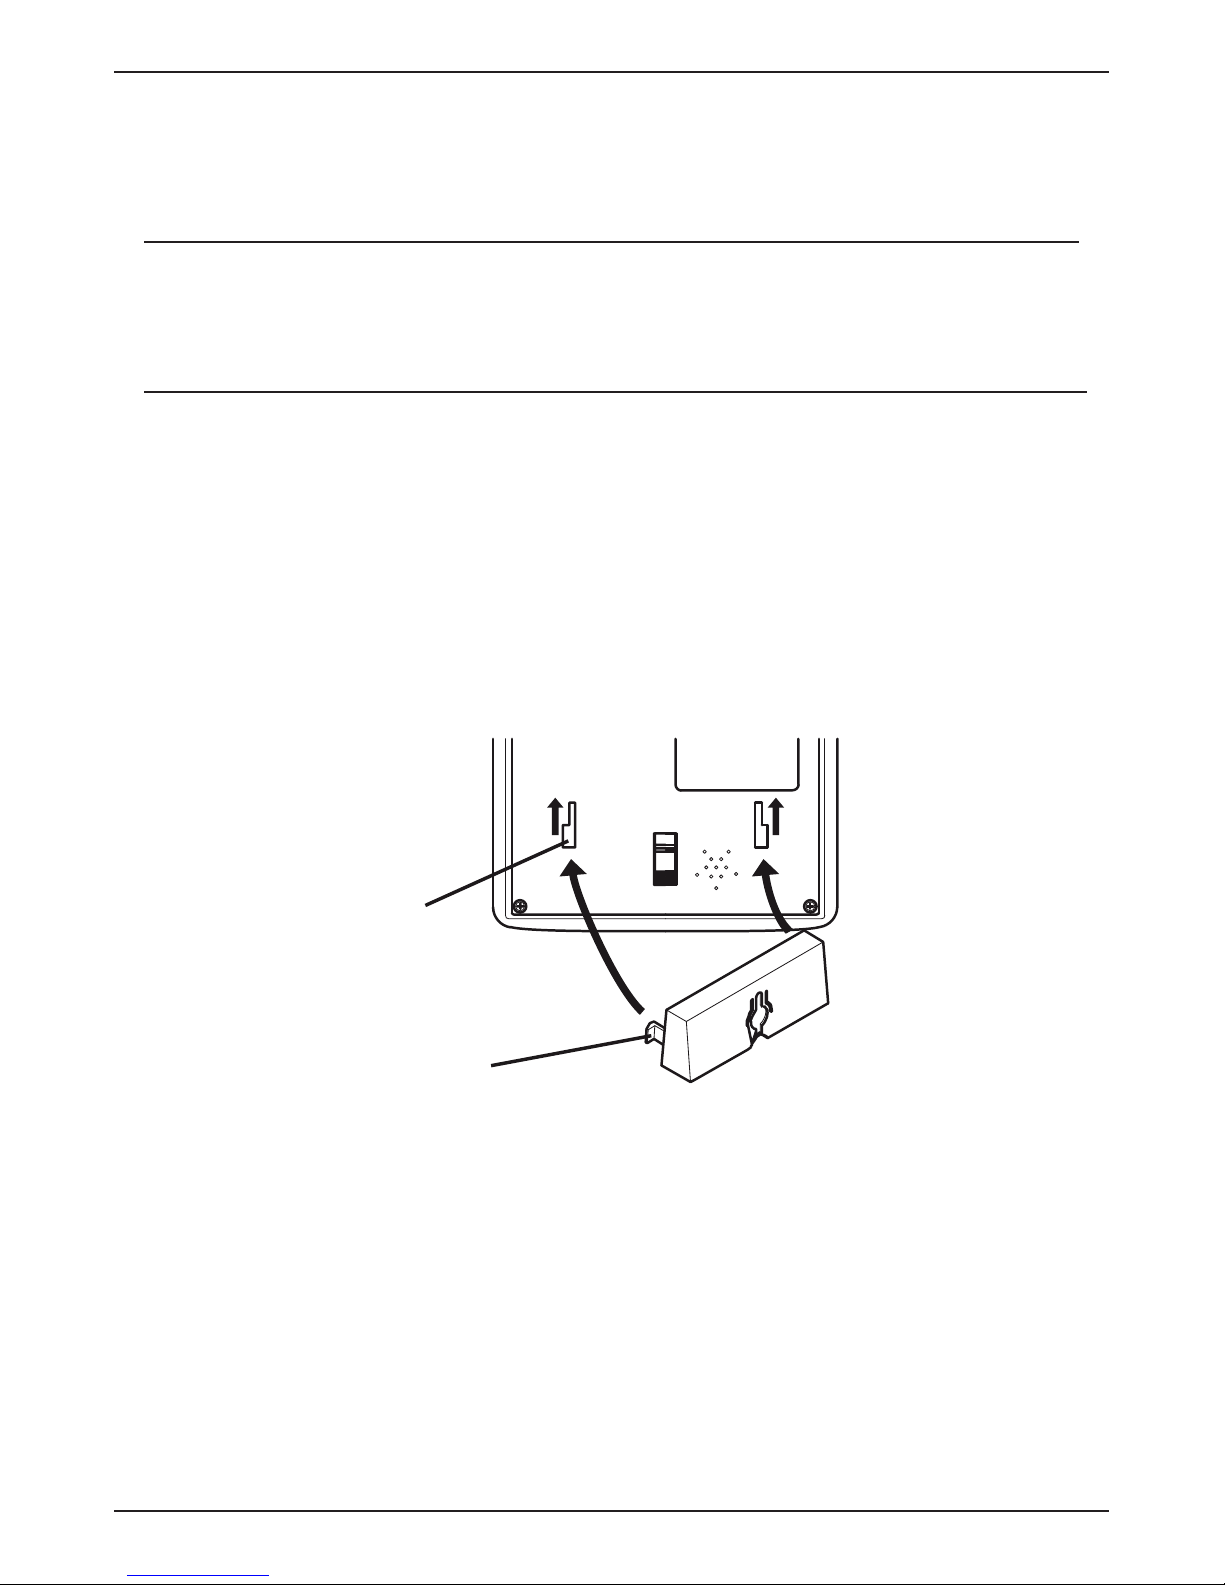
4. Fit the guide tabs (A) on the bracket into the slots (B) on
the back of the telephone, then slide the bracket upwards
until it snaps into place.
B
A
Page 9
6
English
5. Position the telephone so that the screws on the wall fit
into the slots in the bracket, then slide the telephone
downwards until it is hanging on the screws.
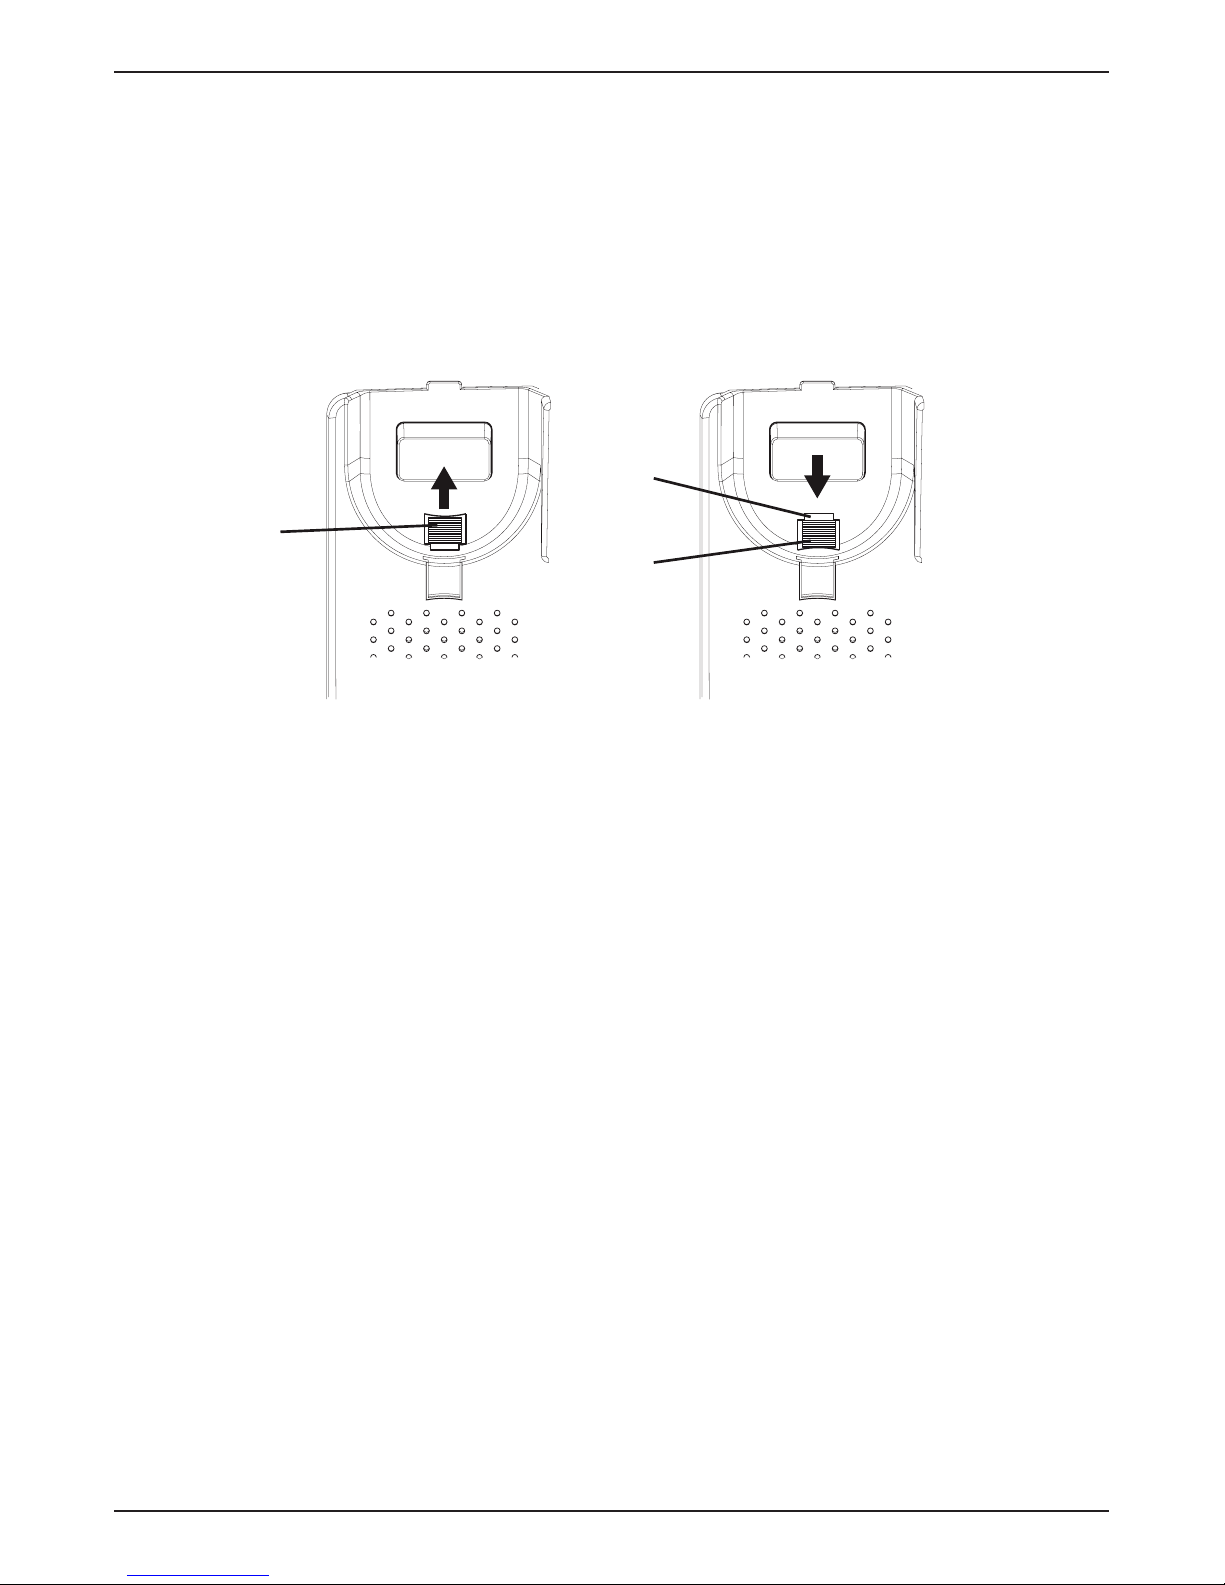
6. Remove the handset hook (C) by pushing it upwards, and
insert it in the reversed position so that the small tab (D)
protrudes. The hook will now keep the handset in the
cradle when the phone is wall mounted.
C
D
C
7. Reconnect the handset and place it in the cradle.
Note!
If the phone is to be used as a desktop phone again,
remember to reverse the position of the handset hook.
Page 10
7
English
Operation
Making a call
Normal dialling
1. Lift the handset.
2. Dial the number. Hang up the handset to terminate the
call.
Speakerphone
Note!
The speakerphone only works when batteries are installed
or mains adapter is connected.
1. Press
s
to activate the speakerphone. The LED next to
the key will light up.
2. Dial the number. Press
s
again to terminate the call.
Lift the handset to switch from speaker to handset during a
call.
Pre-dialling
1. Enter the number. Press to delete the last entered
digit.
2. Lift the handset or press
s
to dial.
Quick redial
1. Lift the handset or press
s
.
2. Press to redial the last dialled number.
Page 11

8
English
Dialling numbers in the call memory
1. Press to display the most recent call.
2. Use
v / V
to scroll through the last 15 incoming and
outgoing calls.
= Incoming call
= Outgoing call
3. Lift the handset or press
s
to dial the displayed
number.
Speed dial (one-touch dialling)
1. Press one of the speed dialling keys A/B/C. The stored
telephone number is displayed.
2. Lift the handset or press
s
to dial.
Dialling numbers in the phone book
1. Press
b
to open the phone book.
2. Use
v / V
to browse through the phone book, or enter
the first character in the name to quickly find an entry
(see Keypad characters).
3. Lift the handset or press
s
to dial.
Answering
Lift the handset to answer an incoming call, or press
s
to
answer using the speakerphone.
Ring signal
The ring melody and tone can be adjusted using the sliders on
the bottom of the telephone.
Ring melody
Ring tone
The ring volume is adjusted with the switch on the right side
of the telephone.
Page 12
9
English
Volume control
The speaker volume is adjusted with a slider on the right side
of the telephone.
The handset volume control is located under the handset.
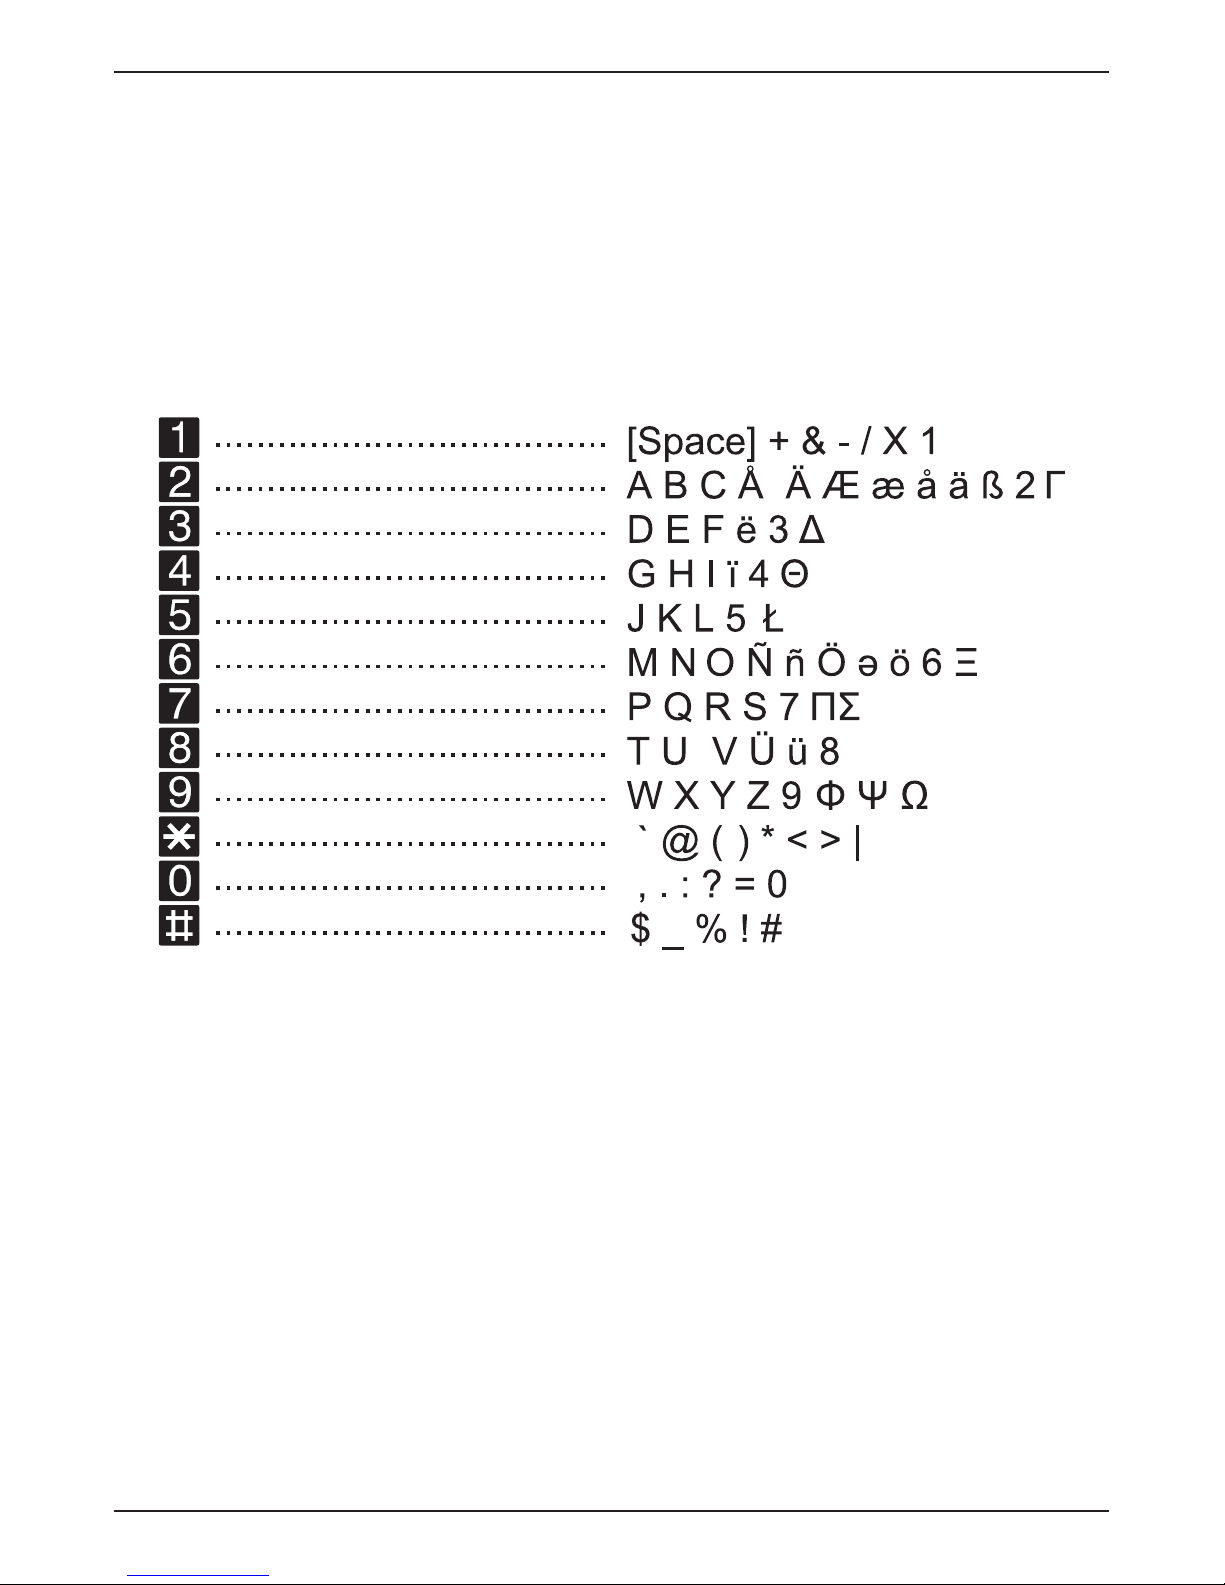
Keypad characters
Page 13

10
English
Additional functions
Phone book
The phone book can store up to 30 entries. When the memory
is full,
----100%
is displayed.
Storing numbers in the phone book
1. Press and hold
b
until a blinking cursor is shown.
2. Enter a telephone number (up to 22 digits). Use
v/V
to move the cursor and to erase if needed.Use # to
insert a pause in the number.
3. Press to confirm. A blinking cursor will be shown on
the second line on the display.
4. Enter a name (up to 9 characters) for the number to be
stored (see Keypad characters).
5. Press to confirm.
OK
is now displayed.
6. Repeat steps 1–5 to store another number, or press and
hold to exit.
Deleting numbers from the phone book
1. Press
b
to open the phone book.
2. Use
v/V
to browse through the phone book, or enter the
first character to quickly find an entry.
3. Press and hold to delete the entry.
Page 14
11
English
Editing numbers in the phone book
1. Press
b
to open the phone book.
2. Use
v/V
to browse through the phone book, or enter the
first character to quickly find an entry.
3. Press and hold
b
until the blinking cursor appears.
4. Use
v/V
to move the cursor, and use and the
keypad to erase and enter new data.
5. Press to confirm. The cursor will move to the second
line.
6. Repeat step 4 to edit the name/description.
7. Press to confirm.
OK
is displayed.
Storing speed dial numbers
1. Press and hold one of the speed dialling keys
A/B/C until a blinking cursor is shown on the first line on
the display.
2. Enter a telephone number (up to 22 digits) using the
keypad. Use
v/V
to move the cursor and to erase
if needed.
Use
#
to insert a pause in the number.
3. Press to confirm. A blinking cursor will be shown on
the second line on the display.
4. Enter a name (up to 9 characters) for the number to be
stored (see Keypad characters).
5. Press to confirm. OK is displayed.
6. Repeat steps 1–5 to store numbers for the other speed
dialling keys.
Deleting speed dial numbers
Speed dial numbers can not be deleted, they can only be
replaced by storing a new number.
Page 15
12
English
Caller ID and call memory
Caller ID allows you to see who is calling before you answer
and to see who has called in your absence.
Note! The Caller ID function must be subscribed. Please
contact your network operator for more information.
The call memory will store the last 15 incoming and 15 outgoing
calls. On the display, incoming (answered and unanswered) calls
are indicated with and outgoing calls with .
If the Call Indicator function is active, a blinking light
indicates that an unanswered call has been received since the
call memory was last checked.
Browsing the call memory
1. Press then
v / V
to scroll through the call
memory. The number and time of each call will be
displayed. For calls older than 24 hours, the date of the
call is displayed instead of the time.
2. Press to exit the call memory.
Deleting numbers from the call memory
1. Press then
v / V
to scroll through the call memory.
2. Press and hold to delete the selected entry.
Copying call memory entries to the phone book
1. Press then
v / V
to scroll through the call memory.
2. Press and hold * until
OK
is displayed. The selected
number has now been saved to the phone book.
Call timer
The display shows the current time when in standby mode.
During a call the display will show a call timer instead,
indicating the duration of the call. The call duration is
displayed for 5 seconds after the call is terminated.
Page 16

13
English
Hearing aid
This telephone is hearing aid compatible. Select the T mode
on your hearing aid to enable this feature.
Recall key (R)
ABC
2
1
DEF
3
JKL
5
GHI
4
MNO
6
TUV
8
PQRS
7
WXYZ
9
0
#
ABC
C
543
R
HearPlus
R
Press the
R
key followed by the extension number to transfer
a call when connected to a PBX system.
Additional network services may be accessible by using the
R, *
and # keys. Please contact your network operator for
more information about the available network services.
Volume Boost
The handset volume can be raised another 10 dB by pressing
the Volume Boost key while talking. The LED indicator on the
key will light up. Press the key again or terminate the call to
turn off Volume Boost.
Warning!
The handset volume can be very loud with this setting.
Volume boost should only be used by persons with impaired
hearing.
Handset tone
The speech tone (bass/treble) can be adjusted for better
clarity using the handset tone control on the right side of the
phone. PLEASE NOTE! Only works when Boost is active.
Page 17

14
English
Care and maintenance
Your unit is a technically advanced product and should be treated with the
greatest care. Negligence may void the warranty.
• Protect the unit from moisture. Rain/snowfall, moisture and all types of
liquid can contain substances that corrode the electronic circuits. If the
unit gets wet, you should remove the battery and allow the unit to dry
completely before you replace it.
• Do not use or keep the unit in dusty, dirty environments. The unit’s moving
parts and electronic components can be damaged.
• Do not keep the unit in warm places. High temperatures can reduce the
lifespan for electronic equipment, damage batteries and distort or melt
certain plastics.
• Do not keep the unit in cold places. When the unit warms up to normal
temperature, condensation can form on the inside which can damage the
electronic circuits.
• Do not try to open the unit in any other way than that which is indicated
here.
• Do not drop the unit. Do not knock or shake it either. If it is treated roughly
the circuits and precision mechanics can be broken.
• Do not use strong chemicals to clean the unit.
• The mains adapter is the disconnect device between the product and
mains power. The mains socket outlet must be close to the equipment and
easily accessible.
The advice above applies to the unit, battery, mains adapter and other
accessories.
Faults and self-help with troubleshooting:
Not every problem signies a fault in your telephone. In some cases,
problems can be resolved by briey interrupting the power supply to the base
station (unplug the power supply unit and then plug it in again) or just plug
in the telephone line cord off and on again.
Important: Some problems or faults can only be resolved if you take
the complete device (base station, handset and connection cable)
to the place of purchase.
Page 18

15
English
Warranty/Maintenance/Repair/ Approval
Warranty
The warranty period is 2 years as of the date of purchase. For warranty repair, the
warranty card, lled out and stamped by the place of purchase must accompany
the faulty device. Excluded from the warranty are damages due to improper use,
wear and tear or tampering by others. The warranty does not include consumable
materials and faults that have only an insignicant affect on the value or usability
of the product. In case of errors, please contact your place of purchase.
Repair/Maintenance
Rental devices
If your phone does not operate properly, notify Technical Assistance
(phone number 0800 800 800).
The repair* and the fault action are free of charge.
Purchased devices
Repair services are performed free of charge within the warranty period
in accordance with the regulation of the warranty certicate. If a repair is
necessary, the device must be returned to the place of purchase.
If Technical Assistance is made available (also during the warranty period*),
the fault action is charged (route lump sum price as well as expenses for
time). The repair costs are additional outside the warranty period.
Help
If you have any general questions about products, services etc., please
contact your Swisscom Information Centre (toll-free number 0800 800 800).
* An exception is damage to wearing parts (cable, labels, batteries etc.) and
due to improper handling (damage from dropping, inltrated uids etc.).
Page 19
16
English
Specications
Size: 175 mm x 175 mm x 60 mm
Weight: 750 g (including batteries)
Battery: 4 x 1.5 V AA Alkaline batteries
Conformity
This device is intended to be operated on the analogue Swiss network.
Country-specic conditions have to be taken into account. If you have any
questions about the differences between the public phone networks, please
contact your specialist dealer or network provider.
Swisscom hereby declares that this device meets the essential requirements
and other relevant regulations laid down in Directive 1999/5/EC.
The Declaration of Conformity can be found the following web site:
www.swisscom.ch
under the rubric “Online Shop”, Phone, Declaration of Conformity.
WEEE
Disposal of Waste Equipment by Users in Private Households in the
European Union. This symbol on the product or on its packaging
indicates that this product must not be disposed of with your other
household waste. Instead, it is your responsibility to dispose of your
waste equipment by handing it over to a designated collection point for
the recycling of waste electrical and electronic equipment. The separate
collection and recycling of your waste equipment at the time of disposal will
help to conserve natural resources and ensure that it is recycled in a manner
that protects human health and the environment. For more information about
where you can drop off your waste equipment for recycling, please contact
your local city ofce, your household waste disposal service or the shop where
you purchased the product.
Where batteries or accumulators are collected together with waste electrical
and electronic equipment on the basis of Directive 2002/96/EC, batteries
or accumulators shall be removed from the collected waste electrical and
electronic equipment.
Page 20

1
Deutsch
Beschreibung
Aton C30
Das Aton C30 kann als Tischtelefon verwendet oder an die
Wand montiert werden. Durch eine verbesserte Regelung
des Hörerklanges, die Lautstärkeanhebung, die verbesserte
Klingellautstärke und die optische Anrufsignalisierung eignet
sich diese Telefon optimal für Menschen mit Hörproblemen.
Durch das extra große Tastenfeld und das leicht lesbare
Display mit großen Zeichen kann das Telefon auch von
Menschen mit eingeschränkter Sehfähigkeit verwendet
werden.
Im integrierten Telefonbuch können bis zu 30 Namen mit
Rufnummern gespeichert werden. Für häufig verwendete
Nummern oder Notrufnummern können drei Direktwahltasten
programmiert werden. Die 15 letzten ein- und ausgehenden
Anrufe werden in einer Anrufliste gespeichert.
Mit der Freisprechfunktion haben Sie mit einem Tastendruck
die Hände beim Telefonieren frei.
Page 21

2
Deutsch
Installation
Anschluss
1. Schließen Sie das Spiralkabel an den Telefonhörer und die
mit
y
gekennzeichneten Buchse am Telefon an.
2. Schließen Sie das Telefonkabel an eine Telefondose
und die mit
K
gekennzeichnete Buchse auf der
Geräterückseite an.
3. Stecken Sie den Netzadapter* in die Netzsteckdose und
den 9-V-Gleichstromstecker am Telefon an.
4. Nehmen Sie den Hörer ab, und prüfen Sie,
ob das Freizeichen zu hören ist.
Batterien
Damit die Speicherung der Anrufliste und die
Freisprechfunktion usw. während eines Stromausfalls
funktioniert, benötigen Sie vier 1,5V-Batterien vom Typ AA.
Wenn
BATT. LOW
angezeigt wird, ersetzen Sie alle vier
Batterien. Verwenden Sie nur hochwertige AA-Alkali-Batterien
(nicht im Lieferumfang enthalten).
Hinweis!
Stellen Sie vor dem Einsetzen oder Wechseln der
Batterien sicher, dass das Telefon nicht an das
Telefonnetz angeschlossen ist.
1. Entfernen Sie die Abdeckung des Batteriefachs. Setzen
Sie die Batterien ein, und achten Sie dabei auf die
korrekte Polung.
2. Setzen Sie die Abdeckung des Batteriefachs wieder auf, und
schließen Sie die Telefonleitung wieder an.
*Hinweis: Nur beiliegendes Steckernetzteil verwenden.
Page 22
3
Deutsch
Grundlegende Einrichtung
Bevor Sie das Telefon zum ersten Mal verwenden, sollten die
folgenden grundlegenden Einstellungen vorgenommen werden.
Wenn Sie eine Einstellung bestätigt haben, wird automatisch die
nächste Einstellung angezeigt. Um zur nächsten Einstellung zu
springen, drücken Sie .
Das Telefon kehrt nach 30 Sekunden ohne Betätigung oder
durch Drücken der Taste in den Ruhezustand zurück.
Bei der Ersteinrichtung wird auf der Uhr im Display
00:00
angezeigt.
1. Halten Sie die *-Taste etwa fünf Sekunden lang gedrückt, bis
die Stundenanzeige anfängt zu blinken.
2. Wählen Sie
v / V
, um den Wert zu ändern, und
bestätigen Sie mit .
3. Wiederholen Sie die Schritte 1-2, um die Minuten, den
Tag und den Monat festzulegen.
DEUTSCH
wird angezeigt.
Wählen Sie
v / V
, um die gewünschte Sprache
auszuwählen, und bestätigen Sie mit .
-2- CONTRAST
Wählen Sie
v / V
, um die Einstellung für den Display-
Kontrast (1-4) auszuwählen, und bestätigen Sie mit .
Page 23

4
Deutsch
KEYT. ON
Wählen Sie
v / V
, um den Tastenton zu aktivieren/
deaktivieren, und bestätigen Sie
mit .
-100- FLASH
Wählen Sie
v / V
, um die Flash-Zeit (100/300/600 ms)
einzustellen, und bestätigen
Sie mit .
Der Standardwert in der Schweiz ist 100.
LED OFF
Wählen Sie
v / V
, um die LED-Anzeige für neue Anrufe zu
aktivieren/deaktivieren, und bestätigen Sie mit .
TONE
Wählen Sie
v / V
, um das Ton- oder Impulswahlverfahren
auszuwählen, und bestätigen Sie mit .
Hinweis!
Falls Sie wegen des Wahlverfahrens im Zweifel sind,
wählen Sie TONE.
Page 24

5
Deutsch
Wandmontage
Mit der im Lieferumfang enthaltenen Halterung für die
Wandmontage und zwei Schrauben (nicht im Lieferumfang
enthalten) kann das Telefon an der Wand befestigt werden.
Warnung!
Prüfen Sie an der Lage der Bohrlöcher, dass in der Wand
keine Kabel, Wasserrohre oder Gasleitungen verlaufen.
1. Bohren Sie zwei Löcher senkrecht übereinander mit
Abstand 83 mm in die Wand.
2. Drehen Sie die Schrauben ein, und lassen Sie sie etwa
5 mm aus der Wand herausstehen.
3. Ziehen Sie das Spiralkabel aus dem Hörer und legen den
Hörer beiseite.
4. Setzen Sie die Führungsspitzen (A) der Halterung in die
Schlitze (B) auf der Rückseite des Telefons ein, und
schieben Sie die Halterung dann nach oben, bis sie
einrastet.
B
A
Page 25

6
Deutsch
5. Positionieren Sie das Telefon so, dass die Schrauben an
der Wand in die Schlitze in der Halterung passen, und
schieben Sie dann das Telefon nach unten, bis es auf den
Schrauben aufliegt.
6. Entfernen Sie den Hörerhaken (C), indem Sie ihn nach
oben ziehen, und setzen Sie ihn umgekehrt wieder ein,
sodass die kleine Rastnase (D) herausragt. Die Rastnase
sorgt nun dafür, dass der Hörer auch bei senkrechter Lage
auf dem Telefon bleibt.
C
D
C
7. Stecken Sie das Spiralkabel in den Hörer und legen Sie
ihn auf die Gabel.
Hinweis!
Wenn das Telefon wieder als Tischtelefon verwendet
werden soll, müssen Sie die Position des Hörerhakens
wieder umkehren.
Page 26

7
Deutsch
Betrieb
Anrufen
Normaler Wählvorgang
1. Nehmen Sie den Hörer ab.
2. Wählen Sie die Rufnummer. Hängen Sie den Hörer ein,
um den Anruf zu beenden.
Freisprechen
Hinweis!
Das Freisprechen funktioniert nur, wenn Batterien
eingesetzt sind oder das Telefon über das Netzteil mit
Strom versorgt wird.
1. Drücken Sie
s
, um die Freisprechfunktion zu aktivieren.
Die LED neben der Taste leuchtet auf.
2. Wählen Sie die Rufnummer. Drücken Sie erneut
s
, um
den Anruf zu beenden.
Heben Sie den Hörer ab, um während eines Gesprächs von der
Freisprechfunktion zum Hörerbetrieb zu wechseln.
Wahlvorbereitung
1. Geben Sie die Rufnummer ein. Drücken Sie , um die
zuletzt eingegebene Ziffer zu löschen.
2. Nehmen Sie den Hörer ab, oder drücken Sie
s
, um die
Nummer zu wählen.
Wahlwiederholung
1. Nehmen Sie den Hörer ab, oder drücken Sie
s
.
2. Drücken Sie , um die zuletzt gewählte Nummer
erneut zu wählen.
Page 27

8
Deutsch
Wählen von Nummern aus der Anruiste
1. Drücken Sie , um den letzten Anruf anzuzeigen.
2. Wählen Sie
v / V
, um durch die letzten
15 ein- und ausgehenden Anrufe zu blättern.
= Eingehender Anruf
= Ausgehender Anruf
3. Nehmen Sie den Hörer ab, oder drücken Sie
s
, um die
angezeigte Nummer zu wählen.
Direktwahltasten
1. Drücken Sie eine der Direktwahltasten A/B/C. Die
gespeicherte Telefonnummer wird angezeigt.
2. Nehmen Sie den Hörer ab, oder drücken Sie
s
, um die
Nummer zu wählen.
Wählen von Nummern aus dem Telefonbuch
1. Drücken Sie
b
, um das Telefonbuch aufzurufen.
2. Wählen Sie
v / V
, um durch das Telefonbuch
zu blättern, oder geben Sie das erste Zeichen des
Namens ein, um einen Eintrag schnell zu finden (siehe
Tastenfeldzeichen).
3. Nehmen Sie den Hörer ab, oder drücken Sie
s
, um die
Nummer zu wählen.
Annehmen von Anrufen
Nehmen Sie den Hörer ab, um einen eingehenden Anruf
anzunehmen, oder drücken Sie
s
, um den Anruf per
Freisprechbetrieb anzunehmen.
Page 28

9
Deutsch
Klingelton
Klingelmelodie und Klingelklang können mit den
Schiebereglern an der Unterseite des Telefons eingestellt
werden.
Klingelmelodie
Klingeltöne
Die Klingellautstärke wird mit einem Schieberegler auf der
rechten Seite des Telefons eingestellt.
Lautstärkeregelung
Die Freisprech wird mit einem Schieberegler auf der rechten Seite
des Telefons eingestellt.
Der Hörerlautstärkeregler befindet sich unter dem Hörer.
Tastenfeldzeichen
Page 29

10
Deutsch
Weitere Funktionen
Telefonbuch
Im Telefonbuch können bis zu 30 Einträge gespeichert
werden. Wenn der Telefonbuchspeicher voll ist, wird
----100%
angezeigt.
Speichern von Nummern im Telefonbuch
1. Halten Sie
b
gedrückt, bis ein blinkender Cursor
angezeigt wird.
2. Geben Sie eine Telefonnummer (bis zu 22 Ziffern) ein. Wählen
Sie
v / V
, um den Cursor zu verschieben, und , um
bei Bedarf Ziffern zu löschen. Verwenden Sie #, um eine
Pause in die Nummer einzufügen.
3. Drücken Sie zur Bestätigung . In der zweiten
Displayzeile wird ein blinkender Cursor angezeigt.
4. Geben Sie einen Namen (bis zu 9 Zeichen) für die zu
speichernde Nummer ein (siehe Tastenfeldzeichen).
5. Drücken Sie zur Bestätigung .
OK
wird angezeigt.
6. Wiederholen Sie die Schritte 1-5, um eine weitere
Nummer zu speichern, oder halten Sie gedrückt, um
ins Menü zurückzukehren.
Löschen von Nummern aus dem Telefonbuch
1. Drücken Sie
b
, um das Telefonbuch aufzurufen.
2. Wählen Sie
v / V
, um durch das Telefonbuch zu
blättern, oder geben Sie das erste Zeichen ein, um einen
Eintrag schnell zu finden.
3. Halten Sie gedrückt, um den Eintrag zu löschen.
Page 30

11
Deutsch
Bearbeiten von Nummern im Telefonbuch
1. Drücken Sie
b
, um das Telefonbuch aufzurufen.
2. Wählen Sie
v / V
, um durch das Telefonbuch zu
blättern, oder geben Sie das erste Zeichen ein, um einen
Eintrag schnell zu finden.
3. Halten Sie
b
gedrückt, bis ein blinkender Cursor
angezeigt wird.
4. Wählen Sie
v / V
, um den Cursor zu verschieben, und
wählen Sie und das Tastenfeld, um die Nummer zu
löschen und neue Ziffern einzugeben.
5. Drücken Sie zur Bestätigung . Der Cursor wird in die
zweite Zeile verschoben.
6. Wiederholen Sie Schritt 4, um den Namen/die
Beschreibung zu ändern.
7. Drücken Sie zur Bestätigung .
OK
wird angezeigt.
Speichern von Direktwahlnummern
1. Halten Sie eine der Direktwahltasten A/B/C gedrückt, bis
in der ersten Displayzeile ein blinkender Cursor angezeigt
wird.
2. Geben Sie eine Telefonnummer (bis zu 22 Ziffern) mit
der Tastatur ein. Wählen Sie
v / V
, um den Cursor zu
verschieben, und , um bei Bedarf Ziffern zu löschen.
Wählen Sie #, um eine Pause in die Nummer einzufügen.
3. Drücken Sie zur Bestätigung . In der zweiten
Displayzeile wird ein blinkender Cursor angezeigt.
4. Geben Sie einen Namen (bis zu 9 Zeichen) für die zu
speichernde Nummer ein (siehe Tastenfeldzeichen).
5. Drücken Sie zur Bestätigung . OK wird angezeigt.
6. Wiederholen Sie die Schritte 1-5, um Nummern für die
anderen Direktwahltasten zu speichern.
Page 31

12
Deutsch
Löschen von Direktwahlnummern
Direktwahlnummern können nicht gelöscht werden, Sie
können lediglich durch das Speichern einer neuen Nummer
ersetzt werden.
Rufnummernanzeige und Anruiste
Mit der Rufnummernanzeige können Sie vor dem Abnehmen des
Hörers sehen, wer Sie anruft. Die Anruiste enthält die während
Ihrer Abwesenheit eingegangenen Anrufe.
Hinweis!
Voraussetzung ist, dass die Rufnummernanzeige (CLIP)
an Ihrem Telefonanschluss zur Verfügung steht. Weitere
Informationen erhalten Sie bei Ihrem Netzbetreiber.
Die 15 letzten ein- und ausgehenden Anrufe werden in der Anruiste
gespeichert. Auf dem Display sind eingehende (angenommene und
nicht angenommene) Anrufe durch und ausgehende Anrufe durch
gekennzeichnet.
Wenn die Funktion zur Anrufanzeige aktiv ist, deutet ein
blinkendes Licht darauf hin, dass ein nicht angenommener
Anruf empfangen wurde, seit die Anrufliste zuletzt überprüft
wurde.
Page 32

13
Deutsch
Durchsuchen der Anruiste
1. Drücken Sie und dann
v / V
, um durch die
Anrufliste zu blättern. Die Nummer und die Uhrzeit jedes
Anrufs werden angezeigt. Bei Anrufen, die älter als 24
Stunden sind, wird statt der Uhrzeit das Datum des Anrufs
angezeigt.
2. Drücken Sie , um die Anruiste zu schließen.
Löschen von Nummern aus der Anruiste
1. Drücken Sie und dann
v / V
, um durch die
Anrufliste zu blättern.
2. Drücken Sie länger, um den ausgewählten Eintrag
zu löschen.
Kopieren von Einträgen aus der Anruiste in das
Telefonbuch
1. Drücken Sie und dann
v / V
, um durch die
Anrufliste zu blättern.
2. Halten Sie * gedrückt, bis
OK
angezeigt wird. Die
ausgewählte Nummer wurde im Telefonbuch gespeichert.
Anrufdauer
Im Ruhezustand wird auf dem Display die aktuelle Uhrzeit
angezeigt. Während eines Telefonats wird stattdessen die des
Gesprächs angezeigt. Die Gesprächsdauer wird nach Beenden
des Gesprächs für weitere fünf Sekunden angezeigt.
Hörgeräte
Dieses Telefon ist kompatibel mit Hörgeräten. Wählen Sie den
T-Modus an Ihrem Hörgerät, um diese Funktion zu verwenden.
Page 33

14
Deutsch
Rückfragetaste (R)
ABC
2
1
DEF
3
JKL
5
GHI
4
MNO
6
TUV
8
PQRS
7
WXYZ
9
0
#
ABC
C
543
R
HearPlus
R
Drücken Sie die Taste R, gefolgt von der Durchwahl, wenn Sie
an eine Telefonanlage angeschlossen sind.
Zusätzliche Netzdienste sind meist über die Tasten R, *
und
#
verfügbar. Weitere Informationen über die verfügbaren
Netzdienste erhalten Sie bei Ihrem Netzbetreiber.
Lautstärkeanhebung
Die Hörerlautstärke kann durch Drücken dieser Taste während des
Sprechens um weitere 10 dB erhöht werden. Die LED-Anzeige
neben der Taste leuchtet auf. Drücken Sie die Taste erneut,
oder beenden Sie das Gespräch, um die Lautstärkeanhebung
auszuschalten.
Warnung!
Die Lautstärke des Hörers kann mit dieser Einstellung extrem
hoch sein. Die Lautstärkeanhebung soll nur von hörgeschädigten
Personen genutzt werden.
Hörerklang
Der Klang des Hörers (Bass/Höhen) kann für eine bessere
Verständlichkeit mithilfe des Hörerklangreglers auf der rechten
Seite des Telefons eingestellt werden. ACHTUNG! Funktioniert nur,
wenn die verstärkung aktiviert ist.
Page 34

15
Deutsch
Pege und Wartung
Ihr Telefon ist ein technisch fortschrittliches Produkt. Es sollte mit
Sorgfalt behandelt werden. Unsachgemäßer Umgang kann zu Verlust der
Gewährleitung führen.
• Schützen Sie das Gerät vor Nässe. Regen/Schnee, Nässe und alle Arten
von Flüssigkeiten können Stoffe enthalten, die zu Korrosion der Elektronik
führen. Wird das Gerät nass, entfernen Sie die Batterien und lassen Sie
das Gerät vollständig trocknen; legen Sie die Batterien erst dann wieder
ein.
• Bewahren Sie das Gerät nicht in staubigen, schmutzigen Umgebungen
auf. Die beweglichen Geräteteile und die Elektronik könnten beschädigt
werden.
• Schützen Sie das Gerät vor Hitze. Hohe Temperaturen können die
Lebensdauer der Elektronik verringern, die Batterien beschädigen und
Kunststoffteile verformen oder gar schmelzen.
• Schützen Sie das Gerät vor Kälte. Beim Aufwärmen auf normale
Temperaturen kann sich im Innern Kondenswasser bilden, das die
Elektronik schädigt.
• Versuchen Sie nicht, das Gerät anders als hier beschrieben zu öffnen.
• Lassen Sie das Gerät nicht fallen. Schützen Sie es vor Stößen oder
Erschütterungen. Bei grobem Umgang können Leiter und feinmechanische
Teile zerstört werden.
• Reinigen Sie das Gerät nicht mit scharfen Mitteln.
• Das Netzteil dient als Trennvorrichtung zwischen Produkt und
Netzanschluss. Die Anschlussdose muss sich in unmittelbarer Nähe des
Geräts benden und gut zugänglich sein.
Diese Hinweise gelten für das Gerät, für Batterien, Netzadapter und anderes
Zubehör.
Störung und Selbsthilfe bei der Fehlersuche
Nicht bei jeder Störung muss es sich um einen Defekt an Ihrem Telefon handeln.
Unter Umständen genügt es, wenn Sie die Telefonanschlussschnur kurz aus- und
wieder einstecken.
Wichtig: Probleme oder Störungen können ggf. nur behoben
werden, wenn Sie den kompletten Apparat (Feststation, Hörer,
Anschlusskabel) in die Verkaufsstelle mitbringen.
Page 35

16
Deutsch
Garantie / Reparatur / Wartung / Zulassung
Garantie
Die Garantiezeit beträgt 2 Jahre ab Verkausdatum. Für eine Garantiereparatur
muss die ausgefüllte und von der Verkaufsstelle abgestempelte Garantiekarte
dem defekten Gerät beigelegt werden. Von der Garantie ausgenommen
sind Schäden aufgrund von unsachgemässem Gebrauch, Verschleiss oder
Eingriffen Dritter. Die Garantie umfasst keine Verbrauchsmaterialien und
Mängel, die den Wert oder die Gebrauchstauglichkeit nur unerheblich
beeinträchtigen. Wenden Sie sich im Fehlerfall bitte an die Verkaufstelle.
Reparatur / Wartung
Mietgeräte
Falls Ihr Telefon nicht ordnungsgemäss funktioniert, benachrichtigen Sie den
Störungsdienst (Telefonnummer 0800 800 800).
Die Reparatur* und der Störungsgang sind gratis.
Gekaufte Apparate
Die Reparaturleistungen werden innerhalb der Garantiezeit gemäss den
Bestimmungen des Garantiescheins gratis ausgeführt. Bei einer notwendigen
Reparatur muss der Apparat zur Verkaufsstelle zurück gebracht werden.
Wird der Störungsdienst (auch während der Garantiezeit*) aufgeboten, wird
der Störungsgang verrechnet (Wegpauschale sowie die Zeitaufwendungen).
Ausserhalb der Garantiezeit werden die Materialkosten zusätzlich belastet.
Hilfe
Haben Sie allgemeine Fragen wie z.B. Produkte, Dienstleistungen usw. so
wenden Sie sich bitte an die Auskunftsstelle der Swisscom (Gratisnummer
0800 800 800).
* Ausgenommen sind Schäden an Verschleissteilen (Kabel,
Beschriftungsschilder, Akku usw.) und durch unsachgemässe Behandlung
(Fallschäden, eingedrungene Flüssigkeiten usw.).
Page 36

17
Deutsch
Technische Daten
Abmessungen: 175 mm x 175 mm x 60 mm
Gewicht: 750 g (inkl. Batterien)
Akku: 4 x 1,5 V AA-Alkali-Batterien
Zulassung
Dieses Gerät ist zum Betrieb am analogen Schweizer Netz vorgesehen.
Länderspezische Besonderheiten sind berücksichtigt.
Bei Rückfragen wegen der Unterschiede in den öffentlichen Telefonnetzen
wenden Sie sich an Ihren Fachhändler bzw. Netzbetreiber.
Hiermit erklärt die Swisscom, dass dieses Gerät den grundlegenden
Anforderungen und anderen relevanten Bestimmungen der Richtlinie 1999/5/
EC etspricht.
Die Konformitätserklärung ist auf folgender Webseite abrufbar:
www.swisscom.ch
unter der Rubrik “Online Shop”, Telefone, Konformitätserklärungen
WEEE
Entsorgung von Elektrogeräten durch Benutzer in privaten Haushalten
in der EU. Dieses Symbol auf dem Produkt oder dessen Verpackung
gibt an, dass das Produkt nicht zusammen mit dem Restmüll entsorgt werden
darf. Es obliegt daher Ihrer Verantwortung, das Gerät an einer entsprechenden
Stelle für die Entsorgung oder Wiederverwertung von Elektrogeräten aller Art
abzugeben (z.B. ein Wertstoffhof). Die separate Sammlung und das Recyceln
Ihrer alten Elektrogeräte zum Zeitpunkt ihrer Entsorgung trägt zum Schutz
der Umwelt bei und gewährleistet, dass sie auf eine Art und Weise recycelt
werden, die keine Gefährdung für die Gesundheit des Menschen und der
Umwelt darstellt. Weitere Informationen darüber, wo Sie alte Elektrogeräte
zum Recyceln abgeben können, erhalten Sie bei den örtlichen Behörden,
Wertstoffhöfen oder dort, wo Sie das Gerät erworben haben.
Werden Batterien oder Akkumulatoren gemeinsam mit Elektro- und
Elektronikaltgeräten gemäß der Richtlinie 2002/96/EG gesammelt, sind
die Batterien oder Akkumulatoren aus den gesammelten Elektro- und
Elektronikaltgeräten zu entfernen.
Page 37

1
Français
Description
Aton C30
Ce produit peut être utilisé comme téléphone de bureau
ou mural. Le réglage de la tonalité du combiné, la touche
d'amplification du volume, l'augmentation du volume de
sonnerie et le témoin d'appel visuel rendent ce téléphone
particulièrement adapté aux personnes présentant une
déficience auditive.
Le clavier extra-large et l'afficheur très lisible à grands
caractères font de ce téléphone un appareil simple à utiliser,
même par les personnes malvoyantes.
Le répertoire intégré peut mémoriser jusqu'à
30 noms et numéros. Trois touches de mémoire directe
peuvent être programmées pour les numéros fréquemment
utilisés ou les numéros d'urgence. Un journal des appels
enregistre les 15 derniers appels entrants et sortants.
Une fonction mains libres vous permet, par une simple
pression sur un bouton, de téléphoner en gardant les mains
libres.
Page 38

2
Français
Installation
Raccordement
1. Reliez le cordon spiralé au combiné et à la prise marquée
y
du téléphone.
2. Reliez le cordon de ligne téléphonique à une prise
téléphonique murale et à la prise
K
située à l'arrière du
téléphone.
3. Branchez le bloc d’alimentation* à la prise de courant
secteur et à la prise 9 V DC du téléphone.
4. Décrochez le combiné et vérifiez que vous avez la tonalité.
Piles
Pour protéger les données en mémoire et d’autres fonctions en
cas de panne de courant, le téléphone nécessite quatre piles
AA de 1,5V. Lorsque
BATT. LOW
s'afche, remplacez les 4
piles. N'utilisez que des piles alcalines AA de bonne qualité (non
incluses).
Remarque :
Avant d'installer ou de remplacer les piles, assurezvous que le téléphone n'est pas branché sur le réseau
téléphonique.
1. Retirez la trappe du compartiment à piles et placez les
piles en veillant bien à respecter les polarités.
2. Remettez la trappe en place et rebranchez le cordon de
ligne téléphonique.
* Remarque : Utilisez uniquement le bloc d’alimentation
fourni !
Page 39

3
Français
Réglages de base
Avant d'utiliser le téléphone pour la première fois, vous devez
procéder aux réglages de base ci-dessous.
Une fois un réglage confirmé, le réglage suivant s'affiche
automatiquement. Pour passer au réglage suivant, appuyez
sur .
Le téléphone repasse en mode veille après 30 secondes d'inactivité
ou lorsque vous appuyez sur .
Lors de la première conguration, l'horloge de l'écran afche
00:00
.
1. Maintenez la touche * enfoncée pendant environ 5
secondes jusqu'à ce que l'heure clignote.
2. Utilisez les touches
v / V
pour modifier la valeur et
confirmez à l'aide de la touche .
3. Répétez les étapes 1–2 pour régler les minutes, le jour et
le mois.
DEUTSCH
s'affiche.
Utilisez les touches
v / V
pour sélectionner la langue de votre
choix, puis conrmez à l'aide de la touche .
-2- CONTRAST
Utilisez les touches
v / V
pour dénir la valeur de contraste
de l'écran (1–4), puis conrmez avec la touche .
KEYT. ON
Utilisez les touches
v / V
pour activer/désactiver les
touches sonores et confirmez à l'aide de la touche .
Page 40

4
Français
-100- FLASH
Utilisez les touches
v / V
pour régler l'intervalle de la
touche R (100/300/600 ms) et confirmez à l'aide de la
touche .
La valeur standard en Suisse est 100.
LED OFF
Utilisez les touches
v / V
pour activer/désactiver le témoin
lumineux (LED) signalant des appels en absence et confirmez
à l'aide de la touche .
TONE
Utilisez les touches
v / V
pour sélectionner le mode de
numérotation par tonalité ou par impulsion et confirmez à
l'aide de la touche .
Remarque :
Si vous n'êtes pas certain du mode à utiliser,
sélectionnez l'option TONE qui fonctionnera dans la
plupart des cas.
Page 41

5
Français
Fixation au mur
Le téléphone peut être fixé au mur à l'aide du support de
fixation mural fourni et de deux vis
(non incluses).
Avertissement !
Assurez-vous qu'aucun câble, aucune conduite d'eau ou de
gaz ne se trouve dans le mur avant de perforer.
1. Percez deux trous dans le mur en respectant un
écartement vertical de 83 mm.
2. Insérez les vis en les laissant dépasser du mur sur environ
5 mm.
3. Débranchez et retirez le combiné.
4. Placez les onglets de guidage (A) du support dans les
fentes (B) situées à l'arrière du téléphone, puis faites
glisser le support vers le haut jusqu'à ce qu'il se mette en
place.
B
A
5. Placez le téléphone de sorte que les vis du mur
correspondent aux fentes du support, puis glissez le
téléphone vers le bas jusqu'à ce qu'il s'accroche aux vis.
Page 42

6
Français
6. Retirez le décrocheur de combiné (C) en le poussant vers
le haut et introduisez-le dans la position inverse de
manière à ce que le petit onglet (D) fasse saillie. Le
décrocheur sera désormais maintenu dans le support
lorsque le téléphone est fixé au mur.
C
D
C
7. Rebranchez le combiné et placez-le dans le support.
Remarque :
Si le téléphone doit être à nouveau utilisé comme
téléphone de bureau, rappelez-vous d'inverser la position
de la languette de support du combiné.
Page 43

7
Français
Utilisation
Passer un appel
Numérotation normale
1. Décrochez le combiné.
2. Composez le numéro. Raccrochez le combiné pour mettre
fin à l'appel.
Mode mains libres
Remarque :
Le mode mains libres ne fonctionne qu’en présence de
piles dans l’appareil ou si le bloc d’alimentation est
branché.
1. Appuyez sur la touche
s
pour activer le mode mains
libres. Le témoin lumineux (LED) situé à côté de la touche
s'allume.
2. Composez le numéro. Appuyez une nouvelle fois sur la
touche
s
pour mettre fin à l'appel.
Décrochez le combiné pour passer du haut-parleur au
combiné pendant un appel.
Pré-numérotation
1. Saisissez le numéro de téléphone. Appuyez sur la touche
pour supprimer le dernier chiffre saisi.
2. Décrochez le combiné ou appuyez sur la touche
s
pour
composer.
Composition rapide du numéro
1. Décrochez le combiné ou appuyez sur
s
.
2. Appuyez sur la touche pour composer le dernier
numéro composé.
Page 44

8
Français
Composition des numéros enregistrés dans la
mémoire des appels
1. Appuyez sur la touche pour afficher l'appel le plus
récent.
2. Utilisez les touches
v / V
pour parcourir les 15 derniers
appels entrants et sortants.
= Appel entrant
= Appel sortant
3. Décrochez le combiné ou appuyez sur la touche
s
pour
composer le numéro affiché.
Mémoires directes (numéros abrégés)
1. Appuyez sur l'une des touches des mémoires directes A/B/C. Le
numéro de téléphone mémorisé s'afche.
2. Décrochez le combiné ou appuyez sur la touche
s
pour
composer.
Composition des numéros mémorisés dans le répertoire
1. Appuyez sur la touche
b
pour ouvrir le répertoire.
2. Utilisez les touches
v / V
pour parcourir le répertoire
ou saisissez le premier caractère du nom pour trouver
rapidement une entrée (voir Caractères du clavier).
3. Décrochez le combiné ou appuyez sur la touche
s
pour
composer.
Répondre à un appel
Décrochez le combiné pour répondre à un appel entrant ou
appuyez sur la touche
s
pour répondre en mode mains
libres.
Page 45

9
Français
Sonnerie
La mélodie et la tonalité de la sonnerie peuvent être réglés à l'aide des
curseurs situés sur le fond du téléphone.
Mélodie
Tonalité d'appel
Le volume de la sonnerie se règle à l'aide du commutateur
situé sur le côté droit du téléphone.
Réglage du volume
Le volume du haut-parleur se règle à l'aide d'un curseur situé
sur le côté droit du téléphone.
Le réglage du volume du combiné se trouve sous
le combiné.
Caractères du clavier
Page 46

10
Français
Fonctions supplémentaires
Répertoire
Le répertoire peut mémoriser jusqu'à 30 entrées. Lorsque la
mémoire est pleine, l'écran afche
----100%
.
Mémorisation de numéros dans le répertoire
1. Maintenez la touche
b
enfoncée jusqu'à ce qu'un curseur
clignotant s'affiche.
2. Saisissez un numéro de téléphone (jusqu'à 22 chiffres).
Utilisez les touches
v / V
pour déplacer le curseur et la
touche pour effacer si nécessaire. Utilisez la touche
#
pour insérer une pause dans le numéro.
3. Appuyez sur la touche pour confirmer. Un curseur
clignotant s'affichera sur la deuxième ligne de l'afficheur.
4. Saisissez un nom (jusqu'à 9 caractères) à associer au numéro
à mémoriser (voir Caractères du clavier).
5. Appuyez sur la touche pour confirmer.
OK
s'affiche
à l'écran.
6. Répétez les étapes 1 à 5 pour mémoriser un autre numéro
ou maintenez la touche enfoncée pour quitter.
Suppression de numéros mémorisés dans le
répertoire
1. Appuyez sur la touche
b
pour ouvrir le répertoire.
2. Utilisez les touches
v / V
pour parcourir le répertoire
ou saisissez le premier caractère pour trouver rapidement
une entrée.
3. Appuyez sur la touche et maintenez-la enfoncée
pour supprimer l'entrée.
Page 47

11
Français
Modication de numéros mémorisés dans le répertoire
1. Appuyez sur la touche
b
pour ouvrir le répertoire.
2. Utilisez les touches
v / V
pour parcourir le répertoire
ou saisissez le premier caractère pour trouver rapidement
une entrée.
3. Maintenez la touche
b
enfoncée jusqu'à ce qu'un curseur
clignotant s'affiche.
4. Utilisez les touches
v / V
pour déplacer le curseur et
utilisez la touche et le clavier pour effacer et saisir
les nouvelles données.
5. Appuyez sur la touche pour confirmer. Le curseur
passe à la deuxième ligne.
6. Répétez l'étape 4 pour modifier le nom ou la description.
7. Appuyez sur pour confirmer.
OK
s'affiche.
Mémorisation de numéros abrégés
1. Appuyez et maintenez enfoncée l'une des touches de
numérotation rapide A/B/C jusqu'à ce qu'un curseur
clignotant apparaisse sur la première ligne de l'écran.
2. Saisissez un numéro de téléphone (jusqu'à 22 chiffres)
à l'aide du clavier. Utilisez les touches
v / V
pour
déplacer le curseur et la touche pour effacer si
nécessaire. Utilisez la touche # pour insérer une pause
dans le numéro.
3. Appuyez sur la touche pour confirmer. Un curseur
clignotant s'affichera sur la deuxième ligne de l'afficheur.
4. Saisissez un nom (jusqu'à 9 caractères) à associer au numéro
à mémoriser (voir Caractères du clavier).
5. Appuyez sur la touche pour confirmer. OK s'affiche.
6. Répétez les étapes 1 à 5 pour mémoriser les numéros des
autres touches de numérotation rapide.
Page 48

12
Français
Suppression de mémoires directes
Les numéros abrégés ne peuvent pas être supprimés, ils
peuvent uniquement être remplacées en mémorisant un
nouveau numéro.
Présentation du numéro/nom et du journal des appels
La présentation du numéro/nom vous permet de voir qui vous
appelle avant de répondre et qui a appelé en votre absence.
Remarque :
La fonction de présentation du numéro/nom doit être
activée par abonnement. Veuillez contacter votre opérateur
pour de plus amples informations.
La mémoire des appels enregistrera les 15 derniers appels entrants et
les 15 derniers appels sortants. Sur l'afcheur, les appels entrants (avec
ou sans réponse) sont indiqués par le symbole et les appels sortants
par le symbole .
Si la fonction Témoin d'appel est active, un témoin clignotant vous
indique qu'un appel sans réponse a été reçu depuis la dernière
vérication de la mémoire des appels.
Parcourir la mémoire des appels
1. Appuyez sur la touche , puis sur les touches
v / V
pour parcourir la mémoire des appels. Le numéro et l'heure de
chaque appel s'afcheront. Pour les appels remontant à plus
de 24 heures, l'appareil afche la date de l'appel plutôt que
l'heure.
2. Appuyez sur pour quitter la mémoire des appels.
Page 49

13
Français
Suppression de numéros enregistrés dans la mémoire
des appels
1. Appuyez sur la touche , puis sur les touches
v / V
pour parcourir la mémoire des appels.
2. Appuyez sur la touche et maintenez-la enfoncée
pour supprimer l'entrée sélectionnée.
Copie des entrées de le journal des appelants dans
le répertoire
1. Appuyez sur la touche , puis sur les touches
v / V
pour parcourir le journal des appelants.
2. Maintenez la touche
*
enfoncée jusqu'à ce que
OK
s'affiche. Le numéro sélectionné est maintenant mémorisé
dans le répertoire.
Minuterie de temps d'appel
L'afficheur indique l'heure actuelle en mode de veille.
Pendant un appel, l'afficheur indiquera la durée de l'appel. La
durée de l'appel s'affiche pendant 5 secondes après la fin de
l'appel.
Touche " R "
ABC
2
1
DEF
3
JKL
5
GHI
4
MNO
6
TUV
8
PQRS
7
WXYZ
9
0
#
ABC
C
543
R
HearPlus
R
Appuyez sur la touche
R
suivie du numéro d'extension pour
transférer un appel si vous êtes connecté à un système PBX.
Page 50

14
Français
D'autres services réseau peuvent être accessibles à l'aide
des touches R, * et #. Veuillez contacter votre opérateur
pour obtenir plus d'informations sur les services réseau
disponibles.
Prothèse auditive
Ce téléphone est compatible avec l'usage d'une prothèse
auditive. Sélectionnez le mode T sur votre prothèse auditive
pour activer cette fonction.
Amplication du volume
Le volume du combiné peut être augmenté de
10 dB en appuyant sur la touche d'amplification du volume
pendant la conversation. Le témoin lumineux (LED) sur la
touche s'allume. Appuyez de nouveau sur cette touche ou
terminez l'appel pour annuler l'amplification du volume.
Avertissement !
Le volume du combiné peut être très élevé avec ce réglage.
L'amplication du volume ne doit être utilisée que par des
personnes souffrant de troubles de l'audition.
Tonalité du combiné
Vous pouvez ajuster la tonalité vocale (basses et aiguës)
pour obtenir un son plus intelligible. Utilisez pour ce faire le
réglage de tonalité du combiné sur le côté droit du téléphone.
REMARQUE ! Ne fonctionne que lorsque le niveau extra-fort
est activé.
Page 51

15
Français
Précautions et entretien
Votre téléphone est un produit de haute technologie et il doit être manipulé
avec le plus grand soin. Une négligence peut annuler la garantie.
• Maintenez l'appareil au sec. L'eau de pluie ou la neige, l'humidité et les
liquides contiennent des minéraux susceptibles d'oxyder et de détériorer
les composants électroniques. Si votre appareil est humide, retirez les piles
et laissez l'appareil sécher complètement avant de la remettre en place.
• N'utilisez pas et ne rangez pas votre appareil dans un endroit sale ou
poussiéreux. Les parties mobiles et les composants électroniques de
l'appareil pourraient être endommagés.
• Ne rangez pas l'appareil dans des endroits où la température est
élevée. Des températures élevées peuvent réduire la durée de vie des
appareils électroniques, endommager les piles et faire fondre certains
composants en plastique.
• Ne rangez pas l'appareil dans des endroits où la température est basse.
Lorsqu'il repasse à température normale, de la condensation peut se
former à l'intérieur de l'appareil et endommager les circuits électroniques.
• N'essayez pas d'ouvrir l'appareil autrement que selon les instructions de
ce manuel.
• Ne faites pas tomber l'appareil. Ne le heurtez pas et ne le secouez pas.
Une manipulation brutale risquerait de détruire les circuits internes et
les pièces mécaniques.
• N'utilisez pas de produits chimiques puissants pour nettoyer votre appareil.
• L’adaptateur secteur sert de dispositif de sectionnement de l’alimentation
230 V. Il doit donc être installé, par précaution, près de l’appareil et être
facilement accessible.
Les recommandations ci-dessus s'appliquent à votre appareil ainsi qu'aux
piles, au bloc d'alimentation et à tout autre accessoire.
Dysfonctionnements et dépannage
Tous les dysfonctionnements ne sont pas imputables à un défaut de votre
téléphone. Dans certains cas, il peut être sufsant de couper pendant
quelques instants l’alimentation de la base (en débranchant puis en
rebranchant le bloc secteur) ou de retirer puis de replacer les batteries
du combiné. Les indications données ci-après doivent vous permettre de
résoudre des erreurs spéciques.
Important : certains problèmes ne pourront être résolus que si vous
rapportez chez votre revendeur la totalité des pièces constituant
l’appareil (base, combiné, et cordons).
Page 52

16
Français
Garantie/Réparation/Entretien/Homologation
Garantie
Cet appareil est garanti pour une durée de 2 ans à compter de la date
d’achat.
Pour une réparation sous garantie, veuillez joindre à l’appareil défectueux le
bulletin de garantie dûment rempli et cacheté par le point de vente.
Sont exclus de la garantie les dommages imputables à une utilisation non
conforme (bris, dégats des eaux, etc.), à l’usure ou à l’intervention technique
de tiers non autorisés, et plus généralement tout dommage accidentel. La
garantie n’englobe ni les consommables ni les défauts qui n’affectent la
valeur ou l’usage de l’appareil que de façon minime.
En cas de problèmes techniques, adressez-vous à votre point de vente.
Réparations/Entretien
Appareils loués
Si votre appareil ne fonctionne pas correctement, avisez le service des
dérangements (numéro de téléphone 0800 800 800).
La réparation* et le dépannage sont gratuits.
Appareils achetés
Les prestations de réparation sont exécutées gratuitement selon les
dispositions du bulletin de garantie. Si une réparation est nécessaire,
l’appareil doit être apporté au magasin de vente.
Si le service des dérangements est appelé (aussi pendant la période de
garantie*, le dépannage sera facturé (forfait de déplacement et temps de
travail). Après la période de garantie, le coût des réparations est facturé en
sus.
Aide
Si vous avez des questions générales concernant par ex. des produits, des
prestations, etc., veuillez vous adresser au service de renseignements de votre
agence Swisscom (numéro de téléphone 0800 800 800).
* Sont exceptés les dégâts aux pièces d’usure (cordon, étiquettes,
accumulateurs, etc.) et dus à un usage non conforme (dégâts dus aux chutes,
pénétration de liquide, etc.).
Page 53

17
Français
Spécications
Dimensions : 175 mm x 175 mm x 60 mm
Poids : 750 g (avec piles)
Piles : 4 piles alcalines 1,5 V AA
Homologation
Cet appareil est destiné à être raccordé au réseau téléphonique analogique Suisse.
Les spécicités nationales sont prises en compte.
Pour toute question concernant les spécicités des réseaux téléphoniques
publics, veuillez vous adresser à votre revendeur ou votre opérateur réseau.
Par la présente, la société Swisscom déclare que cet appareil est conforme
aux exigences fondamentales et autres dispositions applicables de la directive
1999/5/CE.
La déclaration de conformité peut être consultée sur le site
www.swisscom.ch
dans la rubrique Online Shop, téléphones, déclaration de conformité.
WEEE
Evacuation des équipements usagés par les utilisateurs dans les foyers
privés au sein de l’Union européenne. La présence de ce symbole sur
le produit ou sur son emballage indique que vous ne pouvez pas vous
débarasser de ce produit de la même façon que vos déchets courants. Au
contraire, vous êtes responsable de l’évacuation de vos équipements usagés
et à cet effet, vous êtes tenu de les remettre à un point de collecte agréé
pour le recyclage des équipements électriques et électroniques usagés. Le tri,
l’évacuation et le recyclage séparés de vos équipements usagés permettent
de préserver les ressources naturelles et de s’assurer que ces équipements
sont recyclés dans le respect de la santé humaine et de l’environnement. Pour
plus d’informations sur les lieux de collecte des équipements usagés, veuillez
contacter votre mairie, votre service de traitement des déchets ménagers ou le
magasin où vous avez acheté le produit.
Lorsque les piles et accumulateurs sont collectés conjointement avec
des déchets d’équipements électriques et électroniques sur la base de la
directive 2002/96/CE, les piles et accumulateurs sont extraits des déchets
d’équipements électriques et électroniques collectés.
Page 54

1
Italiano
Descrizione
Aton C30
Questo prodotto può essere usato come telefono da tavolo
oppure da parete. Il controllo del tono della cornetta, il
volume amplificato, la suoneria con amplificazione extra
e il display per le indicazioni di chiamata rendono questo
apparecchio adatto alle persone con problemi di udito.
La tastiera grande e il display con i caratteri grandi di facile
lettura rendono il telefono semplice da usare anche per le
persone ipovedenti.
La rubrica incorporata può memorizzare fino a
30 nomi e numeri. Tre tasti di scelta rapida consentono di
richiamare velocemente i numeri utilizzati di frequente e i
numeri per le chiamate di emergenza. La memoria registra i
15 numeri più frequenti sia per le chiamate in entrata che per
le chiamate in uscita.
La funzione vivavoce, che consente di avere le mani libere
durante la conversazione, si attiva con un semplice tasto.
Page 55

2
Italiano
Installazione
Collegamento
1. Collegare il cavo spiralato alla cornetta e alla presa
contrassegnata con
y
sul telefono.
2. Collegare il cavo della linea telefonica alla presa di rete a
muro e alla
K
sul retro del telefono.
3. Collegare l’adattatore di alimentazione* alla presa della
linea elettrica a muro e alla presa da 9 V sul telefono.
4. Sollevare la cornetta e ascoltare il segnale acustico di
linea libera.
Batterie
Quattro batterie di tipo AA da 1,5 V, per mantenere
memorizzati i dati relativi all’ID chiamante, memorie, ecc.
anche in caso di interruzione di corrente. Quando appare la
scritta
BATT. LOW
sostituire tutte e 4 le batterie. Usare solo
batterie alcaline AA di buona qualità (non incluse).
Attenzione!
Prima di installare o sostituire le batterie, verificare che
il telefono non sia connesso alla rete telefonica.
1. Rimuovere il coperchio della batteria e inserire le batterie,
avendo cura di rispettare la polarità.
2. Chiudere il coperchio del vano batterie e ricollegare il
cavo della linea telefonica.
* Nota: Utilizzare solo l’adattore di alimentazione fornito!
Page 56

3
Italiano
Congurazione di base
Prima di utilizzare il telefono per la prima volta è necessario
regolare le seguenti impostazioni di base. Dopo che è stata
confermata un'impostazione, sul display viene visualizzata
l'impostazione successiva. Per passare all'impostazione
successiva, premere .
Il telefono ritorna in modalità standby dopo
30 secondi di inattivittà, oppure premendo .
Alla prima configurazione, l'orologio del display visualizza
l'ora
00:00
.
1. Tenere premuto * per circa 5 secondi fino
a quando le ore iniziano a lampeggiare.
2. Usare
v / V
per cambiare il valore
e confermare usando .
3. Ripetere i punti 1-2 per impostare i minuti,
il giorno e il mese.
DEUTSCH
Usare
v / V
per selezionare la lingua desiderata
e confermare con .
-2- CONTRAST
Usare
v / V
per configurare il contrasto del display (1–4) e
confermare con .
KEYT. ON
Usare
v / V
per attivare/disattivare il tono dei tasti (ON/
OFF) e confermare con .
Page 57

4
Italiano
-100- FLASH
Usare
v / V
per impostare il tempo del tasto flash
(100/300/600 ms) e confermare con .
L'impostazione standard in Svizzera è 100.
LED OFF
Usare
v / V
per attivare/disattivare il LED che indica le
nuove chiamate e confermare usando .
TONE
Usare
v / V
per selezionare la composizione a toni o
impulsi e confermare con .
Attenzione!
Se non si è certi della modalità da utilizzare selezionare
TONE, perché funziona nella maggior parte delle località.
Page 58

5
Italiano
Installazione a parete
Per installare a parete il telefono utilizzare la staffa fornita
nella confezione e due viti (non incluse).
Avvertenza!
Prima di forare la parete vericare che non contenga cavi né
tubi dell'acqua o del gas.
1. Eseguire nella parete due fori, in verticale, distanziati di
83 mm.
2. Inserire le viti, lasciando che sporgano di
~ 5 mm dalla parete.
3. Scollegare e rimuovere la cornetta.
4. Inserire i perni (A) della staffa nelle guide (B) sul retro del
telefono, quindi far scivolare la staffa verso l'alto fino a
quando non è in posizione (scatto).
B
A
5. Posizionare il telefono in modo che le viti che sporgono
dalla parete entrino nelle guide della staffa, quindi
far scivolare il telefono verso il basso fino a quando si
appoggia sulle viti.
Page 59

6
Italiano
6. Rimuovere il gancio per la cornetta (C) spingendolo verso
l'alto e inserirlo al contrario in modo che sporga la
linguetta (D). Adesso il gancio mantiene la cornetta
nell'alloggiamento anche con il telefono in verticale sulla
parete.
C
D
C
7. Ricollegare la cornetta e posizionarla nel suo
alloggiamento.
Attenzione!
Qualora si desideri utilizzare nuovamente l'apparecchio
come telefono da tavolo, la posizione del gancio per la
cornetta deve essere di nuovo invertita.
Page 60

7
Italiano
Funzionamento
Eseguire una chiamata
Composizione normale
1. Sollevare la cornetta.
2. Comporre il numero. Riporre la cornetta dopo avere
concluso la chiamata.
Vivavoce
Attenzione!
La funzione vivavoce funziona solo con le batterie installate o
l’alimentazione elettrica collegata.
1. Premere
s
per attivare la funzione vivavoce.
Il LED accanto al tasto si accende.
2. Comporre il numero. Premere nuovamente
s
per
concludere la chiamata.
Sollevare la cornetta per disattivare la modalità vivavoce
durante una chiamata.
Digitazione del numero anticipata (pre-dialling)
1. Inserire il numero. Premere per cancellare l'ultima
cifra.
2. Sollevare la cornetta o premere
s
per iniziare la
chiamata.
Richiamata veloce
1. Sollevare la cornetta o premere
s
.
2. Premere per chiamare nuovamente l'ultimo numero
composto.
Page 61

8
Italiano
Richiamare numeri dal registro ultime chiamate
1. Premere per visualizzare la lista delle ultime
chiamate.
2. Usare
v / V
per scorrere il registro delle ultime 15
chiamate in entrata e in uscita.
= Chiamata in entrata
= Chiamata in uscita
3. Sollevare la cornetta o premere
s
per comporre il
numero visualizzato.
Composizione rapida (one-touch dialling)
1. Premendo uno dei tasti di composizione rapida A/B/C,
viene visualizzato il numero di telefono associato a quel
tasto.
2. Sollevare la cornetta o premere
s
per iniziare la
chiamata.
Chiamare numeri memorizzati nella rubrica
1. Premere
b
per aprire la rubrica telefonica.
2. Usare
v / V
per scorrere la rubrica telefonica o digitare
la prima lettera del nome per passare direttamente a
quella parte della rubrica (vedi Composizione delle lettere
con la tastiera).
3. Sollevare la cornetta o premere
s
per iniziare la
chiamata.
Rispondere ad una chiamata
Per rispondere a una chiamata in entrata, sollevare la cornetta
o premere
s
per rispondere usando la funzione vivavoce.
Page 62

9
Italiano
Segnale suoneria
La melodia e il tono della suoneria possono essere regolati
usando i cursori posti sulla base del telefono.
Melodia suoneria
Suoneria
Il volume della suoneria si regola con un commutatore sul lato
destro del telefono.
Controllo volume
Il volume del microfono si regola con un cursore sul lato
destro del telefono.
La regolazione del volume della cornetta si trova sotto la
cornetta.
Composizione delle lettere con la tastiera
Page 63

10
Italiano
Funzioni aggiuntive
Rubrica telefonica
La rubrica telefonica può memorizzare fino
a 30 voci. Quando la memoria è piena viene visualizzato il
messaggio
----100%
.
Salvare numeri nella rubrica telefonica
1. Tenere premuto
b
fino a quando appare un cursore a
intermittenza.
2. Digitare un numero di telefono (max. 22 cifre). Usare
v
/
V
per muovere il cursore e per cancellare, se
necessario. Usare # per inserire una pausa nel numero.
3. Premere per confermare. Un cursore a intermittenza
apparirà sulla seconda riga del display.
4. Immettere un nome (fino a 9 caratteri) per il numero
da memorizzare (vedi Composizione delle lettere con la
tastiera).
5. Premere per confermare. Viene visualizzato
OK
.
6. Ripetere i punti da 1 a 6 per memorizzare un altro
numero, o tenere premuto per uscire.
Cancellare numeri dalla rubrica telefonica
1. Premere
b
per aprire la rubrica telefonica.
2. Usare
v / V
per scorrere la rubrica telefonica o digitare
la prima lettera del nome per trovare rapidamente un
numero.
3. Per eliminare la voce, tenere premuto .
Page 64

11
Italiano
Modicare numeri memorizzati nella rubrica
1. Premere
b
per aprire la rubrica telefonica.
2. Usare
v / V
per scorrere la rubrica telefonica o digitare
la prima lettera del nome per trovare rapidamente un
numero.
3. Tenere premuto
b
fino a quando appare il cursore a
intermittenza.
4. Usare
v / V
per spostare il cursore e utilizzare e la
tastiera per cancellare e inserire dati nuovi.
5. Premere per confermare. Il cursore passa alla
seconda linea del display.
6. Ripetere il punto 4 per modificare il nome o la
descrizione.
7. Premere per confermare. Viene visualizzato
OK
.
Memorizzare i numeri di composizione rapida
1. Tenere premuto uno dei tasti di composizione rapida A/B/C
nché non viene visualizzato un cursore a intermittenza sulla
prima riga del display.
2. Digitare un numero di telefono (max. 22 cifre) usando la
tastiera. Usare
v / V
per spostare il cursore e per
cancellare eventuali cifre del numero, se necessario.
3. Premere per confermare. Un cursore a intermittenza
apparirà sulla seconda riga del display.
4. Immettere un nome per il numero da memorizzare (vedi
Composizione delle lettere con la tastiera).
5. Premere per confermare. Viene visualizzato OK.
6. Ripetere i punti 1-5 per associare un numero agli altri
tasti di composizione rapida.
Page 65

12
Italiano
Cancellare i numeri di composizione rapida
I numeri di composizione rapida non possono essere
cancellati, tuttavia è possibile sostituirli con un numero
nuovo.
ID chiamante e memoria delle chiamate
L'ID del chiamante consente di sapere chi sta chiamando
prima di rispondere e di vedere chi ha chiamato mentre si era
assenti.
Attenzione!
Per usare la funzione ID chiamante è necessario essere
abbonati. Per ulteriori informazioni, contattare il proprio
operatore di rete.
Il registro ultime chiamate memorizza le ultime 15 chiamate
in arrivo e in uscita. Sul display, le chiamate in arrivo (con e
senza risposta) sono indicate con e le chiamate in uscita
con .
Se è attiva la funzione di Indicatore nuova chiamata, una
luce a intermittenza indica che è stata ricevuta una chiamata
senza risposta dopo l'ultimo controllo del registro ultime
chiamate.
Scorrere il registro ultime chiamate
1. Premere quindi
v / V
per scorrere il registro
ultime chiamate. Vengono visualizzati il numero e l'ora di
ogni chiamata. Per le chiamate precedenti alle ultime 24
ore viene visualizzata la data della chiamata anziché l'ora.
2. Premere per uscire dal registro ultime chiamate.
Page 66

13
Italiano
Cancellare numeri dal registro ultime chiamate
1. Premere quindi
v / V
per scorrere il registro
ultime chiamate.
2. Tenere premuto per cancellare il numero
selezionato.
Copiare numeri dal registro ultime chiamate alla
rubrica telefonica
1. Premere quindi
v / V
per scorrere il registro
ultime chiamate.
2. Tenere premuto * nché non appare
OK
. Il numero
selezionato è stato salvato nella rubrica telefonica.
Tasto di messa in attesa (R)
ABC
2
1
DEF
3
JKL
5
GHI
4
MNO
6
TUV
8
PQRS
7
WXYZ
9
0
#
ABC
C
543
R
HearPlus
R
Premere il tasto R seguito dal numero interno per inoltrare
una chiamata all'interno di un sistema PBX.
È possibile accedere a servizi di rete aggiuntivi usando i
tasti R, * e #. Per ulteriori informazioni sui servizi di rete
disponibili contattare il proprio operatore.
Page 67

14
Italiano
Timer chiamata
In standby il display del telefono visualizza l'ora. Durante una
chiamata il display visualizza il timer che indica la durata
della chiamata. Dopo la conclusione della chiamata, la durata
della chiamata viene visualizzata per 5 secondi.
Apparecchi acustici
Questo telefono è compatibile con l'uso di apparecchi
acustici. Per attivare questa funzione, selezionare la modalità
T sul proprio apparecchio acustico.
Volume amplicato
Il volume del telefono può essere aumentato di altri 10
dB premendo il tasto Volume amplificato mentre si parla.
L'indicatore LED sul tasto si accende. Premere nuovamente
il tasto per terminare la chiamata o per disattivare il volume
amplificato.
Avvertenza!
Se questa funzione è attiva, il volume della cornetta può
essere molto alto. Il volume amplicato deve essere usato
solo da persone con problemi di udito.
Tono cornetta
È possibile regolare il tono dell'altoparlante (bassi/alti) per
una migliore chiarezza nell'utilizzo del controllo del tono della
cornetta, sul lato destro
del telefono. ATTENZIONE! Funziona esclusivamente quando
è attiva la funzione amplificazione extra.
Page 68

15
Italiano
Cura e manutenzione
Questo apparecchio è un prodotto a tecnologia avanzata e deve pertanto
essere utilizzato con la massima cura. Un uso scorretto può rendere nulla la
garanzia.
• Tenere l’unità al riparo dall’umidità. Pioggia, neve, umidità e qualsiasi altro
tipo di liquido possono contenere sostanze corrosive per i circuiti elettrici. Se
il dispositivo si bagna, rimuovere la batteria e prima di reinserirla consentire
all'unità di asciugarsi completamente.
• Non utilizzare o riporre l’unità in ambienti polverosi e sporchi. Le parti mobili
e i componenti elettronici dell’unità potrebbero danneggiarsi.
• Non tenere l’unità in luoghi caldi. Le alte temperature possono ridurre la
durata di vita delle apparecchiature, danneggiare le batterie e deformare o
fondere alcuni componenti in plastica.
• Non tenere l’unità in luoghi freddi. Quando l’unità si scalda raggiungendo la
sua temperatura normale, al suo interno potrebbe formarsi della condensa che
rischia di danneggiare i circuiti elettronici.
• Non cercare di aprire l’unità in modi diversi da quello indicato nelle
presenti istruzioni.
• Non fare cadere l’unità. Evitare di urtarla e scuoterla. Se si maneggia
l’unità in modo brusco, i circuiti e i meccanismi di precisione potrebbero
rompersi.
• Non utilizzare sostanze chimiche aggressive per pulire l’unità.
• L’alimentatore è il dispositivo di scollegamento tra il prodotto e
l’alimentazione. È necessario che la presa di alimentazione sia situata nelle
vicinanze dell’unità e facilmente accessibile.
I suggerimenti riportati qui sopra si applicano all’unità, alla batteria, al
adattatore di alimentazione e agli altri accessori.
Domande e risposte
Non sempre un’anomalia è indice di un difetto del telefono. A volte, può
essere sufciente staccare per un breve intervallo la fonte di alimentazione
(scollegare/collegare l’alimentatore) oppure estrarre gli accumulatori del
portatile e inserirle di nuovo. Le seguenti indicazioni possono essere di aiuto
nel caso di guasti specici.
Importante: Eventuali problemi o guasti possono essere eliminati soltanto
portando l’intero apparecchio (stazione ssa, portatile e cavo di collegamento)
al proprio rivenditore.
Page 69

16
Italiano
Garanzia/Manutenzione/Riparazione/Omologazione
Garanzia
La durata della garanzia è di 2 anni dalla data risultante dalla ricevuta
d’acquisto. Per avere diritto alla garanzia l’acquirente dovrà inviare insieme
all’apparecchio da riparare la cartolina compilata (presente sull’ ultima
pagina di copertina), completa di timbro del rivenditore, data di acquisto e
rma. La garanzia non si applica in caso di danno provocato da incuria, uso
o installazione non conformi alle istruzioni fornite, usura o danni causati da
interventi di persone non autorizzate. La garanzia non riguarda i materiali
soggetti ad usure e neanche quelle carenze che pregiudicano il valore o
l’utilizzabilità dell’apparecchio solo in modo trascurabile. In caso di problemi
con l’apparecchio, vi preghiamo di rivolgervi al vostro rivenditore.
Riparazioni/Manutenzione
Apparecchi in aftto
Se il vostro telefono non funziona correttamente, rivolgetevi al servizio di
assistenza (Numero di telefono 0800 800 800).
Le riparazioni* e l’intervento sono gratuiti.
Apparati acquistati
Entro il periodo di garanzia, le riparazioni vengono effettuate gratuitamente
secondo le condizioni stabilite sul certicato di garanzia.
Se si dovesse rendere necessaria una riparazione, l’apparecchio deve essere
riportato al punto di vendita.
Interpellando il servizio di pronto intervento (anche durante il periodo di
garanzia*), l’intervento viene addebitato (importo forfettario a copertura del
viaggio e del tempo). Scaduto il periodo di garanzia, verranno addebitati
anche i costi della riparazione.
Informazioni
Per informazioni di carattere generale riguardanti p. es. i prodotti, i servizi
ecc., vi preghiamo di rivolgervi al servizio informazioni del vostro punto
vendita Swisscom (numero di telefono gratuito 0800 800 800).
* Sono esclusi i danni dei particolari soggetti ad usura (cavi, targhette,
accumulatori ecc.) e danni causati da manomissione o dal trattamento non
conforme (cadute, penetrazione di liquidi ecc.)
Page 70

17
Italiano
Speciche
Dimensioni: 175 mm x 175 mm x 60 mm
Peso: 750 g (batterie incluse)
Batteria: 4 batterie alcaline AA da 1,5 V
Concessione
Questo prodotto è stato progettato per l’uso in Svizzera sulla linea telefonica
analogica.
Le particolarità speciche del Paese sono state tenute in considerazione.
In caso di domande a causa delle differenze nelle reti telefoniche pubbliche
rivolgersi al proprio rivenditore o Operatore di Rete.
Con la presente Swisscom dichiara che il prodotto soddisfa tutti i requisiti di
base e le altre disposizioni pertinenti della direttiva 1999/5/EC.
È possibile richiedere copia integrale della dichiarazione di conformità al sito web
www.swisscom.ch
alla rubrica Rubrik “Online Shop”, Telefoni, Dichiarazioni di conformità
WEEE
Smaltimento di apparecchiature da rottamare da parte di privati
nell’Unione Europea. Questo simbolo che appare sul prodotto o sulla
confezione indica che il prodotto non deve essere smaltito assieme agli
altri riuti domestici. Gli utenti devono provvedere allo smaltimento delle
apparecchiature da rottamare portandole al luogo di raccolta indicato per il
riciclaggio delle apparecchiature elettriche ed elettroniche. La raccolta e il
riciclaggio separati delle apparecchiature da rottamare in fase di smaltimento
favoriscono la conservazione delle risorse naturali e garantiscono che tali
apparecchiature vengano rottamate nel rispetto dell’ambiente e della
tutela della salute. Per ulteriori informazioni sui punti di raccolta delle
apparecchiature da rottamare, contattare il proprio comune di residenza, il
servizio di smaltimento dei riuti locale o il negozio presso il quale è stato
acquistato il prodotto.
Quando le pile o gli accumulatori vengono raccolti assieme ai riuti di
apparecchiature elettriche ed elettroniche a norma della direttiva 2002/96/
CE, le pile o gli accumulatori vengono rimossi dai riuti delle apparecchiature
stessi.
Page 71

18
Italiano
Page 72

en/dt/fr/it 11.2013
 Loading...