

Page 1

Aton C28
User Guide
Page 2

Safety information
Please note the following information when installing, connecting and using the
telephone:
• Danger: Never
- try to open the device!
- touch the connector contacts with pointed or metallic objects!
- carry the telephone at the handset or the connection cables.
• Danger: Do not use the telephone in humid rooms (e.g. bathroom).
• Danger: Assistance call function: In rare cases, the function of sending
out an assistance call cannot be guaranteed. This might be the
case if e.g. the telephone network fails. The device should not be
used without additional security backup in emergency life-saving
situations.
• Please use a nonslip pad under the device.
• Make sure that the connecting cables are laid in a way that accidents are
prevented.
• Please do not place the telephone close to heat sources (air-conditioning,
heater, exposure to direct sunlight) and nearly devices emitting strong
magnetic fields.
• Protect your telephone from moisture, dust, aggressive liquids and vapours.
• Only plug the connecting cables into the designated receptacles.
• Use only the telephone connecting cable supplied.
• Use only the AC adapter supplied (type G090020A25).
• Use only approved accessories.
• Clean the telephone with a soft slightly moist cloth.
Page 3
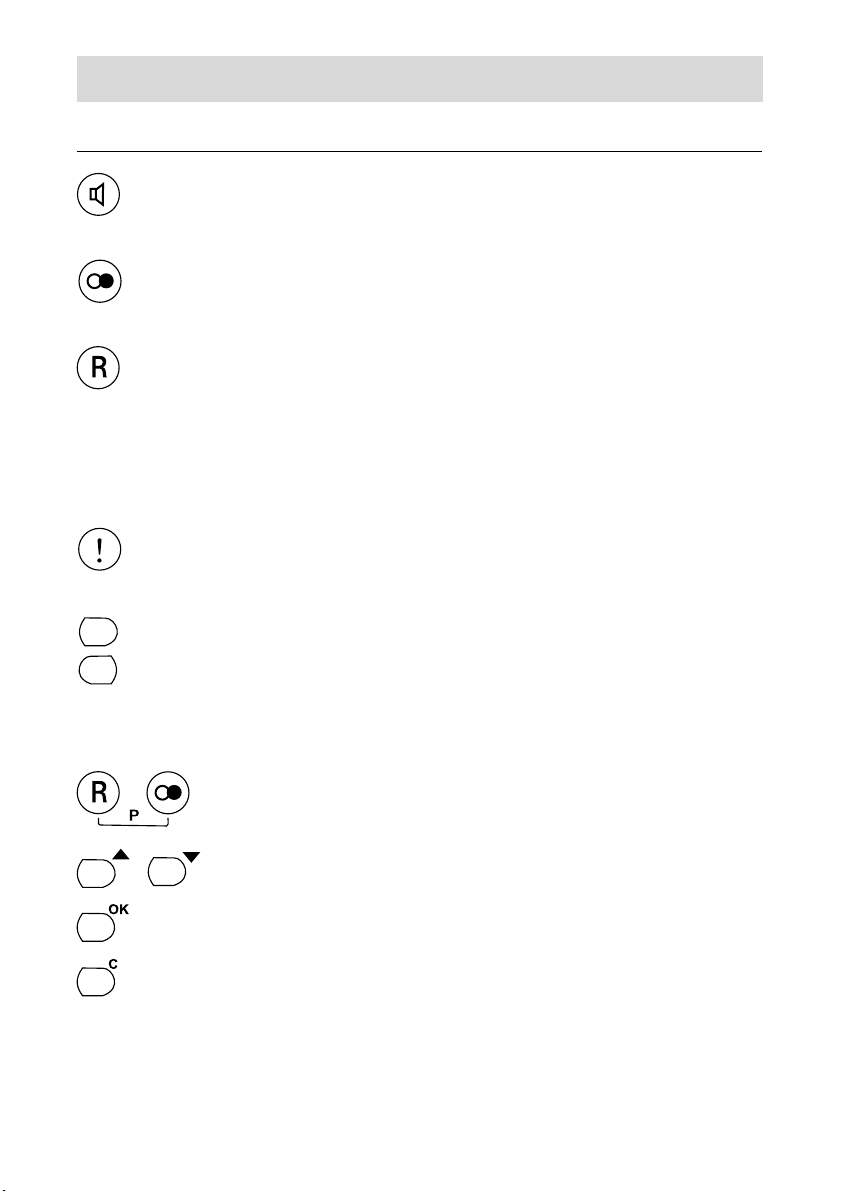
Operation elements
Keys
Loudspeaker key to activate/deactivate listen-in and
hands-free function.
Redial key: A call is established to the subscriber
number dialled last.
During a call: Recall key e.g. for call transfers if the device
is connected to a telephone system.
In idle mode: The transmitted telephone number can be
displayed or to activate features of the telephone
network.
Assistance call key: direct dialling of assistance call
numbers - if programmed.
Speed dialling keys (left and right) direct dialling of a
stored telephone number.
Establishing the settings:
To start and end programming press the R key and the
redial key at the same time. „P“ stands for „Programming“.
Use the arrow keys to select the function you want to set.
Confirm the menu selection or save inputs.
Deleting parts of the input, return to level 1 of the functions,
end programming.
Page 4
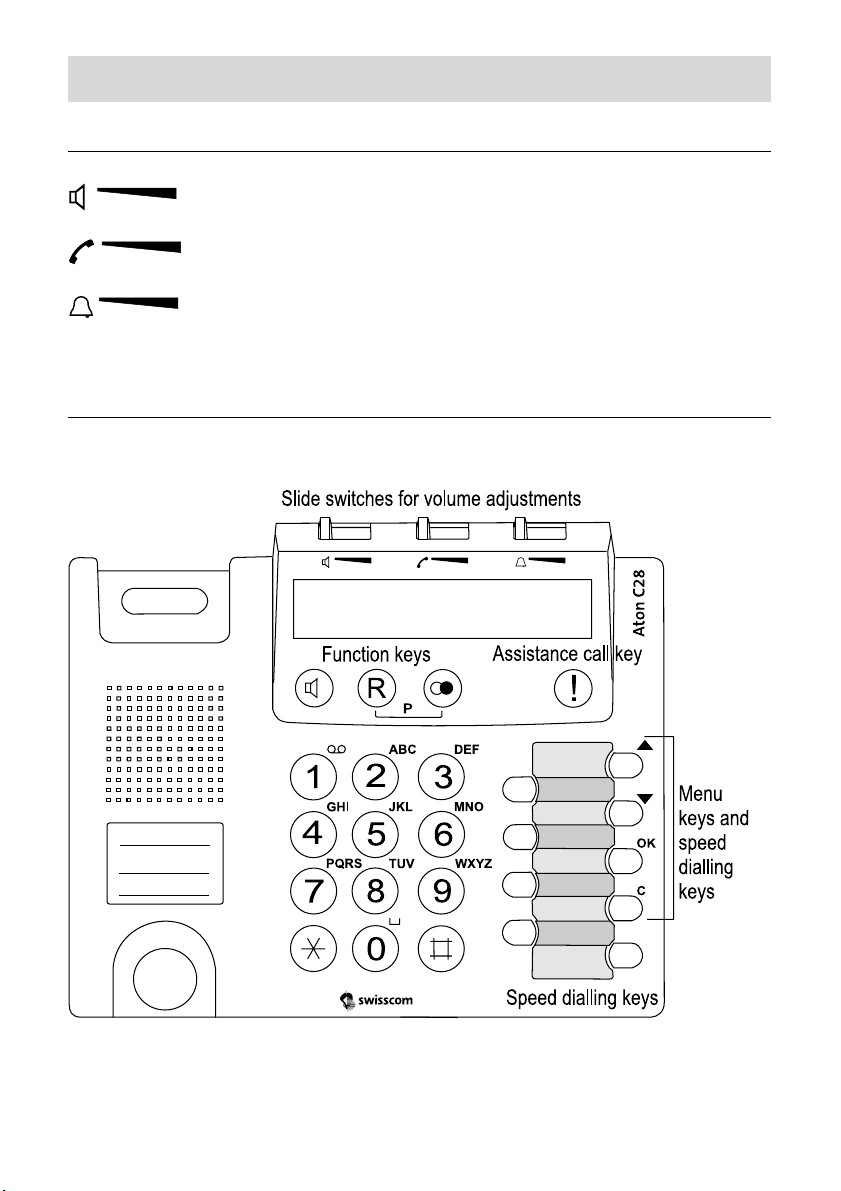
Operation elements
Slide switches for volume adjustments
Loudspeaker volume
Handset volume
Ringing signal volume.
Overview
Page 5

Content
Information on using the phone .................................................................... 3
Menu driven operation ................................................................................. 3
Symbols of the display ................................................................................. 4
General information...................................................................................... 5
Initial operation ............................................................................................... 6
Scope of supply............................................................................................ 6
Placing the telephone ................................................................................... 6
Connecting the telephone ............................................................................ 7
Insert name plates ........................................................................................ 9
Use the short user guide ............................................................................ 10
Making telephone calls ................................................................................. 11
Manual dialling ........................................................................................... 11
Receiving a call .......................................................................................... 11
Dialling with off-line call preparation ........................................................... 11
Redialling ................................................................................................... 12
Automatic redialling .................................................................................... 12
Start Automatic redialling ........................................................................ 13
Stop Automatic redialling ......................................................................... 13
Store speed dialling numbers ..................................................................... 14
Dialling via speed dialling keys ................................................................... 16
Store abbreviated numbers ........................................................................ 16
Abbreviated dialling .................................................................................... 17
Dialling the telephone number transmitted by the last incoming call .......... 17
Delete call back number.......................................................................... 18
On-Hook-Dialling ........................................................................................ 18
Listening-in ................................................................................................. 19
Hands-free operation ................................................................................. 19
Switching between handset and hands-free operation ............................... 20
COMBOX ................................................................................................... 21
Store call number of the network answering machine ............................. 21
Play back message(s) ............................................................................. 22
Assistance call operation mode .................................................................. 23
Description ................................................................................................. 23
1
Page 6

Content
Storing assistance call numbers ................................................................. 23
Activate/deactivate assistance call mode ................................................... 24
Sending an assistance call ......................................................................... 25
Manual interruption of an assistance call ................................................... 26
Security in both directions ........................................................................... 27
Change telephone PIN (personal identification number) ............................ 27
Dialling restrictions ..................................................................................... 27
Store restricted numbers ......................................................................... 28
No. restriction/Full restriction ON/OFF .................................................... 28
Basic settings ................................................................................................ 30
Set display language .................................................................................. 30
Volume adjustments of ringer, loudspeaker and handset ........................... 30
Activate/deactivate ringing signal ............................................................... 30
Ringing melody .......................................................................................... 31
Adjust display contrast ............................................................................... 31
Key tone ..................................................................................................... 32
Reset/delivery status .................................................................................. 33
Connection to a PABX .................................................................................. 34
Program recall key ..................................................................................... 34
Program EIC (Exchange Identification Code)............................................. 34
Program pause duration after dialling EIC ................................................. 35
Appendix ........................................................................................................ 37
Cleaning the device .................................................................................... 37
Factory pre-set ........................................................................................... 37
Short troubleshooting guide ....................................................................... 37
CE-conformity ............................................................................................ 39
Maintenance/Warranty ............................................................................... 39
Menu overview ........................................................................................... 40
Technical data ............................................................................................ 41
Environmental impact ................................................................................. 42
Index ............................................................................................................... 43
2
Page 7

Information on using the phone
Information on using the phone
You have decided on the Aton C28 telephone - an efficient telephone in a modern design. The telephone is simple to operate. The telephone is intended for
use in the Swiss analogue network.
Menu driven operation
You only need to make the settings once or only seldom. This is done with a
simple menu driven operation.
Opening the menu: Press the R-key and the redial key
at the same time. (The„P“ for „Programming-mode“ appears
in the display).
Select functions: The functions are all on one level and are
selected with the arrow keys.
Change setting: The settings can be change directly using
the OK-key or you will get to a second level to enter digits or
characters. With some functions you have to enter a 4-digit
PIN code that protects the function.
Leaving the menu: You can use the C-key to delete parts of
the input, to return to the first level or end programming. After
the end of programming the „P” in the display disappears.
Please note the following information:
• If you enter a „wrong key“ (related to the corresponding function) during the
programming process, the procedure is aborted without saving the changes.
• If you do not press any key for 40 seconds while you take out a specific
programming step, the procedure is aborted without saving the changes.
• You can interupt the programming process without saving the changes by
lifting and replacing the handset.
3
Page 8
Information on using the phone
• After you end an input/setting you will see „stored“ in the display. Wait until the
word disappears before requesting further functions or ending programming.
• If you want to alter several functions protected by a PIN one after the other,
you only need to enter the PIN for the first function (exceptions: reset/restore
the delivery status).
• When you program a telephone number under a memory location, you can
enter manual dialling pauses via the redial key. In the display, a pause is
indicated by the symbol „P“ in the upper display line. If you made a mistake
when entering the telephone number, just use the C-key to erase it.
• If you have stored an Exchange Identification Code you have to enter this in
front of the phone numbers that you want to enter in a memory (phone
numbers for speed dialling, abbreviated dialling, assistance call function and
dialling restriction).
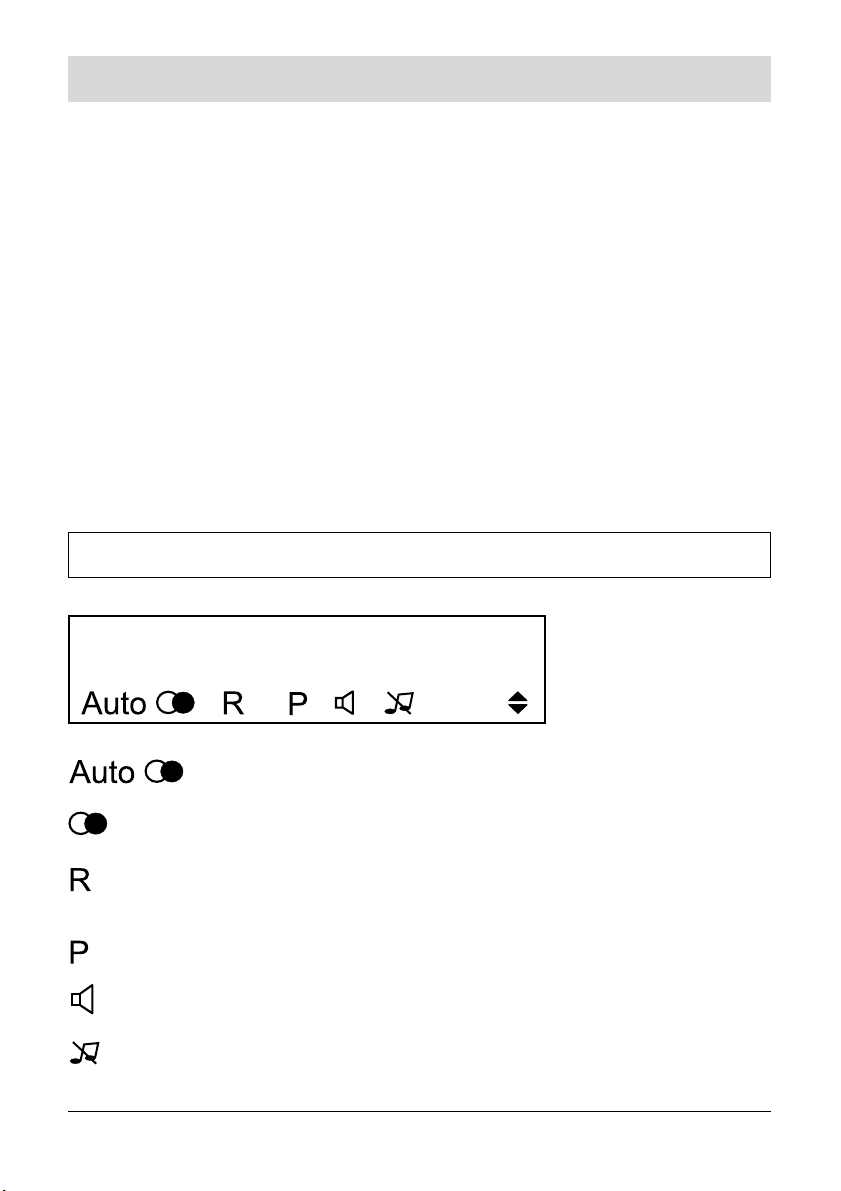
Symbols of the display
Automatic redialling active.
Redialling active.
There is an unanswered call. The transferred telephone
number can be displayed.
A programming step is executed.
Listening-in or hands-free mode is active.
Ringer is switched off.
4
Page 9

Information on using the phone
Arrow keys could be used within the menu.
General information
• In case of power failure, the following features are not availabe:
• Illumination of display, loudspeaker key and assistance call key
• Off-line call preparation
• Automatic redialling
• Transmission of the caller's telephone number (CLIP)
• The volume of ringing signal, loudspeaker and handset are reduced.
• The ear capsule in the handset creates a magnetic field. As for hearing aids
worn behind the ear, the telephone conversation is heard louder and clearer
due to the magnetic coupling.
• The display indicates the call duration. The timer starts 10 sec. after dialling.
• The illumination of the display will be switched on by picking up the handset
or pressing the loudspeaker key or another key.
Illumination off: Replace the handset or press the loudspeaker key.
5
Page 10
Initial operation
Initial operation
Scope of supply
The content of the package is:
• 1 telephone
• 1 handset
• 1 curled cable (handset cable)
• 1 telephone connecting cable to connect the device to the telephone access
• 1 AC adapter
• User guide (1 manual) and short user guide
• Name plates and plastic cover for the speed dialling keys. One pre-printed
inlay plate and a plastic cover for the call numbers of police/fire service/
ambulance".
Placing the telephone
The telephone was produced for standard use conditions. Some furniture
lacquers or furniture cleaning products may attack the rubber at the feet of the
telephone and thus cause patches.
Swisscom understandably cannot assume liability for damage of this kind.
For this reason, always use a non-slip base for your telephone, in particular with
new furniture or furniture that has been restored with lacquer care products.
6
Page 11
Initial operation
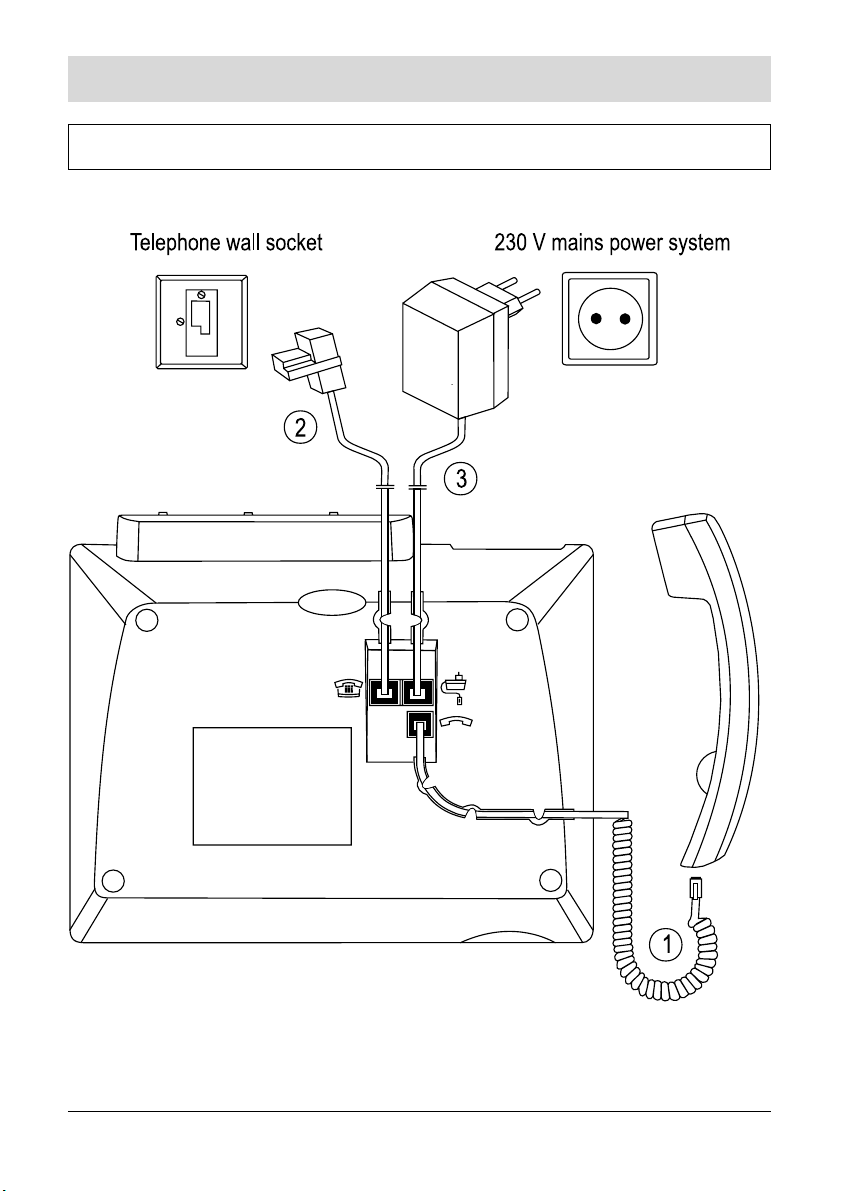
Connecting the telephone
7
Page 12

Initial operation
1
Connect handset
Plug the curled handset cable plug into the jack marked with a handset symbol
on the bottom of the device and into the handset jack.
2
Connect telephone to C/O line
Plug the small plug of the telephone connecting cable into the jack with the
telephone symbol . Placed the cable in the duct provided. The large plug is
to be plugged into the telephone wall socket of your telephone connection.
Caution: Use only the connection cable supplied with the telephone. Other
cables may have a different pin configuration with the consequence that the
telephone does not work.
3
Connect telephone to „Power“
Plug the AC adapter cable plug into the jack with the adapter symbol . Placed
the cable in the duct provided. Plug the AC adapter into a power outlet to
connect the device to the 230 V mains power system. The telephone is now
ready for use and you can make calls.
Caution: Use only the AC adapter supplied (type G090020A25).
Disconnect the cables
Unplug the AC adapter from the power outlet and unplug the telephone plug
from the telephone wall socket. At the telephone: pull the plug's locking clips
towards the plug's body to unplug and disconnect the cables.
8
Page 13

Initial operation
Insert name plates
Write on the speed dialling name plate
Write the names of your speed dialling partners on the fields of the name plate
(see fig. on the left).
Insert the name plate
Lay the name plate into the slot. Slide the plastic cover into the upper gap (see
fig. on the right), curve it and push the other end of the cover into the other gap.
Remove plastic cover: Seize with the fingernail or a suitable tool under the top
margin of the cover and pull these from the telephone away, until it jumps out of
the gaps.
Pre-printed inlay plate and plastic cover for „police/fire brigade/ambulance“
Write the telephone numbers of police/fire service/ambulance in the lines of the
plate. Insert the plate in the recess on the left side of the housing.
Attach plastic cover: Push the side with the longer taps (without the centric
groove) into the lower gaps. Press the cover in slightly, so that the two shorter
taps engage into the gaps above.
9
Page 14

Initial operation
Remove plastic cover: Seize with the fingernail or a suitable tool under the top
margin of the cover and pull these from the telephone away, until it jumps out of
the gaps.
Use the short user guide
Write the names of the persons whose numbers you have stored under
abbreviated dialling on the back of the short user guide.
Place the short user guide next to the telephone so that it is always handy.
10
Page 15
Making telephone calls
Making telephone calls
Manual dialling
Pick up the handset, wait for the dialling tone.
Dial telephone number, ringing tone or busy tone.
Start conversation when the target subscriber answers the
call.
Replace the handset.
Remark:
The key tone can be switched off (see page 32).
Receiving a call
The telephone rings and the loudspeaker key flashes in red color in the rhythm
of the ringer. If you have stored the name of the caller on a speed dialling key or
an abbreviated dialling key, the name appears instead of the number.
Pick up the handset.
Remark:
You can adjust the volume and the melody of the ringer (see page 30/31).
Dialling with off-line call preparation
You can also use the off-line call preparation when making telephone calls. Just
dial the telephone number of the target subscriber, check the number in the
display and seize the line afterwards.
Enter the complete telephone number.
Pick up the handset. The number is being dialled.
11
Page 16

Making telephone calls
Replace the handset to finish the call.
Remark:
When you dial telephone numbers using the off-line call preparation, you can
delete individual digits by pressing the C-key.
Redialling
When the called subscriber does not answer the call as he/she is having another
telephone conversation or is not present, you can repeat the dialling process by
just pressing one key. The target subscriber number may only have 24 digits as
a maximum.
Pick up the handset.
Press the redial key. The number and the redial symbol
appear in the display.
Hold conversation as soon as the subscriber answers the
call.
Remarks:
• Each newly dialled telephone number will overwrite the earlier made entry for
redialling.
• You can press the redial key first and pick up the handset afterwards.
Automatic redialling
If the called target subscriber number is busy, the dialling process for the telephone number dialled last can be repeated automatically up to 10 times. The
target subscriber's telephone will ring for 30 sec., then the phone initiates a
pause for 30 seconds. After the pause, the target subscriber's telephone will ring
for 30 sec. again. This process is repeated up to 10 times (on the condition that
nobody answers your call).
12
Page 17

Making telephone calls
Start Automatic redialling
You have dialled a telephone number and the target
subscriber is busy:
Press the R-key and the redial key at the same time. (The
„P“ for „Programming-mode“ appears in the display.)
Press the OK-key.
Replace the handset.
The telephone initiates a pause of up to 30 sec. and then
repeats the dialling process up to 10 times. During the call,
the loudspeaker key lights red.
As soon as the called subscriber answers the call:
Pick up the handset.
Hold conversation.
Remark:
The automatic redialling is also activated if you press the R-key and the redial
key at the same time and afterwards the OK-key while the handset is on-hook. In
the display, the symbols „Auto“ and „Redial“ appear. After 30 seconds the
telephone starts to dial. If the called party answers the call, you can hear him/her
via the loudspeaker. Pick-up the handset or press the loudspeaker key to hold
the conversation.
Stop Automatic redialling
In the idle state, pick up the handset and replace it. The
automatic redialling process is stopped.
13
Page 18

Making telephone calls
The automatic redialling process is stopped automatically if
the target subscriber has not answered the call after 10
dialling attempts.
Store speed dialling numbers
You can assign a maximum of 9 telephone numbers to the speed dialling
locations. The numbering of the speed dialling keys is shown in the illustration
below. Each of these numbers is restricted to a length of 24 digits as a
maximum.
Press the R-key and the redial key at the same time. (The
„P“ for „Programming-mode“ appears in the display.)
Select the desired memory location „speed dialling number
(1 - 9)“ using the arrow key and confirm with the key.
Enter telephone number and confirm with the key.
Enter name and confirm with the key.
(See page 15 on how to enter a name.)
Select another speed dialling number (or another function)
using the arrow keys or exit the programming menu with the
C-key.
14
Page 19

Making telephone calls
Enter names
The characters will be entered by
numeric keys. Press one or more
times the key labeled with the
required character: once for the
first character, twice for the second
and so on. The list of characters
available for each key is shown in
the table on the right.
You can enter max. 16 characters
(upper and lower case letters and
special characters) per name.
Use the C-key to delete
characters.
Upper and lower case
When you start the input the first letter is written in upper case automatically and
the following in lower case. After a space the telephone starts again with an
upper case letter followed by lower case letters. If you want to use upper case
letters only, go to the characters table and keep pressing the required key until
the upper case you want appears in the display.
Enter dialling pauses
When you enter telephone numbers in a memory use the redial key to set
dialling pauses manually. The pause is shown by „P“ in the upper display line.
Delete numbers and names
Use the C-key to delete digits and characters.
15
Page 20

Making telephone calls
Dialling via speed dialling keys
Press the desired speed dialling key. The selected name is
shown in the display. The number will be dialled. The handsfree mode is activated and the loudspeaker key is illuminated
in a red color.
Pick-up the handset when the subscriber answers the call or
stay with the hands-free mode.
Remarks:
• You have the possibility, to store only parts of a call number e.g. the exchange
number of a company or a dialling code via a speed dialling key. You can dial
extension numbers manually after the stored number. The after-dialled
numbers are stored in the redialling memory.
• Call numbers, which were dialled via speed dialling keys, are stored in the redialling memory, i.e. they can again be dialled with the re-dialling.
• It is possible to engage the line by picking up the handset first and after that
pressing the speed dialling key.
Store abbreviated numbers
You can store up to 9 abbreviated numbers on the numeric keys 2 - 9 and 0.
Each of these numbers is restricted to a length of 24 digits as a maximum.
Press the R-key and the redial key at the same time. (The
„P“ for „Programming-mode“ appears in the display.)
Select the desired memory location „Abbreviated dialling
number (2 - 0)“ using the arrow key and confirm with the
key.
Enter telephone number and confirm with the key.
Enter name and confirm with the key.
16
Page 21

Making telephone calls
Select another abbreviated dialling number (or another
function) using the arrow keys or exit the programming menu
with the C-key.
Remark:
Read page 15 to find out how to enter names and pauses and how to delete
numbers and names.
Abbreviated dialling
Pick-up the handset.
Press corresponding numeric key, under which the desired
call number is stored, for at least 2 seconds. The name
belonging to the number appears in the display. The call
number will be dialled.
Remark:
Abbreviated numbers are stored in the re-dialling memory, i.e. they can again be
dialled with the re-dialling.
Dialling the telephone number transmitted by the last incoming call
A telephone number transmitted with a call is automatically stored. You can view
the number and dial it. If there is an unanswered incoming call, „R“ is shown in
the display's symbol bar. You can view the telephone number and will know who
had called you. You may then dial this telephone number directly. If you have
stored the caller’s name in the speed dialling or abbreviated memory this is
shown instead of the telephone number.
In the symbol bar of the display, the „R“ is shown.
Press the R-key. The number appears in the display.
17
Page 22

Making telephone calls
Pick-up the handset. The telephone number is dialled
automatically.
Remarks:
• After having pressed the R-key, the telephone number is displayed for 40
seconds.
• The "Transmission of the caller's telephone number" is a service provided by
the telephone network provider and possibly has to be applied for and
released.The feature is also known as „CLIP“ (Connected Line Identification
Presentation).
Delete call back number
You can delete a transmitted telephone number from the telephone’s memory.
Press the R-key and the redial key at the same time. (The
„P“ for „Programming-mode“ appears in the display.)
Select the function „Delete call back No.“ using the arrow
keys and confirm with the key.
The call number is deleted.
Select another function using the arrow keys or exit the
programming menu with the C-key.
On-Hook-Dialling
You do not need to pick-up the handset in order to start the dialling process.
After pressing the loudspeaker key you can call the person you want to speak to.
When this person answers you can decide whether to lift the handset and
telephone as usual or to continue using the function „Hands-free“ with the
handset in place.
18
Page 23

Making telephone calls
Press the loudspeaker key and wait for the dialling tone. The
loudspeaker key illuminates in red color.
Enter the call number or press the abbreviated dialling key
or...
press a speed dialling key or...
press the redial key.
The subscriber answers the call – hands-free mode or...
pick up the handset.
Listening-in
You can activate the loudspeaker during a call so that the conversation can be
heard in the room.
Activate the loudspeaker:
Press loudspeaker key.
Deactivate the loudspeaker:
Press loudspeaker key.
Remark:
The loudspeaker volume for listening-in set via the slide switch is also retained
for the next call.
Hands-free operation
The hands-free mode allows to hold a telephone conversation while the handset
is on-hook. You speak through the microphone on the telephone and hear
through the loudspeaker.
19
Page 24

Making telephone calls
You receive a call:
Press the loudspeaker key. It lights red.
Hold conversation.
You call a subscriber:
Press the loudspeaker key. The key lights red.
Enter the call number or press the abbreviated dialling key
or ...
press the redial key or ...
press a speed dialling key.
Hold conversation.
Finish the call by pressing the loudspeaker key again. The
key lighting goes out.
Remark:
You can finish „hands-free mode“ by picking up the handset and continue the
conversation.
Switching between handset and hands-free operation
You are holding a telephone conversation and now intend to
switch from the handset to the hands-free mode.
Press the loudspeaker key and keep it pressed. The key
lights red.
Replace the handset and after this release the loudspeaker
key.
20
Page 25

Making telephone calls
Remark:
You can adjust the loudspeaker volume for listening-in or hands-free operation
via the slide switch.
COMBOX
With COMBOX basic, you can always be reached on the telephone. The
invisible answering machine answers any call you can’t take personally and
registres the caller’s messages digitally. You don’t need an additional device
and you don’t pay a subscription fee. You can operate your COMBOX basic
worldwide from any fixed-line or mobile phone, listen to messages and answer
calls by simply pressing a key.
Message Waiting Indicator (MWI)
COMBOX basic can signal new messages on your telephone. If you don’t have a
Swisscom COMBOX basic yet, you can order it for free. To register your
COMBOX basic dial toll free number 0800 266 269 from your own telephone and
select COMBOX basic.
Store call number of the network answering machine
Press the R-key and the redial key at the same time. (The
„P“ for „Programming-mode“ appears in the display.)
Select the function „COMBOX“ using the arrow key and
confirm with the key.
The code 086 appears. Enter your call number and confirm
with the key.
Select another function using the arrow keys or exit the
programming menu with the C-key.
21
Page 26

Making telephone calls
Play back message(s)
As soon as a new voice message is received in your COMBOX basis, the
following message is displayed:
Press the numeric key 1 for at least 2 seconds. The voice
messages will be played back.
Remark:
The message in the display is deleted as soon as you have heard all messages.
22
Page 27

Assistance call operation mode
Assistance call operation mode
Description
In the assistance call operation mode, up to 3 telephone numbers can be dialled
one after another after pressing the assistance call key.
• You activate the assistance call operation mode by a programming procedure. In factory pre-set, the mode is deactivated.
• The assistance call will be released by pressing the assistance call key .
• After pressing the assistance call key, the key lights red (under the condition,
that the assistance call mode is set active and the AC adapter is plugged).
The key light goes out after the assistance conversation is finished or after
the assistance call is ended after max 12 successless call attempts.
• During an assistance call, hands-free mode is activated. The loudspeaker
key lights red (the AC adapter has to be plugged).
• In the assistance call operation mode, assistance calls have priority over all
other telephone activities.
• The assistance call numbers must be programmed before the assistance call
operation mode will be activated.
Danger: In rare cases, the function of sending out an assistance call cannot
be guaranteed. This might be the case if e.g. the telephone
network fails. If the device is used for people who are in a critical or
life-threatening health condition, you should not refrain from additional safety means.
Storing assistance call numbers
You can store a maximum of 3 assistance call numbers. These numbers are
dialled consecutively when an assistance call is being initiated. Each assistance
call number is limited to a length of 24 digits as a maximum.
Press the R-key and the redial key at the same time. (The
„P“ for „Programming-mode“ appears in the display.)
Select the desired memory location „Assistance call No. (1 -
3)“ using the arrow keys and confirm with the key.
23
Page 28

Assistance call operation mode
Enter PIN-code (factory pre-set: 0000).
Enter assistance call number and confirm with the key.
You can enter a further code of another function or press the
C-key to exit the programming menu („P“ disappears in the
display).
Remarks:
• You can delete an entered assistance call number during the programming
process by pressing C-key.
• After an assistance call is released, the telephone dials the numbers up to 12
times automatically. If 3 assistance numbers are stored, this numbers will be
dialled one after another. This sequence will be repeated up to 4 times. If 2
assistance numbers are stored, these will be dialled one after another. This
sequence will be repeated up to 6 times. If only one assistance number is
stored, this number will be dialled up to 12 times. If all dialling attempts are
unsuccessful, the telephone sends three short tones and terminates the
assistance call.
• Each programmed assistance call number will be called 90 sec. Directly after
this, the next number will be dialled.
• Only if one assistance call number is programmed, you can hardly notice the
new dialling after 90 seconds, because the dialling procedure runs off very
fast.
Activate/deactivate assistance call mode
Please be aware, that the assistance numbers must be stored before you
activate the assistance call mode.
Press the R-key and the redial key at the same time. (The
„P“ for „Programming-mode“ appears in the display.)
Select the function „Switch assist.call on“ using the arrow
keys and confirm with the key.
24
Page 29

Assistance call operation mode
Enter PIN-code (factory pre-set: 0000).
The setting is stored.
Select another function using the arrow keys or exit the
programming menu with the C-key.
Remark:
To deactive this function select „Switch assist. call off“ within the nenu.
Sending an assistance call
After pressing the assistance call key, up to 3 stored assistance call numbers will
be dialled one after the other. The numbers must be stored and the assistance
call operation mode must be activated.
Press the assistance call key. The currently dialled number
will be shown in the display (assistance number 1 - 3).
The assistance call key and the loudspeaker key light red.
Hands-free mode is activated.
If the assistance call will be answered:
You hear the recipient of the assistance call via the
loudspeaker. Speak to him in hands-free mode.
Finishing the assistance call:
When the recipient of the assistance call replaces the handset, your telephone automatically disengages the line. The
red light of the assistance call key and the loudspeaker
key goes out.
Causion: If the caller holds the connection for less than 10 seconds, the call
was not successful und the next number will be dialled.
If you dial an assistance call number and hear an announcement
(e.g. „The number you have dialled is engaged. Do you want the …
service“), the call is regarded as accepted and the next telephone
number will not be dialled.
If the assistance call is picked up an answering machine, then it
25
Page 30

Assistance call operation mode
stops and do not dial the next number.
If you have connected your telephone to a PABX, and there is a
power failure, no assistance call numbers can be dialled.
Remarks:
• When the person seeking help hears the voice of the assistance call
recipient, it is possible that the handset is picked-up from force of habit. In this
case, the telephone automatically switches to handset-operation.
• If you press the assistance call key and the key do not lights, this may have
two reasons: The assistance operation mode is not activated or the power
supply is failed. You can see in the display, if an assistance call number will
be dialled.
• If you press the assistance call key and the key lights, but no numbers will be
dialled. The reason is, that no numbers are stored.
Manual interruption of an assistance call
The programmed assistance call is made after pressing the assistance call key.
Should you press the key mistakenly, you can stop the assistance call procedure
by the following key sequence.
Press the R-key and the redial key at the same time. (The
„P“ for „Programming-mode“ appears in the display.)
Then press the rhombus key. The assistance call is
interrupted.
26
Page 31

Security in both directions
Security in both directions
You can prevent the misuse of your telephone by others by means of various
security functions. You can protect your telephone’s settings by means of a code
(telephone PIN).
Change telephone PIN (personal identification number)
You can protect the settings programmed at your telephone against unauthorised or unintended changes by assigning a PIN. In the factory pre-set, the PIN
(personal identification number) is "0000".
Press the R-key and the redial key at the same time. (The
„P“ for „Programming-mode“ appears in the display.)
Select the function „Change PIN“ using the arrow keys and
confirm with the key.
Enter 4-digit PIN.
Enter new 4-digit-PIN two time one after the other and
confirm with the key.
Select another function using the arrow keys or exit the
programming menu with the C-key.
Causion: If you change the PIN, please make sure that you do not forget
this code as it is used as an "access key" to the programming level
of your telephone. Should you have forgotten your PIN, it can only
be reset to the factory pre-set by the manufacturer. Ask your dealer.
Dialling restrictions
At your telephone, you can set two different types of dialling restrictions: a) Number restriction: The dialling procedure is restricted for individual
telephone numbers (e. g. a specific prefix number). You have to enter
restricted numbers to use this function.
27
Page 32

Security in both directions
b) Full restriction: It is not possible to dial telephone numbers and to establish
calls (except for the numbers of police (117), fire service (118) and
ambulance (144) and the programmed assistance call numbers).
Store restricted numbers
You can assign restricted numbers to 5 memory locations (1 - 5). The length of a
restricted number is limited to 24 digits as a maximum.
Press the R-key and the redial key at the same time. (The
„P“ for „Programming-mode“ appears in the display.)
Select the desired memory location „Restricted number (1 -
5)“ using the arrow keys and confirm with the key.
Enter 4-digit PIN-code (factory pre-set: 0000).
Enter restricted number and confirm with the key.
Select another restricted number (or another function)
using the arrow keys or exit the programming menu with the
C-key.
Remark:
You can delete an entered restricted number during the programming process by
pressing the C-key.
No. restriction/Full restriction ON/OFF
The dialling restriction of restricted numbers should only be activated if you had
stored the restricted numbers before (see last paragraph).
Press the R-key and the redial key at the same time. (The
„P“ for „Programming-mode“ appears in the display.)
Select the desired function using the arrow keys:
„Switch on No. restriction“ or
„Switch on full restriction“ or
„Switch restriction off“ and confirm with the key.
28
Page 33

Security in both directions
Enter 4-digit PIN-code (factory pre-set: 0000).
The restriction is switched on or off.
Select another function using the arrow keys or exit the
programming menu with the C-key.
Remarks:
• If a restricted number es entered and the line is engaged, the display shows
„OFF“.
• If full restriction is activated, the display shows „OFF“.
• If you want to switch off a full restriction setting or a No. restriction setting,
program “Switch restriction off”.
29
Page 34

Basic settings
Basic settings
Set display language
The messages and information shown in the display can be set to the different
languages German, French, Italian or English. Factory pre-set: German.
Press the R-key and the redial key at the same time. (The
„P“ for „Programming-mode“ appears in the display.)
Select the language using the arrow keys:
„Sprache: deutsch“,
„Langue: français“,
„Lingua italiano“,
„Language: english“ and confirm with the key.
The language is stored.
Select another function using the arrow keys or exit the
programming menu with the C-key.
Volume adjustments of ringer, loudspeaker and handset
The ringing signal volume will be adjusted via the right slide
switch.
The loudspeaker volume will be adjusted via the left slide
switch.
The handset volume will be adjusted via the slide
switch positioned in the middle.
Activate/deactivate ringing signal
In factory pre-set, the ringer is switched on.
Press the R-key and the redial key at the same time. (The
„P“ for „Programming-mode“ appears in the display.)
30
Page 35

Basic settings
Select the function „Switch ringer off“ using the arrow keys
and confirm with the key.
Select another function using the arrow keys or exit the
programming menu with the C-key.
Remarks:
• If you want to switch the ringer on, select „Switch ringer on“ within the menu.
• The symbol in the lower display line shows the switched off ringer tone.
• With incoming calls the loudspeaker key flashes red in the rhythm of the
ringer (even if this is switched off). Only in a case of a power failure, the key
do not flashes.
Ringing melody
Your telephone provides 10 different ringing melodies.
Press the R-key and the redial key at the same time. (The
„P“ for „Programming-mode“ appears in the display.)
Select the function „Ringing melody“ using the arrow keys
and confirm with the key. The ringer rings in the
current set melody.
Change melody via the numeric key pad (key 0 - 9) and
confirm with the key.
Select another function using the arrow keys or exit the
programming menu with the C-key.
Adjust display contrast
The legibility of the digits and letters in the display depends on the contrast
between the background and the respective digits or letters. You can select the
contrast that is best for you from nine levels. Factory pre-set: level 5.
31
Page 36

Basic settings
Press the R-key and the redial key at the same time. (The
„P“ for „Programming-mode“ appears in the display.)
Select the function „Display contrast“ using the arrow keys
and confirm with the key.
Change contrast level via the numeric key pad (key 0 - 9)
and confirm with the key.
Select another function using the arrow keys or exit the
programming menu with the C-key.
Key tone
If the key tone is activated, each press on a numeric key will be confirmed by a
tone. The key tone can be switched on or off. In factory pre-set, the key tone is
switched on.
Press the R-key and the redial key at the same time. (The
„P“ for „Programming-mode“ appears in the display.)
Select the function „Switch key beep off“ using the arrow
keys and confirm with the key.
Select another function using the arrow keys or exit the
programming menu with the C-key.
Remark:
If you want to switch the key tone on, select „Switch key beep on“ within the
menu.
32
Page 37

Basic settings
Reset/delivery status
If you „reset“ the telephone, the entries of the memory are retained. If you
resume the „delivery status“, the entries of the memory are erased.
Problem Solution Result
You have frequently
activated and deactivated
different functions and now
lost track of the settings.
„Reset“
The telephone is reset and
the entries of the memory
are retained.
You intend to use the
telephone somewhere else
and want to resume the
delivery status.
Consider carefully if you want to „reset“ the telephone or if you want to resume
the delivery status.
Press the R-key and the redial key at the same time. (The
„P“ for „Programming-mode“ appears in the display.)
Select the function
„Reset“ or
„Delivery status“ using the arrow keys and confirm with the
Enter 4-digit PIN-code (factory pre-set: 0000). The setting is
stored.
Select another function using the arrow keys or exit the
programming menu with the C-key.
„Delivery status“
key.
The telephone is reset and
the entries of the memory
are erased.
33
Page 38

Connection to a PABX
Connection to a PABX
Program recall key
Use the R-key to use the telephone network functions or the functions of your
PABX. In the factory pre-set the short flash is set. The short flash is required e.
g. to activate special features offered by the network provider. Please also refer
to the PABX operating instructions.
Press the R-key and the redial key at the same time. (The
„P“ for „Programming-mode“ appears in the display.)
Select the flash-time using the arrow keys:
„Flash time 100 ms“ (short flash),
„Flash time 200 ms“ and confirm with the key.
Enter the 4-digit PIN-code (factory pre-set: 0000). The flash
time is stored.
Select another function using the arrow keys or exit the
programming menu with the C-key.
Program EIC (Exchange Identification Code)
IIf you operate the telephone at a PABX, for initial operation you have to program
an Exchange Identification Code and the required dialling pause. This is necessary for dialling external telephone numbers. You can enter 1 EIC number (1 - 4
digits). Please also refer to the PABX operating instructions.
Press the R-key and the redial key at the same time. (The
„P“ for „Programming-mode“ appears in the display.)
Select the function “Exchange Identification Code“ using the
arrow keys and confirm with the key.
34
Page 39

Connection to a PABX
Enter the PIN-code (factory pre-set: 0000).
Enter EIC with the numeric keys and confirm with the
key.
Select another function using the arrow keys or exit the
programming menu with the C-key.
Causion: If you have stored an Exchange Identification Code you must place
this in front of the telephone numbers that you want to enter in a
memory (telephone numbers for speed dialling, abbreviated
dialling, assistance call function and restriction function).
Remarks:
• You can delete an entered EIC during the programming process by pressing
the C-key.
• The input of an Exchange Identification Code serves only to set the sequence
of numbers after which there must a dialling pause.
Program pause duration after dialling EIC
For the required pause after dialling the corresponding identification codes, you
have the option to program either a short or a long pause (depends on the type of
PABX). In the factory pre-set, the short pause is set (3 seconds). Please also refer
to the PABX operating instructions.
Press the R-key and the redial key at the same time. (The
„P“ for „Programming-mode“ appears in the display.)
Select the function „Pause duration“ using the arrow keys
and confirm with the key.
Enter the PIN-code (factory pre-set: 0000).
Enter the pause duration using the numeric keys (1 - 9) and
confirm with the key.
35
Page 40

Connection to a PABX
Select another function using the arrow keys or exit the
programming menu with the C-key.
Remark:
The programmed duration of the pause is a maximum time. If the exchange dialling
tone is heard, the dialling procedure is initiated immediately.
36
Page 41

Appendix
Appendix
Cleaning the device
Clean the telephone with a soft slightly moist cloth. Do not use dry or wet cloths.
Causion: Please do not use chemicals, alcohol or abrasive cleaning products
to clean the device.
Factory pre-set
The telephone is preset for general purposes so that you can use it immediately
after installing and connecting (see page 6). You can change these presettings in
accordance with you personal requirements and connection conditions.
The following presettings were made:
• PIN-code: 0000
• Ringer: on
• Ringer melodie: 3
• Key tone: on
• Display contrast: level 5
• Assistance call operation mode: off
• Call restriction: off
• EIC: no entry
• Pause duration after dialling EIC: 3 seconds
• Recall key: Short Flash (100 msec.)
Short troubleshooting guide
In most cases, you can detect error causes and resolve occurring problems or
malfunctions by the following troubleshooting table. If you can’t solve the
problem, please contact your dealer.
37
Page 42

Appendix
Problem
You do not hear a dialling
tone after having picked up
the handset.
PIN code forgotten
No ringing signal for
incoming calls
Dialling with offline call preparation do not work
Automatic redialling do not
work
Dialling process is
interrupted
No call is coming in
No illumination of display,
loudspeaker- and
assistance call key
possible cause
Telephone connecting cable,
handset cable, AC adapter
are not connected correctly
Ringing signal is deactivated
AC adapter is not plugged
or power failure
AC adapter is not plugged
or power failure
Dialling restriction is active
The handset is not placed
correctly
AC adapter is not plugged
or power failure
recommended action
Check all cable connections, check telephone
access by using another
telephone, contact telephone network provider
Call dealer
Activate ringing signal
(see page 30)
Plug AC adapter correctly
Plug AC adapter correctly
Deactivate dialling restriction (see page 28)
Replace handset
Plug AC adapter correctly
Loudness (ringer, handset,
loudspeaker) is reduced
The transferred incoming
call number is not shown
AC adapter is not plugged
or power failure
- AC adapter is not plugged
correctly or power
failure
- the transmission of the
number is not provided
- display of telephone
numbers is suppressed
38
Plug AC adapter correctly
- Plug AC adapter correctly
- contact telephone net work provider
- no remedy possible
Page 43

Appendix
Problem
After pressing the
assistance call key, no
number is dialled
As for connection at a
PABX: No line or wrong
line after dialling from
the memory (e. g. speed
dialling)
As for connection at a
PABX: Recall key
without function
possible cause
- No assistance number
is stored
- assistance call modus
is deactivated.
- Exchange identification
code not entered.
- dialling pause is too
short
Recall key function not
set correctly
recommended action
- Store assistance numbers
(see page 23)
- set assistance call modus
(see page 24)
- Enter exchange identifica tion code (see page 34)
- program dialling pause (see
page 35)
- Change recall key function
(see page 34)
CE-conformity
This device is intended to be operated on the analogue Swiss network. Countryspecific conditions have to be taken into account. If you have any questions
about the differences between the public phone networks, please contact your
specialist dealer or network provider.
Swisscom hereby declares that this device meets the essential requirements and
other relevant regulations laid down in Directive 1999/5/EC.
The Declaration of Conformity can be found the following web site:
www.swisscom.ch/onlineshop.
Maintenance/Warranty
Rental devices
If your phone does not operate properly, notify Technical Assistance (phone
number 0800 800 800).
The repair 1) and the fault action are free of charge.
39
Page 44

Appendix
Purchased devices
Repair services are performed frees of charge within the warranty period in
accordance with the regulation of the warranty certificate. If a repair is
necessary, the device must be returned to the place of purchase.
If Technical Assistance is made available (during the warranty period as well),
the fault action is charged (route lump sum price as well as time expenses). The
repair costs are additional outside the warranty period.
Help
If you have any general questions about products, services, etc., please contact
your Swisscom Information Centre (toll free number 0800 800 800).
General remark
1)
except for damage to wearing parts (cables, labels, batteries etc.) and damage
arising from incorrect handling such as dropping it or allowing fluid to penetrate
into handset etc.
Menu overview
Opening the menu
Press the R-key and the redial key at the same time. (The
„P“ for „Programming-mode“ appears in the display.)
Select the desired function using the arrow keys.
Function Short description
Automatic redialling Subscriber is busy. OK
Speed dialling number 1 - 9 OK, enter number, OK,
enter name, OK
COMBOX OK, enter number, OK
Abbreviated number 2 - 0 OK, enter number, OK,
enter name, OK
40
Page 45

Appendix
Function Short description
Switch ringer on/off OK
Ringer melody OK, select melody using the numeric
keys, OK
Delete call back number OK
Switch key beep on/off OK
Display contrast OK, select level using the numeric
keys, OK
Switch assistance call on/off OK, enter PIN
Assistance call number 1 - 3 OK, enter PIN, enter number, OK
Change PIN OK, enter PIN, enter new PIN two
times one after the other, OK
Restricted number 1 - 5 OK, enter PIN, enter number, OK
Switch on number restriction OK, enter PIN
Switch on full restriction OK, enter PIN
Switch off restriction OK, enter PIN
Flash time 100, 200 msec. OK, enter PIN
Exchange identification code OK, enter PIN , enter EIC, OK
Pause duration (dialling pause) OK, enter PIN , select pause duration
using the numeric keys, OK
Display language: german, french,
italian, english, OK
Reset OK, enter PIN
Delivery status OK, enter PIN
Leaving the menu press C-key.
Technical data
Demensions (W x D x H): ca.230 x 200 x 90 mm
Weight: ca. 740 g
41
Page 46

Appendix
Housing material: ABS
Telephone connecting cable: 3 metres
Wire assignment: Pin 3: la, pin 4: lb
Power supply: Conduction current only for phone
operation
Conversation circuit: Active
Earphone and microphone capsules: Dynamic earphone/electret microphone
Ringing device: Variable ringing signal, adjustable
volume (variable slide switch) and
melody (10 different melodies)
Hands-free device: Half-duplex
Loudspeaker volume: Variable, adjustable via slide switch
Handset volume: Variable, adjustable via slide switch
Display: 2 lines graphic display with pictograms
Max. length of numbers/names: 24/16 digits
Approval: CE conformity
Temperature range for operation: 0°C up to + 40°C
Temperature range for storage: - 5°C up to + 70°C
Subject to modifications
Environmental impact
At the end of its working life this device must not under any
circumstances be disposed of as normal waste. It must be
taken to a point of sale or central collection point for electronic
and electrical devices in accordance with the Swiss Ordinance
on the Return, Taking Back and Disposal of Electrical and
Electronic Appliances (ORDEA).
The individual materials are recyclable as indicated. By reutilizing, recycling or
re-using them in any other form, you are making a major contribution towards
environmental protection.
42
Page 47

Index
Index
A
Abbreviated dialling 17
Delete numbers and names 15
Enter dialling pauses 15
Enter names 15
Store abbreviated numbers 16
Upper and lower case 15
Adjust display contrast 31
Assistance call 23
Activate/deactivate call mode 24
Description 23
Finishing the assistance call 25
Manual interruption 26
Sending an assistance call 25
Storing assistance call numbers
23
Automatic redialling 12
B
Basic settings 30
C
Call duration 5
CE-sign 39
Cleaning the device 37
COMBOX 21
Play back message(s) 22
Store call number 21
Connect handset 8
Connect to C/O line 8
Connect to "Power" 8
Connecting the telephone 7
Connection to a PABX 34
D
Delete call back number 18
Delivery status 33
Dialling
Abbreviated dialling 17
Automatic redialling 12
Manual dialling 11
On-Hook 18
Redialling 12
telephone number transmitted 17
via speed dialling numbers 14
with off-line call preparation 11
Dialling pauses 4
Dialling restrictions 27
Full restriction 28
Number restriction 27
Restricted numbers/Full restriction
ON/OFF 28
Store restricted numbers 28
Display 4, 30
Adjust display contrast 31
Set display language 30
Symbols 4
E
Ear capsule 5
Environmental impact 42
Exchange Identification Code 34
F
Factory pre-set 37
Flash time 34
Full restriction 28
43
Page 48

Index
G
General information 5
H
Hands-free operation 19
Handset 30
handset and hands-free operation 20
Hearing aids 5
I
Illumination 5
Initial operation 6
Insert name plates 9
K
Key tone 32
L
Listening-in 19
Loudspeaker 30
M
Maintenance/Warranty 39
Making telephone calls 11
Manual dialling 11
Menu 3, 40
Menu driven operation 3
Overview 40
N
Name plates 9
Network answering machine 21
Number restriction 27
O
On-Hook-Dialling 18
Operation elements front cover
P
PABX 34
Flash time 34
Pause duration 35
Program EIC 34
Program recall key 34
Pause duration 35
PIN (personal identification number)
27
Placing the telephone 6
Power failure 5
Program recall key 34
Purchased devices 40
R
Receiving a call 11
Redialling 12
Rental devices 39
Reset 33
Ringer 30
Ringing melody 31
Ringing signal 30
Activate/deactivate 30
S
Safety information front cover
Scope of supply 6
Security in both directions 27
Short user guide 10
44
Page 49

Index
Speed dialling
Delete numbers and names 15
Dialling via speed dialling keys 16
Enter dialling pauses 15
Enter names 15
Name plate 9
Speed dialling keys 14
Store speed dialling numbers 14
Upper and lower case 15
Store
Abbreviated numbers 16
Assistance call numbers 23
call number of the network
answering machine 21
Restricted numbers 28
Speed dialling numbers 14
Swisscom Information Centre 40
Symbols of the display 4
T
Technical data 41
Telephone
Cleaning 37
Connecting 7
Placing 6
Transmitted number 17
Troubleshooting guide 37
V
Voice message 22
Volume adjustments 30
of handset 30
of loudspeaker 30
of ringer 30
W
Warranty 39
45
Page 50

en 11.2008
 Loading...