

Page 1
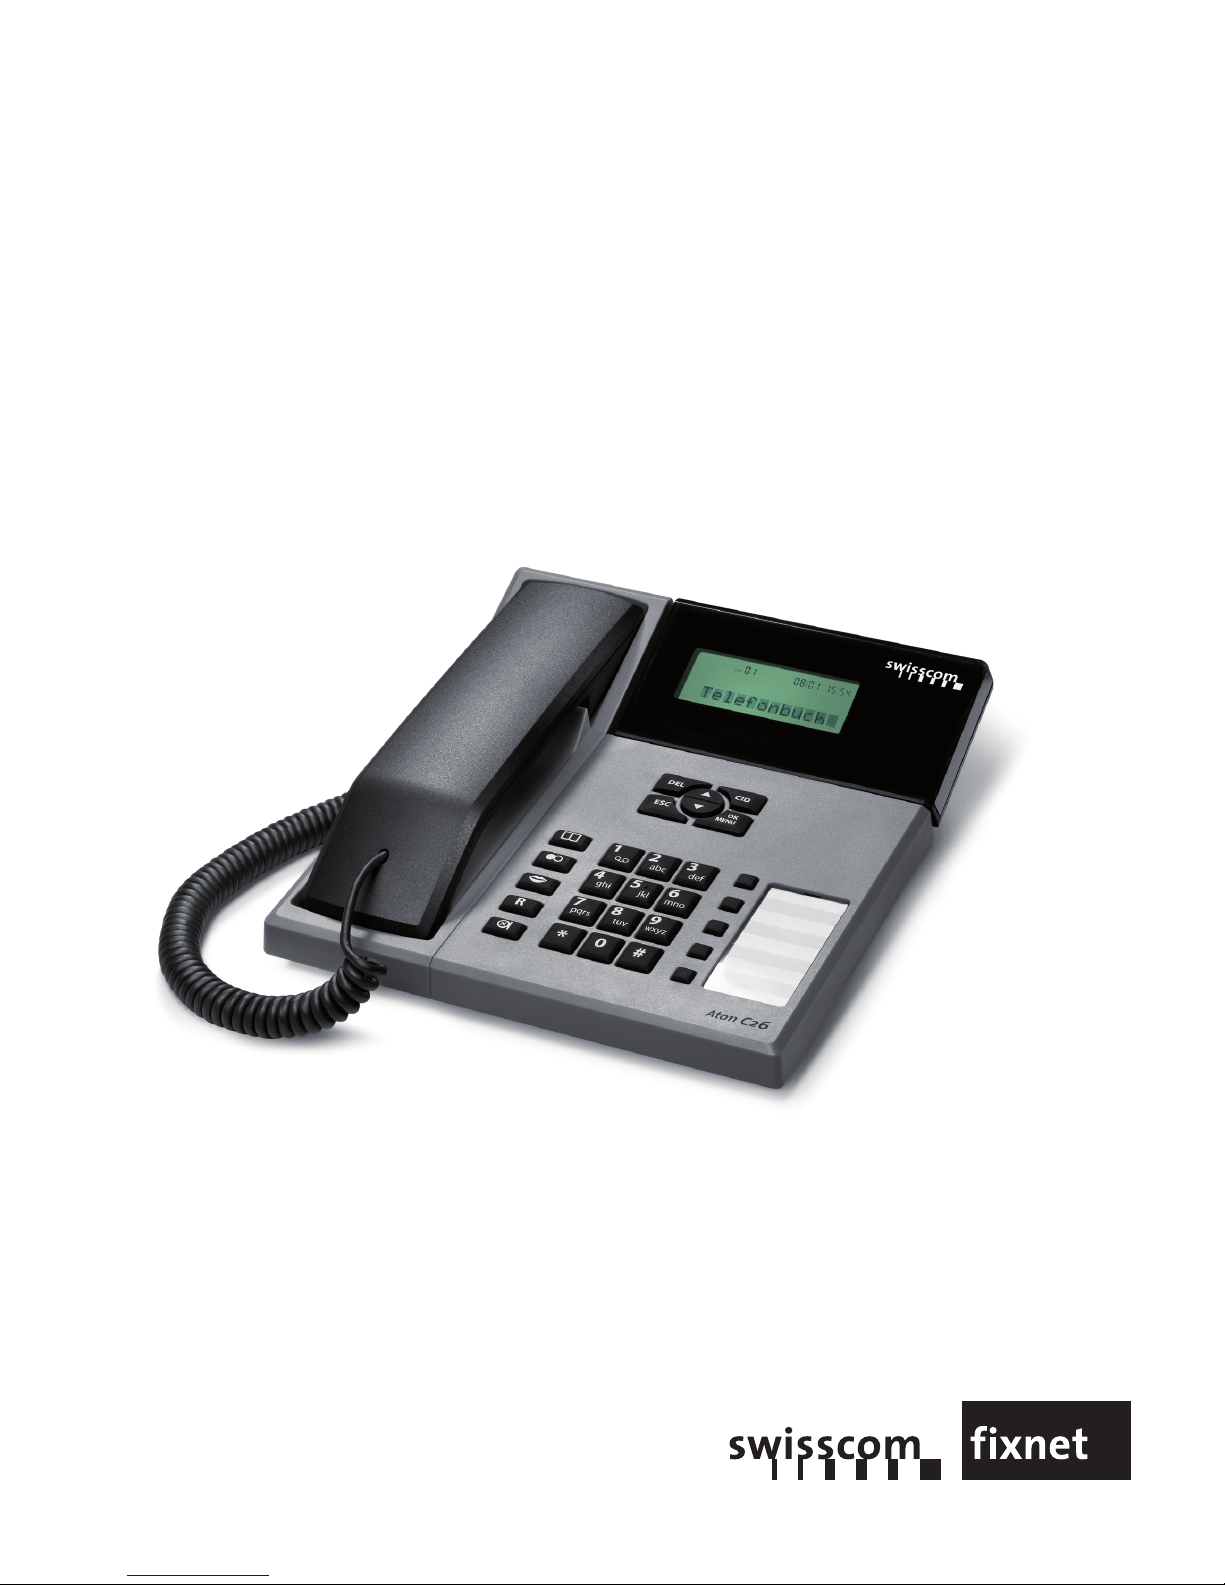
Aton C26
User Manual
Page 2

Page 3

Getting started . . . . . . . . . . . . . . . . . . . . . . . . . . . . . . . . . . . . . . . . . . . . . . . . . . . . . . . . . . . . . . . . . . . . .3
Safety Precautions . . . . . . . . . . . . . . . . . . . . . . . . . . . . . . . . . . . . . . . . . . . . . . . . . . . . . . . . . . . . . . . .3
Environmental impact . . . . . . . . . . . . . . . . . . . . . . . . . . . . . . . . . . . . . . . . . . . . . . . . . . . . . . . . . . . . . .3
Contents of the package . . . . . . . . . . . . . . . . . . . . . . . . . . . . . . . . . . . . . . . . . . . . . . . . . . . . . . . . . . . .4
Location . . . . . . . . . . . . . . . . . . . . . . . . . . . . . . . . . . . . . . . . . . . . . . . . . . . . . . . . . . . . . . . . . . . . . . . . .4
Basic Steps for Installing the C26 . . . . . . . . . . . . . . . . . . . . . . . . . . . . . . . . . . . . . . . . . . . . . . . . . . . . .4
Functions of the phone . . . . . . . . . . . . . . . . . . . . . . . . . . . . . . . . . . . . . . . . . . . . . . . . . . . . . . . . . . . . .5
Characteristics . . . . . . . . . . . . . . . . . . . . . . . . . . . . . . . . . . . . . . . . . . . . . . . . . . . . . . . . . . . . . . . . . . . .5
Description of the keys . . . . . . . . . . . . . . . . . . . . . . . . . . . . . . . . . . . . . . . . . . . . . . . . . . . . . . . . . . . . .5
Description of the display . . . . . . . . . . . . . . . . . . . . . . . . . . . . . . . . . . . . . . . . . . . . . . . . . . . . . . . . . . .6
Using the phone . . . . . . . . . . . . . . . . . . . . . . . . . . . . . . . . . . . . . . . . . . . . . . . . . . . . . . . . . . . . . . . . . . .7
Language setting . . . . . . . . . . . . . . . . . . . . . . . . . . . . . . . . . . . . . . . . . . . . . . . . . . . . . . . . . . . . . . . . . .7
How to use this phone . . . . . . . . . . . . . . . . . . . . . . . . . . . . . . . . . . . . . . . . . . . . . . . . . . . . . . . . . . . . .7
External call . . . . . . . . . . . . . . . . . . . . . . . . . . . . . . . . . . . . . . . . . . . . . . . . . . . . . . . . . . . . . . . . . . . . . .7
Dialling a number . . . . . . . . . . . . . . . . . . . . . . . . . . . . . . . . . . . . . . . . . . . . . . . . . . . . . . . . . . . . . . .7
Answering a call . . . . . . . . . . . . . . . . . . . . . . . . . . . . . . . . . . . . . . . . . . . . . . . . . . . . . . . . . . . . . . . .8
Microphone mute . . . . . . . . . . . . . . . . . . . . . . . . . . . . . . . . . . . . . . . . . . . . . . . . . . . . . . . . . . . . . . . . .8
”Register recall” / flash signal . . . . . . . . . . . . . . . . . . . . . . . . . . . . . . . . . . . . . . . . . . . . . . . . . . . . . . . .8
Pause . . . . . . . . . . . . . . . . . . . . . . . . . . . . . . . . . . . . . . . . . . . . . . . . . . . . . . . . . . . . . . . . . . . . . . . . . .8
Redialling . . . . . . . . . . . . . . . . . . . . . . . . . . . . . . . . . . . . . . . . . . . . . . . . . . . . . . . . . . . . . . . . . . . . . . .9
Caller list . . . . . . . . . . . . . . . . . . . . . . . . . . . . . . . . . . . . . . . . . . . . . . . . . . . . . . . . . . . . . . . . . . . . . . . .10
Dialling a number from the caller list . . . . . . . . . . . . . . . . . . . . . . . . . . . . . . . . . . . . . . . . . . . . . . . . . .10
Saving the CID to the phonebook or direct memory (for speed-dialling) . . . . . . . . . . . . . . . . . . . . . .10
Deleting one / all calls . . . . . . . . . . . . . . . . . . . . . . . . . . . . . . . . . . . . . . . . . . . . . . . . . . . . . . . . . . . . .10
Deleting a single entry . . . . . . . . . . . . . . . . . . . . . . . . . . . . . . . . . . . . . . . . . . . . . . . . . . . . . . . . . . .10
Delete all entries . . . . . . . . . . . . . . . . . . . . . . . . . . . . . . . . . . . . . . . . . . . . . . . . . . . . . . . . . . . . . . .10
Phonebook . . . . . . . . . . . . . . . . . . . . . . . . . . . . . . . . . . . . . . . . . . . . . . . . . . . . . . . . . . . . . . . . . . . . . . .11
Dialling from the phonebook . . . . . . . . . . . . . . . . . . . . . . . . . . . . . . . . . . . . . . . . . . . . . . . . . . . . . . . .11
Adding a new name/number . . . . . . . . . . . . . . . . . . . . . . . . . . . . . . . . . . . . . . . . . . . . . . . . . . . . . . . .11
Editing the phonebook . . . . . . . . . . . . . . . . . . . . . . . . . . . . . . . . . . . . . . . . . . . . . . . . . . . . . . . . . . . . .11
Deleting an entry from the phonebook . . . . . . . . . . . . . . . . . . . . . . . . . . . . . . . . . . . . . . . . . . . . . . . .12
Deleting all entries from the phonebook . . . . . . . . . . . . . . . . . . . . . . . . . . . . . . . . . . . . . . . . . . . . . . .12
Direct memories . . . . . . . . . . . . . . . . . . . . . . . . . . . . . . . . . . . . . . . . . . . . . . . . . . . . . . . . . . . . . . . . . .13
Memory keys (M01-M05)/voice portal key . . . . . . . . . . . . . . . . . . . . . . . . . . . . . . . . . . . . . . . . . . . . .13
Dialling a number on a memory key (M01-M05) / voice portal key . . . . . . . . . . . . . . . . . . . . . . . .13
Saving numbers to memory keys (M01-M05) / voice portal key . . . . . . . . . . . . . . . . . . . . . . . . . . .13
Deleting numbers on memory keys (M01-M05) / voice portal key . . . . . . . . . . . . . . . . . . . . . . . . .13
Speed dialling keys (2-0) . . . . . . . . . . . . . . . . . . . . . . . . . . . . . . . . . . . . . . . . . . . . . . . . . . . . . . . . . . .13
Dialling a number on a speed-dialling key (2-0) . . . . . . . . . . . . . . . . . . . . . . . . . . . . . . . . . . . . . .13
Saving a number to a speed-dialling key . . . . . . . . . . . . . . . . . . . . . . . . . . . . . . . . . . . . . . . . . . . .13
Combox . . . . . . . . . . . . . . . . . . . . . . . . . . . . . . . . . . . . . . . . . . . . . . . . . . . . . . . . . . . . . . . . . . . . . . . . .14
Saving the number of the Combox . . . . . . . . . . . . . . . . . . . . . . . . . . . . . . . . . . . . . . . . . . . . . . . . . .14
Editing the Combox number . . . . . . . . . . . . . . . . . . . . . . . . . . . . . . . . . . . . . . . . . . . . . . . . . . . . . . . .14
Deleting the Combox number . . . . . . . . . . . . . . . . . . . . . . . . . . . . . . . . . . . . . . . . . . . . . . . . . . . . . . .14
Dialling the number of the Combox . . . . . . . . . . . . . . . . . . . . . . . . . . . . . . . . . . . . . . . . . . . . . . . . . .14
1
CONTENT
Page 4

Menu set-up . . . . . . . . . . . . . . . . . . . . . . . . . . . . . . . . . . . . . . . . . . . . . . . . . . . . . . . . . . . . . . . . . . . . . .15
Ringer tone setting . . . . . . . . . . . . . . . . . . . . . . . . . . . . . . . . . . . . . . . . . . . . . . . . . . . . . . . . . . . . . . .15
Ringer volume setting . . . . . . . . . . . . . . . . . . . . . . . . . . . . . . . . . . . . . . . . . . . . . . . . . . . . . . . . . . . . .15
Contrast setting . . . . . . . . . . . . . . . . . . . . . . . . . . . . . . . . . . . . . . . . . . . . . . . . . . . . . . . . . . . . . . . . . .15
Flash time setting . . . . . . . . . . . . . . . . . . . . . . . . . . . . . . . . . . . . . . . . . . . . . . . . . . . . . . . . . . . . . . . .15
Date/time setting . . . . . . . . . . . . . . . . . . . . . . . . . . . . . . . . . . . . . . . . . . . . . . . . . . . . . . . . . . . . . . . . .15
Language setting . . . . . . . . . . . . . . . . . . . . . . . . . . . . . . . . . . . . . . . . . . . . . . . . . . . . . . . . . . . . . . . . .16
Reset . . . . . . . . . . . . . . . . . . . . . . . . . . . . . . . . . . . . . . . . . . . . . . . . . . . . . . . . . . . . . . . . . . . . . . . . . .16
Default settings . . . . . . . . . . . . . . . . . . . . . . . . . . . . . . . . . . . . . . . . . . . . . . . . . . . . . . . . . . . . . . . .16
Annex . . . . . . . . . . . . . . . . . . . . . . . . . . . . . . . . . . . . . . . . . . . . . . . . . . . . . . . . . . . . . . . . . . . . . . . . . . .17
Maintenance/Warranty . . . . . . . . . . . . . . . . . . . . . . . . . . . . . . . . . . . . . . . . . . . . . . . . . . . . . . . . . . . .17
Conformity . . . . . . . . . . . . . . . . . . . . . . . . . . . . . . . . . . . . . . . . . . . . . . . . . . . . . . . . . . . . . . . . . . . . . .17
2
CONTENT
Page 5
The C26 has been designed to allow emergency calls to be made in the event of a mains failure.
Make a call:
• Pick up the handset
• Dial the required number
• Have your conversation
• Hang up
Safety Precautions
Do not expose the telephone to humidity or any types of liquid. To avoid the risk of electrocution, do not
open the telephone.
This telephone should not be used in areas where there is a risk of explosion or gas leaks. There is a
slight possibility that this telephone may be damaged by electrical storms. We therefore recommend
unplugging the telephone from the line during thunderstorms.
Your telephone may interfere with other electrical equipment such as televisions, radios, radio alarms or
computers if placed too close to them. We recommend keeping it at least a meter away from such
equipment.
To clean the product, use a damp (not wet) cloth or antistatic wipe. Never use a dry cloth as this may
cause a static shock. Never spray cleaning fluid directly onto the telephone.
Environmental impact
At the end of its working life this device must not under any circumstances be disposed of as normal
waste. It must be taken to a point of sale or central collection point for electronic and electrical devices
in accordance with the Swiss Ordinance on the Return, Taking Back and Disposal of Electrical and
Electronic Appliances (ORDEA).
The individual materials are recyclable as indicated. By reutilizing, recycling or re-using them in any
other form, you are making a major contribution towards environmental protection.
3
GETTING STARTED
Page 6
4
Contents of the package
•1 telephone base unit
•1 handset with handset cord
•1 telephone line with Swiss connector
•3 Manuals (German, French and Italian)
Location
Keep the phone on a non-slip surface. Varnish and other synthetic finishes can attack and soften the
plastic feet on the phone. If the feet become damaged in this way, they can leave marks on surfaces.
Swisscom Fixnet Ltd declines all responsibility for such damage.
Basic Steps for Installing the C26
❍ Connect the telephone line cord to the phone cord socket on the back of the base unit and
then connect the line phone socket to the wall.
❍ Connect the coiled handset cord to the socket on the back of the base unit.
GETTING STARTED
Page 7

5
Characteristics
• 3- line display with 1 icon line, 1 7-segment line and 1 dot matrix line
• Memories: 5 memory keys, 10 indirect dialling keys and a phonebook with 40 entries
• Call lists (incoming, missed) with 20 entries
• Caller ID, including the caller’s name if this has been stored in a memory
• Redial list with 5 entries
• 10 ring tones
• Ring tone volume: high, medium, low
• Mute function
• Dialling pause
• Call duration displayed (appears automatically for a few seconds during each call)
Description of the keys
FUNCTIONS OF THE PHONE
Delete a character
or entries
Escape from a
function or end
operation
Combox
(long press)
Phonebook
Redial / Pause
Voice portal key
Flash key
Microphone mute
Caller List
Confirm /
Menu entry
Up/down keys
Memory keys
Page 8

Description of the display
Icons Function Switched on Flashing
6
FUNCTIONS OF THE PHONE
Message Waiting
Indication
Microphone Mute
Handset On
Phone Book
Indicates a repeat call in
the caller list
Indicates new missed calls
Counts the no. of entries:
- during review of caller
list
Displays date/month
Displays hours/minutes
Not used
The microphone is muted
Handset is off-hook
Operation in Phone Book
Mode
Repeat call present in the
caller list
A new missed call is
present in the caller list
While the
- caller list
- phonebook
are being displayed.
After setting
After setting
New message present in
the Combox
Not used
Pick up the handset to dial
the number
Not used
Not used
A new call has been
missed
Not used
Not used
Not used
Page 9

Language setting
- Press the Menu key while in idle mode
- Select Sprache with the up/down key and press OK
- Select the desired language and press OK
How to use this phone
Your telephone can be operated via a menu. The menu gives you access to the setting procedures and
the telephone functions. Certain menu items open a sub-menu after being selected. The menu is controlled by using the navigation keys.
The timeout is 20s while in the menu-setting mode. The time starts to be counted once the last key has
been pressed. After timeout the unit will return to idle mode without saving any data.
While in menu mode, press the ESC key once for the unit to exit the current setting mode.
Idle mode:
CLIP10: There have been 10 new calls.
External call
Dialling a number
Off-hook dialling:
- Lift the handset
- Dial the number that you want using the keypad (1~0, *, #)
On-hook dialling:
- Dial the number that you want using the keypad (1~0, *, #)
- Lift the handset
- The number will be dialled after approx. 2s.
Note: Using the Pause/Redial key, a pause can be added after any dialled digit while the handset is
on hook (e.g. for PABX access or to control external functions).
7
USING THE PHONE
10 31 01 12 28
Page 10

Answering a call
To answer an incoming call, pick up the handset. During talking mode, the following will be displayed:
If the name/number is available, it will be shown in the lower line. The name has priority.
During a call the handset icon is turned on. The time counter starts after 8s. The caller’s number will disappear after approx. 8s.
Microphone mute
While in talking mode, press the Mute key once, then the microphone will be muted. The following will
be displayed:
The Mute icon is turned on.
To release the mute function, press the Mute key again.
”Register recall” / flash signal
During talking mode, press the Recall (Flash) key. The unit will send a flash signal to the network. The
default time is 100ms.
Pause
To insert a pause, press the Pause (Redial) key while typing a number. This function can be used in
dialling and storing mode. The default time for the pause is 2s. During the pause, the unit remains in the
mute state.
8
USING THE PHONE
31 01 12 28
00-13
Swisscom
31 01 12 28
<Caller number> 00-13
Swisscom
31 01 12 28
00-13
<Caller number>
Page 11

9
Redialling
Note: Numbers which are pressed more than 4 seconds after the last key will not be saved to the
redial buffer.
The redial memory stores the last 5 dialled numbers with 24 digits for each number. If the number is
over 24 digits long, the first 24 digits will be stored to memory.
In stand-by mode:
- Press Redial once, then the last number dialled will be shown on the screen
(If the number is over 13 digits long, the number will move across the screen)
- Press the up or down key to select the number you want to dial
- Pick up the handset to make the call
(the number will be dialled after 2 seconds)
Note: To save the number to a memory:
- Press the Redial key
- Choose the desired entry using the up or down key
- Press OK to confirm
- Choose the desired memory using the up or down key:
Phonebook
M01 – M05 5 memory keys at the right
M2 – M0 (keys 2 to 0) Speed-dial keys (numeric keys)
- Press OK to confirm
- Edit the number using the keypad
- Press OK to confirm
- Press keys to edit the name. To switch to capitals and back please press the * key.
- Enter the name via the keypad and press OK to save the data.
In the off-hook state:
- Press Redial
- Choose the desired entry using the up or down key
- Press Redial again (the number will be dialled immediately)
Note: The redial list can be deleted by the Reset 1 function.
USING THE PHONE
Page 12

The caller list shows you what calls you have missed. If the telephone network transmitted the number,
name and time, then these will be shown in the caller list, too.
If the caller’s phone number or name was absent or withheld, the LCD will display “- - - -” on the name
line. After receiving a new call along with this CID (caller ID), the CLIP icon flashes.
Dialling a number from the caller list
In the on-hook mode:
- Press CID (= caller ID)
- Choose the desired entry using the up or down key
- Pick up the handset to dial the number (the number will be dialled after 2s).
In the off-hook mode:
- Press CID (= caller ID)
- Choose the desired entry using the up or down key
- Press CID key again, then the number will be dialled immediately.
Note: The caller list can be deleted by the Reset 1 function.
Saving the CID to the phonebook or direct memory (for speed-dialling)
- Press CID
- Choose the desired entry using the up or down key
- Press OK to confirm
- Choose the desired memory key using the up or down key:
Phonebook
M01 – M05 5 memory keys at the right
M2 – M0 (keys 2 to 0) Speed-dial keys (numeric keys)
- Press OK to confirm
- Edit the number using the keypad
- Press OK to confirm
- Press keys to edit the name. To switch to capitals and back please press the * key
- Enter the name via the keypad and press OK to save the data.
Deleting one / all calls
- Press CID
- Choose the desired entry using the up or down key
Deleting a single entry
- Press DEL
- Confirm the message “Delete?” with OK.
Delete all entries
- Press DEL for longer than 2s
- Confirm the message “Delete All” with OK
- Confirm the message “Sure?” with OK.
- Press ESC to leave the menu.
10
CALLER LIST
Page 13

The unit has 40 phonebook entries. Each memory can store numbers with up to 24 digits and names
with up to 16 characters.
Dialling from the phonebook
- Press the phonebook key while in idle mode.
- Select Review and press OK
- Choose the desired entry
(To search for a name, press the first character via the keypad)
- To dial a number, lift the handset (the number will be dialled after 2s)
Note: To dial a displayed number while in off-hook mode, press the phonebook key again.
Adding a new name/number
- Press the phonebook key while in idle mode.
- Select New with the up/down key and press OK (the first character will flash)
- Enter the number with the keypad and DEL key
- Press OK to save the number and go to the name line.
- Edit the name with the keypad. To switch to capitals and back please press the * key
- Press OK to save the entry
(the telephone returns to the phonebook’s Review mode)
Editing the phonebook
- Press the phonebook key while in idle mode.
- Select Review with the up/down key and press OK
- Choose the desired entry
(To search for a name, press the first character via the keypad)
- Press OK (the first character will flash)
- Choose the position to edit the number with the up/down key and change the number with the key-
pad or delete it with the DEL key
- Press OK to save the number and go to the name line.
- Edit the name with the keypad. To switch to capitals and back please press the * key
- Press OK to save the entry
(the telephone returns to the phonebook’s Review mode)
11
PHONEBOOK
Page 14

Deleting an entry from the phonebook
- Press the phonebook key while in idle mode.
- Select Review with the up/down key and press OK
- Choose the desired entry
(To search for a name, press the first character via the keypad)
- Press DEL
- Confirm the message “Delete?” with OK.
Deleting all entries from the phonebook
- Press the phonebook key while in idle mode.
- Select Delete All with the up/down key and press OK
- Confirm the message “Sure?” with OK.
12
PHONEBOOK
Page 15

The telephone has got 5 memory keys and nine speed dialling keys (2 to 0). Each key can store numbers with up to 24 digits and names with up to 16 characters.
Memory keys (M01-M05)/voice portal key
Dialling a number on a memory key (M01-M05) / voice portal key
- While in idle mode or off-hook, press the desired memory key (M1 to M5 / voice portal key)
- If the handset is off hook, the number will be dialled after 2s.
Saving numbers to memory keys (M01-M05) / voice portal key
- While in idle mode press a memory key (M01 to M05/voice portal key) for longer than 2s
- Press OK (the first character will flash)
- Enter the number using the keypad and DEL key
- Press OK to save the number and go to the name line
- Enter the name and press OK to save the entry.
Deleting numbers on memory keys (M01-M05) / voice portal key
- While in idle mode press a memory key (M01 to M05/voice portal key)
- Press DEL
- Confirm the message “Delete?” with OK.
Speed dialling keys (2-0)
Dialling a number on a speed-dialling key (2-0)
- While in idle mode, press and hold down a speed-dialling key (2 to 0) for longer than 2s
(the unit shows the entry).
If the handset is off-hook, the number will be dialled immediately.
- Pick up the handset to dial the number. The number will be dialled 2s after the handset has been
taken off hook.
Saving a number to a speed-dialling key
- While in idle mode, press and hold down a speed-dialling key (2 to 0) for longer than 3s
(the unit shows the memory mode)
- Press OK to edit the memory
- Enter the desired number and press OK to go to the name line
- Enter the name via the keypad and press OK to save the data.
13
DIRECT MEMORIES
Page 16

Saving the number of the Combox
(No number has been saved to key 1)
- Press the Menu key while in idle mode
- Select Combox with the up/down key and press OK
(the first character will flash)
- Enter the number using the keypad and DEL key
- Press OK to save the number and edit the name.
- Enter the name and press OK to save the entry.
Editing the Combox number
- Press the Menu key while in idle mode
- Select Combox with the up/down key and press OK
- Press OK (the first character will flash)
- Choose the position to edit the number with the up/down key and change the number with the key-
pad or delete it with the DEL key
- Press OK to save the number and go to the name line.
- Edit the name via the keypad.
- Press OK to save the entry.
Deleting the Combox number
- Press the Menu key while in idle mode
- Select Combox with the up/down key and press OK
- Press DEL
- Confirm the message “Delete?” with OK.
Dialling the number of the Combox
Note: If no number has been saved for the Combox (or it has been deleted), then the telephone will
request you to enter and save a number for device.
- While in idle mode or off-hook, press and hold the "1" key for more than 3s
- If the handset is off hook, the number will be dialled after 2s.
14
COMBOX
Page 17

While in the idle mode, press the Menu key to enter the menu operation. Press the up/down key to
select the desired item. The timeout for the setting mode is 20s. The possible settings you can make are
stated below:
Ringer tone setting
- Press the Menu key while in idle mode
- Select Ringer Tone with the up/down key and press OK
- Select the desired ring tone and press OK.
Ringer volume setting
- Press the Menu key while in idle mode
- Select Ringer Sound with the up/down key and press OK
- Select the desired ringer volume and press OK.
Contrast setting
- Press the Menu key while in idle mode
- Select Contrast with the up/down key and press OK
- Select the desired contrast and press OK.
Flash time setting
- Press the Menu key while in idle mode
- Select Flash Time with the up/down key and press OK
- Select the desired flash time (100 or 300ms) and press OK.
Date/time setting
If the date and time are transmitted by the telephone network, the setting will be made automatically
during an incoming call (except for the year).
- Press the Menu key while in idle mode
- Select Date/Time with the up/down key and press OK
- Enter the date and the time with the keypad (DD/MM/YY hh/mm)
- Press OK.
15
MENU SET-UP
Page 18

Language setting
- Press the Menu key while in idle mode
- Select Language with the up/down key and press OK
- Select the desired language and press OK (English, German, French, Italian)
Reset
There are two kinds of resets that can be done:
Reset 1: Resets the telephone to the factory default mode
All settings, lists and memories will be reset
Reset 2: Only resets the telephone settings to the factory default mode.
No numbers saved in memories will be deleted (phonebook, speed-dialling/memory and
lists).
- Press Menu
- Choose Reset1 or Reset2 via the up/down key and press OK
- Confirm the message “Sure?” with OK.
Default settings
Description Default Setting
LCD contrast 3
Language German
Date 01/01(-07) 12:00
Dialling mode Tone
Flash 100ms
Pause 2s
Voice portal key 0848 849 850
CID memory Empty
Direct memory (speed-dialling) Empty
Phonebook memory Empty
Redial memory Empty
Ringer volume 3
Ringer tone 1
16
MENU SET-UP
Page 19

Maintenance/Warranty
Rental devices
If your phone does not operate properly, notify Technical Assistance (phone number 175). The repair
1)
and the fault action are free of charge.
Purchased devices
Repair services are performed frees of charge within the warranty period in accordance with the regulation of the warranty certificate. If a repair is necessary, the device must be returned to the place of purchase.
If Technical Assistance is made available (during the warranty period a well), the fault action is charged
(route lump sum price as well as time expenses). The repair costs are additional outside the warranty
period.
Help
If you have any general questions about products, services, etc., please contact your Swisscom
Information Centre (toll free number 0800 800 800).
General remark
1)
except for damage to wearing parts (cables, labels, batteries etc.) and damage arising from incorrect
handling such as dropping it or allowing fluid to penetrate into device etc.
Conformity
This device is intended to be operated on the analogue Swiss network. Countryspecific conditions have
to be taken into account. If you have any questions about the differences between the public phone networks, please contact your specialist dealer or network provider.
Swisscom hereby declares that this device meets the essential requirements and other relevant regulations laid down in Directive 1999/5/EC.
The Declaration of Conformity can be found the following web site:
www.swisscom.com/onlineshop under the rubric, Phone, Declaration of Conformity or can be
ordered from the following postal address:
Swisscom Fixnet Ltd
Residential
Customer Premises Equipment (CPE)
CH-3050 Bern
17
ANNEX
Page 20

 Loading...