

Swiss SensorMaster II Instruction Manual
Size 130 x 90 mm
Type: Book type
Pages: total 40 pages (including front, rear and white pages)
Colour: Black on white paper
Blinding: Saddle wire
Paper: Wood free paper 70 gms
90 mm
folding line
saddle wire
130 mm 130 mm
SensorMaster II: Instruction Manual
Project no: 431 Version: 6.0 File name: 431MAN061.CDR Prepared by C.K Lau Copyright: Latitude Limited Date: 8 Jan, 2003
Instruction Manual
1.0 Introduction
Thanks of your purchase of the SensorMaster II.
Your SensorMaster II features a electronic sensor that
measures the outdoor conditions such as temperature,
pressure and altitude.
Your SensorMaster II provides the essential information at
the time during you are performing hiking, climbing and
other
ensorMaster II also includes normal time, dual time,
daily alarm, chronograph and timer.
Your SensorMaster II is carefully designed and produced for
outdoor activities, in order to utilize these features of your
, it is advisable to read the following
instructions:
- Read the instruction before you use the SensorMaster II.
- Avoid exposing your SensorMaster II to the extreme
conditions for an unreasonable time.
- Avoid rough usages or severe impacts to your
SensorMaster II.
- Do not open the SensorMaster II's case unless a
certified service agency because your SensorMaster II
contains precise electronic sensors and
- Clean your SensorMaster II with a soft cloth occasionally
that working for a longer use life of your watch.
- Store your SensorMaster II in a dry place when it is not
in use.
outdoor activities.
Your S
SensorMaster II
components.
1
3
2 4
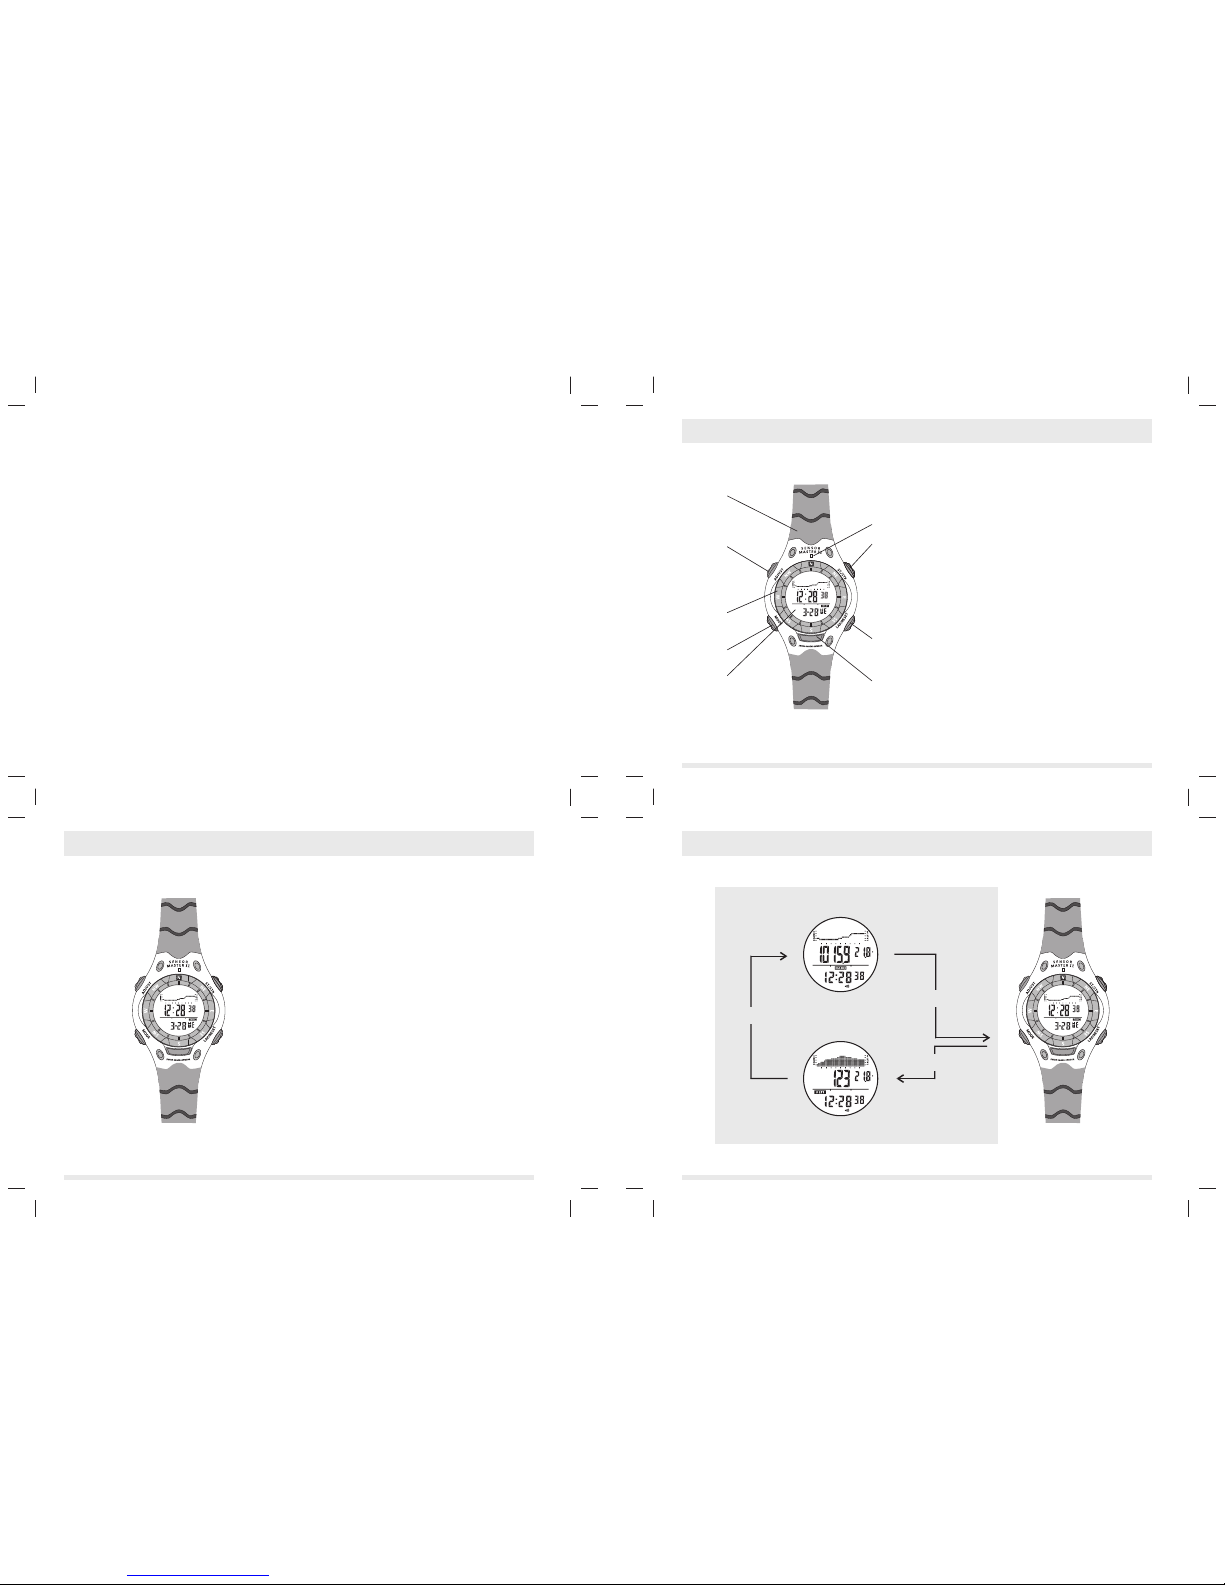
2.0 The SensorMaster II Parts and Its Functions
3.0 Major Function Modes - Timekeeping, Altimeter and Barometer Mode
SensorMaster II
Time Keeping Mode
mode
button
PU strap
pointer
adjust
button
start/stop
button
rotatory
ring
lap/reset
button
mode
button
light
button
display
mode
button
mode
button
Altimeter Mode
Barometer Mode
P
P
P
Mode Button
- To select among Time Keeping Mode, Barometer Mode
and Altimeter Mode.
- Press and hold for 2 seconds to enter setting modes.
- To select sub function of Time Keeping Mode, Barometer
Mode and Altimeter Mode.
- To select the items in setting modes.
- To select Altitude 24 hour memory.
To select Barometric Pressure 48 hour memory.
- To increase the number during setting.
- To start / stop the chronograph and timer.
- To switch between Current Time and Dual Time Display
- To decrease the number during setting.
- To record lap memory in Chronograph Mode.
- Press and hold for 2 seconds to reset lap memory in
Chronograph Mode.
- To select history graph scale information.
- Press and hold for 2 seconds to switch among sensor
units.
- To exit setting sequences.
Adjust Button
Start/Stop Button
Lap/Reset Button
m
C
P
hPa
mb
P
C
5
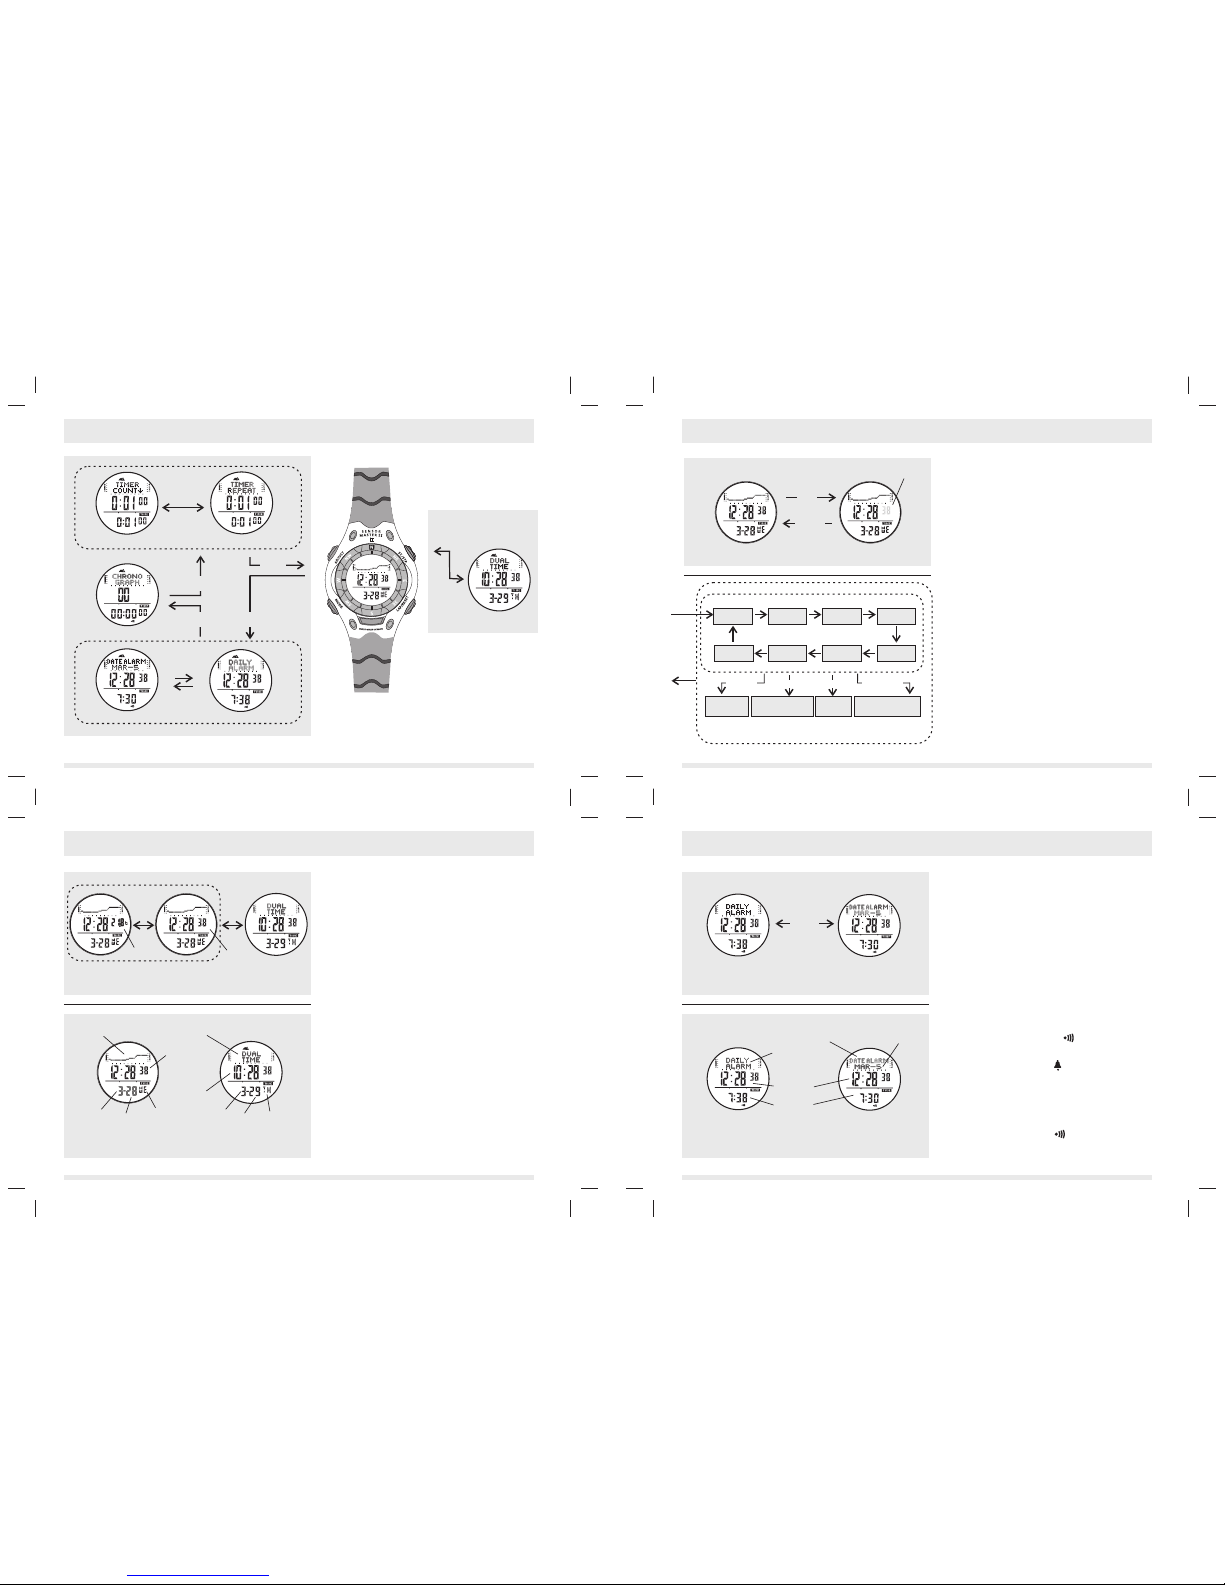
4.0 Time Keeping Mode and its Sub-displays
Current Time Display
adjust
button
adjust
button
adjust
button
adjust
button
start/stop
button
start/stop
button
Dual Time Display
Chronograph Display
Countdown Timer Display
Remark A
Remark A :
- To switch between Countdown Timer Display and Repeater
Timer Display, Check the 'To Set the Timer Counting Display'
section for more detail.
Repeater Timer Display
PP
P P
P
P
A
A
A
6
7
Current Time and Dual Time Display
- Press the [start/stop] button once to switch between
the Current Time Display and the Dual Time Display.
Current Time Display
- The 1st row of the display shows the Pressure History Graph
of the last 48 hours.
- The 2nd row of the display shows current time
in hour, minute and second.
- The 3rd row of the display shows the month, day and day of
week.
- Press and hold the [lap/reset] button for 2 seconds to select
between 'second' display or 'temperature' display.
IMPORTANT: If the user intends to get an accurate reading
of air temperature, the user must taken off the watch from
the wrist for 20 to 30 minutes before the actual
measurement. It allows no body temperature effect on the
watch.
Dual Time Display
- The 1st row of the display shows the Dual Time Display
Indicator.
- The 2nd row of the display shows dual time in hour, minute
and second;
- The 3rd row of the display shows the month, day and day of
week for the dual time.
NOTE: To use the Pressure History Graph, check the 'Implication
of the Pressure History Graph' section for more detail.
4.1 Timekeeping Mode - Current Time and Dual Time Display
mode
button
start/stop
button
hold
lap/reset
hold
adjust
Dual Time Display
Current Time Setting Display
Dual Time Display
pressure history graph
temperature seconds
dual time
display Indicator
digits have been
selected (flashing)
Current Time Display
(seconds)
Current Time Display
(Temperature)
Current Time Display
Current Time Display
day of week day of week
month monthdate date
current time
dual time
4.2 Timekeeping Mode - Setting the Current Time and the Dual Time
second
12/24
hour format
display
contrast
minute hour
day
year
month
To Set the Time and Date
- To set the date and time, press and hold the [adjust]
button for 2 seconds to change from the Current Time
Display to Current Time Setting Display.
- The second digits flash on the display because they are
being selected.
The Setting Procedures
- Press [adjust] button to change the selection as in the
Current Time Setting Sequence.
- While digits are flashing (selected), press the [start/stop]
button to increase the number; press the [lap/reset] button
to decrease the number. Hold the button change the
number at a higher speed.
- While display contrast setting is being selected, press the
[start/stop] button to increase the number. Press the
[lap/reset] button to decrease the number. 15 gives a
darker display; 0 gives a lighter display.
- After you set the time, date, display format and display
contrast, press the [mode] button to exit the Current Time
Setting Sequence.
- If no any key operation in the setting display for about 3
minutes, the SensorMaster II will return to the Current
Time Mode automatically
To Set the Dual Time
- To set the date and time, press and hold the [adjust]
button for 2 seconds to change from the Dual Time
Display to Dual Time Setting Display.
- Follow the Current Time Setting to set the subsequence
settings of the dual time.
Current Time Setting Sequence
adjust
adjustadjust
adjust
adjust
adjust
hold
adjust
mode
button
adjust adjust
8
Daily / Date Alarm Displays
Switch between the Daily / Date Alarm Display
4.3 Timekeeping Mode - Daily Alarm, Date Alarm and Chime/Alarm On/Off
start/stop
Daily Alarm and Date Alarm Display
- SensorMaster II has two alarm displays: The Daily Alarm
Display and the Date Alarm Display.
- The Daily Alarm and the Date Alarm are working
independently.
- When the Daily Alarm is ON, the SensorMaster II sounds
at the preset alarm time every day.
- When the Date Alarm is ON, the SensorMaster II sounds
at the preset alarm time in the schedule date.
- Press the [start/stop] button to switch between
the Daily Alarm Display and the Date Alarm Display, in
the Alarm Display.
To Set the Daily Alarm and Chime On or Off
- Press the [lap/reset] button to change the ON/OFF status
of alarm and the hourly chime, in the Daily Alarm Display.
- When the alarm indicator is appeared (alarm
ON), the SensorMaster II sounds at the preset alarm
time every day.
- When the chime indicator is appeared (chime ON),
the SensorMaster II beeps every hour on the hour.
- To stop the sound, press any button to stop the alarm.
To Set the Date Alarm On or Off
- Press the [lap/reset] button to change the ON/OFF status
of alarm, in the Date Alarm Display.
- When the alarm indicator is appeared (alarm ON),
the SensorMaster II sounds at the preset alarm time in
the preset date.
Date Alarm Display
Date Alarm Display
Daily Alarm Display
Daily Alarm Display
daily alarm
indicator
date alarm
indicator
current time
alarm time
P
A
P
A
P
A
P
A
the alarm
date
Daily Alarm Display
P
A
Date Alarm Display
P
A
hPa
Increase
the number
decrease
the number
Increase the minute
at a higher speed
decrease the number
at a higher speed
start/stop hold start/stop lap/reset hold lap/reset

9
4.4 Timekeeping Mode - Setting the Daily Alarm and the Date Alarm
To Set The Daily Alarm
- Press and hold the [adjust] button for 2 seconds to change
Daily Alarm Setting Display, in the Daily Alarm Display.
- The hour digits flash on the display because it is being
selected.
The Setting Procedures
- Press [adjust] button to change the selections following the
Daily Alarm Setting Sequence.
- While digits ( hour, minute) are flashing (selected), press the
[start/stop] button to increase the number; press the
[lap/reset] button to decrease the number. Hold down the
button to change the number at a higher speed.
- If the alarm time is set, press the [mode] button to exit
the setting sequence.
- If no any key operation in the setting display for about 3
minutes, the SensorMaster II will return to the Alarm Time
Mode automatically
To Set The Date Alarm
- Press and hold the [adjust] button for 2 seconds to change
Date Alarm Setting Display, in the Date Alarm Display.
- The hour digits flash on the display because it is being
selected.
The Setting Procedures
- Press the [adjust] button to change the selection following
the Date Alarm Setting Sequence.
- Set the Date Alarm at the same manner as setting the daily
alarm.
- After you set the date alarm, press the [adjust] button to exit
the setting sequence.
Daily Alarm Setting Sequence
Date Alarm Setting Sequence
month day
adjust
adjust adjust adjust
adjust
adjust
hour digits have
been selected (flashing)
A
A
10
4.5 Timekeeping Mode - Start/Stop the Chronograph
Chronograph Mode
- The Chronograph measures elapsed times and laptimes.
- The display shows the 'All-Zero' display when the
chronograph is being selected the first time or the
chronograph is reset.
- The resolution of the chronograph is 1/100 second.
To Start/Stop the Chronograph
- When the chronograph is stopped, press the
[start/stop] button to start the chronograph; If the
chronograph is running, press the [start/stop] button
to stop the chronograph.
- The elapsed time between the 2 keystroke will be
appeared on the display.
- Repeat the above mentioned steps to get the
accumulated time of which the chronograph is running.
To Reset the Chronograph
- Record a new set of elapsed time, press and hold
the [lap/reset] button for 2 seconds to reset the
chronograph to 'All-Zero' display when the
chronograph is stopped.
Chronograph
Running Display
Chronograph Stop Display
Chronograph
'All-Zero' Display
start/stop
start/stop
hold
lap/reset
the digits
stop running
the digits
keep running
1/100 sec
chronograph
display indicator
hour minutes seconds
start/stop
11
4.6 Timekeeping Mode - Record/Recall a Lap Memory
Chronograph
Lap Display
Chronograph
Running Display
lap/reset
To Record Lap Memory
- The Chronograph Mode allows you to record up to 10
lap memories.
- Press the [lap/reset] button once to record the lap
memory during the chronograph is running.
- The lap number will be displayed at the right hand side of
the display for 5 seconds, as well as the lap time display
on the bottom row of the display. Then the chronograph
starts running again automatically.
- During the lap number and lap time are displaying, the
chronograph keeps running.
- Repeat the steps mentioned above to get another set of
lap memory.
To Recall Lap Memory
- Press and hold the [adjust] button to enter the lap
memory recall sequence, in Chronograph Stop Display.
- Press the [lap/reset] button to switch among the lap
memories.
- Press the [mode] button to exit the lap memory recall
sequence.
To Reset Lap Memory
- Record new sets of lap time, press and hold the
[lap/reset] button for 2 seconds to reset the chronograph
lap memory when the chronograph was stopped.
5 second
the digits
is running
the lap
number
Chronograph
Stop Display
lap memory recall
sequence
lap/reset
1st lap memory
the next
lap memory
mode
hold adjust
To record the Lap Memory
To recall the Lap Time
12
4.7 Timekeeping Mode - Countdown Timer and Repeater Timer
Countdown Timer and Repeater Timer Display
- SensorMaster II has two timer counting displays:
Countdown Timer and Repeater Timer.
- The Countdown Timer starts the counting from the preset
value to zero and stops at zero.
- The Repeater Timer starts the counting from the preset
value to zero, when it is zero, the timer starts the
counting again and again automatically until the [start/stop]
button is pressed.
- To select between Countdown Timer and Repeater
Time Display, check the 'To Set the Timer Counting
Display' section for more detail.
The Timer Display Format
- The 1st row of the display shows the Countdown Timer
or the Repeater Timer indicators.
- The 2nd row of the display shows the digits, which the
timer starts counting from that digits.
- The 3rd row of the display shows the digits, which the
timer is going to be set.
To Set the Timer from the Quick Set Values
- Press the [lap/reset] button to select among the 5
quick-set-values (3,5,10,15 and 45 min) and the existing
User Preset Value as in the
- When the desired value displays on the 3rd row of the
display, press and hold the [lap/reset] button for 2
seconds to load that value to the 2nd row of the display.
The timer is now set.
- To set the timer values other than the 5 Quick Set Value
and the existing User Preset Value, check the 'To Set the
User Preset Value' section for detail.
Timer Setting Sequence.
Countdown Timer Display Repeater Timer Display
3 min
User
Preset
Value
5 min
45 min
10 min
15 min
Timer Setting Sequence
Quick Set ValuesUser Preset Value
lap/resetlap/reset lap/resetlap/reset
lap/reset lap/reset lap/resetlap/reset
the setting row
the counting row
countdown timer
display indicator
repeater timer
display indicator
hour
minute
minute
mode
button
hold
adjust
hold
adjust
mode
button
Increase
the number
decrease
the number
Increase the minute
at a higher speed
decrease the number
at a higher speed
start/stop hold start/stop lap/reset hold lap/reset
hour
Remark A
Remark A :
- To switch between Countdown Timer Display and Repeater Timer
Display, Check the 'To Set the Timer Counting Display' section for
more detail.
Daily/Date Alarm
Setting Display
Daily/Date Alarm Display
 Loading...