

Swiss HealthPro 100 User Manual
Swiss Made
105.10.31.40_140113_IN_MA_HP100_EN(CN)
HealthPro® 100
User Manual


3
About This User’s Manual
Congratulations on your purchase of this high-performance air cleaning system made by IQAir AG of Switzerland.
Please study this user manual carefully to familiarize yourself with the special features and functions of your system
and keep it in a safe place for future reference.
Read these instructions before using the appliance:
• Do not use this appliance as sole protection against harmful pollutants.
• Do not immerse the appliance in water or other liquids.
• Always disconnect the power from your air cleaner by unplugging the power cable before adding or removing
parts and before cleaning.
• Do not operate this appliance if it has a damaged cord or plug, if the motor fan fails to rotate, if it is not working
properly, if it has been dropped or damaged, or immersed in water.
• If the mains cord of this appliance should become damaged, it may be replaced with a similar cord set, as is
commonly used for computers and similar appliances.
• Only use this appliance for its intended purpose of air cleaning in non-industrial environments.
• Do not use this appliance in areas with very high concentrations of dusts or powder to prevent the danger of dust
explosions.
• Do not use this appliance in explosive areas.
• Only use lters and accessories recommended by the manufacturer.
• Do not use outdoors.
• Do not obstruct the air inlet and air outlet of the air cleaner.
• Do not place the appliance on a soft surface such as a bed or other soft furnishings.
• Only use this appliance in an upright position.
• Do not place next to a humidier.
• Keep the power cord away from heated surfaces.
• Save these instructions for future reference.
This appliance is not intended for use by persons (including children) with reduced physical, sensory or mental
capabilities, or lack of experience and knowledge, unless they have been given supervision or instruction concerning
the use of the appliance by a person responsible for their safety.
Children should be supervised to ensure that they do not play with the appliance.
Important Safety Instructions
IQAir AG, Switzerland reserves the right to change specications contained in this document at any time and without prior notice.
© 1998 –2014 IQAir AG, Switzerland. All rights reserved. HealthPro® and HyperHEPA® are the registered trademarks of the IQAir AG, Switzerland. V5-Cell™, PreMax™
and EvenFlow™ are trademarks of the IQAir AG, Switzerland. This air cleaning system and its lters are protected under U.S. patents 6 001 145 and
6 159 260. Other U.S., European and Asian patents pending.

4
Page
Important Safety Instructions 3
Chapter 1 – Air Cleaning Systems and Indoor Air Quality 5
1. 1 Improving Indoor Air Quality 5
Chapter 2 – Setting Up 6
2. 1 Unpacking 6
2. 2 Fitting Your Air Purifier with Casters 7
2. 3 Choosing a Suitable Location 8
2. 4 Connecting to Power 8
Chapter 3 – The System’s Components 9
3. 1 Description of Housing Components 9
3. 2 Description of Removable Components 10
3. 3 How the System Works 10
Chapter 4 – Using the Control Panel 11
4. 1 Description of Control Panel 11
4. 1. 1 Description of Control Panel Keys 11
4. 2 Control Panel Locking Function 12
4. 3 Fan Speed and Air Delivery 12
4. 3. 1 Regulating Fan Speed 12
4. 3. 2 Air Exchange Rates in Differently Sized Rooms 13
4. 4 Using the Menu Functions 13
4. 4. 1 Menu Overview 13
4. 4. 2 Filter Life Monitor 14
4. 4. 3 Setting the Daily Timer 15
4. 4. 4 Setting the Weekly Timer 16
4. 4. 5 Timer ON/OFF Fan Speed Selection 16
4. 4. 6 Timer Information in the Control Panel 17
4. 4. 7 Time & Day Setting 17
4. 4. 8 Filter Life Reset 18
4. 4. 9 Changing Airflow Units 18
4. 4. 10 Language Setting 18
4. 4. 11 Filter Load Index Setting 19
4. 4. 11.1 Determining the Filter Load Index 19
4. 4. 11.2 Modifying the Filter Load Index 20
Chapter 5 – Using the Remote Control 21
5. 1 Remote Control Functions 21
5. 2 Getting the Best Transmission Results 21
5. 3 Placing Batteries in the Remote Control 22
Chapter 6 – Replacing Filters 22
6. 1 Location of the Filters 22
6. 2 Ordering Replacement Filters 22
6. 3 Opening and Closing the Housing 23
6. 3. 1 Troubleshooting when Closing the Housing 23
6. 4 Replacing the PreMax
TM
Filter (Filter 1) 23
6. 5 Replacing the HyperHEPA® Filter (Filter 2) 25
6. 6 Discarding Used Filters 25
Chapter 7 – Maintenance 25
7. 1 Cleaning the Housing 25
7. 2 Maintenance-Free Fan 25
Chapter 8 – Accessories (Optional) 26
Table of Contents

5
Chapter 1 – Improving Indoor Air Quality
Chapter 1 – Air Cleaning Systems and Indoor Air Quality
1.1 Improving Indoor Air Quality
Air cleaning can play an important role when it comes to improving indoor air quality. However, it should be noted
that air cleaning should be used in conjunction with pollution source control and ventilation, wherever possible.
Strategy to improve indoor air quality
To tackle any indoor air quality problem, keep the following three-step strategy in mind:
1. Eliminate or reduce the air pollution source as much as possible. Source control is by far the most effective way to
improve indoor air quality, since it sets out to deal with air pollution at the point of origin.
2. Ensure that sufcient fresh air is entering the room from outside. Air cleaners are not a substitution for sufcient
ventilation. They are not able to reverse the conversion of oxygen (O
2
) into carbon dioxide (CO2), caused by
breathing and combustion processes.
3. Ensure the system can clean enough air to cope with your room size. The actual hourly air volume cleaned by the
system should be at least double the air volume of your room. If the rate at which pollutants enter the room air is
high or the indoor air quality requirements are stringent, the hourly air delivery of the system needs to exceed the
room air volume several times. To achieve that level of air turnover, it may be necessary to employ more than one
system.
Air Cleaning Results
Although air cleaners may be advertised and sold to be suitable for use in specic indoor environments and to deal
with specic indoor air quality problems, the manufacturer and distributors make no claim as to the specic air
cleaning results that are achieved under the user’s individual operating conditions. The air quality improvements
that can be realized with this system (as with any air cleaner) in indoor environments depends to a signicant degree
on circumstantial factors, which are out of the control of the manufacturer or distributors. Important factors which
will inuence the air quality improvements that can be achieved in an indoor environment with an air cleaner
include:
• Type of air pollutants present
• Intensity of the pollutant source(s)
• Pollutant concentration
• Size of the indoor environment (room size)
• Operating speed of the unit
• Number of air cleaners placed in the indoor environment
• Saturation state of the lters in the air cleaner
Consult a qualified specialist to determine an effective and comprehensive indoor air quality strategy.

38 0
24 0
15 0
11 0
70
40
Certificate of Performance
Model:
Serial No.:
Shell No.:
I. Air Delivery Rate
Speed 1:
Speed 2:
Speed 3:
Speed 4:
Speed 5:
m3/h
m
3
/h
m
3
/h
m
3
/h
m
3
/h
This certifies that the aforementioned air cleaning system has been tested prior to packaging
at the production facility in Switzerland. This particular system has been found to
be in compliance with the model’s published specifications for air delivery and particle
filtration efficiency. This system has also passed the particle leakage test.
Speed 1:
Speed 2:
Speed 3:
Speed 4:
Speed 5:
m
3
/h
m
3
/h
m
3
/h
m
3
/h
m
3
/h
Published Air Delivery Actual Air Delivery
Speed 6: m3/h Speed 6: m3/h
Test Voltage/Frequency:
m3/h = cubic meters per hour
1 m
3
/h = 0,59 cfm
The aforementioned system
has been tested for its air
delivery at all fan speed
settings. Due to component
tolerances, a divergence of
10%+10 m
3
/h is deemed
acceptable.
Note:
The air delivery rate refers
to the system’s initial air
delivery, which will decrease
as filters load up with dust
particles.
Measuring instrument: Alnor LoFlo Balometer
Instrument accuracy: ± (3% + 8 m
3
/h)
Signed:_________________
Testing & QC Dept.
Testing carried out by:
105.60.10.02_101109_Cert_E_HP100
1 A A E A 0 0 0 0
230V, 50Hz
HealthPro 100
Swiss Made
105.10.31.40_131220_IN_MA_HP100_EN(CN)
HealthPro®100
User Manual
6
Chapter 2 – Setting Up
Chapter 2 – Setting Up
2.1 Unpacking
To unpack the system, open the top of the box and remove the square styrofoam pad which contains all accessories
and product literature. Lay the box on its side, hold the system by the handle and pull it out of the box. Remove the
plastic bag and foam belt. Keep the packaging for future transport and service needs.
Power cord
(plug types vary)
User manual Certicate of
Performance
Advanced Air Cleaning System
Set of casters Warranty Card and
Technical Specications
Remote control
including battery
7
Chapter 2 – Setting Up
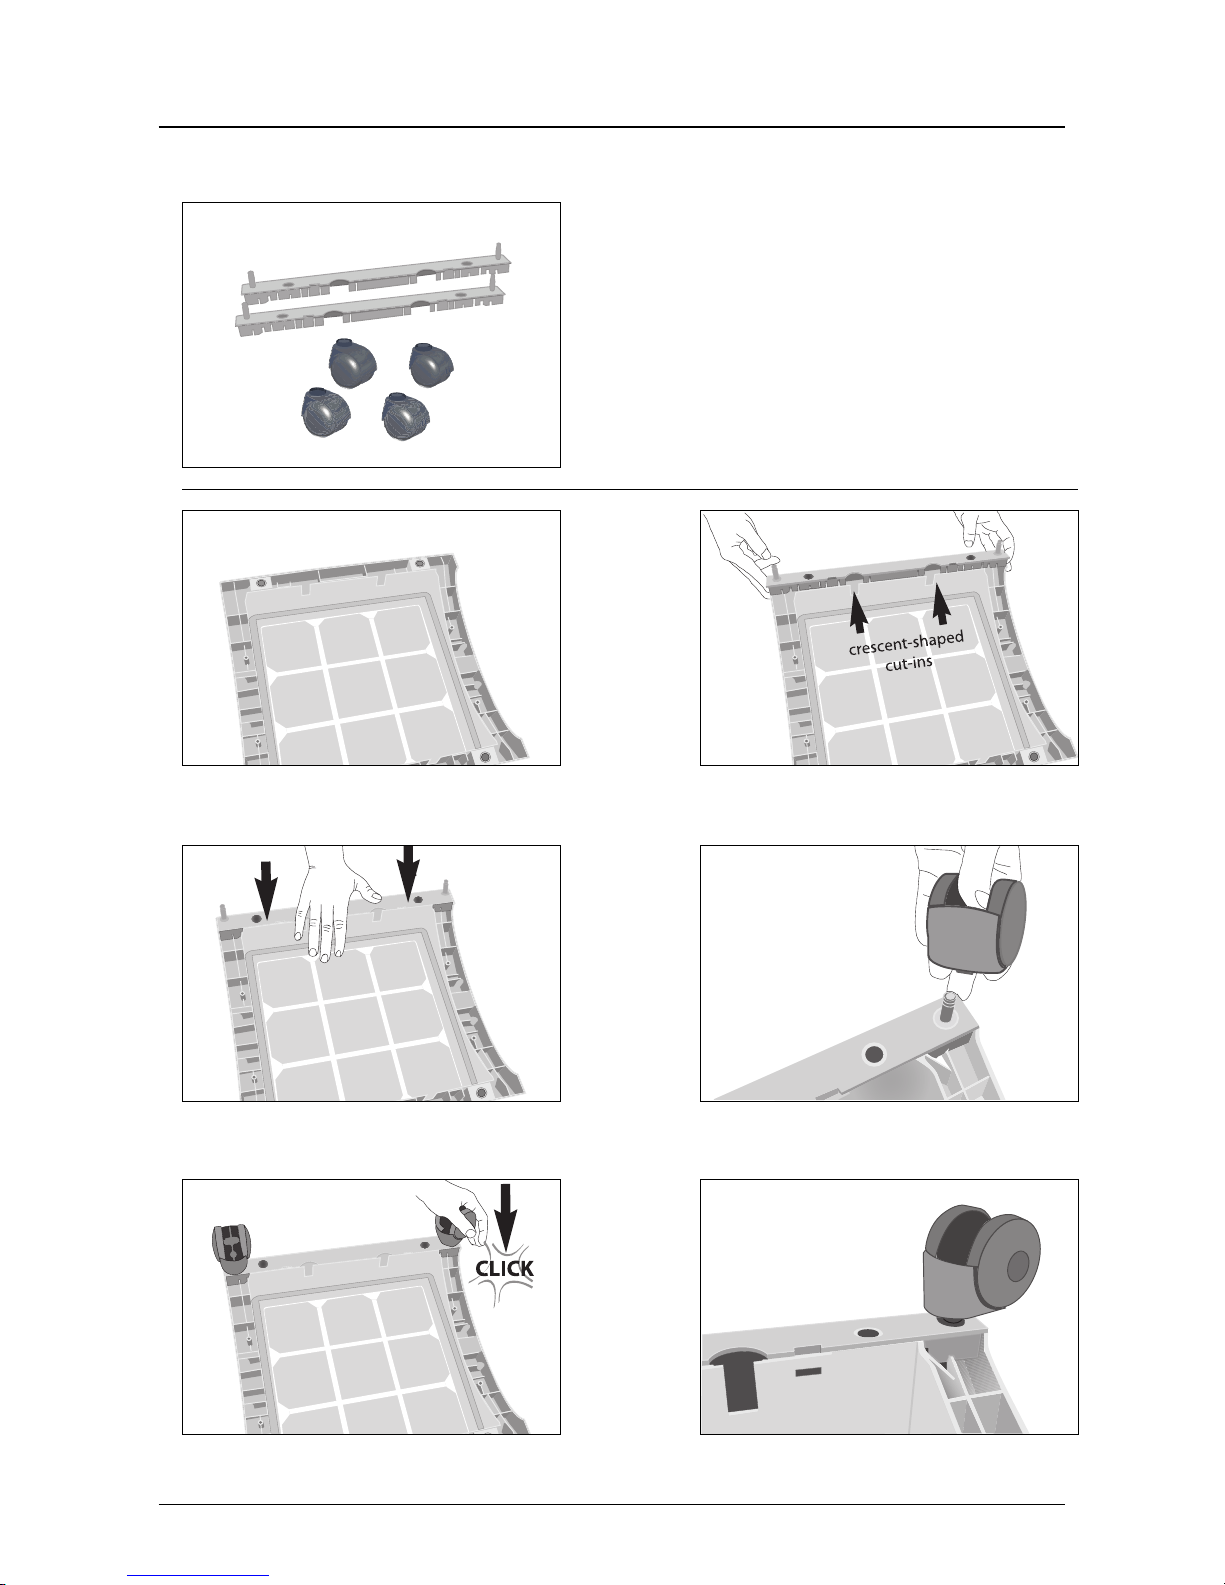
Attaching the supplied casters is optional. They make it
easy to move the air purifier between rooms.
Attention: Please be careful and roll the unit gently when
moving it over thresholds or other obstacles to avoid
breakage.
The Mobility Caster kit consists of:
1. mounting rail ( x 2)
2. casters ( x 4)
For installation simply follow the below instructions:
1
2
3
4
5
6
Turn the device upside down on a soft and clean
surface.
Place the mounting rail on the purifier’s base so that
the holes line up with the black connector pins on the
base. The cut-ins should face the center of the unit.
Press down until the mounting rail snaps into place.
Repeat with second rail.
Place the caster onto caster pin.
Press on caster, until it snaps into place. Repeat steps
4 and 5 with the remaining casters.
Ensure that each caster is securely fitted before
placing the air purifier in its upright position onto
the casters.
2.2 Fitting Your Air Purifier with Casters
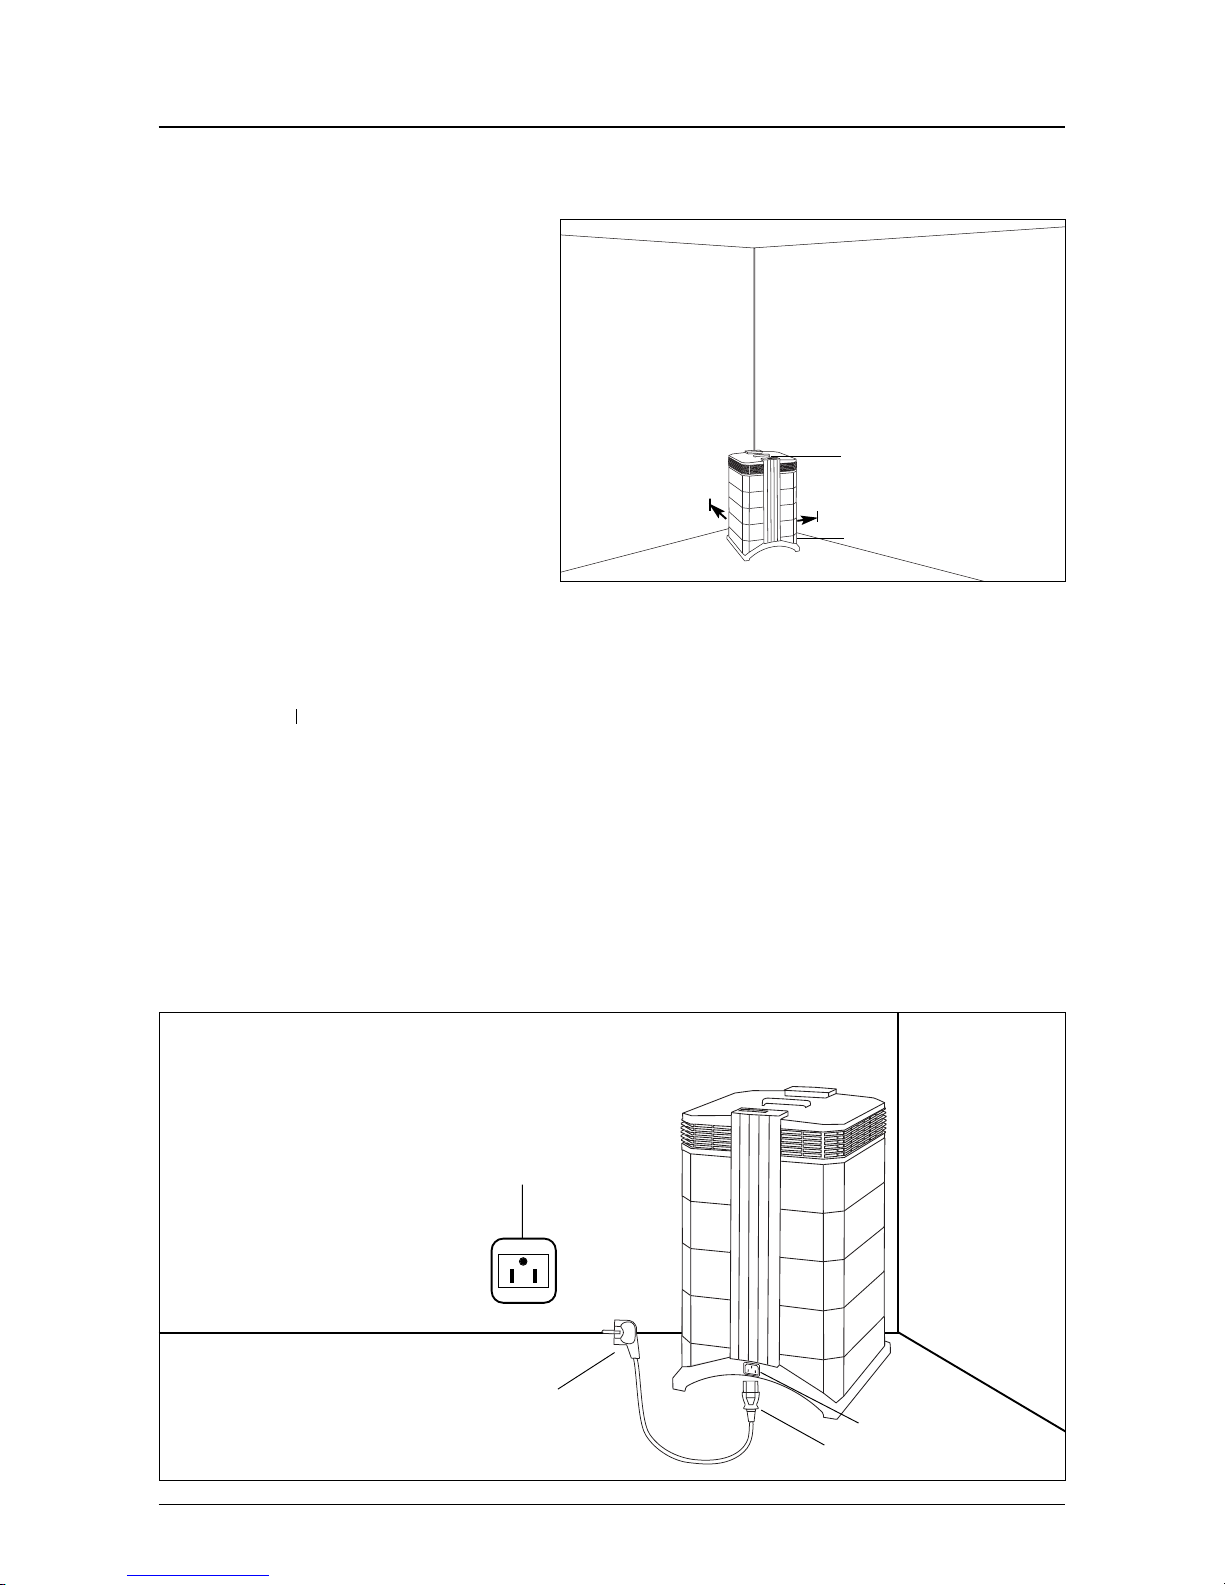
2.3 Choosing a Suitable Location
When choosing a suitable location for the
system, keep the following considerations in
mind:
• Choosing the most suitable room for the
system will depend on where you would
like the focus of the air cleaning efforts. Two
main considerations are the time you spend
in a particular room and the location of the
main air pollution sources. As a general rule,
the closer the system is located to the air
pollution source, the better the air cleaning
performance in the room. Although an air
cleaning result may be achieved in adjacent
rooms, the main air cleaning will take place
in the room where the system is located. For
the best air cleaning results in adjacent
rooms, make sure that doors to these rooms
are left wide open.
• For best performance, the system should be positioned at least 30 cm (1 foot) away from the nearest vertical
surface, such as a wall or a cupboard. In general, the more centrally the system is positioned, the better the
performance.
• Position the system close to a power outlet and make sure that the power cable is positioned in a way that it does
not present an obstacle that could be tripped over.
• Make sure that the system is positioned in such a way that the control panel is easily accessible.
2.4 Connecting to Power
1. Plug the connector end of the power cord into the recessed power inlet socket on the back of the system.
2. Plug the other end of the power cord into a power outlet or power strip. Important: The only way to disconnect
power completely is to unplug the power cord.
Do not use the system when the power cord becomes damaged. The power cord may be replaced with an
approved cord with a two-pole plug. These power cords are commonly used for computers and similar appliances.
Power cord plug
(plug type can vary)
Power cord connector
Power inlet socket
Power outlet
8
Chapter 2 – Setting Up
min. distance
30cm/12”
Control panel should
be easily accessible
Keep power cable
clear of walk-ways
9
Chapter 3 – The System’s Components
Chapter 3 – The System’s Components
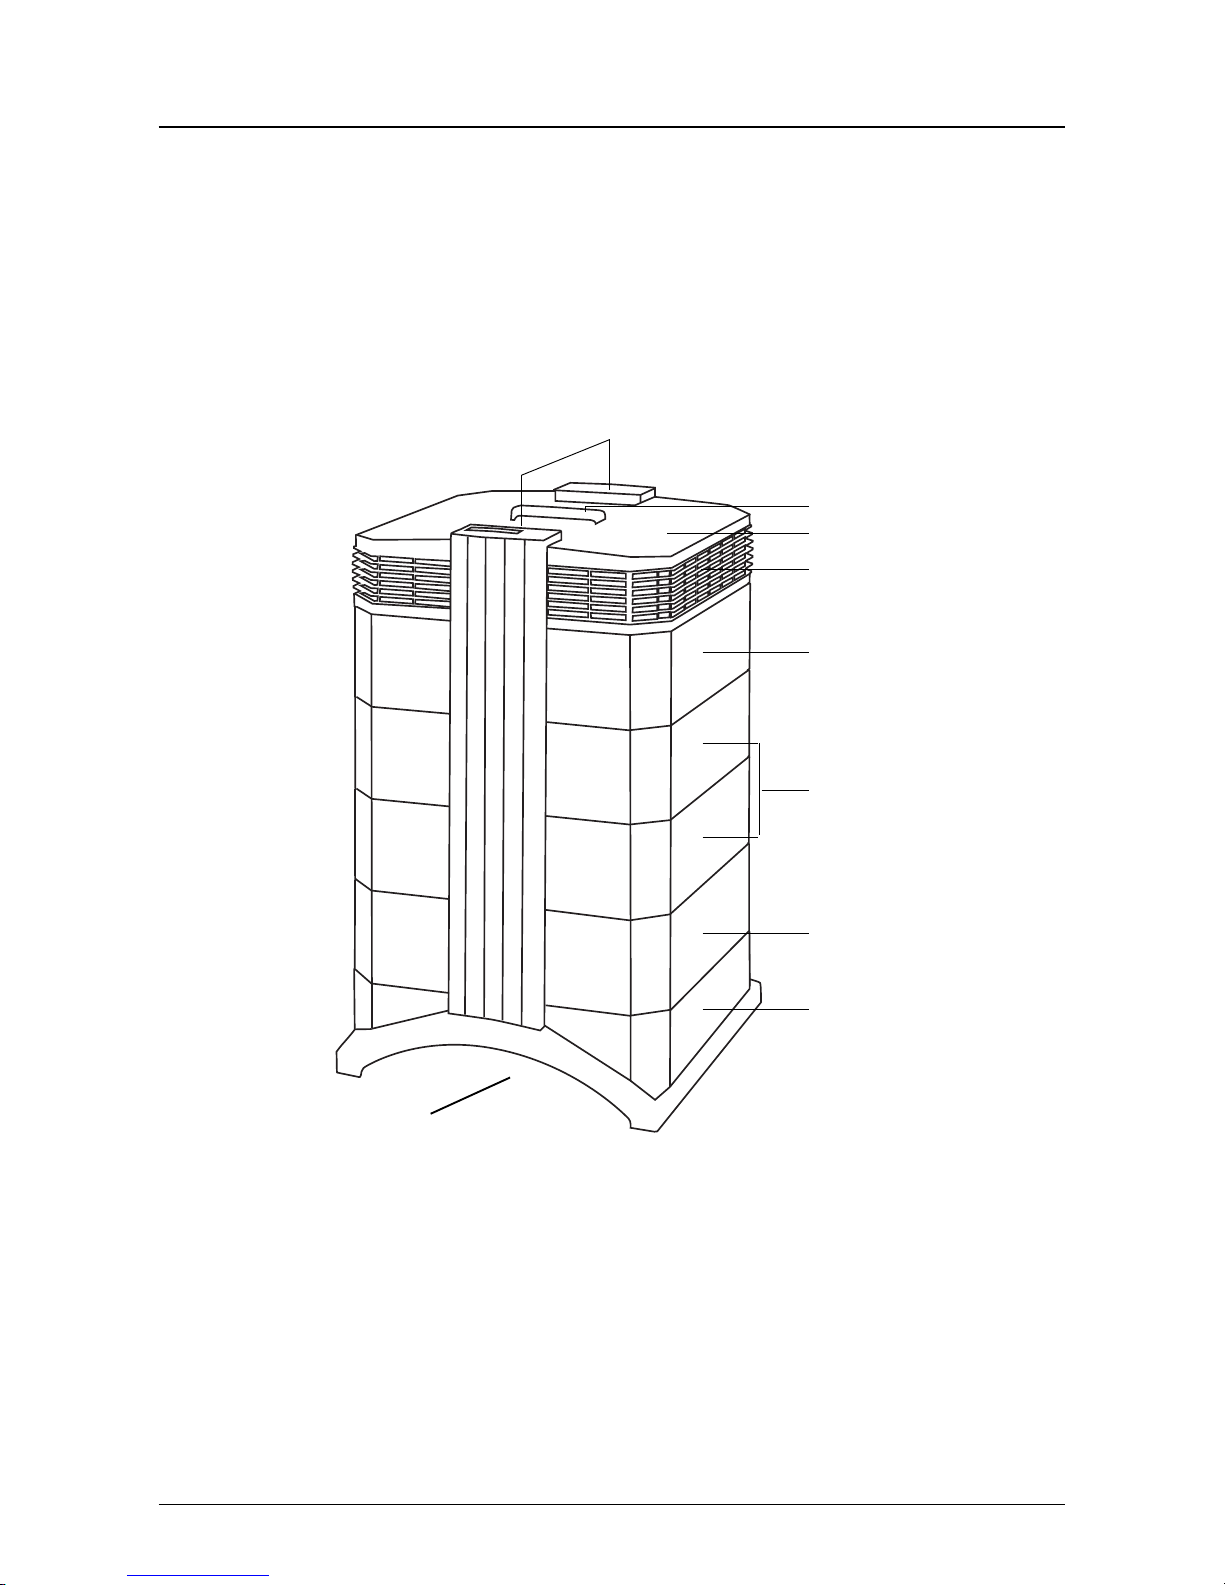
3.1 Description of Housing Components
The system features a modular tower design in which all important ltration and air moving components are
positioned vertically in-line, i.e. stacked on top of another. Air is drawn into the system at the base, and passes
through several lter stages to be returned to the room via the diffuser on top of the system. The housing modules
are held together by two locking arms.
• The base with its arched design features air intake openings on two sides.
• The PreMax
TM
lter module consists of frame 1 and the PreMaxTMlter which is xed inside the frame by four lter
clamps.
• The fan assembly comprises two housing modules with the centrifugal fan inside.
• The HyperHEPA® lter module consists of frame 2 and the HyperHEPA® lter.
• The EvenFlow™ diffuser features the omni-directional air outlet openings.
• The handle on top of the diffuser is designed for carrying the system.
• The locking arms hold the housing elements together. When opened, the locking arms allow easy access to all
lters.
EvenFlow™ diffuser
PreMax
TM
filter module (1)
Fan assembly
HyperHEPA®
filter module (2)
Locking Arms
Base
Handle
Air intake opening
Air outlet openings
 Loading...