

Page 1

Read and follow all Safety
Precautions and
Instructions before
operating this equipment.
LOG
SPLITTER
OWNER’S
MANUAL
1602 CORPORATE DRIVE, WARRENSBURG, MISSOURI 64093 PHONE 660-747-8183
FAX 660 -74 7-8 650
MODEL NO.
LS622
LS67525
LS928
LS11534
LS12534D
Manufacturing quality lawn care equipment since 1945
Safety
Assembly
Operation
Service and Adjustment
Repair Parts
Made In Th e
USA
IMPORTANT
swisherinc.com
㻔 㻓 㻓 㻖 㻕
Rev. 04-303
Page 2

2
In the event you have a claim under this warranty, you must ret urn the product to an authorized service
dealer. All transportat ion charges, damage, or loss incurred during t ransportation of part s submitted for
replacement or repair under this warranty shall be borne by the purchaser. Should you have any questions
concerning this warrant y, please cont act us toll-free at 1-800-222-8183. The model number, serial
number, date of purchase, and t he name of the authorized Swisher dealer from whom you purchased the
mower will be needed before any warranty claim can be processed.
THIS WARRANTY DO ES NO T APPLY TO ANY INCIDENTAL O R CO NSEQ UENTIAL
DAMAGES AND ANY IMPLIED WARRANTIES ARE LIMITED TO THE SAME TIME PERIO DS
STATED HEREIN FOR ALL EXPRESSED W ARRANTIES. Some states do not allow the limitation of
consequential damages or limitat ions on how long an implied warranty may last, so t he above limitations
or exclusions may not apply to you. T his warranty gives you specific legal rights and you may have
ot her right s, which vary from state-t o-stat e. This is a limit ed warranty as defined by the Magnuson-Moss
Act of 1975.
LIMITED WARRANTY
The manufact urer’s warranty to the original consumer purchaser is: T his product is free from defects in
mat erials and workmanship for a period of t wo (2) year from the date of purchase by the original
consumer purchaser. We will repair or replace, at our discretion, parts found to be defect ive due to
mat erials or workmanship. T his warranty is subject to the following limit at ions and exclusions:
TABLE OF CONTENTS
WARRANTY………………....….2
SAFET Y..……………………….3-4
TOWING..….……..……………..5
OPERATION……………………6-8
MAINT ENANCE.…………………….8-9
DECALS…..………….……………….10
PARTS BREAKDOWN…………….11-18
SP ECIFICATIONS..…………………23
1) Engine Warranty All engines utilized on our products have a separat e warrant y extended
to them by the individual engine manufact urer. Any engine service
difficulty is t he responsibility of the engine manufact urer and in no
way is Swisher Mower Co., Inc. or its agents responsible for the engine
warrant y. The Briggs & Stratton Engine Service Hot -Line is 1-800233-3723. T he T ecumseh Engine Service Hot -Line is 1-800-558-5402.
2) Commercial Use T he warranty period for any product used for commercial or rent al is
limit ed t o ninet y (90) days from the date of original purchase.
3) Limit ation T his warrant y applies only t o products which have been properly
assembled, adjusted, and operated in accordance wit h t he instructions
cont ained wit hin this manual. This warranty does not apply t o any
product of Swisher Mower Co., Inc., t hat has been subject to alterat ion,
misuse, abuse, improper assembly or installation, shipping damage, or
to normal wear of product.
4) Exclusions Excluded from this warranty are normal wear, normal adjustment s, and
normal maint enance. T he pump, valve, and cylinder each carry separate
manufact ure’s warranties. T he valve and cylinder bot h carry a one (1)
year limit ed warranty. T he pump carries a two (2) year limit ed warrant y.
Page 3
3
Page 4

Fluid escaping from a very small hole can be almost invisible. Do not check for leaks with your
hand. Escaping fluid under pressure can have sufficient force to penetrate skin, causing serious
personal injury. Leaks can be located by passing a piece of cardboard or wood over the suspected
leak and looking for discoloration.
IF injured by escaping fluid, see a doctor at once. Serious
infection or reaction can develop if proper medical treatment is not administered
immediately.
•
Split only one log at a time. Never attempt to split two logs on top of each other.
•
Do not straddle or reach across the splitting area while operating the splitter.
•
Do not step over splitter when the engine is running. You may trip or accidentally
activate the splitting wedge. Walk around to get to the other side.
•
Never place hands or feet between log and splitting wedge or between log and ram during
forward or reverse stroke.
•
Never attempt to load splitter while splitting wedge is in motion. When loading log
splitter, place hands on the sides of the log, not the ends.
•
Only use your hands to operate the control lever. Never use foot, knee, rope or any
extension device.
•
Always keep fingers clear of splits that open in log during splitter operation.
•
When splitter is in the return mode, keep hands off the machine.
•
Only operate splitter on level ground, not on the side of a hill. It could tip or rolling logs,
poor footing, etc. could cause an accident.
•
Never operate or allow someone to operate this equipment while under the influence of
alcohol or drugs.
•
Always block the wheels to prevent movement while using splitter.
•
Never operate your splitter on wet, muddy, or icy surfaces. Safe footing is essential in
preventing accidents.
•
Never operate your splitter while it is attached to the tow vehicle.
•
Never make adjustments or repairs with the engine running.
•
Never attempt to split woods across the grain. Some types of wood may burst or fly out
of your splitter and result in injury.
•
Both ends of the log should be cut as squarely as possible to prevent the log from sliding
out of the splitter during operation. Log length should be kept to 24” or less.
4
Page 5
TOWING SAFETY
•
Do not allow persons to ride on splitter. Do not carry any cargo or wood on your
splitter. It may fall off and endanger vehicles that are following you.
•
Be sure jack stand is in the travel position and coupling secure. This must also be
retracted so not to interfere while towing. Retract kickstand by removing pin,
rotating up, and replacing pin.
•
Never exceed 45 MPH while towing your splitter. Be extra cautious when
traveling over rough terrain, especially over railroad tracks.
•
Always be careful while backing your splitter. You could jackknife your log
splitter if not careful.
•
Before using splitter, disconnect it from tow vehicle. A log could easily be
pushed forward into the vehicle.
•
See tire and wheel specifications for PSI while towing.
•
Be aware of the extra length of splitter while turning, parking, crossing
intersections, and in all driving situations.
•
OPERATION INSTRUCTIONS
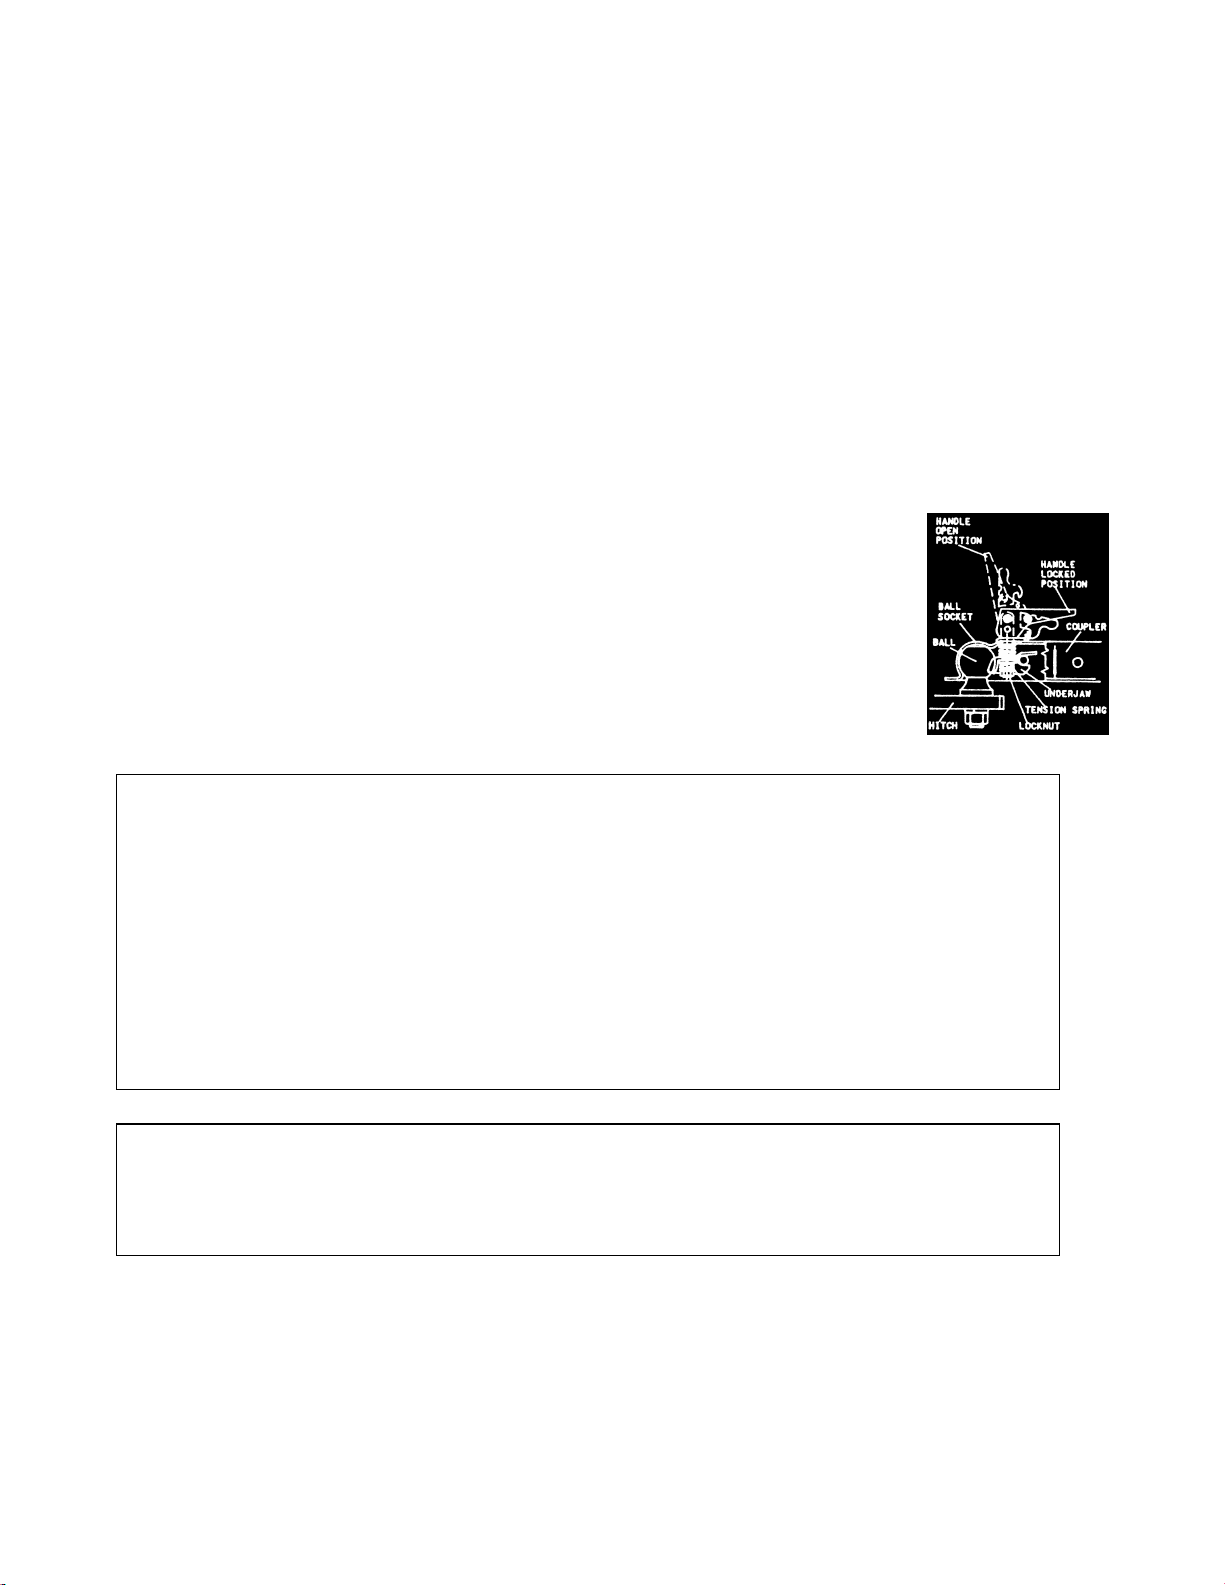
POSI-LOCK COUPLER
ADJUST COUPLER LOCKING PRESSURE ON BALL BEFORE USE. PLACE HANDLE IN LOCKED
POSITION WITH BALL IN COUPLER. TIGHTEN LOCKNUT AGAINST TENSION SPRING SO THAT
COUPLER IS NOT LOOSE ON BALL. CORRECT ADJUSTMENT WILL ALLOW HANDLE TO BE
RELEASED WITH MODERATE PRESSURE APPLIED TO HANDLE.
TO OPEN, PULL UP ON COUPLER HANDLE AND ROTATE FORWARD. PLACE COUPLER ON BALL
WHEN BALL IS COMPLETELY NESTED IN BALL SOCKET, ROTATE COUPLER HANDLE
BACKWARD UNTIL HANDLE IS IN LOCKED POSITION.
AFTER TOWING FOR 50 MILES, CHECK COUPLER FOR TIGHTNESS ON BALL. ALWAYS CHECK
TIGHTNESS BEFORE TOWING. BE SURE COUPLER HANDLE IS IN LOCKED POSITION.
WARNING:
NEVER EXCEED WEIGHT CAPACITY AND ALWAYS USE SAFETY CHAINS. ALWAYS USE
CORRECT BALL SIZE, MAKING SURE BALL IS COMPLETELY INSERTED INTO COUPLER. LOCK
COUPLER HANDLE SECURELY BEFORE TOWING. ALWAYS CHECK FOR DAMAGES AND
REPLACE IF DAMAGED. AVOID SHARP TURNS AND STEEP VERTICAL ANGLES WHEN TOWING.
5
Page 6
OPERATION
Intended use:
This log splitter is intended and designed to only split wood. NEVER use
for any other purposes. Doing so can cause injury or VOID THE WARRANTY.
ASSEMBLY INSTRUCTIONS
This log splitter has been partially assembled at the factory. Refer to the drawings and part
lists should it become necessary to disassemble the unit for repair or replacement of parts.
Inspect all components for damage.
WARNING:
Exercise extreme caution, as parts are very heavy. Sufficient persons or
mechanical handling equipment should be used.
IMPORTANT:
This unit is shipped with oil but without gasoline in the engine. After
assembly, see separate Engine Manual for proper fuel and oil recommendations.
1. General Assembly: Remove top, sides and ends of crate. Place crate panels aside
to avoid puncturing tires. Remove tongue assembly from top.
2. Carefully set the beam pre-assembly aside.
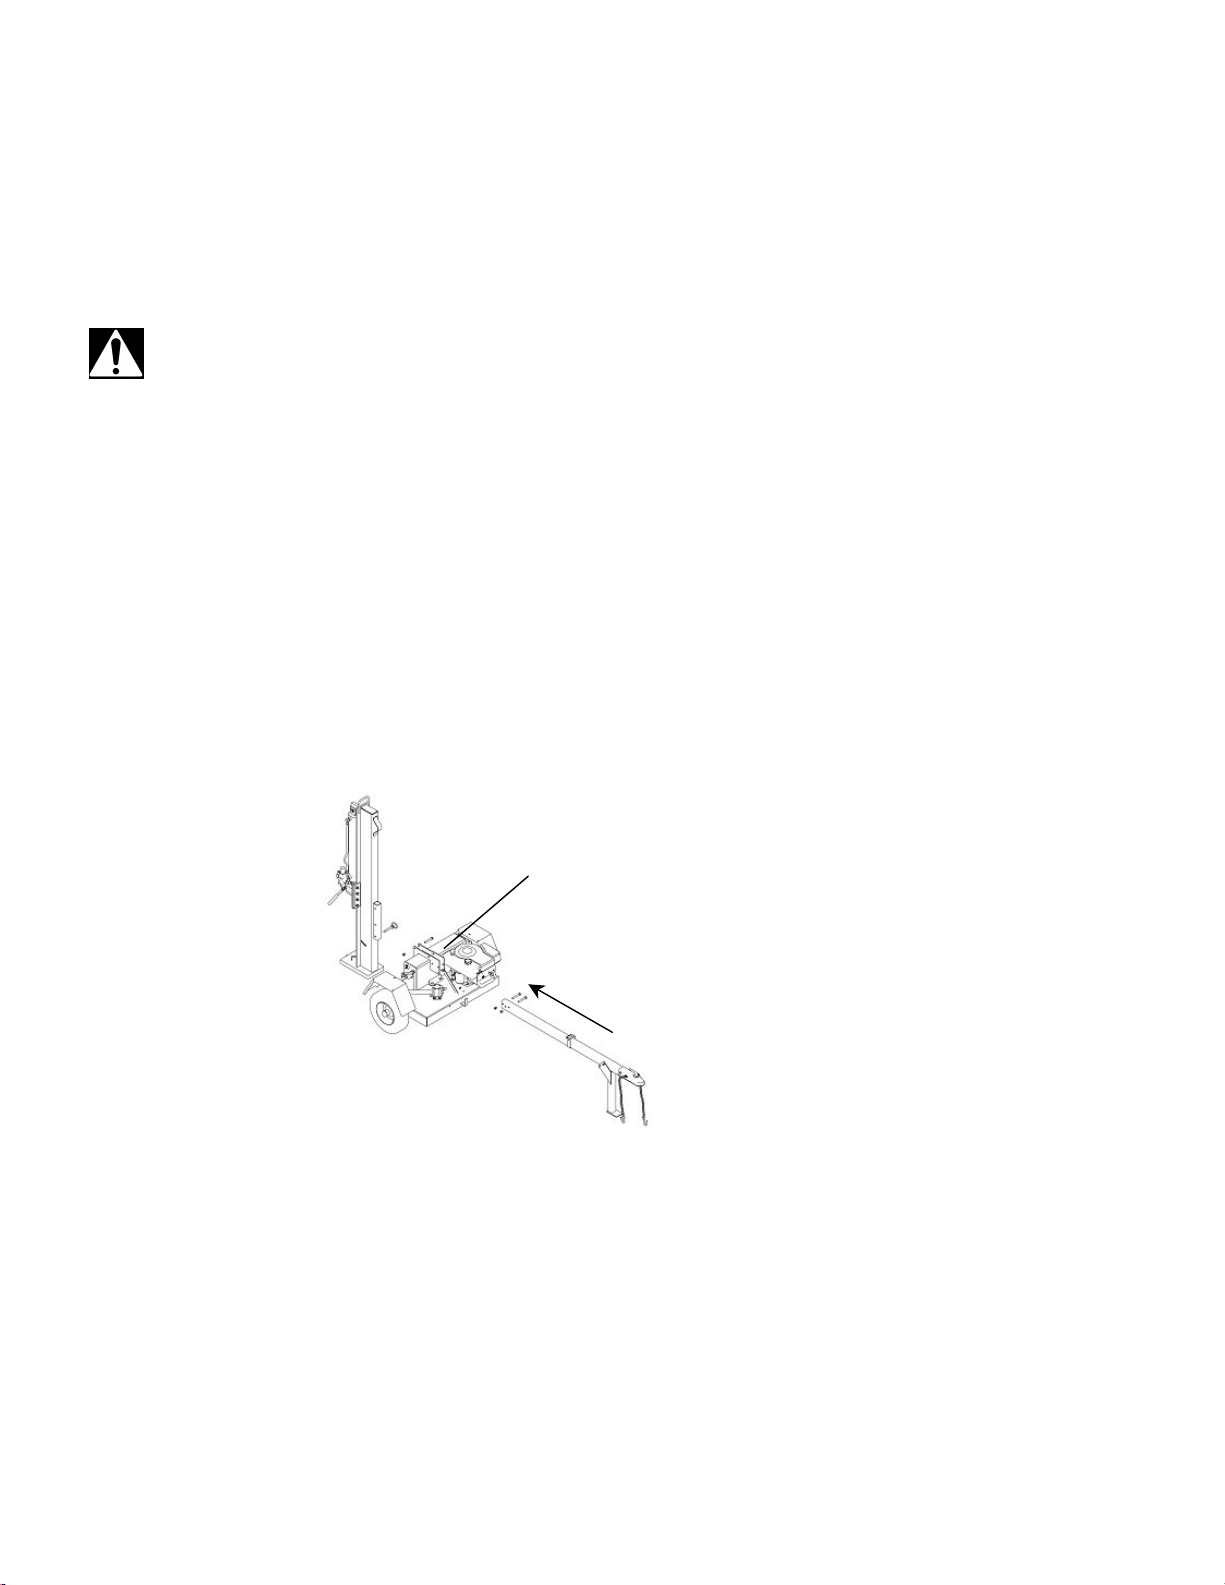
3. Attach tongue to tank/mount plates using two bolts and nuts. Be certain hardware
is secure. (See Assembly Figure 1)
4. Remove tank/engine assembly from base of crate and discard banding.
5. Fender Assembly: Remove fenders from box. Mount to fender brackets with 5/16
hardware provided. Make sure fender clears wheel.
6. The cylinder is tied to the base. Remove ties and slide cylinder/wedge forward
aligning clevis at cylinder end to beam. Insert pin and retaining clips, check
component to assure proper assembly. Stand beam pre-assembly vertical and
secure in position. Roll tank/engine assembly into place, aligning pivot holes. Bolt
with provided hardware. Note: Do not over tighten; this is the vertical/horizontal
pivot point.
7. Pivot beam assembly into the horizontal position and lock with pin provided.
8. Hose Assembly: Locate the Pressure Hose, noted by the pipe fittings, and attach it
to the lower fitting on the valve. The remaining hose attaches to the top fitting of
the valve. Secure with provided hose clamp.
9. Check both the horizontal and vertical positions for any “kinks” in the hoses. Note:
Always make sure beam is locked securely into place.
See
OPERATING POSITIONS
for Horizontal to Vertical Splitting
Assembly Figure 1
Tank/Mount Plates
6
Page 7

OPERATION
FILLING THE HYDRAULIC RESERVOIR
Fill the hydraulic reservoir with at least five gallons of Dextron III Automatic Transmission fluid or
10W AW hydraulic fluid. After the hydraulic reservoir and the engine crankcase are filled
correctly with their respective oils, start the engine. Remember to set the throttle and turn on the
fuel shut-off valve. The hydraulic pump should prime itself. With the engine running, move the
hydraulic valve lever toward the wedge. This will cause the cylinder to extend and expel air. When
the cylinder is fully extended, retract it. Repeat this procedure several times. An erratic movement
of the cylinder indicates that there is still air in the system. More oil should then be added to bring
the fluid level up to approximately 1” below the fill hole. After adding more oil to fill the tank,
cycle the cylinder again until it has a constant speed indicating that all air has been expelled. Check
the oil level in the reservoir again. Standard models require approx. 6.5 gallons of hydraulic fluid.
(Deluxe models – 9 gallons)
NOTE:
If the tank is overfilled, it will tend to expel oil from the breather cap when the cylinder is
retracted.
START UP
WARNING: DO NOT START OR RUN THE LOG SPLITTER WITHOUT OIL IN THE
ENGINE AND HYDRAULIC RESERVOIR.
See separate Engine Manual for fuel and oil recommendations. Your log splitter has come
equipped with a fuel shut-off valve for towing purposes.
Before starting engine make sure crankcase is filled correctly with oil and the proper fuel has been
used. The engine will only start when the throttle lever and fuel shut-off valve are turned to their
ON positions.
COLD WEATHER START UP
The Cold Weather Clutch enables the engine to be started without having to pull through cold,
thickened hydraulic fluid. Simply pull the handle out and slide into locked position. Start engine,
let it warm up, and release Cold Weather Clutch. After starting, assure that the lever has reengaged.
TOWING
This unit should not be towed on any street, highway, or public road without checking the existing
federal, local, and state laws. Any licensing or modifications such as taillights, etc., need to comply
with existing federal, local, or state vehicle requirements is the sole responsibility of the purchaser.
Obey all regulations when towing on public roads and highways. See also
TOWING SAFETY
.
Be sure you are using the correct ball hitch size for the hitch coupler on the log splitter (2” ball).
Be sure safety chains are properly connected. Leave enough slack in chains for turning. See
TOWING SAFETY
to read warnings about coupling.
Make sure beam attachment is locked in the horizontal position. NEVER tow splitter in the vertical
position.
Turn the fuel shut-off valve OFF to prevent flooding of the engine while traveling.
TOWING AT NIGHT
The requirements for taillights are based on States regulations. Some states allow towing at night
as long as the towed equipment does not visibly impair the tow vehicle taillights. This is based on a
state, to state requirements. The customer is responsible for meeting the states requirements. A
Taillight Kit Accessory (Part No. 7420)is available and recommended for night driving.
If a “Statement of Origin” is required in your state, see your local dealer to receive one.
7
Page 8

8
Page 9

Do not operate your splitter in poor mechanical condition or when needing repair. Repair and
replace worn or broken parts immediately.
Periodically tighten nuts, bolts, and hydraulic fittings.
The hydraulic system of your log splitter requires careful inspection, along with the mechanical
parts. Be sure to replace frayed, kinked, or otherwise damaged hydraulic components.
The pressure relief valve on the splitter is preset at the factory. Do not adjust valve. Only a
qualified service technician should perform this adjustment.
If the wedge becomes dull or nicked, it can be removed and sharpened. The wedge is heavy and
may still have sharp edges, wear gloves while handling the wedge.
REPAIR PARTS
Your Swisher Log Splitter has been produced with components designed specifically to this
machine. Although standard springs, hardware, etc. may look similar to parts used on other
machinery, they may in some cases be made of a different construction and/or materials.
9
Page 10

OD12 – HYDRAULIC FILL PLUG
DECAL
OD09 – DANGER/POS ITION LOCK
DECAL
OD08 – OPERATOR INS TRUCTION
DECAL
OD16 – FUEL SHUT OFF DECAL OD07 – COLD WEATHER DECAL
SAFETY DECALS
Replace decals immediately if damaged.
OD22 – POS ITION LOCK DECAL
OD23 – TOW POS ITION DECAL
10
Page 11

ASSEMBLY DETAIL
LS622, LS67525, LS928, LS11534
MODELS
SEE DETAIL
1
2
3
B
4
5
6
7
8
9
10
A
A
11
16
15
14
13
12
18
17
8
20
25
21
23
24
2627
22
22
22
28
29
6
25
39
31
33
3432
35
35
36
30
42
41
40
38
37
43
44
45
46
47
48
49
50
42
16
51
55
18
52
54
53
52
58
57
56
49
6
5
SEE DETAIL
NOT ALL PARTS ARE ON ALL MODELS
57
B
FENDERS ONLY ON
LS11534 MODEL
19
11
190
Page 12

SERVICE PARTS
Please have M odel and Serial Numbers ready when ordering parts.
Color cannot be guaranteed upon service parts.
ITEM NUMBER DESCRIPTION PART NUMBER
1 RETURN HOSE 54" 7290
2 PRESSURE HOSE 48" 7289
3 #12 HOSE CLAMP LS5001
4 HYDRAULIC RESERVOIR 7319
5 1/2-13 X 3 1/2 GR5 BOLT NB577
6 1/2-13 NYLOCK NUT NB281
7 RESERVOIR VENT PLUG 7379
8 3/8-16 X 1 GR5 BOLT NB604
9 1/2 X 3 1/2 HITCH PIN W/ HAIR PIN NB648
10 SUCTION HOSE 18" 7346
11 #16 HOSE CLAMP LS4999
12 RETURN LINE FITTING 7329
13 FILTER HEAD LS1112
14 FILTER ELEMENT LS1113
15 1/2-13 X 1 1/4 GR5 BOLT NB647
16 3/8-16 2-WAY LOCK NUT NB280
17 TANK BRACE 7352
18 3/8-16 NYLOCK NUT NB182
19 TRAILER JACK/ CENTERING SPACER 7167 / 7165
20 HYDRAULIC PUMP - LS622,LS67525 MODEL LS2001H
HYDRAULIC PUMP - LS928,LS11534 MODELS LS2002B
21 1/8 X 1/2 #3 WOODRUFF KEY 024002
22 5/16-18 2-WAY LOCK NUT NB558
23 PUMP PULLEY 7306
24 SET SCREW W/ NYLOCK NB312
25 5/16-18 X 3/4 GR2 BOLT NB143
26 FENDER BRACKET - RIGHT SIDE - LS11534 ONLY 7417
FENDER BRACKET - LEFT SIDE - LS11534 ONLY 7418
27 FENDER - LS11534 ONLY 7428
28 KICKSTAND 7398
12
On units with Throttle
190 Throttle Plate 7104TC
191 Key Switch (Not Shown) KSM
192 Throttle Cable (Not Shown) 7105
193 Throttle Decal (Not Shown) OD58TX
194 Key Switch Decal (Not Shown) OD99
Page 13

SERVICE PARTS
Please have M odel and Serial Numbers ready when ordering parts.
ITEM NUMBER DESCRIPTION PART NUMBER
29 MOTOR BASE / AXLE 7297
30 TIRE / WHEEL 7296
31 COTTER PIN NB633
32 WHEEL DUST COVER 2203DC
33 CASTLE NUT 2203CN
34 WASHER NB184
35 TAPERED BEARING 2203B
36 BEARING SEAL 2203S
37 BELT 644
38 IDLER ARM 6681TK
39 CLUTCH LEVER 7358
40 SPRING 682S
41 3/8-16 JAM NUT NB174
42 HARDENED WASHER NB196
43 3/8-16 X 2 1/2 GR5 BOLT NB619
44 5/16-18 FLANGE NUT NB170
45 IDLER SPRING MOUNT 2046
46 WIRE LINK FOR IDLER SPRING BRS6H
47 SHOULDER BOLT NB220
48 IDLER PULLEY B527
49 WASHER NB272
50 BELT COVER 7321
51 #14 x 3/4 SELF-TAPPING SCREW NB161
52 SAFETY CLIP PIN H11
53 TOWING TONGUE 7343
TOWING TONGUE - LS11534 7168
54 TRAVEL LOCK 7441
55 SAFETY CHAIN W/ HOOK 7366
56 2" BALL COUPLER 7365
57 3/8-16 X 3 GR5 BOLT NB164
58 3/8-16 X 3 1/2 GR5 BOLT NB649
Color cannot be guaranteed upon service parts.
13
Page 14

ITEM NUMBER DESCRIPTION PART NUMBER
59 CLIP PIN NB642
60 STEEL PIN 7293
61 HYDRAULIC FITTING 7291
62 STATIONARY LINE ASSEMBLY 7288
63 RAM CYLINDE R - LS622 MODELS 7284
RAM CYLINDE R - LS928&LS67525 MODEL 7354
RAM CYLINDE R - LS11534&LS12534DMODEL 7355
64 1/2-13 X 3 GR5 BOLT NB131
65 SPLITTING WEDGE 7233
66 1/2-13 X 2 1/2 GR5 CARRIAGE BOLT NB643
67 RETURN LINE FITTING 7329
68 1/2-13 JAM 2-WAY LOCK NUT NB121
69 2-WAY PIPE NIPPLE 7292
70 MAS TER CHAIN LINK 7424
71 COTTER PIN NB597
72 VALVE INLET FITTING 7387
73 VALVE CONTROL W/ LEV ER 7287
74 BEAM WELDMENT 7624
BEAM WELDMENT - LS12534D MODEL 7384
75 1/4 X 1 CLEVIS PIN NB522
76 1/2-13 NUT NB213Z
77 VALVE LEVER & GRIP 7423/7425
78 THIN GIB PLATE 7388
79 THICK GIB PLATE 7237
80 BOTTOM GIB PLATE 7333
81 LOCK W ASHER NB508
81A FLAT WA SHER NB555
62
61
64
68
60
70
69
67
66
65
61
74
72
71
73
75
77
79
80
81
78
76
BEAM DETAIL
ALL MODELS
NOT ALL PARTS ARE ON ALL MODELS
59
63
81A
14
Page 15

ENGINE DETAIL
LS622, LS67525 MODELS
ITEM # DESCRIPTION PART #
89 ENGINE N/A
90 5/16-18 X 1 1/4 GR5 BOLT NB504
91 5/16-18 2-WAY LOCK NUT NB558
92 UPPER SPACER BB105SL
93 ENGINE PULLEY BB105
94 LOWER SPACER BB105S
95 BELLEVILLE WASHER 699
96 7/16-20 X 1 GR5 BOLT W/ NYLOCK NB452N
106 KEYSTOCK 9031
182 WASHER TR150W
NOTSHOWN WIRING HARNESS - LS12534D MODEL 7416
NOTSHOWN OIL DRAIN VALVE AS122
NOTSHOWN FUEL SHUT OFF VALVE (INLINE) 7414
ITEM # DESCRIPTION PART #
97 ENGINE N/A
98 5/16-18 X 2 1/2 GR5 BOLT NB138
99 5/16-18 2-WAY LOCK NUT NB558
100 5/16-18 X 1 1/4 GR5 BOLT NB504
101 KEYSTOCK 9030
102 SET SCREW W/ NYLOCK NB312
103 ENGINE PULLEY - LS622 7323
104 BELLEVILLE WASHER 699
105 3/8-24 X 1 BOLT W/ NYLOCK NB238N
89
90
91
94
93
92
182
96
100
98
97
99
99
101
105
102
104
103
106
15
ENGINE DETAIL
LS928, LS11534, LS12534D MODELS
95
Page 16

127
127
113
126
112
110
129
107
124
108
127
110
114
110
107
126
124
109
122
124
128
110
134
130
146
128
128
131
112
117
125
131
128
145
131
149
116
128
147
124
148
115
129
113
113
129
123
119
133
132
130
121
120
123
135
136
137
138
140
139
142
151
150
144
143
141
See Detail
152
153
154
155
156
157
156
158
159
160
161
166
164
162
165
163
167
168
169
170
169
See Detail
ASSEMBLY DETAIL
MODEL LS12534D
171
NOT ALL PARTS ARE ON ALL MODELS
173
172
16
174
175
176
177
178
179
180
181
Page 17

ITEM NUMBER DESCRIPTIO N PART NUMBER
107 3/8-16 X 3 1/2 G R5 BO LT NB649
108 3/8-16 X 3 GR5 BOLT NB164
109 1/2-13 X 3 1/2 G R5 BO LT NB577
110 1/2-13 X 1 1/4 G R5 BO LT NB647
112 3/8-16 X 1 GR5 BOLT NB604
113 5/16-18 X 1 G R5 BO LT NB143
114 5/ 16-18 X 3/4 F LANGE BOLT NB596
115 #14X 3/4 SELF TAPPING SCREW NB161
116 SHOULDER BOLT NB220
117 3/8-16 X 2 1/2 G R5 BO LT NB619
119 3/4-10 X 7 1/2 G R5 BO LT NB655
120 1/4-20 X 1 GR5 BOLT NB102
121 5/16-18 X 4 G R5 BO LT NB513
122 SAF ETY CLIP PIN H11
123 1/2 X 2 1/2 BALL LOCK PIN NB651
124 WASHER NB272
125 HARDENED WASHER NB196
126 3/8-16 NYLOC NUT NB182
127 1/2-13 NYLOC NUT NB281
128 3/8-16 2 WAY LOCK NUT NB280
129 5/16-18 2 WAY LOCK NUT NB558
130 5/16-18 NYLO C NUT NB181
131 3/ 8-16 JAM NUT NB174
132 1/4-20 NYLOC NUT NB180
133 3/4-10 NYLOC NUT NB313
134 SET SCREW W / NYLOC NB312
135 SAFETY CHAIN W/ HOOK 7366
136 2" BALL COUPLER 7365
137 TONGUE 7168
138 TUBE RECIEVER 7362
139 KICKSTAND 7386
140 KICKSTAND BRACKET 7385
141 HYDRAULIC PUMP LS2002B
142 HYDRAULIC ELBOW 7291
143 PUMP PULLEY 7306
144 MOTO R BASE 7399
145 BELT 32.5 7345
146 IDLER ARM 6681
147 IDLER PULLEY B527
148 CLUTCH LEVER 7358
149 SPRING 682S
150 BOTTOM COVER 7336
151 MO TOR BASE SUPPORT ARM 7375
152 DUST COVER 2203DC
SERVICE PARTS
Please have Model and Serial Numbers ready when ordering parts.
Color cannot be guaranteed upon service parts.
17
Page 18

ITEM NUMBER DESCRIPTION PART NUMBER
153 COTTER PIN NB633
154 CASTLE NUT 2203CN
155 WASHER NB184
156 TAPERED BEARING 2203B
157 TIRE & W HEEL 7296
158 BEARING SEAL 2203S
159 FENDER 7428
160 DELUXE TANK WELDMENT 7400
161 RESERVOIR VENT PLUG 7379
162 14" SUCTION HOSE 7419
163 #16 HOSE CLAMP LS4999
164 FILTER ELEMENT LS1113
165 FILTER HEAD LS1112
166 FITTING RETURN LINE 7329
167 82" RETURN HOSE 7326
168 90" PRESSURE HOSE 7325
169 #12 HOSE CLAMP LS5001
170 PIVOT 7402
171 TRAILER JACK / CENTERING SPACER 7167 / 7165
172 ROPE GUIDE 2046
173 5/16-18 FLANGE NUT NB170
174 KEY SWITCH NUT 9087
175 KEY SW ITCH LOCK WASHER 9088
176 8-32 KEP NUT NB201
177 THROTTLE ASSEMBLY 10036
178 THROTTLE KNOB 686K
179 8-32 X 1/2 PHIL TRUSS ZP NB197
180 KEY SWITCH ON-OFF, 2 PRONG KSM
181 THROTTLE PLATE 10034
NOT SHOWN BEAM LOCK 7439
NOT SHOWN COMPRESSION SPRING 7429
SERVICE PARTS
Please have Model and Serial Numbers ready when ordering parts.
Color cannot be guaranteed upon service parts.
18
Page 19

19
NOTES:
______________________________________________________________________
______________________________________________________________________
______________________________________________________________________
______________________________________________________________________
______________________________________________________________________
______________________________________________________________________
______________________________________________________________________
______________________________________________________________________
______________________________________________________________________
______________________________________________________________________
______________________________________________________________________
______________________________________________________________________
______________________________________________________________________
______________________________________________________________________
______________________________________________________________________
______________________________________________________________________
______________________________________________________________________
______________________________________________________________________
______________________________________________________________________
______________________________________________________________________
______________________________________________________________________
______________________________________________________________________
______________________________________________________________________
______________________________________________________________________
______________________________________________________________________
______________________________________________________________________
______________________________________________________________________
______________________________________________________________________
______________________________________________________________________
______________________________________________________________________
______________________________________________________________________
______________________________________________________________________
______________________________________________________________________
Page 20

20
NOTES:
______________________________________________________________________
______________________________________________________________________
______________________________________________________________________
______________________________________________________________________
______________________________________________________________________
______________________________________________________________________
______________________________________________________________________
______________________________________________________________________
______________________________________________________________________
______________________________________________________________________
______________________________________________________________________
______________________________________________________________________
______________________________________________________________________
______________________________________________________________________
______________________________________________________________________
______________________________________________________________________
______________________________________________________________________
______________________________________________________________________
______________________________________________________________________
______________________________________________________________________
______________________________________________________________________
______________________________________________________________________
______________________________________________________________________
______________________________________________________________________
______________________________________________________________________
______________________________________________________________________
______________________________________________________________________
______________________________________________________________________
______________________________________________________________________
______________________________________________________________________
______________________________________________________________________
______________________________________________________________________
______________________________________________________________________
Page 21

21
NOTES:
______________________________________________________________________
______________________________________________________________________
______________________________________________________________________
______________________________________________________________________
______________________________________________________________________
______________________________________________________________________
______________________________________________________________________
______________________________________________________________________
______________________________________________________________________
______________________________________________________________________
______________________________________________________________________
______________________________________________________________________
______________________________________________________________________
______________________________________________________________________
______________________________________________________________________
______________________________________________________________________
______________________________________________________________________
______________________________________________________________________
______________________________________________________________________
______________________________________________________________________
______________________________________________________________________
______________________________________________________________________
______________________________________________________________________
______________________________________________________________________
______________________________________________________________________
______________________________________________________________________
______________________________________________________________________
______________________________________________________________________
______________________________________________________________________
______________________________________________________________________
______________________________________________________________________
______________________________________________________________________
______________________________________________________________________
Page 22

22
NOTES:
______________________________________________________________________
______________________________________________________________________
______________________________________________________________________
______________________________________________________________________
______________________________________________________________________
______________________________________________________________________
______________________________________________________________________
______________________________________________________________________
______________________________________________________________________
______________________________________________________________________
______________________________________________________________________
______________________________________________________________________
______________________________________________________________________
______________________________________________________________________
______________________________________________________________________
______________________________________________________________________
______________________________________________________________________
______________________________________________________________________
______________________________________________________________________
______________________________________________________________________
______________________________________________________________________
______________________________________________________________________
______________________________________________________________________
______________________________________________________________________
______________________________________________________________________
______________________________________________________________________
______________________________________________________________________
______________________________________________________________________
______________________________________________________________________
______________________________________________________________________
______________________________________________________________________
______________________________________________________________________
______________________________________________________________________
Page 23

LS622 LS67525 LS928 LS11534 LS12534D
Splitting
Force
22 Tons 25 Tons 28 Tons 34 Tons 34 Tons
Engine
6 Hp Briggs and
Stratton Quantum
6.75 HP Briggs
and Stratton
9 HP Briggs and
Stratton I/C
11.5 HP Briggs
and Stratton
12.5 HP Briggs
and Stratton
Splitting
Positions
Horizontal and
Vertical
Horizontal and
Vertical
Horizontal and
Vertical
Horizontal and
Vertical
Horizontal and
Vertical
Cylinder
Siz e
4" X 24" 4" X 24" 4 1/2" X 24" 5" X 24" 5" X 24"
Pump
2 Stage with Heavy
Duty Bearings
2 Stage with Heavy
Duty Bearings
2 Stage with Heavy
Duty Bearings
2 Stage with Heavy
Duty Bearings
2 Stage with Heavy
Duty Bearings
Pump
Specs
11 Gallons Per
Minute
11 Gallons Per
Minute
16 Gallons Per
Minute
16 Gallons Per
Minute
16 Gallons Per
Minute
Valve Auto Return Auto Return Auto Return Auto Return Auto Return
Drive
System
Belt Drive 1:1 Ratio
with Clutch for
Easy Starting
Belt Drive 1:1 Ratio
with Clutch for
Easy Starting
Belt Drive 1:1 Ratio
with Clutch for
Easy Starting
Belt Drive 1:1 Ratio
with Clutch for
Easy Starting
Belt Drive 1:1 Ratio
with Clutch for
Easy Starting
Oil
Capacity
6.5 Gallon 6.5 Gallon 6.5 Gallon 6.5 Gallon 9 Gallon
Maximum
Log length
24" 24" 24" 24" 24"
Tire Specs
4.00 X 4.80 X 8
with High Speed
Bearings
4.00 X 4.80 X 8
with High Speed
Bearings
4.00 X 4.80 X 8
with High Speed
Bearings
4.00 X 4.80 X 8
with High Speed
Bearings
4.00 X 4.80 X 8
with High Speed
Bearings
Metal
Fenders
No No No Yes Yes
Ball Hitch 2" Ball 2" Ball 2" Ball
2" Ball with Trailer
Jack
2" Ball with Trailer
Jack
Unit
Weight
515 Lbs 535 Lbs 550 Lbs
600 Lbs 615 Lbs
Models
23
SPECIFICATIONS
Page 24

OWNER’S
MANUAL
MODEL NO.
LS622
LS67525
LS928
LS11534
LS12534D
HOW TO ORDER
REPAIR PARTS :
LOG SPLITTER
Each Log Splitter has its own serial number. Each engine has
its own serial number. T he serial number for the Log Splitter
will be found on the right hand side of the hydraulic oil
reservoir. The serial number for the engine will be found on
the top of the blower fan housing.
All Log Splitter parts listed herein may be ordered directly
from Swisher Mower & Machine Co. Inc., your nearest
Swisher dealer, or from our website.
All engine parts may be ordered from the nearest dealer of the
engine supplied with your log splitter. Parts subject to change
without notice.
WHEN ORDERING PARTS, PLEASE HAVE T HE
FOLLOWING INFORMATION AVAILABLE:
* PRODUCT – SWISHER LOG SPLITT ER
* SERIAL NUMBER - _______________
* MODEL NUMBER - _______________
* ENGINE MODEL NUMBER - _______________
TYPE - _______________
* PART NUMBER
* PART DESCRIPTION
www.swisherinc.com
TELEPHONE - 1-800-222-8183
FAX - 1-660-747-8650
SWIS HER MOWER & MACHINE CO. INC.
1602 CORPORATE DRIVE
WARRENSBURG, MO 64093
SWISHER MOWER & MACHINE CO. INC.
 Loading...