

Page 1
MANUFACTURING QUALITY LAWN CARE EQUIPMENT SINCE 1945
Owner’s
Manual
AE-48
IMPORTANT
Read and follow all
Safety Precautions
and Instructions
Before Operating this
Equipment.
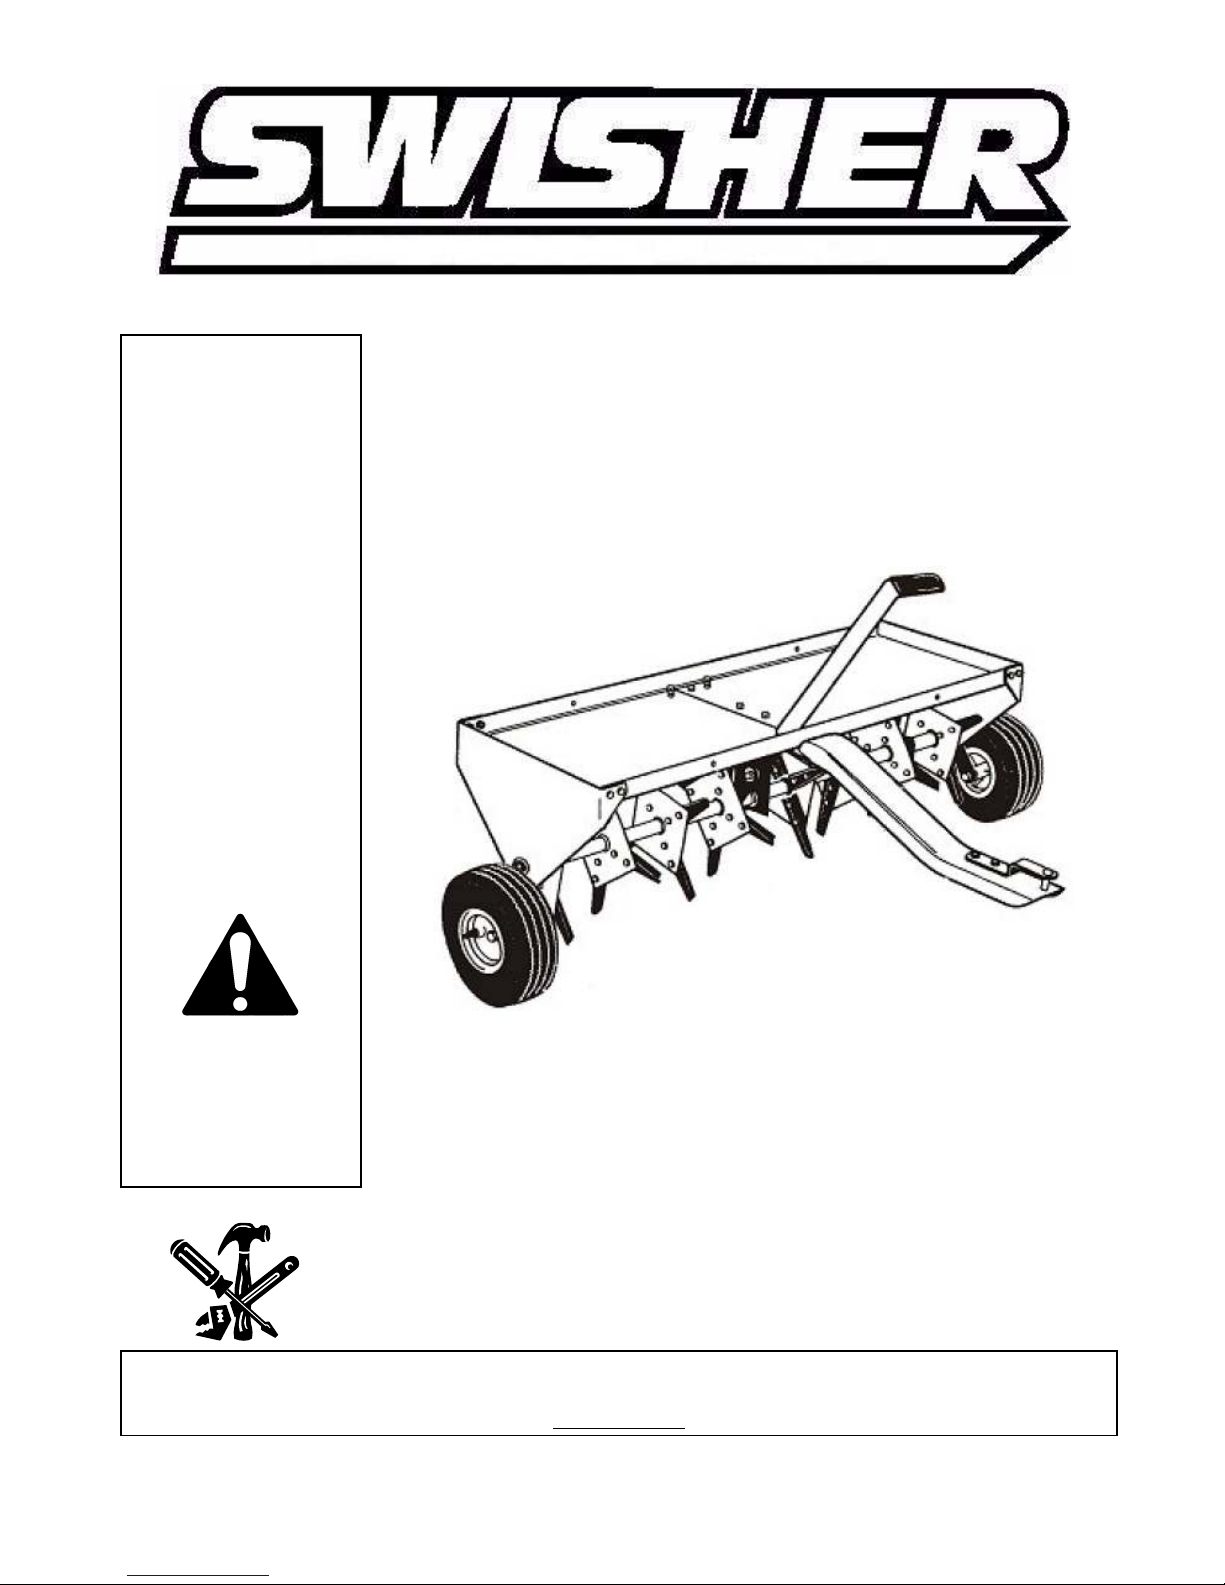
48” PLUG AERATOR
1602 CORPORATE DRIVE , PO BOX 67, WARRENSBURG, MISSOURI 64093
11626 REV. 05-350
Made In CHINA
PH 660. 747. 8183 FAX 660. 747. 8650
swisherinc.com
Page 2

LIMITED WARRANTY
The manufacturer’s warranty to the original consumer purchaser is: This product is free
from defects in materials and workmanship for a period of One (1) year from the date of
purchase by the original consumer purchaser. We will repair or replace, at our discretion,
parts found to be defective due to materials or workmanship. This warranty is subject to the
following limitations and exclusions:
1) Commercial Use This product is not intended for commercial use and
carries no commercial warranty.
2) Limitation This warranty applies only to products which have been
properly assembled, adjusted, and operated in accordance
with the instructions contained within this manual. This
warranty does not apply to any product of Swisher Mower
Co., Inc., that has been subject to alteration, misuse, abuse,
improper assembly or installation, shipping damage, or to
normal wear of the product.
3) Exclusions Excluded from this warranty are normal wear, normal
adjustments, and normal maintenance.
In the event you have a claim under this warranty, you must return the product to an
authorized service dealer. All transportation charges, damage, or loss incurred during
transportation of parts submitted for replacement or repair under this warranty shall be borne
by the purchaser. Should you have any questions concerning this warranty, please contact
us toll-free at 1-800-222-8183. The model number, serial number, date of purchase, and the
name of the authorized Swisher dealer from whom you purchased the mower will be needed
before any warranty claim can be processed.
THIS WARRANTY DOES NOT APPLY TO ANY INCIDENTAL OR CONSEQUENTIAL
DAMAGES AND ANY IMPLIED WARRANTIES ARE LIMITED TO THE SAME TIME
PERIODS STATED HEREIN FOR ALL EXPRESSED WARRANTIES. Some states do not
allow the limitation of consequential damages or limitations on how long an implied warranty
may last, so the above limitations or exclusions may not apply to you. This warranty gives
you specific legal rights and you may have other rights, which vary from state-to-state. This is
a limited warranty as defined by the Magnuson-Moss Act of 1975.
2
2
Page 3
Pre-assembly Instructions:
For best results, follow all directions step by step. Please read entire step instructions
first, and then proceed with the set up.
Open all boxes before beginning to assemble and check parts and hardware.
HELPFUL TIP: Read ALL instructions before starting to assemble.
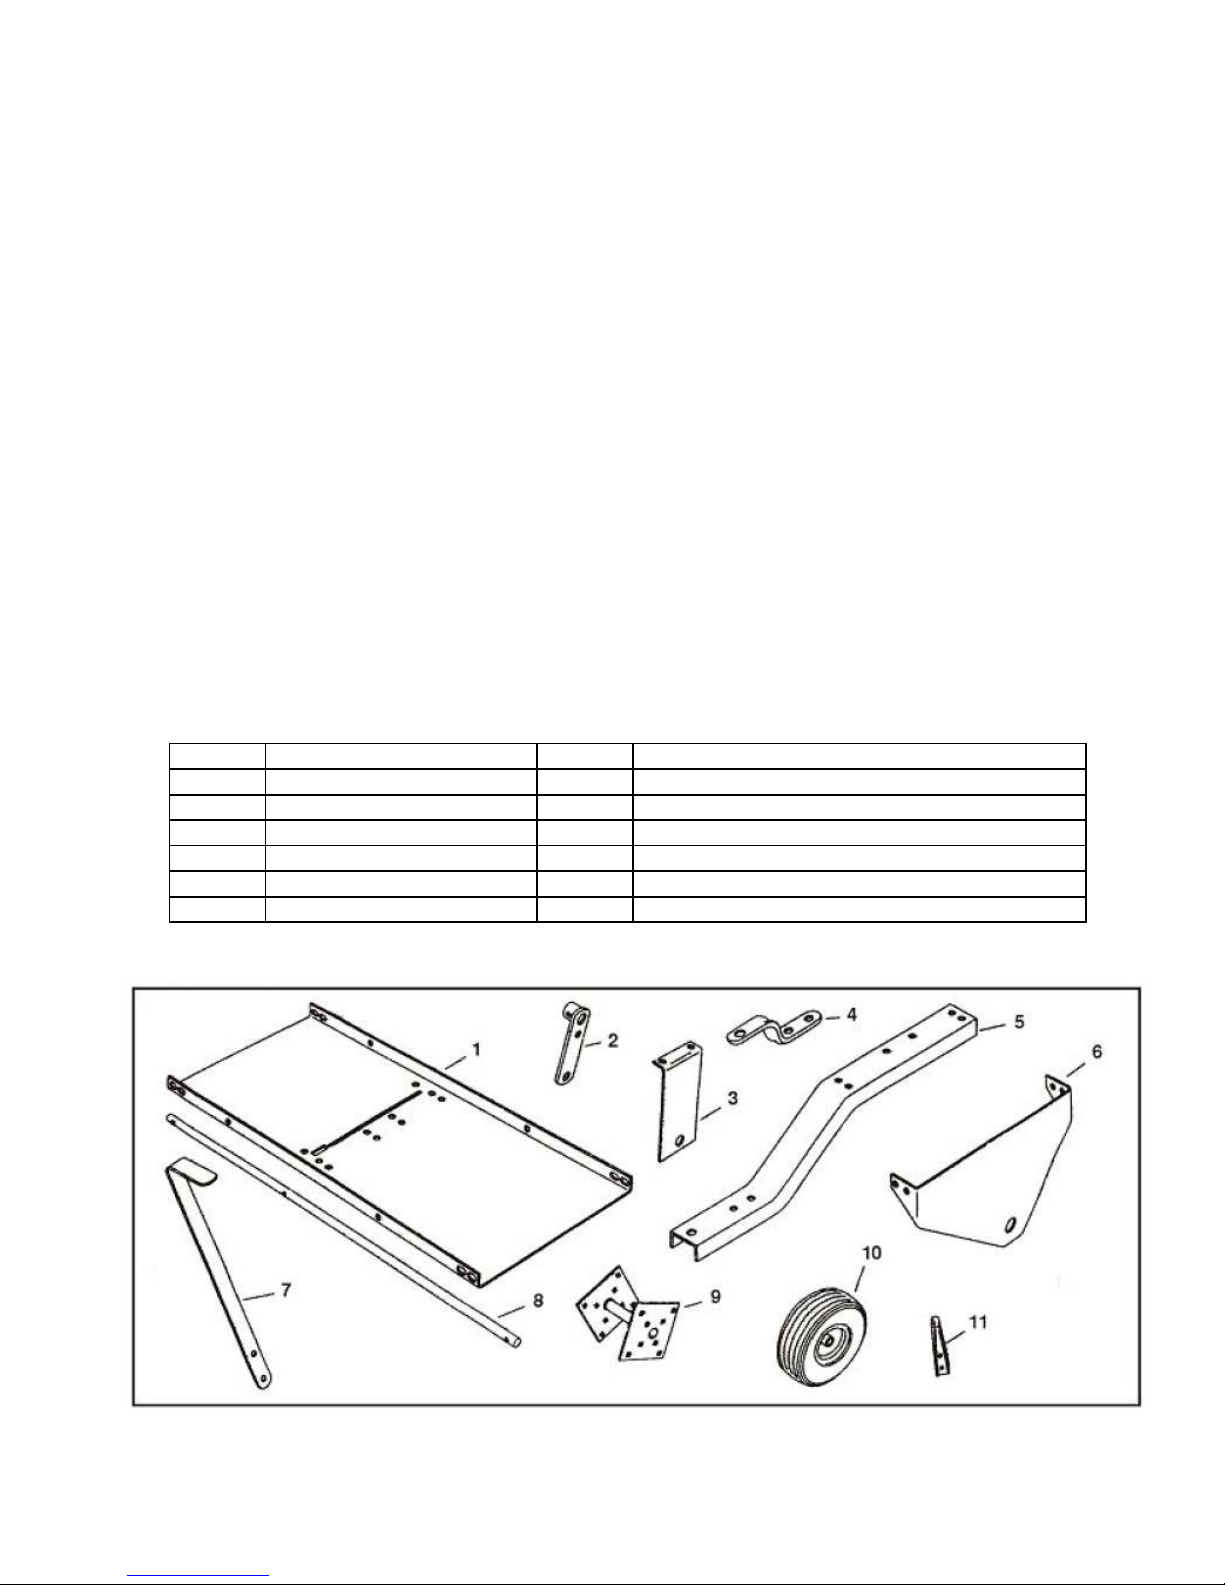
Check Parts and Hardware:
Group together and check that all hardware and parts are included.
Refer to parts and hardware illustrations below.
If you are missing parts, contact Swisher l Customer Service at 1-800-222-8183 for
missing hardware or parts.
Recommended Tools for assembly:
2 each - Combination Wrenches 7/16”,1/2” & 3/4”
1 - Adjustable Wrench - Medium Size
1 - Medium Size Pliers
PARTS LISTING:
NOTE: Parts #9 & #11 below will be assembled for this model
Carton Contents
Ref# Description Ref# Description
1 Tray 7 Lift Handle
2 Wheel Bracket 8 Shaft
3 Middle Brace 9 Double Spool Assembly (4) Pre assembled w/ #11
4 Hitch Bracket 10 Wheels (2)
5 Tongue 11 Knives (32) Pre Assembled w/ #9
6 End Plates (2)
3
Page 4
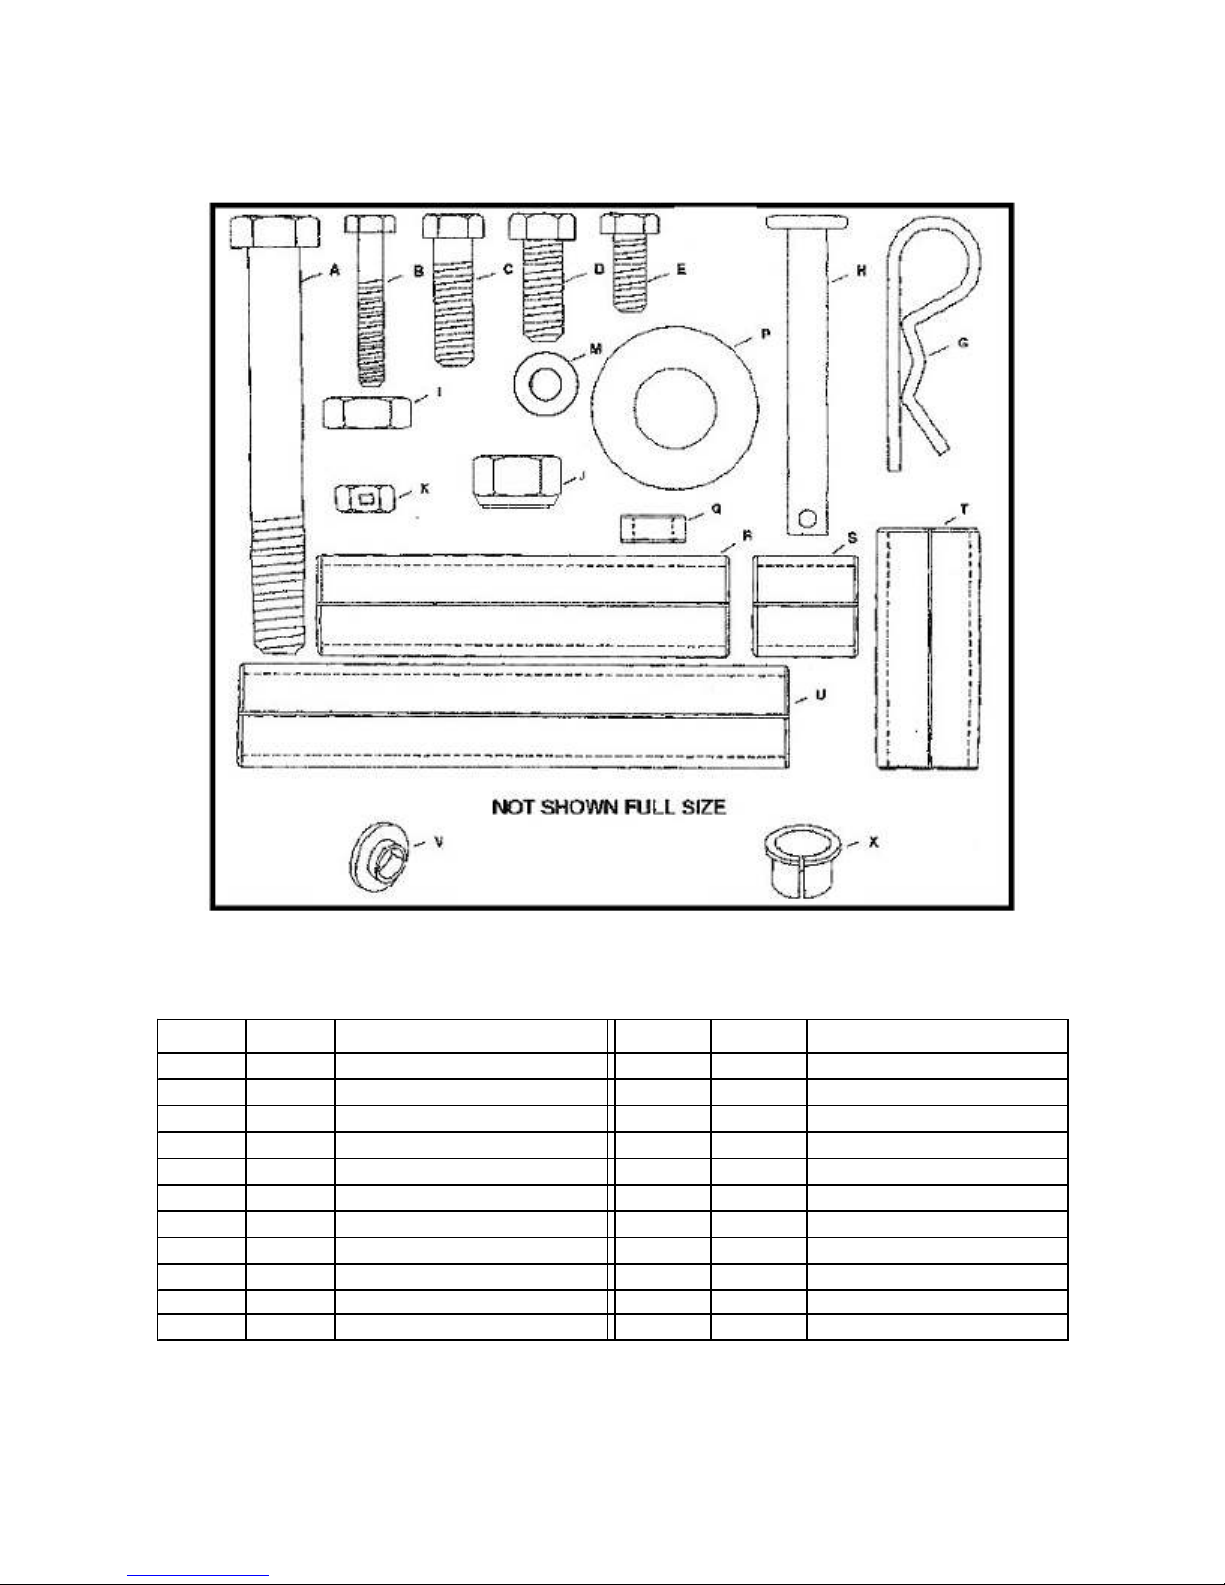
Hardware Contents
Ref# Qty Description Ref# Qty Description
A 2
B 3
C 6
D 8
E 6
F 1
G 1
H 1
I 2
J 2 Hex Nylock Nut 1/2" X 8 Split Plastic Bearing
Hex Bolt 1/2" x 4 -7/16"
Hex Bolt 5/16 x 1 -3/4 M 10 Flat W asher, 5/16.
Hex Bolt 5/16 x 1 -3/16 P 6 Flat Washer, 7/8
Hex Bolt 5/16 x 7/8" Q 8 Spacer 1/4" Long
Hex Bolt 5/16 x 1" R 1 Spacer Tube, 2.90"
Lock Pin (Not Shown) S 2 Spacer Tube, 1.00"
Hair Cotter Pin T 1 Spacer Tube, 2.38"
Hitch Pin U 2 Spacer Tube, 5.29"
Hex Nut, 1/2" V 1 Shoulder Spacer
K 23
4
Lock Nut, 5/16"
Page 5

Assembly Instructions:
Step 1: Insert Split Plastic Bearing
See Figure #1.
Push/Insert one plastic split bearing into each side of
the double spool assembly.
Repeat for each spool assembly.
Step 1 Hardware Needed:
8 - Split Plastic Bearings
Step 2: Attach Wheel Bracket to Axle Shaft
See figure #2.
Attach one wheel bracket to the middle hole of the axle shaft.
Note the wheel bracket ring should point towards the shortest
side of the axle. See Figure #2. Attach the wheel bracket
using a 5/16” x 1-3/4” Hex Bolt and 5/16” Lock Nut.
tighten connection.
Step 2 Hardware Needed:
1 - Axle Shaft
1 - Hex Bolt (5/16” x 1-3/4”)
1 - Lock Nut (5/16”)
Fully
Step 2A: Insert Hex Bolt
See Figure #2.
Next, insert from the short side of the axle a 5/16” x 1-3/16”
Hex Bolt into the hole on the wheel bracket closest to the axle.
(smaller hole) Attach 5/16” Lock Nut to the bolt.
Do not fully tighten until later step.
Step 2A Hardware Needed:
1 - Hex Bolt (5/16” x 1-3/16”)
1 - Lock Nut (5/16”)
Step 3: Assemble Short Side of Axle Shaft
See figure #3.
Assemble below items onto short side of the axle shaft in the
following order. Take note of the direction of plugger knives in
Figure #3.
1. Start with one double spool (knives facing inward)
2. 5.29” spacer tube
3. Double spool (knives facing outward)
4. 1” spacer tube
5. 7/8” Flat washer
Step 3 Hardware Needed:
2 - Double Spools
1 - 5.29” Spacer Tube
1 – 1” Spacer Tube
1 - Flat Washer (7/8”)
5
Page 6

Step 4: Assemble Long Side of Axle Shaft
See Figure #4.
Assemble these items onto LONG SIDE of the axle shaft in the following order. Take
note of the direction of plugger knives in Figure #4.
IMPORTANT
, be sure top bracket
of Middle Brace faces short end of axle!
1. Start with 2.38” spacer tube
2. 7/8” flat washer
3. Middle Brace
(top bracket facing short side of axle)
4. 7/8” flat washer
5. 2.90” spacer tube
6. Double spool assembly
(knives facing inward
7. 5.29” spacer tube
8. Double spool assembly
(knives facing outward)
9. 1” spacer tube
10. 7/8” flat Washer
Step 4 Hardware Needed:
1 - Middle Brace
2 - Double Spools
1 - 2.38” Spacer tube
1 - 2.90” Spacer tube
1 - 5.29” Spacer tube
1 - 1” Spacer Tube
3 - Flat Washer (7/8”)
Step 5: Attach End Plates & Wheel Brackets
Start by rotating the wheel bracket in the middle of the
axle shaft so it is pointing upward. Next, attach an End
Plate to one side, followed by 7/8” Flat washer ,
followed by a wheel bracket. Note in Figure #5, wheel
bracket ring faces inward. Fasten wheel bracket to axle
shaft using 5/16” x 1-3/4” Hex Bolt and 5/16” Lock Nut.
Fully tighten connection
. Repeat for opposite side.
Step 5 Hardware Needed:
2 - End Plates
2 - Wheel Brackets
2 - Flat Washers (7/8”)
2 - Hex Bolts (5/16” x 1-3/4”)
2 - Lock Nuts (5/16”)
6
Page 7

Step 6: Attach Wheel Assembly
See figure #6.
Insert ½” x 4-7/16” Hex bolt through wheel assembly,
install ½” Hex nut on ½” x 4- 7/16” Hex bolt, tighten nut
on bolt until it’s hand tight, then loosen
hex nut ½ turn.
Attach assembled wheel and ½” Hex bolt on to wheel
bracket and fasten with second ½” Hex nut. Repeat for
opposite side.
Make certain wheels spin freely after assembly.
Step 6 Hardware Needed:
2 - Wheel Assembly
2 - Hex Bolt (½” x 4-7/16”)
4 - Hex Nut (½”)
Step 7: Attach Hitch Bracket & Hitch Pin
See Figure #7
Attach hitch bracket to the tongue using 5/16” x 1” Hex
Bolt and 5/16” Lock Nut. Next, insert hitch pin through
hitch bracket and the tongue secure with cotter pin.
Fully tighten connections.
Step 7 Hardware Needed:
1 - Hitch Bracket
2 - Hex Bolts (5/16. x 1.)
2 - Lock Nuts (5/16.)
1 - Hitch Pin
1 - Hair Cotter Pin
Step 8: Attach Tongue to Top Tray
See Figure #8.
Attach the tongue to the top tray with the large opening
of the tray slot facing forward. Attach tongue using the
top tray holes to right side of slot (viewing from front).
For right side holes of tongue connection (view from
front), use 5/16” x 1-3/16” Bolt, 2 spacers per Bolt, and
5/16” Lock Nut. For left side holes of tongue connection,
use 5/16” x 1” Bolt and 5/16” Lock Nut, no spacers. See
figure #8 for detail. For holes left of tray slot (viewing
from front) use 5/16” x 1-3/16” Hex bolt, two ¼” spacers
per bolt, and 5/16” Lock Nut.
Fully tighten all connections.
Step 8 Hardware Needed:
4 - Hex Bolt (5/16”x 1-3/16”)
2 - Hex Bolt (5/16” x 1”)
6 - Lock Nut (5/16”)
8 - ¼” Spacer
7
Page 8

Step 9: Attaching Middle Brace
See figure #9.
Position Top Tray between End Plates by leaning the Top Tray into the End Plates.
Temporarily attach right end plate to the top tray using two 5/16” x 7/8” bolts (see
figure #9). Swing middle brace into position and fasten to top tray using 5/16” x 1”
Bolts and 5/16” Lock Nuts.
Do not fully tighten until final step
.
Step 9 Hardware Needed:
2 - Hex Bolt (5/16” x 1”)
2 - Lock Nuts (5/16”)
2 - Flat Washers (5/16”)
Step 10: Secure Upper Tray
See figure #10.
Attach both end plates to the top tray using 5/16” x 7/8” Hex Bolt, 5/16” Flat Washer,
and 5/16” Lock Nut for each corner (2 connections per corner).
Repeat for each corner.
Do not fully tighten until final step.
Step 10 Hardware Needed:
8 - Hex Bolt (5/16” x 7/8”)
8 - Lock Nuts (5/16”)
8 - Washer (5/16”)
8
Page 9

Step 11: Attach Lift Handle
See figure #11.
Place the lift handle through the large opening in the tray slot. Attach the lift handle to
the wheel bracket smaller hole using the 5/16” x 1-3/16” bolt and 5/16” nut you pre-assembled
earlier in step 2. Attach the lift handle to larger hole using a 5/16” x 1-3/16” Hex Bolt, shoulder spacer, and
5/16” Lock Nut.
Fully tighten connections.
Step 11 Hardware Needed:
1 - Hex Bolt (5/16” x 1-3/16”)
1 - Lock Nut (5/16”)
1 - Shoulder Spacer
9
Page 10

Final Step: Adjust Handle & Tighten Connections
See figure #12.
Carefully place the aerator upright on the wheels.
Lock the lift handle by moving into large offset hole
in front of tray slot. Make following adjustments for
correct alignment of the lift handle and the offset
slot.
For #1 in Figure #12:
Adjust the Tray side to side until the lift
handle rests against the right side (viewing
from back) of the offset hole in the top tray.
For #2 in Figure #12:
Next, re-straighten end plates with top tray
then fully tighten all 8 corner connections,
making sure lift handle is still resting against
the right side of the offset hole.
For #3 in Figure #12:
Next, re-straighten the middle brace under
the top tray, if necessary and then fully
tighten the connections on the middle brace.
Make sure handle still rests against right side of
offset hole. Lift handle should have to be forced
over to tray slot for lowering.
FULLY TIGHTEN CONNECTIONS and CHECK
THAT ALL CONNECTIONS ARE TIGHT.
Figure #12 . Close Up Photo
BEHIND THE LIFT ARM on the top tray is a place for locking pin device. Slide locking pin
through holes when aerator is in the upright position. This is a safety lock to keep the aerator
from dropping down while towing and not in use. This can help prevent damage to plug knives.
Your Aerator is now fully assembled and ready for use.
MAINTENANCE:
Plugger knives can be periodically sharpened with a small grinder to have continued good plugs
from the soil.
Oil the axle shaft and wheel hubs as needed with spray lubricant or small amount of grease
It is recommended to clean and dry the aerator before long periods of storage.
10
Page 11

AE-48
11
Parts Illustration And Listing
Ref# Part No. Description
1 12144 Top Tray
2 12145 Middle Brace
3 12146 End Plate
4 12147 Lift Arm
5 12148 Tongue
6 12149 Axle Shaft
7 12150 Hitch Bracket 24 12164 Hex Bolt 1/2 X 4 7/16
8 12151 Wheel Assembly 25 12165 Hex Nut 1/2"
9 12152 Wheel Brasket 27 NB195 Flat Washer
10 12153 Double Spool 28 12156 Split Plastic Bearing
12 NB504 Hex Bolt 5/16-18X1 1/4 29 12157 Spacer Tube 2.38"
13 NB501 Hex Bolt 5/16-18X1 30 12158 Spacer Tube 1"
14 12154 Spacer 1/4 31 12159 Spacer Tube 2.90"
17 BN181 Lock Nut 32 12160 Spacer Tube 5.29"
18 12155 Shoulder Spacer 33 12161 Handle Grip
19 NB143 Hex Bolt 5/16 X 3/4" 34 12162 Hitch Pin
20 NB275 Flast Washer 35 NB247 Cotter Pin
21 NB181 Lock Nut 5/16 36 12163 Aerator Plugger Knife
22 NB503 Hex Bolt 5/16 X 1 3/4 37 NB246 Carraige Bolt 5/16-18 X 3/4"
23 NB181 Lock Nut 5/16 38 NB218 Hex Nylock Nut 1/2"
Ref# Part No. Description
Page 12

MANUFACTURING QUALITY LAWN CARE EQUIPMENT SINCE 1945
Owner’s
Manual
AE-48
IMPORTANT
Read and follow all
Safety Precautions
and Instructions
Before Operating this
Equipment.
ATV & LAWN ACCESSORIES
WHEN ORDERING PARTS, PLEASE HAVE THE
FOLLOWING INORMATION AVAILABLE:
* PRODUCT – ________________
* SERIAL NUMBER - _______________
* MODEL NUMBER - _______________
TYPE - _______________
* PART NUMBER WITH PAINT CODE
* PART DESCRIPTION
TELEPHONE - 1-800-222-8183
FAX - 1-660-747-8650
SWISHER MOWER & MACHINE CO. INC.
SWISHER MOWER & MACHINE CO. INC.
SWISHER MOWER & MACHINE CO. INC.SWISHER MOWER & MACHINE CO. INC.
1602 CORPORATE DRIVE
P.O. BOX 67
WARRENSBURG, MO 64093
swisherinc.com
 Loading...