

Swim'n Play International Concord Oval User Manual [de, en, fr, it, cs, es]

THE REQUIRED TOOLS
Check that you have at your disposal all the tools and materials for setting up the swimming pool: a shovel, a
pick-axe, a rake, a beam longer than the radius of the pool and a quantity of sand.
In addition you will need string, adhesive tape, a cutter, a tape measure, engineer’s pliers, a mason’s level, two
stakes and a bag of fl our.
Before preparing the site, we recommend that you set up a Swim’n Play ladder. It will be essential for assembling
the pool. (The exact assembly instructions are in the package.)
GB
LES OUTILS NECESSAIRES
Vérifi er que vous disposez bien des outils et des matériaux nécessaires au montage:
une pelle, une pioche, un rateau, un tasseau d’une longueur supérieure au rayon de la piscine et du sable.
Mais aussi de la fi celle, un ruban adhésif, un cutter, un mètre-ruban, une pince universelle, un marteau, un
tournevis, un niveau de maçon, deux piquets et un sachet de farine.
Avant de préparer l’emplacement et, dans le cas où vous auriez également acquis une échelle Swim’n Play, nous
vous conseillons de monter votre échelle. Celle-ci sera indispensable lors de l’installation da la piscine. (la notice
précise de montage se trouve dans le carton).
NOTWENDIGE HILFSMITTEL:
Überprüfen Sie, ob Sie alle Werkzeuge und Hilfsmittel zur Hand haben: Schaufel, Hacke, Rechen, eine Leiste, die
länger als der Radius des Schwimmbeckens sein muß, und Sand.
Sie benötigen außerdem: Bindfaden, Klebeband, einen Teppichschneider, ein Maßband, Kombizange, Hammer,
Schraubenzieher, Wasserwaage, Pfl öcke und eine Tüte Mehl.
Setzen Sie eine Swim’n Play-Leiter zusammenzusetzen (falls Sie eine gekauft haben), bevor Sie mit der Standortvorbereitung beginnen. Sie werden sie später beim Aufstellen dringend brauchen. Die Montageanleitung befi ndet
sich im Karton der Leiter.
HERRAMIENTAS NECESARIAS
Verifi car que tiene las herramientas y materiales necesarios para el montaje : una pala, un pico, un rastrillo, un
listón de madera de una longitud superior al radio de la piscina y harina.
Pero también se necesita cuerda, cinta adhesiva, cúter, cinta métrica, pinza universal, martillo, desatornillador,
nivel de albañil, 2 estacas y 1 bolsa de harina.
Antes de preparer el emplazamiento y en caso en que también haya adquirido una escalera Swim’n Play, le recomendamos montar su escalera. Esta será indispensable para la instalación de la piscina. ( El manual preciso de
montaje se encuentra en la caja ).
F
D
E
GLI ARNESI NECESSARI:
Accertatevi che disponete esattamente di tutti gli utensili e del materiale necessario al montaggio : un badile, un
piccone, un rastrello, un tassello di lunghezza superiore al raggio della piscina, sabbia.
Ma anche: spago, nastro adesivo, un tagliabalze, un metro a nastro, una pinza universale, un martello, un cacciavite, una livella da muratore, due paletti, nonchè un sacchetto di farina ed alcune calzatoie d’appoggio di legno.
Prima di preparare il luogo prescelto, vi consigliamo di montare una scala Swim’n Play. Questa vi sarà indispensabile al momento dell’installazione della piscina ( le istruzioni precise di montaggio si trovano nello scatolone.)
HET BENODIGDE GEREEDSCHAP:
Check of u alle voor de montage benodigde gereedschappen en materialen heeft: een schop, een houweel, een hark, een lat, die langer is
dan de straal van het zwembad, en zand.
En verder nog touw, plakband, een cutter, een meetlint, een tang, een hamer, een schroevedraaier, een waterpas, twee paaltjes en een pak
meel.
Voordat u het terrein voor het zwembad gaat voorbereiden en voor het geval dat u eveneens een Swim’n Play basintrap heeft aangeschaft,
raden wij u aan deze te monteren. U heeft deze namelijk nodig bij het installeren van het zwembad (het document met de gedetailleerde
montage-instructies is bijgesloten in de doos)
Potr∨ebné nár∨adí
Zkontolujte, z∨e máte k dispozici ves∨keré nár∨adí a materiál, který je nutný k sestavení bazénu: rýc∨, krumpác∨, hrábe∨, dr∨eve∨mý hranoi dels∨í
nez∨ je polome∨r bazénu, písek, kladivo, hr∨ebíky. Dále budete potr∨ebovat klubko motouzu, textilní lepicí pásku, nu°z∨, s∨roubovák, pásmo,
kombinac∨ní kles∨te∨, vodováhu, dva dr∨eve∨né kolíky a pytlík mouky.
Pr∨ed pr∨ípravou stanovis∨te∨ doporuc∨ujeme sestavit schu°dky. Bude to nezbytné pro sestavení celého bazénu. Pr∨esné pokyny pro sestavení
jsou v balení.
I
NL
CZ
2
RIGID FRAMEWORK OVAL SWIMMING POOLS INSTRUCTIONS
IMPORTANT : Read instructions carefully in their entirely before setting up and using the swimming pool. Before beginning assembly of
your pool, check that you have the correct number of parts using the packing slip. If in the future you shold require a spare part, give the part
number indicated in the list.
GB
PISCINES RIGIDES OVALES NOTICE D’EMPLOI
IMPORTANT : Bien lire toutes les instructions avant le montage et l’utilisation. Avant de commencer à assembler votre piscine, vérifi er que
vous avez le bon nombre d’éléments à l’aide de la liste d’emballage. Si, dans le futur, vous avez besoin d’une pièce de rechange, se référer
au numéro d’article indiqué
STARRE SCHWIMMBECKEN OVAL MONTAGEANWEISUNG
WICHTING:Lesen Sie sämtliche Anweisungen sorgfältig durch, bevor das Schwimmbecken aufstellen und benutzen.
Überprüfen Sie, bevor Sie Ihr Schwimmbeckens zusammenbauen, an Hand der untenstehenden Packzettel, ob alle Teile in der erforderli-
chen Anzahl vorhanden sind. Verwenden Sie die angegebenen Artikelnummern, wenn Sie später ein Ersatzteil bestellen möchten.
PISCINAS RIGIDAS OVALES MANUAL DE UTILIZACION
IMPORTANTE : Leer bien todas las instrucciones antes del montaje la utilización. Antes de comerzar el montaje de su piscina, verifi que que
tiene todos los elementos de la guía de envase. Si en el futuro necesita una pieza de recambio, remitirse al numero de articulo indicado.
PISCINA RIGIDE OVALI INSTRUZIONI PER L’USO
IMPORTANTE : Leggere con la massima attenzione tutte le istruzioni prima del montaggio e prima dell’utilizzazione.
Prima di incominciare l’assemblaggio della vostra piscina,verifi cate che disponete dell’esatto numero delgi elementi controllando con bolla di
accompagnamento. Se ulteriormente avrete necessità di un pezzo di ricambio, dovrete far riferimento al numero indicato dell’articolo.
TUINZWEMBADEN OVAAL GEBRUIKSAANWIJZING
BELANGRIJK! Lees voor montage en gebruik eerst zorgvulding alle instructies
Controleer, voordat u met de montage van uw zwembad begint, met behulp van onderstaande paklijst. Als u in de toekomst een los on-
derdeel nodig heeft, verwijs dan naar het aangegeven artikelnummer.
F
D
E
I
NL
NÁVOD PRO OVÁLNÝ BAZÉN
DU°LEZ∨ITÉ: Pr∨ed tím, ne∨z zac∨nete sestavovat a pouz∨ívat bazén, si pec∨live∨ proc∨te∨te celý návod k obsluze a pec∨live∨ jej uschovejte
Nez∨ zac∨nete sestavovat bazén, proved’te kontrolu, zda máte správný poc∨et souc∨ástí podle seznamu, který je uveden níz∨e. Pokud v budoucnu budete poz∨adovat ne∨kterou souc∨ást, uváde∨jte na objednávee c∨íslo dílu.
GB
F
D
E
CZ
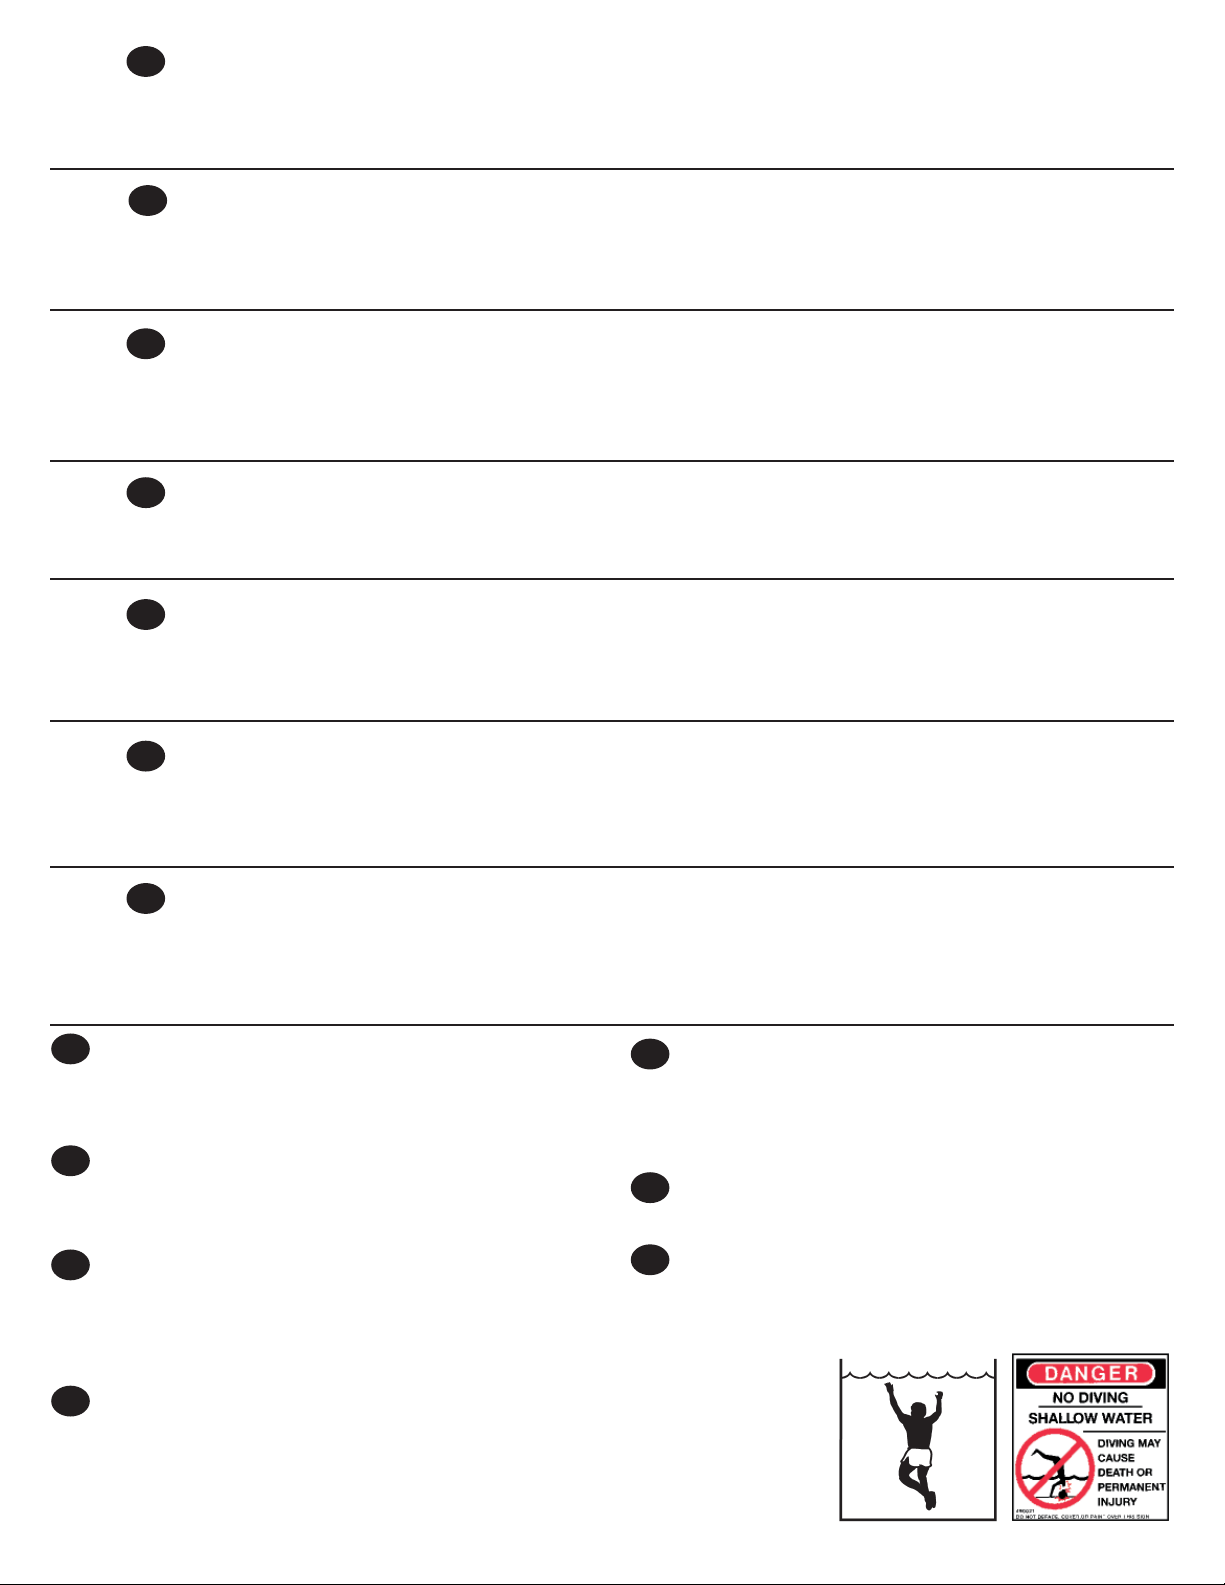
Prevent drowning!
Watch children at all times
Pool not designed for diving or jumping!
Ne pas laisser les enfants se baigner
seuls!
Ne pas plonger ou sauter!
Achtung Ertrinkungsgefahr!
Kinder sind zu beaufsichtigen
Das Becken ist nicht geeignet zum
Tauchen und Springen!
¡Vigilar siempre a los niños para evitar
Prevenite annegamenti! Sorvegliate i
I
bambini costantemente
Tuffi e salti dall’orlo della piscina sono
vietati!
De kinderen niet alleen laten baden!
NL
Niet duiken, springen!
Pr∨edcházejte utonutí! Dohlíz∨ejte na de∨ti po
CZ
celou dobu koupání!
Bazén není navrz
∨
en pro potápe∨ní a skákání
do vody!
que se ahoguen!
Piscina no adecuada para tirarse de
cabeza o de cualquier otro modo!
3
GB
SAFETY GUIDELINES
1) Do not authorize access to the pool without the presence of an adult.
2) Do not dive or jump from the edge of the
pool. Do not sit on or climb up the pool wall.
The ledge on top of the wall is not designed
for this type of use.
3) At all times comply with the setting-up
and installation instructions as well as safety
quidelines.
4) Make sure that your swimming pool and
your fi lter are mounted and installed in com-
pliance with instructions and that the pool is
fi lled as described in the instructions.
5) Do not allow rough games to be played in
or near the pool.
6) Do not under any circumstances modify
or remove any part. Do not pierce any holes
in the pool or ladder. Follow instuctions at all
times.
7) The ladder must be positioned on a solid
foundation and must always be absolutly
level.
8) The ladder can only carry one person at
a time, and it will carry a maximum weight
of 85 kg.
9) Always face the ladder when getting in or
out the pool.
10) Never use the ladder for another purpose
than the one for which it was designed, i.e.
getting in or out of the pool.
11) Regularly check to see if all the parts of
the pool and ladder are in good working order. If need be, replace them. If necessary,
tighten screws, nuts and bolts.
*BEFORE BEGINNING TO SET UP YOUR
SWINNING POOL, READ ALL INSTRUCTIONS CAREFULLY.
*THE POOL MUST BE ASSEMBLED BY AN
ADULT.
F
SWIM’N PLAY SE SOUCIE
DE VOTRE SECURITE
CONSIGNES DE SECURITE
1) N’autoriser l’usage de la piscine que sous
la surveillance d’un adute.
2) Ne jamais plonger, ni sauter du rebord de
la piscine. Ne pas s’y asseoir ni y grimper.
Le rebord de la piscine n’est pas prévu à cet
effect.
3) Toujours suivre les directives d’installation
et les conseil de sécurité.
4) Assurez vous que la piscine et votre fi ltre
soient installés selon les instructions de montage et que la piscine soit remplie de facon
adéquate.
5) Ne jamais permettre des jeux violents dans
la piscine ni autour.
6) Ne jamais modifi er ni enlever de pièces,
percer des trous dans la piscine ou l’échelle.
Suivre toujours les directives d’installation.
7) L’échelle doit être placée sur une base solide et être toujours de niveau.
8) L’échelle ne peut porter qu’une seule personne à la fois, elle ne supporte pas un poids
supérieur à 85 kg.
9) Toujours faire face à l’échelle en entrant ou
en sortant de la piscine.
10) Ne jamais utiliser l’échelle à d’autre utilisations que celle por laquelle elle est prévue,
c’est à dire, entrée et sortie de la piscine.
11) Vérifi er périodiquement si toutes les
pièces de la piscine et de l’échelle sont en
bon état, les remplacer au besoin. Resserrer
vis écrous si nécessaire.
*LISEZ ATTENTIVEMENT TOUTES LES
INSTRUCTIONS AVANT DE COMMENCER
L’ASSEMBLAGE DE VOTRE PISCINE.
* L’ASSEMBLAGE DOIT ETRE EFFECTUE
PAR UN ADULTE.
D
SWIM’N PLAY KÜMMERT
SICH UM IHRE
SICHERERHEIT
SICHERHEITSVORSCHRIFTEN
1) Gestatten Sie die Benutzung des
Schwimmbeckens nur unter Aufsicht eines
Erwachsenen.
2) Keine Kopfsprünge durchführen und nicht
vom Rand ins Becken springen. Sich nicht
auf den Beckenrand setzen und nicht daran
hochklettern. Der Rand des Schwimmbeckens ist dafür nicht geeignet.
3) Stets die Montageanweisungen und die
Sicherheitsvorschriften beachten.
4) Vergewissern Sie sich, daß das
Schwimmbecken und der Filter den Anweisungen entsprechend installiert wurden und daß
das Schwimmbecken vorschriftsmäßig gefüllt ist.
5) Erlauben Sie Kindern nicht, im oder in der
Nähe des Schwimmbeckens zu toben.
6) Verändern oder entfernen Sie auf gar keinen Fall Teille des Schwimmbeckens, bohren
Sie keine Löcher in das Becken oder die
Leiter. Befolden Sie stets die Installierugsanleitung.
7) Die Leiter muß auf einer festen Unterlage
und vollständing waagrecht stehen.
8) Auf der Leiter sich immer nur eine Person
befi nden. Die Leiter darf nur mit einem Ge-
wicht 85 kg belastet werden.
9) Drehen Sie sich Betreten oder Verlassen
des Beckens immer mit dem Gesicht zur
Leiter.
4
10) Verwenden Sie die Leiter nur für den
vorgesehenen Verwendungszweck, d.h. das
Betreten und Verlassen sed Schwimmbeckens.
11) Überprüfen Sie regelmäßig, ob alle Teile
des Schwimmbeckens und der Leiter in
einwandfreiem Zustand sind, und ersetzen
Sie ggf. durch Neuteile. Falls erforderlich
Schraunben und Muttern nachziehen.
*LESEN SIE SÄMTLICHE ANWEISUNGEN AUFMERKSAM DURCH, BEVOR
SIE MIT DEM ZUSAMMENBAU IHRES
SCHWIMMBECKENS BEGINNEN.
*DAS AUFSTELLEN DES SCHWIMMBECKENS IST VON EINEM ERWACHSENEN
DURCHZUFÜHREN.
E
SWIM’N PLAY SE PREOCUPA
POR SU SEGURIDAD
CONSIGNAS DE
SEGURIDAD
1) Autorizar el uso de la piscina solo bajo la
vigilancia de un adulto.
2) Nunca zambullirse ni saltar del borde da
la piscina. No sentarse ni trepar en el borde.
EL borde de la piscina no está previsto para
ello.
3) Seguir siempre las directivas de instalación y los consejos de sequridad.
4) Controlar que la piscina y su fi ltro estén
instalados de acuerdo a las instrucciones
de montaje y que la piscina sea llenada de
manera adecuada.
5) Nunca permitir juegos violentos en la piscina ni alrededores.
6) Nunca modifi car ni retirar piezas, perforar
agujeros en la piscina o en la escalera. Seguir
siempre las directivas de instalación.
7) La escalera debe ser colocada sobre
base sólida y encontrarse siempre al nivel.
8) La escalera sólo puede soportar una persona a la vez, no soporta un peso superior
a 85 kg.
9) Encontrarse siempre de frente a la escalera al entrar o salir de la piscina.
10) Nunca utilizar la escalera para otras utilizaciones que la prevista, es decir entrar y
salir de la piscina.
11) Verifi car periódicamente si todas las pie-
zas de la piscina y de la escalera están en
buen estado, cambiarlas si fuere necesario.
Volver a apretar tornillos y tuercas si fuere
necesario.
una

I NL CZ
SWIM’N PLAY SI
PREOCCUPA DELLA
SWIM’N PLAY HEEFT
UW VEILIGHEID OP
VOSTRA SICUREZZA
CONSEGNE DI
SICUREZZA
1) L’uso della piscina deve essere autorizzato
sontanto sotto la sorveglianza di un adulto.
2) Mai tuffarsi, né saltare dall’orlo della piscina. Mai sedersi sullo stesso, né arrampicarsi. L’orlo della piscina non è stato previsto
a questo scopo.
3) Attenersi sempre alle direttive d’installazione
ed ai consigli di sicurezza.
4) Assicuratevi che la piscina ed il vostro fi l-
tro siano stati installati in conformità con le
istruzioni di montaggio e che la piscina sia
adeguatamente riempita.
5) Non permettete mai giochi violente nella
piscina, né attorno alla stessa.
6) Mai modifi care, né togliere pezzi, né eseguire
fori nella piscina o sulla scala. Sempre attenersi
alle direttive d’installazione.
7) La scala deve essere sistemata su una
base solida ed essere sempre a livello.
8) La scala può reggere solo una persona
volta, non sopporta pesi superiori a 85kg.
9) Entrando od uscendo dalla piscina, mantenersi sempre di fronte alla scala.
10) Mai impiegare la scala per altri usi di fuori
di quelli per i quali è stata prevista. Essa serve
infatti ad entrare ed a uscire dalla piscina.
11)
Verifi care periodicamente che tutti gli elementi
della piscina e della scala siano in buono stato, se
necessario sostituirli. Se necessario, serrare nuovamente le viti e i dadi.
*PRIMA DI INCOMINCIARE
L’ASSEMBLAGGGIO DELLA VOSTRA
PISCINA LEGGETE ATTENTAMENTE
TUTTE LE ISTRUZIONI.
*L’ASSEMBLAGGIO DEVE ESSERE
EFFETTUATO DA UN ADULTO.
alla
VEILIGHEIDSVOORSCHRIFTEN
1) Laat kinderen niet zonder toezicht van een
volwassene het zwembad gebruiken.
2) Duik niet in het bassin en spring niet van de
rand van het bad af. Ga niet op de rand van
het bad zitten of eraan hangen, de bassinrand is hier niet op berekend.
3) Neem alle aanwijzingen voor de installatie
en veiligheidsvoorschriften in acht.
4) Verseker u ervan dat het zwembad en het
fi lter volgens de montage-instructies geïnstalleerd zijn en dat het zwembad op de juiste
wijze gevuld is.
5) Laat geen wilde spelletjes in of om het
zwembad toe.
6) U mag nooit onderdelen wijzigen of verwijderen, gaten boren in het zwembad of de
bassintrap. Houd u altijd aan de installatie
voorschriften.
7) De bassintrap moet op een stevige ondergrond geplaatst zijn en altijd waterpas staan.
8) De trap kan slechts één persoon tegelijk
dragen en is niet bestand tegen gewichten
boven de 85 kg.
9) Houd het gezicht altijd naar de trap toe gekeerd als u het bassin in- of uitgaat.
10) Gebruik de bassintrap nooit voor andere
doeleinden dan waarvoor hij bestermd is,
d.w.z. om het bassin in- of uit te gaan.
11) Controleer van tijd tot tijd of alle onderdelen van het zwembad en van de trap in goede
staat verkeren en vervang ze als dit niet het
geval is. Draai schroeven en moeren zonodig
opnieuw vast.
*LEES AANDACHTIG ALLE INSTUCTIES
VOORDAT U MET BAD MONTAGE VAN UW
ZWEMBAD BEGINT.
*HET BAD MOET DOOR EEN
VOLWASSENE GEMONTEERD WORDEN.
HET OOG
Firme∨ Swim’n Play lez∨ í
vas∨ e bezpec∨ nost
na srdci
Bezpec
1) Zamezte pr∨ístup de∨tí do bazénu bez
pr∨ítomnosti dospe∨lých
2) Neskákejte a nevrhejte se po hlave∨ do
vody pr∨es okraje bazénu. Nesedejte si ani
nestoupejte na ste∨nu bazénu. Ste∨na není
navrz∨ena na takovýto zpu°sob zatíz∨ení.
3) Vz∨dy se chovejte podle instrukcí a pokynu°,
které jsou uvedeny v tomto návodu
4) Zajiste∨te, aby byly bazén a ste∨nova
filtrac∨ní jednotka sestaveny podle instrukcí a
pokynu° , které jsou uvedeny v tomto návodu.
5) Nedovolte, aby se nebezpec∨né hry provozovaly uvnitr∨ nebo v blízkém okolí bazénu.
6) Za z∨ádných okolností neupravujte souc∨ásti
bazénu. Nede∨lejte z∨ádné otvory do bazéhu
ani do schu° dku
7) Schu°dky musí být umíste∨ny na pevném
podkladu a vz∨dy na rovine∨.
8) Na schu°dky mu°z∨e vstupovat vz∨dy
jedna osoba, nosnost schu°dku° je 85 kg
9) Schu°dky pouz∨ívejte vz∨dy tak, abyste byli
obráceni tvár∨í k nim.
10) Nepouz∨ivejte schu°dky k jinému úc∨elu,
nez∨ pro který byly navrz∨eny.
11) Pravidelne∨ obhlédne∨te bazén a schu°dky,
zda jsou v por∨ádku. Pokud je ne∨která
∨
ást pos∨kozena, vyme∨n∨te ji. Pouz∨íveje
souc
originální náhradní díly. Pokud je nutno,
dotáhne∨te s∨rouby a matice.
*Pr∨ed tím, nez∨ zac∨nete sestavovat bazén,
si pec∨live∨ proc∨te∨te celý návod k obsluze.
Bazén musí být sestavován pouze dospe∨lými
osobami.
∨
nostní pokyny
°
pouze
5
GB
Expertly designed, your swimming pool
offers every quality and security guaranty and you will soon be able to appreciate
how easy it is to use it. Before beginning
to set up the pool, it is absolutely necessary that you read these instructions
carefully.
CHOOSING THE RIGHT SPOT
The choice of the exact location for the pool
is an important decision for subsequent satisfactory operation. It is absolutely imperative
to choose even ground. The pool must be set
up in perfectly even position.
Do not position it close to trees in order to
prevent it fi lling with leaves.
Make sure that you have access to electric
current and water mains.
For the sake of child safety, we recommend
not to set up the pool below an area accessible to children.
Finally, it is strictly recommended not to
try setting up the pool in windy weather.
CHECKING THE BOXES
AND PARTS
We recommend that you check each box
carefully with the help of the list of parts.
Proceed in the same manner for accessory
equipment if necessary (fi lter, ladder etc.).
F
Vous venez d’acquérir une piscine
Swim’n Play pour le plus grand bonheur
de vorte famile. Concue par des professionnels, votre piscine requiert toutes
les garanties de qualité et de sécurité,
et vous pourrez bientôt apprécier son
confort d’utilisation. II ne vous reste plus
qu’à l’installer. Avant de commencer, il
est indispensable de lire attentivement la
notice de montage.
CHOIX DE L’EMPLACEMENT :
L’emplacement de la piscine est un élément
déterminant pour une bonne utilisation ultérieure. II est impératif de choisir un terrain
plat. En effet la piscine doit être absolument
de niveau. Eloignez-la des arbres pour éviter
qu’elle ne se remplisse de feuilles.
Assurez vous de la proximité d’une alimentation électrique et d’une arrivée d’eau. Pour la
sécurité des enfants, nous vous recommandons de ne pas l’installer près d’un accès qui
la surplombe.
Enfi n, il est formellement déconseillé
d’effectuer le montage les jours de vent.
VERIFICATION DES COLIS ET
DES PIECES
Vous devez contrôler minutieusement dans
chaque carton si vous avez bien toutes les
pièces constitutives.
Procéder de même pour les équipements
complémentaires si nécessaire (fi ltre, échelle,
etc.)
D
Sie haben zur großen Freude Ihrer
Familie ein Swim’n Play Schwimmbecken gekauft.
Ihr Schwimmbecken wurde von Experten
entwickelt: Es bietet Ihnen sämtliche
Qualitäts- und Sicherheitsgarantien und
besonderen Komfort.
Jetzt müssen Sie es nur noch aufstellen. Lesen Sie, bevor Sie beginnen, die
Anleitung aufmerksam durch.
WAHL DES STANDORTS :
Die Wahl des Standorts ist eine wichtige
Voraussetzung für eine spätere unproblematische Benutzung des Schwimmbeckens:
Sie müssen unbedingt fl aches Gelände aus-
wählen, denn das Schwimmbecken muß
genau waagrecht stehen.
Stellen Sie es nicht unter Bäumen auf, damit
kein Laub hineinfällt.
Vergewissern Sie sich, daß in der Nähe ein
Strom- und Wasseranschluß vorhanden ist.
Als Sicherheitsmaßnahme für Kinder empfehlen wir, das Schwimmbecken nicht in der
Nähe von Zugangsmöglichkeiten aufzustellen, die das Becken überragen.
Und last, not least raten wir dringendst
davon ab, das Schwimmbecken bei Wind
aufzustellen.
ÜBERPRÜFUNG DER
KARTONS UND DER TEILE
Kontrollieren Sie die Kartons und überprüfen
Sie, ob alle Teile vorhanden sind
Überprüfen Sie ebenfalls alle zusätzlichen
Ausrüstungen (Filter, Leiter usw.).
E
Acaba de adquirir una piscina Swim’n
Play para la felicidad de su familia. Diseñada por profesionales, su piscina
cuenta con todas las garantías de calidad y seguridad y pronto podrá apreciar
su comodidad de utilización. No le queda
más que instalarla. Antes de comenzar,
es indispensable leer atentamente el
manual de montaje.
ELECCION DEL
EMPLAZAMIENTO
El emplazamiento de la piscina es un elemento determinante para una correcta utilización posterior.
6
Es inperativo elegir un terreno plano. En
efecto, la piscina debe estar absolutamente
nivelada.
Aléjela de los árboles para evitar que se llene
de hojas. Asegúrese de que tenga cerca
una alimentación eléctrica y una llegada de
agua.
Para la seguridad de los niños, le recomendamos no instalarla cerca de un
acceso que la domine desde lo alto.
Finalmente, se desaconseja formalmente
efectuar el montaje los días de viento.
VERIFICACION DE LAS
CAJAS Y PIEZAS
Controlar cuidadosamente que se
encuentren todas las piezas en cada caja.
Proceder de la misma manera para los
equipos complementarios si fuere necesario
(fi ltro, escalera, etc.)
I
Avete appena comprato una piscina
Swim’n Play per la più grande felicità
della vostra famiglia. Concepita da professionisti, la vostra piscina richiede tutte
le garanzie di qualità e di sicurezza, e
potrete ben presto apprezzarne la comodità d’uso. Non vi rimane più che da
installarla. Prima di incominciare, è indispensabile che leggiate attentamente le
istruzioni per il montaggio.
CELTA DELL’UBICAZIONE
L’ubicazione della piscina costituisce un elemento determinante per il buon impiego ulteriore :
- è imperativo scegliere una zona di terreno
ben piana. Infatti, la piscina deve assolutamente trovarsi a livello orizzontale;
- ponetela a distanza dagli alberi, per evitare
che si riempia di foglie;
- assicuratevi della vicinanza di
un’alimentazione elettrica e di un arrivo
d’acqua;
- per la sicurezza dei bambini, vi raccomandiamo di non installarla vicino ad un accesso
che la sovrasti;
Infi ne, si sconsiglia formalmente di procedere
al montaggio con tempo ventoso.
VERIFICA DEI COLLI E DEI
PEZZI:
Dovete controllare accuratamente, per ogni
singolo scatolone, che avete essattamente
tutti pezzi constitutivi (elenco completo a
pag. 2):
Se necessario, procedere nello stesso modo
per le attrezzature complementari (fi ltro,
scala, ecc...).

NL
U bent zojuist de gelukkige bezitter geworden van een Swim’n Play zwembad
tot het grootste genoegen van uw gezin.
Uw zwembad, dat ontworpen is door experts, voldoet aan alle vereisten op het
gebied van kwaliteit en veiligheid en zal
u weldra veel plezier verschaffen. U hoeft
het alleen nog maar te installeren. Lees,
voordat u begint, eerst de montagehandleiding zorgvulding door.
KEUZE VAN DE PLEK
De juiste plaatsing van het zwembad is een
bepalende factor voor een goed gebruik naderhand.
Het is absoluut noodzakelijk een vlak terrein
te kiezen.
Het bad moet namelijk volledig waterpas
staan.
Plaats het bad uit de buurt van bomen om te
voorkomen dat het vol met bladeren komt.
Zorg er voor dat er een elektrische voeding
en een watertoevoer in de buurt is.
Voor de veiligheid van de kinderen, raden wij
aan het zwembad niet vlakbij een toegankeli-
jke overhang te installeren.
Tenslotte, wordt ten strengste afgeraden het
zwembad te monteren als er veel wind staat.
HET CONTROLEREN VAN DE
DOZEN EN DE ONDERDELEN:
Controleer zorgvuldig in elke doos of u alle
onderdelen heeft (zie complete lijst op blz.
2):
Doe hetzelfde bij de eventuele aanvullende
uitrustingen (fi lter, bassintrap, enz.)
CZ
Pokyny pro sestavení vas∨eho
bazénu
Tento bazén je odborne∨ navrz∨en a nabízí
vám kvalitu a bezpec∨nost. Brzy uvítáte
skutec∨nost jak je snadné jeho pouz∨ití Pr∨ed
tím, nez∨ se pustíte do jeho sestavování, je
nutné proc∨íst následující pokyny:
∨
Výbe∨r stanovis∨te
Výbe∨r vhodného stanovis∨te∨ je velice
du°lez∨itý. Vyberte co nejrovne∨js∨í pozemek,
protoz∨e bazén musí být postaven na vodorovné plos∨e
Stanovis∨te∨ o blízkostí stromu° není vhodné,
protoz∨e padající listí, míza apod. znec∨is∨t’ují
hladinu bazénu a zate∨z∨ují filtrac∨ní jednotku.
Zajiste∨te, aby bylo stanovis∨te∨ v dosahu elektrické síte∨ a zdroje vody.
°
vodu bezpec∨nosti de∨tí doporuc∨ujeme
Z du
nestave∨t bazén v blízkosti ploch a pr∨edme∨tu°,
které jsou pro de∨ti pr∨ístupné a které jim
mohou usnadnit vstup do vody.
Nepokous
ve∨trného poc∨así.
Doporuc∨ujeme pr∨ekontrolovat obsah
kaz∨dého balaní za pomoci seznamu dílu°
(viz. str.2)
Postupujte stejuým zpu°sobem pro díly
pr∨idavných zar∨ízení (filtrac∨ní jednotka,
schu°dky atd.)
∨
ejte se sestavovat bazén za
III Kontrola dílu
°
GB
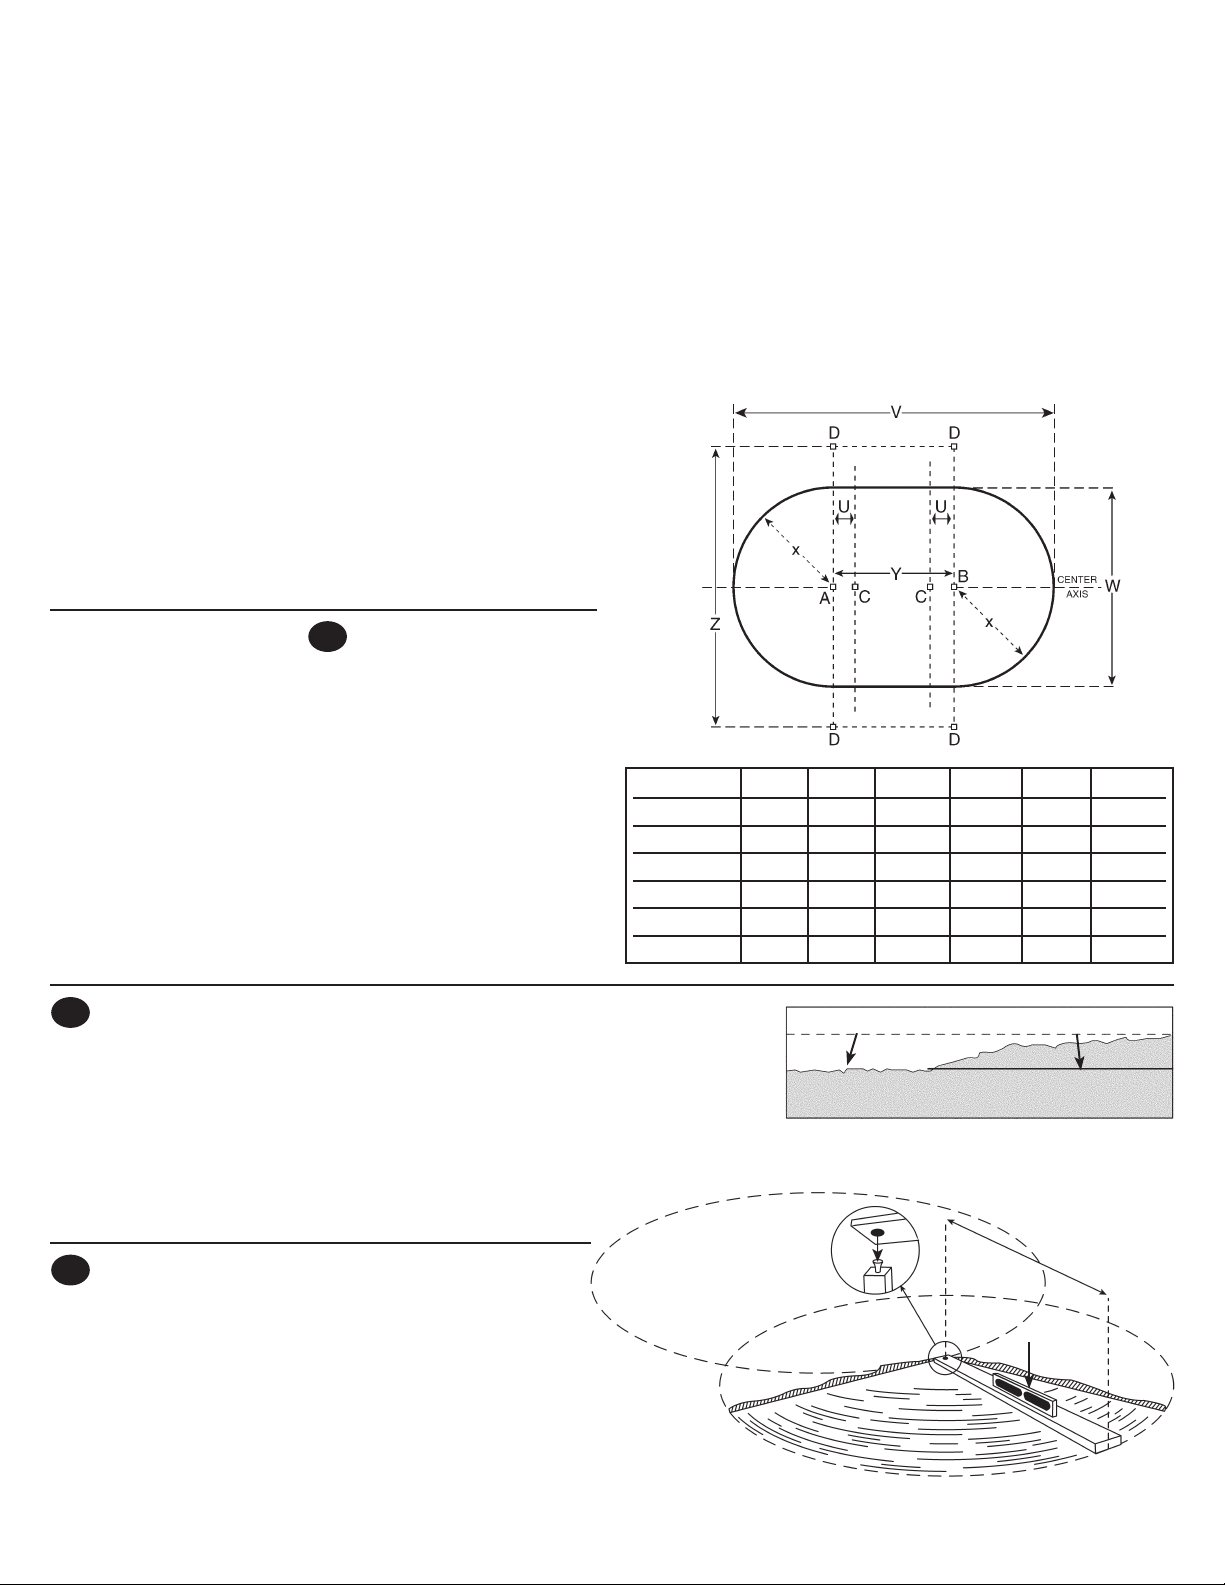
PREPARING THE GROUND
First of all, you must choose a spot which provides the space required
by the overall dimensions of your pool. The table below indicates
the exact general requirements, taking into account the extra 15cm
needed on all sides in order to prepare the terrain correctly.
Defi ne the central axis of your pool by setting two stakes at the pre-
scribed distance and pulling a string between them (outer stakes).
Now place two central stakes along this axis (A and B). Taking measure from the outer stakes, stakes A and B should be placed at a
distance equal to exactly half the width of the pool, respectively. Now
drive in other stakes along the outline of the area to be covered by the
pool. The correct spot is found by placing the stakes at right angles
from the central stakes at a distance equal to half the width of the pool
plus 90cm from the base of the struts.
Check all measurements with the help of the diagram. Finally, use
fl our to draw the outline of the pool on the ground, drawing a semicircle from the central stakes at half the width of the pool plus 15cm.
For better protection of the pool, Swim’n Play suggests that you
X Y V W Z U
5,50 x 3,70 1,95m 1,80m 5,80m 4,00m 5,80m 30,5cm
7,30 x 3,70 1,95m 3,60m 7,60m 4,00m 5,80m 61,0cm
7,30 x 4,60 2,40m 2,70m 7,60m 4,90m 6,70m 15,2cm
9,10 x 4,60 2,40m 4,60m 9,40m 4,90m 6,70m 45,7cm
12,00 x 5,50 2,85m 6,40m 12,30m 5,80m 7,60m 15,2cm
13,70 x 5,50 2,85m 8,23m 14,10m 5,80m 7,60m 45,7cm
lay out a ground mat. Roll the mat out evenly. Before beginning
assembly of the pool mark its outline using a felt marker.
WARNING:
In order to ensure the stability of your swimming pool it is strongly rec-
ommended that you do not under any circumstances fi ll in but rather
dig out excess earth to level the ground.
Check for evenness particularly carefully along the lines of the bottom
rails. Finally rake and carefully clean the entire pool surface area.
F
LA PRÉPARATION DU TERRAIN
Vous devez en premier lieu choisir un emplacement correspondant
à l’encombrement total extérieur de votre piscine. Le tableau ci-dessous vous précise les principales dimensions compte tenu des 15 cm
supplémentaires nécessaires tout autour de la piscine pour la préparation du terrain.
Déterminez l’axe central de votre piscine en reportant sa longueur
entre deux piquets et rejoighezles par une fi celle (piquets extrêmes).
Plantez ensuite deux piquets centraux cet axe (A et B). Placezles par
rapport à chaque piquet des extrémités, à une distance égale à une
demi largeur de la piscine.
Plantez maintenant d’autres piquets qui vont matérialiser les contours
de la piscine. Pour cela, reportez sur les côtes à partir des piquets
7
centraux, la distance d’une demi largeur de la piscine plus 90cm pour
l’empattement des jambes de force.
Vérifi er toutes les mesures avec le dessin cidessus. Enfi n, tracez avec
la farine les contours de chaque extrémité de la piscine en reportant,
en arc de cercle à partir des piquets cetraux, une demi largeur de la
piscine plus 15cm.
Pour assurer une meilleure protection, Swim’n Play vous suggère la pose d’un tapis de sol. Déployez uniformément le tapis
sur l’emplacement nivelé. En suivant le même procedé, tracez
avec un marqueur la circonférence du cercle sur le tapis.
TRES IMPORTANT:
Pour assurer la future stabilité de votre piscine il est surtout
recommandé de creuser le terrain et de ne jamais le remblayer
pour le mettre à niveau. Vérifi ez particulièrement le niveau du
sol à l’endroit où reposerons les rails inférieurs.
Enfi n, ratissez et nettoyez soigneusement l’emplacement.
D
DEN STANDORT VORBEREITEN
Zunächst sollten Sie einen Standort in der Große des Schwimmbeckens auswählen. In der untenstehenden Tabelle sind die wichtigsten
Abmessungen angegeben (unter Berücksichtigung eines zusätzlichen 15 cm breiten Streifens für die Vorbereitung des Geländes).
Besttimmen Sie zunächst die zentrale Achse Ihres Schwimmbeckens. Markieren Sie Ihre Länge mit Hilfe von zwei Pfl öcken, die sie
mit Schnur verbinden (äußere Pfl öcke). Plazieren Sie dann auf dieser
Archse die beiden mittleren Pfl öcke (A und B).
Der Abstand zwischen denmittleren Pfl öcken und den äußeren
Pfl öcken muß jeweils eine halbe Beckenbreite betragen.
Markieren Sie jetzt mit den restlichen Pfl öcken den Umriß des
Schwimmbeckens. Gehen Sie dazu ausgehend von den mittleren
Pfl öcken um eine halbe Beckenbreite (plus 90cm für die Weite der
Stützstreben) zur Seite.
Überprüfen Sie die Maße an Hand der obernstehenden Zeichnung.
Markeieren Sie anschließend die umrisse der beiden Beckeneden mit
Mehl. Schlagen Sie dazu um die mittleren Pfl öcke einene Kreisbogen,
dessen Radius der halden Beckenbreite plus 15 cm entspricht.
Zum Schutz des Beckens empfehlen wir Ihnen, eine Swim’n Play
- Unterlage zu verwenden. Breiten Sie die Unterlage auf dem nivellierten Gelände aus und markieren Sie, wie vorher beschrieben,
die Umrisse des Beckens auf der Unterlage.
SEHR WICHTIG:
Um die Stabilität Ihres Schwimmbeckens nicht zu gefährden,
beim Nivellieren des Geländes immer nur Erde ausheben, aber
nie aufschütten. Überprüfen Sie die Elbenheit des Bodens sorgfälting, insbesondere an den Stellen, an denen später die unteren
Schienen zu liegen kommen. Anschließend den Standort sorgfälting harken und reinigen.
E
PREPARACION DEL TERRENO:
En primer lugar, debe elegir un emplazamiento que corresponda
a las dimensiones totales exteriores de su piscina. El cuadro a
continuación precisa las principales dimensiones tomando en cuenta
los 15 cms adicionales necesarios alrededor de la piscina para la preparación del terreno.
Determine el eje central de su piscina transfi riendo su longitud entre
2 estacas y únalas con una cuerda (estacas extremas). Plante luego
las dos estacas centales eneste eje (A y B).
Colóquelas en relación a cada estaca de los extremos, a una distancia igual a la motad de la anchura de la piscina. Plane ahora las otas
estacas que van a materializar los contornos de la piscina. Para ello,
transfi era en los lados a partir de las estacas centrales, la distancia
de la mitad de la anchura de la piscina + 90cm para el empalme de
los puntales.
Verifi que todas las medidas con el dibujo a continuación. Finalmente,
trazar con la los contornos de cada extremo de la piscina transfi rien-
do, en arco de círculo a partir dela estacas centrales, la mitad de la
anchura de la piscina +15 cm.
Para garantizar una mejor protección, Swim’n Play le recomienda la
instalación de un tapiz de suelo. Despliegue uniformemente el tapiz
en el emplazamiento nivelado. Siguiendo el mismo procedimiento,
trazar con un marcador la circunferencia del círculo en el tapiz.
MUY IMPORTANTE
Atención, para garantizar la futura estabilidad de su piscina, se
recomienda sobre todo cavar el terreno y nunca terraplenar para
nivelarlo. Verifi que particularmente el nivel del suelo, en el lugar
donde se colocarán los railes inferiores. Finalmente, rastrille y
limpie cuidadosamente el emplazamiento.
I
LA PREPARAZIONE DEL TERRENO
Dovete innanzittuto scegliere un posto adeguatamente proporzionato
all'ingombro totale esterno della vostra piscina. La tabella qui sotto
vi precisa le principali dimensioni, predendo in considerazione i 15
cm supplementari necessari su tutto il perimetro della piscina per la
preparazione del terreno.
Determinate l'asse centrale della vostra piscina segnandone la lunghezza tra i due paletti, congiungeteli con lo spago (paletti di estremità).
Piantate quindi due paletti centrali su detto asse (A e B). Rispetto a
ciascun paletto di estremità, piazzate i due paletti centrali a distanza
pari alla metà della lerghezza della piscina. (nomenclature de haut en
bas et gauche à droite)
Piantate ora gli altri paletti, questi infatti denovo materializzare il perimetro della piscina. A tale scopo, riportate sui lati, a partire dai paletti
centrali, la distanza pari ad una metà della larghezza della piscina con
90 cm in più per il basamento delle gambe di forza.
Ricontrollate tutte le misure servendovi del disegno sopra. Tracciate
infi ne, servendovi della farina, i contorni di ciacuna estremita della
piscina riportando, secondoun arco di cerchio a partire dai paletti centrali., la metà di una larghezza della piscina con 15 cm in più.
Per assicurare una migliore protezione, Swim’n Play vi suggerisce
la posa di una copertura per suolo. Spiegate in maniera uniforme la
copertura sull’ubicazione spianata. Sempre nello stesso modo, tracciate con un pennerello la circonferenza del cerchio sulla copertura
per suolo.
IMPORTANTISSIMO:
Attenzione, per assicurare la futura stabilità della vostra piscina,
si raccomanda sopratuto di scavare il terreno e di non mai terrapienarlo mai per metterlo a livello. Verifi cate accuratamente
il livello del suolo, sulla zona dove saranno collacate le rotaiette inferiori. Infi ne, rastrellate e pulite accuratamente il luogo
di sistemazione.
NL
HET TERREIN VOORBEREIDEN
U dient in de eerste pllats een plek te kiezen waarvan de grootte overeenkomt met de totale buitenafmetigenvan uw zwembad. Onderstaande tabel geeft de voornaamste afmetingen op met inbegrip van de
extra 15 cm rondom het zwembad, die nodig zijn voor de voorbereiding van het terrein.
Bepaal de middenas van uw zwembad door de lengte uit te zetten
tussen twee paaltjes en hier een touwtje tussen te spannen (buiten-
8
paaltjes).Plaats vervolgens twee middenpaaltjes op deze as (A en
B).
Zet deze paaltjes op gelijke afstand van de buitenpaaltjes en wel op
een halve zwembadbreedte. Plaats nu de andere paaltjes, om de omtrek van het zwembad aan te geven. Hiervoor zet u vanaf de middenpaaltjes een halve zwembadbreedte uit, plus 90cm voor het uitspringende gedeelte van de steunen.
Controller alle afmetingen aan de hand van bovenstaande tekening. Teken tenslotte met het meel de omtrek van de uiteiden van het
zwembad af, door vanaf de middenpaaltjes een boog te beschrijen
met een straal van een halve zwembadbreedte plus 15 cm.
Voor een betere bescherming van uw bad, raadt Swim’n Play u aan
grondzeil onder het bassin te plaatsen. Leg dit gelijkmatig uit over de
vlak gemaakte plek. Markeer op de hierboven beschreven wijze de
omtrek van de cirkel op het grondzeil.
ZEER BELANGRIJK
Om te verzekeren dat uw zwembad in de toekomst stevig blijft
staan, wordt vooral aangeraden het terrein vlak te maken door
de grond af te graven en nooit door deze op te vullen. Controleer
in het bijzonder of de grond waterpas is op de plaats woor de
onderrail komt te liggen. Hark tenslotte de grond zorgvulding
aan en verwijder alle ongerechtigheden
*Verwijder alle ongerechtigheden en hark de grond zorgvuldig
aan.
v pravých úhlech od str∨edních tyc∨í ve vzdálenosti rovnající se
polovine∨ s∨ír∨ky bazénu plus 90 cm od základny podpe∨r.
Zkontrolujte vs∨echny rozme∨ry s pomocí diagramu. Nakonec
vyznac∨te obvod bazénu na zemi moukou, pr∨ic∨emz∨ pu°lkruhy ved∨te
od str∨edních kolíku° ve vzdálenosti poloviny s∨ír∨ky bazénu plus
15cm.
VAROVÁNÍ:
Aby se zaruc∨ila stabilita vas∨eho bazénu, doporuc∨ujeme vám
silne∨, abyste v z∨ádném pr∨ípade∨ nevypln∨ovali pr∨ípadné prohl
ubne∨-zeminou.-Chcete-li srovnat podkladový povrch, rade∨ji
odstran∨te nadbytec∨nou zeminu.
Zkontrolujte vodorovnost povrchu zejména podél linie dolního
rámu.
Nakonec uhrabte a pec∨live∨ uklid∨te celou plochu, na které bude
bazén stát.
CZ
PRˇÍPRAVA POZEMKU
Nejdr∨íve si musíte vybrat místo, které bude rozlohou vyhovovat celkovým rozme∨ru°m vas∨eho bazénu. Tabulka uvedená
níz∨e uvádí pr∨esné vs∨eobecné poz∨adavky, pr∨ic∨emz∨ bere zr∨etel
na dals∨ích 15 cm potr∨ebných na vs∨ech stranách na to, aby se
správne∨ upravil podkladový terén.
Vyznac∨te si str∨ední osu bazénu dve∨ma kolíky zaraz∨enými v
pr∨edepsané vzdálenosti od sebe a natáhne∨te mezi ne∨ (vne∨js∨í
kolíky) s∨n∨u°ru. Pak do této osy zaraz∨te dva str∨ední kolíky (A
a B). Kolíky A a B by me∨ly být od vne∨js∨ích kolíku° ve vzdálenosti rovnající se pr∨esne∨ polovine∨ s∨ír∨ky bazénu. Poté do
zeme∨ zaraz∨te dals∨í kolíky podél obvodu povrchu, který má být
pokryt bazénem. Správné místo najdete tak, z∨e kolíky zarazíte
GB
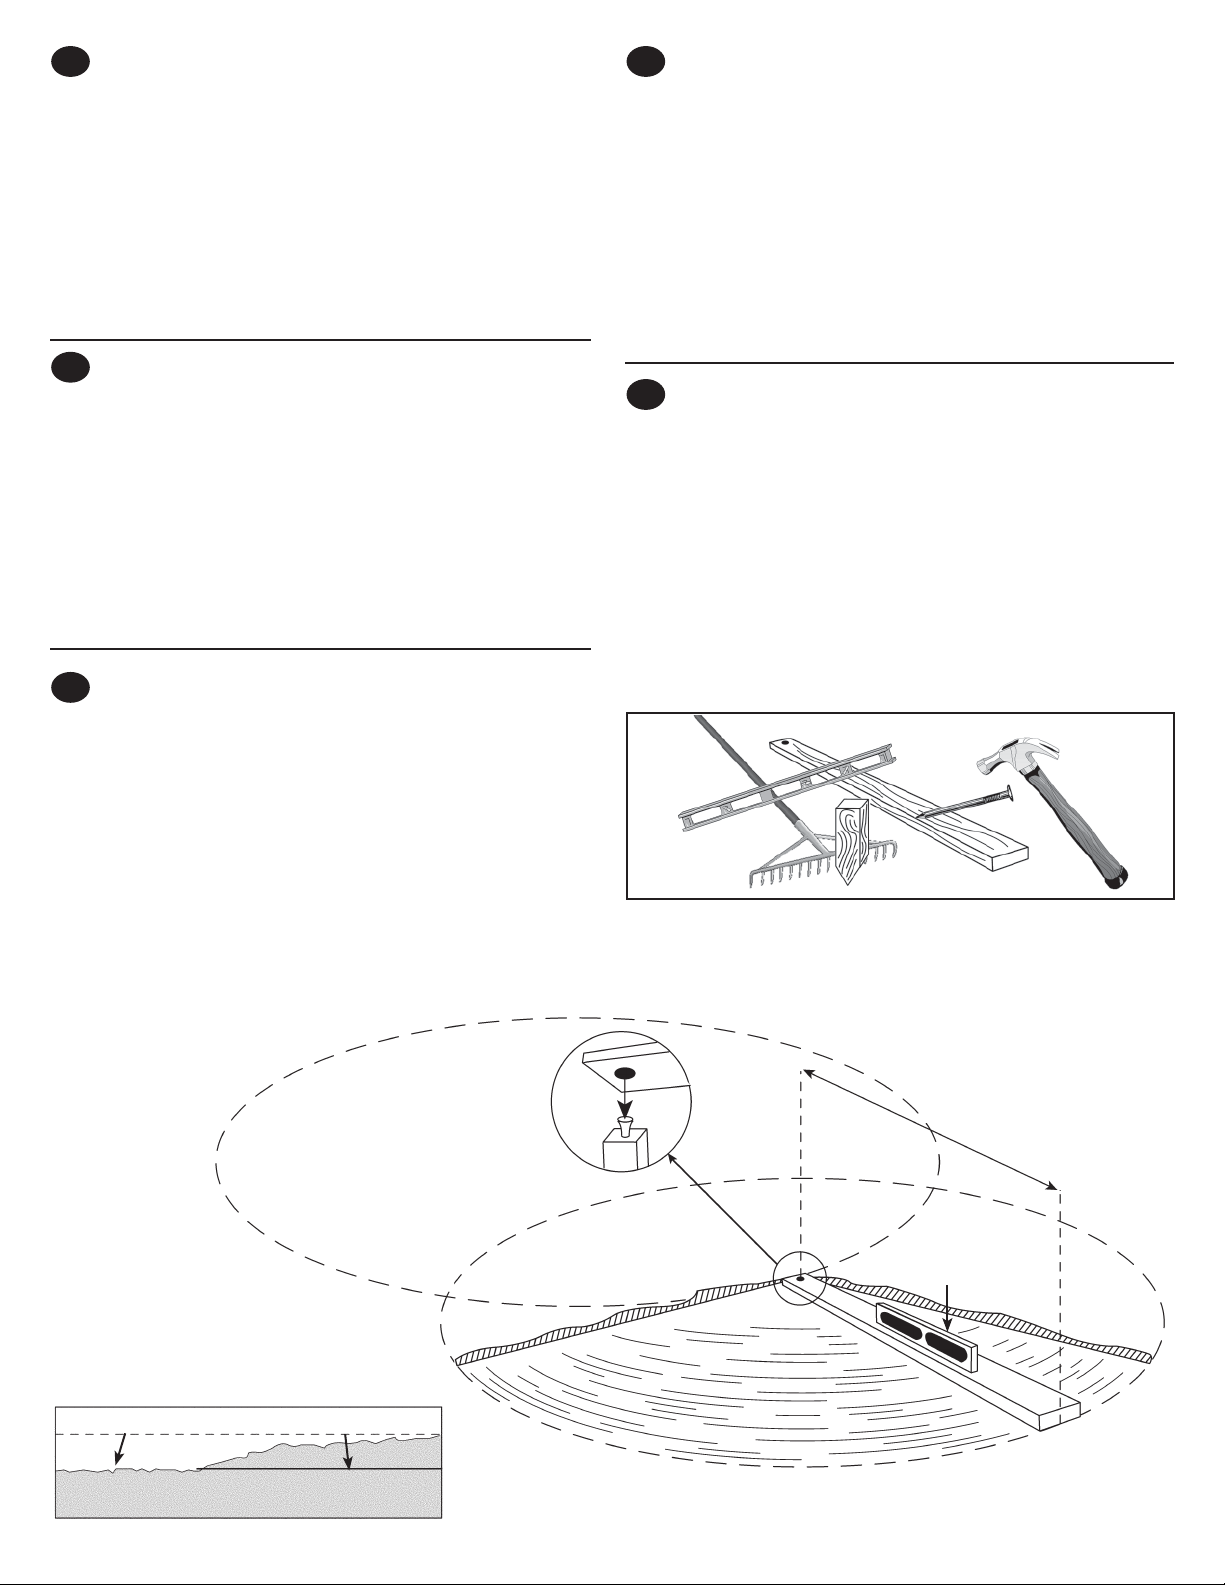
LEVELING THE GROUND
Using a spade, level the ground within the perimeter of the pool, removing weeds and
excess earth.
Before beginning this step, you must check the table of exterior dimensions included in the
description from above and proceed to level the entire surface area.
Nail one end of the beam to one of the central stakes and place the mason’s level on the
beam. Now make the beam revolve in order to check that the ground is absolutely level.
Then do the same thing at the second central stake.
A) Mason’s Level B) Do not fi ll in C) Dig
X Y V W Z U
5,50 x 3,70 1,95m 1,80m 5,80m 4,00m 5,80m 30,5cm
7,30 x 3,70 1,95m 3,60m 7,60m 4,00m 5,80m 61,0cm
7,30 x 4,60 2,40m 2,70m 7,60m 4,90m 6,70m 15,2cm
9,10 x 4,60 2,40m 4,60m 9,40m 4,90m 6,70m 45,7cm
12,00 x 5,50 2,85m 6,40m 12,30m 5,80m 7,60m 15,2cm
13,70 x 5,50 2,85m 8,23m 14,10m 5,80m 7,60m 45,7cm
B C
F
LA MISE A NIVEAU DU TERRAIN
Avec une pelle, mettez le terrain à niveau à l'intérieur de
l'emplacement en enlevant l'herbe et la terre excédentaire.
Vous devez avant cela faire référence au tableau de au-dessus sur
les dimensions extérieures de la piscine et procéder à la mise à niveau de
toute la surface concernée.
Clouez une des extrémités du tasseau sur un des piquets centraux.
Fixez le niveau de maçon sur sur le tasseau et faites tourner celu-ci autour du piquet pour
obtenir un sol parfaitement plane. Procédez de la même façon autour de liautre piquet central.
A) Niveau de Maçon B) Ne pas remplir C) Creuser
9
A
D
DAS GELÄNDE NIVELLIEREN
Mit einer Schaufel das Gelände am gewählten Standort nivellieren
sowie Gras und Erhebungen entfernen.
Sie müssen vorher die äußeren Abmessungen des Schwimmbeckens in
der Tabelle für p. 9. Schritt abgelesen haben. Nivellieren Sie die gasamte
Fläche.
Ein Ende der Leiste auf einen der mittleren Pfl öcke nageln. Die Was-
serwaage auf der Leiste befestigen und die Leiste um den Pfl ock dre-
hen, bis der Untergrund vollständig eben ist.
Gehen Sie beim zweiten mittleren Pfl ock genauso vor.
A) Setzwaage B) Nicht einfüllen C) Graben
E
NIVELACION DEL TERRENO
Con una pala, nivele el terreno al interior del emplazamiento retirando
la hierba y la tierra sobrante.
Antes de ello, debe remitirse al cuadro de la p. 9, sobre las dimensiones exteriores de la piscina y nivelar toda la superfi cie concernida.
Clave uno de los extremos del listón de madera en una de las estacas
centrales.
Fije el nivel de albañil en un listón de madera y hágalo girar alrededor
de la estaca para obtener un suelo perfectamente plano. Proceda de
la misma manera en la otra estaca central.
A)Nivel de albañil B) No rellene C) Excave
NL
TERREIN
Maak het afgebakende terrein vlak met een schop, waarbij u gras en
overtollige aarde verwijdert.
Raadpleeg echter eerst de tablel bij p. 9 over de buitenafmetingen
van het zwembad en maak vervolgens de hele betreffende oppervlakte waterpas.
Spijkel één van de uiteinden van de lat op één van de middenpaaltjes.
Bevestig de waterpas op de lat en draai deze op het paaltie rond om
een volledig vlakke ondergrond te krijgen. Ga op dezelfde wijze te
werk rondom het andere middenpaaltje.
A) Waterpas B) Niet invullen C) Graven
NL
VYROVNÁVÁNÍ POVRCHU
Pomocí lopaty a rýc∨e srovnejte povrch obvodu bazénu,
odstran∨te plevel a pr∨ebytec∨nou zeminu.
Nez∨ zac∨nete, musíte zkontrolovat tabulku na strane∨ 9, kde
jsou uvedeny vne∨js∨í rozme∨ry bazénu, a pak vyrovnat celkovou
plochu.
Pr∨itluc∨te jeden konec ráhna hr∨ebíkem na jeden ze str∨edních
kolíku° a pr∨iloz∨te na ne∨ vodováhu. Poté opis∨te ráhnem kruh a
zkontrolujte, zda je povrch absolutne∨ vodorovný. Pak tento
postup opakujte u druhého str∨edního kolíku.
A) vodováha B) Nevypln∨ujte C) Odkopejte
I
LA MESSA A LIVELLO DEL
TERRENO
Con il badile, spianare il terreno, all'interno del luogo prescelto, asportando l'erba e la terra eccedentaria.
Innanzitutto dovete, prima di procedere a quest'operazione, riferirvi
alla tabella della p. 9, relativamente alle demensioni esterne della piscina , quindi procedere allo spianamento di tutta la superfi cie inters-
sata.
Nchiodate una delle estremitá del tassello su uno dei picchetti centrali.
Fissate la livella da muratore sul tassello che farete ruotare attorno al
paletto per ottenere un suolo perfettamente spianato. Procedete nello
stesso modo attorno all'altro paletto cetrale.
A) Livella B) Non riempire C) Scavare
BC
A
10
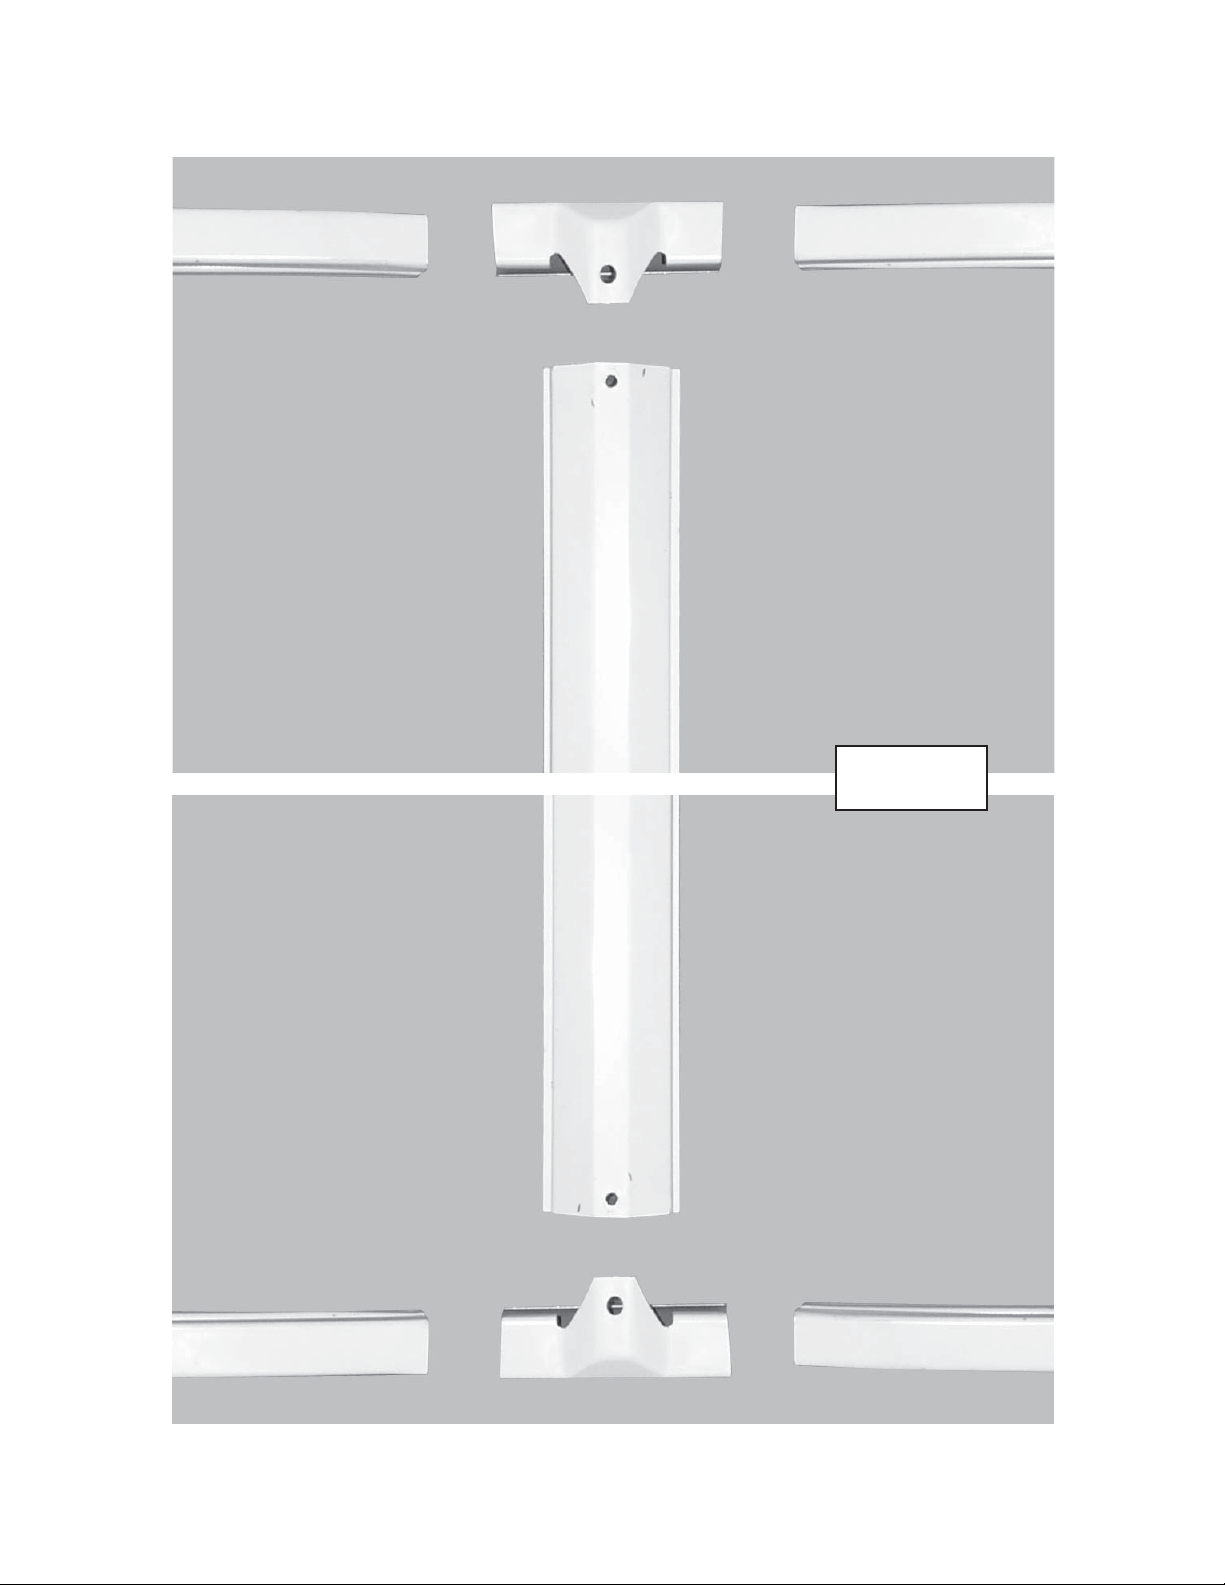
FIG. A
11
 Loading...