

SwimLife Swimstream, Aquastream, Dualstream Owner's Manual
SWIMLIFE OWNER’S MANUAL
Contents subject to change without notice
2018

TABLE OF CONTENTS
Letter of introduction 3
Important User Safety Instructions
Warnings 4
Hyperthermia 5
Choosing the Right location
Indoor Locations 6
Outdoor Locations 6
General Installation Considerations 7
Special Considerations
Indoor Installations 7
Outdoor Installations 7
Site Preparation
Above Ground Installations 8
In-ground & Partial In-ground Installations 8
Overall Support (non-cabinet installations) 8
Installation Examples 9
Equipment Accessibility & Protection 9
Equipment Placement 9
Unloading/Handling your Swim Spa 10
Important Electrical Safety Instructions 11-13
G.F.C.I./R.C.D. Application Guideline & Wire Size 11
North America G.F.C.I. Installation Diagram 12
Europe R.C.D. Installation Diagram 13
Filling, Checking and Starting your Hot Tub 14-15
Pump Priming/Releasing an Air Lock 14-15
Swimlife Control Systems 16-25
IN.YE Spa Pack Series 16-23
Dualstream Spa Controls Gold 17
Swim Fit Controls 18
Swim Expert Controls 19
Programming 20-23
Swim Sync System 24-34
Standby Mode 35
Topside Panel Display Messages 35
Wave Rider Current Control 36
Swimlife Surround Sound 37
INK800 Keypad Bluetooth Audio Options 37
Water Balance
General Overview 38
Initial Fill 38
Glossary of Common Water Maintenance Terms 39
Water Balance Summary for your Hot Tub (chart) 39
Water Balance Troubleshooting 40
Routine Hot Tub Maintenance
Daily, Weekly, Monthly, Quarterly 41
Cleaning the Skimmer Basket 41
Safety Hard Cover 41
Cartridge Filter, Removal, Cleaning, Re-installation 42
Cleaning the Acrylic Surface 42
Changing your Swim Spa Water 43
Draining your Swim Spa Water 43
Winterizing your Swimlife Swimspa 44
General Troubleshooting 45
What to do in the event of
Power Fluctuations 45
Cold Weather Power Failure 45
NOTE: Product specifications, warnings and labels are subject to change without notice. This user’s manual
should be used as a guide only. For further information, please contact your independent Swimlife dealer.
2

On behalf of everyone at the company, we thank you for your decision to purchase a
Swimlife swim spa.
Recognized for quality worldwide, we are confident that your new swim spa will provide
you, your family and friends, with years of enjoyment and fulfill all your hydrotherapy
needs.
Swimlife swim spas are not only healthful and relaxing, they can even add value to
your home.
Please take the time to carefully read and understand all the safety, installation
and operating instructions in this manual before electrically connecting your hot
tub and adding water.
The following pages contain valuable information and pointers that will save you both
time and money, as well as help you to simplify upkeep and maintenance.
Since manufacturing our first swim spa in 1995, we have seen the popularity of this
mini-fitness and massage pool grow by leaps and bounds year after year.
The minimal space and maintenance requirements of swim spas, combined with the
year-round use potential, safety and better swim, will ensure the future of swim spas as
”the pool of the future“.
Enjoy.
3

SAVE THESE INSTRUCTIONS
IMPORTANT SAVE THESE INSTRUCTIONS
Your physiological response to hot water is subjective and depends on your age, health, and medical history. If you don’t know your
tolerance to hot water, or if you get a headache, or become dizzy or nauseous when using your hot tub, get out
and cool off immediately.
WARNING
1. CHILDREN SHOULD NOT USE SPAS OR HOT TUBS WITHOUT ADULT SUPERVISION.
2. DO NOT USE SPAS OR HOT TUBS UNLESS ALL SUCTION GUARDS ARE INSTALLED TO PREVENT BODY AND HAIR ENTRAPMENT.
3. PEOPLE USING MEDICATIONS AND/OR HAVING ANY ADVERSE MEDICAL HISTORY SHOULD CONSULT A PHYSICIAN
BEFORE USING A SPA OR HOT TUB.
4. PEOPLE WITH INFECTIOUS DISEASES SHOULD NOT USE A SPA OR HOT TUB.
5. TO AVOID INJURY, EXERCISE CARE WHEN ENTERING OR EXITING THE SPA OR HOT TUB.
6. DO NOT USE DRUGS OR ALCOHOL BEFORE OR DURING THE USE OF A SPA OR HOT TUB, TO AVOID UNCONSCIOUSNESS AND POSSIBLE DROWNING.
7. PREGNANT OR POSSIBLE PREGNANT WOMEN SHOULD CONSULT A PHYSICIAN BEFORE USING A SPA OR HOT TUB.
8. WATER TEMPERATURE IN EXCESS OF 38°C (100°F)MAY BE INJURIOUS TO YOUR HEALTH.
9. BEFORE ENTERING THE SPA OR HOT TUB, MEASURE THE WATER TEMPERATURE WITH AN ACCURATE THERMOMETER.
10. DO NOT USE A SPA OR A HOT TUB IMMEDIATELY FOLLOWING STRENUOUS EXERCISE.
11. PROLONGED IMMERSION IN A SPA OR HOT TUB MAY BE INJURIOUS TO YOUR HEALTH.
12. DO NOT PERMIT OR USE ELECTRIC APPLIANCES (SUCH AS LIGHT, TELEPHONE, RADIO OR TELEVISION) WITHIN 1.5M
(5FT) OF THIS SPA OR HOT TUB.
13. CHILDREN SHOULD NOT ENTER A HOT TUB WHERE THE WATER TEMPERATURE EXCEEDS BODY TEMPERATURE (37°
C / 98.6°F).
14. DO NOT ALLOW CHILDREN TO SUBMERGE THEIR HEAD UNDER WATER.
15. NEVER OPERATE THE HOT TUB PUMP AT HIGH SPEED WITHOUT HAVING ALL SUCTION AND RETURN LINES OPEN.
16. ALWAYS KEEP THE HARDCOVER INSTALLED AND LOCKED WHEN THE HOT TUB IS NOT IN USE.
17. TEST THE GFCI (GROUND FAULT CIRCUIT INTERRUPTER) MONTHLY.
18. POST EMERGENCY PHONE NUMBERS FOR POLICE, FIRE DEPARTMENT, AND AMBULANCE AT THE NEAREST PHONE.
19. TO REDUCE THE RISK OF INJURY
THE WATER IN A SPA SHOULD NEVER EXCEED 40°C (104°F). WATER TEMPERATURES BETWEEN 38°C (100°F) AND
40°C (104°F) ARE CONSIDERED SAFE FOR A HEALTHY ADULT. LOWER WATER TEMPERATURES ARE RECOMMENDED FOR YOUNG CHILDREN AND WHEN SPA USE EXCEEDS 10 MINUTES.
SINCE EXCESSIVE WATER TEMPERATURES HAVE A HIGH POTENTIAL FOR CAUSING FETAL DAMAGE DURING THE
EARLY MONTHS OF PREGNANCY, PREGNANT OR POSSIBLY PREGNANT WOMEN SHOULD LIMIT SPA WATER TEMPERATURES TO 38°C (100°F).
BEFORE ENTERING A SPA, THE USER SHALL MEASURE THE WATER TEMPERATURE SINCE THE TOLERANCE FOR
WATER TEMPERATURE-REGULATING DEVICES VARIES.
THE USE OF ALCOHOL, DRUGS, OR MEDICATION BEFORE OR DURING SPA USE MAY LEAD TO UNCONSCIOUS-
NESS, WITH THE POSSIBILITY OF DROWNING.
OBESE PERSONS AND PERSONS WITH A HISTORY OF HEART DISEASE, LOW OR HIGH BLOOD PRESSURE, CIRCU-
LATORY SYSTEM PROBLEMS OR DIABETES SHOULD CONSULT A PHYSICIAN BEFORE USING A SPA.
PERSONS USING MEDICATION SHOULD CONSULT A PHYSICIAN BEFORE USING A SPA SINCE SOME MEDICATION
MAY INDUCE DROWSINESS WHILE OTHER MEDICATION MAY EFFECT HEART RATE, BLOOD PRESSURE AND CIRCULATION.
4
SAVE THESE INSTRUCTIONS
IMPORTANT SAVE THESE INSTRUCTIONS
Your physiological response to hot water is subjective and depends on your age, health, and medical history. If you don’t know your
tolerance to hot water, or if you get a headache, or become dizzy or nauseous when using your hot tub, get out
and cool off immediately.
CAUTION
1. MAINTAIN WATER CHEMISTRY IN ACCORDANCE WITH THE MANUFACTURER’S INSTRUCTIONS.
DANGER
1. RISK OF ACCIDENTAL DROWNING. EXTREME CAUTION MUST BE EXERCISED TO PREVENT UNAUTHORIZED ACCESS
BY CHILDREN. TO AVOID ACCIDENTS, ENSURE THAT CHILDREN CAN’T USE THE SPA UNLESS THEY ARE SUPERVISED
AT ALL TIMES.
2. RISK OF INJURY. THE SUCTION FITTINGS IN THIS SPA ARE SIZED TO MATCH THE SPECIFIC WATER FLOW CREATED
BY THE PUMP. SHOULD THE NEED ARISE TO REPLACE THE SUCTION FITTINGS OR THE PUMP, BE SURE THAT THE
FLOW RATES ARE COMPATIBLE. NEVER OPERATE THE SPA IF THE SUCTION FITTINGS ARE BROKEN OR MISSING.
NEVER REPLACE A SUCTION FITTING WITH ONE RATED LESS THAN THE FLOW RATE MARKED ON THE ORIGINAL
SUCTION FITTING.
3. RISK OF ELECTRIC SHOCK. INSTALL AT LEAST 1.5M (5FT) FROM ALL METAL SURFACES. AS AN ALTERNATIVE, A SPA
MAY BE INSTALLED WITHIN 1.5M (5FT) OF METAL SURFACES IF EACH METAL SURFACE IS PERMANENTLY CONNECTED BY A MINIMUM 8 AWG (8.4 mm2) SOLID COPPER CONDUCTOR TO THE WIRE CONNECTOR ON THE TERMINAL BOX
THAT IS PROVIDED FOR THIS PURPOSE.
4. RISK OF ELECTRIC SHOCK. DO NOT PERMIT ANY APPLIANCE, SUCH AS A LIGHT, TELEPHONE, RADIO, OR TELEVISION, WITHIN 1.5M (5FT) OF THE SPA.
HYPERTHERMIA
Since your hot tub can be set to reach temperatures of 40°C (104°
F), users should be aware that extended submersion in water that
exceeds normal body temperature can lead to hyperthermia.
The causes, symptoms and effects of hyperthermia may be described as follows:
Hyperthermia occurs when the internal temperature
of the body reaches several degrees above the normal
body temperature of 37°C (98.6°F). The symptoms of
hyperthermia include drowsiness, lethargy, and an increase in the
internal temperature of the body. The effects of hyperthermia include:
Unawareness of impending hazard
Failure to perceive heat
Failure to recognize the need to exit the hot tub
Physical inability to exit the hot tub
Fetal damage in pregnant woman
Unconsciousness resulting in the danger of drowning
If you sense any of the symptoms of hyperthermia, safely
exit the hot tub immediately.
WARNING
THE USE OF ALCOHOL, DRUGS OR MEDICATION
CAN SIGNIFICANTLY INCREASE THE RISK OF
FATAL HYPERTHERMIA.
NEVER ALLOW DIVING OR JUMPING
IN YOUR SWIM SPA
5

CHOOSING THE RIGHT LOCATION
Your Swimlife swim spa can be installed indoors or out, on the ground, in the ground or half-and-half. The following
information will assist you in choosing the right location for your individual needs. When making your decision, always remember that swim spas can be enjoyed year-round, indoors or out, regardless of the climate.
INDOOR LOCATIONS
If members of your family are not cold weather enthusiasts, or if your backyard or patio area is not suitable for a swim spa installation, then an indoor location for your swim spa may be your best or only choice. You may wish to create an exercise/spa
area in your home, or install your swim spa in a glass solarium or four-season room adjoining your home. Indoor installations
not only add a unique look and appeal to your home, they provide the privacy and controlled climate to ensure that use and
enjoyment of your swim spa is maximized. If you should choose an indoor location, you will find further information as outlined
in the section “SPECIAL CONSIDERATIONS FOR INDOOR INSTALLATIONS”
OUTDOOR LOCATIONS
For a variety of reasons, outdoor locations are a far more popular choice. Some of the reasons include:
• Limited indoor space
• Delivery complications due to door openings, stairwells, etc.
• Limited budget (indoor installations usually also involve interior home renovations)
• Desire for an outdoor entertainment center
• Swim spa is being installed adjacent to an existing or planned swimming pool
• Concerns over splashing water inside the home
For those who choose an outdoor location, swim spa operating temperatures can be adjusted to match the season. In cooler months, many owners will operate their swim spa in the range of 26-32°C (80-90°F).
During warmer months, an operating temperature of 24-30°C (75-85°F) will provide a refreshing retreat. If you should
choose an outdoor location, you will find further information as outlined in the section “SPECIAL CONSIDERATIONS FOR
OUTDOOR INSTALLATIONS”
6

GENERAL INSTALLATION CONSIDERATIONS
1 Ensure that your Swimlife Swim Spa is properly supported
by either a level concrete pad, or a properly constructed
deck capable of supporting 1220 kg/m2 (250 lbs./ft2). If there
is a possibility that the pad could shift by freezing/thawing
ground movement (such as in clay regions, and/or areas
with high water tables) concrete footings extending below
the frost line are recommended.
2 Decking should be chosen and constructed in a manner that
minimizes the chance of slipping or falling.
3 If you do not have a factory installed insulated cabinet, it is
assumed that you are building your own custom cabinet,
tiling or decking in combination with the leg kit package.
Please consider the following:
a. Always provide a convenient access door for servicing the
equipment.
b. Decking should be constructed to allow future service
access around the entire swim spa.
c. Extra insulation may be added, however, the equipment
area must remain unimpeded and have adequate ventilation.
d. Decking should be chosen and constructed in a manner
that minimizes the chance of slipping or falling
e. When not in use or empty, make sure to cover the
swimspa with the hard cover to prevent damage to the
acrylic due to overexposure to the sun.
4 Never suspend the swim spa from a deck or cabinet as
personal injury and/or unwarrantable product damage may
occur.
5 The swim spa equipment and all electrical plugs, outlets
and lights within 1.5m (5ft) of the pool must be GFCI protected. Consult your electrician for further details.
6 Installation of a safety grab rail or reachable support for use
when entering or exiting the swim spa is recommended.
7 A nearby garden hose connection is recommended for filling and “topping up” the swim spa.
WARNING
The swim spa equipment and all electrical
plugs, outlets and lights within 1.5m (5ft) of
the hot tub must be G.F.C.I protected. Consult your electrician or local electrical authority for further details.
Access to the swim spa must always be secured:
Outdoors - in accordance with local property by-laws
and/or via an approved fence with a self-closing gate and
a safety hardcover;
Indoors - by a lockable door and a safety hardcover.
SPECIAL CONSIDERATIONS
INDOOR INSTALLATIONS
• It is beneficial to have the swim spa room located near wash room and shower facilities
• The swim spa room should have a floor drain to handle splash water, a window, outside exhaust fan or humidistat controlled ex
haust fan for ventilation and a humidifier.
• Consider plumbing a water tap and drain location nearby to facilitate draining and top-up
• Always provide adequate ventilation for the support equipment
• Consult your local Swimlife retailer for further information
OUTDOOR INSTALLATIONS
• Contact your local building code department to determine if a building permit is necessary and for information on applicable
bylaws (distance from property lines, buildings, fencing requirements, etc.)
• If you are doing any excavating, contact your local gas, electric, and cable-company to ensure that there are no underground
lines
• Locate the swim spa, where practical, within close distance of a door to the house to maximize potential winter use.
• Ensure that all swim spa support equipment is easily accessible and protected from the elements
• The swim spa support equipment is designed for indoor (out of the direct elements) use. When your Swimlife swim spa is
equipped with a factory-installed cabinet, and installed as per the guidelines of this manual, the equipment will be adequately
protected. If the swim spa is shipped without a cabinet, your custom cabinet or other structure must be designed to supply protection for the swim spa support equipment from rain, snow, splash water, etc., but still designed in a manner to ensure adequate ventilation.
7
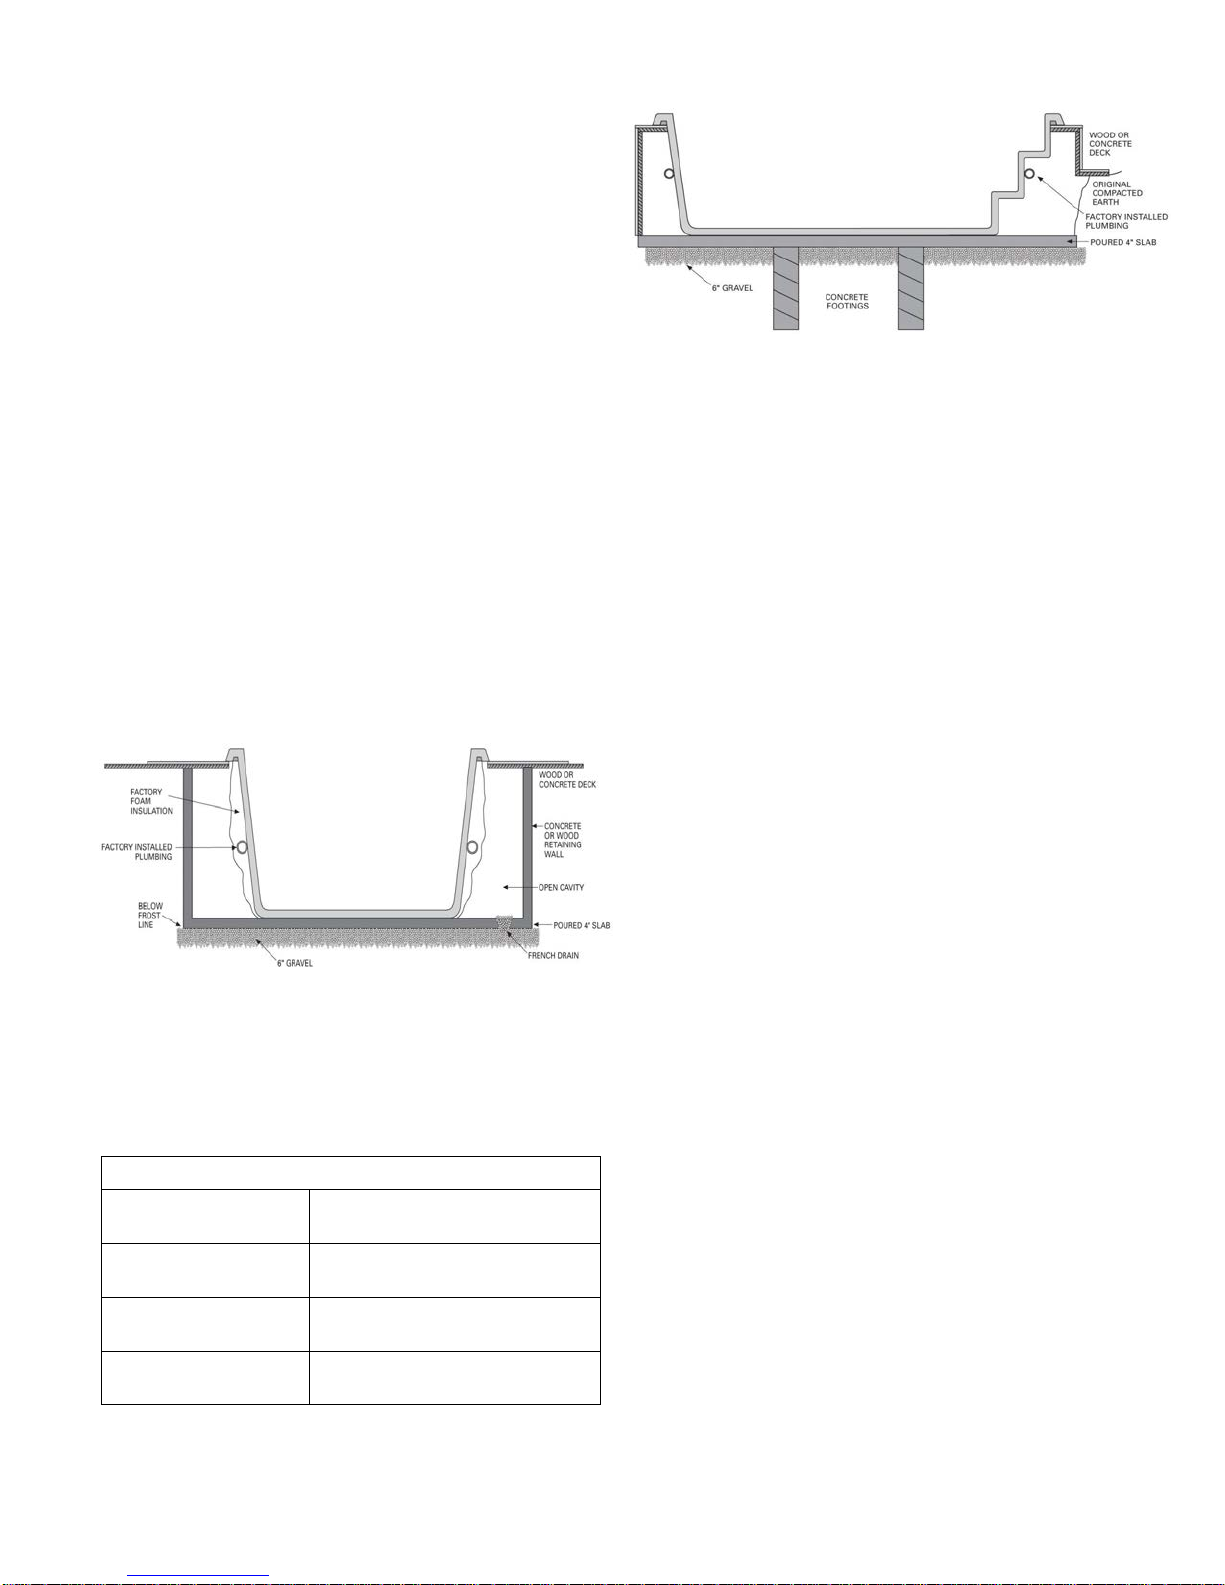
SITE PREPARATION
ABOVE-GROUND INSTALLATIONS
Where the swim spa is a ”stand-alone“ above-ground installation to be installed in regions where freeze/thaw conditions
may occur, a level patio stone or pre-formed paver type base
may be sufficient if there is no abutting deck(s) that could be
damaged during potential seasonal movement of the ground.
The potential drawback to this type of base is that splash water
could eventually de-stabilize the ground under the base, with
the resultant shift of the support base causing damage to the
swim spa structure.
For best results, we recommend the installation of a level
concrete pad:
• Dig out and level the ground 20-30 cm (8-12 in.) below
your desired base level
• Install 10-15 cm (4-6 in.) of crushed stone
• Next, install 10-15 cm (4-6 in.) of poured concrete
• Level the concrete and apply a broom-type finish
• We recommend that the pad be made 15 cm (6 in.) larger
than the swim spa on three sides, and 1 m (3 ft.) larger on
the side where the access steps and/or planters will be
installed.
Swimspa must be installed on a level pad
In regions where freeze/thaw occurs, or where there will be
custom decking abutting the swim spa, we recommend the
installation of poured concrete footings extending below the
frost line beneath the pad to prevent the possibility of future
shifting.
IN GROUND & PARTIAL IN GROUND INSTALLATIONS
When recessing the swim spa all or part way below ground
level, a concrete base along with a concrete or wood retaining
wall to hold back the earth is suggested.
This forms a box or ’bunker‘, in which the swim spa is placed.
Swimlife does not recommend back-filling full in-ground or
partial in-ground installations.
Recommended Minimum Concrete Pad Dimensions
With Factory
Cabinet & Steps
Swimstream Model 259 cm x 576 cm
102 in x 228 in
Aquastream Model 259 cm x 671 cm
102 in x 264 in
Dualstream Model 259 cm x 726 cm
102 in x 286 in
• It is recommended leaving a 61 cm (24 in) wide crawl-space
around the entire unit to ensure adequate accessibility.
• Non-freezing climates – it is sufficient to ensure that the base of
the hole or cavity created for the swim spa has a dry, stable, compacted level base and proper drainage.
• Climates where freeze/thaw occurs – it is necessary that a
poured level reinforced concrete base, complete with concrete
footings, be installed as outlined in the sectionABOVE-GROUND
INSTALLATIONS.
Areas with a high ground water table – a level concrete base, as
well as a concrete or wood retaining wall to hold back the earth, is
recommended. This forms a box or ‘bunker’, in which the swim
spa is placed.
• ALWAYS ensure that there is good drainage, via a properly de-
signed French (gravel) drain system and/or a sump pump, to prevent ground water flooding damage to the support equipment or
structure of the swim spa.
• Install protective waterproof conduit to house any cables that will
be buried
• Access for future service must be considered at the time of design and installation. You must be able to access all sides and
areas of your swim spa. Difficult access will result in supplemental
service labour charges not covered by the factory warranty. Consider easily removable deck materials.
• Make sure the swim spa is tested for 48 hours before you prepare the installation of the surrounding/finish deck around your
swim spa. Even though all units are tested in our plant, some
transport/site handling damage can occur and we suggest you
make sure the swim spa is perfectly waterproof before finalizing
your installation.
• It is recommended to backfill the first 12 inches of material with
3/4” gravel to provide proper drainage around the perimeter of the
swimspa prior to backfilling with earth.
• If at any point you choose to drain down your swim spa for a
long duration make sure that you brace the interior of the shell
wall approximately 12” down from the top in order to minimize any
stress from the force created by the backfill. In normal conditions,
the weight of the water is the opposing force to the earth but when
the swim spa is emptied down there is no opposing force and
there is the risk of inward bowing which could compromise the
structural integrity of the shell.
OVERALL SUPPORT (non-cabinet installations)
Your Swimlife swim spa is equipped with a factory installed load
support substructure, which distributes the weight of the water
over the entire foot area of the swim spa. The cabinet, either factory installed or customized on-site, should be decorative only,
and not relied on for overall support. Although the lip of the swim
spa must be supported to ensure it remains level, never suspend
a swim spa from a deck or floor by the outer acrylic edge, as this
will lead to product damage and/or serious personal injury.
8

SITE PREPARATION CONTINUED
INSTALLATION EXAMPLES
EQUIPMENT ACCESSIBILITY & PROTECTION
The equipment must be located in an area where it will remain dry and will not be exposed to rain, snow or ground water.
• When your swim spa is to be installed above ground, the factory cabinet is designed for both protection and accessibility
• When your swim spa is to be installed fully or partially in the ground, or if you have ordered a swim spa without a cabinet: it
is necessary that the equipment be installed in an area that is dry, protected from the elements, has proper ventilation, and
is easily accessible for service
• Always ensure that the equipment is mounted on a raised base or platform to prevent potential water damage to the motors, equipment or controls. Note that the equipment is supplied on a raised composite support equipment platform.
• Ensure that access to the equipment, and the working area around the equipment, is large enough to accommodate a
service person
• The equipment should be located as close to the swim spa as possible to maximize jet performance
• Whenever possible, install the pump(s) and control with heater below water level to ensure easy priming and maximize
performance.
• Install protective waterproof conduit to house applicable cords or line extensions such as the topside control cables, light
wires or ozone tubing.
• In climates where freeze/thaw occurs we recommend that remote plumbing lines be buried below the frost line and that
pipe insulation is applied over all pipes that run from the swim spa to the remote equipment to help maintain energy efficiency.
EQUIPMENT PLACEMENT
• The equipment should be located as close to the swim spa as possible to maximize jet performance
• Whenever possible, install the pump(s) and control with heater below water level to ensure easy priming
• Piping diameter on pump lines must be 2.5 in. for inlet/ suction pipes and 2 in. for outlet/pressure pipes with minimal use of
elbows.
• Install protective waterproof conduit to house applicable cords or line extensions such as the topside control cables, light
wires or ozone tubing.
The swim spa equipment is designed for indoor use out of the direct elements. Your custom enclosure or other
structure must be designed to provide protection for the swim spa support equipment from rain, snow, splash water, etc., but still designed in a manner to ensure adequate ventilation.
• All field installed plumbing must meet minimum sizes as previously outlined in order to conform to regulated standards
regarding safe inlet and outlet flows. If required, please call your dealer for more detailed drawings.
9
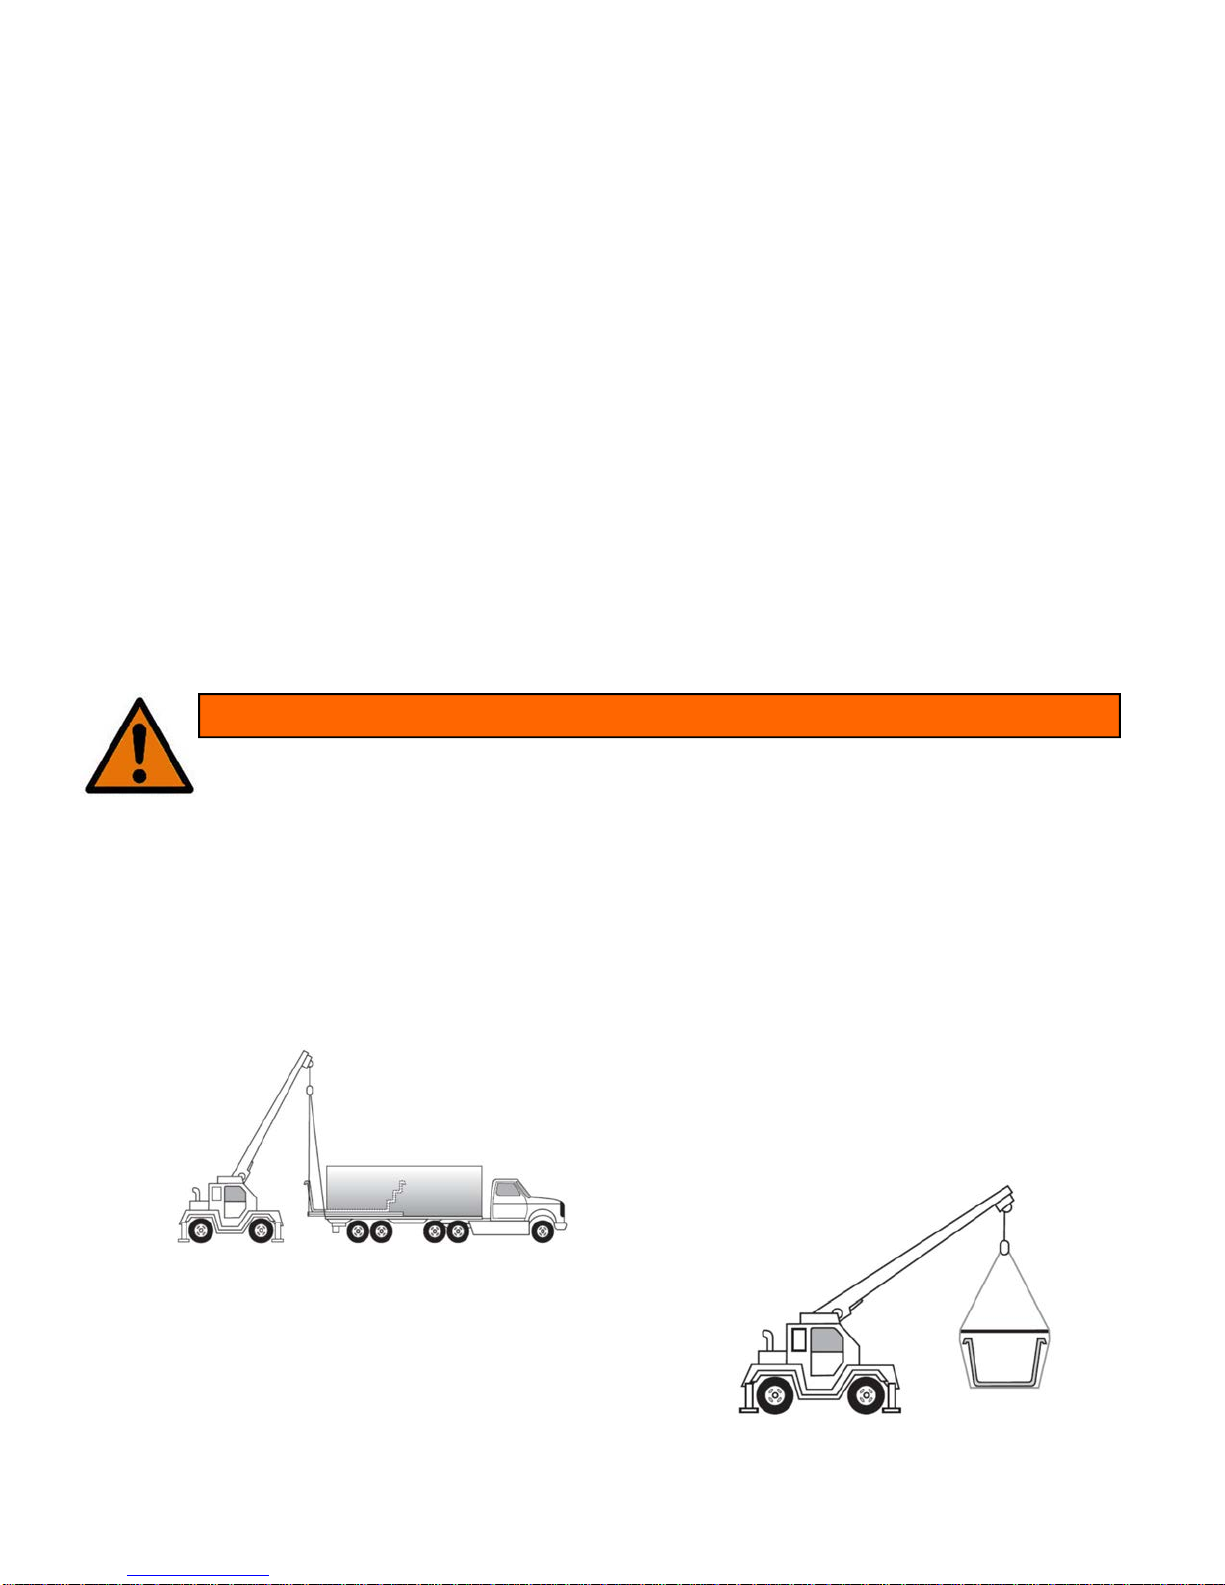
UNLOADING / HANDLING YOUR SWIM SPA
All Swimlife swim spas are shipped with a layer of protective foam wrap and plastic film. Each swim spa is shipped from the
factory strapped onto a wood skid. If your swim spa is to be delivered by your local Swimlife retailer, it will generally arrive
on a flat bed truck or low profile trailer. Typically, the dealer will arrive with the necessary equipment to maneuver the swim
spa from the truck.
For direct deliveries, your swim spa may arrive on a 48 ft. or 53 ft. common carrier closed box trailer. It may be necessary to
arrange with a local towing company for a tilt and load flatbed truck with a winch system, to pull the unit from the box trailer
to the flatbed. The swim spa can then be gently slid off the flatbed truck or lifted by a crane into place.
Although it is recommended to install your swim spa by crane, it may be pushed along rollers by 10 to 12 able-bodied adults
(see image below), trailered, or craned to its final installation site. If rollers are to be utilized, we recommend that at least six
4” pipes, 8’ long, be placed under the shell to move it across a soft lawn, down a path, etc.
Some installations require the use of a crane. When a crane is used for lifting, place the straps under the swim spa, ensuring that the plumbing lines and fittings are not stressed and/or damaged. The straps should be secured so that they will not
slip in any direction, and strap spreaders utilized to prevent undue structural side load on the swim spa shell.
Swimlife swim spas require a minimum clearance of 249 x 143 cm (98 x 56 in.) to allow movement of the unit through alleyways, fence openings, etc. Where this is not possible, the use of a crane (with strap spreaders) to lift the swim spa from the
truck or trailer over the house to the patio or yard is often the most viable option.
WARNING
• Do not move or place the swim spa on the side
• Never lift or handle the swim spa by the plumbing
• Make sure that there is sufficient assistance to gently slide the swim spa off the dolly or cart to the support base without any damage
Important Note: Damage caused during transportation or
by improper handling is not covered by the factory warranty.
Crane
Crane & Strap
Spreader
10

IMPORTANT ELECTRICAL SAFETY INSTRUCTIONS
SAFETY COMES FIRST. WHEN INSTALLING & USING THIS ELECTRICAL EQUIPMENT,
BASIC SAFETY PRECAUTIONS MUST ALWAYS BE FOLLOWED!
1 READ AND FOLLOW ALL INSTRUCTIONS
2 Electrical installation must be completed by a qualified elec-
trician in accordance with all National, Regional and Local
Codes and Regulations in effect at the time of installation.
3 Connect only to a dedicated circuit protected by a class ‘A’
two-pole ground fault circuit interrupter (GFCI)
4 Use copper conductors only!
5 The hot tub equipment and all electrical plugs, outlets and
lights within 1.5m (5ft) of the unit must be G.F.C.I protected.
Consult your electrician or local electrical authority for further
details.
6 A green colored terminal or a terminal marked “G”, “GR”,
“Ground”, or “Grounding” is located inside the supply terminal box or compartment. To reduce the risk of electric shock,
this terminal must be connected to the grounding means
provided in the electric supply service panel with a continuous copper wire equivalent in size to the circuit conductors
supplying the equipment.
7 At least two lugs marked “BONDING LUGS” are provided on
the external surface or on the inside of the supply terminal
box or compartment. To reduce the risk of electric shock,
connect the local common bonding grid in the area of the hot
tub to these terminals with an insulated or bare copper conductor not smaller than No.6 AWG (Canada/Europe) / No.8
AWG (USA).
8 All field installed metal components such as rails, ladders,
drains or other similar hardware within 3 m (10 ft) of the hot
tub shall be bonded to the equipment grounding bus with
copper conductors not smaller than No.6 AWG.
IMPORTANT NOTE:
• This guide is for standard installations where the wire run
is 15 m (50 ft.) or less. For longer wire runs, consult a qualified electrician.
G.F.C.I./R.C.D. APPLICATION GUIDE FOR
NORTH AMERICA
SWIMLIFE SWIM SPA SERIES
Swim Fit 50A
Swim Fit Dualstream 40A spa / 50A swim
Swim Expert 60A
Swim Expert Dualstream 40A spa / 60A swim
EUROPE (single phase)
Swim Fit 40A
Swim Fit Dualstream 20A spa / 40A swim
Swim Expert 40A
Swim Expert Dualstream 20A spa / 40A swim
WIRE SIZE
NORTH AMERICA
• The minimum wire size for systems that require a 40A GFCI is # 8/3 c/w ground (also referred to as # 8 gauge / 4 conductor).
• The minimum wire size for systems that require a 50A GFCI is # 8/3 c/w ground (also referred to as # 8 gauge / 4 conductor).
• The minimum wire size for systems that require a 60A GFCI is # 6/3 c/w ground (also referred to as # 6 gauge / 4 conductor).
EUROPE
Standards for amperage breakers may vary from country to country in the CE controlled area. Please consult your local installer
for advice on breaker level and wire specifications. Some examples are below:
Breaker of 13A –wire must be 1.5 mm2
Breaker of 16A—wire must be 2.5 mm2
Breaker of 20A—wire must be 4.0 mm2
Breaker of 32A—wire must be 6.0 mm2
NOTE: Please consult your applicable electrical codes related to the size of conductors as they may vary from what is
stated above. Take into consideration the length of cable as well and increase as required.
11
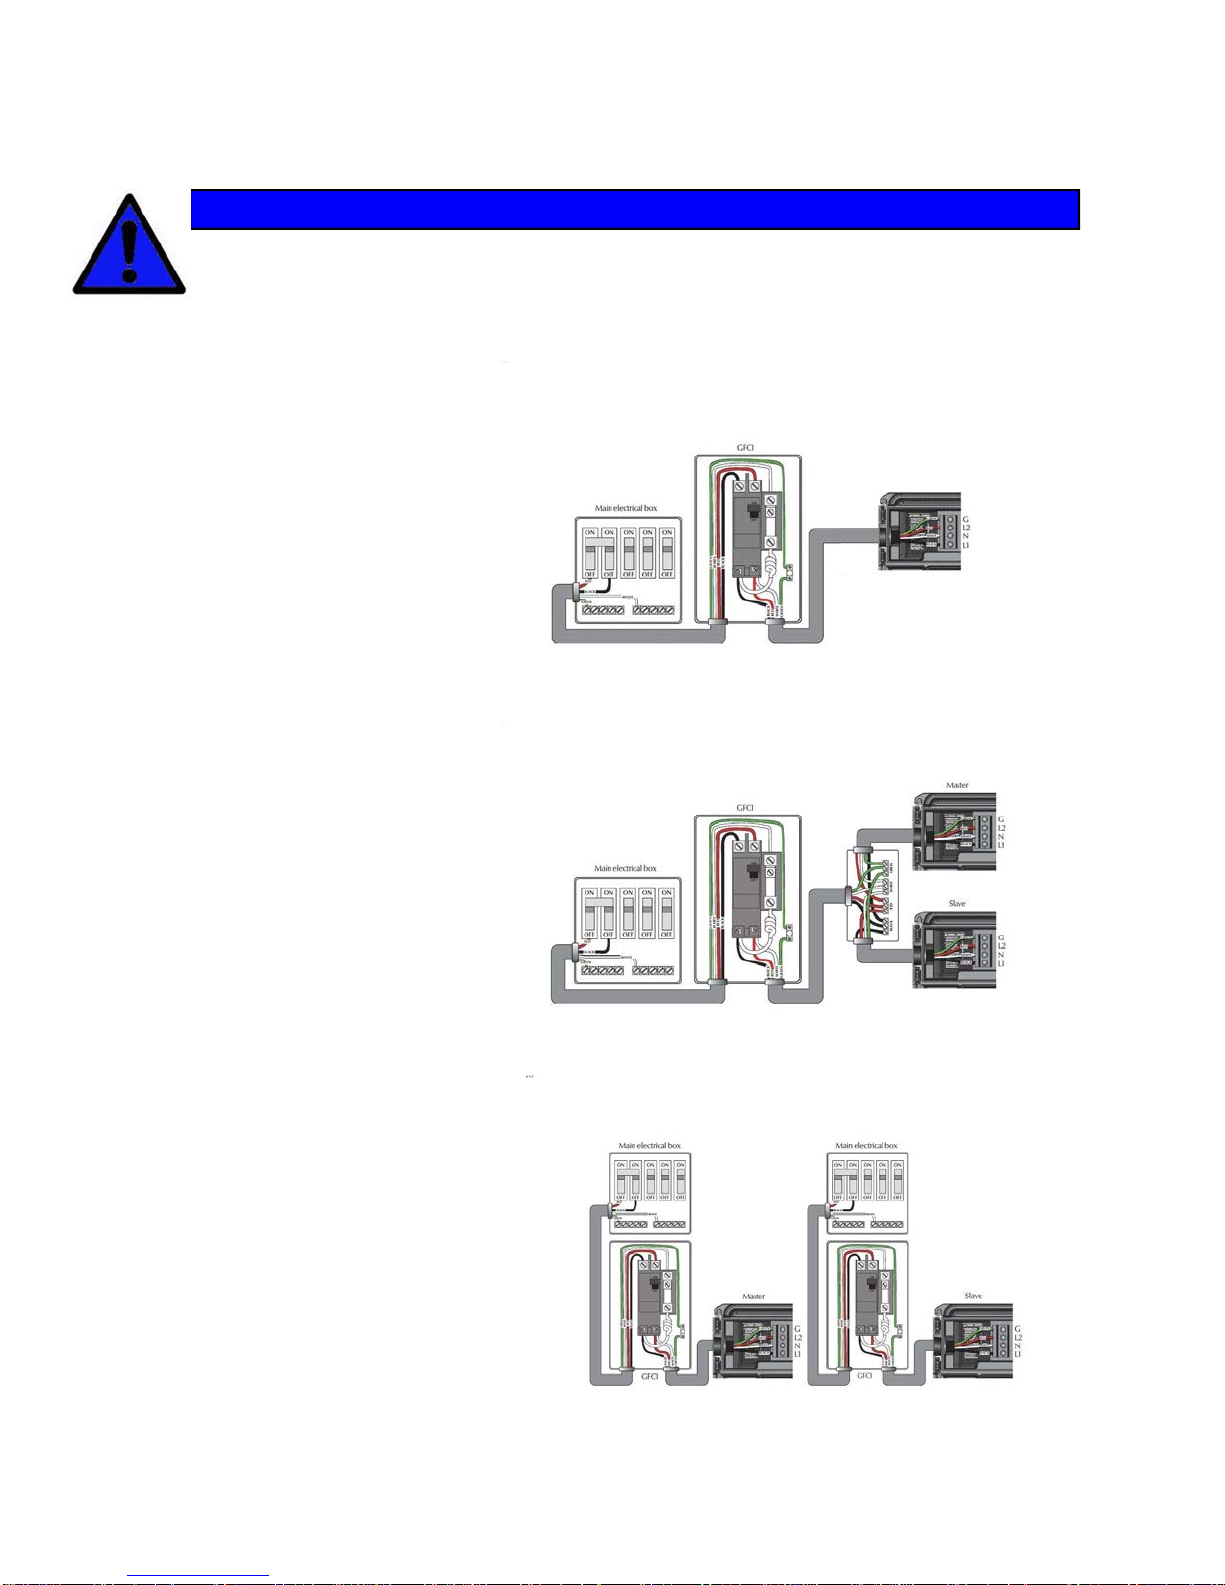
NORTH AMERICA – GFCI INSTALLATION
NOTICE
Installation of the GFCI - Circuit Breaker, including ampere sizing and selection of conductor size and
type, must be performed by a qualified electrician in accordance with the National Electrical Code, or
the Canadian Electrical Code, and all Federal, State/Provincial and local codes and regulations in effect at the time of installation. Swimlife highly recommends the use of a new Siemens GFCI breaker for
all of its products. Other GFCI’s and older Siemen’s GFCI’s may have tripping issues.
240 VOLT SWIMSPA
SINGLE GFCI WIRING
(MASTER ONLY)
240 VOLT SWIMSPA
SINGLE GFCI WIRING
MASTER / SLAVE HEATER
240 VOLT SWIMSPA
DUAL GFCI WIRING
MASTER / SLAVE HEATER
12

EUROPE – R.C.D. INSTALLATION - TYPICAL
NOTICE
Important Note: Installation of the R.C.D. - Circuit Breaker, including ampere sizing and selection of
conductor size and type, must be performed by a qualified electrician in accordance with National,
Regional and Local Codes and Regulations in effect at the time of installation.
230 VOLT SINGLE
PHASE RCD WIRING
230 VOLT DUAL
PHASE RCD WIRING
230 VOLT THREE
PHASE RCD WIRING
13
FILLING, CHECKING AND STARTING YOUR SWIM SPA—ALL OTHER SWIMSPAS
CHECKING
Although your swim spa was thoroughly water-tested in the
factory, some loosening of fittings can occur during shipping.
Before any decking, tiling or carpeting is completed around
the installation, fill and operate your hot tub to test for leaks
(this ensures easy access and inexpensive correction).
Check all union connections and plumbing for minor leaks.
In the event of a leak, ensure all union connections and
pump plugs are tight and all o-rings/gaskets are in place.
STARTING
Before applying voltage to power-up your swim spa, it is
very important that you understand the sequence of events
that occur when the system is activated in order that the
pump can be primed efficiently and damage to the system
can be avoided.
Turn the main power “on” at your electrical panel.
Follow the control instructions for your particular model
swim spa to put the pump into low speed.
See section SWIMLIFE CONTROL SYSTEMS
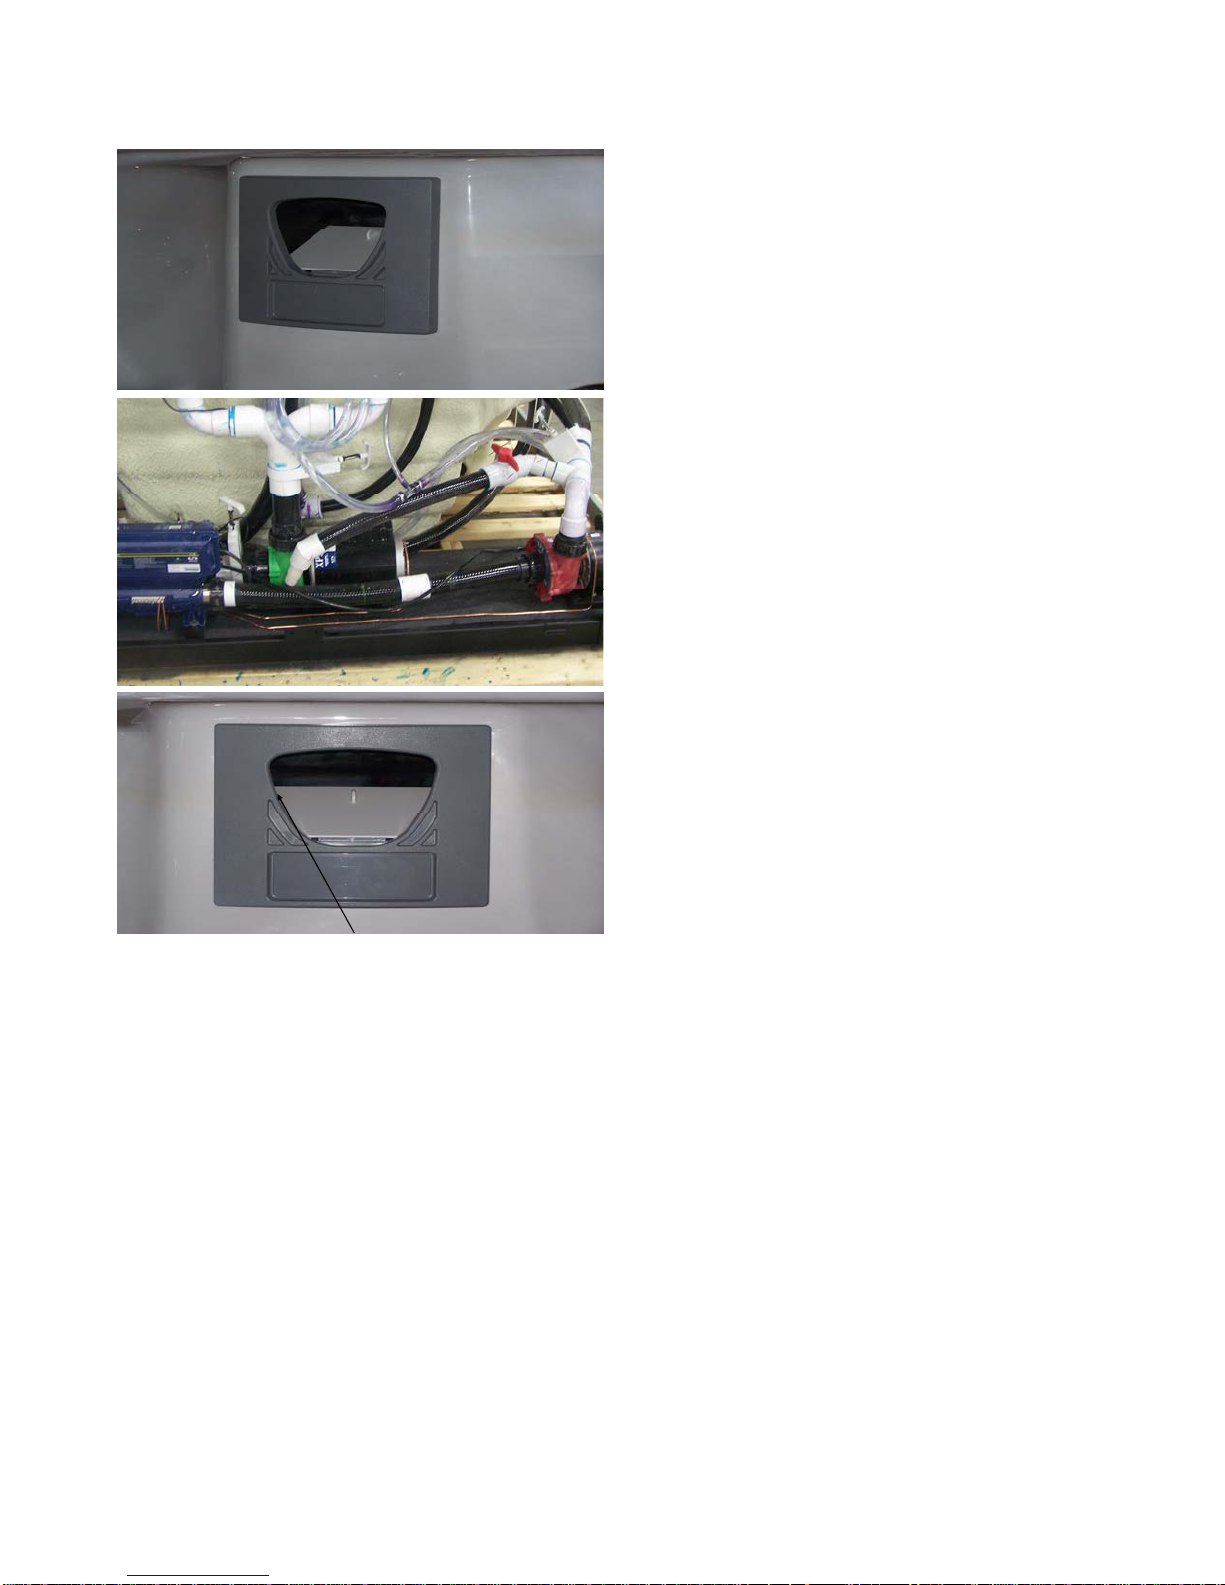
PUMP PRIMING/RELEASING AN AIR LOCK
• On some systems a message will appear on the display
indicating that the system is in PUMP PRIMING MODE.
This mode will last for 4 to 5 minutes before automatically
entering the normal operation mode. See complete details
for your spa in section SWIMLIFE CONTROL SYSTEMS.
When the pump is located below water level, the water
should start circulating immediately. If the motor works but if
you do not notice water circulation within the first 15 seconds, the pump may require priming due to trapped air
(referred to as an ‘air lock’). To prime (inset 2), open the
hose-bib to allow trapped air to escape. Close as soon as
the water flow from the jets becomes regular. If the pumps
have not primed after 2 minutes, and water is not flowing
from the jets, DO NOT allow the pumps to continue to run.
PROPER WATER LEVEL
FILLING
• When adding water for the first time, the swim spa should
be filled through the skimmer opening (helps to prevent air
locks) using a standard garden hose, turning the tap on
slowly to prevent damage to the surface by a jerking hose
connection.
• Pull up the handles on the intake and return gate valves
and clip on the stem locks. (handles are pulled up when
valves are open and pushed down when valves are
closed).
Ensure the drain valve is closed.
Ensure that all jets are open.
Fill the swim spa to the recommended level as indicat-
ed.
Turn power off at the main house panel (or GFCI) and try
releasing the air again by loosening the union on the discharge side of the pump(s) while the motor is not running.
Turn the power back on. If the pump(s) does not prime after
15 seconds, sometimes momentarily turning the pump(s) off
and on will help the system to prime (note: do not do this
more than 5 times). Repeat if necessary.
• Important: Under NO circumstances should the pump
(s) be allowed to operate without priming beyond 5 minutes,
as this may not only cause unwarrantable damage to the
pump, it may also cause the control system to go into an
overheat condition.
Definition: ‘Priming’ a pump is a term used to describe
the process in which air trapped in the plumbing and pump
wetend (referred to as an ‘air lock’) is released, allowing the
pump to move water efficiently through the plumbing system
and to the jets.
14
 Loading...