

Page 1
Quick Start Guide
www.swiftpoint.com/support/z
WARNING: CHOKING HAZARD
Parts of this device are small and may pose a choking
hazard for young children.
Ref: Z-QSG V1.0B
Page 2
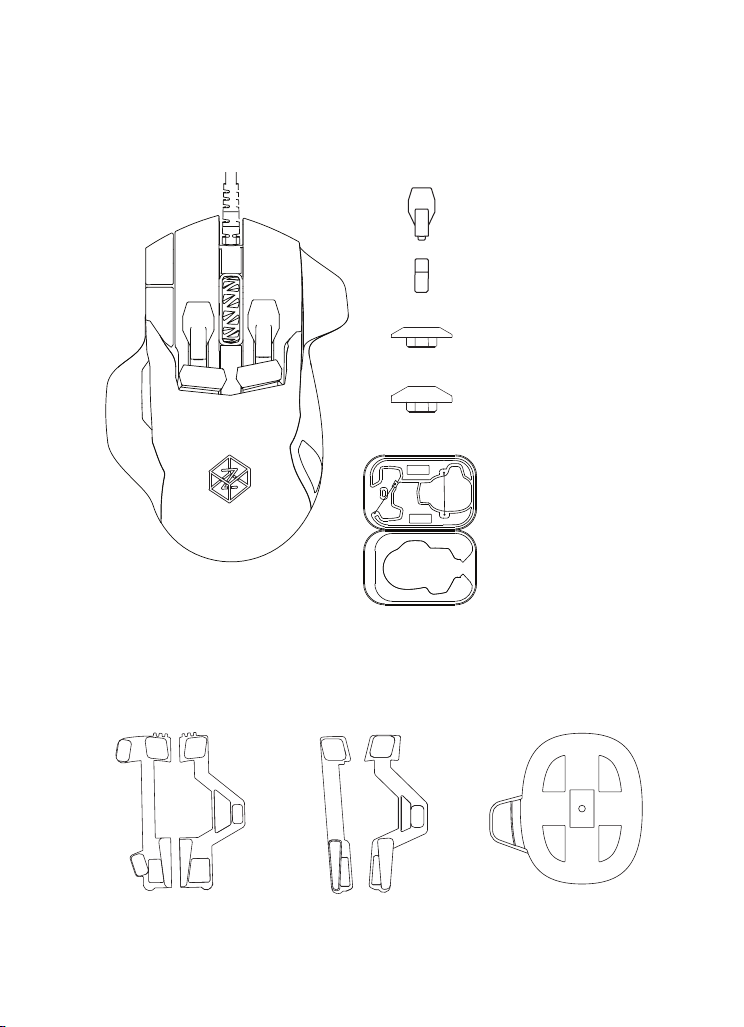
Box Contents
Long Fingertip caps (2)
Short Fingertip caps (2)
The Swiftpoint Z
Base Accessories
1 1
Adjustable Tilt
Base (2)
3 3
Lock Out
Base (2)
Short Trigger caps
Tall Trigger caps
Case
7
(2)
FlightStick
Extender
(2)
Page 3
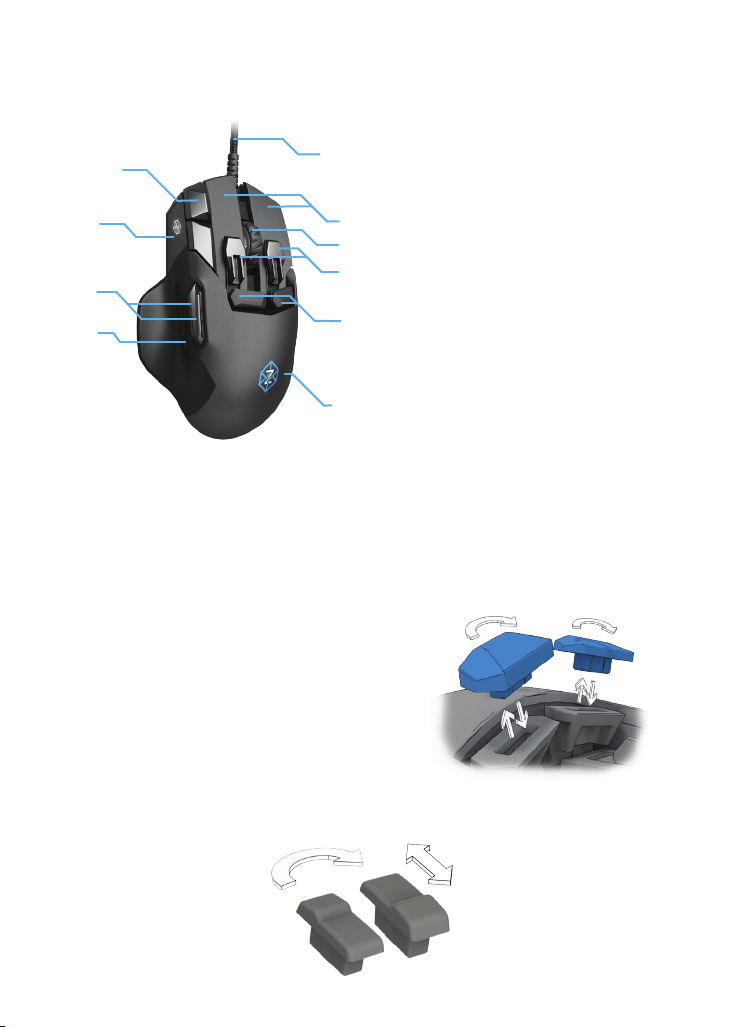
Getting Started
10
9
8
7
1
2
3
4
5
6
Braided cord
AA1
Left and Right Click Buttons
AA2
supporting Deep Click feature
AAA
Scrollwheel & Middle Mouse
AA3
AAA
Buttons supporting Deep Click
feature
Left & Right Fingertip Buttons
AA4
AA
supporting Deep Click feature
AA5
Left & Right Trigger Buttons
AAA
supporting push, and pull
AA6
RGB LED Logo
AA7
Thumb and Finger rubber grips
AA8
Thumb Buttons (two)
AA9
OLED Display
A110
Edge buttons (two)
Plug The Z into your computer and it will work as a standard mouse.
To get the most out of The Z and configure it to your preferences,
download the Swiftpoint Driver from www.swiftpoint.com/support/z-drivers
Insert the Fingertip and Trigger Caps as follows:
Trigger Button Caps
- Insert either the tall or short cap
- Rotate cap to optimize the position
- You can choose not to fit them at all
Fingertip Button Caps
- Choose the long or short cap for either left or right button
- You can choose not to fit them at all
Short fingertip caps
can be rotated to position
the raised edge to the front
or rear
For further adjustment, slide
the button caps forward or
backward in the slot
Page 4

Special features
The Z is a fully featured mouse with a high performance optical sensor and ergonomics
that will give you the edge, whether you are a serious gamer or a professional user.
It has many new features including; gyro, accelerometer, touch sensitive buttons,
tactile feedback and OLED display.
Ergonomics
The main mouse buttons are flat, creating a stable
platform so you do not nudge the mouse while clicking.
The Z can be customized so it fits your hand perfectly.
You can choose the fingertip and the trigger button caps
to suit the size of your hand and your grip style.
Trigger Buttons
The trigger buttons under the index and middle fingers
can be operated in two ways. Each button can be pressed
down by slightly straightening the finger. It’s so easy that
you can use the buttons for actions you use frequently.
Curl your finger back and pull back on the buttons like
a trigger for additional actions. The height of the buttons
can be changed by selecting between taller or shorter
button caps. For even finer adjustment, the button caps
can be reversed so the contact point can be moved
backwards or forwards.
Fingertip Buttons
The fingertip buttons can be configured to make reaching
them easy. If you prefer to move your finger as little as
possible, choose the larger button cap. If you prefer
something smaller, the smaller button cap option can be
inserted instead. The smaller button cap has a raised portion, and the button cap
can be inserted with the raised portion at the front or at the back. For further
adjustment, slide the button cap forward or backward in its slot.
Page 5

Deep Click
The Z senses how hard you push the main left and right click
buttons, the left and right fingertip buttons, and also the
middle mouse button. Use the Swiftpoint Driver to use this
pressure-sensing capability to perform additional actions as
you press harder.
Normal Click
First Action
Firmer Press
Second Action
Tilt Left and Right
The Z can be tilted to one side or the other, and senses how far you have tilted.
This can be used to provide an analog control such as steering, or you can set it to
perform an action like leaning, crouching or reloading. Alternatively, you can configure
the mouse to use the tilt as a control modifier, similar to holding down the Shift key while
you click. This gives you additional actions at your fingertips with nothing more than a tilt
of your wrist. You can even use tilt to help you set the sensor DPI or select a profile.
Adjustable feet let you control how easy or hard it is to tilt, and the size of the tilt
angle. You can also lock out the tilt entirely, see diagram below.
Adjustable Mouse Feet
The Z has removable feet held in place by magnets. Looking at the underside of The Z,
the left foot can be lifted out using the tab at the top, near the edge of the mouse.
The right foot can be lifted out using the tab in the middle, on the edge of the mouse.
The standard feet can be positioned towards the outer edges of the mouse
(a position suitable for most people getting used to using the tilt features of The Z)
or towards the middle of the mouse, providing greater sensitivity.
The lockout feet can be fitted to prevent The Z from tilting altogether.
1
1
Lift here to remove
1
1
Move to the
edge for
more stability
1 1
Move to the
center for
greater sensitivity
3
3
Replace with
Lock Out feet to
prevent tilting
Page 6

Pivot Left and Right
The Z also knows when it is pivoting left or right. Just like tilt,
you can assign any action or control modifier (e.g. Alt or Shift)
to a pivot.
Tilt Forwards and Backwards
To give complete 3-axis control The Z also senses when it is tilting
forwards and backwards. You can use it for 3-axis analog control,
pitch, roll and yaw, for flight simulators and other programs.
To give accurate 3-axis control, us the FlightStick Extender.
FlightStick Extender
The FlightStick Extender is great for flying or driving,
providing analog pitch, roll and yaw control. Note that The Z will
not track (move the pointer) when using this accessory.
Simply hover the mouse over it to magnetically attach. It can easily
on top of the other base feet - these don’t need to be removed, and
stay on the mouse.
7
Rating: 5V , 1A
Designed in New Zealand
Made in China
www.swiftpoint.com
The technical documentation as required by the Conformity assessment procedure is kept at the following address:
77 Montreal Street
Sydenham
Christchurch 8023
New Zealand
Page 7

Regulatory
Product Disposal
Please dispose of this product and packaging in a responsible manner and in accordance with any applicable local or national disposal
regulations, including those governing the recovery and recycling of waste electrical and electronic equipment (WEEE).
Federal Communication Commission Interference Statement:
This device complies with Part 15 of the FCC Rules. Operation is subject to the following two conditions: (1) This device may not cause harmful
interference, and (2) this device must accept any interference received, including interference that may cause undesired operation.
This equipment has been tested and found to comply with the limits for a Class B digital device, pursuant to Part 15 of the FCC Rules.
These limits are designed
radiate radio frequency energy and, if not installed and used in accordance with the instructions, may cause harmful interference to radio communications.
However, there is no guarantee that interference will not occur in a particular installation. If this equipment does cause harmful interference to radio or
following measures:
- Reorient or relocate the receiving antenna
- Increase the separation between the equipment and receiver
- Consult the dealer or an experienced radio/TV technician for help
FCC Caution:
Any changes or modifications not expressly approved by the party responsible for compliance could void the user’s authority to operate this
equipment. This transmitter must not be co-located or operating in conjunction with any other antenna or transmitter.
Radiation Exposure Statement:
The product complies with the FCC portable RF exposure limit set forth for an uncontrolled environment and is safe for intended
operation as described in this manual.
Europe EU Declaration of Conformity.
This device complies with the essential requirements and other relevant provisions of the R&TTE Directive 1999/5/EC. The following test
methods have been applied in order to prove presumption of conformity with the essential requirements of the R&TTE Directive 1999/5/EC:
EN 60950-1: 2006/A2:2013
Information technology equipment - Safety - Part 1: General requirements
EN 62479: 2010
Assessment of the compliance of low power electronic and electrical equipment with the basic restrictions related to human exposure to
electromagnetic fields (10 MHz to 300 GHz)
EN 301 489-1 V1.9.2: 2011
Electromagnetic compatibility and Radio Spectrum Matters (ERM); ElectroMagnetic Compatibility (EMC) standard for radio equipment and
services;
Part 1: Common technical requirements
EN 301 489-3 V1.6.1: 2013
Electromagnetic compatibility and Radio spectrum Matters (ERM); ElectroMagnetic Compatibility (EMC) standard for radio equipment and
services;
Part 3: Specific conditions for Short-Range Devices (SRD) operating on frequencies between 9 kHz and 246 GHz
Warranty
Swiftpoint warrants this product to be free from defects in material and workmanship for a period of one (1) year from the date of purchase.
In the event that this product is found to be defective in material and workmanship, Swiftpoint shall, at its sole election, either (1) repair or
replace the product, or (2) refund the purchase price, provided that the product is returned to Swiftpoint with a copy of the sales receipt or
invoice. Postage charges shall be to the cost of the purchaser, unless applicable law requires otherwise. Refer to the support page at
www.swiftpoint.com for product return addresses.
This warranty does not cover accidental damage, wear and tear, or use of the product in a manner other than in accordance with the
to provide reasonable protection against harmful interference in a residential installation. This equipment generates, uses and can
interference by one of the
UNDER NO CIRCUMSTANCES SHALL SWIFTPOINT BE LIABLE FOR ANY CONSEQUENTIAL, INDIRECT OR INCIDENTAL LOSS
OR DAMAGES INCLUDING, BUT NOT LIMITED TO, LOSS OF REVENUES, PROFITS, DATA, OR RECORDS, EVEN IF
SWIFTPOINT HAS BEEN MADE AWARE OF THIS POSSIBILITY.
Patent Information
Patents pending in the United States and other countries.
Features and specifications of the product and this user guide are subject to change without notice.
 Loading...