

Page 1
Packing list
Parts Qty Parts Qty
Heat Sink 1 80mm fan straight brackets 4
Spring assembly – pre-installed 4 Snap-rivets (for fan installation) 4
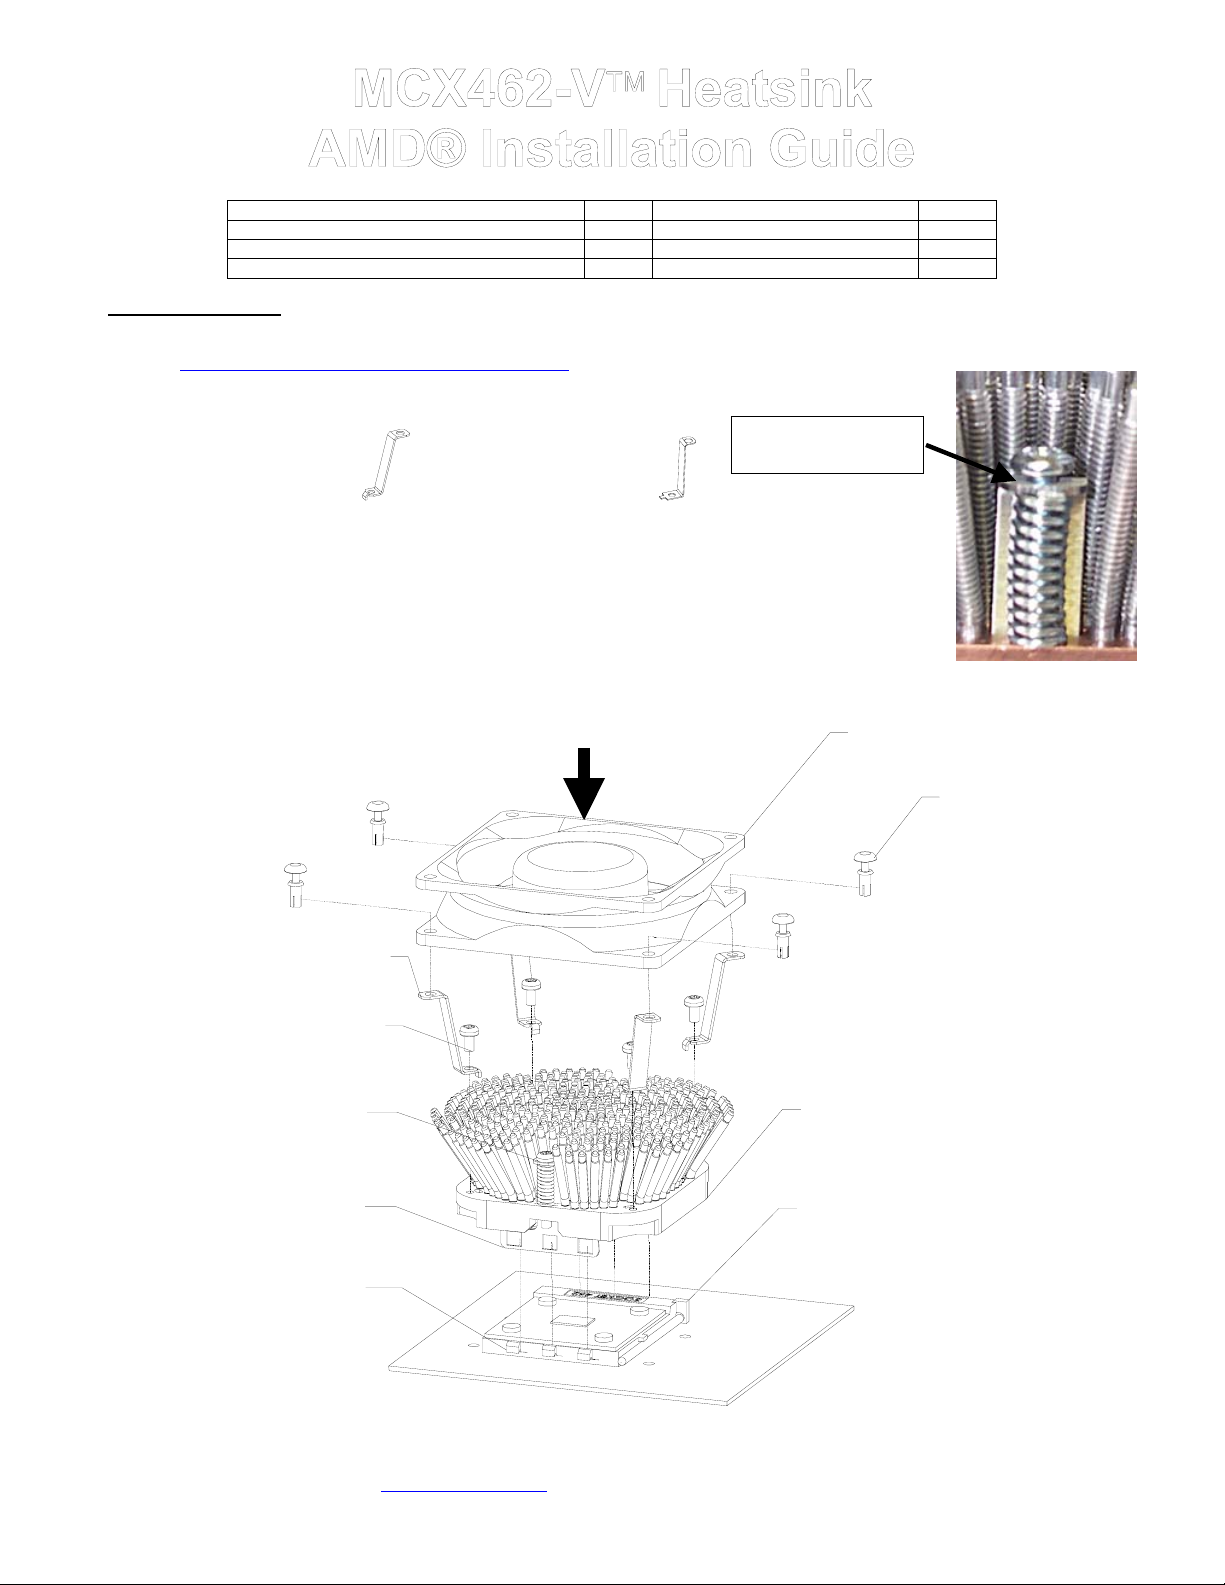
I. Heat sink Installation
1. The case should be laying flat on a table.
2. Lightly coat the CPU with the provided Céramique™ thermal compound. Detailed instructions can be found at
3. The heatsink ships with 92mm fan brackets pre-installed. You will need to remove them, and install the
92mm fan angled brackets– pre-installed 4 Thermal grease – Céramique 1
http://www.arcticsilver.com/ceramique_instructions.htm
included 80mm brackets if you plan on using a 80mm fan. Use a thin screwdriver to remove and install the
brackets, so as to not damage the surrounding pins.
Screw head clears the
top of the bracket
92mm fan angled bracket
4. Place the MCX462-V heatsink over the CPU as shown in the schematic below. The large step side
MUST be located over the socket cam box. A label affixed to the base of the heatsink clearly identifies
which side this is.
- The retention clips should snap over each side, and hook onto the socket tabs. Make sure that the clips
are properly aligned to fit snuggly underneath the tabs.
- Gradually loosen (counterclockwise) each screw-spring assembly to release the spring tension,
checking that the clips remain engaged underneath the tabs.
- Continue backing off until the head of the screw completely clears the top of the bracket as shown
in the picture to the right ------------------------------------------------------------------------------------------------------Æ
- Double-check to ensure that the clips have remained underneath the tabs.
- Installation to the CPU is now complete
Fan bracket
Bracket screw
80mm fan straight bracket
AIRFLOW DIRECTION
Fan
Snap-rivet
Screw-spring assembly
Retention clip
Socket tabs
Copyright Swiftech 2002 – All rights reserved – Last revision date: Sep 11, 2002
Rouchon Industries, Inc., dba Swiftech – 1703 E. 28
E Mail: Swiftech @swiftnets.com – URL: http://www.swiftnets.com
th
Street, Signal Hill, CA 90755 – Tel. 562-595-8009 – Fax 562-595-8769
MCX462-V heatsink
Socket 462
Cam box
Page 1
Information subject to change without notice
Page 2

5.
Fan installation:
80mm and 92mm fans: use the provided snap-rivets as shown in the page 1 schematic.
5. Recommended fans
Please consult our web site at http://www.swiftnets.com/products/MCX462-V.asp
III. Final inspection
DISCLAIMER: Swiftech assumes no liability whatsoever, expressed or implied, for the use of these products.
Now that the heat sink is installed, startup your computer, go into the BIOS and observe the CPU temperature. CPU temperature is
completely dependant on ambient temperature inside the case, type of fan used, and processor frequency. At the lowest air flow level,
the MCX462-V heatsink should never exceed AMD’s specifications, as defined in the link below:
http://www.amd.com/us-en/assets/content_type/white_papers_and_tech_docs/23794.pdf
In all cases, and irrespective of any of the factors listed above, processor temperature should never exceed 65°C as you monitor the
temperature in the Bios. If it does, shut down the computer immediately, and review your entire installation. Troubleshooting help is
available on our web site at www.swiftnets.com
, or by calling customer support at 562-595-8009.
for an updated list of recommended fans.
.
Copyright Swiftech 2002 – All rights reserved – Last revision date: Sep 11, 2002
Rouchon Industries, Inc., dba Swiftech – 1703 E. 28
E Mail: Swiftech @swiftnets.com – URL: http://www.swiftnets.com
th
Street, Signal Hill, CA 90755 – Tel. 562-595-8009 – Fax 562-595-8769
Page 2
Information subject to change without notice
 Loading...