

Page 1
1
2
3
4
5
6
7
8
9
PART NUMBER DESCRIPTI N
91841A003 Thumb Nut
10SC004025 SCREW INSULATOR
70700S
X2900 HDP X2900 Hold Down Plate
2-56NUT 2-56 Nut
2-56 Washer 2-56 Washer
90089A295
2-56x1 1/4
X2900 series VGA Adapter VGA Adapter
1/8" 1/4" Fiber Washer
2-56 x 1 1/4" Philips Screw
Spring
O
1
4
4
4
4
8
4
4
1
1
2
3
4
5
6
7
9
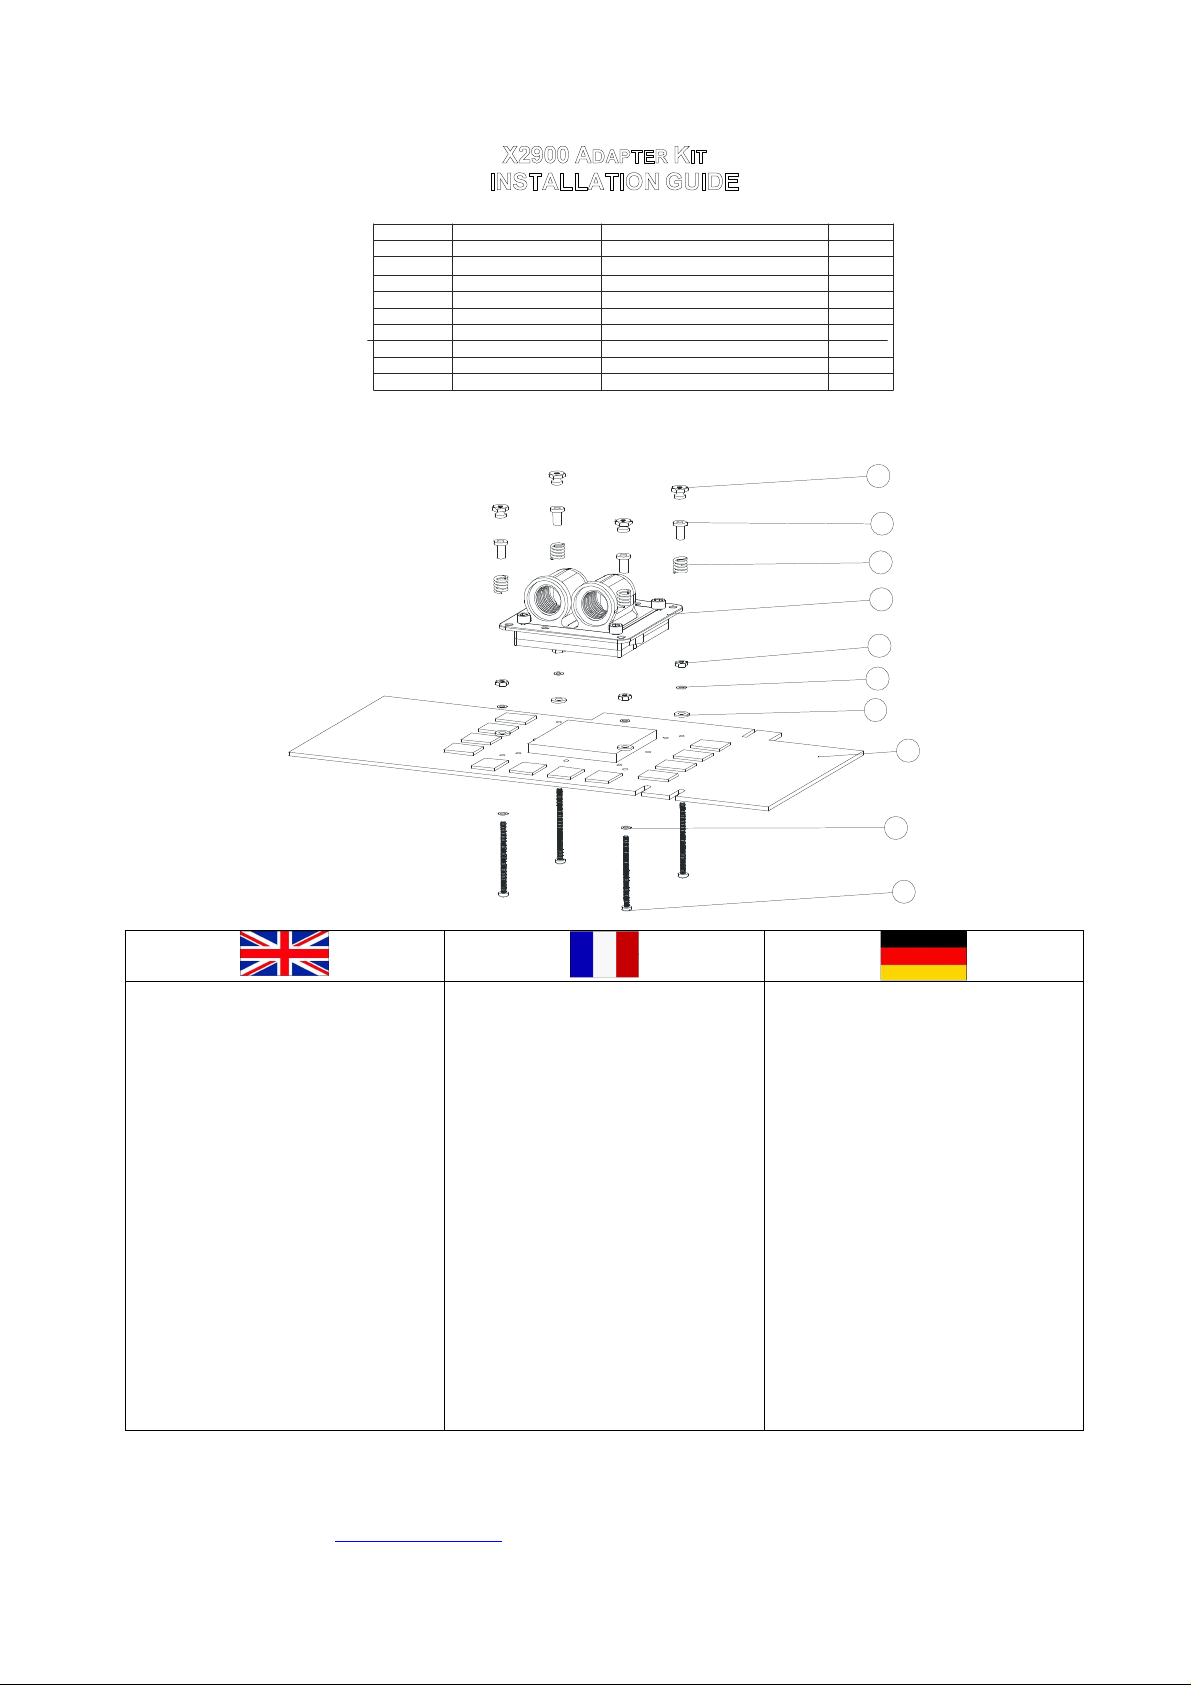
1. Remove the existing cooling solution
from your graphics card & carefully clean
off the GPU with an electronics degreaser.
Then apply the Arctic Céramique™
thermal grease to the GPU.
2. Remove the 4 6-32 screws and then the
chrome hold-down plate 4-holes set up.
3. Replace it with the X2900 hold down
plate then re install the 4 6-32 screws.
4. Put a washer (6) on each Philips screw.
Install them thru the circuit board.
5. Put a fiber washer (7), a washer (6) and
a nut (5) on each Philips screw (8) and
tighten the nut (5).
6. Install the MCW60 on the GPU through
the screws.
7. Put a spring (3) and a screw insulator
(2) on each Philips screw.
8. Finally, screw the 4 thumb nuts in a
cross pattern and gradually.
1. Retirez le dissipateur de votre carte
graphique, nettoyez le GPU avec un
dégraissant électronique puis appliquez la
pâte thermique Arctic Céramique™ sur le
GPU.
2. Retirez les 4 vis 6-32 puis enlevez la
plaque de fixation « 4 points standard » du
water block MCW60.
3. Remplacez-la par la plaque de fixation
X2900 puis revissez les 4 vis.
4. Sur chaque vis 2-56 (8) enfilez une
rondelle métallique (6). Passez-les à
travers les 4 trous de la carte graphique.
5. Sur chaque vis qui traverse la carte
graphique, enfilez une rondelle en fibre (7),
une rondelle métallique (n°6) et enfin un
écrou (5). Serrez l’écrou.
6. Positionnez le water block en le passant
à travers les 4 vis (8).
7. Sur chaque vis, placez un ressort (3)
puis une entretoise en plastique (2).
8. Enfin, vissez alternativement et
progressivement les 4 écrous à main.
6
88
1. Sie bauen das Kühlkörper von der
Grafikkarte aus und Sie putzen sie mit
Xylene, dann tragen Sie hauchdünn
Warmleitpaste Arctic Céramique™auf die
GPU auf.
2. Sie bauen die 4 6-32 Schrauben und die
4 Löcher Befestigungplatte aus.
3. Sie tauschen sie gegen die X2900
Befestigungplatte aus.
4. Sie installieren eine Scheibe (8) auf jede
2-56 Schraube. Sie Installieren sie durch
die 4 Löcher der Grafikkarte.
5. Sie Installieren eine Scheibe (7), eine
metallische Scheibe (6) und schließlich ein
Mutter auf jede Philips Schraube.
6. Sie positionieren das Waterblock durch
die 4 Schrauben (8).
7. Sie installieren eine Feder (3), und eine
plastike Distanzscheibe (2).
8. Dann schrauben sie die Mutter in
Diagonal und alternierend.
Copyright Swiftech 2007 – All rights reserved – Last revision date: 08-21-07 –
Rouchon Industries, Inc., dba Swiftech –3700 Industry avenue, Suite 104, Lakewood, CA 90712 – Tel. 888-857-9438– Fax 562-595-8769 - E
Mail: help@swiftech.com – URL: http://www.swiftech.com - Information subject to change without notice
 Loading...