

Page 1
This product is intended for expert users only. Please consult with a qualified technician for installation. Improper installation may result in
damage to your components. Swiftech assumes no liability whatsoever, expressed or implied, for the use of these products, nor their
installation. The following instructions are subject to change without notice. Please visit our web site at www.swiftnets.com
for updates.
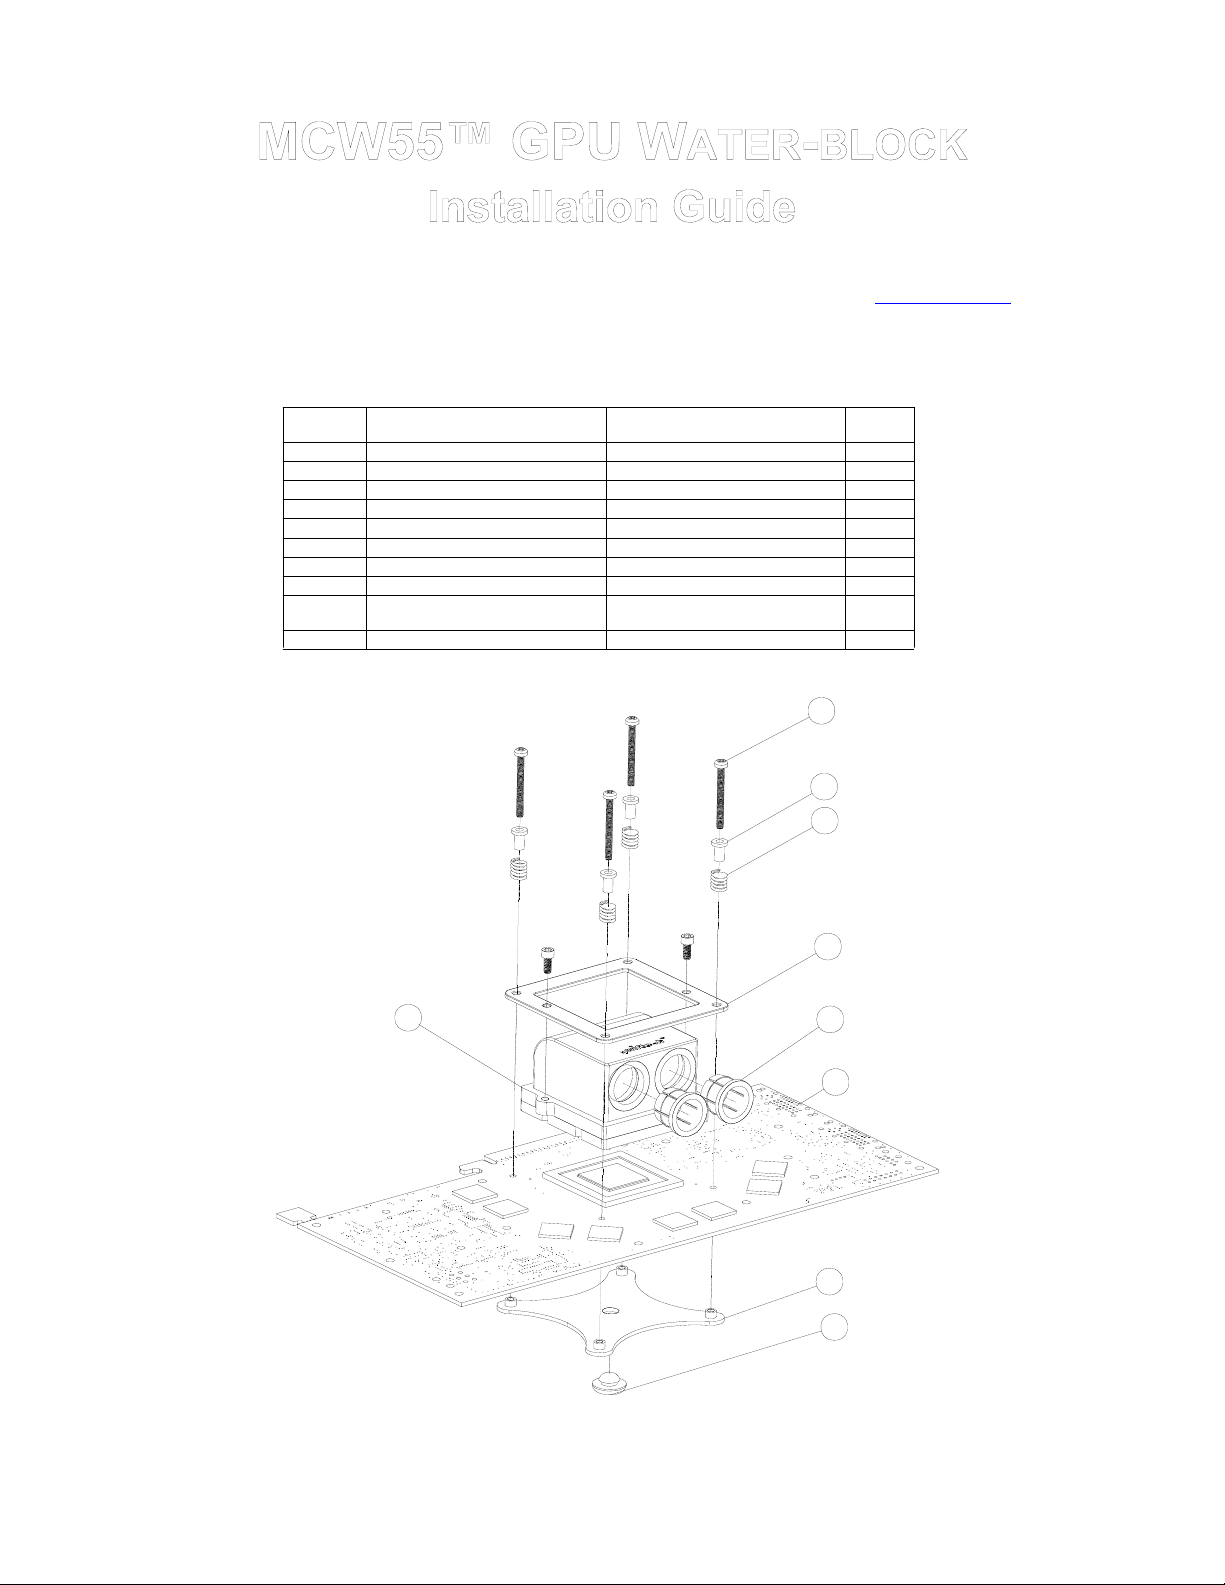
Setup diagram for nVidia® GeForce 6800 and GeForce 7 series adapters
ITEM NO. PART NUMBER DESCRIPTION QTY.
1MCW55 Waterblock 1
3 92196A106 4-40 x 1/4" S/S socket screw 2
6 1-2inch-collet Quick-connect collet 2
7 NV70 VGA adapter 1
8 bracket-NV40 Water-block hold-down plate 1
9 MCW55-CROSS-bracket-G70 Back plate 1
11 SCREW INSU LATOR10SC004025 Nylon tension limiter 4
12 70700S spring 4
13 Stem plug Rubber plug 1
14 M2-5x27mm Metric screws 4
Installation sequence:
1. Temporarily fasten 2 diagonal screws
without
their springs and washers. This
will conveniently align back-plate 9
with hold-down plate 8.
2. Then Install the other 2 screws with
their springs and washers as shown in
this schematic, and tighten them half way.
3. Remove the first two screws,
and re-install them with their springs
and washers and tighten half-way.
4. Complete tightening all four
screw-spring assemblies in a cross
pattern.
2
14
11
12
8
Pull-out these 2 collets
installing the hold-down bracket 8.
Then snap them back into place.
6
7
9
prior to
Figure 1
Copyright Swiftech 2005 – Subject to revision without notice - Revision date: 9-15-05
Swiftech Inc., 1703 E. 28
th
St., Signal Hill, CA 90755 T. (562) 595-8009 F. (562) 595-8769
13
Page 1 of 2
Page 2
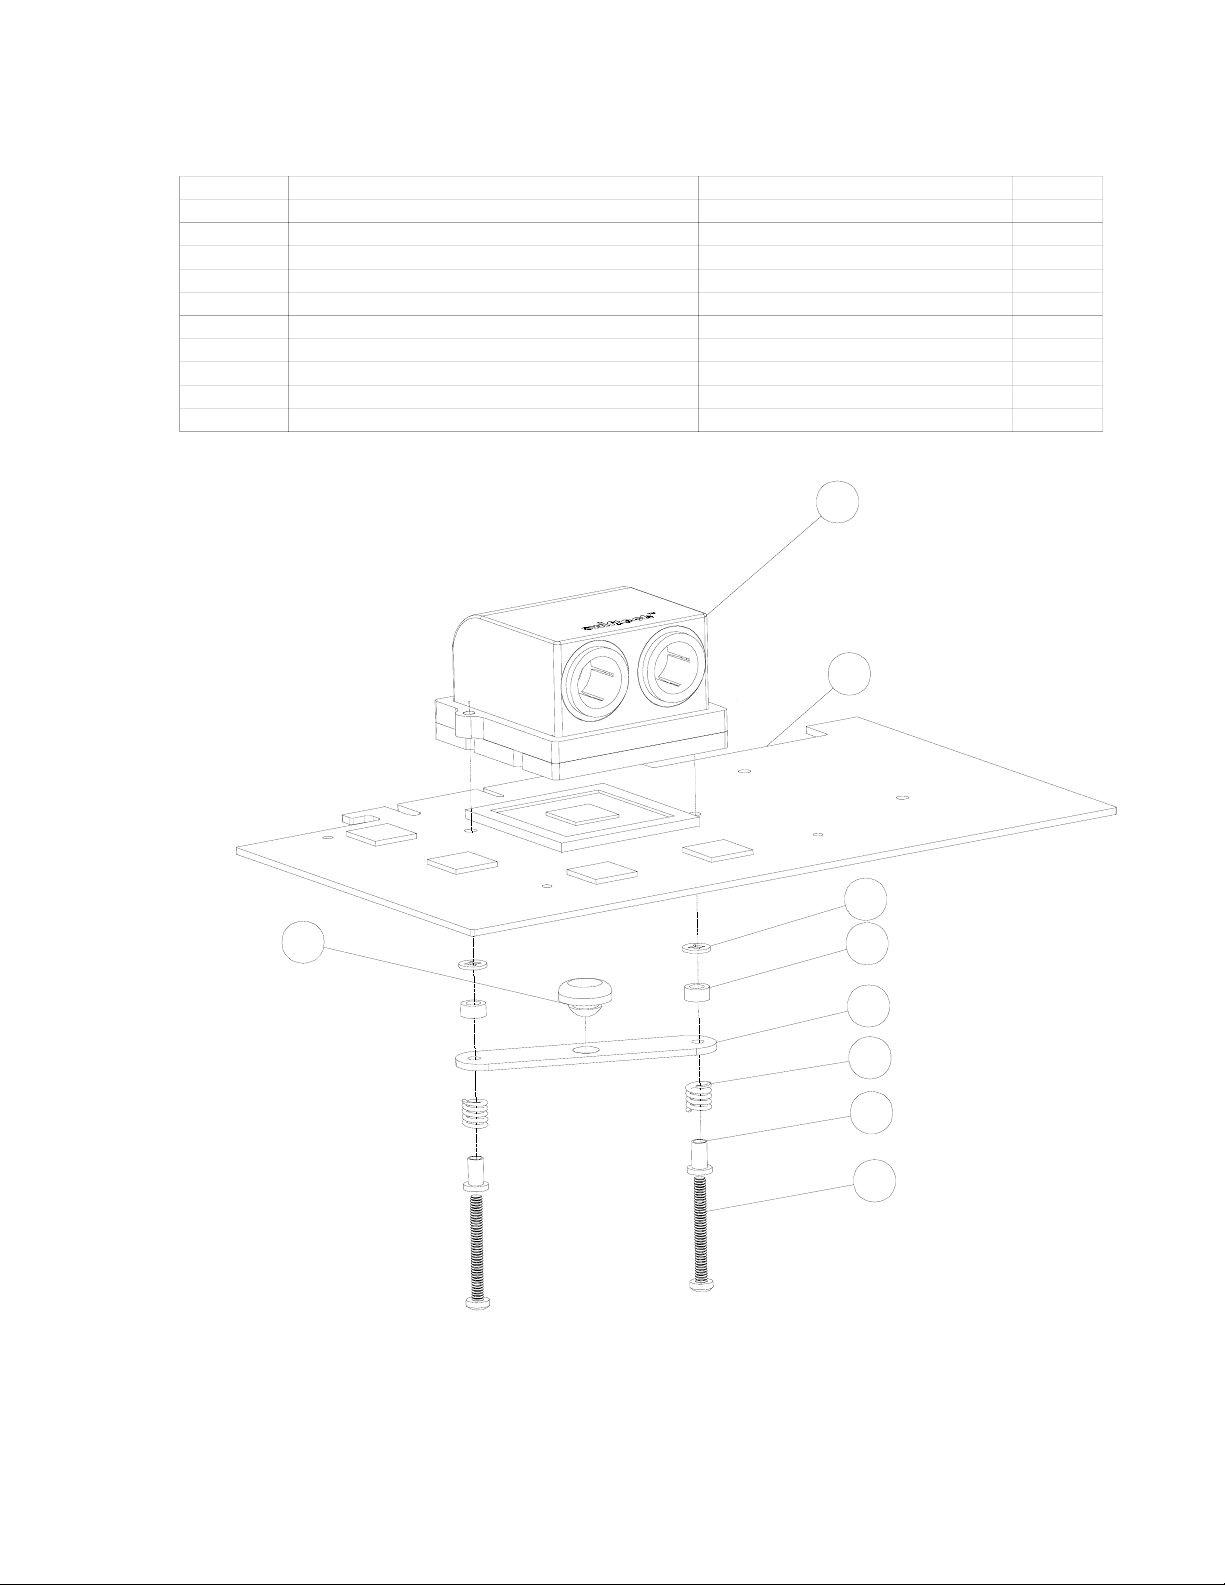
Setup diagram for ATI® Radeon series adapters
ITEM NO. PART NUMBER DESCRIPTION QTY.
1
3 92196A106 4-40 x 1/4" S/S socket screw 2
7 X800-XT ATI RADEON VGA 1
8 stiffening-bar Stiffening bar 1
9 9309k13-stemplug Stem plug 1
10 4-40 nylon retaining washer 4-40 nylon retaining washer 2
11
12
13 13ME028 Black nylon spacer 2
18 SCREW INSULATOR10SC004025 Nylon tension limiter 2
MCW55
4-40x1-philips-91400A119
70700S
WATERBLOCK 1
Philips screw 2
spring 2
2
7
10
9
13
8
12
18
11
Figure 2
Copyright Swiftech 2005 – Subject to revision without notice - Revision date: 9-15-05
Swiftech Inc., 1703 E. 28
th
St., Signal Hill, CA 90755 T. (562) 595-8009 F. (562) 595-8769
Page 2 of 2
Page 3

1. Preparing your graphics card
2. Before installing the block onto the graphics card cut two pieces of tubing of sufficient length to connect to the rest of your circuit, and
a. Remove the existing heat sink
b. Carefully clean the GPU (graphics processing unit)
c. Lightly coat the GPU with the provided Arctic Céramique thermal compound.
install them into the MCW55™ Inlet and outlet. It is absolutely imperative to use the provided tube inserts when using clear vinyl (soft)
tubing (figure 3). Make sure that the tubes are fully inserted into the fitting. The tip of the plastic tube inserts should be flush with the inlet
and outlet openings. Inserting the tubes requires a firm push, accompanied by a twisting motion. Note that a little bit of dishwashing liquid
soap rubbed around the extremity of the tube greatly helps its insertion.
Common instructions to all VGA adapters
Figure 3
Figure 4
Once the tubes are inserted, gently pull them to
separate the collets from the face of the waterblock,
and insert the safety clips as shown in Figure 5
Figure 5
3. Installing the MCW55™ GPU Cooler
The MCW55™ retention mechanism can either use the two diagonal holes featured in many graphics cards such as ATI Radeon™
9000 to 9700 families, or the four mounting holes found in NVidia GeForce™ families of products.
Copyright Swiftech 2005 – Subject to revision without notice - Revision date: 9-15-05
Swiftech Inc., 1703 E. 28
th
St., Signal Hill, CA 90755 T. (562) 595-8009 F. (562) 595-8769
Page 3 of 2
Page 4

Install your block onto the graphics card, as shown in Figure 1 or Figure 2 (p.1) according to your application. A “finger –tight” lock is
always sufficient when tightening the spring retention assemblies. Over-tightening will squish the nylon screw spacer body, and result in
uneven pressure over the GPU.
4. Re-install the graphics card in the AGP or PCI slot, connect the tubes to the rest of the circuit, and proceed with filling and bleeding
the cooling circuit.
5. Type of Coolant: For best performance, use 95% distilled water, and 5% Swiftech brand “HydrX” corrosion inhibitor (available here:
http://www.swiftnets.com/store/category.asp?CatID=2
6. Final inspection: Once the installation is completed, it is always a good idea to test the circuit for leaks, prior to powering up the
computer. Troubleshooting help is available on our web site at www.swiftnets.com
Removal of the tubing:
1. Remove the red safety clips
2. In quick-connect fittings, the collets contain a ring of shark-like teeth that prevent the tubing from coming out of the fitting. In order to
release the ring of teeth and allow the tube to come out, the collet needs to be pushed squarely flat against the face of the water-block.
To make sure that the collet remains completely flat against the face of the water-block while the tube is being pulled out, use a simple
½” flat wrench. Then holding the tube with 3 fingers as shown below, push with your thumb against the face of the wrench, this will pull
the tube out of the fitting. This simple leverage effect works great, and avoids many frustrations!
, under the “accessories” section).
, or by calling customer support at 562-595-8009.
IMPORTANT MAINTENANCE PRECAUTIONS:
If you need to disassemble the waterblock for cleaning purposes, it is extremely important to exert the utmost care in re-fastening the copper
base-plate to the housing. Since an o-ring assures the seal between housing and base-plate, little pressure is needed to guarantee a good
seal between these two components. Fasten the four screws finger-tight only, or you take the risk of stripping the thread of the plastic
housing. Note that no warranty claims will be accepted for stripped threads in the housing.
IMPORTANT DISCLOSURES
While all efforts have been made to provide the most comprehensive tutorial possible, Swiftech assumes no liability expressed or implied for any
damage(s) occurring to your components as a result of using Swiftech cooling products, either due to mistake or omission on our part in the above
instructions, or due to failure or defect in the Swiftech cooling products.
WARRANTY
Our products are guaranteed for 12 months from the date of delivery to the final user against defects in materials or workmanship. During this period,
they will be repaired or have parts replaced provided that: (I) the product is returned to the agent from which it was purchased; (II) the product has
been purchased by the end user and not used for hire purposes; (III) the product has not been misused (*), handled carelessly, or other than in
accordance with any instructions provided with respect to its use. This guarantee does not confer rights other than those expressly set out above and
does not cover any claims for consequential loss or damage. This guarantee is offered as an extra benefit and does not affect your statutory rights as a
consumer.
Copyright Swiftech 2005 – Subject to revision without notice - Revision date: 9-15-05
Swiftech Inc., 1703 E. 28
th
St., Signal Hill, CA 90755 T. (562) 595-8009 F. (562) 595-8769
Page 4 of 2
 Loading...