

Page 1
User Guide: SW100
Page 2

Welcome to your Swift SW100 microscope! Whether you are a seasoned professional
or a beginner hobbyist, Swift has the perfect microscope for you.
This quick-start guide will introduce you to the components of your new microscope and
help you begin to use it. For more information about our microscopes or customer
service requests, please visit www.swiftoptical.com.
Table of Contents
I. Specifications 2
II. Parts of the microscope 3
III. Assembly and set up 3
IV. Using the microscope 3
IV. Caring for your microscope 4
V. Troubleshooting 4
VI. Warranty information and customer support 7
1
Page 3

I. Specifications
Model
SW100
Observation tube
Monocular, 360° rotatable
Inclination
30°
Eyepieces
Wide-field 10X and 25X
Nosepiece
Triple revolving
Objectives
4X, 10X, and 40X
Magnifications
40X, 100X, 250X, 400X, and 1000X
Stage
Plain stage with slide clips
Stage size
90mmx90mm
Condenser
6-hole disc diaphragm
Focusing
Coaxial coarse and fine focus knobs
Illumination
Dimmable top and bottom LED lights
Power
100-240V AC adapter or 3 AA batteries (included)
2
Page 4
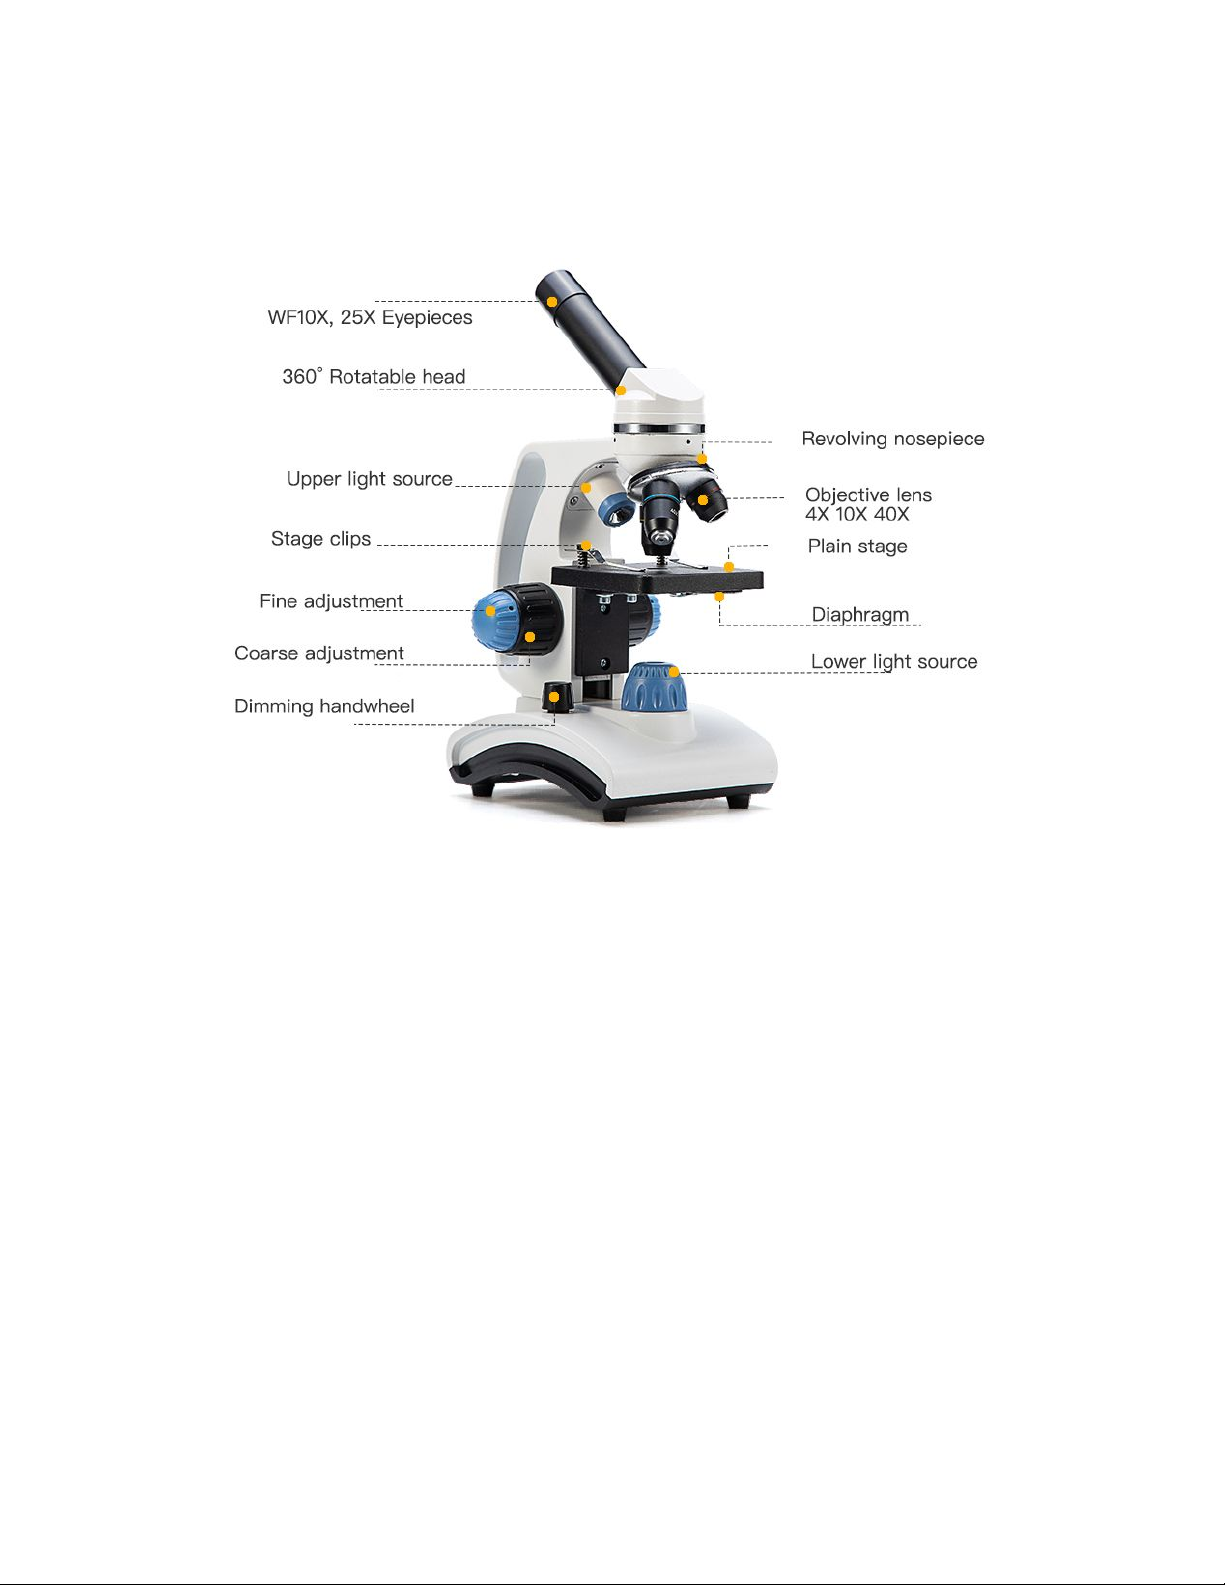
II. Parts of the microscope
III. Assembly and set up
Carefully remove the microscope from the box and set it on a sturdy, flat surface.
Remove the plastic cover from the eyepiece holder on the microscope's head, then
place an eyepiece into the holder. Locate the power adapter and attach it to the
microscope, then plug it in. Turn the microscope on by pressing the power button.
IV. Using the microscope
Turn the microscope on and choose the lower lamp setting. Use the illumination
intensity control dimming handwheel to set the lamp on the lowest brightness setting.
Secure a slide via the slide clips on the stage.
3
Page 5

Rotate the monocular head to either the forward- or backward-facing position,
depending on what is most comfortable for viewing. Look through the eyepiece and
adjust the bulb brightness to a comfortable intensity with the dimmer wheel.
Always start with the lowest magnification objective lens centered over the stage, in this
case the 4x objective. Look through the eyepiece and bring the image into focus by
slowly turning the larger coarse adjustment focus knob to bring the stage closer to the
objective.
Once an image forms, switch to the blue fine adjustment focus knob to fine-tune for
clarity. Manually move the slide across the stage to look at different parts of the
specimen slide.
Increase magnification by rotating the nosepiece clockwise to a higher magnification
objective, taking care not to strike the slide with the objective. If you cannot move the
objective into place without making contact with the slide, use the coarse focus knob to
move the stage down and away to make room before changing magnification.
*To use the microscope in stereo mode, switch the illumination to the upper light built
into the body. Place a solid specimen (such as hair, pollen, etc.) onto the stage with the
objective lenses on the lowest magnification setting. Repeat the steps for focusing to
see magnified details.
IV. Caring for your microscope
As with any quality instrument, your microscope should be stored in a cool, dry place.
Use the dust cover to protect the microscope when not in use. If necessary, clean the
lenses with a soft brush or compressed air to gently remove dust. Avoid touching the
optical surfaces directly and never disassemble the optical components of the
microscope. When not using an eyepiece, use the plastic cover to protect the eyepiece
holder and ocular lens.
V. Troubleshooting
If you have a problem, you may be able to correct it yourself. Here are some common
issues and easy solutions you can try before calling customer support for service.
4
Page 6

*Caution: Never disassemble the electrical, mechanical, or optical components. This
servicing should only be done by a Swift technician.
Issue
Possible cause
Solution
Visual field is uneven, or
image is dark at the edges
Nosepiece is not locked in
place to center the
objective lens
Turn nosepiece until you
hear a click to center the
objective lens
Slide is not centered over
the bulb, leaving part of the
specimen unilluminated
Center the slide over the
bulb with the X-Y
translational control knobs
Dirty objective or eyepiece
lens
Clean with compressed air
or soft brush
Iris aperture is closed too
far
Open the iris aperture
wider
Visual field is blurry or dirty
Dirty objective or eyepiece
lens
Clean with compressed air
or soft brush
The slide is dirty
Clean the slide with glass
cleaner
Eyepiece or objective lens
not fully screwed into place
Tighten eyepiece or
objective lenses
Poor image quality
No cover slip on the
specimen
Place glass cover slip over
the specimen
Slide is too thick or too thin
Use a lab-quality slide
Slide is placed upside
down on the stage
Flip the slide over so that
the cover slip is facing up
Oil on objective lens
Wipe the lens off with soft
cloth and glass cleaner
Iris aperture is too narrow
or too wide
Adjust the iris aperture
5
Page 7

Image moves while
adjusting focus
Slide is shifting on the
stage
Reposition slide more
securely in the slide holder
Light is too dim
Iris aperture is closed too
far
Open the iris aperture
wider
Lamp setting is too low
Increase intensity on the
control knob
Condenser lens is dirty
Wipe the condenser lens
off with a soft cloth
Voltage is too low
Use the supplied power
adapter
Objective lens collides with
the slide when switching
from a lower to a higher
power objective
Slide is upside down or too
thick
Use a lab-quality slide or
flip the slide over so the
cover slip is facing up
Stage is set too close to
the objectives
Lower the stage with the
coarse focus knob
Safety rack stop needs
adjustment
Adjust the safety rack stop
to stop the stage farther
from the objectives
Image won't come into
focus when using a
high-powered objective
Slide is upside down
Flip the slide over so the
cover slip is facing up
Slide is not moving when
using the X-Y translational
control knob
Slide has come unclipped
from the holder
Reposition slide in the
holder and secure with clip
Lamp does not turn on
No power source
Check that the adapter is
fully connected or that
batteries are installed
Bulb has burned out
Replace the bulb
6
Page 8

Lamp flickers while on
Bulb is not inserted into the
socket correctly
Check to make sure the
bulb is fully screwed into
the socket
Power adapter is not fully
plugged in
Check to make sure that
the adapter is fully
connected to wall socket
and to the microscope
VI. Warranty information and customer support
Our microscopes are manufactured to meet ISO 9001 standards. Swift warranties are
as follows:
● Five (5) Year Warranty for Microscopes: Microscopes come with a five (5) year
warranty against manufacturing defects. Does not cover normal wear, routine
maintenance, add-on accessories, damage resulting from repair by unauthorized
parties, accident, alteration, shipping, misuse or abuse is not covered.
● One (1) Year Warranty for Electrical and Video components. Does not cover light
bulbs, batteries, fuses, or electrical cords.
All warranties start from the original date of purchase. Swift provides the repair or
replacement of warrantied parts for free, including labor, during the warranty period.
Proof of original purchase is required. Buyers are responsible for shipping to and from
our warehouse for warranty services. The warranty does not cover damages resulting
from normal wear and tear, abuse, or unauthorized repairs. Warranty service is
provided by Swift Optical Instruments, Inc.’s authorized technicians. Determination of
warranty is at the technician’s discretion.
*For customers living outside the United States, Swift Optical Instruments, Inc. will
provide standard warranty service. Both inbound and outbound shipping costs
(including duties and taxes) is the responsibility of the consumer.
For more information or to submit a repair request, please contact our Customer
Support department:
Tel: 877-967-9438, option 1
Email: [email protected]
7
Page 9

Disclaimer: We are constantly working to improve our instruments and to adapt them in
response to customer feedback. These improvements occasionally involve small
modifications to the mechanical structure and optical design of our microscopes.
Therefore, some descriptions, illustrations, and specifications in this instruction manual
may vary slightly from the microscope you receive.
Swift Optical Instruments, Inc.
(877) 967-9438
www.swiftoptical.com
8
 Loading...