

Page 1

Swift M3 Microscope
The Swift M3 is a versatile microscope designed for both microscopic (high
magnification, small field of view) and macroscopic (low magnification,
large field of view) applications.
Micro/macro optical capability combined
with an innovative modular stage design produce a sophisticated
instrument designed to perform for many years in numerous applications.
The M3 is equipped with an adjustable stage that allows the viewing mode
to be changed. The microscope stage can be placed in the uppermost
position, the “micro” mode, or by lowering the stage to its middle or lowest
position in can be placed in the “macro” mode.
The M3 is equipped with multiple stage inserts for observation of
specimens which include a stage plate with an integrated 0.65 N.A.
condenser for microscopic use and an optically clear specimen cup or a
black/white contrast plate for macroscopic use. The M3 features top and
bottom rechargeable LED illumination for cordless operation both indoors
and out.
Page 2
Page 3

10
microscope is hard epoxy and is resistant to acids and reagents. Clean this
surface with a damp cloth and mild detergent.
CLEANING - The front lens of the objectives should be cleaned
periodically. First brush with a soft, camel hair brush or blown off with
clean, oil-free air to remove dust particles. Then wipe gently with a soft
lens tissue, moistened with optical cleaner (eyeglass or camera lens) or
clean water. Immediately dry with a clean lens paper. The eyepiece(s) may
be cleaned in the same manner as the objectives, except in most cases
optical cleaner will not be required. In most instances breathing on the
eyepiece to moisten the lens and wiping dry with a clean lens tissue is
sufficient to clean the surface. Lenses should never be wiped while dry as
this will scratch or otherwise mar the surface of the glass.
Periodically, the microscope should be disassembled, cleaned and
lubricated. This should only be done by a qualified, authorized microscope
technician.
DUST COVER AND STORAGE - All microscopes should be protected
from dust by a dust cover when in storage or not in use. A dust cover is the
most cost-effective microscope insurance you can buy. Ensure that the
storage space is tall enough to allow the microscope to be placed into the
cabinet or onto a shelf without making undue contact with the eyepieces.
Never store microscopes in cabinets containing chemicals which may
corrode your microscope. Also, be sure that the objectives are placed in
the lowest possible position and the rotating head is turned inward and not
protruding from the base. Microscopes with mechanical stages should be
adjusted toward the center of the stage to prevent the moveable arms of
the mechanical stage from being damaged during storage in the cabinet.
SERVICE – If your microscope needs to be serviced or if parts need to be
replaced, please contact Swift customer service for more information at
(877) 967-9438.
3
Components of the Microscope
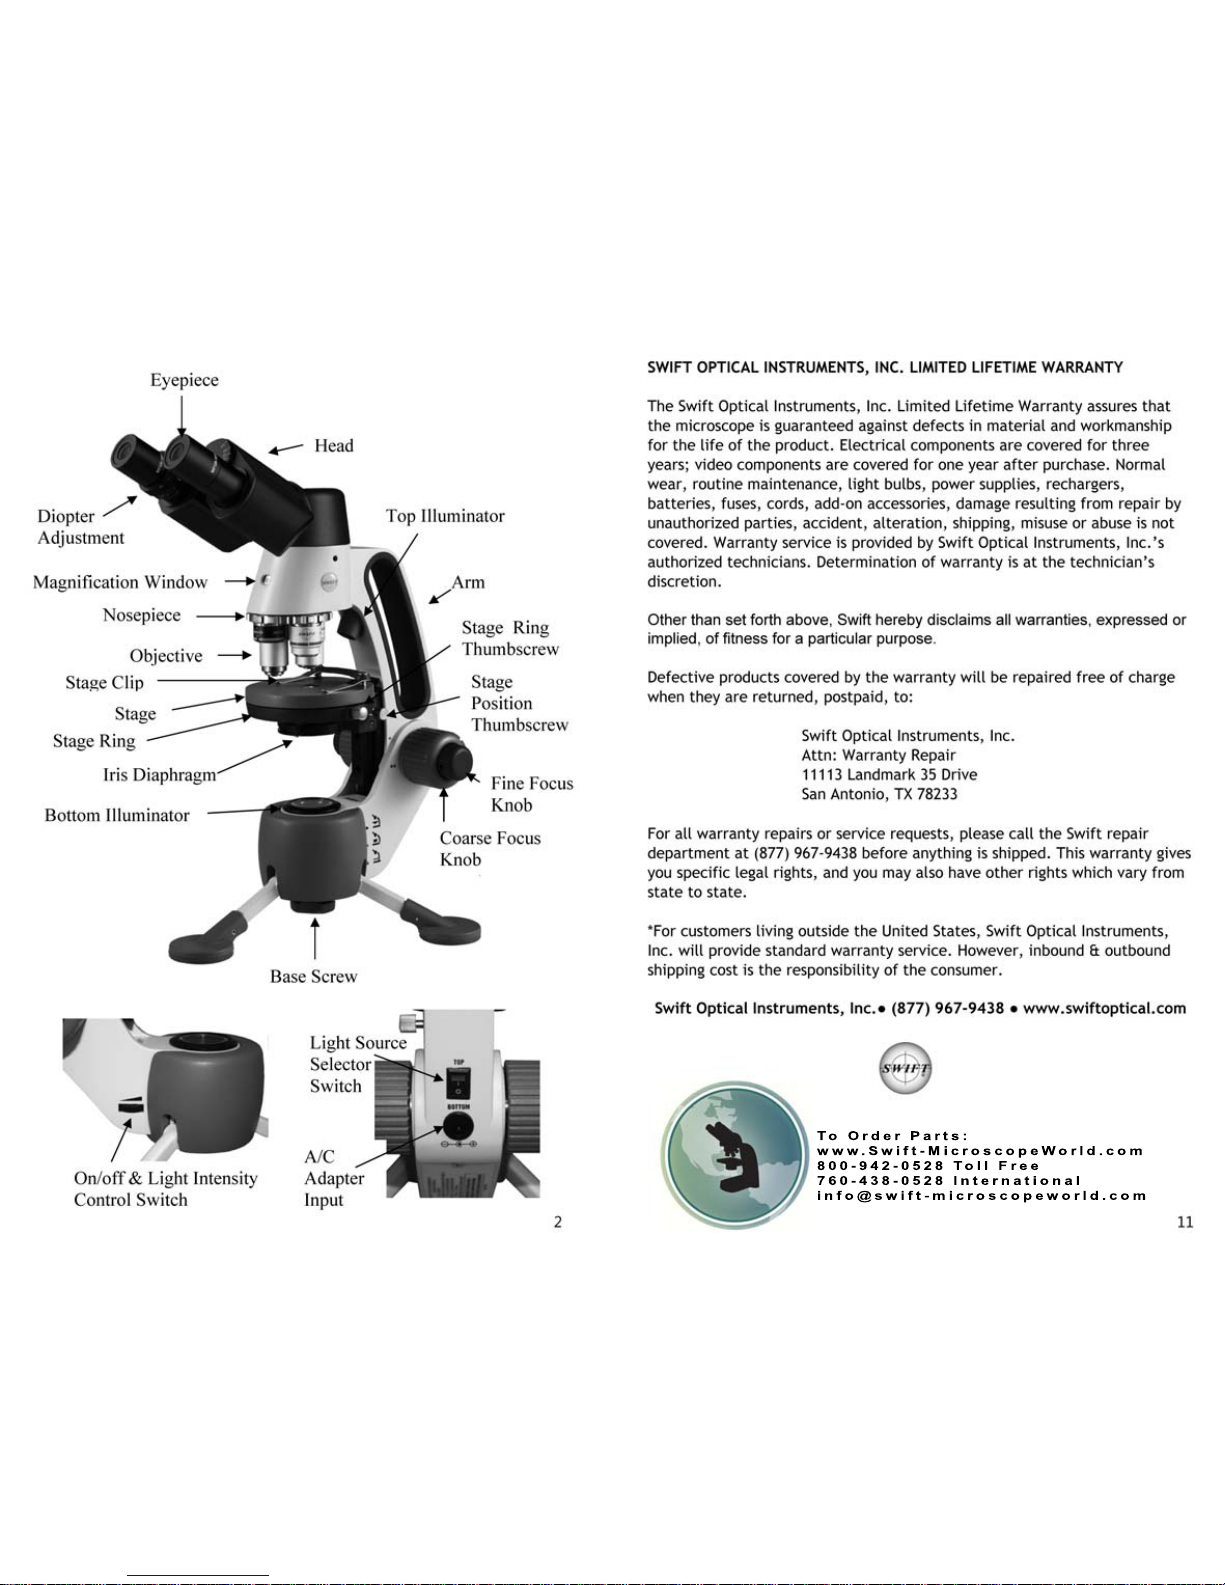
ARM – the frame that connects the head and the base of the
microscopes. It also houses the illumination switch, carrying handle,
stage ring, coaxial focus controls, and the incident (top) light.
BASE – attaches to the bottom of the M3 with a thumb screw located
underneath the tripod base. The tripod legs extend out to ensure
stable footing or fold in for storage.
*
* The M3 can also be mounted on a standard camera tripod for use in the
field.
COAXIAL CONTROLS – the coaxial focusing system combines both
the coarse and fine focus into one focusing mechanism located on
both sides of the microscope. The large gray knob is the coarse focus
control and the smaller blue knob is the fine focus control.
COARSE FOCUS – the larger, outer knob of the focus control which
facilitates rapid and heavy movement of the focusing mechanism. In
order to prevent gear damage, the focus control is equipped with
an upper limit stop that protects the high magnification objectives and
slides.
DIOPTER ADJUSTMENT (M3-B only) – located on the left eyepiece
of the binocular head, this adjustment compensates for the
differences between the users’ eyes.
EYEPIECE(S) – the upper optical element that further magnifies the
primary image of the specimen and brings the light rays into focus at
the eyepoint. The M3 has widefield 10X magnification eyepiece(s)
with an 18mm field of view.
FINE FOCUS – the smaller, inner knobs of the coaxial control which
allow for slow and subtle focusing movement to bring the specimen into
sharp focus.
HEAD – the upper portion of the microscope which contains the
refracting prisms and the eyepiece tubes which hold the eyepieces.
Note that the head rotates, allowing operation from the front or back.
ILLUMINATION – the Swift M3 uses a low voltage Light Emitting
Diode (LED) for both transbase (bottom) and incident (top) light.
(The illumination system may be used while the M3 is charging.)
IRIS DIAPHRAGM – The iris diaphragm is a round device that is
mounted below the stage. It has multiple leaves similar to a
camera shutter. Moving the control lever from side-to-side causes the
opening in the diaphragm increases or decreases, allowing the user to
control the contrast of the specimen. If the image is “washed out” the
iris diaphragm is opened too wide. If the image is too dark the iris is
Page 4

4
not open wide enough.
NOSEPIECE – the revolving turret that holds the objective lenses.
Changes in magnification are accomplished by rotating different
powered objective lenses into the optical path. The nosepiece must
“click” into place for the objectives to be in proper alignment.
OBJECTIVES – the optical systems which magnify the primary image of
the instrument. Microscope magnifications are 4X, 10X, 40X. The
macroscopic magnification is 2X. The magnification of the objective
combined with the magnification of the eyepiece gives a total 20X
macroscopic magnification of the subject, and allows for total
microscopic magnifications of 40X, 100X and 400X.
SIEDENTOPF (M3-B only) – a binocular head design where the
interpupillary adjustment (increasing or decreasing the distance between
the eyepieces) is achieved by pivoting the eyepiece tubes in an up and
down arc motion similar to binoculars.
STAGE RING – the circular ring located in the center of the
microscope that supports the stage plate, black/white contrast plate,
or specimen cup. These components are held onto the stage ring
with a thumbscrew.
Other Important Terminology
“COATED” LENS – in attempting to transmit light through glass, much
of the light is lost through reflection. Coating a lens increases the
light transmission by reducing or eliminating reflection, thus allowing
more light to pass through.
COVER GLASS – thin glass cut in circles, rectangles or squares
usually a thickness of 0.15 to 0.17mm, for covering the specimen. The
majority of specimens should be protected by a cover glass, and must
be covered when using 40XRD objective.
DEPTH OF FOCUS – the ability of a lens to furnish a distinct image
above and below the focal plane. Depth of focus decreases with the
increase of numerical aperture or with the increase of magnification.
DIN – (Deutsche Industrie Normen) A German standard for the
manufacturing of microscope lenses. DIN is not a quality standard, but
one of commonality.
EYE POINT or EYE RELIEF – the distance from the eyepiece lens to
your eye where a full field of view can be seen. A higher eye point
accommodates users who wear eyeglasses
9
Step 3: Select the top (incident) illuminator by pressing the light source
selector switch on the back of the microscope’s arm to the top position.
Step 4: Turn on the illumination by rotating the on/off & light intensity
control dial towards the bottom illuminator.
Step 5: Place the specimen in the specimen cup or on the contrast plate
and center it in the optical path.
Step 6: Rotate the nosepiece to place the 2X macro objective into position
over the specimen. Be sure the objective “clicks” into position. (The 2X
macro objective in the only objective that can be used in macro mode.)
Step 7: (M3-B only) Adjust the Seidentopf binocular head until one perfect
circle is seen in the field of view. This is accomplished by moving the
eyepiece tubes up and down in an arc-like motion, similar to adjusting
binoculars.
Step 8: While viewing through the eyepiece(s), rotate the coarse focus
knob slowly and carefully to bring the specimen into focus. The specimen
may require some centering in the field of view at this time. By using the
fine focusing knob, slowly and carefully refine the focus to clearly observe
the fine details of the specimen.
Step 9: (M3-B only) Set the diopter adjustment, which is designed to help
compensate the difference between the user’s eyes. To adjust, first bring
specimen into perfect focus by using the coaxial focusing knobs while
using your right eye only (close your left eye). Now, using your left eye
only (close your right eye), adjust the left eye diopter only (do not adjust the
focus control knobs) until the specimen is in sharp focus. The diopter is
now set and no further adjustment to the diopter is needed until a new
operator uses the scope.
Care of Your Swift M3 Microscope
The M3 Series microscope is designed to function with minimal
maintenance, but certain components should be cleaned frequently to
ensure ease of viewing. The microscope’s illumination should be turned off
when the microscope is not in use to prolong electrical component life.
CAUTION - Objectives should never be disassembled by the user. If
repairs or internal cleaning should be necessary, this should only be done
by qualified, authorized microscope technician. The finish of the
Page 5

8
that once the 4x objective is focused; only a slight turn of the fine focus is
required to refine the focus when changing to higher power objectives.
Step 9: (M3-B only) Set the diopter adjustment which is designed to help
compensate for the difference between the user’s eyes. To adjust, first
bring the specimen into perfect focus by using the coaxial focusing knobs
while looking through the eyepiece with the right eye only (close your left
eye). Now, using your left eye only (close the right eye) turn the left eye
diopter only (don’t touch the focus controls) to obtain a crisply focused
image. The diopter adjustment is now set and no further adjustment will be
needed until a new operator uses the scope.
Please note: a smaller diaphragm aperture (opening) increases the
contrast in the image while a larger aperture decreases the contrast. (The
diaphragm is not intended for controlling the brightness of the illumination).
A good procedure to follow in selecting the proper opening is to start with a
large aperature and reducing it until the fine detail of the specimen is in
exact focus. Using an inappropriate aperture results in a “washing out” of
the image. Care must be exercised not to reduce the aperture too much to
gain high contrast, as then the fine structure in the image of the specimen
will be destroyed. Reducing the aperture does increase contrast and depth
of focus, but it also reduces resolution and causes diffraction. The aperture
for the 10X objective will not be the same as for the 40XRD objective, since
the angle of the required light is determined by the numerical aperture
(N.A.) of the objective. The proper aperture of the diaphragm can be easily
achieved after minimal experience with the microscope.
Macroscopic Settings
Step 1: Loosen the stage ring thumbscrew on the right side of the stage
ring. Insert the
specimen cup or the black/white contrast plate into the
stage ring. The specimen cup is designed to be rotated while viewing a
specimen so the thumbscrew does not need to be tightened. If the contrast
plate is being used, tighten the thumbscrew to secure it in place.
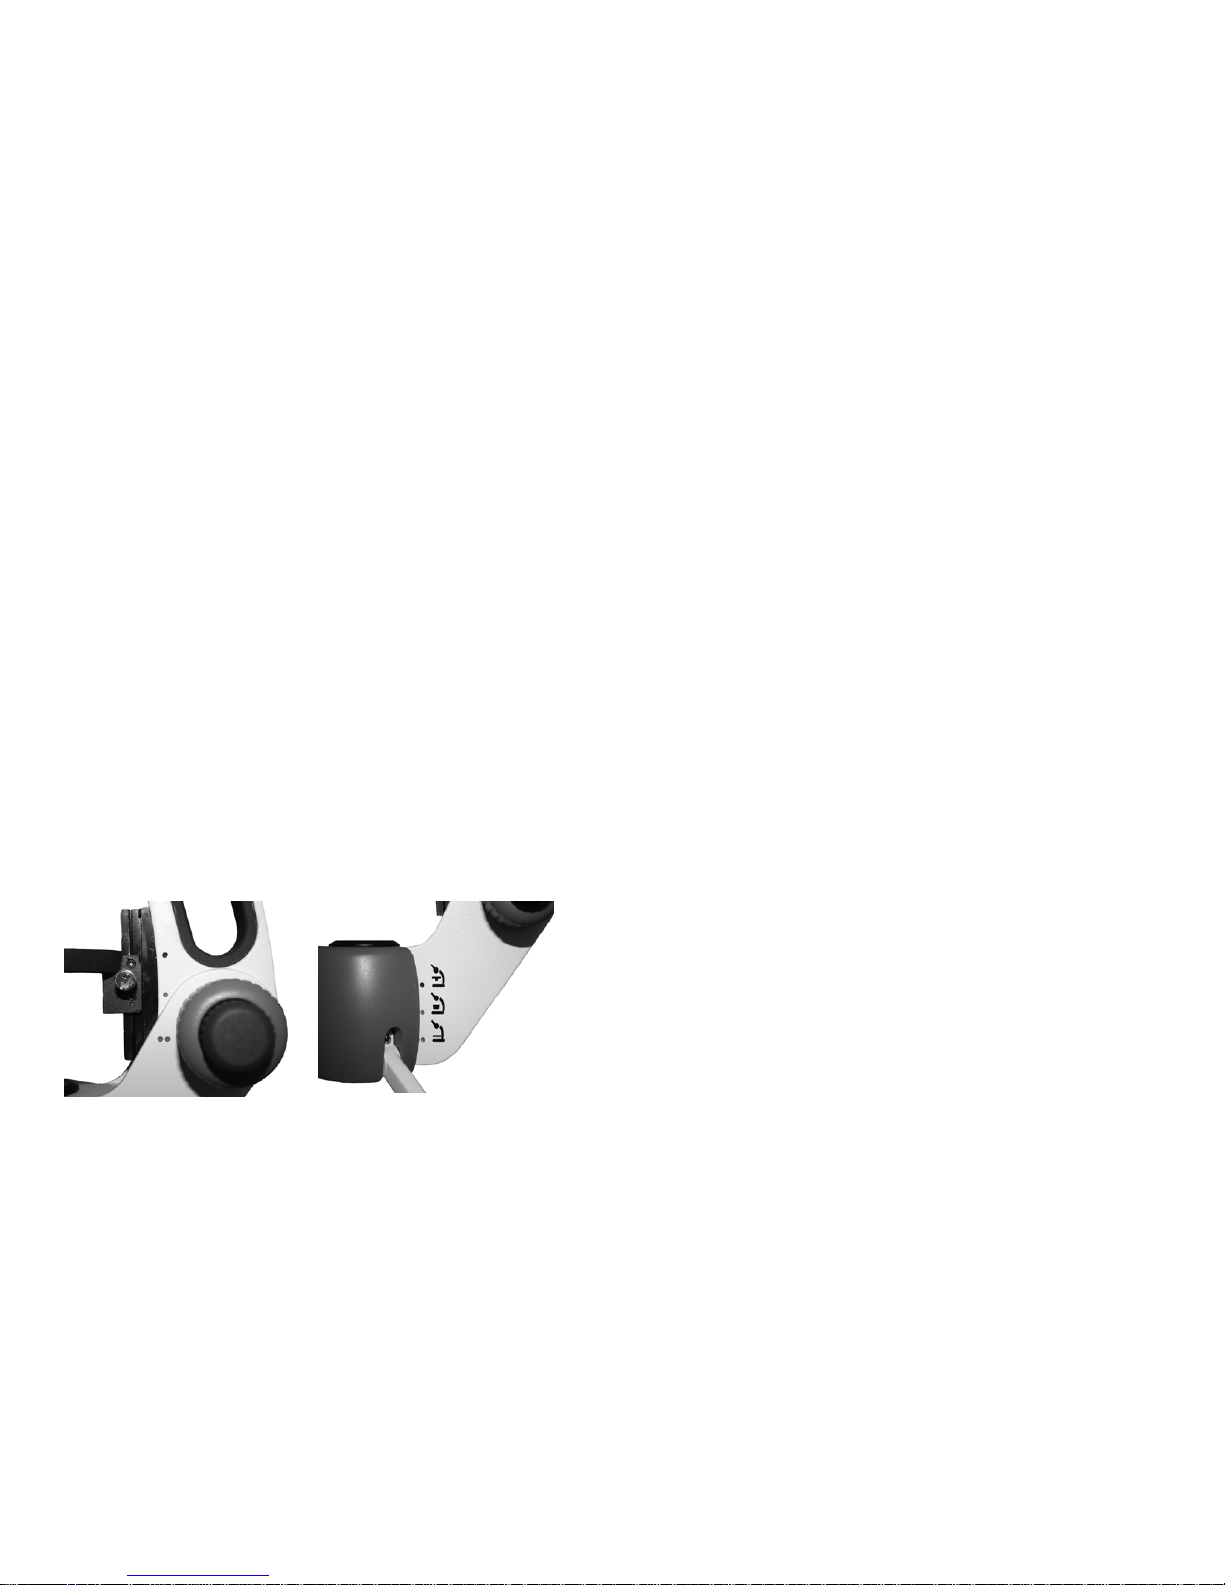
Step 2: Loosen the
stage position thumbscrew on the right side of the
stage to move the stage assembly to the suggested middle position for
specimen cup use (indicated by 1 red dot) or the lowest position for
contrast plate use (indicated by 2 red dots). The red dot below the stage
position thumbscrew should be lined up with the red dot(s) on the right side
of the microscope arm near the coarse focus knob. If odd-sized specimens
are being viewed, the stage assembly may have to adjusted slightly off of
the indicator marks to achieve the proper working distance in order to bring
the specimen into focus.
5
FIELD OF VIEW – the area of the object that is seen when the image is
observed. It may range in diameter from several millimeters to less
than 0.1mm, depending on the level of magnification.
FOCAL LENGTH – parallel rays of light after refraction through a lens
will be brought to a focus at the focal point. The distance from the
optical center of the lens to the focal point is the focal length.
NUMERICAL APERTURE (NA) – a measure of an objective’s light
gathering capabilities. The concept may be compared to the F-valve in
photographic lenses. Generally speaking, N.A. values of less than 1.00
are "Dry" objectives. Values of 1.00 or greater require oil as a medium.
Please note that condensers are part of the optical system and are also
assigned an N.A. value. That value must be at least as high as that of
the highest objective used.
PARFOCAL – a term applied to objectives and eyepieces when
practically no change in focus is needed when changing
objectives. The objectives on your Swift M3 microscope are
parfocalized at the factory so that only a slight adjustment of the fine
focus knob is needed to maintain focus when switching magnification.
RESOLUTION or RESOLVING POWER – the ability of a lens to define
the details of the specimen at a maximum magnification. This is
governed by the N.A. (Numerical Aperture) of the lens. For example, a
40X objective with a N.A. of 0.65 has a maximum resolving power of 650X,
equal to 1000 times the N.A.. This rule of N.A. x 1000 is true of all
achromatic objectives.
WORKING DISTANCE – the distance from the lens of the objective to
the cover slip on the slide, when the specimen is in focus.
Using Your Swift M3
CORDLESS OPERATION – The rechargeable battery should be fully
charged for approximately 8 hours before the initial use. It can be charged
by using the 4.5 volt A/C adapter included with the microscope. An LED
indicator light on the A/C adapter will be red while the battery is charging
and will turn green when the battery is fully charged. The battery can be
used to power the illumination system for approximately 40 hours. If the
microscope is used in the same location, the A/C adapter can remain
plugged-in without damage to the battery or recharging system.
MAGNIFICATION – The M3 comes with silver 4X, 10X and 40X
objectives (for microscopic use only) and a black 2X objective (for
Page 6
6
macroscopic use only). The objective magnifications shown in the
magnification window are color coded to correspond to the stage
position icons on the side of the arm. Micro magnifications are written
in blue to coordinate with the blue micro mode stage position. The 2X
macro magnification is written in red to coordinate with the two macro
mode stage positions.
STAGE SELECTIONS
SPECIMEN CUP – a container used for collecting and viewing
specimens at a macroscopic level. This container has adequate depth
and has a ventilated optically clear lid for use with a variety of
specimens.
CONTRAST PLATE – offers a black or white viewing background
STAGE PLATE – the microscopic stage with a built-in 0.65 N.A.
condenser, iris diaphragm, stage clips and swing out white filter.
STAGE POSITION ADJUSTMENT – proper stage height is critical for
achieving the correct focusing distance for viewing micro or macro
specimens. The stage can be set at 3 levels:
MICROSCOPIC – uppermost stage position. (Stage plate must be
placed in the stage ring).
MACROSCOPIC – middle stage position. (Specimen cup must be
placed in the stage ring).
– lowermost stage position. (Black/white contrast plate must be placed
in the stage ring).
For proper stage ring adjustment, loosen the stage position thumbscrew to
raise or lower the stage ring housing to line up with the desired stage
position indicator marks. Tighten the thumbscrew to secure the stage
7
assembly in place. The macro indicator marks are the suggested positions
for viewing most macro specimens. The macro stage ring positions may
have to be adjusted slightly to find the best working distance for unusual
sized specimens.
Microscopic Settings
Step 1: Loosen the stage ring thumbscrew on the right side of the stage
ring. Insert the
stage plate into the stage ring and secure it in place by
tightening the thumbscrew.
Step 2: Loosen the
stage position thumbscrew on the right side of the
stage to move the stage assembly to its uppermost position. The red dot
underneath the stage position thumbscrew should be lined up with the blue
dot on the right side of the microscope arm near the coarse focus knob.
Step 3: Select the bottom (transbase) illuminator by pressing the light
source selector switch on the back of the microscope’s arm to the bottom
position.
Step 4: Turn on the illumination by rotating the light on/off & intensity
control dial towards the bottom illuminator. (Note: Please notice that that
the dial will "click" when turning on the light. When turning the unit off,
please ensure that the dial is rotated all the way back until it "clicks" off to
save power and prolong LED lifespan.)
Step 5: Place the slide on the stage, securing it with the stage clips.
Center the specimen in the optical path.
Step 6: After securing and moving the slide into position, rotate the
nosepiece to place the lowest power 4XD objective into position over the
specimen. Be sure the objective “clicks” into position. The iris diaphragm
should be adjusted at this time to about a ¼ inch (5 mm) open.
Step 7: (M3-B only) Adjust the Siedentopf binocular head (by moving the
eyepiece tubes up and down in an arc-like motion, similar to adjusting
binoculars) until one perfect circle is seen in the field of view
Step 8: While viewing through the eyepiece(s), rotate the coarse focus
knob slowly and carefully to bring the specimen into focus. The specimen
may require some centering in the field of view at this time. By using the
fine focusing knob, slowly and carefully refine the focus to clearly observe
the fine details of the specimen. Now you can turn the nosepiece to the
higher magnification micro objectives. The objectives are parfocalized so
 Loading...