

Page 1
Quick User Guide
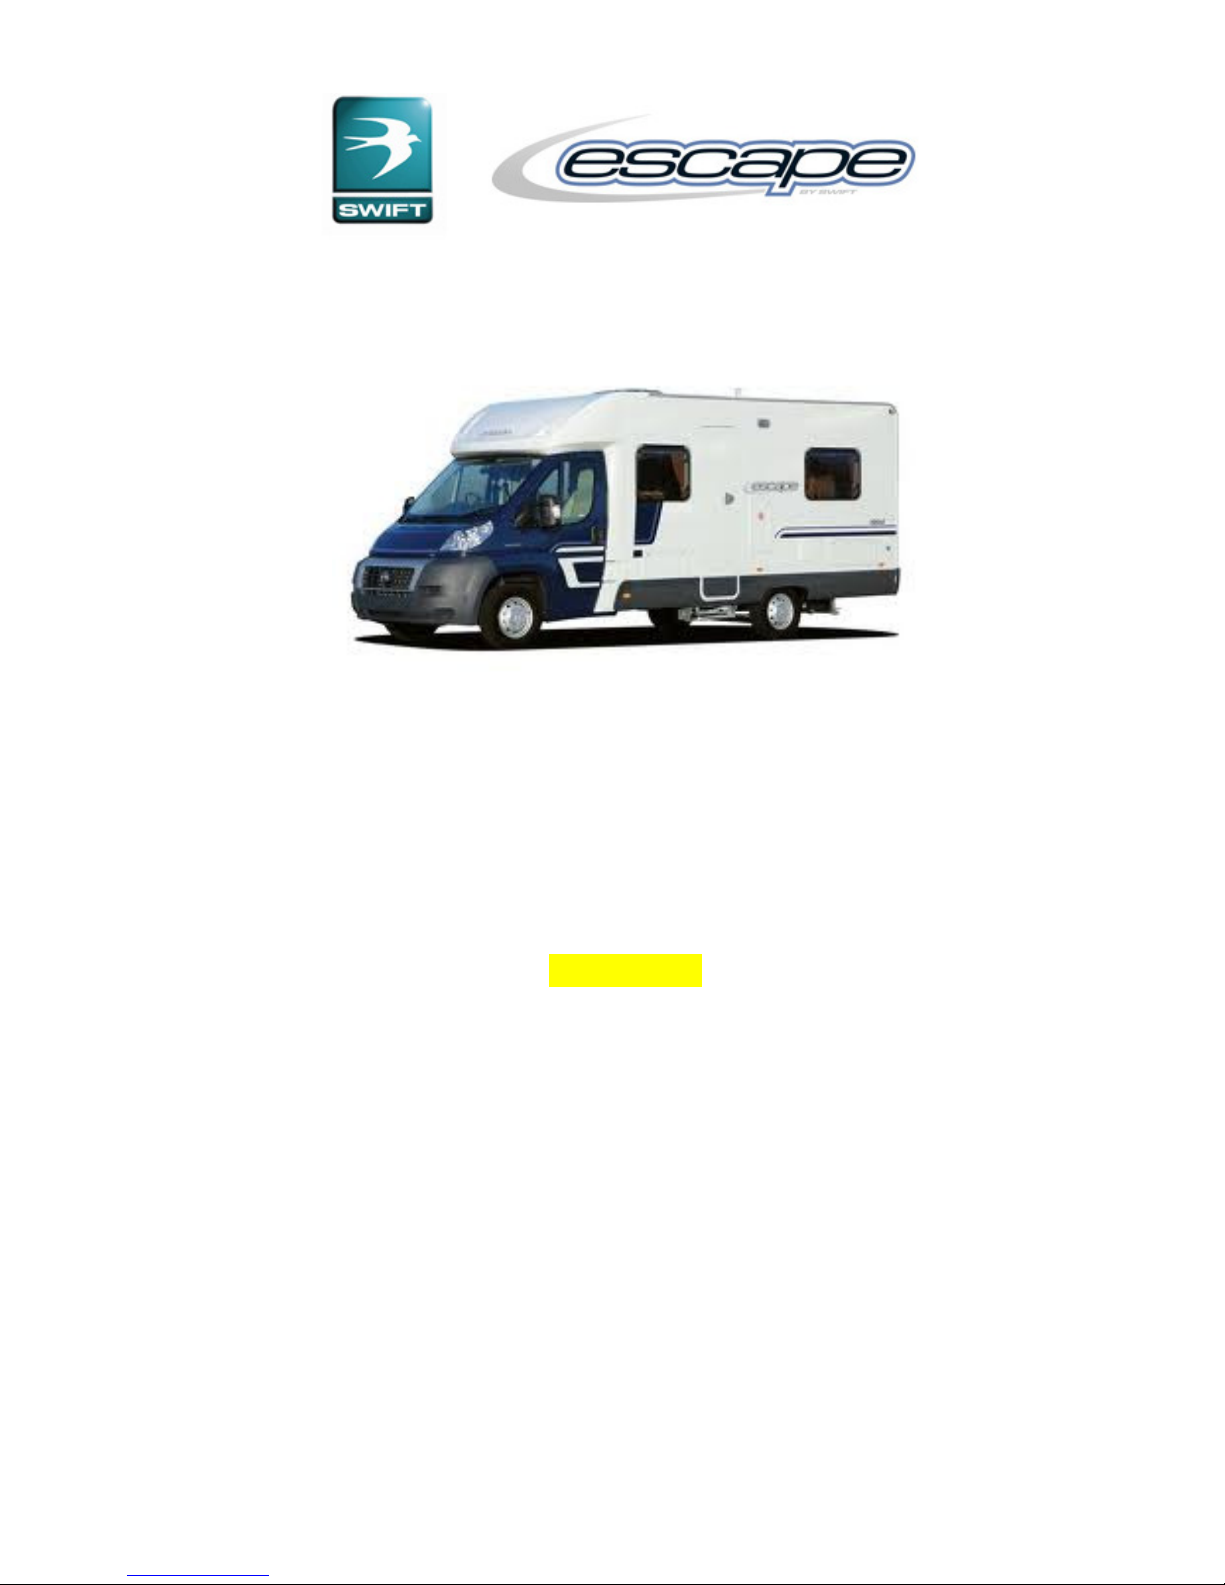
for the Swift Escape 664
Height 2.85m
Length 6.72m
Overall Width (Mirrors Folded) 2.24m
Page 2

Pre-Start Checks
There are a lot of items that need to be safely stowed before driving the vehicle, please
follow this checklist – it starts outside and works forward through the vehicle.
1. Gas off
2. Bike rack secure
3. Mains cable stowed and cupboard door secured
4. Step retracted
5. Levelling ramps stowed away
6. TV aerial down, and red spot to the rear (to avoid being caught by overhead
branches)
7. Table leg clipped to the floor
8. TV bracket locked (screw to tighten and lock arms in place)
9. Fridge; set to 12v, contents secure, and door latched
10. All overhead cupboards shut and locked
11. Roof lights closed and locked down
12. Gas hob lid down
13. Work surfaces clear of loose items
14. Windows closed and locked (at motorway speeds it may rip them off completely)
15. Shower head placed in tray (to prevent falling off and cracking tray)
16. Toilet cassette in closed position
17. Bathroom window closed and door locked shut
18. Driver and passenger seat rotated forward and locked
19. Fresh water – check levels and fill as required
20. Waste water – check levels and empty as required
21. Empty toilet cassette into chemical waste facility
22. Adjust wing mirrors (can you see the rear wheels?)
23. Consider the extra length of vehicle, and run wider when cornering
24. The camper is 2.85m or 9’ 4” high
Page 3
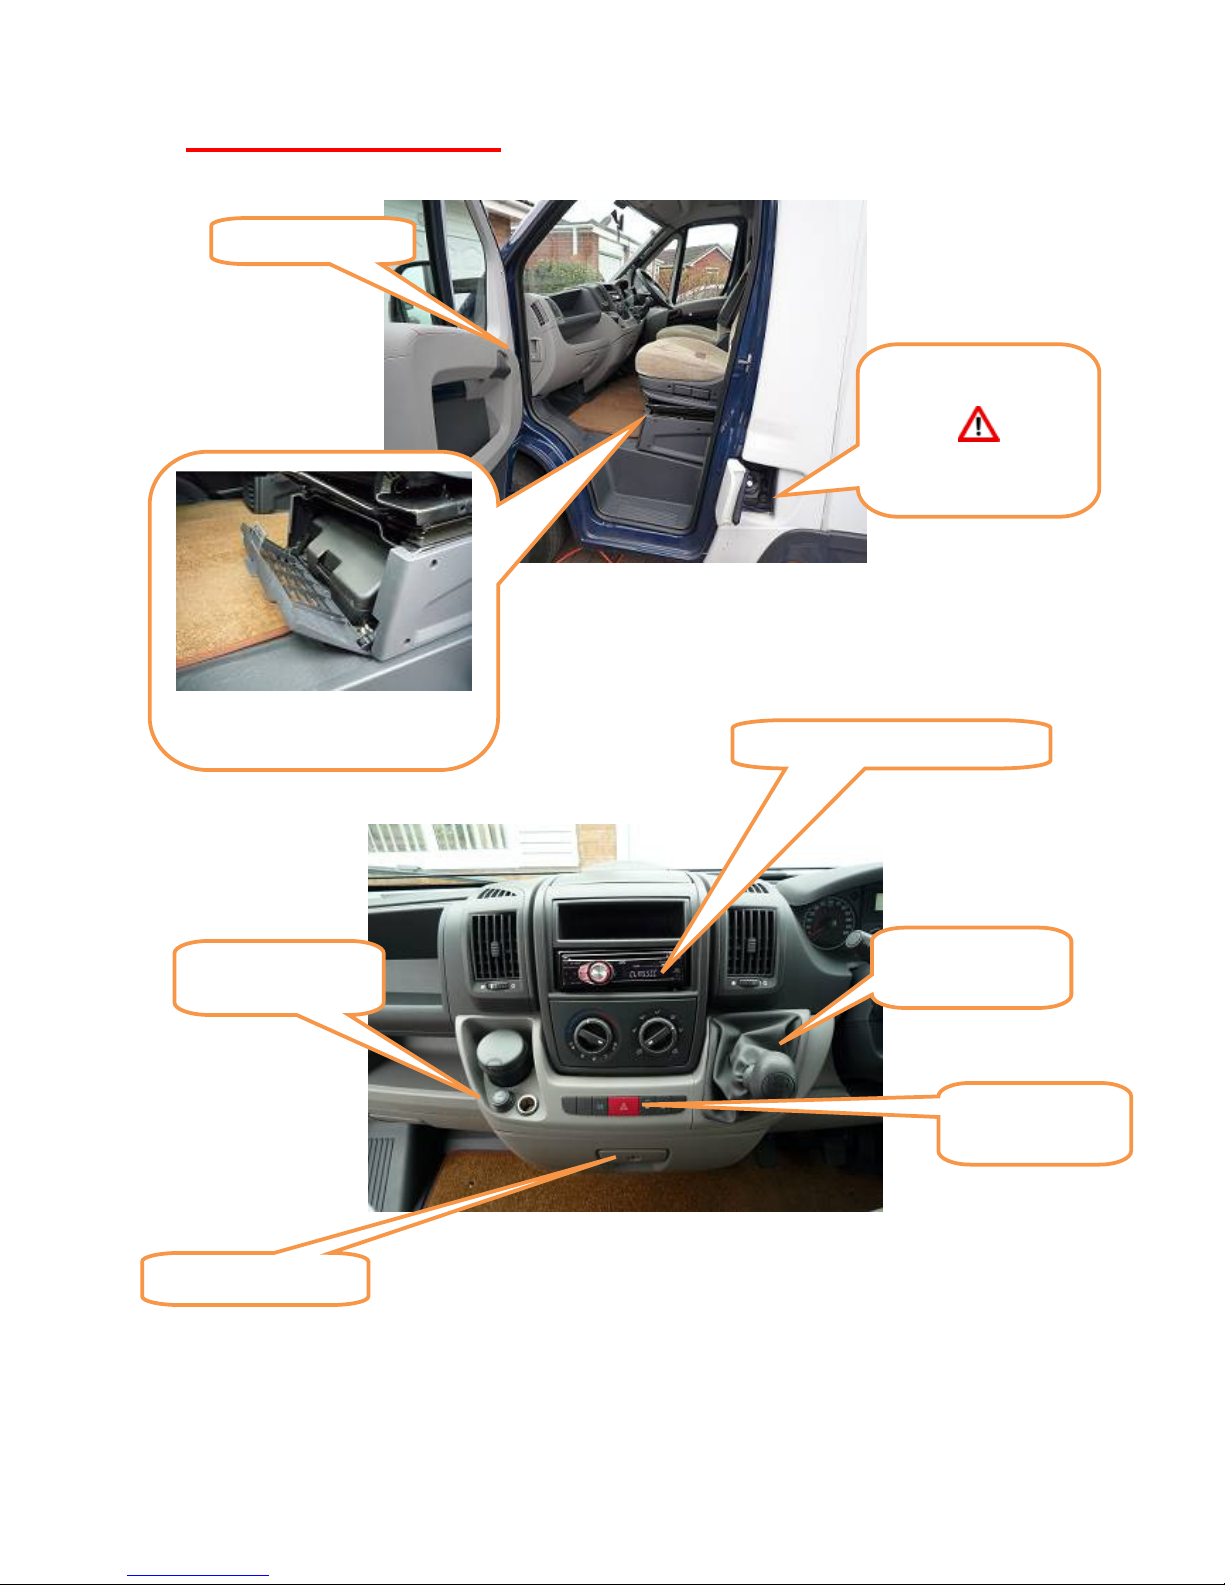
Fiat Ducato Cab
Fuel filler cap
DIESEL FUEL ONLY
Bonnet release
Emergency toolkit
MP3 ‘mini jack’ stereo input
5 speed ma
nual
gearbox
2 x 12v power
sockets for GPS
Central locking
(night time)
Lockable storage
Page 4
Driving a Large Vehicle
The dimensions of this vehicle are printed on the front cover.
Width: Although it appears big, the van is actually not much wider than an ordinary car.
The exterior mirrors are the widest part of the vehicle, and they give you a good “feel”
for the width.
Be careful though, about getting too close to trees and hedges. Strong branches hidden
among the leaves frequently scratch the sides of motorhomes.
Some countries require drivers to fold external mirrors inward when parked.
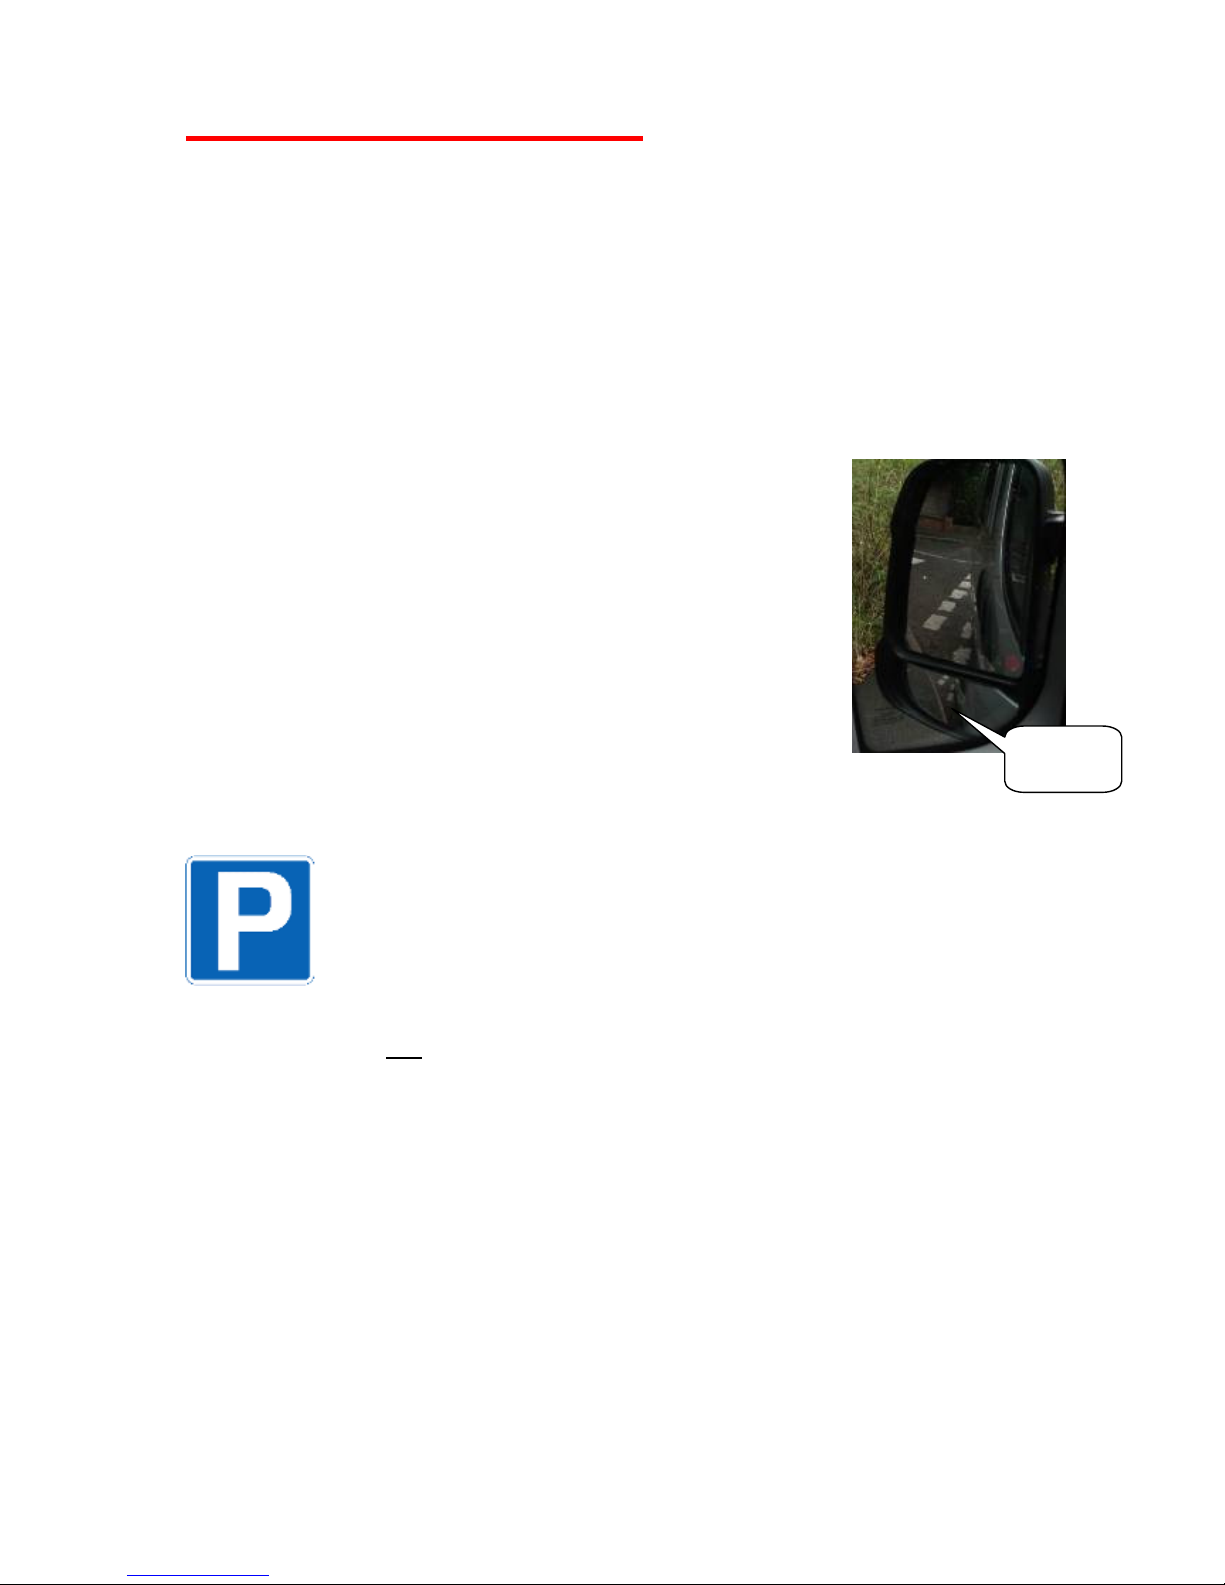
Length: The rear wheels are significantly further back from the
driver than in a normal car. As a result it is very easy to turn too
soon and have the rear wheels bumping over the kerb, or worse,
to scrape the side of the van against something.
The trick is to turn later, running wider on corners and at
junctions. Adjust each external mirror so that you can see both
the kerb and the rear wheel. Then as you turn, glance in the
mirror, and you will quickly learn when to turn.
Height: Arches or low bridges are an obvious hazard.
Also watch out for low roofs, and overhanging tree branches,
particularly when you are squeezing into the side of a narrow road to avoid an oncoming
vehicle and your attention is focused at ground level.
Parking: The vehicle is too tall to fit in most multi-storey car parks, and longer
than most on-street parking bays. If you effectively occupy two parking bays, it
is safer to buy two parking tickets. Some car parks have high-level barriers that
are open during the day, but are closed in the evening, and could prevent your
tall vehicle from leaving.
Reversing: Ask your passenger to walk and guide you. Explain that you can see them
only if they can see you in the mirrors. Open both front windows, so you can hear them.
Fuel Economy: Motorhomes are not very aerodynamic. You will use about 20% less
fuel at 60mph than at 70. Change up at 2000rpm for best economy.
Passengers must remain seated with seat belts fastened whenever the vehicle is
moving.
Length (no bike rack) – 6.72m (22’ 1”). Width (mirrors folded) – 2.24m (7’ 4”)
Height (no aerial) – 2.85m (9’ 4”)
Wheel
and kerb
Page 5
External Step
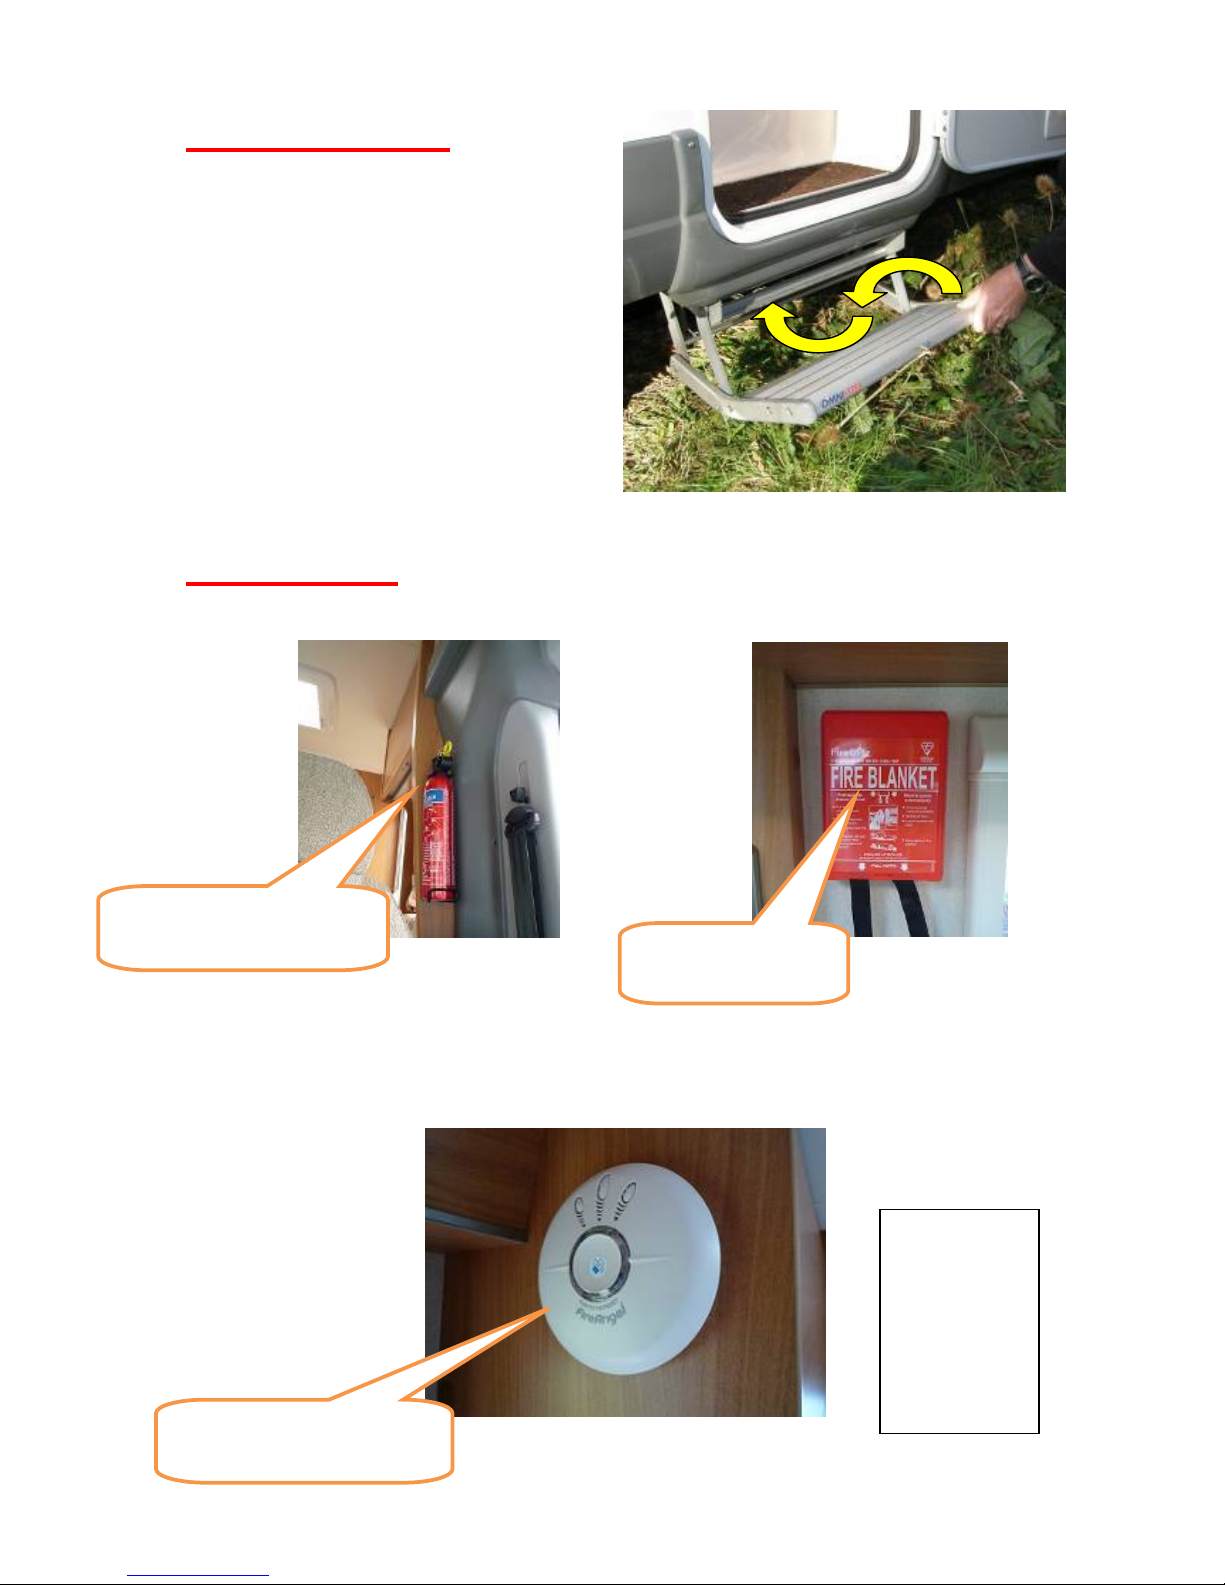
The retractable step simply pulls out, but
to return it, you must lift and push at the
same time.
There is an audible alarm if you start the
engine without retracting the step.
Fire Safety
Never Try To Move A Burning Pan Outside – Use The Fire Blanket
Instead
Fire extinguisher located
behind passenger front seat
Fire blanket located
in kitchen area
Smoke detector located near
habitation door
If the b
attery
needs
replacing, turn
the whole
alarm anticlockwise to
open.
Page 6
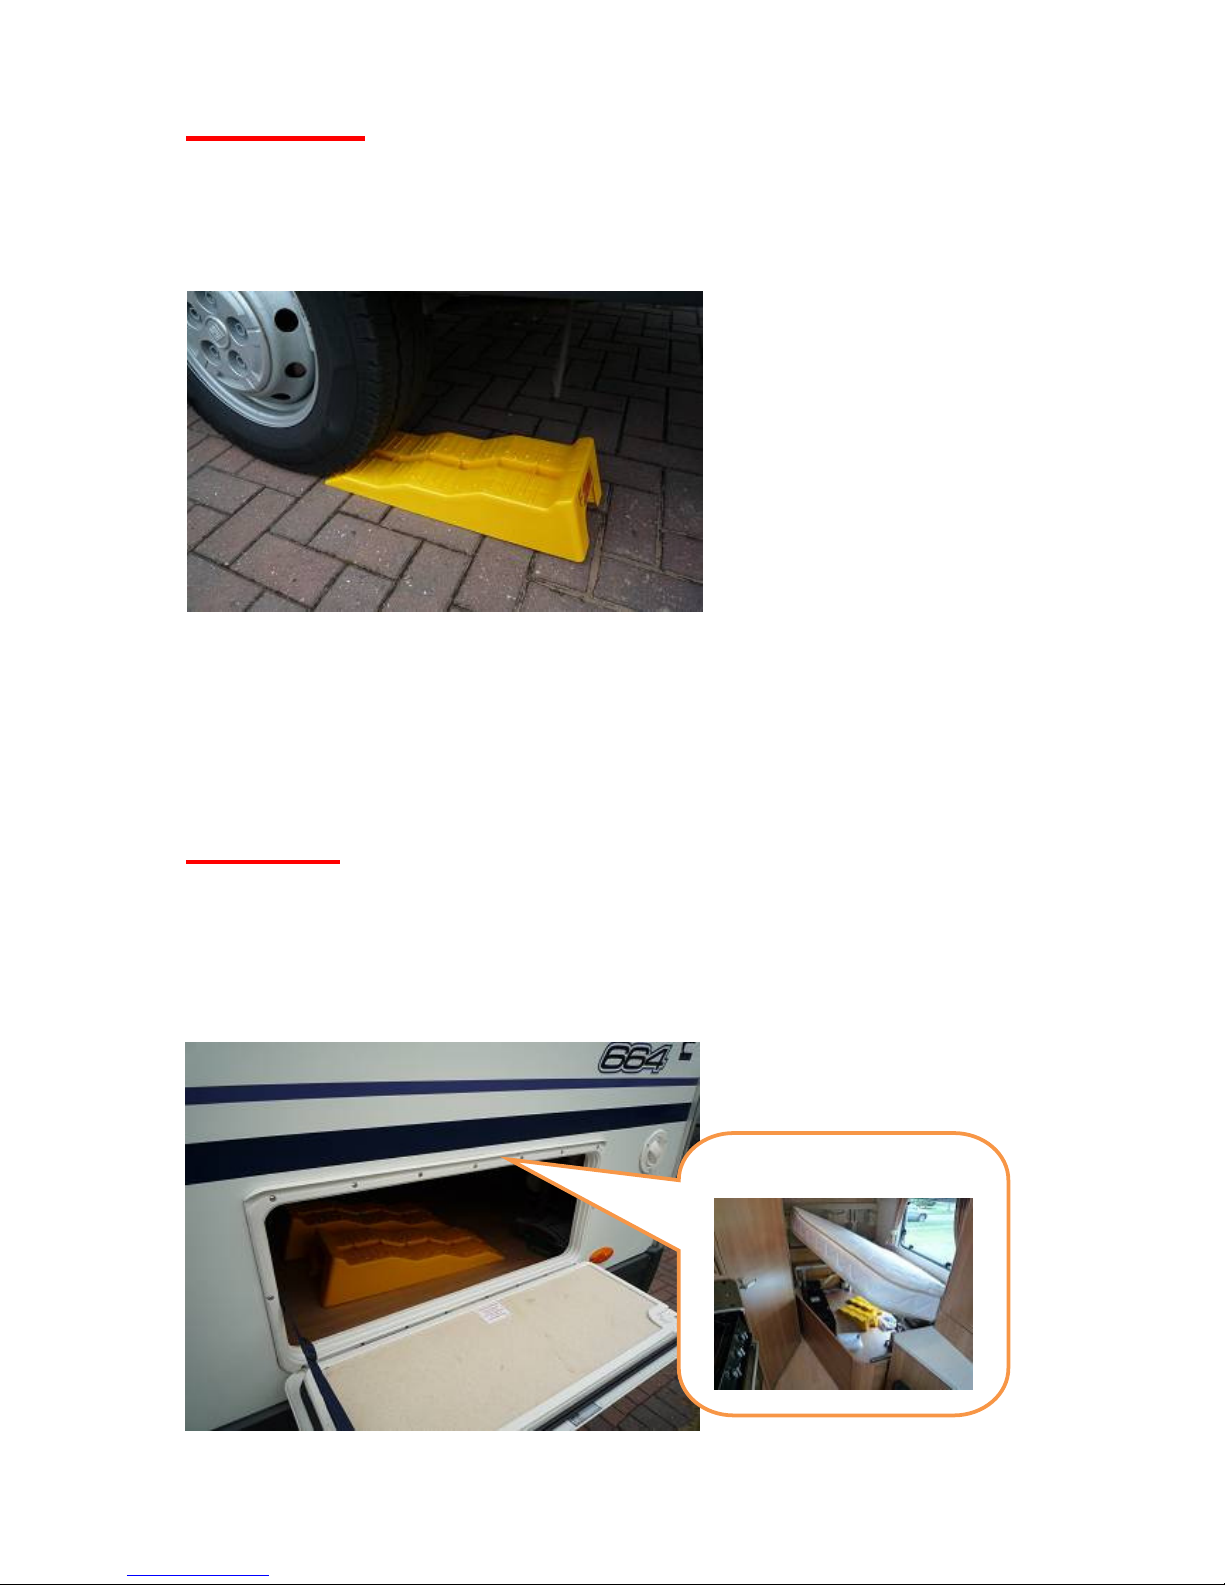
Levelling
If the motorhome is not level when parked, it can prevent the fridge from working, and
affect the drainage of water from the shower trays. More importantly, it can make
sleeping uncomfortable.
Levelling ramps are provided to
assist in levelling the motorhome.
These can be used to lift either
one end of alternatively one side.
Slowly drive forward onto the
ramps with your passenger
directing you from outside of the
vehicle.
Try not to drive too quickly up the ramps. If you overshoot, and drive off the end,
they may flip over and become wedged under the vehicle.
Once you have levelled up, make sure that the handbrake is firmly applied and you
leave the vehicle in 1st gear to ensure that the vehicle does not move either way.
Storage
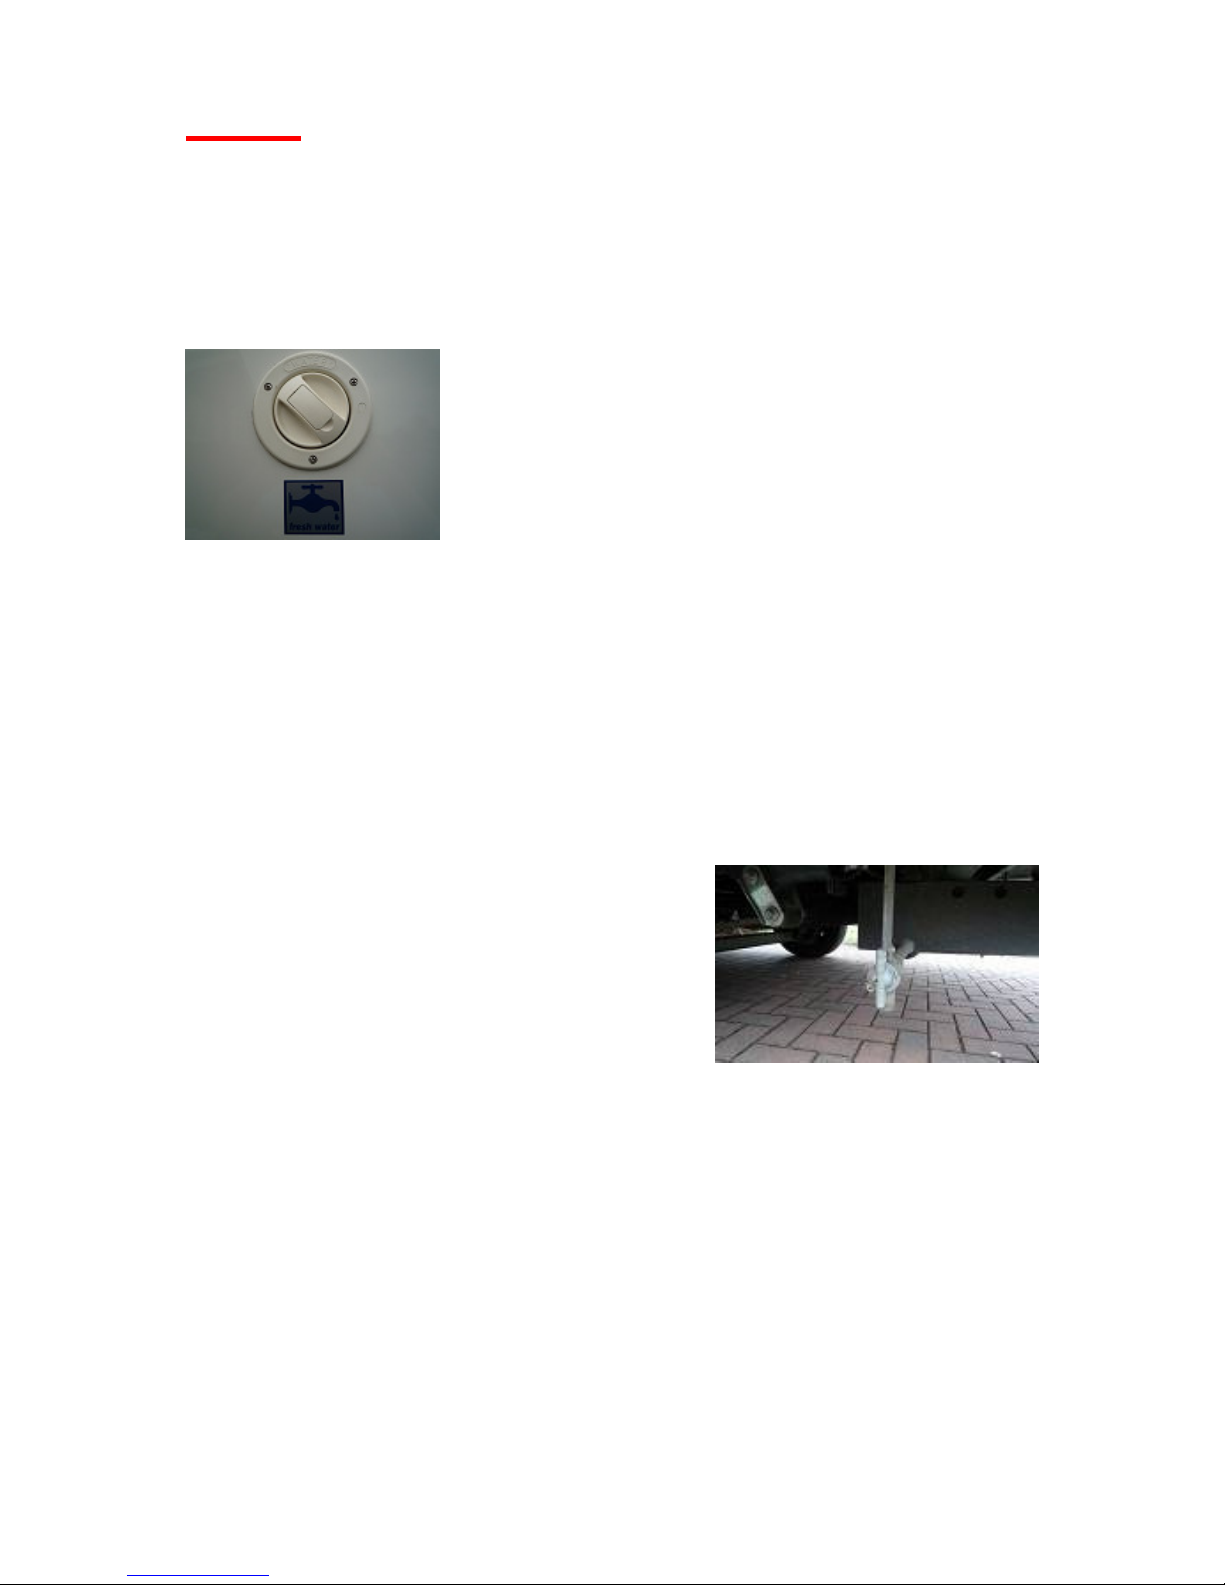
There is a hatch giving access to the storage under the bed.
Anything that is too big to pass through this hatch, may be loaded by lifting up the bed
inside.
Access under bed inside
Page 7
Water
The motorhome has two separate on-board water tanks, 65 litres for fresh tap water and
70 litres for waste water. This water is exclusively what has gone down the drains of
either the sink or the shower. It does not include the toilet waste - which is completely
separate.
We recommend NOT to drink the fresh water from the tank, unless it has been boiled.
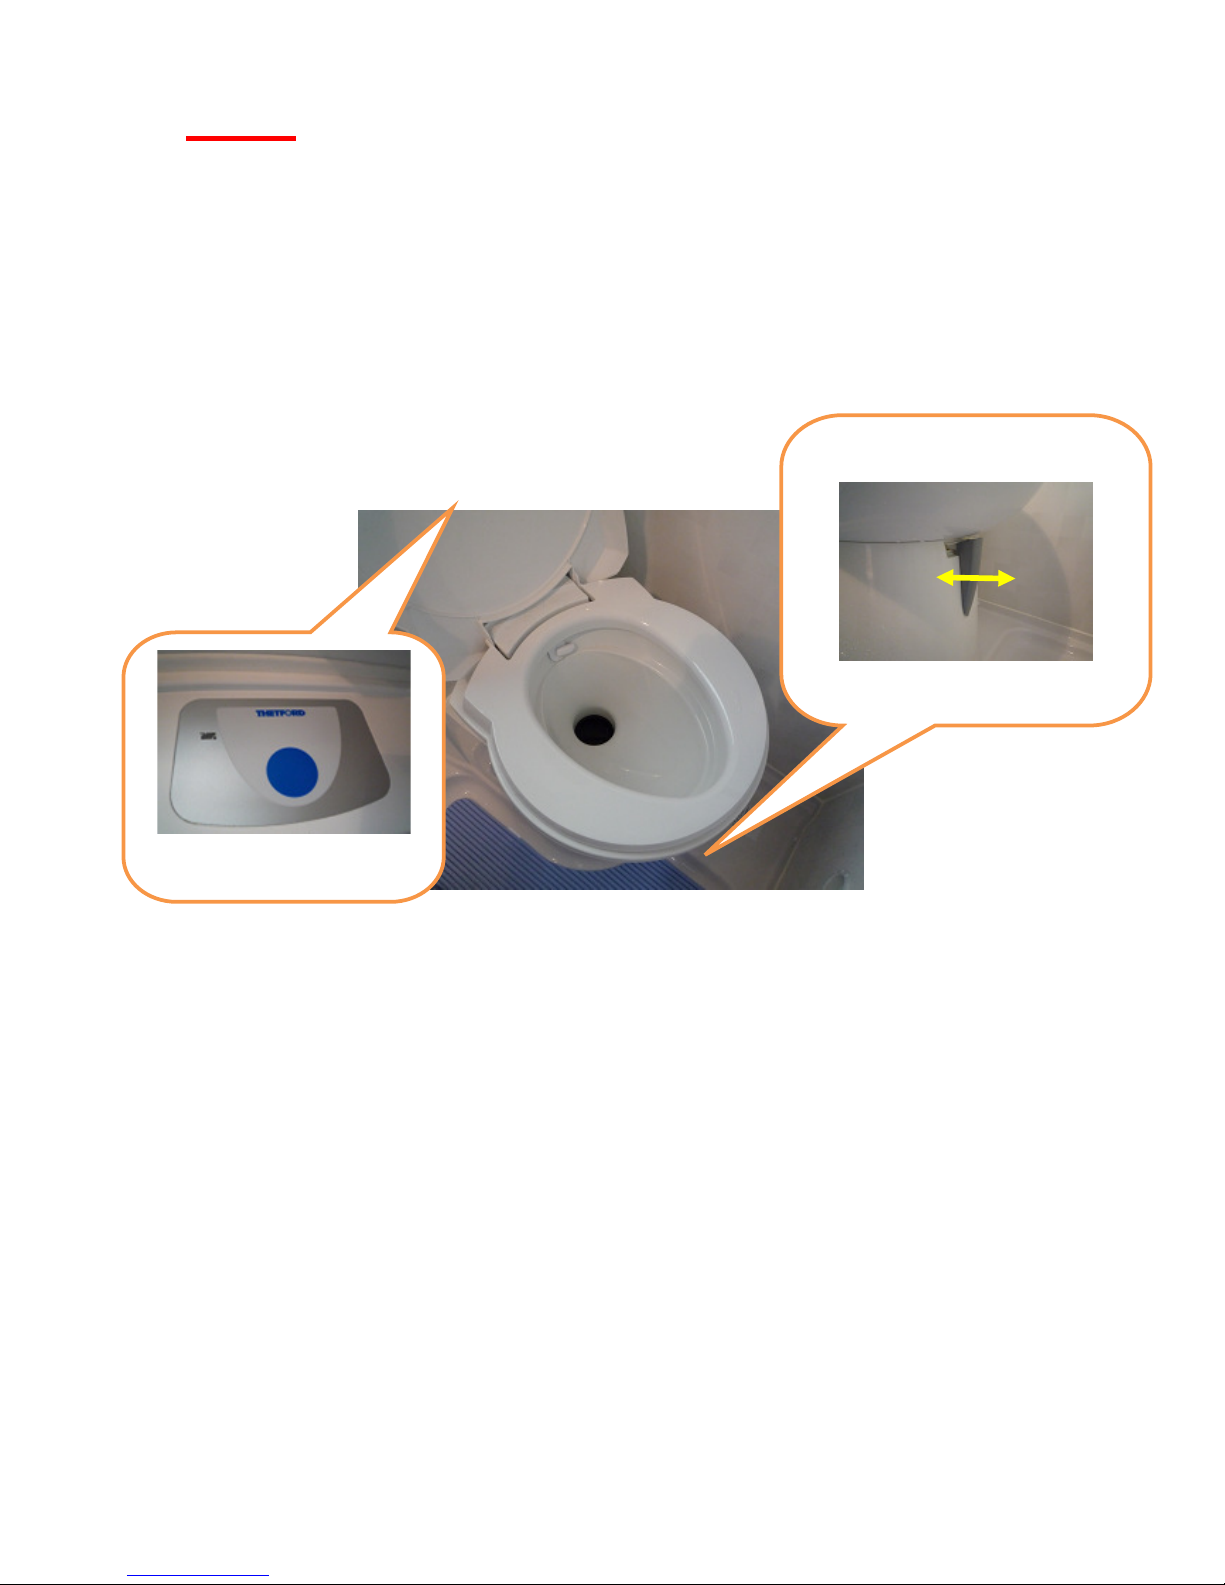
The fresh water is filled through the filler cap located on the
left side of the vehicle at the rear, using the hose supplied.
When full the tank weighs 65kg so you may want to part fill it
to save weight.
Water is electrically pumped from the tank to the taps,
shower and toilet flush. The pump creates a small positive
pressure in the system and then automatically switches off (you may hear a vibration
noise whilst the pump is working).
When any tap is opened, the pressure falls and the pumps runs again until the pressure
is restored when the tap has been turned off.
If the pump seems to be running for a long period of time, this may indicate that a tap is
open, there is a leak in the system, or a fault with the pump. Please check all taps and
visually check underneath the vehicle to see if any water is being dumped via the
overflow valve.
The waste water tank collects water from the sink
and shower drains and is located underneath the
vehicle at the rear on the left. This tank can be
emptied by opening the plastic grey tap, and allow
the water to drain out.
This water should be emptied over a designated
motorhome waste point (usually a grid which you
drive over).
Before leaving a campsite, consider whether the water tanks and toilet need
filling or emptying.
If you neglect emptying the grey water tank you may add up to 70kg of
unnecessary weight to the vehicle, and you may see grey water returning to the
shower tray.
Don’t put hot fat or solid material down the sink drain, as the pipes are narrow
and will block easily.
Page 8
Toilet
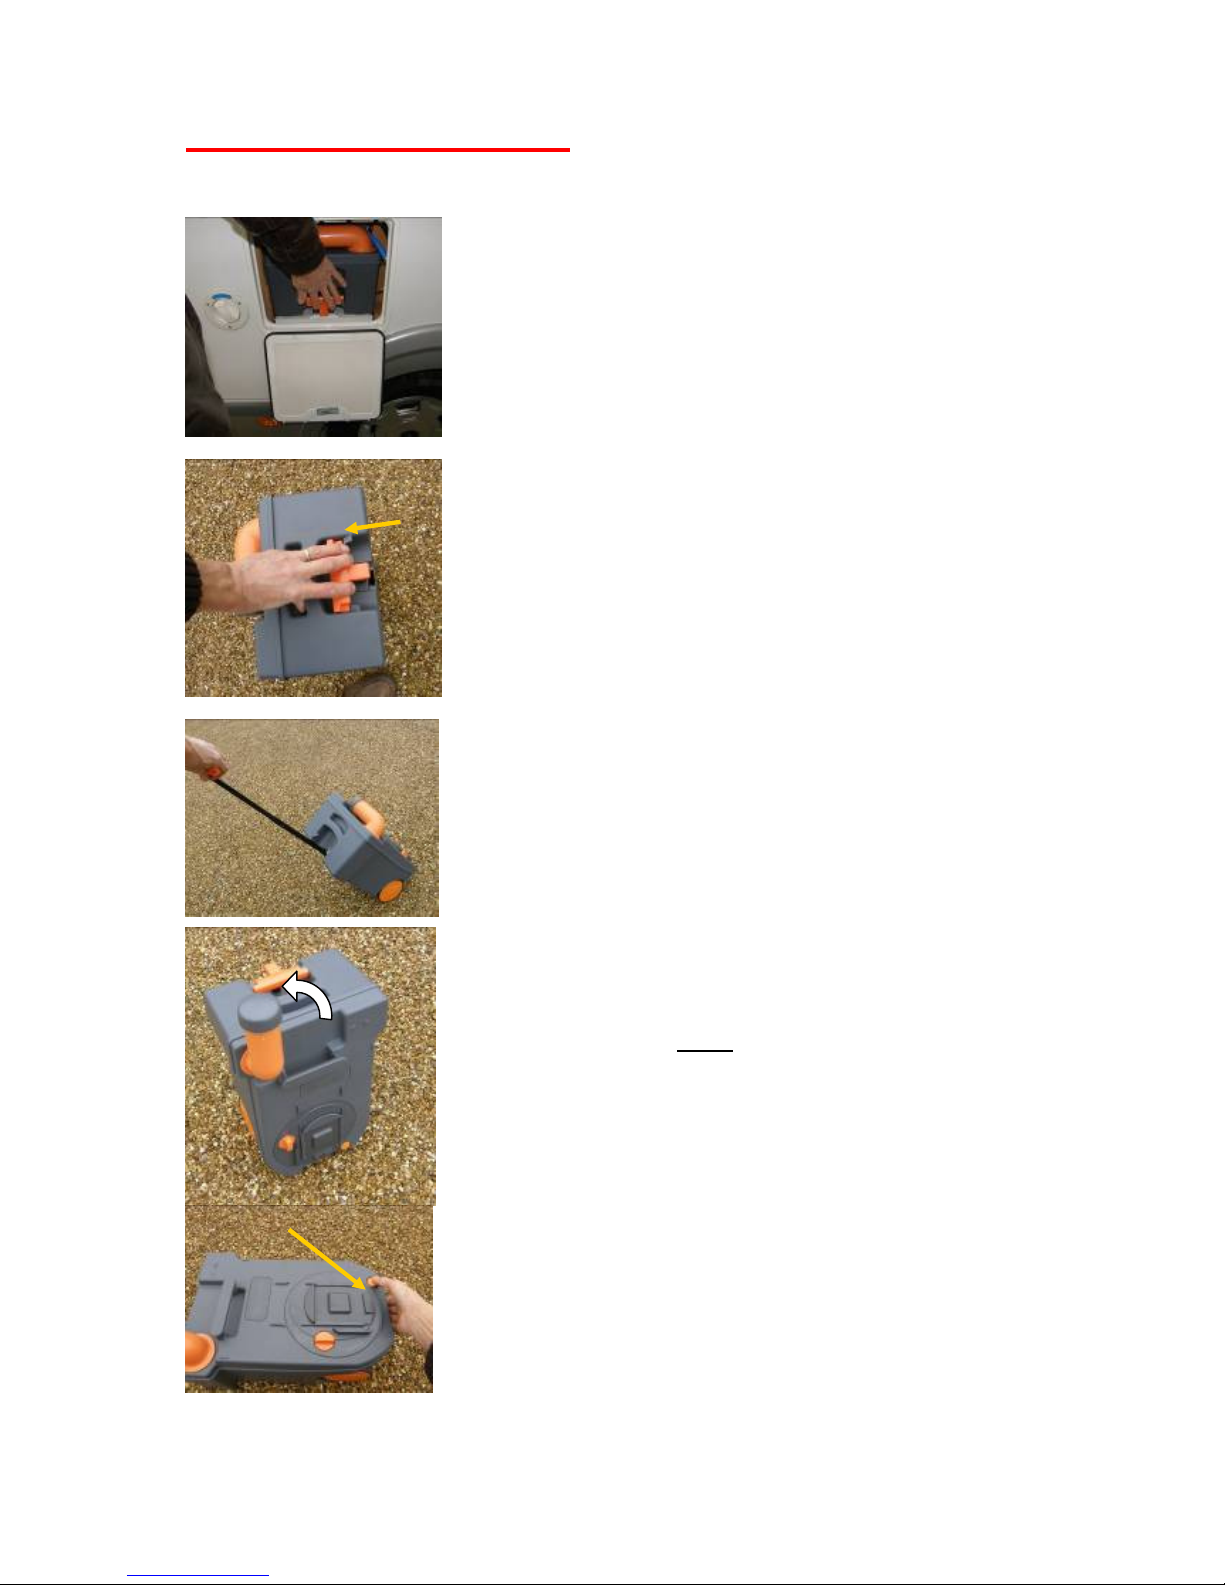
Turn on the water pump to enable the electric flush.
The whole toilet bowl can swivel to make a little more elbow room.
The outlet in the bottom of the toilet bowl is normally closed with a sealing “blade”.
Move it out of the way by sliding the lever at the front.
After use, flush the toilet using the central button, and close the blade by pushing the
lever backwards. (Otherwise if you hit a sleeping policeman too fast, the toilet contents
could be ejected.)
A red warning light shows when the toilet tank is nearly full. This indicates that a
capacity of 2 litres is left, allowing approximately 5 more uses, but it is better to empty
the toilet earlier.
Toilet lever to open cassette
Press blue button for flush
Open
/ Close
Page 9
Emptying the Toilet
1. This job is not as bad as you might expect.
2. Inside the van, make sure that the slide valve in the
bottom of the toilet bowl is closed.
3. Go outside, and open the toilet compartment.
4. Lift the orange latch and withdraw the grey tank.
5. Release the handle from its latches, extend it from the
body.
6. Tow the cassette to the toilet disposal point.
7. At the disposal point, stand the tank upright, (this keeps
the runners on the bottom clean), and swivel the neck
upwards.
8. Remove the screw-on cap, and pour away the contents of
the tank
9. When you have begun to pour, press down the orange
button with your thumb. This lets air into the tank so it
pours freely without glugging..
10. Don’t press the button until you have tipped the tank so
the button is above the level of the liquid.
11. Rinse the tank with clean water until it runs clear.
12. The dosage ratios of toilet fluid brands vary, so you must
read the bottle to deduce the correct dose for a 19 litre
capacity cassette.
13. Use the scale inside the cap to measure the toilet fluid
and pour into the tank.
14. Top up with two litres of water.
15. Never add more fluid through the bowl of the toilet. It
must always be added through the tank filler cap.
16. Don’t forget to wash your hands.
4
9
7
6
5
Page 10
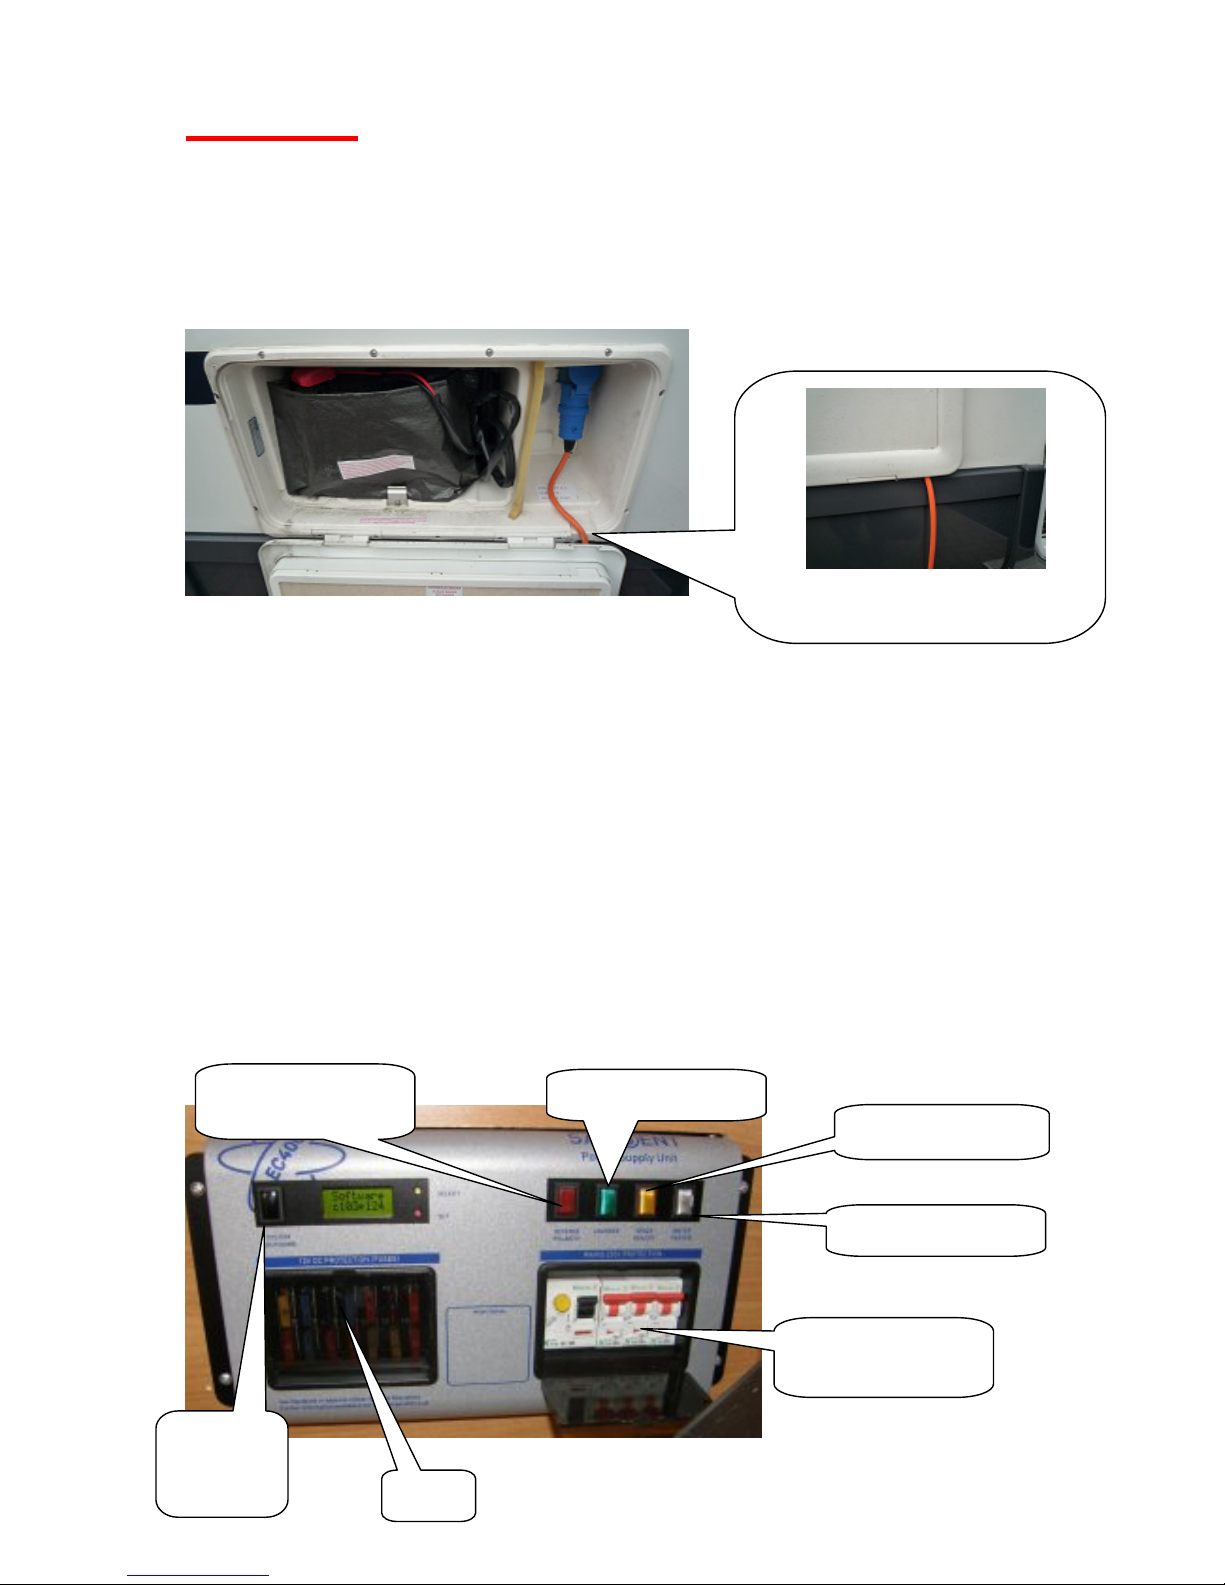
Electrics
The van has a 16amp 230v mains input connection on the left side. This is connected
using the long orange cable from the storage compartment.
First connect the larger of the two plugs to the van as shown. Then connect the other
end of the cable to the socket provided by the campsite. This avoids handling a live
connector.
DON’T DRIVE AWAY WITH THE CABLE CONNECTED
The blue flap on the connector hooks onto the mating plug. So to release the socket,
pull the flap towards you and twist the plug whilst pulling down.
There may also be a switch on the campsite socket outlet that must be turned on.
There is an electrical control panel over the entrance door.
Once the van is connected to the mains, the yellow “Mains On” indicator will glow, the
mains sockets inside the van will become active, the fridge can be switched over to use
mains electricity, and the van’s batteries will begin to charge up.
Be aware that on its highest setting, the room heater can draw 8 amps of current from
the campsite. If used at the same time as an electric kettle and 4 amp water heater, the
combined load may exceed the limit of the campsite supply (often 16 amps), and cause
it to switch off and need resetting.
The main electrical switches are located underneath the right hand bench seat, you will
find the main RCD switch should you need to re-set the electrics after a trip.
Close compartment to secure cable
Water Heater Switch
Room Heater Switch
Battery
Charger On
Reverse Polarity
Warning
Resettable Circuit
Breakers
Master
Controller
On Off
Fuses
Page 11
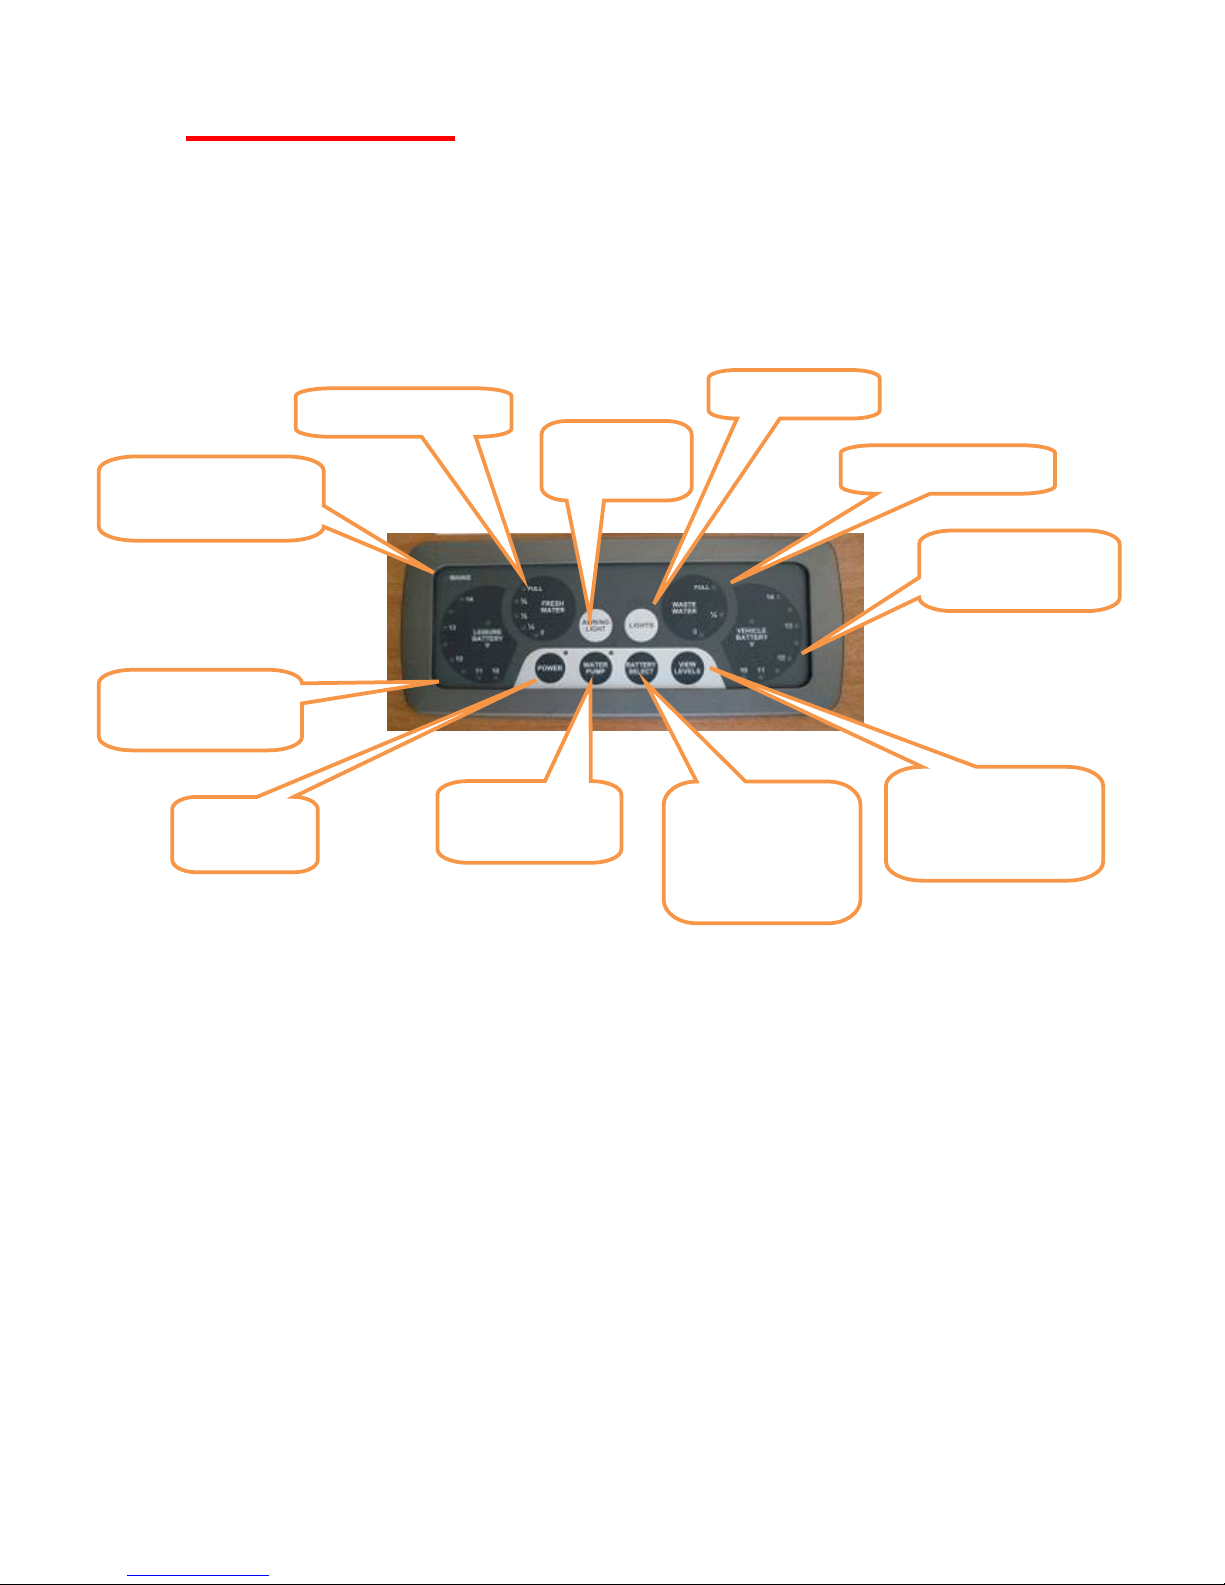
Control Panel
The control panel for the electrics is located above the habitation door, this uses touch
buttons for switching both ‘on’ and ‘off’.
The panel goes to sleep, and it may be necessary to touch a button twice to have the
desired effect. (The first touch wakes the panel).
Press the Power button to activate the panel.
LED light indicators for Power and Water Pump will illuminate when powered on.
The vehicle has two 12v batteries, one for starting the engine and the other ‘leisure
battery’ for all the appliances (lights, water pump, 12v outlet, fridge, cooker ignition,
toilet flush). Everything within the motorhome will work without the requirement for 240v
hook-up.
If the panel starts to beep, this means the fresh water tank is either empty or full (when
filling). If this happens a red LED will flash as well as the beeping. Turn off the water
pump and take the necessary action to stop the warning (by filling with water or turn off
filling hose).
The 12v battery will charge when the engine is running, so if you see that the voltage of
the leisure battery has fallen to a low level, you can either hook-up to 240v mains or run
the engine for 10-15 minutes to recharge (please do not do this at night as you may
disturb your neighbours).
Switch main
power on
Water pump
power
Switch between
leisure battery
and vehicle
battery
Quick view of all
levels – battery and
water
Vehicle battery
level
Leisure battery
level
230v
mains
indicator
Fresh water level
Waste water level
Internal lights
Outside
Awning light
Page 12
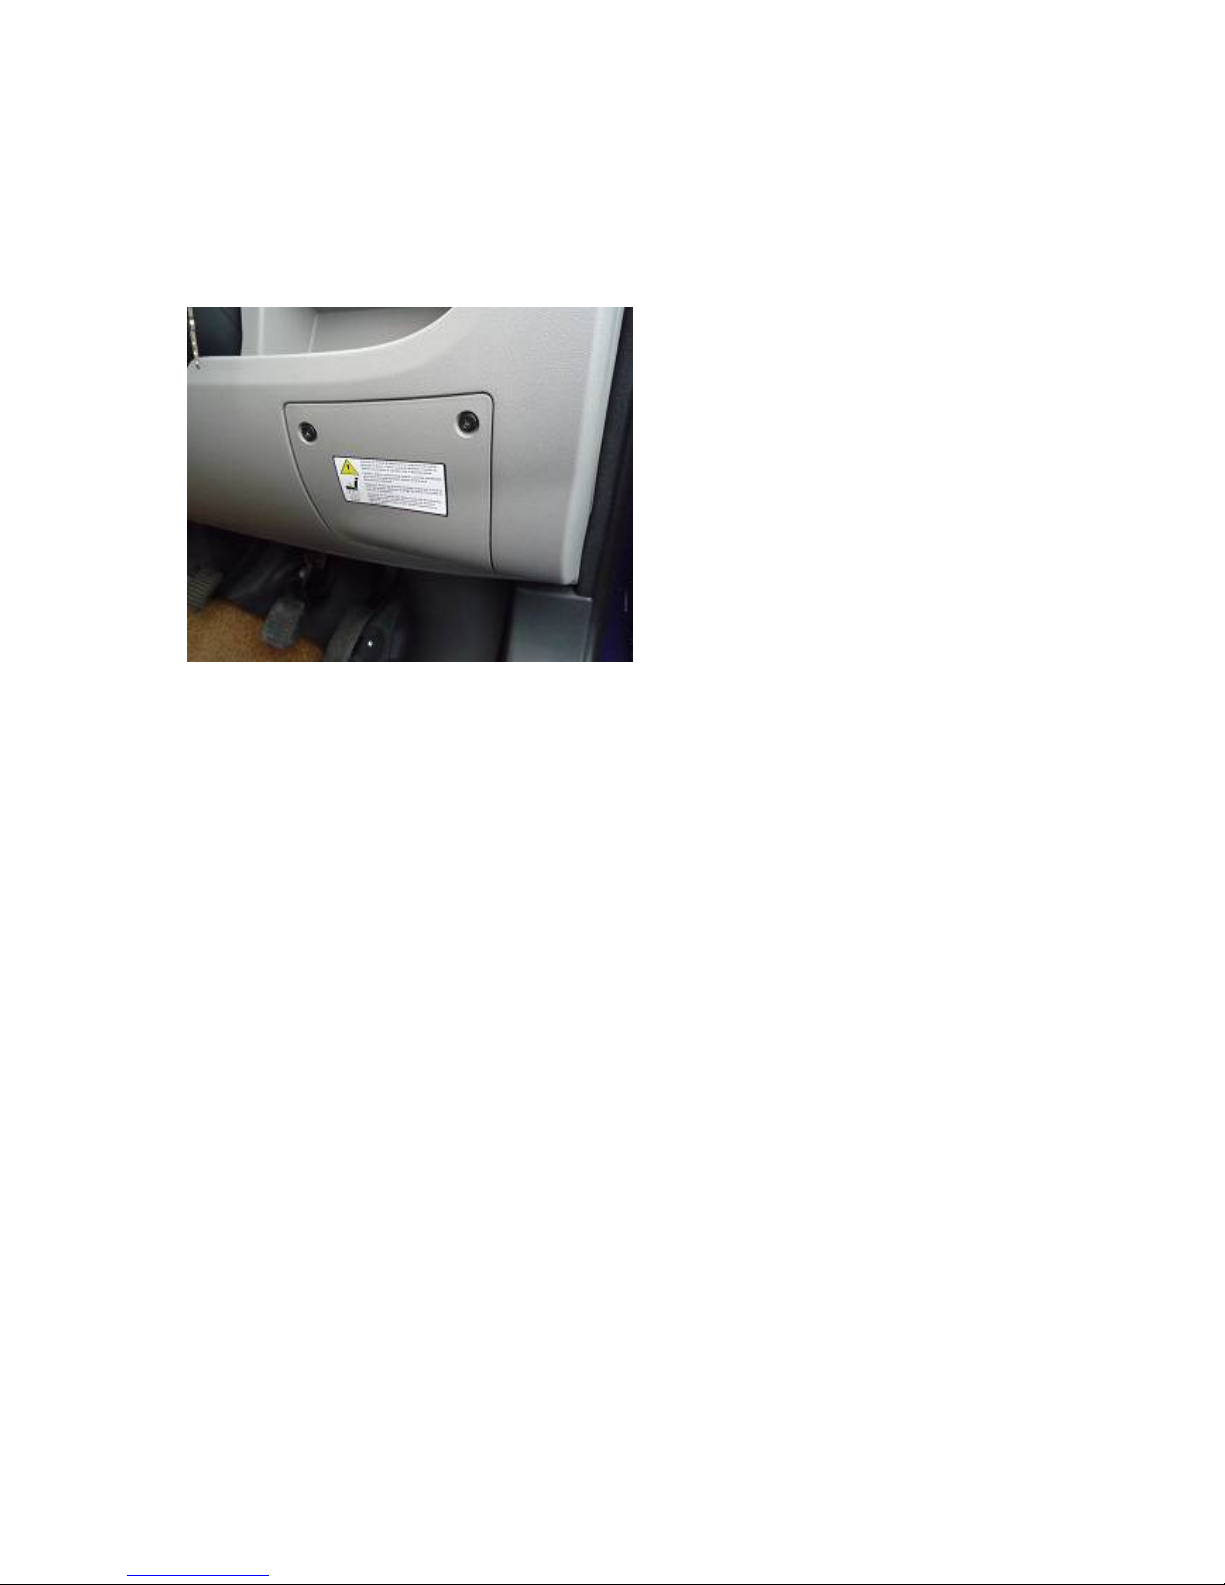
Replacing fuses & bulbs
Sometimes fuses and bulbs will blow, this is not anything to get too concerned about, as
they are easily changed. Spare fuses are included in the spare bulb pack located under
the drivers seat.
Never replace a fuse with one of a higher rating. This is a potential fire risk.
There are two main fuse locations:
Fuses for the motorhome electrics
(fridge, pump etc), are under the right
hand bench seat.
Fuses for the vehicle lights, wipers etc
are at the right side of the dashboard as
shown.
A cross-head screw driver can be found
in the first aid kit (under drivers seat)
should you need to access the fuse
panel.
Page 13
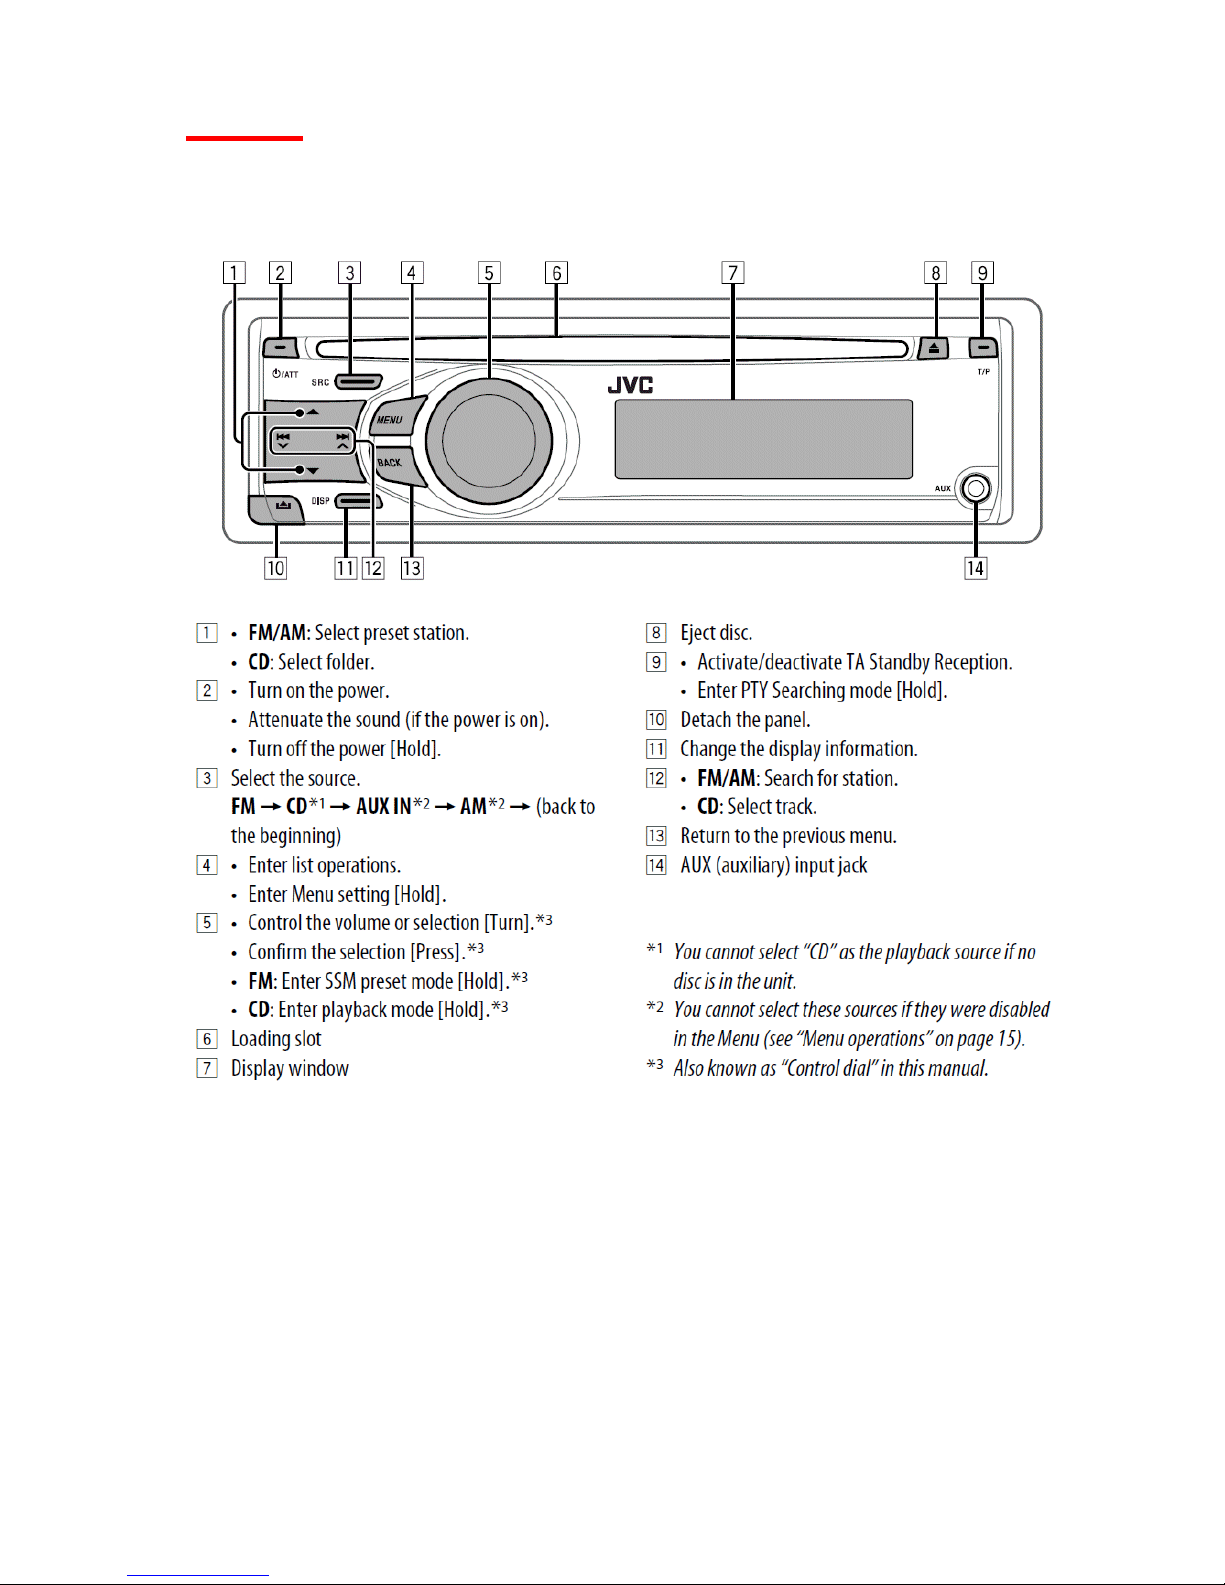
Music
The JVC radio plays audio CDs and MP3 CDs, and has an auxiliary input to connect to an iPod
or MP3 player using a 3mm jack (headphone socket).
Page 14

TV and DVD
The 16” Avtex TV works on 12v, so it is usable without a 230V mains connection, and rear seat
passengers can watch DVDs while travelling.
There are two HDMI inputs for other video equipment such as a PlayStation, and both VGA and
USB sockets.
Page 15
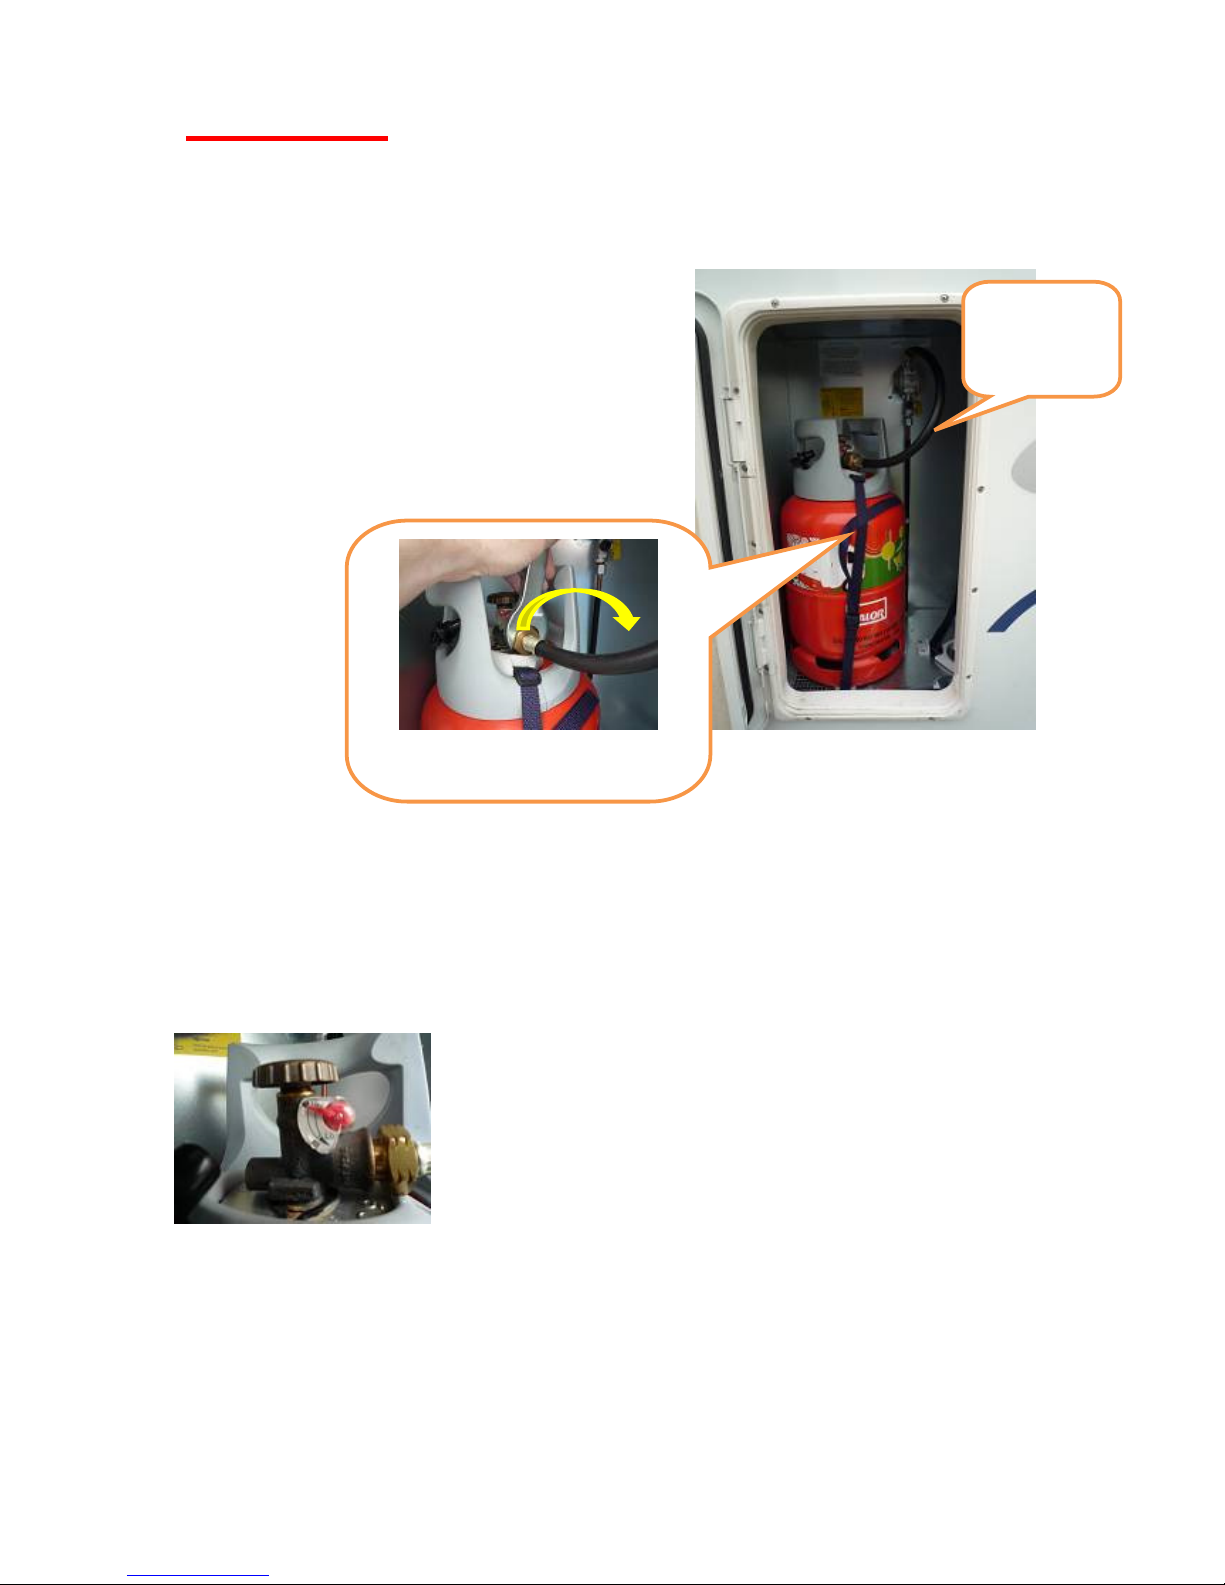
Gas (LPG)
Please Note: it is illegal to use gas devices in petrol filling stations, indoor car
parks and on ferries due to the ignition hazard. Turn off at the cylinder whenever
the vehicle is moving.
The gas compartment is beside the door.
To turn the gas on, open the ‘tap’ on the top of
the Calor cylinder (you may hear a hiss as the
gas flows through).
To change gas cylinders over, close the tap, then
turn the provided spanner Clockwise to release
the left-hand threaded nut.
To fit a new cylinder, undo the nylon webbing strap restraining the cylinder.
There is another strap at the back which cannot be released, so lift and pull the base of
the cylinder towards you, leaving behind the rear strap and the grey yoke around the
neck of the cylinder.
When fitting a new cylinder, make sure it locates on the lugs in the floor, then tighten the
straps, and use foam pads to prevent rattling in transit.
Most of the CalorLite (recommended) cylinders come with a
gauge on the tap to show how full it is – this is only a guide as
they sometimes show empty when there is some gas left.
You can always check by shaking the cylinder as you can feel
and hear whether it is empty.
If You Smell Gas:
• Turn off tap on gas cylinder
• Extinguish all naked flames
• Do not switch on any electrical devices (including battery powered ones)
• Open all doors and windows
•
Stay outside of the vehicle until gas has dispersed
Release nut clockwise
Ensure safety
valve is open
(down)
Page 16
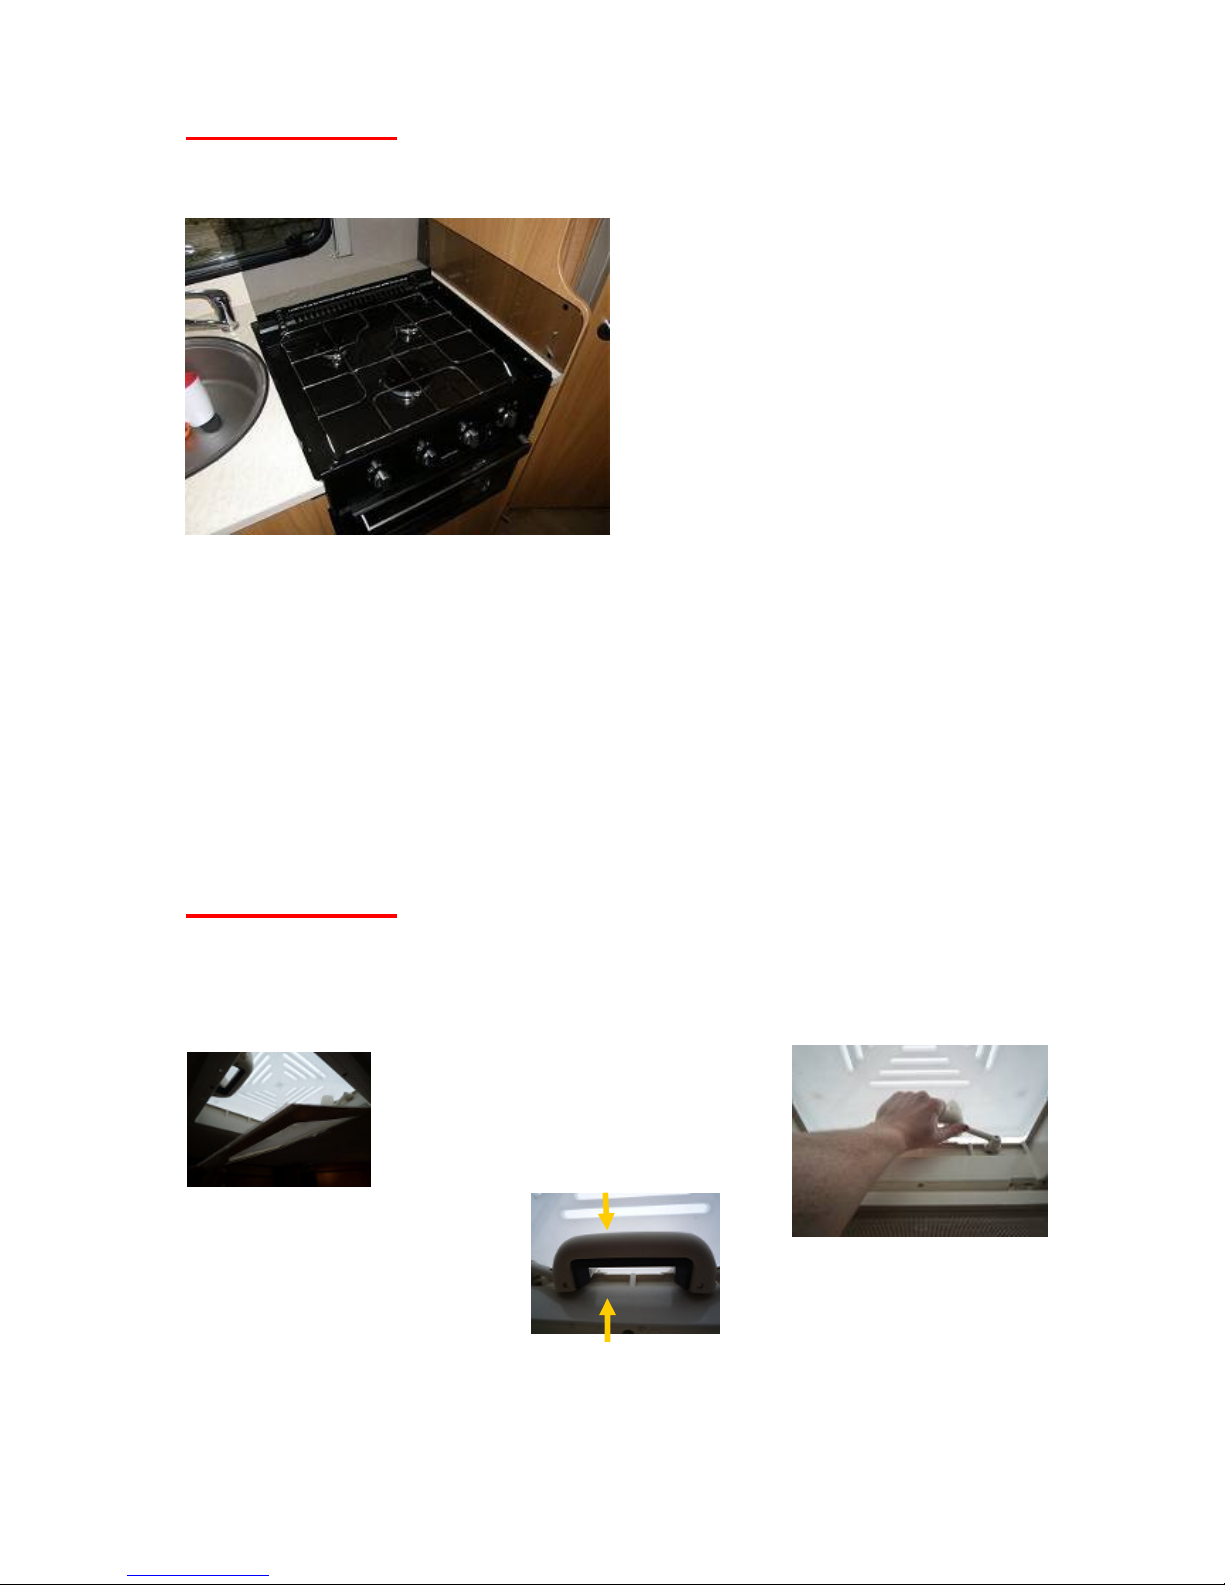
Gas Cooking
The lid of the cooker should always be raised
before use and not lowered until the hob has
cooled. It must be down when travelling.
Some people put a towel under the glass to
stop rattles when travelling.
There is a spark ignition switch.
The knobs must be held in for a few seconds
after lighting until the flame is detected. There
is a sensor that turns off the gas if the flame
blows out.
To light the grill, turn the right hand knob to the right, and push in while pressing the ignition
switch.
Keep the button pressed for a few seconds after the gas has lit, allowing time to warm the
sensor that turns off the gas if the flame blows out.
The oven is lit in the same way, but by turning the knob to the left instead of right.
Ventilation
The vents must always be closed for travelling; otherwise they may be taken off by low
branches. But when cooking or showering, opening the vent above the kitchen will help remove
moist air, food smells, and reduce the risk of condensation.
Pull down the flyscreen, and then
squeeze the black part of the handles and
push upwards to raise the vent.
Page 17
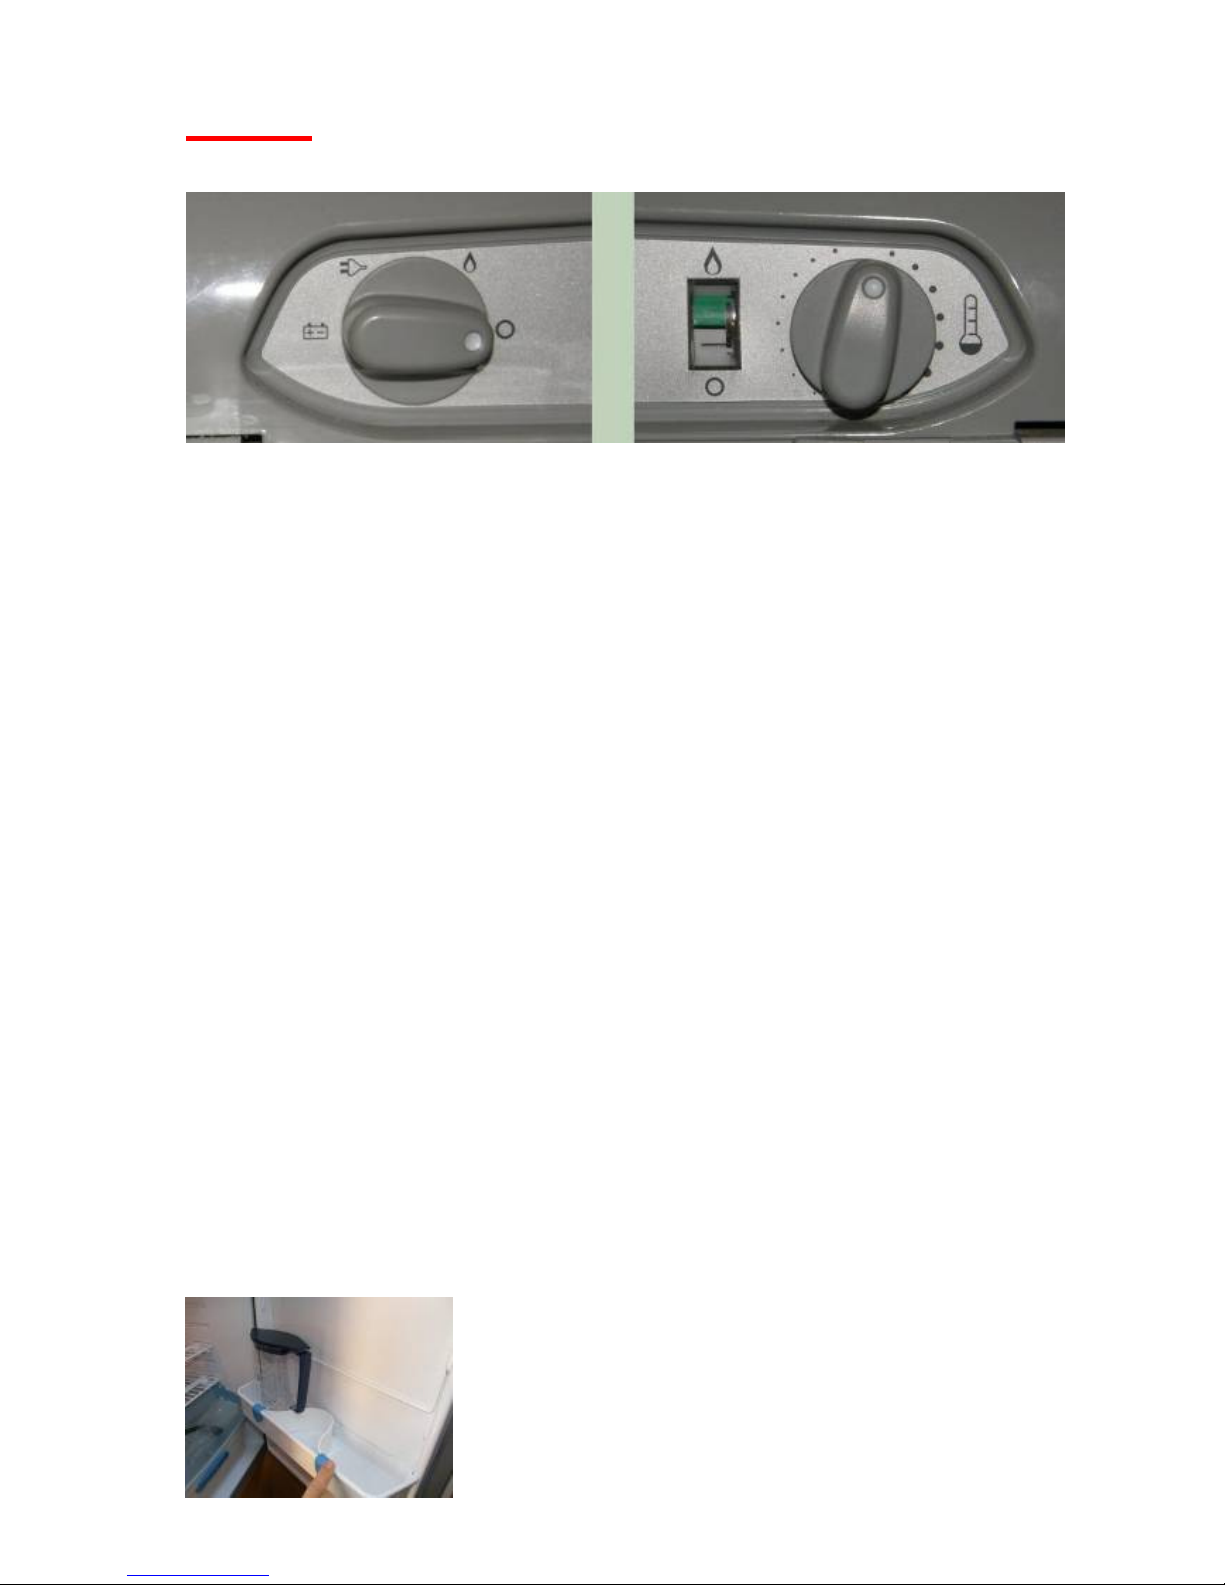
Fridge
N80
The left knob connects the fridge to one of three sources of power:-
Gas, 12v engine-driven alternator, or 230v mains voltage, and O = Off
The right hand knob adjusts the temperature (the bigger the dot, the colder the setting).
Using Gas
Turn the left knob to the gas position. You will hear the repeated tick of the ignition system.
Turn the right hand knob fully clockwise, then press it in and hold until the flame lights, and the
needle on the meter rises up into the green section.
Turn the right knob back to a mid position.
If the flame goes out, ignition will be repeated automatically.
Do not to use the fridge on gas while you are travelling. It is forbidden to use gas
appliances in petrol filling stations, ferries, and indoor
Using 230v Mains Electricity: Turn the left knob to the plug symbol.
When Driving, turn the left knob to the 12v battery symbol.
When the engine stops, the fridge will not work from the leisure battery (That would quickly
flatten it) so change over to gas until the mains electricity is connected.
The fridge prefers to work on 230v mains. (It takes longer to cool down on gas or 12v).
The fridge door shelf has
a slider to prevent items
from moving around when
the van is in motion.
Page 18
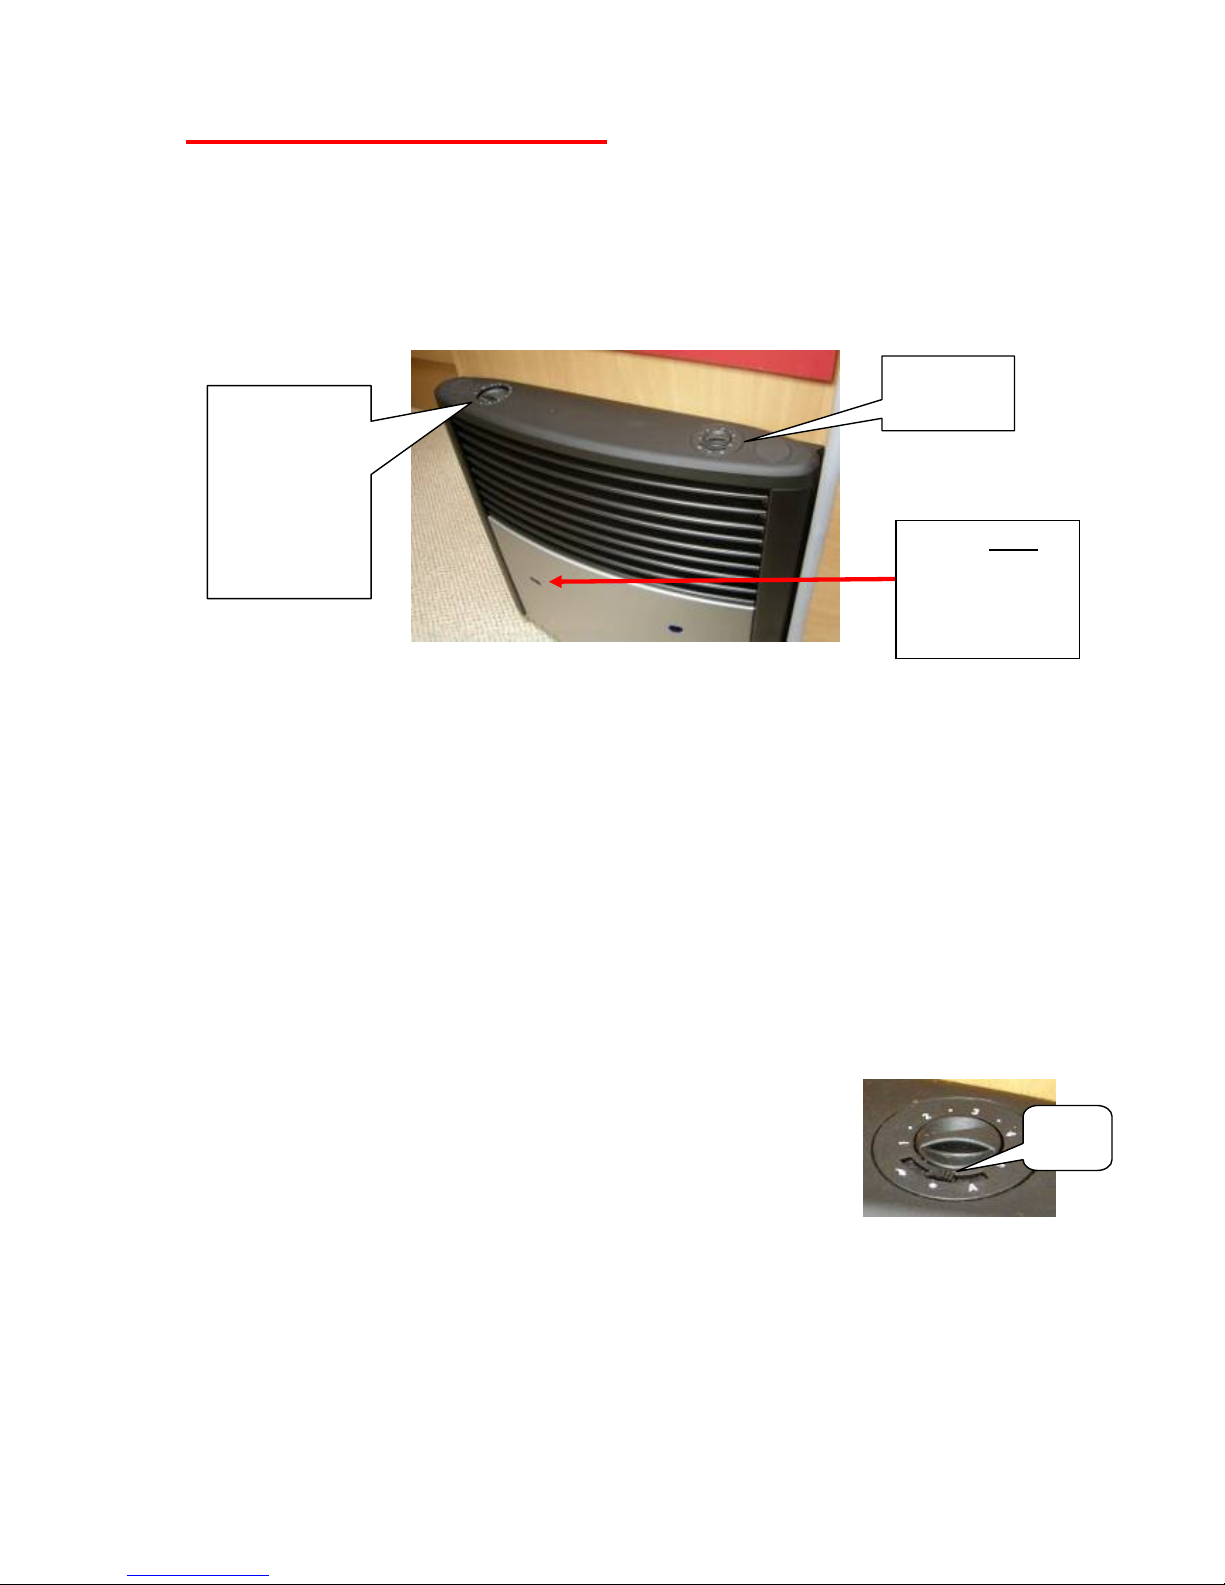
Central Heating - Gas
The Truma heater works on gas or 230v mains electricity, or (briefly) both at once.
Most sites provide free electricity. The heater has a variable speed fan which distributes
warm air in the van, and makes the case of the heater less hot to the touch.
1. Turn on the gas outside the vehicle.
2. Turn the left hand control knob (a) to 1or 2, and press it down as far as the stop.
3. You will hear the spark igniter clicking until the flame ignites. If there is air in the gas
supply line, it can take up to two minutes for the gas to get through and the flame to
light.
4. You should see the flame if you look down through the viewing window.
5. Keep the knob pressed for 10 seconds longer, to allow the sensor to detect the flame.
6. In the event of a fault, always wait 2 minutes for the gas to disperse before attempting to
re-ignite.
7. If the flame goes out, automatic re-ignition is attempted for about 30 seconds until the
safety valve closes.
8. If there is no flame, the automatic igniter continues to operate until the control knob (a) is
switched to “0".
9. The right hand knob controls the speed of a fan, which warms
up the room more quickly, and makes the case of the heater
less hot to the touch.
10. You can manually control the fan speed by moving the slide
switch to the left.
11. If you move the slider to the right, the fan speed will be varied automatically up to the
limit set by the position of the rotary knob. You can use this to reduce the noise from the
heater.
12. To switch the fan off, put the slider in the middle position, and turn the left knob to “O”.
13. Be aware that on its highest setting, the electric heater can draw 8 amps of current from
the campsite. If used at the same time as an electric kettle or water heater, the
combined load may exceed the limit of the campsite supply (often 16 amps), and cause
it to switch off and need resetting.
Look down
through the
viewing window
to see the flame.
(a) Press and
turn to ignite.
Then set the
temperature
required.
(b) Fan
Control.
Slide
switch
Page 19
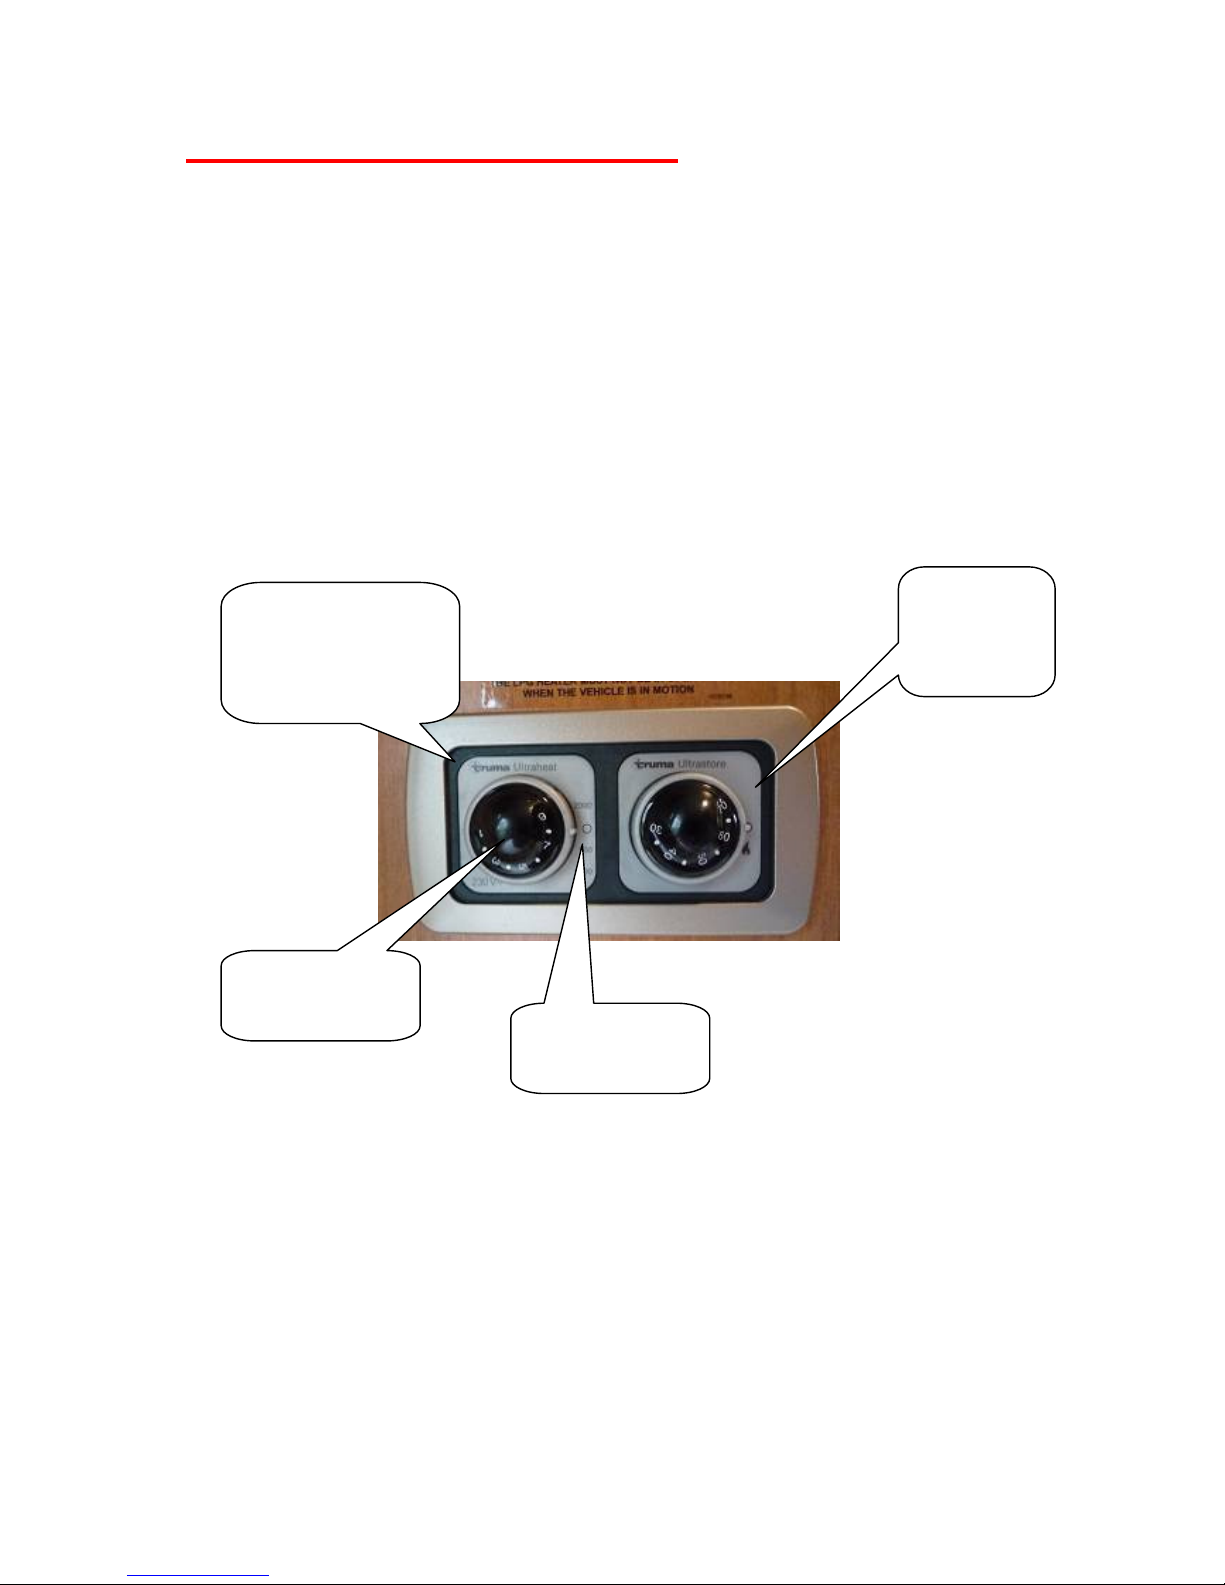
Central Heating - Electric
Electricity is usually provided as part of the campsite fee at no extra cost. If so you
should use electric heating in preference to gas. If it is very cold you can use both at
once.
Besides the controls detailed below, there is fan switch on the heater itself. Turning the
fan on improves the heat output and makes the case of the heater less hot to the touch.
To use the 230v electric heating, simply turn the grey outer ring of the Ultraheat knob to
the desired wattage setting (green LED will show ON). You might choose less than the
maximum to avoid risk of overloading the campsite electrical supply, causing it to trip
out and need resetting. (500W= 2amps, 1000W= 4amps, 2000W=8amps)
Then use the black Inner knob to adjust temperature.
Heater wattage
500W to 2000W
Ultra
store
Electric
Water Heater
Ultra
heat room heater
(only when 230v
connected)
Adjust Room
Temperature
Page 20
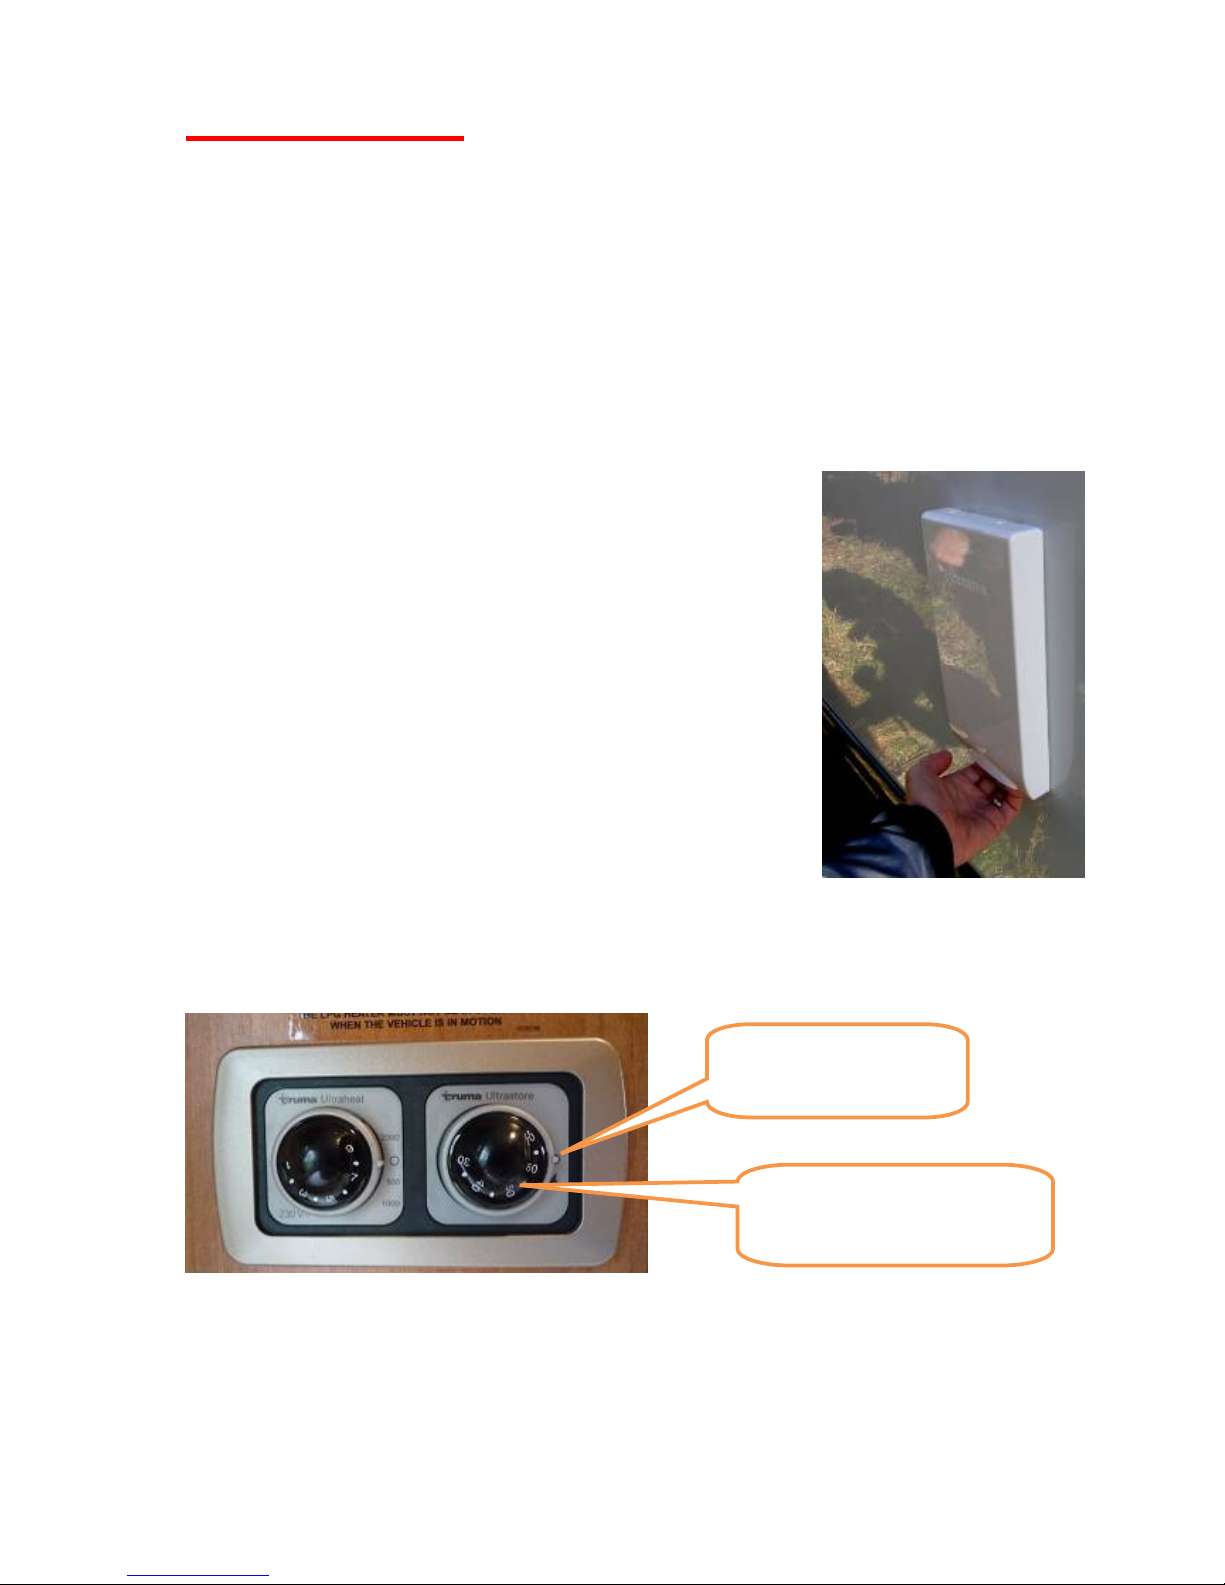
Water Heating
Make sure the water tank is not empty.
Water is heated by gas and /or an 850W (3.7amp) electrical heater.
Electricity is usually provided as part of the campsite fee at no extra cost.
The boiler can heat 10 litres of water in around 20 minutes, or around 80 minutes if
room heater is being used as well.
For showering, heat the water to 70 degrees as this will mean that you add more cold
water and therefore the hot water will last longer.
Electric Heating:
Electric water heating is controlled only by the switch under
the right hand bench seat. It is thermostatically controlled and
can be left on.
Gas Heating
Make sure the gas is turned on outside the vehicle.
On the left side of the vehicle, remove the cover over the
boiler flue before operation, and place it on the dashboard as
a reminder to the driver to replace it before driving further.
If the cover is stiff to remove, push down on the top with one
hand, and with your lower hand prise the cover outwards, allowing your knuckles to
lever against the side of the van.
If the gas water heater flame goes out, a red LED appears within the black dial of the
Ultrastore heater control. Turn off and leave for five minutes to cool down. Ensure that
the gas is connected and the exhaust cover is removed, then try and switch on again.
Water heater controls
ON/OFF
Water tempe
rature settings
30 to 70 degrees
Page 21
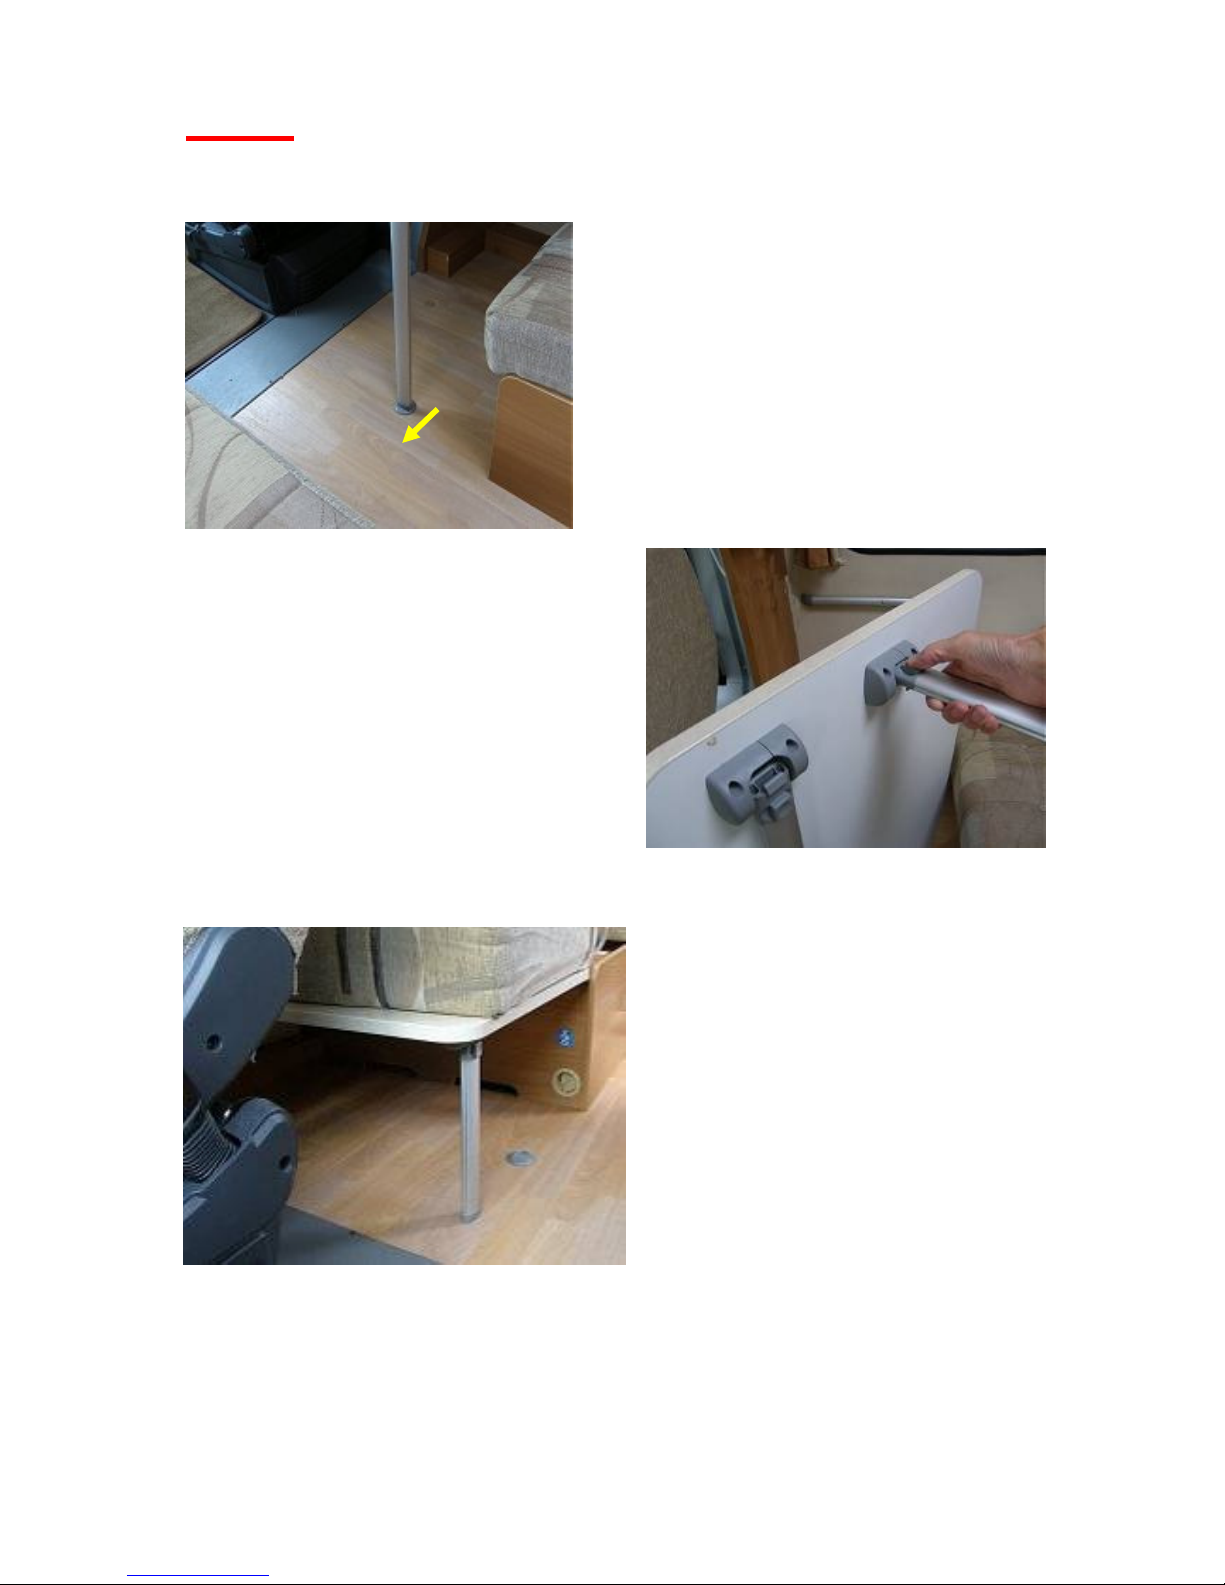
Table
The table is detachable:
Unclip the foot of the support leg by sliding it to
the left of the van.
Then you can lift the left edge, rotating the
table up at about 30 degrees, and then it will
unhook from the side rail.
Push the button at the top of the leg to allow
it to hinge down.
For use as a bed, the table top can be
attached to the lower rail.
There is a second short leg that hinges
down to support it in the lower position.
The short secondary table leg is used to
support
Page 22
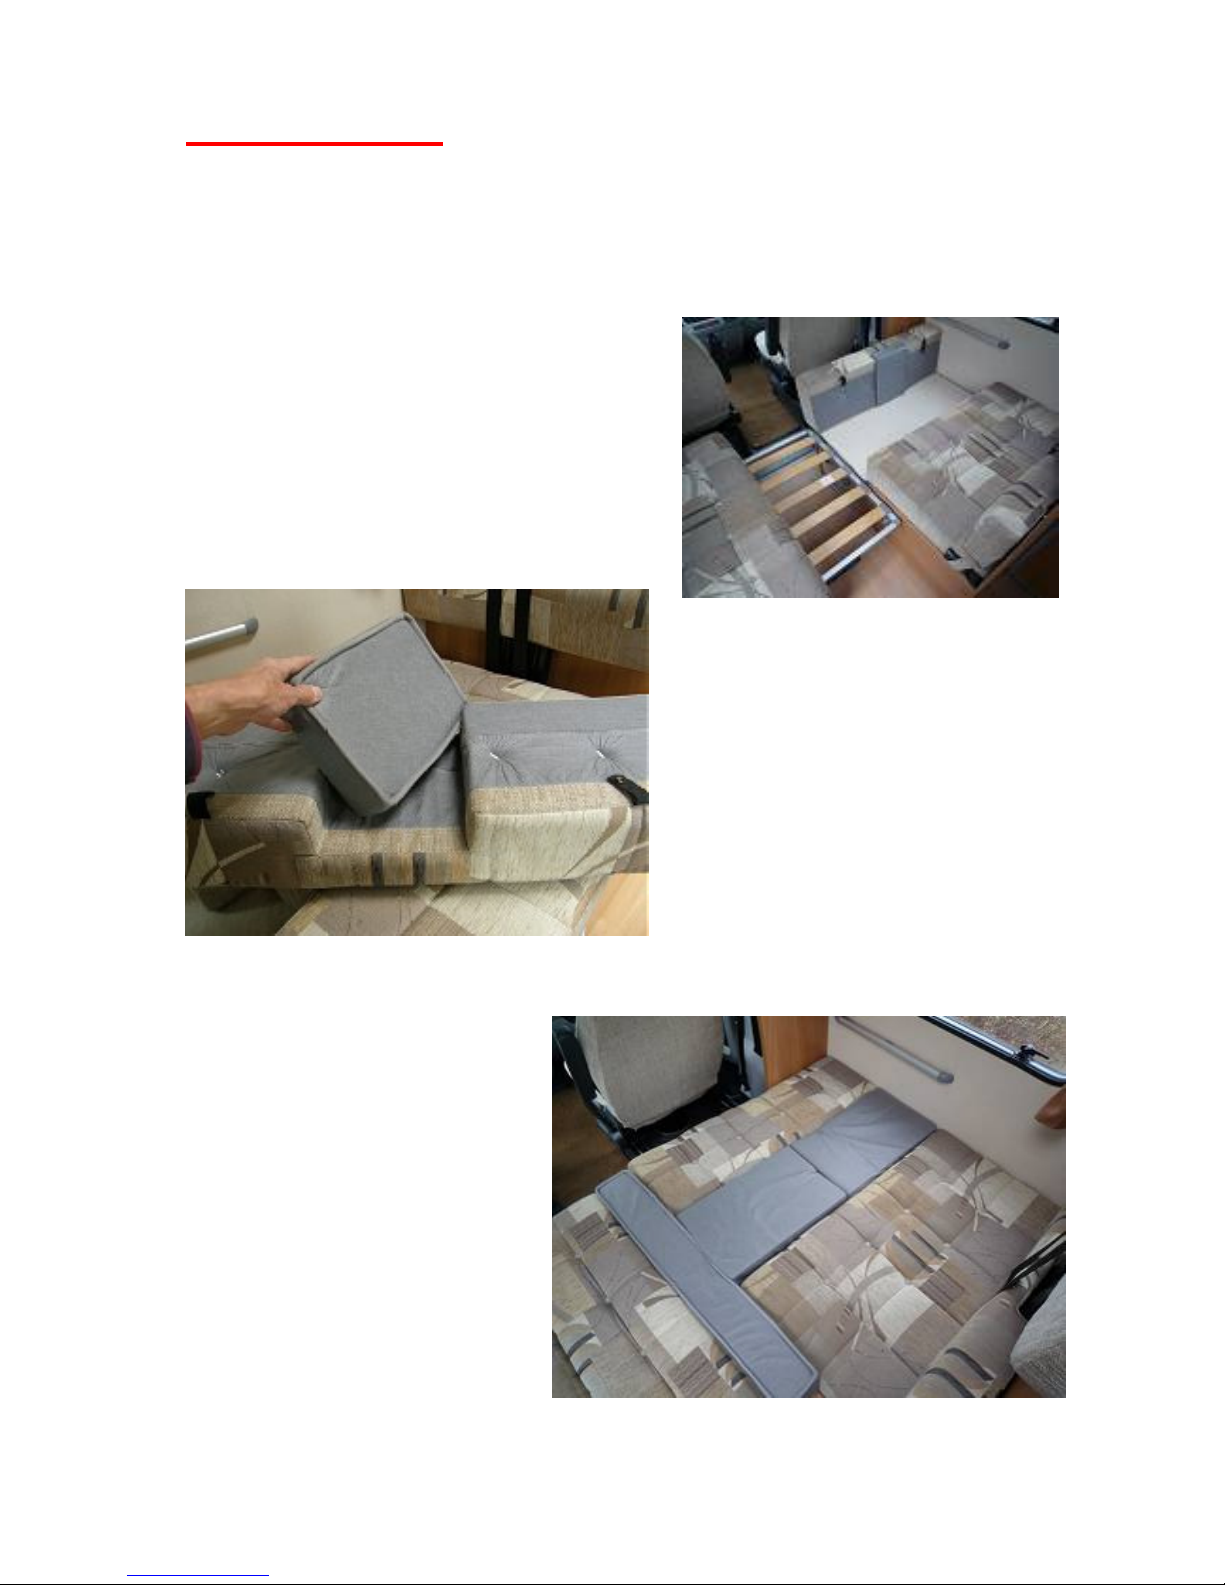
Made up Bed
To assemble the double bed from the dinette area, you will need to drop the table as
described above.
Check that the short table leg is in place.
Remove the base cushion from the short sofa
on the left, and lift up the frame.
Take out the grey cushions, slide out the
extension, and fold down the support frame
onto the floor.
Use the smallest cushion to make good
the section cutaway for the seatbelt
pillar.
The cushions are then
rearranged as shown to make the
bed..
Page 23
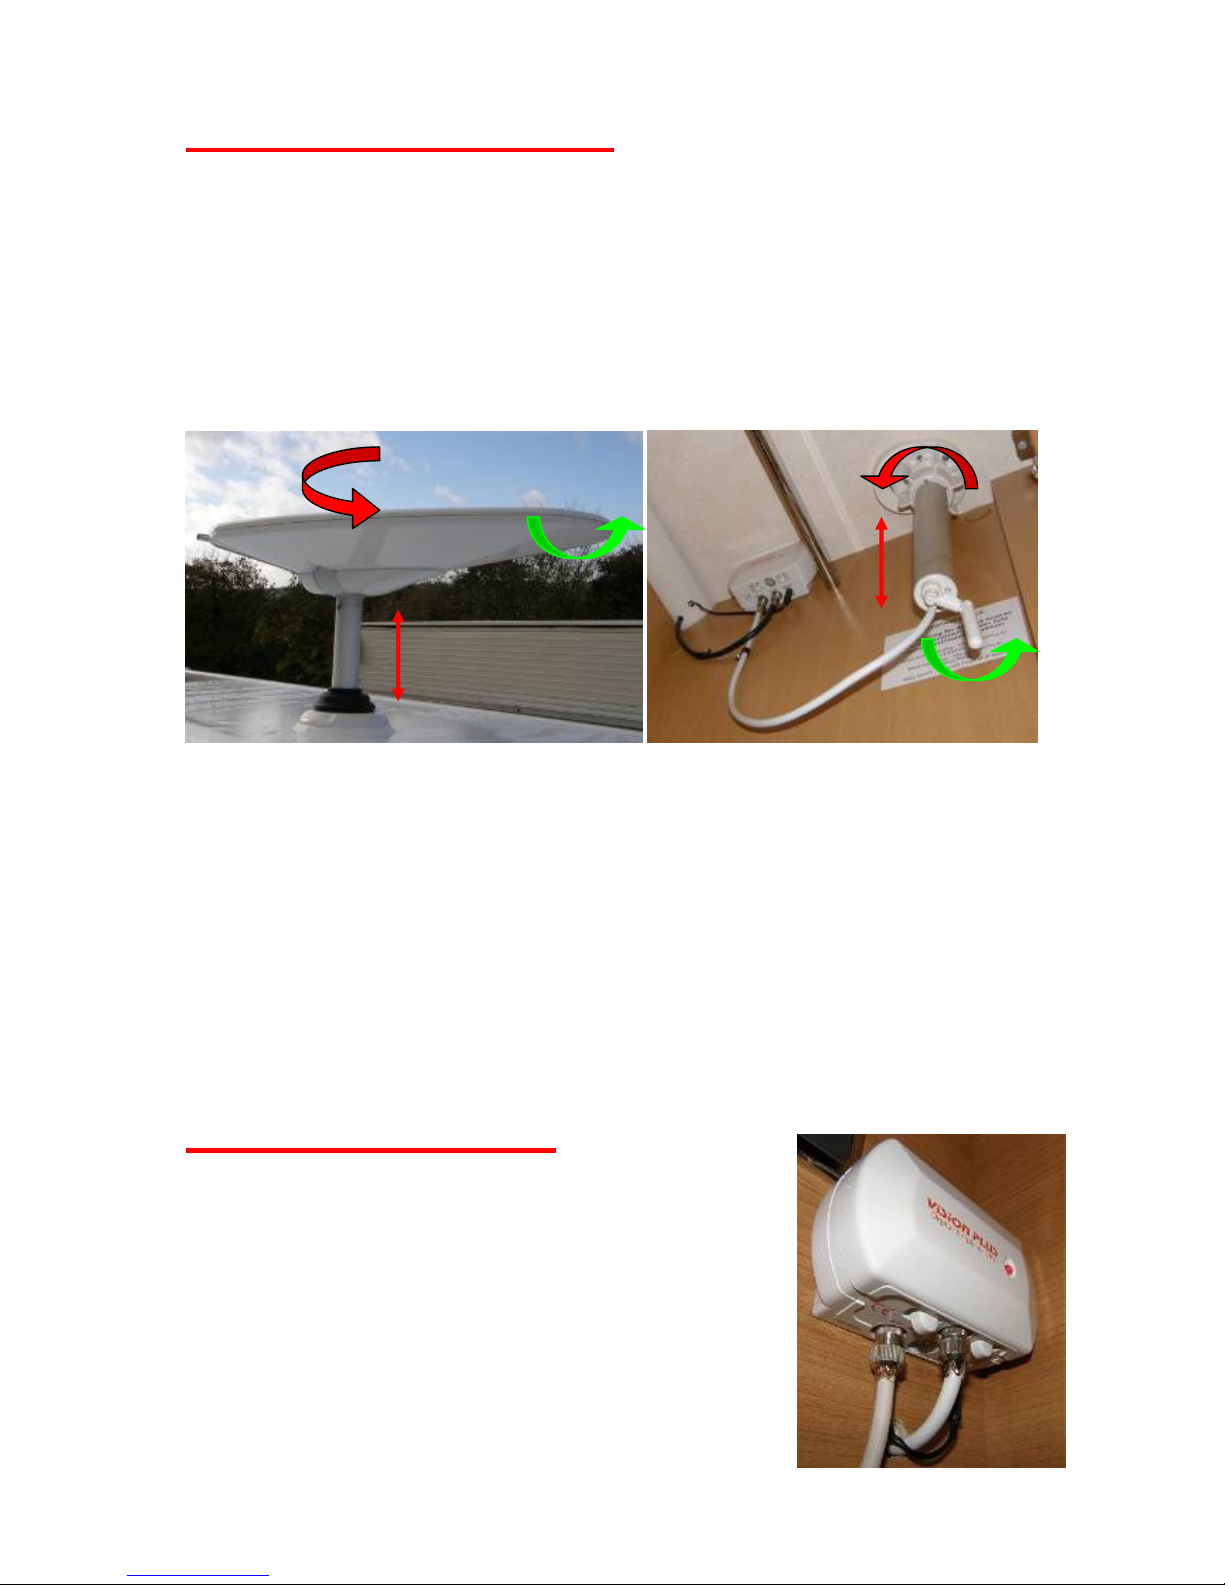
TV Aerial: Status type
Before you begin, look around for other TV aerials, and note which way they are pointing, and
whether the bars on the aerials are horizontal or vertical.
The aerial is adjusted from inside the wardrobe.
Unscrew the big white finned nut (red arrow) to allow the aerial to be raised and then turned to
face the same way as other aerials nearby. A red dot on the shaft is aligned with the front of the
aerial.
If nearby aerials have vertical bars, turn the handle anti-clockwise (green arrow) to rotate the
aerial into the vertical position. This handle is rather fragile, but can usually be clicked back into
place if it comes off in your hand.
If you have moved since last using the TV it will probably need re-tuning to the local transmitter.
(See TV manufacturer’s instructions).
You must lower the aerial before travelling, and point it towards the rear; otherwise tree
branches may damage it.
TV Aerial Amplifier
Make sure that the TV amplifier is switched on and the red light
is showing. Move the right hand switch to the left.
The left hand switch is normally set to the right, but can be slid
left if the signal is very weak.
Page 24
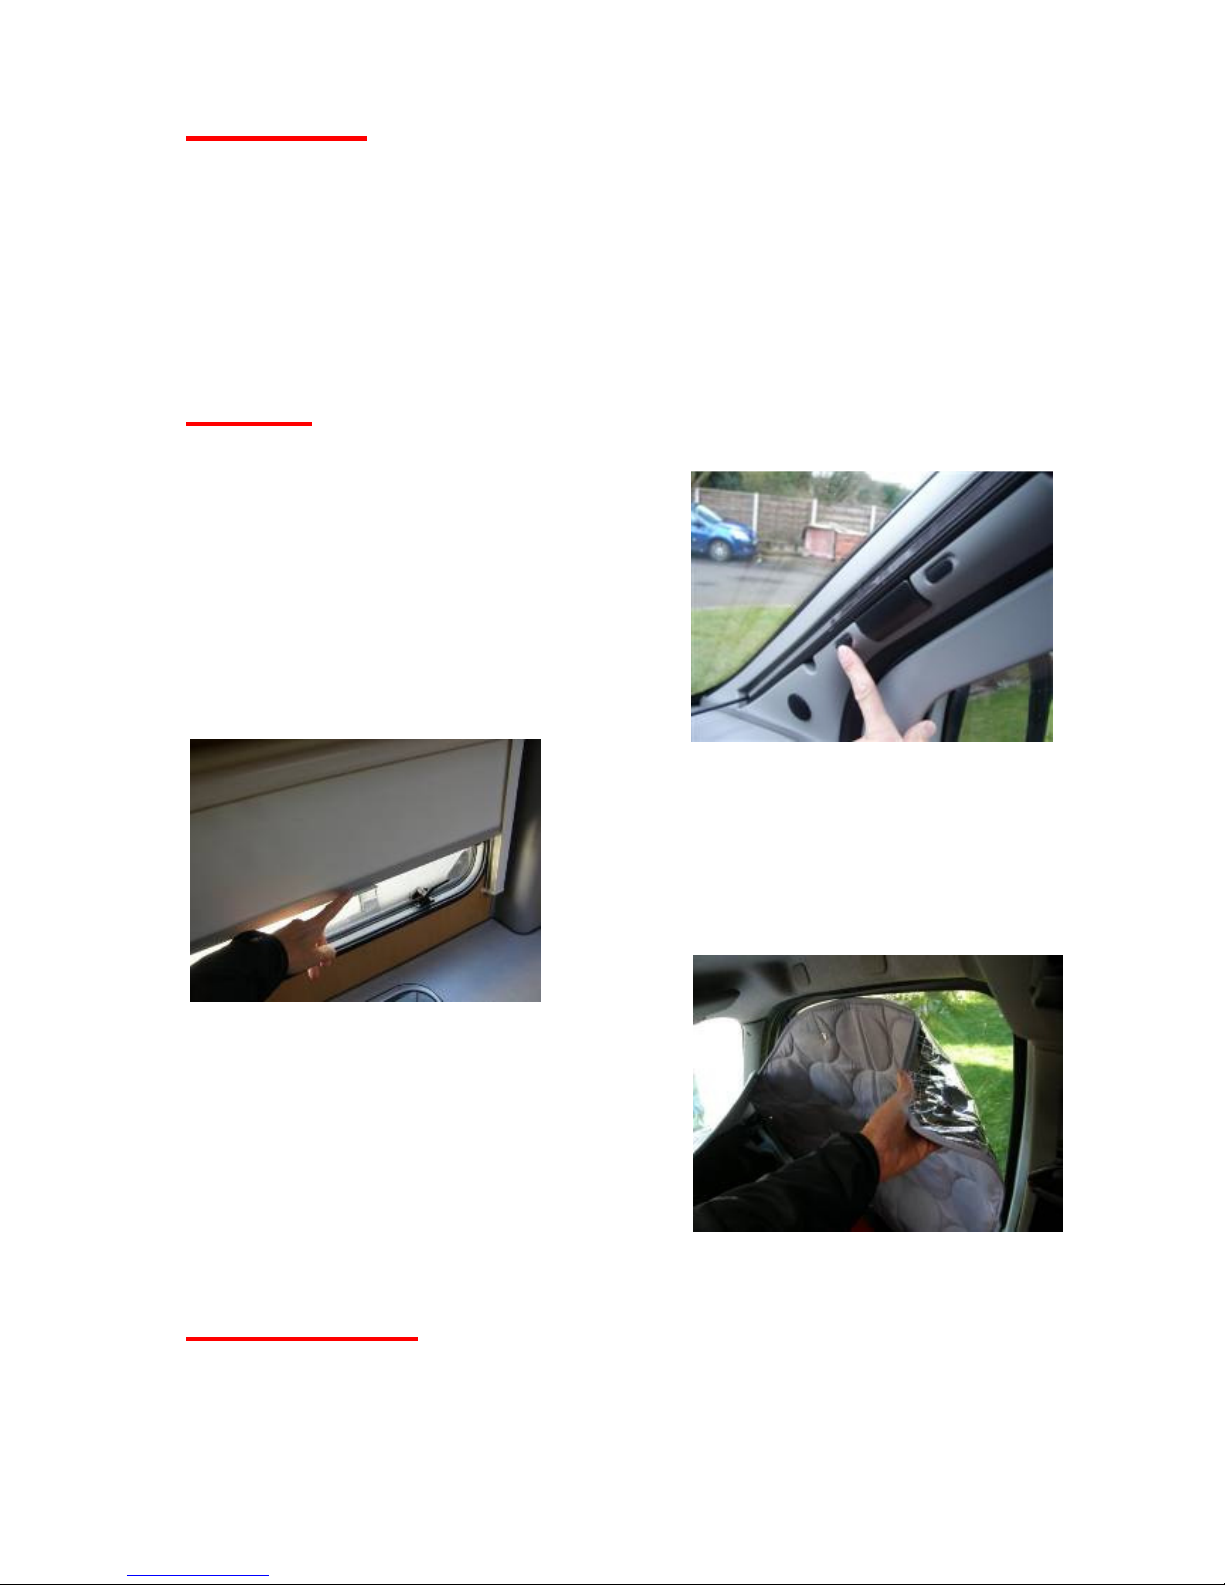
Windows
The clamping knob on the window support arm must be released before the window can
be opened.
The windows are closed using lever latches that incorporate a locking ventilation
position, which holds the window securely a few millimetres ajar.
Windows must be fully closed when driving. If they blow open at motorway speed, or
brush against hedges, it may rip them off completely
Blinds
The windows and roof lights all have blinds for
privacy at night, and to exclude the heat from
the sun during the day.
The windscreen blind has two slide locks each
side that must be released to allow opening.
The side windows have roller blinds.
Pull down and push away to latch them.
The cab door windows have quilted screens,
which are attached to with press studs.
The screens have a silvered surface on the
outside, which helps reflect the heat of the sun in
the daytime.
Fly Screens
The roof lights, windows and the rear door all have fly screens
Page 25
Technical Data
Fiat Multijet Diesel Engine 100
Engine Capacity 2198cc
Engine Power lOObhp
Engine Torque 250Nm
Wheel Base 3.80 m
Designated Passenger Seats 3 (total 4 belted seats including driver. All 3 point belts)
Berths (Sleeping Positions) 4
Overall Length (No Ladder) 6.72m
Overall Width (Mirrors Folded) 2.24m
Overall Height 2.85m
Maximum Technical Permissable Laden Mass (A) 3,500kg
Mass in Running Order (B) 1 2,850kg
Maximum User Payload (A-B) 650kg
Maximum Recommended Trailer Weight 1,600kg
Gross Train Weight3 5,100kg
Thermal Insulation Grade Two
Bed Sizes Length Width
Fixed Rear Double 1.85m (6’1”) 1.25m (49”)
Additional Front Double 2.08m (6’10”) 1.24m/0.93m (49” / 37”)
 Loading...