

Page 1
SWIFT 2
Racing drone
User Manual
www.swellpro.com
V 1.0
Do not blink, because it’s fast!
Page 2

INDEX
-1-
1. Get to know your aircraft.................................................... 3
2. Get to know your remote controller ........................... 4
3. Specification ................................................................................ 6
4. Attention before flight .......................................................... 8
5. Charge the battery.................................................................. 8
6. Prepare the drone ................................................................... 9
7. Ready for flight ........................................................................ 11
8. Operation instruction .......................................................... 13
9. End flight ..................................................................................... 16
10. Additional Instruction ....................................................... 17
11. Instruction for balance changer .............................. 24
Page 3

Swift
User Manuzal
SWIFT 2 Racing drone
-2-
1. Do not blink, because it’s fast!
2. Unprecedented modular design and highly integrated design.
3. Championship level racing power system.
4. Compatible with different types of blades.
5. 3S 2600mah Lipo battery.
6. 120° wide angle FPV camera lens.
7. 800TVL/F2.5 aperture.
8. Ruggedness and anti-drop ability.
9. Professional protection design.
10. Much more convenient to DIY.
11. The most considerate radio controller.
12. 5.8G real time video transmitter.
13. Quick exchangeable 5.8G clover antenna.
14. Build in buzzer to help find your drone easily.
15. Three flight modes meet the needs of junior and senior pilot.
16. The top quality ESC enhances the power and reduces maintenance.
17. Comes with elegant and adjustable rear flight indication lights, they can beturned
ON / OFF on the radio controller.
18. Turn ON / OFF OSD data from controller. Easily adjust the PID parameter on theradio
controller.
19. Lock/unlock the motor by switch. This is very convenient and protects the droneand
prevents accidents.
20. Compact package design.
A professional, ready to fly, compact but aggressive
andyet elegant racing drone!
Page 4
1
2
3
3
2
4
4
5
5
6
7
8
10
11
12
13
9
9
-3-
Swift
User Manual
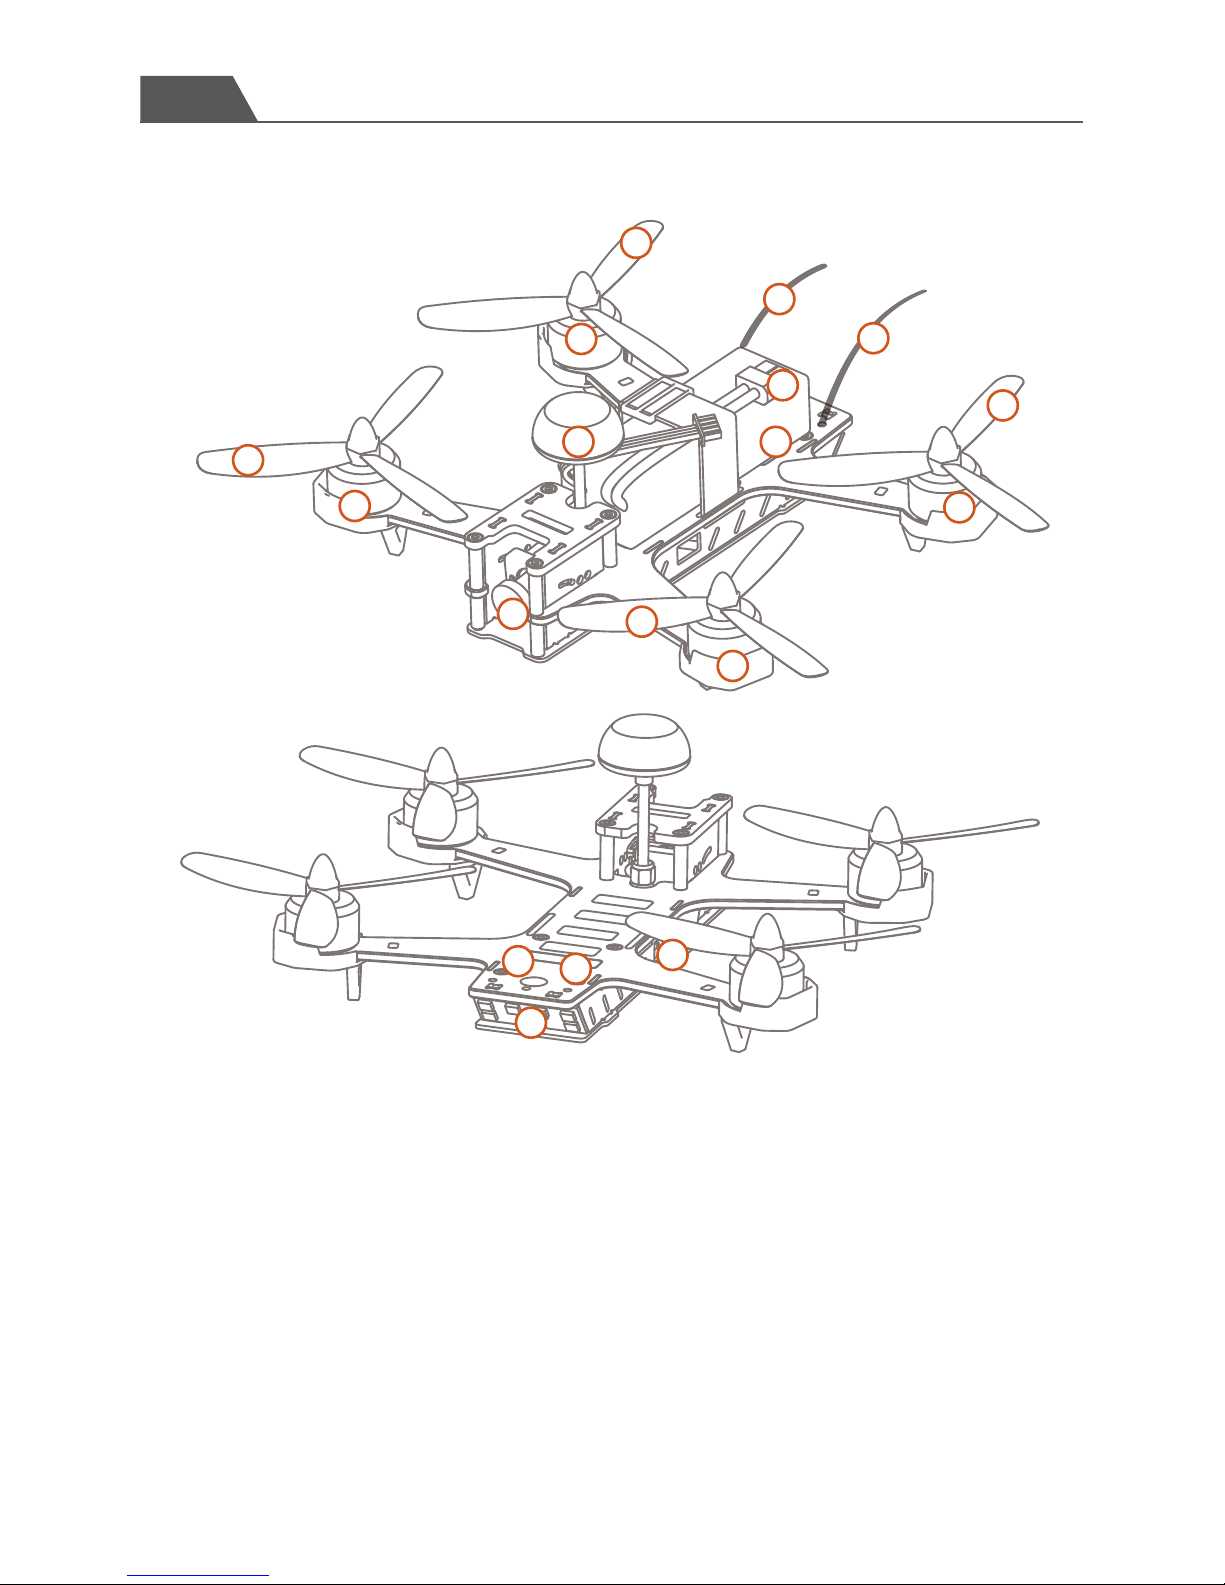
1. Get to know your aircraft
1. Camera
2. Propeller(CW)
3. Propeller(CCW)
4. Clockwise motor
5. Counterclockwise motor
6. Li-Po Battery
7. Power port
8. Mushroom antenna
9. Reciever antennas
10. Tail light
11. Transmitter monitor
12. Transmitter control switch
13. USB Ports
Page 5
Swift
User Manual
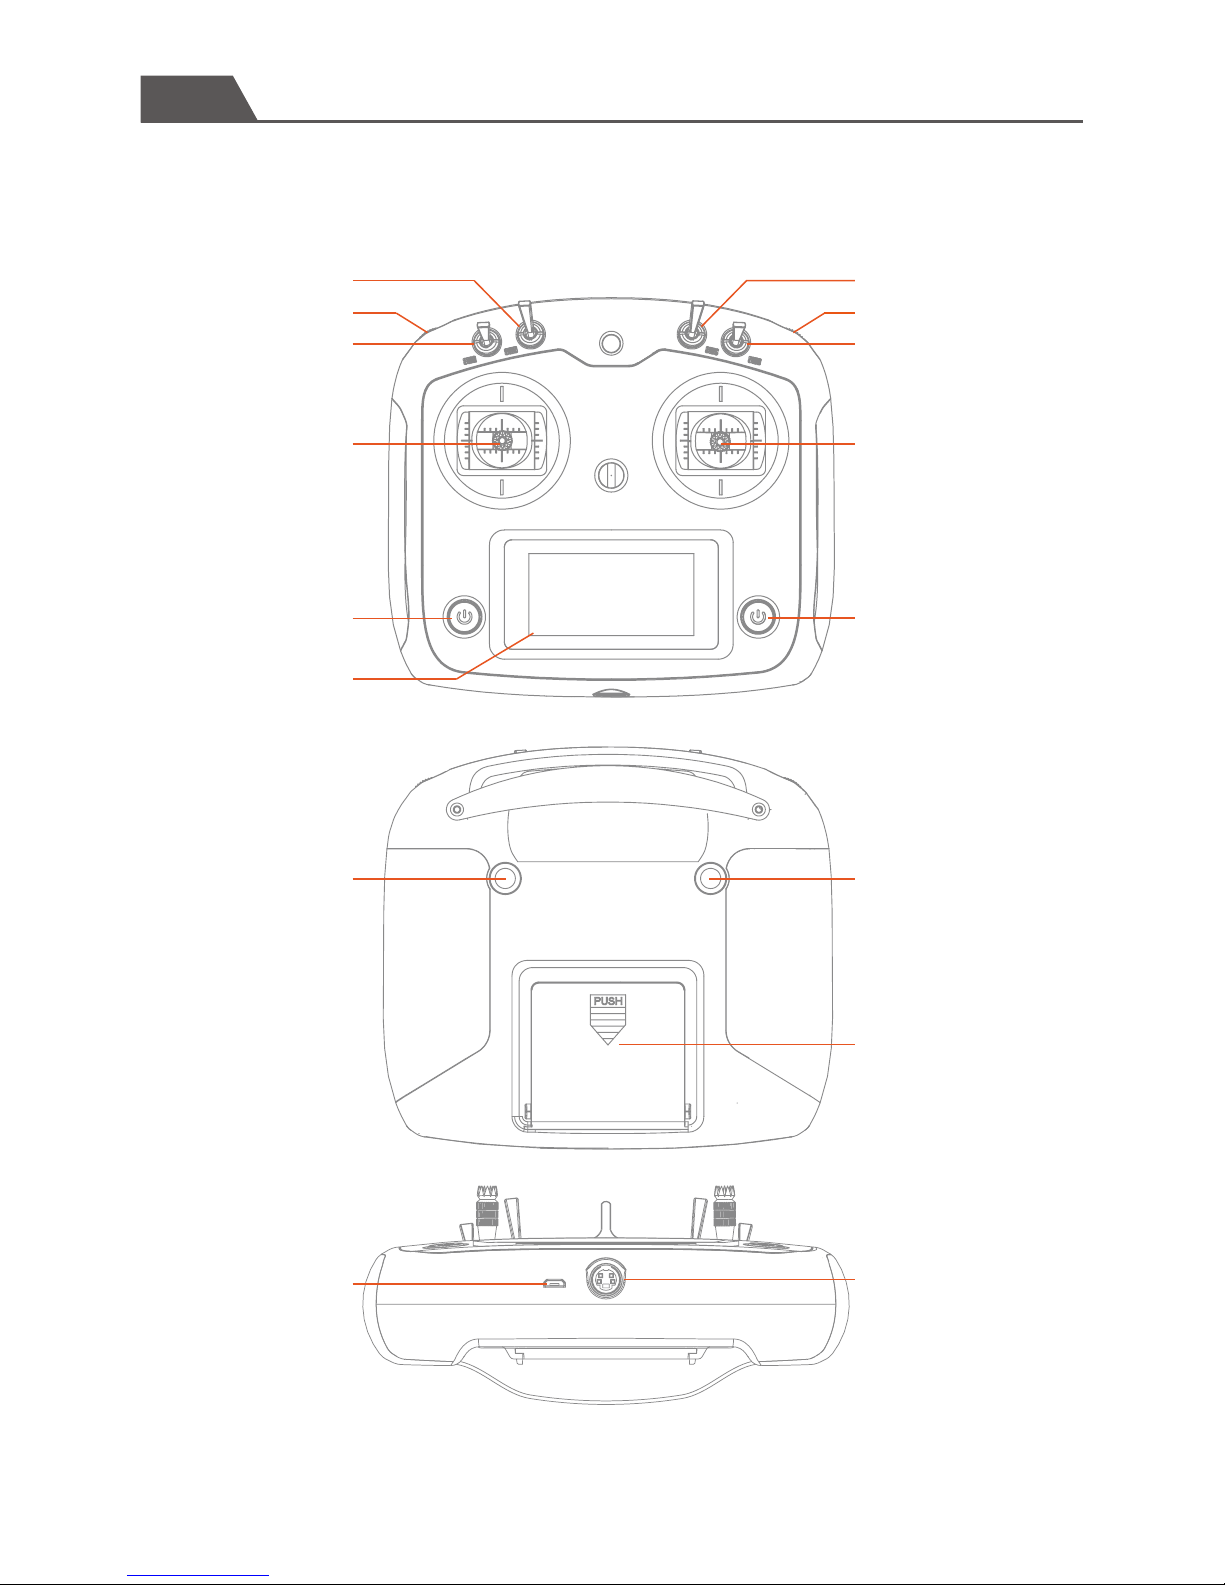
2. Get to know your Remote Controller
-4-
Light ON / Light OFF Stablize / Intermediate / Advanced
Wave wheel switch (No function) Wave wheel switch (No function)
OSD ON / OSD OFFLock Motor / Unlock Motor
Left Joystick Right Joystick
Power Power
Alarm
Battery cover
PS/2 (No function)
USB
Alarm
Touch screen
Attention: The factory default of the remote controller is the left hand setting, Please make a special
note if you need the right hand setting remote controller, because customization setting is needed.
Page 6
Swift
User Manual
-5-
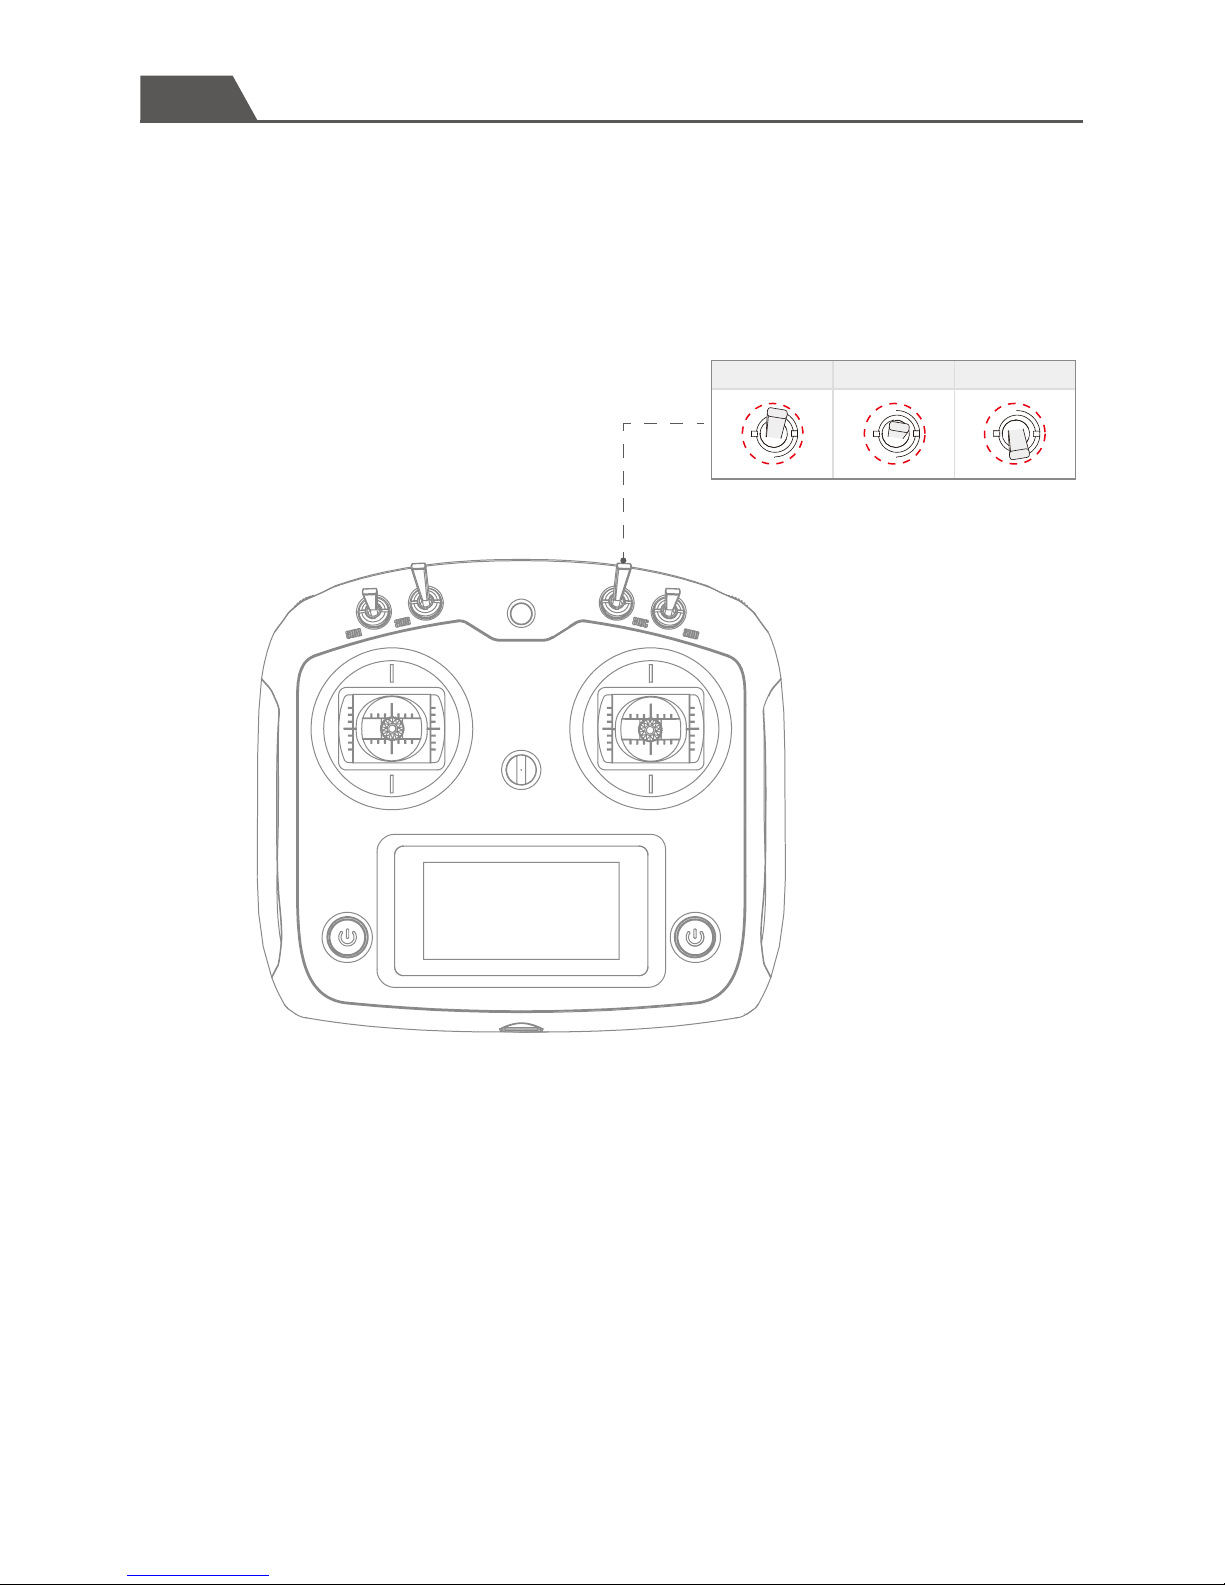
AdvancedStablize Intermediate
The Swift 2 features 3 useful flight modes,
STABILIZE/INTERMEDIATE / ADVANCED(RATE) Flight modes are
selected by SWC.
(Select the appropiate mode according to your flight skills)
STABILIZE Flight mode: the main flight controller system comes with stabilization
function,its operation is relatively stable, it can not roll, it is suitable for beginners.
INTERMEDIATE flight mode: the main flight controller system comes with partial stabiliza-
tion function,its operation is relatively flexible, it can roll.
ADVANCED Flight Mode: the main flight controller system without stabilization
function,its operation is very flexible, it can roll.
Page 7
Swift
User Manual
3. Specification
-6-
Aircraft
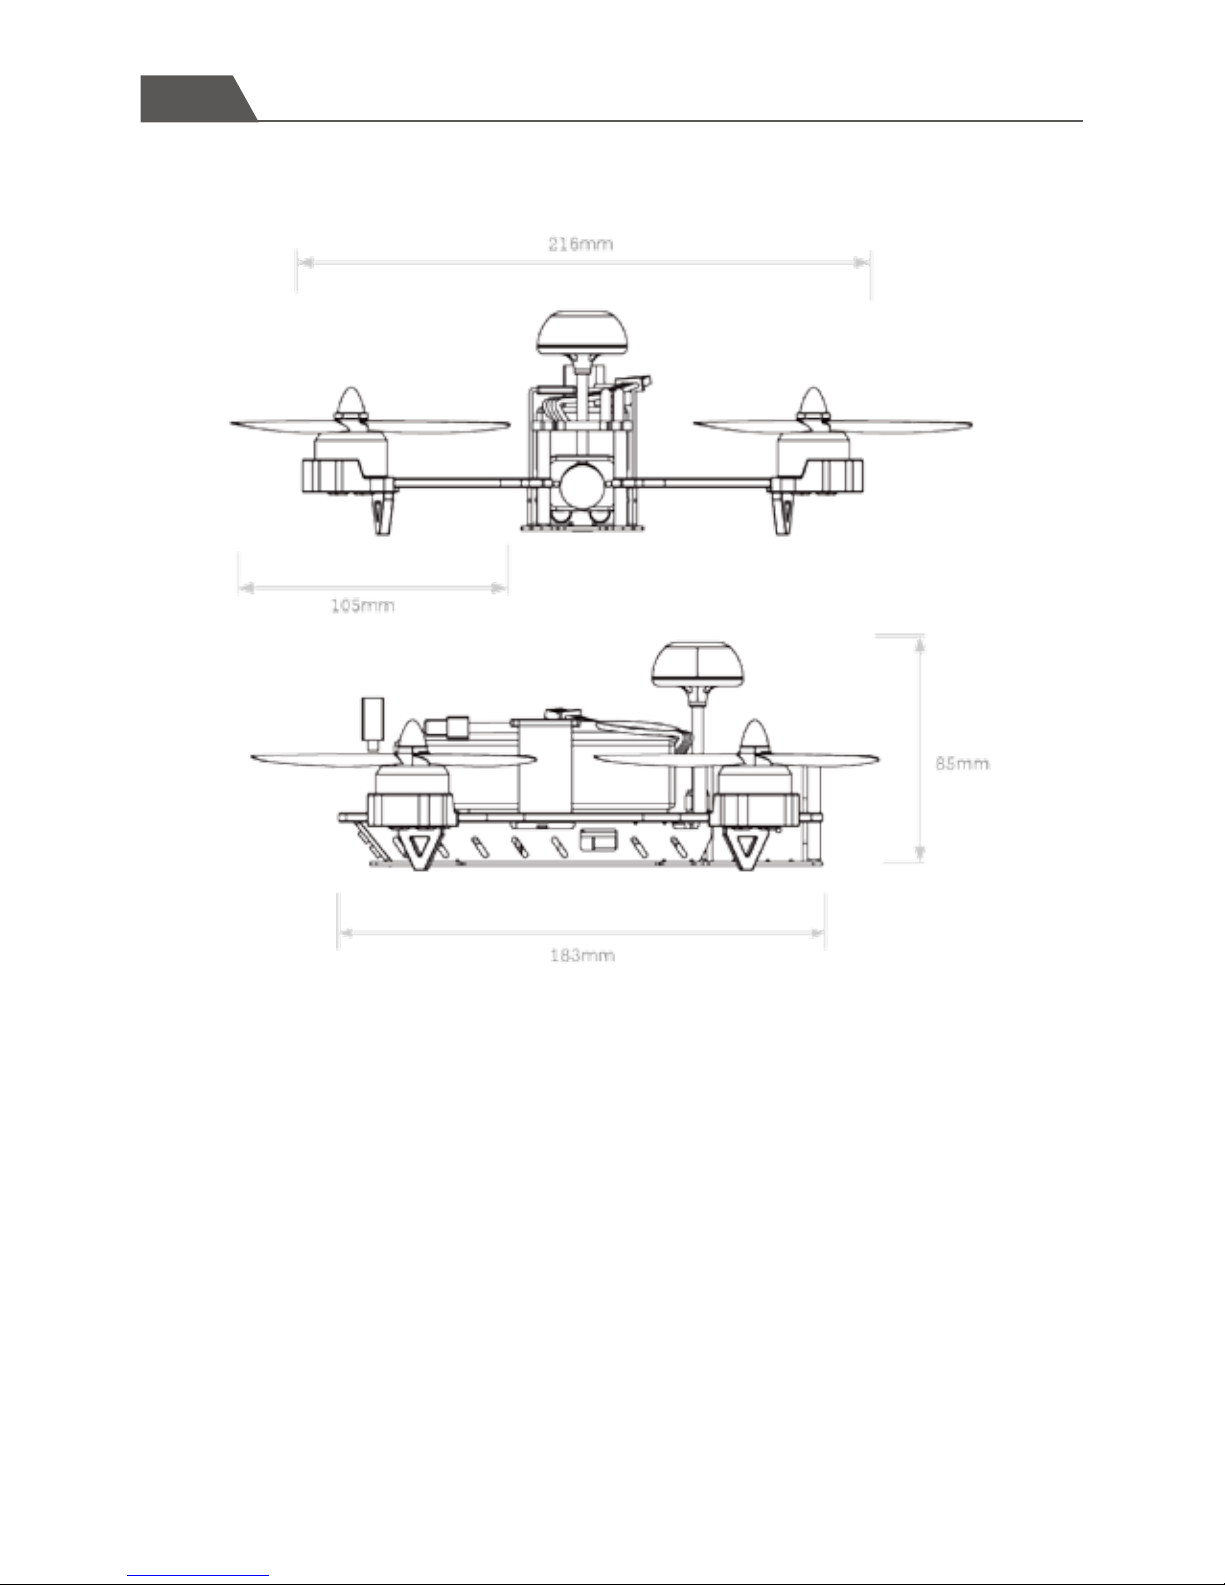
Main carbon frame: 3.5mm 3K altra strong carbon fiber frame
Propeller: #5045 3blades
Axis Diameter:220mm
Overall (L x W x H):183 x 216 x 85mm
Weight: 378g (Battery excluded)
Flight Controller: F3 enhanced version
OSD: Integrated
Brushless Motor: #2205 2300KV
Brushless ESC: 25A
Battery: 3S 2600 mAh LiPo (Weight: 214g)
Transmitter: 5.8G 40CH, Digital Channel
Selector
Flight Time: 12~15 mins ( 2600mAh)
Max Flight Speed: 150km/h
Max Flight Distance: 1000m
Working Temperature: -10C°~ 40C°
Page 8

Swift
User Manual
-7-
Remote Controller
Net Weight: 435g (Battery Excluded)
Frequency Channel: 2405 ~ 2475HMZ
Remote Control Distance: 1.0 KM
Receiver Sensitivity(1%PER):-105dbm
Working Current: 120 mA
Battery: 7.4V-11.1V
Channel: 10
Camera
Horizontal Resolution: 800TVL
System Commitee: PAL/NTSC
Power input: 5V
FOV: 120 Degree
Aperture: F2.5
Transmitter
Transmitter: 5.8G Wireless Image Transmission
Channels: 40CH
Power: 25mW、200mW、400mW
Page 9

Swift
User Manual
-8-
4. Attention before flight
5. Charge the battery
The Swift is recomended for pilots, 15 years or older, with RC hobby experience.
Only fly the Swift in dry weather, with low wind, please do not fly in rain or heavy
foggy conditions.
Always choose large open fields for flying. Check local LAW and ordinances for
legal flying areas.
Always keep at least 10 feet distance to the aircraft, to avoid injury from high-speed
propellers on the ground or while flying.
Do not fly close to high-voltage power lines, cellphone towers, or radio towers, as
these may disrupt your control signal.
ALWAYS check local laws BEFORE flying. NEVER fly over crowds, concerts or sports
stadiums.
Connect the power-cable to the wall-outlet, the E3 charger accept voltage from 100v
to 240v .When correctly powred the charger LED will be flashing green.
Insert the LiPo battery balance plug into the E3 charger.
During charging the LED will be flashing GREEN and display power.
When charging is completed, the charger will display a solid BLUE LED.
Attention:
1. When the 4 LED lights flashes at the same time, there maybe something wrong with
charger or battery,so please stop charging.
2. Please refer to Page XX for details of E3 balance charger.
Page 10
Swift
User Manual
-9-
Airplane Head
Propeller(CW)
5045R( )
Propeller(CW)
5045R( )
Propeller(CW)
5045R( )
Propeller(CW)
5045R( )
6. Prepare the drone
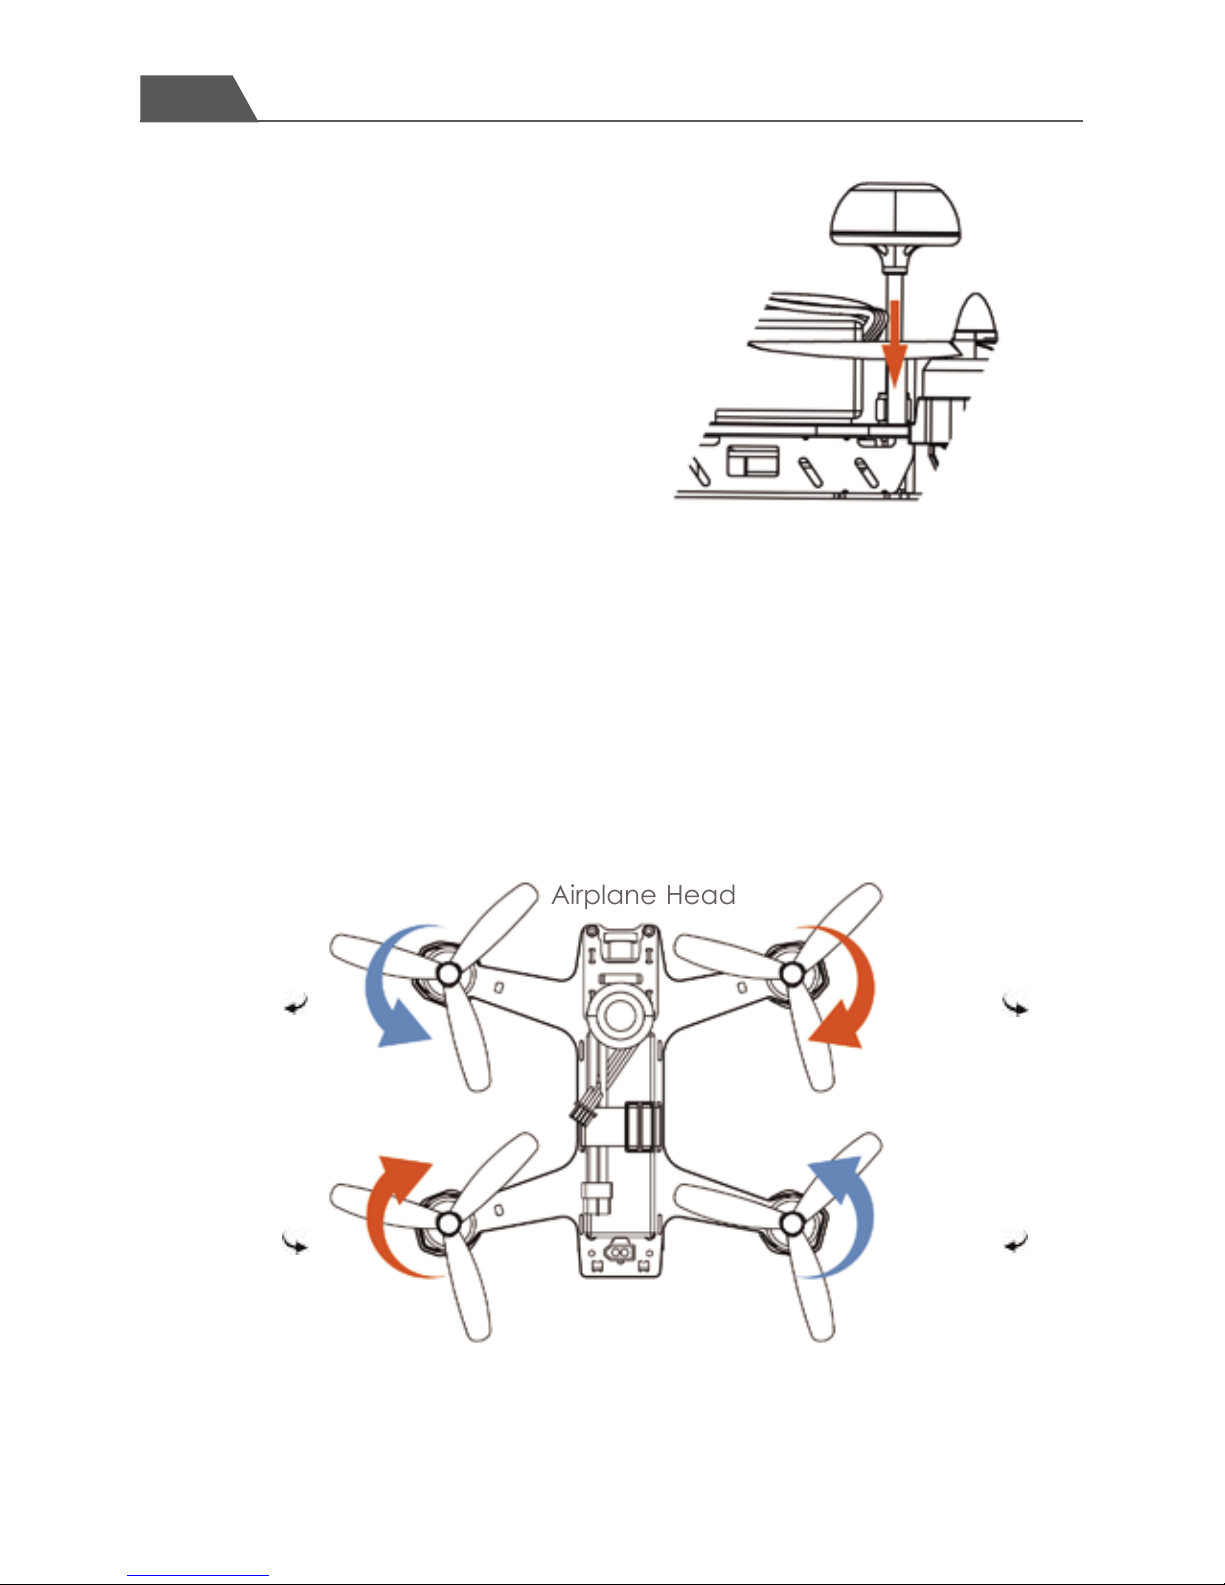
Install propellers
Attention:
Fix the clockwise propeller onto the clockwise motor according to the direction of blue
arrow,and fix the counter clockwise propeller onto the counterclockwise motor
according to the direction of orange arrow.
Tighten the propellers manually and make sure the propeller is installed in proper way
and fastened.
Install prop by hand and tighten by holding the motor with the included wrench.You
can also use the wrench to help remove broken props in case of a crash.
First, install the mushroom to the mounting
brackets as show.Next, push into the Video
Transmitter, Finally tighten the rotating
collar with the included wrench.
Page 11
Swift
User Manual
Airplane Head
-10-
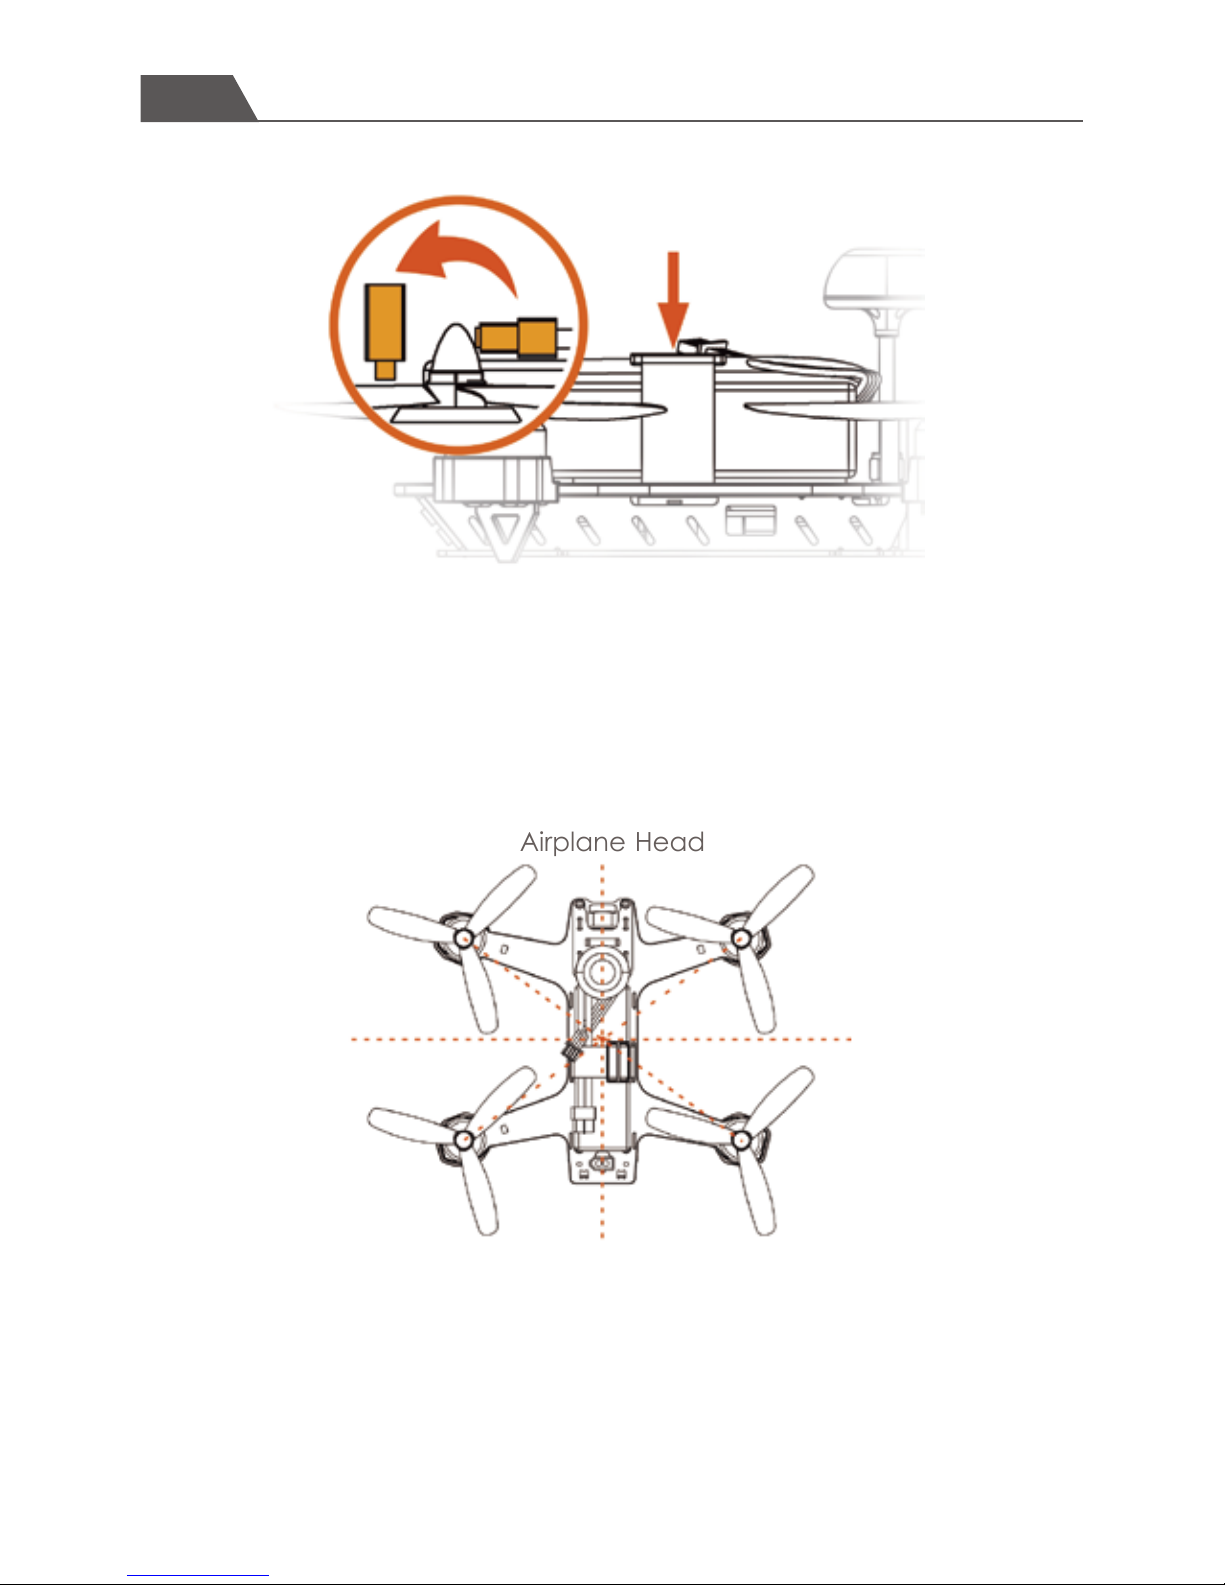
Battery installation
First put the battery anti-slip mat into the battery compartment.Put the battery on top
and move it forward-backwards as required for perfect balance, then firmly secure the
battery with the velcro strap.
Gravity center adjustment
Grab the Swift by the COG line (center of gravity).See the illustration for the COG.Adjust
the battery forward-backwards until the quad balances.
Page 12
Swift
User Manual
-11-
7. Ready for flight
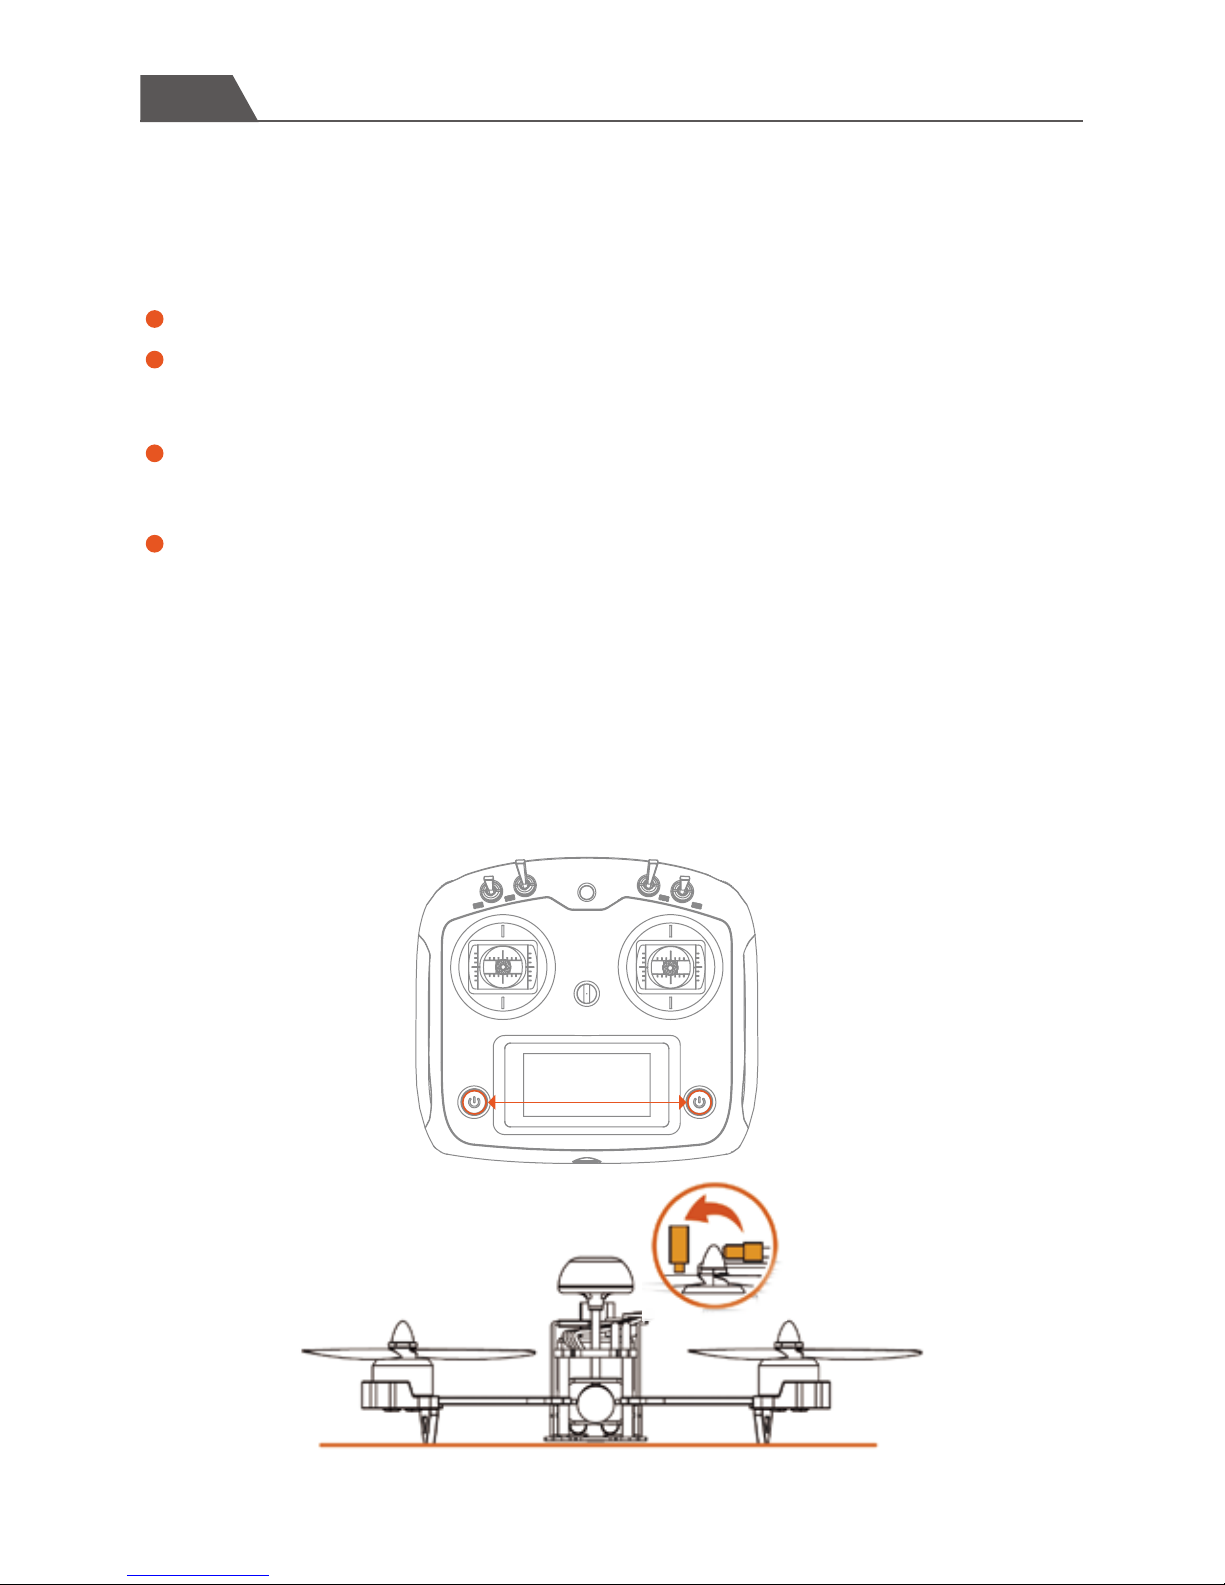
7.1 Binding of the drone
Attention:
Press the two power on buttons at the same time to turn on the remote controller
Put the aircraft on a horizontal place and connect the aircraft power.
1. Place the aircraft in a wide open space, with the rear facing you.
2. Put the motor switch to the lock mode position, move the throttle to the lowest
position.
3. A video receiving equipment is needed to display an image and OSD informa-
tion
4. When voltage reach below 10.8 volts the rear LED light will flash quickly and the
beeper will sound alarm.Do not hesitate to land when you hear the alarm or see
the OSD indicating 10.8 volts
Page 13
Swift
User Manual
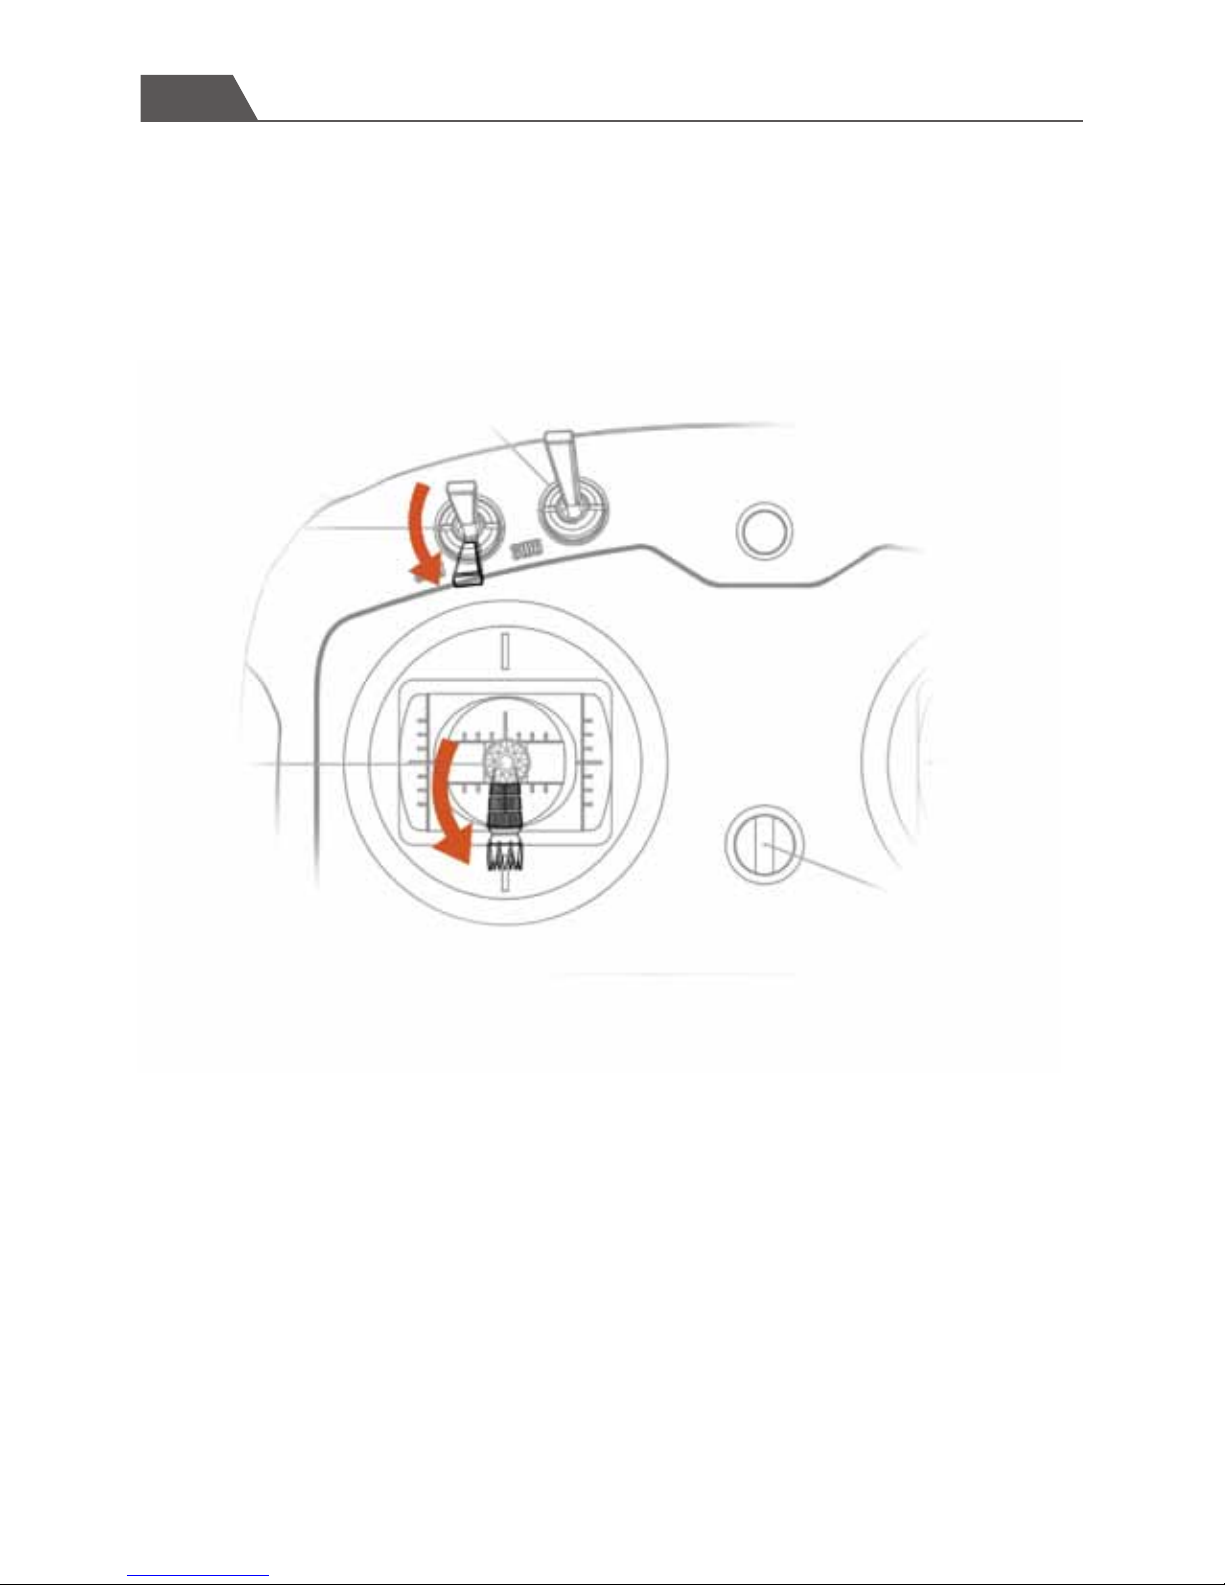
7.2 Motor unlock
-12-
Put the throttle joystick at the lowest position,put the SWA at the lowest position to
unlock the motor.
Page 14
Swift
User Manual
-13-
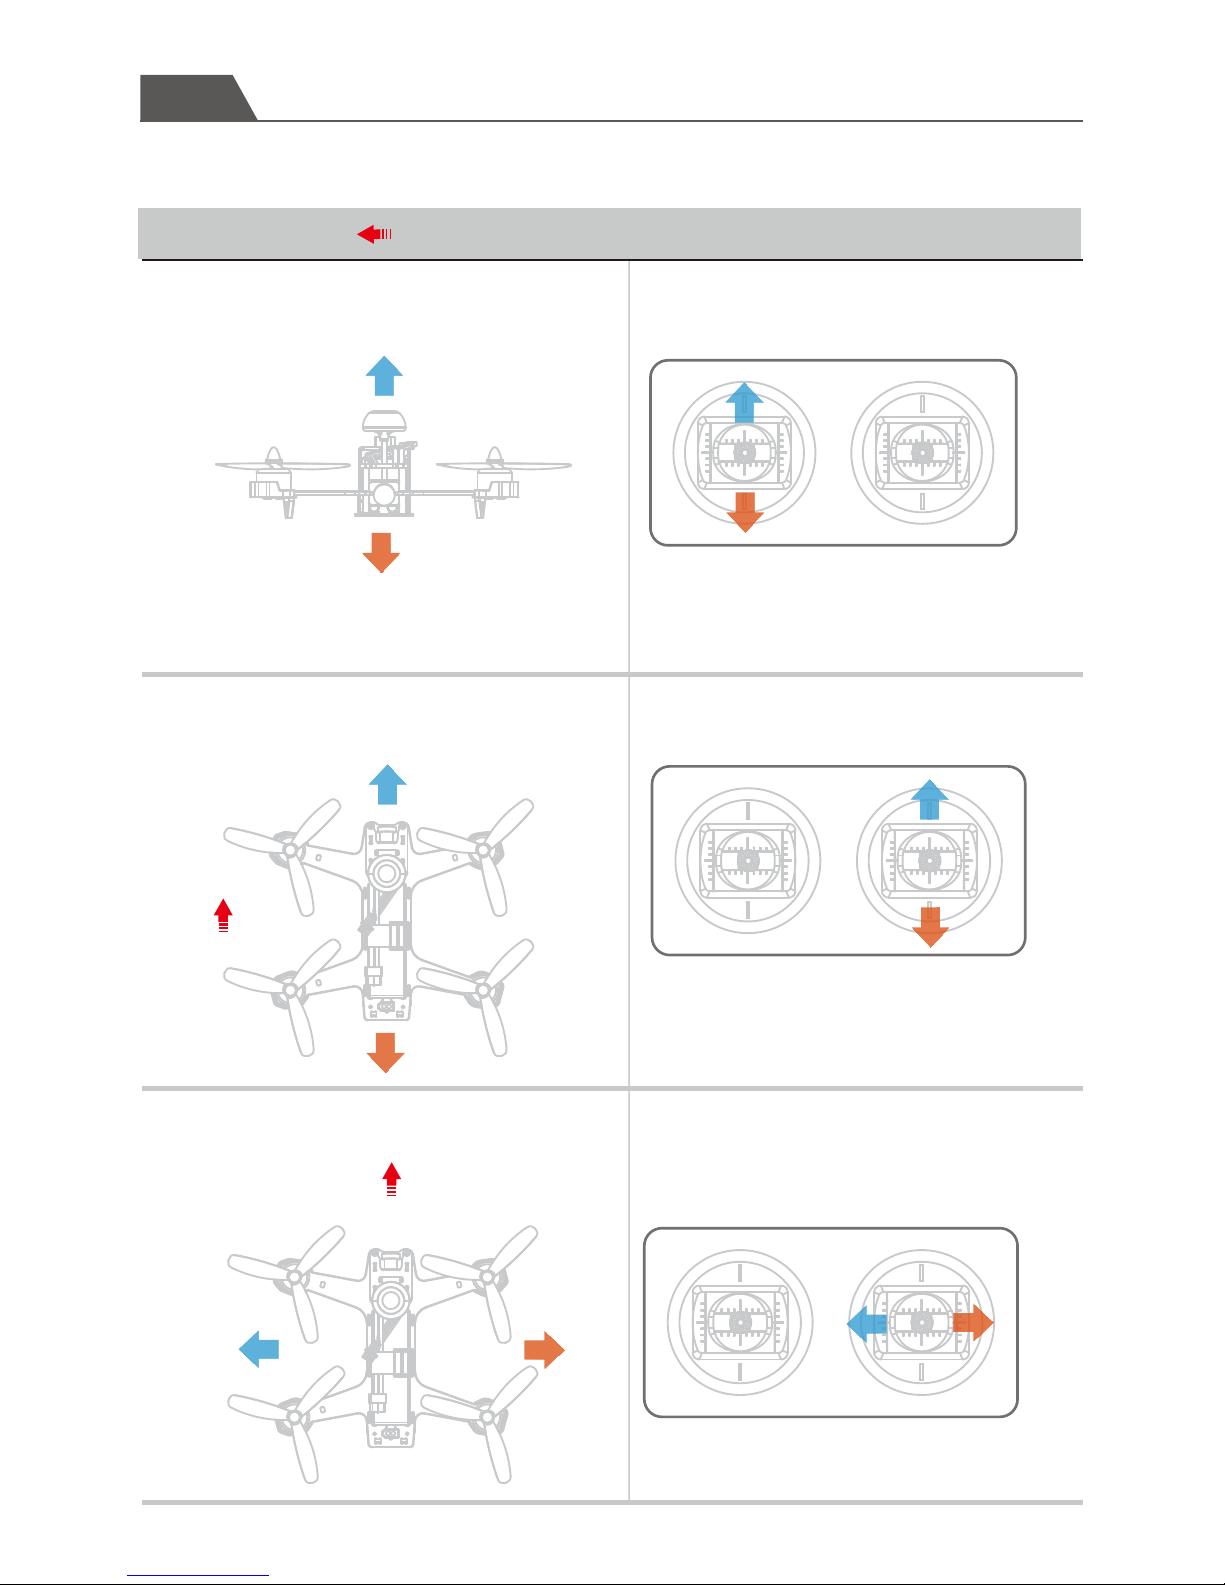
8. Operation instruction
( -the direction of the head)
up/down
(The rear toward operator)
Remote Controller control instruction
Throttle
forward/backward
(Indicator light instruction )
Pitch
left/right
(Indicator light instruction )
ROLL (lean)
Aircraft instruction
Page 15
Swift
User Manual
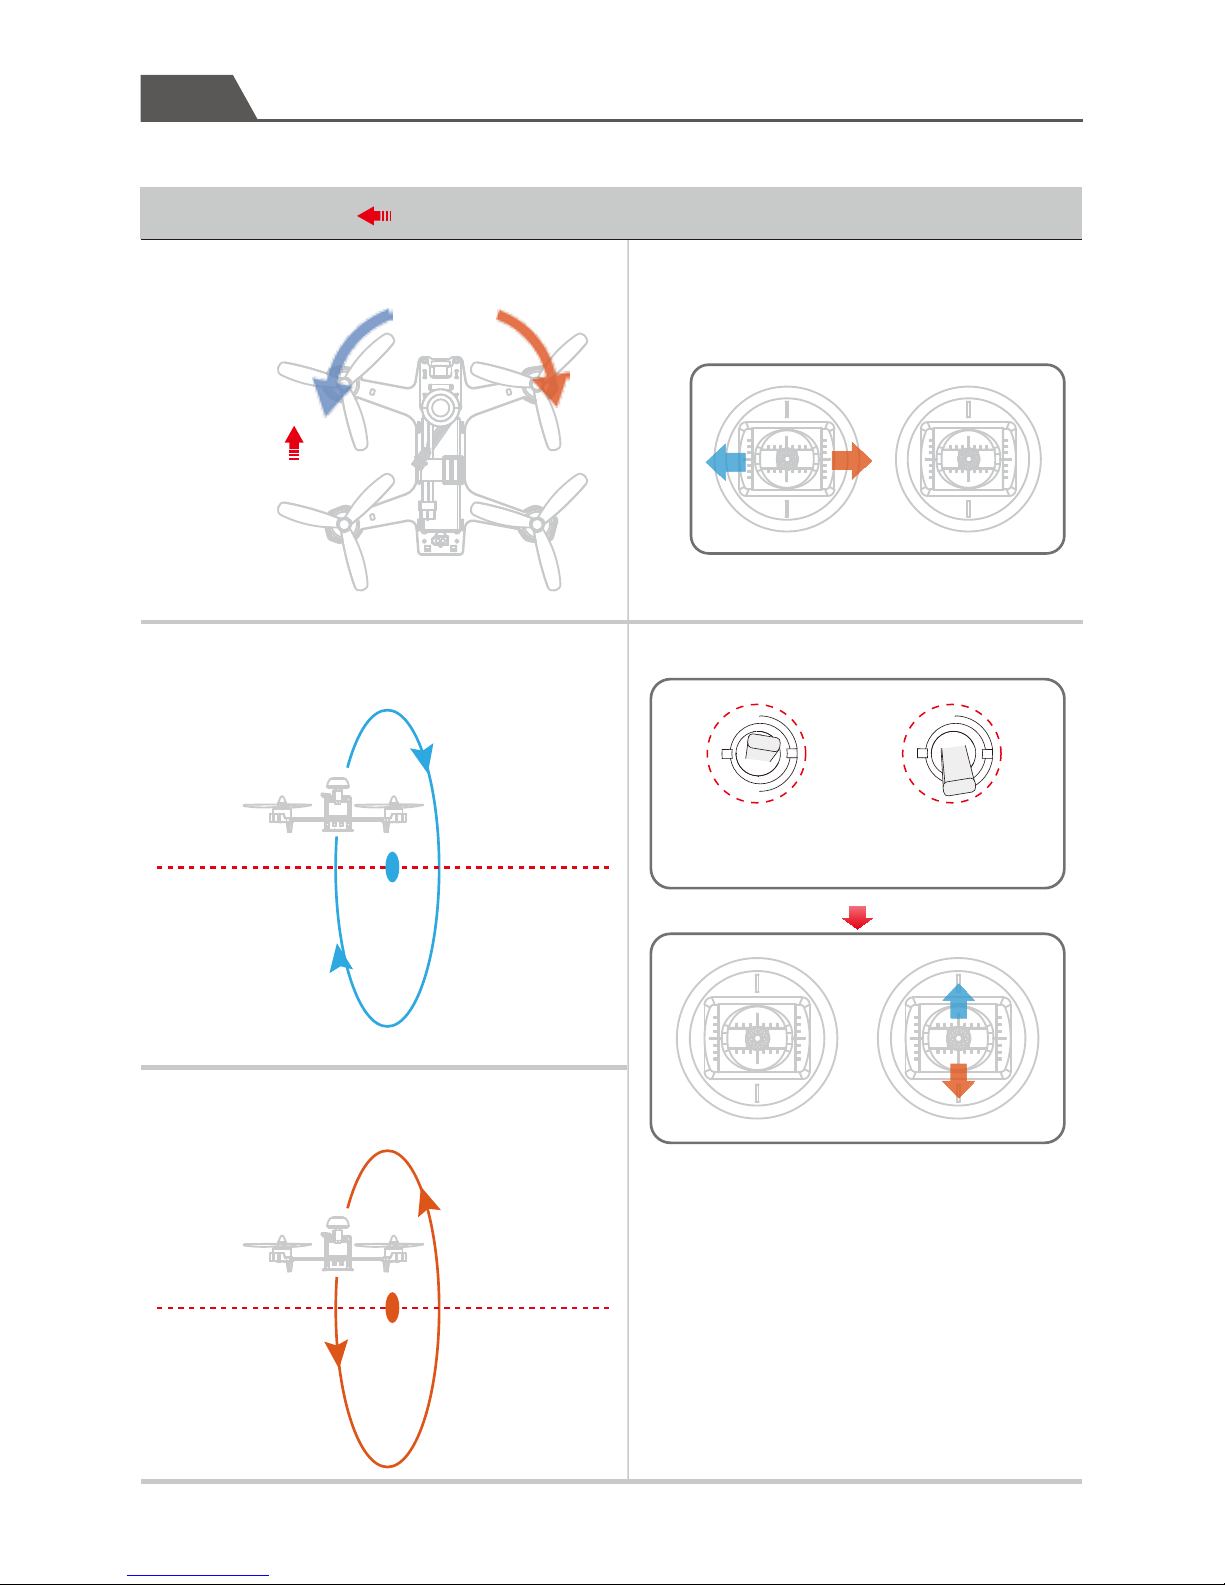
left/right
(Indicator light instruction )
YAW(turn)
The rear toward operator
The aircraft roll forward
The rear toward operator
The aircraft roll backward
-14-
Make sure fly in the Intermediate&Advanced flight mode.
( -the direction of the head)
Remote Controller control instruction
Aircraft instruction
Attention: Always select large open
spaces with soft ground for flying, Rolls
and flips are best suited for experi-
enced pilots.Match throttle power to
the flight to manage altitude.
AdvancedIntermediate
Page 16
Swift
User Manual
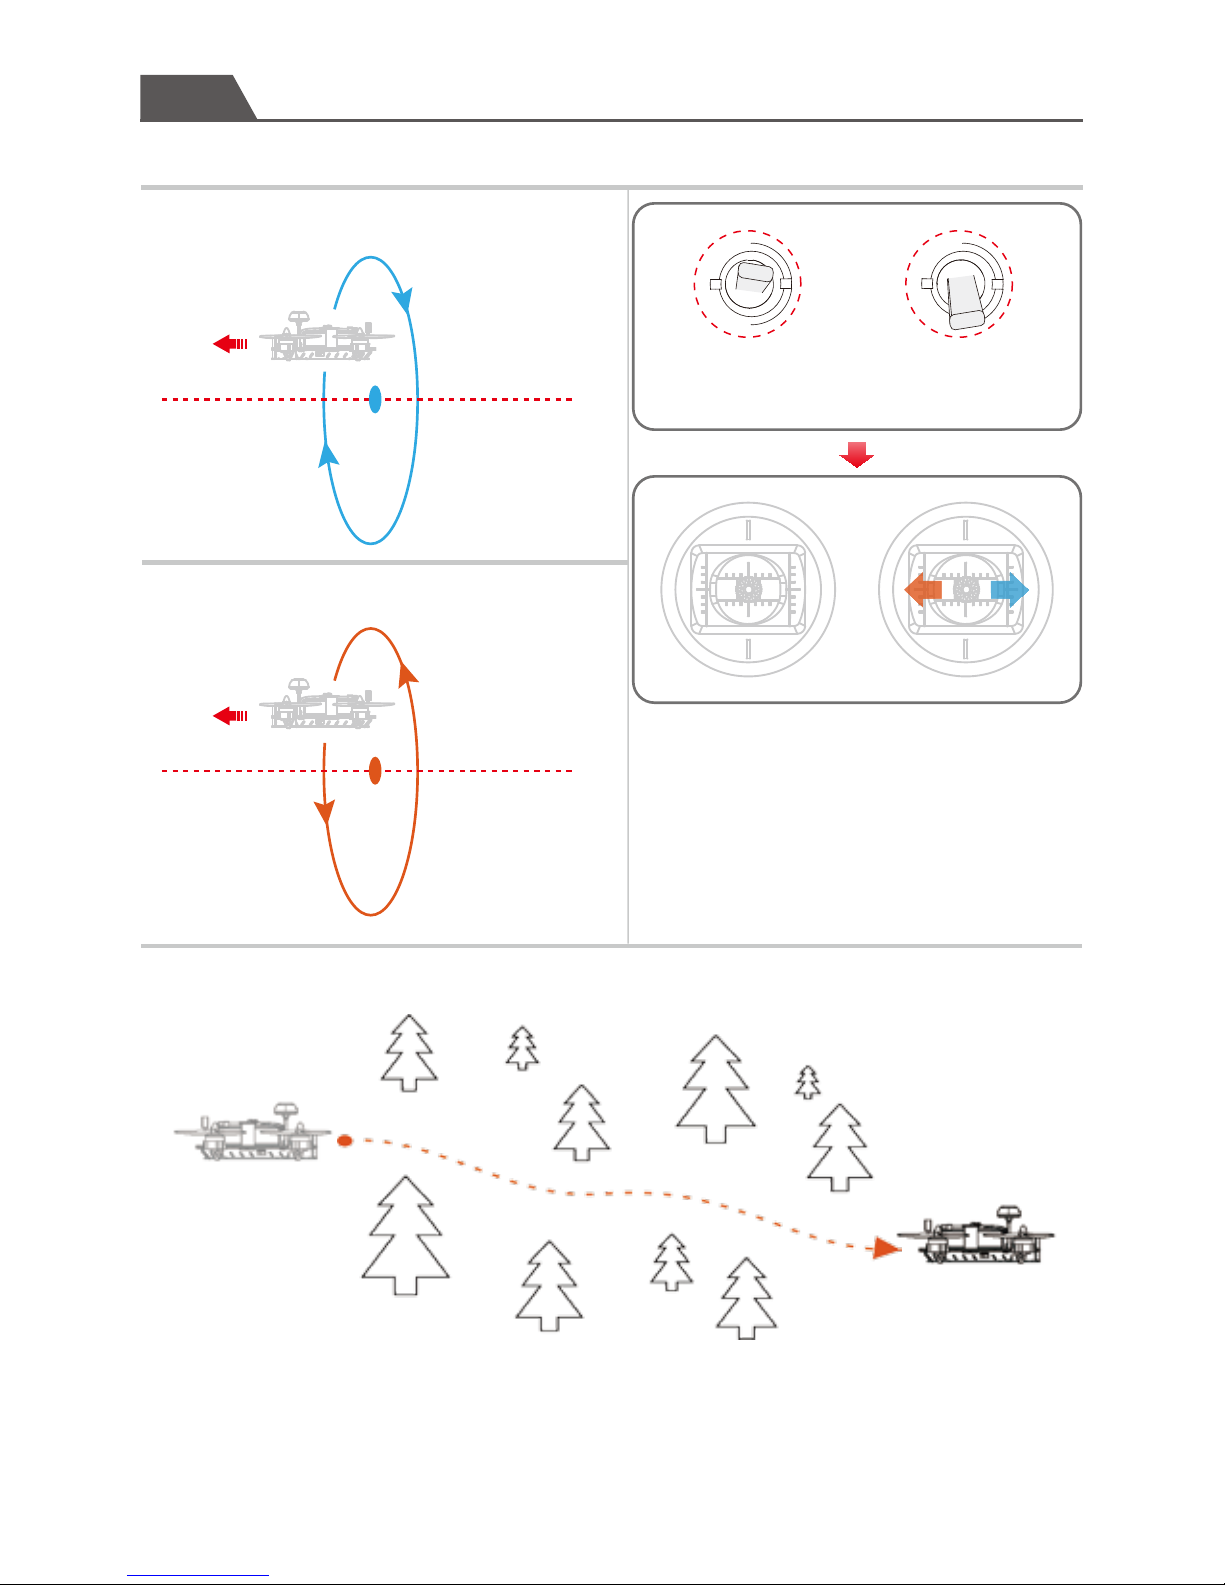
The aircraft roll left
The aircraft roll right
-15-
Attention:
Obstacle flying is more suitable for experienced pilots.
Recommended FPV range 300m depending on environment.
Avoid flying over people, animals or high voltage line.
Obstacle flying
Attention: Always select large open
spaces with soft ground for flying, Rolls
and flips are best suited for experi-
enced pilots.Match throttle power to
the flight to manage altitude.
Make sure fly in the Intermediate&Advanced flight mode.
AdvancedIntermediate
Page 17
Swift
User Manual
-16-
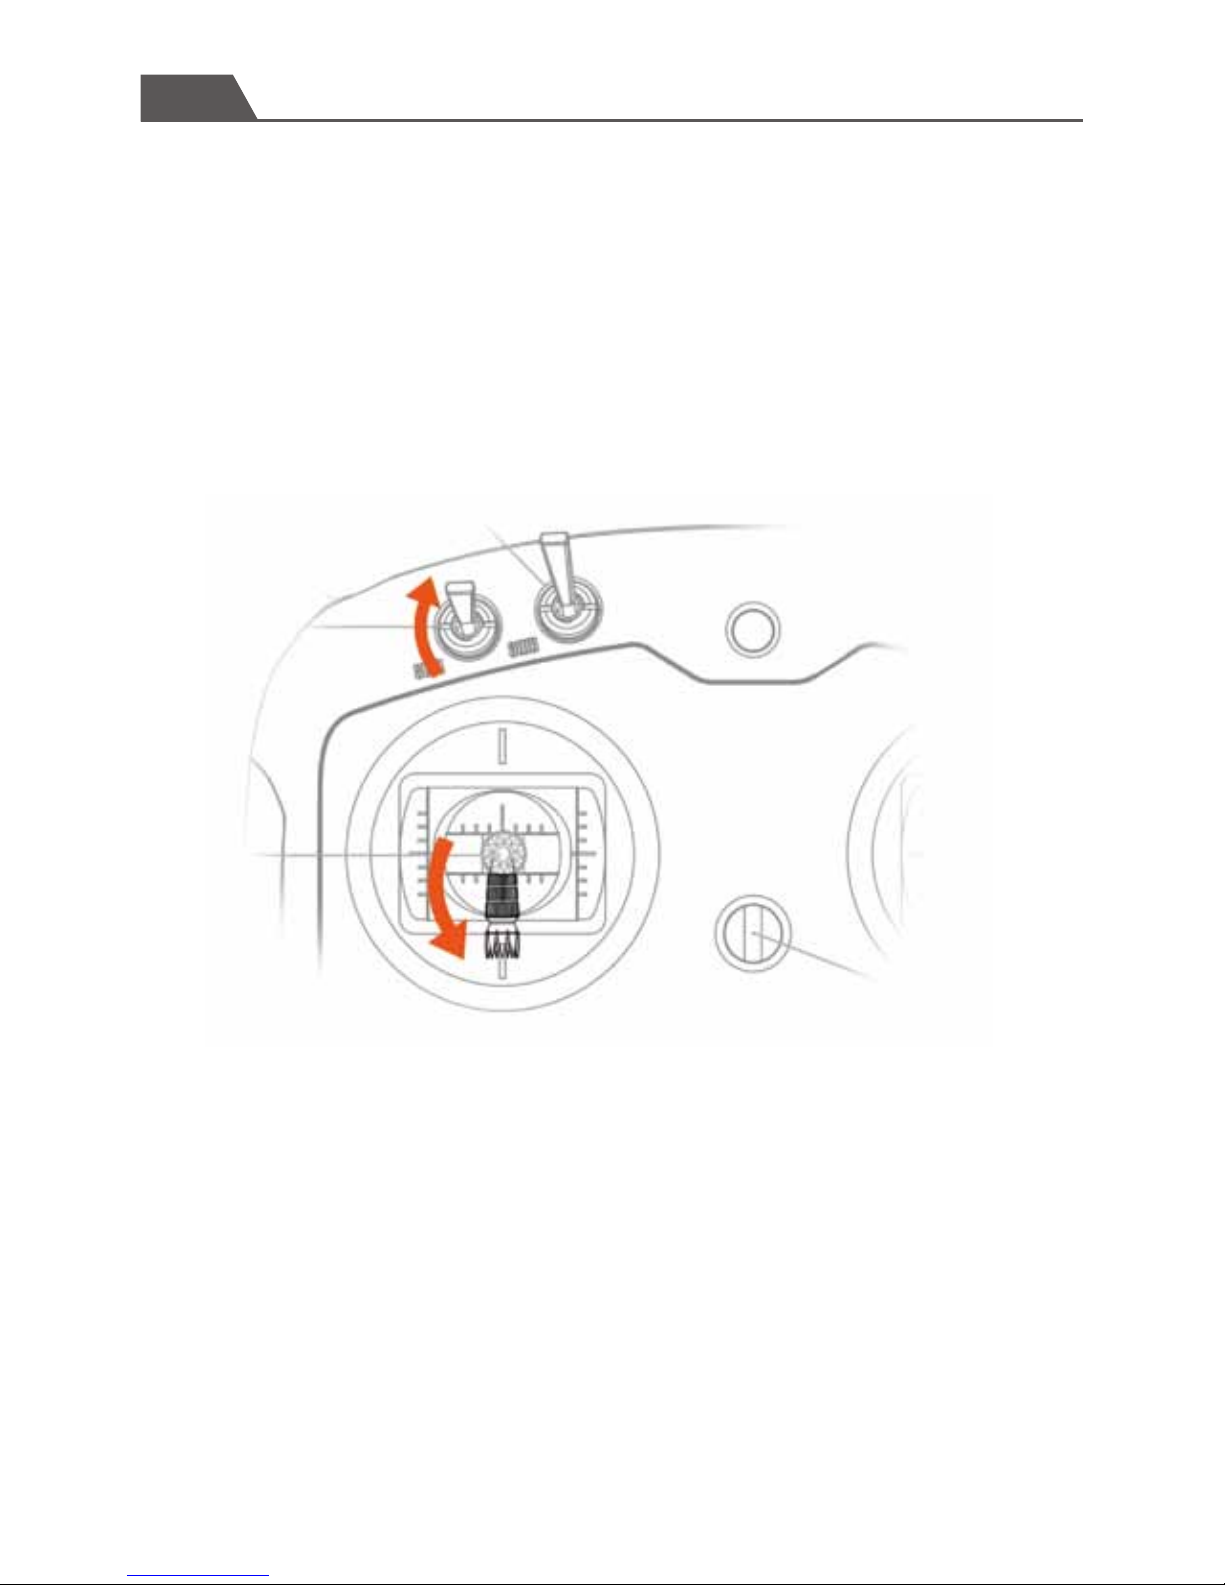
9. End flight
Land the aircraft
Motor lock
First Power off the aircraft , then turn off the radio
Finally, remove the battery from the aircraft
Page 18
Swift
User Manual
10. Additional Instruction
10.1 Remote controller setting
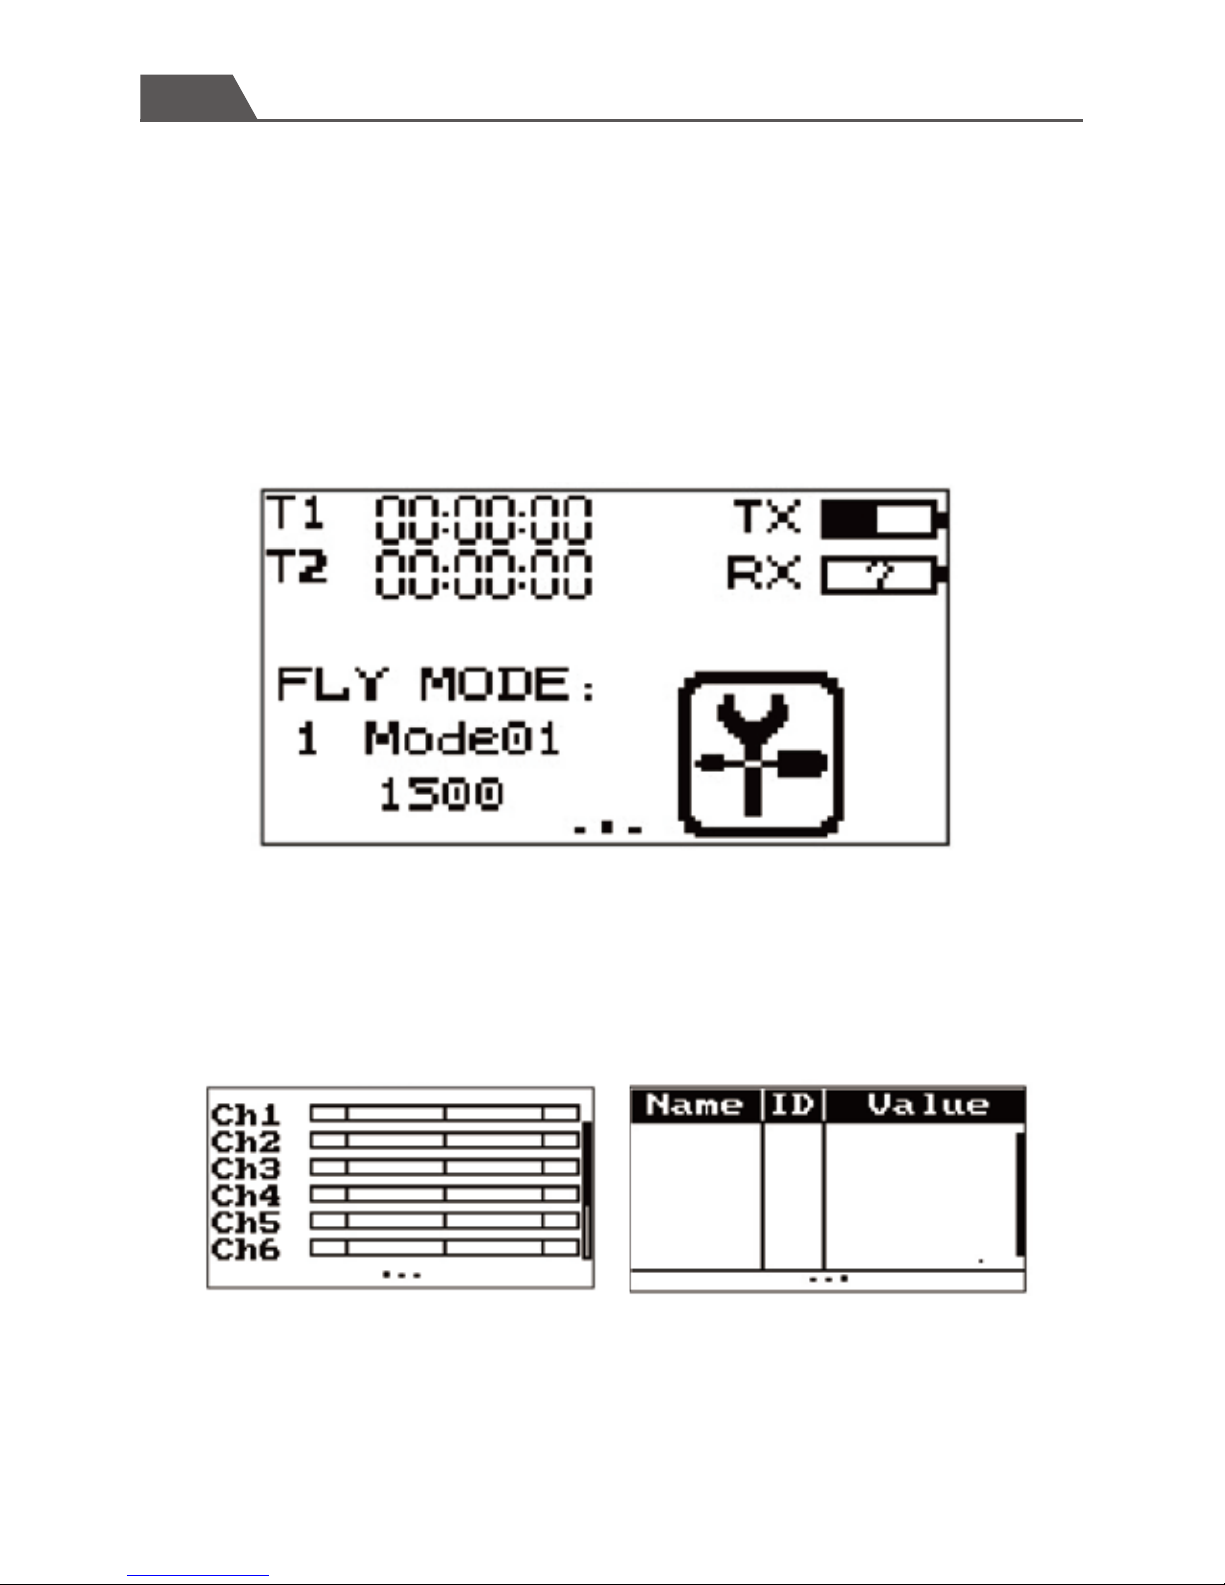
Boot screen(Main interface)
Display actuator
-17-
Caution: Power off the throttle to avoid damage and personnel injuries before check
the actuator.
Sliding up and down to check and long press the screen to
check the actuator
T1 \T2:Timer and setting menu
FLY MODE: Current flight mode and setting menu
TX/RX: Status and voltage settings menu
Attention: We strongly recommand not to
change the default setting of remote controller. This is only for senior pilot.
Page 19
Swift
User Manual
-18-
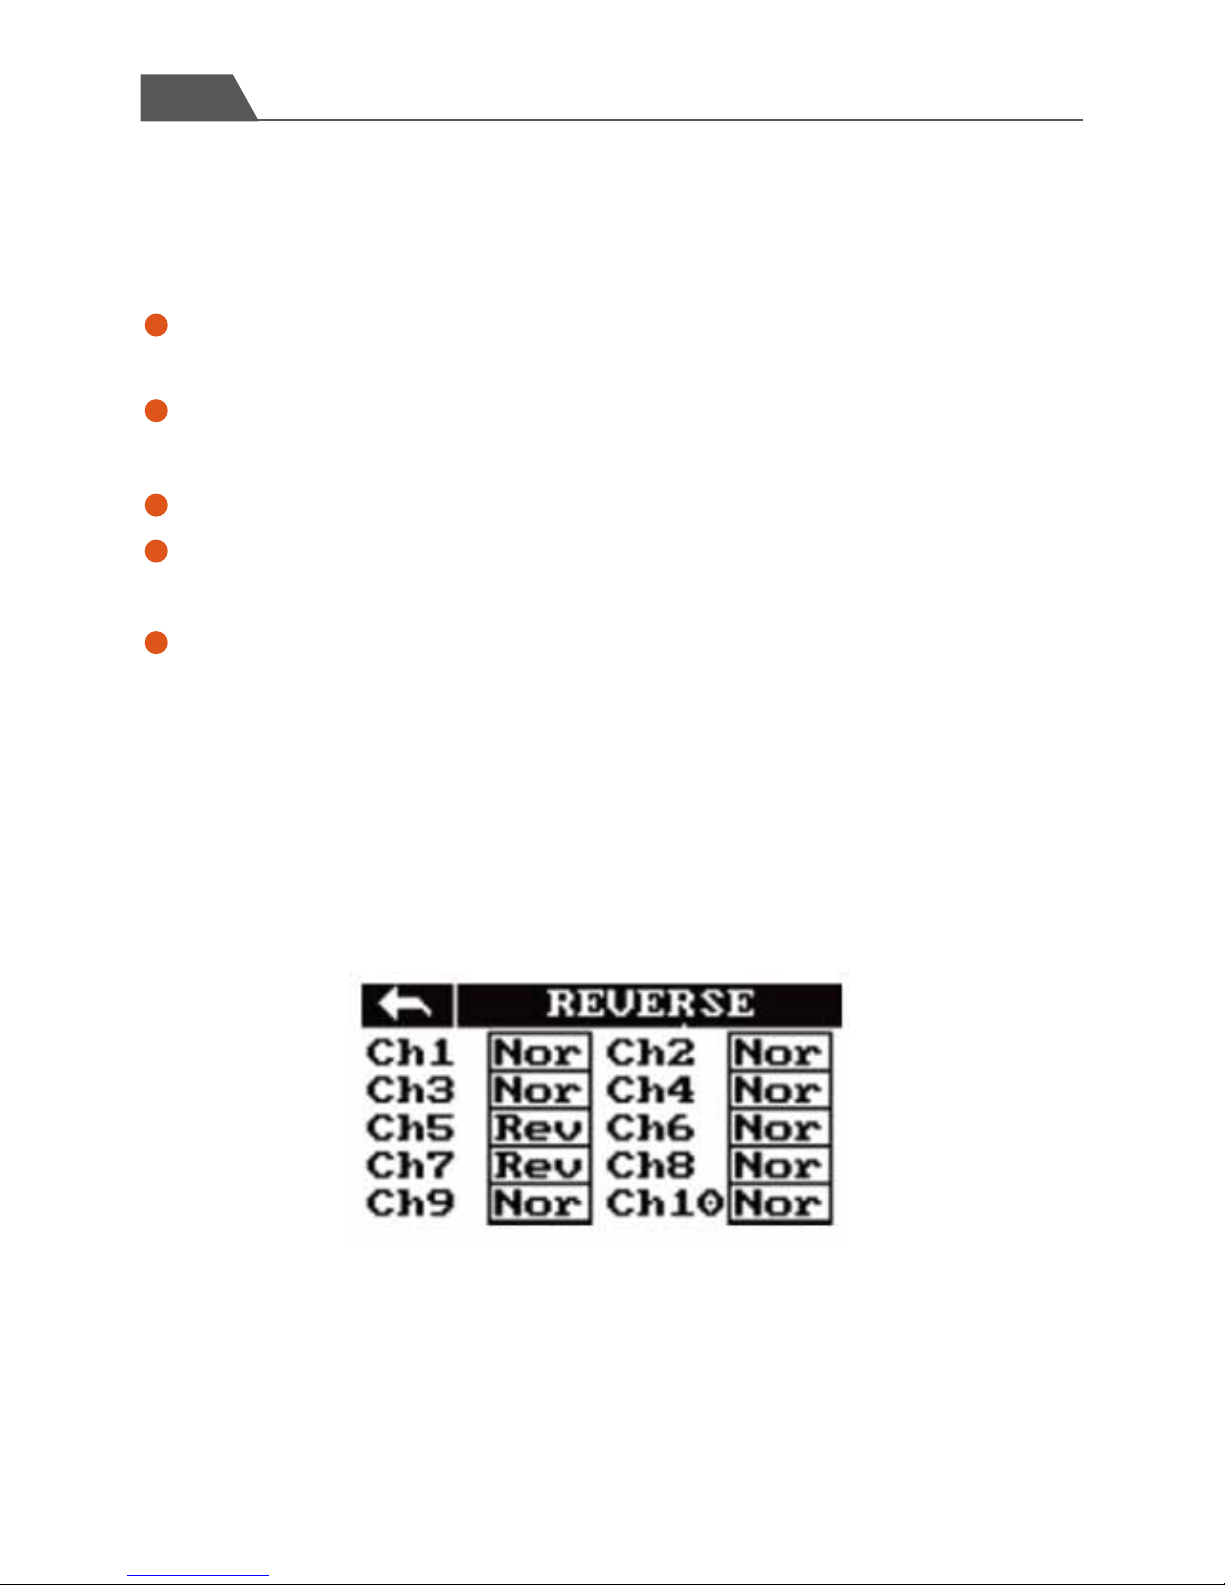
Positive reversal
Sliding screen to the right to check the channel status,Sliding to the left to check
the sensor list.
Click the ( wrench) to enter the main menu, Slide the screen down to view the
settings menu.
Touch the function name to enter the function setting menu.
Slide the screen up and down to skim the function menu, and select a menu item
in the list to enter the settings menu.
Click (return) icon to back to the superior menu.
Main interface display make operation more easy
and simple
Setup:To change between normal and reverse touch the box to the right side of the
desired channel.Nor=Normal, Rev=Reverse.Select the【Back】icon to save and return
to the previous menu.
The reverse function changes a channels direction of movement in relation to its input.
For example, if the blades are spinning in the wrong direction, pushing the model into
the ground instead of taking off, this function can be used to correct this.
Page 20
Swift
User Manual
-19-
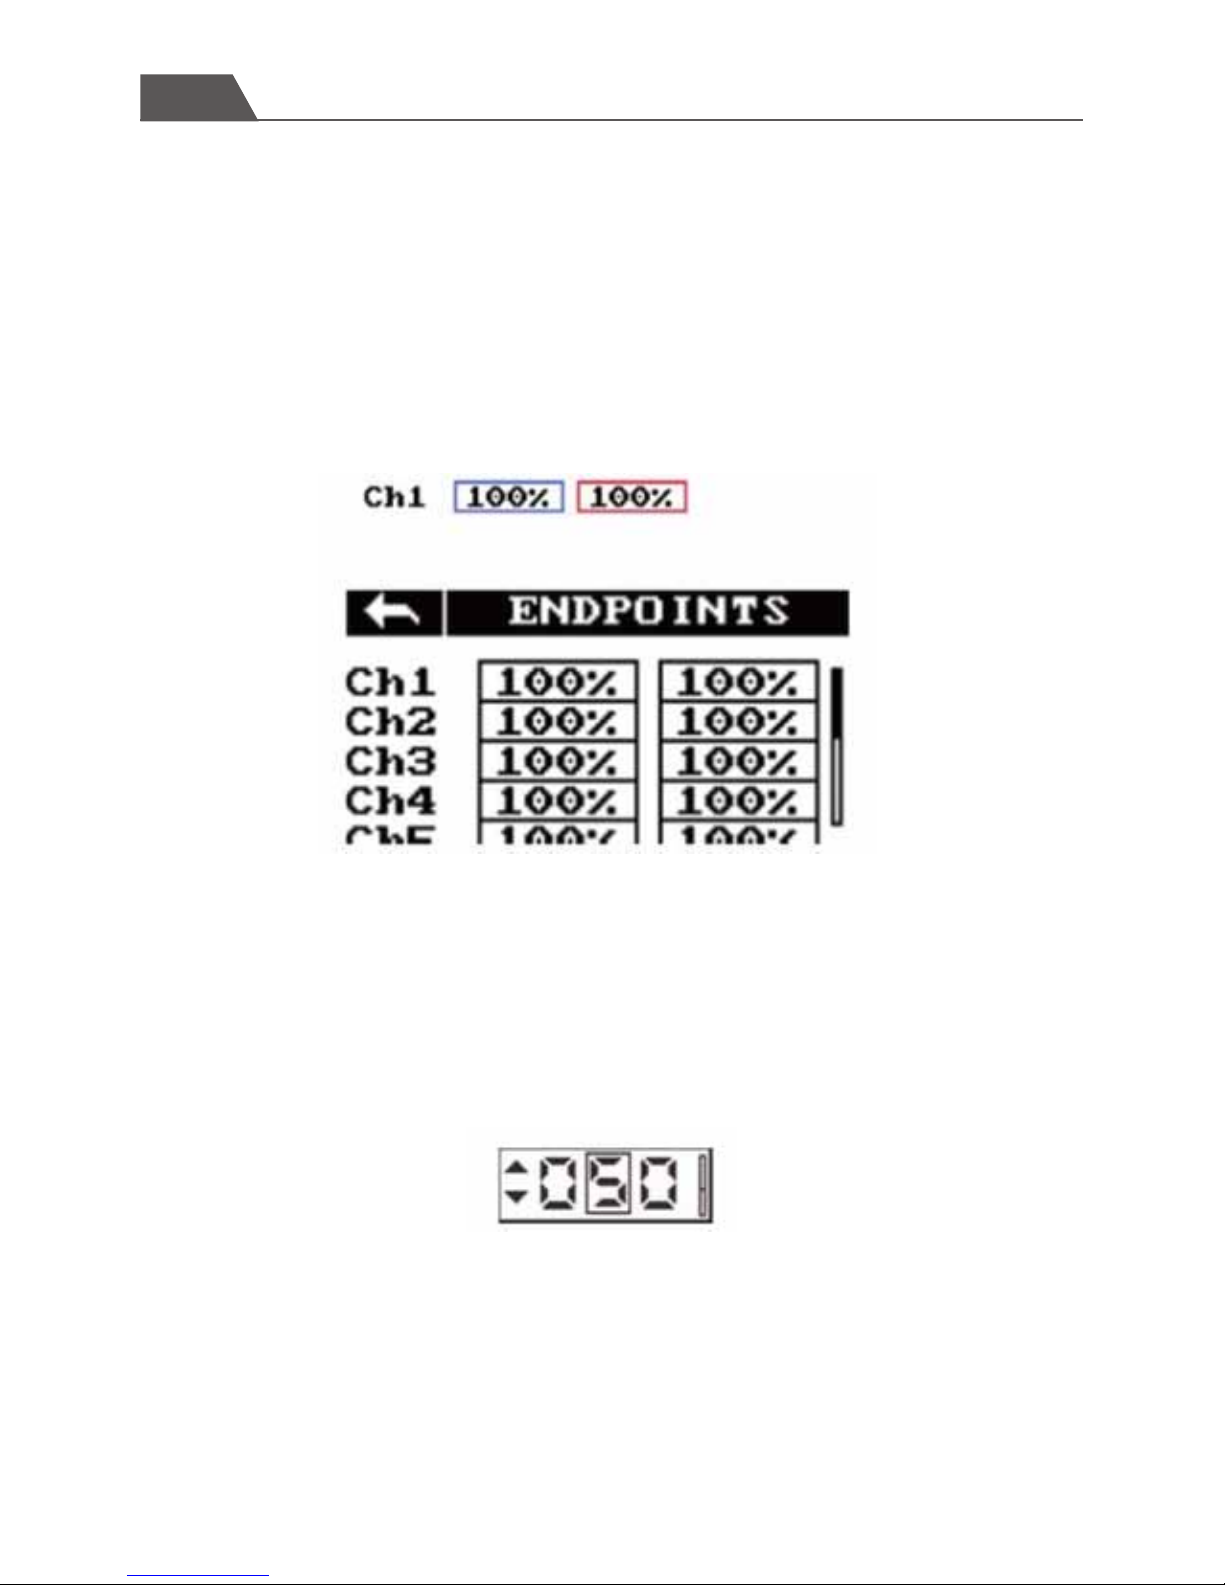
End points
Setting method:
The end points function changes the range of movement available to a channel. This
can be used to limit the tilt of the model, so that it is easier to control.The left box is the
low end points, the right box is the high end points, marked below as low being blue
and red being high.
1.Touch the low or high end points box.
2.Touch the desired decimal to change then use the onscreen up and down arrows
to change the value.
3.Select [√] to confirm the value, or choose [X] to quit the edit menu.
4.Select [back] to save and back to the superior menu.
Page 21
Swift
User Manual
-20-
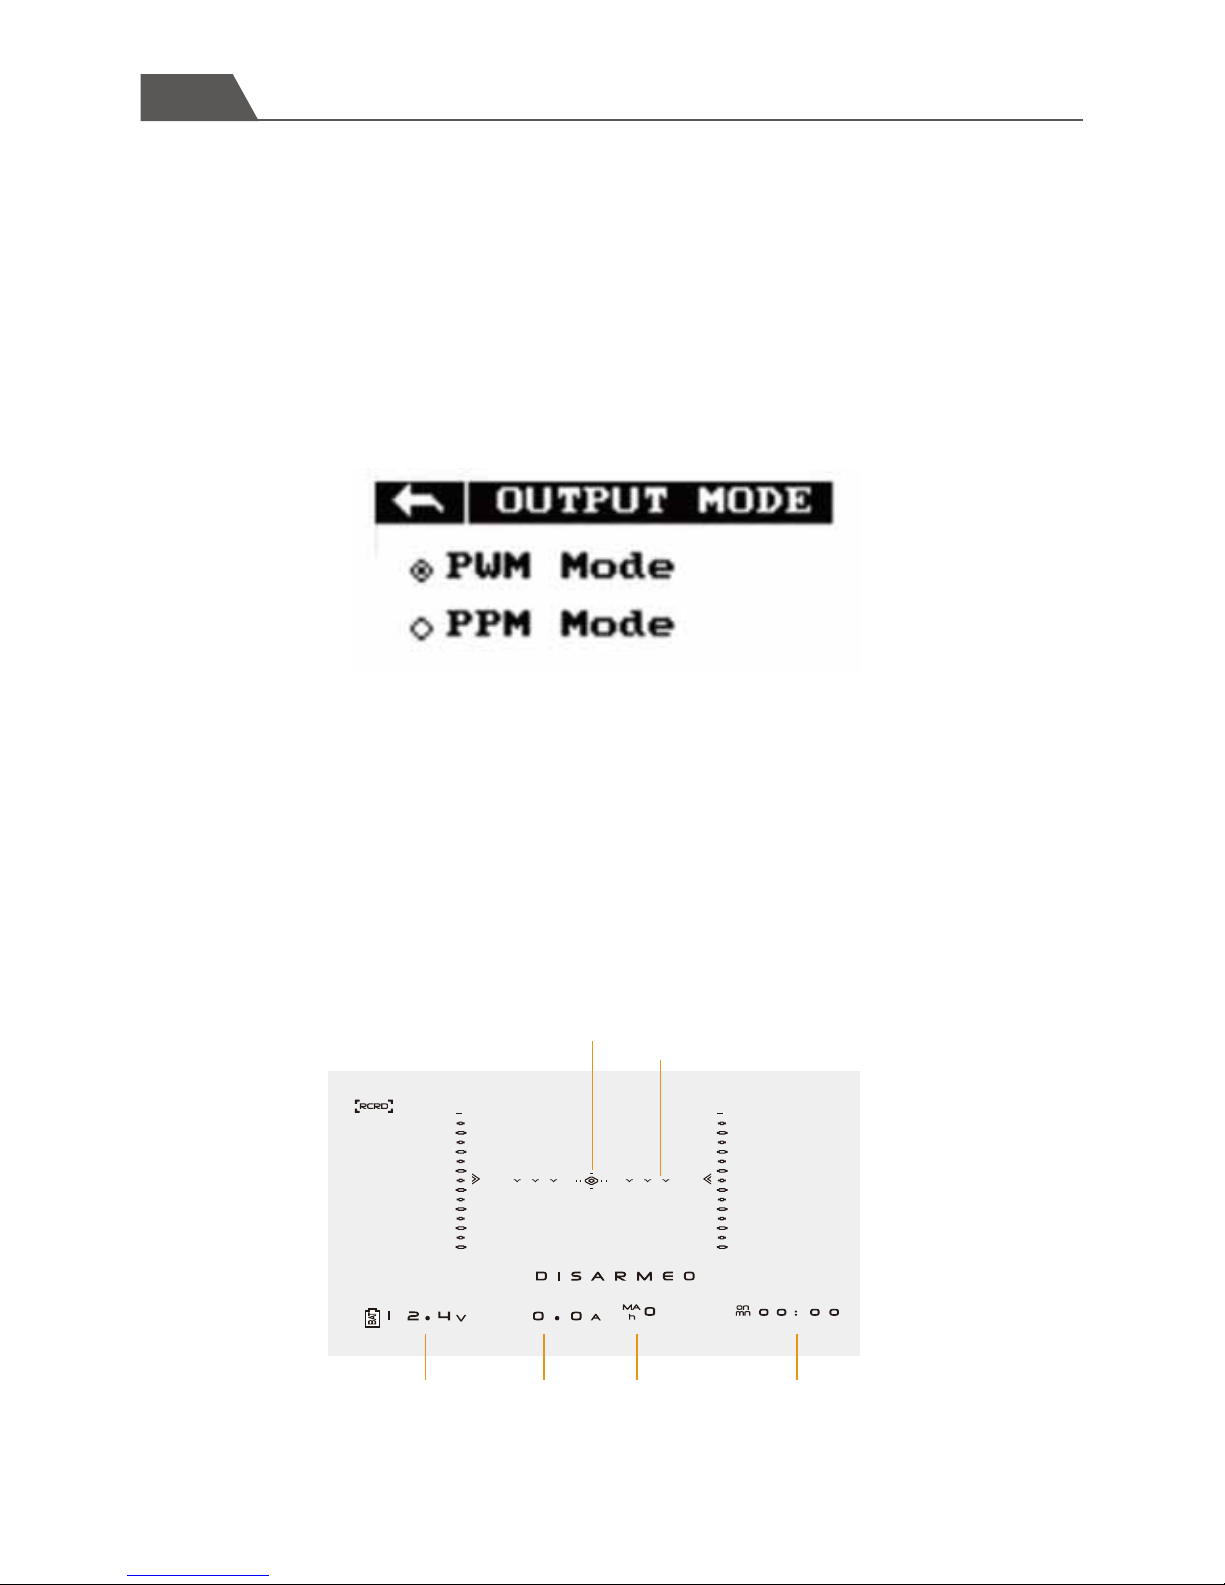
output mode
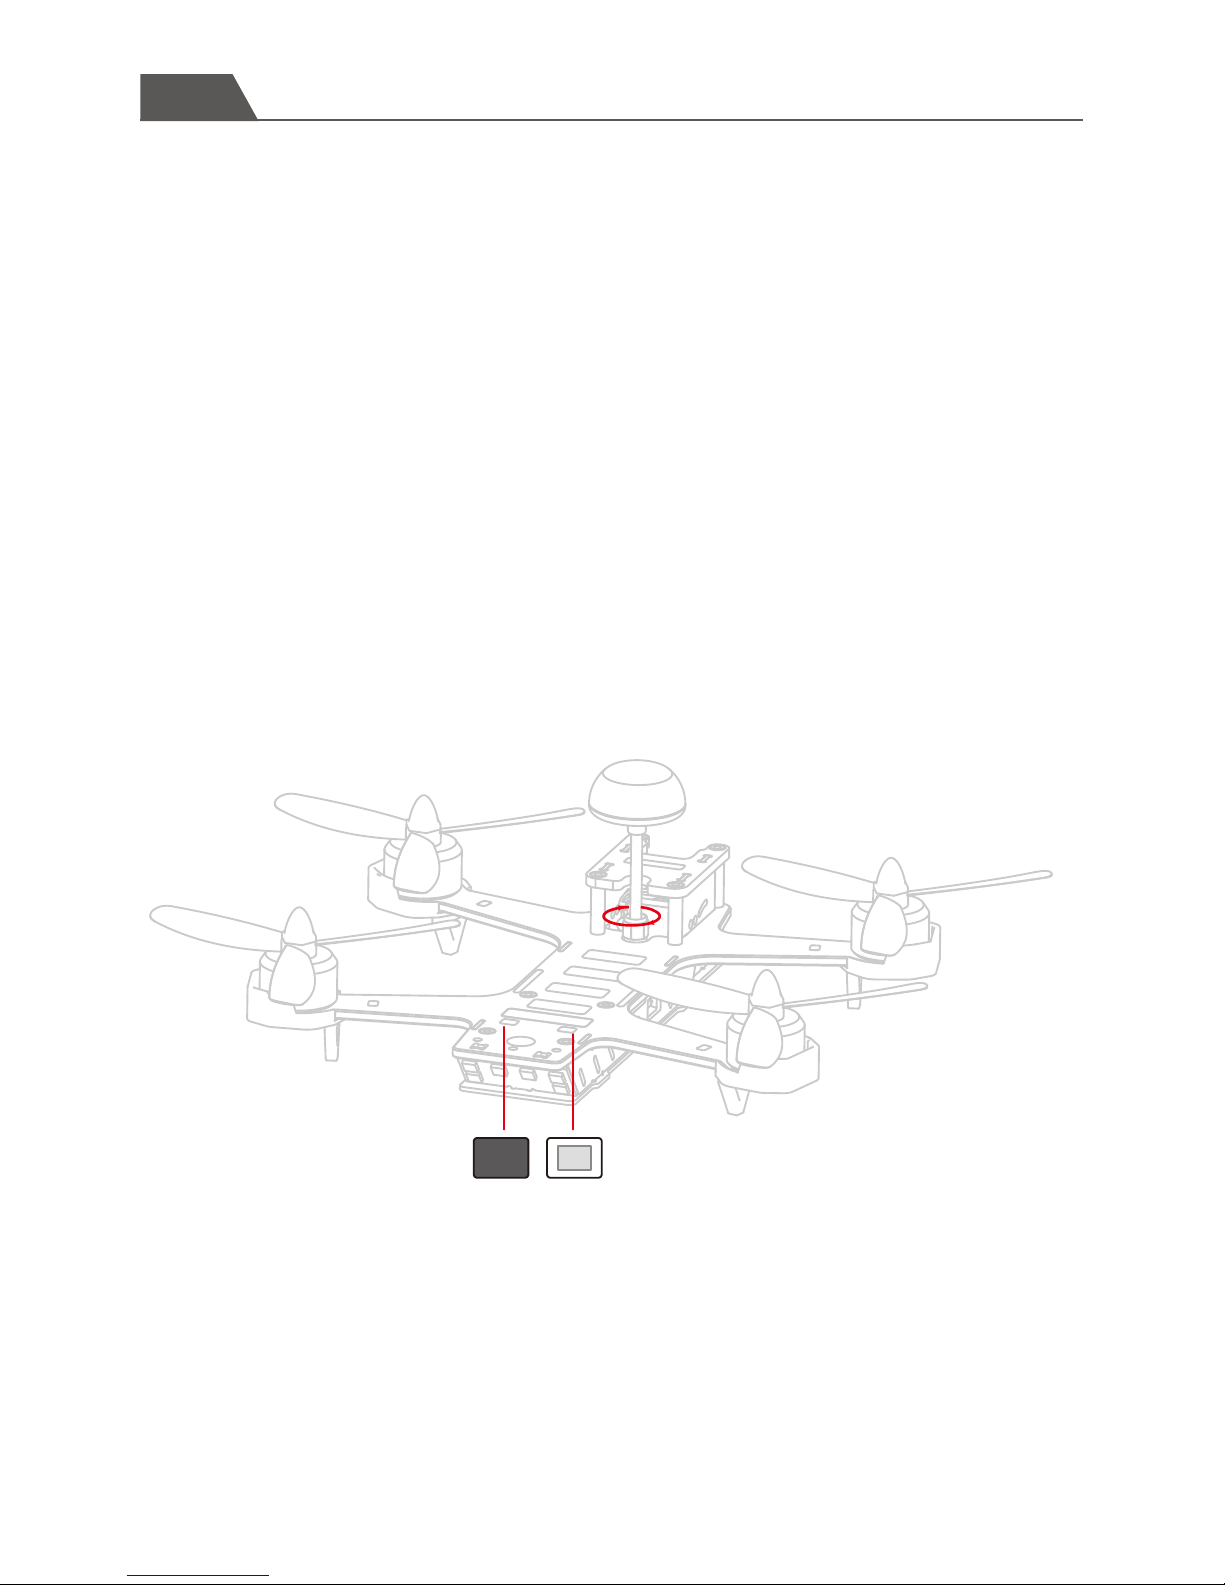
10.2 OSD information
Select [back] to save and back to the superior menu
drone center point
The battery voltage Current Battery level power time /unlock time
the drone head posture
This function can choose two output modes of the receiver, PWM mode and PPM
mode.
Select the output mode according to the demand, the black dot icon indicates the
currently selected mode.
A video receiver is needed to display the OSD information.
Page 22
8
display window Adjustment button
Swift
User Manual
-21-
10.3 Video transmitter channel selection
channel selection method
Caution: Transmitter channel and video receiver channel are one to one
correspondence.
There are 40 channels available,chose the best video quality based on your screen.
Channel selection: press for 3 seconds to enter into the ABCDE loop mode,Short press
to enter the selection of 1-8 loop mode for adjust the specific channel ,and hold for 2
seconds to confirm
Power selection
Long press for 5 seconds to enter the power switching mode;Short press to switch 1
(25mW), 2 (200mW), 3 (400mW) three modes;Hold for 2 seconds to confirm after
selected
Page 23
Swift
User Manual
-22-
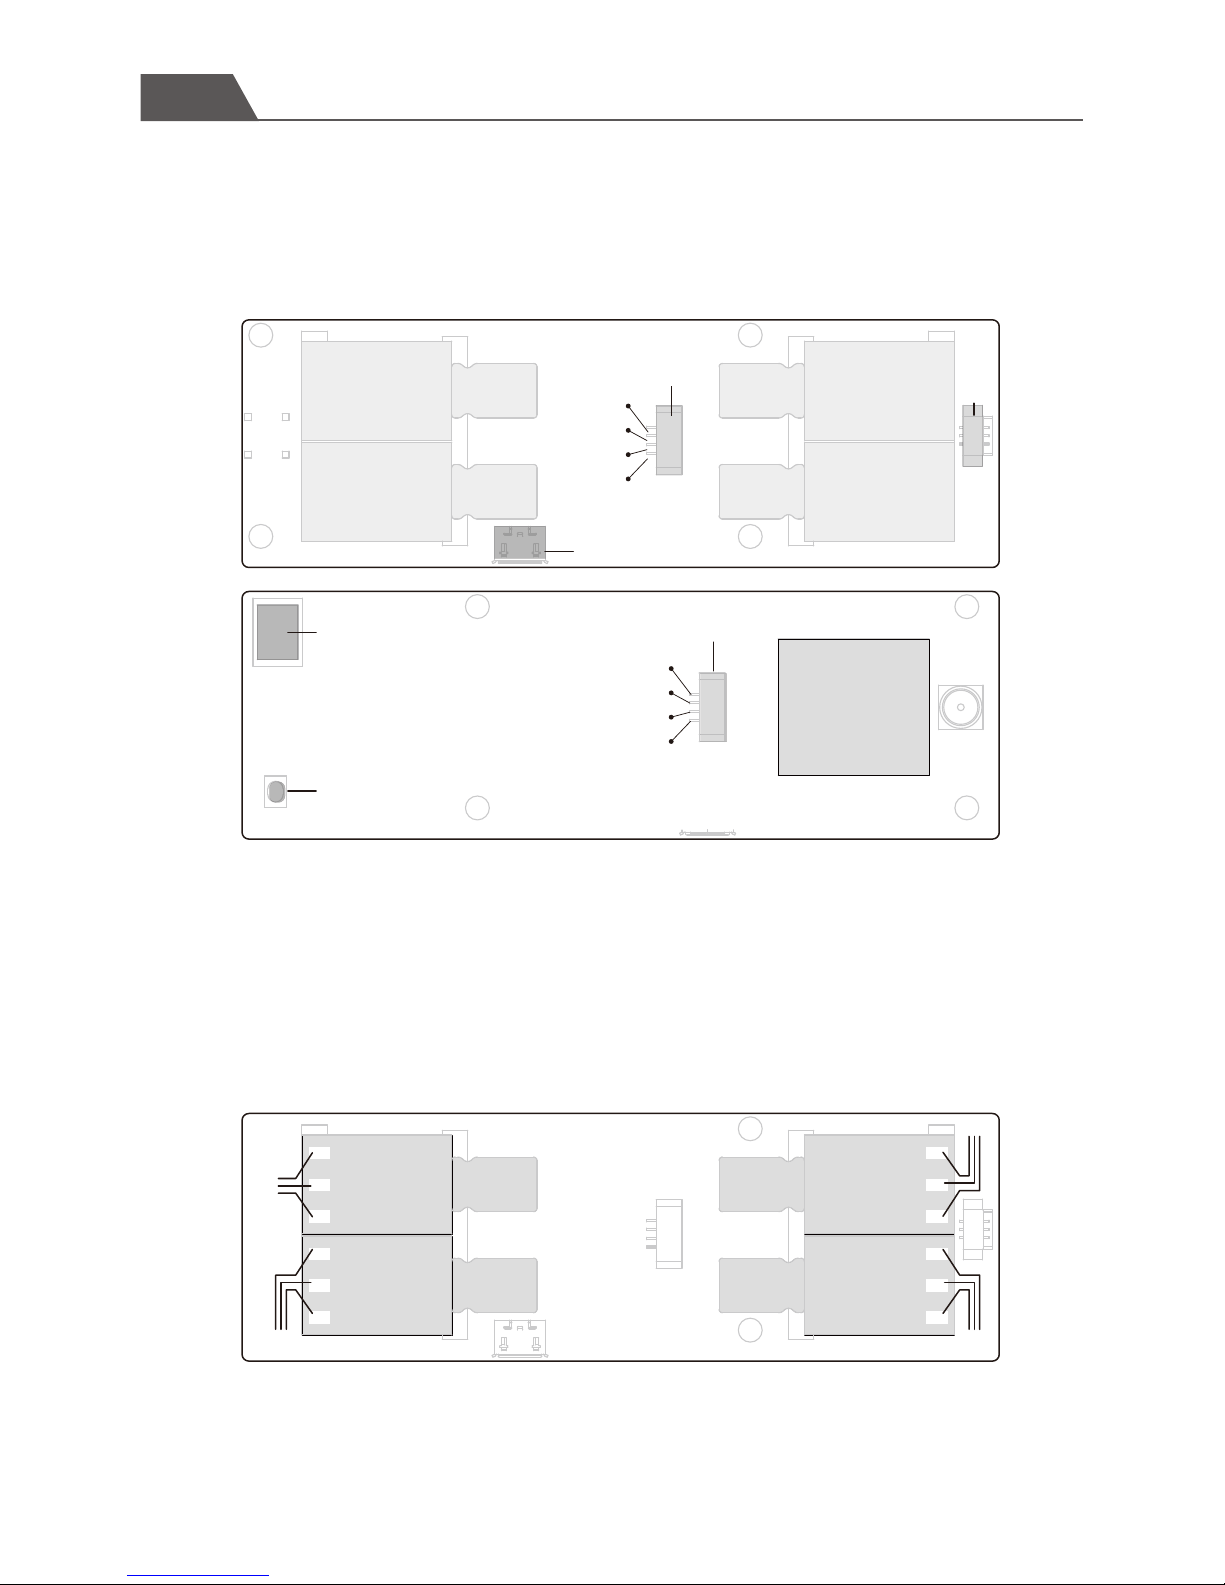
10.4 Main board connection
Brushless ESC and brushless motor connection diagram
ESC4
ESC2
display window
Adjustment button
Clockwise motor
Clockwise motor
ESC3
ESC1
video transmission
modular
camera connection holder
receiver connection
USB
LED holder
-
AV
5V
12V
PPM
SBUS
5V
-
Counterclockwise motor
Counterclockwise motor
ESC1
ESC3
ESC2
ESC4
Page 24
Swift
User Manual
-23-
10.5 Flight controller upgrade method
10.6 LED indicator setting
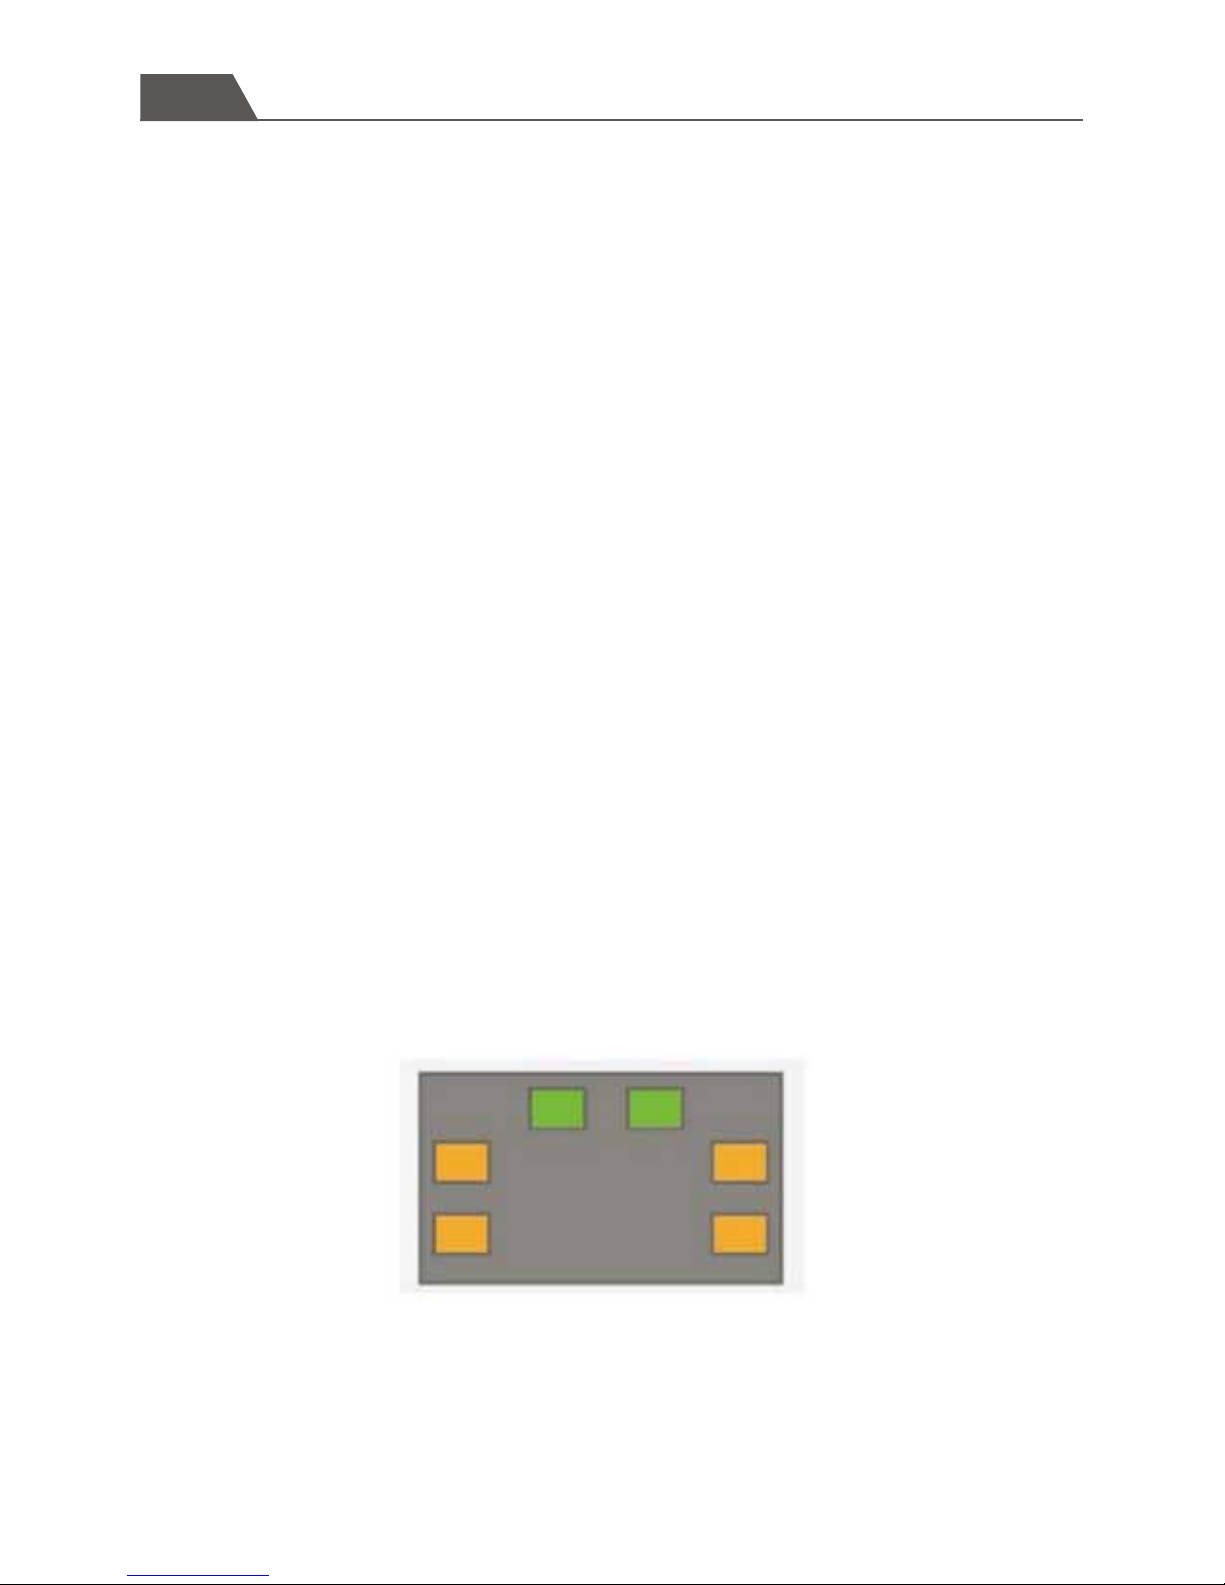
The factory default setting (The rear toward operator)
LED light color can be set freely:
The green indicator keep solid on after powering on the drone. Move the direction
joystick to the left, the left yellow indicator light turns on; Move the direction joystick to
the right, the right yellow indicator light turns on. Move the direction joystick down, the
yellow indicator lights on the left and right are both on and blink.
For Detailed adjustment method, please refer to the official website of F3 (
http://cleanflight.com/ )
OSD adjustment method
Pull the 2 joystick to their top location in opposite direction to setting PID, right stick to
select the item. The left stick to adjust the value ( pull right to increase the value and
pull left to decrease the value)
Attention: ESC and flight controller can both be adjusted via USB , please download
and install the Cleanflight in Google apps for adjust the flight controller, and download
the application and documents at swellpro.com for adjust the ESC, The power should
be on when adjust the ESC.
Value adjustment method via USB
Please refer to the official website of F3 (http: //cleanflight.com/)
Page 25
Swift
User Manual
-24-
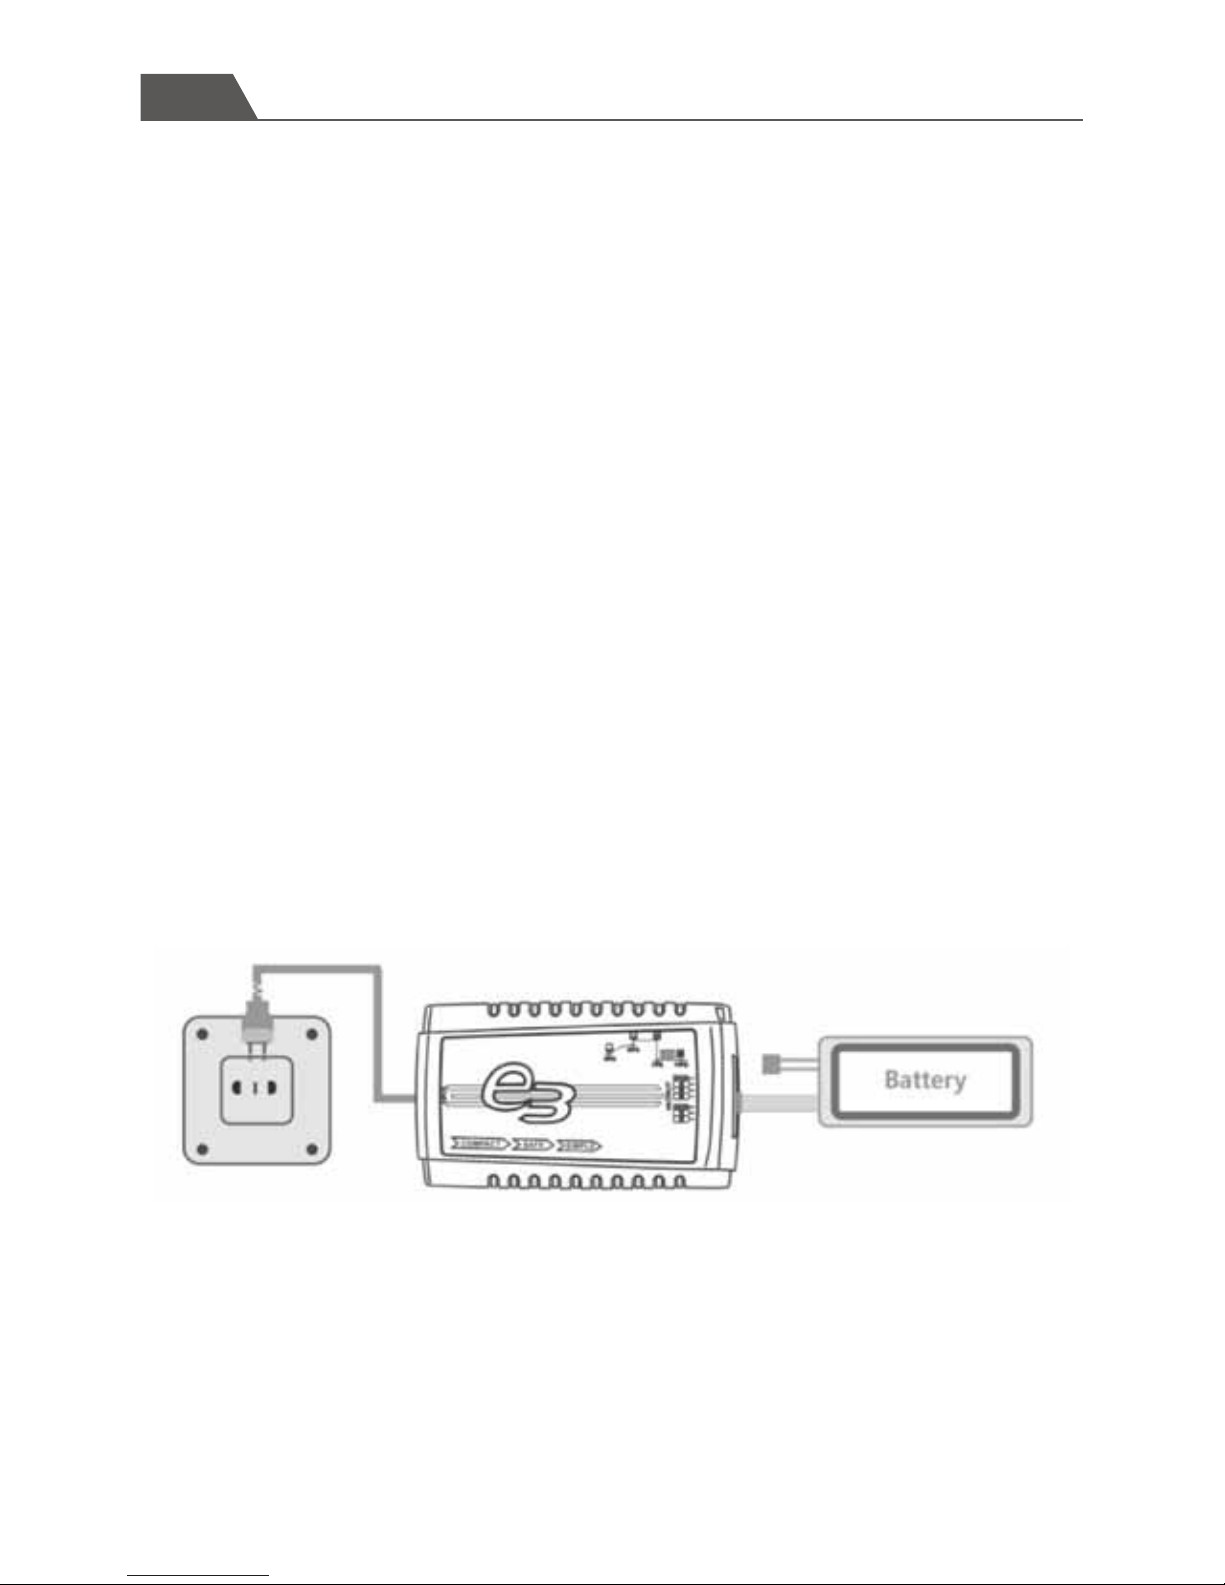
Charging connection diagram
Attention:
11. Instruction for balance changer
General specification of the balance changer
Operation instruction:
1. Insert the AC power cord into changer and 100-240V AC socket
2. Connect the battery and the balance changer after the LED indicator light on for 1
second.
3. Charging complete when all the indicator solid.1
1. Please make sure the correct battery type, always power on the changer before
connecting a battery, or damage to the hanger and battery can result.
2. During the charging process, if the 4 LEDs keep blinking,that means ERROR occur,
stop changing and find out the reason.
Input voltage: AC100-240V
Support battery: LiPo 2-4S
Charging current:3A±10%
Charging power :35W
Balance current:400mA
Page 26

Swift
User Manual
-25-
Notice
Caution:
1. The indicator flash and the motors alarm to remind you of powering off the motors
after 5 minutes without any operation;
2. When the aircraft drop in some areas that are not easy to find,you can hold the
alarm button then the buzzer will alarm to help you find it;
Do not leave the battery and charger unattended when charging.
Place the charger in a dry and ventilated place during charging.
Do not charge the waste battery,damaged battery and wet battery..
Do not charge the different types of battery pack.
Do not allow children under 15 years to use the changer to avoid accidents.
Do not charge under the overheated or overcooled and direct sunlight environ-
ment.
Do not charge when the battery connecting wire is damaged or short-circuit.
Do not charge with the short-circuit and broken charging wire.
Do not connect the 12V car battery when the car is moving.
Do not disassemble or use the broken changer.
Do not cover the charger cooling tank .
Page 27

SWELLPRO TECHNOLOGY Co., LTD
TEL:0755-82266175
Email: [email protected]
Address: D15.shengang Flower Center , Shohe West Road, ShenZhen, China 51800
This manual is subject to renewal without prior notice.Please refer to the Swellpro official website for the latest version.
 Loading...