

Page 1
Remote Controller User Manual
www.swellpro.com
Page 2
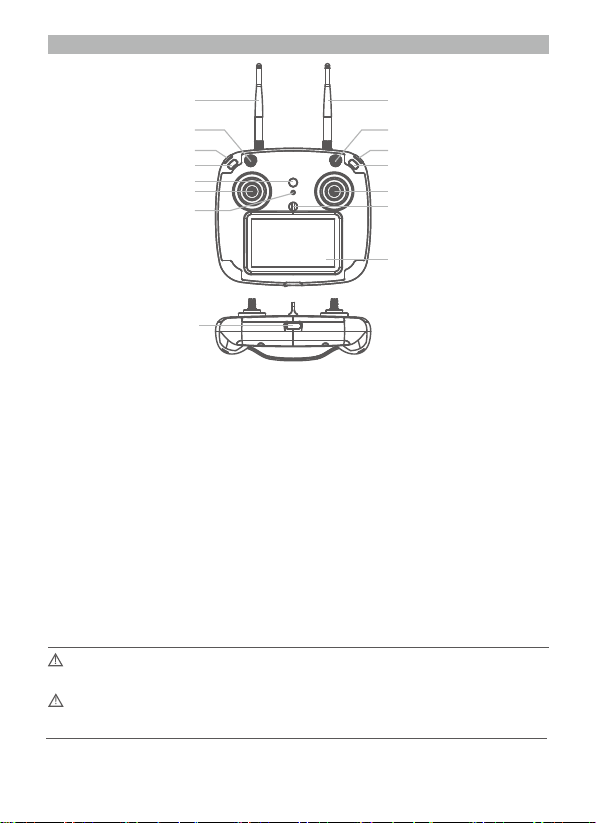
Remote Controller Illustration
[01]
[02]
[03]
[04]
[05]
[06]
[07]
[14]
[13]
[12]
[11]
[10]
[09]
[08]
[15]
[01] 2.4G Remote Antenna
For drone control signal
[02] Return-Home Switch
Commands the drone
to return automatically
[03] Camera Tilt Down Button
Tilts the camera down
[04] Follow Me Button
Controls the drone to follow
the remote controller
[05] Power Button + Controller
Status Light
Press and hold to power on
the remote controller.
The button will glow to indicate
remote controller status.
Before powering on the controller, please be sure to put all the toggle switches on the controller in the up
position.
As the remote controller is completely sealed, the air inside is subject to changes in pressure and temperature.
If the rubber joystick seals balloon or suck in, simply equalize the pressure inside the remote by briefly
opening the USB charge plug.
[06] Left Joystick
Control the drone’s ascent (up),
descent (down) and/or to rotate
the aircraft nose left or right.
[07] FPV Channel Button
Press and hold to search for the
best FPV channel
[08] FPV Screen
Displays flight data and FPV video
[09] Hanger Ring
Attachment point for neck
lanyard
Right joystick
[10]
Controls the drone direction
of flight
[11] Camera Button
Used for controlling Video
and Photo functions.
[12] Camera Up Button
Tilts the camera up
[13] Flight Mode Switch
GPS / Circle / ATTI
[14] 5.8G FPV Antenna
Receives FPV live video
5.8GHz
[15] USB Port/Vent plug
For charging the remote
controller battery and
performing firmware
upgrades
©2019 SwellPro All Rights Reserved
02
Page 3
Remote Controller
This section introduces the remote controller functions, including the drone operation and the camera
operation.
Charging Remote Controller Battery
The Spry remote controller has a built-in battery and charging circuit. Charge the controller using the
supplied micro-USB cable and a regular 5V /2A USB charger. Some USB ports and some USB cables cannot
provide the full 2 amps (2A) of power required. These ports and cables can still be used to charge the Remote
Controller but the charging time will be longer. Normal charging time is ~90 minutes.
During charging, the remote controllers power button will glow blue. When charging is complete the blue
light will turn off. Charging is possible during flight if necessary, but the remote must be connected to the
drone before connecting the charging cable.
Low Battery Alarm
The remote control has a built-in lithium battery and the operating time is about 2 hours. When the remote
controller battery is low, the remote control will beep and the battery power icon in the upper right corner
of the screen will be red. The remote control will then have approximately 10 minutes of power left. It is best
to return the drone and land as soon as possible or plug in the controller to charge the battery.
Remote Controller Operation
The Spry Remote Controller operates using two frequency bands, 2.4GHz and 5.8GHz. The 2.4GHz band is
used for drone control and 5.8GHz is for the FPV video signal. The remote control has a built-in 4.3-inch FPV
screen that displays real-time images and flight data of the aircraft.
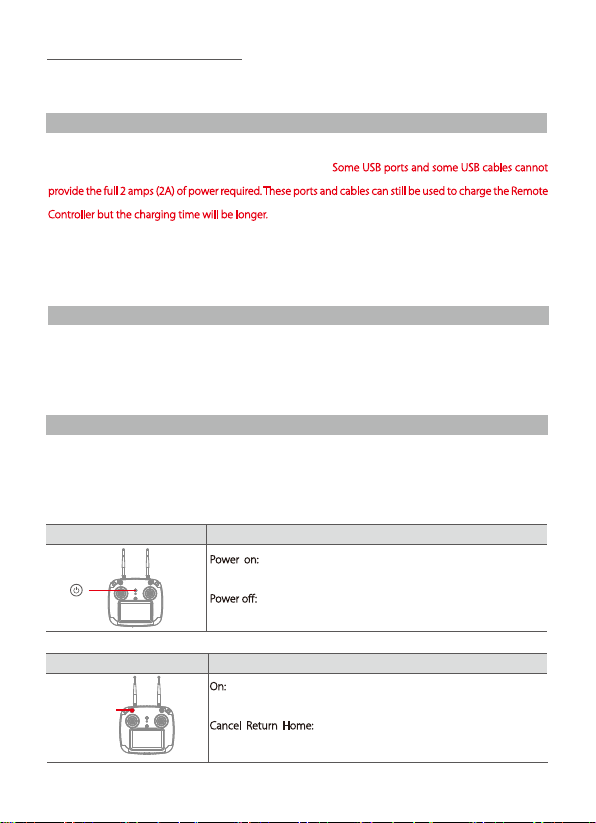
Power ON and Power OFF
DescriptionRemote Control Operation
Power on: Long-press the power button for 3 seconds, the remote
controller will vibrate, beep and screen will turn on.
Long-press the power button again for 3 seconds to turn off
Power off:
the remote control.
One Key Return Home
DescriptionRemote Control Operation
On:
Long-press the Return Home switch until the the controller beeps.
Return Home
The aircraft enters the return state, and the FPV screen will display “RTH”.
Cancel Return Home:
controller beeps.
Long-press the Return Home switch until the
©2019 SwellPro All Rights Reserved
03
Page 4
Flight Modes
GPS
GPS:GPS mode
Circle Flight
Circle Flight:Orbit mode
AT TI:ATTI mode
ATT I
Note: In circle mode, by activating the Follow Me mode the aircraft can fly around a moving object as
long as the speed of moving objects is less than 4 m/s (15km/h).
DescriptionRemote Control Operation
Follow Me Mode
DescriptionRemote Control Operation
When the Controller Status Light is solid green, this indicates that the
Follow Me
Green Status light indicates good GPS fix.
In the Follow Me mode, the joysticks are disabled. Long-press the “F” button again to cancel Follow Me
and resume joystick operation.
When the speed of the remote controller exceeds 10m/s during Follow Me operation the Spry will
stop following and hover in place.
GPS of the remote control has a fix and the Follow Me function is
available in GPS and Circle mode
To activate Follow Me
seconds until a beep sounds. The Controller Status Light will change to
solid red, indicating that the aircraft enters the Follow Me mode.
Long-press the “F" button again for 2 seconds to cancel Follow Me.
, Long-press the Follow Me button “F” for 2
If the remote controller’s GPS does not have a fix, the Follow Me function cannot be activated.
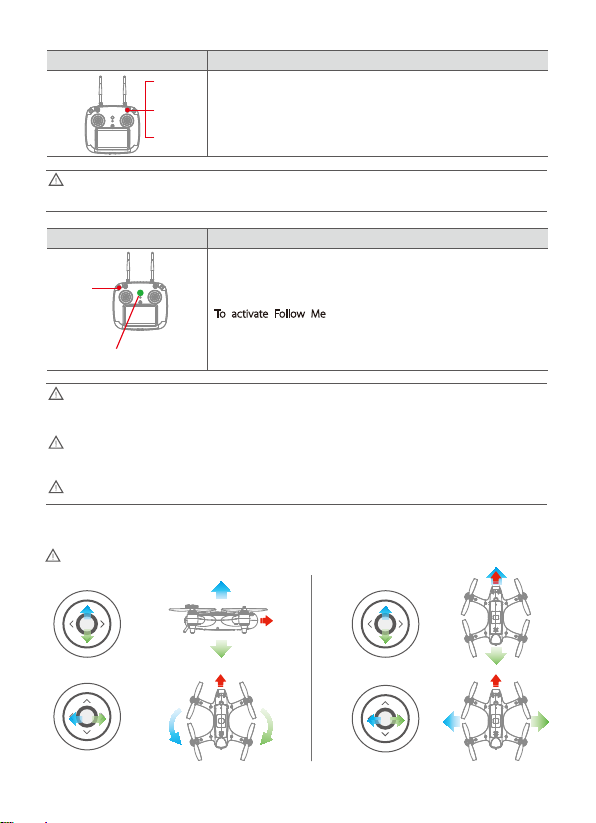
Drone Control
Left hand throttle- (American/ European conguration)
Please contact us if you need to change to right hand throttle.
Left Stick
p
U
t
f
e
L
n
r
u
T
n
D
o
w
T
u
r
n
R
i
g
h
t
Right Stick
w
r
a
o
r
d
F
t
f
e
L
B
d
a
r
c
a
k
w
R
i
g
h
t
p
U
T
u
t
f
r
e
n
L
R
n
i
r
g
u
h
T
t
n
D
o
w
04
©2019 SwellPro All Rights Reserved
w
r
a
o
r
d
F
t
R
f
i
e
g
L
h
t
B
d
a
r
c
a
k
w
Page 5
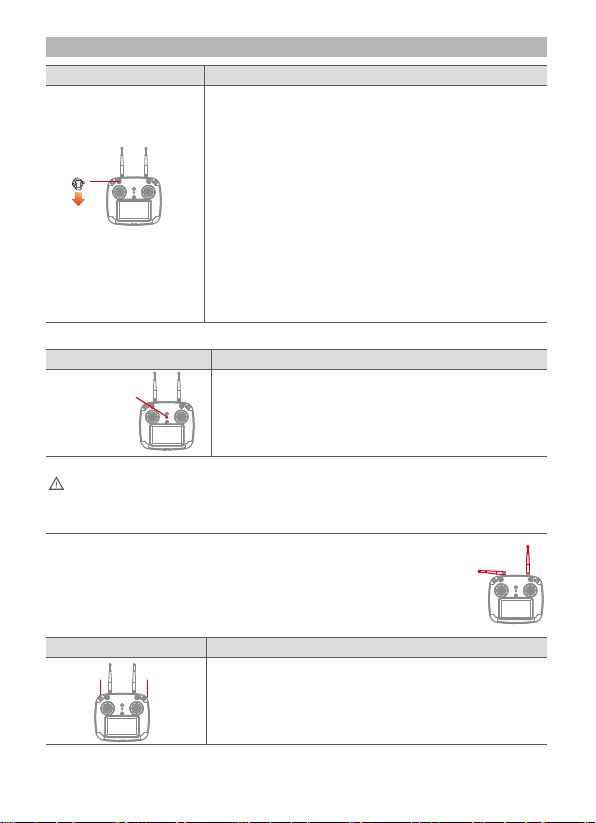
Remote Controller Pairing
FPV Channel Adjust
DescriptionRemote Control Operation
1. To pair the remote controller to the drone, hold the Return
Home switch down and simultaneously power on the
remote controller.
2. The remote controller will vibrate and beep twice. The
Controller Status Light will flash red and green.
3. Power on the drone. After pairing has completed, the
Controller Status Light will turn green.
4. Long-press the FPV channel button. The FPV screen will
display “RF SEARCHING” and automatically find the best
FPV channel.
DescriptionRemote Control Operation
FPV Chennel Button
There are 8 FPV channels available. Long-press the FPV channel button
(CH) and the system will automatically search for channels.
Always pair the remote controller and then select the FPV channel to match the best channels and
avoid interference.
In the absence of obstacles and interference the flight height can reach >80m and FPV
transmission range can reach 800m. For best reception, keep the left-hand (2.4GHz)
antenna horizontal and the right-hand antenna (5.8GHZ) vertical.
Camera Gimbal Control
DescriptionRemote Control Operation
Camera up Camera down
Camera up: Tilt camera up
Camera down: Tilt camera down
©2019 SwellPro All Rights Reserved
05
Page 6
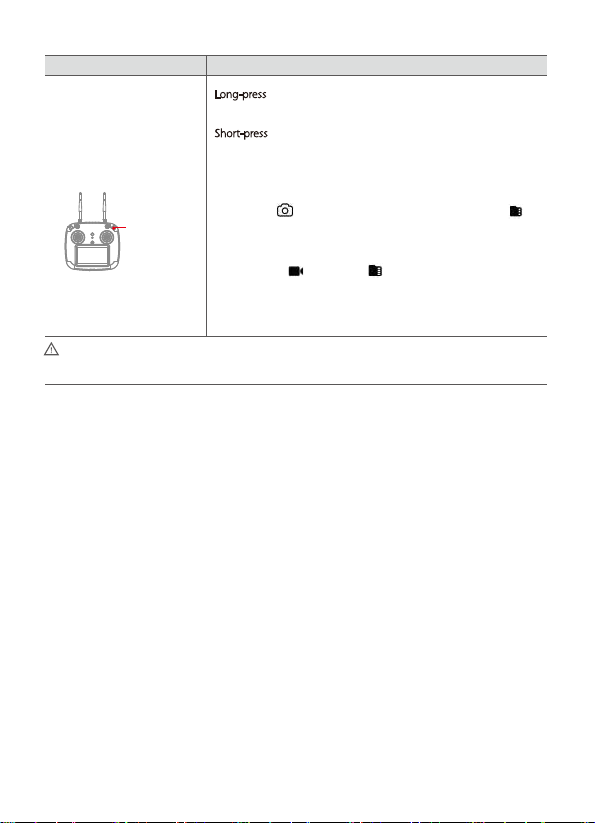
Camera Control
DescriptionRemote Control Operation
Long-press the camera button (five beeps) to start or stop video
recording.
the camera button (two beeps) to take a photo.
Short-press
You cannot take a photo if video recording is started.
After taking a photo, the camera information window will display a
Photo/Video
The Spry will automatically save longer video files into chapter files of 4GB.
Always stop video recording before powering off the Spry or your video will be lost.
camera icon and the resolution of the photo. The card icon
indicates the remaining number of photos the microSD card can hold.
In video mode, the card icon indicates the remaining hours and
minutes (hh:mm) the microSD card can hold.
06
©2019 SwellPro All Rights Reserved
Page 7
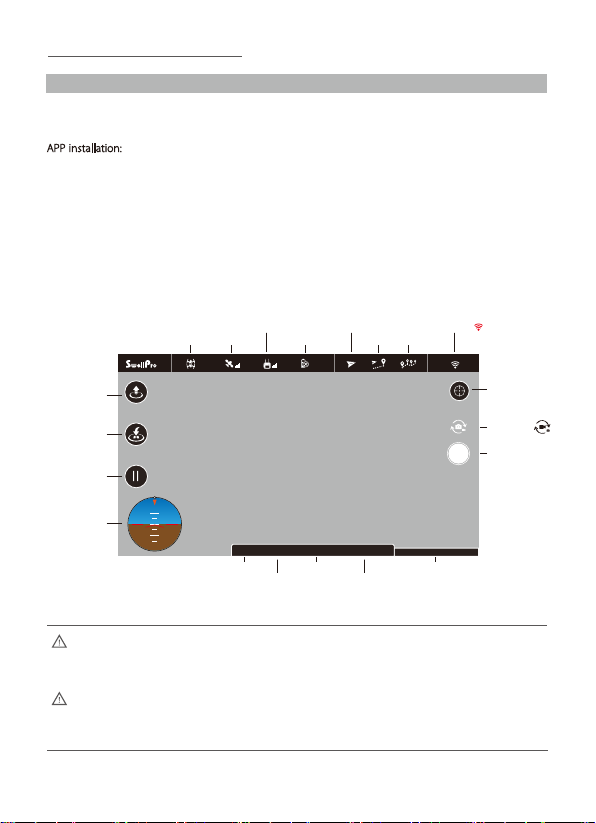
APP Control
How to Use
The Spry remote controller has a built-in WI-FI module that can be used to connect your mobile device and
control the aircraft to perform various intelligent automatic flight modes with the Spry APP.
APP installation:
APK from either the Android market or our website www.swellpro.com.
To connect the app to the Spry’s remote controller, power on the remote controller and drone, then connect
your mobile device to the WiFi hotspot called SP_FF1.....
After successfully connecting, open the APP to display realtime data from the drone such as voltage,
coordinates, altitude, distance, GPS signal and other flight parameters.
Automatic takeoff
Return home
(return to the
remote controller)
Attitude meter
The Spry app is available for iOS and Andoid devices. Android systems can download the
Connection status
disconnected
Flight path
Lat:113.860667 Ing:22.704291
Coordinate information
Hover
Flight mode GPS signal
I
I
I
I
I
I
I
I
10 10
-10 -10
0
GPS
I
Horizontal distance
Remote control signal
10
D: 0.0m H: 0.0m H.S: 0.0m/s V.S: 0.0m/s
Vertical distance
Drone information
Battery capacity
80%
Ascent/descent speed
Point to fly
Flight speed
Phone location
Photo/Video
mode
Shutter
When ying indoors or in enclosed spaces, the lack of a strong GPS signal will aect the
positioning stability of the aircraft. Do not use the APP to control the aircraft at this time.
If the aircraft is lost due to improper operation or malfunction, you can use the APP to locate the
last coordinates to retrieve the aircraft. The Remote Control must be turned on to use the APP.
©2019 SwellPro All Rights Reserved
07
Page 8
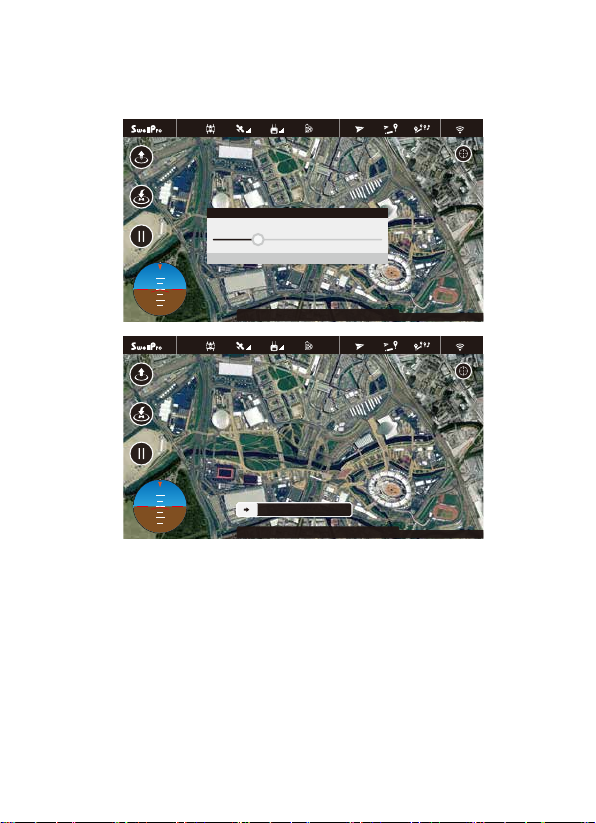
1. Once you have a minimum of 8 GPS satellites, you can unlock the drone and start flying with the remote
controller or click the “takeoff” button on the APP, set the take off altitude and then slide to unlock, the drone
will ascend automatically and hover.
I
I
I
10 10
-10 -10
I
I
I
10 10
-10 -10
I
I
I
0
I
0
I
I
I
I
I
I
I
I
10
GPS
Take-off
Drag to set take-off height: 3m
Cancel Ok
D: 0.0m H: 0.0m H.S: 0.0m/s V.S: 0.0m/s Lat:113.860667 Ing:22.704291
10
GPS
D: 0.0m H: 0.0m H.S: 0.0m/s V.S: 0.0m/s
11. 2V
11. 2V
Slide to take off
Lat:113.860667 Ing:22.704291
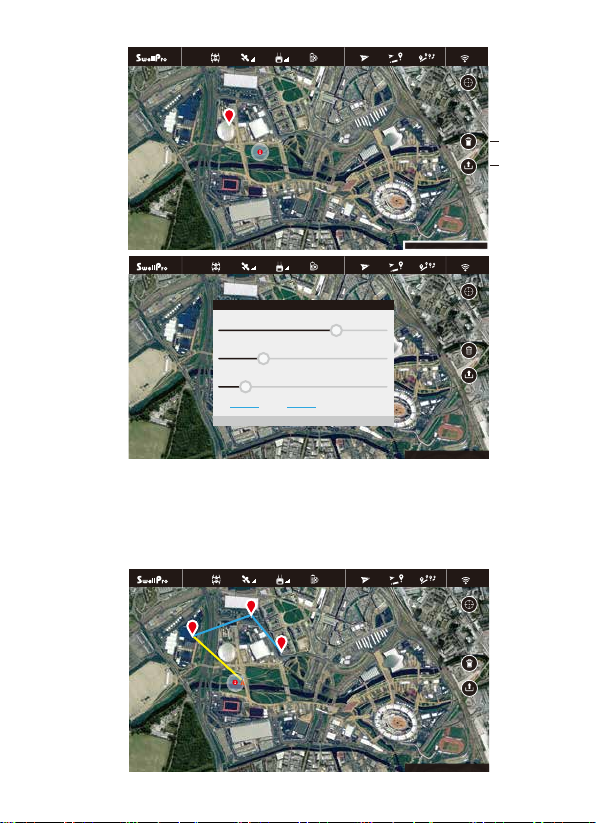
The APP allows you to set hover, return home, flight paths, follow me, tap to fly, etc.
2. Tap-to-Fly: Click the “Tap-to-Fly” button, and then click the target points on the map and click the Upload
button. The drone will start flying to the point and hover there. If you need to set the parameters manually,
you can tap on the flight point.
08
©2019 SwellPro All Rights Reserved
Page 9
10
GPS
0
11. 2V
Delete
Upload
10
GPS
Point Edit
Altitude:66m
FlySpd: 4.0m/s
Hover Time: 3sec
LNG:113.8698811 LAT: 22.6258727
Cancel Ok
11. 2V
Lat:113.860667 Ing:22.704291
Lat:113.860667 Ing:22.704291
3. Flight Path Setting
a.Tap the “Flight Path Setting” at the top of the screen and tap the map to set the flight path (double tap the
flight point to delete it, tap the “Delete” button to delete all flight paths). Tap the flight point again to edit.
b.After completing the setup, click the “Upload” button and the drone will fly according to the flight path.
10
GPS
1
0
11. 2V
2
Lat:113.860667 Ing:22.704291
©2019 SwellPro All Rights Reserved
09
Page 10
APP control requires a good wireless communication environment. If the drone does not execute the
operation command, this may be due to interference, please try again.
If the drone continually fails to respond to your APP commands, please operate the drone with the
remote controller: quickly switch the Flight Mode switch once, it is suggested to use the GPS mode to
take over control.
FCC Statement
This device complies with part 15 of the FCC rules. Operation is subject to the following two
conditions: (1) this device may not cause harmful interference, and (2) this device must accept any
interference received, including interference that may cause undesired operation.
Changes or modifications not expressly approved by the party responsible for compliance could
void the user's authority to operate the equipment.
NOTE: This equipment has been tested and found to comply with the limits for a Class B digital
device, pursuant to part 15 of the FCC Rules. These limits are designed to provide reasonable
protection against harmful interference in a residential installation. This equipment generates
uses and can radiate radio frequency energy and, if not installed and used in accordance with the
instructions, may cause harmful interference to radio communications. However, there is no
guarantee that interference will not occur in a particular installation. If this equipment does cause
harmful interference to radio or television reception, which can be determined by turning the
equipment off and on, the user is encouraged to try to correct the interference by one or more of
the following measures:
•Reorient or relocate the receiving antenna.
•Increase the separation between the equipment and receiver.
•Connect the equipment into an outlet on a circuit different from that to which the receiver is
connected.
•Consult the dealer or an experienced radio/TV technician for help.
The device has been evaluated to meet general RF exposure requirement. The device can be used
in portable exposure condition without restriction.
User Manual
2019.3
 Loading...