

Page 1
©2015 SwellPRO All Rights Reserved. www.swellpro.com
1
SPLASH DRONE
User Manual V1.0
Disclaimer & Warning
Please read this disclaimer carefully before using Splash Drone. By using this product, you hereby
to agree this disclaimer and signify that you have read this manual fully. This product is not suitable
for people who are under age of 18.
Please obey relevant regulations of the International Civil Aviation Organization, local airspace
control law and UAV management rules. Operate only in a safe area; like an open field, Do not
operate close to crowds and populated areas.
Splash Drone is an excellent flight platform offering an excellent flight experience providing, only if
it is powered normally and is in a good working condition. Splash Drone has a built-in GPS system
and also efforts have been made to reduce an accidental starting, you need to be mindful of risks
when the main power battery is connected. We strongly recommend users to remove all propellers
when calibrating and setting parameters to reduce these risks. Make sure all connections are good,
and keep children and animals away when conducting , system calibration and parameter setup.
Page 2

©2015 SwellPRO All Rights Reserved. www.swellpro.com
2
SwellPRO accepts no liability for damage(s) or injuries incurred directly or indirectly from the use of
this product in the following conditions:
1. Damage(s) or injuries incurred when users are drunk, taking drugs, drug anesthesia, dizziness,
fatigue, nausea and any other conditions no matter physically or mentally that could impair your
ability.
2. Damage(s) or injuries caused by subjective intentional operations.
3. Any mental damage compensation caused by accident.
4. Failure to follow the guidance of the manual to assemble or operate.
5. Before using Splash Drone, please accept some flight training first. (Using a flying simulator
software to practice flying, or learning from a professional experienced person who can teach you
flight, and etc).
6. Damage(s) or injuries caused by without Calibration before using
7. Malfunctions caused by refit or replacement with non-SwellPRO accessories and parts.
8. Damage(s) or injuries caused by using third party products or fake SwellPRO products.
9. Damage(s) or injuries caused by mis-operation or subjective mis-judgment.
10. Damage(s) or injuries caused by mechanical failures due to erosion, aging.
11. Damage(s) or injuries caused by continued flying after low-voltage protection alert are
triggered.
12. Damage(s) or injuries caused by sea water intrusion motor not timely clean the motor with
pure water.
13. Damage(s) or injuries caused by subjective remove the Fight Controller in case of lose control.
14. DO NOT use the Splash Drone transmitter (receiver) with the other third party remote control
equipment.
15. Damage(s) or injuries caused by knowingly flying the Splash Drone in abnormal condition (such
as oil, soil, sand and other unknown material ingress into the Splash Drone or the assembly is not
completed, the main components have obvious faults, obvious defect or missing accessories).
16. Damage(s) or injuries caused by flying in the following situations such as the Splash Drone in
magnetic interference area, radio interference area, government regulated no-fly zones or the pilot
is in backlight, blocked, fuzzy sight, and poor eyesight is not suitable for operating and other
conditions not suitable for operating.
17. Damage(s) or injuries caused when the Splash Drone is in the following situations: collision, fire,
explosion, floods, tsunamis, subsidence, ice trapped, avalanche, debris flow, landslide, earthquake,
Page 3
©2015 SwellPRO All Rights Reserved. www.swellpro.com
3
etc.
18. Damage(s) or injuries caused by infringement such as any data, audio or video material
recorded by the use of Splash Drone.
19. Damage(s) or injuries caused by the misuse of the battery, protection circuit, RC model and
battery chargers.
20. All parts must be kept out of the reach of children to avoid choke hazard; if a child accidentally
swallow sandy part you should immediately seek medical assistance.
21. Other losses that are not covered by the scope of SwellPRO liability.
Symbol Meaning:
Forbidden (Important) Caution (Important)
Simple test methods
Please stop the operation if any exceptional movement occurs.
Turn on the power; please ensure the throttle is in the neutral position every time the
transmitter is turned on. When making adjustments to the drone, make sure the engine is turned
off otherwise you may unexpectedly lose control and create a dangerous precedent.
Contents
Introduction----------------------------------------------------------------------------------------------------4
Function Overview--------------------------------------------------------------------------------------------5
What’s in box---------------------------------------------------------------------------------------------------5
Preparation----------------------------------------------------------------------------------------------------6
Cautions for Product Use
Battery
Splash Drone
Remote Controller
Propeller
Calibration-----------------------------------------------------------------------------------------------------14
Flying mode introduction------------- ---------------------------------------------------------------------17
Transmitter menu------ -------------------------------------------------------------------------------------18
OSD------------- ------------------------------------------------------------------------------------------------19
Before Flying --------------------------------------------------------------------------------------------------22
Start & launch and Landing--------------------------------------------------------------------------------23
LED Flight Indicators ----------------------------------------------------------------------------------------25
Low Voltage Warning & Auto Return Flight-----------------------------------------------------------26
Splash Drone & Battery & Transmitter Specification------------------------------------------------28
Flying Note-----------------------------------------------------------------------------------------------------28
FAQ---------------------------------------------------------------------------------------------------------------29
Page 4
©2015 SwellPRO All Rights Reserved. www.swellpro.com
4
Introduction
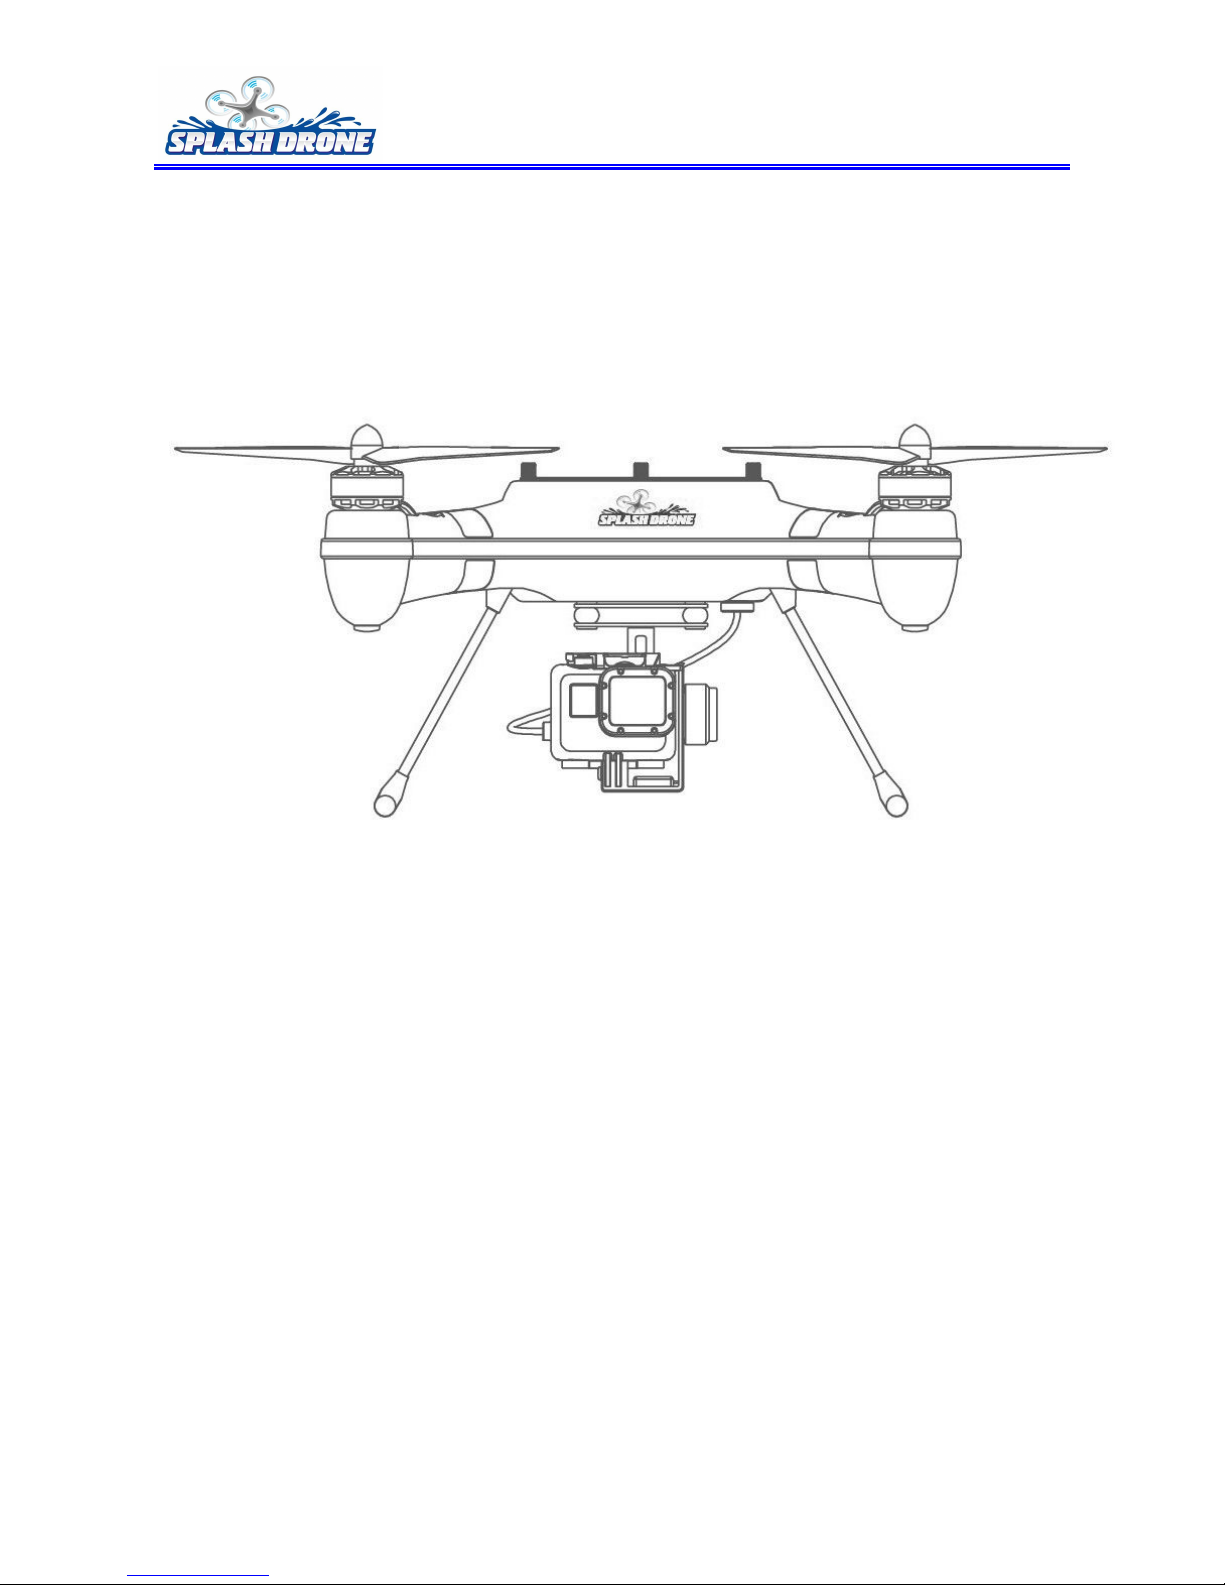
Splash drone is first one of amphibious drone in the world that can carry sports Camera with dive
cases easily to record your life moments, especially water sport wonderful moment. With the
addition of a 2 or 3 Axis gimbal to make aerial filming so easy, this is the perfect photo platform.
Enjoy a very real flying experience with the sports camera (FPV Feature). With latest design Payload
Release Mechanism carry objects up to 1.0Kg and drop exactly where you want. Splash Drone is not
only a flying camera, but also a super strong flying tool for different kinds of applications.
Function Overview
Splash Drone Function Overview
1. Payload release mechanism: Capable of dropping a two-pound payload at the flip of a switch.
2. Waterproof Camera Gimbal: This 2 axis waterproof gimbal allows the pilot to tilt the GoPro
camera in the air and loose the fear of landing on water, while getting live video feed back.
3. Splash Drone Dive Case: Gets live video feed directly from the GoPro and into the video
transmitter.
4. Emergency LED flare: Can hover a flare light 300 feet in the air for up to 15 minutes. This is a
huge improvement on traditional emergency flares that only last about a few seconds in the air.
5. Lifesaver delivery: Splash Drone can delivery an automatically inflating life preserver to a
swimmer in trouble in seconds.
6. Integrated video transmitter: Can transmit a clear video signal for up to 2 mile.
7. Return Home: The Splash Drone will automatically return to its take off position if the radio lose
contact.
8. Telemetry flight control and remote control system: Telemetry at the palm of your hands
showing you its location, altitude, distance and battery status
9. Self-tighten Propeller: Customized make #12” self-tighten carbon fiber propeller included.
10. Smart Balance Charger: Splash Drone Easy Battery Charger, no more complex setting.
11. Follow me mode: Follow the pilot wherever he goes without the need of piloting the drone.
12. App based control: Allow the pilot to fly the Splash Drone with an android device.
13. Autonomous Mission: Allow the pilot to drop waypoints and have the Splash Drone execute a
specific flight path.
14. Aluminum Suitcase: Completely self-contained Aluminum Suitcase that is light and easy to carry
with custom cut foam to keep everything safe and organized inside.
Page 5
©2015 SwellPRO All Rights Reserved. www.swellpro.com
5
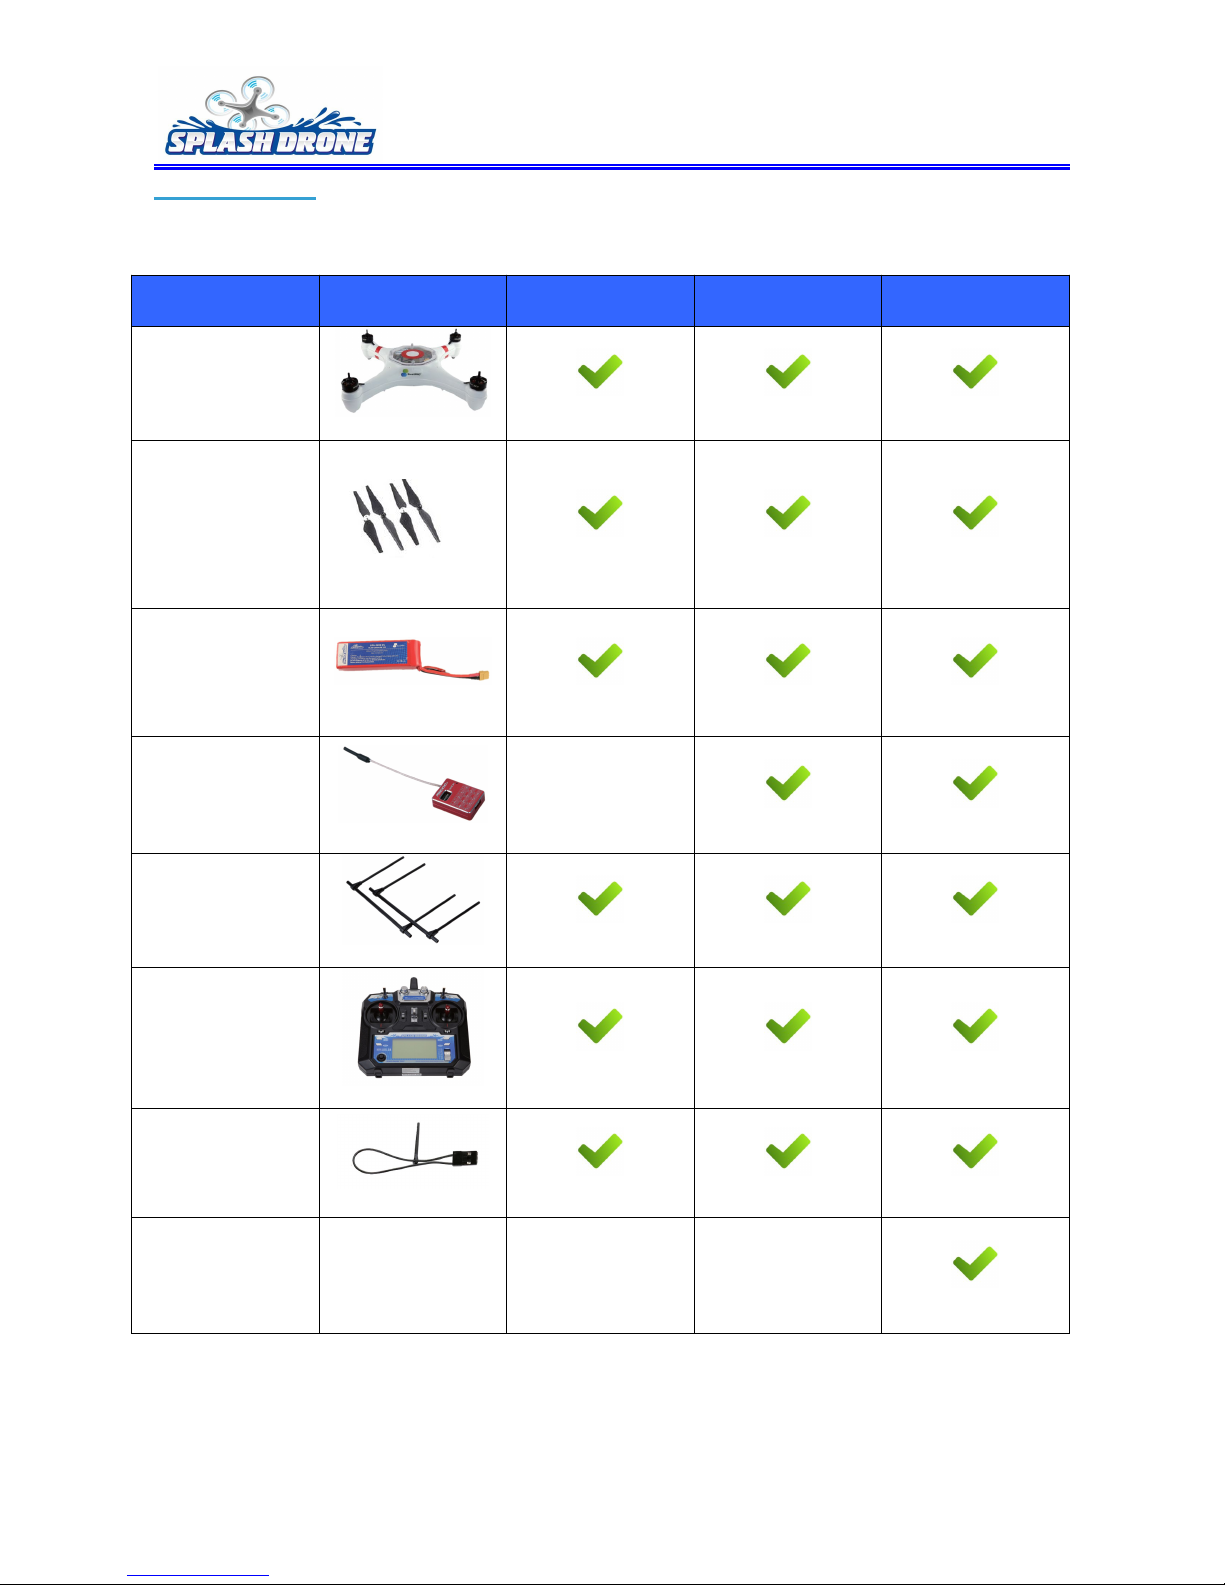
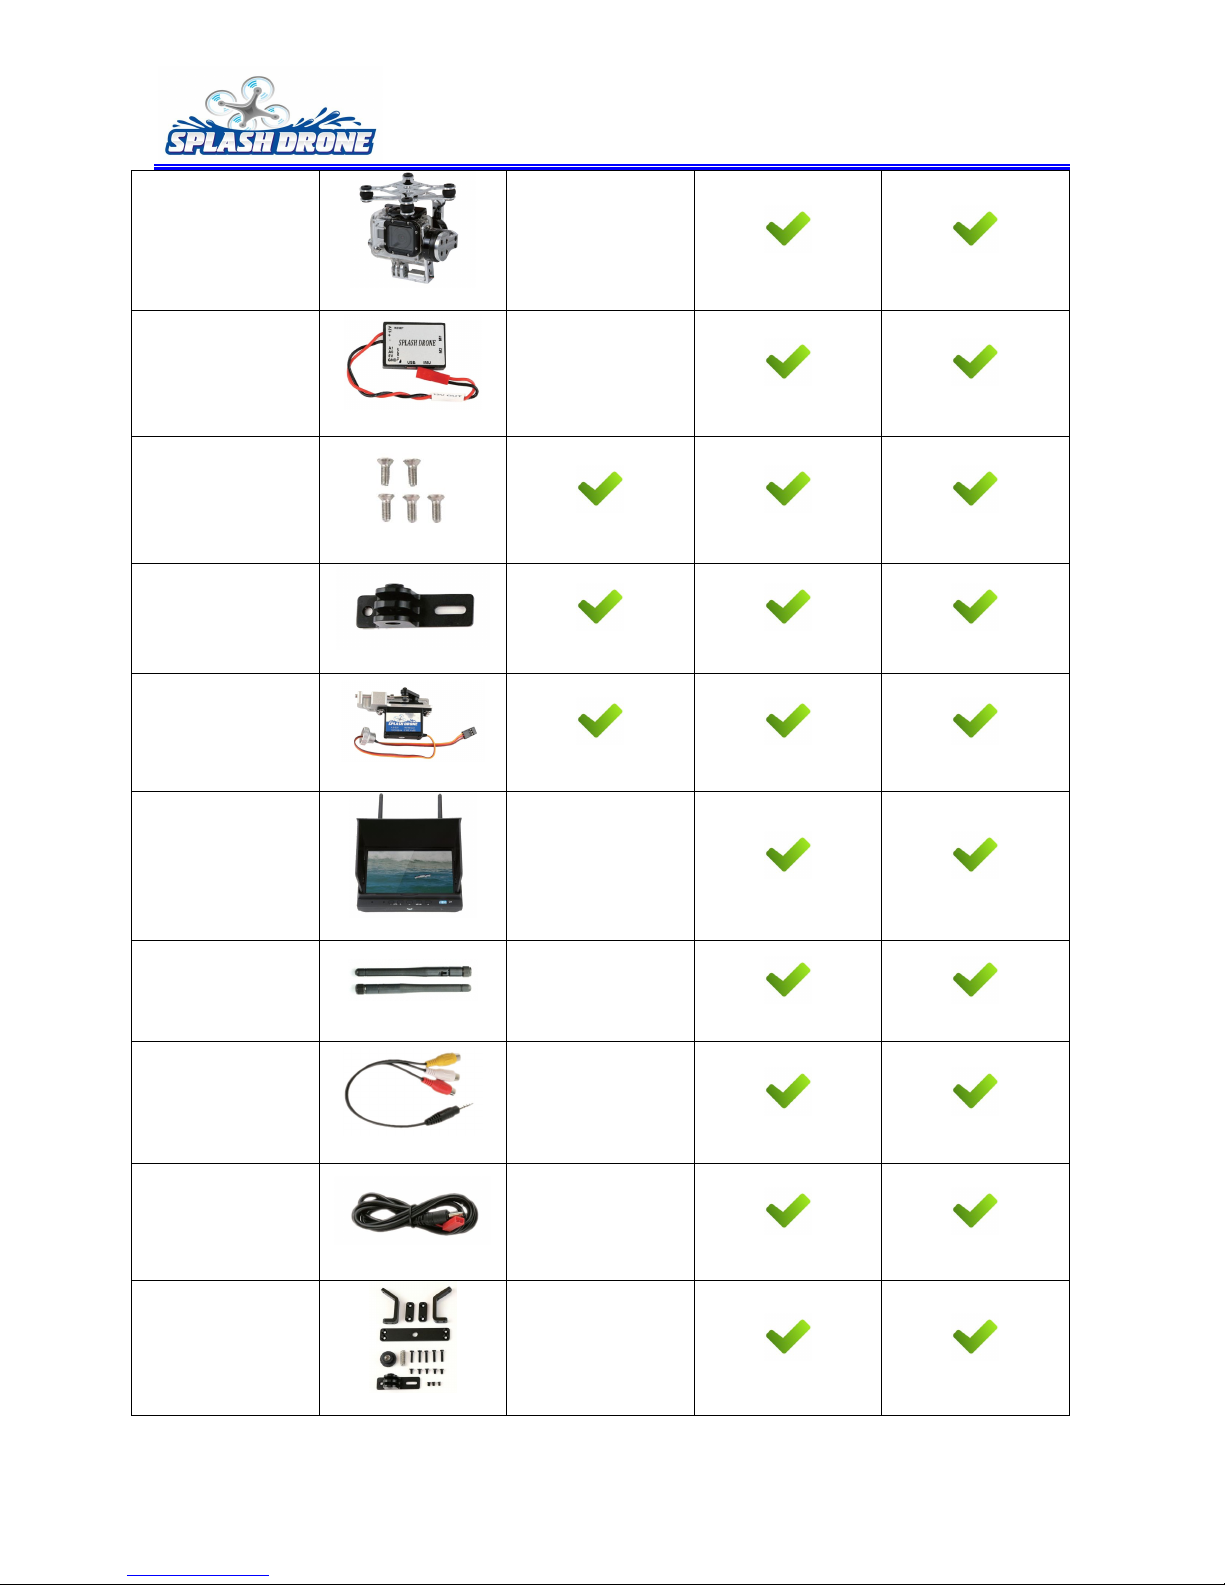
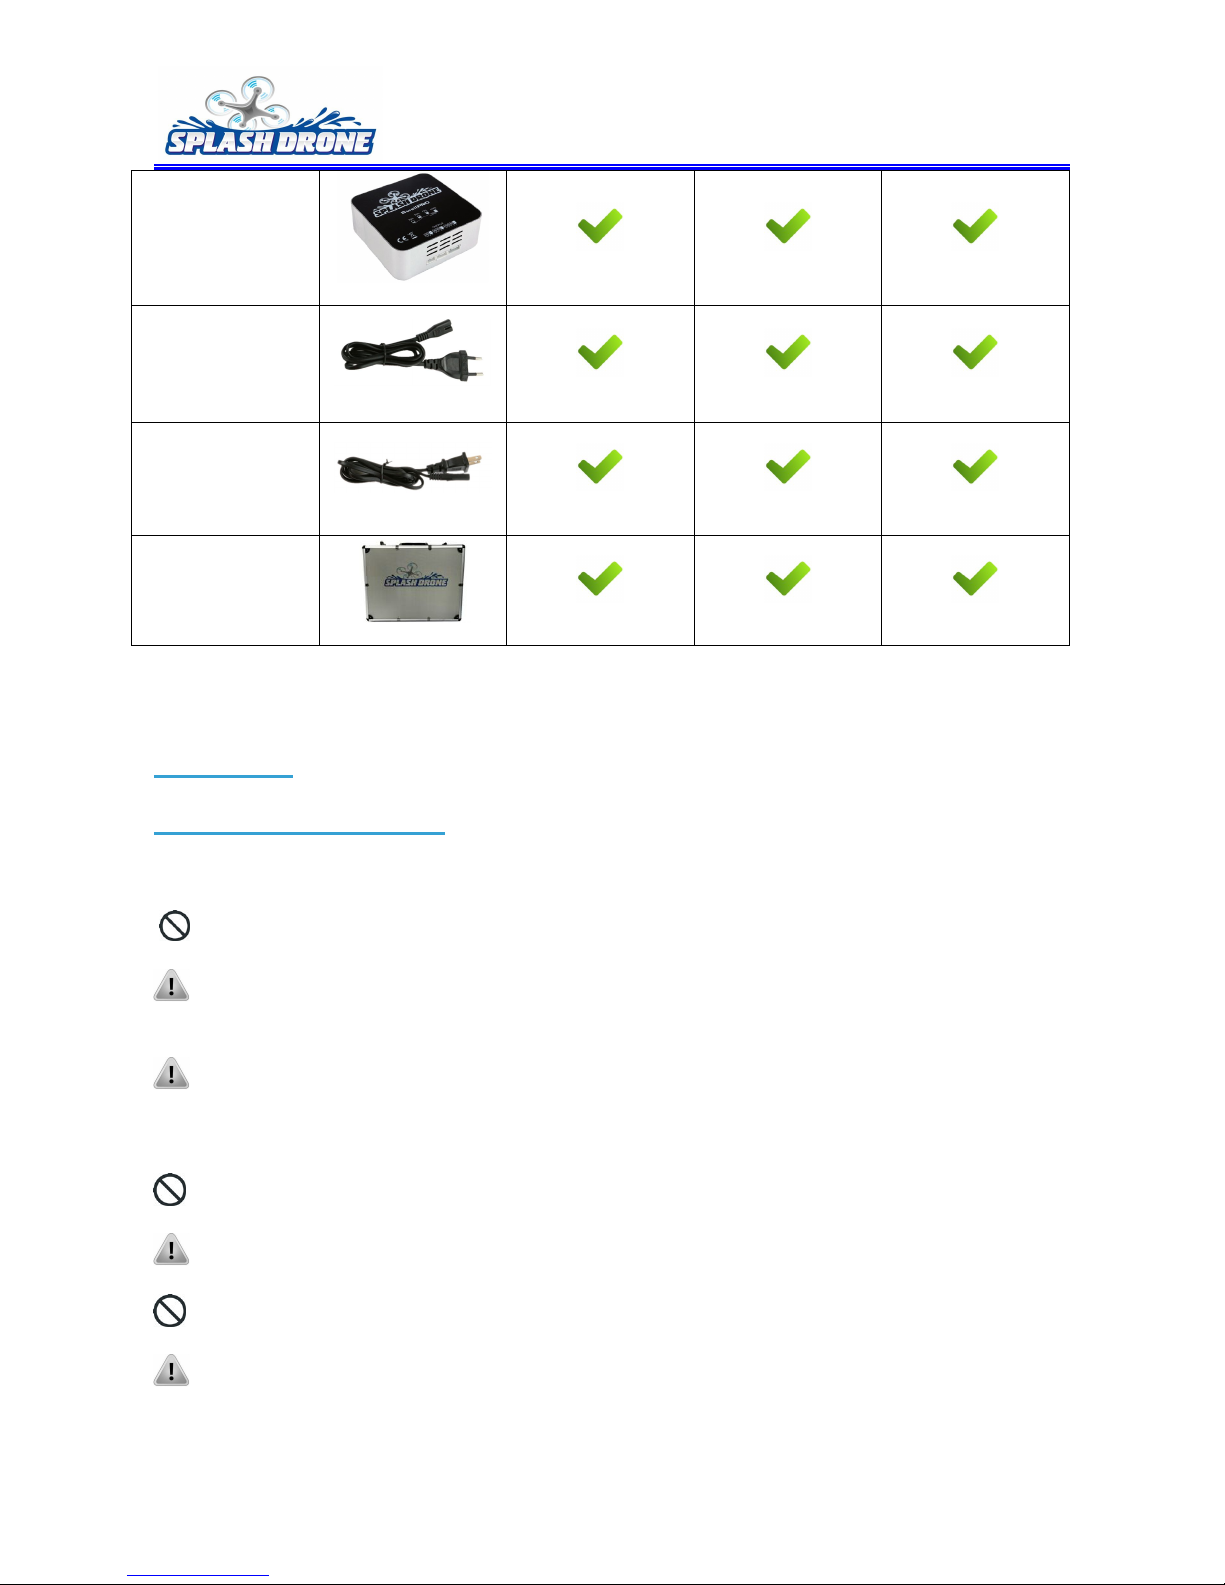
What’s in box?
Please check the contents of the box before using.
Item
Image
RTF Version
PRO Version
AUTO Version
Splash Drone x1
Self-tighten Prop
Pair x2(pair)
4S 4500Mah Lipo
battery x1
(build- in)
Mi600 VTX
(build-in)
Land Gear
x1(pair)
Romote
controller x1
Short-circuits
cable x1
Groud station
Page 6
©2015 SwellPRO All Rights Reserved. www.swellpro.com
6
Waterproof
Gimbal x1
Gimbal control
board x1
M3 x5 screw
Quick Release x1
Payload Release
x1
7’’ FPV Monitor
x1
Monitor Antenna
x2
Monitor AV cable
x1
Monitor Power
Cable x1
Monitor Bracket
x1
Page 7
©2015 SwellPRO All Rights Reserved. www.swellpro.com
7
Charger x1
EU charger cable
x1
US charger cable
x1
Suitcase x1
Preparation
Cautions for Product Use
Please check with follow steps carefully every time before flight.
Obey the national laws; do not fly in forbidden areas
Check all parts of Splash Drone are in good condition before flight. Do not fly with aging or
broken parts.
Check the propeller and the motor are installed correctly and firmly before flight, making sure
the rotation direction of each propeller correct. Do not get close to or even touch the working
motors and propellers to avoid serious injury.
Do not over load on the Splash Drone, it should load no more than 1.0Kg.
Make sure the Remote Controller battery and flight battery are fully charged.
Avoid interference between the Remote Control transmitter and other wireless equipments.
Make sure to switch on the Remote Controller first, then power on Splash Drone before take
off! After Landing, Power off the Splash Drone first, then switch off the Remote Controller.
Page 8
©2015 SwellPRO All Rights Reserved. www.swellpro.com
8
The fast rotating propellers of Splash Drone will cause serious damage and injury. Always fly
the Splash Drone 3 meters or above away from you and unsafe conditions, such as obstacles,
crowds, high-voltage lines, etc.
Please always keep the compass module away from the magnet. Otherwise it may damage the
compass module and lead the Splash Drone to work abnormally or even be out of control.
The built-in ESCs of Splash Drone ONLY supports up to 4S (14.8V) power supply.
ONLY use the SwellPRO original motor and 12-inch propeller.
If you want to put the Splash Drone in a car, please keep it away from the speaker, since the
compass module may be magnetized.
DO NOT use the magnetic screwdriver to avoid magnetic interference.
If you use your own equipment (for example: GoPro3), please make sure the WiFi function is
disabled, to avoid the interference on the transmitter, which may cause the Splash Drone failsafe,
crash and even to fly away.
Battery
Battery Usage & Cautions
The battery is specially designed for Splash Drone, with 4S 4500mAh capacity, 14.8V voltage and
charge-discharge management functionality.
Forbid putting the battery into water, fire or heat place; please keep the battery away from
source of water and fire;
Battery should store in a cool and dry environment.
Battery temperature is high immediately after use. Don’t start charging until the battery cools
down to room temperature;
Do not leave the battery charged unattended. If abnormal charging situation occurs, please
stop charging the battery at once; if you cannot attend the battery, remove the battery from the
charger in case of unpredictable danger;
Forbid making external force on the battery; do not drop the battery from high places and
disassemble or modify the battery;
Please replace the battery with new one if it bulges;
Page 9
©2015 SwellPRO All Rights Reserved. www.swellpro.com
9
If a child accidentally swallows the battery you should immediately seek medical assistance.
Battery should be charged with proper standard charger.
Forbid connecting the battery reversed in positive and negative terminals in the charger or
equipment.
Do not connect the battery directly to the wall plugs or vehicle-mounted socket.
Forbid letting the battery terminals (+and-) touch together to cause short-circuit.
Forbid transport or store the battery together with metal objects.
Do not weld the battery terminals together.
Forbid driving a nail in, hit with a hammer, or stomp on the battery.
Do not disassemble or alter the battery.
Do not use the battery in strong electrostatic areas; otherwise the electronic protection may
be damaged which may cause a hazard.
If you get the battery electrolyte leakage into your eyes, don't rub, first wash your eyes with
clean water then seek medical assistance immediately. If not handled in a timely manner, eyes
could be damaged.
Do not use the battery when it emits an odor, high temperature, deformation, change in color
or other abnormal phenomena; if the battery is in use or charging, you should stop charging or
using immediately.
If the battery terminal gets dirty, please clean it with a dry cloth before using. Otherwise it will
cause a poor contact, thus causing energy loss or inability to charge.
Discarded battery could lead to a fire; you should completely discharge the battery and wrap
the output terminal with insulating tape before discarding.
DO NOT drain the battery of Splash Drone or leave the battery plugged into the Splash Drone
when unused. When there is low voltage alert please landing timely to avoid damages to the
battery or others.
Page 10
©2015 SwellPRO All Rights Reserved. www.swellpro.com
10
Battery Charging
Charging Procedures
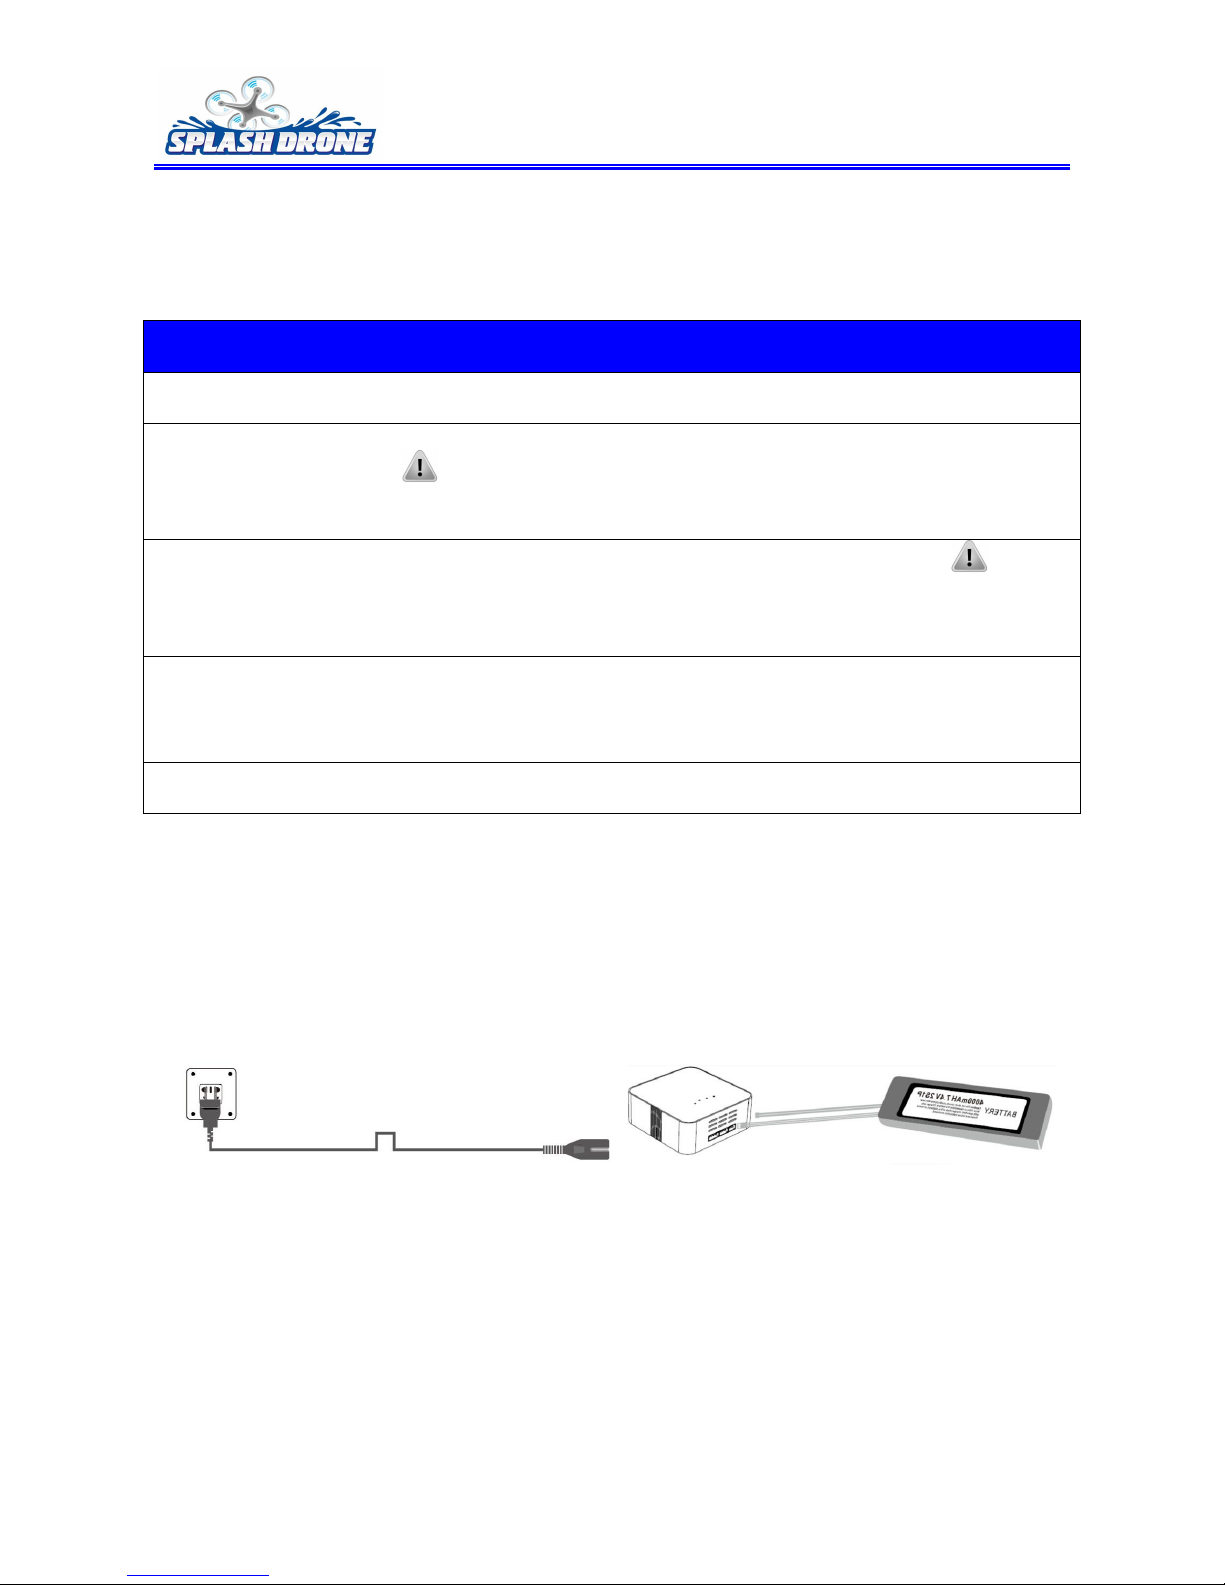
1, Insert the AC power cord into charger (Image I)
2, Insert the AC power cord into 100-240V AC socket, all LED will light for 1 second, then your
charger is ready for using ( Caution: Always power ON the charger before connecting a battery,
or damage to the hanger and the battery can result)
3, Connecting the battery pack to the charger with the XH balance plug (Image I) ( Caution:
Before charging, ensure you have chosen the correct battery chemistry type for the battery
charging)
4. The charger starts charging. The four LED will indicate the battery capacity: 1 LED light means
battery capacity percentage is 25%, 2 LED lights: 50%, 3 LED lights: 75%, 4 LED lights means battery
is fully charged
5. During the charging process, if the 4 LEDs all keep flashing, this is an ERROR
Image I
Page 11
©2015 SwellPRO All Rights Reserved. www.swellpro.com
11
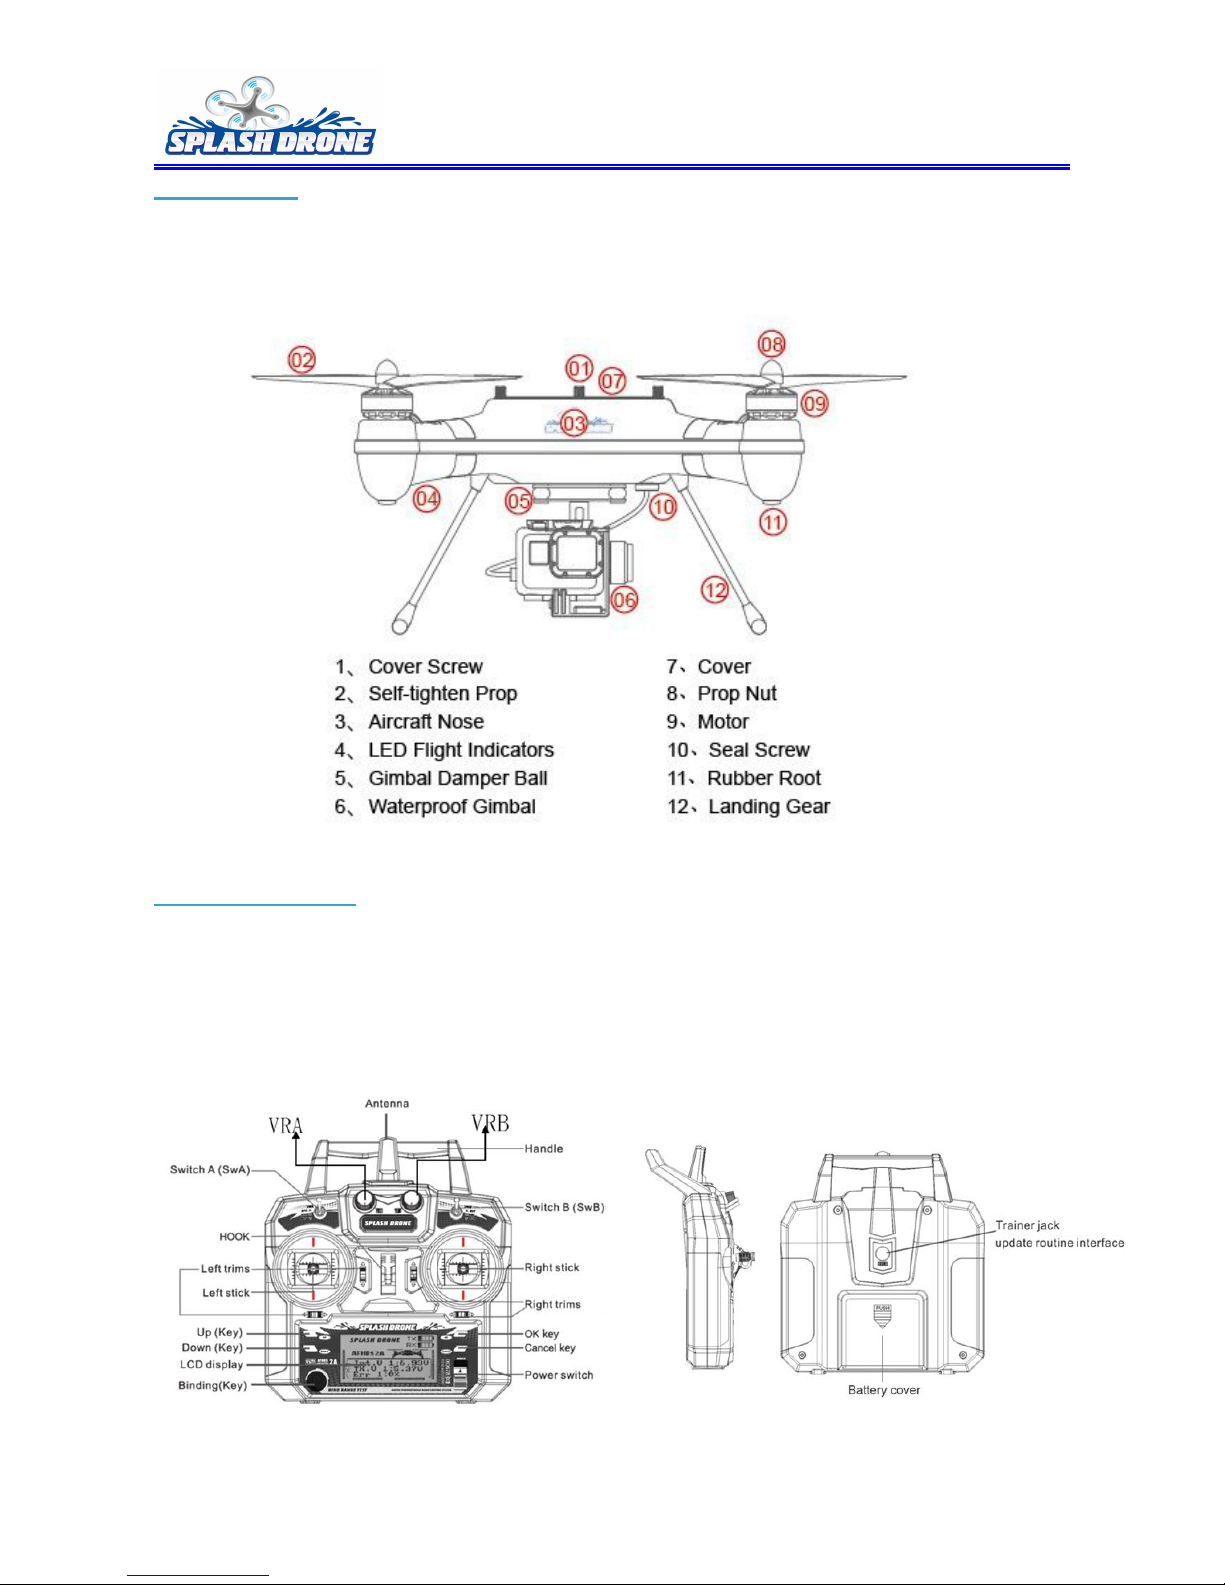
Splash Drone
Splash Drone (with or without gimbal) built-in flight controller which control the entire Splash
Drone’s functions in flight such as move forwards and backwards, left and right, up and down,
control the gimbal turn left or right, up and down and etc.
Remote Controller
The 2.4GHz radio band has a completely different behavior than previously used lower frequency
bands. Aways keep your Splash Drone in sight as any large object can block the RF signal and lead to
loss of control and danger. Never grip the transmitter antenna when operating a Splash Drone as
this degrades significantly the RF signal quality and strength and may cause loss of control and
danger
Remote Controller Operation (Mode 2)
Page 12
©2015 SwellPRO All Rights Reserved. www.swellpro.com
12
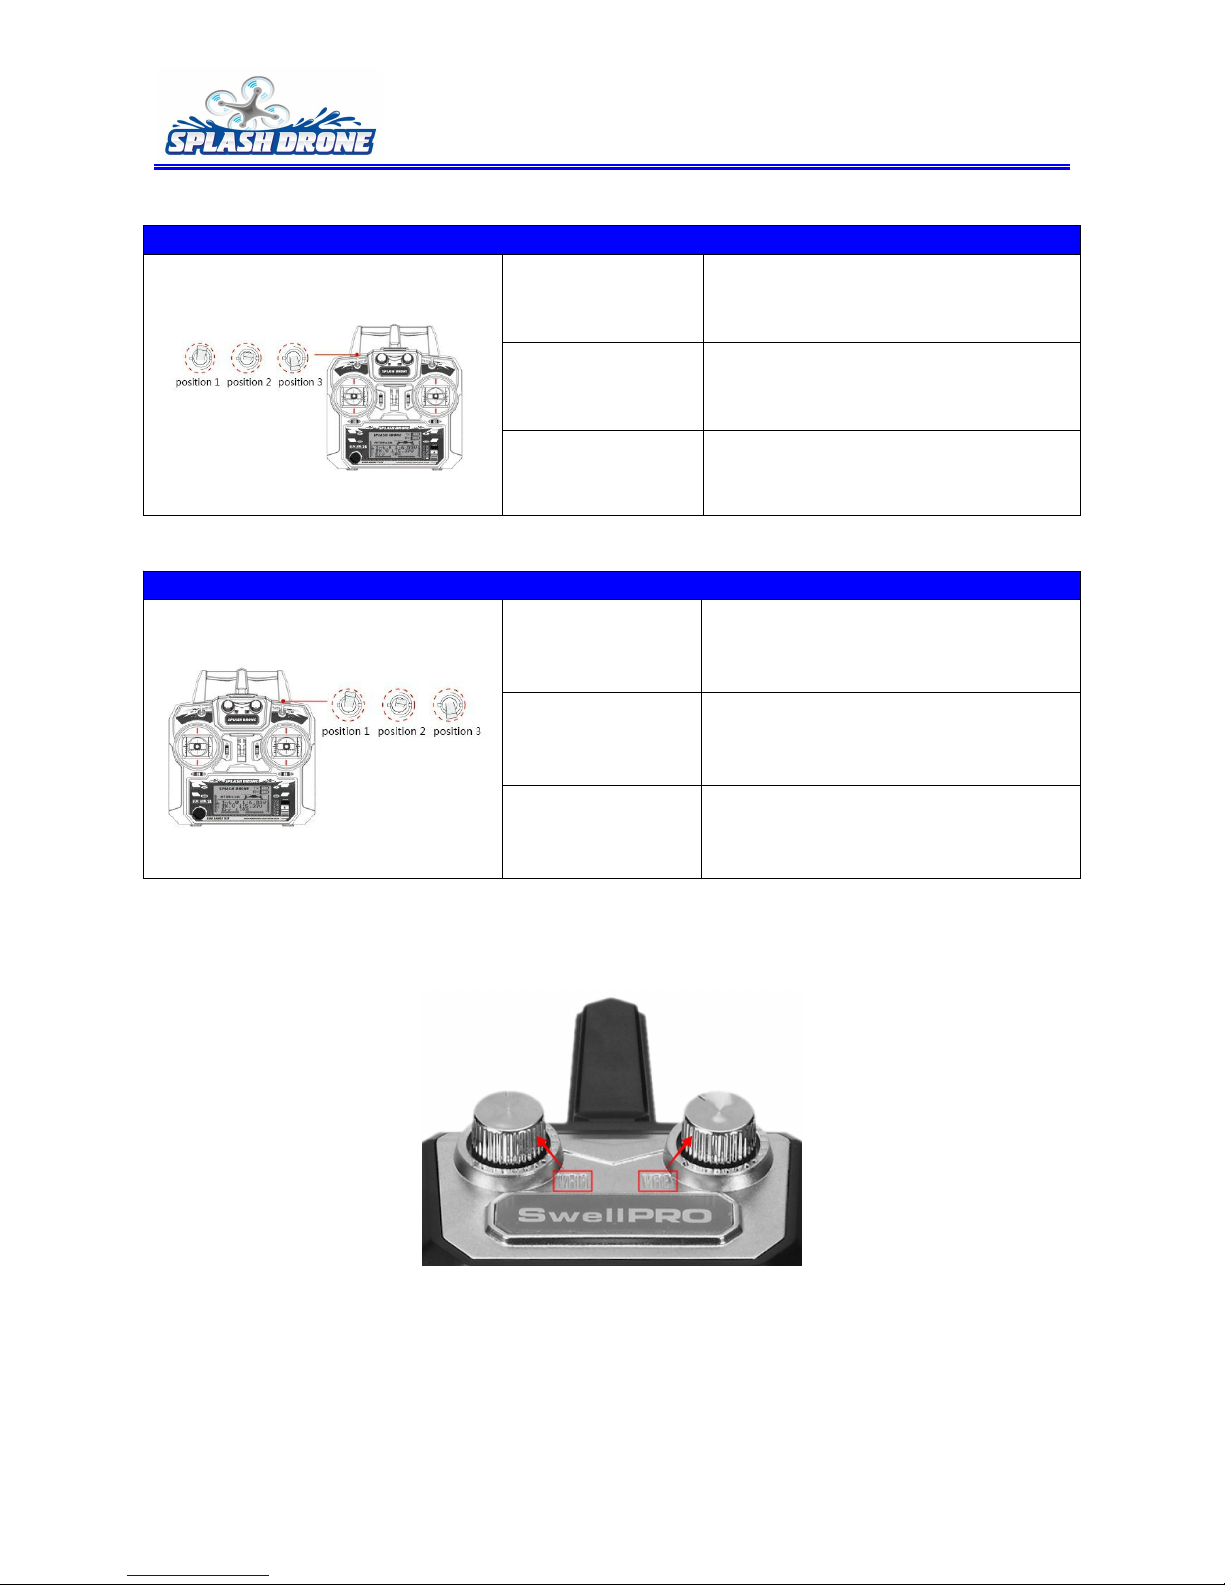
1. Fight Mode
Switch A (SWA), three-position switch. position 1, position 2 and position 3.
SWA position 1
ATTI Mode
SWA position 2
ATTI Mode
SWA position 3
GPS Mode
2. IOC Mode
Switch B (SWB), three-position switch, position 1, position 2 and position 3.
SWB position 1
OFF Mode
SWB position 2
Cycle Mode (Under GPS Mode)
SWB position 3
Auto Return Home Mode (Under GPS
Mode)
3. VRA, VRB adjust the camera position if install the 2 or 3 Axis Gimbal ( Gimbal Horizontal
initialization position in middle VRA, and gimbal pitch initialization position should be end of left
VRB)
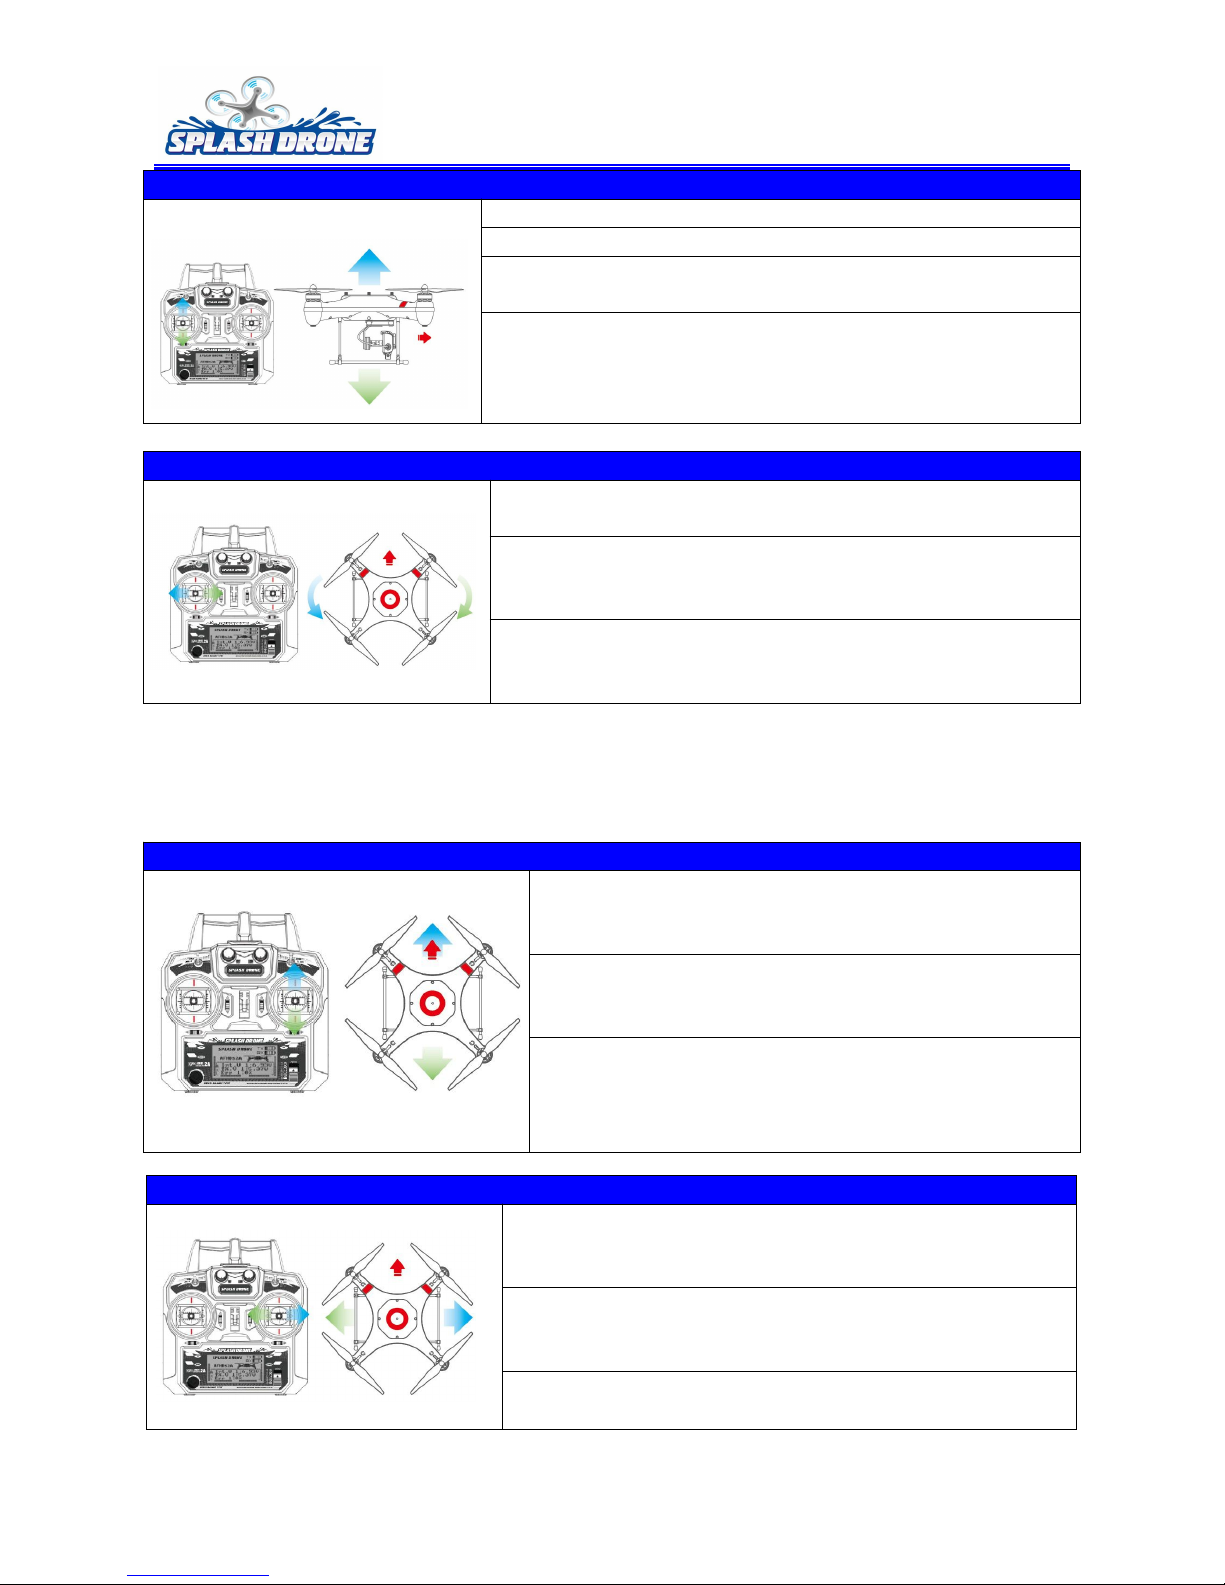
4. Throttle (Left) Joystick push Up and pull Down control the Throttle, yaw stick controls Splash
Drone left and right horizontal tilt
Page 13
©2015 SwellPRO All Rights Reserved. www.swellpro.com
13
The throttle joystick controls Splash Drone elevation.
Push the joystick up and the Splash Drone rise.
Pull the joystick down and the Splash Drone descend.
If the joysticks are centered under GPS Mode, the Splash
Drone will automatically hover and hold the height.
Push the throttle joystick above the middle position to make
the Splash Drone take off. When flying, we suggest that you
push the throttle joystick slowly to prevent the Splash Drone
from sudden and unexpected elevation changes.
The yaw joystick controls the Splash Drone rudder.
Push the joystick left and the Splash Drone rotates counter
clock-wise.
Push the joystick right and the Splash Drone rotates clockwise. If the joystick in centered, the Splash Drone will remain
the same direction.
The yaw joystick controls the rotating angular velocity of the
Splash Drone. Pushing the joystick further away from center
results Splash Drone in a faster rotation velocity.
5, The Pitch (Right) Joystick, push Up and pull down control Splash Drone forward and backward tilt,
push left and right control Splash Drone horizontal tilt.
The pitch joystick controls Splash Drone forward & backward tilt.
Push joystick up and the Splash Drone tilt and fly forward.
The Splash Drone will keep level and straight if the
joystick is centered.
Pull joystick down and the Splash Drone tilt and fly
backward. The Splash Drone will keep level and straight if
the joystick is centered.
Push or pull the joystick further away from center will
result in a larger tilt angle and faster flight velocity.
The roll joystick controls the Splash Drone left & right tilt.
Push joystick right and the Splash Drone tilt and fly right.
The Splash Drone will keep level and straight if the stick is
centered.
Push joystick left and the Splash Drone tilt and fly left. The
Splash Drone keeps level and straight if the stick is
centered.
Push joystick further away from center will result in a larger
tilt angle and faster flight velocity.
Page 14
©2015 SwellPRO All Rights Reserved. www.swellpro.com
14
Propeller
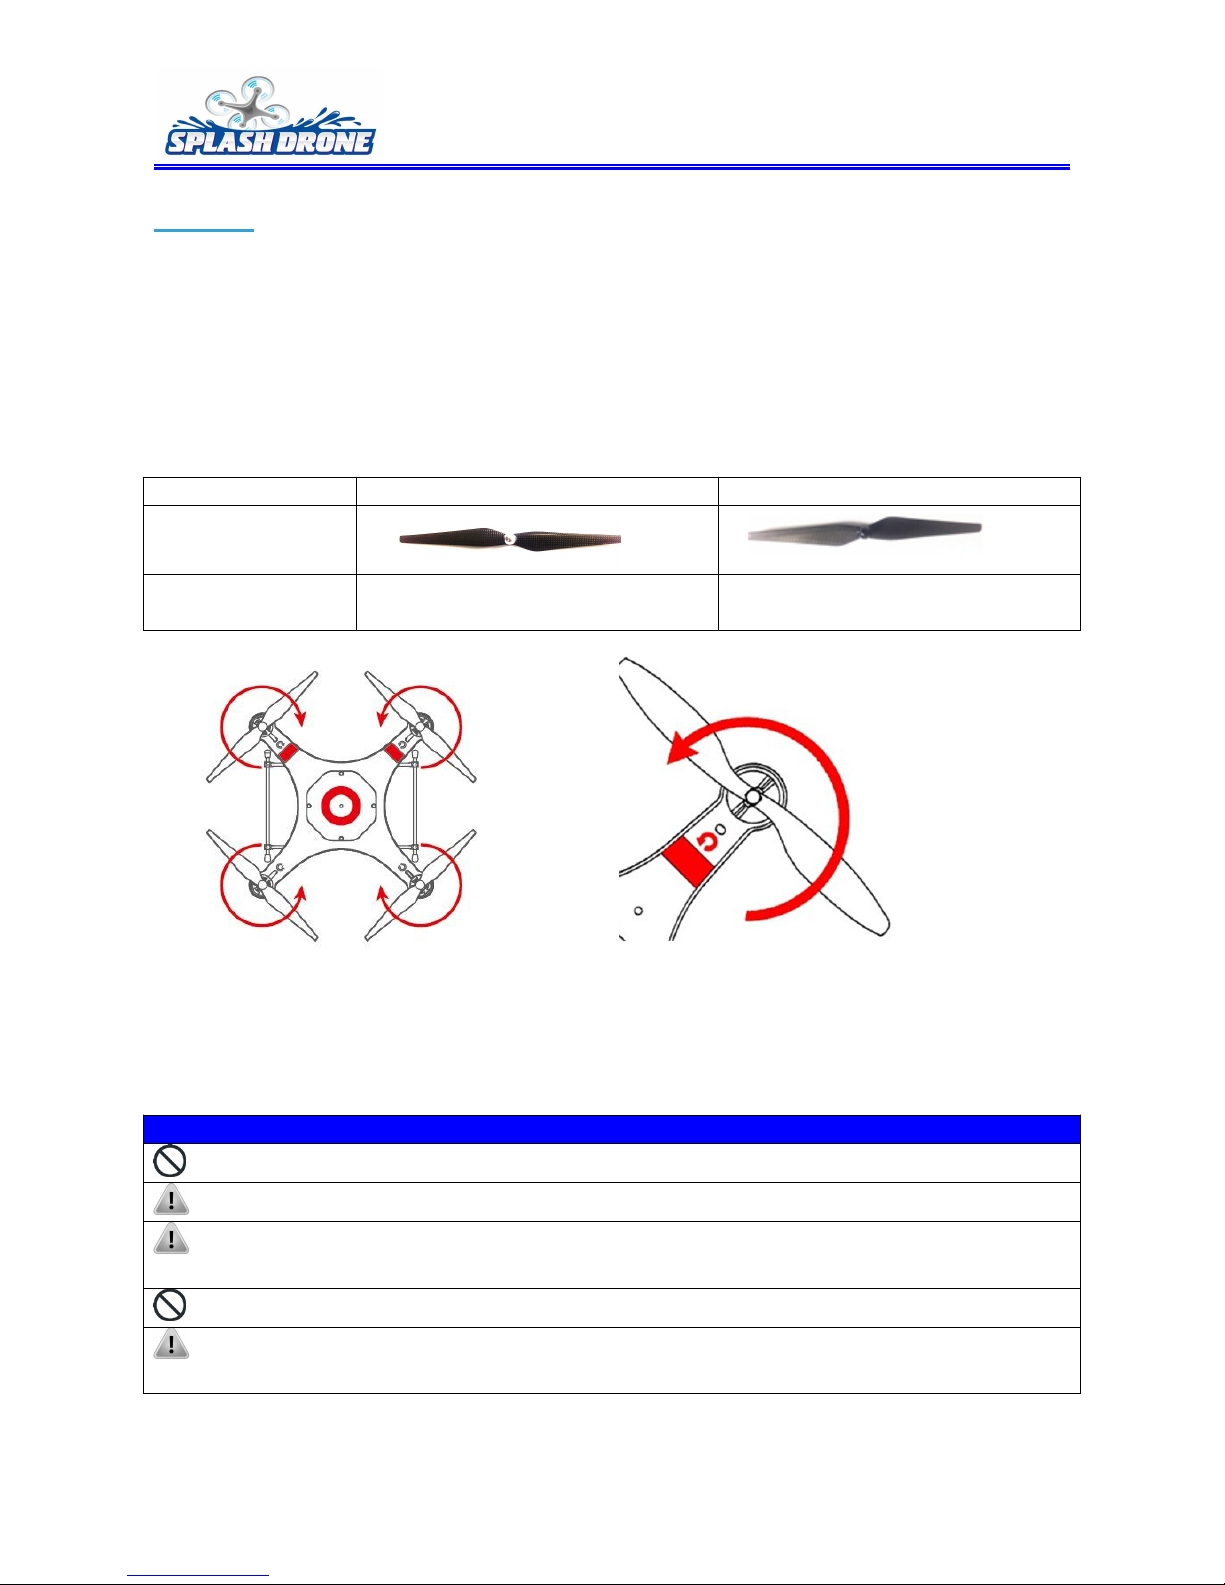
1.Mounting the propeller before flight
Preparing 4 original 12-inch propellers, two sliver nut propellers and two black nut propellers. Put
Splash drone on a flat level ground, make sure match the sliver nut propellers with the correctly
marked “CCW” motors, and Black nut propellers with the motor which mark “ CW ”, ensure tighten
all propellers firmly .The arrow’s direction stands for the rotating direction of the motors. And
install propeller direction is opposite of the motors rotating direction till firm.
Propeller
Sliver Nut (1243R)
Black Nut (1243L)
Image
Assemble Propeller
Install to the motor which mark on
“CCW”
Install to the motor which mark on
“CW”
2. Uninstall Propellers
After the motor stop rotating, power off the Splash Drone and put the Splash drone on a flat place.
Hold the motor, and screw out the propeller.
Notice:
Propellers are self-tightening during flight. DO NOT use any thread locker on the threads.
Ensure all 4 propellers and motors are installed correctly and firmly before every flight.
Check all propellers are in good condition before flight. DO NOT use any ageing, chipped, or
broken propellers.
DO NOT touch the propellers or motors when they are spinning.
Please use original 12-inch propeller, which are classified by the color of each central nut.
Replaced Damaged propellers, purchasing new ones if necessary.
Page 15
©2015 SwellPRO All Rights Reserved. www.swellpro.com
15
Calibration
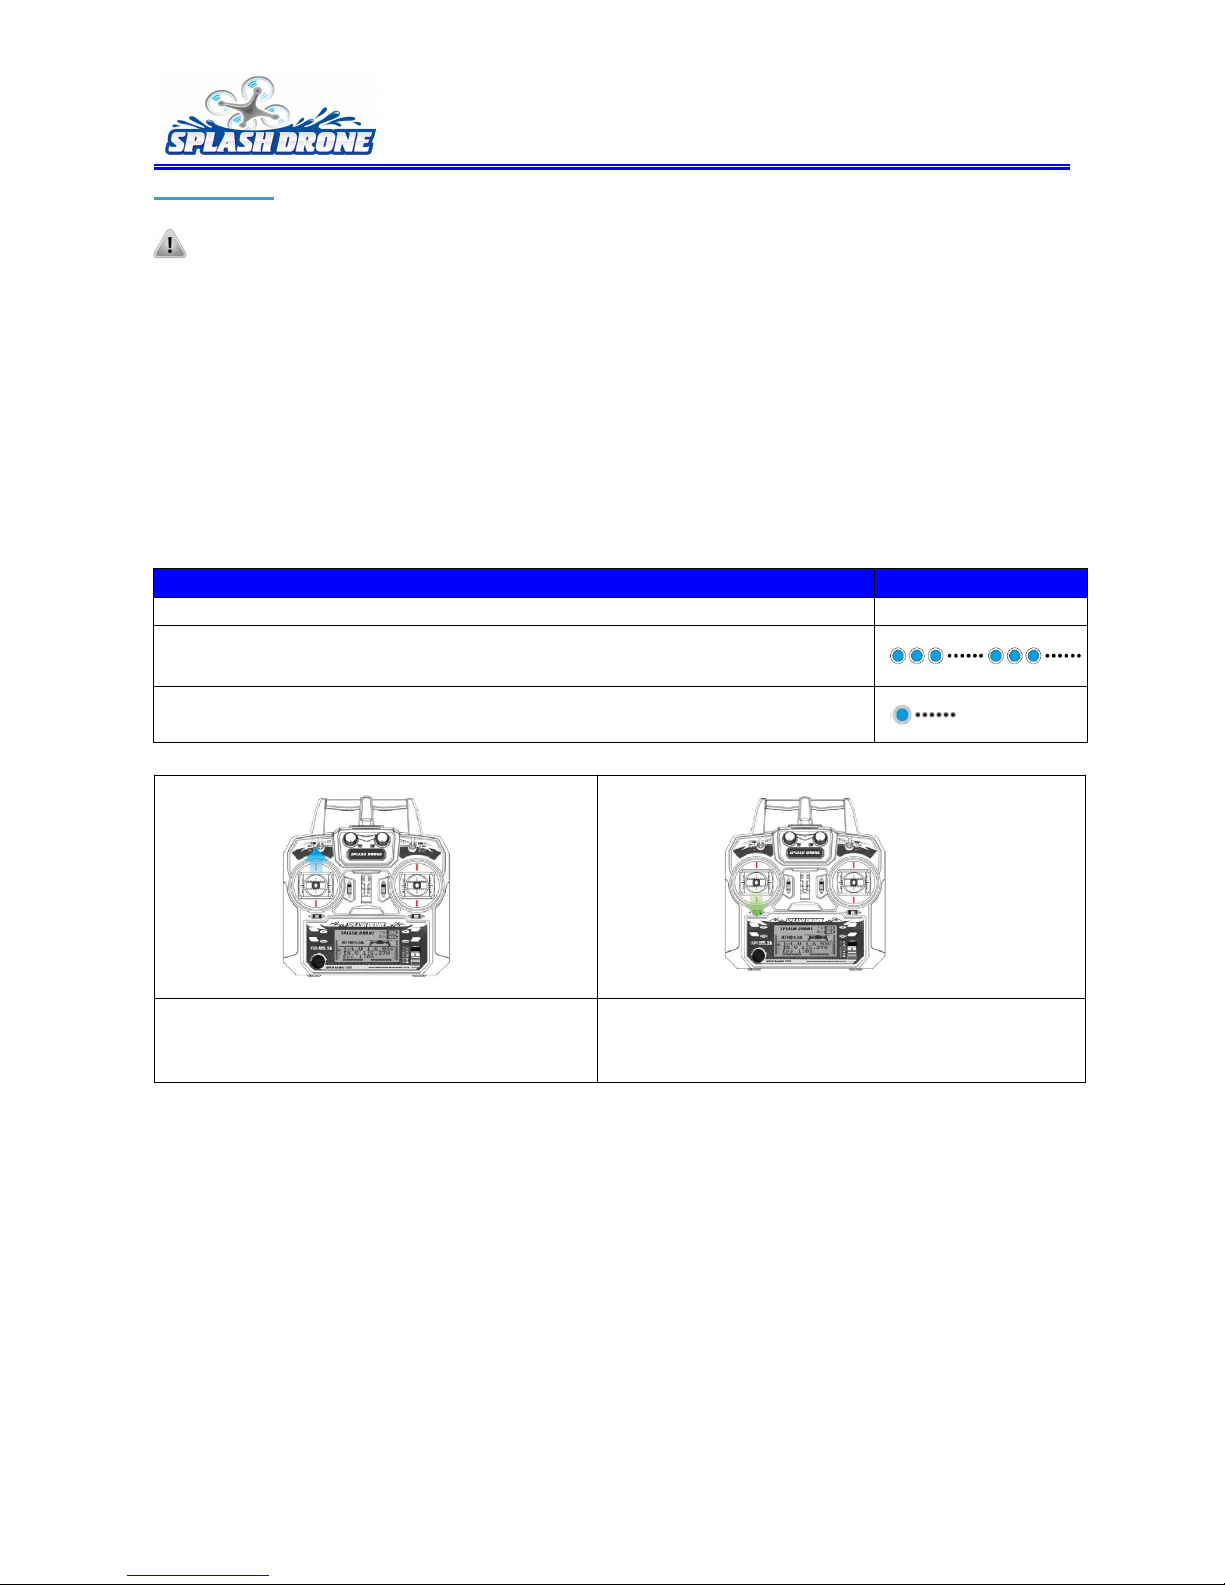
Notice: All calibration switch SWA to the Attitude mode under unlocked state to calibrate.
Splash Drone Calibration Steps:
Joystick Calibration -->> Compass Calibration --->> Horizontal Position Calibration
1. Remote Controller Joystick Calibration
Calibration situation
1. First time use the remote controller.
2. When the joystick in middle position, but the Splash Drone fly sideslip.
3. If remote controller crash occurs.
Joystick Calibration Process
LED Flashing
1. Turn on the remote controller, and power off the Splash Drone
2. Push the throttle joystick to the top neutral position, Power on the Splash
Drone and wait for 5-10 seconds, blue LED intermittent flashing
3. Pull the throttle joystick to the lowest neutral position, when the blue
LED stops flashing, and become normal status, Joystick calibration done.
2.Compass Calibration
The GPS module built-in magnetic field sensor for measuring the geomagnetic field, which is not
the same in different areas. The GPS module will not work unless the Compass Module has been
connected. Make sure the Compass Module connections are correct.
Calibrating the compass before the first flight or when flying in a different area. Make sure to keep
away from ferromagnetic substances and other electronic equipment when calibrating or flying. If
you keep having calibration failures, it might suggest that there is magnetic interference or other
ferromagnetic substance, avoid flying in this area.
Power off the Splash Drone, push the throttle
joystick to the top neutral position
Power on the Splash Drone, pull the throttle
joystick to the lowest neutral position till the bule
LED flashing
Page 16
©2015 SwellPRO All Rights Reserved. www.swellpro.com
16
Notice: Please always keep the compass module away from magnets. If this situation occurs
please change the compass module before flying, otherwise it may damage the compass module
and lead the Splash Drone to work abnormally or even be out of control.
Calibration Situation
1. First time use the Splash Drone
2. More than 100 km from the last calibration.
3. Crash occurs
4. If Splash Drone has been to a computer for setting up the parameters.
5. When Splash Drone has shaking, or twitching motions.
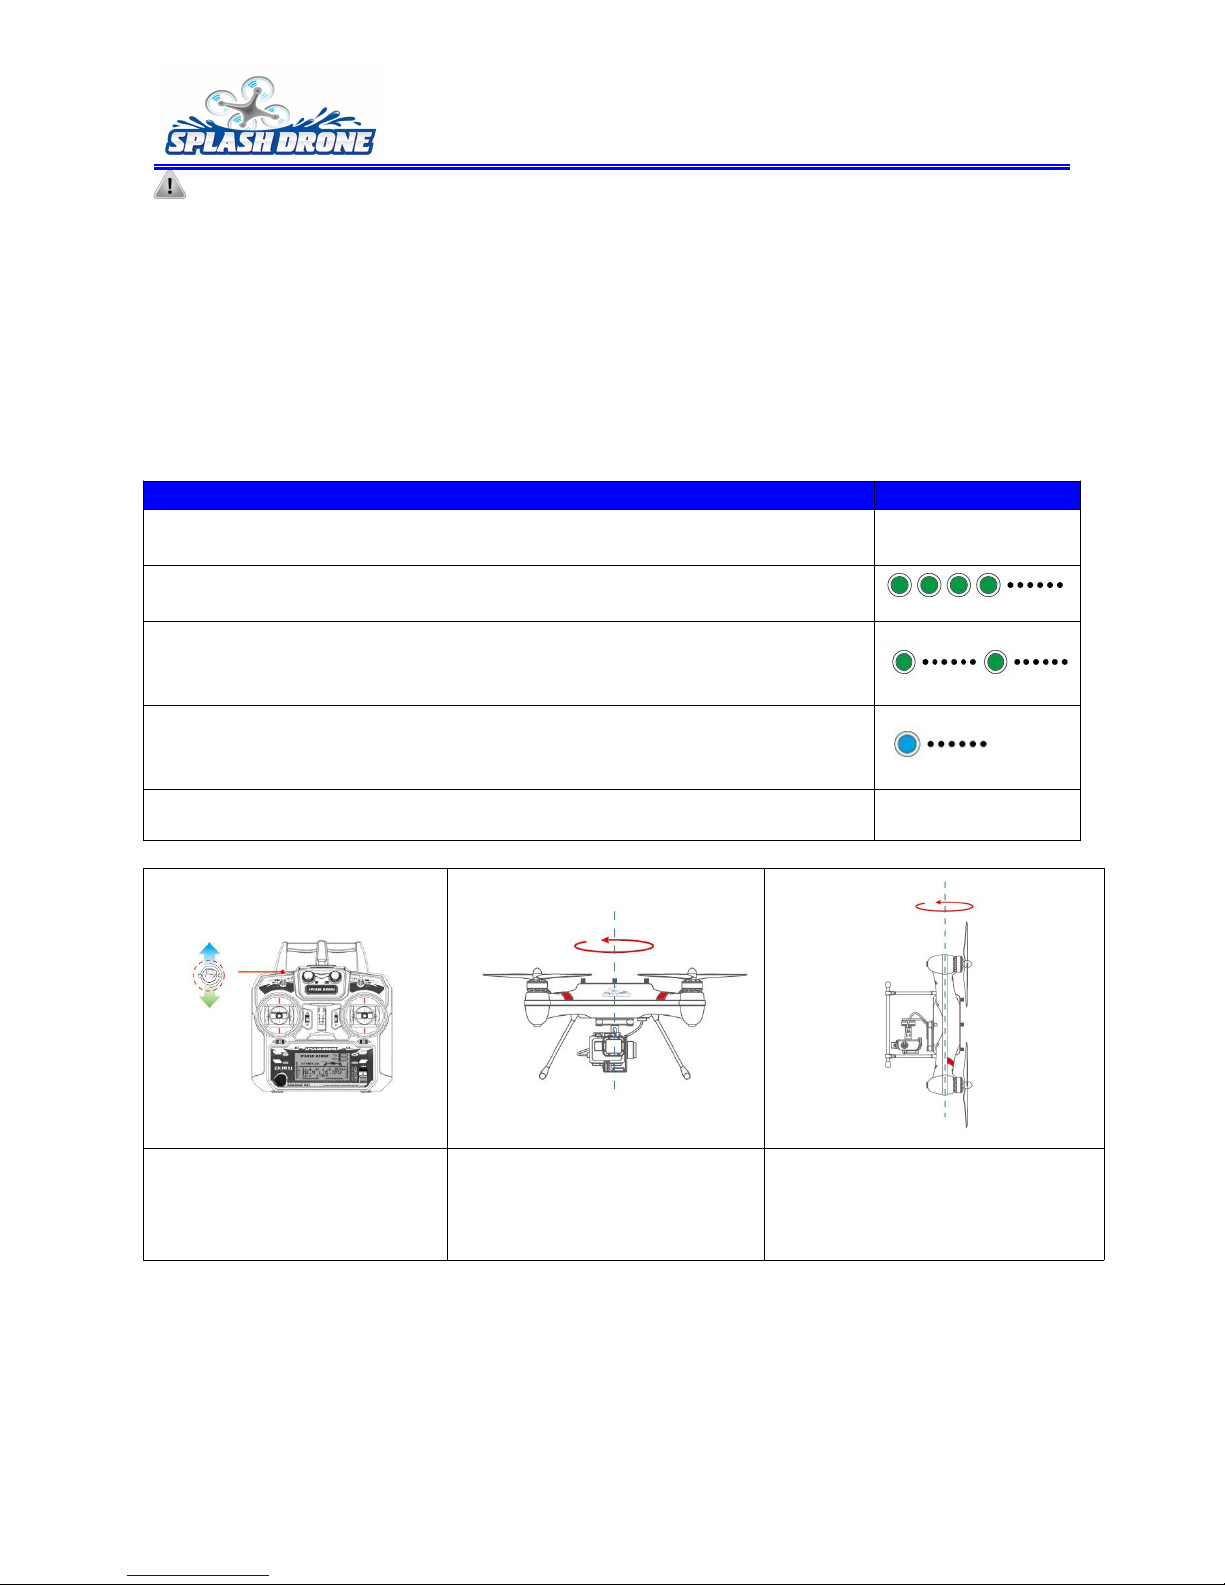
Compass Calibration Process
LED Flashing
1. Turn on the Remote Controller and Splash drone, keep the throttle at the
lowest neutral position.
2. Quickly move SWA fully up and fully down a few times (6-10 times) (see
switch SWA Image II) till the green LED fast flashing green continuously.
3. Put the Splash Drone in a horizontal position and continuous rotation in
one direction 2 circles (720 degrees), till the green LED slowly flashing.
(Image III)
4. Turn the Splash Drone head down; keep the vehicle vertical and
continuous rotation in one direction 2 circles (720 degrees), till the green LED
stop flashing, and become normal status (Image IV)
5. After calibration, must restart the Spalsh Drone
Image II
Image III
Image IV
Quickly move SWA fully up
and down Green LED fast
flashing
Put the Splash Drone in a
horizontal position; rotate in
one direction 2 circles till the
green LED slow flashing.
Turn the Splash Drone head down,
rotation in one direction 2 circles
till the green LED stops flashing
If a cycling phenomenon occurs after correctly installing the electrical compass calibration and GPS
installation, please ensure you calibrate the electrical compass again.
Page 17
©2015 SwellPRO All Rights Reserved. www.swellpro.com
17
3. Splash Drone Horizontal Position Calibration
Calibration situation
1. First time use the Splash Drone, or every time when Splash Drone is not horizontal in the air.
2. In ATT mode and in no wind conditions, Splash Drone fly sideslip.
3. Splash Drone Crash Occurs
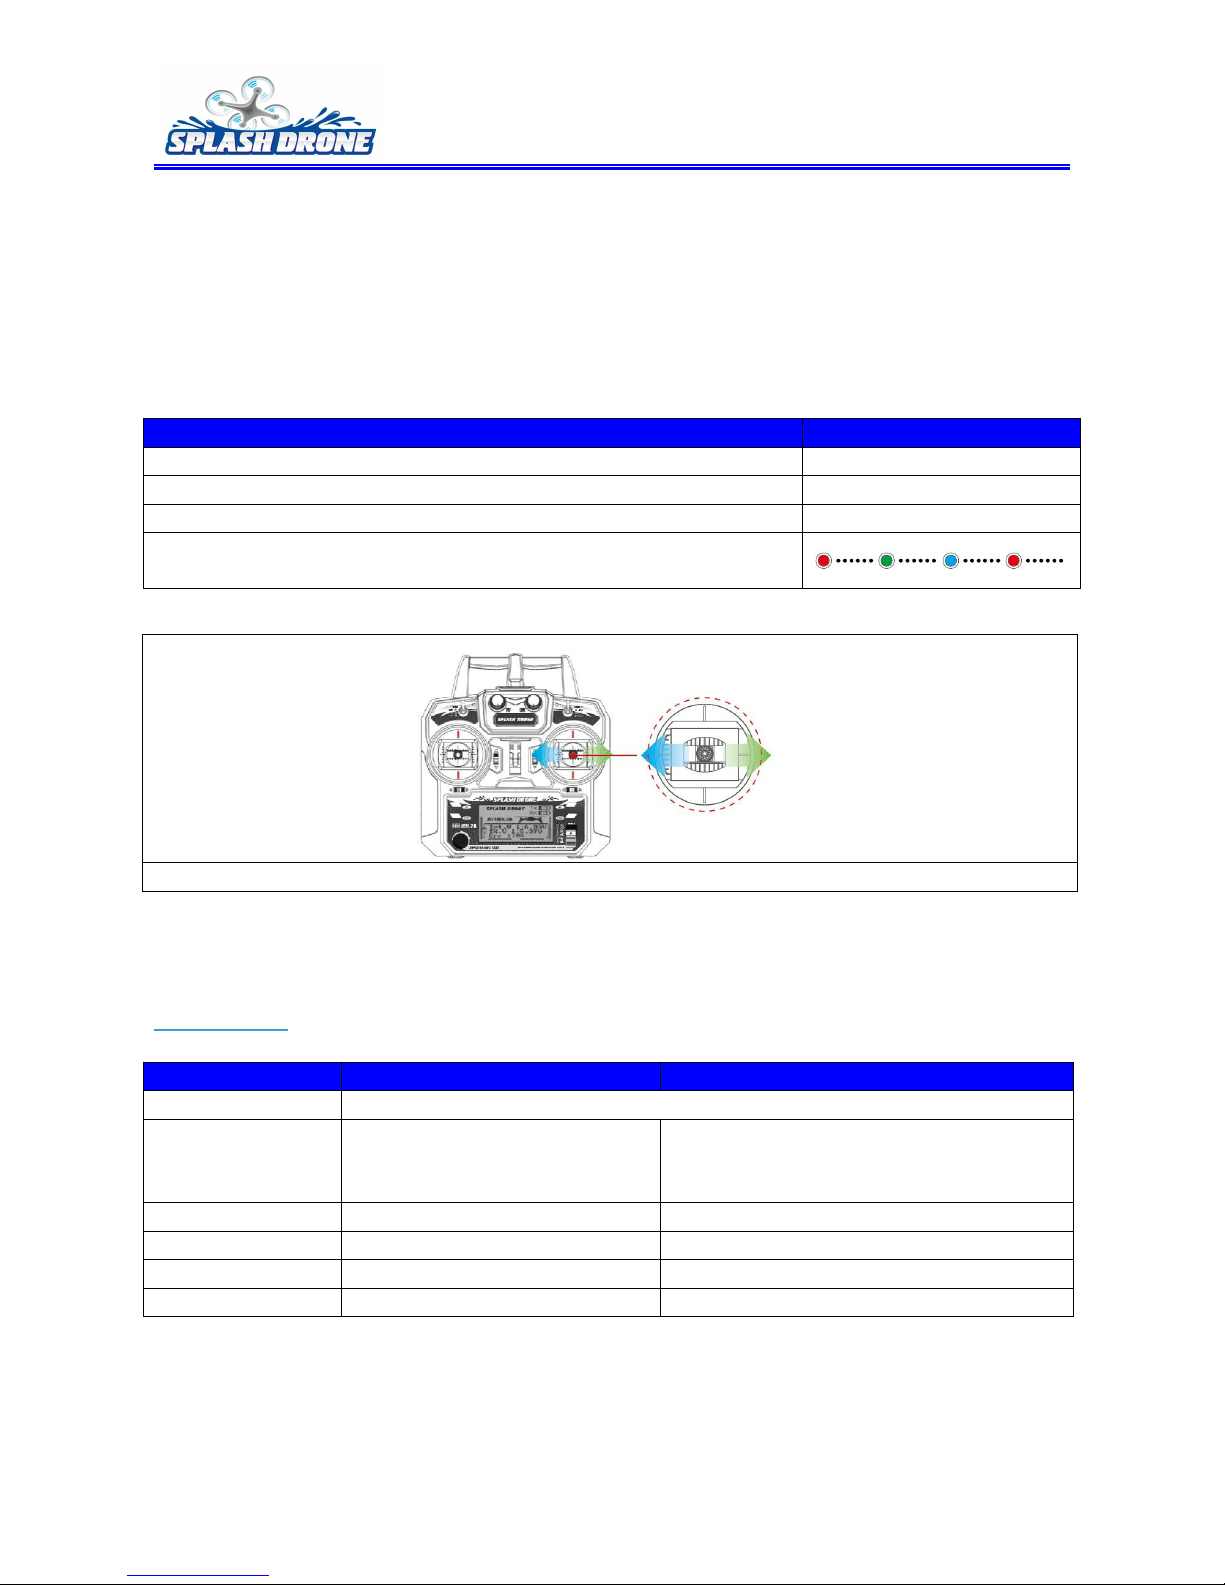
Splash Drone Horizontal Position Calibration
LED Flashing
1. Put the Splash Drone on the horizontal ground.
2. Turn on the remote controller and Splash Drone.
3. Put the Throttle stick in lowest neutral position.
3. Quickly left and right move the pitch joystick, till LED become Red,
Blue, Green flashing
Flying Mode
ATTI Mode
GPS Mode
Transmitter Input
Linearity Control
The Steering Lever
Push lever to middle can keep
fuselage horizontal push lever
max can keep fuselage in 30° tilt
Push lever to middle to lock position
automatically. Push lever in Max can keep
6m/s speed
Position LockedNOYES
Lifting Speed
No limited
Max 2m/s
Auto Return HomeNOSupport
Flying Speed
No limited
Max 6m/s
Quickly left and right move the pitch joystick, till LED become Red, Blue and Green flashing.
Page 18
©2015 SwellPRO All Rights Reserved. www.swellpro.com
18
1. Flying mode
Flying mode
ATTI Mode
Under this mode, Splash Drone control the flight balance automatically, but also
lock the flying height when the throttle lever is in the middle. When the stick is
pushed forward, the Splash Drone ascends; when the stick pull back the Splash
Drone descend.
When loss of radio signal occours,the Splash Drone will enter into the Auto
Return Home mode automatically ; when the signal is received again,can not
control the Splash Drone. If you want to control it again,please switch to GPS
mode.
GPS Mode
GPS Mode provides users with simple and easy flying experience, when the
steering stick is pushed to the middle, the position of the Splash Drone locked
automatically and maintains high-precision hovering. It can perform a stable
hover in light wind as it has been designed for effective wind-resistance. In this
mode, the lever can control the flying speed accordingly. Max Speed 6m/s
speed.
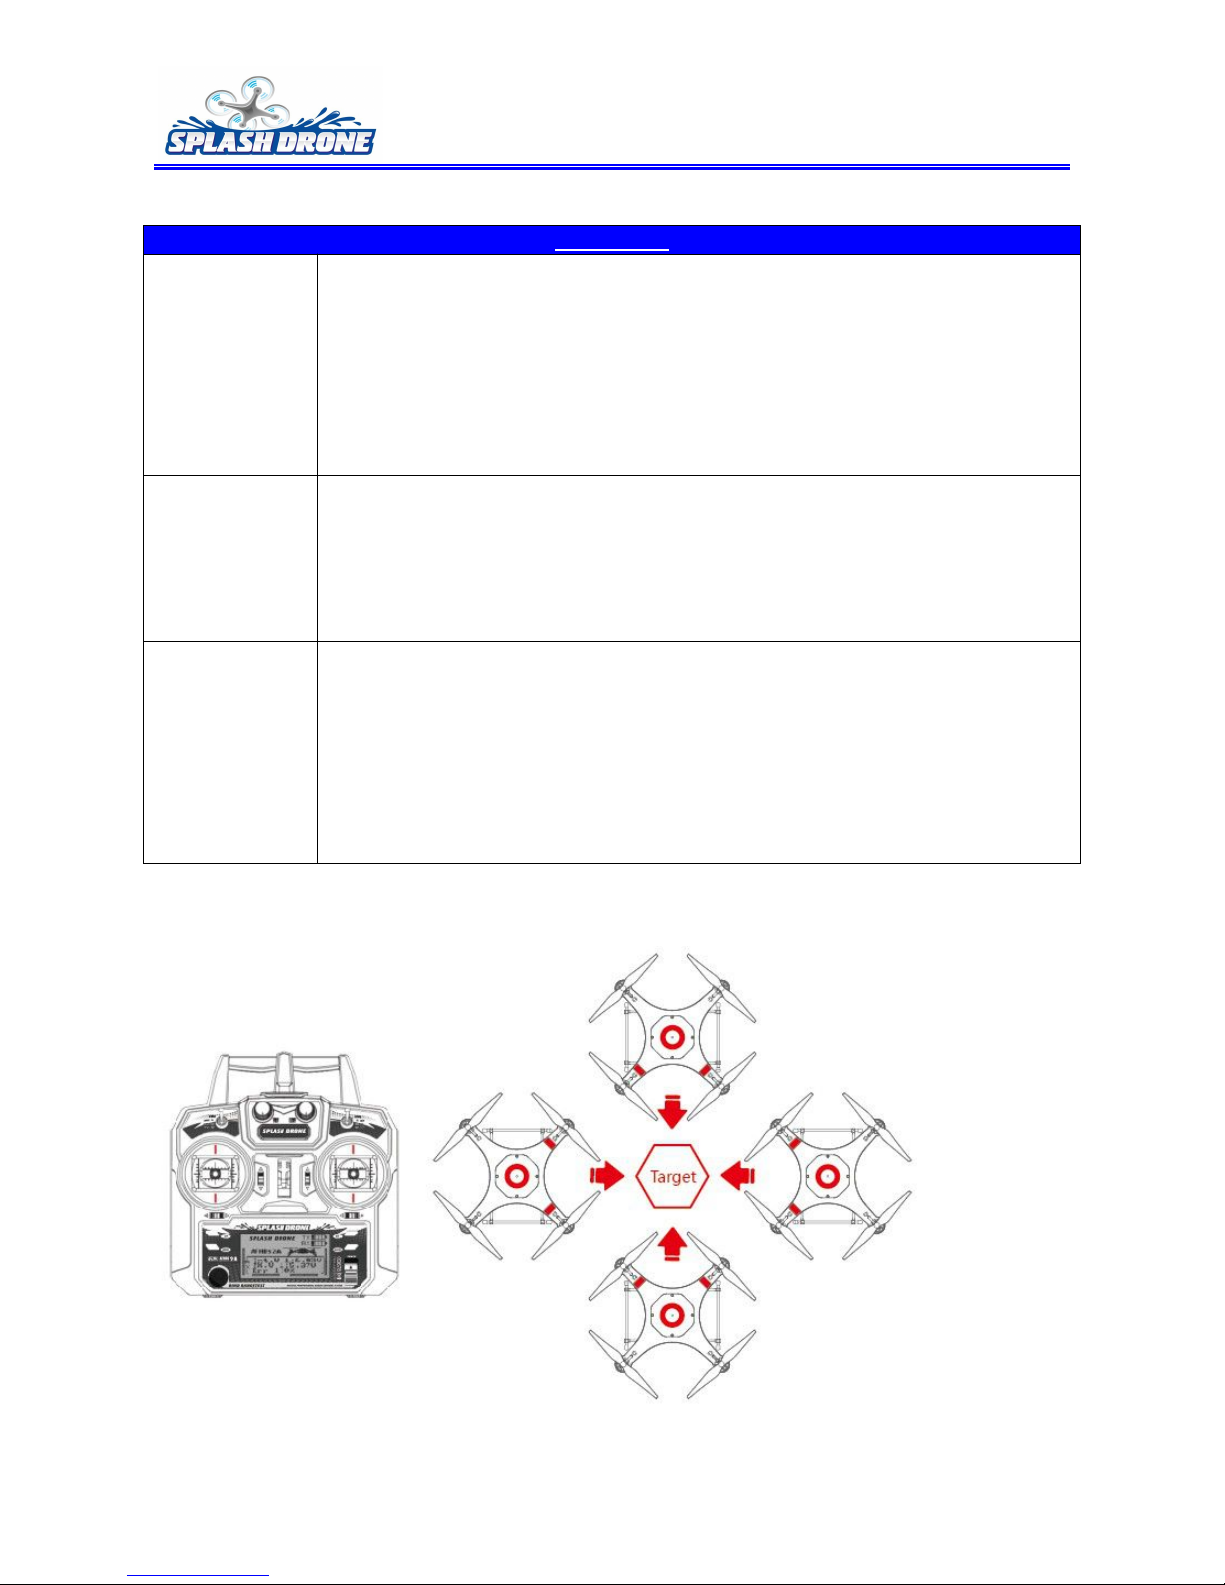
AOC (under GPS
mode)
Splash Drone flies to top of the TARGET, switch SWB to middle position to turn
on the AOC function. The Splash Drone nose always point towards the TARGET.
Push the pitch joystick up, Splash Drone forward direction to enlarge radius. Pull
the pitch joystick down, Splash Drone backward direction to reduce radius. Push
Roll Stick right, Splash Drone flies right around the TARGET, Push Roll Stick left,
the Splash Drone flies left around the TARGET.
Notice: This mode will only work providing the radius of your target is greater
than 5M.
AOC Mode
Page 19
©2015 SwellPRO All Rights Reserved. www.swellpro.com
19
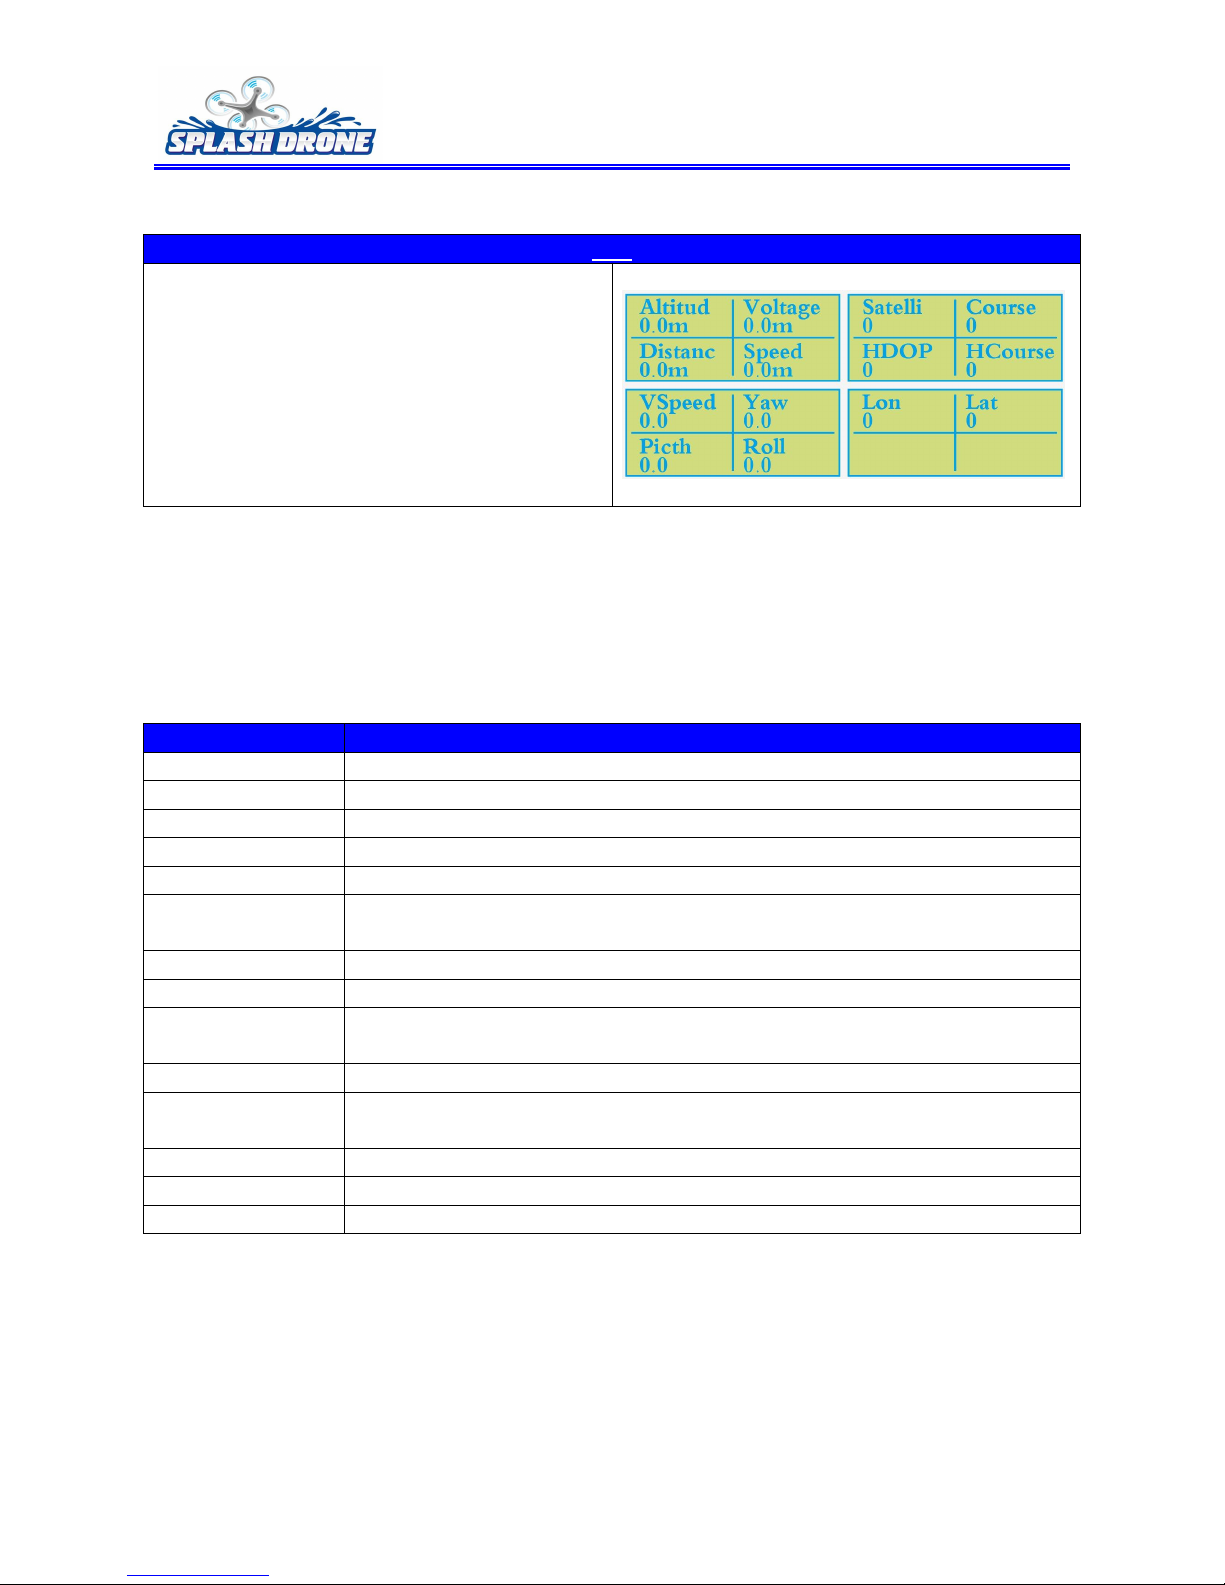
3. OSD Data on Remote Controller
OSD
Press up or down the button on remote
controller enter the OSD panel. You can find
aircraft flying information, include Longitude,
altitude, battery voltage, speed, satellite etc.
Note: Under GPS mode, the home point will
record as soon as you have connected to one
satellite.
Remote Controller Menu
Menu
Meaning
Altitud
Splash Drone height from the take off place (m).
Voltage
Splash Drone battery voltage (V).
Distanc
Splash Drone distance from the take off place (m).
Speed
Splash Drone fly speed (m/s).
Satelli
The GPS signal strength (from 0-12).
Course
The angle compared to the present position and the original takeoff point
(Degree).
HDOP
GPS Horizontal Dilution of Precision.
HCourse
The current moving angel compared to the original takeoff point (Degree).
VSpeed
Rise or descend speed (m/s), positive number means rise speed, negative
number means descend speed.
Yaw
The splash drone nose fly angle.
Pitch
Pitch angle, positive number means forward, Negative number means
backward.
Roll
Roll angle, positive number means right fly, negative number means left fly.
Lon
Longitude
Lat
Latitude
Page 20
©2015 SwellPRO All Rights Reserved. www.swellpro.com
20
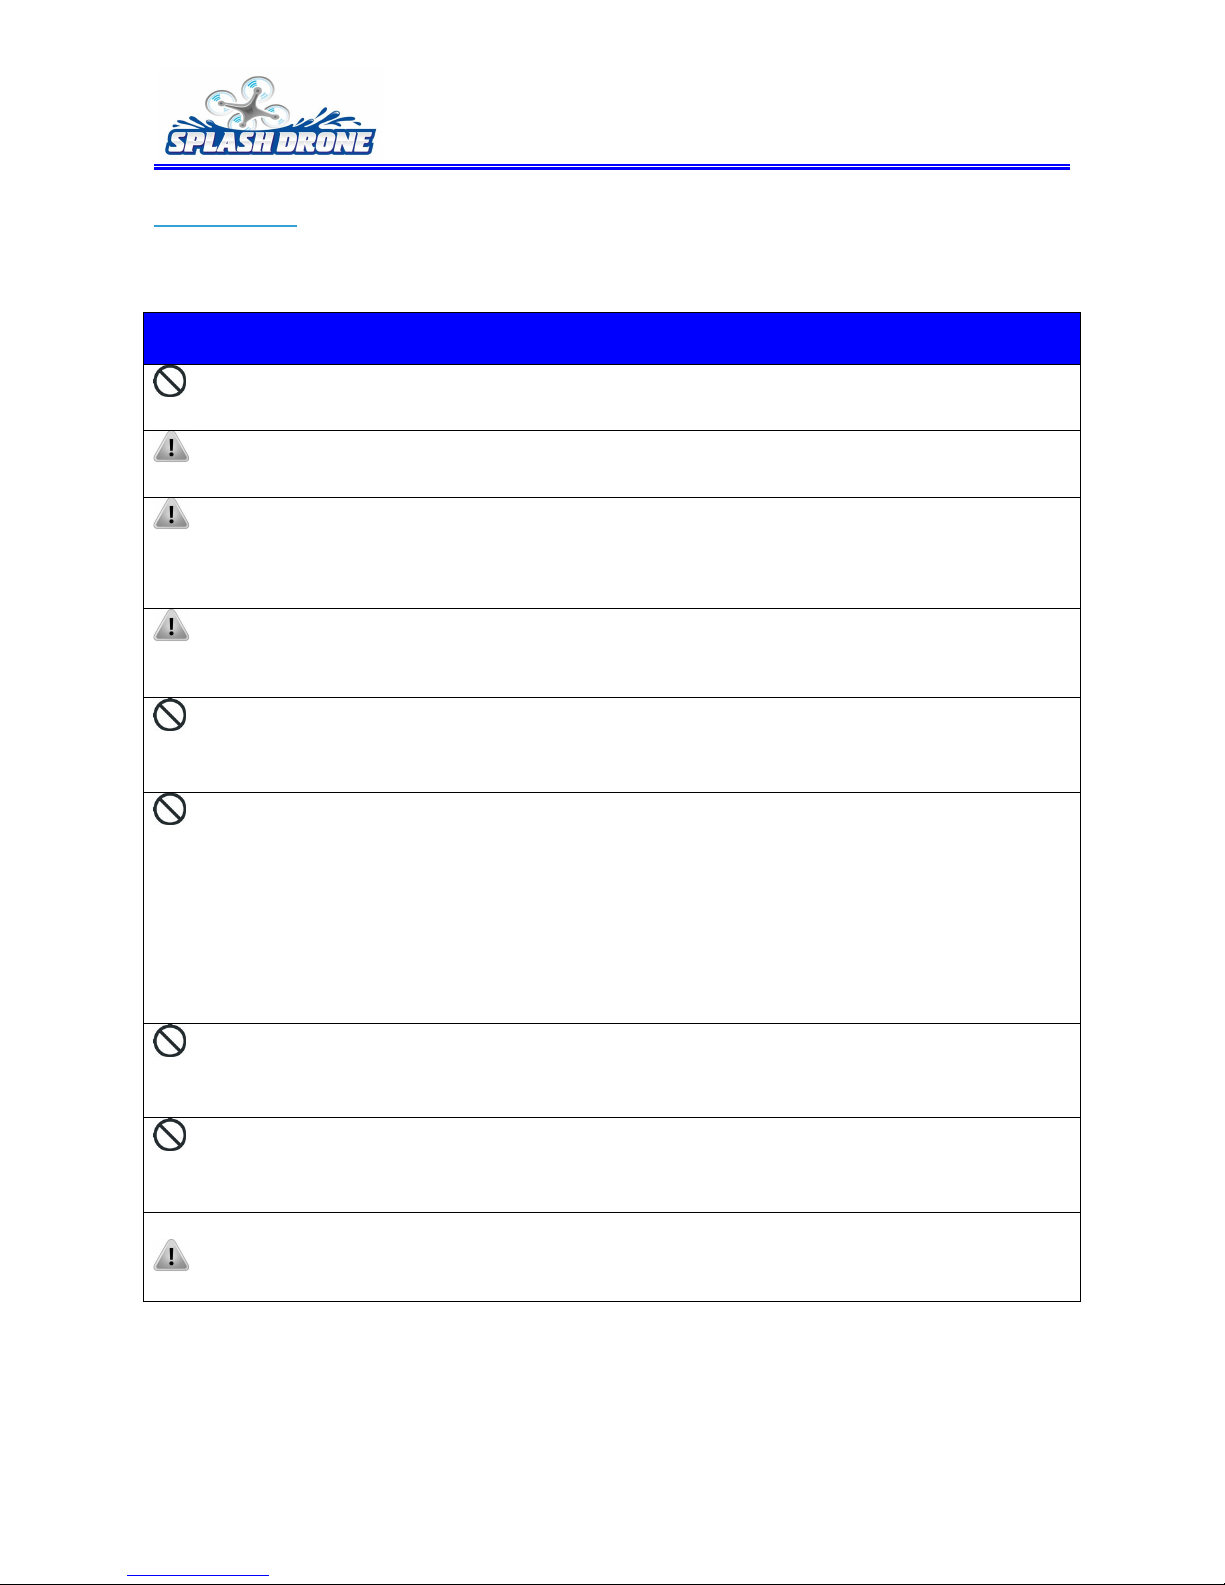
Before Flying
1.Safty Guide
Always Follow the Safety Guide
The Splash Drone allows you to fly in rain, lake and ocean. But make sure not in extreme
weather. It is irresponsible and dangerous.
Make sure all motors moving direction is in accordance with the operating instructions. If
incorrect please adjust the direction.
Landing Drone Process: Power off Splash Drone then turn off the transmitter
Take off Drone process: Turn on Transmitter, then turn on Splash Drone
Always remember that the 2.4G RC systems could affect a plane or a car in your vicinity when
you power up the transmitter.
When operate in raining or wet environments, make sure no water gets into the Splash Drone
body. Should any type of moisture (water or snow) enter the components of the system, erratic
operation and loss of control may occur.
Do not operate in the following places:
1. Near other radio controlled activity area
2. In the vicinity of people or public highways.
3. On any water mass where passenger boats may be present.
4. Near high-tension power lines or communication broadcasting antennas as interference could
cause loss of control.
5. Improper installation of your Radio Control System in your Splash Drone could result in serious
injury.
Do not operate this R/C system when you are tired, not feeling well or under the influence of
alcohol or drugs. Impaired judgment may lead to dangerous situations including injuries to yourself
or others.
Do not touch the engine, motor, speed controller or any other parts of the Splash Drone that
will generate heat while the Splash Drone is operating or immediately after use. Those parts may
be very hot and can cause serious burns.
Please make sure thoroughly check Splash Drone all parts working well before every flight.
Any problems on radio control system or improper installation may cause lose control.
Page 21
©2015 SwellPRO All Rights Reserved. www.swellpro.com
21
2. Start and launch Splash Drone
Start and launch Splash Drone
1. Place Splash Drone in an open area without buildings or trees, and keep 3-5 meters away
from you and others, to avoid accidental injury.
2. Set all transmitter buttons at original positions
3. Ensure all Splash Drone feature has been checked for serviceability before power on
4. When power on Splash Drone, it will enter into a self-check test first. Please make sure no
movement on Splash Drone in this short period.
5. LED flight indicator starts flashing as per LED Flashing, means the Splash Drone is initializd and
entered the “Ready to Fly” state.
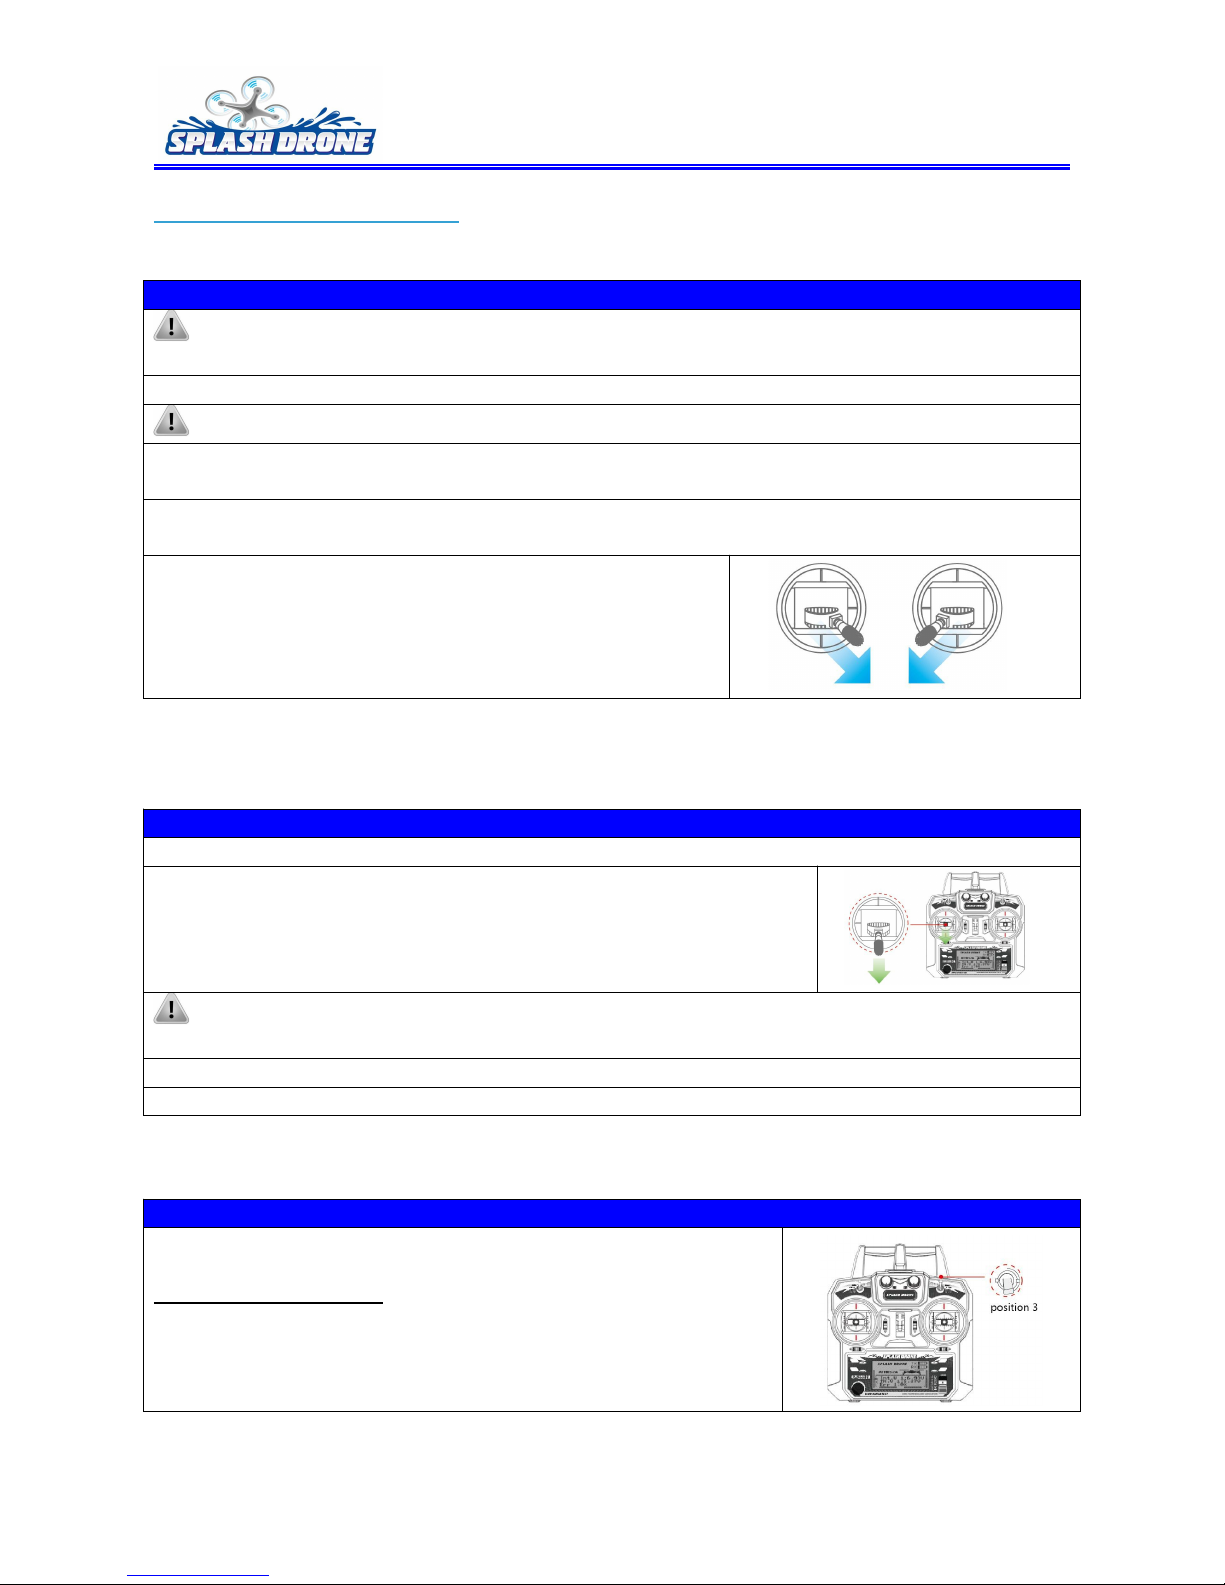
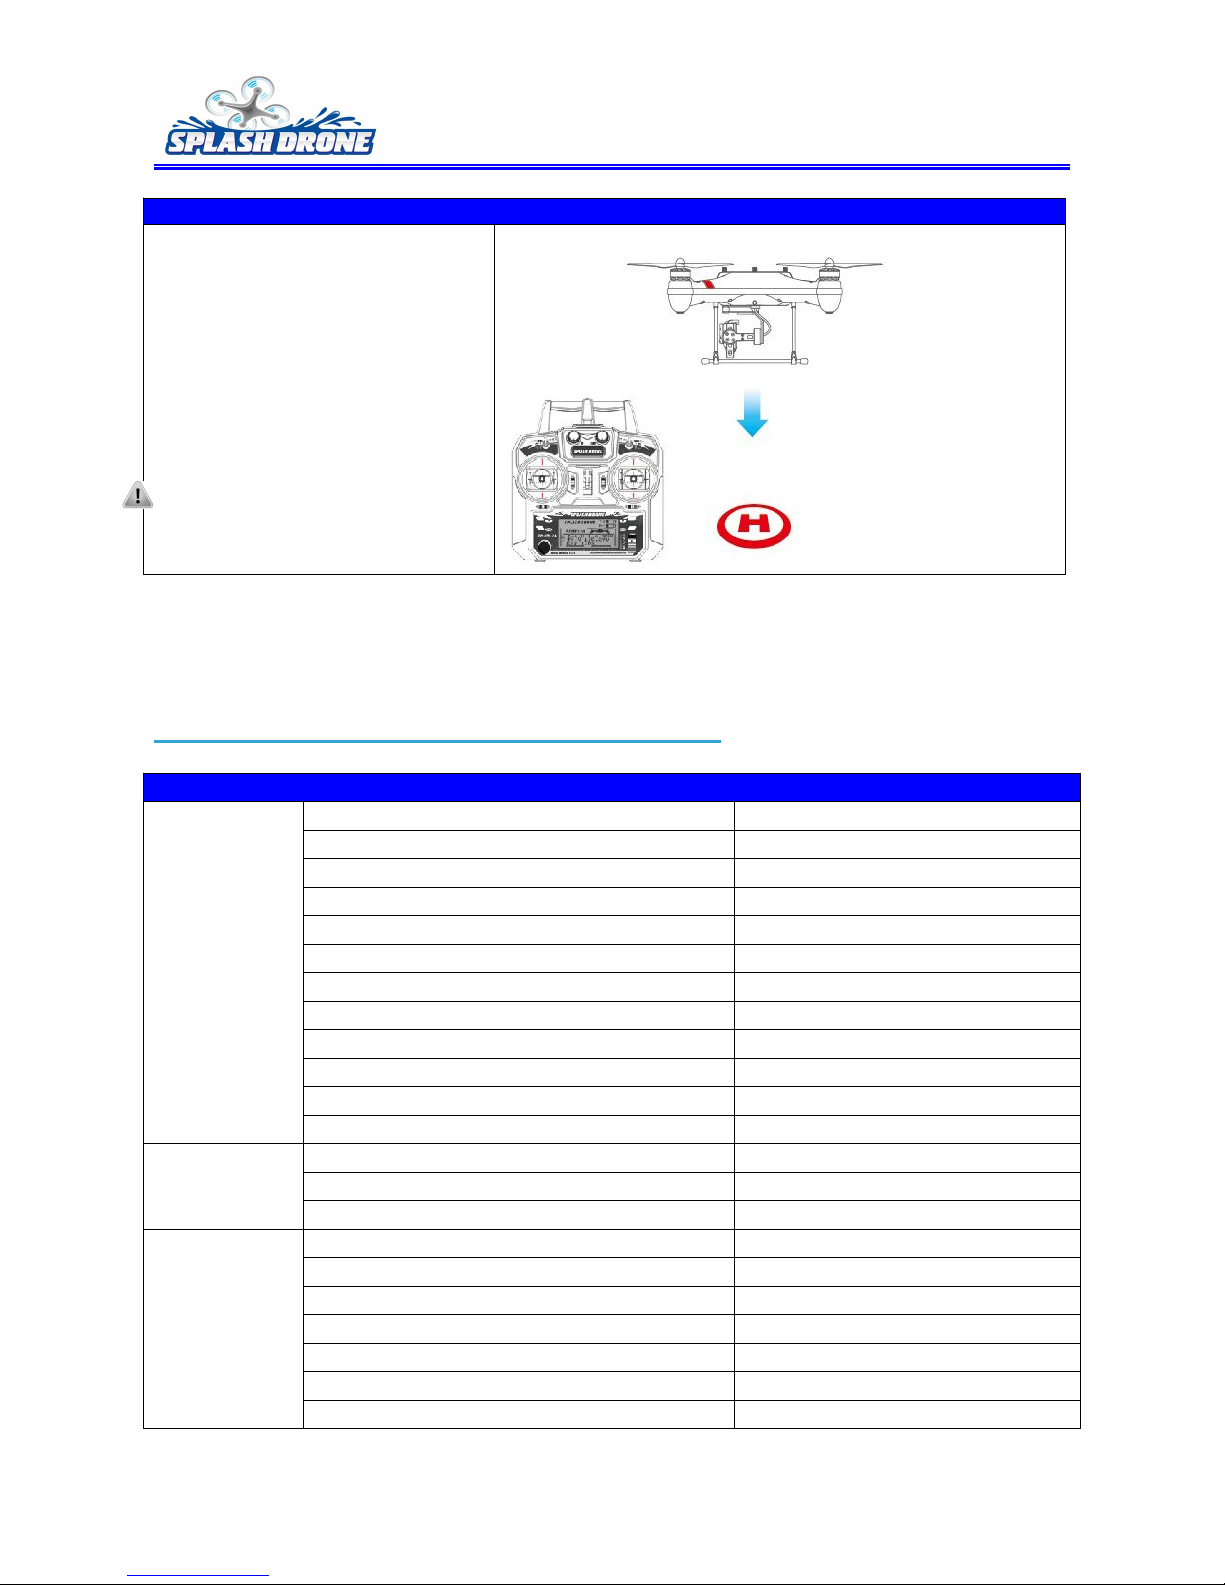
5. Push both sticks to their lowest neutral position corners as
indicated in the diagram on the right side to unlock and start
flying the Splash Drone.
3. Landing
Landing Splash Drone
1. Push the throttle stick up slowly to lift the Splash Drone off the ground.
2. Pull down the throttle stick to descend. The stick will lock into place
and the Splash Drone will descend steadily
3. After landing the Splash Drone on the ground, keep the throttle stick at its lowest neutral
position for 5 seconds, the Splash Drone will stop the motors and lock
4. Disconnect the Splash Drone battery
5. Power off the transmitter
Automatically Return home and landing (GPS Mode)
Switch SWB to position 3, the flight control system will
automatically control the Splash Drone to fly back to the home
point (starting place) and landing.
Page 22
©2015 SwellPRO All Rights Reserved. www.swellpro.com
22
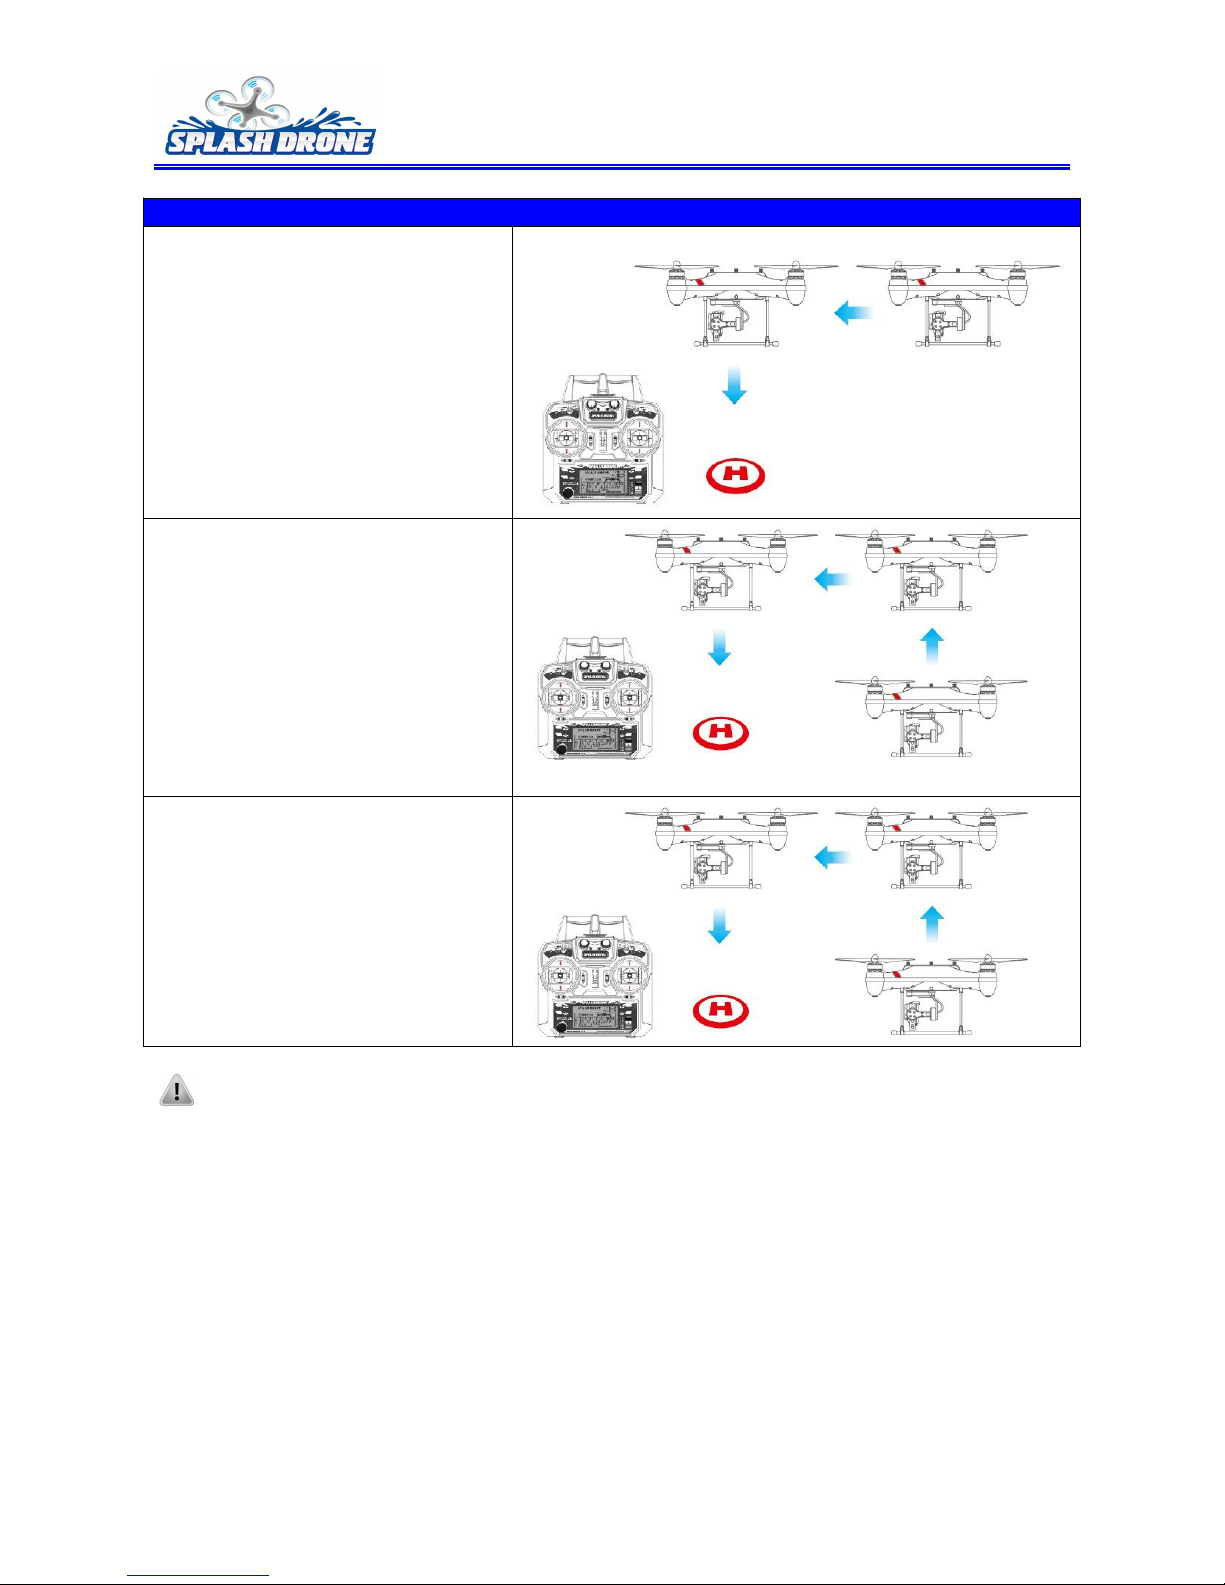
Auto Return Procedure
Vertical height > 20M
Distance > 15M
(Original Height Return Home)
Vertical height < 20M
Distance> 15M
(Lifting 20 M, then return home)
Vertical height <10M
Distance < 15M
(Original Height Return Home)
Warning: If landing place is not looking accurate, exit Return to Home mode and control
Splash Drone land the place where you want.
Page 23
©2015 SwellPRO All Rights Reserved. www.swellpro.com
23
LED Flight Indicators
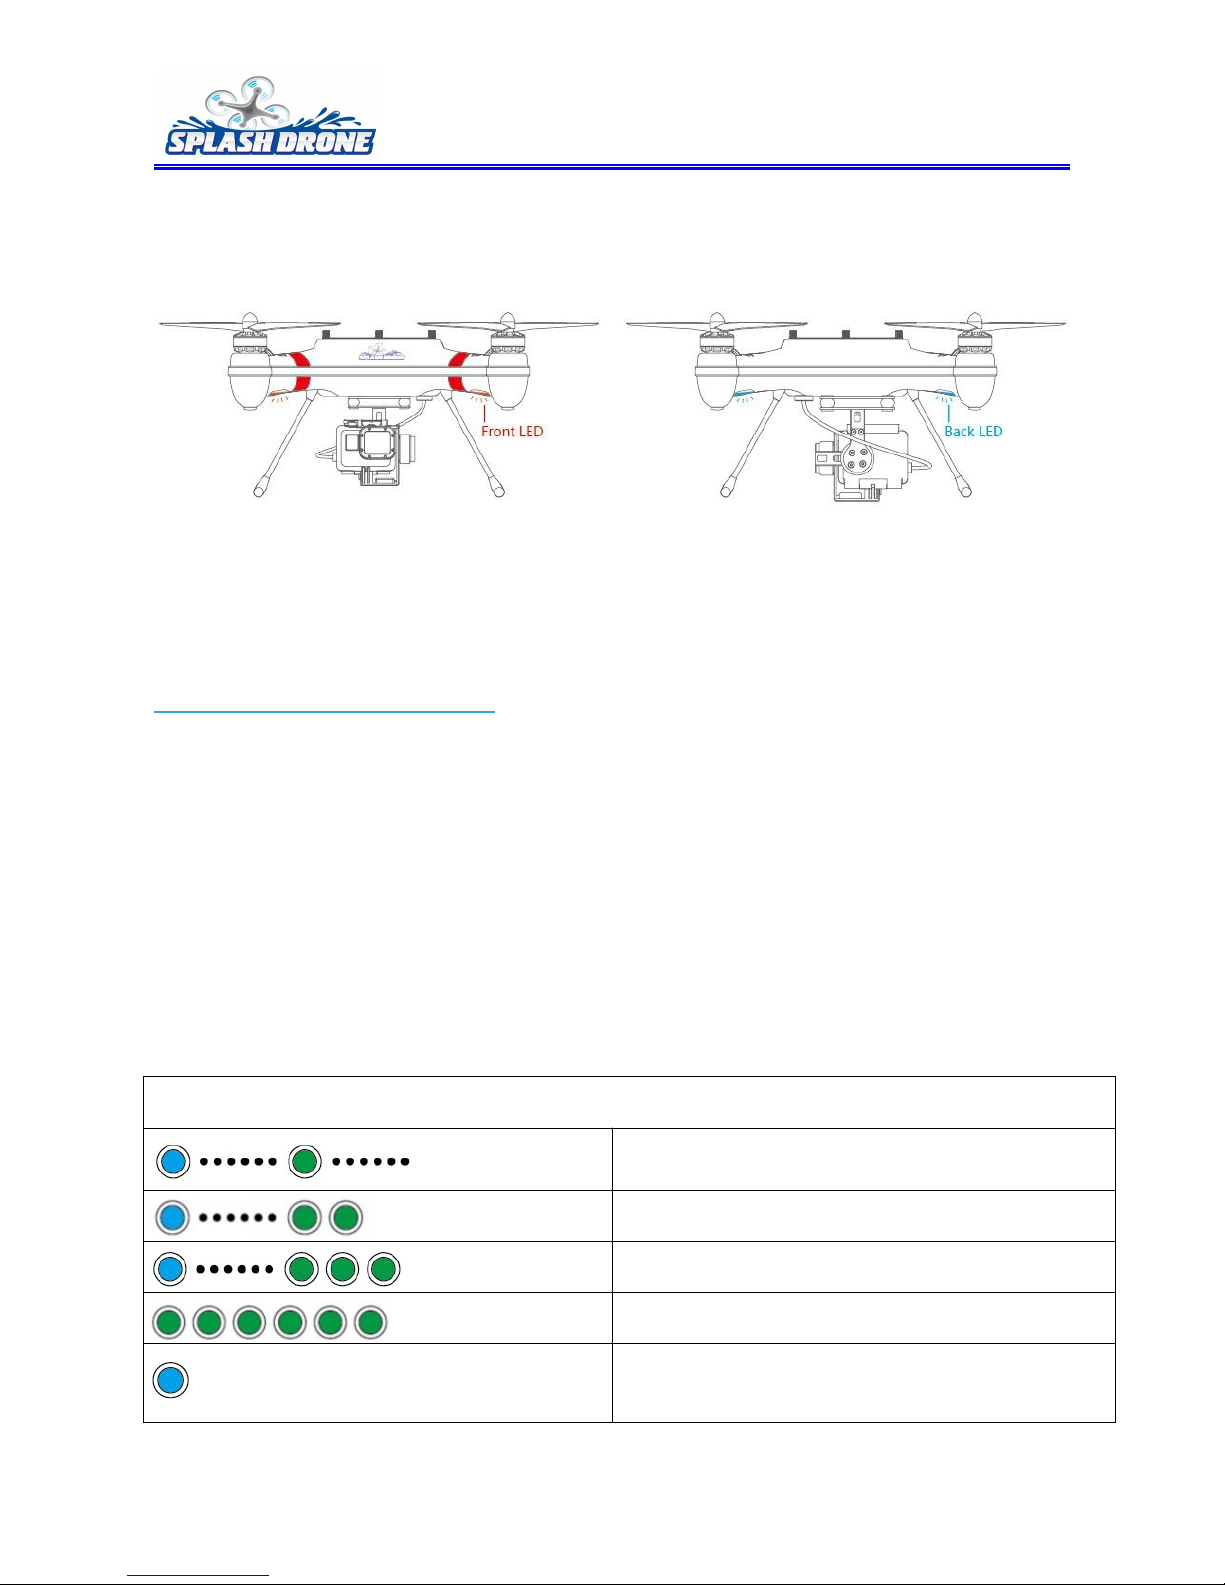
The front LEDs are for indicating where the nose of the Splash Drone is. They light up solid red only
after the motors have started spinning.
There are Red and Green indicators; Red indicates forward and Green indicates rear;
Low power ( lower than 14.4V) both the front and back LEDs flash.
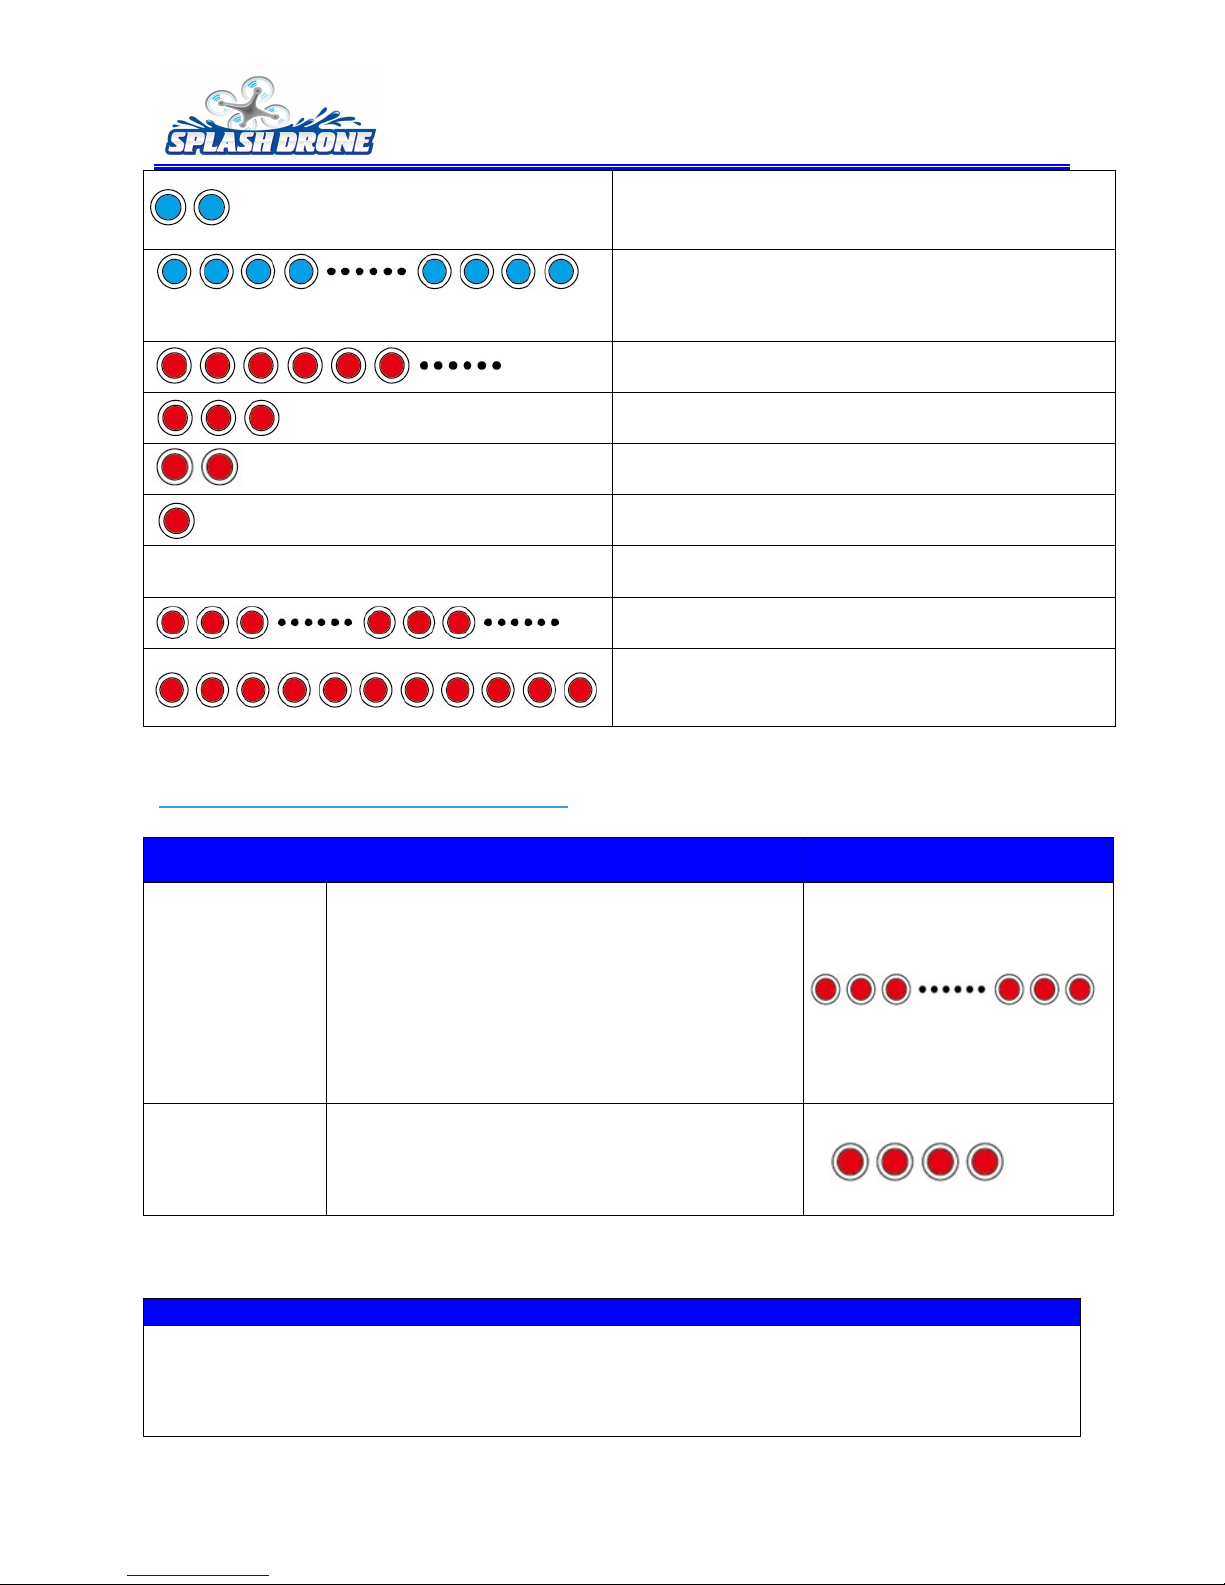
LED Flight controller Indicators
Power on the Splash Drone, the LED flight indicators light up and show the Splash Drone’s current
status. (There are two indication LEDs on the Splash Drone. One is on the top of the power
distribution board; the other one is under the bottom of power distribution board. They both blink
at the same time).
Flight Controller LED Status:
Green LED: Working mode
Blue LED : System Status
Red LED : GPS signal strength and low power warning
Flashing order: Green -> Blue -> Red
LED Description (Unlock lowest neutral position Joystick State)
ATTI Mode
GPS Mode
AOC Mode
Auto Return Mode
Height unlocked, Throttle joystick not in middle
position
Page 24
©2015 SwellPRO All Rights Reserved. www.swellpro.com
24
Unlocked, Pitching & Roll joystick not in middle
position (Joystick calibration)
Intermittent flashing
Throttle joystick not in the lowest neutral position,
or splash drone compass abnormal (all 3 calibration)
No GPS Signal
GPS Signal ( 5 satellites )
Normal GPS ( 6 satellites )
Good GPS Signal ( 7 satellites )
No Flashing
Best GPS Signal (>7 satellites)
Low Power Warning (Level 1 warning)
Voltage lower than force landing voltage (Level 2
warning) Land Immediately
Low Voltage Warning & Auto Return Flight
Low Voltage Warning
LED Flashing
Level 1 Low
Voltage Warning
Low Voltage is preset, to indicate user to start
return flight back. When Splash Drone battery
voltage lower than the preset voltage (Level 1
voltage warning), the indication LED will blink
RED. In this case, should start to fly back to
home point, ensuring enough power in the
course of return. Also can check current voltage
from your remote controller screen.
Level 2 Low
Voltage Warning
The battery voltage lower than the 2ndlow
voltage warning, Splash Drone will be forced to
land. If the landing place is not correct, Switch to
ATTI mode control it land to a correct point.
Low Voltage Auto Landing
When the battery voltage low than the 2nd voltage warning , the Fight control will control aircraft
automatically fly back to the home point. If landing place is not correct, please quickly switch to the
ATTI mode to control drone lift and landing in correct place. But if you do this may casue the
battery overusing can not use
Page 25
©2015 SwellPRO All Rights Reserved. www.swellpro.com
25
Low Voltage Auto Landing
Vertical Landing
Warning: If the battery voltage lower than Auto landing setting voltage, please keep aircraft in 50
meter from you.
Splash Drone & Battery & Transmitter Specification
Splash Drone & Battery & Transmitter Specification
Splash Drone
Weight (Battery & Propellers Included)
1750Kg
Hover Accuracy (Ready To Fly)
±
0.2 m
Max Yaw Angular Velocity
30°
Max Tilt Angle
30°
Max Ascent / Descent Speed
2 m/s
Max Flight Speed
GPS & Atitude Mode 6m/s
Wheel Base Deter meter
450mm
Flight Time
19 Mins ( 4500mah)
Max Take-Off Weight
2.5Kg
Operating Temperature
10C°to 45C°
Supported Battery
14.8V 3200mah--5200mah
Type
Lipo Battery
Battery
Capacity
14.8V 4500mah
Charging Environment Range
0C°to 40C°
Charging Time
60minutes
Remote
Controller
Weight
390g
Operating Frequency
2405 to 2475HMZ
Communication Distance (Open Area)
1.0 KM
Receiver Sensitivity (1%PER)
-105dbm
Working Current/Voltage
120 mA
Battery
1.5V AA*4
Channels
6 channels
Page 26

©2015 SwellPRO All Rights Reserved. www.swellpro.com
26
FAQ:
Splash Drone flight control distance?
Test max flight control distance 1.2 km, transmission distance depends on THE environment.
Splash Drone flies over view, how can we control the drone?
Use one key return home function,Drone will return back automatically( Make sure No abstacle
onthe fight lin. When you can see the drone, you can use exit one return home function to control
drone)
Splash Drone motor waterproof?
The Splash Drone motor use special structure waterproof design, make it can overcome rain fly. By
the way, if fly in sea water, please use the pure water clean the motor ASAP, avoid the small sand
and etc to damage motor.
Splash Drone fly time?
19 minutes fight time with full charge battery, and the fly time depend on the different
environment.
Splash Drone remote control support Mode 1?
Yes, support Mode 1, can switch in the remote control menu.
Splash Drone come with follow me feature ?
The RTF and Pro version Spalsh Drone do not support this feature, but Auto version support
Splash Drone Support cycle point feature?
Support
Why after drone landing and throttle joystick in the lowest position, but the motor do not stop
working immediately?
Be safe, the drone landing on the groud and throttle joystick in the lowest position, the motor will
stop work in 5 seconds and lock
Splash Drone in the aerial video, sport camera shoud close wifi function?
In the aerial video situation, must close the camera wifi fucntion, the wifi signal will effect the
remote control.
Splash Drone whether need the screw to fixed?
Splash Drone use self-tighten propeller, just install the propeller install on the correct motor and
fixed
Spalsh Drone remote controller push the throttle joy-stick, drone do not fly ?
Be safe, before Splash Drone fly ,need break lever to unlock, then push throttle the drone will fly.
Page 27

©2015 SwellPRO All Rights Reserved. www.swellpro.com
27
Push throttle drone do not fly or turn-over?
1,Propeller install not correct, check the propeller whether install in the correct motor
2,The large error on Gyro, please connect with software to calibration .
Drifting in fight
1,May large error on Gyro, please connect with software to calibration .
2, No calibration Gyro, re calibration Gyro
Suddenly drop height and red LED flash in fight?
TLow voltage warning, please immediately landing.
Aircraft hard searching satellite signal
1, please check whether in building block around.GPS work outdoors open area.
2, please check any objects placed on the top of Splash Drone
Start remote controller alarm
1, throttle lever not in lowest postion, Pull throttle lever to the lowest point.
2, remote controorl battery no more power, replace the battery
Short flight time
1, Battery not fully charged
2, Flying weight increased
3, Aging battery
Which Channel control Payload Release in remote controller?
Defualt use the 5th or 6th , through SWA or SWB to release
Waterproof gimbal Initialization position is not Horizontal
calibration Gimbal Gyro via software
Software download link:
https://www.dropbox.com/s/1xaixq2y0kkm5vn/Waterproof%20Gimbal%20Gyro%20%20Software.
rar?dl=0
Under GPS mode, aircraft hovering appear dithering?
Please re-calibration compass, calibration process check page 18
 Loading...