

Swegon TuneWISE Instructions For Use Manual
JA Wettergrens gata 7
SE-421 30 Västra Frölunda, Sweden
Swegon reserves t he right to alter speci fications .
Application area
Scanner TuneWISE is used with the hand-held terminal TuneWISE and
dongle Connect WISE USB to identify each product and to link it with the
function it is designed to fulfil in the WISE system.
Product identification is performed by reading the product’s QR code using
the scanner TuneWISE and communicating with TuneWISE via Bluetooth.
General
All relevant personnel must acquaint themselves with these instructions
before beginning work. Any damages to the product or parts of it due
to improper handling cannot be considered subject to warranty if this
instruction has not been followed correctly. For further information about
the WISE, see the relevant documentation at www.swegon.com
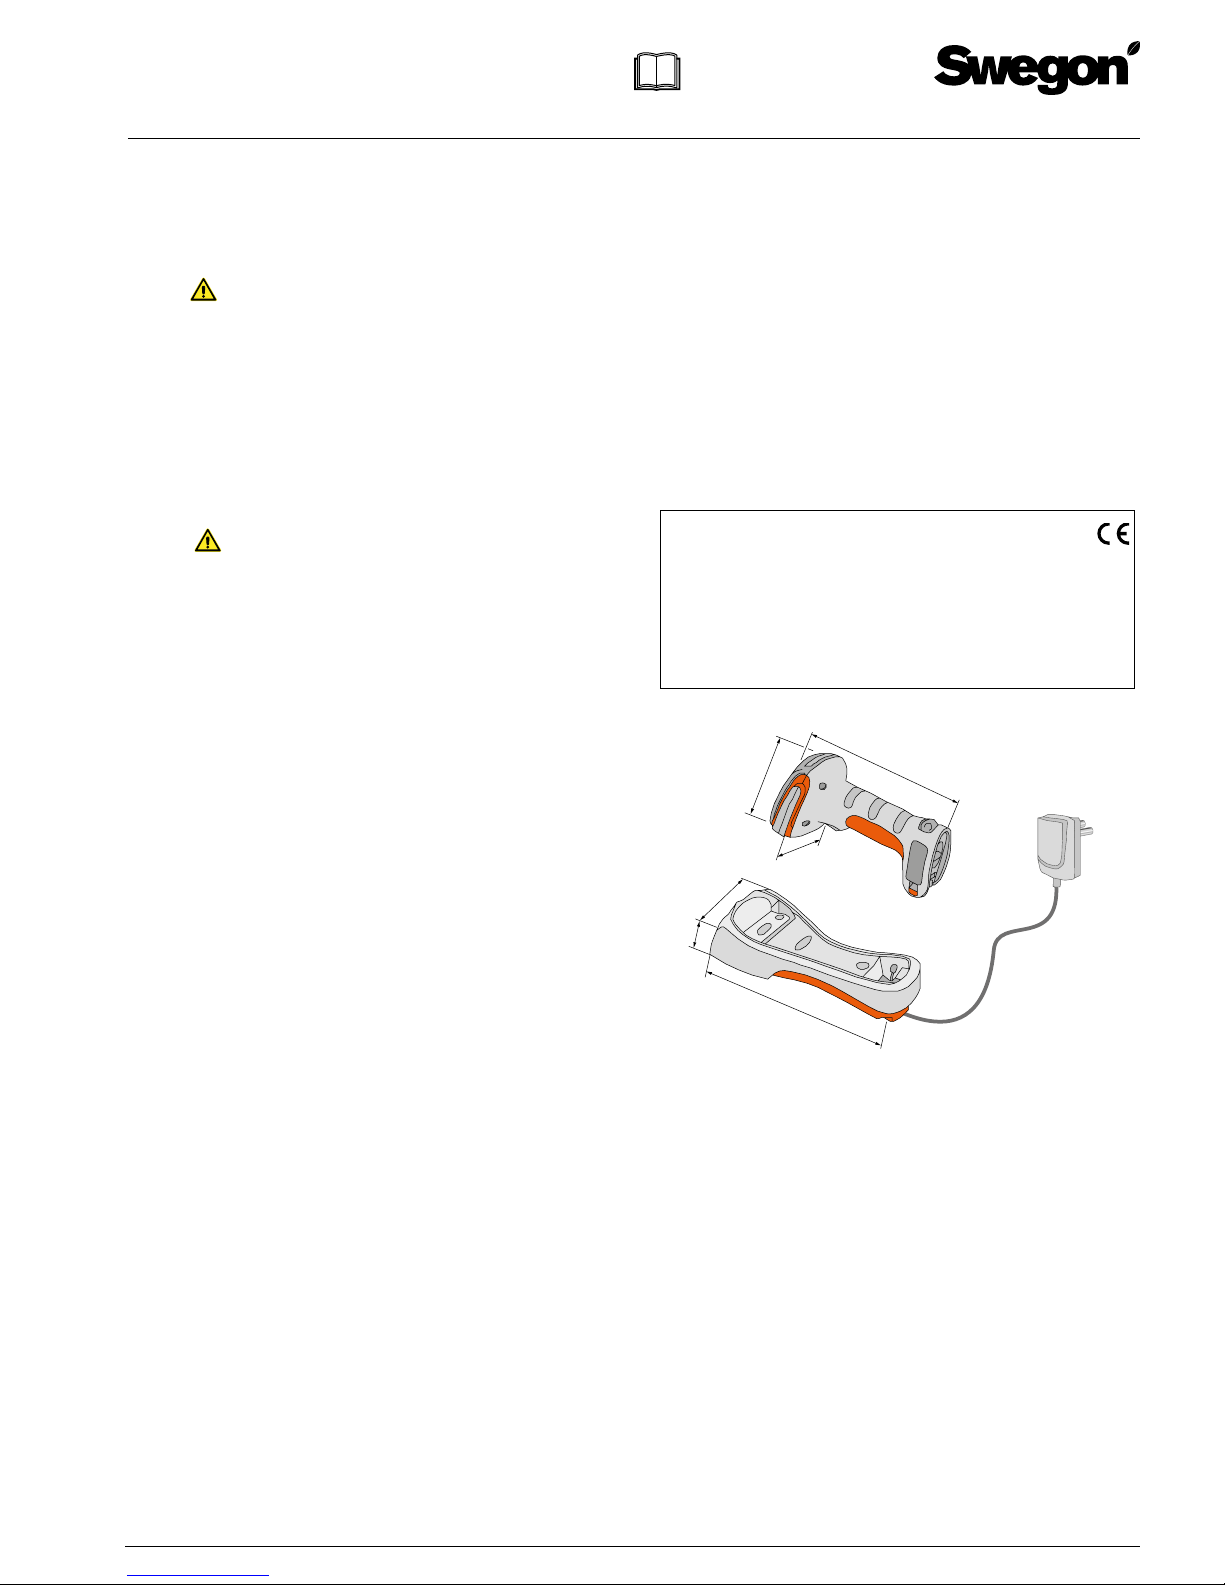
The packaging contains the following items:
1 x Scanner TuneWISE
1 x Charging station
1 x Power adapter
1 x Instructions for use
Safety
Only service personnel trained by Swegon may perform actions in connection with the pairing of products with the system.
You must not look into the laser light.
Installation
Check to make sure that the product does not have any visible defects.
Connect the charging station’s power adapter to a wall socket and charge
the hand scanner, see figure 1.
Prior to using for the first time, charge fully for 4.5 hours.
Use
Once Scanner TuneWISE has been charged and connected to TuneWISE as
per the instruction on page 2 the scanner is ready to use.
Make the products’ QR-code visible before pairing.
The products’ codes are read by directing the laser pointer with the red
dot towards the QR code at the same time as the trigger is pressed.
Commissioning must be performed by an authorised and qualified WISE
service engineer.
Trouble shooting
Check that the product is charged and correctly connected to the handheld terminal TuneWISE.
Cleaning
If necessary, use a dry cloth when cleaning. Never use water, detergent,
cleaning solvent or a vacuum cleaner.
Service/maintenance
If you suspect that the product has some defect, please contact Swegon.
Disposal
Must be handled according to local regulations.
Warranty
The warranty or service agreement will not be in effect/will not be
extended if: (1) the product is repaired, modified or changed, unless such
repair, modification or change has been approved by Swegon AB; or (2)
the serial number on the product has been made illegible or is missing.
Declaration of Conformity
Swegon AB hereby declares that the radio equipment Scanner TuneWISE conforms with the Directive 1999/ 5/ EC, 2014/35/EU and Directive
2011/65/EU.
The complete EU Declaration of Conformity is available at Swegon’s website:
www.swegon.com.
This declaration is applicable only if the product has been installed according
to the instruc tions in this document and if no changes have been made on this
product.
Technical data
Scanner
F r e qu en c y b an d: 2.4-2.5 GHz, IMS- band (240 0- -2483 MHz)
Charging time:
Using time per charge
Battery:
4.5 hours
8 hours
2000 mAh Li-ion minimum
IP class: IP65
Laser product class: Class 2
Colour: Black/orange
Ambient temperature: Operating : -20 – + 50°C, Storage: - 40 – +70°C
RH: 0 – 95% Non-condensing
Weight scanner: 420 g
Charging station
Power supply: +230V AC
Max. power consumption: 5W
Weight: 290 g
Figure 1. Scann er TuneWISE -KIT co nsists of hand scann er, charging s tation an d power ad apter.
250
65
99
210
103
75
Scanner TuneWISE a-KIT
Instructions for Use
English
25/10/2017

JA Wettergrens gata 7
SE-421 30 Västra Frölunda, Sweden
Swegon reserves t he right to alter speci fications .
Connection to hand-held terminal TuneWISE
To connect the scanner to TuneWISE you first need to make some
settings on the scanner.
The settings are made by scanning the adjacent seven codes in order.
(Depending on which code is to be scanned different beeps are
heard).
Wait about 5 seconds between each code
When the settings in the scanner have been completed, start TuneWISE and go to the “Scanner” menu under the “Settings menu”.
• When the scanner appears in the list to the left: First select the
scanner and then “Connect”.
• A beep is heard and the scanner symbol appears on the header in
TuneW ISE.
• All done!
If it is not possible to connect the scanner to TuneWISE after this,
repeat the procedure from the beginning.
Bar codes and QR codes used when initiating the Scanner TuneWISE
1.
2.
3.
4.
5.
6.
7.
Scanner TuneWISE a-KIT
Instructions for Use
English
25/10/2017
 Loading...