

Page 1
English version
RO003/RO003UK Sweex Broadband Router
Important! The Setup Wizard is located on the Sweex CD-ROM. This installation procedure will show you step by step how to setup the router.
If your provider can not be configured with the Setup Wizard, contact your provider for the correct settings and enter them manually.
Introduction
• Do not expose the Sweex Broadband Router to extreme temperatures. Do not place the product in direct sunlight or in the direct vicinity of heating elements.
• Do not use the Sweex Broadband Router in extremely dusty or moist surroundings.
• Protect the product against powerful shocks or jolts - they may damage the internal electronics.
• Never attempt to open the product yourself - it will cause the warranty to lapse.
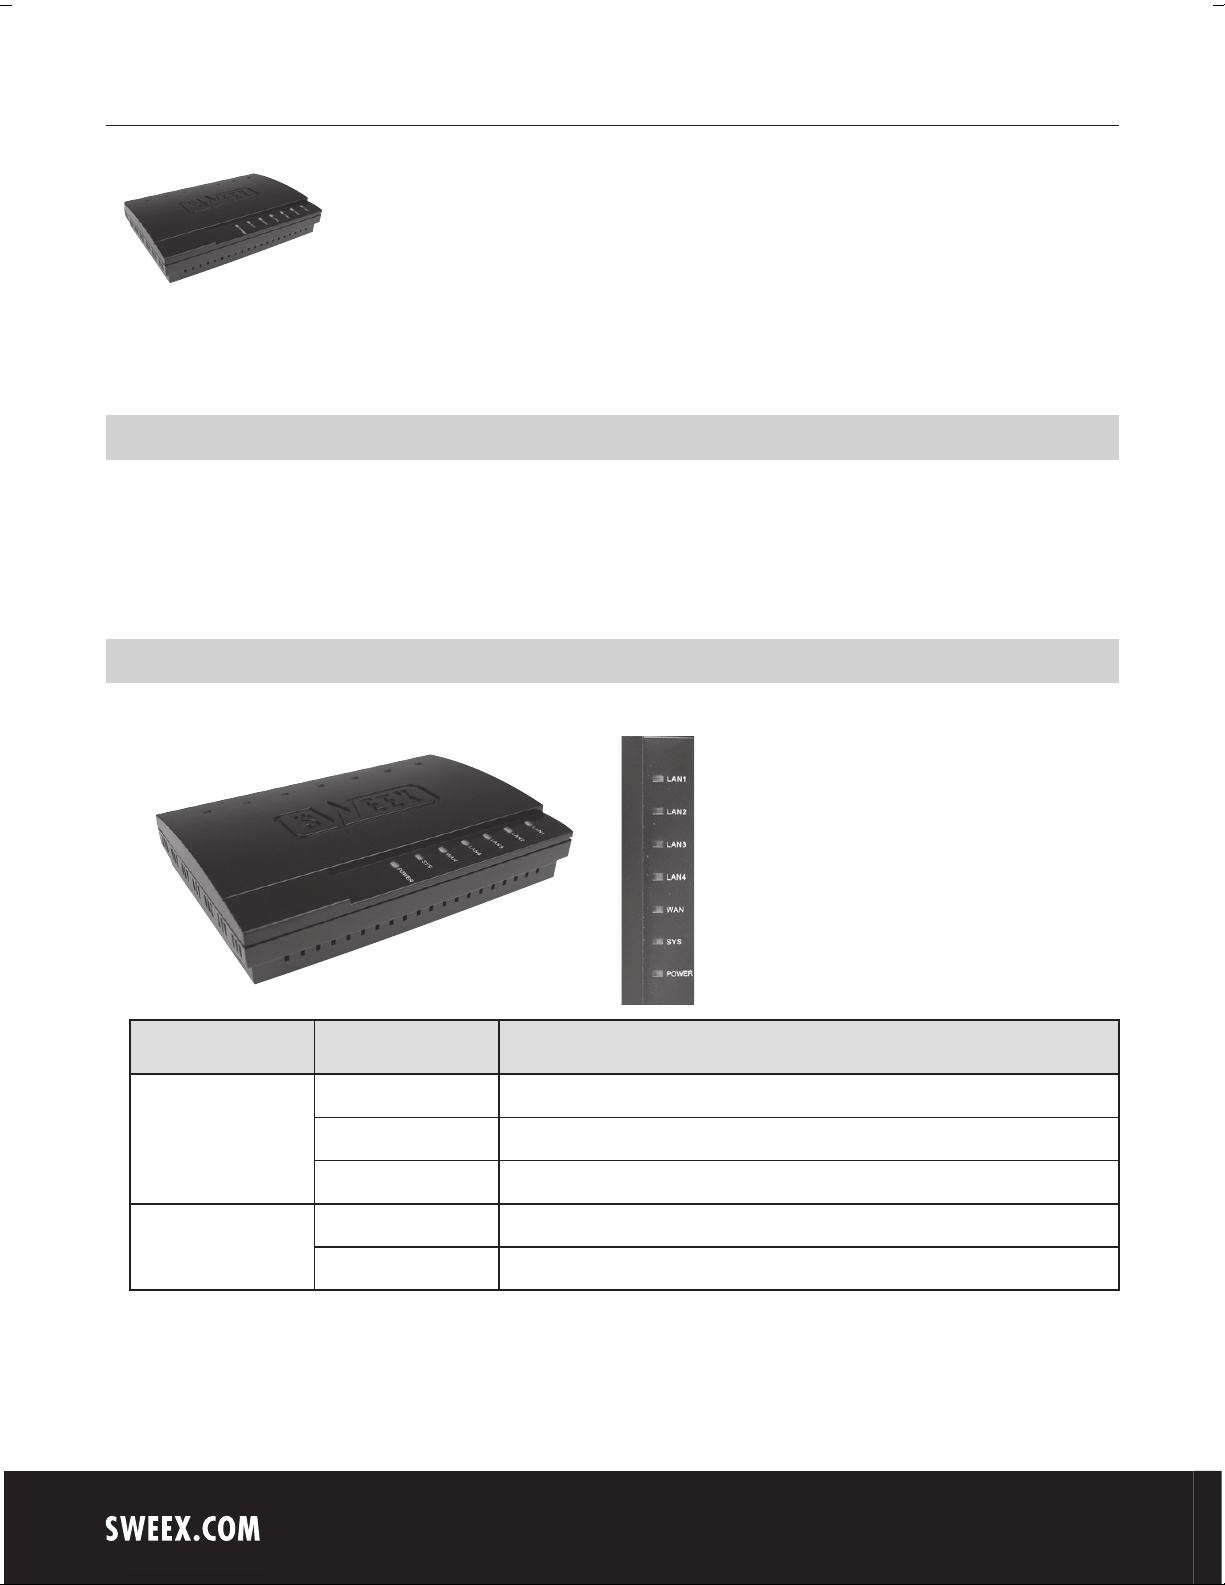
Front view
LAN1x t/m 4x
WAN
Status Meaning
Off No device is connected to this port
On A computer or other network device is connected to this port
Blinking Data traffic is exchanged between the router and the connected device
Off The router is not or not correctly connected to the internet modem
On The router is connected to the internet modem
2
Page 2
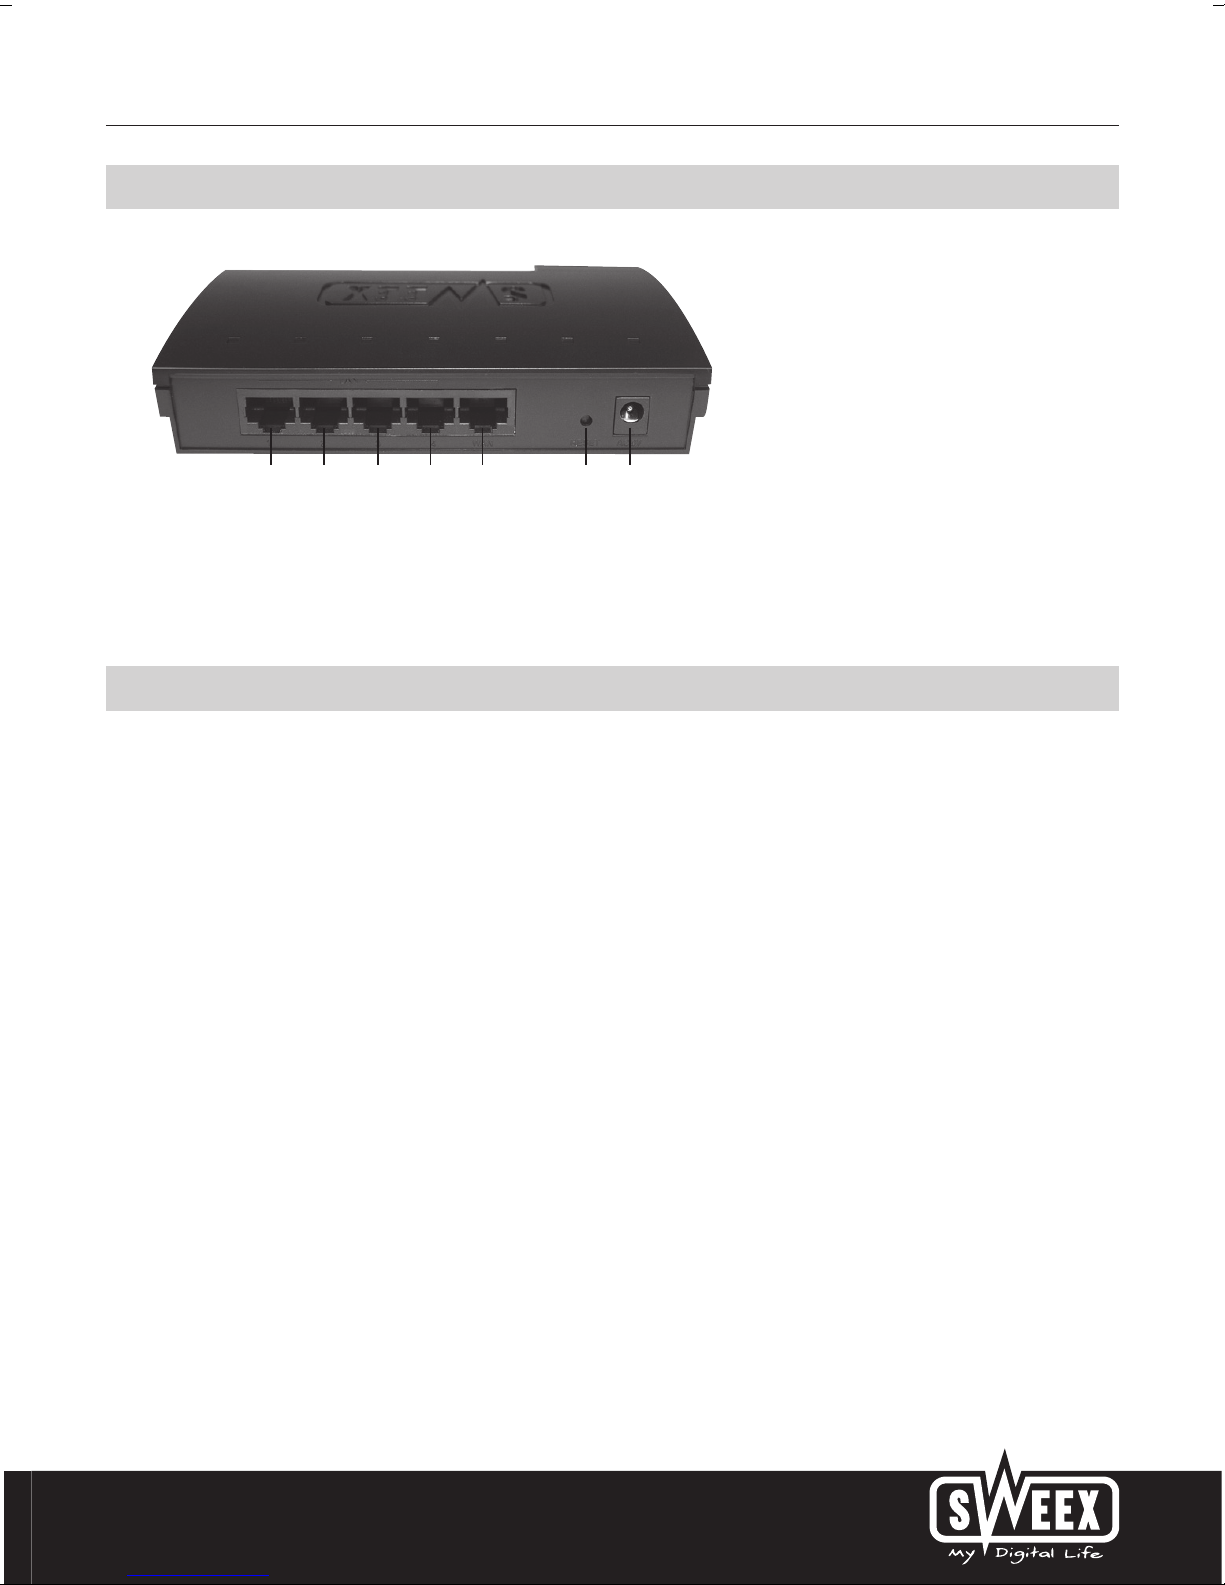
Rear view
1 2 3 4 WAN RESET AC 9V
1. LAN ports 1, 2, 3 and 4 for connecting computers by means of an RJ-45 UTP Ethernet network cable.
2. WAN port for connecting a modem by means of a RJ-45 UTP Ethernet network cable.
3. Reset button to return to the factory settings.
4. Power connector for connecting the power adaptor.
English version
Connecting the Sweex Broadband Router
1. Connect the power adaptor (included) to the rear of the router and the mains socket. The light next to “Power” is lit. In the event the LED is not lit, check
the connections of the power adaptor to the router and the mains socket.
2. Switch on the computer and connect it to the rear of the modem using a network cable (RJ-45 UTP). You can select any of the ports 1, 2, 3 and 4. The
corresponding light at the front will be lit. In the event the light fails to light up, check whether the network cable is properly connected to the computer and
the router.
3. Switch on the modem* again. Note: Here we do not refer to the Sweex router. Connect the modem to the rear of the router using a network cable (RJ-45
UTP). Do this via the WAN port The WAN light at the front of the router will light up. In the event the light fails to light up, check whether the network cable
is properly connected to the router and the modem.
* In order to use the Sweex Broadband Router you need an active Internet connection, which is established through a modem. This modem is usually supplied
by the provider.
3
Page 3
English version
Configuring the computer to connect to the router
Windows Vista
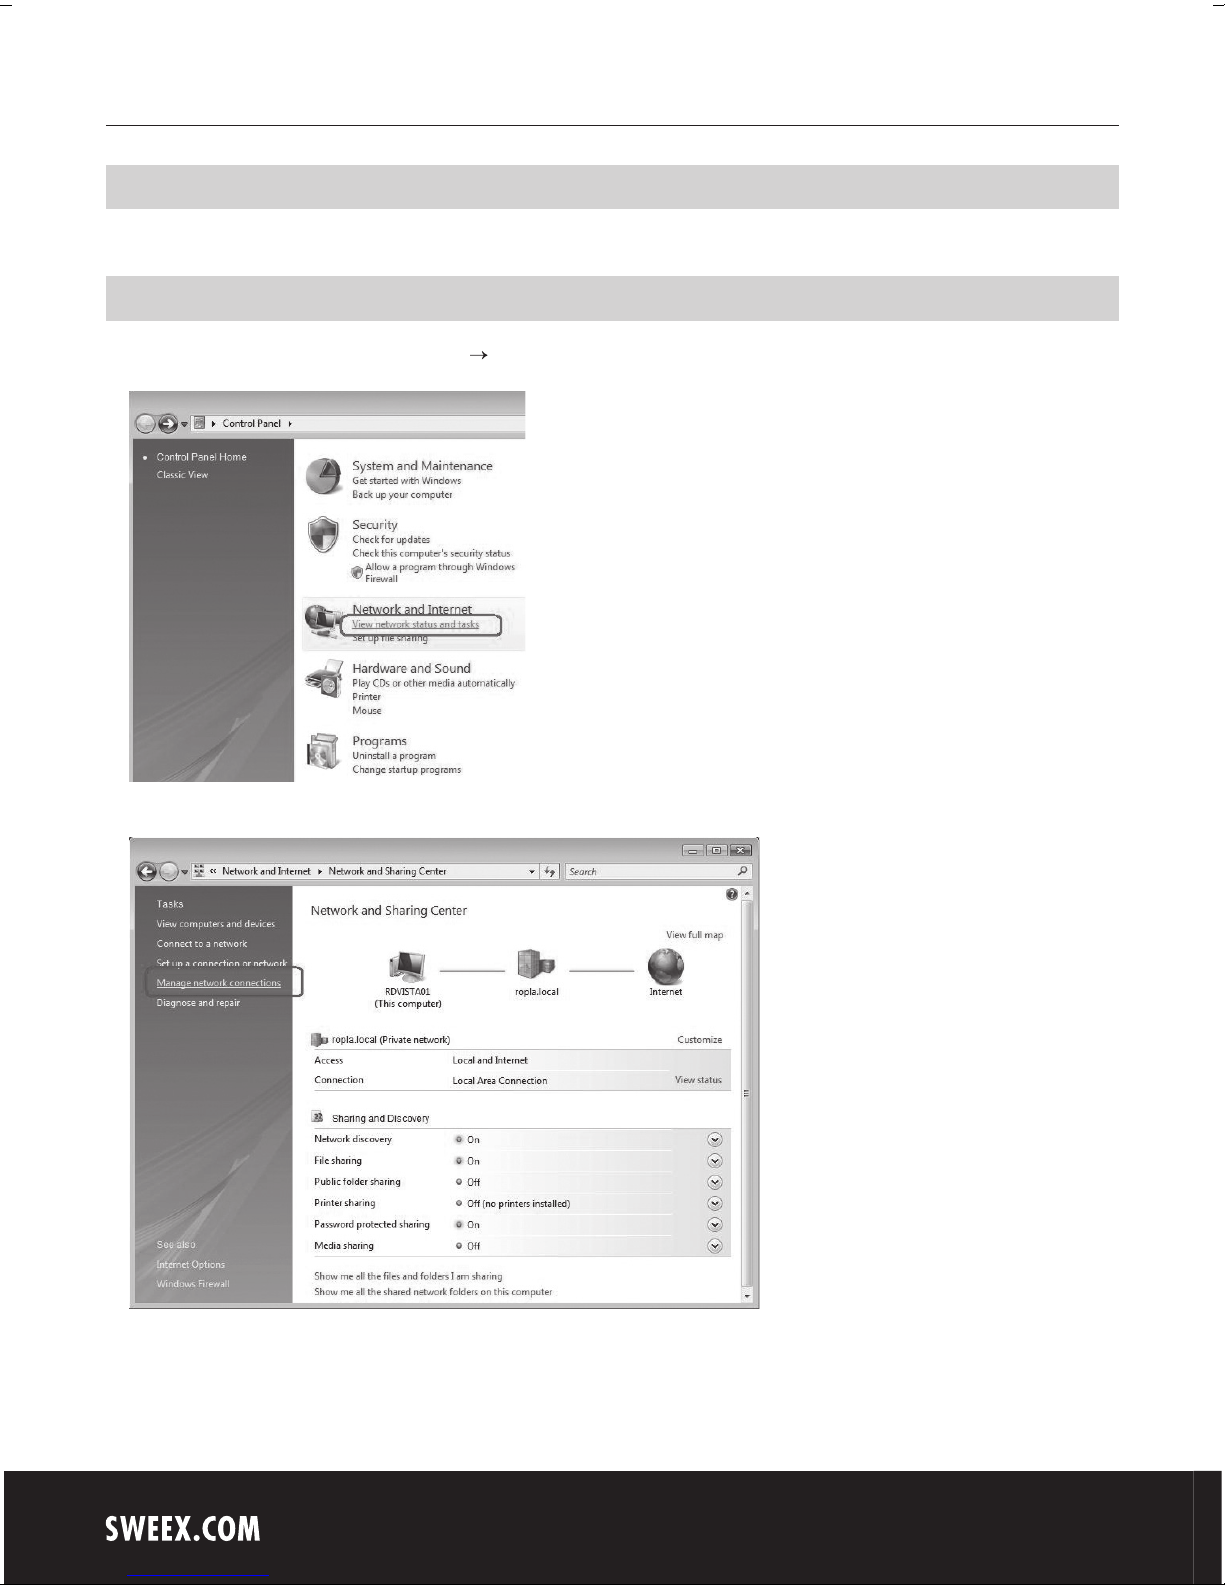
In the bottom left of your screen, go to “Start” (Start) “Control Panel” (Control Panel).
Click on “View network status and tasks” (View network status and tasks).
Left in the column, click on “Manage network connections” (Manage network connections).
4
Page 4
English version
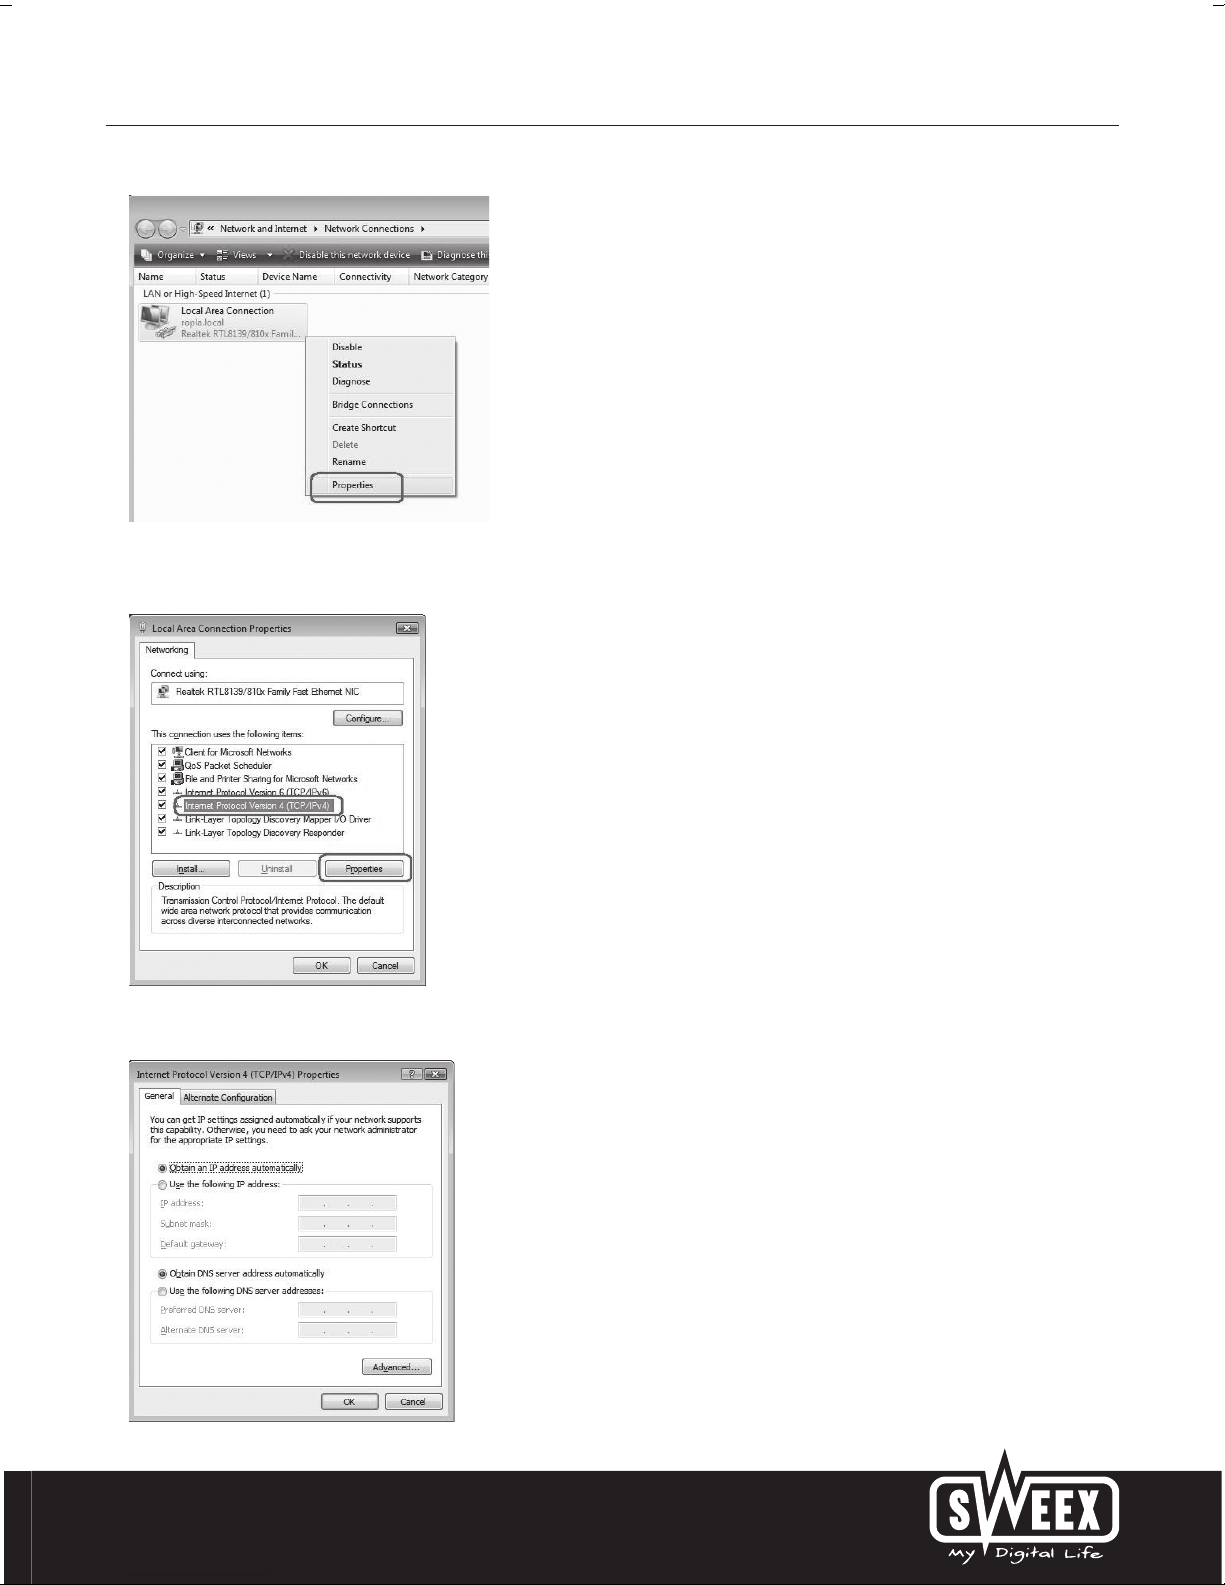
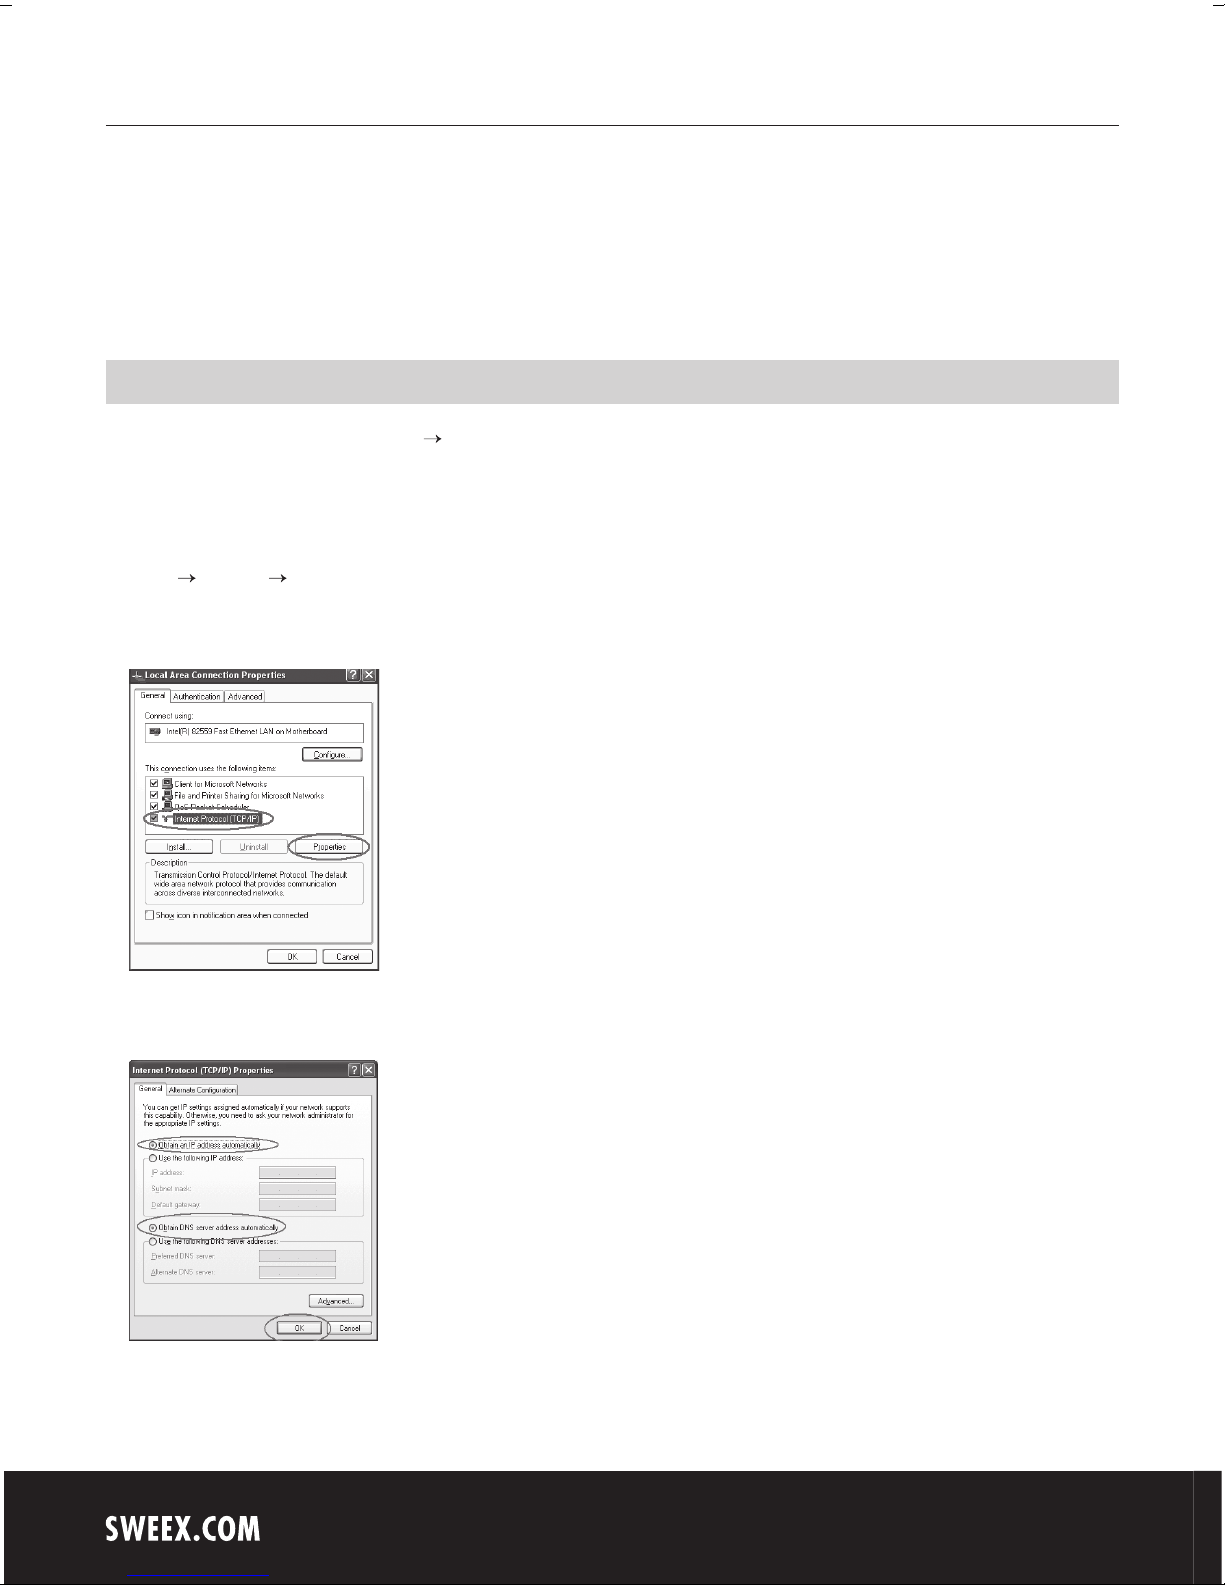
Right-click “LAN Connection” (LAN Connection) or “Wireless Network connection” (Wireless Network connection) and select “Properties” (Properties). The
following screen appears:
Now select “Internet Protocol Version 4 (TCP/IPv4)” and click “Properties” (Properties).
5
Page 5
English version
Select the options “Obtain an IP address automatically” (Obtain an IP address automatically) and “Obtain DNS server address automatically” (Obtain DNS
server address automatically).
Confirm the settings by clicking “OK”. The network settings have now been configured correctly for Vista. The correct settings for the Internet browser will be
discussed later in this manual.
Windows XP
In the bottom left of your screen, go to “Start” “Control Panel”
Then go to “Network and Internet Connections”.
Open “Network Connections”.
Or, if the Windows classic style is used:
“Start”
Right-click “LAN Connection” or “Wireless Network Connection” and select “Properties”. The following screen appears:
“Settings” “Network Connections”.
Under the tab “General” select TCP/IP and click “Properties”
Select the options “Obtain an IP address automatically” and “Obtain DNS server address automatically”.
Confirm the settings by clicking “OK”. The network settings for Windows XP have now been configured correctly. The correct settings for the Internet browser will
be discussed later in this manual.
6
Page 6
Windows 2000
In the bottom left of your screen, go to “Start” “Control Panel”.
Then go to “Network and Internet Connections”.
Open “Network Connections”.
Or, if the Windows classic style is used:
“Start”
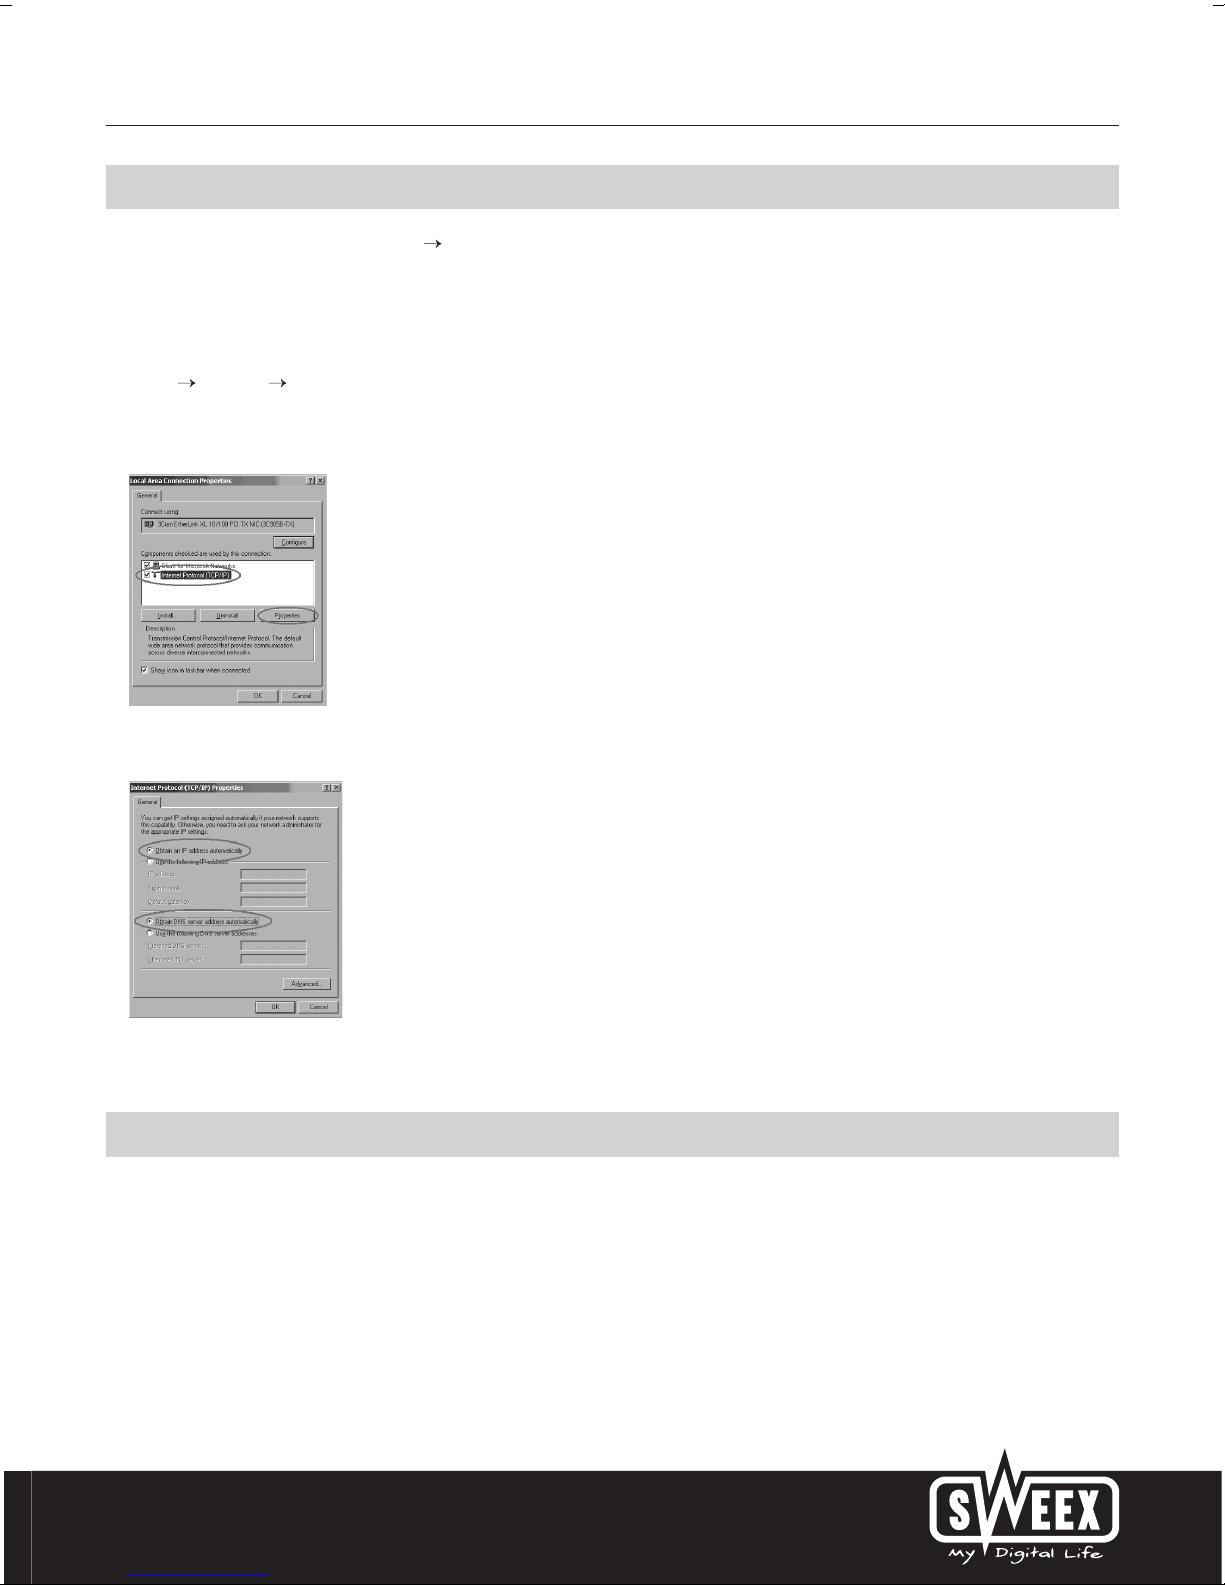
Right-click “LAN Connection” or “Wireless Network Connection” and select “Properties”. The following screen appears:
“Settings” “Network Connections”.
English version
Now select “Internet Protocol (TCP/IP)” and click “Properties”.
Select the options “Obtain an IP address automatically” and “Obtain DNS server address automatically”. Click “OK” twice.
The network settings for Windows 2000 have now been configured correctly. The correct settings for the Internet browser will be discussed later in this manual.
Internet browser settings for Windows 2000, XP and Vista
1. In order to access the router, the browser settings must be correct. This is easy to check by starting up Internet Explorer and selecting “Tools” from the menu
bar and then selecting the option “Internet Options”.
2. In this window, go to “Connections” and select “Never dial a connection” or remove all connections listed in the field above.
3. At the bottom, click “LAN Settings”, remove all ticks and click “OK”.
4. Restart the browser to activate the settings.
7
Page 7

English version
Accessing the router (Login)
Open your web browser. In this example we use “Internet Explorer”.
The default router IP address is: 192.168.23.1
An IP address is a unique number required by each network device, including a computer or router, in order to be active within that network. Without an IP
address you are unable to make connections within a network. Type the router IP address in the browser address bar. You can now access the router.
The router login screen appears. Fill out the login name and the corresponding password. The standard login is sweex and the corresponding password is
mysweex.
If this login screen fails to appear, recheck the settings of your Internet browser as described above. Also check the IP address of your computer. In this IP
address, only the digits after the last dot may deviate from the IP address of the router (e.g.: 192.168.22.xxx).
Where to find the IP address of the computer
Vista: Keep the Windows key (next to the left Ctrl key) pressed and press the letter “R”. Type in cmd - press ENTER - In the black window, type ipconfig - press
Enter and your IP address is displayed.
Win2000/WinXP: Click “Start” (Start) - “Run” (Run) - Type in cmd - press ENTER- In the black window, type ipconfig - press Enter and your IP address is
displayed.
Win98/Me: Click “Start” (Start) - “Run” (Run) - Type in winipcfg - press ENTER. In the window, select your network adaptor. (Usually NOT the ppp adaptor) and
your IP address is displayed.
8
Page 8

English version
Setting the Internet Provider (ISP)
Important! The Setup Wizard is located on the Sweex CD-ROM. This installation procedure will show you step by step how to setup the router.
If your provider can not be configured with the Setup Wizard, contact your provider for the correct settings and enter them manually.
Prior to setting the provider, make sure that the Internet connection is active without the Sweex Breedband Router. If the modem without the router does not
have an Internet connection, setting the router would be pointless. After all, the modem establishes the Internet connection and the Sweex Breedband Router
forwards this existing Internet connection to one or more computers in your network.
A total of 6 different settings are possible. We have listed these together with instructions on how to enter these. In order to find out which settings correspond
to your provider, you can consult the list with providers further down in this manual. The list consists of providers and corresponding subscriptions. The applicable
settings are listed for each subscription form. In the event that your subscription is not listed, consult your Internet provider for the router settings which
correspond to your subscription.
These settings need to be configured in your router only once. Regardless of the number of computers you connect to the router, the following settings only
need to be done on one computer. That is because the settings are not stored on the computer, but on the router.
Setting 1 DHCP without hostname
1. Log in to the Router (see the section “Accessing the Router” above).
2. Left in the column, click on “Internet Provider Setup” or, if you see the screen below, click on “Next”.
3. Select “Dynamic IP” and click “Next”. This setting belongs to providers that use a DHCP connection.
4. You do not have to enter anything in the next window. Click on “Next”. Click “Save” to save the settings.
5. In order to check whether the Internet connection has been set up successfully, go to the status screen by clicking “Status” left in the column. The “WAN IP”
section will display your Internet IP address. It can sometimes take up to 1 minute for this IP address to appear. You have now completed the configuration
and are ready to surf the Internet.
9
Page 9

English version
6. If your IP address continues to be displayed as 0.0.0.0, click on “Renew”.
If after 1 minute your IP address still continues to show as 0.0.0.0, check the above steps.
Still no Internet? Complete the following steps:
1. Switch off the router and the modem.
2. Disconnect the network cable between the router and the modem at the “WAN” port.
3. Switch on the router and wait until it is fully started up.
4. Switch on the modem and wait until it is fully started up and all the correct lights are lit.
5. Reconnect the network cable between the modem and the router via the “WAN” port of the router. The “WAN” light should light up now.
6. Connect the router via 192.168.23.1 and check your Internet connection in the status screen.
Setting 2 DHCP with hostname
Important: when configuring the router, always use the computer with which you were connected to the Internet prior to connecting the router.
a. Log in to the Router (see the section “Accessing the Router” above).
b. Left in the column, click on “Internet Provider Setup” or click on “Next”.
10
Page 10

c. Select ‘Dynamic IP” and click on “Next”. This setting is for providers who use a DHCP connection.
d. Under “Hostname” enter the hostname you received from your provider.
e. Leave “Domain name” empty.
f. In order to enter the MAC address of your computer into the router, click “Clone MAC”.
g. Click on “Next”. Click “Save” to save the settings.
English version
h. In order to check whether the Internet connection has been set up successfully, go to the status screen by clicking “Status” left in the column. The “WAN IP”
section will display your Internet IP address. It can sometimes take up to 1 minute for this IP address to appear. You have now completed the configuration
and are ready to surf the Internet.
i. If your IP address continues to be displayed as 0.0.0.0, click on “Renew”.
If after 1 minute your IP address still continues to show as 0.0.0.0, check the above steps.
Still no Internet? Complete the following steps:
1. Switch off the router and the modem.
2. Disconnect the network cable between the router and the modem at the “WAN” port.
3. Switch on the router and wait until it is fully started up.
4. Switch on the modem and wait until it is fully started up and all the correct lights are lit.
5. Reconnect the network cable between the modem and the router via the “WAN” port of the router. The “WAN” light should light up now.
6. Connect the router via 192.168.23.1 and check your Internet connection in the status screen.
11
Page 11

English version
Setting 3 PPPoE
1. Log in to the Router (see the section “Accessing the Router” above).
2. Left in the column, click on “Internet Provider Setup” or click on “Next”.
3. Select the option “PPPoE”. This setting is for providers who use a PPPoE connection.
4. Under “User Name” enter the user name you received from your provider.
5. Under “Password”, enter the corresponding password.
6. Click on “Next”. Click “Save” to save the settings.
7. In order to check whether the Internet connection has been set up successfully, go to the status screen by clicking “Status” left in the column.
The “WAN IP” section will display your Internet IP address. It can sometimes take up to 1 minute for this IP address to appear. You have now completed the
configuration and are ready to surf the Internet.
8. If your IP address continues to be displayed as 0.0.0.0, click on “Connect”.
If after 1 minute your IP address still continues to show as 0.0.0.0, check the above steps.
12
Page 12

Still no Internet? Complete the following steps:
1. Switch off the router and the modem.
2. Disconnect the network cable between the router and the modem at the “WAN” port.
3. Switch on the router and wait until it is fully started up.
4. Switch on the modem and wait until it is fully started up and all the correct lights are lit.
5. Reconnect the network cable between the modem and the router via the “WAN” port of the router. The “WAN” light should light up now.
6. Connect the router via 192.168.23.1 and check your Internet connection in the status screen.
Setting 4 PPTP
1. Log in to the Router (see the section “Accessing the Router” above).
2. Left in the column, click on “Internet Provider Setup” or click on “Next”.
3. Select the option “PPTP”. This setting is for providers who use a PPTP connection.
English version
4. Under “PPTP Account” enter the user name you received from your provider.
5. Under “PPTP Password”, enter the corresponding password and click on “Next”.
6. In the next window, click “Next”. Click “Save” to save the settings.
7. In order to check whether the Internet connection has been set up successfully, go to the status screen by clicking “Status” left in the column.
The “WAN IP” section will display your Internet IP address. It can sometimes take up to 1 minute for this IP address to appear. You have now completed the
configuration and are ready to surf the Internet.
If after 1 minute the router continues to show as ”Disconnected”, check your settings again and complete the following steps:
1. Switch off the router and the modem.
2. Disconnect the network cable between the router and the modem at the “WAN” port.
3. Switch on the router and wait until it is fully started up.
4. Switch on the modem and wait until it is fully started up and all the correct lights are lit.
13
Page 13

English version
5. Reconnect the network cable between the modem and the router via the “WAN” port of the router. The “WAN” light should light up now.
6. Connect the router via 192.168.23.1 and check your Internet connection in the status screen.
Setting 5 Static IP
1. Log in to the Router (see the section “Accessing the Router” above).
2. Left in the column, click on “Internet Provider Setup” or click on “Next”.
3. Select the option “Static IP”. This setting is for providers who use a fixed Static IP address.
4. Under “IP Address”, enter the IP address you received from your provider.
5. Also enter your “Subnet Mask”, “Gateway”, “Primary DNS” and possibly your “Secondary DNS” values.
6. Click on “Next”. Click “Save” to save the settings.
7. In order to check whether the Internet connection has been set up successfully, go to the status screen by clicking “Status” left in the column.
The “WAN IP” section will display your Internet IP address. It can sometimes take up to 1 minute for this IP address to appear. You have now completed the
configuration and are ready to surf the Internet.
If after 1 minute the router continues to show as ”Disconnected”, check your settings again and complete the following steps:
1. Switch off the router and the modem.
2. Disconnect the network cable between the router and the modem at the “WAN” port.
3. Switch on the router and wait until it is fully started up.
4. Switch on the modem and wait until it is fully started up and all the correct lights are lit.
5. Reconnect the network cable between the modem and the router via the “WAN” port of the router. The “WAN” light should light up now.
6. Connect the router via 192.168.23.1 and check your Internet connection in the status screen.
14
Page 14

English version
Opening ports in the router (Virtual Server and DMZ)
The built-in firewall in this router cannot be disabled. However, ports can be opened for programmes and games which require this.
We recommend using a fixed IP address for computers for which ports are opened. This is to ensure that these computers always use the same IP address
as registered in the router. The router may assign a different IP address to the computer so that the forwarding or DMZ command no longer applies to that
computer.
1. The port settings can be changed by clicking “Virtual Server” left in the column.
2. In box 1, enter the port you want to open.
3. In box 2, enter the last digits of your IP address of the computer for which you want to open these ports.
4. Click “Enable” to save the line.
You can enter a maximum of 51 lines. It is not possible to open multiple ports on a single line.
15
Page 15

English version
DMZ
In some instances, or when a game console is used, you may opt to place a computer or game console entirely outside the firewall. This can be done in the socalled “demilitarized zone” (“DMZ”). This option can be found in the main screen of the port settings (“Port Forwarding”) under (“Advanced”.) Note however,
you no longer take advantage of the protection offered by the firewall of the router. All ports to the computer placed in the DMZ are open. Only a single
computer can be placed in the DMZ.
1. Left in the column, click “Virtual Server” and then “DMZ”.
2. Under “DMZ Host IP Address”, enter the IP address of the computer which you want to place in the DMZ.
3. Tick “Enable”.
4. Click “Save” to save the settings.
How to assign a fixed IP address to a computer
This is only required for computers for which you want to open ports by means of the Forwarding or DMZ feature. Complete the steps in chapter “Configuring
the computer to connect to the router”. Instead of selecting “Obtain an IP address automatically” (Obtain an IP address automatically) you select “Use the
following IP address” (Use the following IP address).
The IP address in our example is as follows (192.168.22.xxx). The final number you enter must be unique to your network. We recommend using a number
ranging from 150 to 200. Thus an IP address could be (192.168.23.150). A subsequent computer would then be assigned (192.168.23.151) etc.
For “Subnetmask” (Subnetmask) you enter: 255.255.255.0
Both under “Default gateway” (Default gateway )and under “Preferred DNS-server” (Preferred DNS-server) you enter the IP address with which you log into the
router. In our example: 192.168.23.1
Under “Alternative-DNS-server” (Alternative-DNS-server), you can leave the field blank.
Click “OK” twice to save the settings and to close the windows.
16
Page 16

English version
LAN settings
The network settings of the router can be changed as follows. Left in the column, click “Advanced Config”.
Under “IP Address”, the IP address of the router (192.168.23.1) is stated. Click “Save” to save the settings. Your browser will not look for a new page. So do
not wait, but log on to your router again, using the new IP address.
Changing the password
The standard login of the Sweex Broadband Router can be changed by clicking “System Tools” and then “Change Password”, left in the column.
In order to change the user name and password settings, enter your new user name under ”Username” and your current password under ”Original Password”.
Then enter your new password under “New Password”. Again enter your new password under “Confirm Password”.
Click “Save” to save the settings. A small login window appears. Log in, using your new user name and password.
Upgrading the firmware of the router (Firmware)
In order to provide the router with updates, the so-called ‘firmware’ needs updating. Left in the menu, click “System Tools” and then “Firmware”.
17
Page 17

English version
Here the firmware of the router can be upgraded. New firmware can be downloaded from the Sweex website under ”Service and support”. If the firmware file is
zipped, make sure you select and extract the file first on a location on your computer where you can retrieve it easily.
Now click “Browse” (Browse) and select the extracted firmware file. In most cases the name of this file will start with “Sweex_Firmware_RO003…”.
In order to start the firmware upgrade, click “Upgrade”. Do not interrupt this procedure. This may harm the router. Wait for the upgrade to be completed
confirmed by a message. The connection between the computer and the router will be briefly interrupted.
Resetting the router to its factory settings
The Sweex Broadband Router can be reset to its factory settings in two different ways.
Note! After the reset, all settings which apply to your connection and network need to be reconfigured. After the reset, the router will restart. During start-up,
the factory settings are reloaded and the computer will lose connection with the router for around 30 seconds. After this, the router can be accessed via the
default IP address (192.168.23.1).
Method 1: The reset button is located at the rear of the router. Use a pointy device to press the button. Press and hold the button for 10 seconds. The router
will restart.
Method 2: Left in the column, click “System Tools” and then “Restore Factory Setting”. Click “Restore” to start the reset.
Additional tips and further explanation to the remaining functions of the router can be found in the English manual on the CD-ROM.
Warranty
For most Sweex products a warranty period of 3 years applies. On Graphics Cards and Consumer Electronics Sweex offers 2 years of warranty. We do not give
support or warranty on supplied software, rechargeable batteries and batteries. Transaction of warranty only takes place at the sales point where the product
is bought.
All brand names and associated rights mentioned in this manual are and stay property of the rightful owner.
18
 Loading...