

Page 1

S W E E X . C O M
4
English version
MO128 SWEEX ISDN MODEM 128K PCI
Introduction
First of all, many thanks for purchasing this Sweex ISDN PCI adapter. To ensure this product operates correctly, we advise you to carefully read this
manual first. If despite this manual you still experience problems during installation or operation of this product, go to sweex.com and look under the
heading service & support.
Contents of the box
Prior to installation, check if all required parts are present. The following parts must be present in the box:
• ISDN PCI adapter
• RJ-45 Cable
• CD-ROM with RVS-COM Lite and Panda antivirus trial software
• CD-ROM with manual and drivers
If one of the above parts is missing, please contact the supplier.
Specifications
• Cologne chipset
• Plug and Play
• Data transfer up to 128 Kbps
• Multilink PPP combines the two ISDN lines up to 128K
• Supports: Windows 98SE, 2000 and XP
Additional specifications
• ISDN Interface: S/T Interface ITU-T I.430
• ISDN Standard: automatic (euro ISDN)
• B-channel protocol: ML-PPP asynchronous to synchronous HDLC transparent, PPP asynchronous to synchronous HDLC transparent
Page 2
5
English version
Installation of hardware
Take the following precautionary measures prior to installing the hardware:
1. Ensure the PC is switched off and disconnected from the mains.
2. Also, disconnect the printer and monitor cables (they have their own power supplies) to make absolutely sure the PC is not live.
3. Now unscrew the computer casing.
4. Subsequently, remove any static electricity you may carry on your body. Do this by touching a (neutral) pipe of the central heating system or an
unpainted water pipe, among other things. Please note that you must not use a magnetic screwdriver for this. Before you proceed any further,
briefly touch the iron frame of the PC casing. Make sure that you minimise contact with any contact points of the PC Card or the memory.
5. Find a vacant PCI slot and remove the metal guard plate part of the computer casing in front of the relevant slot. On occasion the card does not
allow to be inserted in the PCI slot smoothly. Should this be the case, do not force anything, but try another available slot.
6. Once the card has been successfully installed, check whether all other cards are still properly inserted in the PCI slots. It is possible that the
other PCI cards are lifted up slightly when installing a new PCI card; as a result, the relevant cards or even the entire PC may no longer operate
correctly.
7. Replace the casing on the computer base and correctly reconnect all cables.
8. Switch on the PC again.
Windows 98SE installation
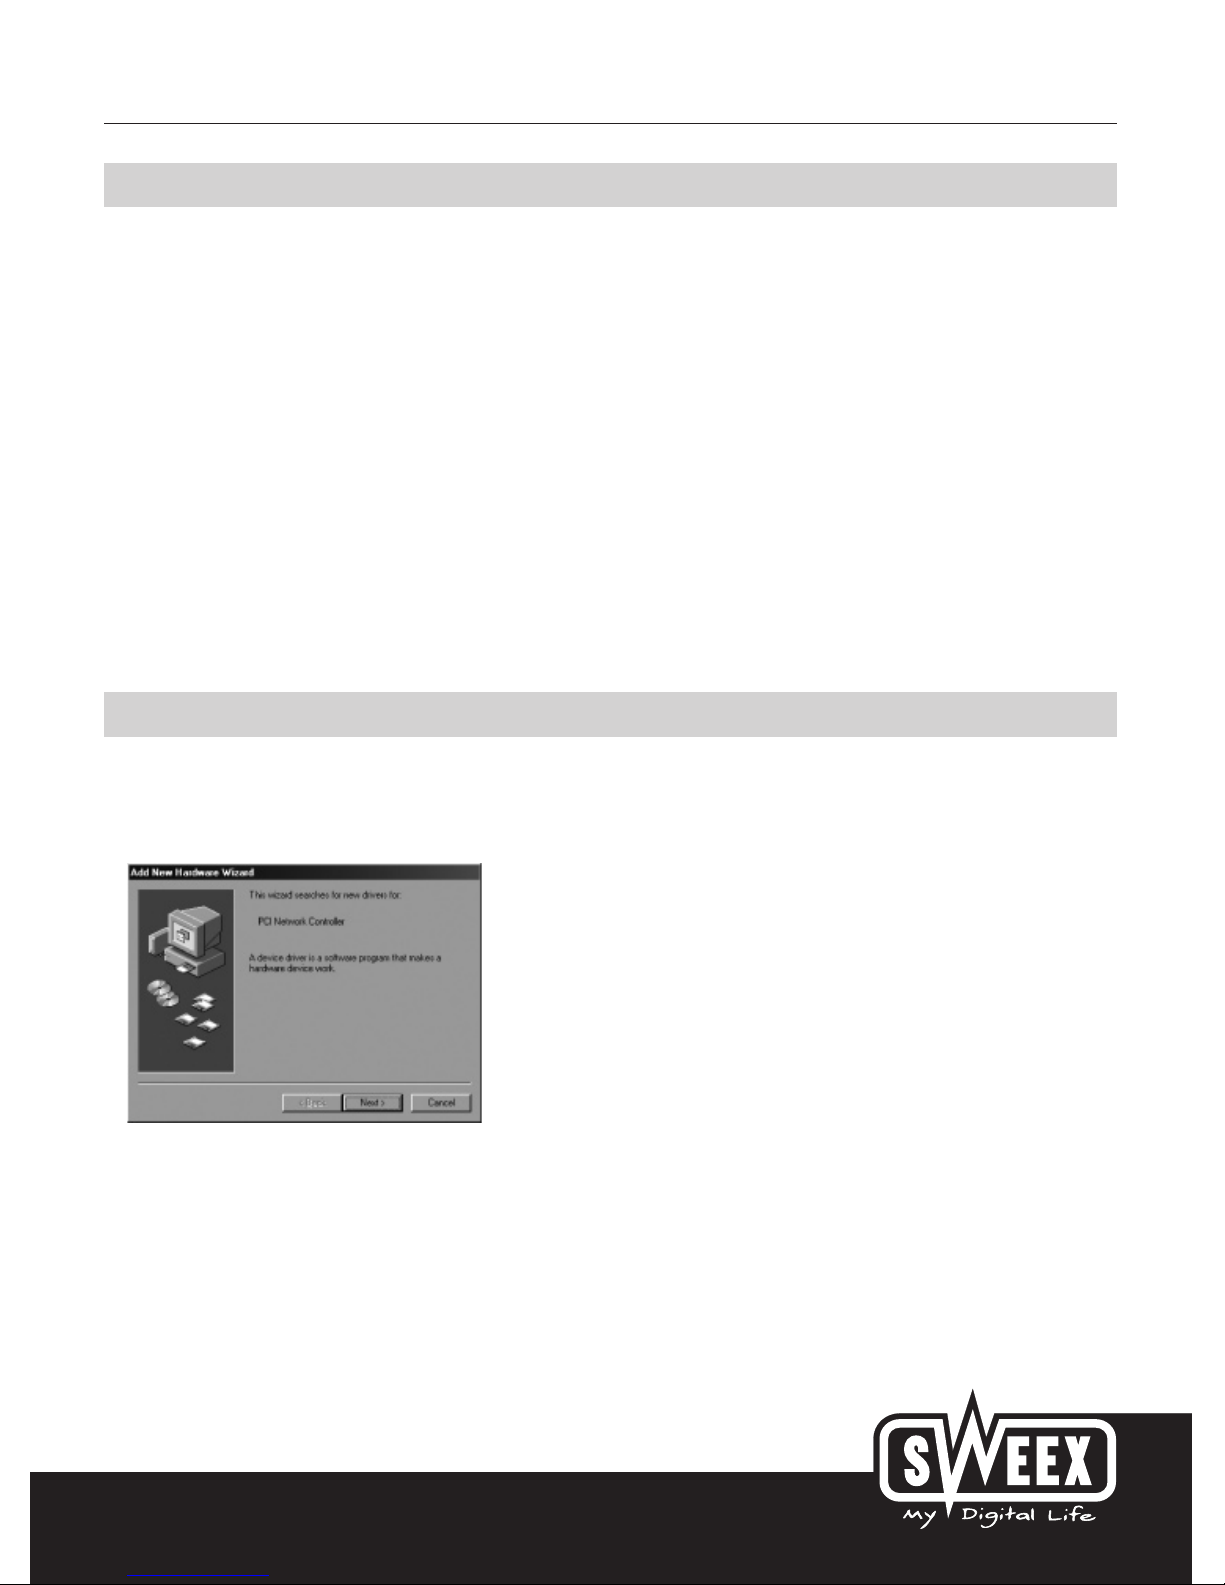
After the card has been installed in the system, switch on the PC. Windows will detect the card and show the following screen.
Here click “Next” (Next).
Page 3
S W E E X . C O M
6
English version
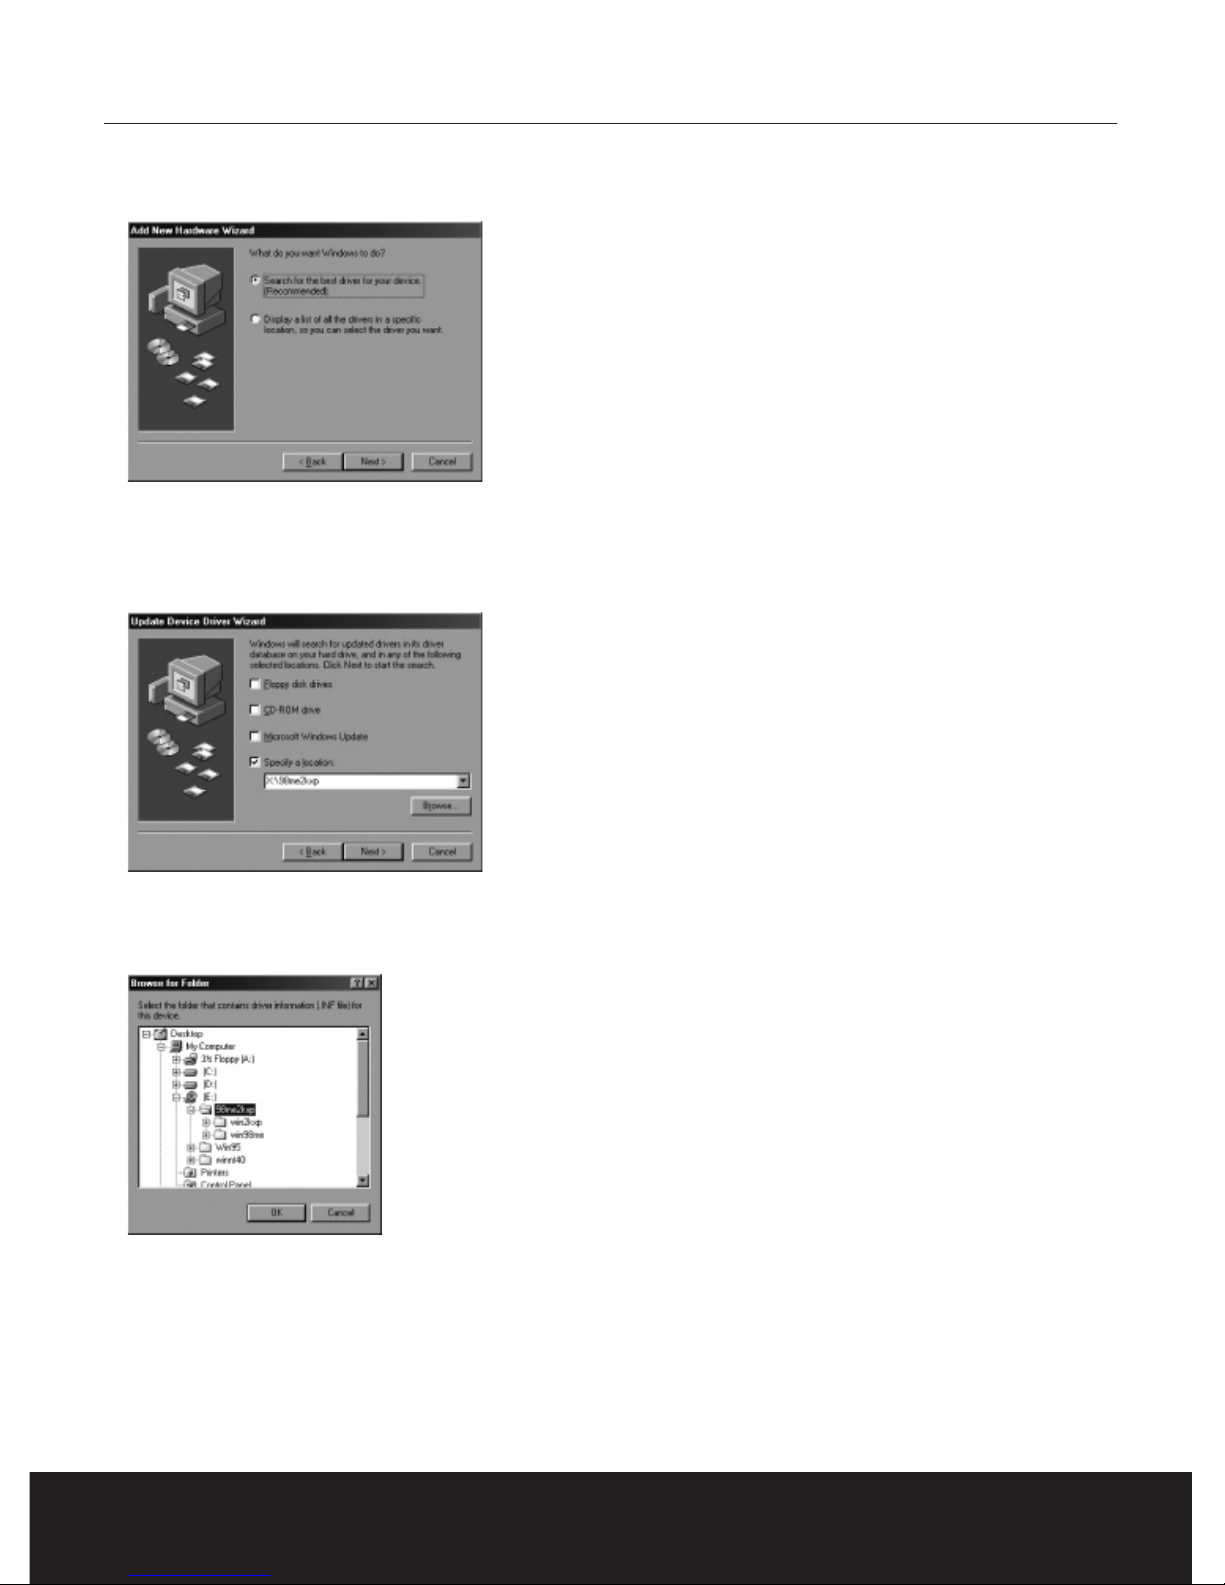
In the next screen, select the option “Search for the best driver” (Search for the best driver) and click “Next” (Next).
In the next screen, tick “Specify a location” (Specify a location).
Underneath, type “X:\98me2kxp “ (X being the letter of your CD-ROM drive which will be different from this example).
Insert the Sweex CD-ROM in the CD-ROM player and click “Next” (Next).
Or click “Browse” (Browse). Select the CD-ROM drive and the folder “98me2kxp” and click “OK” (OK). You will then be led back to the above
screen. Here click “Next” (Next).
Page 4
7
English version
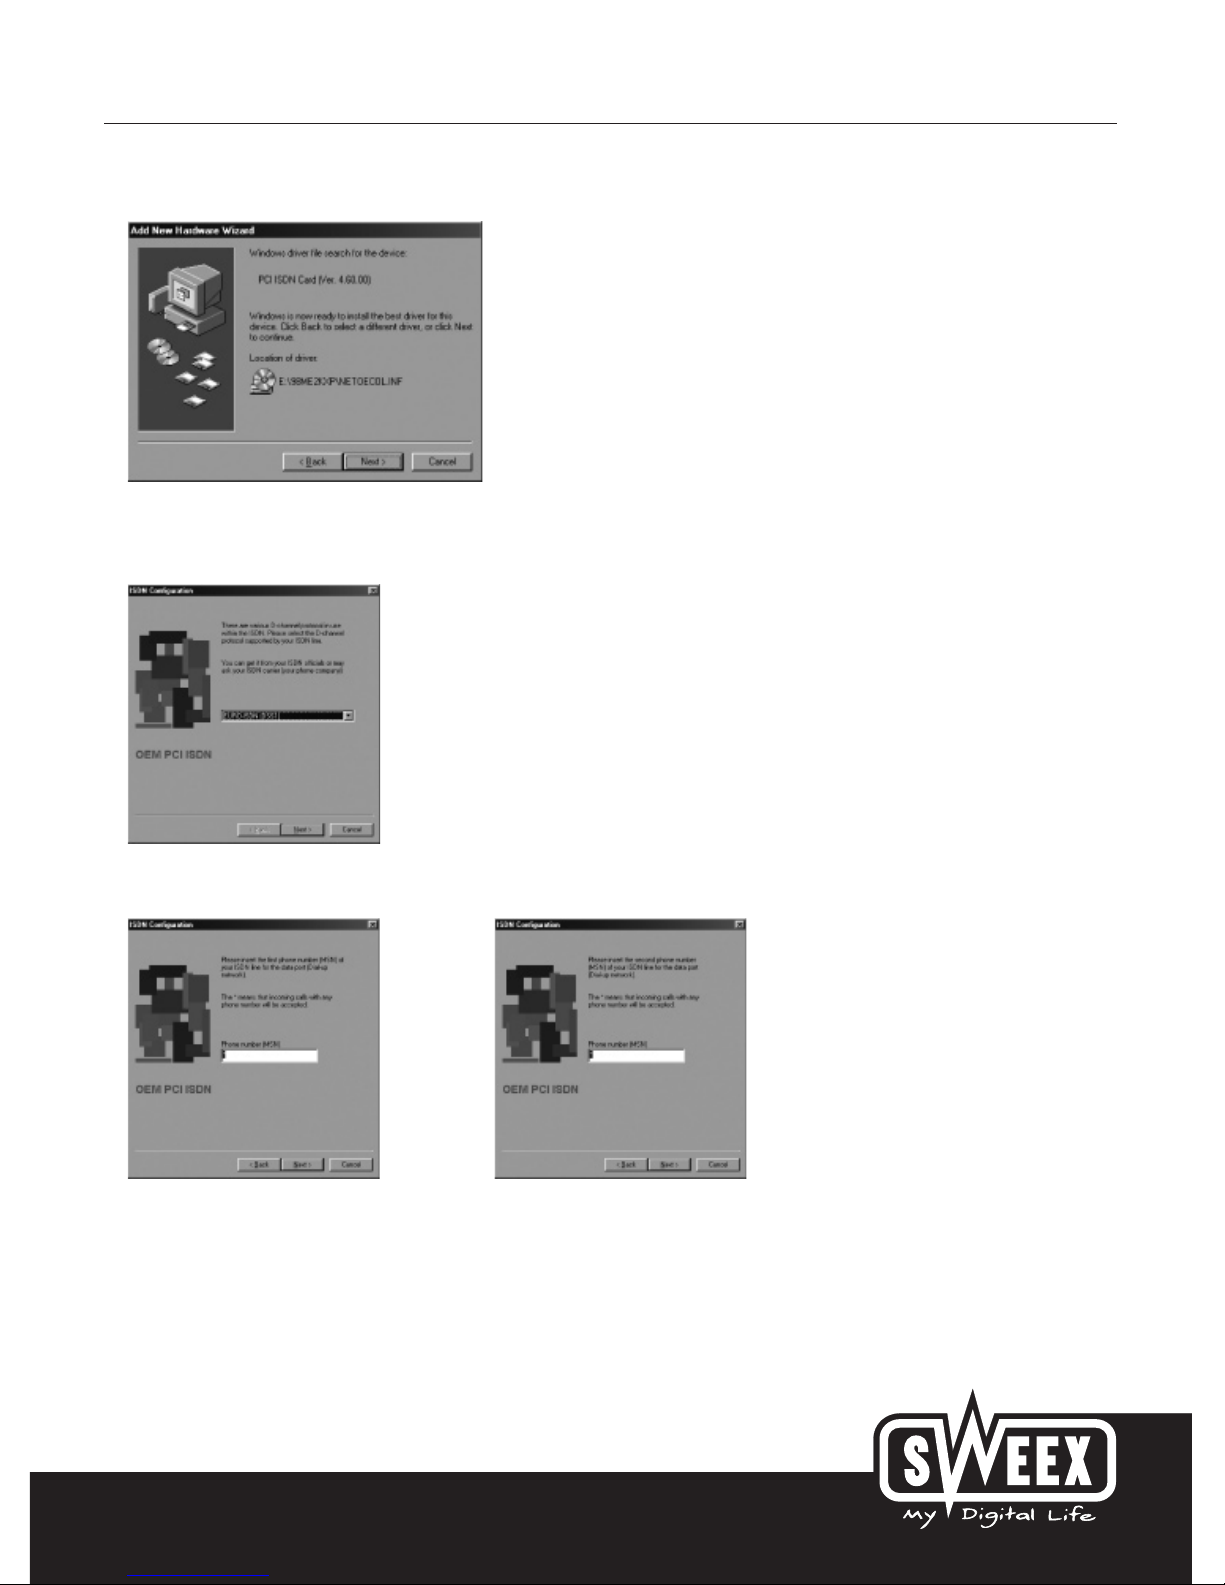
Windows will find the driver on the indicated location. Now click “Next” (Next) to start the installation.
Subsequently, you will be prompted to restart the PC. Having restarted to PC, the following screen will appear.
Here select EURO-ISDN (DSS1) and click “Next” (Next).
In the following two screens you will be given the opportunity to submit your ISDN number. You can also leave it blank and click “Next” (Next).
Page 5
S W E E X . C O M
8
English version
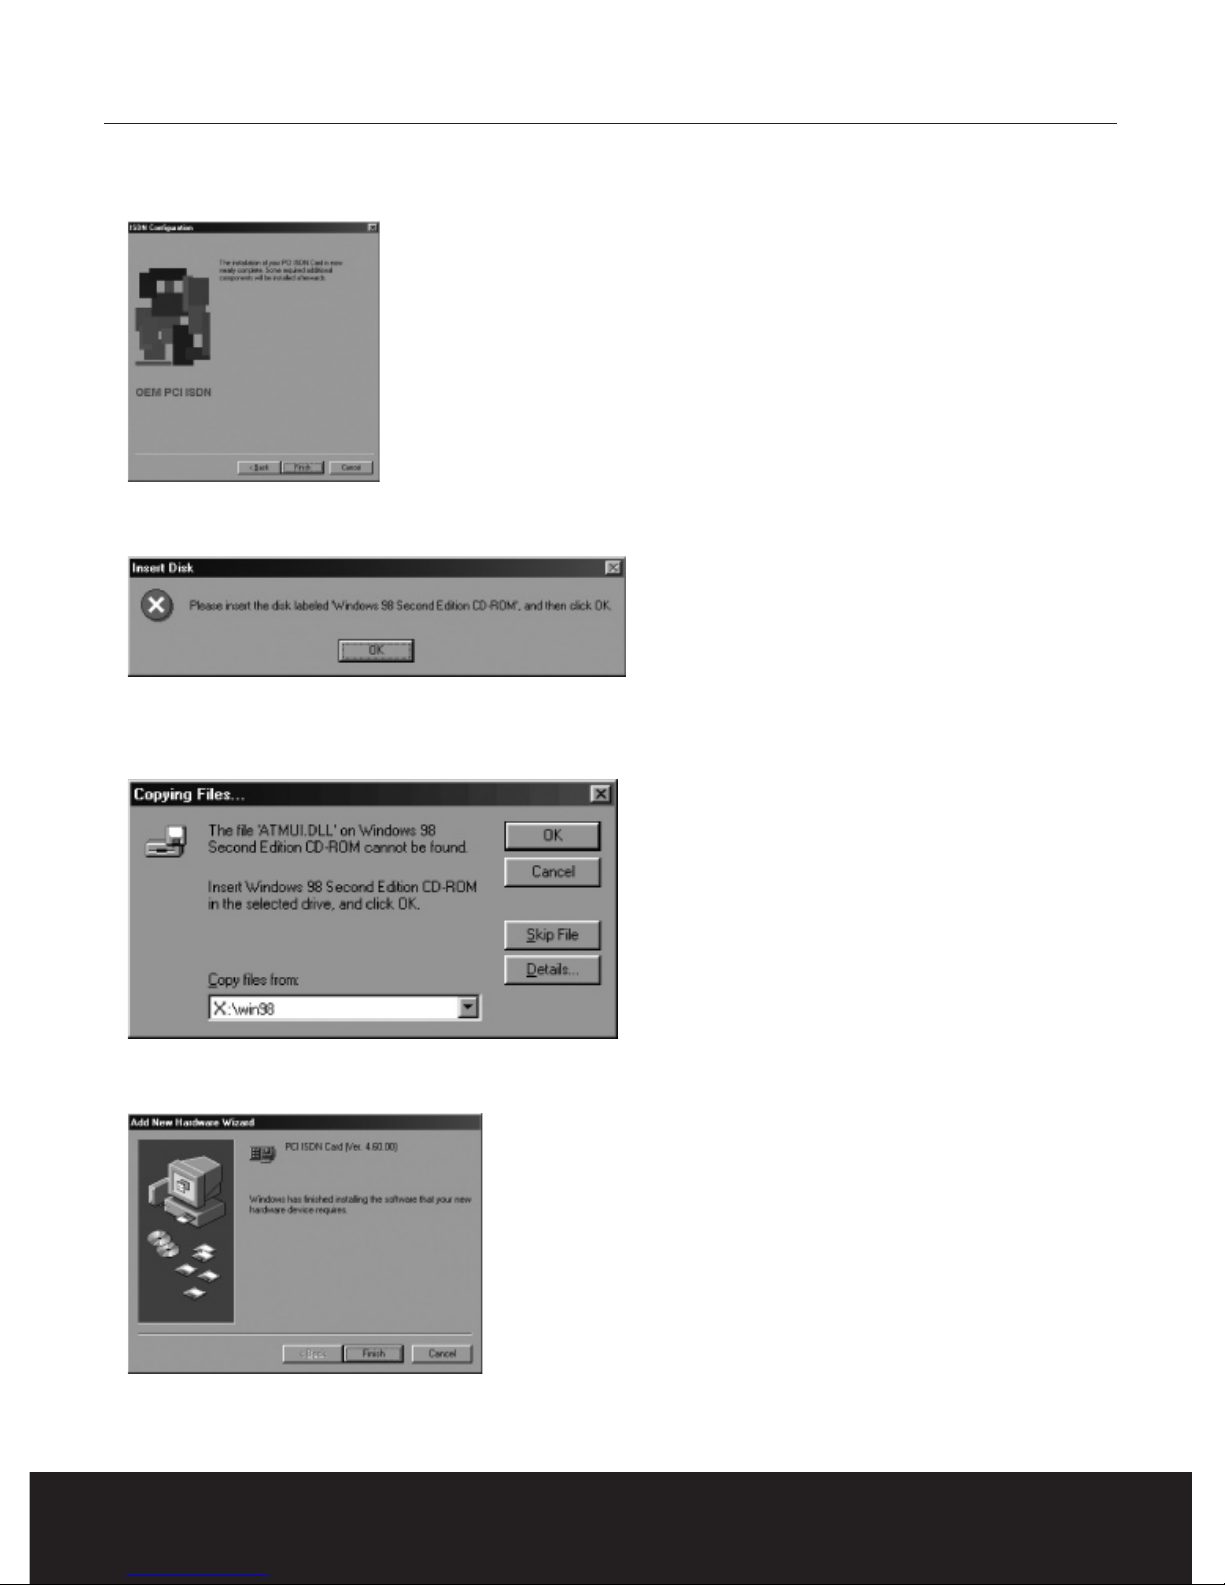
Click “Finish” (Finish).
When prompted, insert the Windows 98SE CD-ROM into your CD-ROM drive.
In the following screen, type “X:\win98 “ (X being the letter of your CD-ROM drive which will be different from this example).
Click “OK” (OK).
Click on “Finish” (Finish) to complete the installation.
Page 6
9
English version
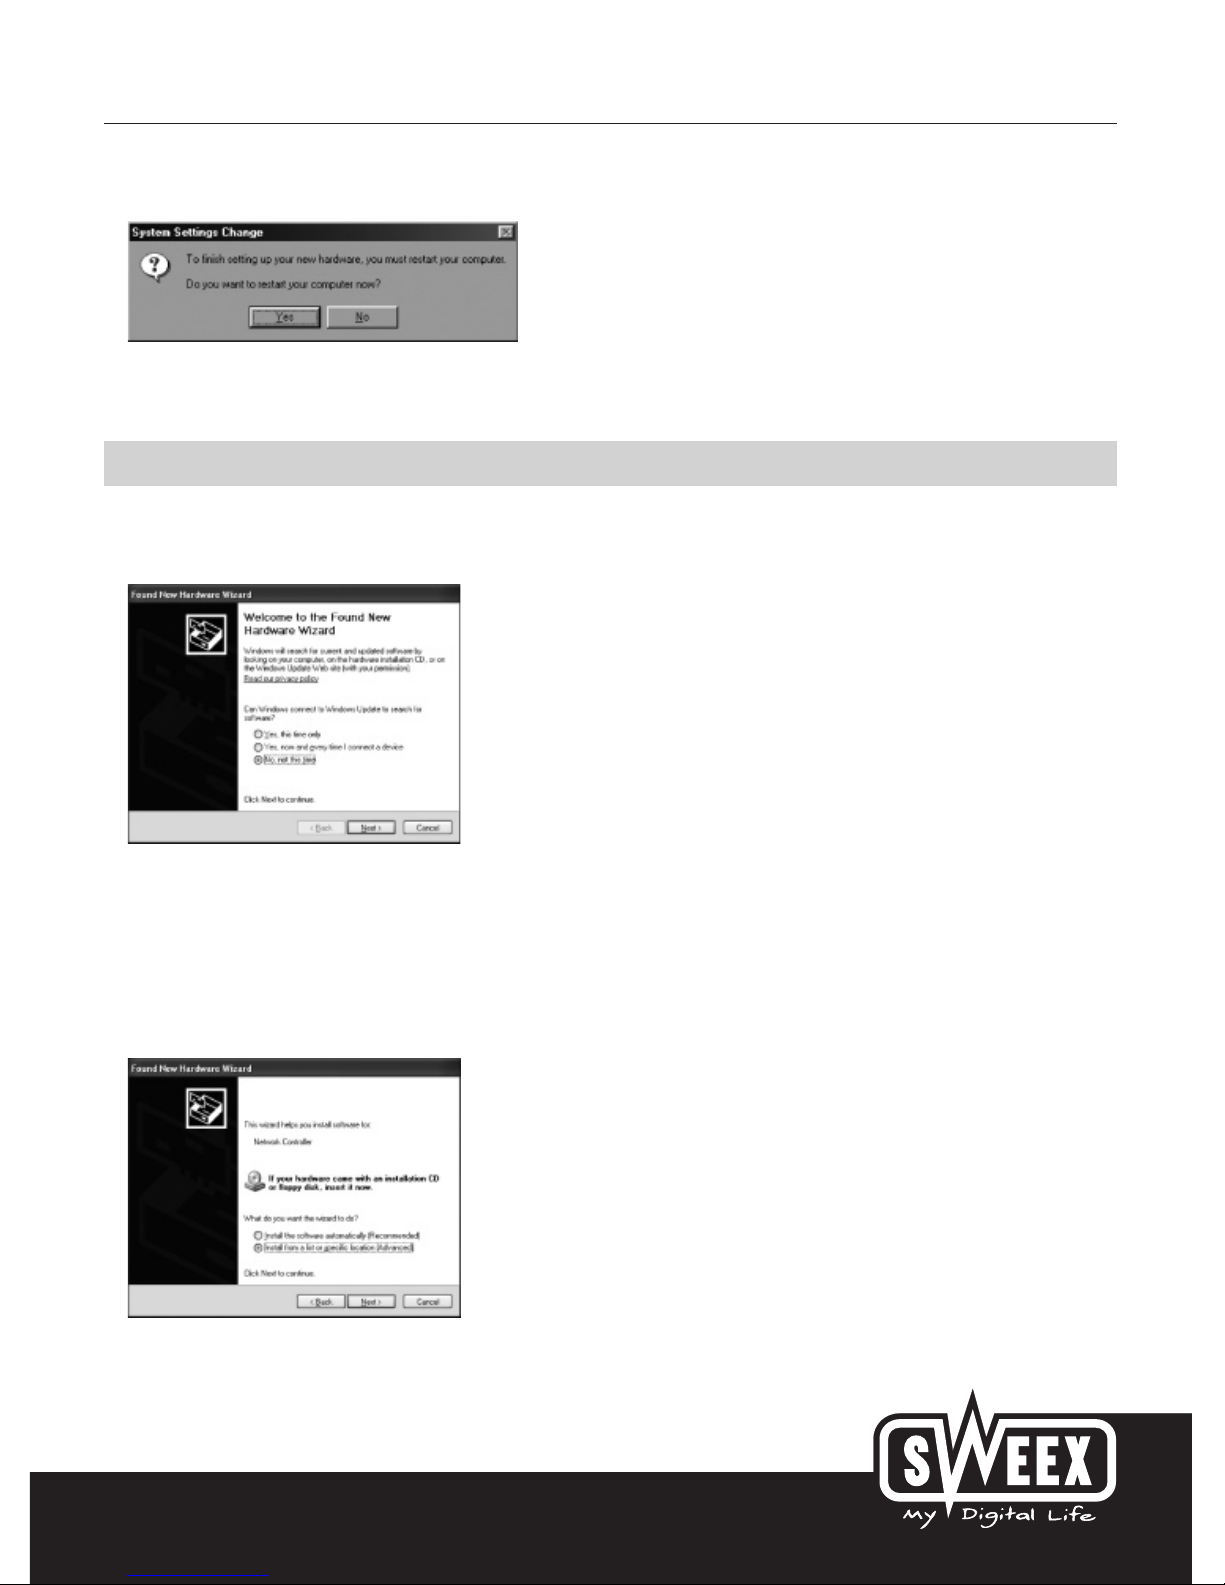
In the following screen, click “Next” (Next) to restart the PC.
The installation has now been completed. The Sweex ISDN PCI adapter is ready for use.
Windows 2000 and XP installation
After the card has been installed in the system, switch on the PC. Windows will detect the card and show the following screen.
Here select “No, not this time” (No, not this time) and click “Next” (Next).
Now insert the Sweex CD-ROM in the CD-ROM player. If you have already done so, open the CD-ROM player and close it again.
Windows will now automatically start to search for drivers on the CD-ROM.
Or:
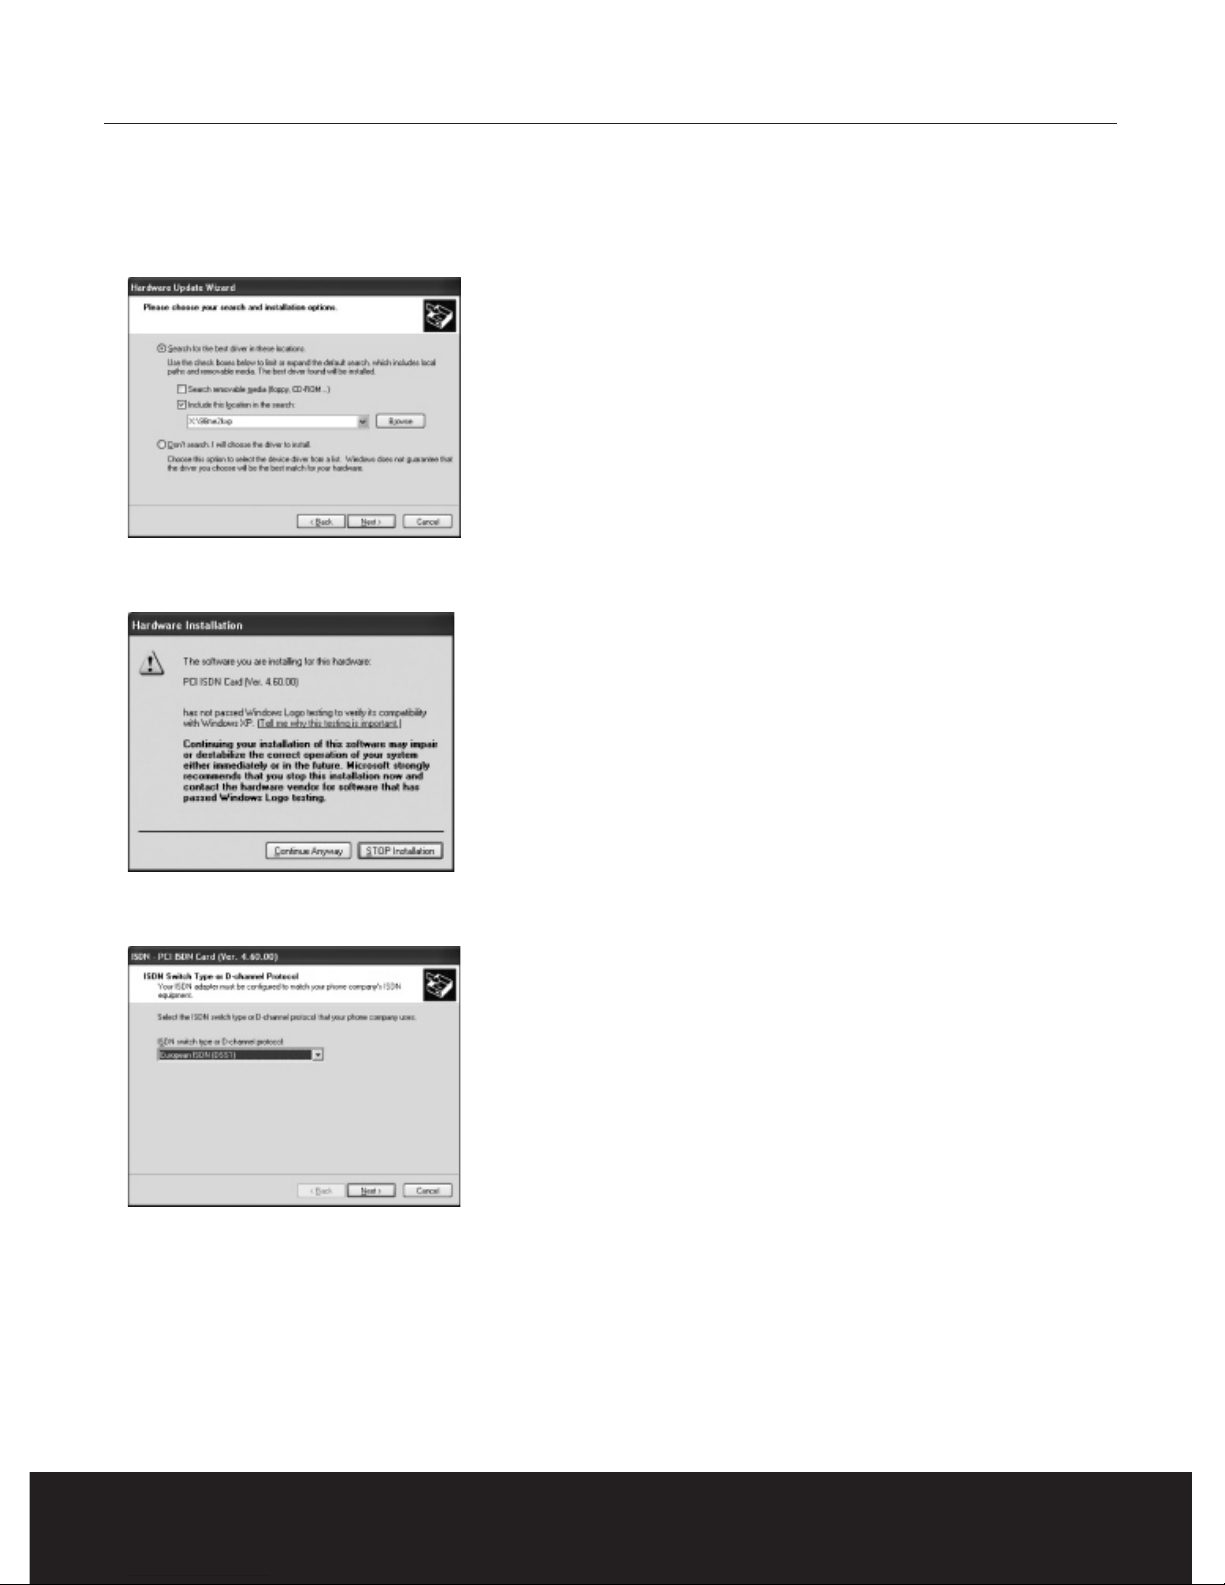
If Windows does not start searching automatically or is unable to locate any drivers, select “Install from a list or specific location”
and click “Next” (Next).
Page 7
S W E E X . C O M
10
English version
In the next screen, only tick “Include this location in the search” (Include this location in the search).
Underneath, type “X:\98me2kxp “ (X being the letter of your CD-ROM drive which will be different from this example).
Insert the Sweex CD-ROM in the CD-ROM player and click “Next” (Next).
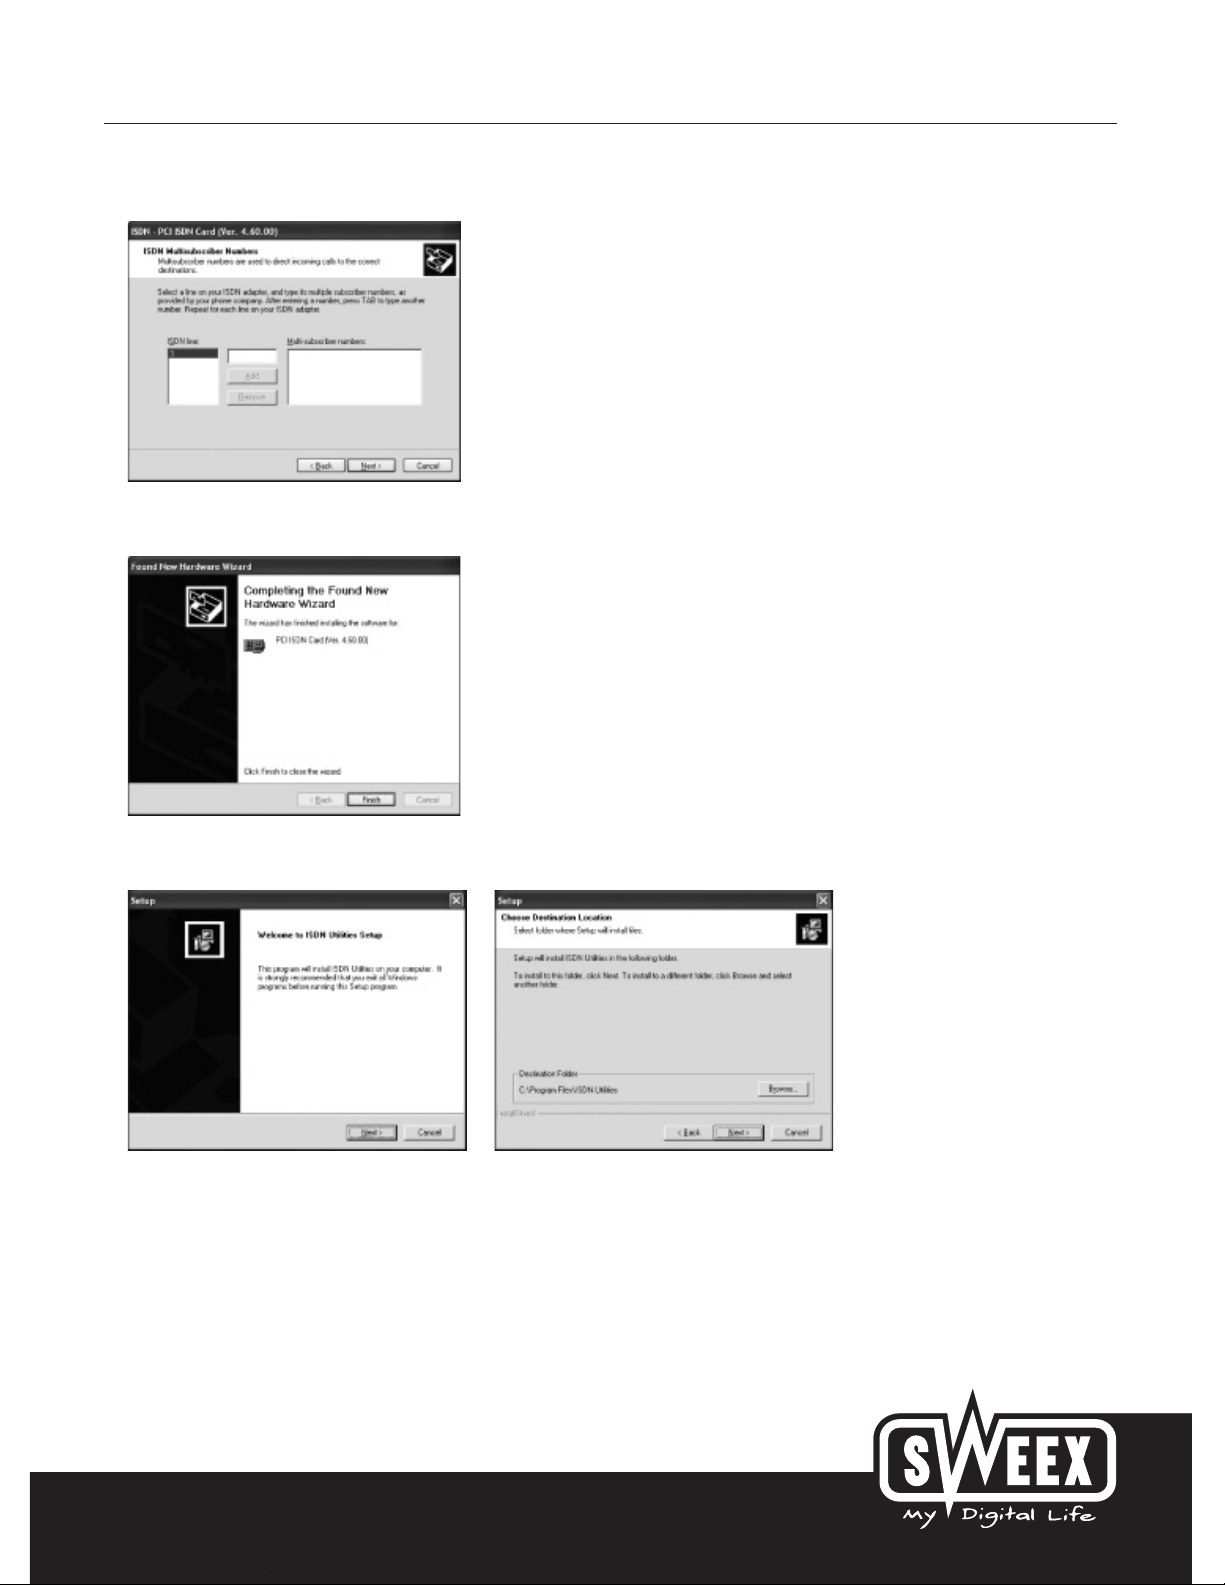
Sweex extensively tests the drivers of all its products. Here click “Continue Anyway” (Continue Anyway) to confirm the logo test.
Select European ISDN (DSS1) and click “Next” (Next).
Page 8
11
English version
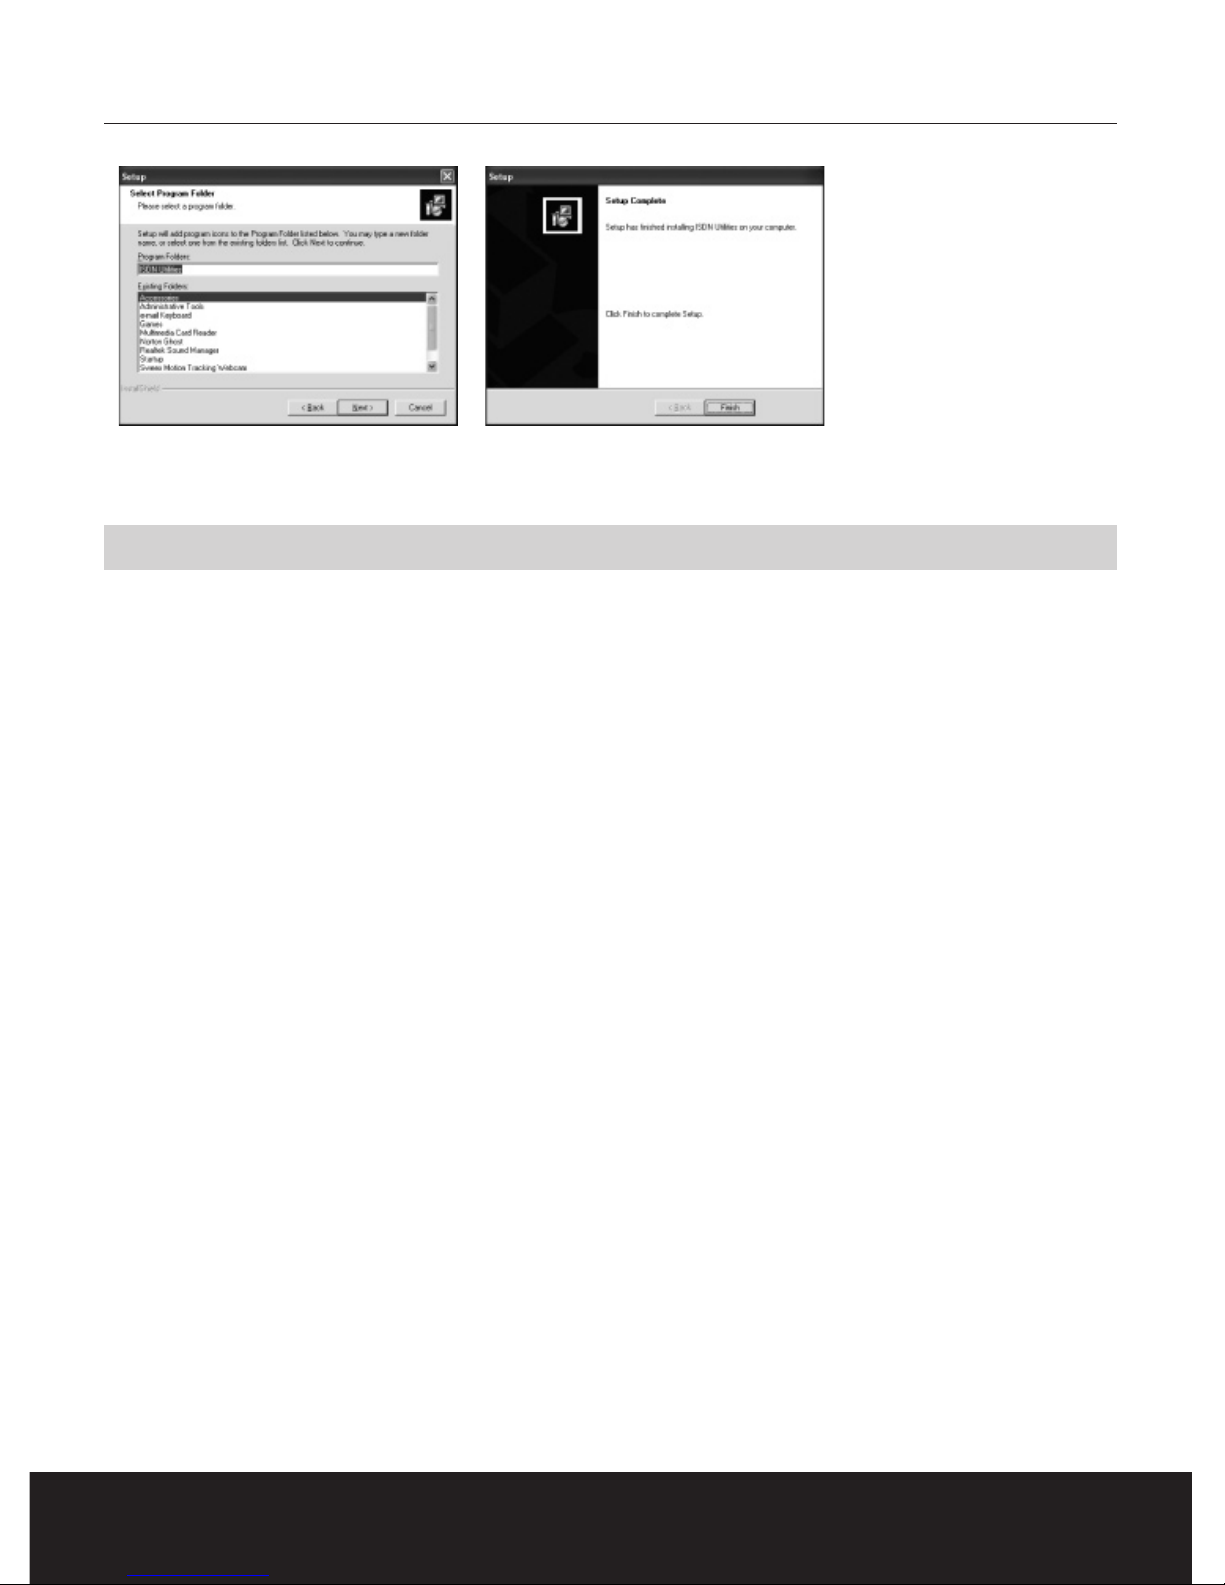
Here submit your ISDN number. You can also leave it blank and click “Next” (Next).
Click “Finish” (Finish).
In the following screens click “Finish” (Finish). to complete and “Next” (Next) to set up the installation process.
Page 9
S W E E X . C O M
12
English version
The installation has now been completed. The Sweex ISDN PCI adapter is ready for use.
Warranty
All products under the Sweex brand are warranted for a period of three years. We do not grant support or warranties for any software and/or
(rechargeable) batteries included. Warranty claims are only settled via the dealer where the product concerned was purchased.
The rightful owner has and retains title to all brand names and related rights mentioned in this manual.
 Loading...