


Your digital pictures directly in a frame!
7" DIGITAL PHOTO FRAME
Manual
Benutzershandbuch
Manuale d’istruzioni
Gebruikershandleiding
Manuel d’utilisation
Guía del usuario
Manual do funcionamento
Руковдство
Instrukcja
EC Declaration of Conformity

INDEX
English version 4
Deutsche Version 6
Versione Italiana 8
Nederlandse versie 10
Version Française 12
Versión Española 14
Versão Portuguesa 16
Русская версия
Wersja polska
18
20

English version
MM007 SWEEX 7" DIGITAL PHOTO FRAME
Introduction
• Do not expose the Sweex Digital Photo Frame to extreme temperatures. Do not place the device in direct sunlight or in the immediate vicinity of
heating elements.
• Do not use the Sweex Digital Photo Frame in extremely dusty or moist surroundings.
• Protect the device against powerful shocks or jolts as this could damage the internal electronics.
• Never attempt to open the device yourself as it will cause the warranty to lapse.
User manual
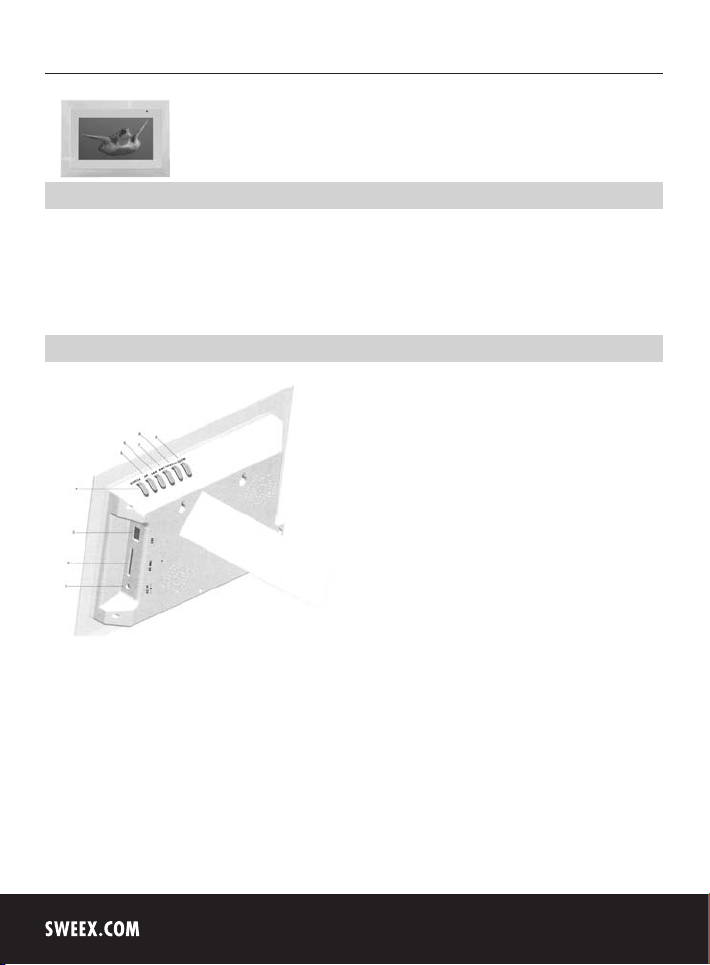
1. Connection power adaptor
2. SD, MMC and MS Duo/MS Pro Duo card reader
3. USB connection for USB Memory Stick. When connecting a USB Stick and memory card at the same time, the USB Stick will be read.
4. Power (on/off)
5. Play / Pause
6. Next
7. Previous
8. Interval time: Press and hold the button to set the time. 5 sec, 10 sec, 15 sec, 30 sec, 1 min and 3 min. To stop, press “Play/Pause”.
9. Screen modus and language settings: Press briefly to select from “Full Screen”, “4:3” or “auto”. Press and hold to set the language.
4

English version
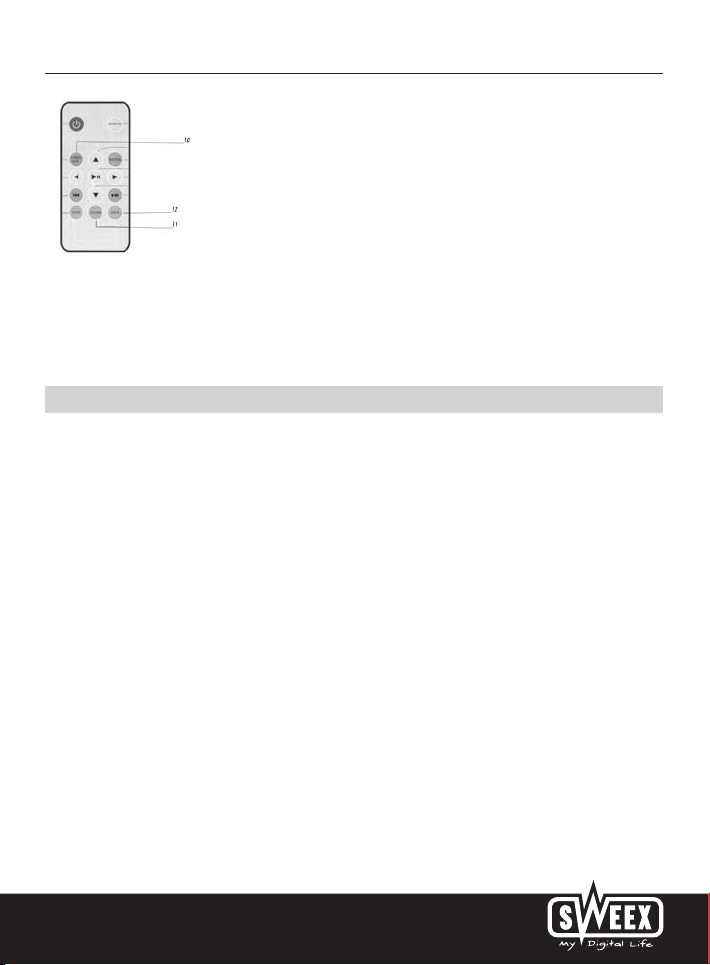
10. Language settings
11. Press and hold the zoom to zoom in or out. 25%, 50%, 100%, 150%, 200%
12. Back to start.
In the event the menu fails to appear, you can reset the photo frame by switching the device off and on again.
Warranty
All Sweex products are warranted for three years. We do not grant support or warranties for any software and/or (rechargeable) batteries included.
Settlement of guarantee only takes place via the dealer where you have purchased the product in question.
The rightful owner has and retains title to all brand names and related rights mentioned in this manual.
5

Deutsche Version
MM007 SWEEX 7" DIGITAL PHOTO FRAME
Einleidung
• Setzen Sie den Sweex Digital Photo Frame keinen extremen Temperaturen aus. Legen Sie das Gerät nicht in direktes Sonnenlicht oder in die
unmittelbare Nähe von Heizelementen.
• Verwenden Sie den Sweex Digital Photo Frame nicht in sehr staubiger oder feuchter Umgebung.
• Vermeiden Sie starke Erschütterungen oder Stöße des Geräts, hierdurch könnte die interne Elektronik beschädigt werden.
• Versuchen Sie niemals, das Gerät selbst zu öffnen − hierdurch verfällt die Garantie.
Bedienungsanleitung
1. Anschluß Spannungsadapter
2. SD, MMC und MS Duo/MS Pro Duo Kartenleser
3. USB-Anschluß für USB Memory Stick. Sind gleichzeitig ein USB-Stick und eine Speicherkarte angeschlossen, so wird der USB-Stick ausgelesen.
4. Strom (An/Aus)
5. Wiedergabe/Pause
6. nächster
7. voriger
8. Intervallzeit: Halten Sie den Knopf gedrückt, um die Zeit einzustellen: 5, 10, 15, 30, 60 oder 180 Sekunden. Zum Anhalten drücken Sie
“Wiedergabe/Pause”.
9. Anzeigemodus und Spracheinstellung: Drücken Sie kurz, um zwischen “Full Screen” (Vollbild), “4:3” oder “auto” (automatisch) zu wählen.
Drücken Sie lange, um die Sprache einzustellen.
6

Deutsche Version
10. Spracheinstellung
11. Halten Sie Zoom gedrückt, um heran- oder auszuzoomen: 25 %, 50 %, 100 %, 150 %, 200 %
12. Zurück zum Anfang.
Sollte das Menü nicht mehr erscheinen, dann können Sie den Bilderrahmen durch Aus- und Einschalten zurücksetzen.
Garantie
Für alle Sweex-Produkte gilt eine Garantiefrist von drei Jahren. Für mitgelieferte Software und Akkus gewähren wir weder Unterstützung noch
Garantie. Die Abwicklung der Garantie erfolgt nur über die Verkaufsstelle, wo der betreffende Artikel gekauft wurde.
Alle in dieser Anleitung genannten Markennamen und die damit verbundenen Rechte sind und bleiben im Eigentum des rechtmäßigen Eigentümers.
7

Versione Italiana
MM007 SWEEX 7" DIGITAL PHOTO FRAME
Introduzione
• Non esporre la Sweex Digital Photo Frame a temperature estreme. Non lasciare mai l’apparecchio alla luce diretta del sole o in prossimità di
elementi di riscaldamento.
• Non utilizzare la Sweex Digital Photo Frame in ambienti estremamente polverosi o umidi.
• Evitare che l’apparecchio subisca colpi o urti forti che potrebbero provocare danni all’elettronica interna.
• Non cercare mai di aprire da sé l’apparecchio, rendendo invalida la garanzia.
Istruzioni per l’uso
1. Collegamento adattatore d’alimentazione
2. Lettore di schede SD, MMC e MS Duo/MS Pro Duo
3. Collegamento USB per Memory Pen USB. Se vengono collegate contemporaneamente una penna USB e una scheda di memoria, l’apparecchio
leggerà la penna USB.
4. Accensione (acceso/spento)
5. Riproduzione/Pausa
6. Successivo
7. Precedente
8. Intervallo: tenere premuto il pulsante per impostarne la durata: 5, 10, 15, 30 secondi, 1 minuto e 3 minuti. Per arrestare la funzione, premere
“Riproduzione/Pausa”.
9. Modalità schermo e impostazione lingua: premere brevemente per scegliere tra “Full Screen”, “4:3” o “auto”. Premere a lungo per
impostare la lingua.
8

Versione Italiana
10. Impostazione lingua
11. Tenere premuto lo zoom per aumentarlo o ridurlo: 25%, 50%, 100%, 150%, 200%
12. Tornare all’inizio.
Se il menu non compare più, è possibile ripristinare le impostazioni della cornice spegnendola e riaccendendola per mezzo dell’apposito pulsante.
Garanzia
Tutti i prodotti Sweex hanno un periodo di garanzia di tre anni. Non è concessa invece alcuna garanzia sul software in dotazione, sulle batterie
ricaricabili e sugli accumulatori. Il ricorso alla garanzia avviene esclusivamente tramite il punto vendita presso cui si è acquistato l’articolo in
questione.
Tutti i marchi ed i relativi diritti che compaiono nel presente manuale sono e restano patrimonio dei legittimi proprietari.
9

Nederlandse versie
MM007 SWEEX 7" DIGITAL PHOTO FRAME
Inleiding
• Stel de Sweex Digital Photo Frame niet bloot aan extreme temperaturen. Plaats het apparaat niet in direct zonlicht of in de dichte nabijheid van
verwarmingselementen.
• Gebruik de Sweex Digital Photo Frame niet in een extreem stoffige of vochtige omgeving.
• Voorkom harde schokken of stoten van het apparaat, hierdoor zou de interne elektronica beschadigd kunnen raken.
• Probeer nooit zelf het apparaat te openen, hierdoor vervalt de garantie.
Bedieningshandleiding
1. Aansluiting voedingsadapter
2. SD, MMC en MS Duo/MS Pro Duo kaartlezer
3. USB aansluiting voor USB Memory Stick. Als een USB Stick en geheugenkaart tegelijk zijn aangesloten, wordt de USB Stick gelezen.
4. Power (Aan/uit)
5. Afspelen / Pauzeren
6. Volgende
7. Vorige
8. Interval tijd: Houd de knop ingedrukt om de tijd in te stellen. 5 sec, 10 sec, 15 sec, 30 sec, 1 min en 3 min. Om te stoppen druk “Afspelen/
Pauzeren”.
9. Scherm modus en taal instellingen: Druk kort om te kiezen tussen “Full Screen”, “4:3” of “auto”. Druk lang om de taal in te stellen.
10

Nederlandse versie
10. Taalinstellingen
11. Houd zoom ingedrukt om in of uit te zoomen. 25%, 50%, 100%, 150%, 200%
12. Terug naar begin.
Indien het menu niet meer verschijnt dan kunt u de photo frame resetten door middel van de power knop uit en weer aan te zetten.
Garantie
Voor alle Sweex producten geldt een garantietermijn van drie jaar. Op meegeleverde software, oplaadbare batterijen en accu’s geven wij geen
support of garantie. Afhandeling van garantie vindt alleen plaats via het verkooppunt waar het betreffende artikel is aangekocht.
Alle merknamen en daaraan verbonden rechten genoemd in deze handleiding zijn en blijven eigendom van de rechtmatige eigenaar.
11

Version Française
MM007 SWEEX 7" DIGITAL PHOTO FRAME
Introduction
• N’exposez pas le Sweex Digital Photo Frame à des températures extrêmes. N’exposez pas l'appareil à la lumière directe du soleil ou à proximité
immédiate d’éléments chauffants.
• N’utilisez pas le Sweex Digital Photo Frame dans un environnement extrêmement poussiéreux ou humide.
• Evitez tout impact ou choc violent à l’appareil (risque d’endommagement de l’électronique embarquée).
• N’essayez jamais d’ouvrir vous-même l’appareil (annulation de la garantie).
Mode d’emploi
1. Raccordement de l’adaptateur secteur
2. Lecteur de cartes SD, MMC et MS Duo/MS Pro Duo
3. Prise USB pour clé USB Memory. Quand une clé USB et une carte mémoire sont insérées en même temps, la clé USB est lue.
4. Alimentation (Marche/Arrêt)
5. Lecture / Pause
6. Suivant
7. Précédent
8. Intervalle : maintenez la touche enfoncée pour régler la durée de l'intervalle. 5 secondes, 10 secondes, 15 secondes, 30 secondes, 1 minute et
3 minutes. Pour arrêter, appuyez sur « Lecture / Pause ».
9. Mode écran et paramètres de langues : appuyez brièvement pour choisir « Plein écran », « 4:3 » ou « auto ». Appuyez plus longtemps pour
choisir la langue.
12

Version Française
10. Paramètres de langue
11. Maintenez la touche zoom enfoncée pour effectuer un zoom avant ou arrière. 25%, 50%, 100%, 150%, 200%
12. Retour au début.
Si le menu n’apparaît plus, réinitialisez le cadre numérique en l’éteignant et en le rallumant avec la touche alimentation.
Garantie
Une garantie de trois ans s'applique à tous les produits Sweex. Les logiciels, piles et batteries rechargeables accompagnant les produits ne
bénéficient pas de l’assistance ou de la garantie. La prise en charge de la garantie est exclusivement assurée par le point de vente où l’article en
question a été acheté.
Tous les noms de marque et droits y attachés mentionnés sur cet emballage ou dans ce manuel sont et restent la propriété du propriétaire légitime.
13

Versión Española
MM007 SWEEX 7" DIGITAL PHOTO FRAME
Introducción
• No exponga el Sweex Digital Photo Frame a temperaturas extremas. No sitúe el aparato bajo la luz solar directa o cerca de elementos térmicos.
• No utilice el Sweex Digital Photo Frame en entornos con demasiado polvo o excesiva humedad.
• Evite que el aparato sufra fuertes sacudidas o choques, ya que se podrían dañar los componentes electrónicos internos.
• Jamás intente abrir el aparato usted mismo porque, en este caso, expira la garantía.
Instrucciones de uso
1. Conector de alimentación
2. Lector de tarjetas SD, MMC y MS Duo/MS Pro Duo
3. Puerto USB para lápiz de memoria USB (USB Memory Stick). Si están conectados simultáneamente un lápiz USB y una tarjeta de memoria, el
marco fotográfico lee el lápiz USB.
4. Power (Encendido/Apagado)
5. Reproducción / Pausa
6. Siguiente
7. Anterior
8. Intervalo entre diapositivas: Para ajustar el tiempo, mantenga pulsado el botón. 5 segundos, 10 segundos, 15 segundos, 30 segundos, 1 minuto
y 3 minutos. Para detener la reproducción, pulse “Reproducción/Pausa”.
9. Configuración de modo de pantalla e idioma: Pulse brevemente para seleccionar entre “Full Screen”, “4:3” o “Auto”. Mantenga pulsado para
seleccionar el idioma.
14

Versión Española
10. Configuración del idioma
11. Mantenga pulsado “Zoom” para ampliar o reducir la imagen. 25%, 50%, 100%, 150%, 200%
12. Volver al principio.
Si el menú no aparece, apague y reencienda el marco fotográfico pulsando el botón “Power”.
Garantía
Todos los productos Sweex disponen de un período de garantía de tres años. Sweex no ofrece servicio o garantía para el software o baterías
recargables suministrados. La liquidación de la garantía debe realizarse exclusivamente a través del distribuidor donde se haya adquirido el respectivo
artículo.
El propietario legítimo posee y conserva el título de todos los nombres de marca y los derechos asociados mencionados en este manual.
15

Versão Portuguesa
MM007 SWEEX 7" DIGITAL PHOTO FRAME
Introdução
• Não exponha a Sweex Digital Photo Frame a temperaturas extremas. Não coloque o dispositivo directamente ao sol ou perto de elementos de
aquecimento.
• Não utilize a Sweex Digital Photo Frame em espaços extremamente poeirentos ou húmidos.
• Evite choques fortes no dispositivo que possam causar danos à electrónica interna.
• Nunca abra o dispositivo, porque nesse caso a garantia será anulada.
Manual de utilização
1. Ligação do adaptador de alimentação
2. Leitor de cartões SD, MMC e MS Duo/MS Pro Duo
3. Ligação USB para USB Memory Stick. No caso de uma ligação simultânea de um USB Stick e um cartão de memória, a moldura panorâmica
reproduz o conteúdo do USB Stick.
4. Potência (Ligar/Desligar)
5. Reproduzir / Pausar
6. Avançar
7. Retroceder
8. Tempo de intervalo: mantenha o botão pressionado para determinar o tempo de intervalo. 5 seg., 10 seg., 15 seg., 30 seg., 1 min. e 3 min.
Para parar, pressione o botão “Reproduzir/Pausar”.
9. Modo de ecrã e definições de idioma: pressione por um instante para escolher entre o modo “Full Screen” (Ecrã Inteiro), “4:3” ou “auto”.
Pressione por mais algum tempo para definir o idioma.
16
Versão Portuguesa
10. Definições de idioma
11. Mantenha pressionada a tecla zoom para aumentar ou reduzir o tamanho da imagem. 25%, 50%, 100%, 150%, 200%
12. Voltar ao início.
Se o menu não voltar a aparecer, faça um reset na moldura panorâmica desligando e voltando a ligar o botão de potência.
Garantia
Para todos os artigos com o nome de Sweex, aplica-se um período de garantia de três anos. Ao software fornecido, pilhas recarregáveis e baterias
não damos nenhuma garantia ou apoio. A garantia só é realizada através do fornecedor onde comprou o artigo correspondente.
Todas as marcas e os respectivos direitos mencionados neste manual de instruções são e permanecem propriedade do proprietário legítimo.
17

Русская версия
MM007 SWEEX 7" DIGITAL PHOTO FRAME
Введение
• Не подвергайте Sweex Digital Photo Frame воздействию значительных температурных перепадов. Не подвергайте устройство
воздействию прямых солнечных лучей и не используйте его в непосредственной близости от нагревательных приборов.
• Не используйте Sweex Digital Photo Frame в очень пыльных или влажных местах.
• Не подвергайте устройство воздействию мощных толчков или тряски, поскольку это может вызвать повреждение внутренних
компонентов электроники.
• Никогда не пытайтесь открыть устройство, в противном случае гарантия становится недействительной.
Руководство пользователя
1. Соединительный сетевой адаптер
2. Карт-ридер для карт формата SD, MMC и MS Duo/MS Pro Duo
3. Разъем USB для подключения флэш-карт USB При одновременном подключении флэш-карты USB и карты памяти будет
читаться флэш-карта USB.
4. Включение/выключение питания
5. Воспроизведение/Пауза
6. Далее
7. Назад
8. Промежуток: чтобы установить время, нажмите и удерживайте нажатой кнопку. 5 сек, 10 сек, 15 сек, 30 сек, 1 мин и 3 мин.
Для остановки нажмите “Воспроизведение/Пауза”.
9. Режимы экрана и языковые настройки: кратко нажмите кнопку, чтобы выбрать режимы «Полноэкранный», “4:3” или “авто”.
Чтобы установить язык, нажмите и удерживайте нажатой кнопку.
18

Русская версия
10. Языковые настройки
11. Чтобы увеличить или уменьшить масштаб, нажмите и удерживайте нажатой кнопку зума. 25%, 50%, 100%, 150%, 200%
12. Вернуться к началу.
Если меню не появится, можно перезагрузить копировальную машину, выключив устройство, и включив его снова.
Гарантия
На все изделия компании Sweex распространяется гарантия три года. Гарантия и техническая поддержка не распространяется
на прилагающееся программное обеспечение и (перезаряжаемые) батареи. Урегулирование гарантийных вопросов происходит у
дилера, у которого приобретено изделие.
Правообладатель сохраняет за собой права на все торговые названия изделий и смежные права на продукты, упомянутые в
данном руководстве.
19
Wersja polska
MM007 SWEEX 7" DIGITAL PHOTO FRAME
Wstęp
• Nie należy wystawiać Sweex Digital Photo Frame na działanie wysokich temperatur. Nie należy wystawiać produktu na bezpośrednie działanie promieni
słonecznych lub umieszczać w pobliżu elementów grzewczych.
• Nie należy używać Sweex Digital Photo Frame w otoczeniu wilgotnym lub zakurzonym.
• Należy zabezpieczyć urządzenie przed wstrząsami lub uderzeniami - może to być przyczyną uszkodzenia wewnętrznej elektroniki.
• Nigdy nie należy otwierać urządzenia - może to być przyczyną utraty praw gwarancyjnych.
Instrukcja obsługi
1. Podłączenie zasilacza
2. Czytnik kart SD, MMC i MS Duo/MS Pro Duo
3. Złącze USB dla USB Memory Stick. Przy podłączaniu karty USB Stick i karty pamięci w tym samym czasie, odczytana zostanie karta USB Stick.
4. Włączenie/wyłączenie
5. Odtwarzanie/pauza
6. Następny
7. Poprzedni
8. Czas przerwy: Naciśnij i przytrzymaj przycisk, aby ustawić czas. 5 sek., 10 sek., 15 sek., 30 sek., 1 min. i 3 min. Aby zatrzymać naciśnij “Odtwórz/
Pauza”.
9. Ustawienia ekranu i języka: Naciśnij krótko, aby wybrać “Pełen ekran”, “4:3” lub “auto”. Naciśnij i przytrzymaj, aby ustawić język.
20

Wersja polska
10. Ustawienia języka
11. Naciśnij i przytrzymać zoom, aby powiększyć lub pomniejszyć. 25%, 50%, 100%, 150%, 200%
12. Powrót do start.
Jeżeli menu nie pojawi się na ekranie, możesz zresetować ramkę na zdjęcia wyłączając urządzenie i włączając je ponownie.
Gwarancja
Wszystkie produkty marki Sweex są objęte trzyletnią gwarancją. Gwarancja i pomoc nie obejmuje załączonego oprogramowania i/lub dołączonych
akumulatorów (do ładowania). Z usług gwarancyjnych można skorzystać za pośrednictwem sprzedawcy, u którego został zakupiony produkt.
Właściciel posiada i zachowuje prawa do wszystkich nazw marek wymienionych w niniejszej instrukcji oraz wszelkie prawa pokrewne.
21

22

EC Declaration of Conformity
We the under signed: Sweex Europe B.V.
Declare under our sole responsibility that the product:
P.O. Box 110
2600 AC Delft
The Netherlands
MM007 SWEEX 7" DIGITAL PHOTO FRAME 16:9 INCL. REMOTE CONTROLLER
Is tested to and conforms with the essential radio test suites included in the following standards:
Standard EMI Issue date
EN 55022 1998 + A1: 2000 + A2:2003
EN 55024 1998 + A1: 2001+ A2:2003
EN 61000-3-2 2000 + A2: 2005
EN 61000-3-3 1995 + A1: 2001
The measurements shown in this test report were made in accordance with the procedures given in
EUROPEAN COUNCIL DIRECTIVE 89/336/EEC.
Delft 27-02-2008 R. Ramaekers
© 2008 Sweex. All rights reserved. Sweex, the Sweex logo, and other Sweex marks are owned by Sweex and may be registered. All other trademarks
are property of their respective owners. Prices and technical specifications are conditional and may be changed without any prior notification.
23

MM007
7" Digital Photo Frame 16:9 incl. Remote Controller
© Sweex 2008
 Loading...