

SWEEX LW320, LW321 User Manual

English version
LW320/LW321 Sweex Wireless 300N Router
• Do not expose the Sweex Wireless 300N Router to extreme temperatures. Do not place the device in direct sunlight or in the direct vicinity of
heating elements.
• Do not use the Sweex Wireless 300N Router in extremely moist or dusty surroundings.
• Protect the device against powerful shocks and falls – they may damage the internal electronics.
• Never attempt to open the device yourself, there are no serviceable parts inside. Opening the device will cause the warranty to lapse.
Package Contents
In this package you will find:
• Wireless 300N router
• Power adapter
• Network cable
• Quick Installation Guide
• CD-ROM with this manual
If you find that any of the package contents are missing, please return the package to the sales point where it was bought..
Terminology list
This manual will contain a number of technical terms. It is important to know what they mean before you begin installing and configuring the
router.
• Router: This is the product you have just bought. A router acts as a boundary between two networks, WAN and LAN.
• Network cable. A network cable is used for connecting network devices such as computers, modems and routers. Yo u may already have such
a cable, the cable in the package contents is intended to connect the
• ISP: Internet Service Provider, this is the company that supplies you your Internet connection.
• Broadband modem: From here on: modem. Your modem is the device you already have or that has been supplied to you by your ISP that
currently provides your internet connection. The two most common modem types are cable modems and ADSL modems, but other kinds of
modems also exist.
• LAN: LAN stands for “Local Area Network”, in the case of this router, the LAN consists of the four yellow ports and the wireless network. With
the router, all your computers will form a single LAN.
• WAN: WAN stands for “Wide Area Network”, in most cases this means the Internet.
• Wireless security: By default, the router’s wireless network is not secured. This means that anyone in range (including your neighbours) can
connect to the network and use your internet connection. Wireless security protects your network so that only authorised devices can gain
access. Sweex recommends all users to secure their wireless network after installation using either the WPA or WPS methods explained
further on in the “securing your wireless network” chapter of this manual.
router to
your modem.
4
English version
Product description
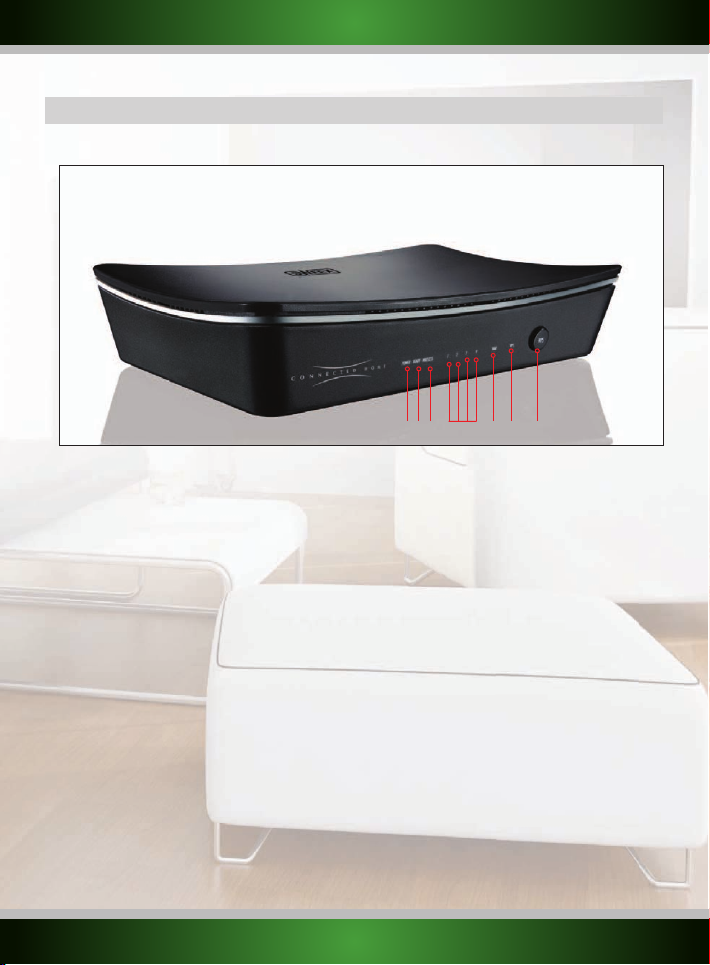
Front
1 2 34 5 6 7
1. Power LED: This light indicates that the router receives power.
2. READY LED: A constantly blinking SYS light indicates correct functioning of the router.
3. WPS LED: When this light blinks, it is possible to connect to the router with a WPS enabled device. For more information, see
4. WIRELESS LED: This light indicates that the wireless network is active. A flickering light indicates wireless activity.
5. LAN Port 1 - 4 LED: This light indicates an active connection on the corresponding LAN port. A flickering light indicates network activity.
6. WAN Port LED: This light indicates an active connection on the WAN port. A flickering light indicates WAN activity.
7. WPS button: This button activates WPS wireless security. For more information on WPS, see the chapter “Securing your wireless
the chapter: “Securing your wireless network”.
network”. This button also functions as the reset button, for more information on the reset procedure refer to the
troubleshooting section of this manual
5
English version
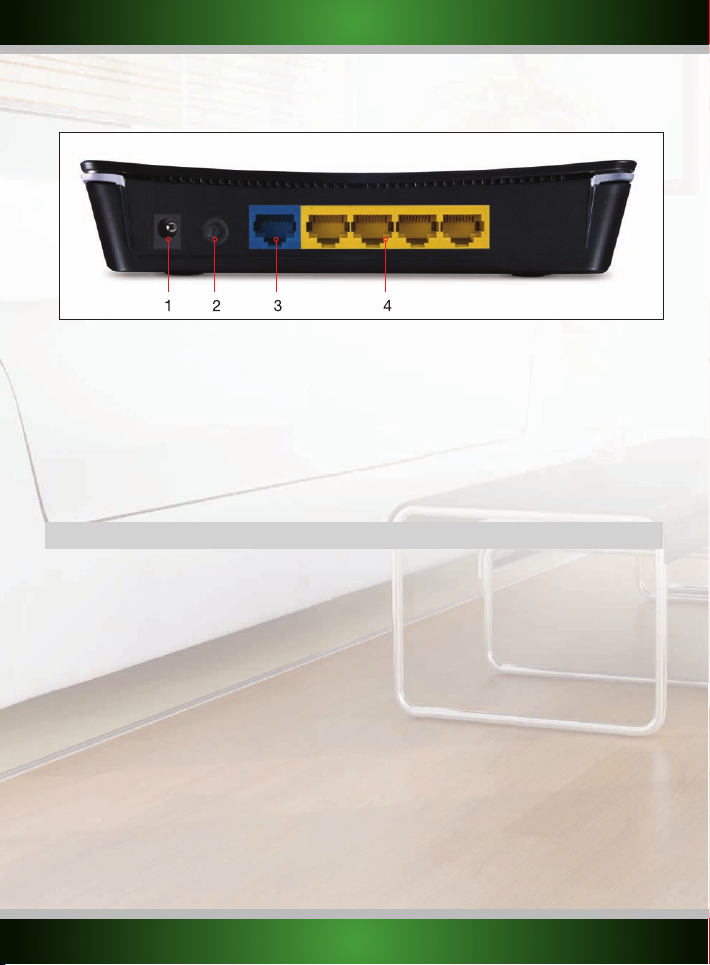
Back
1 2 3 4
1. DC power input: Connect the supplied power adapter to this input. If the adapter is lost it can be replaced by a
2. POWER ON/OFF button: Press the button in to power on the router and press again to turn off the router.
3. WAN port: Connect the network cable coming from your ISP modem to this port. Upon a successful WAN
4. LAN port 1 - 4: You can connect a network cable coming from a computer to this port. When the computer is
similar model with 9 V DC output and 0.6 A current rating.
connection, the WAN light at the front of the router will light up. This is a prerequisite for
internet access.
turned on the corresponding light at the front of the router will light up.
Installing the router
There are two ways of installing the router:
• The Simple setup described in this manual
• The Advanced setup also described in this manual.
The wizard and simple setup assume default settings and will work for most users. If you are an advanced user or if you know which setup
method your ISP requires, you may proceed to the advanced setup immediately.
6

English version
Simple setup
Simple setup is done in 7 steps:
1. Disconnect the power to your modem. If one or more computers were connected to your modem using a network cable, disconnect them.
2. Use the included network cable to connect your modem to the blue WAN port of the router. Do not connect any computers yet!
3. Connect the power to your modem and wait until its lights indicate normal operation
4. Connect the power to the router and press the POWER ON/OFF button, and wait 1 minute to give the router time to
start up and configure itself. This is important!
5. If you have any computers or other devices that were already connected by a network cable, you can now connect these cables to the yellow
LAN ports of the router.
6. Wait another minute. Your router is now installed! Wired computers now have internet access, for wireless computers one additional step is
required, follow the instructions below for the Windows version you have.
7
English version
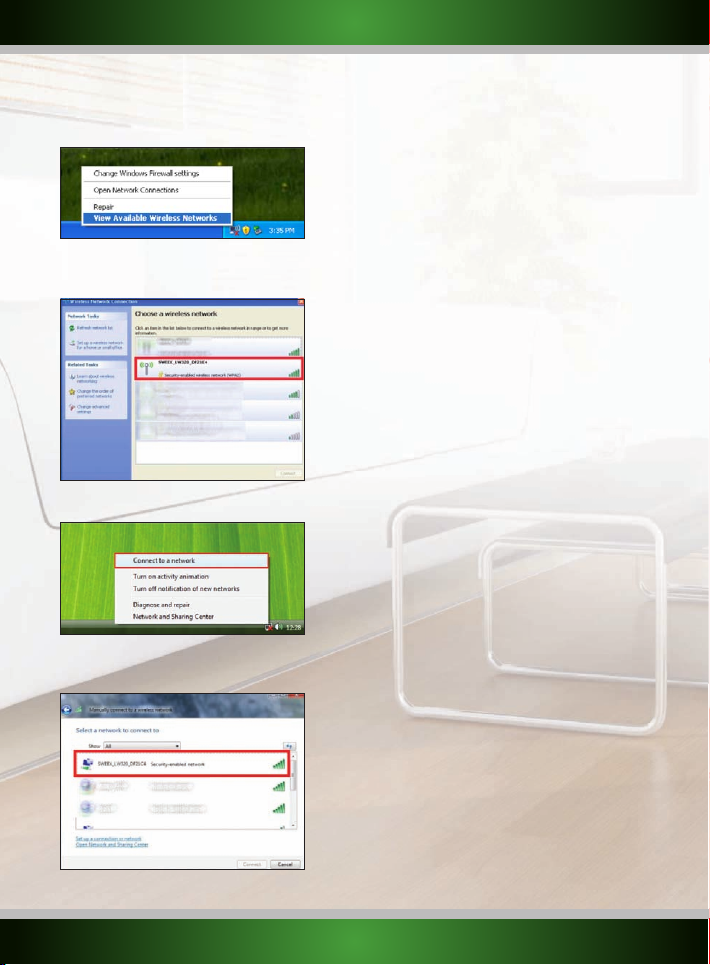
Connecting to a wireless network
• Windows XP: Right click on your wireless adapter’s icon at the bottom right of your screen and click “View Available Wireless Networks”:
A window titled “Choose a wireless network” will appear. In this window, select the “Sweex LW320/321” entry, click the “Connect” button and
follow the instructions on screen:
• Windows Vista: Right click on the Network & Sharing Center icon in the bottom right of your screen, and click “Connect to a network”:
A window titled “Connect to a network” will appear. In this window, select the “Sweex LW320/321” entry, click the “Connect” button and
follow the instructions on screen:
8

English version
Note: If you see a red cross near the network and the text: “The settings saved on this computer for the network do not match the
requirements of the network”, please refer to the troubleshooting section of this manual.
If you have Windows Vista with Service Pack 2 or Feature Pack for Wireless installed and you are connecting the router for the first time, Vista
will allow you to easily setup and secure your wireless network through the WPS method. After connecting you will see the following screen.
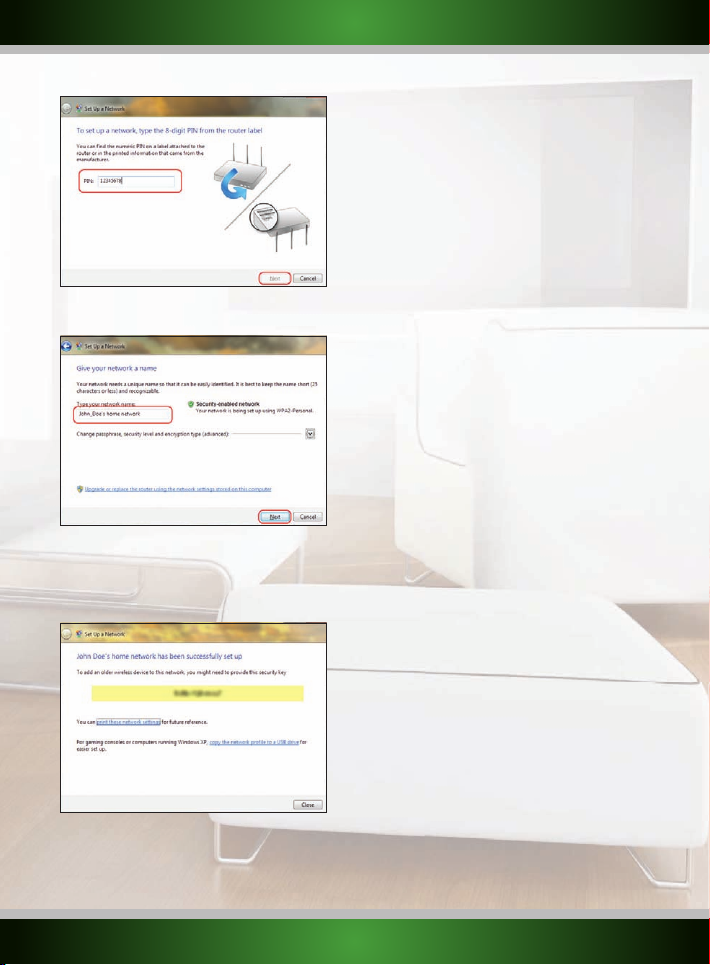
Enter the PIN code on the label on the bottom of your router and click “Next”:
The following screen will appear, enter the desired name for your wireless network, enter a security key and click “Next” to begin configuring
the router:
Note: It is very important that you write down the security key and keep it in a secure place, it is required to add older, non-WPS enabled
devices (such as a Windows XP computer) to your network. Because your network is now already setup and secured, you can skip the
“Wireless network configuration” and “Securing your wireless network” chapters of this manual.
9
English version
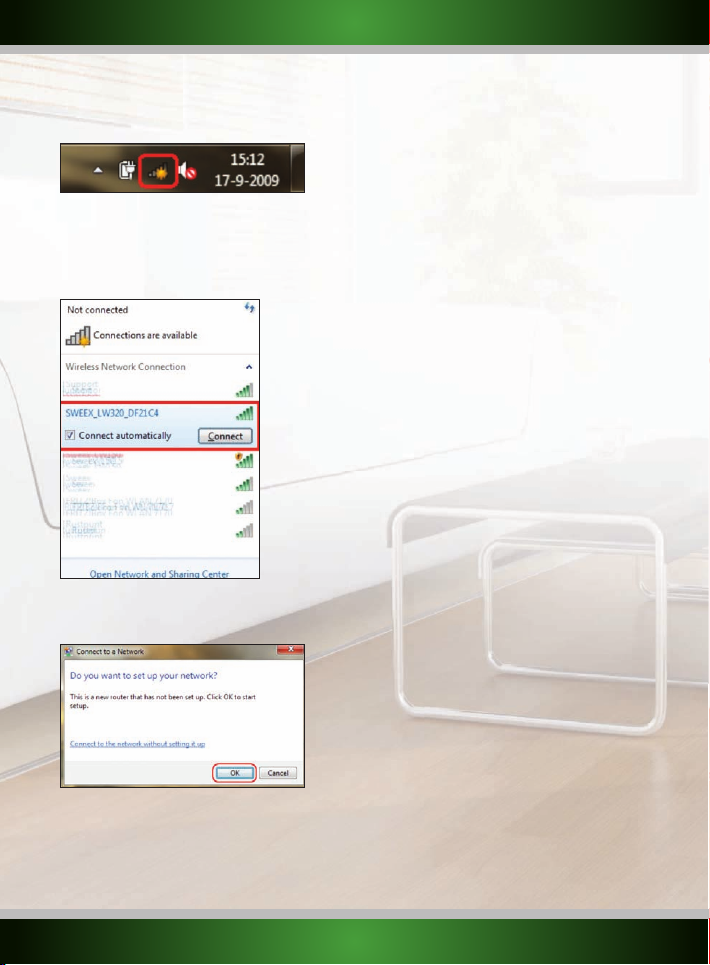
Windows 7: Windows 7 will indicate when wireless networks are available. You can recognise this by the following icon in the bottom-right of
your screen:
Note: If you see a small red cross through the icon, no networks are in range of your computer. Please consult the troubleshooting section of this
manual if this is the case.
Click the icon and a list of wireless networks will appear, select the “Sweex LW320/321 network, check the “Connect Automatically” checkbox,
click “Connect” and follow the instructions on-screen:
When you connect for the first time, Windows 7 will allow you to easily setup and secure your wireless network through the WPS method. After
connecting you will see the following screen:
After clicking “OK” you will be asked for the PIN code of your router. You can find this code printed on the label on the bottom of the router. Fill
in the code and click “Next”:
10
English version
The following screen will appear, enter the desired name for your wireless network and click “Next” to begin configuring the router:
Note: The default security method with this setup procedure is WPA2. If a device in your network does not support WPA2, you can change the
security method by clicking the “Advanced” button.
When the router is configured, you will see the following screen:
Note: It is very important that you write down the security key and keep it in a secure place, it is required to add older, non-WPS enabled
devices (such as a Windows XP computer) to your network. Because your network is now already setup and secured, you can skip the
“Wireless network configuration” and “Securing your wireless network” chapters of this manual.
11

English version
Advanced setup
Advanced setup can be done when you know exactly which settings your ISP requires or when the simple setup fails.
There are 4 possible configurations. We have listed them with instructions on how to configure them. To know which setting matches the
settings required by your ISP, look at the list of providers further on in this manual. The list is made out of ISP’s and their corresponding services.
Behind each service is listed the required setting.
Note: If any of the settings below do not work immediately, it is recommended to power down your modem, wait a few minutes and then
connect the power to your modem again.
Logging in to the router:
For advanced setup, it is required that you login to the router to manually configure it correctly for your internet connection. To log in to the
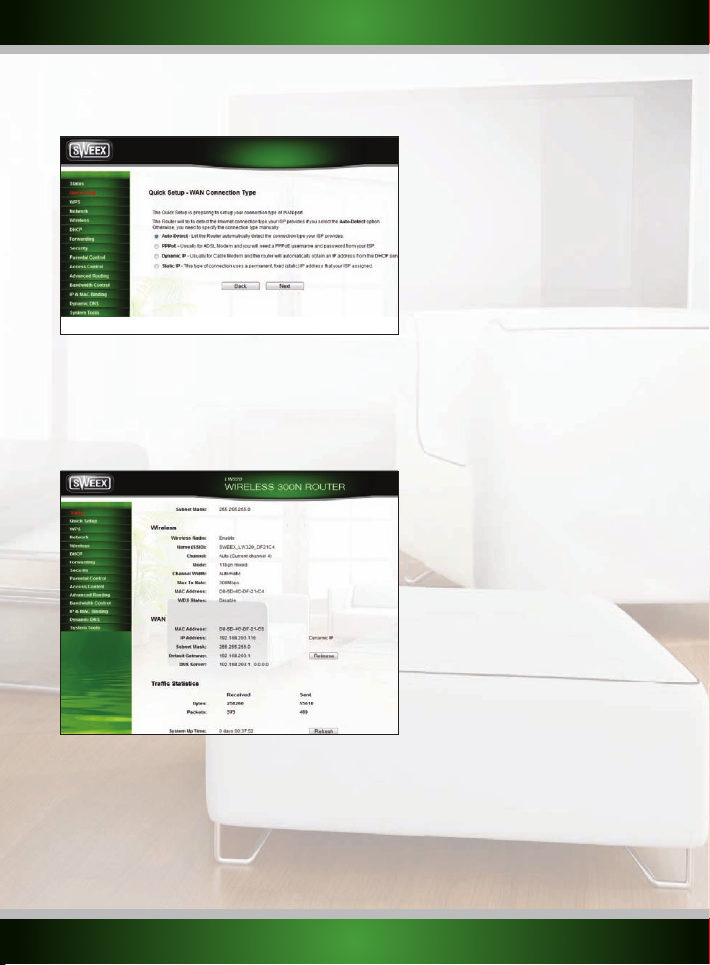
router, start Internet Explorer, empty the address bar and enter: http://192.168.32.1/, then press Enter. The following window should appear:
Enter “sweex” as user name and “mysweex” as password, then click OK. If you are unable to login, please refer to the troubleshooting section
of this manual.
The following screen should appear. Click “Next” to start the advanced setup. If
on the left:
you
see a different screen, click “Quick Setup” in the menu
12
English version
You should see the Internet Configuration Wizard screen:
You can now proceed with the advanced setup using one of the configurations described further on.
Checking if the router is successfully connected to the internet
For all configurations, it is possible to check in the router if you have a working internet connection. After applying the configuration, the router
will process the changes and take you to the “System Status” page. If this does not happen, you can click “Status” in the menu on the left. The
status page looks as follows:
Configuration 1: Auto-Detect
This option will try to detect the internet connection type automatically for your ISP.
If the connection cannot be detected automatically then it is needed to manually configure the internet connection type.
13
 Loading...