

Page 1

English version
4
English version
LW052 Sweex Wireless LAN PCI Card 54 Mbps
Introduction
First of all, many thanks for purchasing this Sweex Wireless LAN PCI Card 54 Mbps. This Wireless LAN Adapter enables you to connect to a wireless
network safely, easily and fast.
To ensure this product operates correctly, we advise you to carefully read this manual first. If despite this manual you still experience problems during
installation or operation of this product, go to www.sweex.com and look under the heading service & support.
In order to fully enjoy the Sweex Wireless LAN PCI Card 54 Mbps, it is important to observe a number of things:
• Do not expose the Sweex Wireless LAN PCI Card 54 Mbps to extreme temperatures. Do not place the card in direct sunlight or in the direct
vicinity of heating elements.
• Do not use the Sweex Wireless LAN PCI Card 54 Mbps in extremely dusty or moist surroundings.
• Protect the card against powerful shocks or jolts – they may damage the internal electronics.
• Never attempt to open the card yourself – it will cause the warranty to lapse.
Contents of the box
Prior to using the Sweex Wireless LAN PCI Card 54 Mbps, check if all required parts are present. The following parts must be present in the box:
• Wireless LAN PCI Card 54 Mbps
• CD-ROM with software, driver, manual and Panda Antivirus trial software
If one of the above parts is missing, please contact the retail outlet where you purchased the device.
Specifications
• Supports: IEEE802.11b and IEEE802.11g
• Maximum connection speed: 54 Mbps
• Auto fallback
• Chipset: Atheros AR2413A
• Protection: WPA/WPA2 encryption, IEEE802.x encryption, TKIP/AES encryption, 64/128/152-bit WEP encryption
• Supports: Windows 98SE, 2000 and XP
Page 2
English version
5
English version
Hardware Installation
1. Ensure that the PC is switched off and there is no voltage on the mains.
2. Also, disconnect the printer and monitor cables (they have their own power supply) to make absolutely sure that the PC is not live.
3. Now unscrew the computer casing.
4. Subsequently, remove any static electricity you may carry on your body. Do this by touching a (neutral) pipe of the central heating system or an
unpainted water pipe, among other things. Please note that you must not use a magnetic screwdriver for this. Before you proceed any further,
shortly touch the iron frame of the PC casing. Make sure that you minimise contact with any contact points of the PC, PCI card or the memory.
5. Find a vacant PCI slot and remove the metal guard plate part of the computer casing in front of the relevant slot. On occasion the card does not
allow to be inserted in the PCI slot smoothly. Should this be the case, do not force anything, but try another available slot.
6. Once the card has been successfully installed, check whether all other cards are still properly inserted in the PCI slots. It is possible that the
other PCI cards are lifted up slightly when installing a new PCI card; as a result, the relevant cards or even the entire PC may no longer operate
correctly.
7. Replace the casing on the computer base and correctly reconnect all cables.
8. Switch on the PC again.
Software Installation under Windows 2000 and XP
We advise you to ensure the operating system is up-to-date before you start the installation. This is easy to check by starting up Internet Explorer and
selecting the option “Windows Update” in the “Extra” menu.
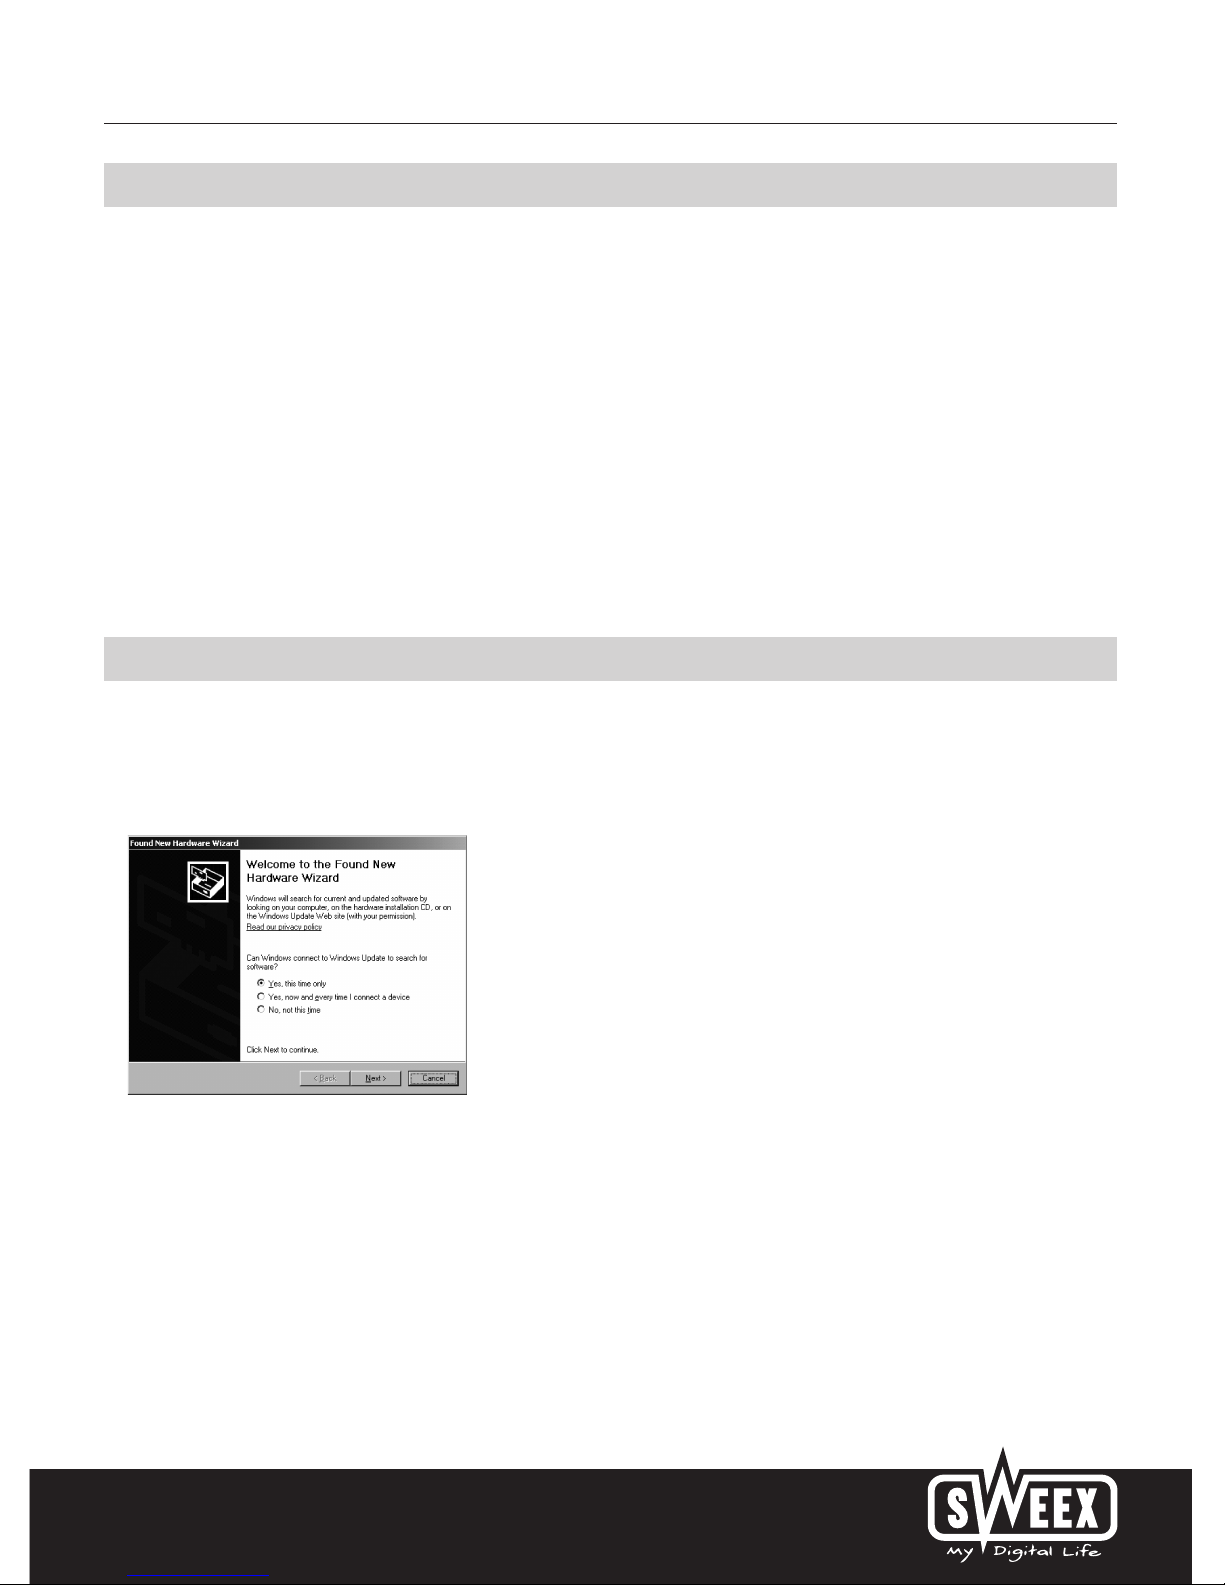
When starting up the PC, Windows will recognise the card and the following screen will appear.
Here click “Cancel”.
After the PC has started up, insert the Sweex CD-ROM in the CD-ROM player. If you have already done so, briefly open the CD-ROM loader and close
it again.
The CD-ROM will start automatically. A menu will automatically appear.
Page 3
English version
6
In the event that the autorun menu does not appear, it can also be started manually. In order to do this, open “My computer” and go to X: (X being
the letter of your CD-ROM drive). Here you will find the “autorun.exe” file. Double-click to execute.
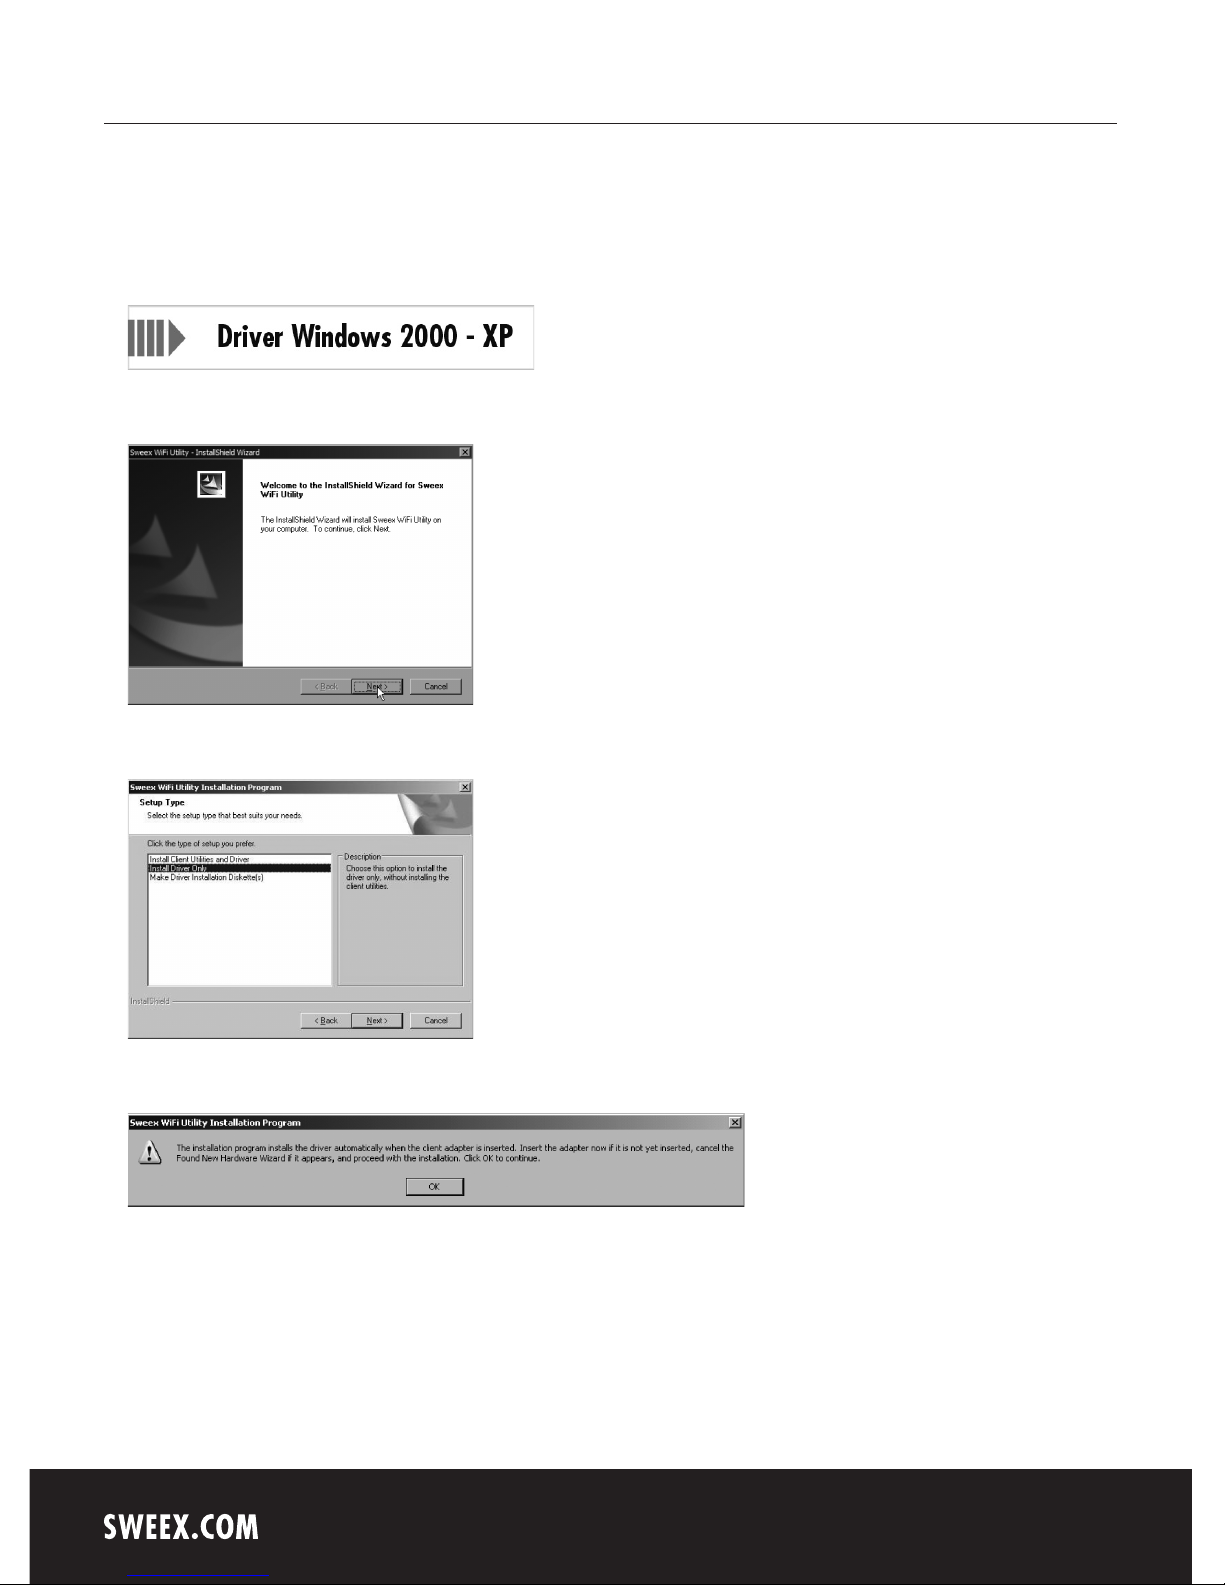
Click on “Driver Windows 2000 - XP” to start the driver installation process.
The following screen appears:
Click “Next”.
Here select “Install Driver Only” and click “Next”.
Click “OK”.
Page 4
English version
7
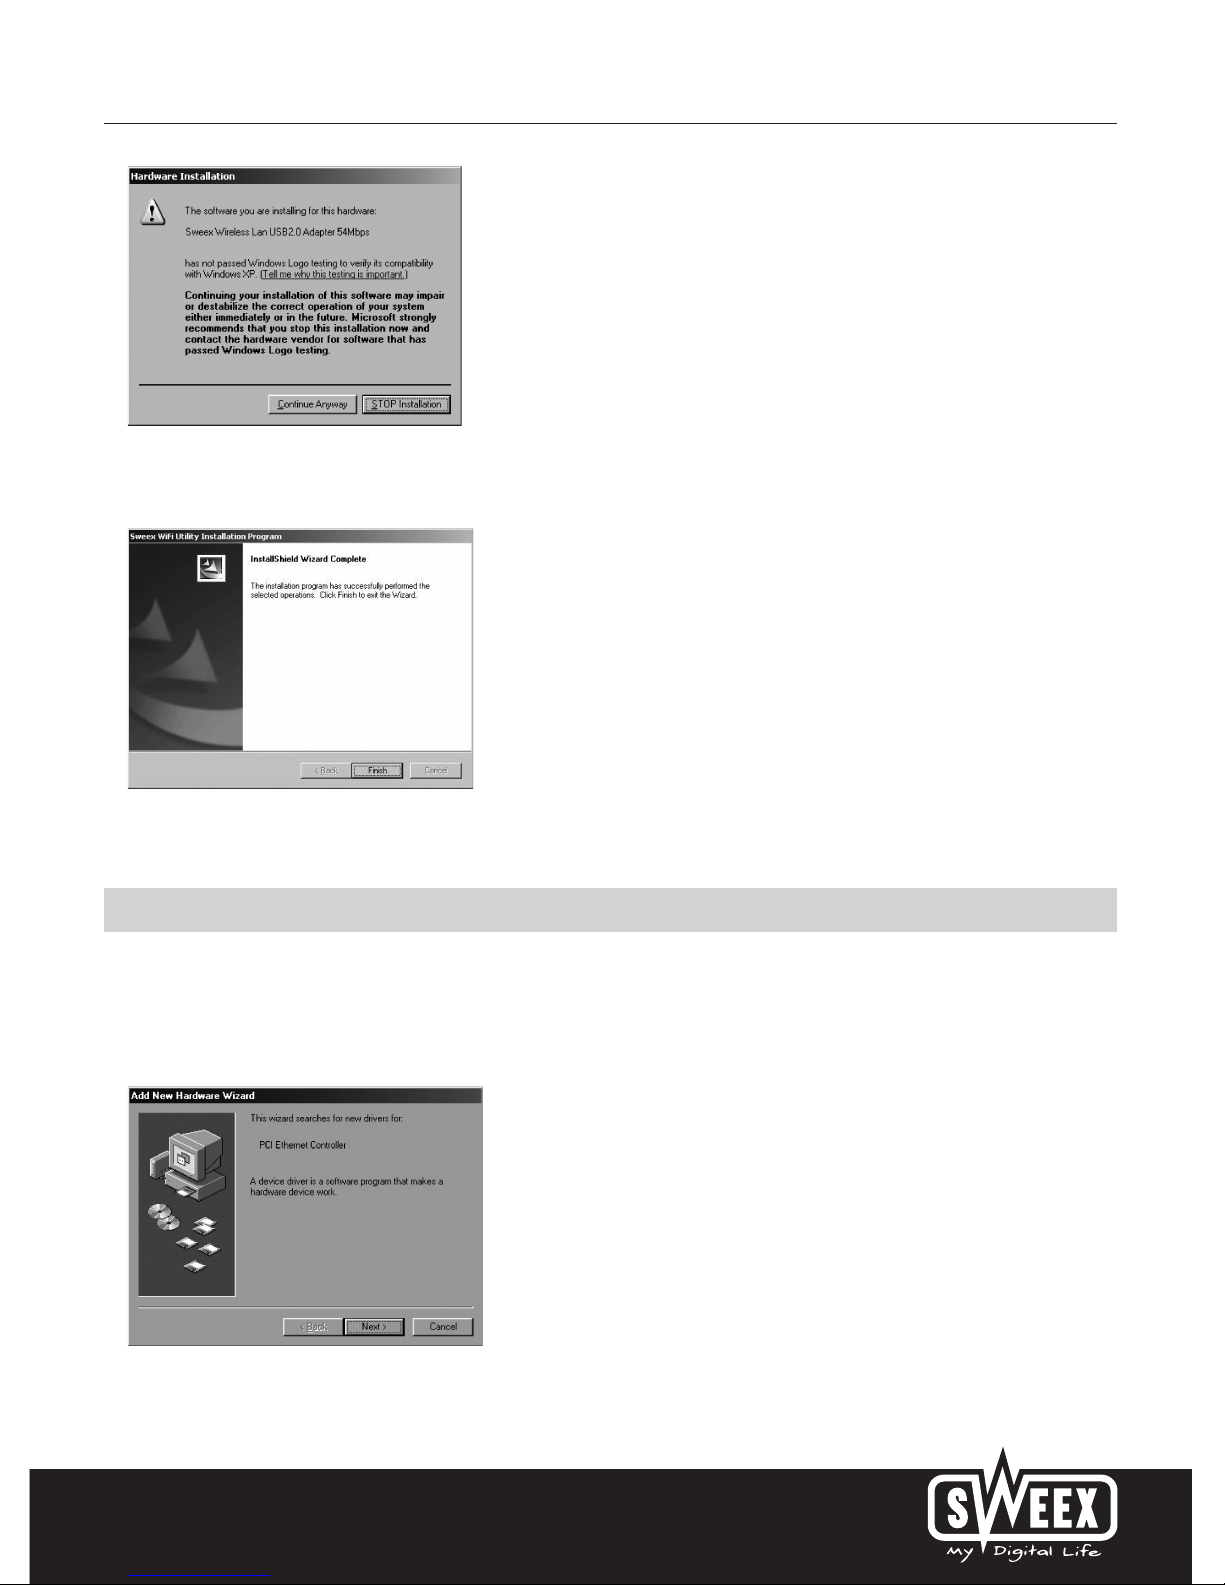
Windows will note that the driver is not certified. This will not affect the correct functioning of the Sweex Wireless LAN PCI Adapter 54 Mbps. All
Sweex products and corresponding drivers are tested extensively. Here select the option “Continue Anyway”.
Click on “Finish” to complete the installation.
Software installation under Windows 98SE
We advise you to ensure the operating system is up-to-date before starting the installation. This is easy to check by starting up Internet Explorer and
selecting the option “Windows Update” in the “Extra” menu.
When starting up the PC, Windows will recognise the card and the following screen will appear.
Here click “Cancel”.
Page 5
English version
8
After the PC has started up, insert the Sweex CD-ROM in the CD-ROM player. If you have already done so, briefly open the CD-ROM loader and close
it again.
The CD-ROM will start automatically. A menu will automatically appear.
In the event that the autorun menu does not appear, it can also be started manually. In order to do this, open “My computer” and go to X: (X being
the letter of your CD-ROM drive). Here you will find the “autorun.exe” file. Double-click to execute.
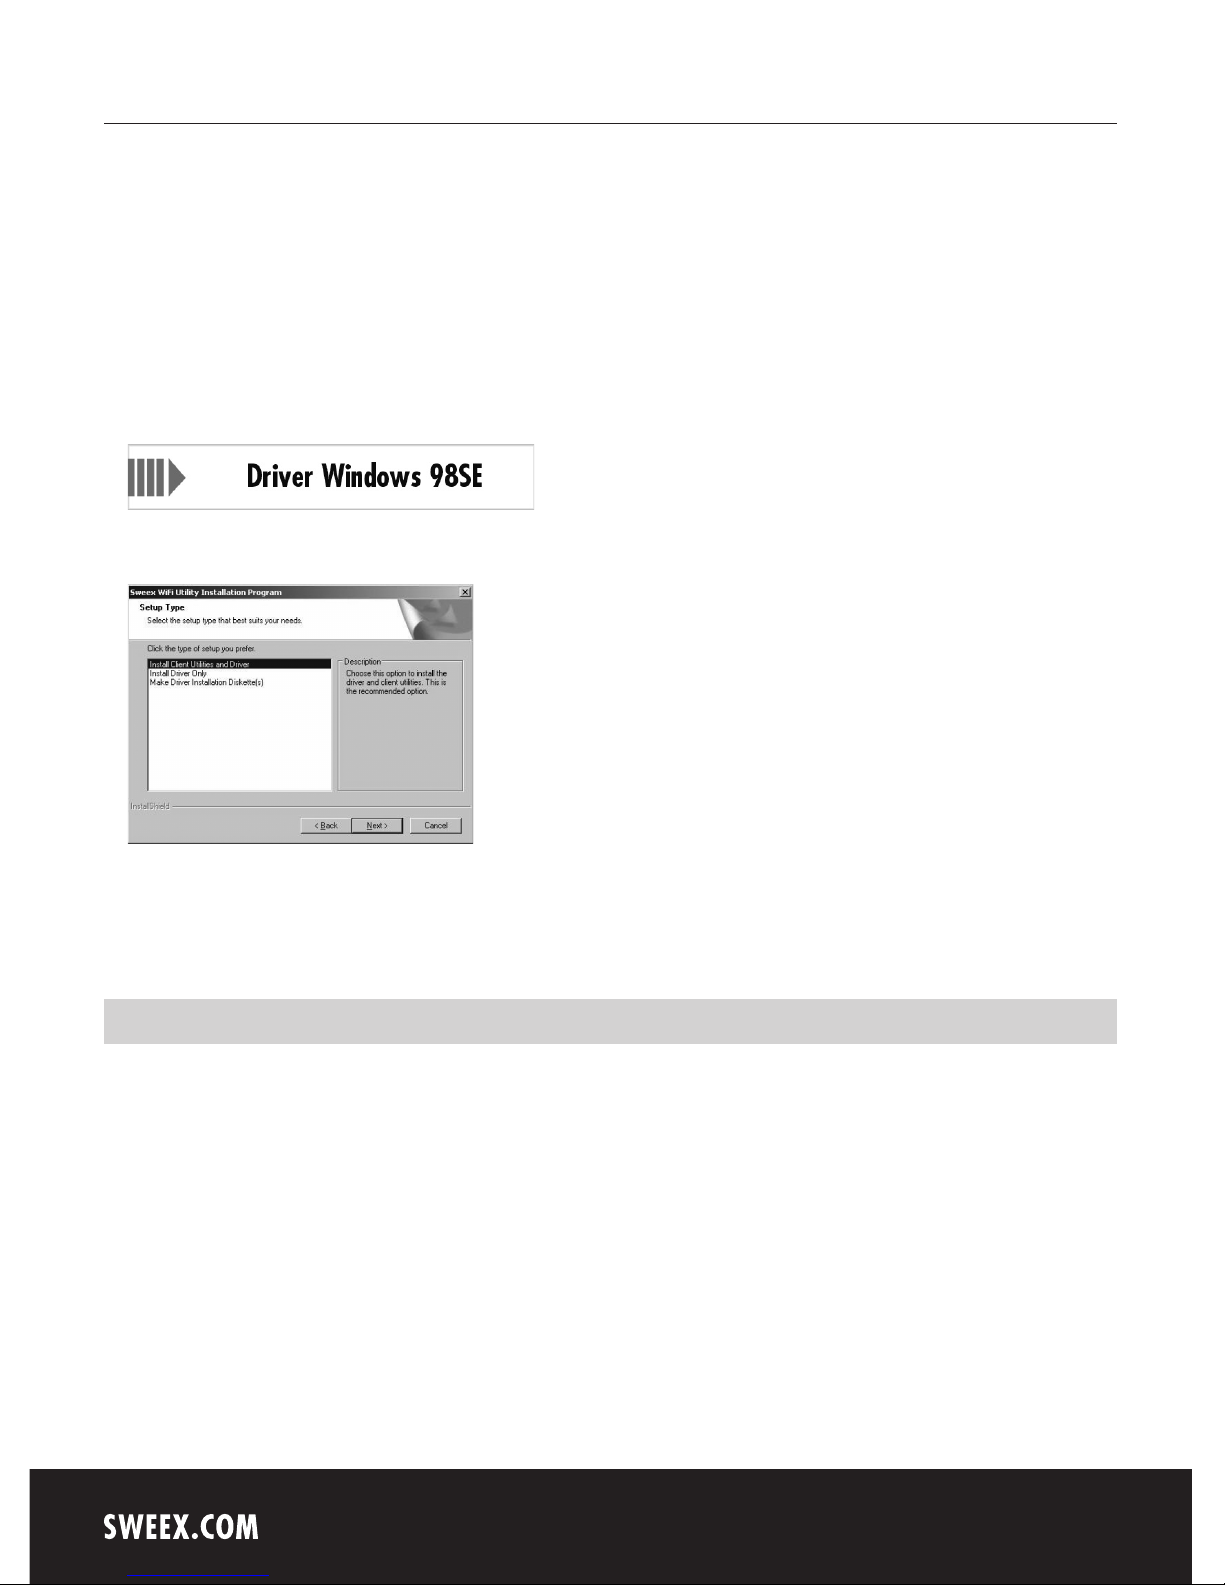
Click on “Driver Windows 98SE” to start the driver installation process.
Follow the installation procedure until you see the window below.
Here select “Install Client Utilities and Driver” and click “Next”.
Follow the subsequent steps to complete the installation procedure. When the computer prompts you to restart, click “OK” to do so.
Setting the wireless network
How does it work?
In order to create a wireless network, you need a wireless router, wireless modem or WiFi access point. The wireless router, modem or access point
transmits the wireless network. The name of this network, also referred to as SSID, depends on your wireless router, modem or access point and
often differs per model or brand. You can often determine the name yourself and thus recognise your own wireless network.
Protection
You could compare a wireless network to radio signals. However, the range of a wireless network at home is not as extensive. Your home wireless
network often has a range of 20 to 30 metres. This means that neighbours and passers-by too can make use of your network. As a result they can
get away with surfing on your Internet connection, and they may gain access to your shared folders and files on your network. That is why it is often
recommended to secure your wireless network. This protection is set up on the device transmitting the network. In most cases that is the wireless
router, modem or access point. By adding a WEP or WPA protection code, you secure your network. This code is also referred to as the network key.
Enter this code on each computer that wants to connect to that secured network. You can only be part of that network if you enter this code. If you
did not enter the network key into the router or modem yourself, ask the installer, manufacturer, supplier or provider for this code.
Page 6
English version
9
Connecting the computer to the wireless network
After having installed the drivers of the Sweex Wireless LAN PCI Card 54 Mbps, you can connect your wireless computer to your wireless network.
This procedure is outlined below.
Windows 2000 and XP
In the bottom left of your screen, go to Start “Control Panel”.
Then go to “Network and Internet Connections”.
Open “Network Connections”.
Or, if the Windows classic style is used:
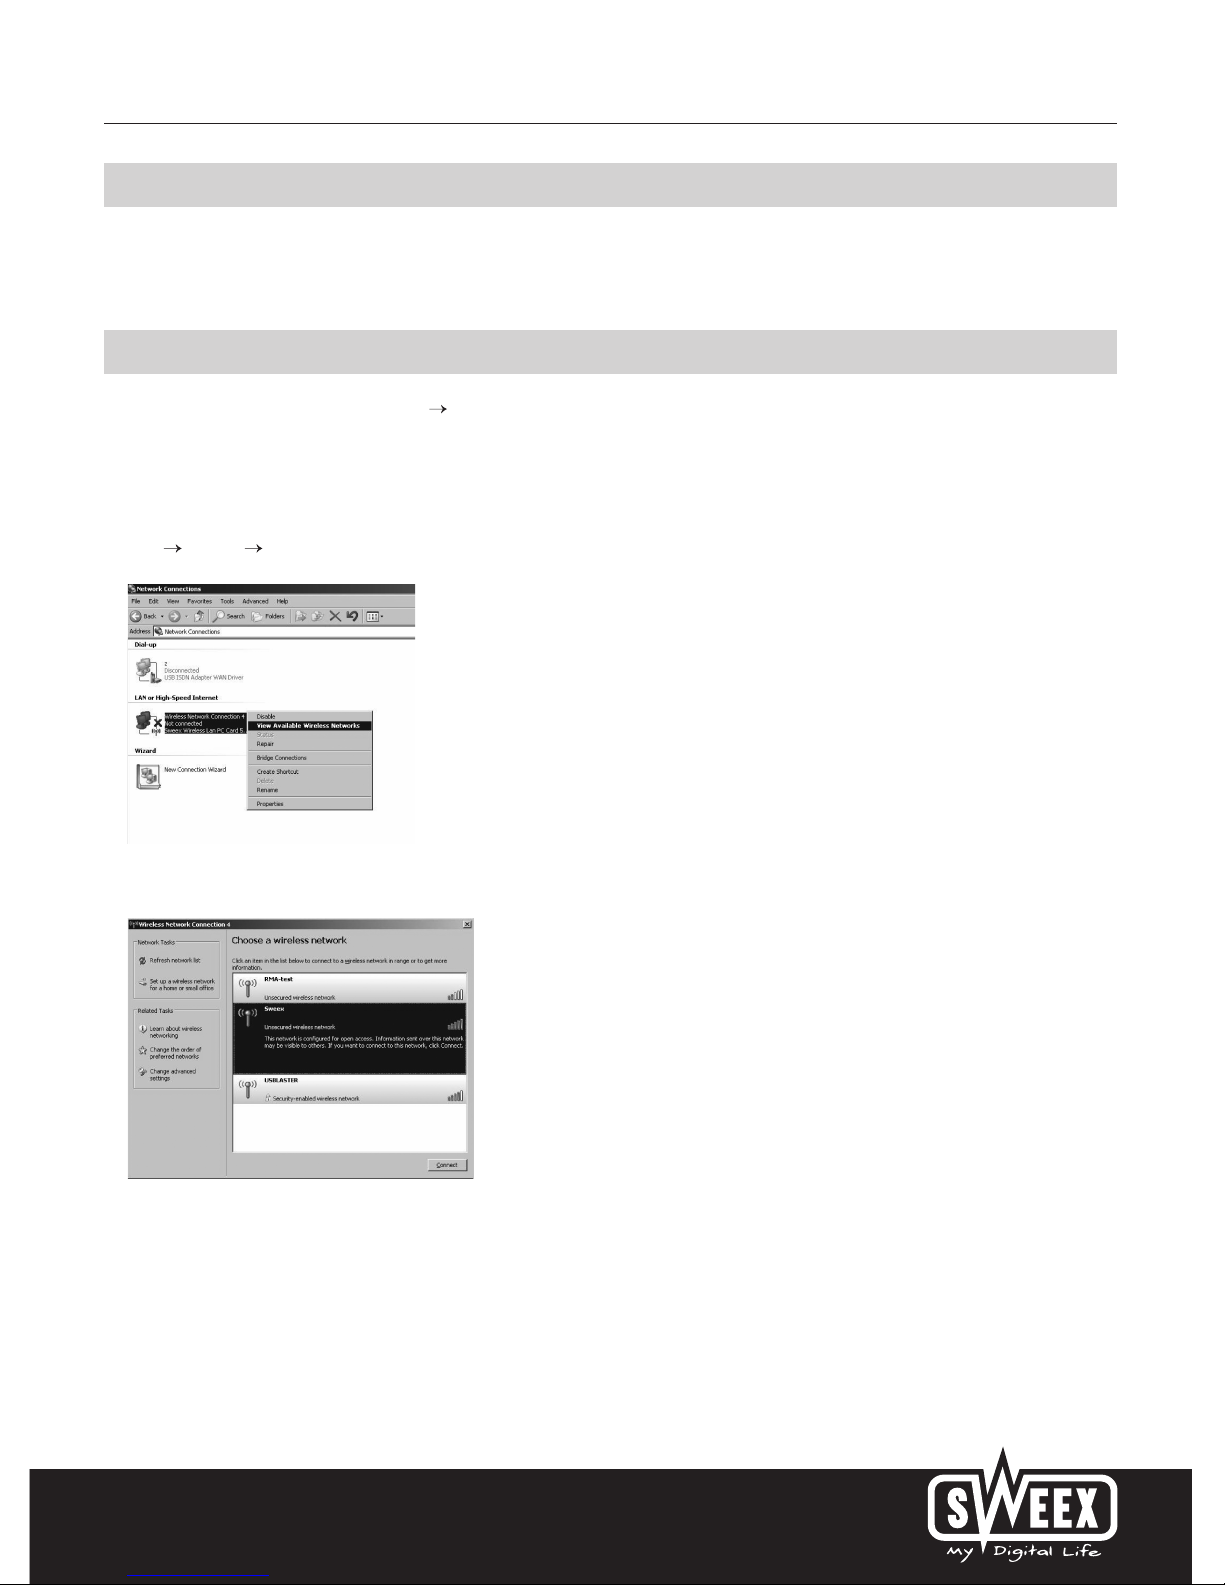
Start Settings “Network connections”. The following window appears.
Right-click “Wireless Network connection” and select “View Available Wireless Networks”.
This window shows you which wireless networks are detected by your computer. In our example, it has found the “RMA-test”, “Sweex” and
“USBLASTER” networks. In your situation, the detected networks will differ from this picture.
In order to let the computer again check any networks it detects, click on “Refresh network list” in the left column. This will always give you the
most up-to-date and latest situation.
Page 7
English version
10
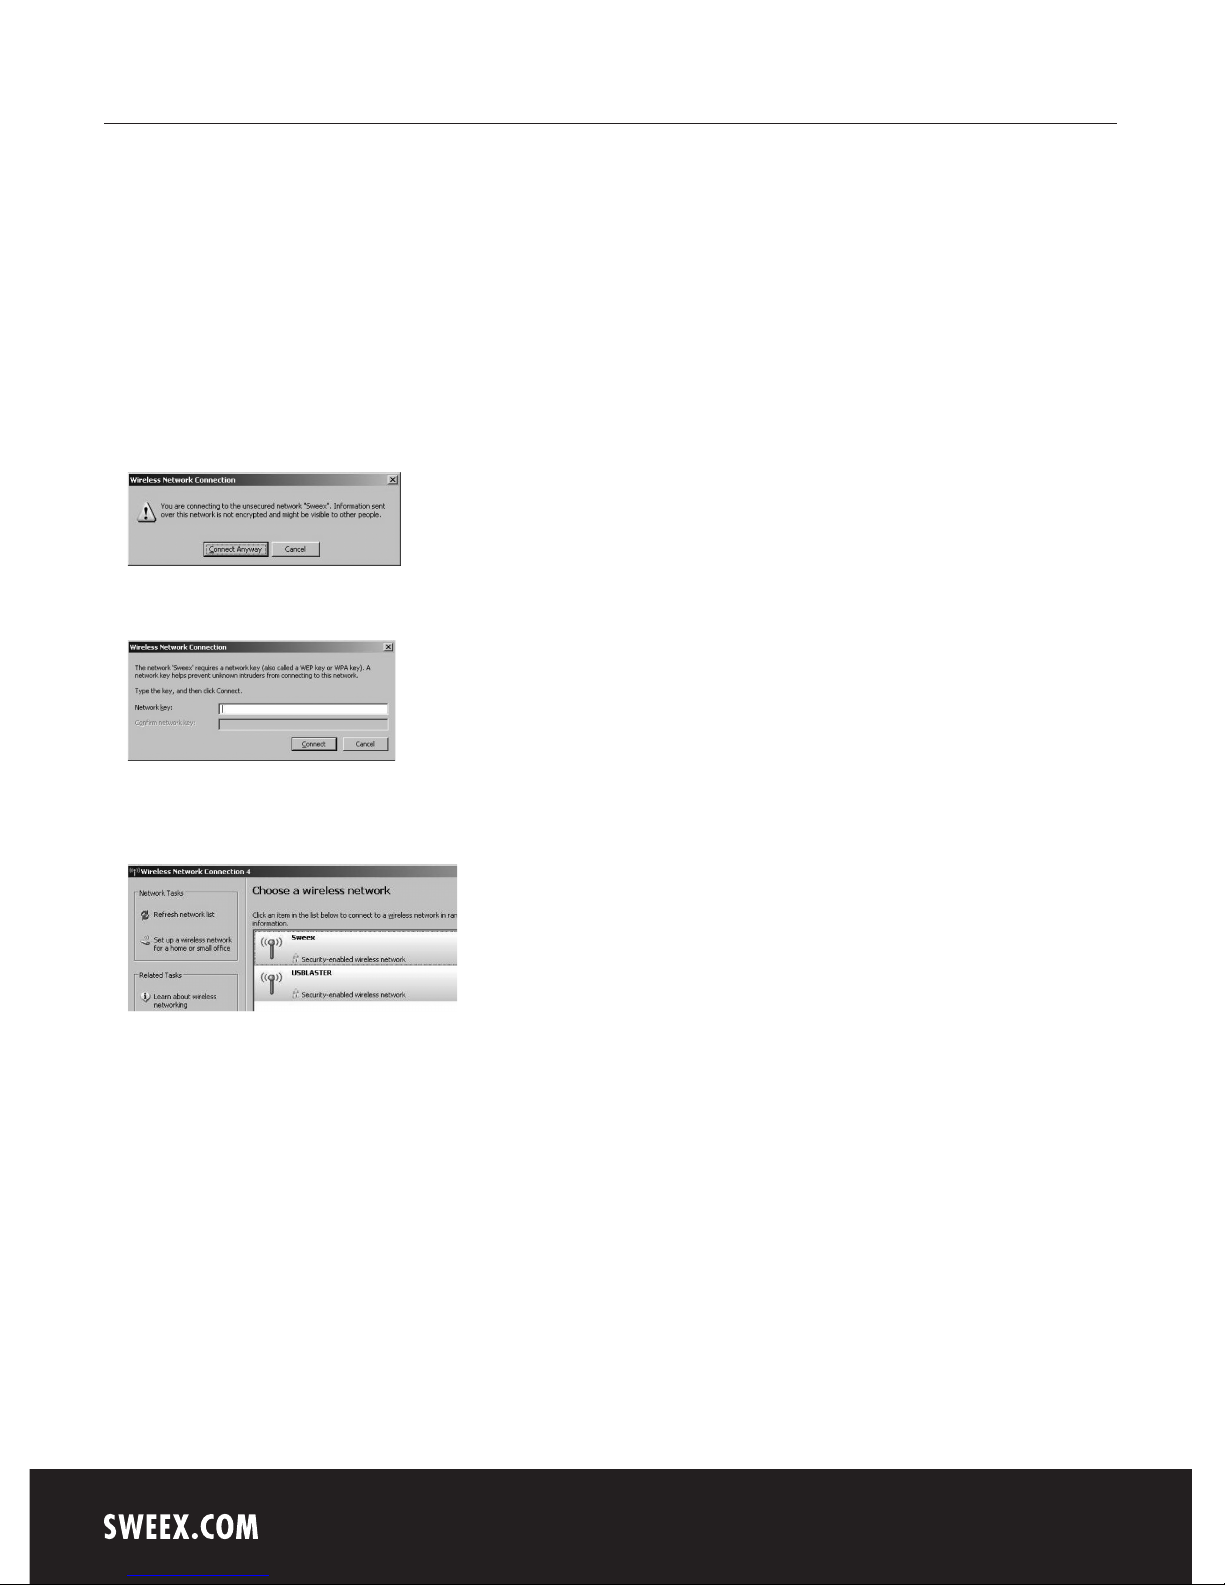
The network called “Sweex” is an unsecured network. You do not need a security code to connect your computer to this network. The “USBLASTER”
network is secured. You do need a security code to connect your computer to this network.
If no list appears, but you are told no wireless networks can be detected, check whether the wireless router, modem or access point is switched on
and whether the distance to the wireless computer is not too big.
If you receive a notification saying the wireless connection cannot be configured because it is managed by another programme, disable that software
and go back to the previous step to start again.
In order to connect to one of the networks detected, select it and then click “Connect”.
This notification appears when you are connecting to an unsecured network. Click “Connect Anyway”.
This window appears when you are connecting to a secured network. You are prompted for the security code, also referred to as network key.
Enter the network key in both lines and click “Connect”.
If the connection to the wireless network has been successful, the notification “Connected” appears after a couple of seconds. You now have an
active wireless network.
If the network key you have entered is incorrect, a notification saying "Limited or no network connection" appears after a couple of seconds. Your
wireless connection is not satisfactory. Check the network key. Check the wireless router, modem or access point which should provide the computer
with an IP address. This is a unique number required for each computer that is part of a network. In most cases, the computer is automatically given
an IP address. Also check the computer settings.
Page 8
English version
11
View the computer settings under Windows 2000 and XP
In the bottom left of your screen, go to Start “Control Panel”.
Then go to “Network and Internet Connections”.
Open “Network Connections”. Double-click the wireless network connection.
Or, if the Windows classic style is used:
Start Settings “Network connections”.
Double-click “Wireless Network connection”.
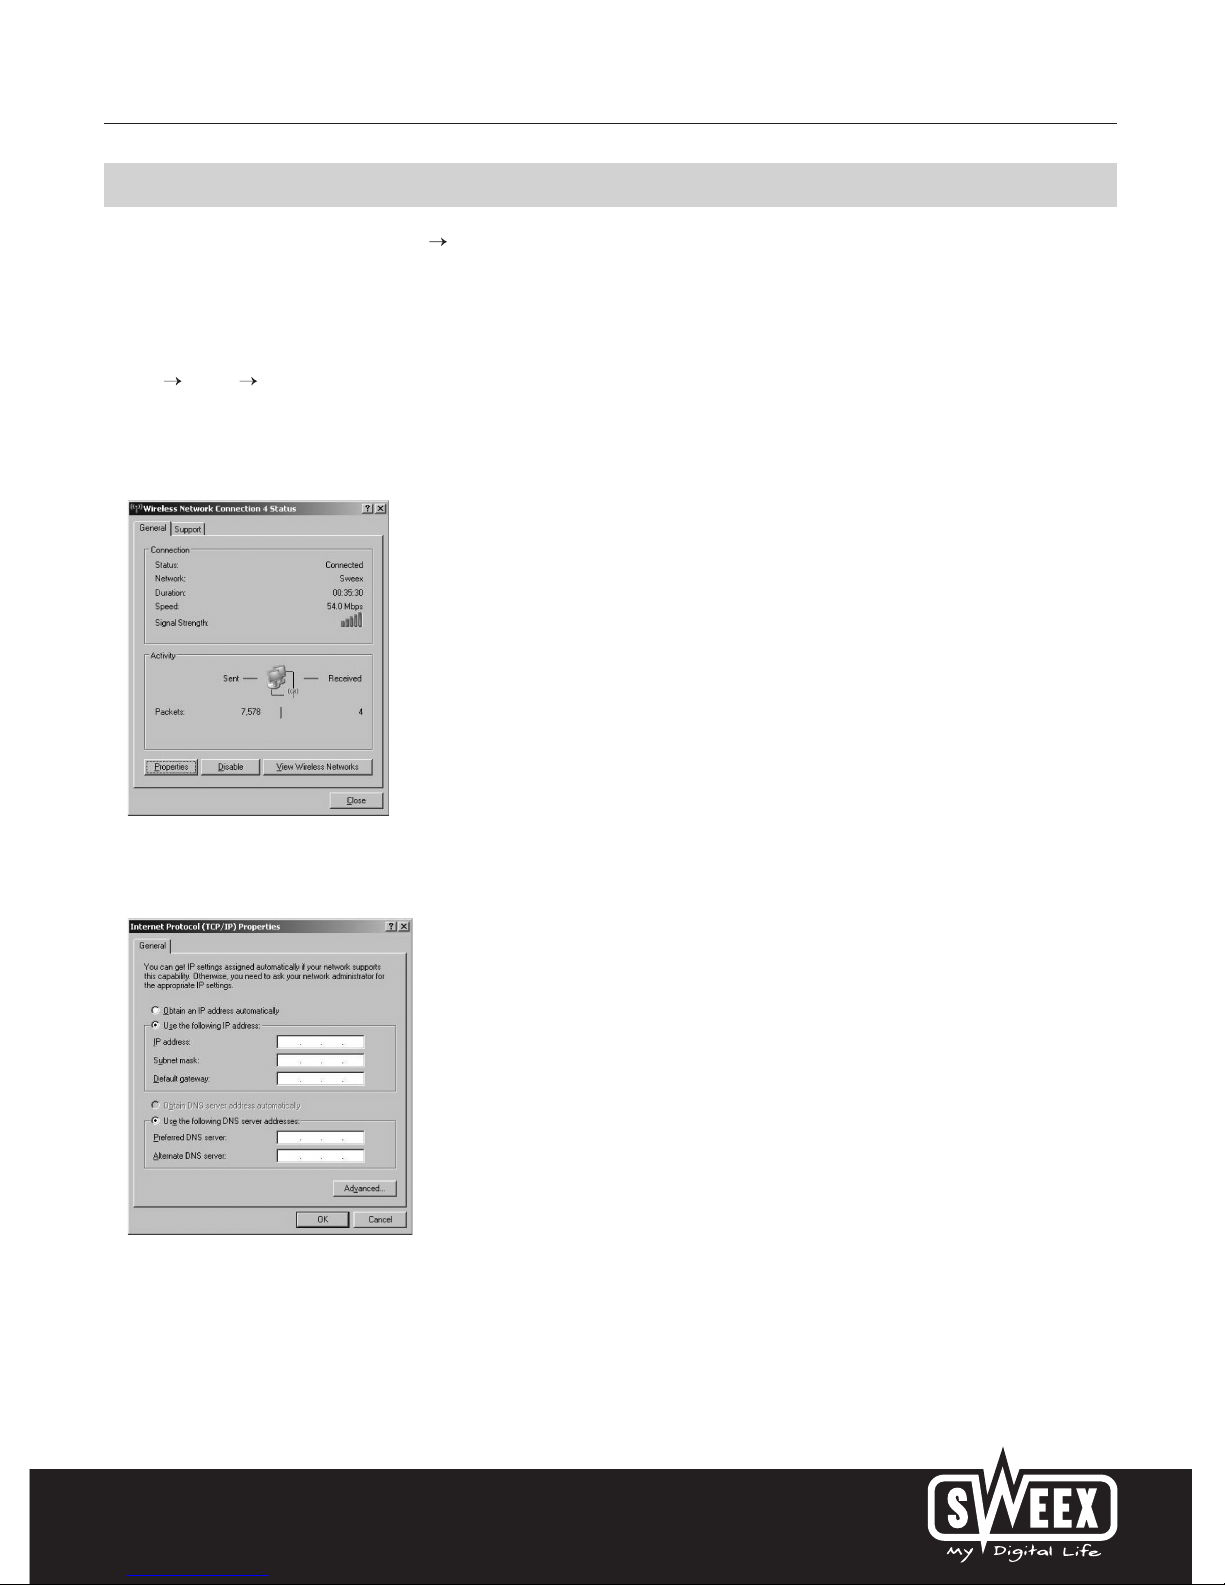
A window appears, indicating the status of the wireless connection.
Click on the “Support” tab to view your IP address. If the connection is successful, the IP address shown usually is that of the wireless router or
modem. If you need to enter or change the IP address settings, return to the “General” tab and click “Properties”.
Here, either choose to obtain an IP address automatically or enter the IP address you want to use. Click “OK” to save the settings.
Page 9
English version
12
Connecting the computer to the wireless network under Windows 98SE
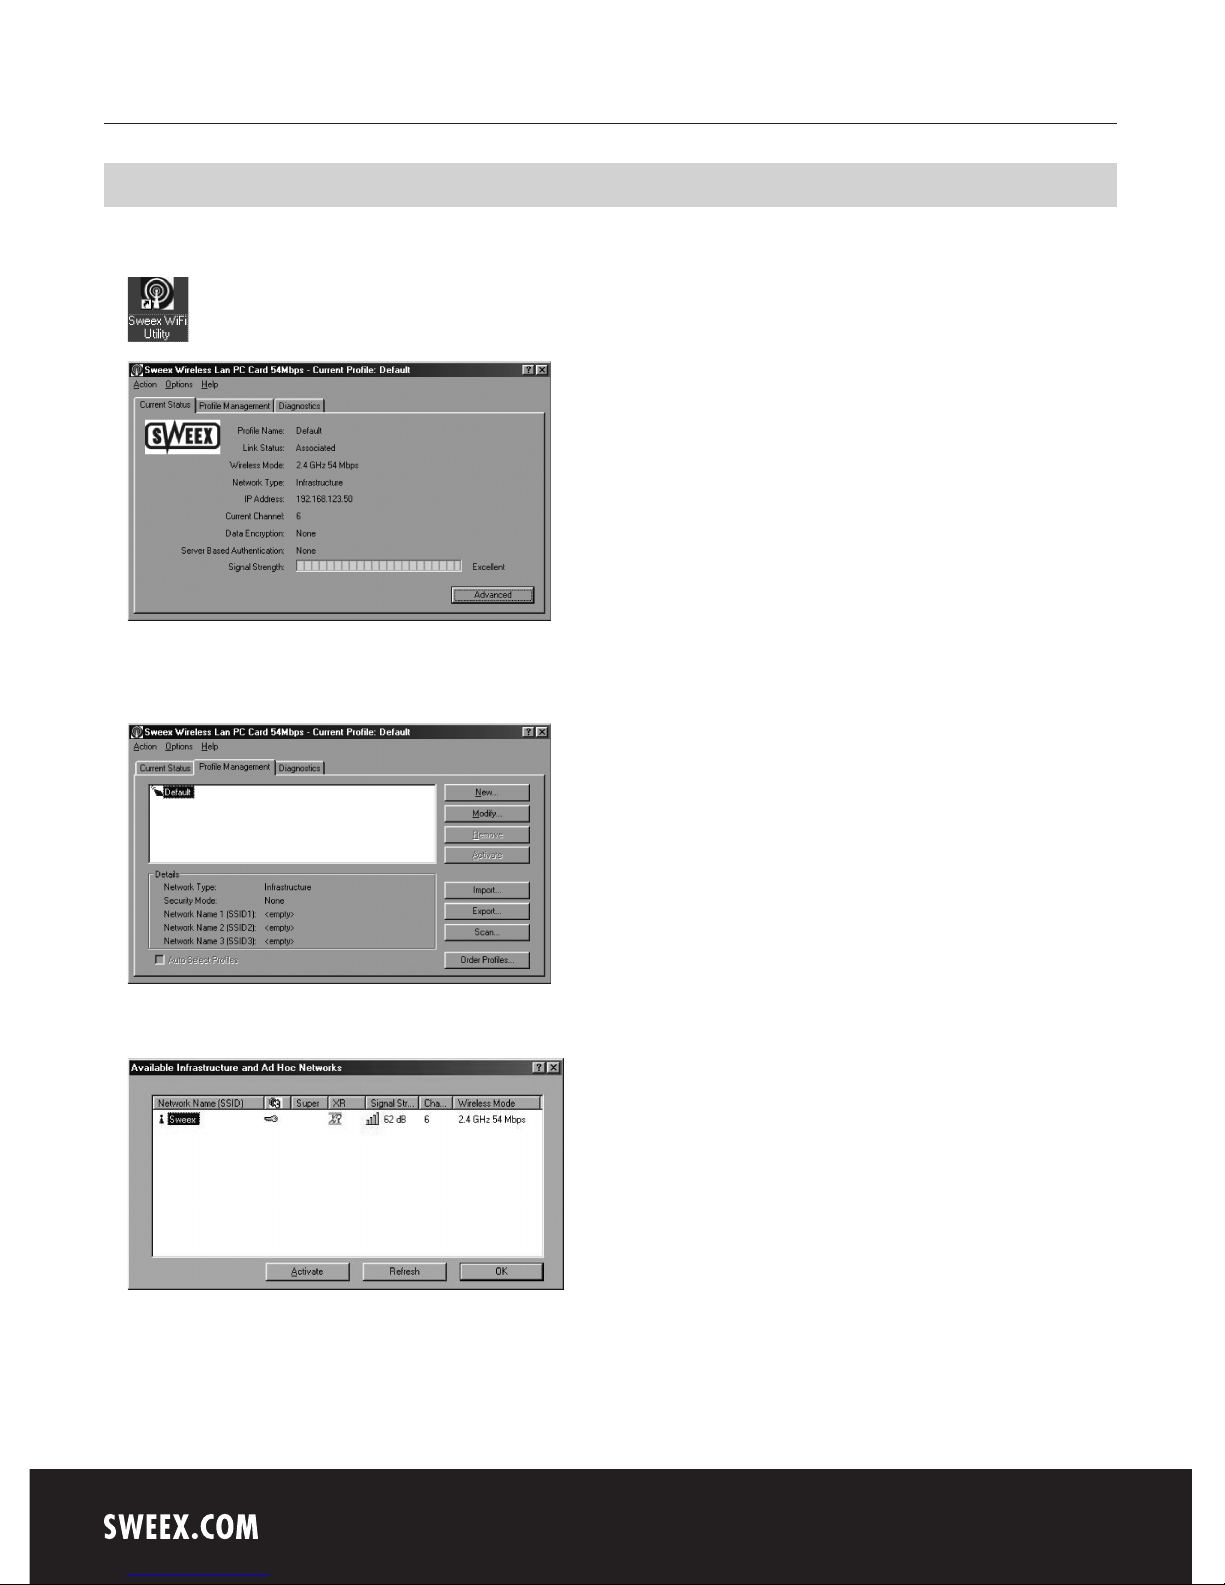
Following the computer's restart, click on the Sweex WiFi Utility icon on your desktop in order to connect your computer to the wireless network.
On the “Current Status” tab you can view the current status of the wireless connection. Click on the “Profile Management” tab in order to configure
or change the connection.
In order to establish a connection with the wireless network, click on “Scan” to view a list of wireless networks detected by your computer.
This window shows you which wireless networks are detected by your computer. In our example, the “Sweex” network has been found. In your
situation, the detected networks will differ from this picture.
Page 10
English version
13
The key shown after the “Sweex” network indicates that this is a secured network. In order to connect to “Sweex”, you need a network key. Select
your wireless network and click on “Activate”.
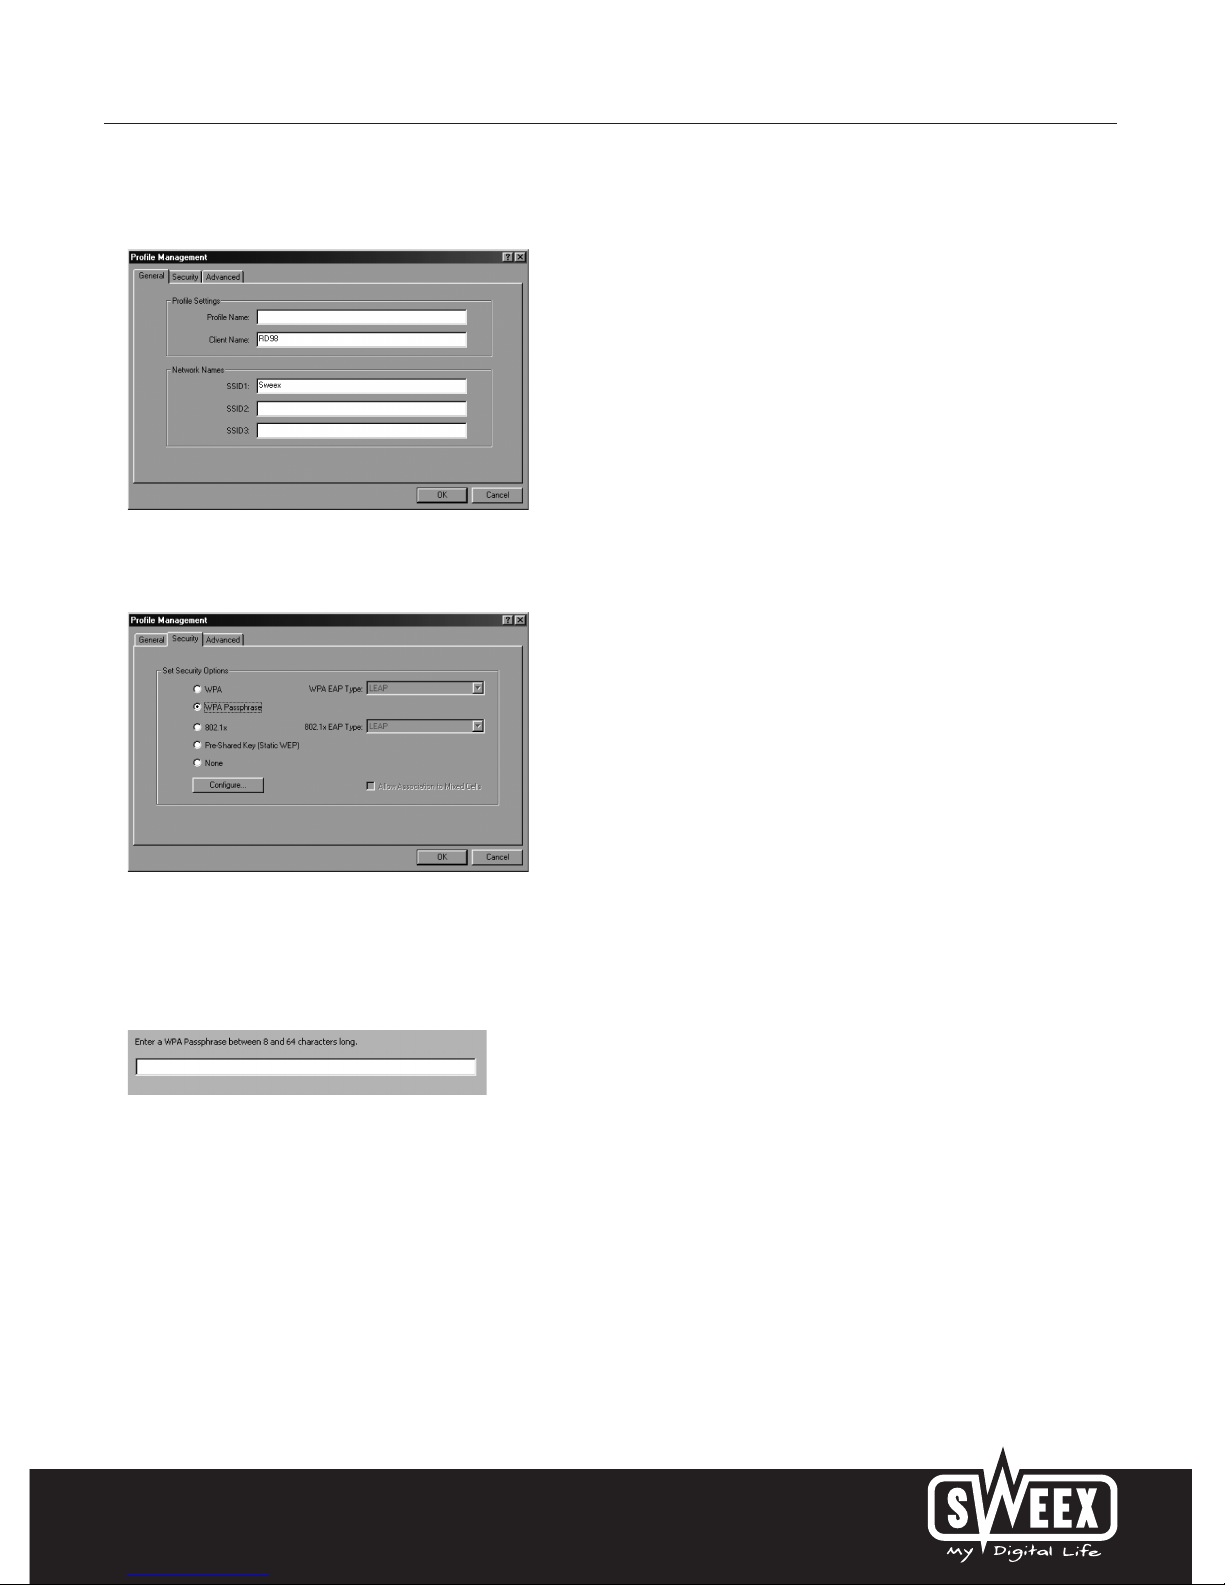
Enter a name for this profile under “Profile Name”. You can make this up yourself; it can be anything you like and you do not need to remember
or save it.
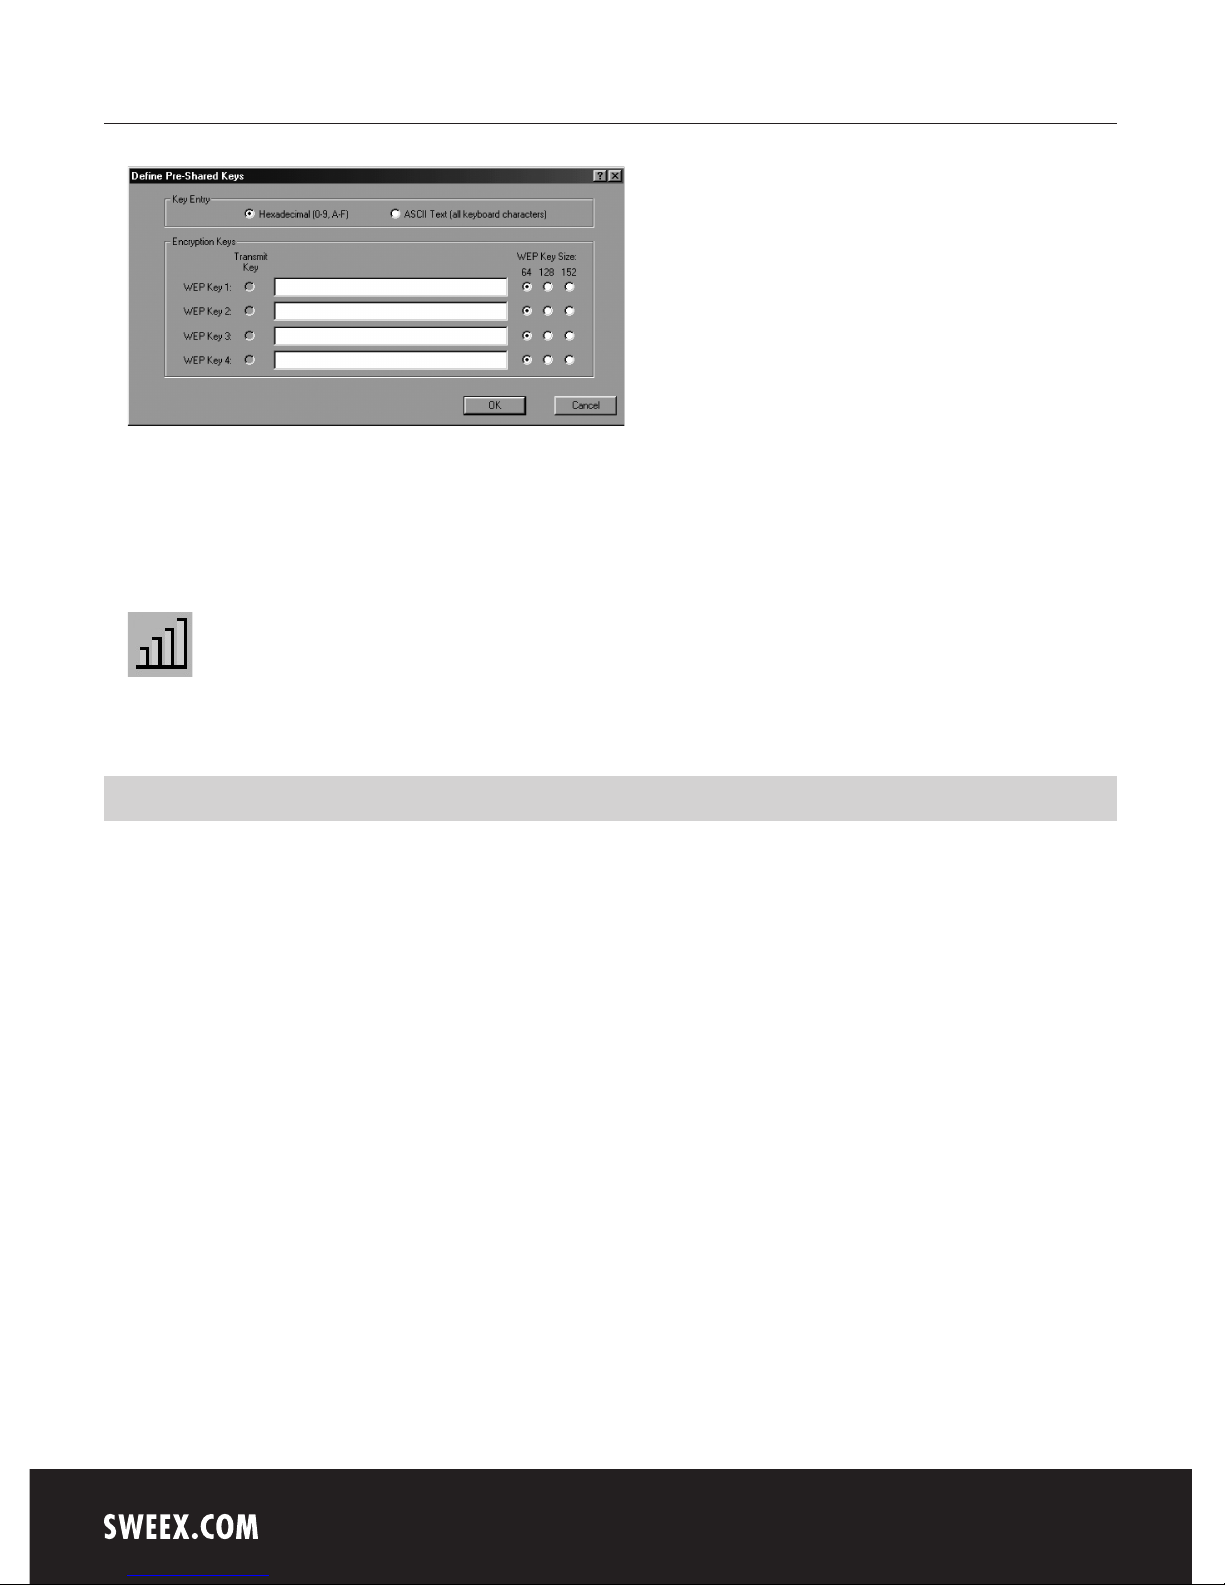
When connecting to a secured wireless network, you can set the WPA or WEP encryption under the “Security” tab. Select “WPA Passphrase” or “PreShared Key (Static WEP)” and click on “Configure” in order to enter the network key.
With the current drivers, WPA2 is not available for Windows 98SE.
Here enter the WPA network key.
Page 11
English version
14
Under “Key Entry” select Hexadecimal or ASCII Text.
Enter your WEP network key under “WEP Key 1”. Under “WEP Key Size” indicate whether your network key is a 64, 128 or 152-bit key. Click
“OK” to save the settings.
If the network key is correct and the connection is successful, the icon in the bottom right of your screen will turn green.
You now have an active wireless network.
Warranty
All products under the Sweex brand are warranted for a period of three years. We do not grant support or warranties for any software and/or
(rechargeable) batteries included. Settlement of guarantee only takes place via the dealer where you have purchased the product in question.
The rightful owner has and retains title to all brand names and related rights mentioned in this manual.
 Loading...