


English version
LC103 Sweex LAN PCI Express Card Gigabit
• Do not expose the LAN PCI Express Card Gigabit to extreme temperatures. Do not place the device in direct sun light or close to
heating elements.
• Do not use the LAN PCI Express Card Gigabit in extremely dusty or moist environments.
• Prevent hard shocks or impacts of the device, as this can cause damage to the internal electronics.
Hardware Installation
1. Make sure the computer is turned off and that there is no power connected.
2. Also remove the printer and monitor cable, because these have their own power supply.
3. Now unscrew the computer casing.
4. Make sure that you undo yourself of possible static electricity. This can be done by grabbing a (naked) central heating pipe or
an unpainted water pipe. Pay attention not to use a magnetic screwdriver. Briefly touch the iron frame of the PC casing. Avoid
direct contact with the contact points of the PCI Express slot and contact points on the graphics card.
5. Locate a free PCI Express slot and remove the metal protection plate that is in the computer casing for the intended slot.
Consult the manual of your computer to find the PCI Express slot.
6. When possible fasten the card with screws so it can not move.
7. When the card is mounted successfully, check if the other cards are still fitted properly in their expansion slot. It can happen
that when a new card is added the other cards rise a little with as result that the card, or even the entire computer, may not
work.
8. Close the computer casing and reconnect all cables properly.
9. Turn on the computer.
Installation Windows XP and Vista
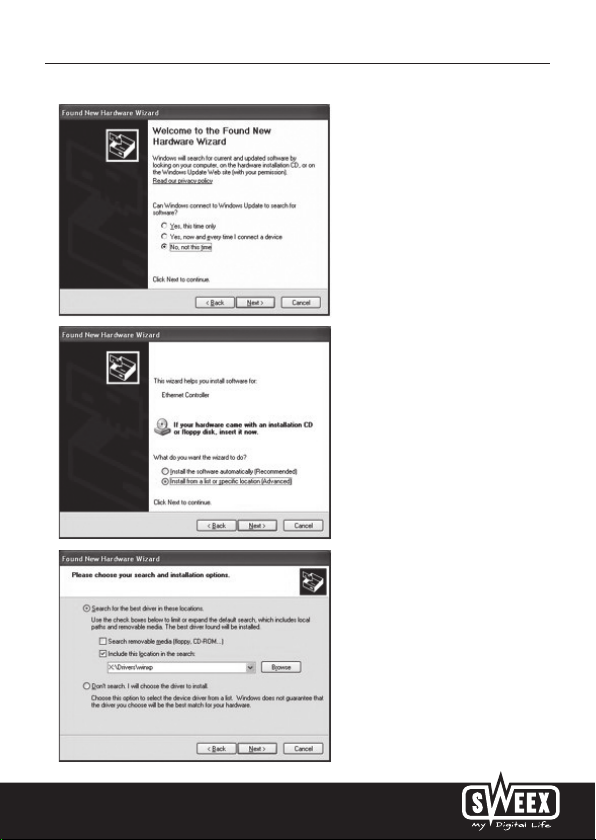
After detection of the hardware, Windows shows the following screen;
4
English version
Choose the option “No, not this time” and Press
“Next”.
In the next screen choose “Install from a list or specific
location” and press “Next”.
Check the second option: “include this location”. Place
the Sweex CD-ROM in the player. Thereafter go to the
Sweex CD-ROM via “Browse” and select the “Drivers”
folder. In this folder choose the correct operating
system; Winxp or Vista. Press “Next”.
5

English version
Windows can give a warning that the driver is not certified. This is not a problem for correct functioning of the PCI card. All Sweex
products and relevant drivers are tested thoroughly. Choose the option “Continue Anyway”. To complete press “Finish”.
The hardware is now installed successfully.
LED status.
On the LAN PCI card gigabit there are 4 LEDs:
LED INDICATORS COLOUR STATUS INDICATION
10/100/1000 Green On Indicates the networking speed;
Blinking Network activity
FDX Green On Indicates if the networking card works on
Off Indicates if the networking card works on
respectively 10/100/1000 Mbit
FULL-DUPLEX mode
HALF-DUPLEX mode
Warranty
For all Sweex products a warranty period of 3 years applies. We do not give support or warranty on supplied software,
rechargeable batteries and batteries. Transaction of warranty only takes place at the sales point where the product is bought.
All brand names and associated rights mentioned in this manual are and stay property of the rightful owner.
6
 Loading...