

Page 1
Sweex Joystick vibration USB
GB Manual
DE Benutzerhandbuch
IT Manuale d’istruzioni
NL Gebruikershandleiding
FR Manuel d’utilisation
ES Guía del usuario
PT Manual do funcionamento
RU
Руководство
PL Instrukcja
DA Brugervejledning
NO Bruksanvisning
SV Bruksanvisning
FI Käyttöopas
CZ Návod k obsluze
SK Príručka
EL
Εγχειρίδιο Χρήσης
UK
Керівництво
AR
HU Használati útmutató
BG
Български
RO Manual de utilizare
HR Priručnik
EC Declaration of Conformity
Page 2

Page 3

INDEX
English version 4
Deutsche Version 6
Versione Italiana 8
Nederlandse versie 10
Version Française 12
Versión Española 14
Versão Portuguesa 16
Русская версия
Wersja polska
Dansk version
Norsk versjon
Svensk version
Suomenkielinen versio
Česká verze
Slovenská verzia
Ελληνική έκδοση
Українська версія
Magyar változat
Български
Versiunea în română
Hrvatska verzija
18
20
22
24
26
28
30
32
34
36
38
40
42
44
46
Page 4

English version
GA200 Sweex Joystick vibration USB
• Do not expose the Joystick vibration USB to extreme temeratures. Do not place the device in direct sun light or close to heating
elements.
• Do not use the Joystick vibration USB in extremely dusty or moist environments.
• Prevent hard shocks or impacts of the device, as this can cause damage to the internal electronics.
• Never try to open the device yourself, this voids the warranty.
Installation
Place the Sweex CD-ROM in the computer The CD-ROM will start automatically and display a menu.
Connect the Joystick vibration USB to an USB port
To install the drivers press “Drivers XP and Vista”. Follow the installation procedure. When the installation is succesful you can use
the Joystick vibration USB.
Testing and configuration
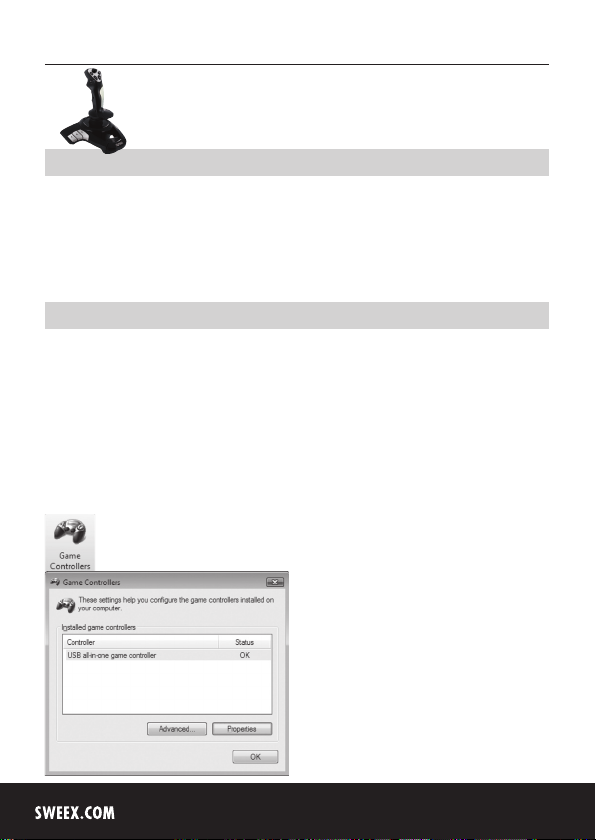
If testing or configuration of the Joystick is required go to “Start” – “Control Panel” and double click “Game Controllers”.
4
Page 5

English version
Press “Properties” to test and configure the Joystick vibration USB.
Vibration function
At the bottom of the Joystick vibration USB there is a button to switch the vibration function on and off. This function only works
when the drivers are installed correctly.
Warranty
For all Sweex products a warranty period of 3 years applies. We do not give support or warranty on supplied software,
rechargeable batteries and batteries. Transaction of warranty only takes place at the sales point where the product is bought.
All brand names and associated rights mentioned in this manual are and stay property of the rightful owner.
5
Page 6
Deutsche Version
GA200 Sweex Joystick Vibration USB
• Setzen Sie den Joystick Vibration USB keinen extremen Temperaturen aus. Stellen Sie das Gerät nicht in direktes Sonnenlicht
oder in die Nähe von Heizgeräten.
• Benutzen Sie den Joystick Vibration USB nicht in extrem staubigen oder feuchten Umgebungen.
• Vermeiden Sie, dass das Gerät stark gestoßen wird, da die innere Elektonik dadurch beschädigt werden kann.
• Versuchen Sie nie, das Gerät selbst zu öffnen, sonst erlischt die Garantie.
Installation
Legen Sie die Sweex CD-ROM in den Computer. Die CD-ROM wird automatisch starten und ein Menü anzeigen.
Verbinden Sie den Joystick Vibration USB mit einem USB-Anschluss.
Um die Treiber zu installieren, klicken Sie auf “Drivers XP and Vista (Treiber XP und Vista)”. Befolgen Sie den Installationsablauf.
Wenn die Installation erfolgreich ist, können Sie den Joystick Vibration USB verwenden.
Test und Konfiguration
Wenn ein Test oder eine Konfiguration des Joysticks erforderlich ist, klicken Sie auf “Start” – “Systemsteuerung” und
doppelklicken Sie auf “Gamecontroller”.
6
Page 7

Deutsche Version
Klicken Sie auf “Eigenschaften”, um den Joystick Vibration USB zu testen und zu konfigurieren.
Vibrationsfunktion
Auf der Unterseite des Joystick Vibration USB befindet sich ein Schalter, um die Vibrationsfunktion ein- und auszuschalten. Diese
Funktion kann nur ausgeführt werden, wenn die Treiber richtig installiert sind.
Garantie
Für alle Sweex-Produkte wird eine Garantie von 3 Jahren übernommen. Wir leisten keinen Support und keine Garantie für
gelieferte Software, wiederaufladbare Batterien und Batterien. Die Übertragung der Garantie findet nur an der Verkaufsstelle statt,
an der das Produkt gekauft wurde.
Alle Markennamen und zugehörigen Rechte, die in diesem Handbuch erwähnt werden, sind und bleiben Eigentum des
rechtmäßigen Besitzers.
7
Page 8

Versione Italiana
GA200 Sweex Joystick a vibrazione USB
• Non esponete il Joystick a vibrazione USB a temperature estreme. Non posizionate il dispositivo alla luce solare diretta o vicino
a fondi di calore.
• Non usate il Joystick a vibrazione USB in ambienti estremamente polverosi o umidi.
• Impedite scosse dure o urti del dispositivo, siccome questo potrebbe causare danni ai circuiti elettronici interni.
• Non tentate mai di aprire il dispositivo da soli, perché ciò rende nulla la garanzia.
Installazione
Posizionate il CD-ROM Sweex nel computer. Il CD-ROM si avvierà automaticamente e visualizzerà un menu.
Collegamento del Joystick a vibrazione USB a una porta USB
Per installare i driver premete “Drivers XP and Vista”. Seguite la procedura di installazione. Quando l'installazione è avvenuta con
successo, potete usare il Joystick a vibrazione USB.
Test e configurazione
Se sono necessari il test e la configurazione del Joystick andate su “Start” – “Control Panel” e fate doppio clic su “Game
Controllers”.
8
Page 9

Versione Italiana
Premete “Properties” per testare e configurare il Joystick a vibrazione USB.
Funzione di vibrazione
Sul fondo del Joystick a vibrazione USB è presente un tasto per attivare e disattivare la funzione di vibrazione. Questa funzione
funziona solo quando i driver sono installati correttamente.
Garanzia
Per tutti i prodotti Sweex viene applicato un periodo di garanzia di 3 anni. Non offriamo assistenza né garanzia sul software in
dotazione, sulle batterie ricaricabili e le batterie. La transazione della garanzia ha luogo presso il punto di vendita dove è stato
acquistato il prodotto.
Tutti i nomi dei marchi e i diritti associati citati nel presente manuale sono e rimangono di proprietà del legittimo proprietario.
9
Page 10

Nederlandse versie
GA200 Sweex Joystick vibration USB
• Stel de Joystick vibration USB niet bloot aan extreme temperaturen. Plaats het apparaat niet in direct zonlicht of in de dichte
nabijheid van verwarmingselementen.
• Gebruik de Joystick vibration USB niet in een extreem stoffige of vochtige omgeving.
• Voorkom harde schokken of stoten van het apparaat, hierdoor zou de interne elektronica beschadigd kunnen raken.
• Probeer nooit zelf het apparaat te openen, hierdoor vervalt de garantie.
Installatie
Plaats de Sweex CD-ROM in de pc. De CD-ROM zal automatisch opstarten en een menu weergeven.
Sluit de Joystick vibration USB aan op de USB poort.
Om de drivers te installeren druk je op de knop “Drivers XP and Vista”. Volg de installatie procedure. Als de installatie succesvol is,
kun je de Joystick vibration USB gebruiken.
Testen en configureren
Als het nodig is om de Joystick te testen of te configureren ga je naar “Start” – “Configuratie Scherm” (“Control Panel”) en
dubbelklik je op “Spelbesturing” (“Game Controllers”).
10
Page 11

Nederlandse versie
Klik op “Eigenschappen” (“Properties”) om de Joystick vibration USB te testen en te configureren.
Vibratie functie
Onder op de Joystick vibration USB bevindt zich een knop je om de vibratie functie aan of uit te zetten. Deze functie werkt alleen
als de drivers correct zijn geïnstalleerd.
Garantie
Voor alle Sweex producten geldt een garantietermijn van drie jaar. Op meegeleverde software, oplaadbare batterijen en accu’s
geven wij geen support of garantie. Afhandeling van garantie vindt alleen plaats via het verkooppunt waar het betreffende artikel
is aangekocht.
Alle merknamen en daaraan verbonden rechten genoemd in deze handleiding zijn en blijven eigendom van de rechtmatige
eigenaar.
11
Page 12

Version Française
Joystick vibrant USB GA200 Sweex
• N'exposez pas le joystick USB à des températures extrêmes. N'exposez pas le périphérique aux rayons directs du soleil ou à
proximité de sources de chaleur.
• N'utilisez pas le joystick dans des environnements trop poussièreux ou humides.
• Evitez les chocs et les impacts violents qui pourraient endommager les éléments électroniques internes du périphérique.
• Ne tentez jamais d'ouvrir le périphérique vous-même, cela annulerait la garantie.
Installation
Installez le CD-ROM Sweex dans l'ordinateur. Le CD-ROM s'exécute automatiquement et affiche un menu.
Raccordez le joystick à un port USB
Pour installer les pilotes, cliquez sur «Pilotes XP et Vista». Suivez la procédure d'installation. Vous pouvez utiliser le joystick vibrant
USB une fois l'installation terminée.
Test et configuration
Si vous devez tester ou configurer le joystick, accédez à «Démarrer» – «Panneau de Configuration» et effectuez un double-clic sur
«Contrôleurs de jeux».
12
Page 13

Version Française
Cliquez sur «Propriétés» afin de pouvoir tester et configurer le joystick USB.
Fonction Vibrations
Au bas du joystick se trouve un bouton qui permet d'activer ou de désactiver la fonction Vibrations. Cette option ne fonctionne
correctement que lorsque les pilotes sont correctement installés.
Garantie
Une garantie de 3 ans s'applique à tous les produits Sweex. Nous n'accordons aucune assistance ou garantie sur le logiciel fourni,
les piles rechargeables ou les batteries. La prise en charge de la garantie ne s'effectue qu'auprès du revendeur où le produit a
été acheté.
Tous les noms de marques et prérogatives associées mentionnées dans ce manuel sont et demeurent la propriété de leur
détenteur.
13
Page 14

Versión Española
Joystick con vibración y USB GA200 Sweex
• No exponga el Joystick con vibración y USB a temperaturas extremas. No coloque el dispositivo a la luz directa del sol o cerca
de elementos calientes.
• No utilice el Joystick vibración USB en entornos extremadamente polvorientos o húmedos.
• Evite los impactos fuertes o choques del dispositivo, ya que esto podrá dañar los dispositivos electrónicos internos.
• Nunca intente abrir el dispositivo por sí mismo, esto anularía la garantía.
Instalación
Coloque el CD-ROM de Sweex CD-ROM en el ordenador. El CD-ROM empezará automáticamente y mostrará el menú.
Conecte el Joystick vibración USB a un puerto USB
Para instalar los pilotos, pulse “Pilotos XP y Vista”. Siga el procedimiento de instalación. Cuando la instalación ha tenido lugar con
éxito, podrá utilizar el Joystick de vibración USB.
Prueba y configuración
Si necesita probar o configurar el Joystick, vaya a “Inicio”, “Panel de control” y haga doble clic en los “Controladores de juego”.
14
Page 15

Versión Española
Pulse “Propiedades” para probar y configurar el Joystick de vibración USB.
Función de vibración
En la parte inferior del Joystick vibración USB, hay un botón para cambiar la activación y la desactivación de la función. Esta
función sólo funciona cuando los pilotos están instalados correctamente.
Garantía
Todos los productos de Sweex gozan de una garantía de 3 años. No ofrecemos ninguna garantía ni asistencia sobre el programa
suministrado, las pilas recargables y las baterías. La transacción de la garantía tan sólo tendrá lugar en el punto de venta en el
que se compró el producto.
Todos los nombres de marcas y derechos asociados mencionados en el presente manual son y seguirán siendo propiedad de su
correspondiente titular.
15
Page 16

Versão Portuguesa
Joystick USB vibratório GA200 da Sweex
• Não exponha o Joystick USB vibratório a temeraturas extremas. Não exponha o dispositivo a luz solar directa ou perto de
aquecedores.
• Não utilize o Joystick USB vibratório em ambientes com muito pó ou humidade.
• Evite choques ou impactes duros, porque pode causar danos nos componentes electrónicos internos.
• Nunca tente abrir o dispositivo. Se o fizer, viola a garantia.
Instalação
Insira o CD-ROM da Sweex no computador. O CD-ROM é iniciado automático e é apresentado um menu.
Ligue o Joystick USB vibratório a uma porta USB
Para instalar os controladores, prima “Drivers XP and Vista” (Controladores XP e Vista). Siga o procedimento de instalação.
Quando a instalação estiver concluída, pode utilizar o Joystick USB vibratório.
Testes e configuração
Se for necessário efectuar testes ou configuração do Joystick, vá para “Start” (Iniciar) – “Control Panel” (Painel de controlo) e
faça duplo clique em “Game Controllers” (Controladores do jogo).
16
Page 17

Versão Portuguesa
Prima “Properties” (Propriedades) para testar e configurar o Joystick USB vibratório.
Função de vibração
Na parte inferior do Joystick USB vibratório há um botão que permite ligar ou desligar a função de vibração. Esta função apenas
funciona se os controladores estiverem instalados correctamente.
Garantia
Todos os produtos da Sweex têm uma garantia de 3 anos. Não fornecemos garantia ou assistência ao software, pilhas
recarregáveis e pilhas fornecidos. A transacção da garantia pode ser apenas efectuada no local onde adquiriu o produto.
Todos os nomes de marcas e direitos associados mencionados neste manual pertencem e continuarão a pertencer ao legítimo
proprietário.
17
Page 18

Русская версия
USB-джойстик GA200 Sweex с вибрацией
• Не подвергайте USB-джойстик с вибрацией воздействию слишком высоких или низких
температур. Не помещайте устройство в местах воздействия прямых солнечных лучей
или в непосредственной близости от отопительных приборов и источников тепла.
• Не используйте USB-джойстик в условиях сильной запыленности или высокой
влажности.
• Избегайте воздействия ударов на устройство, так как это может привести к
повреждению внутренних электронных компонентов.
• Никогда не пытайтесь самостоятельно разбирать устройство, это приведет к потере гарантии.
Установка
Установите компакт-диск Sweex в дисковод компьютера. Автоматически произойдет
запуск компакт-диска, и на экране появится меню.
Подключите USB-джойстик к порту USB
Для установки драйверов щелкните “Драйверы XP и Vista”. Следуйте инструкциям по установке.
После выполнения установки вы можете начинать использовать USB-джойстик с вибрацией.
Проверка и настройка
При необходимости проверки или настройки джойстика откройте меню “Пуск” – “Панель
управления” и дважды щелкните “Игровые устройства”.
18
Page 19

Русская версия
Щелкните “Свойства”, чтобы выполнить проверку и настройку USB-джойстика с
вибрацией.
Функция вибрации
В нижней части USB-джойстика имеется кнопка включения и выключения вибрации.
Данная функция работает только при условии правильной установки драйверов.
Гарантия
На всю продукцию Sweex распространяется гарантия сроком 3 года. Мы не
предоставляем поддержку и гарантию на прилагаемое программное обеспечение, а также
аккумуляторные или одноразовые батареи. Гарантийное обслуживание осуществляется
только по месту приобретения изделия.
Все упомянутые в данном руководстве торговые марки и соответствующие права
являются и остаются собственностью своих законных владельцев.
19
Page 20

Wersja polska
Dżojstik USB z funkcją wibracji Sweex GA200
• Nigdy nie narażać urządzenia na działanie skrajnie wysokich lub skrajnie niskich temperatur. Nie umieszczać urządzenia w
miejscu bezpośrednio nasłonecznionym ani blisko urządzeń grzewczych.
• Nie używać urządzenia w mocno zapylonych lub wilgotnych miejscach.
• Chronić urządzenie przed uderzeniami i wstrząsami, ponieważ mogą one doprowadzić do uszkodzenia wewnętrznych układów
elektronicznych.
• Nigdy nie próbować własnoręcznie otwierać lub demontować urządzenia; takie działanie powoduje unieważnienie gwarancji.
Instalacja
Włóż płytę CD-ROM do napędu CD-ROM komputera. Płyta CD-ROM uruchomi się automatycznie i wyświetli się menu.
Podłącz dżojstik do gniazda USB
Aby zainstalować sterowniki, naciśnij “Drivers XP and Vista”. Postępuj zgodnie z poleceniami na ekranie w celu zakończenia
instalacji. Po udanej instalacji można rozpocząć korzystanie z dżojstika.
Testowanie i konfiguracja
Jeśli wymagane jest sprawdzenie i skonfigurowanie dżojstika, przejdź do “Start” – “Panel sterowania" i kliknij dwukrotnie ”Kontrolery gier".
20
Page 21

Wersja polska
Naciśnij “Właściwości”, aby przetestować i skonfigurować dżojstik.
Funkcja wibracji
Na dole dżojstika znajduje się przycisk włączania i wyłączania funkcji wibracji. Ta funkcja działa, tylko jeśli poprawnie
zainstalowano sterowniki.
Gwarancja
Wszystkie produkty Sweex są objęte trzyletnią gwarancją. Nie zapewniamy wsparcia technicznego ani gwarancji obejmującej
dołączone oprogramowanie, akumulatory lub baterie. Roszczenia gwarancyjne można składać tylko w punkcie sprzedaży produktu.
Wszystkie nazwy handlowe i powiązane z nimi prawa pozostają własnością odpowiednich podmiotów - właścicieli.
21
Page 22

Dansk version
GA200 Sweex Joystick vibration USB
• Joystikket må ikke udsættes for ekstreme temperaturer. Enheden må ikke placeres i direkte sollys eller tæt ved varmekilder.
• Brug ikke joystikket i ekstremt støvede eller fugtige miljøer.
• Undgå kraftige rystelser eller stød af enheden, da det kan forårsage skade på den indvendige elektronik.
• Prøv aldrig selv at åbne enheden; det vil annullere garantien.
Installation
Sæt cd'en i computeren. Cd'en starter automatisk og viser en menu.
Tilslut joystikket til en USB-port
For at installere driverne skal du trykke på “Drivers XP and Vista” (Drivere til XP og Vista). Følg installationsproceduren. Når
installationen er gennemført, kan du bruge joystikket.
Afprøvning og konfiguration
Hvis der er behov for afprøvning eller konfiguration af joystikket, så gå til “Start” – “Kontrolpanel”, og dobbeltklik på
“Spilleenheder”.
22
Page 23

Dansk version
Tryk på “Egenskaber” for at afprøve og konfigurere joystikket.
Vibratorfunktion
I bunden af joystikket er der en knap, hvor du kan slå vibratorfunktionen til og fra. Funktionen fungerer kun, når driverne er
korrekt installeret.
Garanti
Der gælder en garantiperiode på 3 år for alle Sweex-produkter. Vi yder ikke support eller garanti på medfølgende software,
genopladelige batterier og batterier. Garantitransaktioner kan kun finde sted på det salgssted, hvor produktet er købt.
Alle mærkenavne og tilhørende rettigheder, der er nævnt i denne vejledning, er og forbliver den retmæssige ejers ejendom.
23
Page 24

Norsk versjon
GA200 Sweex Joystick vibration USB
• Ikke utsett Joystick vibration USB for ekstreme temperaturer. Ikke plasser innretningen i direkte sollys eller nær
varmeelementer.
• Ikke bruk Joystick vibration USB i ekstremt støvete eller fuktige miljøer.
• Forhindre at innretningen blir utsatt for harde støt eller kollisjoner, fordi dette kan skade den innvendige elektronikken.
• Prøv aldri å åpne innretningen selv, det vil gjøre garantien ugyldig.
Installering
Sett inn Sweex CD-ROM-en i datamaskinen. CD-Rom-en vil starte automatisk og viser en meny.
Koble Joystick vibration USB til en USB port
Trykk på ”Drivers XP and Vista” for å installere driverne. Følg installasjonsprosedyren. Når installasjonen er fullført, kan du bruke
Joystick vibration USB.
Testing og konfigurasjon
Hvis det kreves testing og konfigurasjon på Joystick, gå til ”Start” – ”Kontrollpanel” og dobbelklikk på ”Spillkontroller”.
24
Page 25

Norsk versjon
Trykk på ”Egenskaper” for å teste og konfigurere Joystick vibration USB.
Vibrasjonsfunksjon
På bunnen av Joystick vibration USB er det en knapp for å slå vibrasjonsfunksjonen av og på. Denne funksjonen fungerer kun når
driverne er riktig installert.
Garanti
Alle Sweex-produkter har en garantiperiode på 3 år. Vi gir ikke kundestøtte eller garanti til vedlagt programvare, oppladbare
batterier og batterier. Innfrielse av garanti finner bare sted der produktet ble kjøpt.
Alle merkenavn og assosierte rettigheter nevnt i denne håndboken er og blir eiendommen til den rettmessige eieren.
25
Page 26

Svensk version
GA200 Sweex Joystick vibration USB
• Utsätt inte ditt Joystick för extrema temperaturer. Placera inte enheten i direkt solljus eller nära värmekällor.
• Använd inte ditt Joystick i extremt dammiga eller fuktiga miljöer.
• Undvik hårda stötar eller slag mot enheten då detta kan orsaka skador på de inre elektroniska delarna.
• Försök aldrig att öppna enheten själv, då upphör garantin att gälla.
Installation
Sätt in Sweex CD-ROM i datorn. Skivan startar automatiskt och en meny visas.
Anslut enheten till ett USB-uttag.
Installera drivrutinerna genom att trycka på “Drivers XP and Vista”. Följ installationsanvisningarna. När installationen är slutförd
kan du börja använda ditt Joystick vibration USB.
Test och konfiguration
Om du behöver testa eller konfigurera ditt Joystick går du till “Start” – “Control Panel” (Kontrollpanelen) och dubbelklickar på
“Game Controllers”.
26
Page 27

Svensk version
Tryck på “Properties” för att testa eller konfigurera ditt Joystick.
Vibrationsfunktion
I botten av ditt Joystick finns en knapp där du kan sätta på och stänga av vibrationsfunktionen. Denna funktion fungerar endast
då drivrutinerna har installerats ordentligt.
Garanti
För alla Sweex-produkter gäller en garantitid på tre år. Vi ger ingen support eller garanti på medföljande programvara,
uppladdningsbara batterier eller andra batterier. Överlåtelse av garantin sker endast på det försäljningsställe där produkten köps
in.
Alla varumärkesnamn och associerade rättigheter som nämns i denna handbok är och förblir den rättmätige ägarens egendom.
27
Page 28

Suomenkielinen versio
GA200 Sweex Joystick Vibration USB -ohjain
• Älä altista Joystick Vibration USB -ohjainta äärilämpötiloille. Älä aseta laitetta suoraan auringonvaloon tai sulje
lämmityselementtejä.
• Älä käytä Joystick vibration USB -ohjainta erittäin pölyisissä tai kosteissa ympäristöissä.
• Vältä kohdistamasta kovia iskuja laitteeseen, sillä tämä voi vaurioittaa sen sisällä olevaa elektroniikkaa.
• Älä koskaan yritä avata laitetta itse, tämä mitätöi takuun.
Asennus
Aseta Sweex CD-ROM-levy tietokoneeseen. CD-ROM käynnistyy automaattisesti ja näkyviin tulee valikko.
Liitä Joystick Vibration USB -ohjain USB-porttiin
Asenna ajurit napsauttamalla “Ajurit XP ja Vista”. Noudata asennusohjeita. Kun asennus on suoritettu onnistuneesti, Joystick
Vibration USB -ohjaimen käyttö on mahdollista.
Testaus ja konfigurointi
Jos ohjaimen testaus ja konfigurointi on tarpeen, valitse “Käynnistä” – “Ohjauspaneeli” ja kaksoisnapsauta “Peliohjaimet”.
28
Page 29

Suomenkielinen versio
Testaa ja konfiguroi Joystick Vibration USB-ohjain napsauttamalla “Ominaisuudet”.
Värinätoiminto
Joystick Vibration USB-ohjaimessa on värinätoiminnon aktivointi-/deaktivointipainike. Toiminto toimii ainoastaan silloin, kun ajurit
on asennettu oikein.
Takuu
Kaikkiin Sweex-tuotteisiin soveltuu 3 vuoden takuu. Emme tarjoa palvelua tai takuuta toimitetuille ohjelmistoille, uudelleen
ladattaville akuille tai paristoille. Takuu myönnetään ainoastaan myyntipisteessä, josta tuote hankitaan.
Kaikki tämän käyttöoppaan tuotemerkit ja niihin liittyvät oikeudet ovat vastaavien omistajien omaisuutta.
29
Page 30

Česká verze
GA200 Sweex vibrační joystick USB
• Vibrační joystick USB nevystavujte vysokým teplotám. Neumísťujte zařízení na přímé sluneční světlo ani do blízkosti zdrojů
tepla.
• Nepoužívejte vibrační joystick USB ve velmi prašném nebo vlhkém prostředí.
• Chraňte zařízení před otřesy a nárazy, protože by mohlo dojít k poškození vnitřní elektroniky.
• Nikdy se nepokoušejte zařízení jakkoliv demontovat; došlo by ke zneplatnění záruky.
Instalace
Sweex CD-ROM umístěte do mechaniky počítače; CD-ROM se automaticky spustí a zobrazí se menu.
Vibrační joystick USB připojte k USB portu.
Chcete-li instalovat ovladače, klikněte na „Drivers XP and Vista” (ovladače pro XP a Vista). Řiďte se pokyny instalačního procesu.
Jestliže byla instalace úspěšná, můžete vibrační joystick USB používat.
Testování a konfigurace
Pokud je nutné joystick otestovat či konfigurovat, zvolte „Start” - „Ovládací panely”, a dvojitě klikněte na „Herní zařízení”.
30
Page 31

Česká verze
Chcete-li vibrační joystick USB otestovat, klikněte na „Vlastnosti”.
Funkce vibrace
Na spodní straně vibračního joysticku USB je umístěno tlačítko pro zapnutí a vypnutí funkce vibrace. Tato funkce funguje pouze v
případě správné instalace ovladačů.
Záruka
Na všechny výrobky Sweex je poskytována tříletá záruka. Neposkytujeme však zákaznickou podporu nebo záruku na dodaný
software, akumulátory a baterie. Záruku lze uplatnit pouze v prodejně, ve které jste výrobek zakoupili.
Všechny názvy výrobků a přidružená práva uvedená v této příručce jsou majetkem příslušných vlastníků.
31
Page 32

Slovenská verzia
Vibračný USB joystick GA200 značky Sweex
• Vibračný USB joystick nevystavujte extrémnym teplotám. Zariadenie nedávajte na priame slnečné svetlo alebo do blízkosti
ohrevných prvkov.
• Vybračný USB joystick nepoužívajte v extrémne prašných alebo vlhkých prostrediach.
• Zabráňte tvrdým ranám alebo nárazom zariadenia, pretože to môže spôsobiť poškodenie vnútornej elektroniky.
• Nikdy sa nepokúšajte otvoriť zariadenie svojpomocne, pretože tým strácate nárok na záruku.
Inštalácia
Vložte disk Sweex CD-ROM do počítača. Disk CD-ROM sa automaticky spustí a zobrazí ponuku.
Vibračný USB joystick pripojte k portu USB
Aby ste nainštalovali ovládače, stlačte položku “Drivers XP and Vista”. Postupujte podľa postupu inštalácie. Keď je inštalácia
úspešná, môžete použiť vibračný USB joystick.
Testovanie a konfigurácia
Ak je potrebné testovanie alebo konfigurácia joysticku, prejdite na položku “Štart” – “Ovládací panel” a dvakrát kliknite na
položku “Herné ovládače”.
32
Page 33

Slovenská verzia
Stlačte položku “Vlastnosti”, aby ste otestovali a nakonfigurovali vibračný USB joystick.
Vibračná funkcia
Na spodnej strane vibračného USB joysticku sa nachádza tlačidlo na zapnutie a vypnutie vibračnej funkcie. Táto funkcia funguje
len vtedy, ak sa správne nainštalovali ovládače.
Záruka
Na všetky produkty značky Sweex sa vzťahuje 3-ročná záruka. Neposkytujeme vám podporu alebo záruku na dodaný softvér,
nabíjateľné batérie a batérie. Uskutočnenie záručnej činnosti sa uskutočňuje len na predajnom mieste, kde ste produkt zakúpili.
Všetky názvy značiek a príslušné práva uvedené v tejto príručke sú a zostanú vlastníctvom príslušného vlastníka.
33
Page 34

Ελληνική έκδοση
GA200 Sweex - Joystick USB με Δόνηση
• Μην εκθέτετε το Joystick USB με Δόνηση σε ακραίες θερμοκρασίες. Μην τοποθετείτε τη
συσκευή σε άμεση ηλιακή ακτινοβολία ή κοντά σε στοιχεία θέρμανσης.
• Μη χρησιμοποιείτε το Joystick USB με Δόνηση σε περιβάλλον με πολλή σκόνη ή υγρασία.
• Αποφεύγετε απότομα τραντάγματα ή χτυπήματα της συσκευής, γιατί μπορεί να προκληθεί
ζημιά στα εσωτερικά ηλεκτρονικά εξαρτήματα.
• Ποτέ μην προσπαθήσετε να ανοίξετε τη συσκευή μόνοι σας. Αυτό ακυρώνει την εγγύηση.
Εγκατάσταση
Τοποθετήστε το CD-ROM της Sweex στον υπολογιστή. Το CD-ROM θα ξεκινήσει αυτόματα και
θα εμφανίσει ένα μενού.
Συνδέστε το Joystick USB με Δόνηση σε μια θύρα USB
Για να εγκαταστήσετε τα προγράμματα οδήγησης πατήστε “Drivers XP and Vista”
(Προγράμματα Οδήγησης XP και Vista). Ακολουθήστε τη διαδικασία εγκατάστασης. Όταν η
εγκατάσταση είναι επιτυχής μπορείτε να χρησιμοποιήσετε το Joystick USB με Δόνηση.
Δοκιμή και διαμόρφωση
Αν απαιτείται δοκιμή ή διαμόρφωση του Joystick USB με Δόνηση, μεταβείτε στο “έναρξη”
– “Πίνακας Ελέγχου” (“Start” “Control Panel”) και κάνετε διπλό κλικ στο “Ελεγκτές παιχνιδιών”
(“Game Controllers”).
34
Page 35

Ελληνική έκδοση
Πατήστε “Ιδιότητες” (“Properties”) για τη δοκιμή και τη διαμόρφωση του Joystick USB με
Δόνηση.
Λειτουργία δόνησης
Στην κάτω πλευρά του Joystick USB με Δόνηση υπάρχει ένα κουμπί για ενεργοποίηση και
απενεργοποίηση της λειτουργίας δόνησης. Αυτή η λειτουργία είναι δυνατή μόνο αν έχουν
εγκατασταθεί σωστά τα προγράμματα οδήγησης.
Εγγύηση
Για όλα τα προϊόντα Sweex ισχύει περίοδος εγγύησης 3 ετών. Δεν παρέχουμε υποστήριξη ή
εγγύηση για το παρεχόμενο λογισμικό, επαναφορτιζόμενες μπαταρίες και κοινές μπαταρίες.
Η εκτέλεση της εγγύησης λαμβάνει χώρα μόνο στο σημείο πώλησης όπου έγινε η αγορά του
προϊόντος.
Όλες οι εμπορικές ονομασίες που αναφέρονται στο παρόν εγχειρίδιο και τα συνδεόμενα με
αυτές δικαιώματα είναι και παραμένουν ιδιοκτησία των νόμιμων ιδιοκτητών.
35
Page 36

Українська версія
Джойстик GA200 Sweex vibration USB
• Не піддавайте джойстик vibration USB впливу надмірних температур. Не розташовуйте
пристрій під прямим сонячним світлом та біля нагрівальних елементів.
• Не використовуйте джойстик vibration USB в дуже пильних або вологих місцях.
• Уникайте сильних фізичних впливів на пристрій, що може призвести до пошкодження
внутрішньої електроніки.
• Ніколи не намагайтесь самостійно відкривати пристрій, це робить гарантію недійсною.
Встановлення
Вставте компакт-диск Sweex в комп’ютер. Диск автоматично відкриється, відобразиться
меню.
Підключіть джойстик vibration USB до порту USB
Для встановлення драйверів натисніть “Drivers XP and Vista” (Драйвери для XP та
Vista). Виконайте інструкції процесу встановлення. Після успішного завершення процесу
встановлення Ви зможете використовувати джойстик vibration USB.
Перевірка конфігурації
Для перевірки конфігурації джойстика необхідно перейти до меню “Start” – “Control
Panel” (Пуск - Панель управління) та двічі клацнути на пункті “Game Controllers” (Ігрові
контролери).
36
Page 37

Українська версія
Натисніть на кнопку “Properties” (Властивості) для перевірки та встановлення джойстика
vibration USB.
Функція вібрації
В нижній частині джойстика vibration USB є кнопка ввімкнення/вимкнення функції вібрації.
Ця функція працює лише, якщо драйвери встановлені вірно.
Гарантія
Для всіх продуктів Sweex існує гарантія на період 3 років. Ми не підтримуємо та не
забезпечуємо гарантією програмне забезпечення, акумулятори та батареї. Гарантія діє
лише в точках продажу продукту.
Всі вказані в цьому керівництві назви торгових марок та пов’язані з ними права є та
залишаються власністю відповідних власників.
37
Page 38

ﻲﺑ ﺱﺃ ﻮﻳ ﺓﺯﺍﺰﻬﻟﺍ ﻢﻜﺤﺘﻟﺍ ﺎﺼﻋ GA200
ﺲﻤﺸﻟﺍ ﺔﻌﺷﺃ ﺖﺤﺗ ﺯﺎﻬﺠﻟﺍ ﻊﻀﺗ ﻻ .ﺔﻌﻔﺗﺮﻤﻟﺍ ﺓﺭﺍﺮﺤﻟﺍ ﺕﺎﺟﺭﺪﻟ ﻲﺑ ﺱﺃ ﻮﻳ ﺓﺯﺍﺰﻬﻟﺍ ﻢﻜﺤﺘﻟﺍ ﺎﺼﻋ ﺽﺮﻌﺗ ﻻ •
.ﺓﺭﺍﺮﺤﻟﺍ ﺭﺩﺎﺼﻣ ﻦﻣ ﺏﺮﻘﻟﺎﺑ ﻭﺃ ﺓﺮﺷﺎﺒﻤﻟﺍ
.ﺔﺑﻮﻃﺮﻟﺍ ﺪﻳﺪﺷ ﻭﺃ ﺏﺮﺘﻣ ﻂﺳﻭ ﻲﻓ ﻲﺑ ﺱﺃ ﻮﻳ ﺓﺯﺍﺰﻬﻟﺍ ﻢﻜﺤﺘﻟﺍ ﺎﺼﻋ ﻡﺪﺨﺘﺴﺗ ﻻ •
.ﺔﻴﻠﺧﺍﺪﻟﺍ ﺕﺎﻴﻧﻭﺮﺘﻜﻟﻺﻟ ﻒﻠﺘﺑ ﺐﺒﺴﺘﻳ ﺪﻗ ﻚﻟﺫ ﻥﺃ ﺚﻴﺣ ،ﺯﺎﻬﺠﻟﺍ ﻰﻠﻋ ﺔﻔﻴﻨﻌﻟﺍ ﺕﺍﺮﻴﺛﺄﺘﻟﺍ ﻭﺃ ﺕﺎﻣﺪﺼﻟﺍ ﺐﻨﺠﺗ •
.ﻥﺎﻤﻀﻟﺍ ﻲﻐﻠﻳ ﻚﻟﺬﻓ ،ﻚﺴﻔﻨﺑ ﺯﺎﻬﺠﻟﺍ ﺢﺘﻓ ﺍﺪﺑﺃ ﻝﻭﺎﺤﺗ ﻻ •
ﺖﻴﺒﺜﺘﻟﺍ
.ﺔﻤﺋﺎﻗ ﺮﻬﻈﺗﻭ ﺎﻴﻜﻴﺗﺎﻣﻮﺗﻭﺃ ﺔﻧﺍﻮﻄﺳﻻﺍ ﺃﺪﺒﺘﺳ .ﺮﺗﻮﻴﺒﻣﻮﻜﻟﺍ ﻲﻓ ﺲﻜﻳﻮﺳ ﺔﻧﺍﻮﻄﺳﺍ ﻊﺿ
(ﻲﺑ ﺱﺃ ﻮﻳ) ﻡﺎﻋ ﻲﻠﺴﻠﺴﺗ ﻞﻗﺎﻧ ﺬﻔﻨﻣ ﻰﻟﺇ ﻲﺑ ﺱﺃ ﻮﻳ ﺓﺯﺍﺰﻬﻟﺍ ﻢﻜﺤﺘﻟﺍ ﺎﺼﻋ ﻞﺻﻭ
ﺖﻴﺒﺜﺘﻟﺍ ﺡﺎﺠﻧ ﺪﻌﺑ .ﺖﻴﺒﺜﺘﻟﺍ ﺕﺍﻮﻄﺧ ﻊﺒﺗﺍ .«Drivers XP and Vista» ﻰﻠﻋ ﻂﻐﺿﺍ ﻞﻴﻐﺸﺘﻟﺍ ﺞﻣﺍﺮﺑ ﺖﻴﺒﺜﺘﻟ
.ﻲﺑ ﺱﺃ ﻮﻳ ﺓﺯﺍﺰﻬﻟﺍ ﻢﻜﺤﺘﻟﺍ ﺎﺼﻋ ﻡﺍﺪﺨﺘﺳﺍ ﻚﻨﻜﻤﻳ
ﺩﺍﺪﻋﻹﺍﻭ ﺭﺎﺒﺘﺧﻻﺍ
ﻰﻠﻋ ﻦﻴﺗﺮﻣ ﺮﻘﻧﺍﻭ «Start» – «Control Panel» ﻰﻟﺇ ﺐﻫﺫﺍ ﺎﺑﻮﻠﻄﻣ ﻢﻜﺤﺘﻟﺍ ﺎﺼﻋ ﺩﺍﺪﻋﺇﻭ ﺭﺎﺒﺘﺧﺍ ﻥﺎﻛ ﻥﺇ
.«Game Controllers»
Page 39

.ﻲﺑ ﺱﺃ ﻮﻳ ﺓﺯﺍﺰﻬﻟﺍ ﻢﻜﺤﺘﻟﺍ ﺎﺼﻋ ﺩﺍﺪﻋﺇﻭ ﺭﺎﺒﺘﺧﻻ «Properties» ﻰﻠﻋ ﻂﻐﺿﺍ
ﺪﻌﺑ ﻂﻘﻓ ﻞﻤﻌﺗ ﺔﻴﺻﺎﺨﻟﺍ ﻩﺬﻫ .ﺯﺍﺰﺘﻫﻻﺍ ﺔﻴﺻﺎﺧ ﻑﺎﻘﻳﺇﻭ ﻞﻴﻐﺸﺘﻟ ﻲﺑ ﺱﺃ ﻮﻳ ﺓﺯﺍﺰﻬﻟﺍ ﻢﻜﺤﺘﻟﺍ ﺎﺼﻋ ﻞﻔﺳﺃ ﺭﺯ ﺪﺟﻮﻳ
.ﺢﻴﺤﺻ ﻞﻜﺸﺑ ﻞﻴﻐﺸﺘﻟﺍ ﺞﻣﺍﺮﺑ ﺖﻴﺒﺜﺗ
ﺯﺍﺰﺘﻫﻻﺍ ﺔﻴﺻﺎﺧ
ﻥﺎﻤﺿ
ﺞﻣﺍﺮﺒﻟﺍ ﻦﻤﻀﻧ ﻭﺃ ﻢﻋﺪﻧ ﻻ ﻦﺤﻧ .ﺕﺍﻮﻨﺳ ﺙﻼﺛ ﻰﻟﺇ ﻞﺼﺗ ﺲﻜﻳﻮﺳ ﺕﺎﺠﺘﻨﻣ ﺔﻓﺎﻛ ﻰﻠﻋ ﻥﺎﻤﺿ ﺓﺮﺘﻓ ﺪﺟﻮﺗ
ءﺍﺮﺷ ﻢﺘﻳ ﺚﻴﺣ ﻊﻴﺒﻟﺍ ﺔﻄﻘﻧ ﺪﻨﻋ ﻂﻘﻓ ﺙﺪﺤﻳ ﻥﺎﻤﻀﻟﺍ ﻞﻘﻧ .ﺎﻬﺤﻨﻤﻧ ﻲﺘﻟﺍ ﺕﺎﻳﺭﺎﻄﺒﻟﺍﻭ ﻦﺤﺸﻠﻟ ﺔﻠﺑﺎﻘﻟﺍ ﺕﺎﻳﺭﺎﻄﺒﻟﺍﻭ
.ﻚﻟﺬﻛ ﻞﻈﺗﻭ ﺢﻴﺤﺼﻟﺍ ﻚﻟﺎﻤﻟﺍ ﻚﻠﻣ ﻲﻫ ﺐﻴﺘﻜﻟﺍ ﺍﺬﻫ ﻲﻓ ﺓﺭﻮﻛﺬﻤﻟﺍ ﺎﻬﺑ ﺔﻘﻠﻌﺘﻤﻟﺍ ﻕﻮﻘﺤﻟﺍﻭ ﺔﻳﺭﺎﺠﺘﻟﺍ ءﺎﻤﺳﻷﺍ ﻞﻛ
.ﺞﺘﻨﻤﻟﺍ
Page 40

Magyar változat
GA200 Sweex joystick vibráló funkcióval, USB
• Az USB-s vibráló funkciós joysticket szélsőséges hőmérsékletektől óvja. Ne tegye ki közvetlen napsugárzásnak, és ne helyezze
fűtőszerkezetek közelébe.
• Az USB-s vibráló funkciós joysticket ne használja túlságosan poros vagy nedves környezetben.
• Erős ütődésektől és egyéb mechanikai behatásoktól védje, mert ezek árthatnak a belső elektronikának.
• Soha ne próbálja sajátkezűleg szétnyitni, mert az esetben elveszíti a jótállást.
Telepítés
Tegye be a Sweex CD-ROM-ot a számítógépbe, a CD-ROM automatikusan elindul és kijelez egy menüt.
Csatlakoztassa az USB-s vibráló funkciós joysticket egy USB portra.
Az illesztőprogramok telepítéséhez nyomja meg a “Drivers XP and Vista” (XP és Vista illesztőprogramok) gombot. Végezze el a
telepítés műveletét. Amint a telepítés sikeresen befejeződött, használhatja az USB-s vibráló funkciós joysticket.
Tesztelés és konfigurálás
A joystick telepítésénél vagy konfigurálásánál kattintson a “Start” menüre, majd a “Vezérlőpult” programra, azután pedig
kattintson duplán a “Játékvezérlők” menüre.
40
Page 41

Magyar változat
A vibráló funkciós joystick teszteléséhez és konfigurálásához kattintson a “Tulajdonságok” menüre.
Vibráló funkció
A vibrálófunkciós joystick alján van egy kapcsoló, amellyel a vibráló funkció be- és kikapcsolható. Ez a funkció csak megfelelően
telepített illesztőprogramokkal működik.
Jótállás
Minden Sweex termékre 3 év jótállás érvényes. A mellékelt szoftverre, akkumulátorokra és elemekre nem terjed ki a jótállás.
Jótállási ügyek intézése csak abban a kereskedelmi egységben lehetséges, ahol a terméket vásárolták.
A kézikönyvünkben említett minden márkanév és ahhoz kapcsolódó jogok azok jogos birtokosainak tulajdonát képezik.
41
Page 42

Версия на български
USB вибрационен джойстик GA200 Sweex
• Да не се излага USB вибрационният джойстик на екстремни температури. Да не се
поставя устройството на директна слънчева светлина или близо до нагревателни
елементи.
• Да не се използва USB вибрационният джойстик в извънредно прашни или влажни среди.
• Устройството да се пази от силни удари или въздействия, тъй като те могат да
причинят повреда по вътрешната електроника.
• Никога да не се опитва отваряне на устройството, което анулира гаранцията.
Инсталиране
Поставете инсталационния диск на Sweex в компютъра. CD-ROM устройството ще се
стартира автоматично и ще покаже меню.
Свържете USB вибрационния джойстик към USB порт
За да инсталирате драйверите, натиснете “Drivers XP and Vista” (“Драйвери за XP и
Vista”). Следвайте процедурата за инсталация. Когато инсталацията е успешна, можете
да използвате USB вибрационния джойстик.
Изпробване и конфигуриране
Ако се изисква изпробване или конфигуриране на джойстика, отидете в “Start” – “Control
Panel” и щракнете двукратно върху “Game Controllers”.
42
Page 43

Версия на български
Натиснете “Properties”, за да изпробвате и конфигурирате USB вибрационния джойстик.
Функция за вибрация
В основата на USB вибрационния джойстик има бутон за включване и изключване на
функцията за вибрация. Тази функция работи само когато драйверите са инсталирани
правилно.
Гаранция
За всички продукти на Sweex важи гаранционен срок 3 години. Не осигуряваме поддържа
или гаранция за доставен софтуер, сухи и акумулаторни батерии. Прехвърлянето на
гаранцията се извършва само в пункта на закупуване, откъдето е закупен продуктът.
Всички имена на марки и свързаните с тях права, споменати в това ръководство, са и
остават собственост на собственика на правата.
43
Page 44

Versiunea în română
Joystick GA200 Sweex cu vibraţii şi cu USB
• Feriţi joystickul de temperaturile extreme. Feriţi aparatul de razele solare directe sau de elementele de încălzire.
• Nu utilizaţi joystickul într-un mediu foarte prăfuit sau umed.
• Evitaţi şocurile puternice sau lovirea aparatului, deoarece acestea pot cauza deteriorarea componentelor electronice interne.
• Nu încercaţi dezasamblarea aparatului, deoarece asta ar duce la anularea garanţiei.
Instalare
Introduceţi CD-ul Sweex în calculator. Unitatea CD-ROM va porni în mod automat şi va afişa un meniu.
Conectaţi joystickul la un port USB
Pentru a instala driverele, vă rugăm să apăsaţi pe “Drivers XP and Vista” (Drivere XP şi Vista). Urmaţi procedura de instalare. Dacă
instalarea s-a efectuat cu succes, joystickul cu vibraţii şi cu USB este gata de utilizare.
Testare şi configurare
Dacă este necesară testarea sau configurarea joystickului, intraţi la “Start” – “Control Panel” (Panou de comandă) şi daţi clic
dublu pe opţiunea “Game Controllers” (Gestionar jocuri).
44
Page 45

Versiunea în română
Apăsaţi opţiunea “Properties” (Proprietăţi) pentru a testa şi configura joystickul.
Funcţia de vibraţii
Sub joystick există un buton cu ajutorul căruia se poate activa sau dezactiva funcţia de vibraţii. Această funcţie este disponibilă
doar în cazul în care driverele au fost instalate corect.
Garanţie
Toate produsele Sweex au o garanţie de 3 ani. Nu oferim suport tehnic sau garanţie softwarelor, acumulatoarelor şi bateriilor
furnizate. Validarea garanţiei are loc doar la punctul de vânzare unde s-a făcut achiziţionarea produsului.
Toate denumirile brandurilor menţionate în acest manual, precum şi drepturile legale asociate cu acestea, sunt şi rămân ale
proprietarilor de drept.
45
Page 46

Hrvatska verzija
USB igraća palica s vibracijom GA200 Sweex
• Igraću palicu ne izlažite ekstremnim temperaturama. Uređaj ne ostavljanje na izravnom sunčevom svjetlu ili u blizini grijućih
elemenata.
• Igraću palicu ne koristite u iznimno prašnjavim ili vlažnim radnim okruženjima.
• Spriječite snažne udarce po uređaju ili udaranje s uređajem jer na taj način možete izazvati oštećenje interne elektronike.
• Uređaj nikad ne pokušavajte sami otvarati jer time poništavate jamstvo.
Instalacija
U optički pogon računala umetnite Sweex CD-ROM. CD-ROM medij automatski će se pokrenuti i prikazati izbornik.
Igraću palicu povežite na USB priključak.
Za instaliranje upravljačkih programa pritisnite gumb “Drivers XP and Vista (Upravljački programi za sustave XP i Vista)”. Slijedite
postupak instalacije. Igraću palicu možete koristiti nakon uspješnog dovršetka instalacije upravljačkih programa.
Provjera i konfiguriranje
Ako je igraću palicu potrebno provjeriti ili konfigurirati, krenite na izbornik “Start” – “Control Panel (Upravljačka ploča)” i
pritisnite stavku “Game Controllers (Kontrole za igranje)”.
46
Page 47

Hrvatska verzija
Pritisnite gumb “Properties (Svojstva)” kako biste provjerili ili konfigurirali igraću palicu.
Funkcija vibracije
Pri dnu igraću palicu nalazi se tipka pomoću koje se uključuje i isključuje funkcija vibracije. Ova funkcija radi isključivo ako su
upravljački programi ispravno instalirani.
Jamstvo
Za sve proizvode tvrtke Sweex primjenjuje se jamstvo u trajanju od 3 godine. Za isporučeni softver, dopunjive i obične baterije ne
dajemo nikakvo jamstvo. Primopredaja jamstva odvija se isključivo na mjestu kupnje proizvoda.
Svi nazivi proizvoda i pridružena prava navedena u ovom priručniku neizmjenjivo su vlasništvo odgovarajućeg vlasnika.
47
Page 48

484950
Page 49

Page 50

Page 51

EC Declaration of Conformity
We the under signed: Sweex Europe B.V.
Declare under our sole responsibility that the product:
P.O. Box 110
2600 AC Delft
The Netherlands
GA200 Sweex Joystick vibration USB
Is tested to and conforms with the essential radio test suites included in the following standards:
Standard EMI Issue date
EN61000-3-2 2000
EN61000-3-3 1995+A1,2001
EN55024 1998+A1,2001+A2,2003
The measurements shown in this test report were made in accordance with the procedures given in
EUROPEAN COUNCIL DIRECTIVE 89/336/EEC.
Delft 08-04-2008 R. Ramaekers
© 2008 Sweex. All rights reserved. Sweex, the Sweex logo, and other Sweex marks are owned by Sweex and may be
registered. All other trademarks are property of their respective owners. Prices and technical specifications are conditional and
may be changed without any prior notification.
51
Page 52

GA200
SWEEX JOYSTICK VIBRATION USB
© Sweex 2008
 Loading...