

English version
BT211 Sweex Bluetooth 2.0 Class 1 Adapter USB
Introduction
• Do not expose the Sweex Bluetooth 2.0 Class 1 Adapter USB to extreme temperatures. Do not place the device in direct sunlight or in the direct
vicinity of heating elements.
• Do not use the Sweex Bluetooth 2.0 Class 1 Adapter USB in extremely dusty or moist surroundings.
• Protect the device against powerful shocks or jolts – they may damage the internal electronics.
• Never attempt to open the device yourself – it will cause the warranty to lapse.
Drivers and software
The Sweex Bluetooth 2.0 Class 1 Adapter USB operates under Windows 2000, XP and Vista without having to install drivers or software. Windows
will automatically detect the device and install it.
The “XTND Connect Blue Manager” software that comes with this product offers extra functionality in addition to the basic options of Bluetooth.
Sweex offers no support for this software.
Insert the Sweex CD-ROM in your computer in order to install the software. In the start-up window, select “Install XTND Connect Blue Manager”.
Installation
Connect the Sweex Bluetooth 2.0 Class 1 Adapter USB to a free USB port on your computer. Following installation, a blue Bluetooth icon will appear
in the bottom right-hand corner of your screen. If you right-click this icon, you will see a number of options for connections with other devices.
If the icon fails to appear, you can enable the icon to appear in the system field. You can do so in the configuration screen under the “Options” of
“Bluetooth Devices”.
4
English version
Adding a Bluetooth device
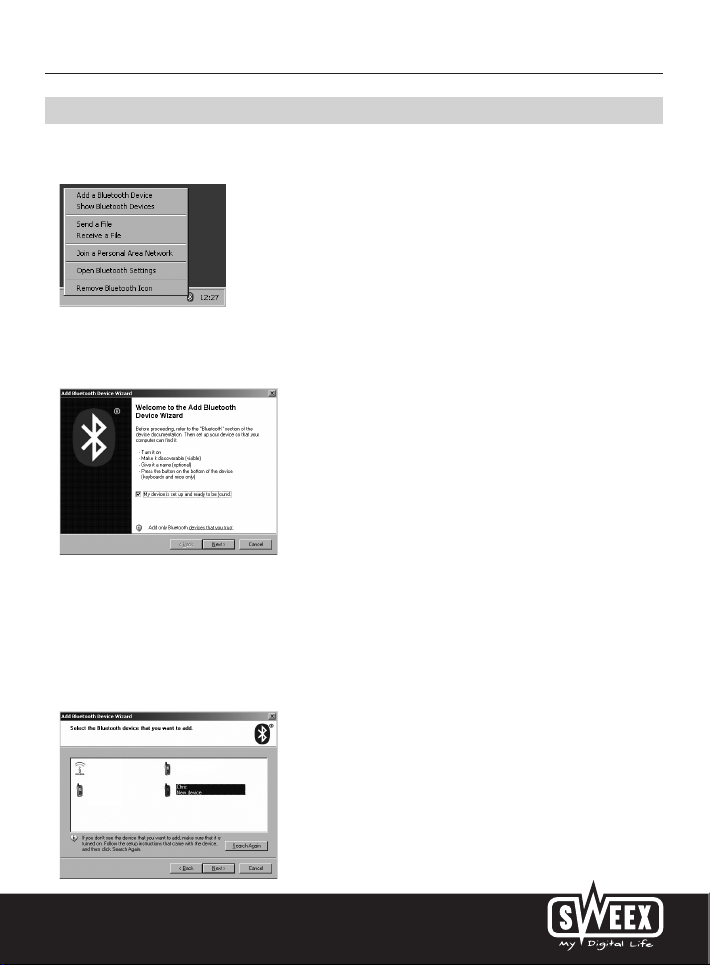
After having installed the Sweex Bluetooth 2.0 adapter, a ‘B’ icon appears on the right-hand side of the taskbar. Right-click here - the following
menu appears:
Select the first option; “Add a Bluetooth device”
The following screen appears:
Tick the option “My device is set up and ready to be found”. Ensure that the device to be connected meets the stated requirements. In the case
of a mobile phone, ensure that Bluetooth is activated and that the telephone can be detected. The manual of the relevant device describes how to
activate this.
Then click “next”.
An overview listing the devices found appears:
5

English version
Select the device you want to add. Then click “next”.
The following screen appears. Here you can add a password to connect your device.
In this example we have chosen “0000” (however, you can also choose another password).
Then click “next”. Windows now tries to connect the adapter to the telephone:
During the connecting process the telephone will request confirmation. The password must be entered also. The correct procedure depends on the
brand name and type of telephone. To this end, we refer you to the manual of the relevant telephone.
The telephone was connected to the Bluetooth 2.0 adapter successfully.
6

Sending a file
Here select the option “Send a file”.
The adapter will now search for Bluetooth devices within its range:
Select the device you want to send a file to.
English version
To this end, we have selected the mobile phone which was already connected to the adapter. If you choose another device, you can enter a
password. We recommend using a password to increase security during file transfers.
Then click “next”.
7

English version
Now select the file you want to send and click “next”.
The file was sent successfully.
Receiving a file
Prior to being able to receive a file, you must ensure that the adapter can be detected. You can do so as follows:
Select the option “Open Bluetooth Settings”.
8

Click on the second tab and the following screen appears:
Here tick the option “Turn discovery on”. The adapter can now be detected by other Bluetooth devices.
Here select the option “Receive a file”.
English version
The adapter is now waiting for a device to connect.
9

English version
The adapter received and accepted the file. You can choose how to name the file and where to store it.
The file transfer was completed successfully.
Warranty
All Sweex products are warranted for three years. We do not grant support or warranties for any software and/or (rechargeable) batteries included.
Settlement of guarantee only takes place via the dealer where you have purchased the product in question.
The rightful owner has and retains title to all brand names and related rights mentioned in this manual.
10
 Loading...