

Page 1
`
WELCOME TO
SUGARCUBE
TM
For any usage questions,
please contact:
[email protected]
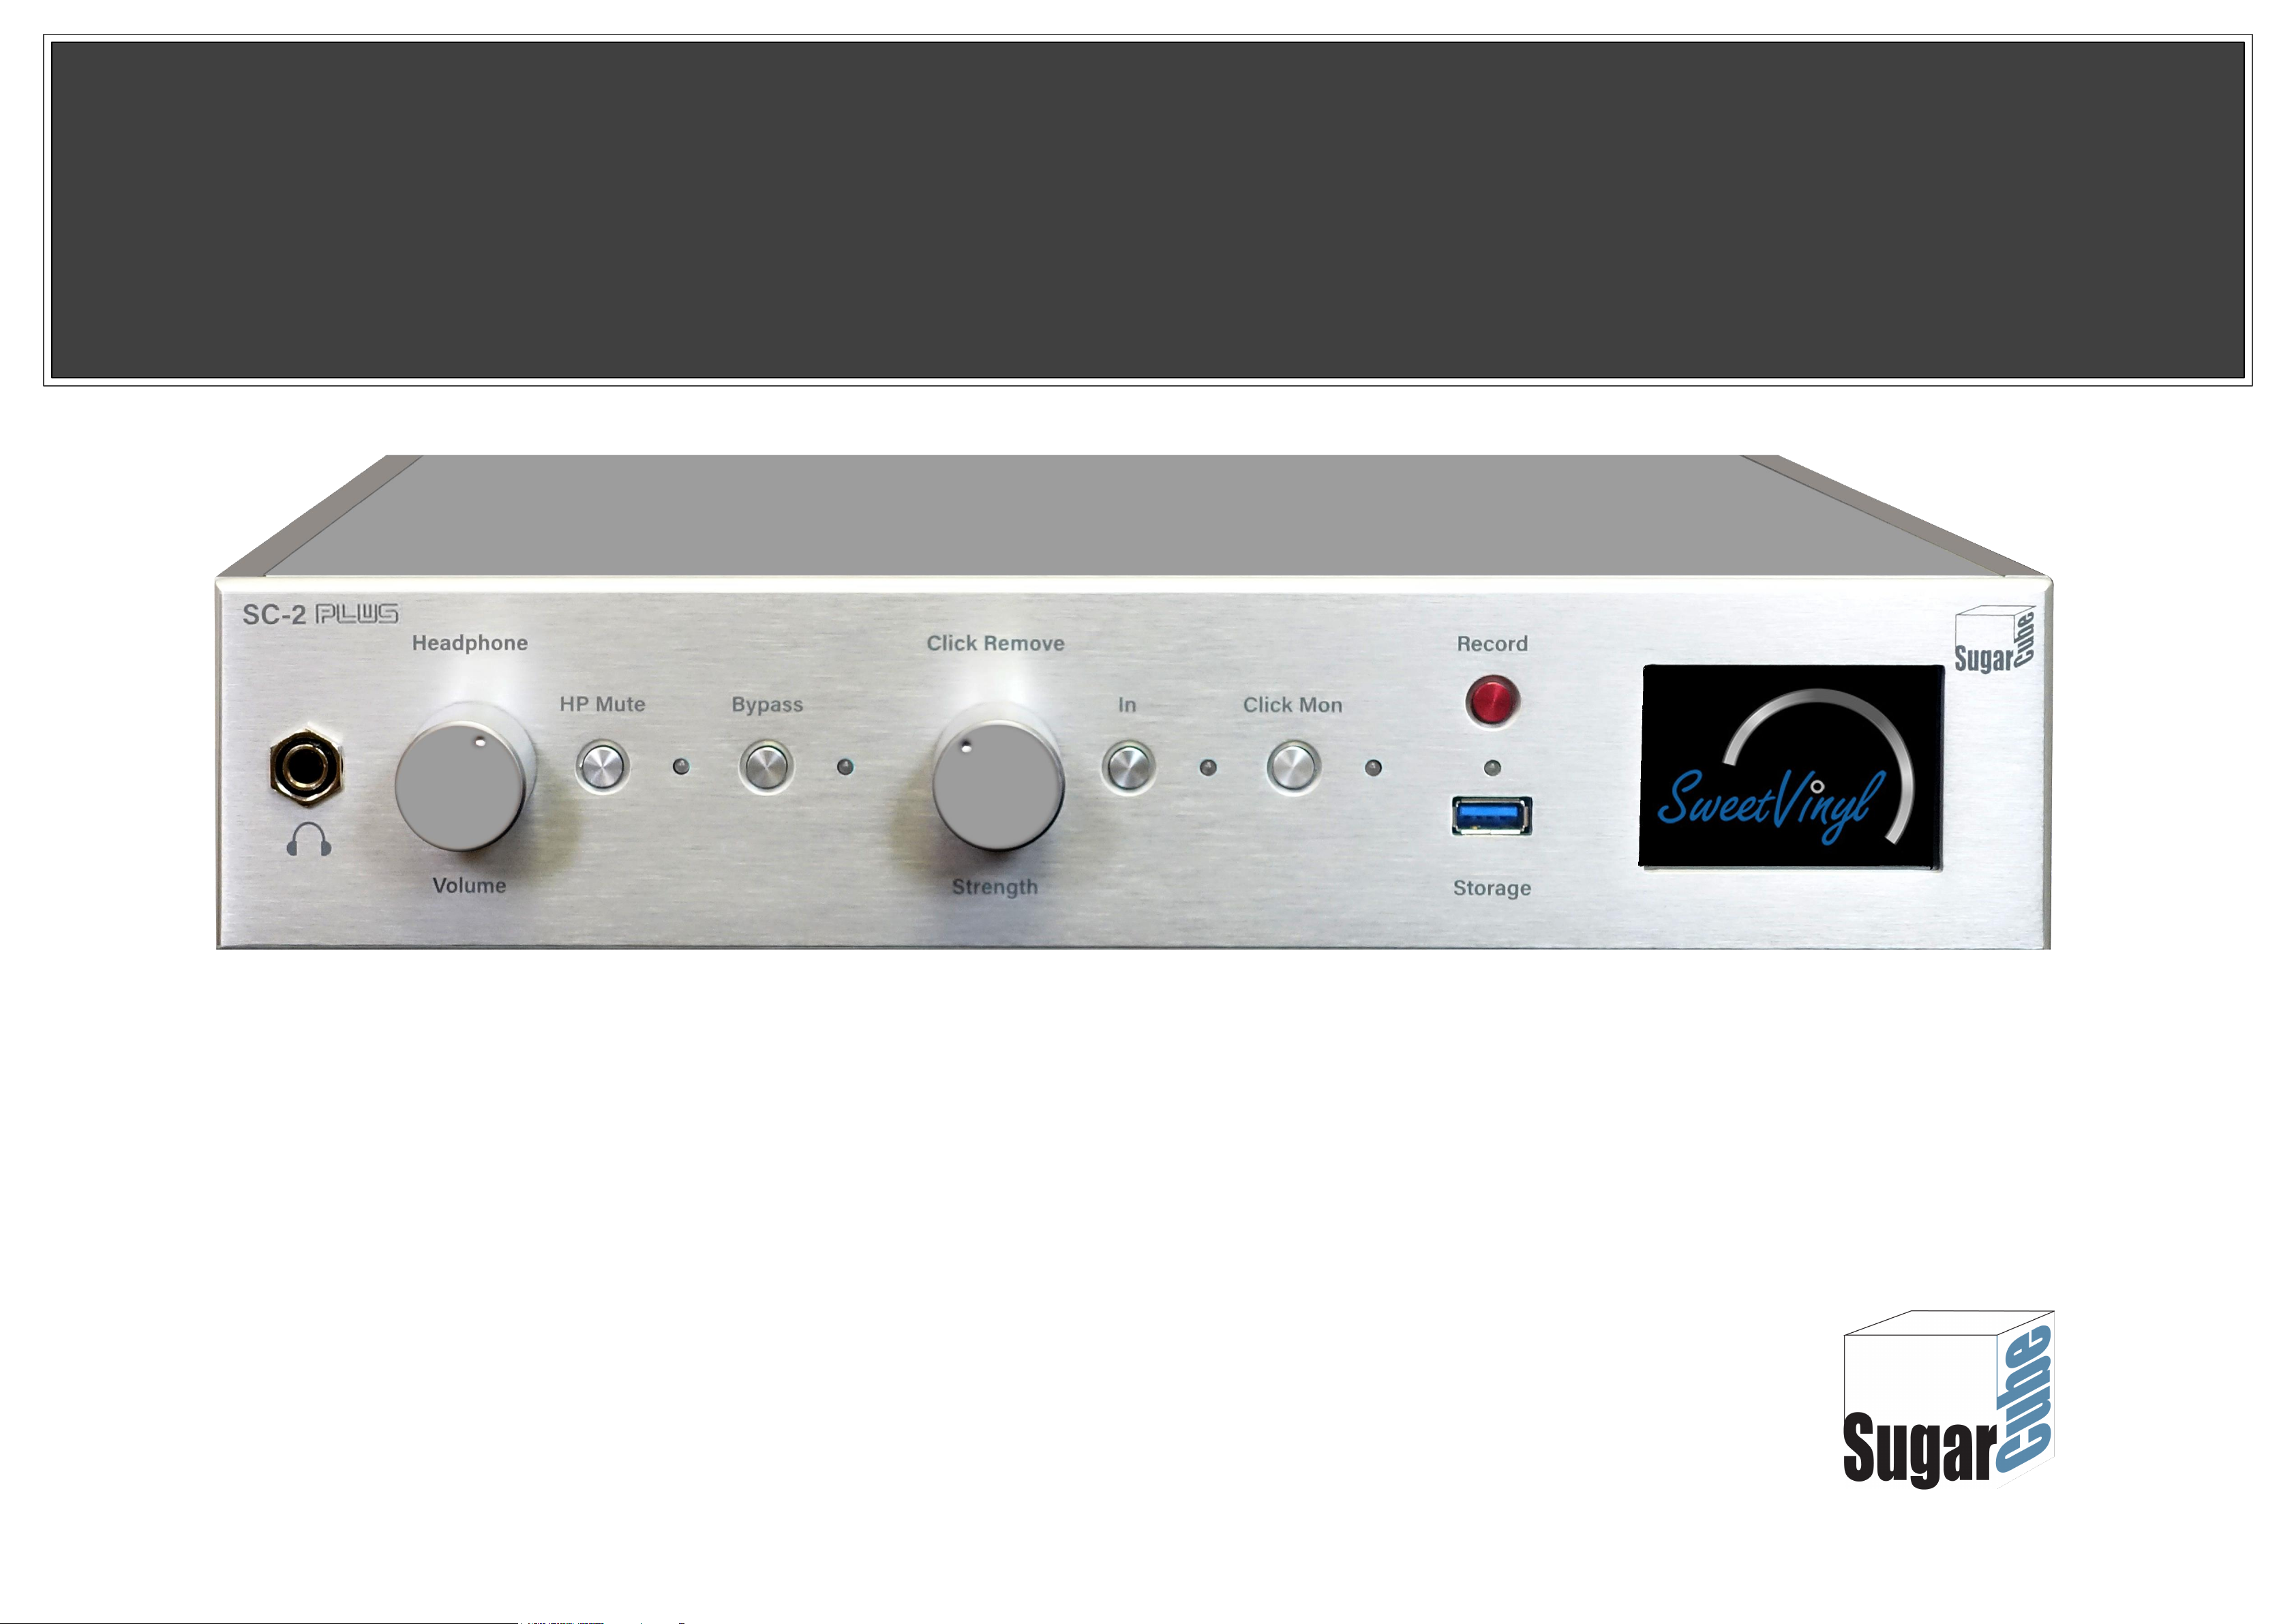
Thank You for purchasing the SugarCube SC2-Plus.
Your experience of high-end audio is about to get a
lot sweeter when all your vinyl will sound like mint.
These pages provide an overview of the set-up and
control of the SC2-Plus.
`
For Instructions on SC-2 Recording – Please See Recording Quick Start User Guide
Page 2
Unpacking
Your
SugarCube
Section 1
Page 3
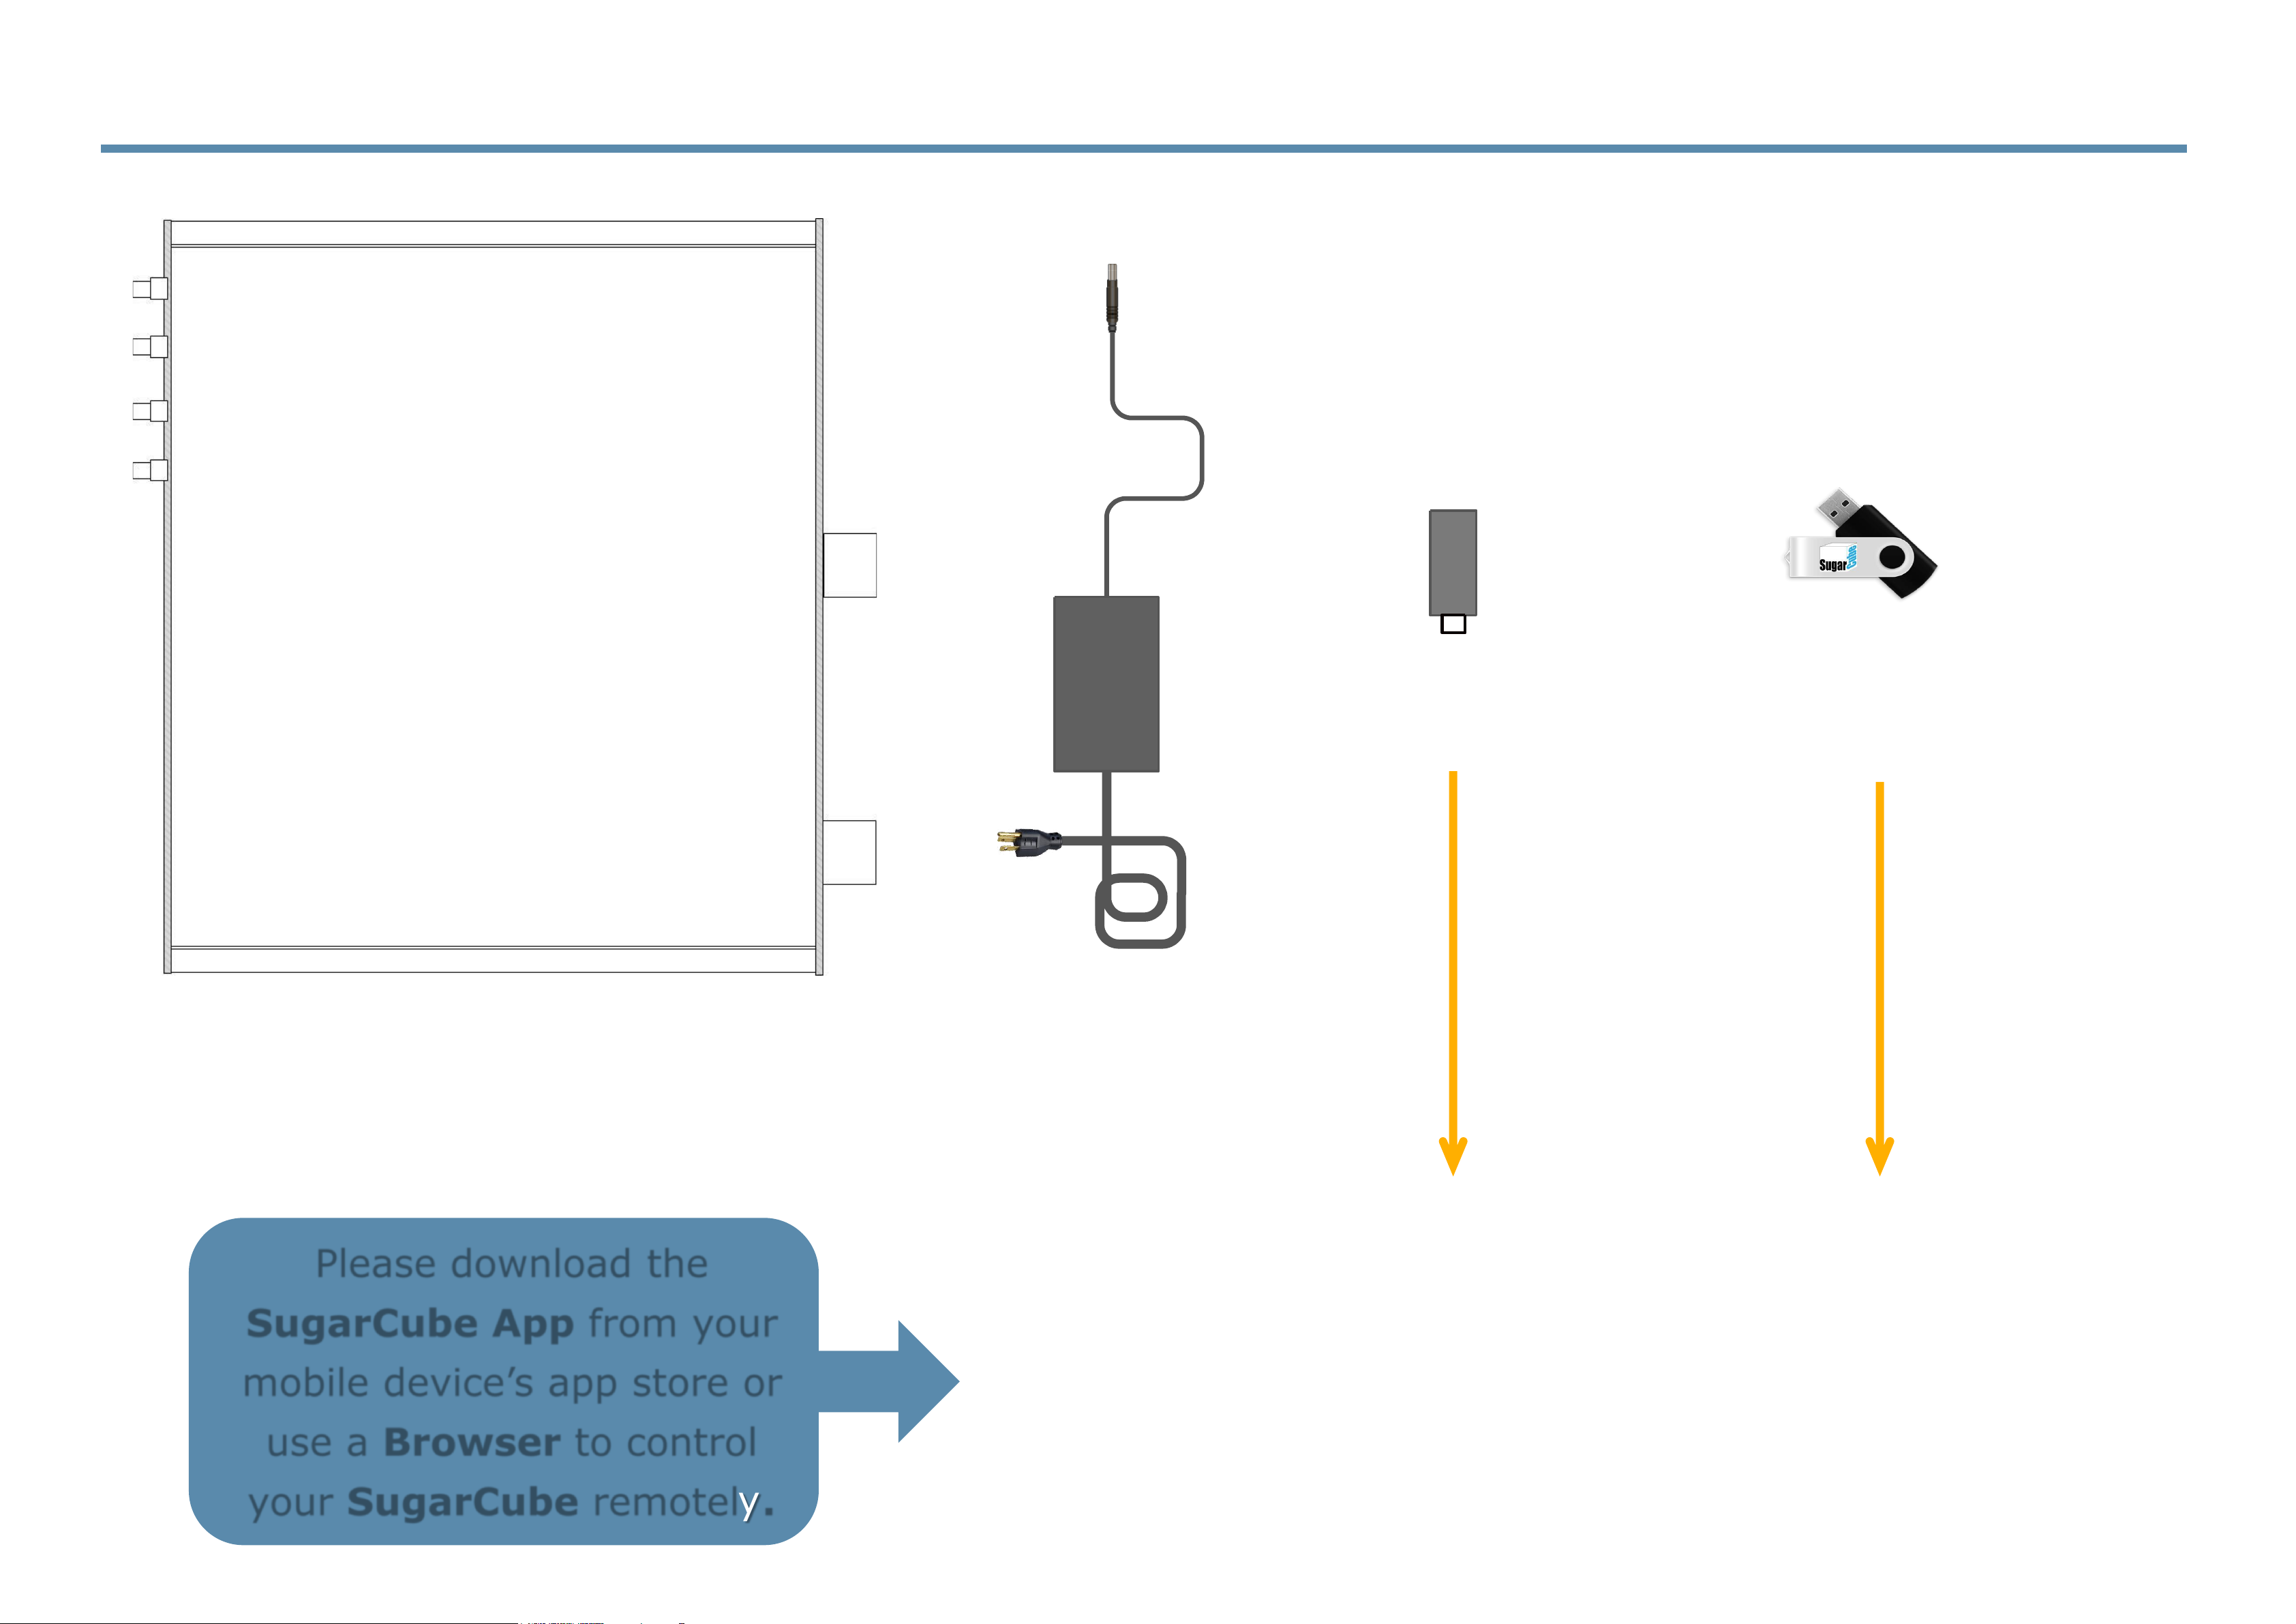
Wifi USB Adapter
This adapter connects
the SugarCube to your
WiFi network or you can
use a wired Internet
connection if available.
Please download the
SugarCube App from your
mobile device’s app store or
use a Browser to control
your SugarCube remotely.
USB
Stick
USB-stick contains the full
SugarCube Setup and User
Guide.
1.1 Unpacking Your SugarCube
AC Power Adapter,
5V, 4A DC Output
SugarCube SC2-Plus Unit
For Instructions on SC-2 Recording – Please See Recording Quick Start User Guide
Page 4
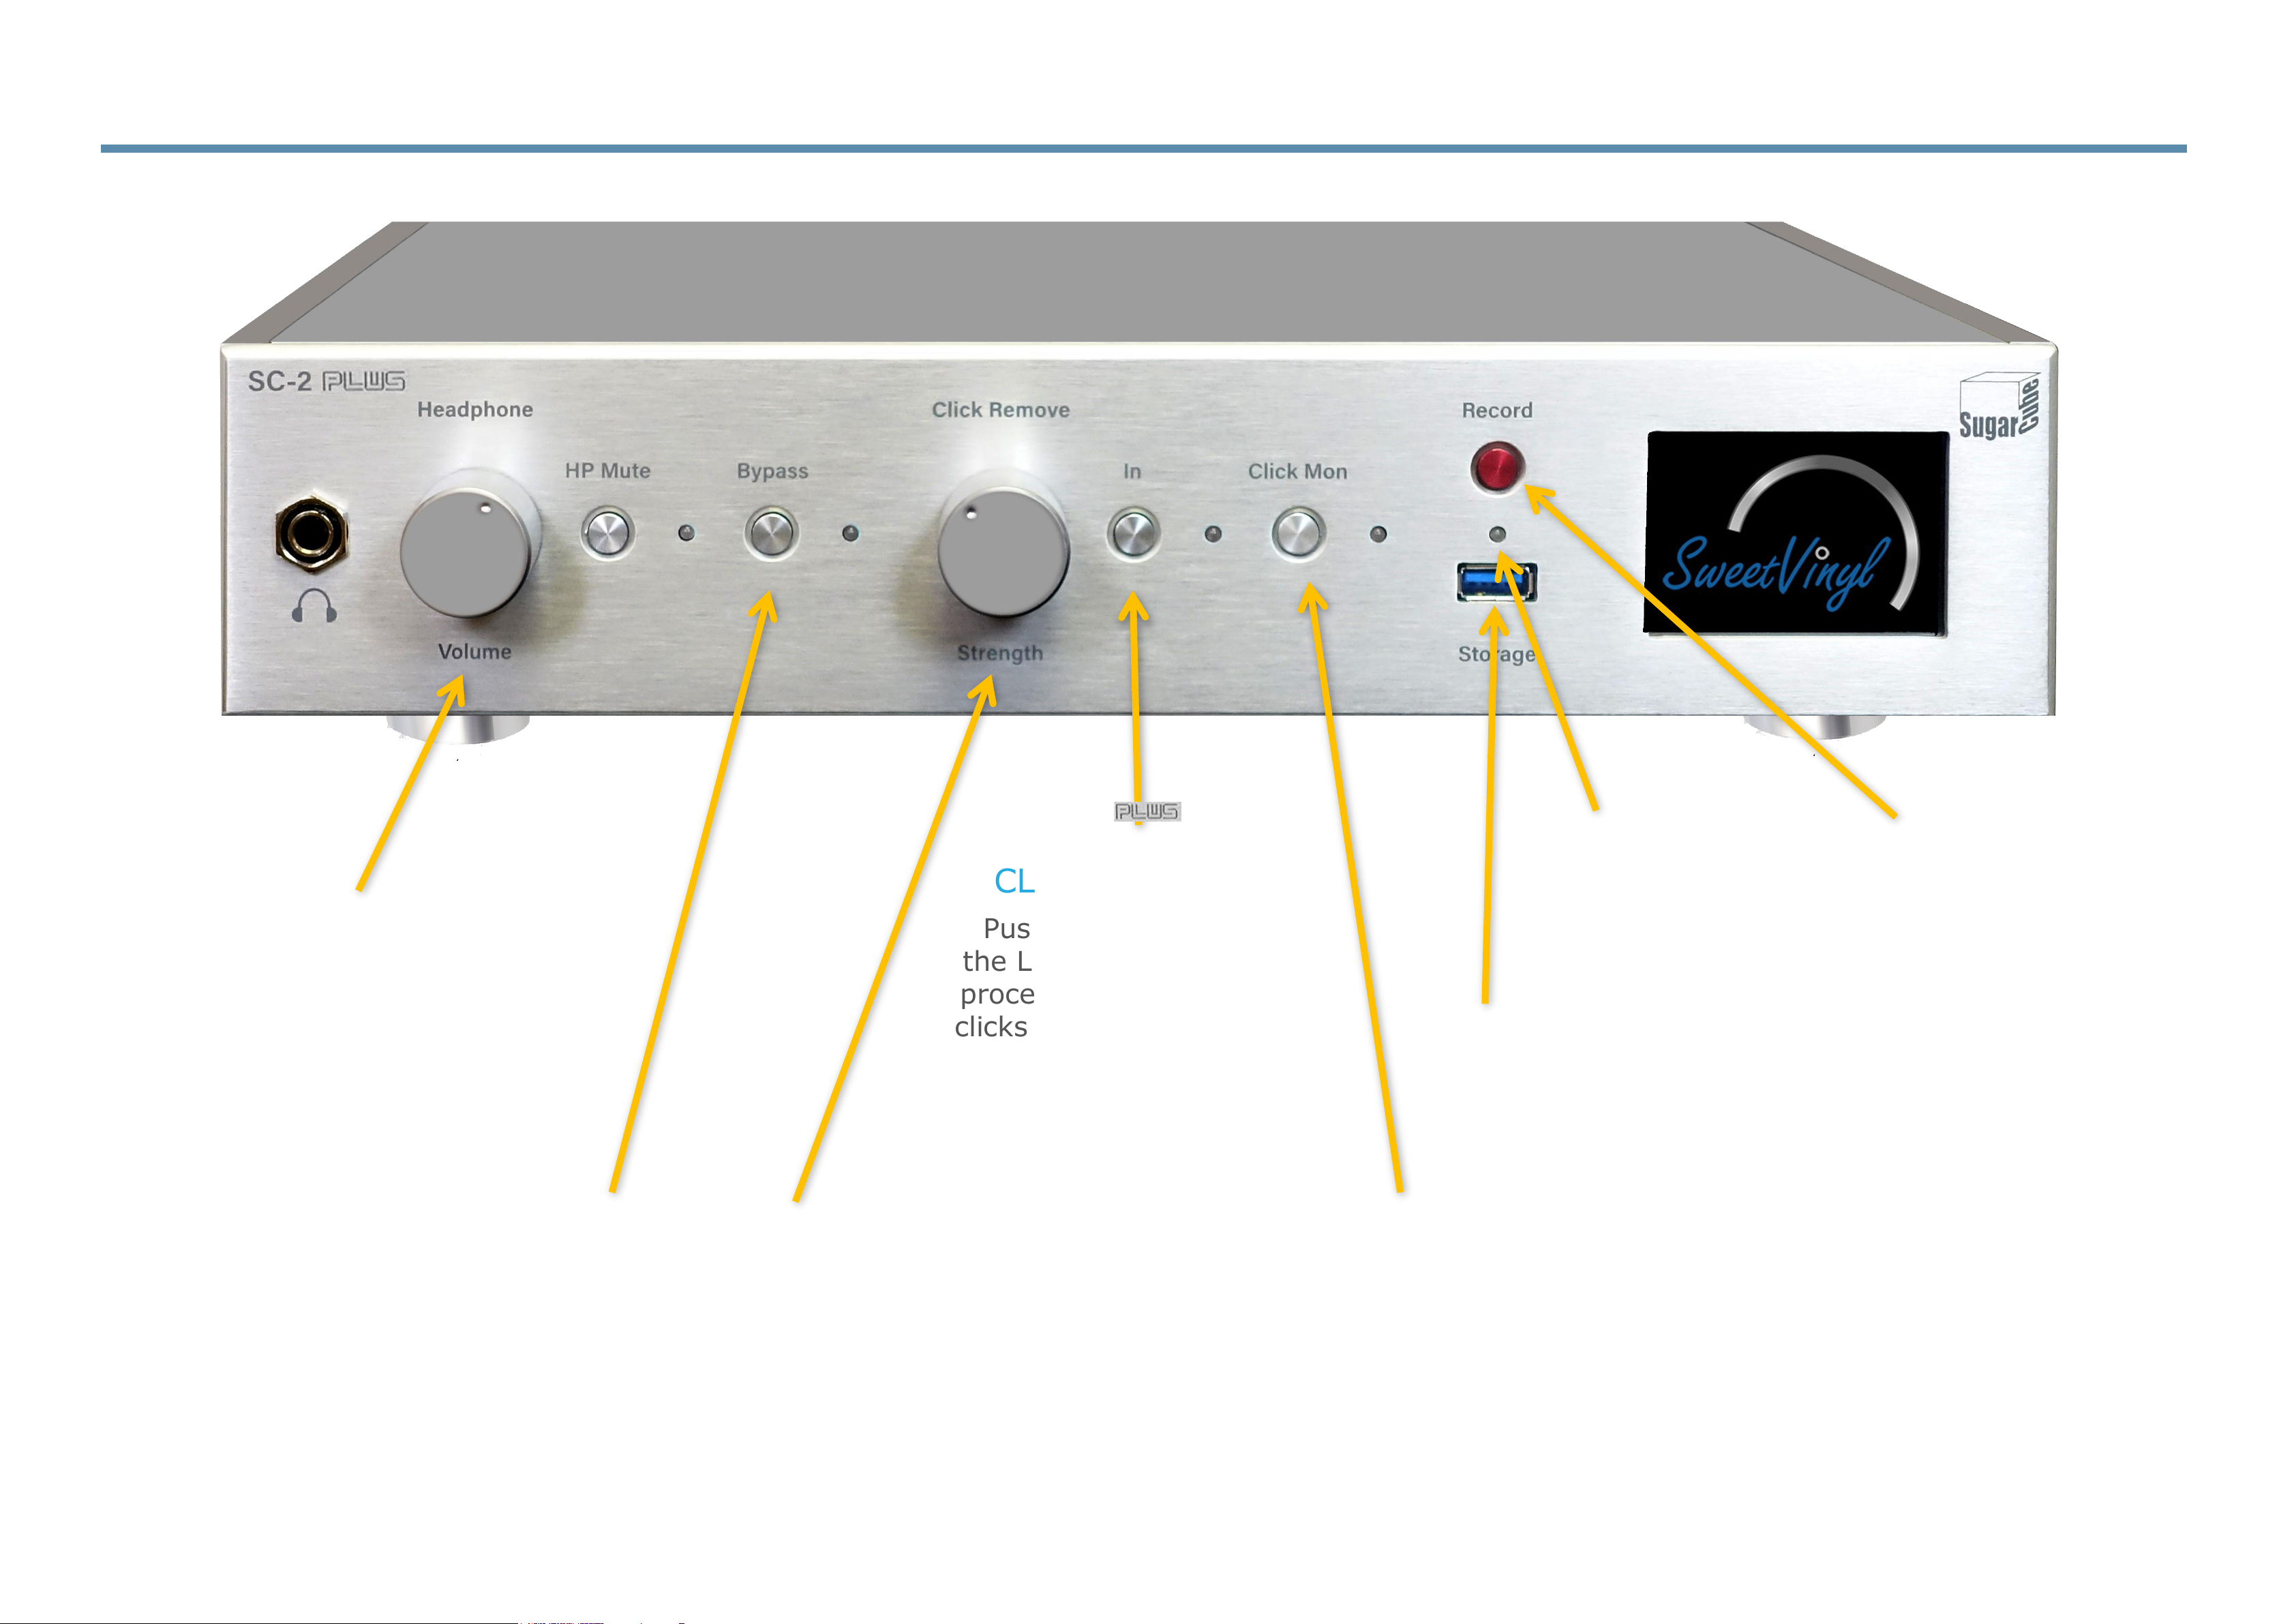
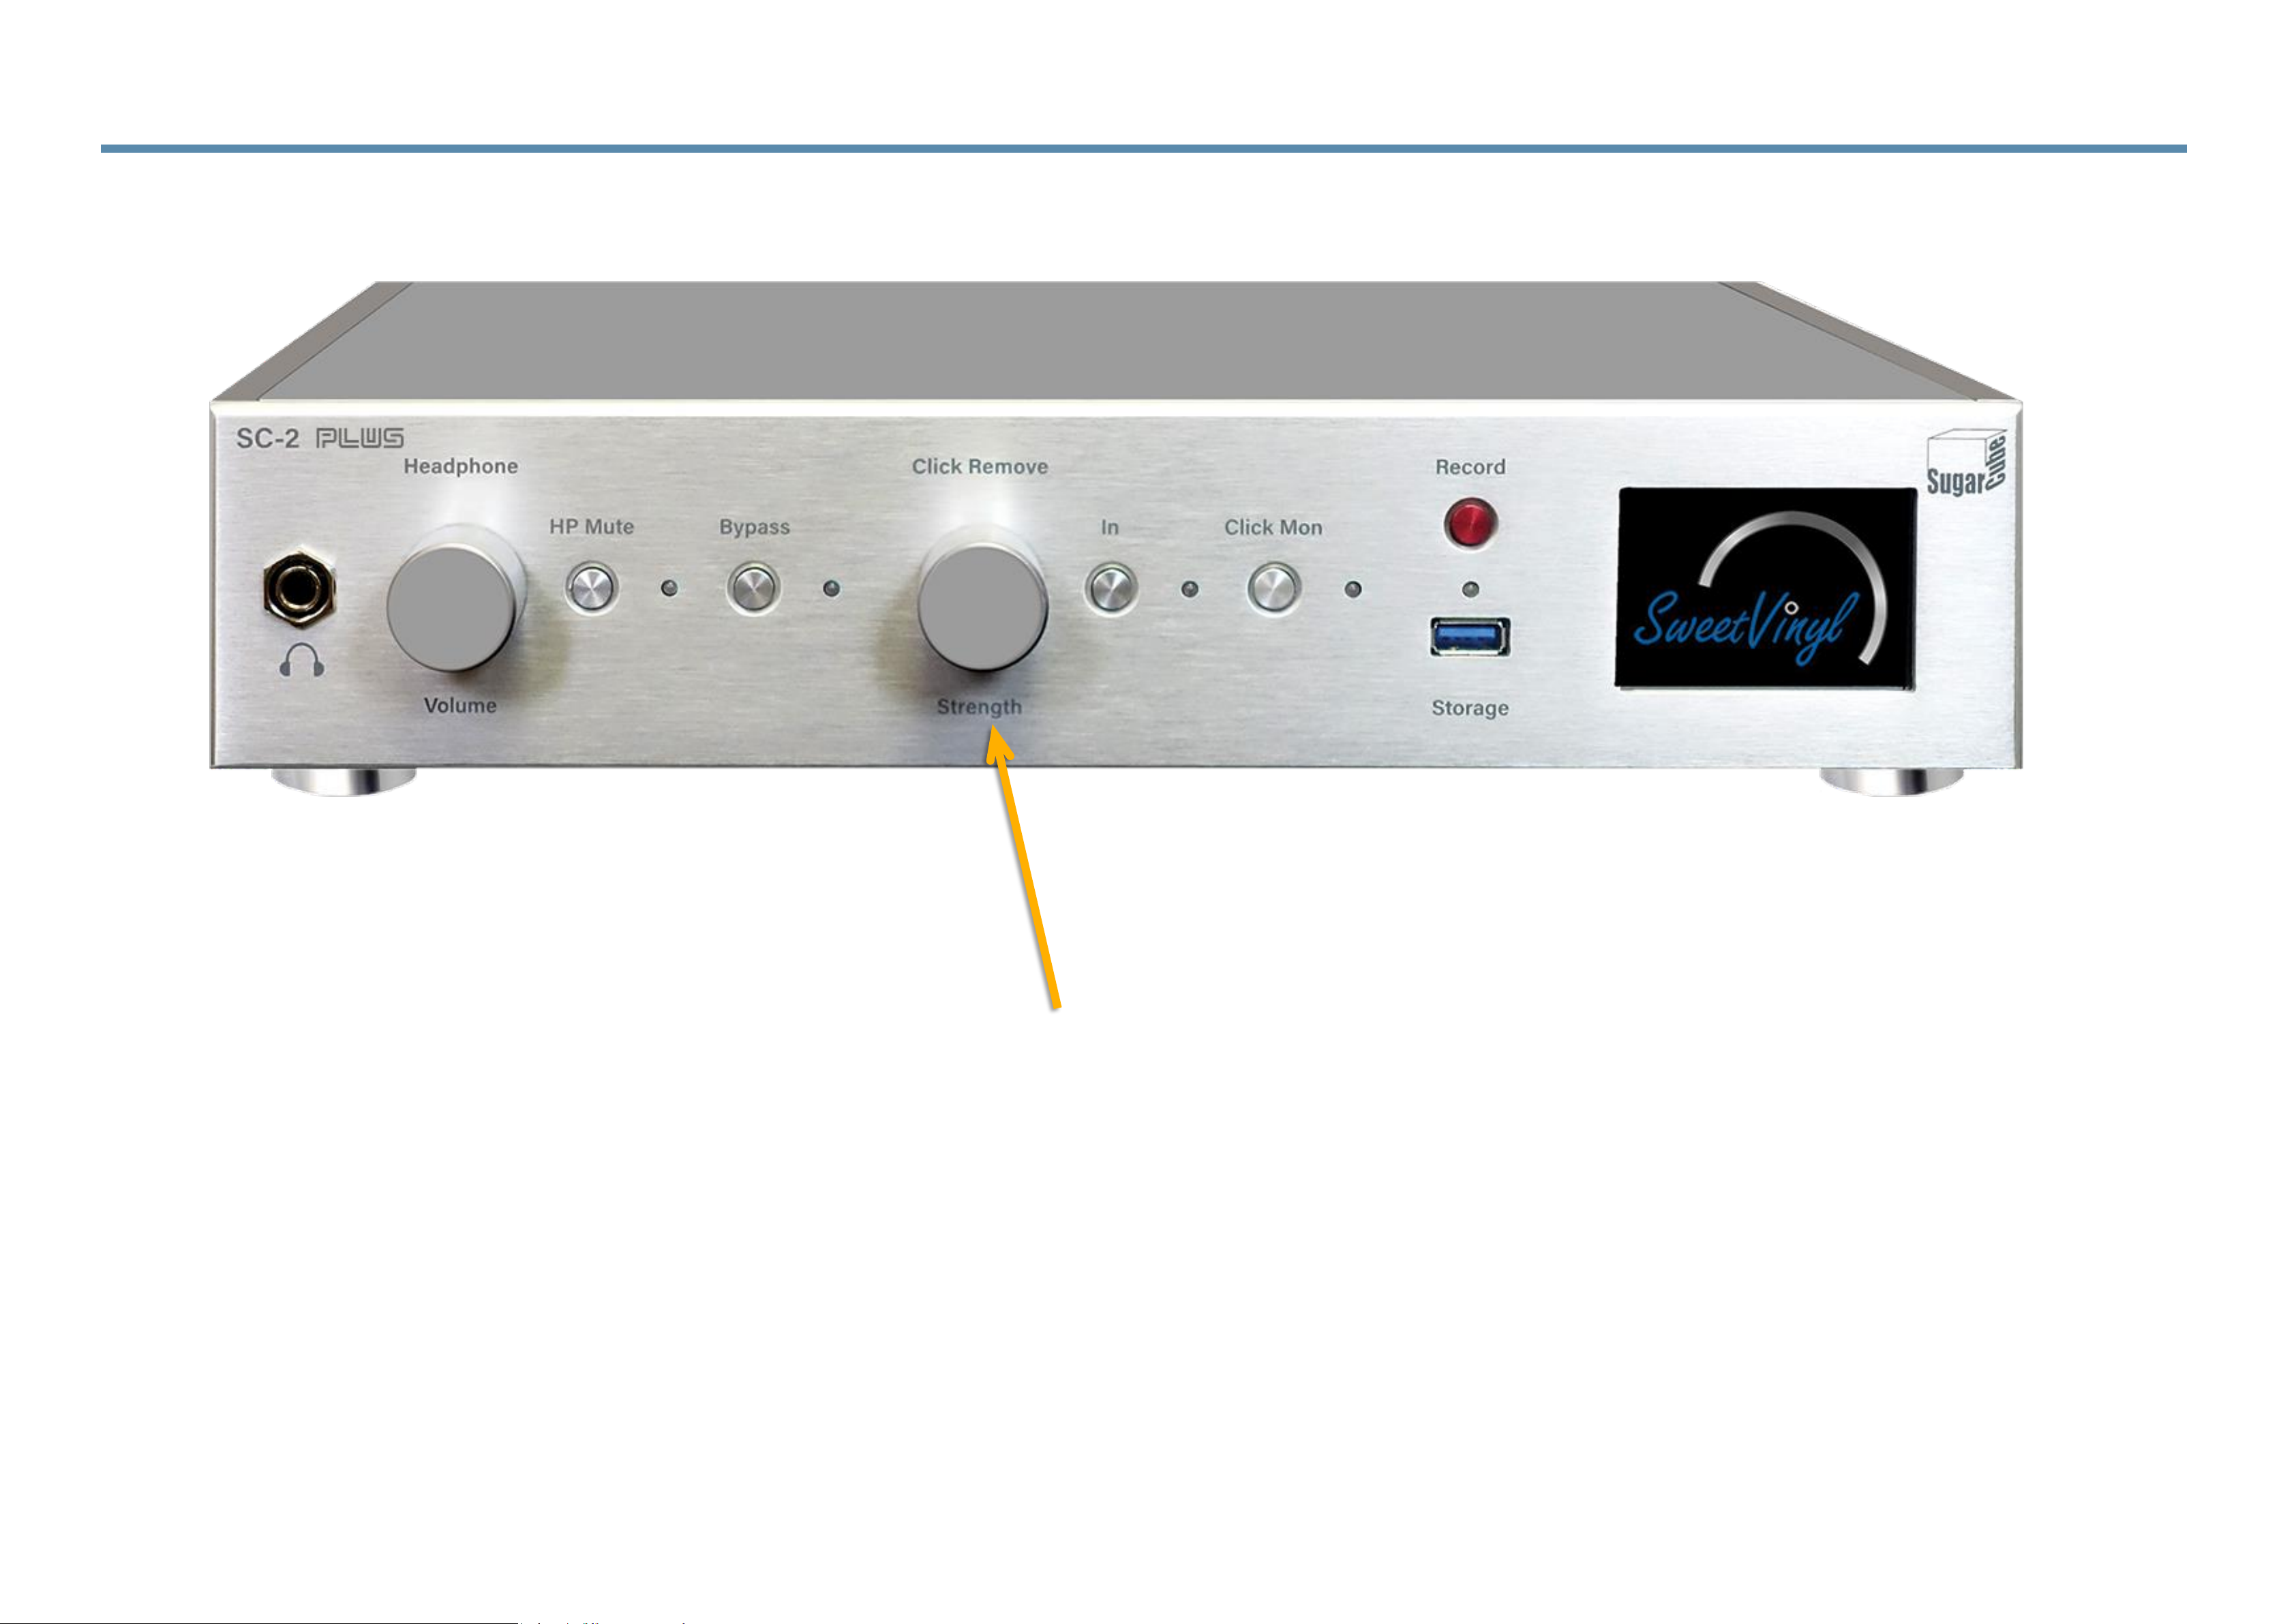
1.2 SC2-Plus Front-Panel Controls
CLICK MONITOR
Push on, push off: when
the LED is lit, SugarCube is
processing audio to remove
clicks and pops (the BYPASS
LED will go out.)
CLICK REMOVE ‘IN’
When pressed and the LED is lit, the
SugarCube suppresses the music so
that you can better hear the clicks and
pops. This helps set the STRENGTH
level for particularly noisy LPs.
STRENGTH
Headphone amp operates
independently and does not
affect the level of the line
in / out audio.
BYPASS
When pressed and the LED is lit,
an internal relay has shunted the
LINE-IN directly to LINE-OUT,
bypassing all internal circuitry.
Controls the strength of the click
and pop detection and removal
process. Almost all LPs will sound
great at a setting of 5 or 6.
Note: we recommend that you do
NOT adjust STRENGTH all the
way to 10, you will rarely need
this much. Less is more.
USB3
Plug in USB stick or drive
To record & playback
Storage.
STATUS
Green when storage
pugged in and ready.
Blinks red while
recording.
RECORD
Press to start recording
Press to stop.
HEADPHONE
JACK, VOLUME, MUTE
Page 5
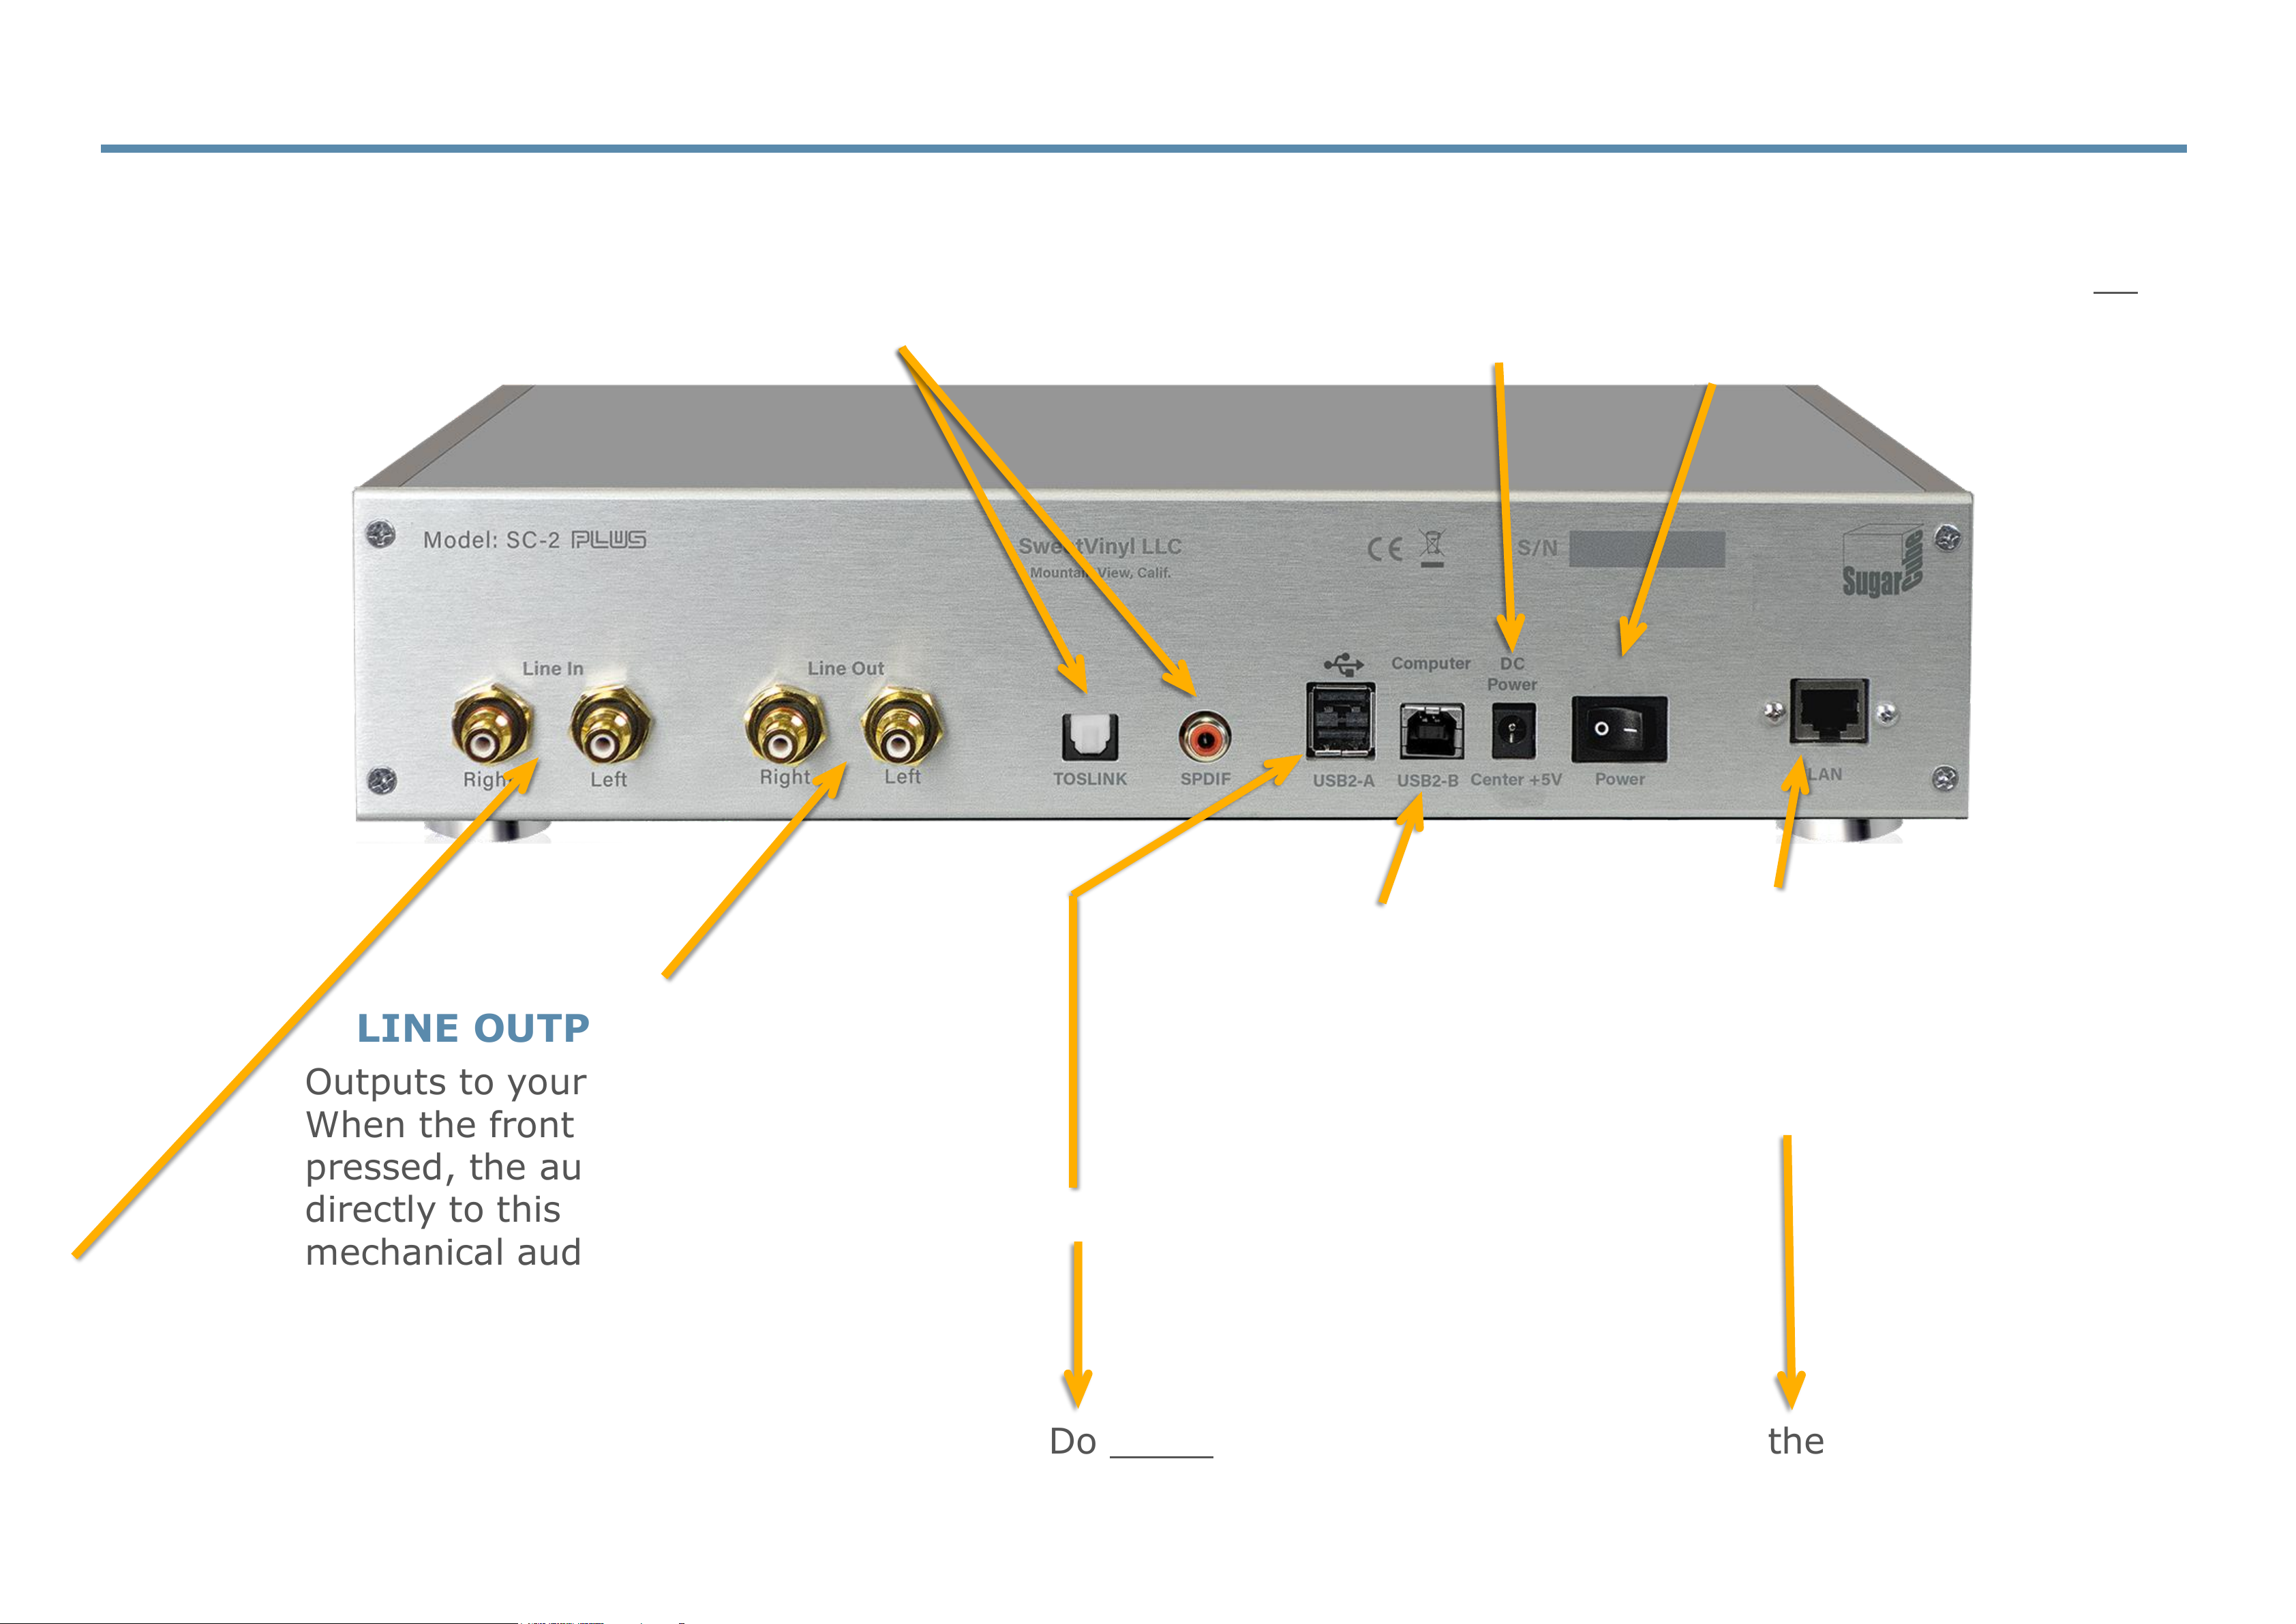
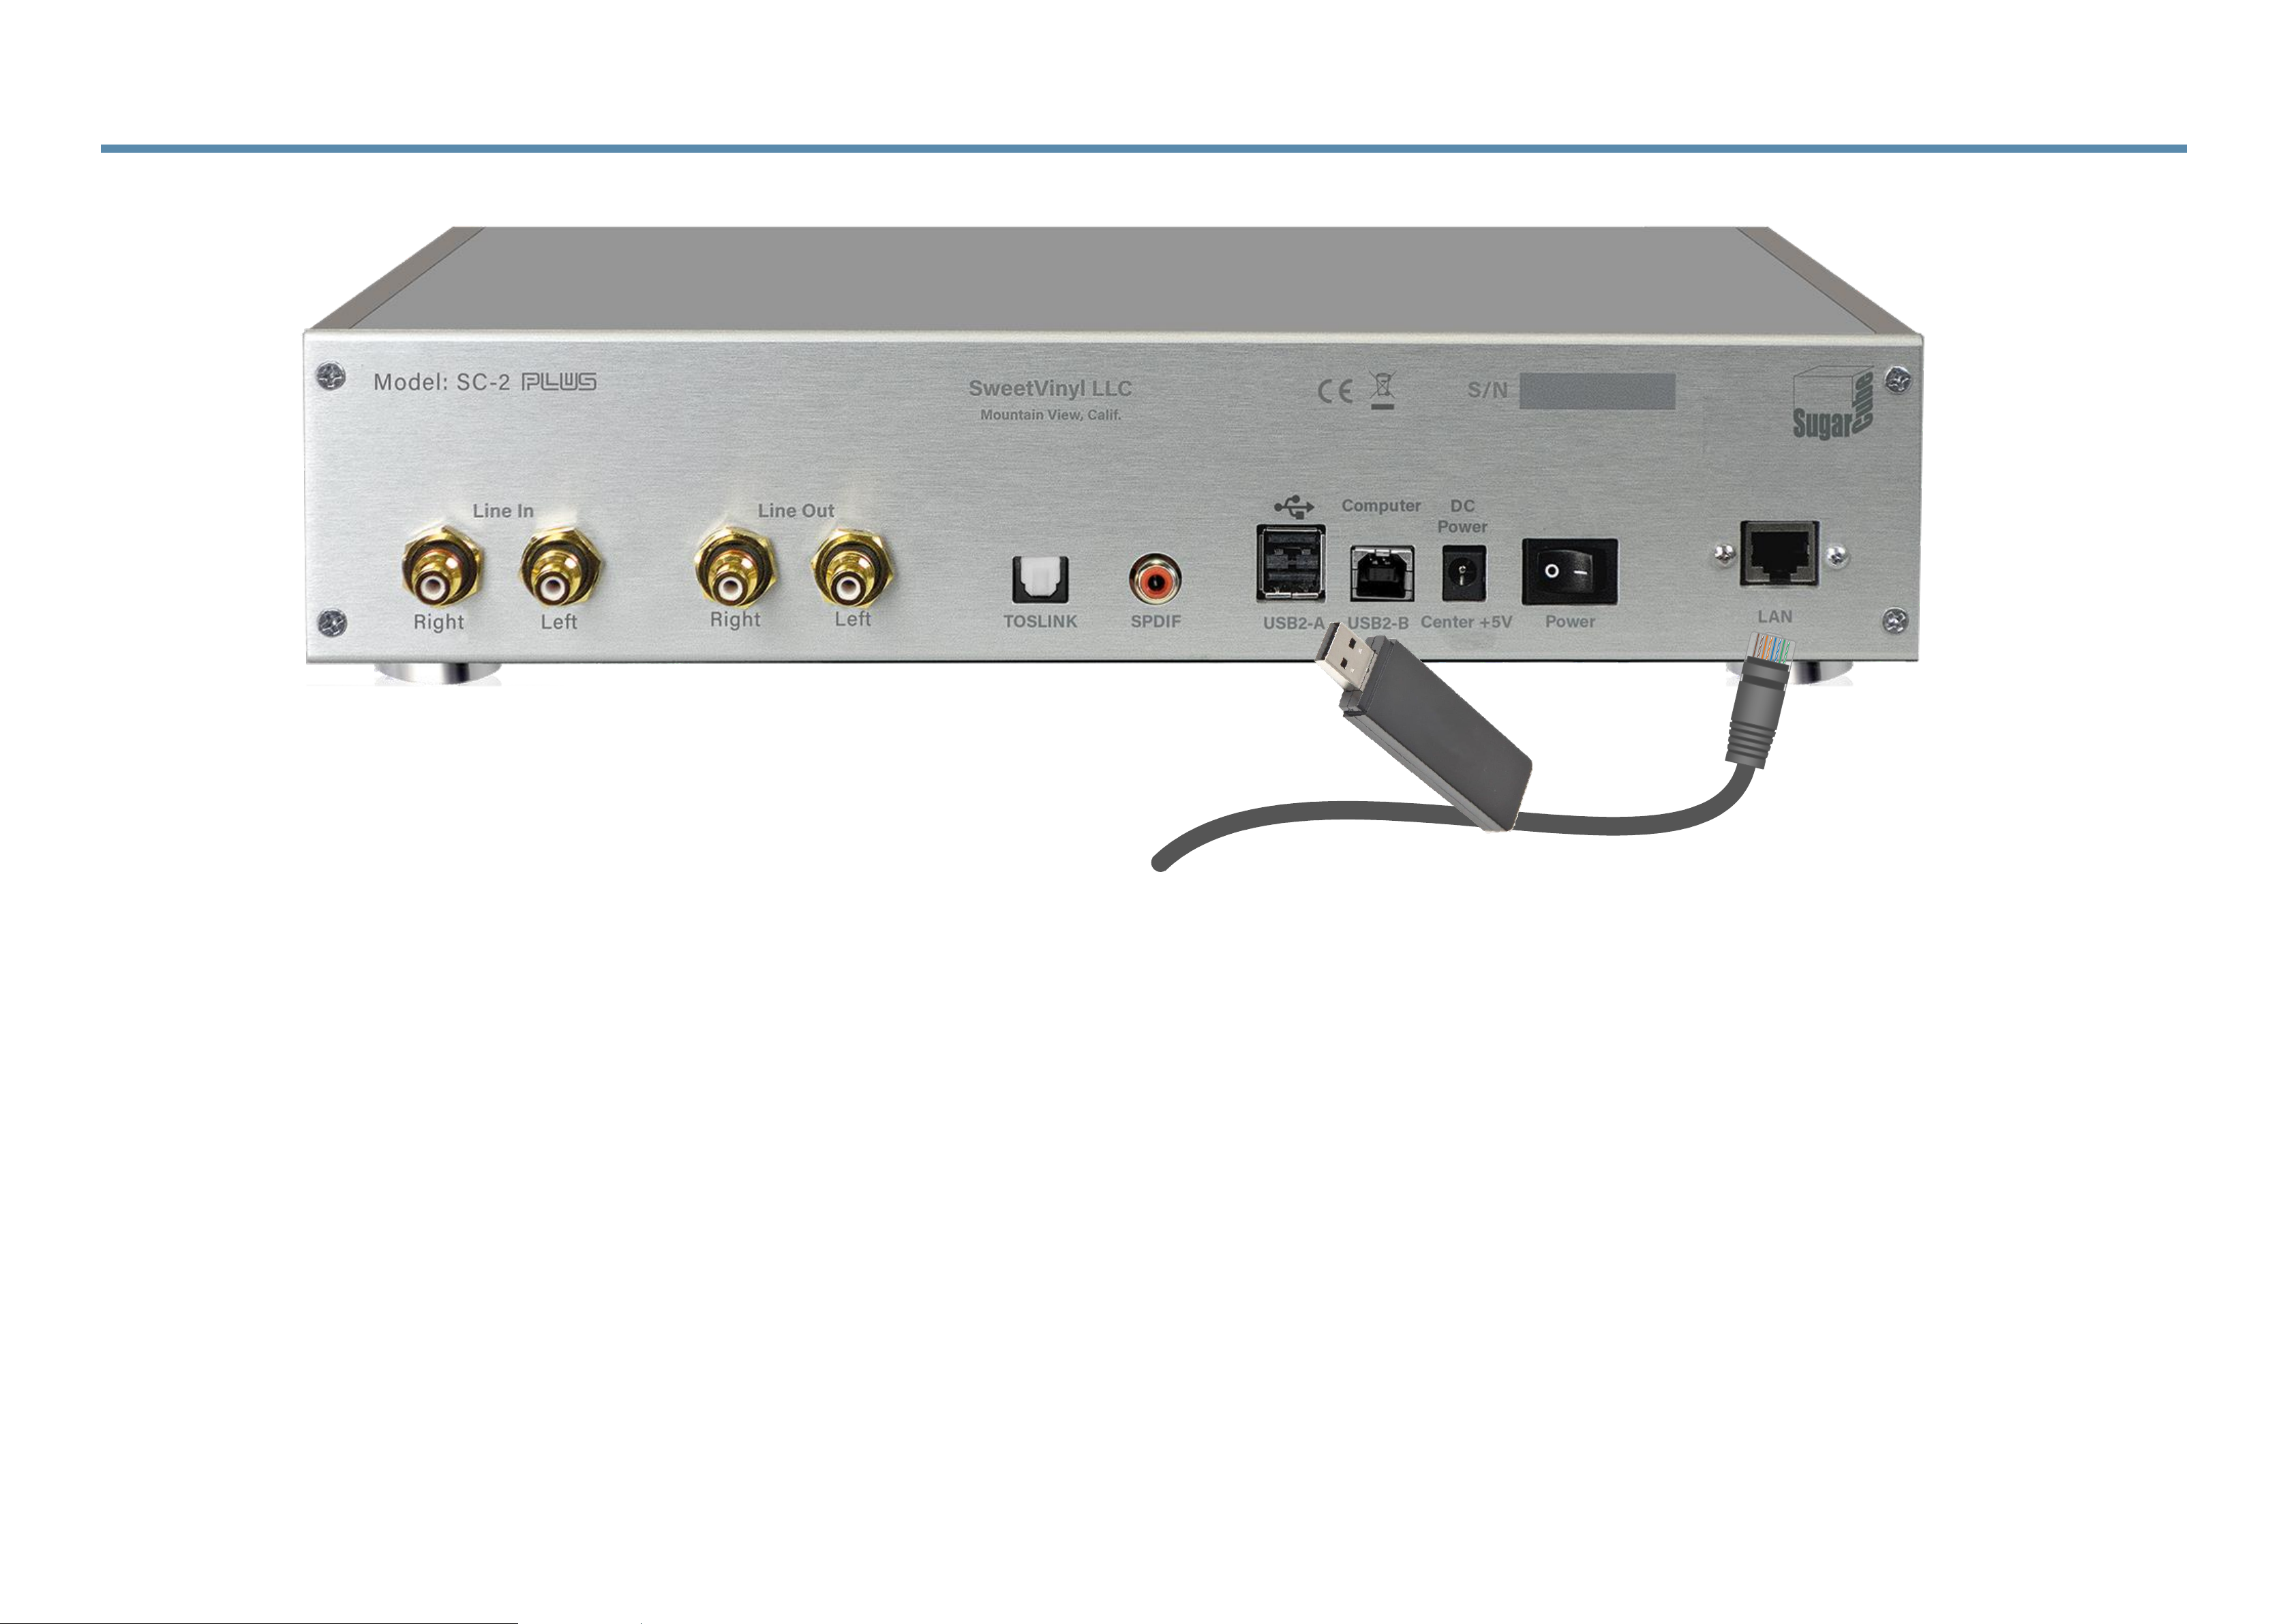
1.3 SC2-Plus Back-Panel
LINE OUTPUT
Outputs to your line stage (pre-amp).
When the front panel BYPASS button is
pressed, the audio from LINE IN passes
directly to this LINE OUT through a
mechanical audiophile-grade relay.
WIRED LAN
If an Ethernet LAN cable is
available, connect to this port
instead of plugging in the WiFi
adapter.
Note: when power is off, an
internal relay bypasses
LINE IN to LINE OUT.
Do either of the above when controlling the SC2-Plus on
the SugarCube iOS or Android app or from your desktop.
DIGITAL OUTPUT
Toslink and SPDIF outputs
at 192K/24bit.
Connect the supplied
adapter to this port.
POWER ON/OFF
DC POWER IN
LINE INPUT
Accepts the output of your phono pre-amp.
Please do NOT directly plug your turntable
into this port unless it has a built-in phono
pre-amp with a line-level output.
USB PORT FOR WIFI ADAPTER
Use this port to link your
computer or music server to
for enhanced ADC and DAC
functionality. Detailed
instructions later in guide.
USB COMPUTER PORT
Page 6

Connecting
SugarCube
to Your
Sound
System
PLEASE BE SURE ALL
EQUIPMENT IS
TURNED OFF
BEFORE ATTEMPTING
INSTALLATION
Section 2
Page 7
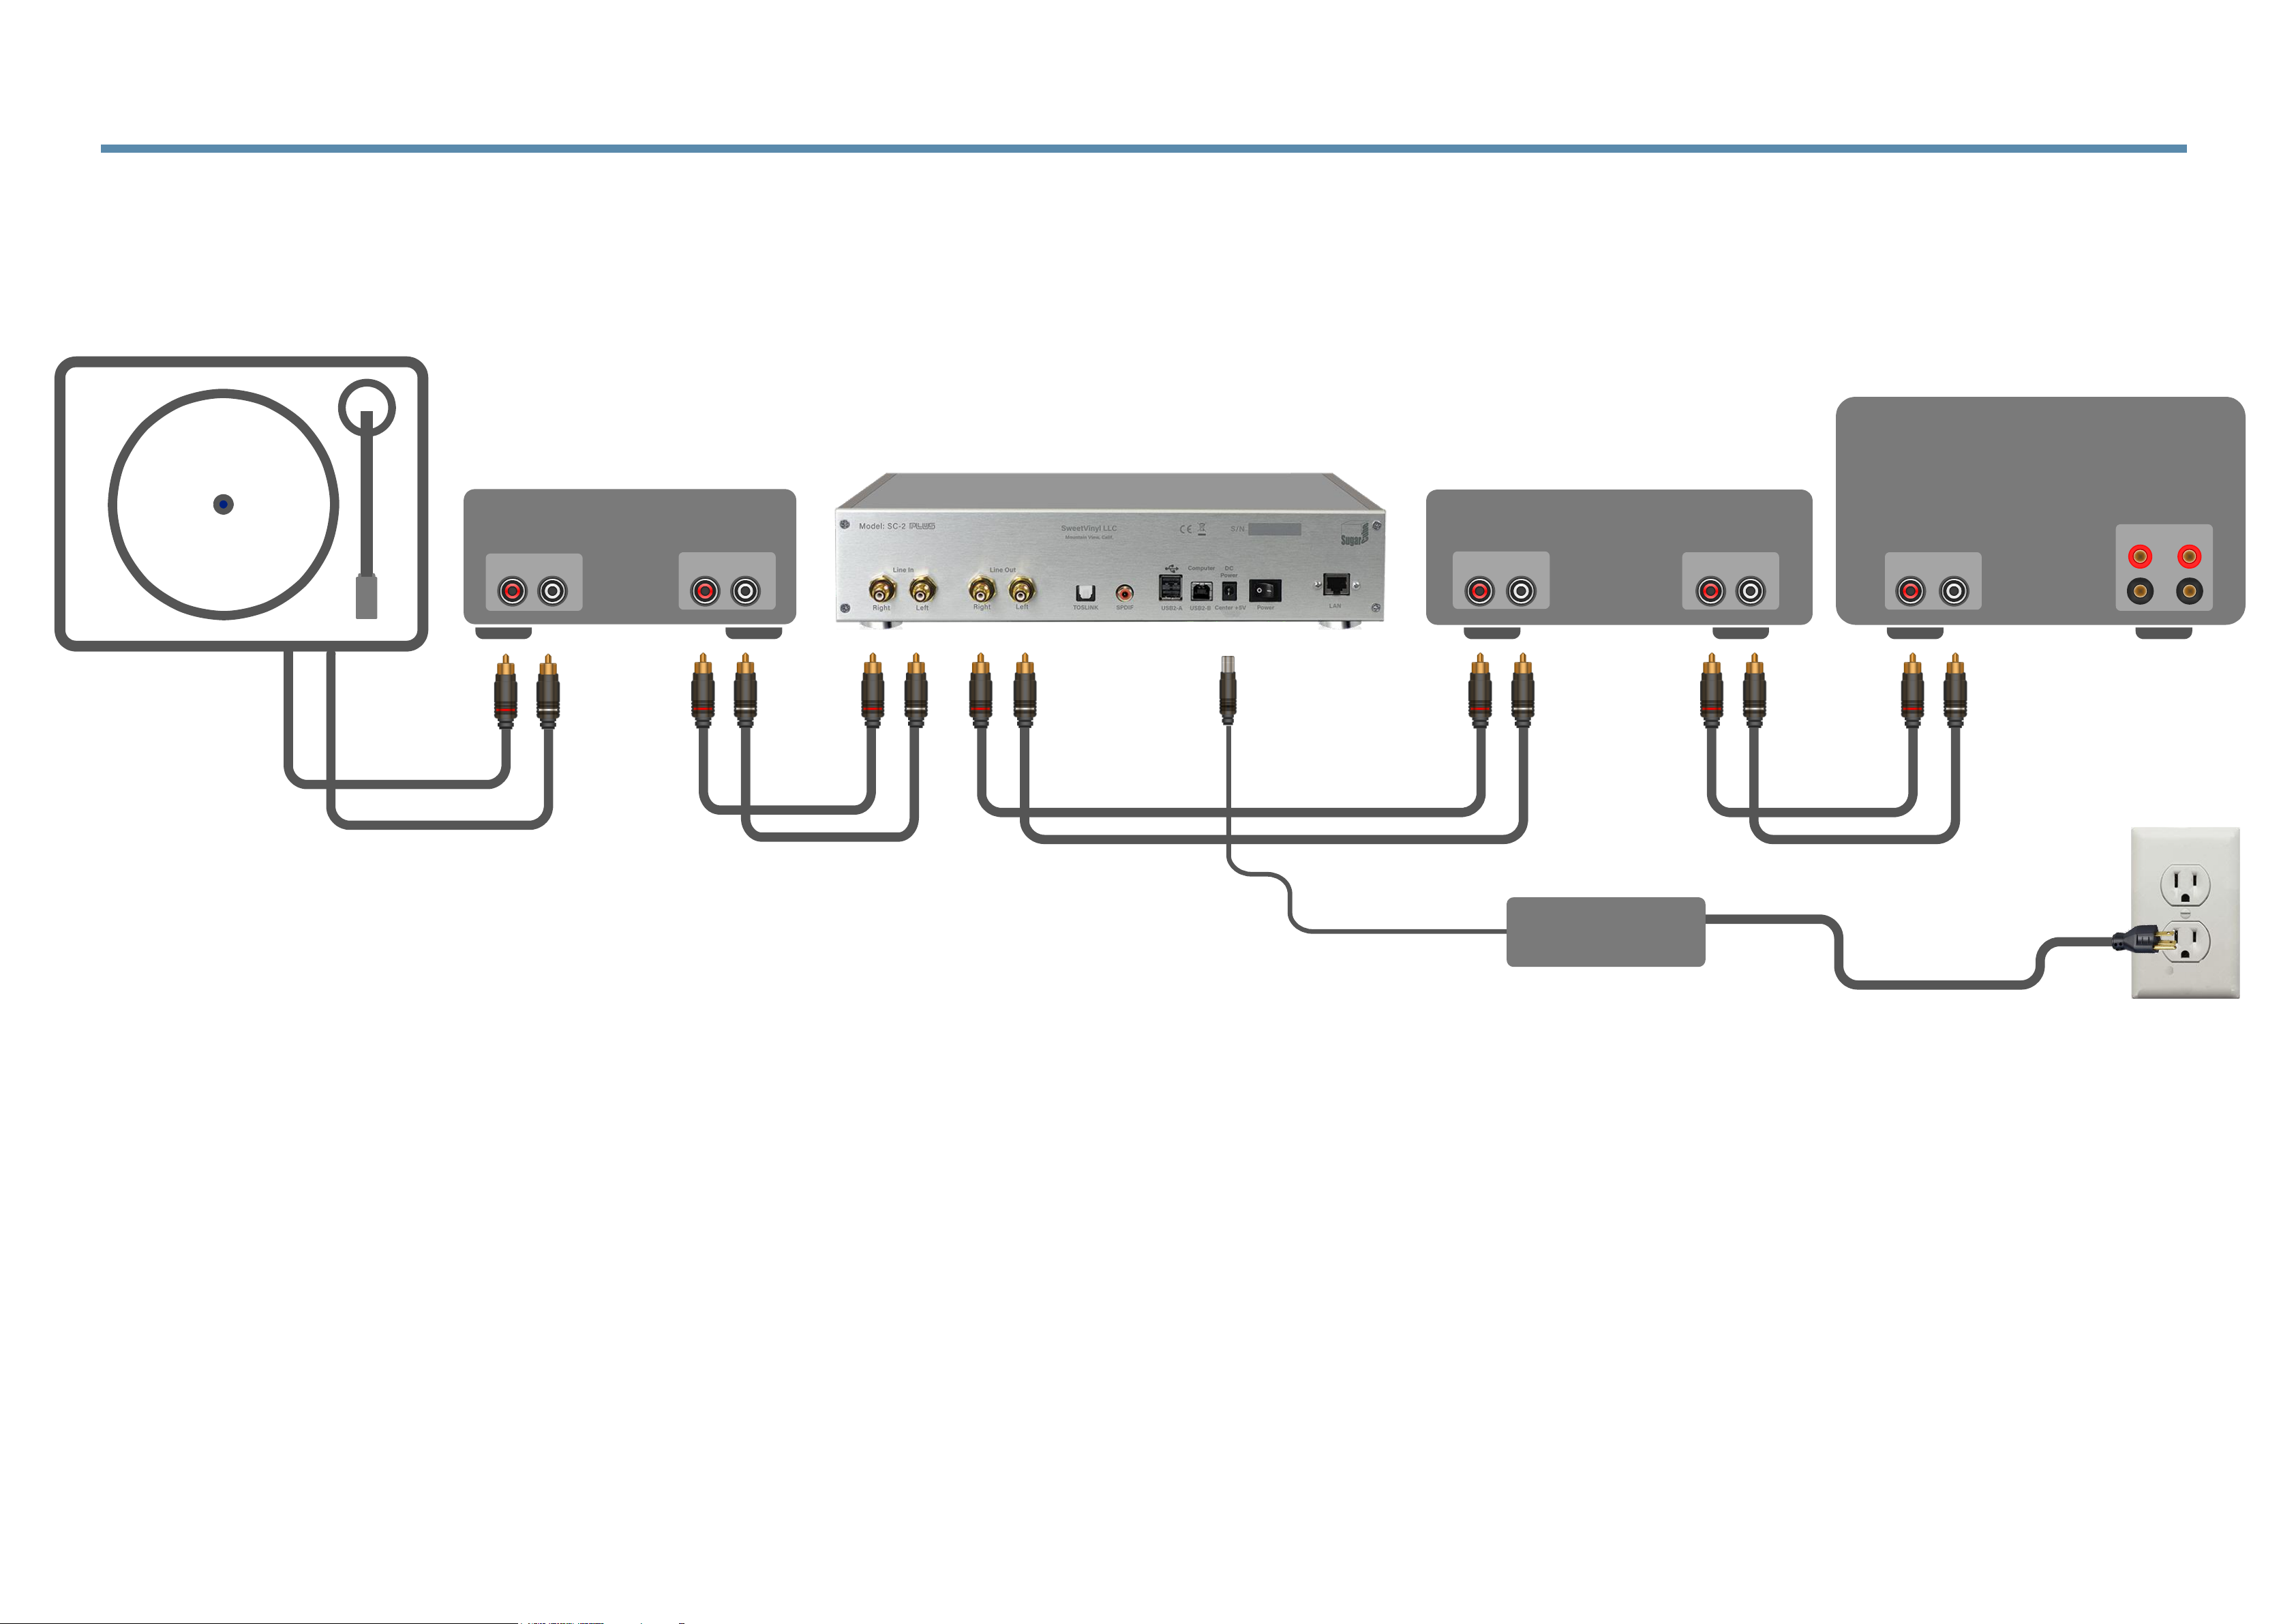
Speakers
Phono Pre-amp Line Pre-amp
Power Amp
Line Out Aux In Line Out Line In
Phono In
AC Adaptor
5V/4A
Connecting in series between a phono pre-amp and line-stage (pre-amp).
1. Plug your SugarCube power adapter into a power source.
2. Connect the output of your phono pre-amp to the LINE IN of the SugarCube.
3. Connect the LINE OUT of the SugarCube to an appropriate line-level input of your line-stage/pre-amp.
NOTE: DO NOT CONNECT THE LINE OUT OF THE SUGARCUBE TO THE PHONO INPUT ON YOUR EQUIPMENT.
2.1 Connecting Your SugarCube
Page 8
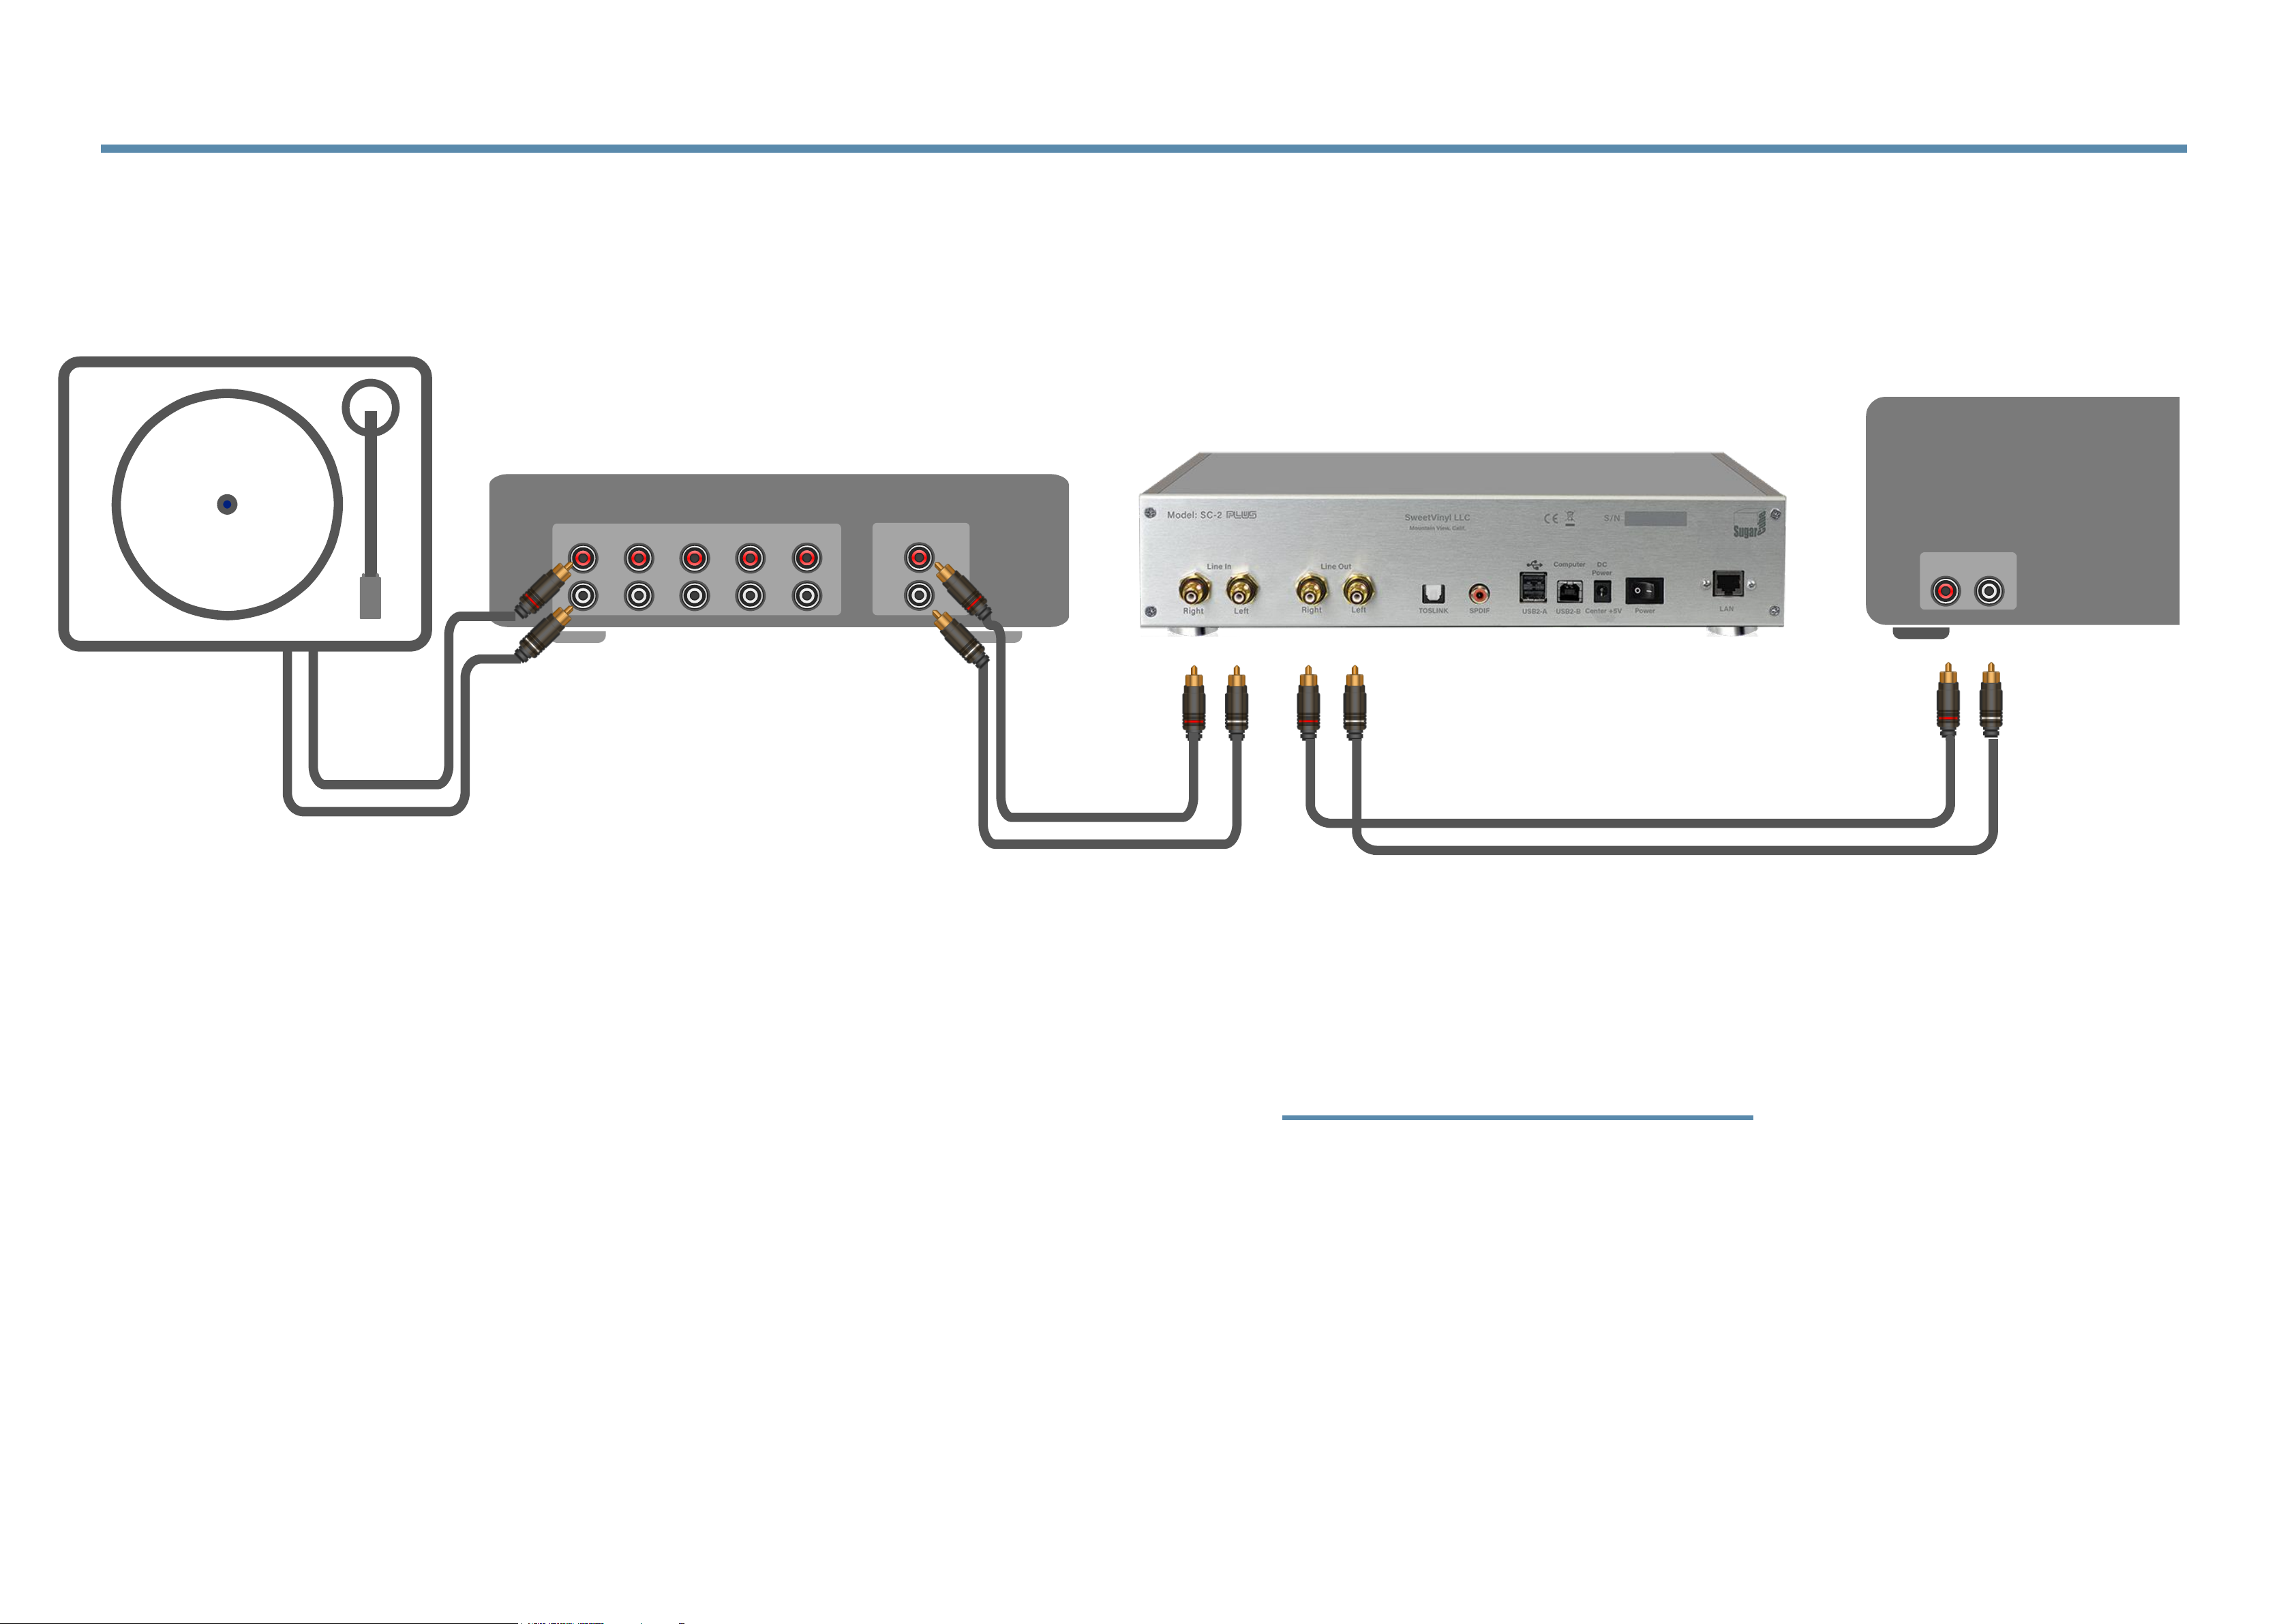
Power Amp
Line In
Connecting in series between a pre-amp, with phono input, and power amp
2.2 Connecting Your SugarCube
1. Connect the output of your pre-amp to the LINE IN of the SC2-Plus.
2. Connect the LINE OUT of the SC1-Plus to the input of your power amp.
Output
Phono
AC Adaptor
5V/4A
Pre-amp
Page 9
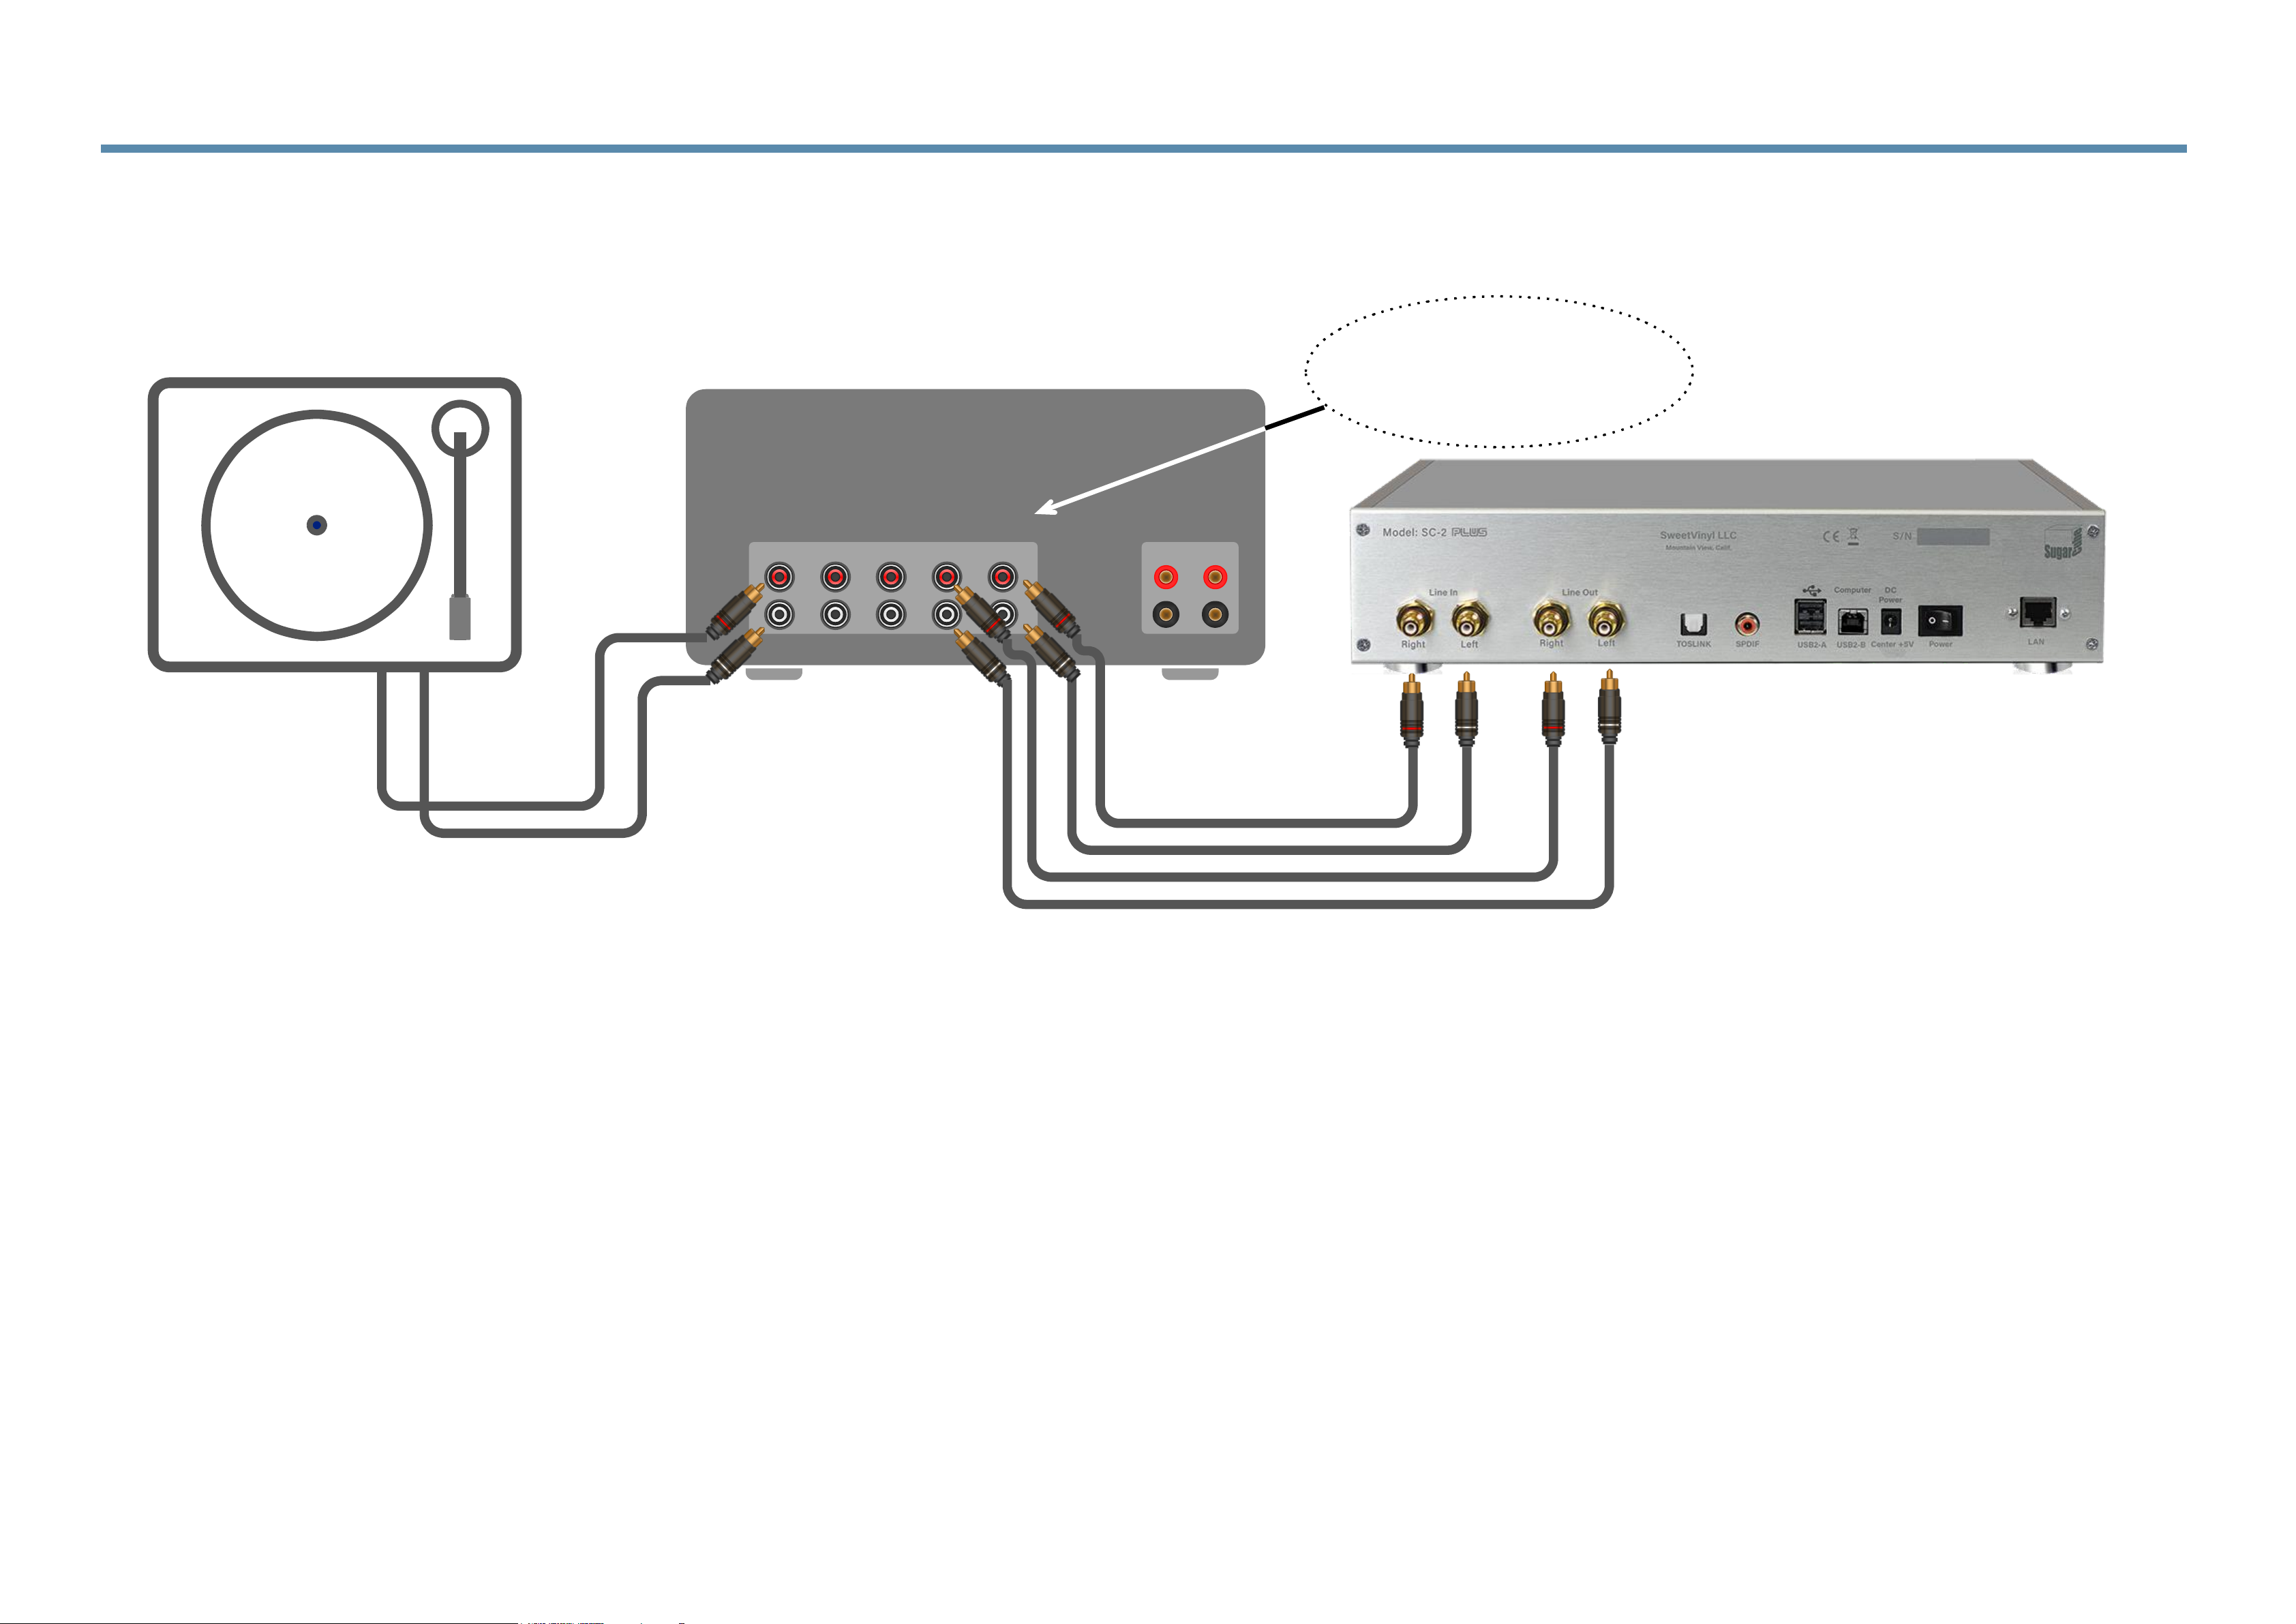
Speakers
Integrated Amp
Aux In
Aux Out
Phono
2.3 Connecting Your SugarCube
please note:
aux in/out is sometimes
labelled
record in/out
Integrated Amp: using the ‘tape loop’
Connecting to an integrated amplifier via Aux In/Out (or Rec In/Out).
1. Connect AUX OUT (or REC OUT) of your integrated amp (or processor) to the LINE IN of the SC2-Plus.
2. Connect LINE OUT of the SC2-Plus to AUX IN (or REC IN) of your integrated amp or processor.
NOTE: DO NOT CONNECT THE LINE OUT OF THE SUGARCUBE TO THE PHONO INPUT ON YOUR EQUIPMENT.
Page 10
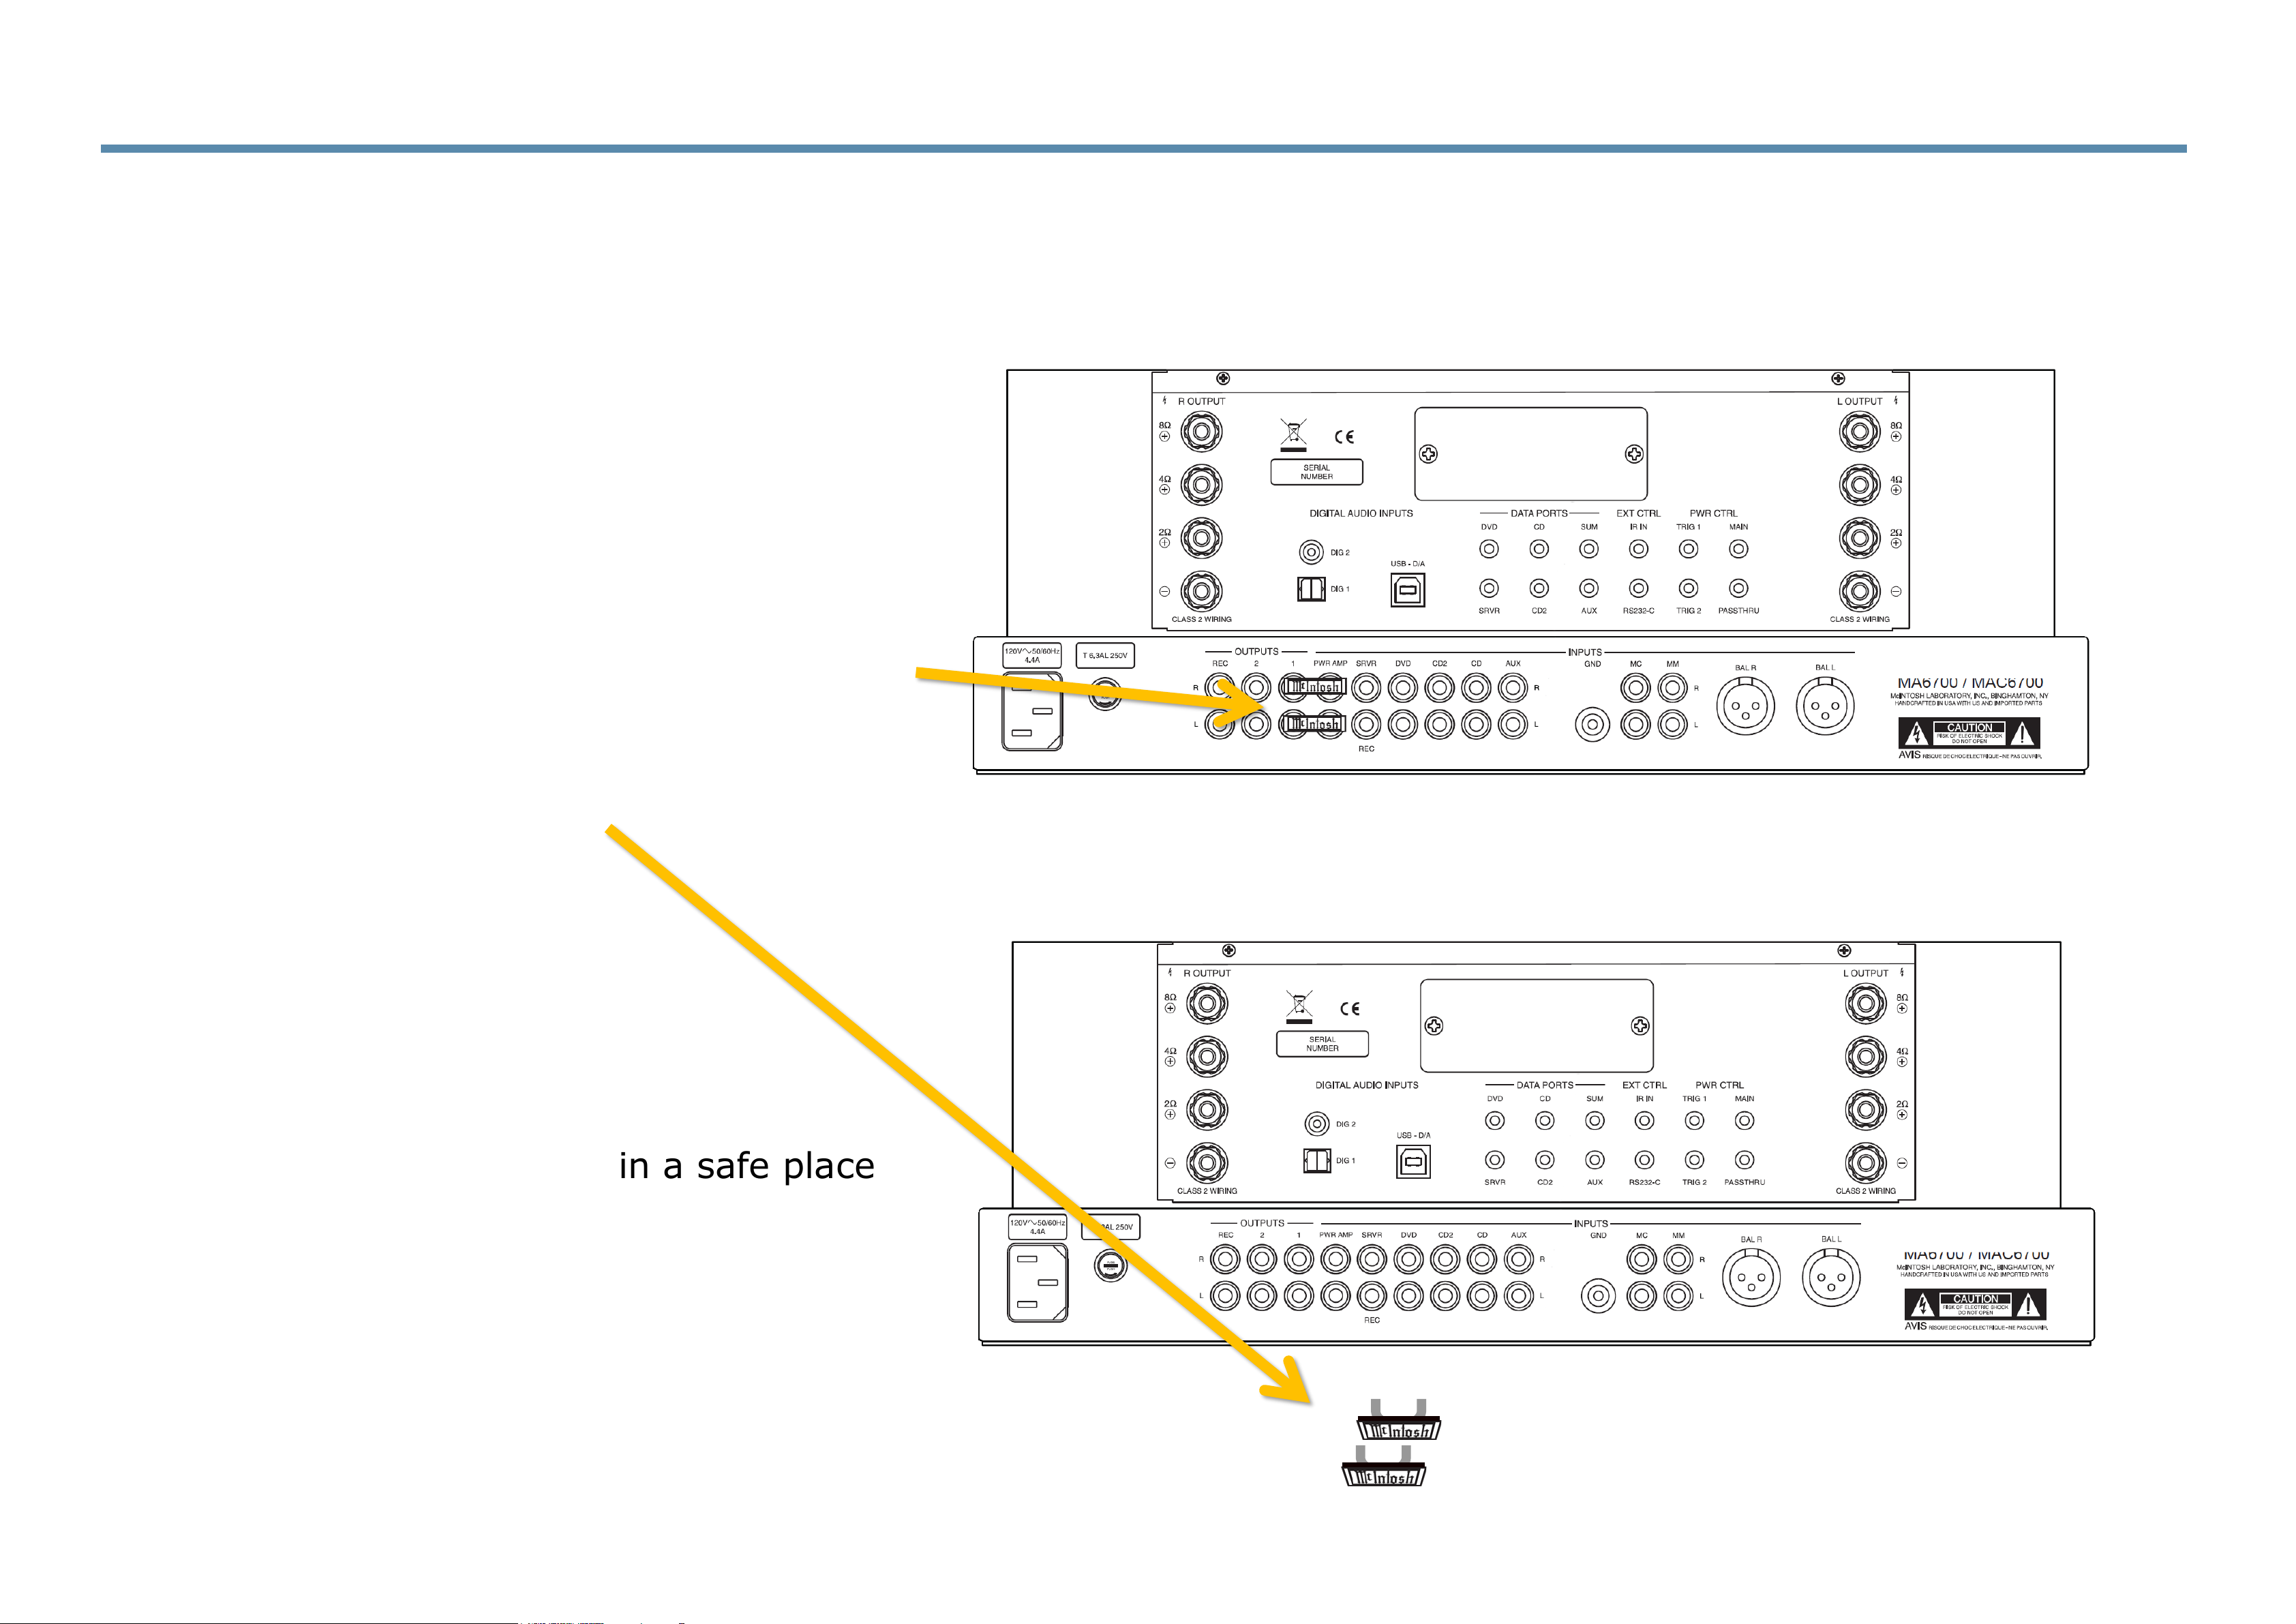
Step 1: TURN OFF THE INTEGRATED AMP
Step 2: Wait a minute or two
Step 3: locate the preamp-power amp jumpers
Step 4: DOUBLE-CHECK THAT THE AMP IS OFF
Step 5: Remove the jumpers
Step 6: Put the jumpers away in a safe place
Step 7: NEXT PAGE...
Integrated Amp: connecting between the preamp and power amp
2.4 Connecting Your SugarCube
Page 11
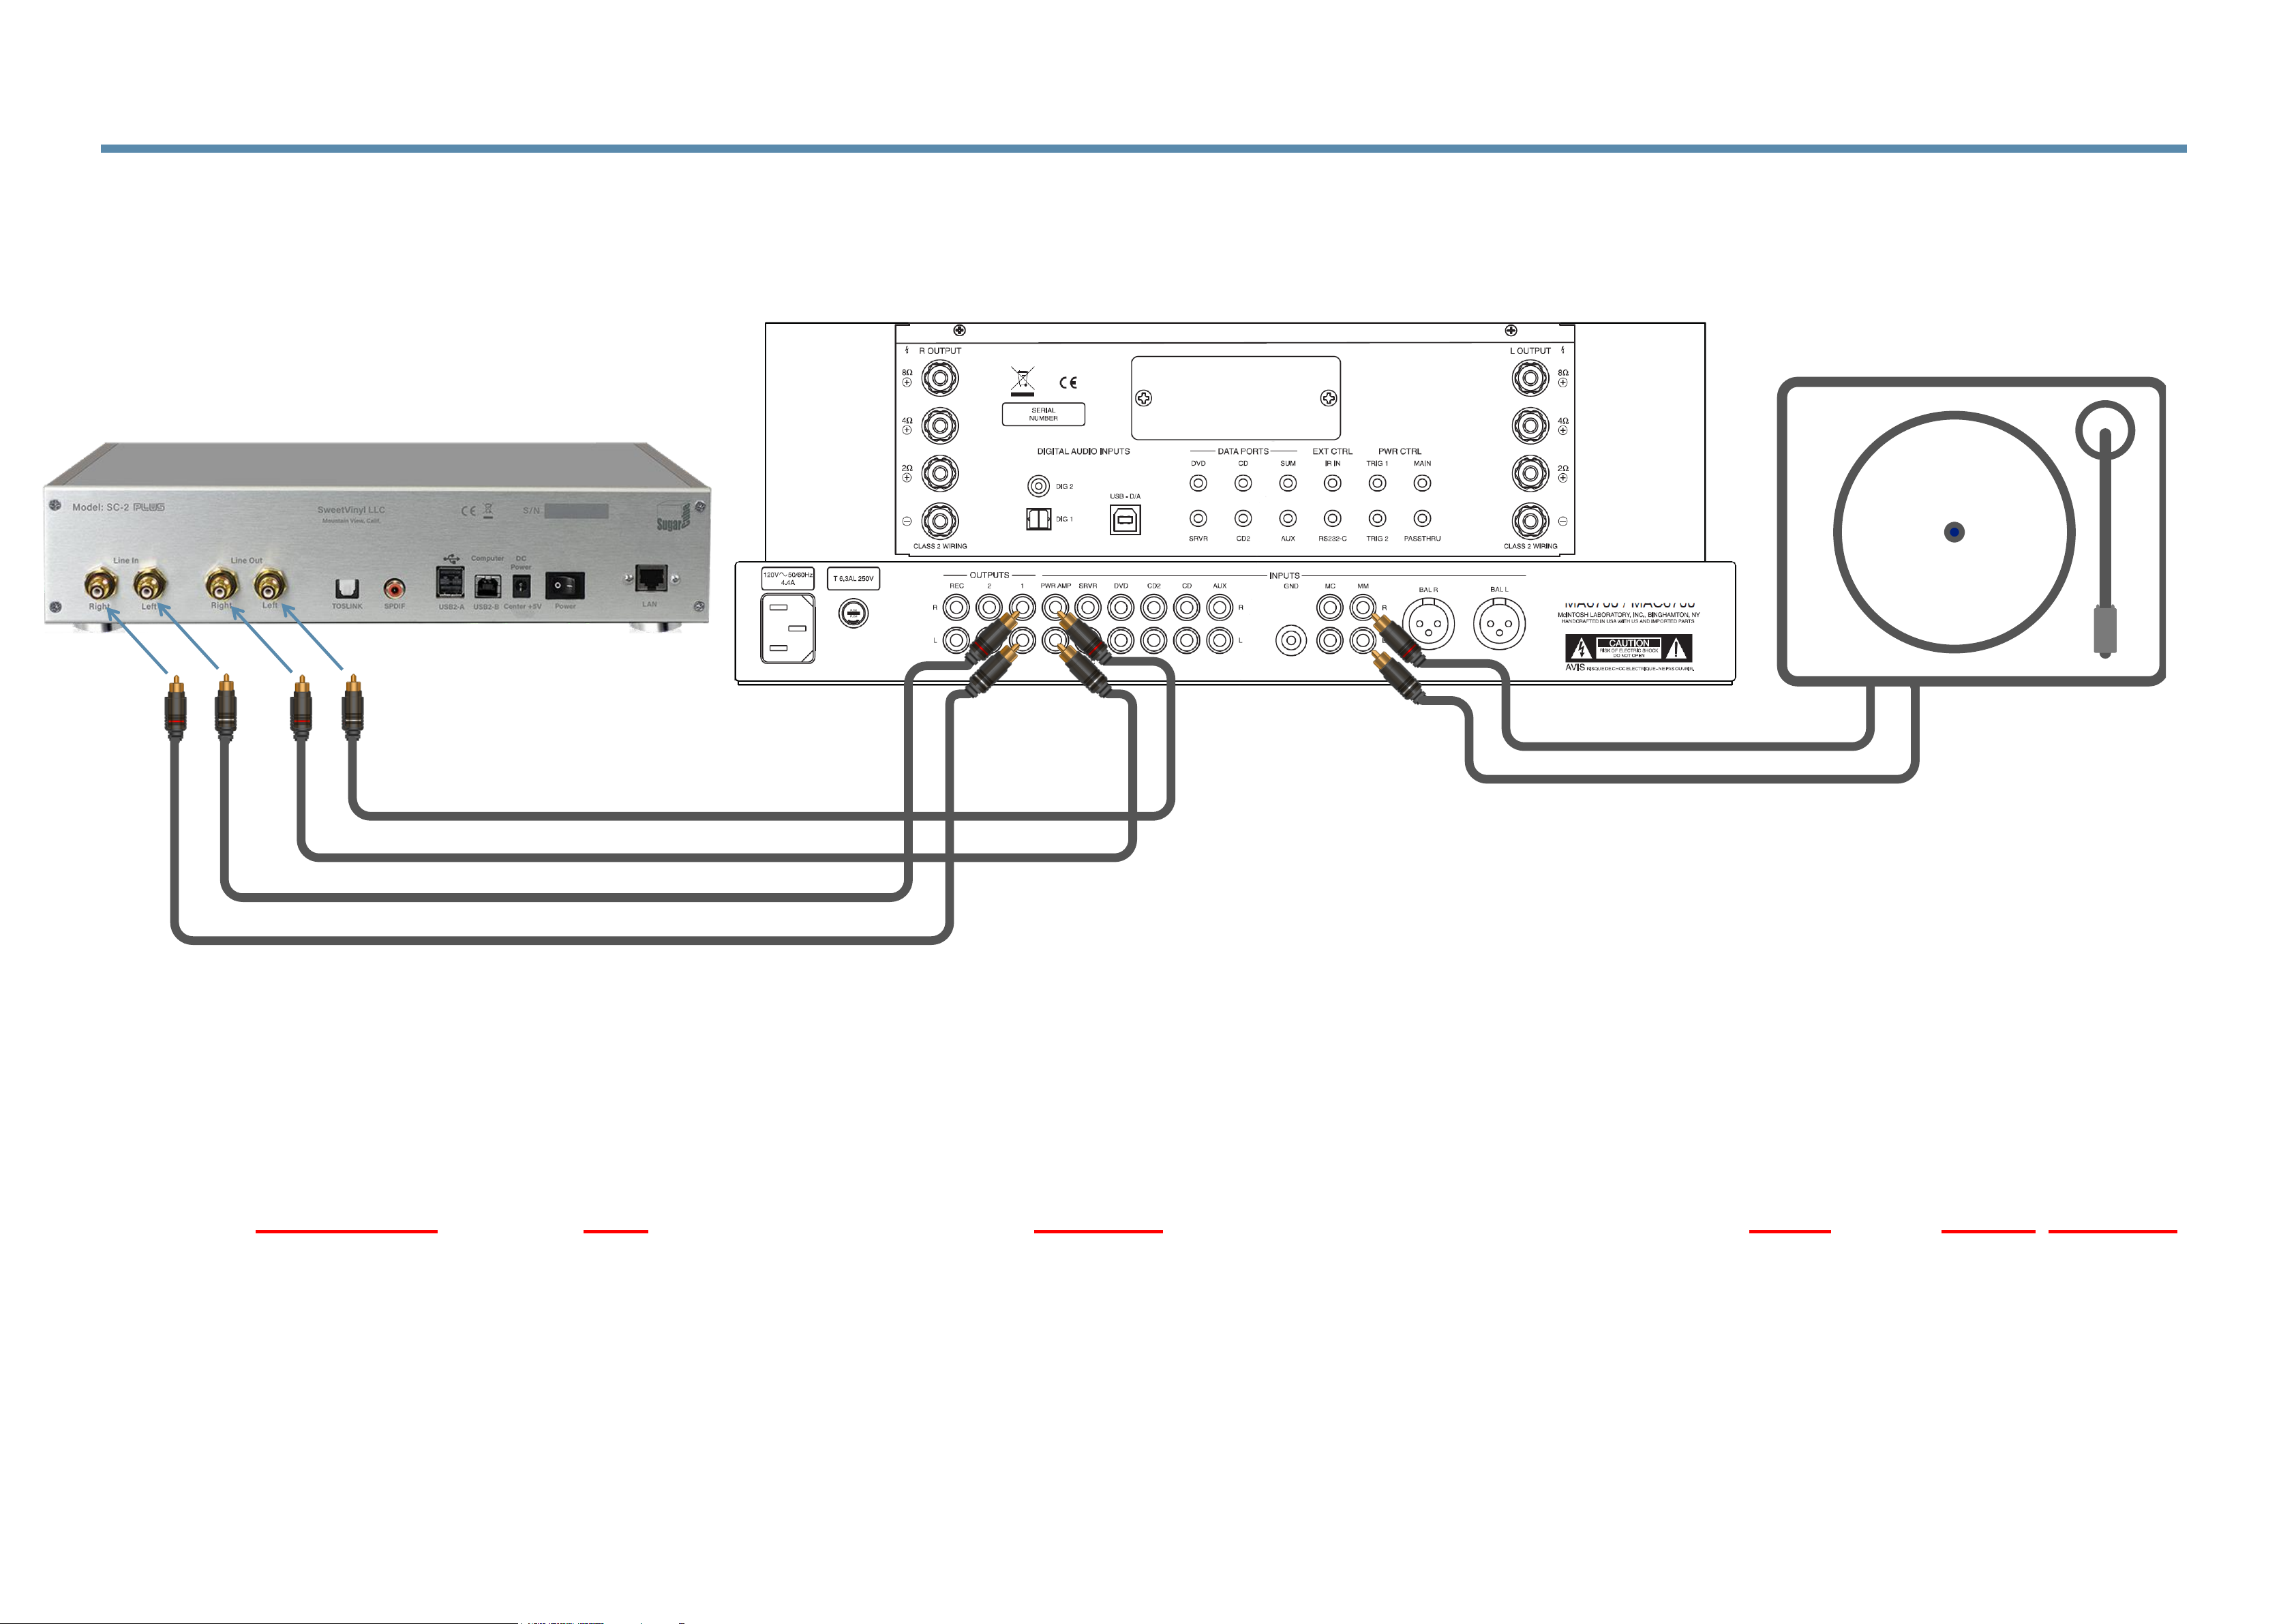
Integrated Amp: connecting between the preamp and power amp, cont.
1. Connect OUTPUT (this is the pre-amp) of your integrated amp to the LINE IN of the SugarCube.
2. Connect LINE OUT of the SugarCube to PWR AMP (power amp input) of your integrated amp.
3. ALWAYS TURN ON THE SUGARCUBE FIRST THEN THE AMP AND TURN OFF THE AMP FIRST
THEN THE SUGARCUBE.
4. If the integrated amp has a headphone output, it will likely have its own amplifier and may not be in
the loop with the SugarCube. If that is the case, you will not hear the SugarCube in the headphones.
5. The SugarCube draws only about 11 watts, you can leave it on full time if you wish.
6. Not all integrated amps have a line out / power amp in or an Aux Out / In. If this is the case, you
may need an external phono pre-amp.
Connecting to an integrated amplifier between the pre-amp and power-amp.
2.5 Connecting Your SugarCube
Page 12
12v DC Adapter
Phono Pre-Amp
Integrated Amp
12v DC Adapter
2.6 Connecting Your SugarCube
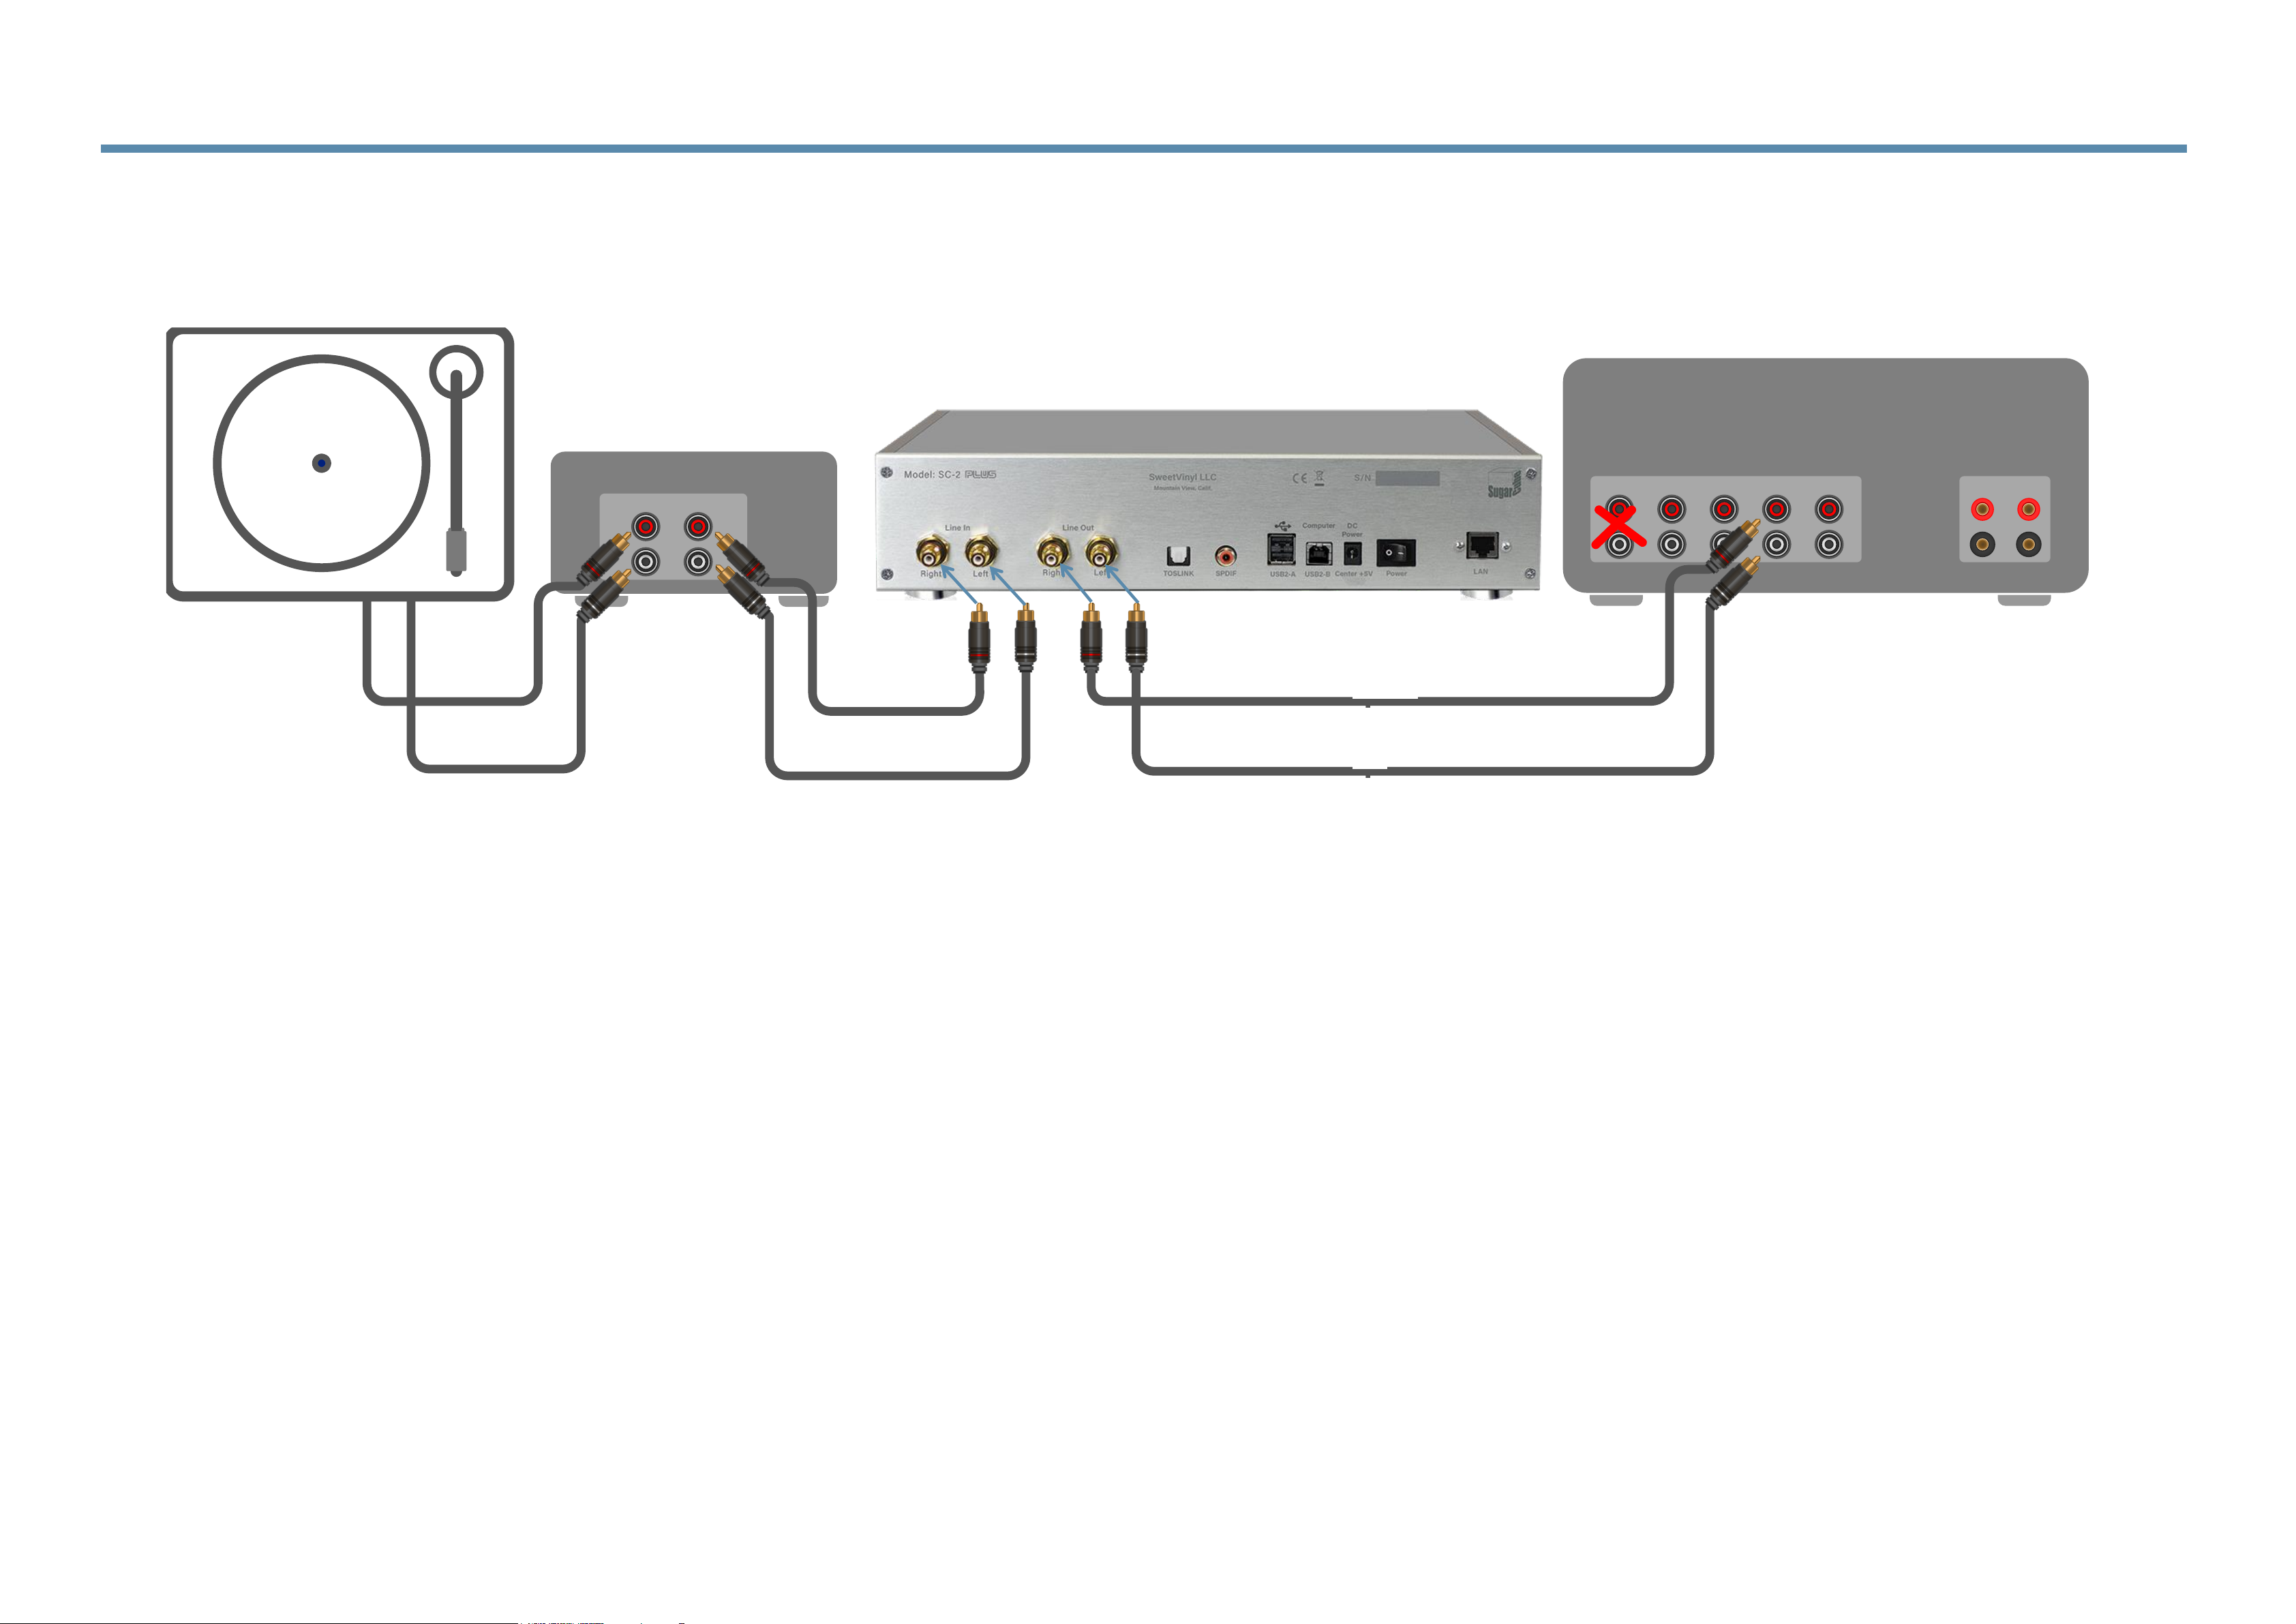
Integrated Amp WITHOUT an AUX OUT/IN (or REC OUT/IN, etc.)
Many contemporary integrated amplifiers no longer have what was known as
a ‘tape loop’ (back in the day of the cassette and reel-to-reel tape). Also,
most modern home theatre processors that do have what are called ‘effects
loops’ will not send audio from its phono input through the loop. In these
cases, there is not a way to connect to SugarCube directly to these devices
while using its built-in phono stage.
The solution is to add a phono stage (pre-amp) between your turntable and
the SugarCube. Then connect the Line Out of the SugarCube to any available
input on the integrated amp (except for the phono input, of course.)
Page 13
Speakers
Integrated Amp
Aux In
Aux Out
Phono
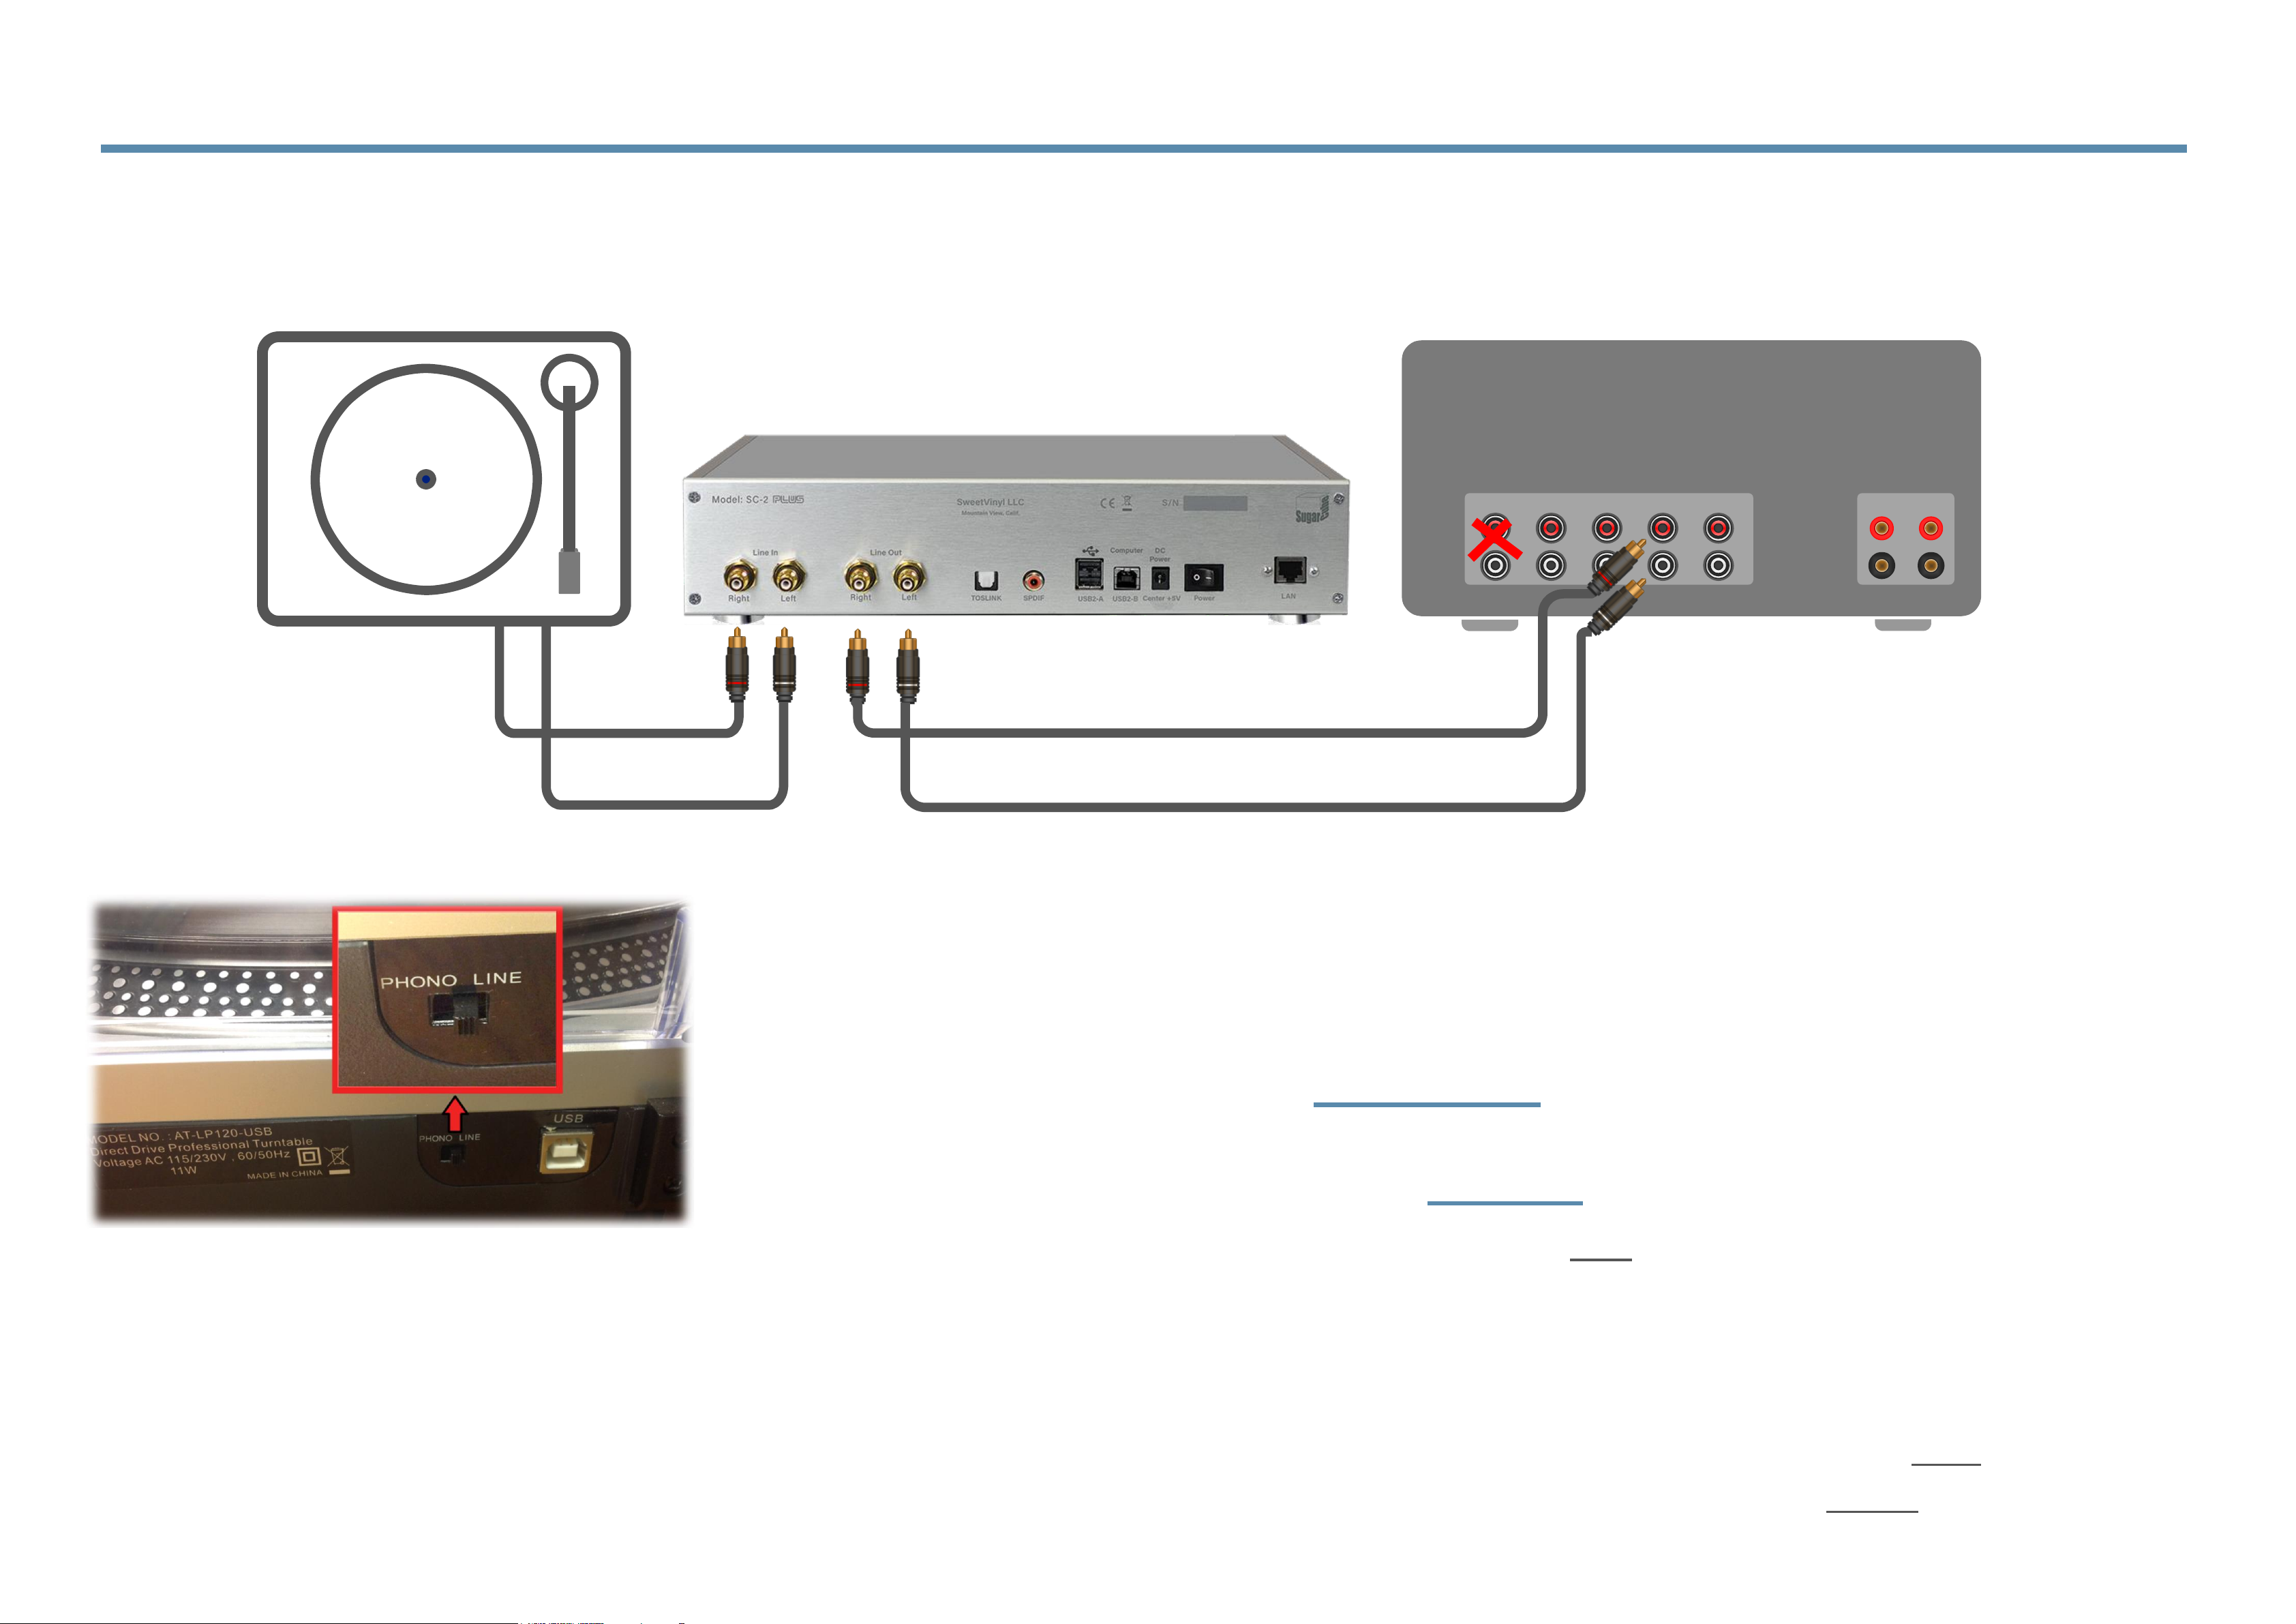
Connecting turntables with built-in phono pre-amps
2.7 Connecting Your SugarCube
1. Connect the turntable with a built-in phono pre-amp to LINE IN.
2. Be sure the turntable is set to LINE not PHONO.
3. Connect the LINE OUT of the SugarCube to any line-level input of
your line stage, pre-amp, or integrated amp.
NOTE: SORRY TO BE A BROKEN RECORD, SO TO SPEAK, BUT DO NOT CONNECT THE
LINE OUT OF THE SUGARCUBE TO THE PHONO INPUT ON YOUR EQUIPMENT.
Directly connecting the line-level output from your turntable.
For turntables with a built-in
phono pre-amp, be sure to set
the PHONO/LINE switch to
LINE before plugging into the
SugarCube.
Page 14
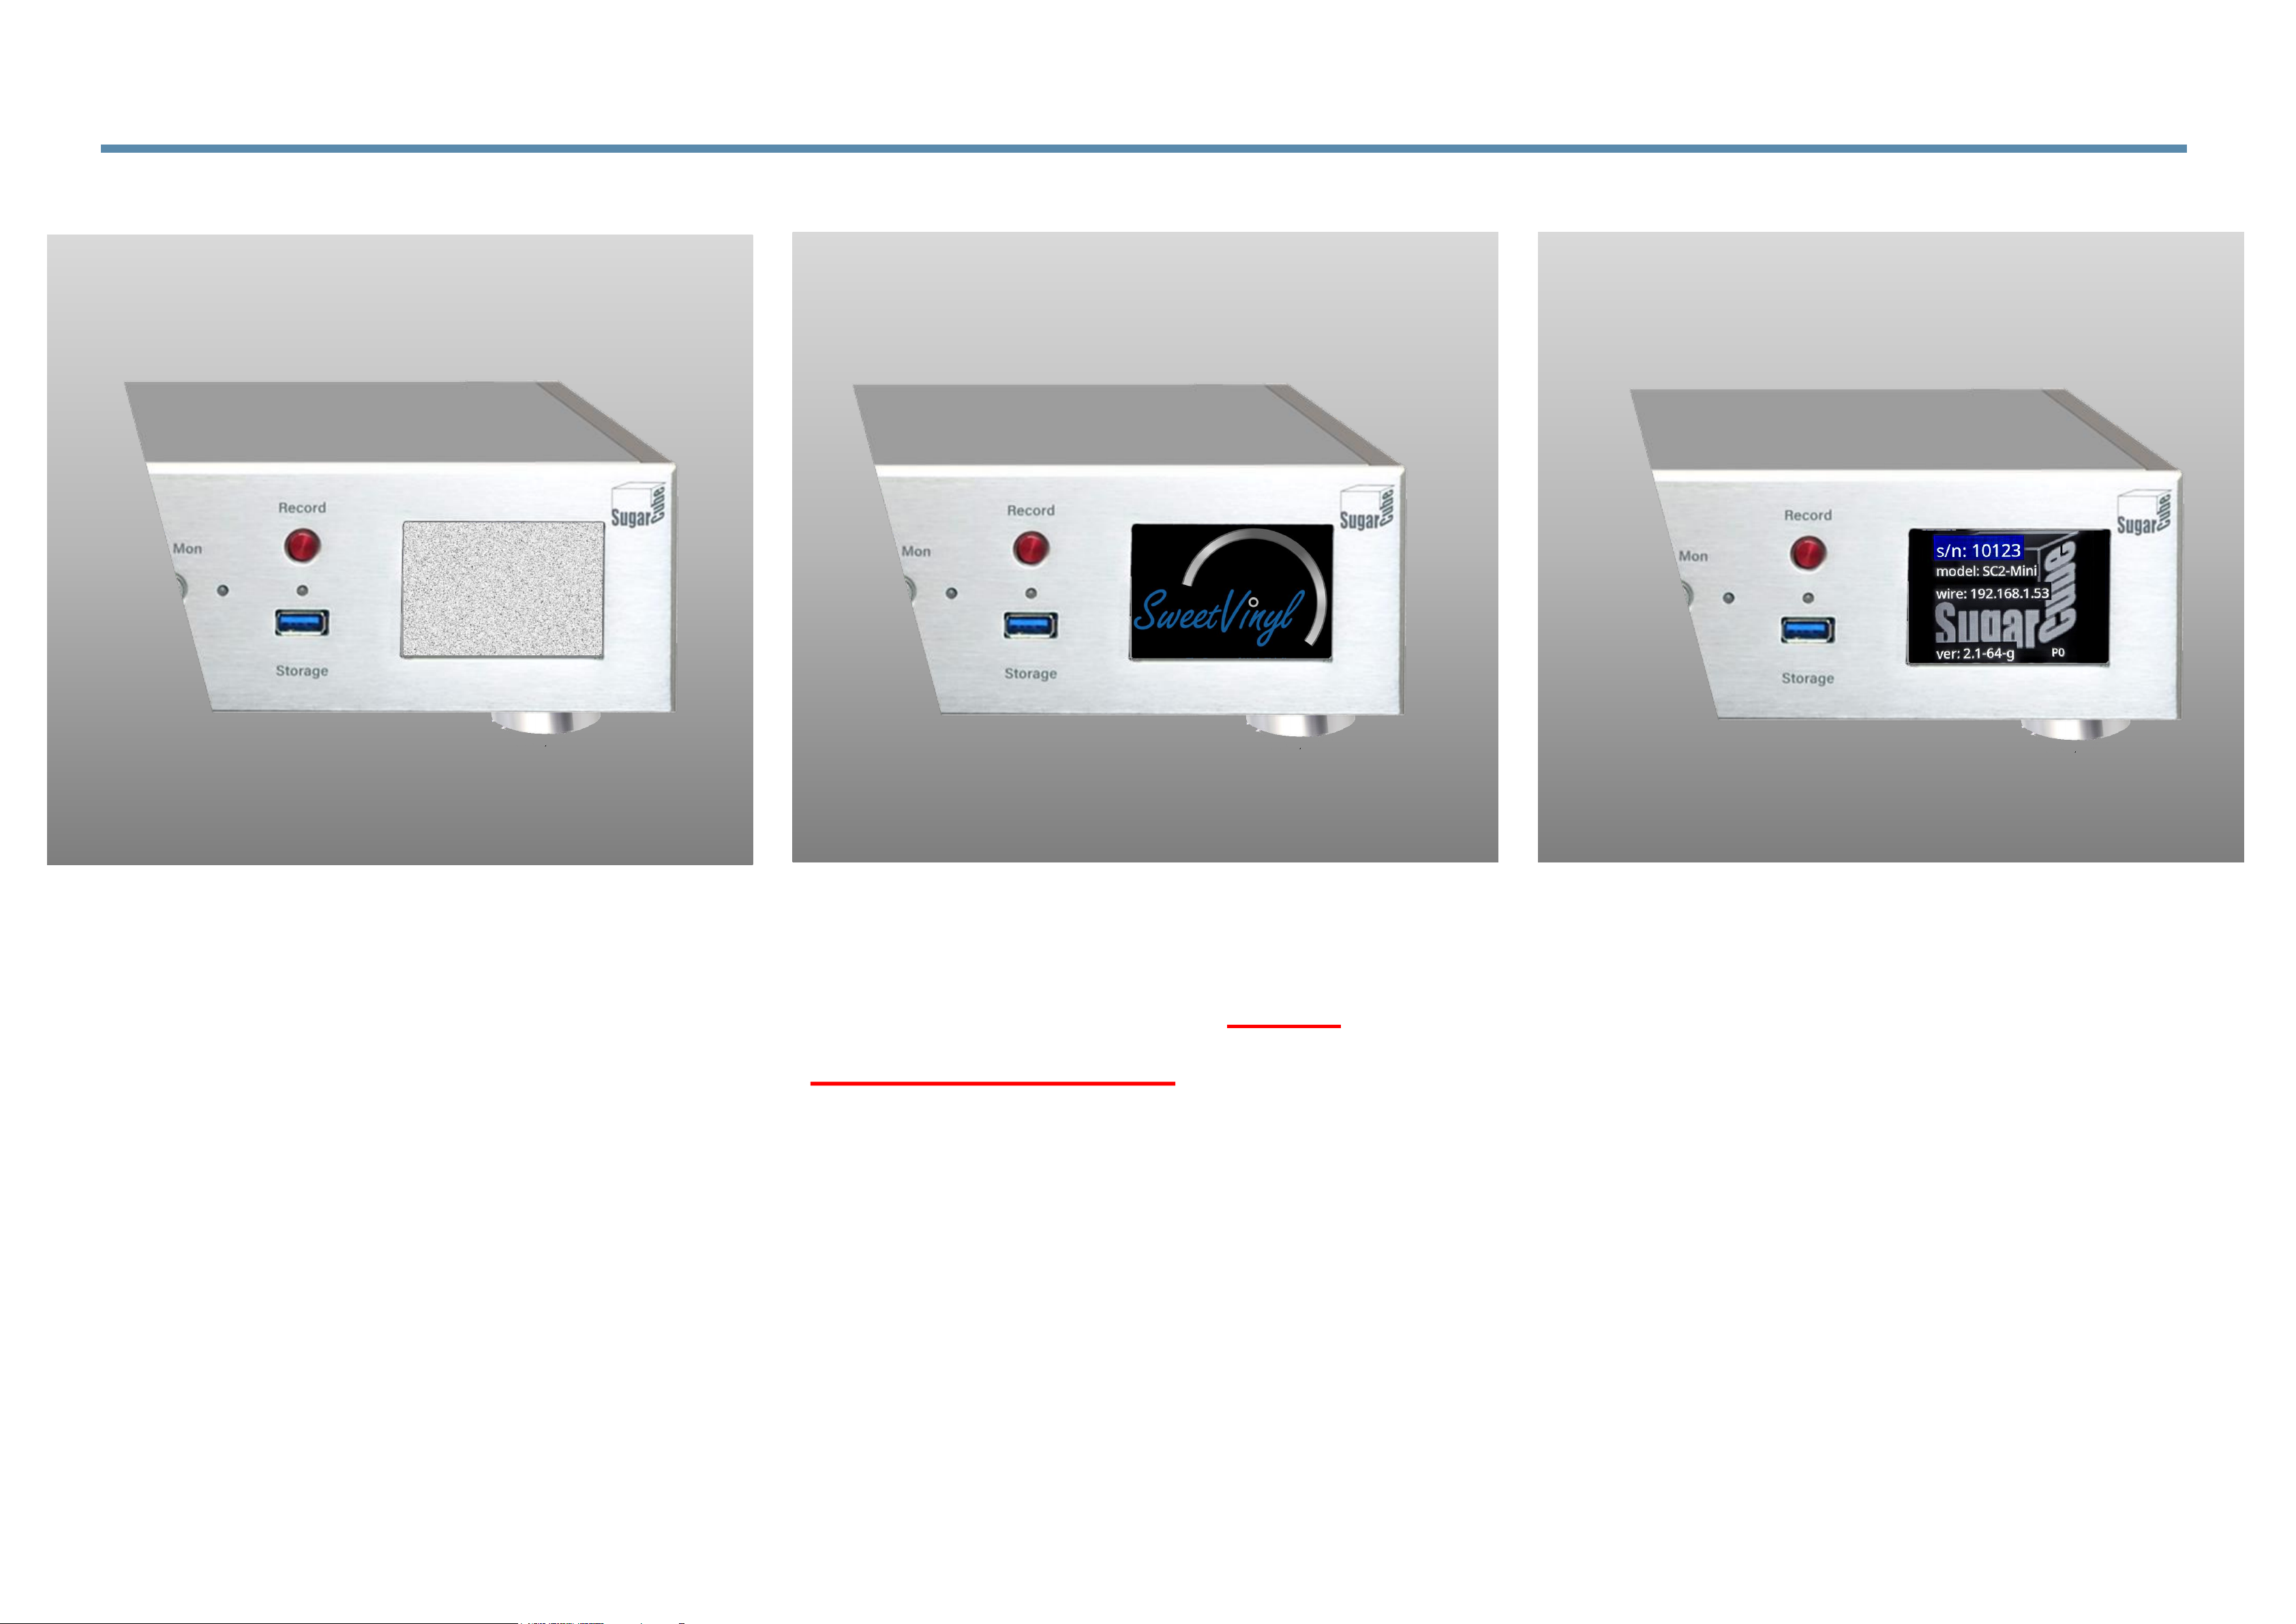
When you power up your SugarCube, it will take about
three minutes to complete its startup procedures.
During this time, the display will light up but remain
blank. We apologize for the wait but we have some
seriously sophisticated software loading and it simply
takes additional time. When you hear the results of
our efforts, you will agree that it was worth the wait.
2.8 Starting Up Your SugarCube
Please note:
(1) SugarCube just powered on (2) SugarCube is ready to go
(please expect about three
minutes to ready.)
(3) Hold the ‘Bypass’ button for a
few seconds to see LAN address
(and WiFi SSID if using wireless.)
Page 15
Networking
the
SugarCube
Part 1: Ethernet and WiFi
Part 2: Chrome Browsers
Part 3: Apple iOS
Part 4: Android
Section 3
Page 16

3.1 Using Ethernet or WiFi with SugarCube
`
Page 17
While setting up the connection between the SugarCube and the mobile or web browser
SugarCube app, you will be prompted to enter a Pair Code, please just use the code 1111.
(Note: you can push in and release the ‘Strength’ knob to obtain a unique pairing code
but there is no need for this extra step, it remains to support legacy systems.)
3.1.1 Pairing your SugarCube
Page 18
- OR -
NOTES:
• THE SUGARCUBE SC2-PLUS BASIC OPERATIONS ARE FULLY FUNCTIONAL BY MEANS OF THE
FRONT PANEL CONTROLS WITHOUT THE NEED TO CONNECT TO A NETWORK.
• SOFTWARE UPDATES ARE AUTOMATIC AND PROVIDED WHEN THE SUGARCUBE IS CONNECTED
TO A WIFI OR ETHERNET NETWORK.
If you would like to use the iOS or Android app or web browser to control your SugarCube SC2-Plus,
please connect either the WiFi adapter supplied with your SugarCube or plug into a wired connection.
3.1.2 Connecting Your SugarCube to a LAN or WiFi
Page 19
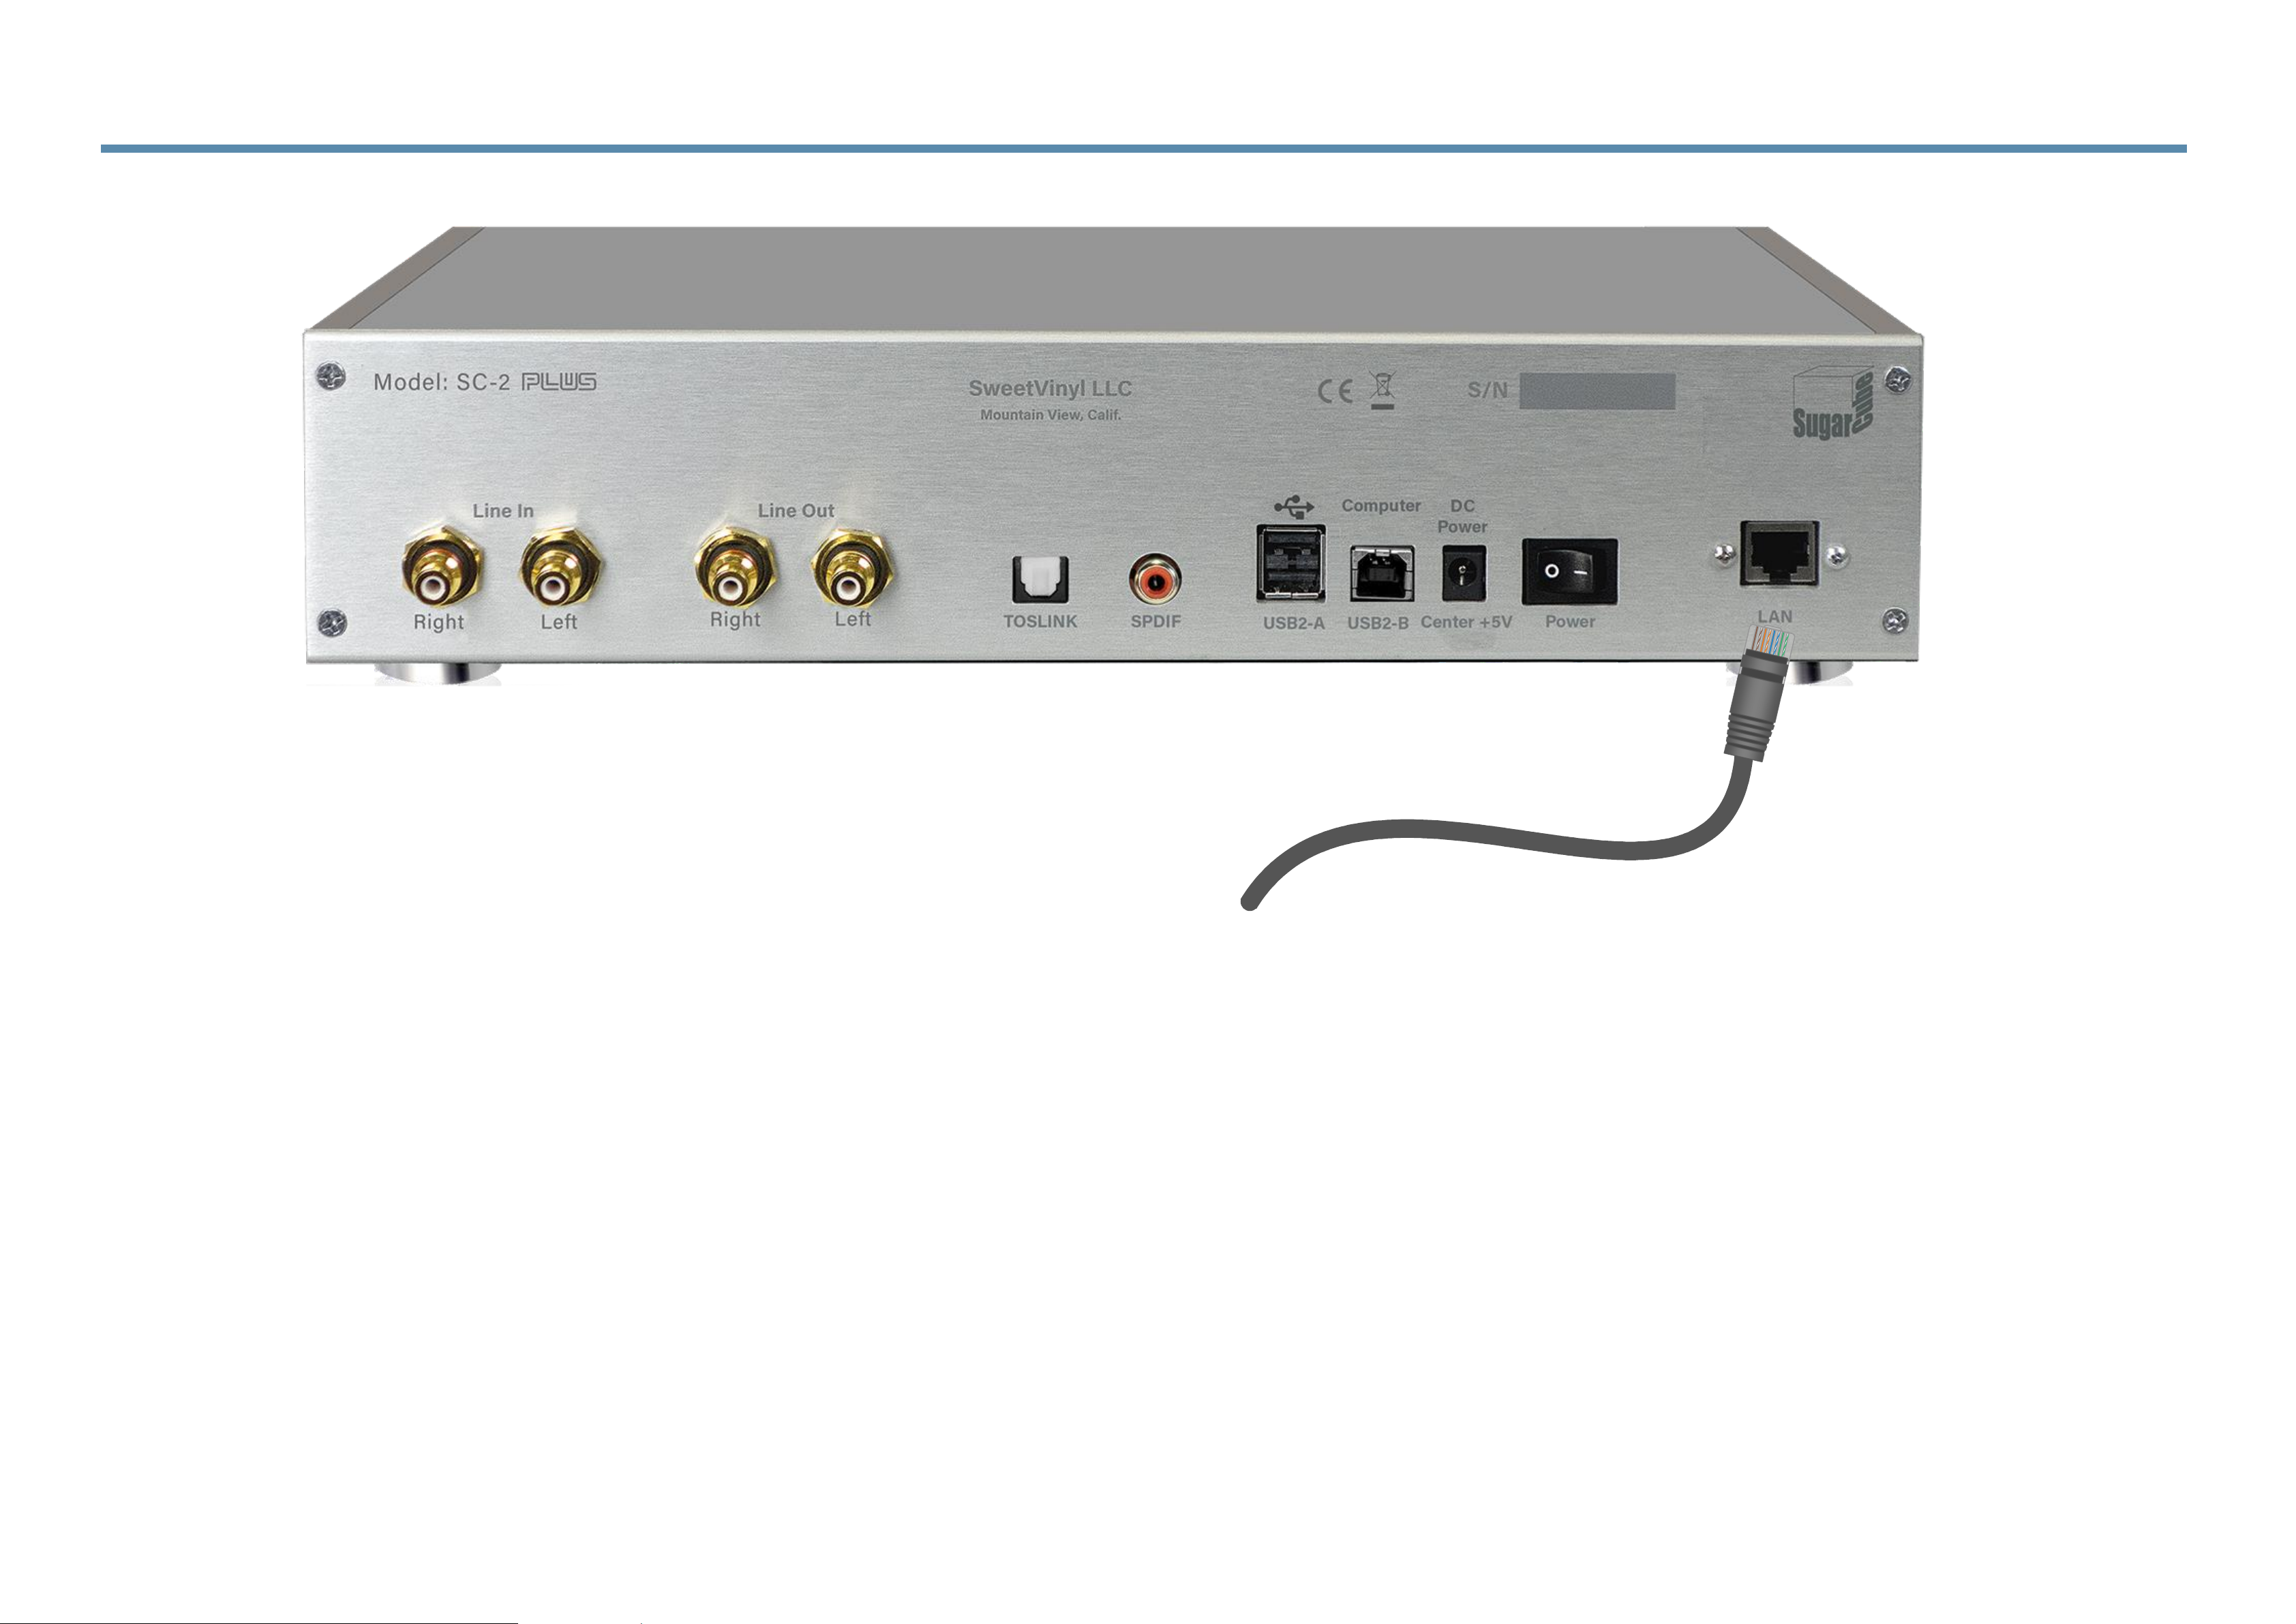
3.1.3 Connecting Your SugarCube via Wired Ethernet
• When connecting via wired Ethernet you need only open the iOS or Android App or follow a few
steps to establish a browser connection.
NOTES:
• THE SUGARCUBE SC2-PLUS BASIC OPERATIONS ARE FULLY FUNCTIONAL BY MEANS OF THE
FRONT PANEL CONTROLS WITHOUT THE NEED TO CONNECT TO A NETWORK.
• SOFTWARE UPDATES ARE AUTOMATIC AND PROVIDED WHEN THE SUGARCUBE IS CONNECTED
TO A WIFI OR ETHERNET NETWORK.
Page 20
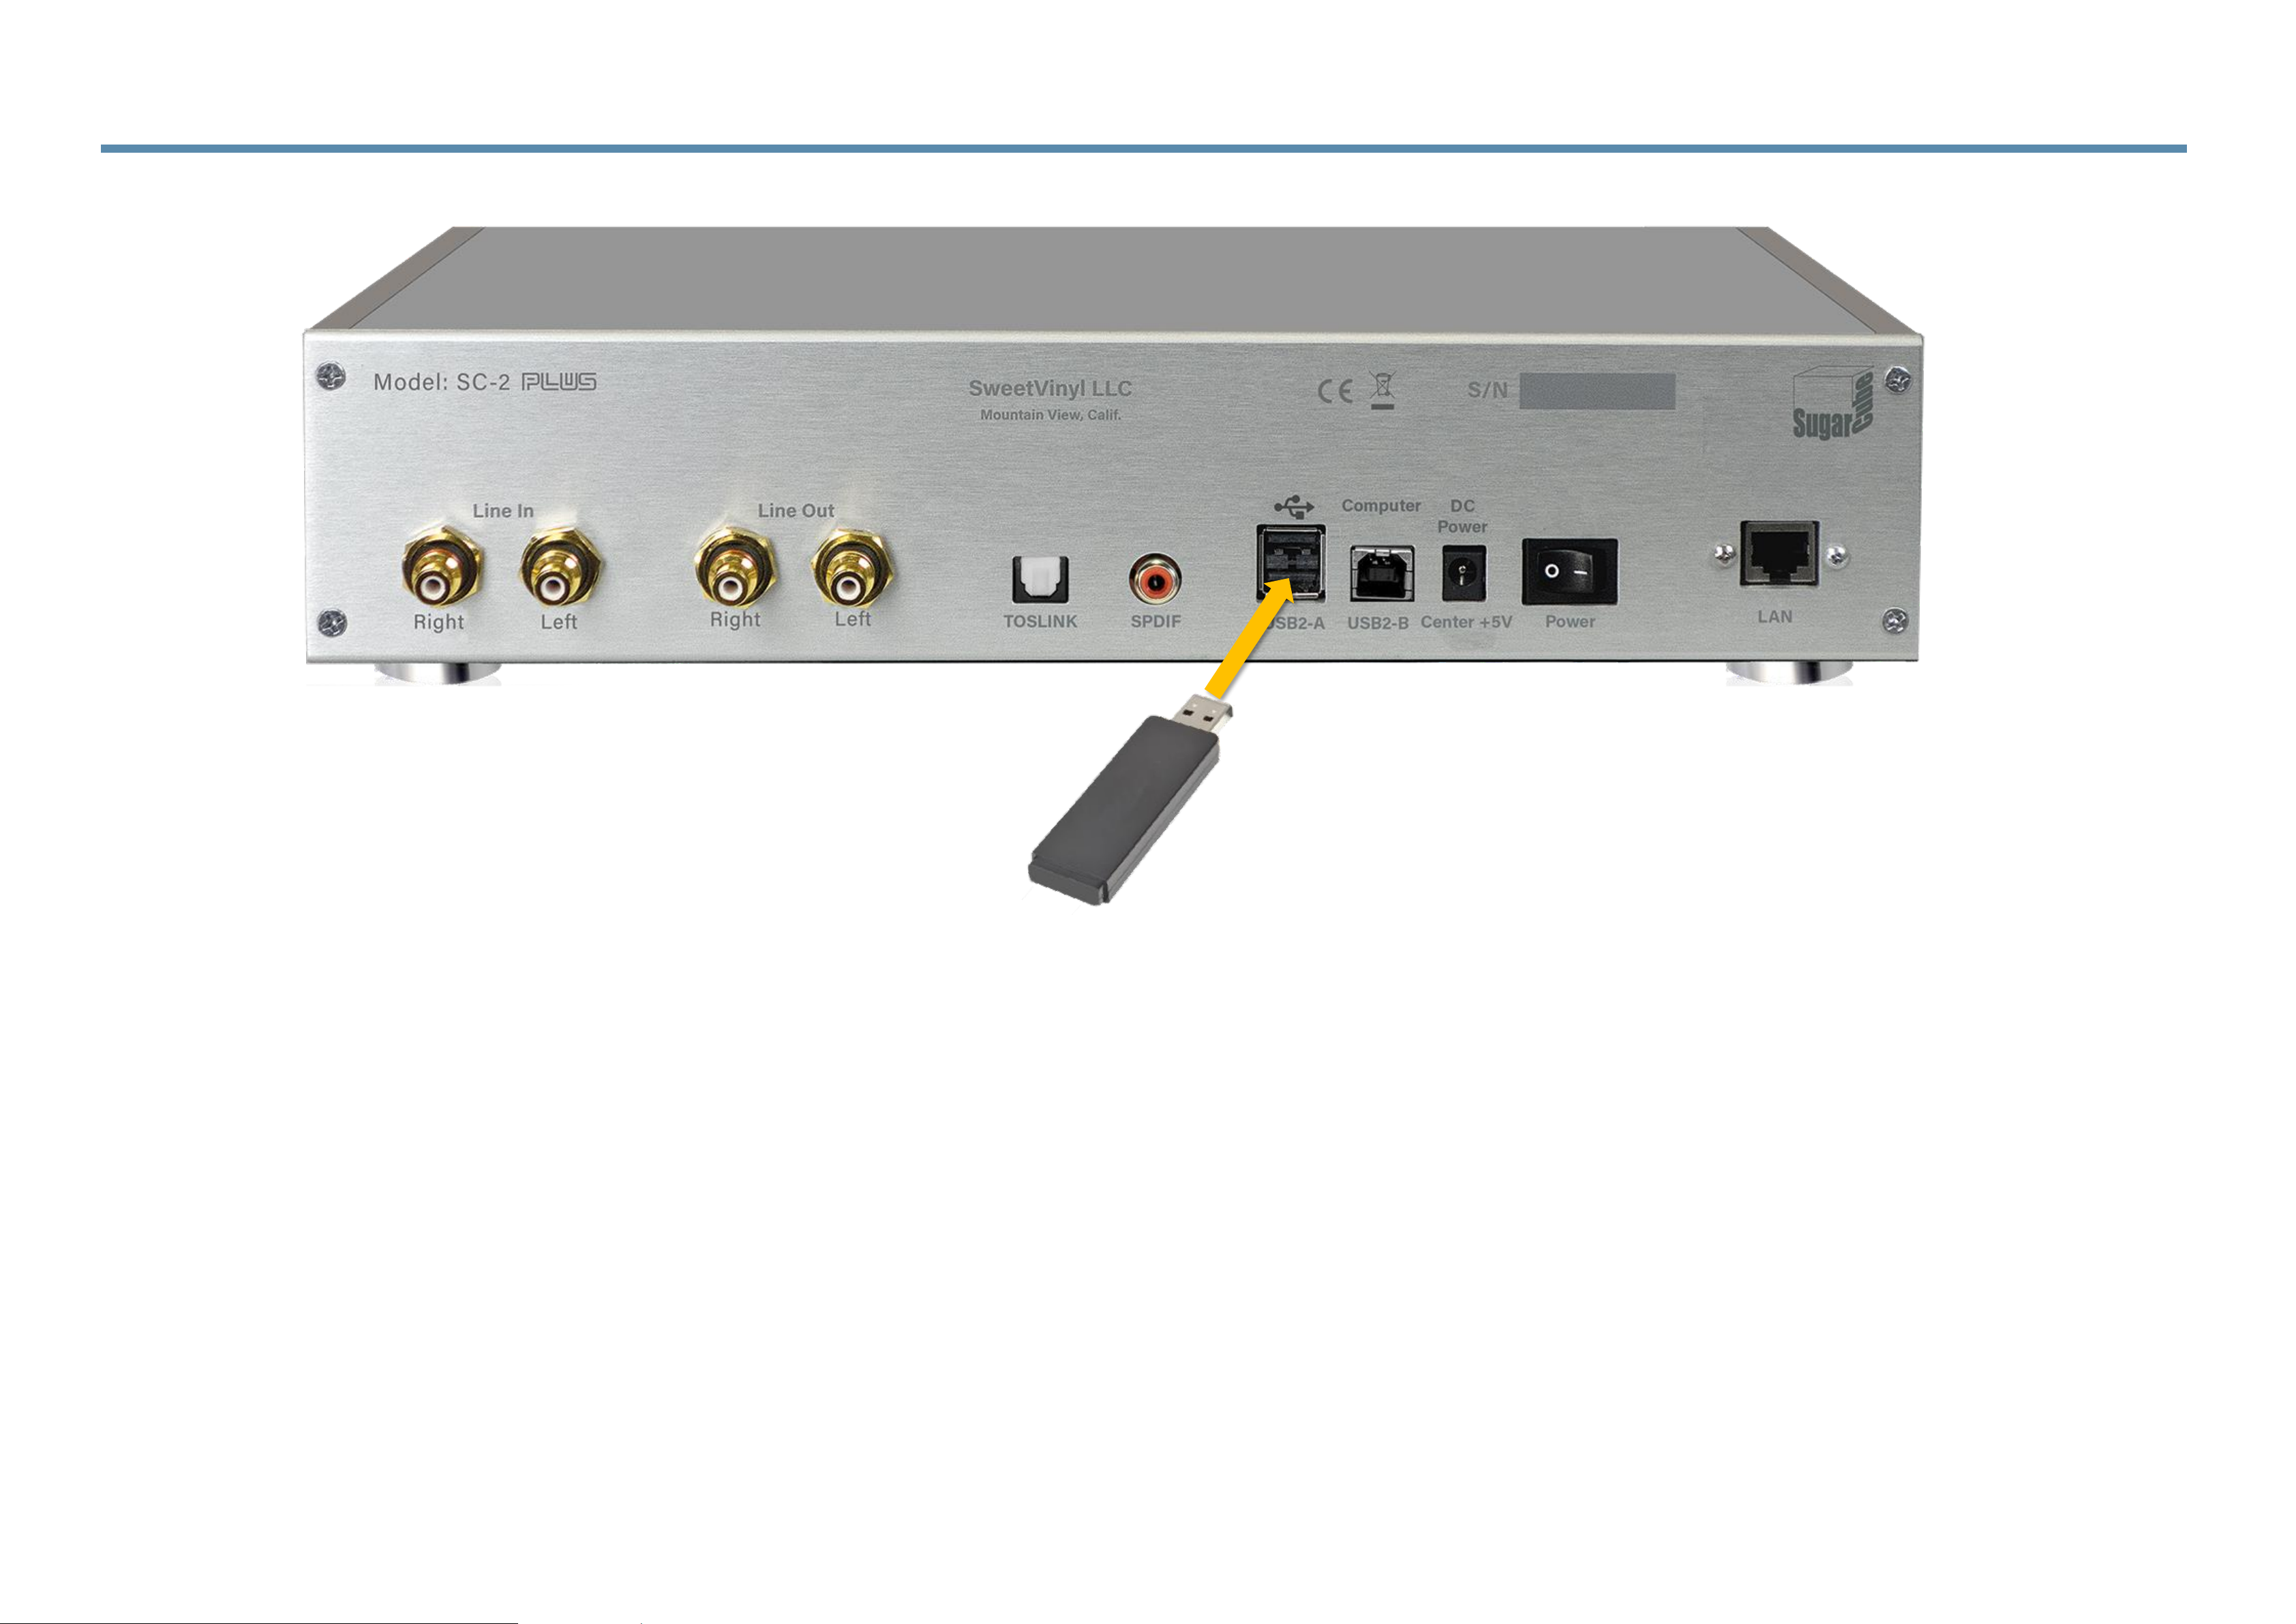
3.1.4 Connecting Your SugarCube via WiFi
• If using the WiFi adapter you will either use the iOS or Android App to setup WiFi, or use Ethernet
and a browser to configure the WiFi parameters.
NOTES:
• THE SUGARCUBE SC2-PLUS BASIC OPERATIONS ARE FULLY FUNCTIONAL BY MEANS OF THE
FRONT PANEL CONTROLS WITHOUT THE NEED TO CONNECT TO A NETWORK.
• SOFTWARE UPDATES ARE AUTOMATIC AND PROVIDED WHEN THE SUGARCUBE IS CONNECTED
TO A WIFI OR ETHERNET NETWORK.
Page 21

3.2 Using a Browser with SugarCube
`
Page 22
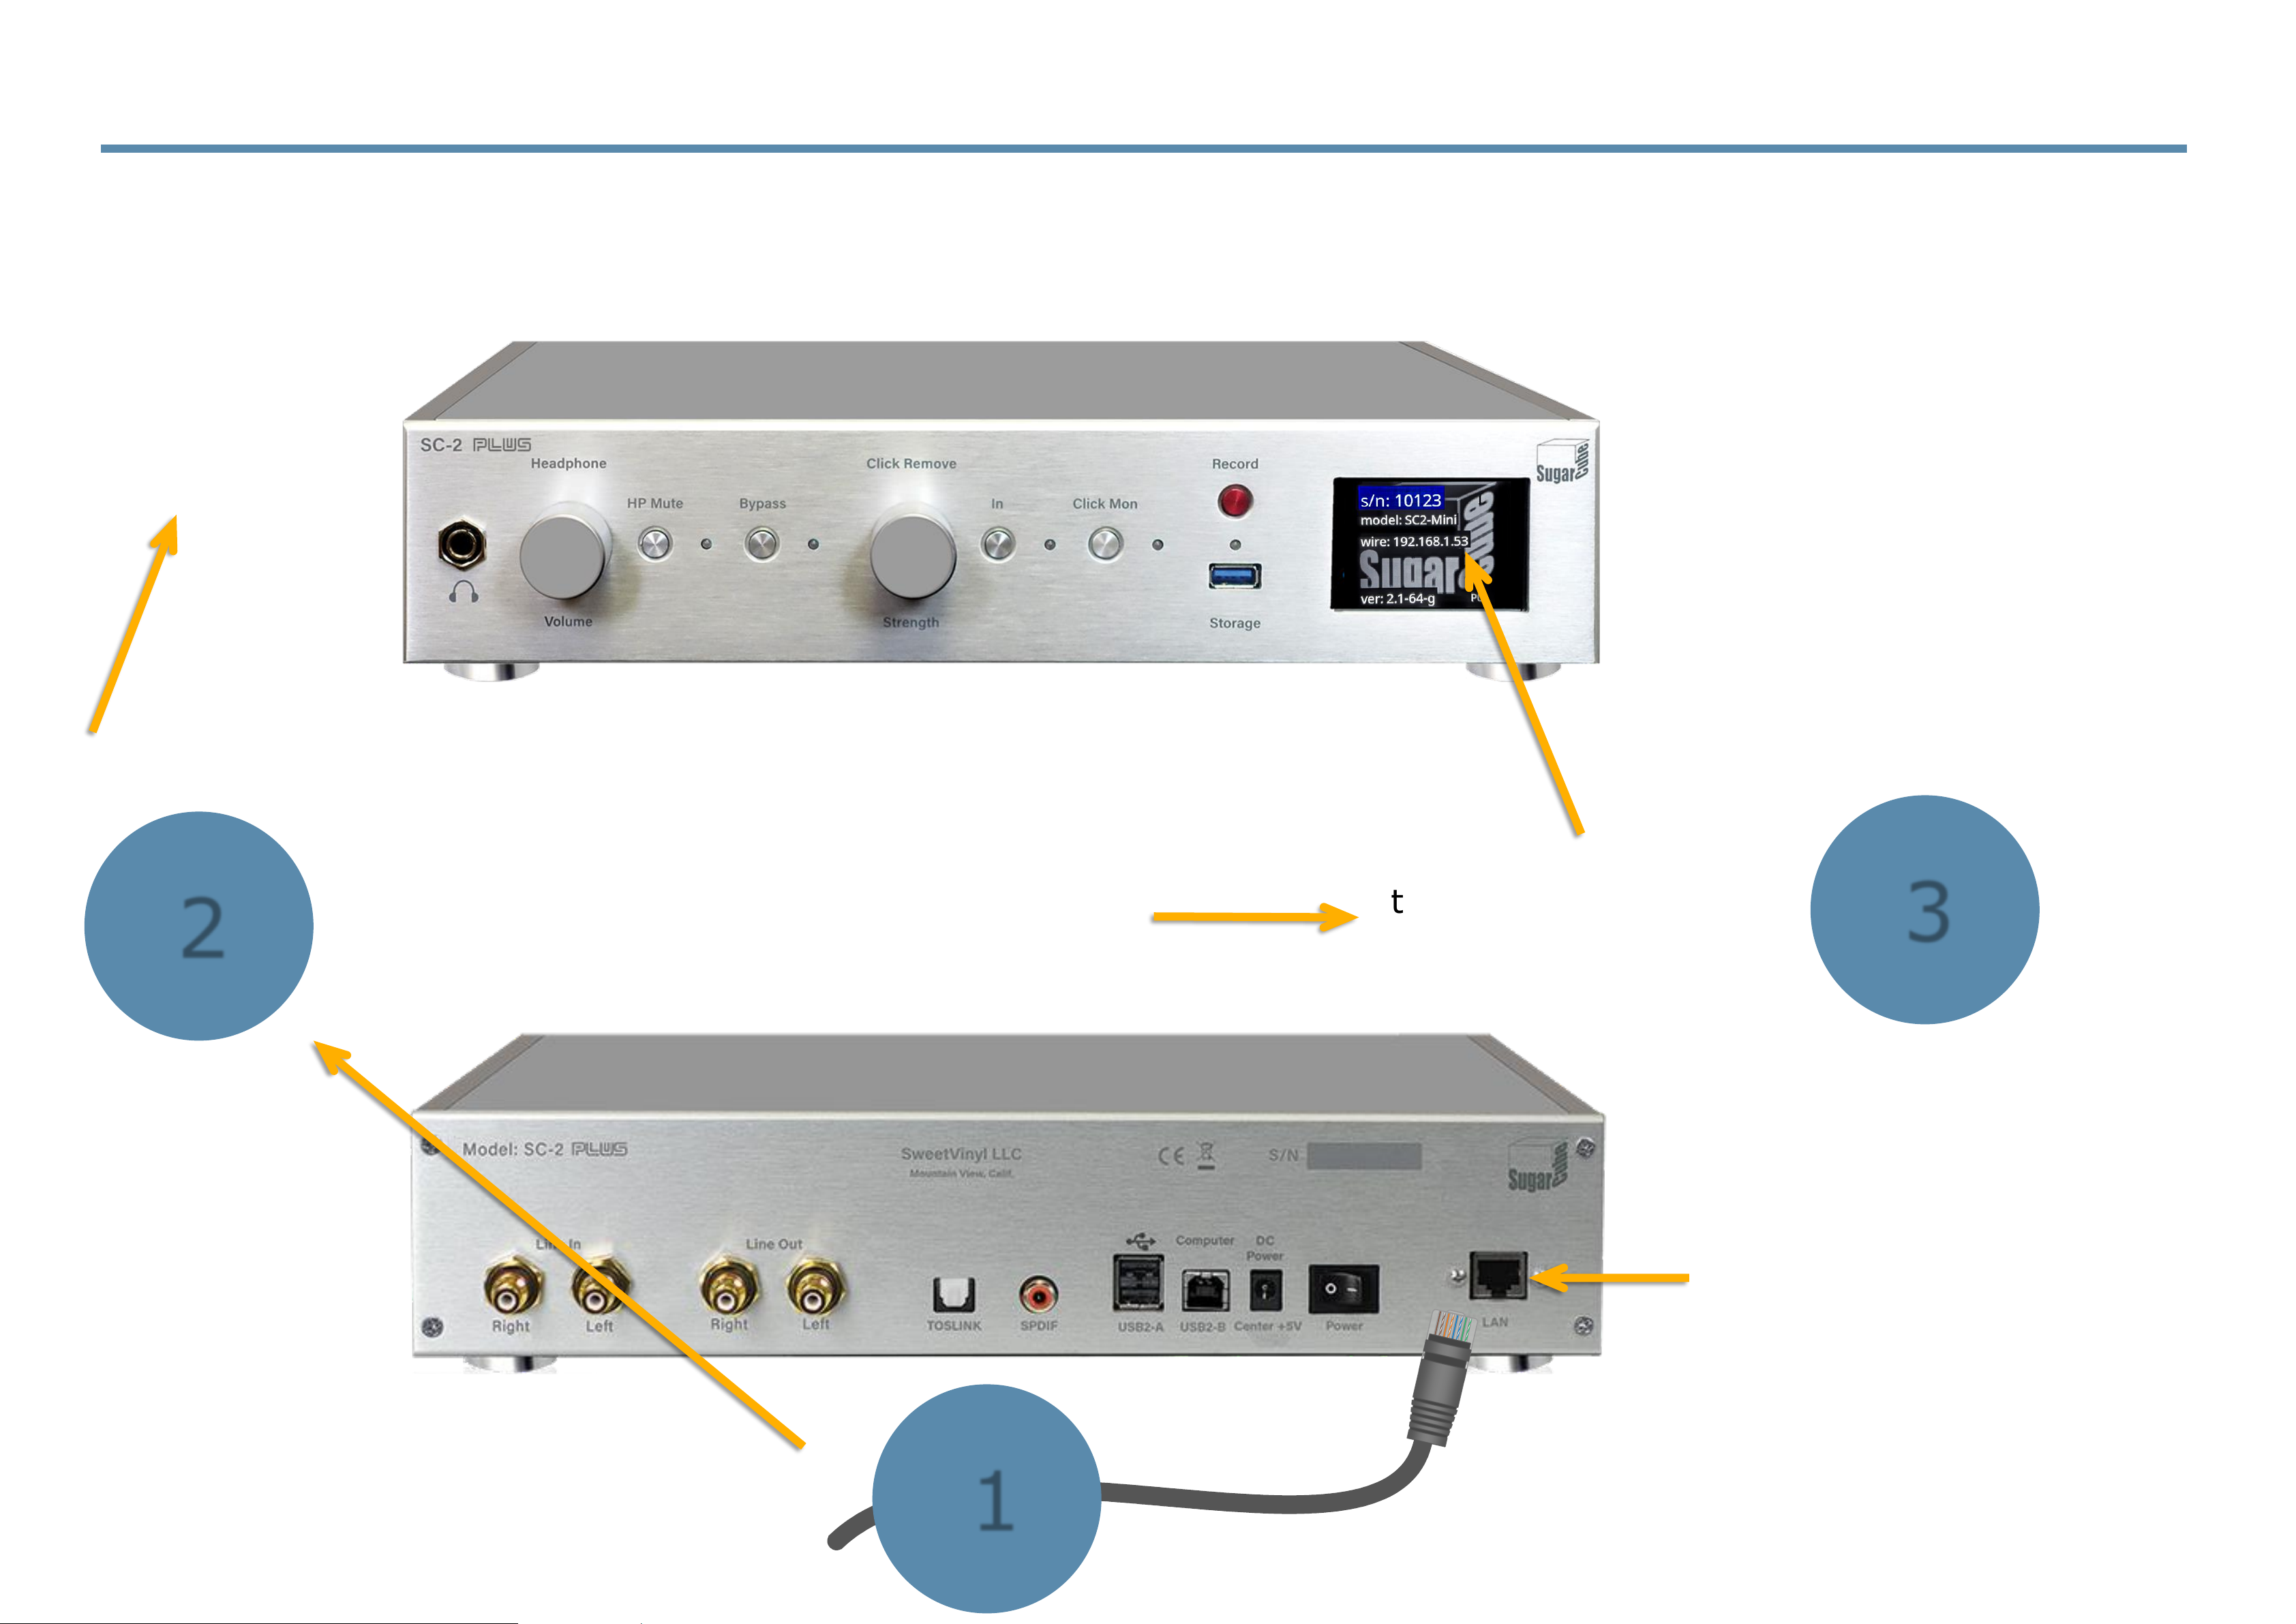
3.2.1 Controlling the SugarCube from a Web Browser
Press in and hold ‘BYPASS’ for 3 to 5 seconds
Your SugarCube will then enter a display
mode where it will show you its IP
address, among other information.
Plug in an Ethernet Cable
1
3
You will use an address
that looks like this
example. It usually will
start with 192 or with 10.
2
Finding the IP address of your SugarCube
Page 23
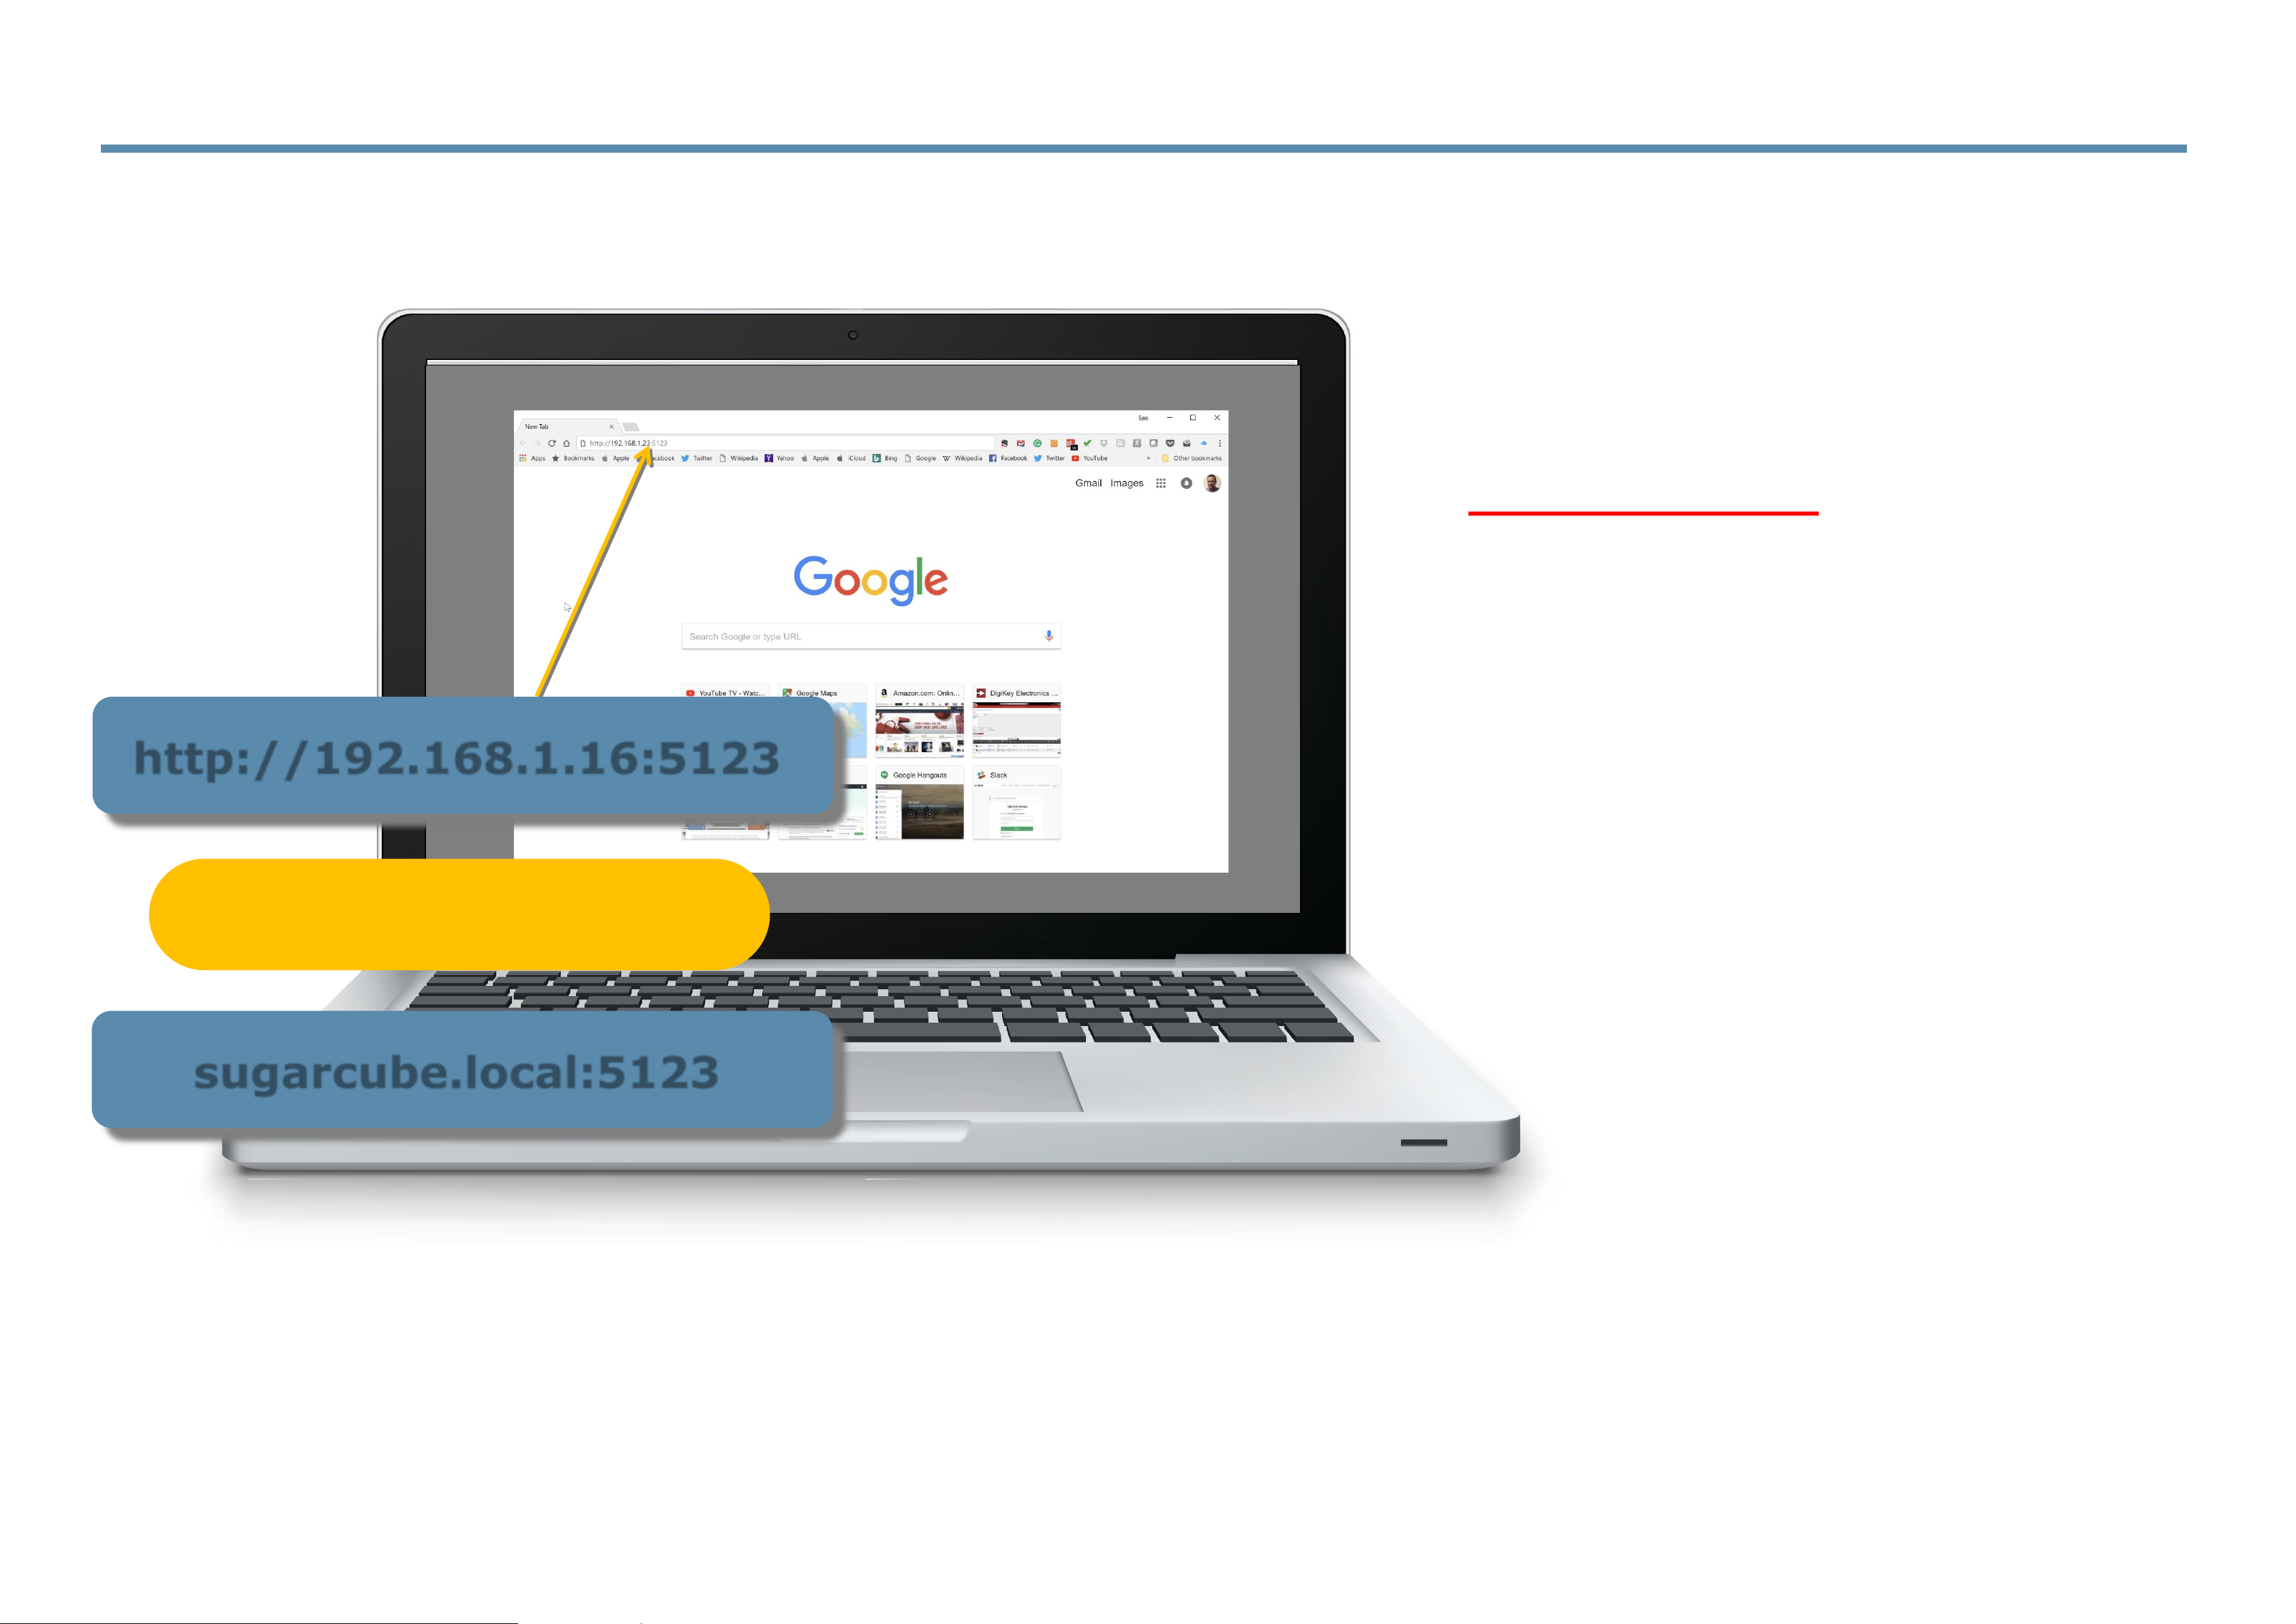
3.2.2 Controlling the SugarCube from a Web Browser
(1) Type the SugarCube’s IP address into the
address bar then add a colon ‘:’ and ‘1111’.
PLEASE NOTE: the ‘1111’ is a fixed port number
and NOT the serial number of your SugarCube.
(2) Press ‘Enter’ and the SugarCube
webpage will appear in the browser.
http://192.168.1.16:5123
Entering the IP address with addition information into the browser
Important Note: the SugarCube
web interface is compatible with
Google Chrome, Microsoft Edge, &
Apple Safari web browsers. We
cannot guarantee compatibility with
any other brand.
sugarcube.local:5123
Or, if you have a relatively modern
LAN, you can try:
Page 24
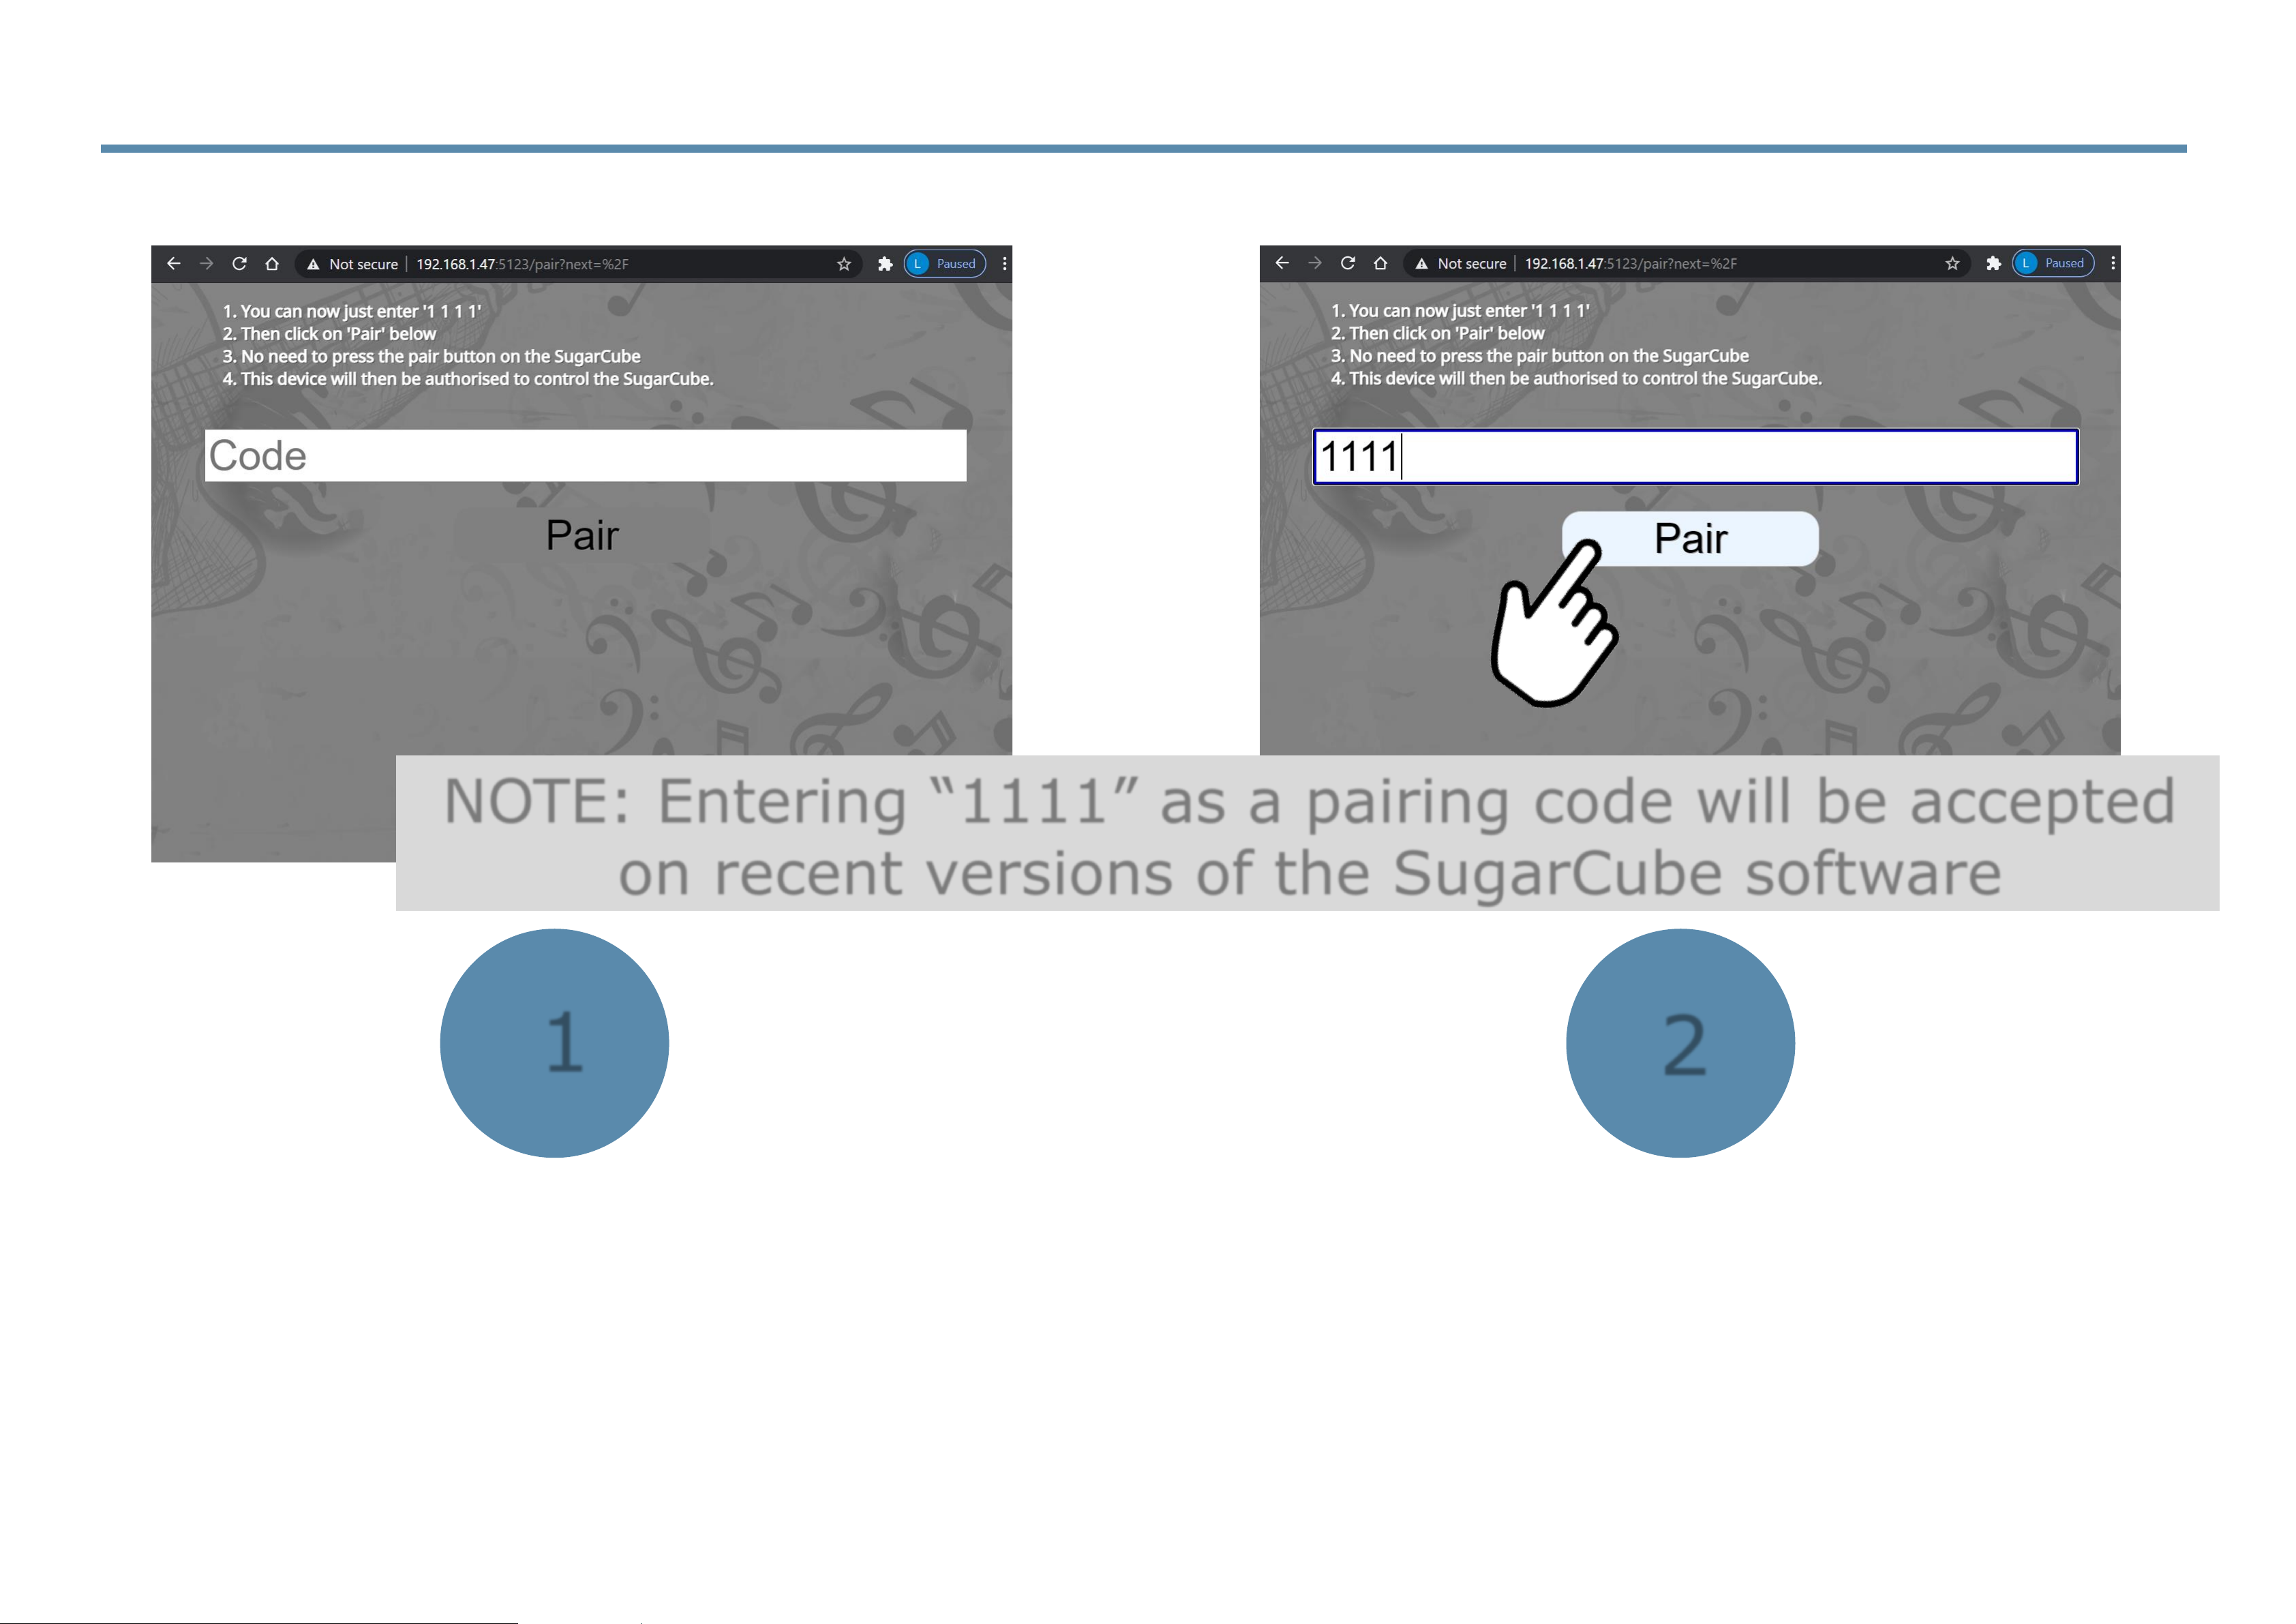
3.2.3 Controlling the SugarCube from a Web Browser
(2) Then, enter the four-digit pairing
code displayed on the SugarCube
display and click on ‘Pair’.
1
2
NOTE: Entering “1111” as a pairing code will be accepted
on recent versions of the SugarCube software
(1) You will see a screen
appearing in your browser
to accept a pairing code.
Page 25

3.2.4 Controlling the SugarCube from a Web Browser
The SugarCube user interface will appear in the browser.
Important Note: the SugarCube
web interface is compatible with
Google Chrome, Microsoft Edge, &
Apple Safari web browsers. We
cannot guarantee compatibility with
any other brand.
Page 26
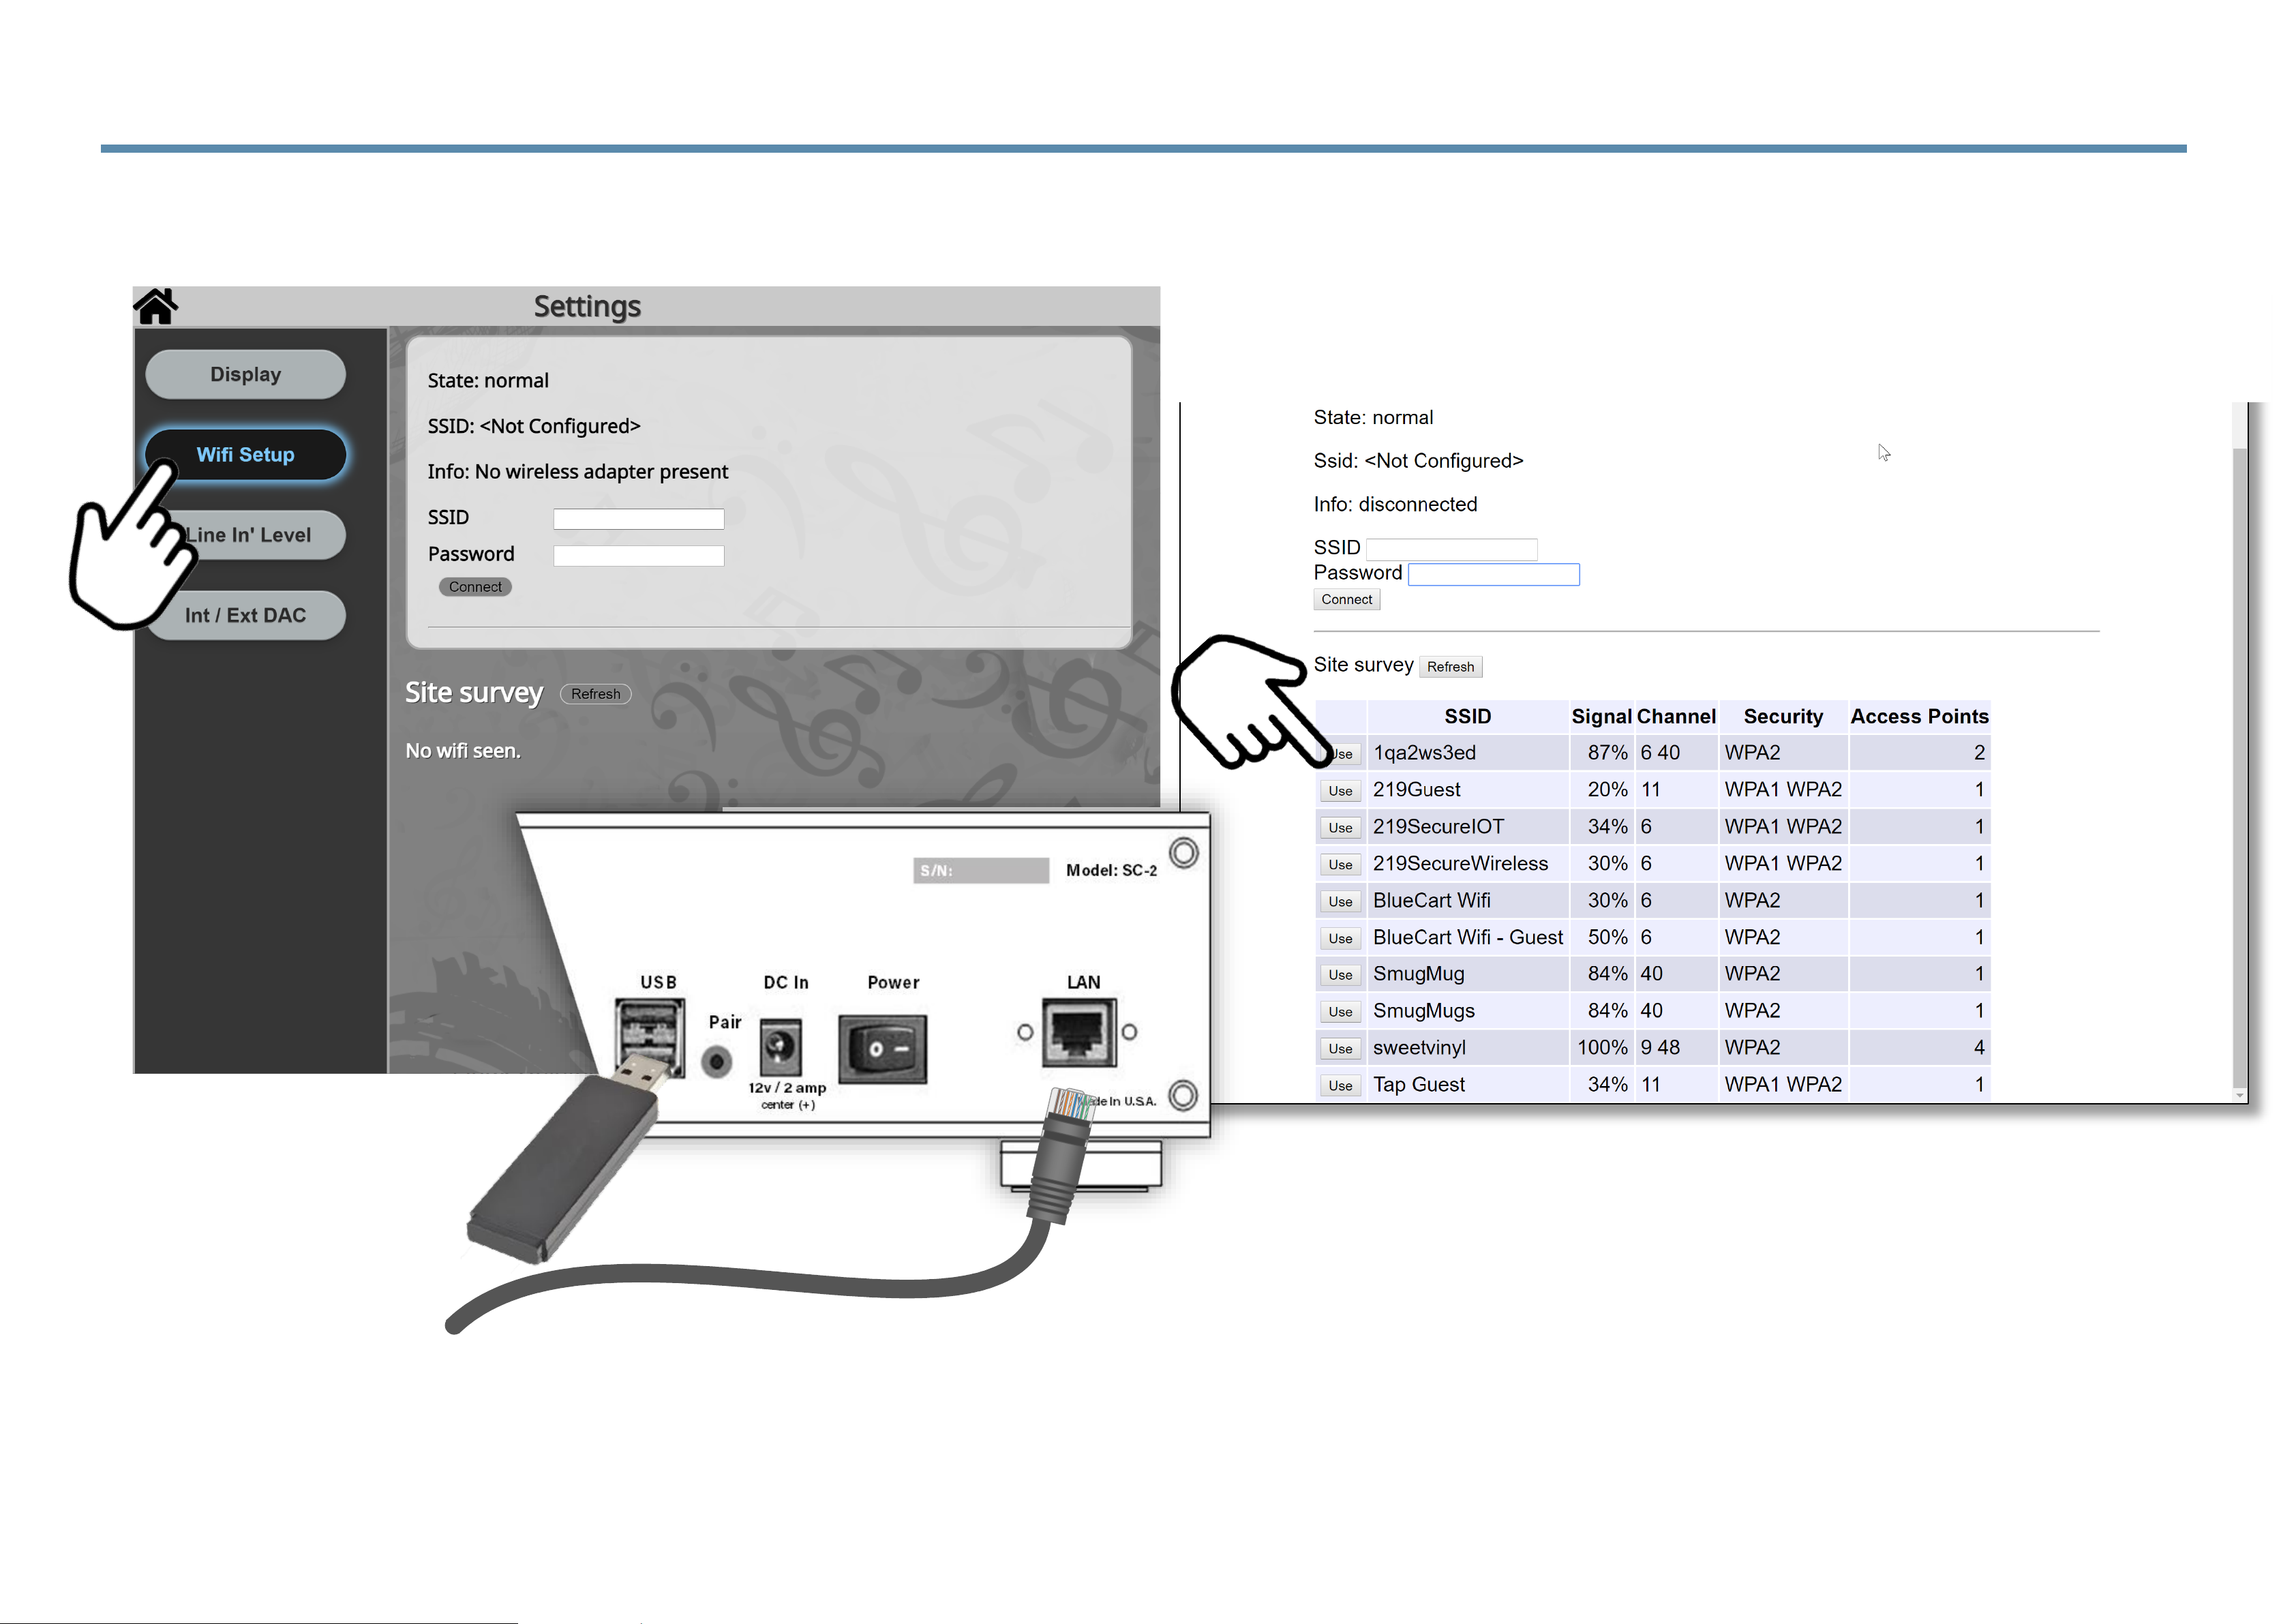
3.2.5 Controlling the SugarCube from a Web Browser
(1) If wired Ethernet is not
available in your sound room, then
take the SugarCube to your router
just for these WiFi setup steps.
(2) You need both Ethernet and the
WiFi stick plugged into the SugarCube.
(3) Find your WiFi name on
the list of SSIDs.
Setting up WiFi (in place of wired Ethernet), 1 of 4
Page 27
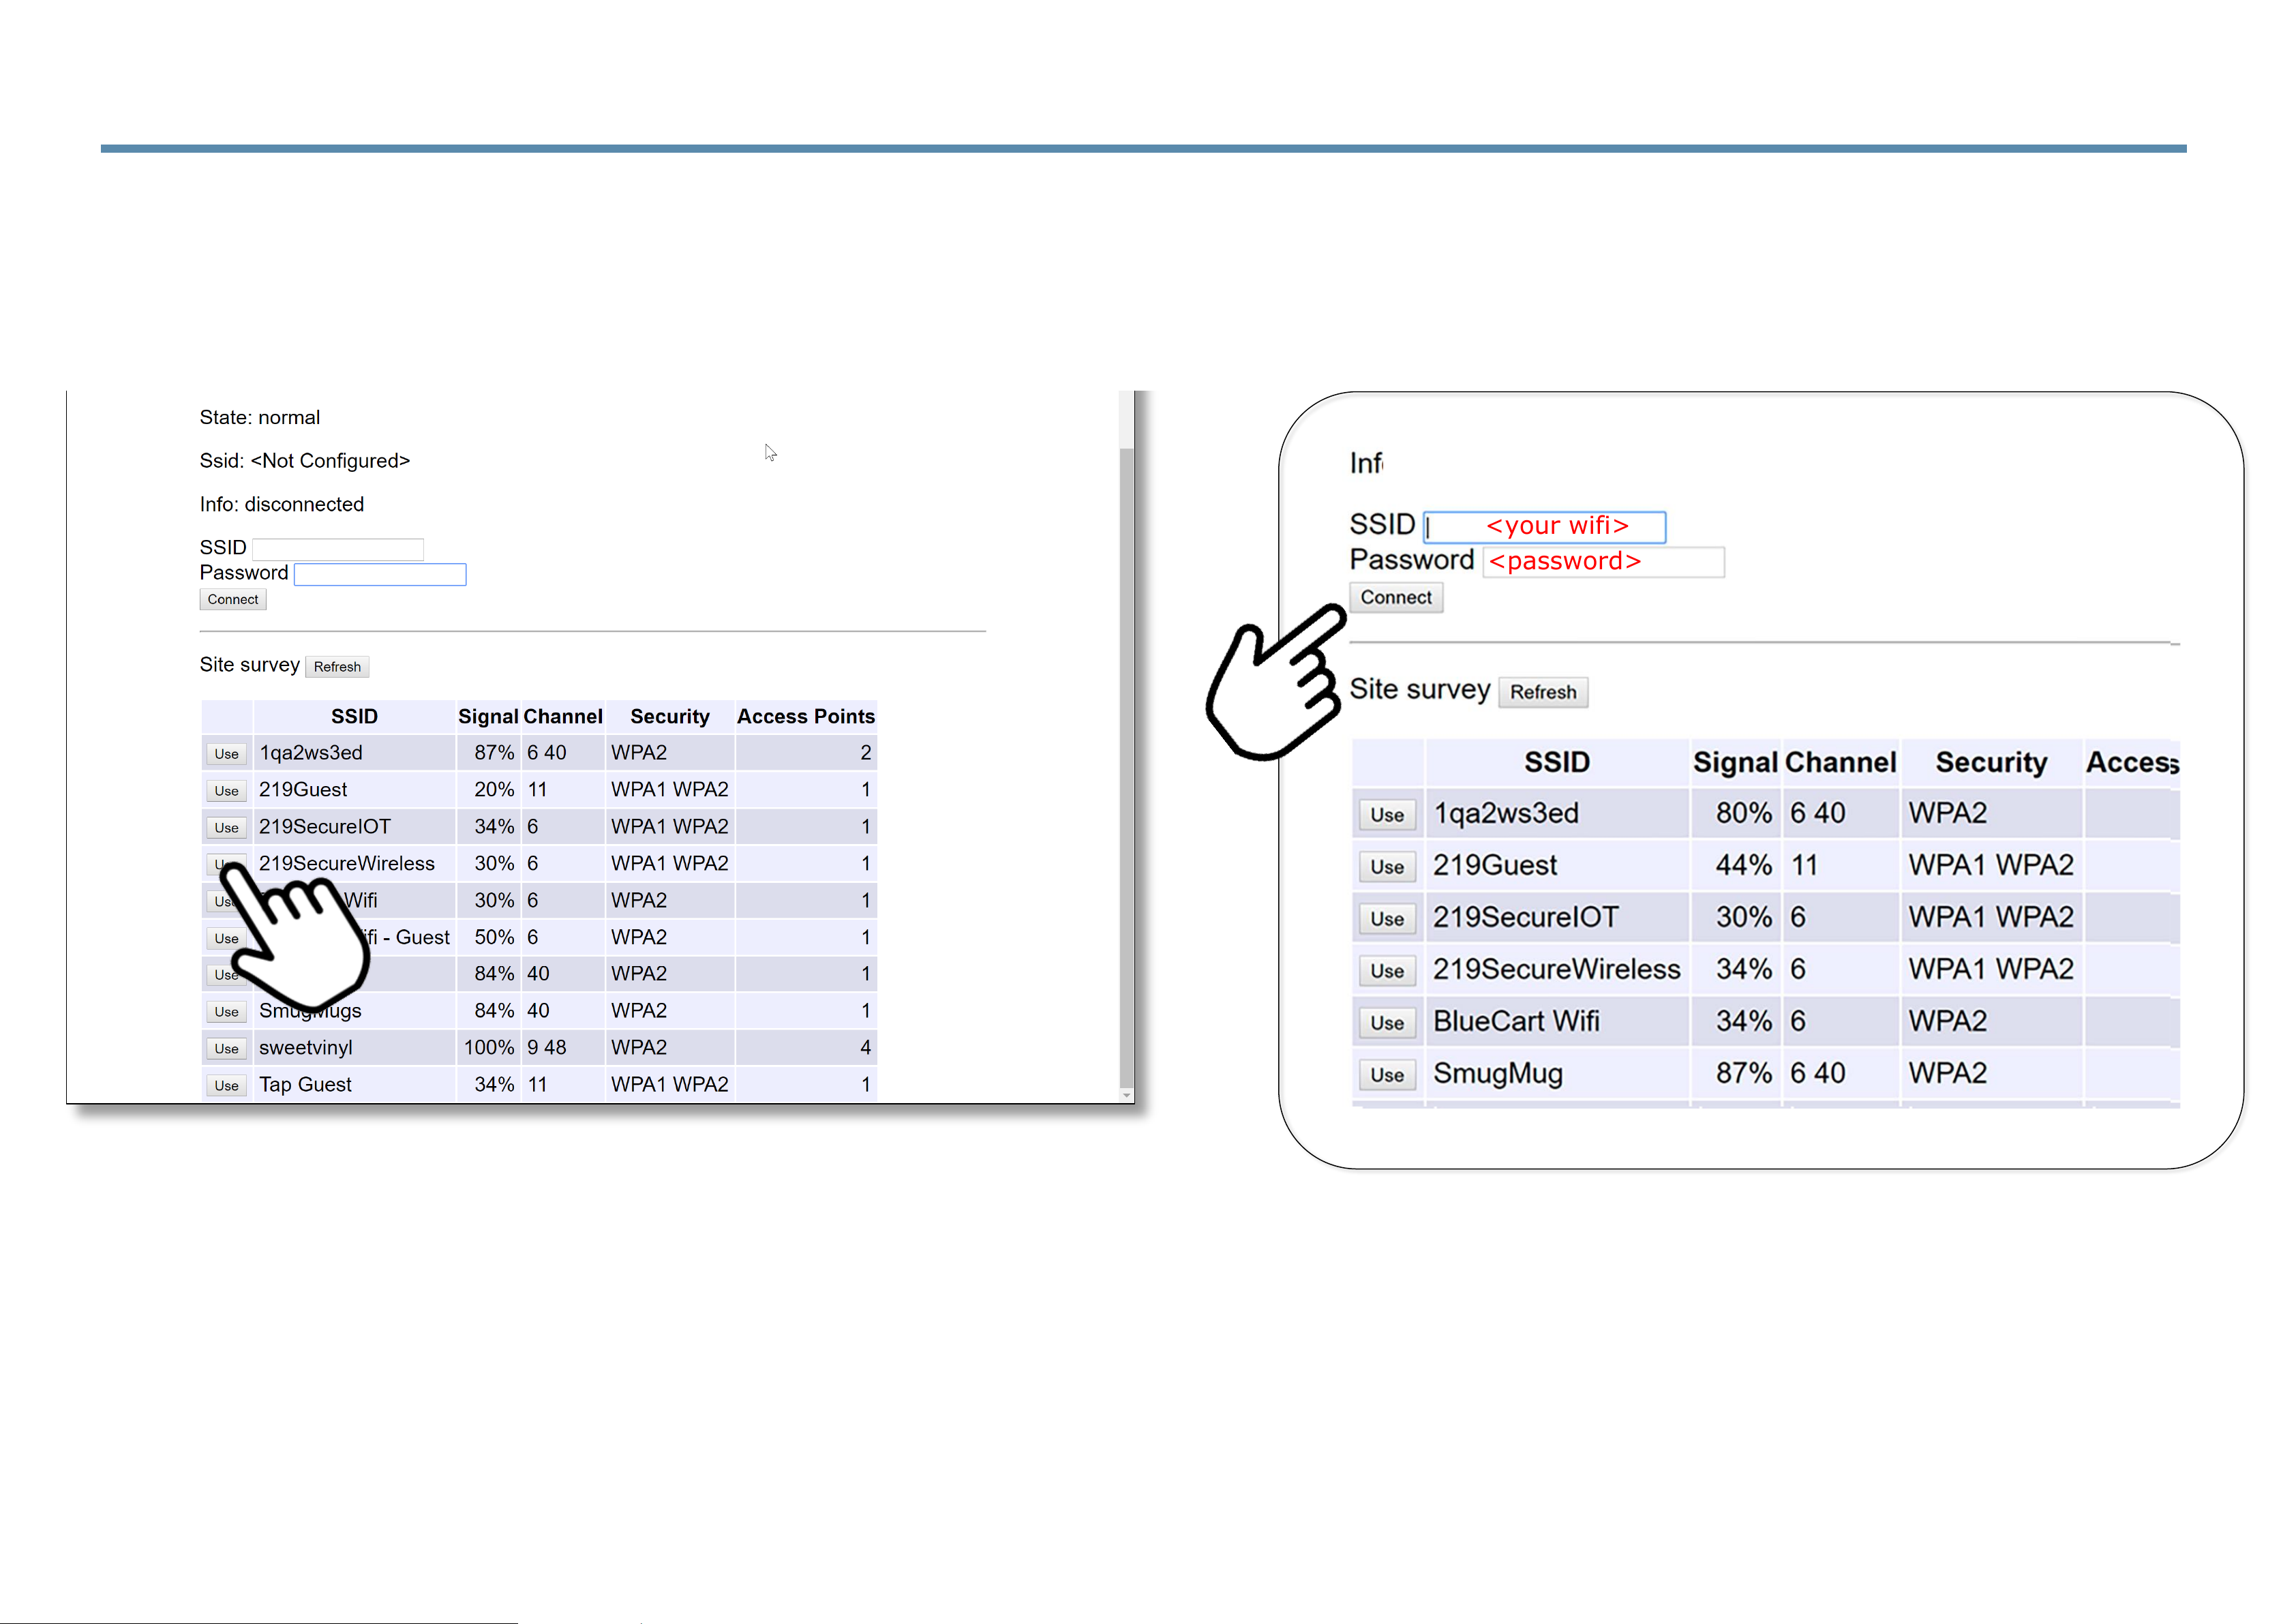
3.2.6 Controlling the SugarCube from a Web Browser
(4) Please select your network by clicking
on the ‘Use’ button next to your SSID.
(5) Next, enter the password for your
WiFi then click on ‘Connect.’
<your wifi>
<your wifi>
<your wifi>
<password>
Setting up WiFi (in place of wired Ethernet), 2 of 4
disconnected
Page 28
wire: 192.168.1.15
StayOffMyLawn
WiFi:
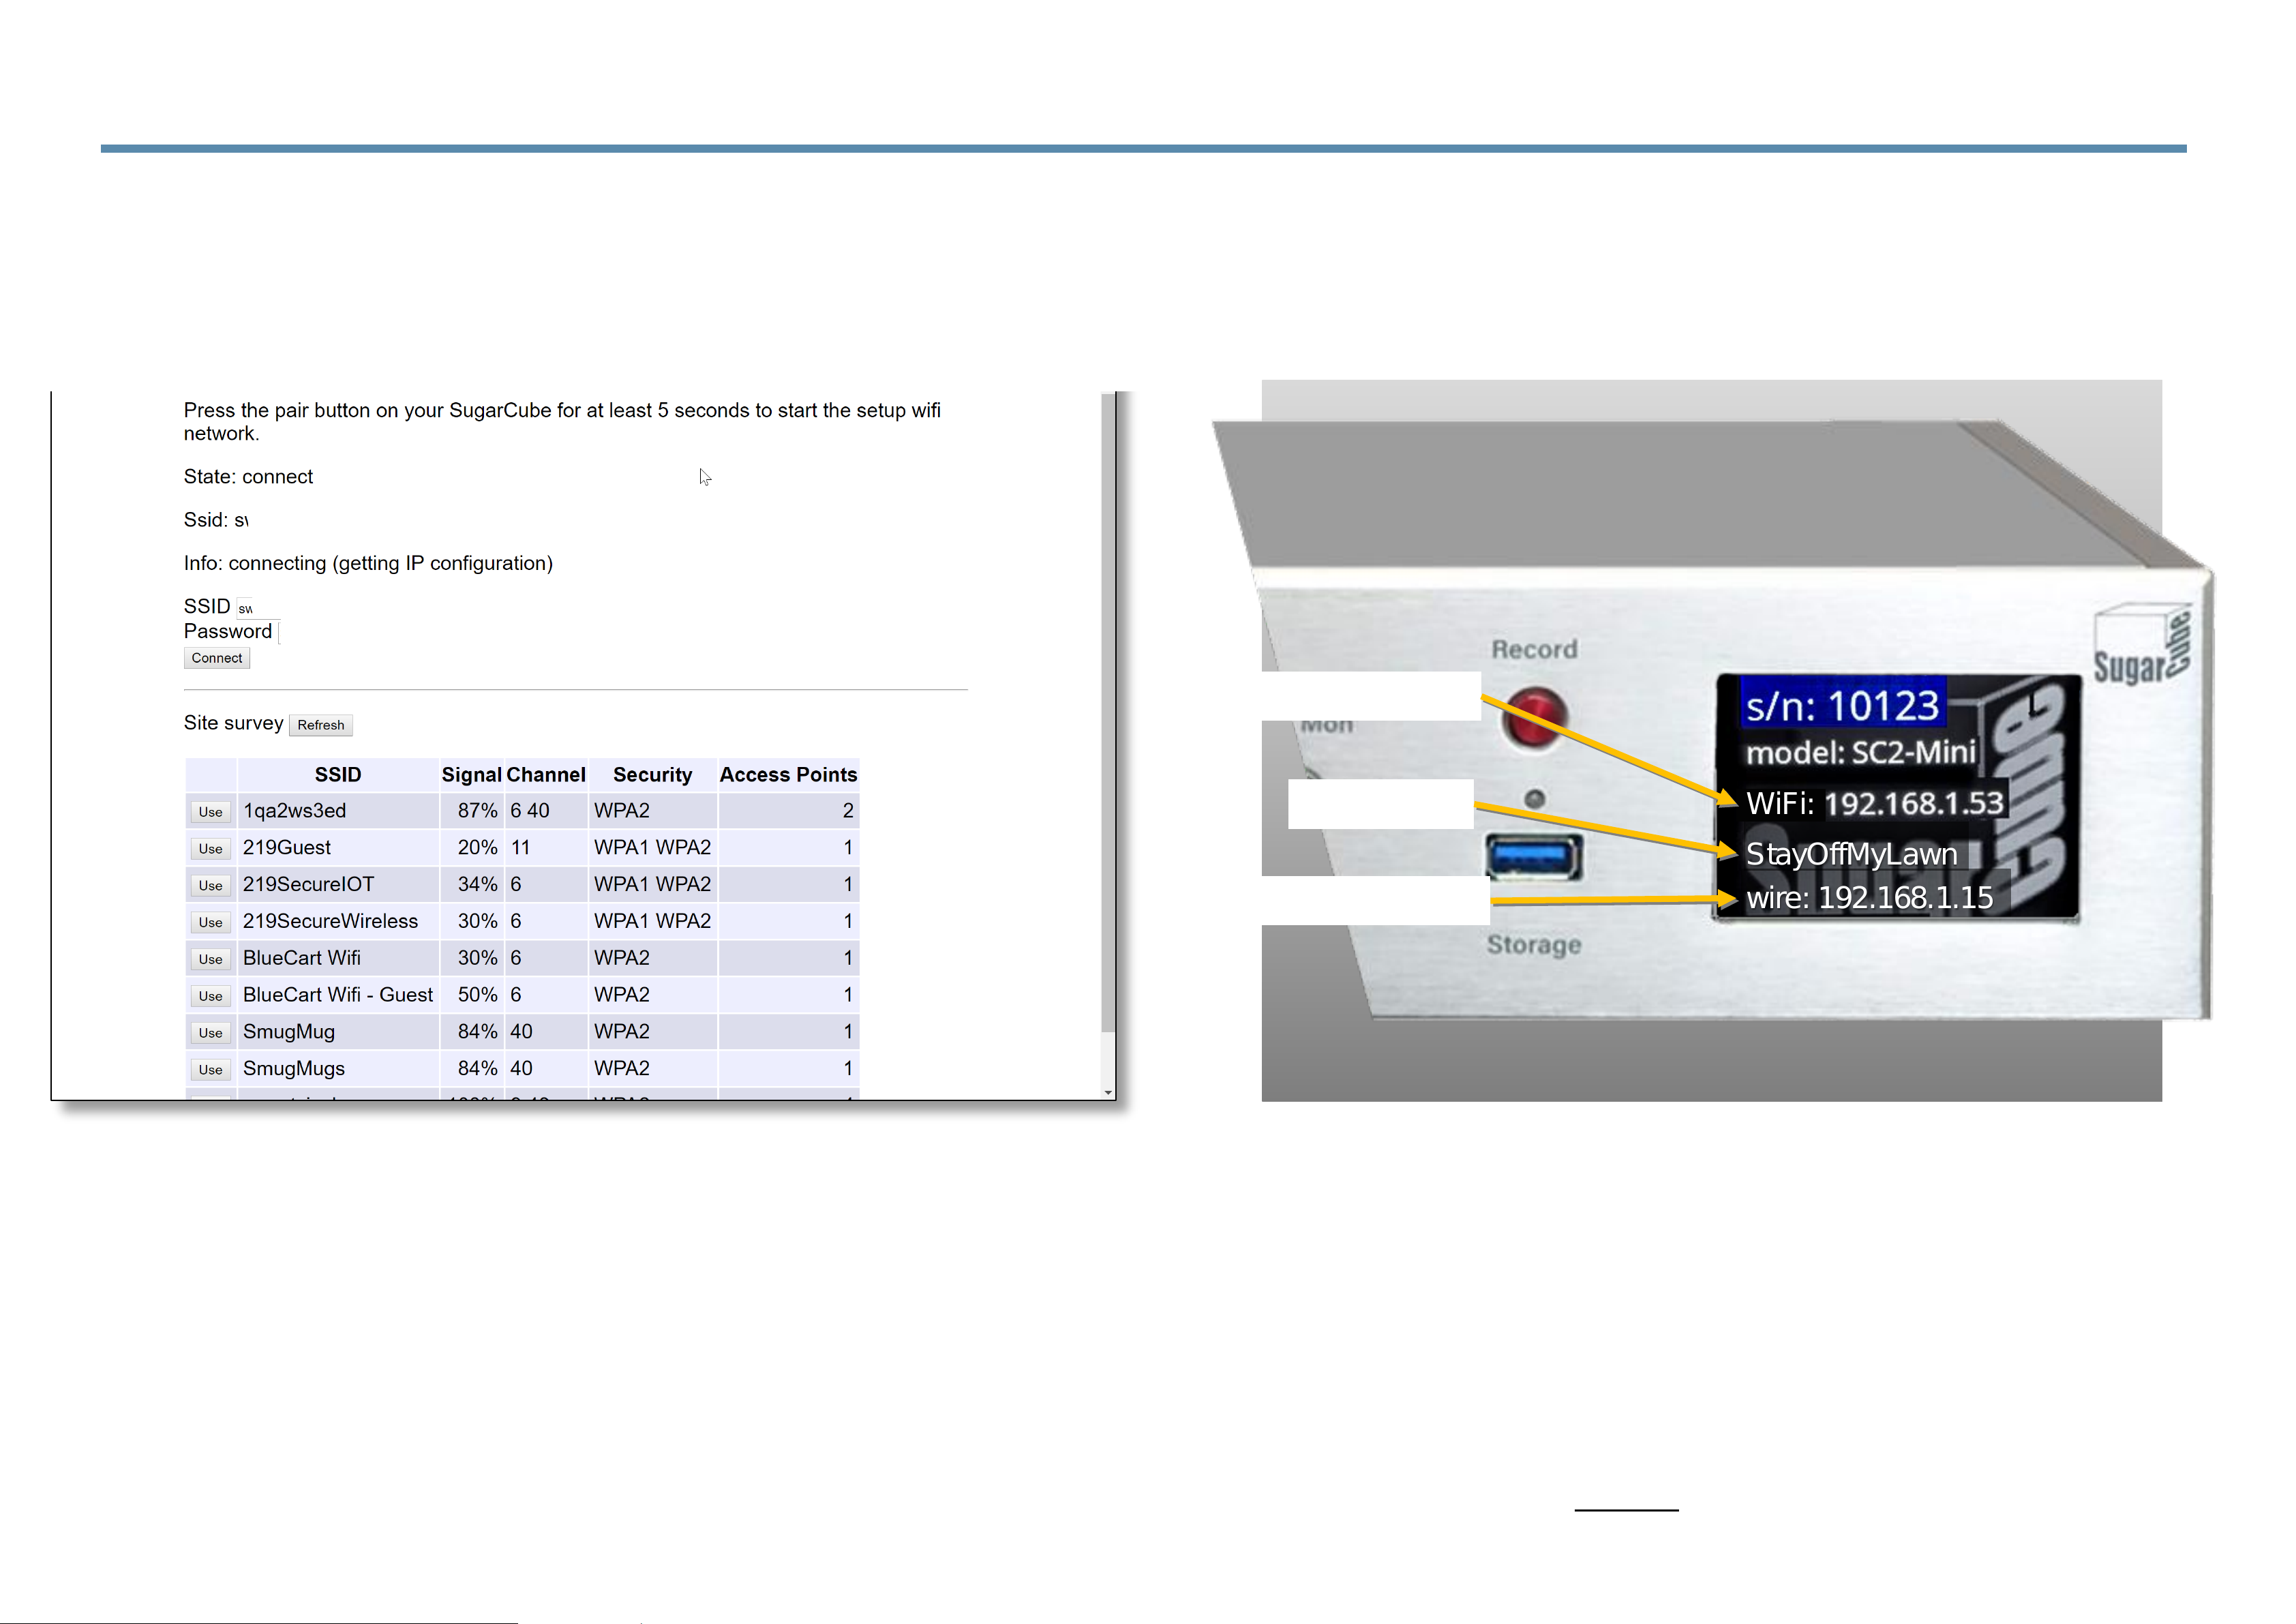
3.2.7 Controlling the SugarCube from a Web Browser
(6) The system will indicate that
it is connecting to your WiFi.
Setting up WiFi (in place of wired Ethernet), 3 of 4
<your wifi>
<your wifi>
<password>
(7) Once connected, you will now see both your new WiFi address (w) and
your currently wired Ethernet IP address (e). Remember, you are currently
communicating with the SugarCube via the wired IP address.
WiFi IP address
Wired IP address
WiFi SSID
Page 29
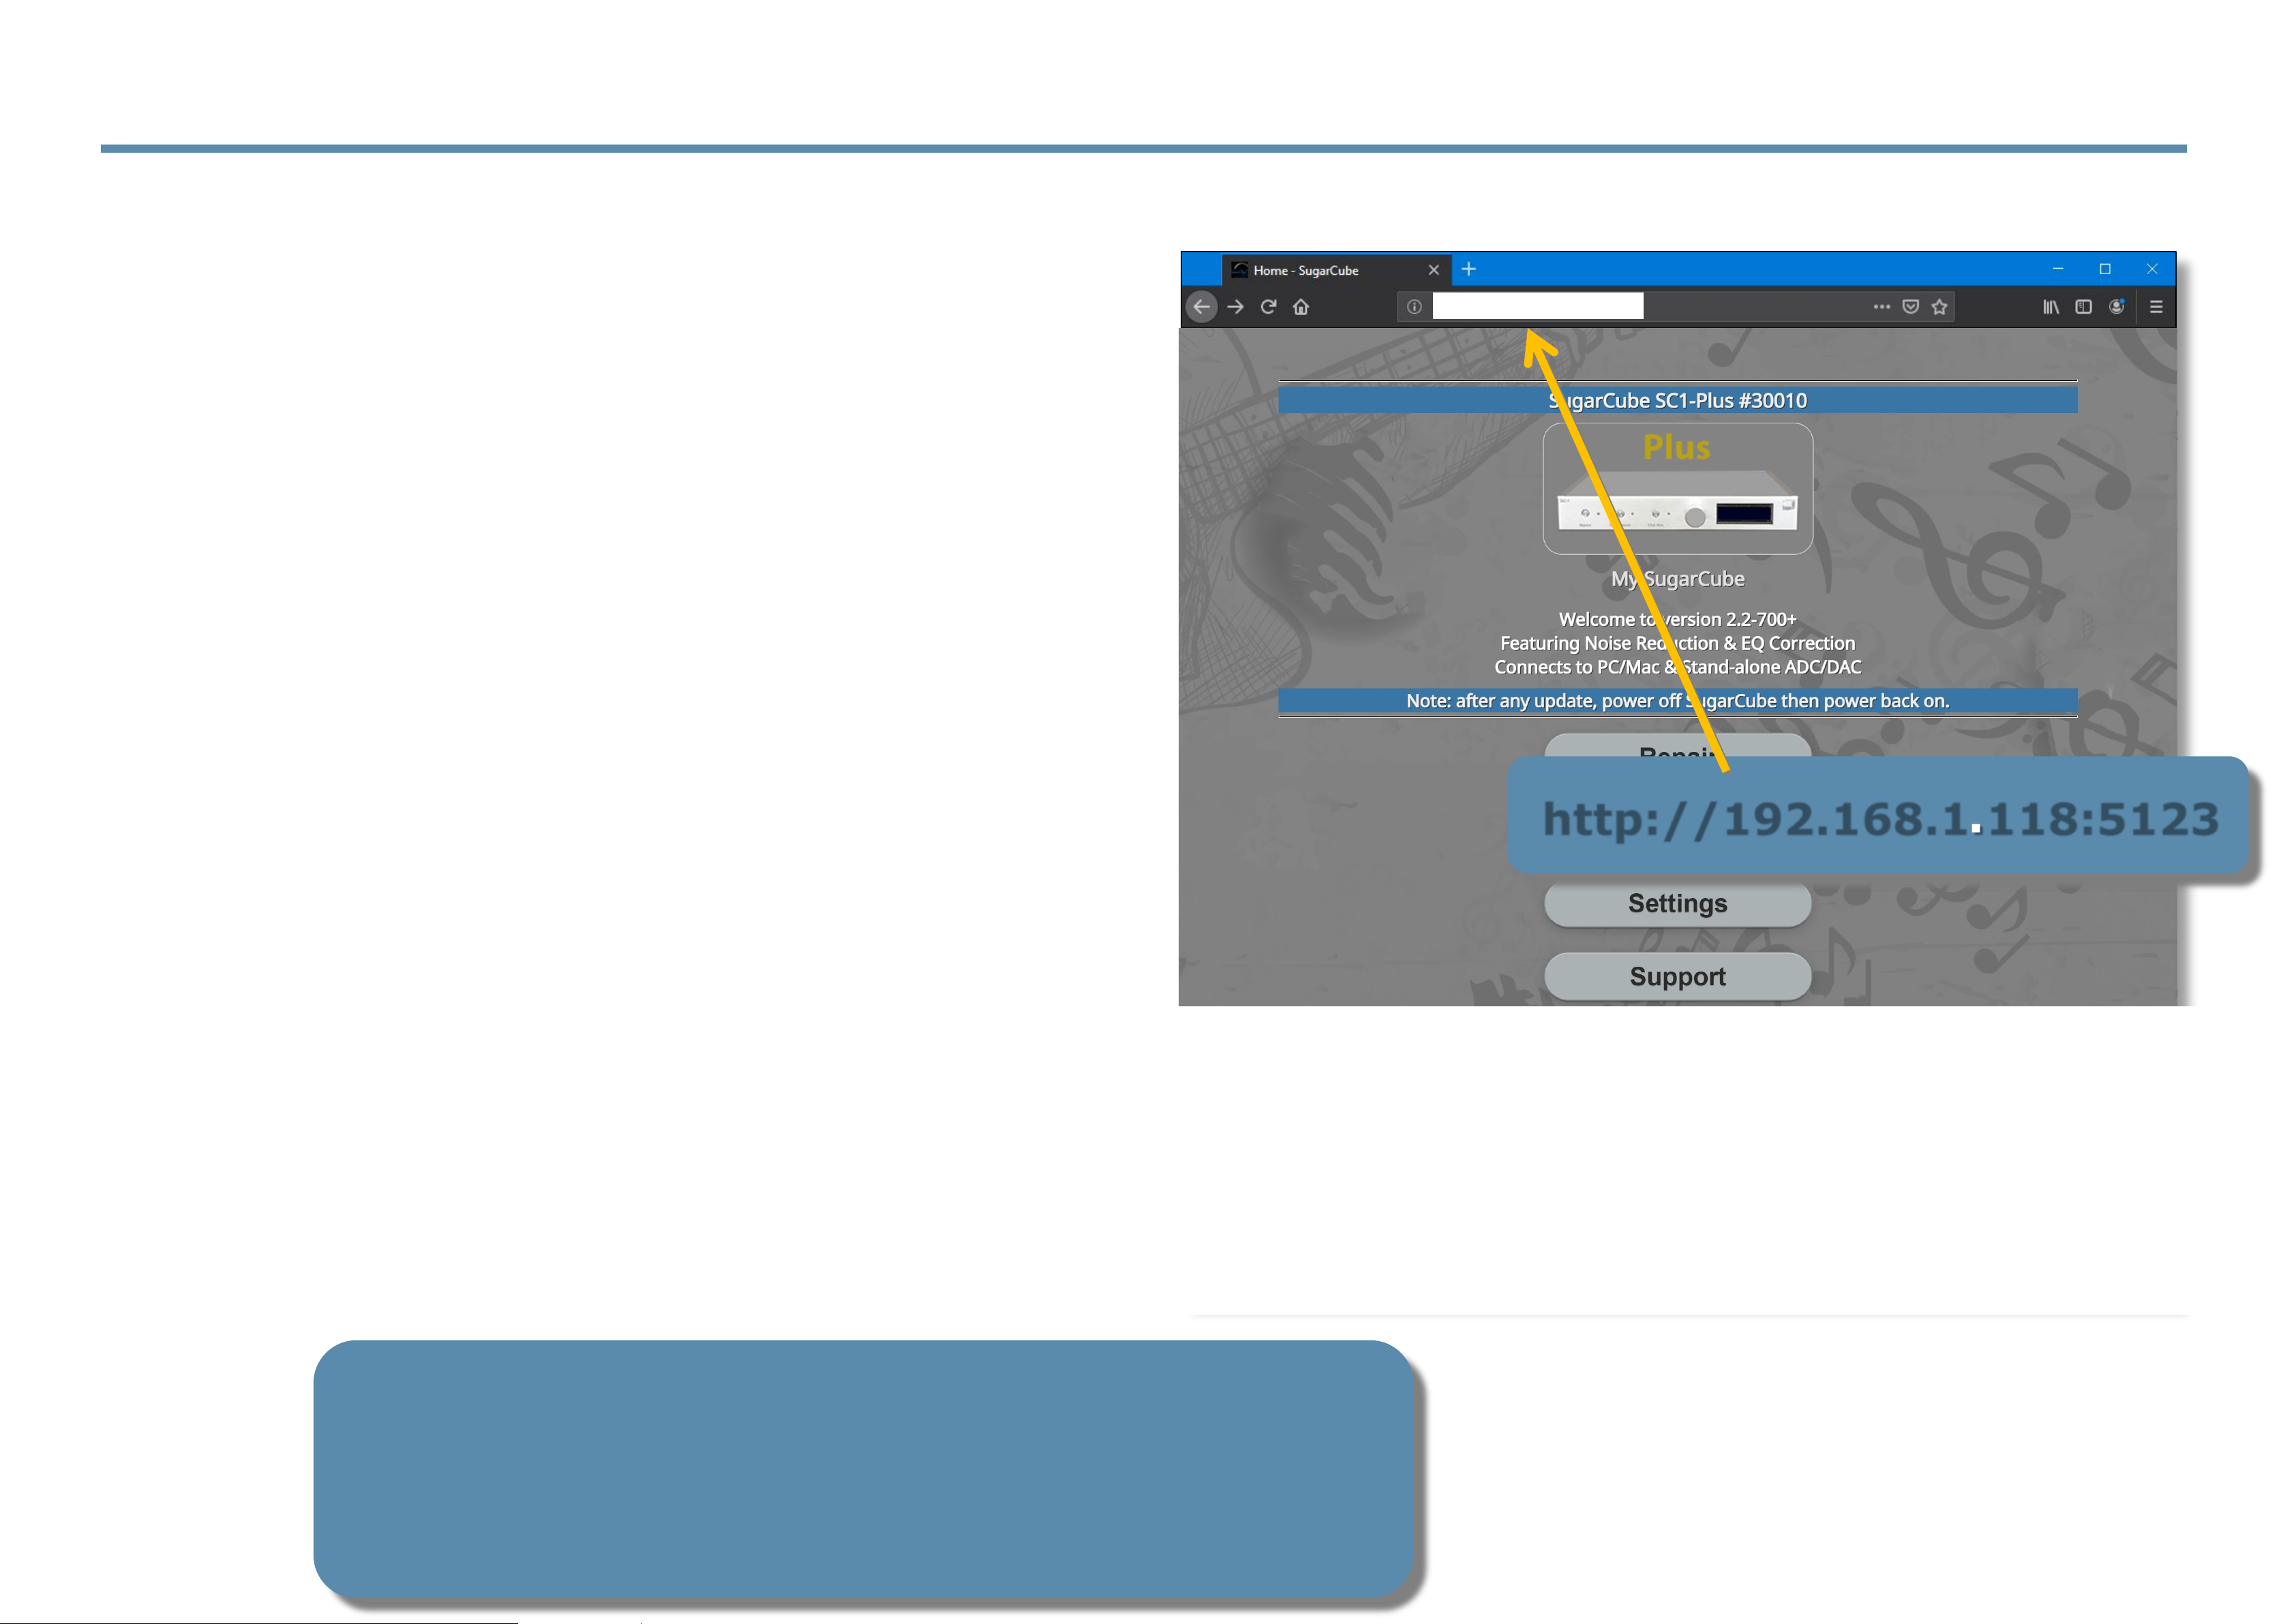
3.2.8 Controlling the SugarCube from a Web Browser
(9) So, when you disconnect the wire, your browser
will no longer communicate. You will have to change
the IP address in your browser, in this example, to
the WiFi address ending in ‘.118’. (Once the wire is
disconnected, the front panel display will show only
the WiFi IP address.)
(11) Please note, if your SugarCube cannot connect
to your WiFi, contact [email protected] with
the details of your system (WiFi make and model
and the serial number of your SugarCube.)
Setting up WiFi (in place of wired Ethernet), 4 of 4
(10) Usually, you need only to change the last group of
numbers and press ‘Enter’, and you should reconnect
(sometimes you may have to re-enter the entire address).
http://192.168.1.118:5123
http://192.168.1.118:5123
Page 30

3.3 Using iOS App with SugarCube
`
Page 31
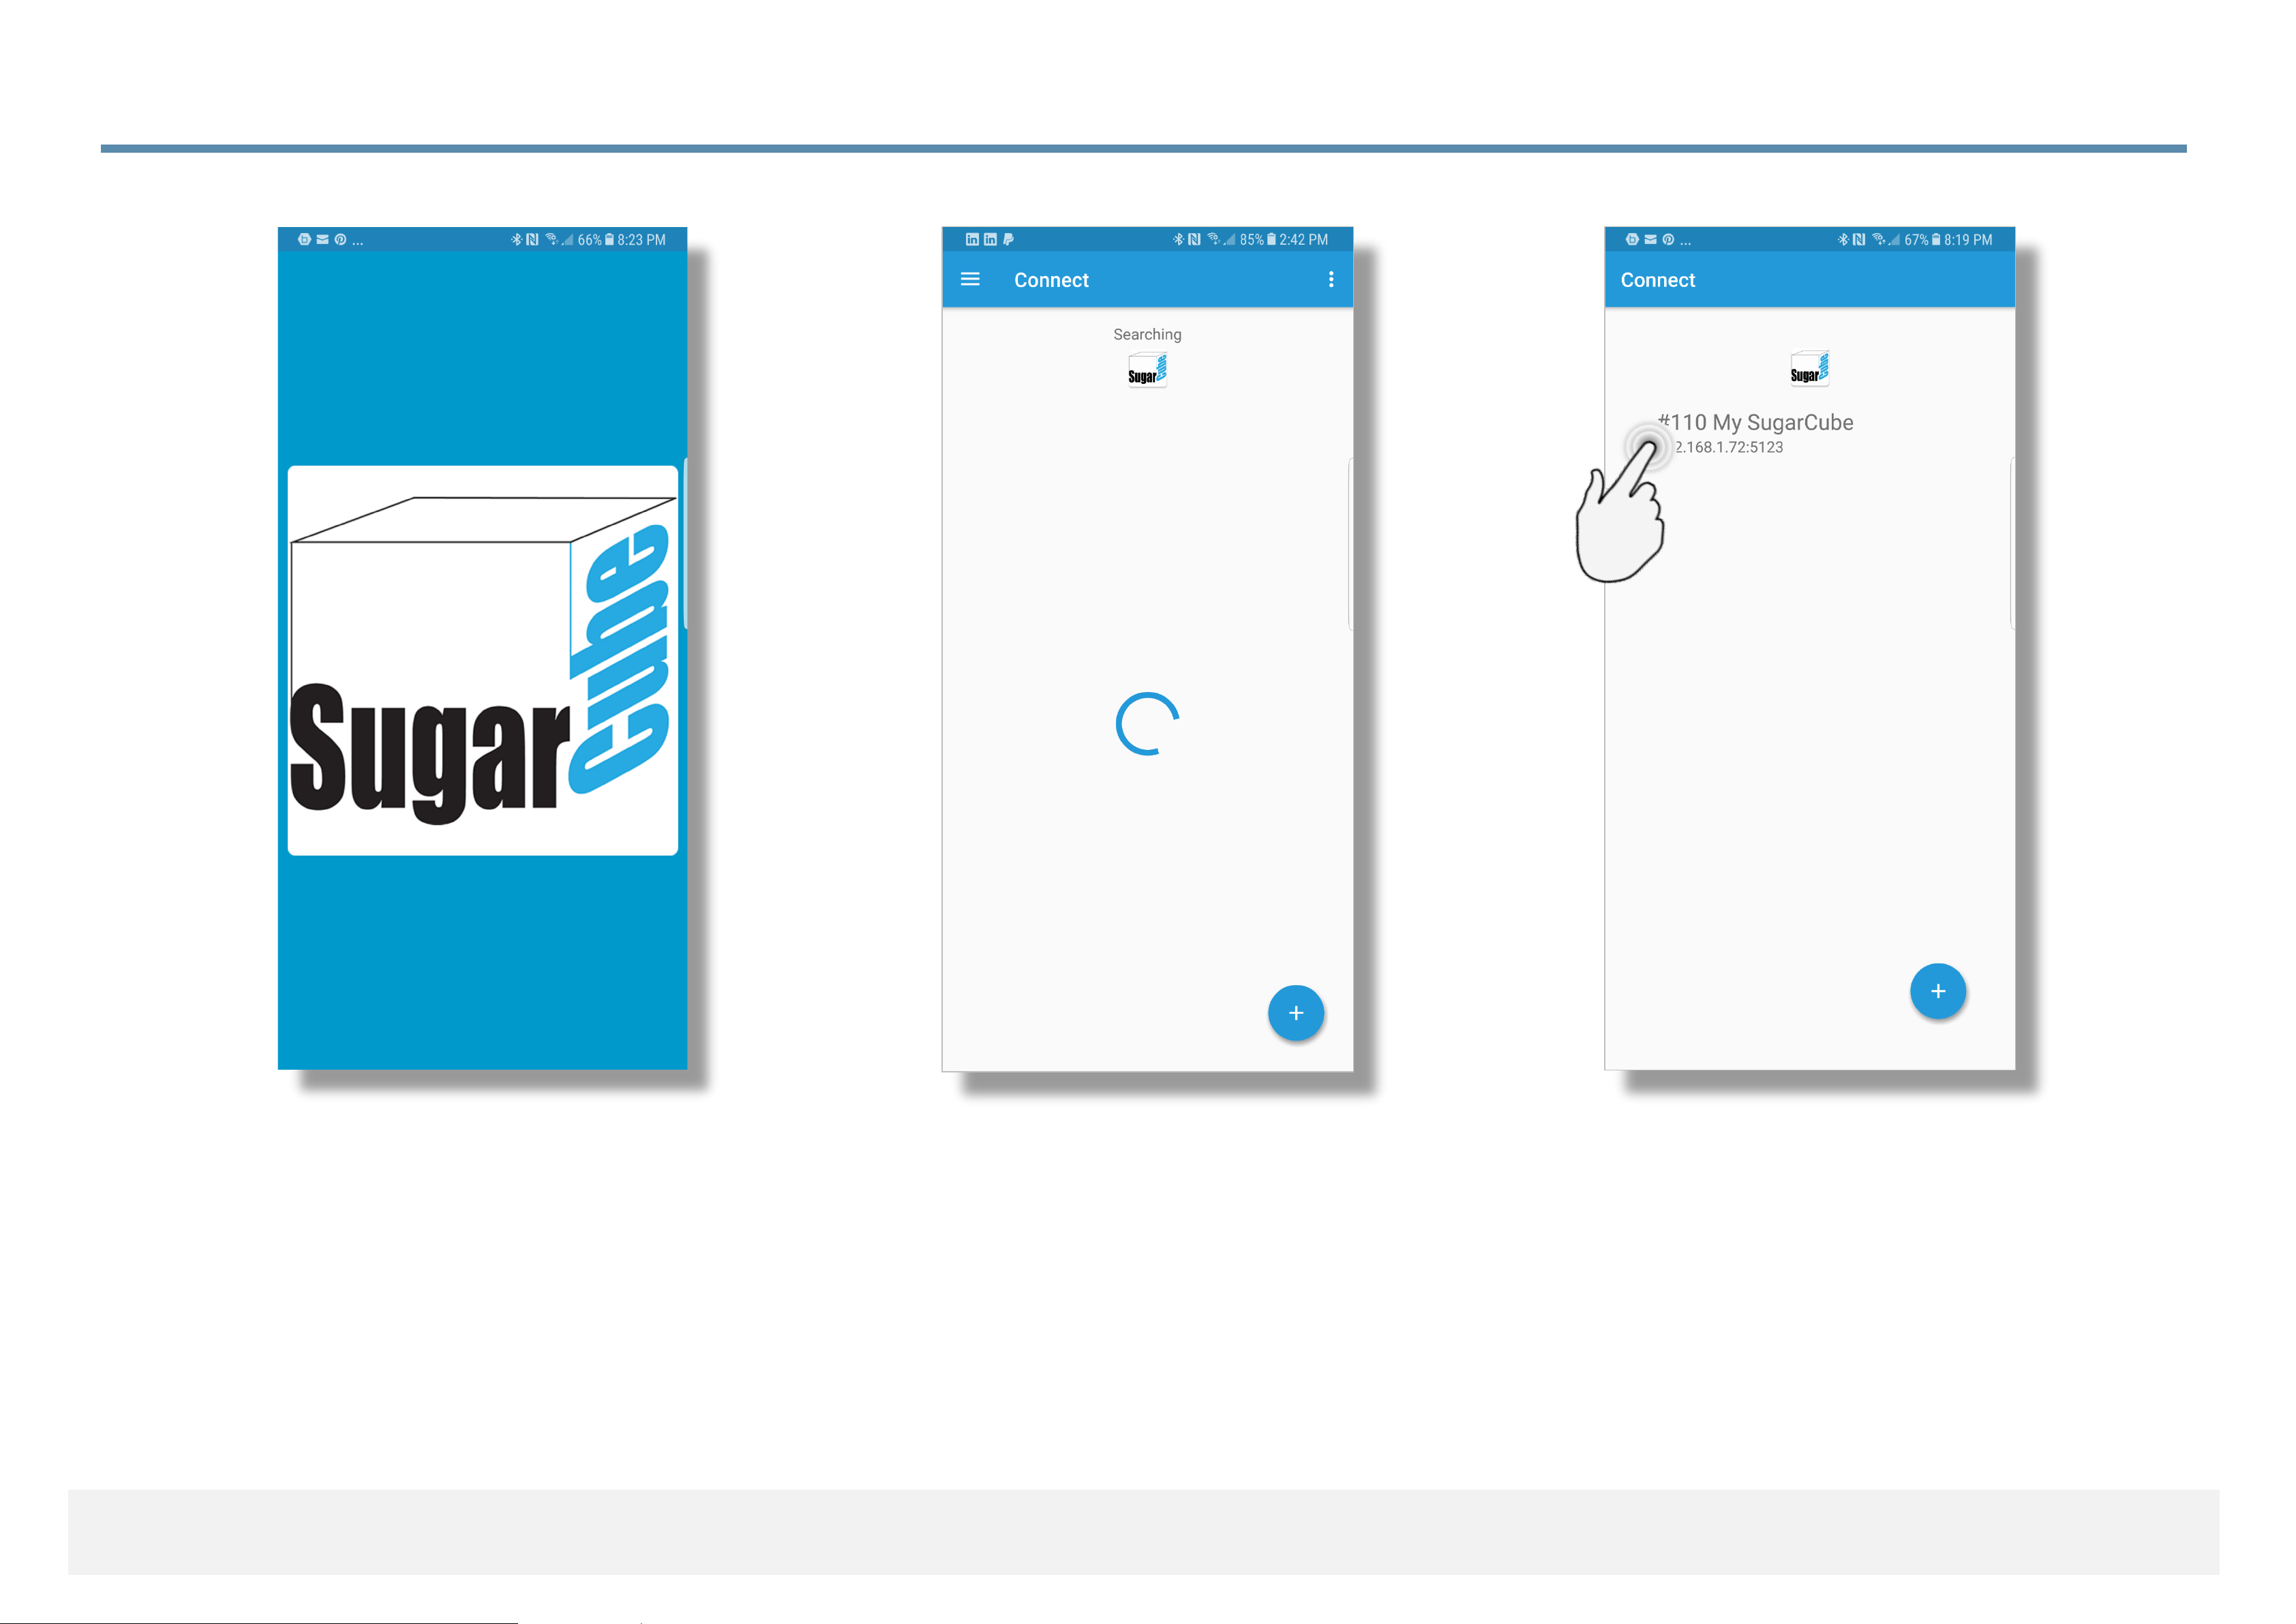
3.3.1 Connecting App with SugarCube on Wired Ethernet
(1) App is loading (2) App is searching for
SugarCubes on the LAN
(3) App has found a
SugarCube and will now
initiate a connection.
Apple iOS
Page 32
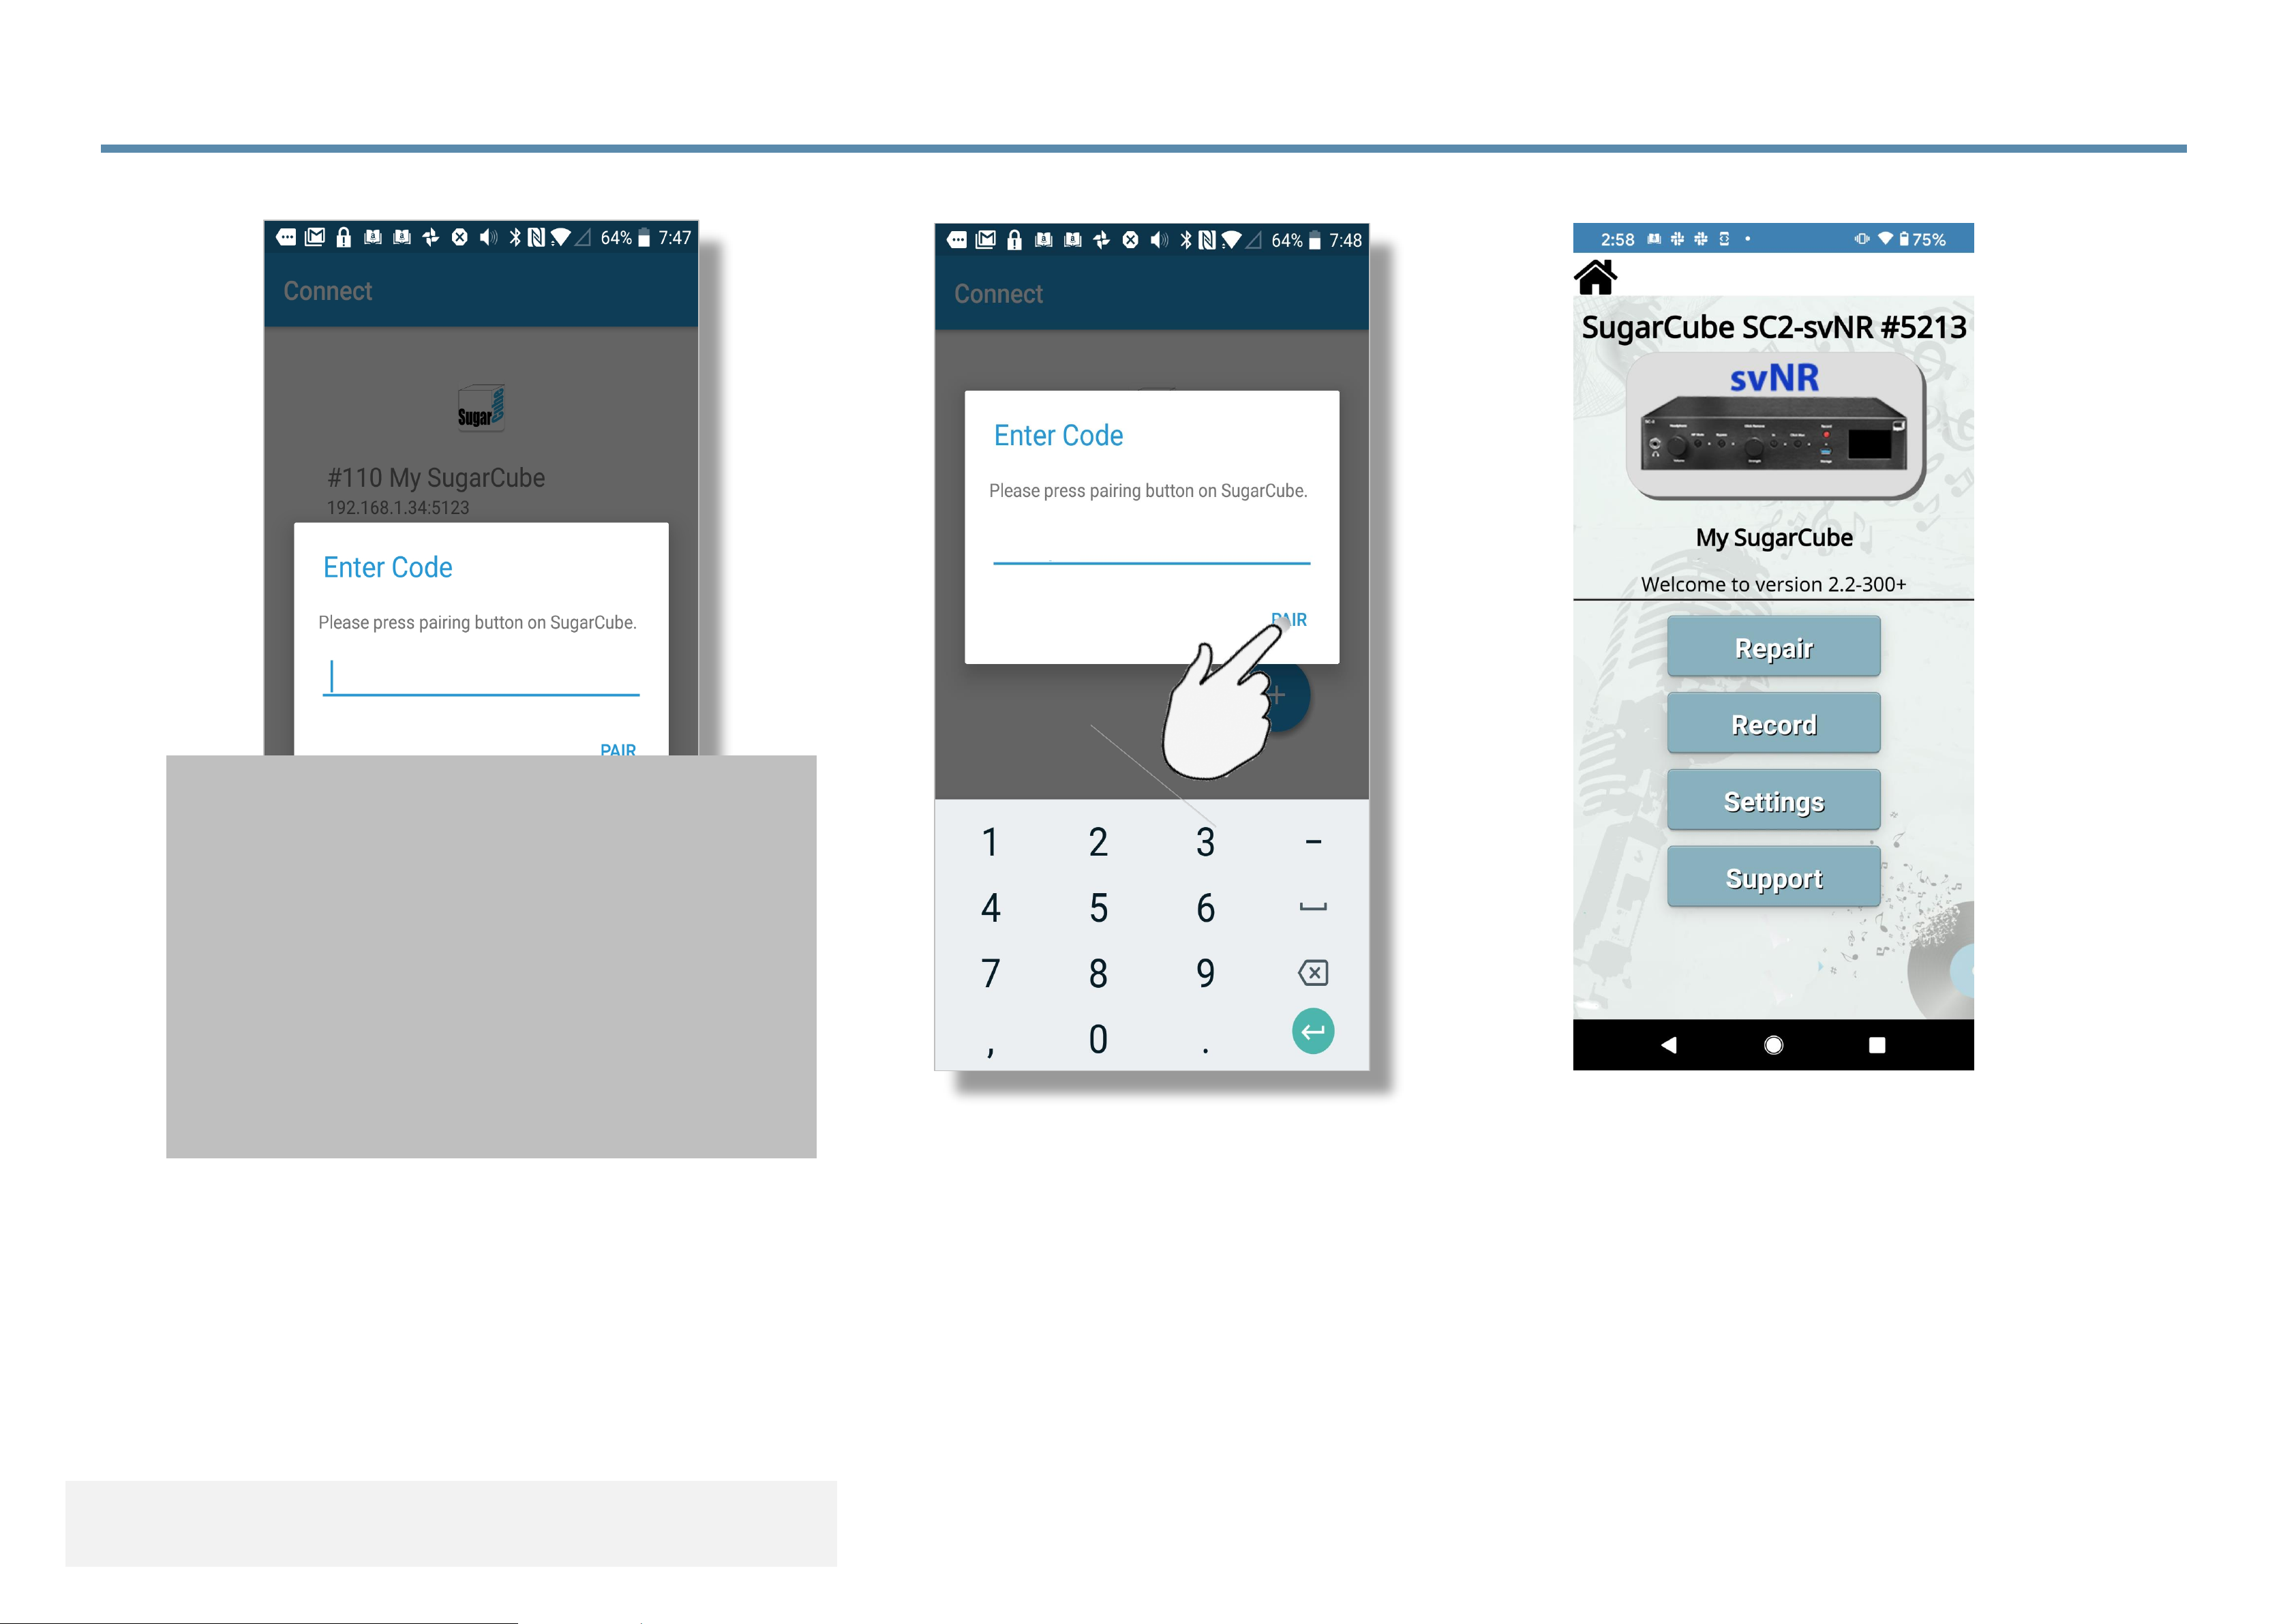
3.3.2 Connecting App with SugarCube on Wired Ethernet
(4) The app needs you to enter a
pairing code, press the knob on
the front panel.
(5) App needs you to enter
the pair code ‘1111’ or what is
displayed on the front panel
display then touch ‘PAIR’.
(6) App is linked to
SugarCube and ready
for use.
Apple iOS
For pairing, enter:
1 1 1 1
as a pairing code
(you may still get a code
from your SugarCube,
if you wish).
1111
Page 33
192.168.1.nnn
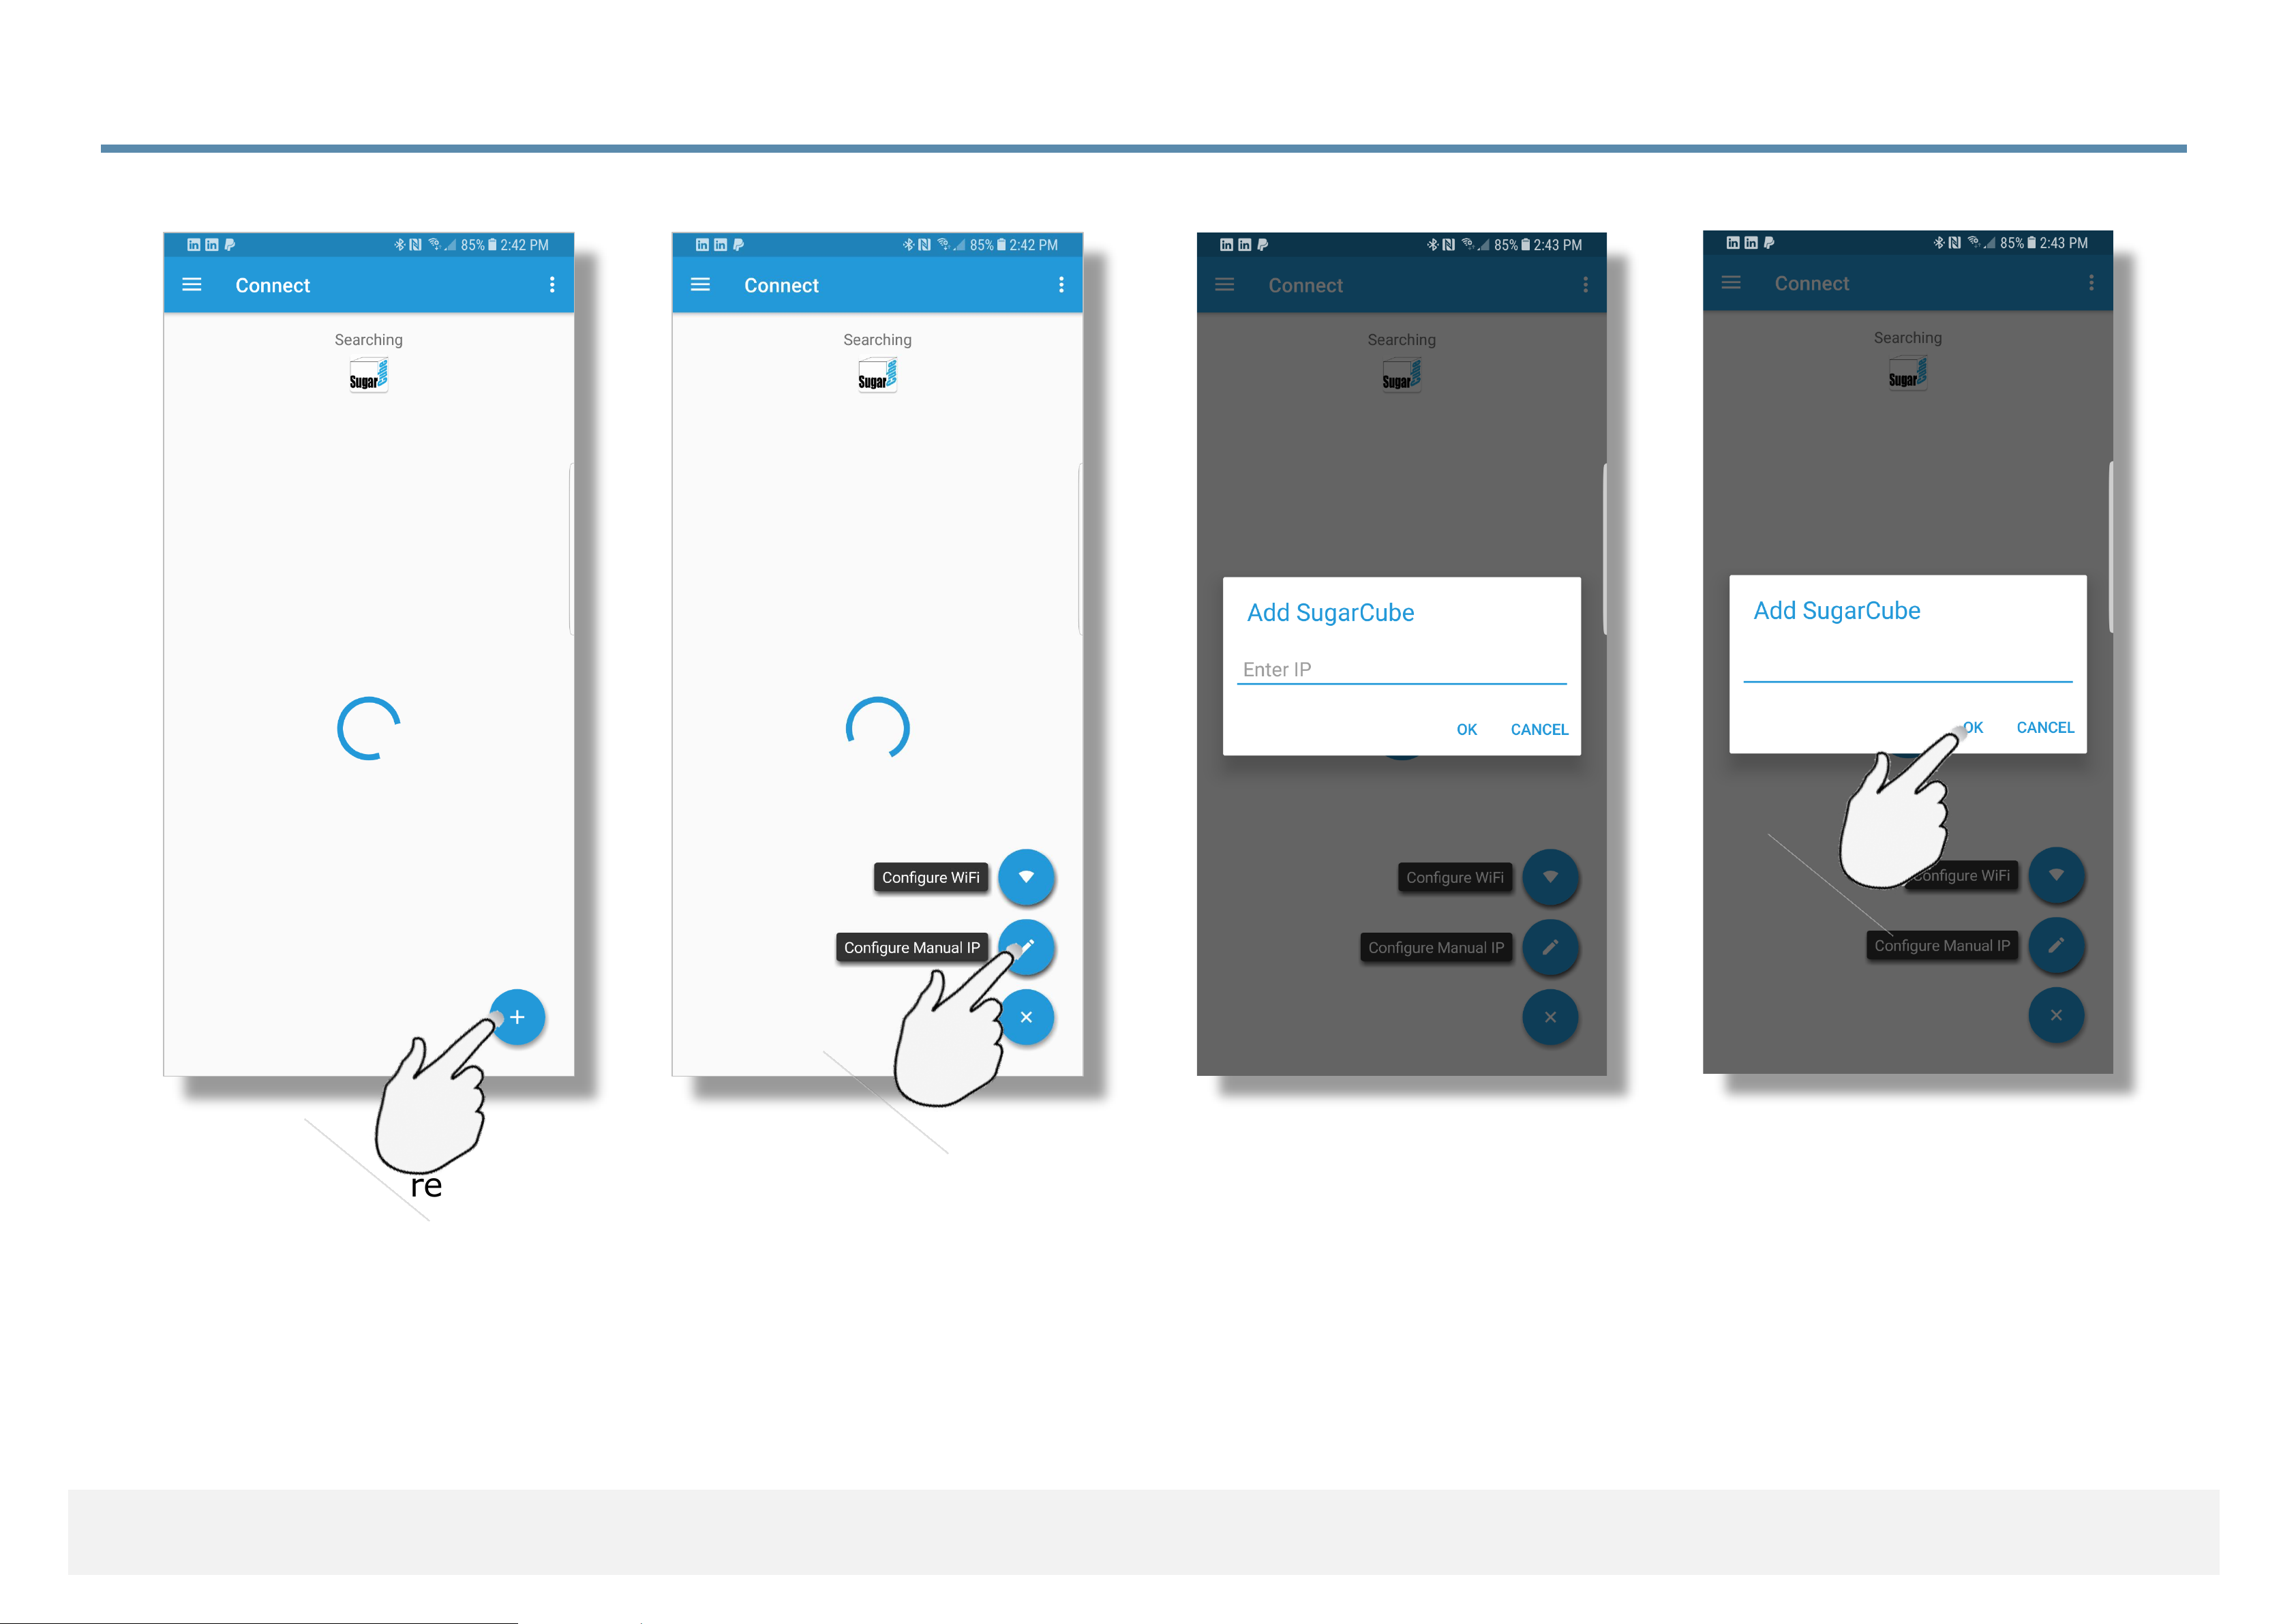
3.3.3 Connecting App with SugarCube Using IP Address
(1) If, for any reason,
you wish to manually
connect to your SugarCube
touch the menu
button in the lower
right of the screen.
(2) Select ‘Configure
Manual IP’.
(3) You will then see a
window to enter the IP
address of the SugarCube.
This address can be seen
by pressing and holding
‘Bypass’ for a few seconds.
(4) Enter the IP address
as displayed on the front
panel display.
Apple iOS
Page 34
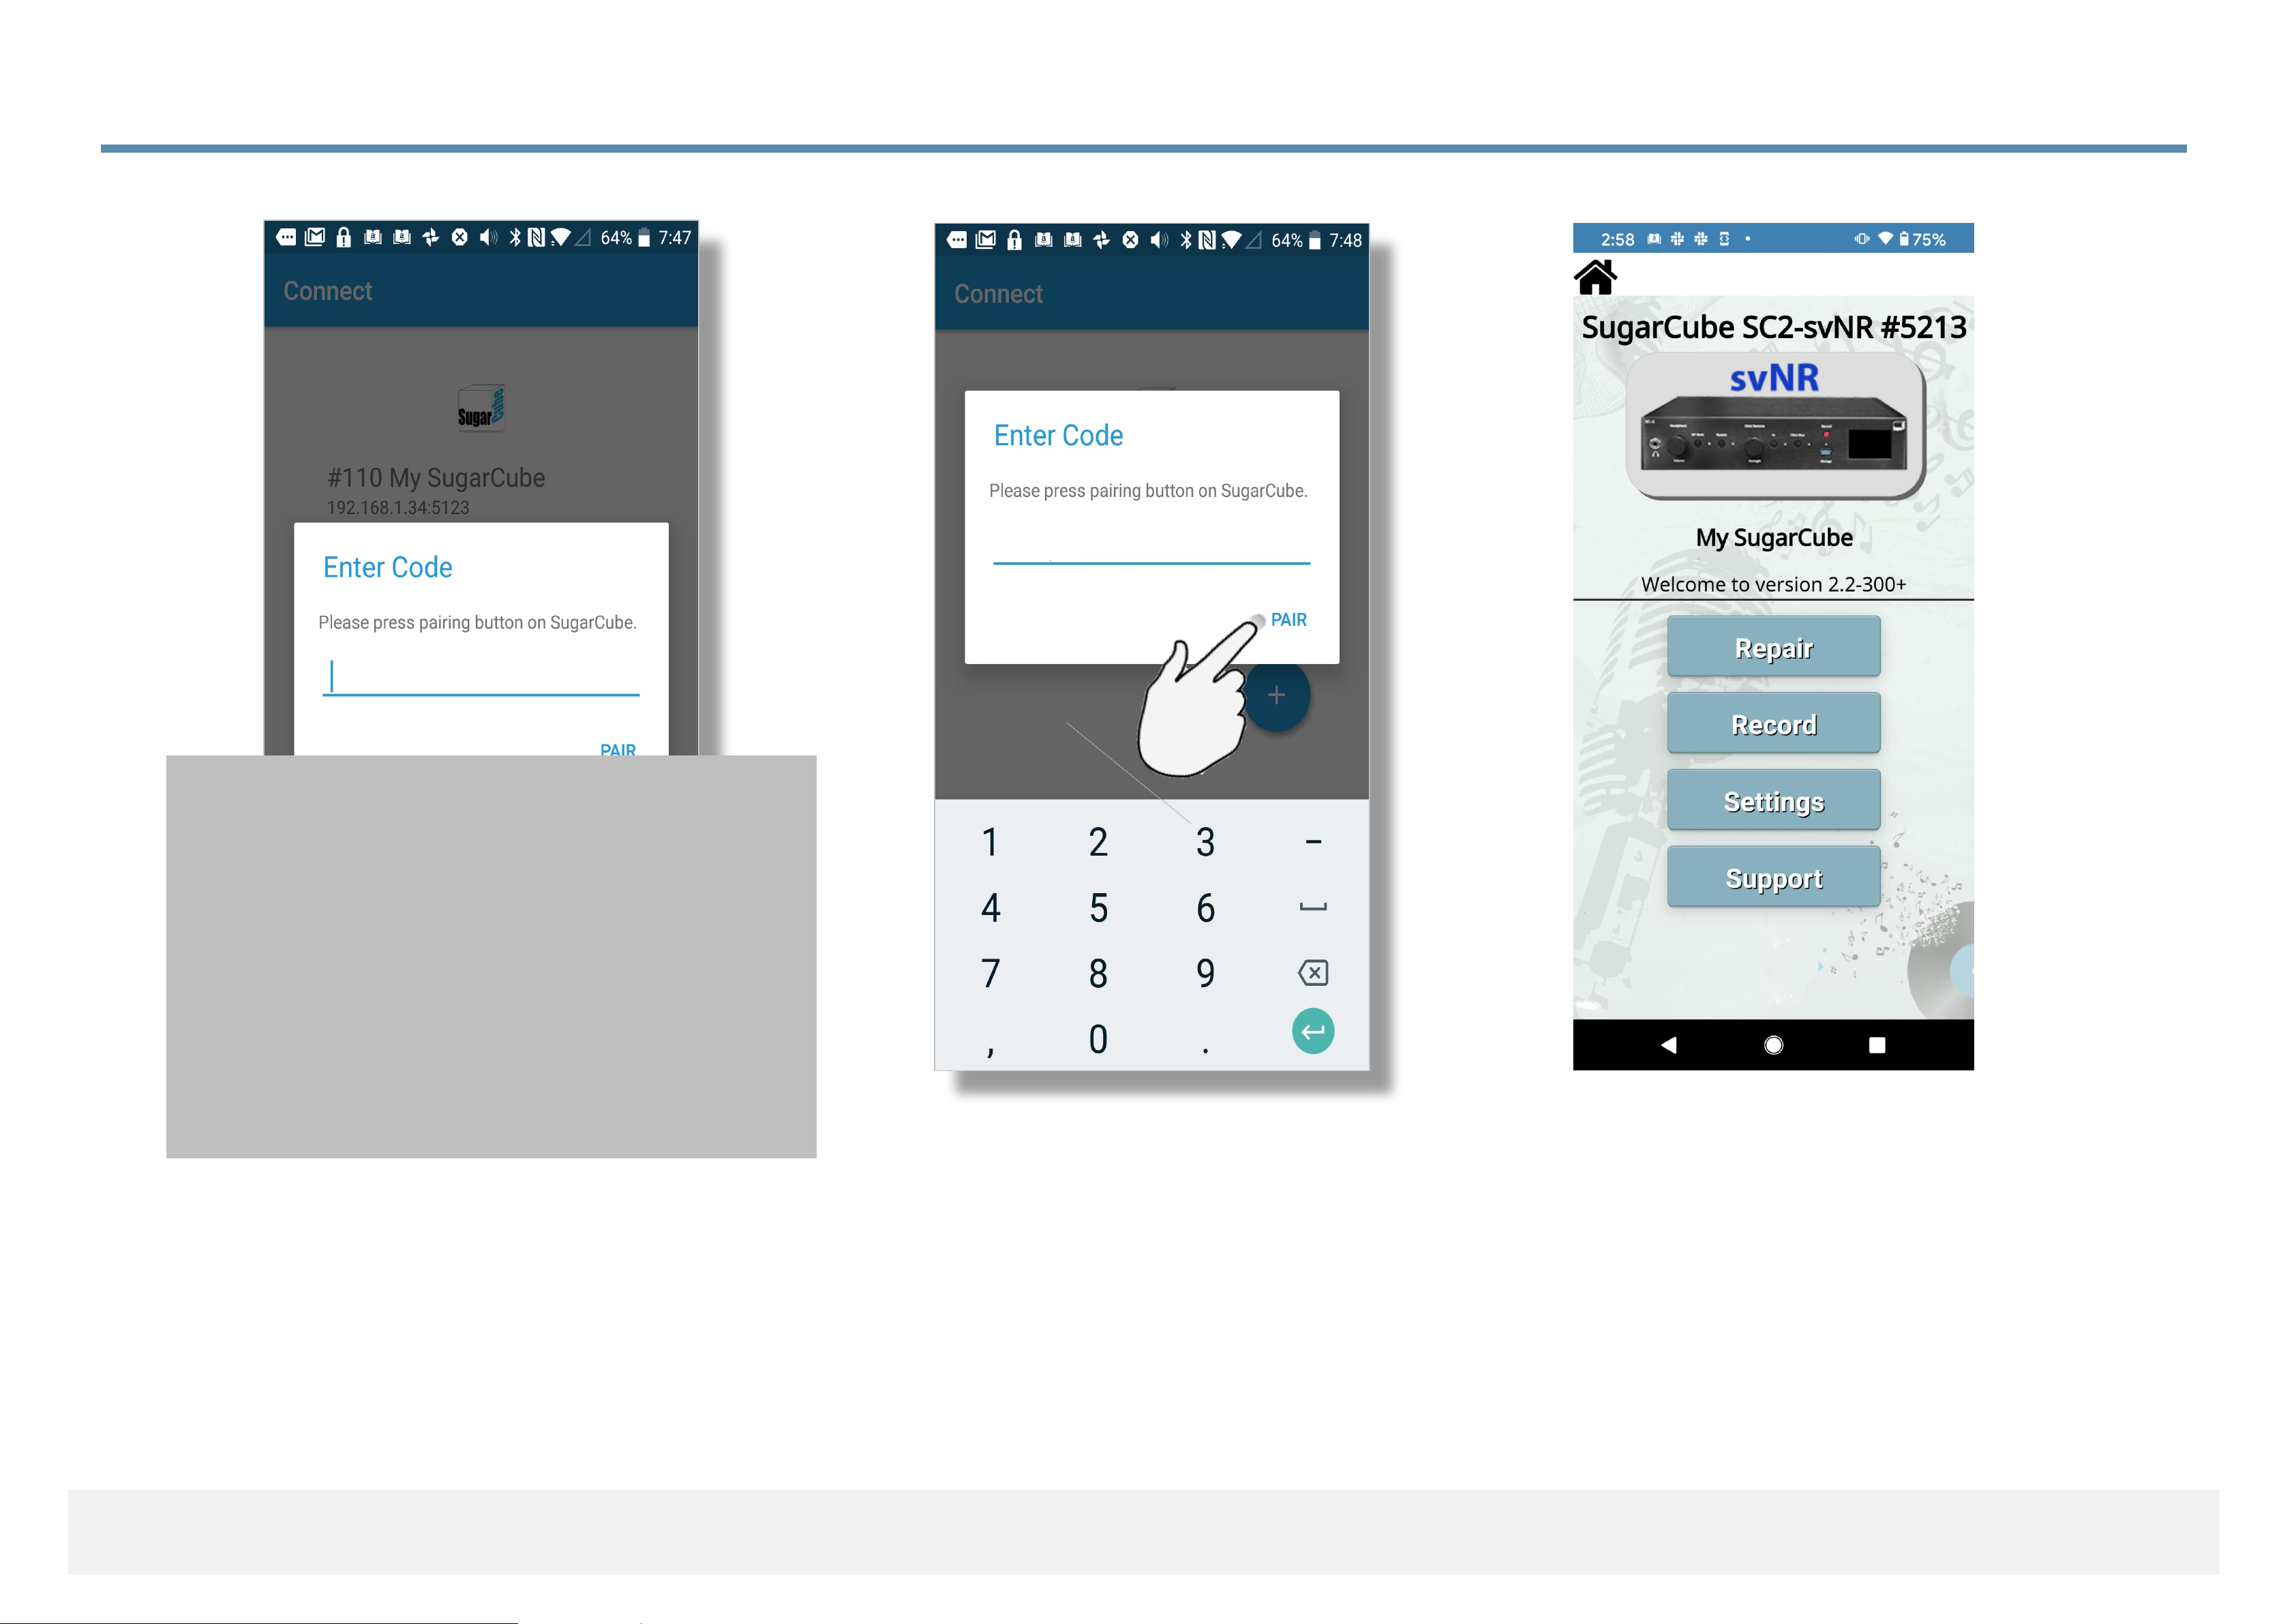
3.3.4 Connecting App with SugarCube Using IP Address
(5) The app need you to press
the knob on the front panel.
(6) App needs you to enter
the pair code displayed on
the front panel display then
touch ‘PAIR’.
(7) App is linked to
SugarCube and ready
for use.
Apple iOS & Android
1111
For pairing, enter:
1 1 1 1
as a pairing code
(you may still get a code
from your SugarCube,
if you wish).
Page 35

3.3.5 Setting up iOS device to control SugarCube with WiFi
1. iPhone, iPad, Touch.
2. Network with WiFi your Apple device can communicate with and that can be connected
to your SugarCube with WiFi or wired Ethernet.
3. From the Apple App Store, you will be able to download the ‘SugarCube’ app to your
Apple mobile device. (Look for: SugarCube by SweetVinyl.)
4. The WiFi dongle supplied with your SugarCube.
Apple iOS
Page 36
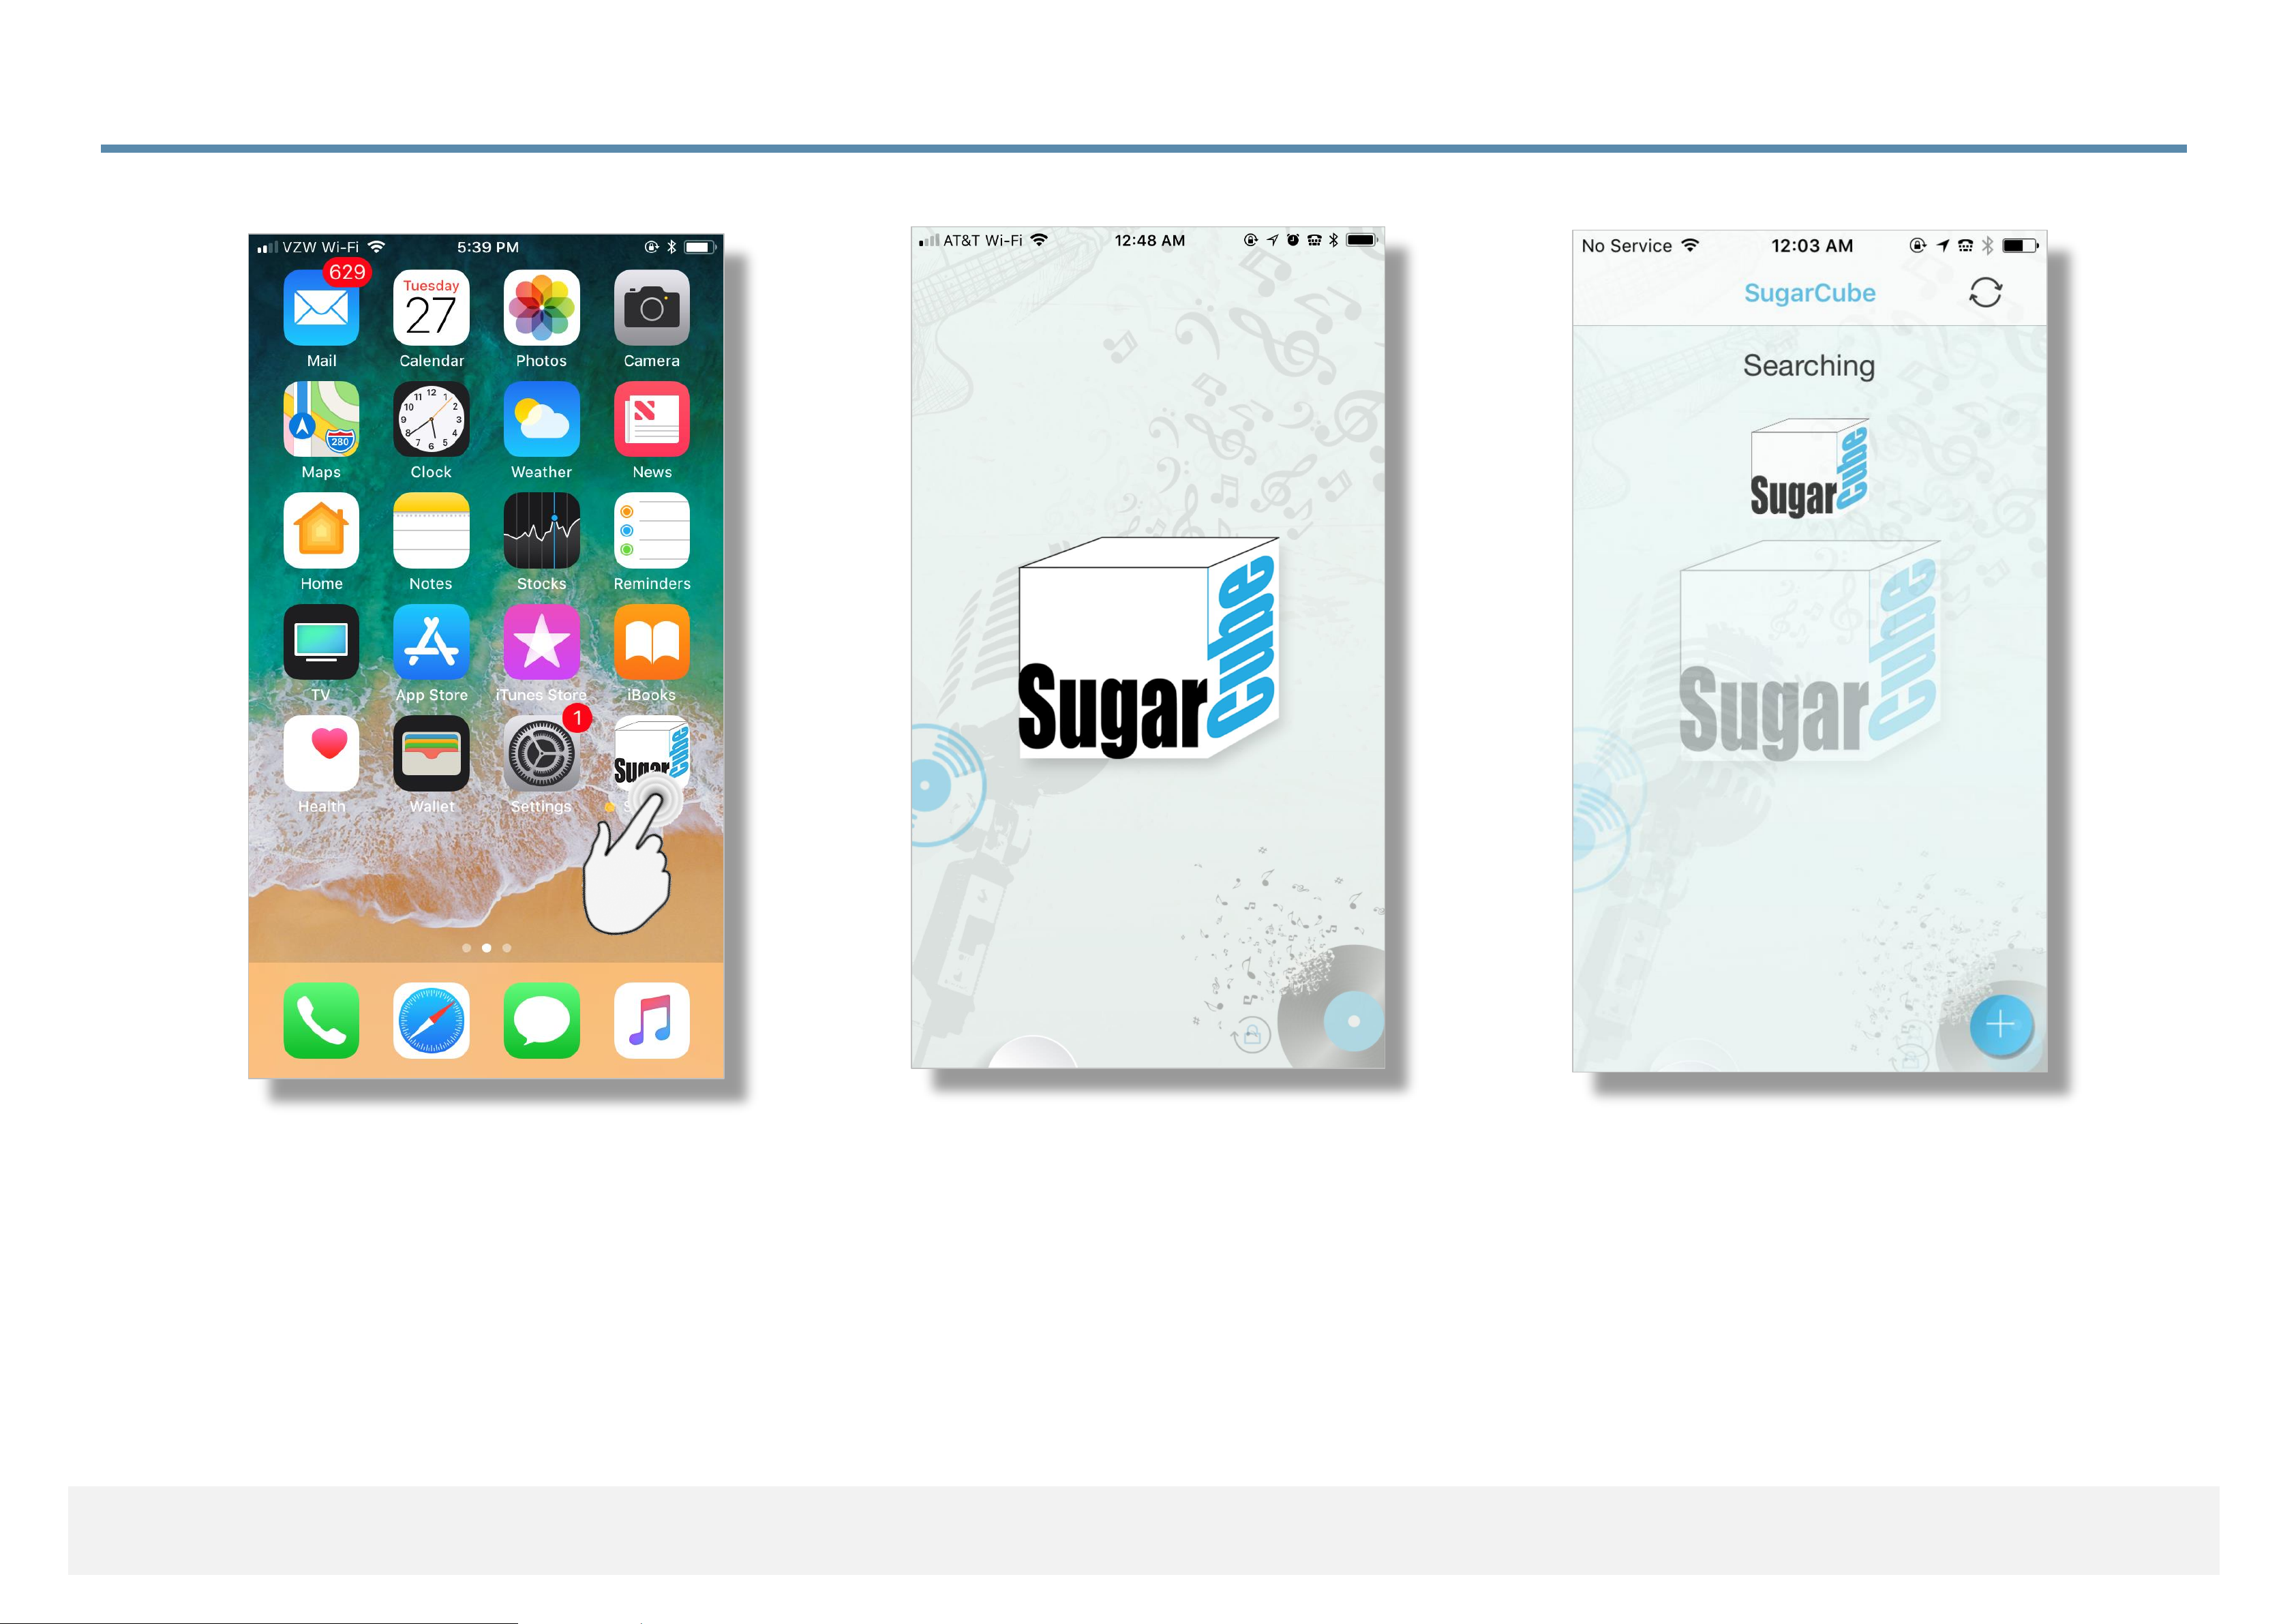
3.3.6 Connecting App with SugarCube on WiFi
(1) Launch the SugarCube app
(2) App is loading
(3) App is searching for
SugarCubes already setup
on the LAN if any. For the
first time user, nothing will
be found, of course.
Apple iOS
Page 37
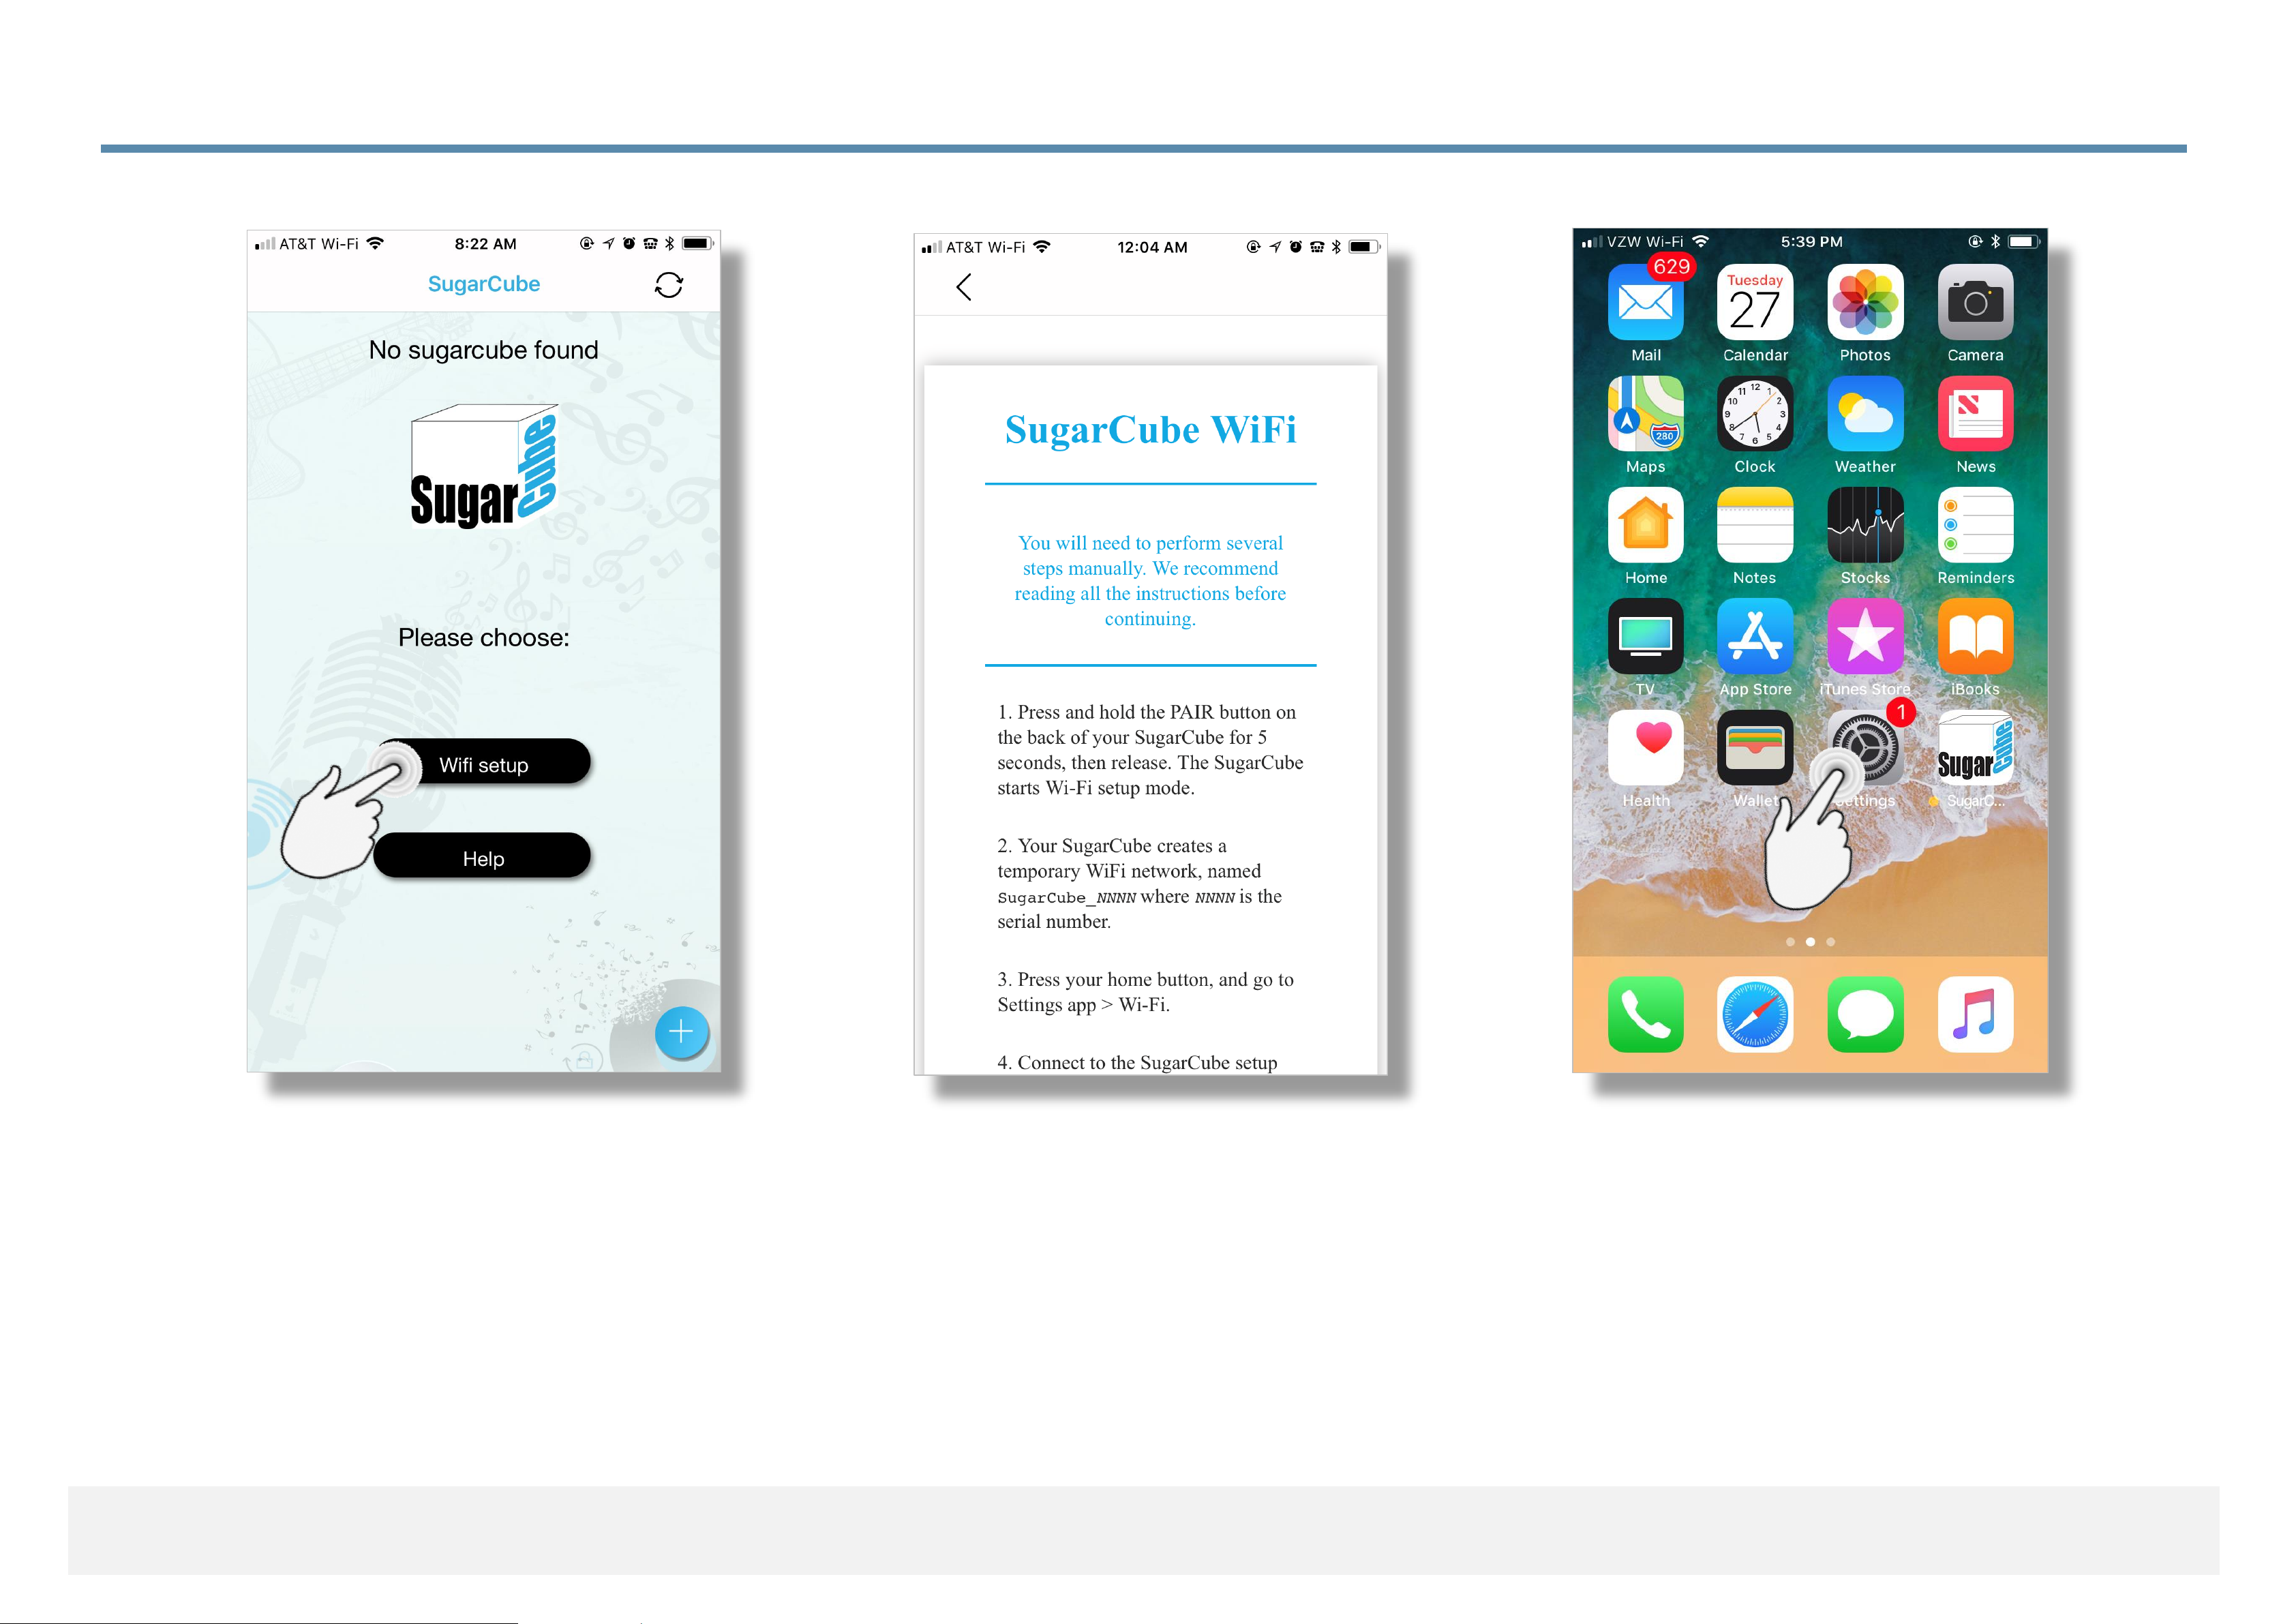
3.3.7 Connecting App with SugarCube on WiFi
(4) No SugarCube is found
so the app offers the option
to run WiFi setup.
Apple iOS
(6) The instructions direct the
user to press the ‘Home’ key to
get back to the ‘Home’ screen
and then launch ‘Setup’.
(5) The user is instructed to
press and hold the front panel
knob for 5 seconds to put the
SugarCube into ‘WiFi Setup Mode’
which will be displayed on the
front panel.
Page 38
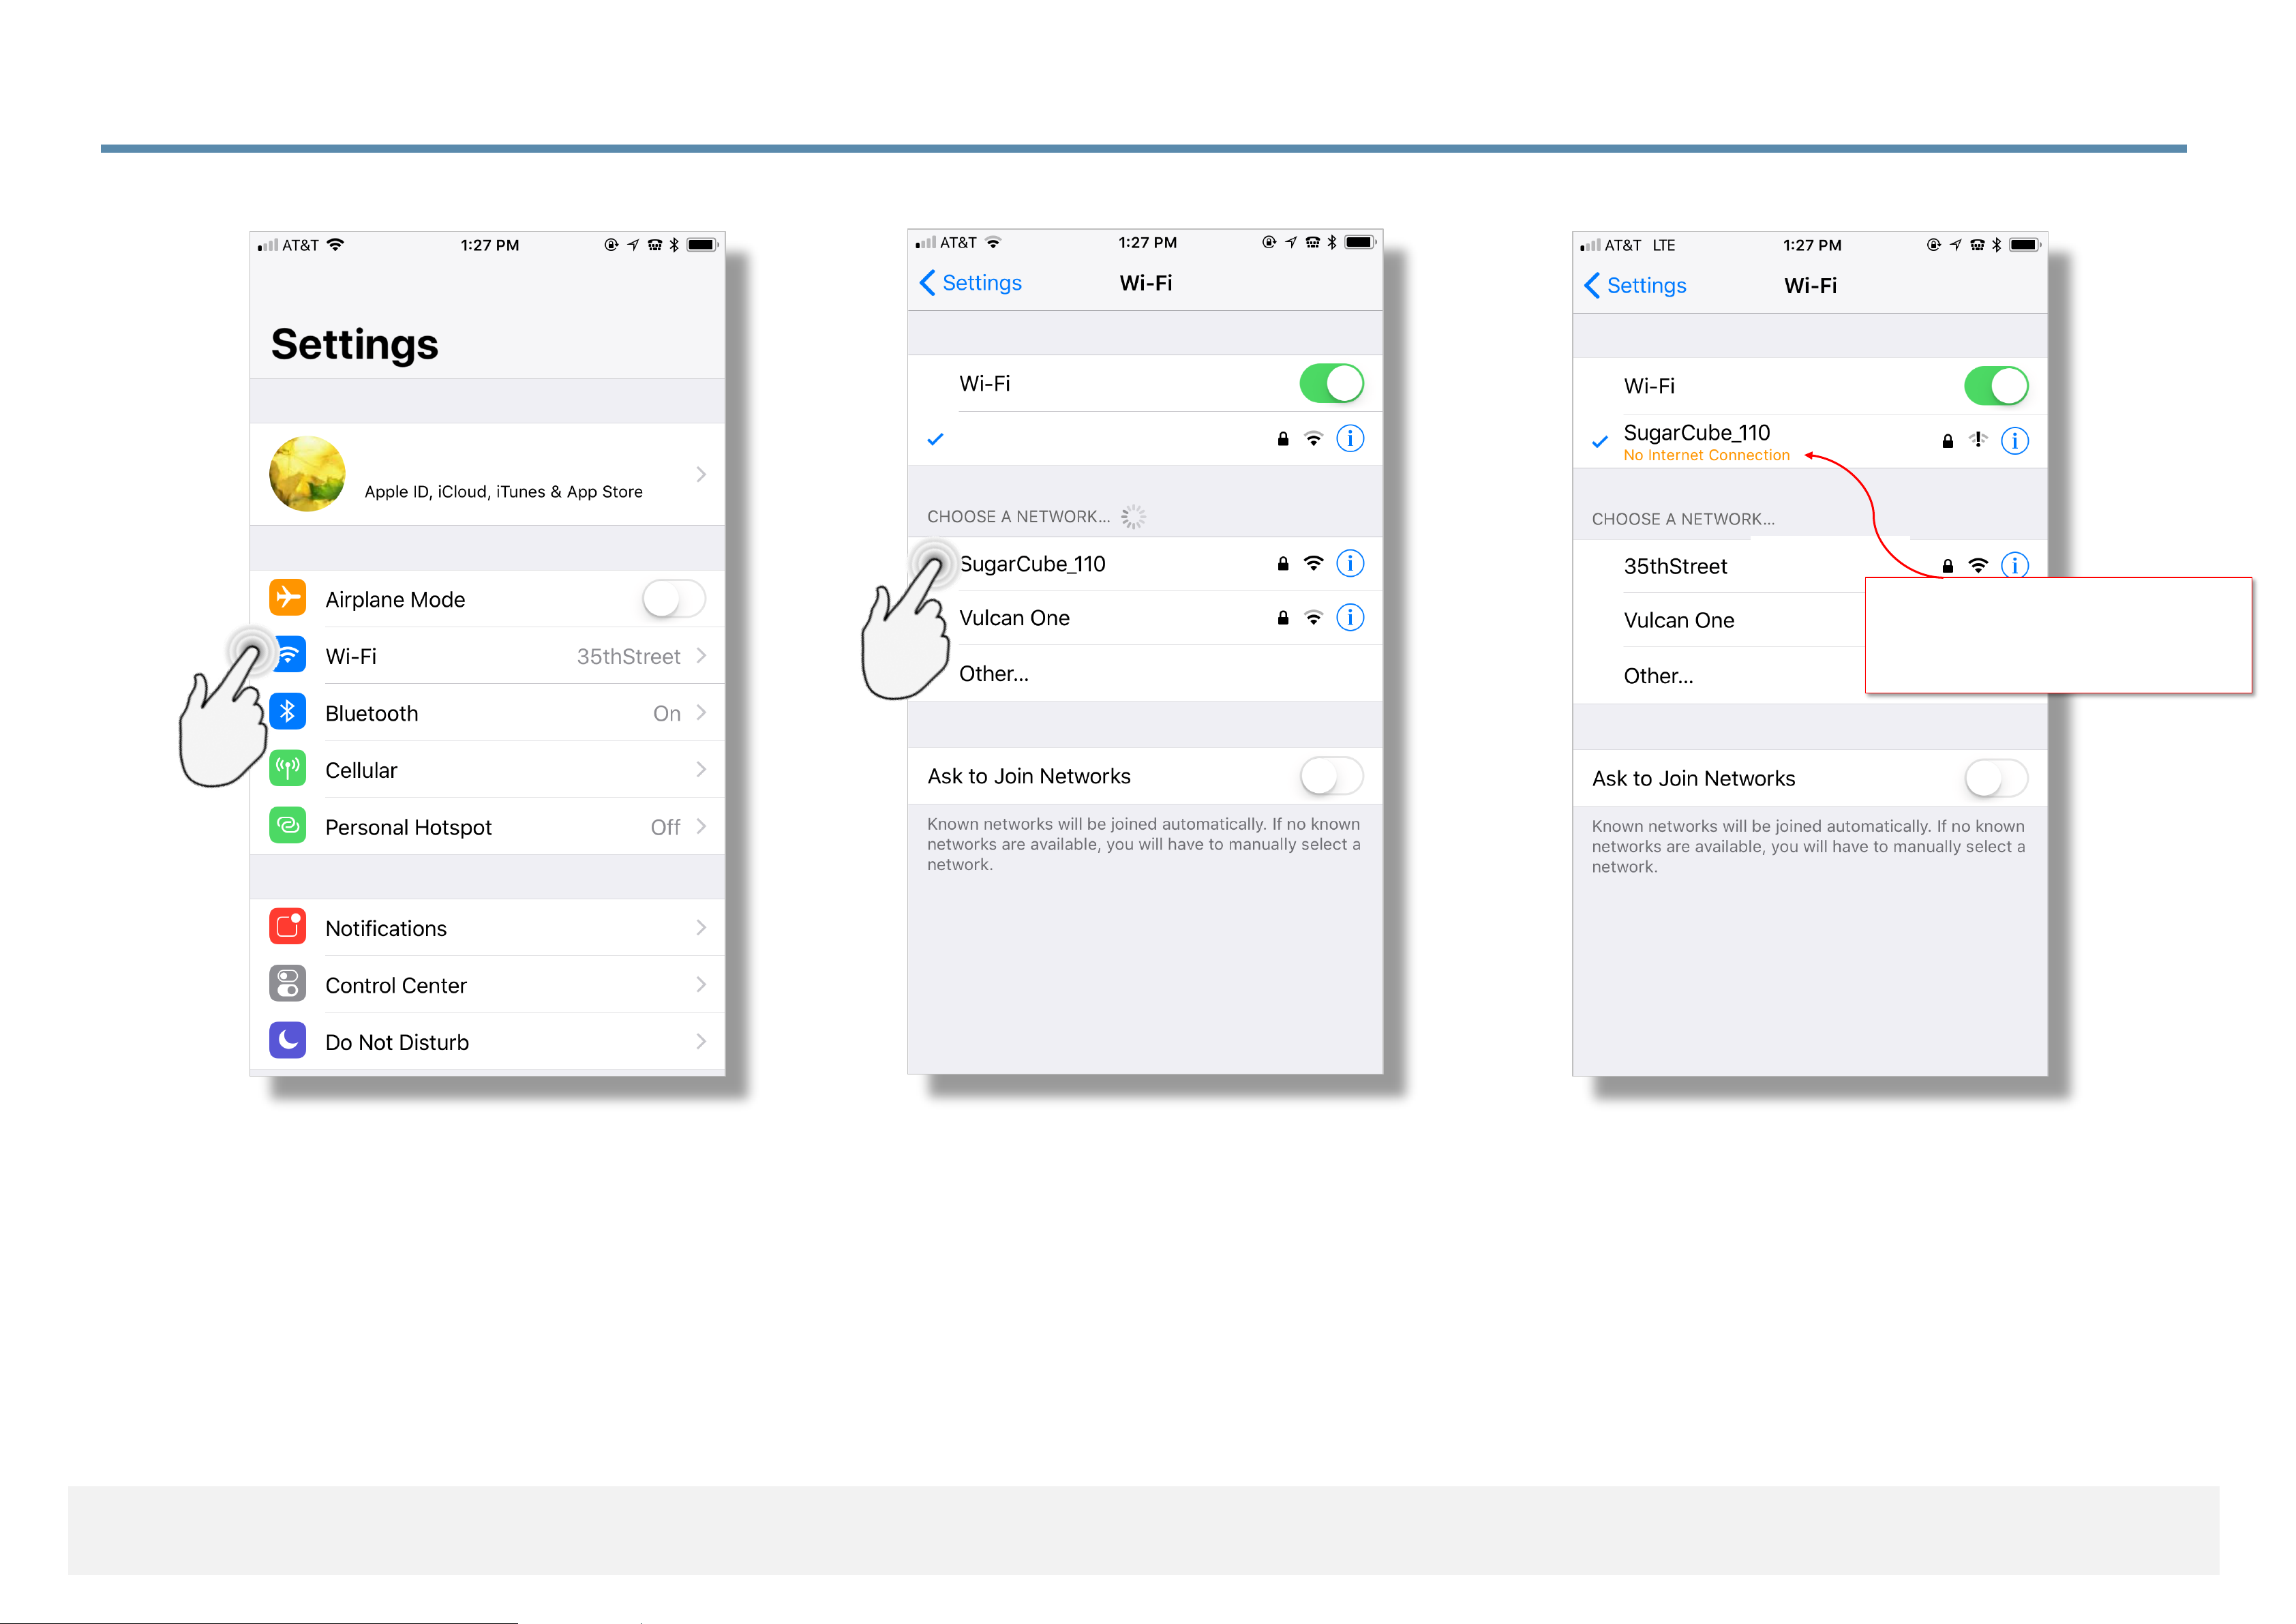
3.3.8 Connecting App with SugarCube on WiFi
(7) When in ‘Settings’, select
‘WiFi’
(8) Select ‘SugarCube_nnnn’,
(whatever number appears
after ‘SugarCube_’ is your
device’s serial number)
(9) With the
‘SugarCube_nnnn’ selected,
your SugarCube is now
temporarily acting as an access
point.
Hapi Apelusr
55th Street
55th Street
(NOTE: ‘No Internet Connection’
is normal)
Apple iOS
Page 39
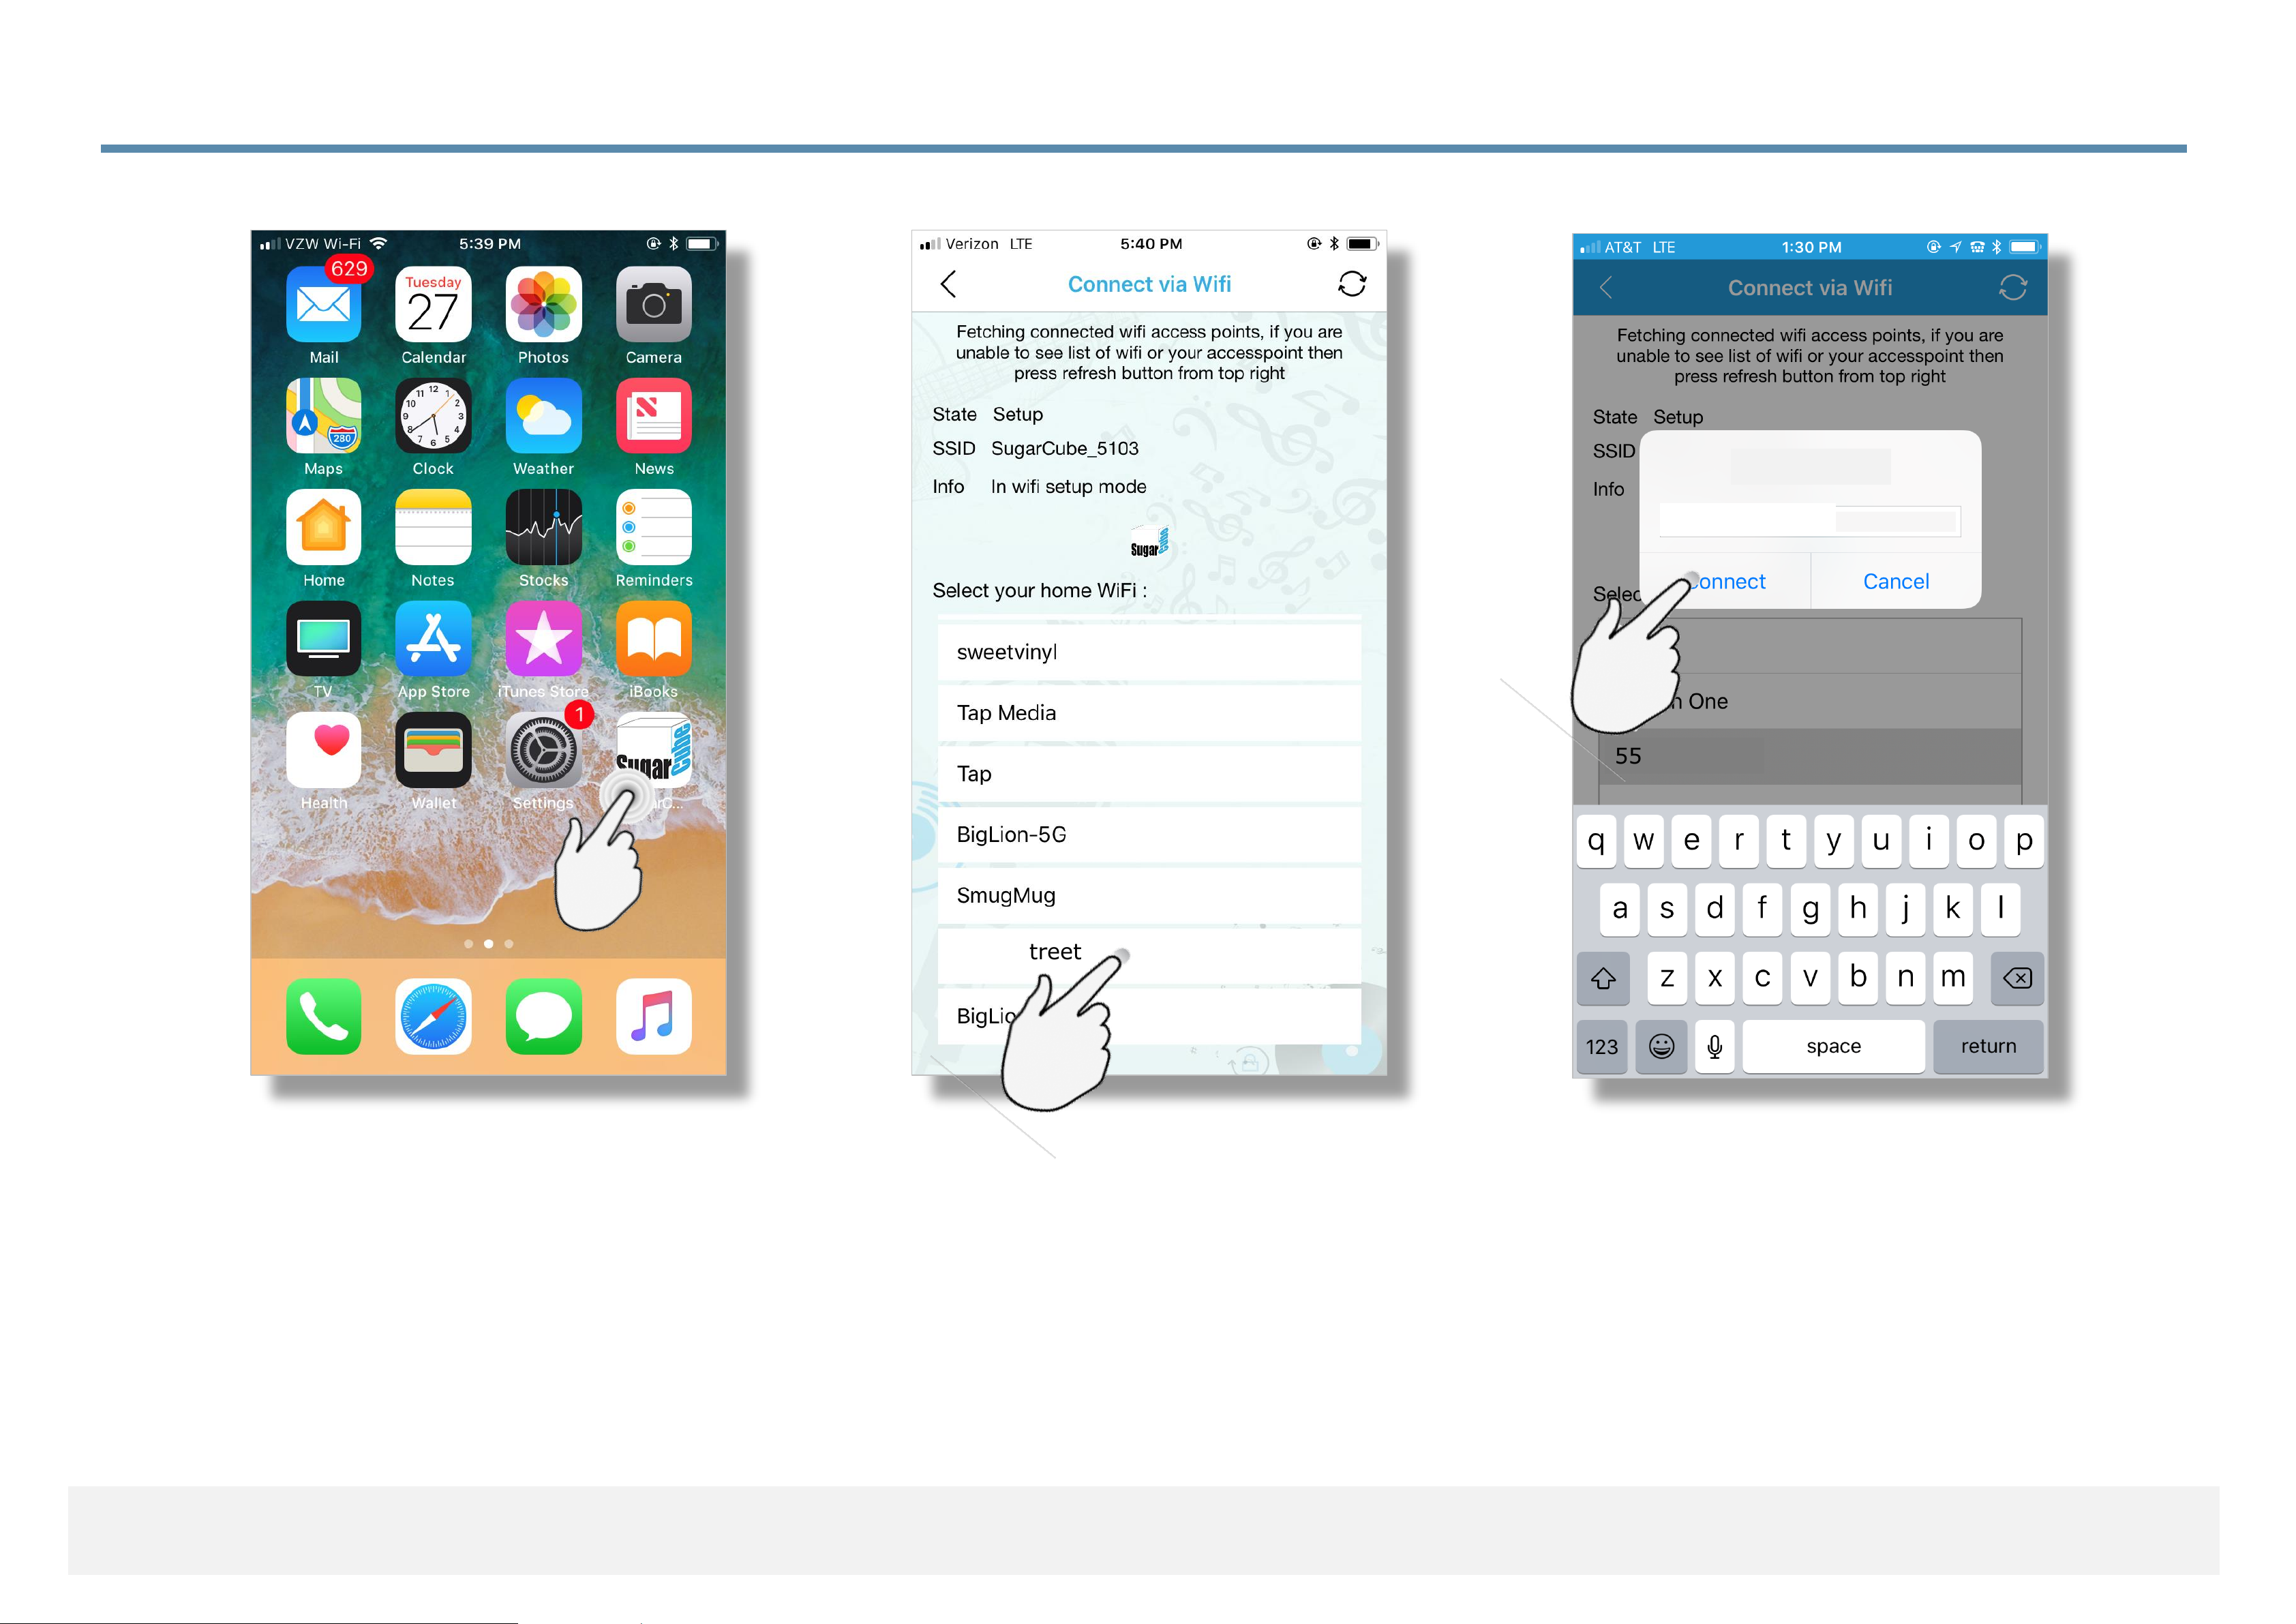
3.3.9 Connecting App with SugarCube on WiFi
(11) Select the WiFi network
that you wish to use
(10) Relaunch the SugarCube
app
(12) Enter the WiFi password
for your network
55th Street
secretagentman
55th Street
55th Street
Apple iOS
Page 40
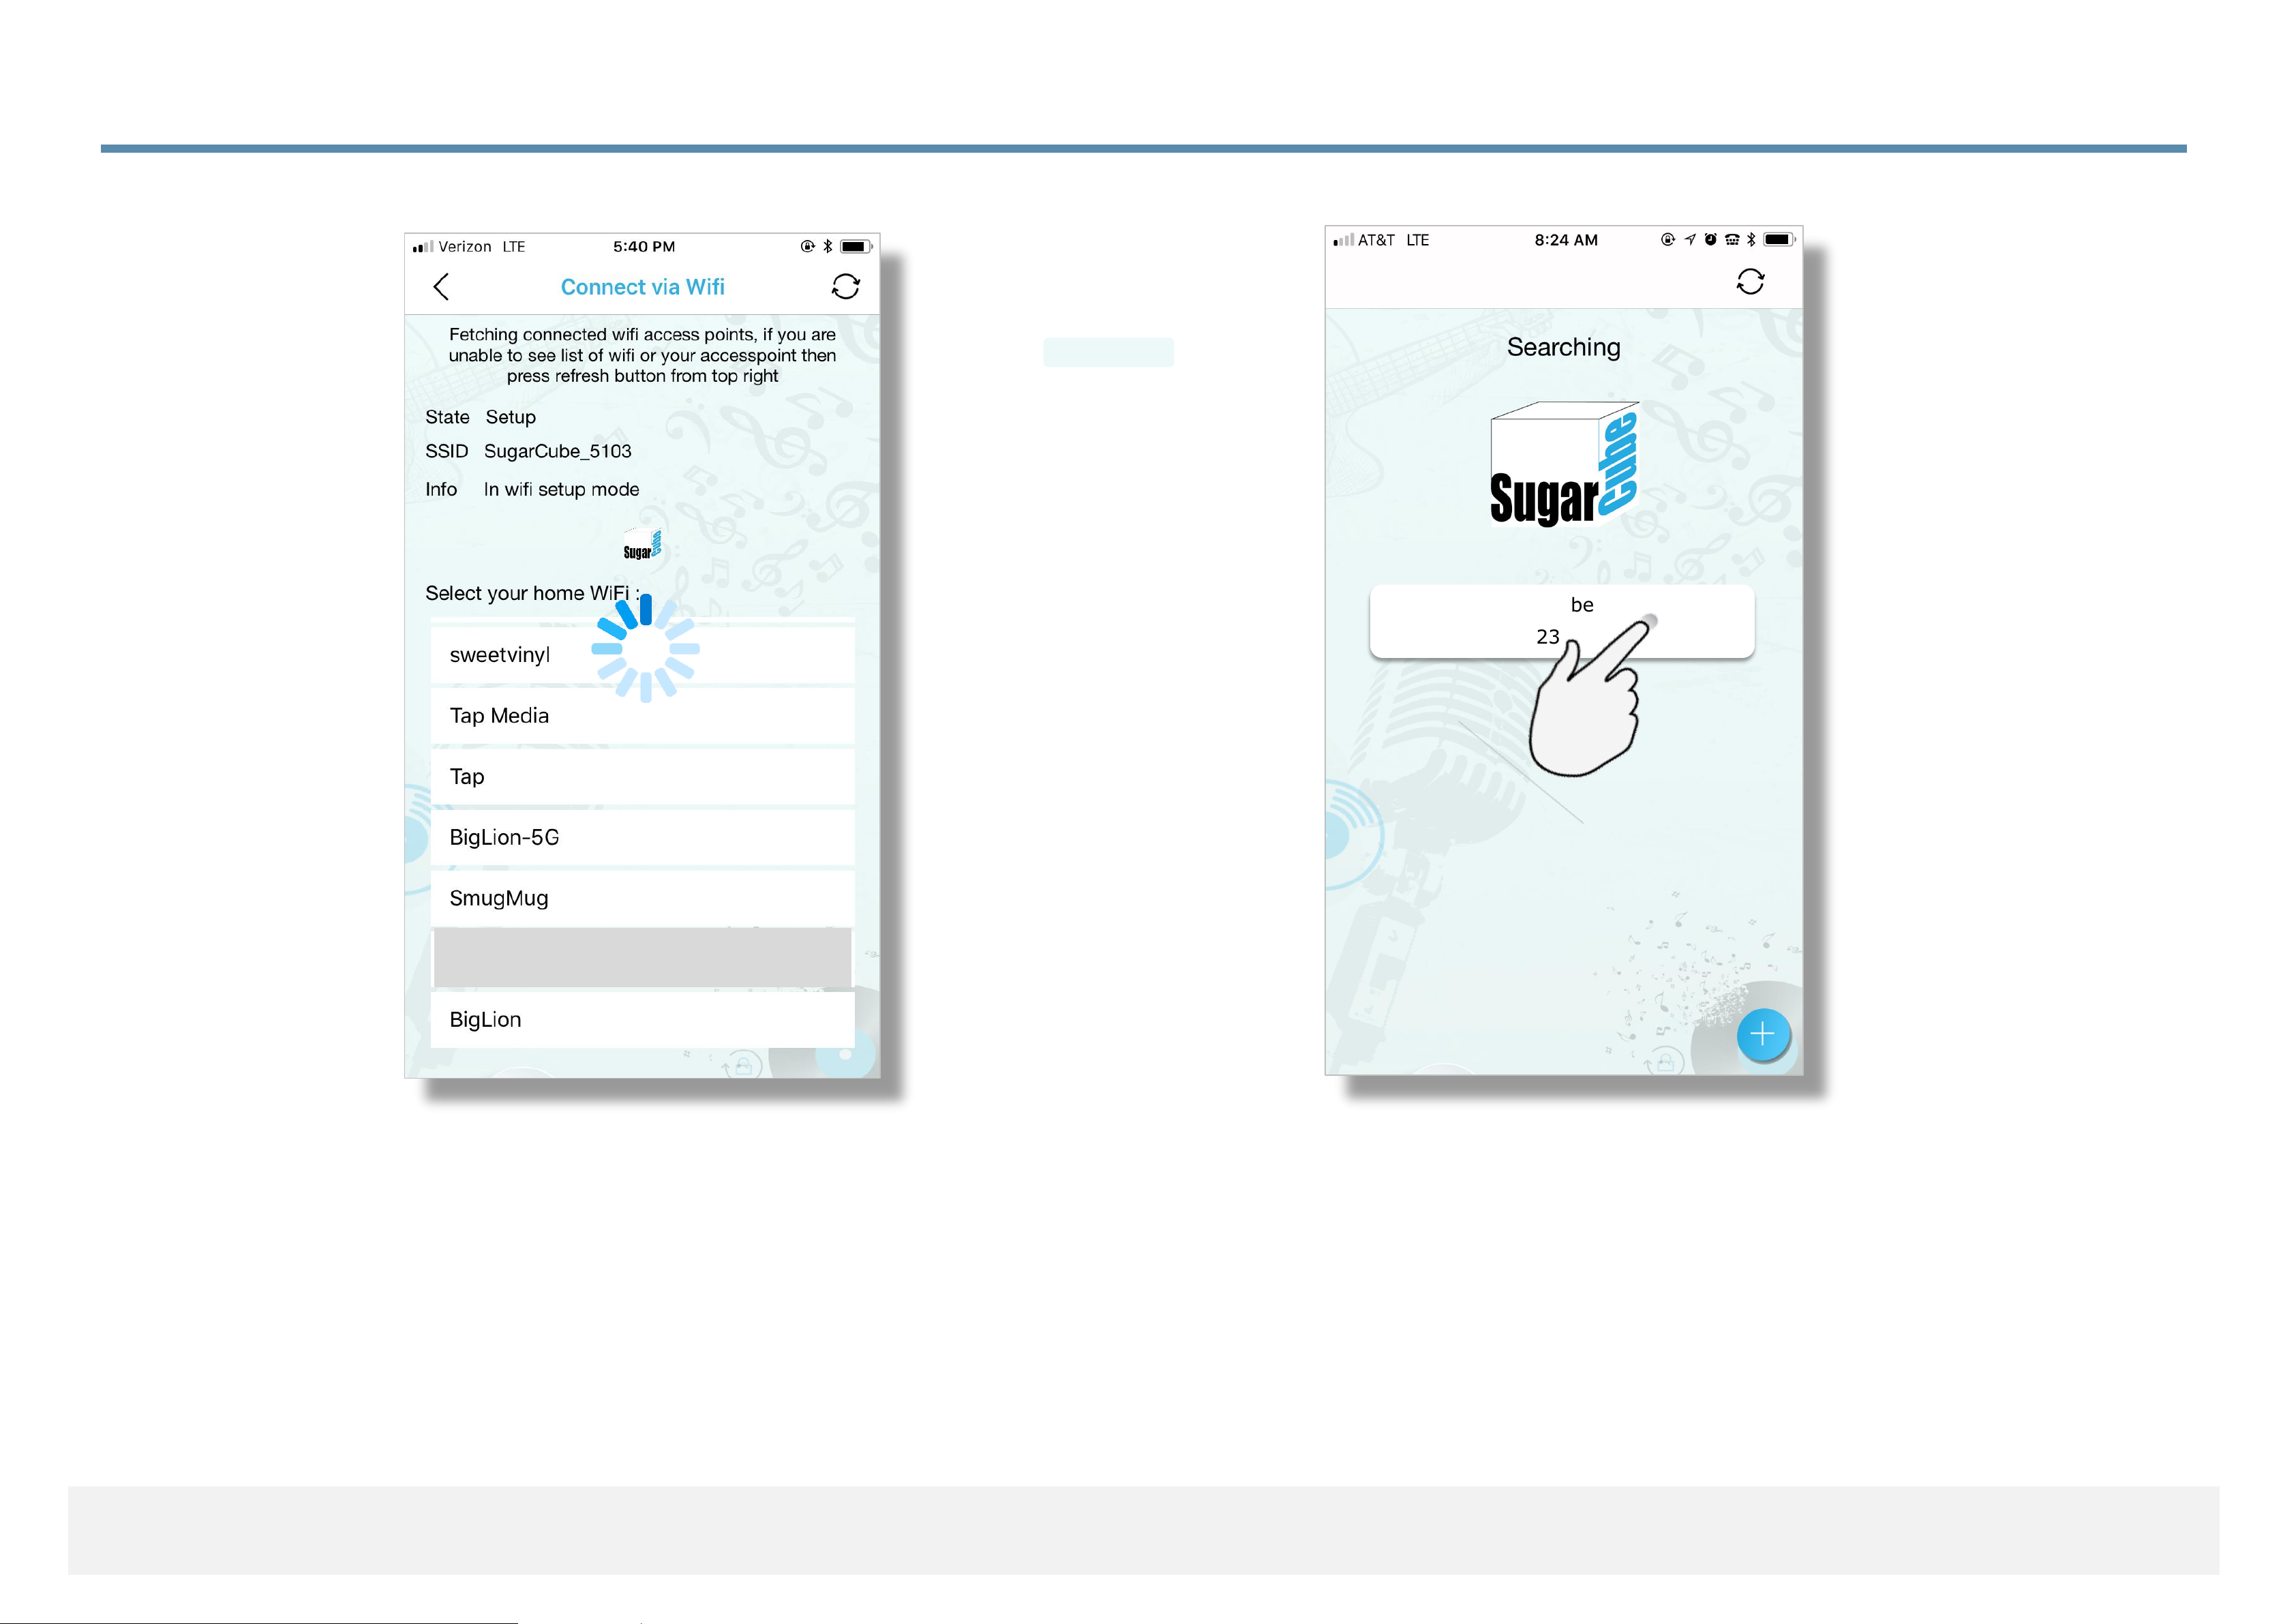
3.3.10 Connecting App with SugarCube on WiFi
(14) The app will then
display the SugarCube(s)
found on your network. Select
the appropriate device.
(13) The app will now complete
the connection to your WiFi
network and also do a little
housekeeping.
#5072 My SugarCube
192.168.1.6:5123
Connect
55th Street
Apple iOS
Page 41
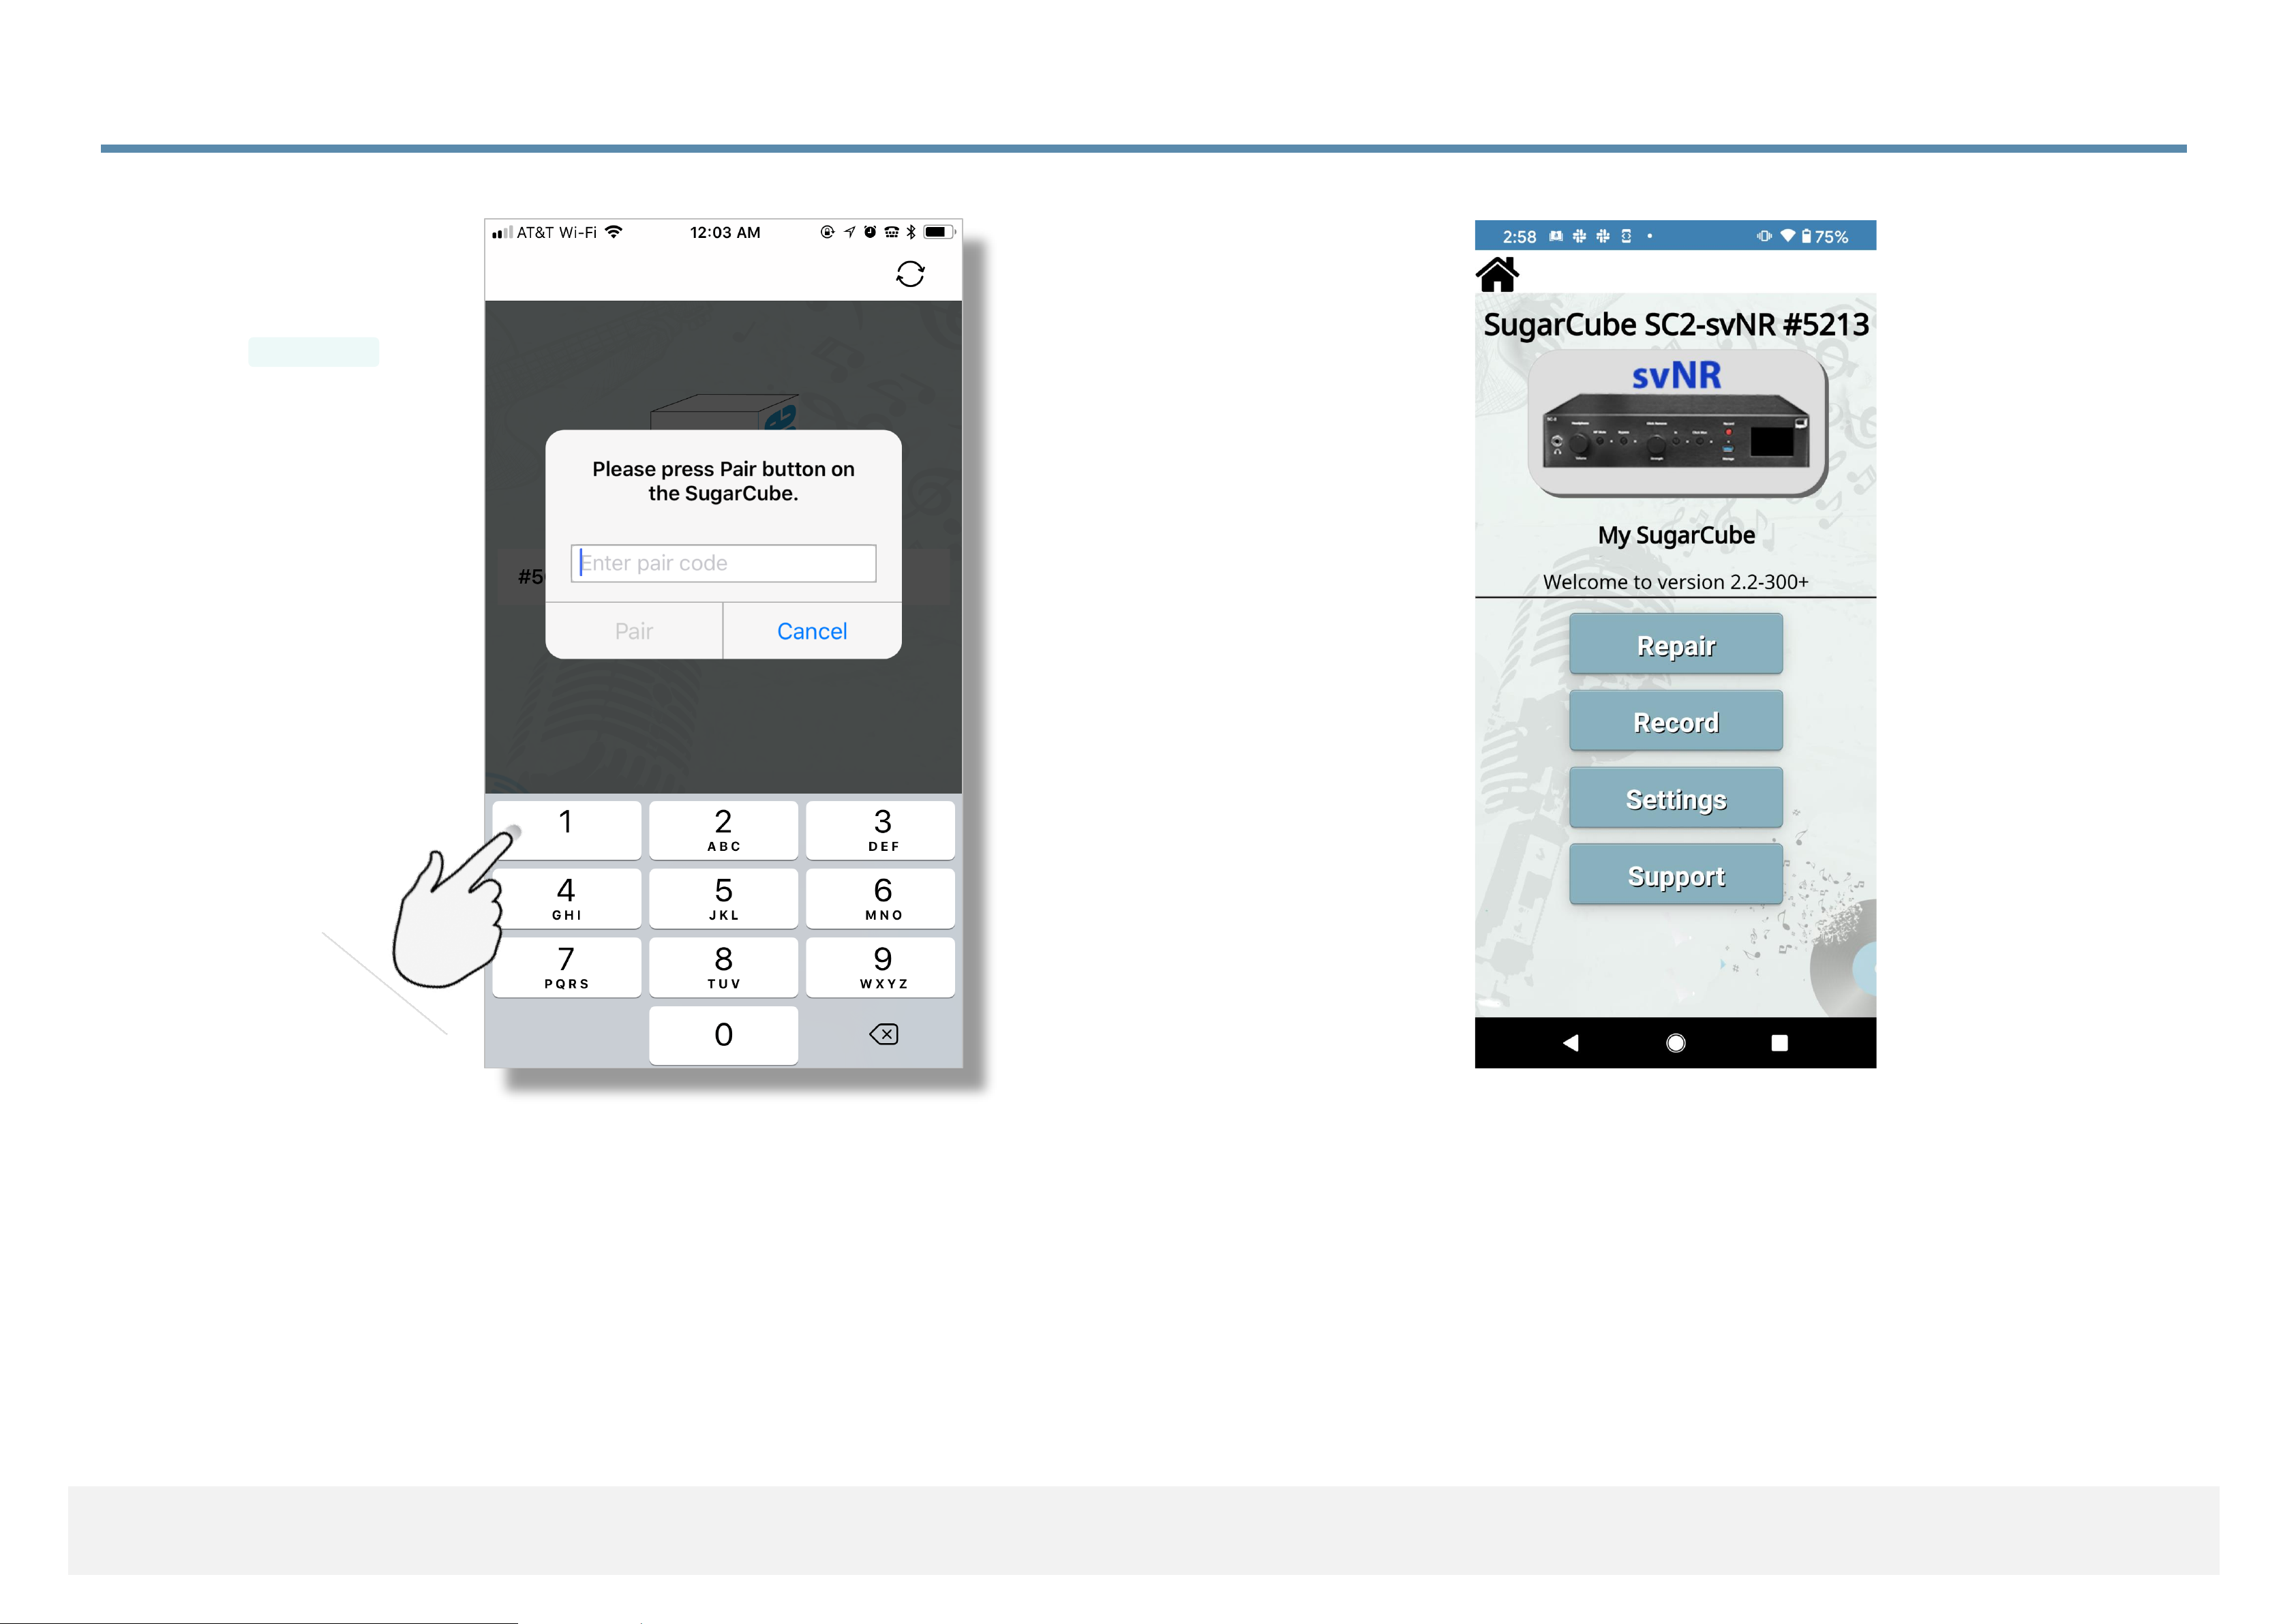
3.3.11 Connecting App with SugarCube on WiFi
(16) You will then see the
‘Control’ screen and you are
done, congratulations!
Apple iOS
(15) When asked to ‘Pair’, enter ‘1111’
(or you can press the front panel knob
of the SugarCube and read the code
from the display.
1111
Page 42

3.4 Using Android App with SugarCube
`
Page 43
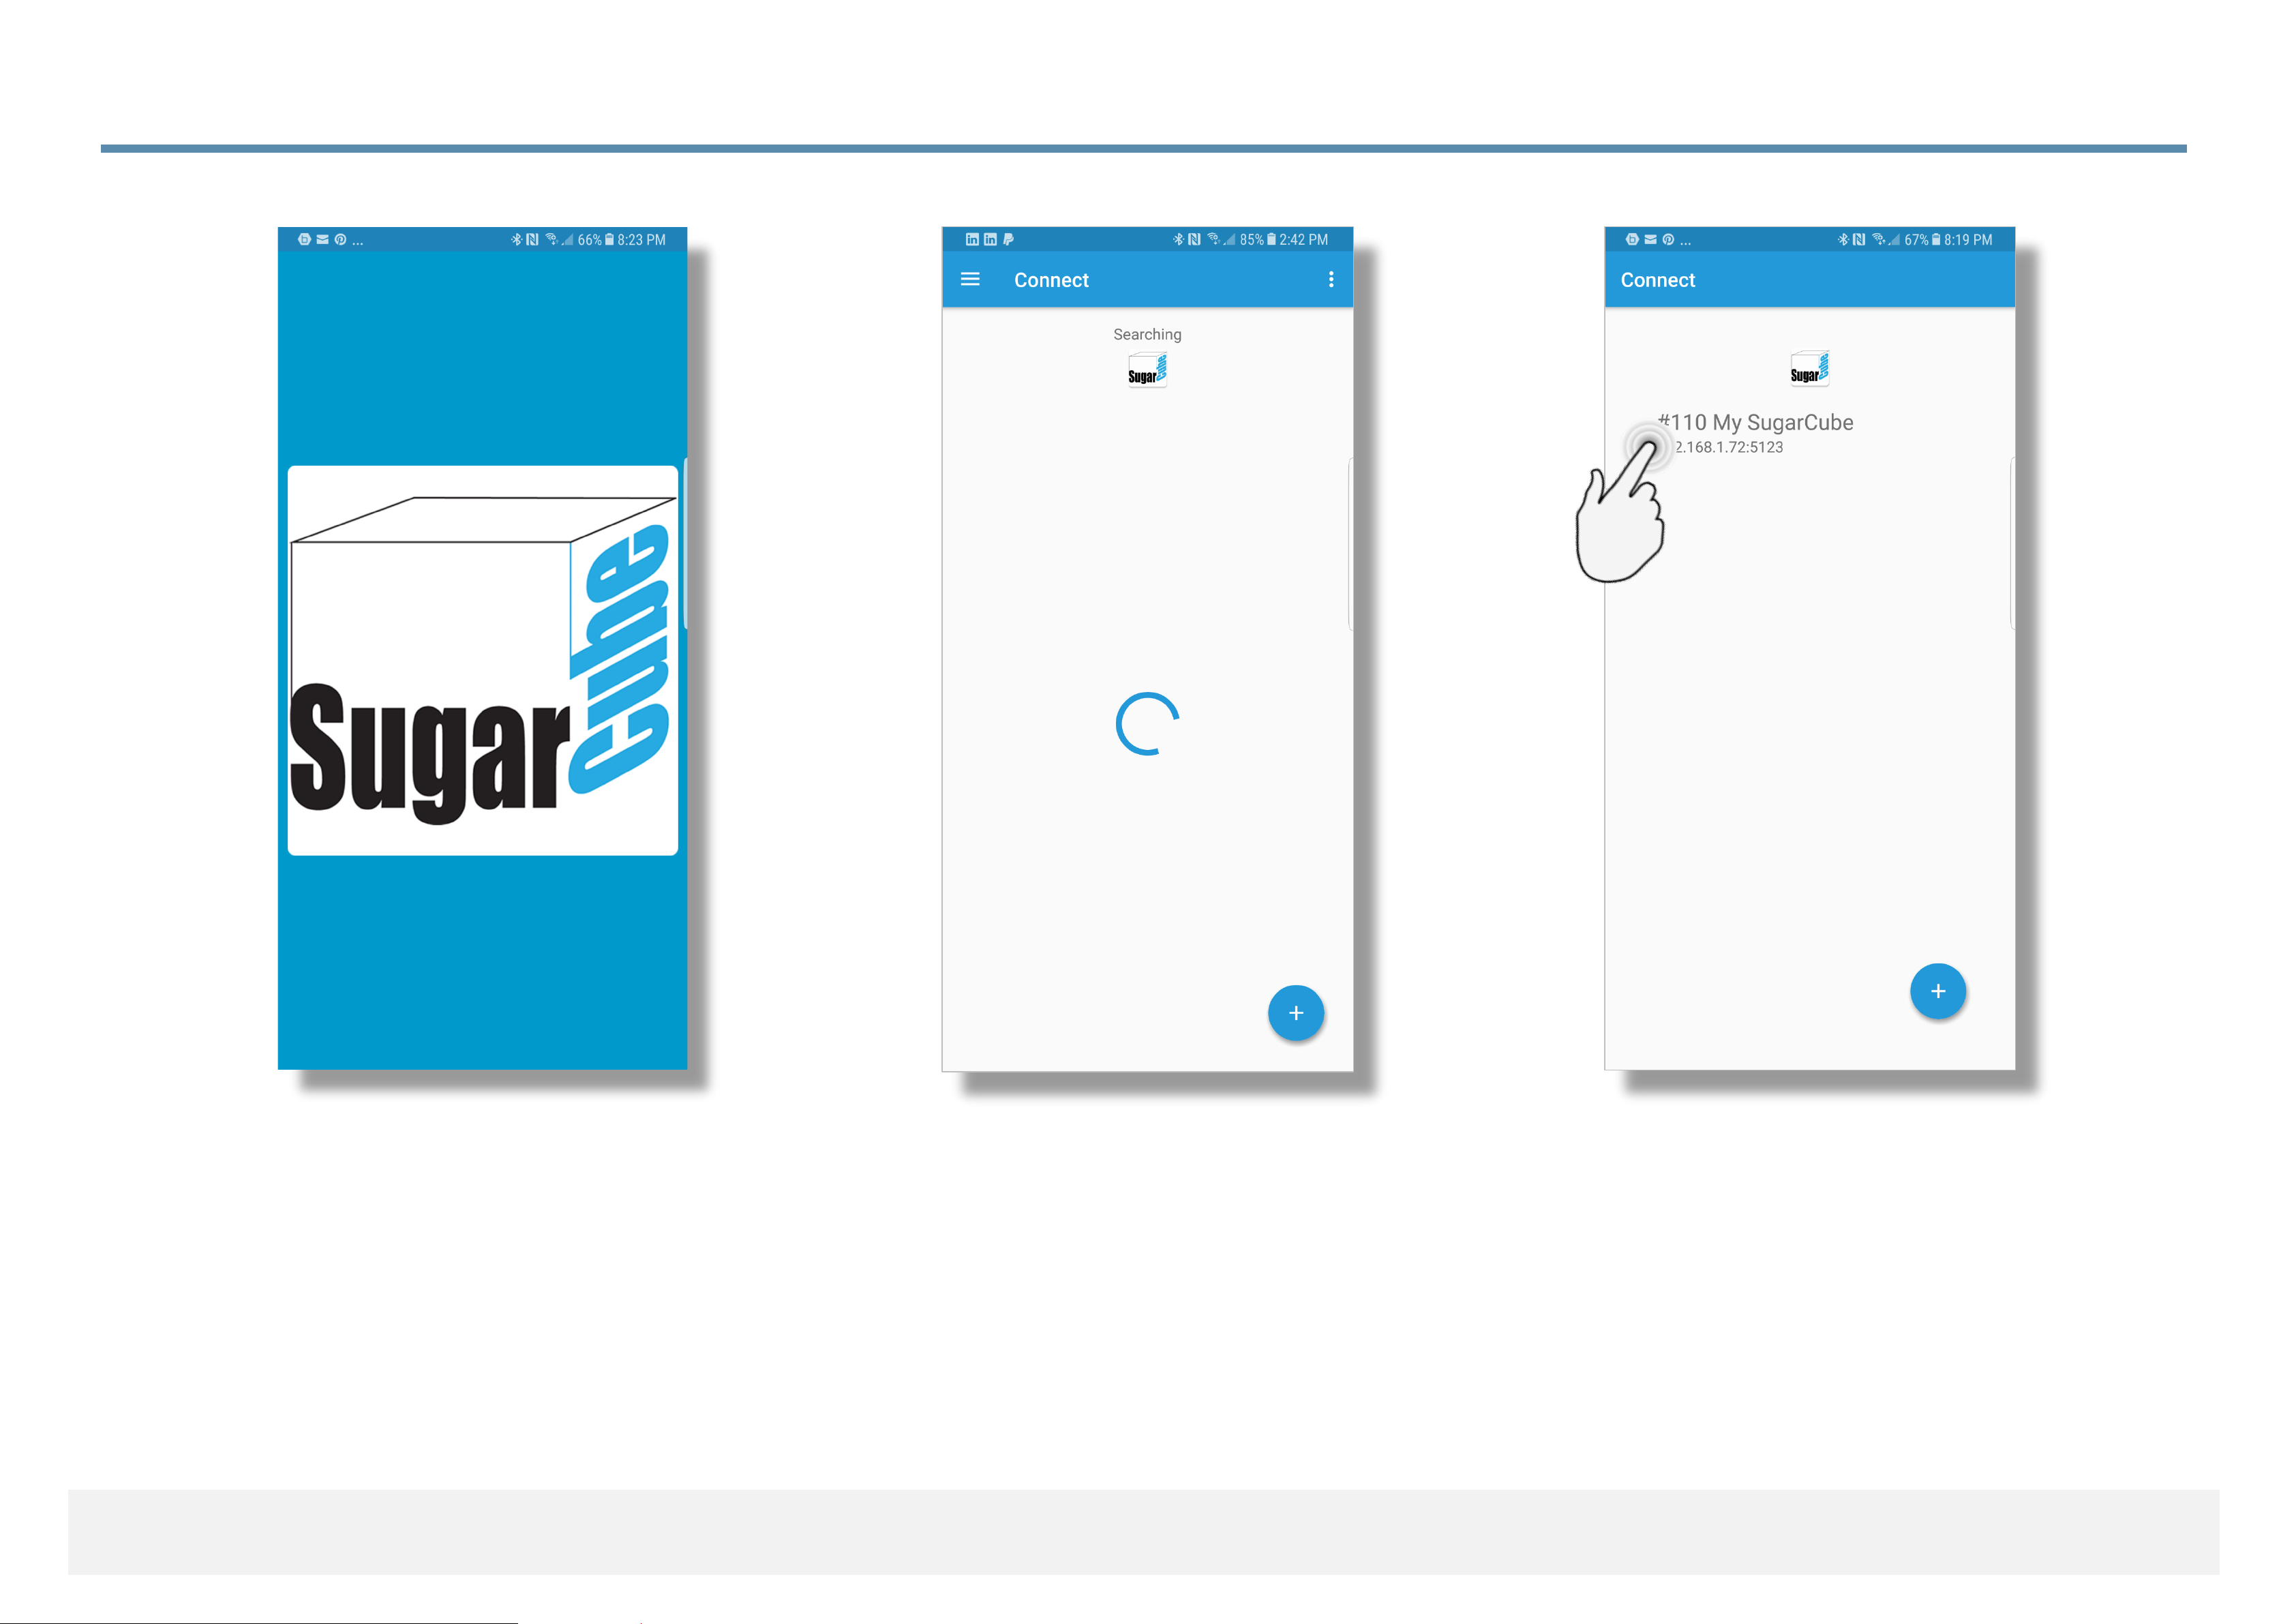
3.4.1 Connecting App with SugarCube on Wired Ethernet
(1) App is loading (2) App is searching for
SugarCubes on the LAN
(3) App has found a
SugarCube and will now
initiate a connection.
Android
Page 44
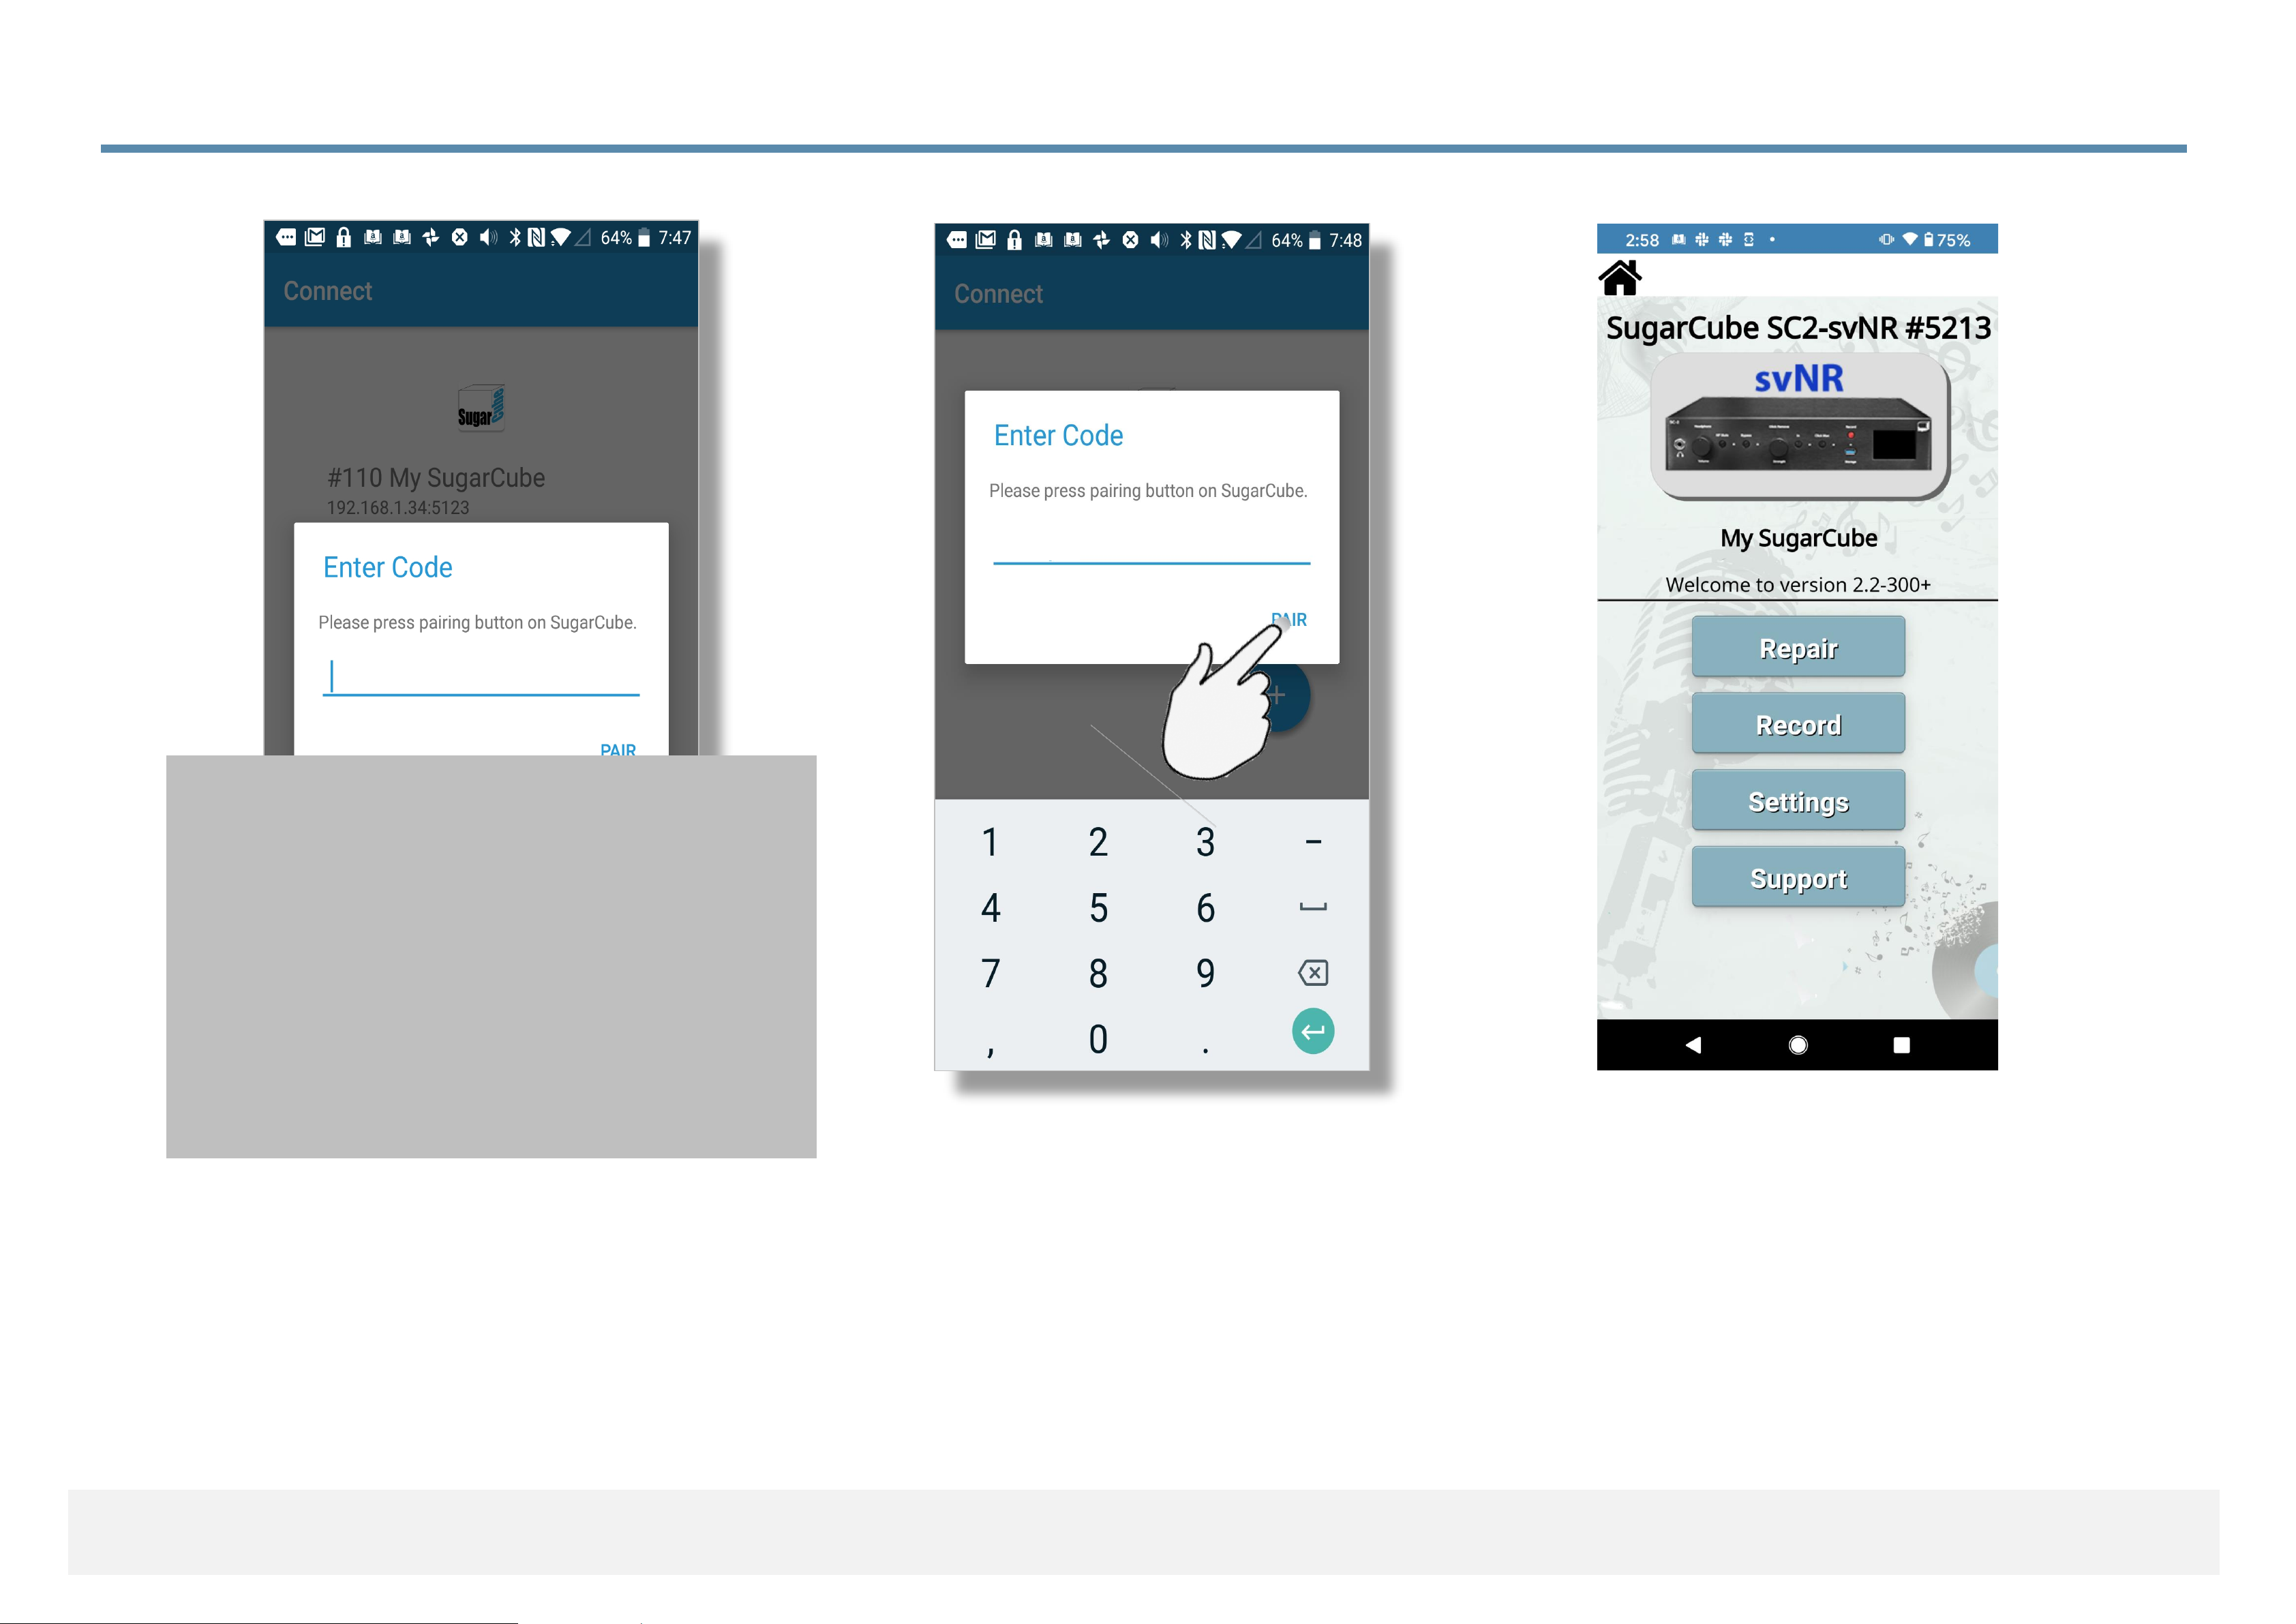
3.4.2 Connecting App with SugarCube on Wired Ethernet
Android
(4) The app needs you to enter a
pairing code, press the knob on
the front panel.
(5) App needs you to enter
the pair code ‘1111’ or what is
displayed on the front panel
display then touch ‘PAIR’.
(6) App is linked to
SugarCube and ready
for use.
For pairing, enter:
1 1 1 1
as a pairing code
(you may still get a code
from your SugarCube,
if you with).
1111
Page 45
192.168.1.nnn
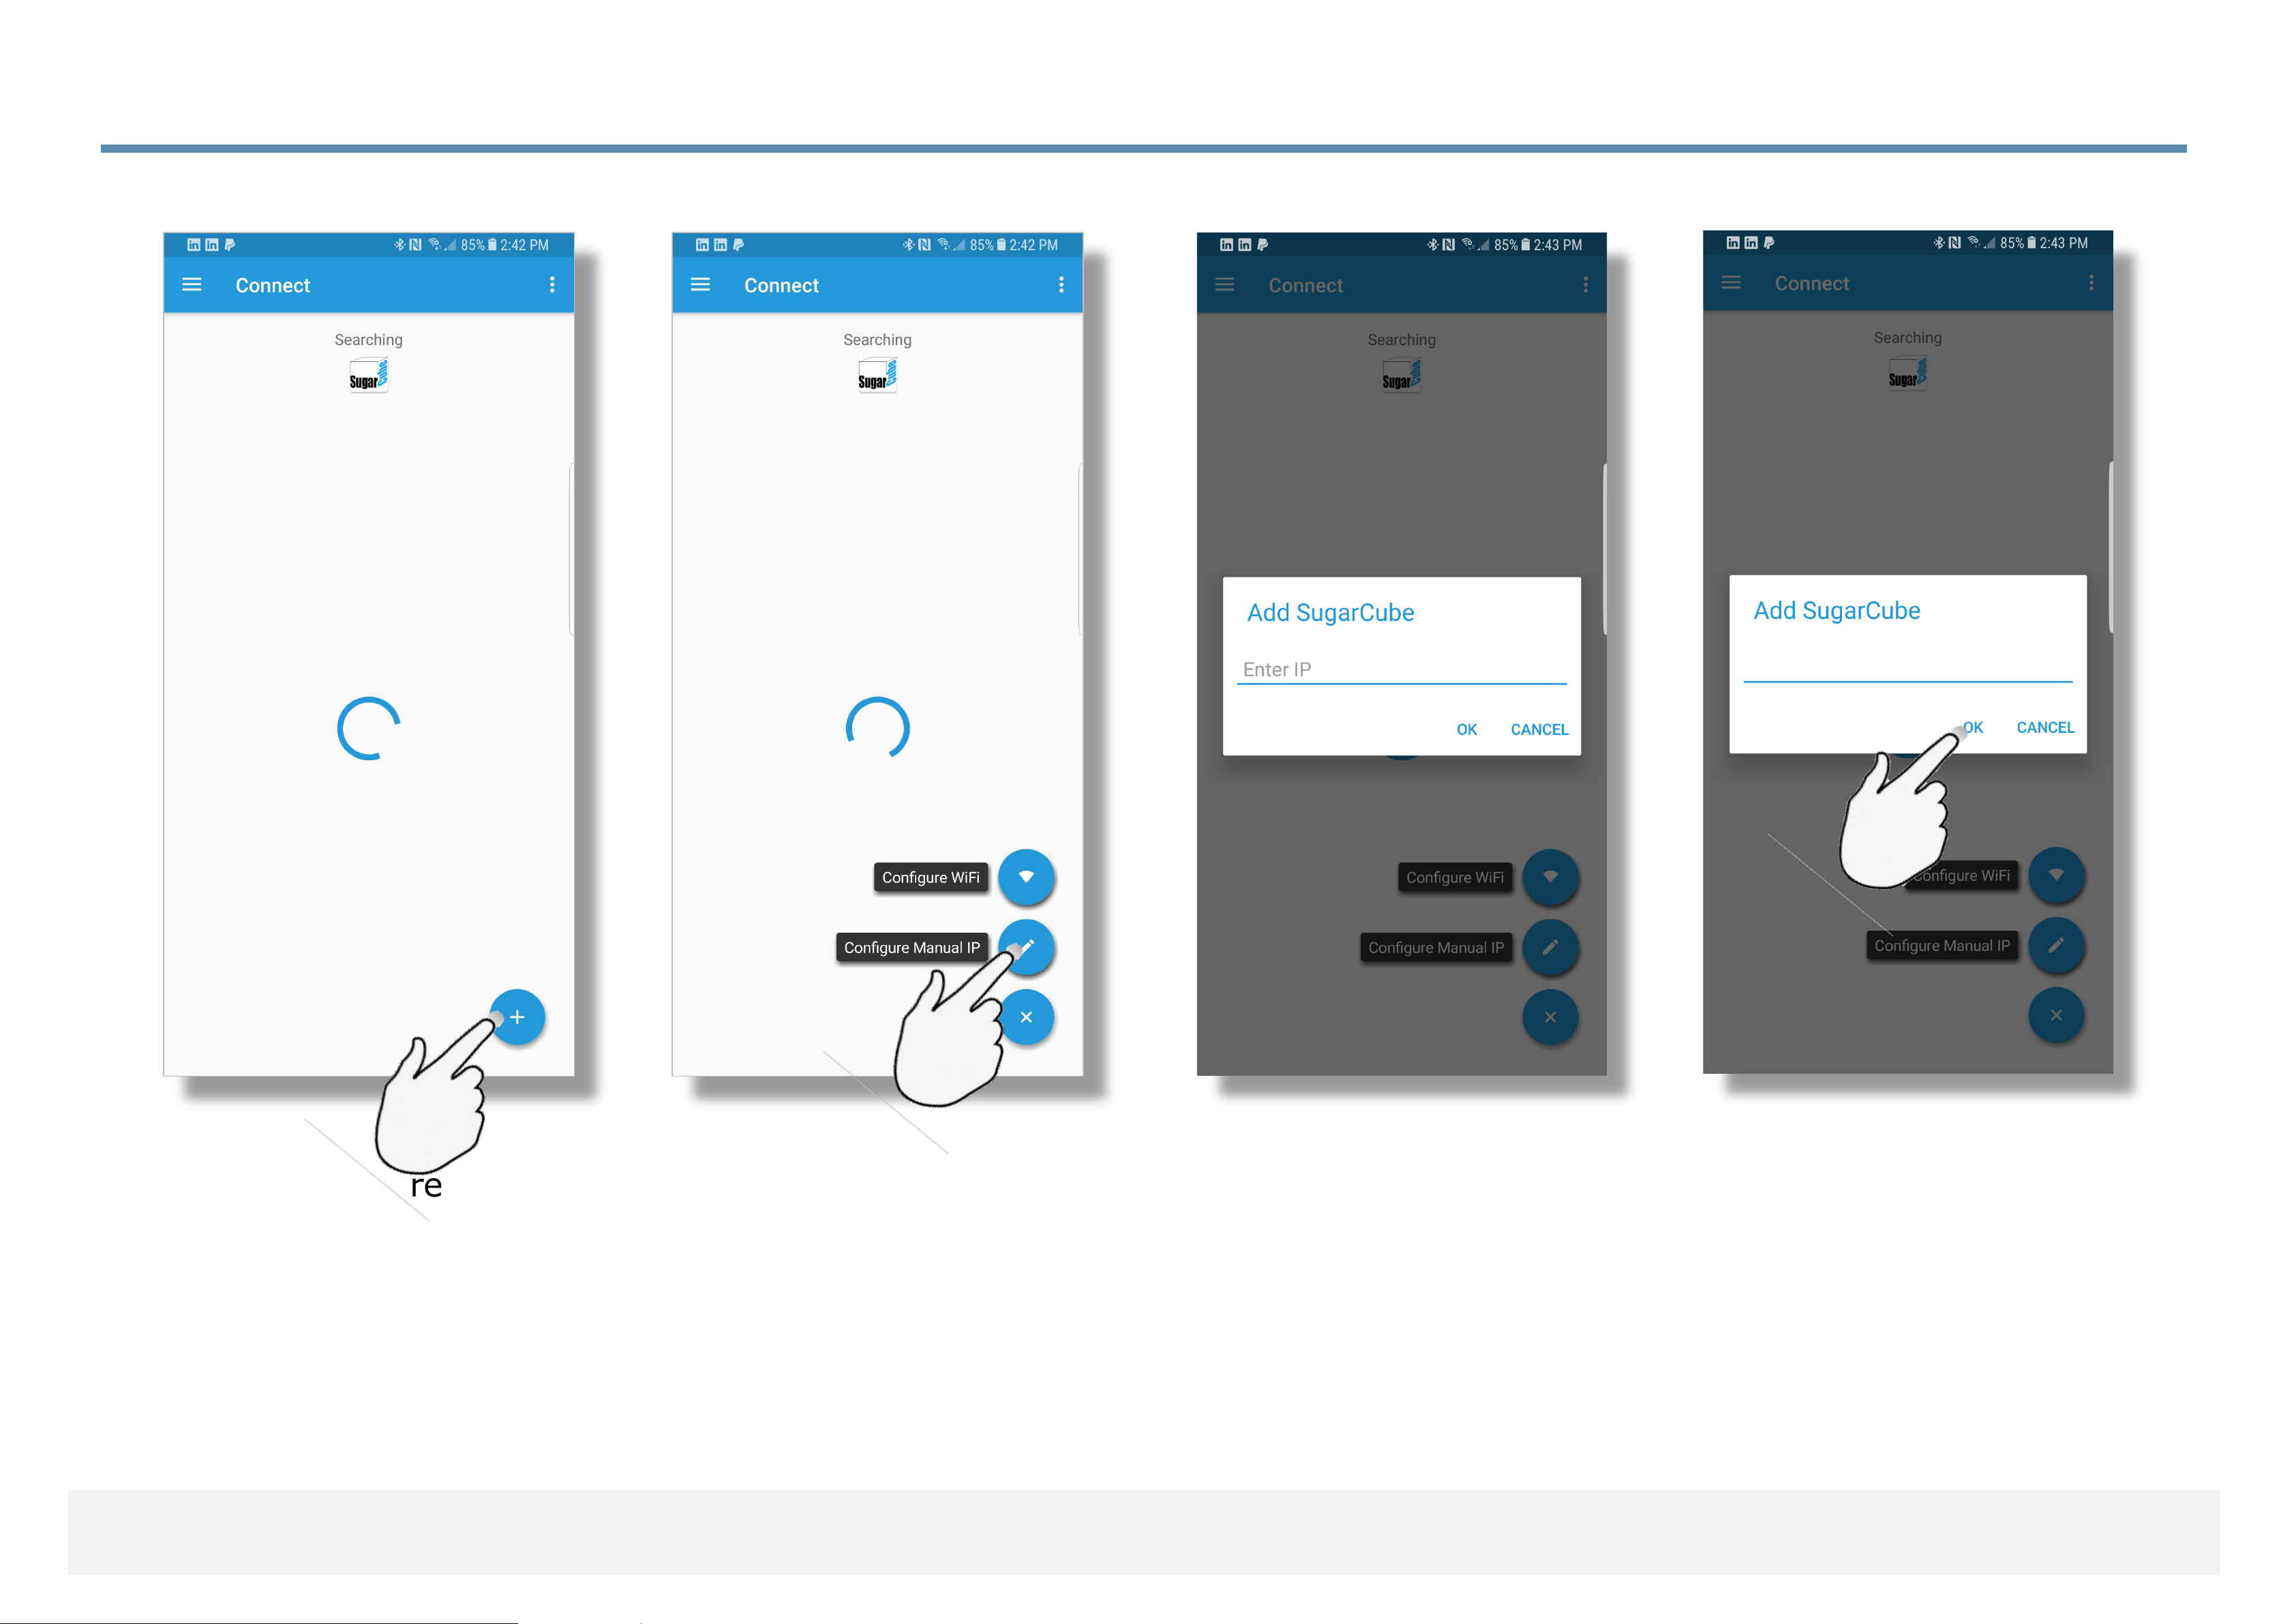
3.4.3 Connecting App with SugarCube Using IP Address
(1) If, for any reason,
you wish to manually
connect to your SugarCube
touch the menu
button in the lower
right of the screen.
(2) Select ‘Configure
Manual IP’.
(3) You will then see a
window to enter the IP
address of the SugarCube.
This address can be seen
by pressing and holding
‘Bypass’ for a few seconds.
(4) Enter the IP address
as displayed on the front
panel display.
Android
Page 46
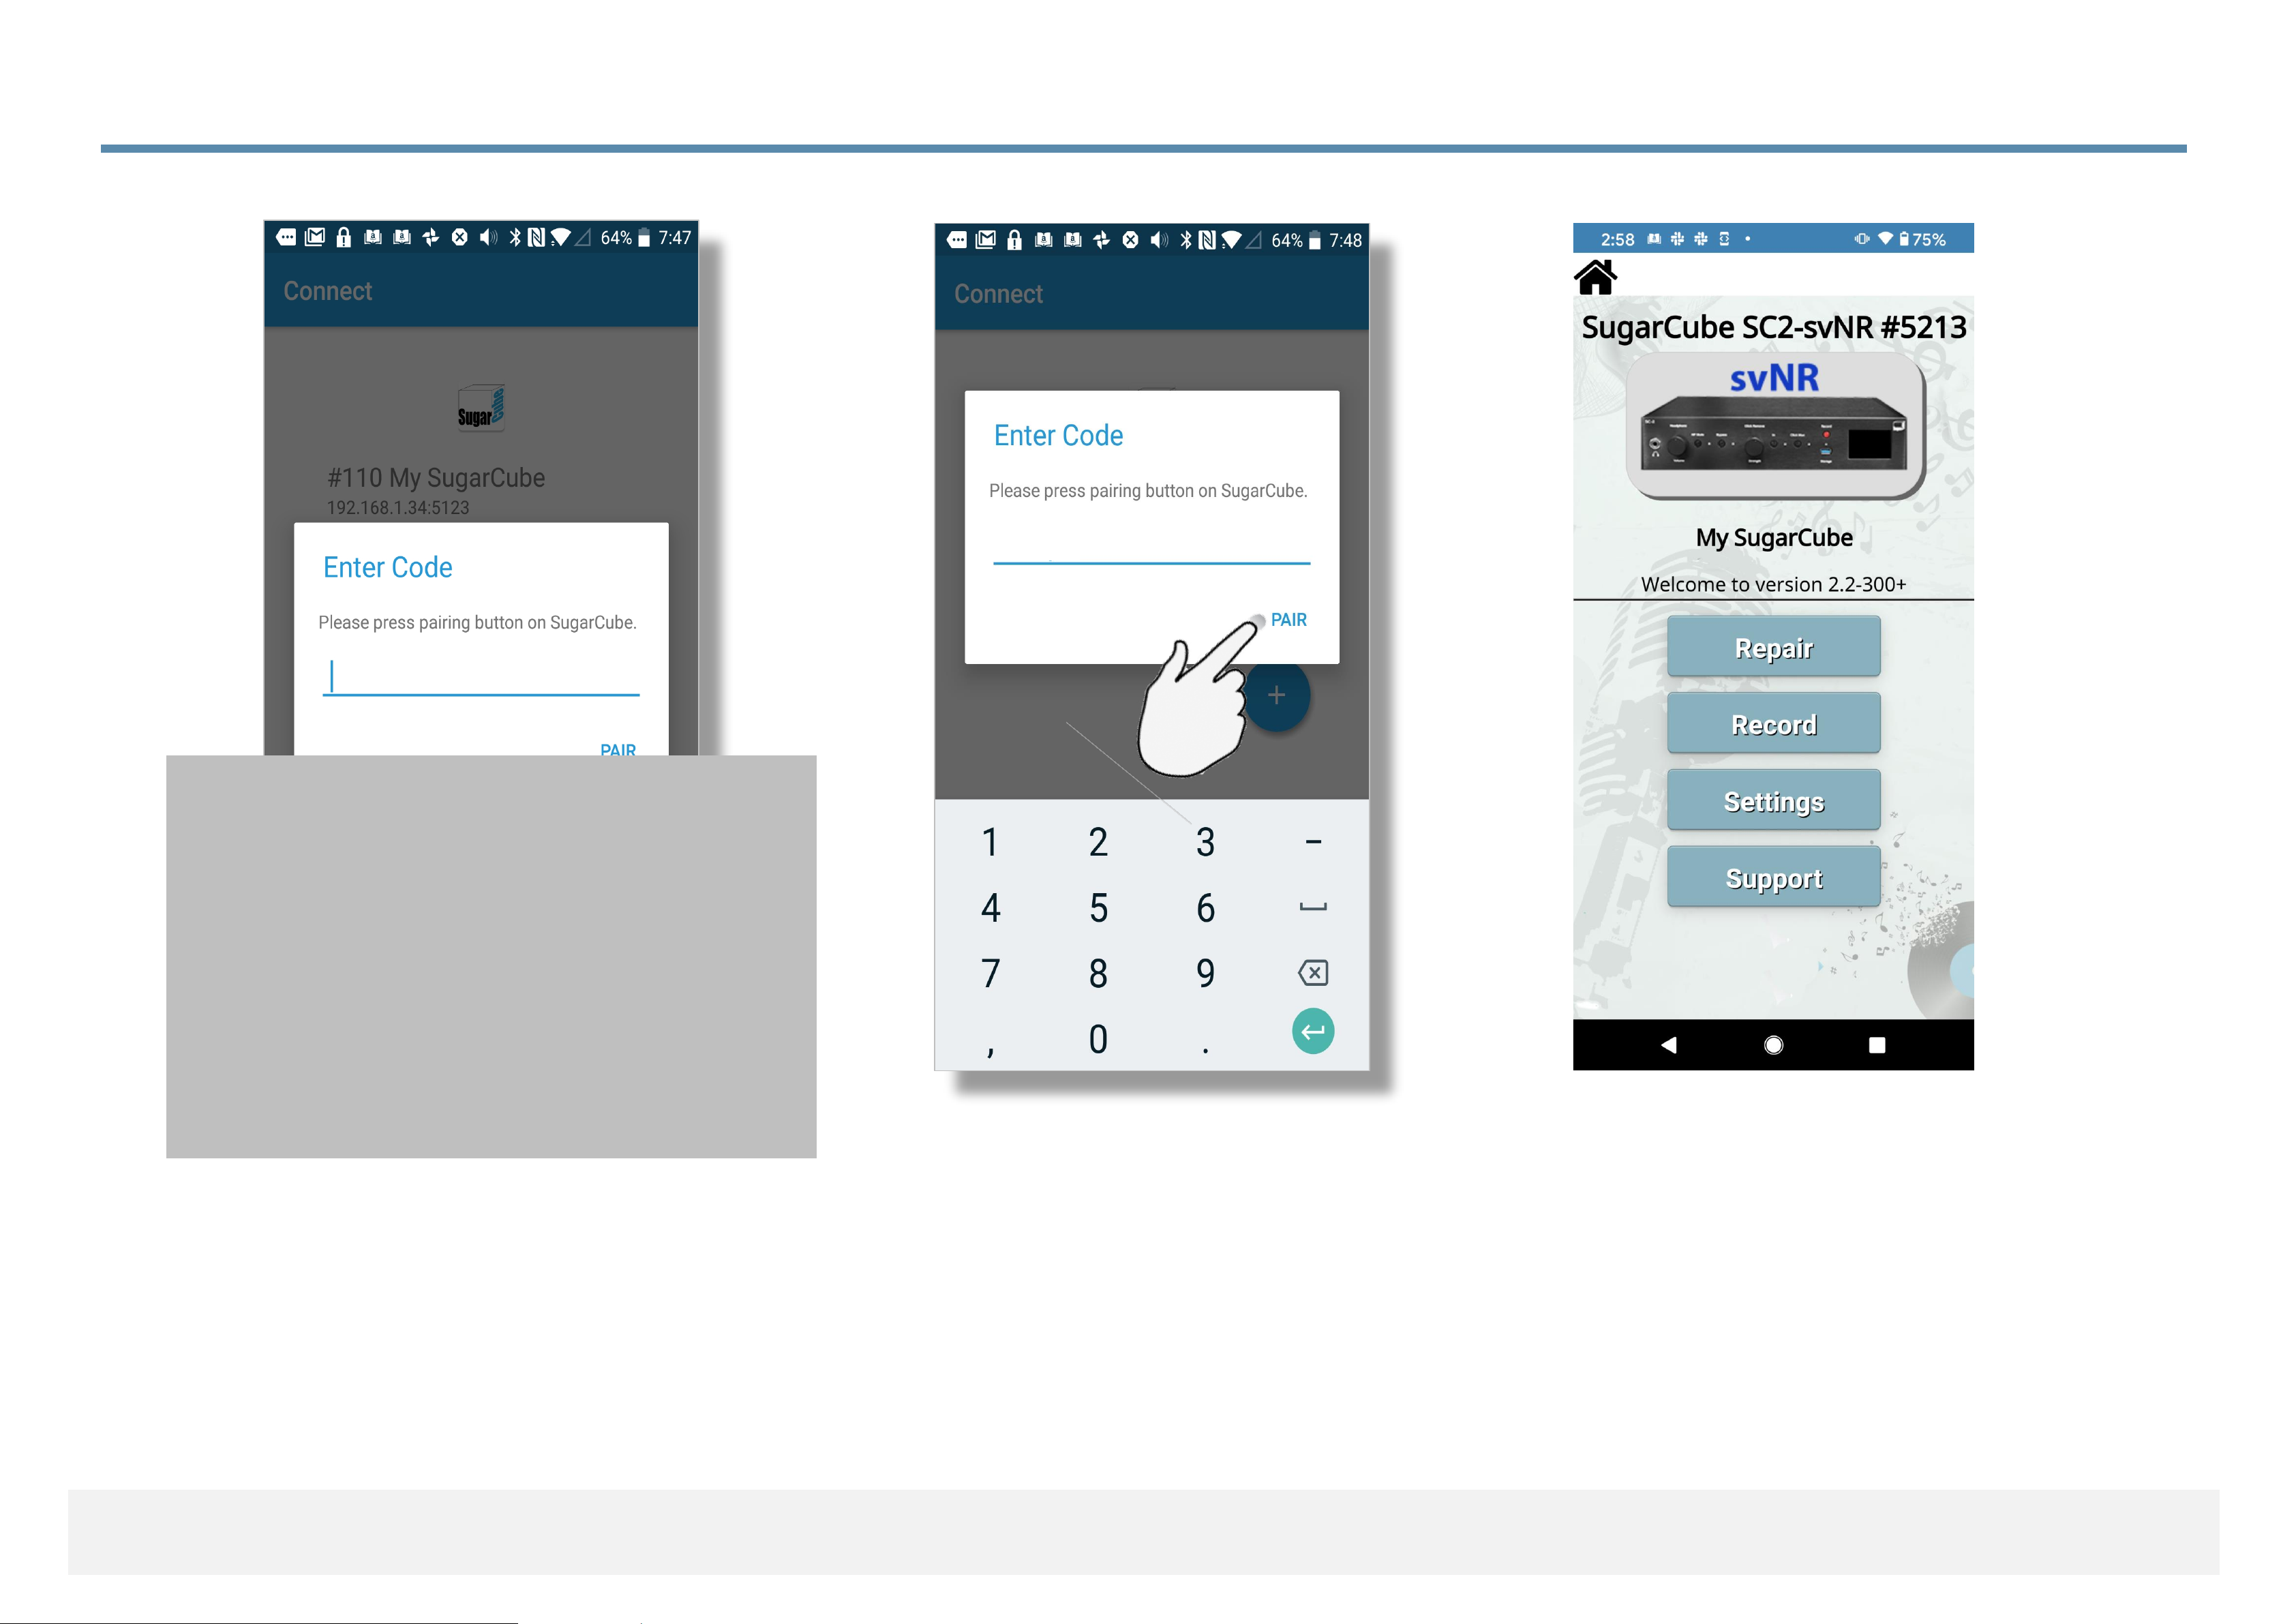
3.4.4 Connecting App with SugarCube Using IP Address
Android
(5) The app need you to press
the knob on the front panel.
(6) App needs you to enter
the pair code displayed on
the front panel display then
touch ‘PAIR’.
(7) App is linked to
SugarCube and ready
for use.
1111
For pairing, enter:
1 1 1 1
as a pairing code
(you may still get a code
from your SugarCube,
if you wish).
Page 47

3.4.5 Setting up Android to control SugarCube with WiFi
You will need:
1. An Android phone or tablet.
2. To connect with WiFi on your Android device on the same network that you
plan to use with your SugarCube with WiFi or wired Ethernet.
3. Download the Android App from the Google Play Store.
(Look for: SugarCube by SweetVinyl.)
4. To plug in the WiFi dongle supplied with your SugarCube or a wired Ethernet
cable from a port on your router.
Android
Page 48
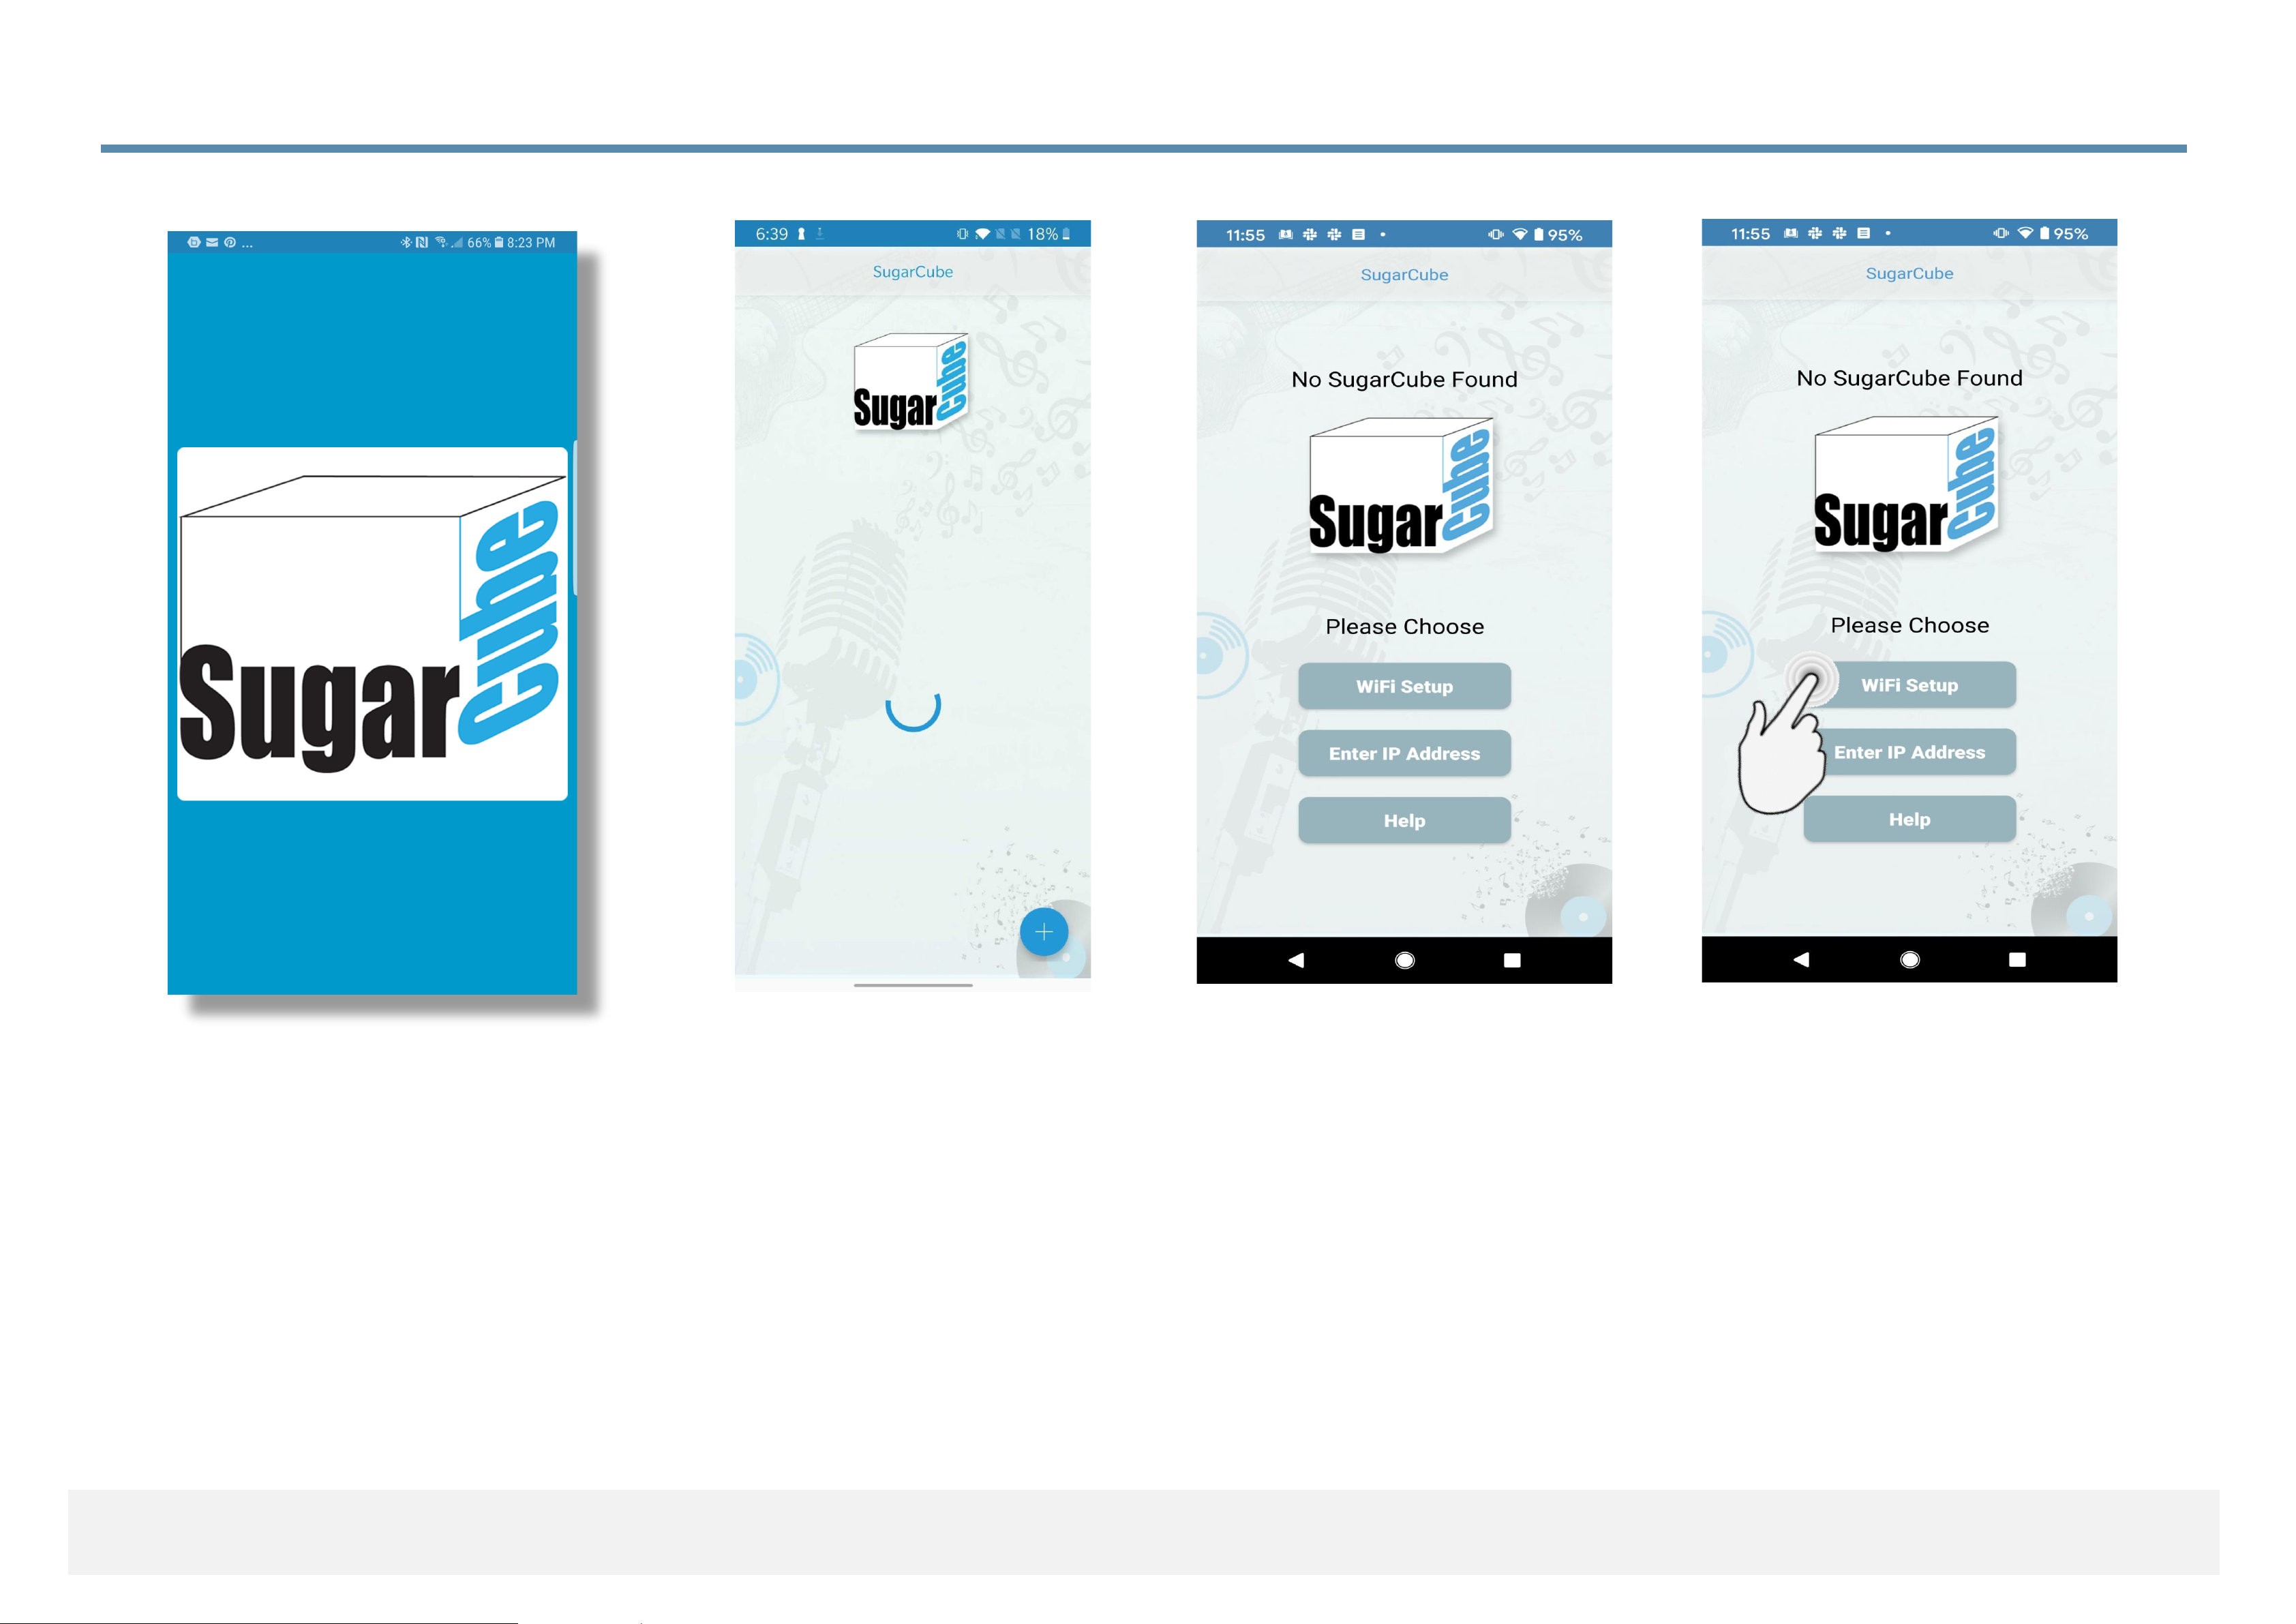
3.4.6 Connecting App with SugarCube on WiFi
(1) App is loading
(2) App is searching for
SugarCubes on the LAN
(3) No SugarCube is found
so the app offers the option
to run WiFi setup.
(4) User taps ‘WiFi Setup’
to start the process.
Android
Page 49
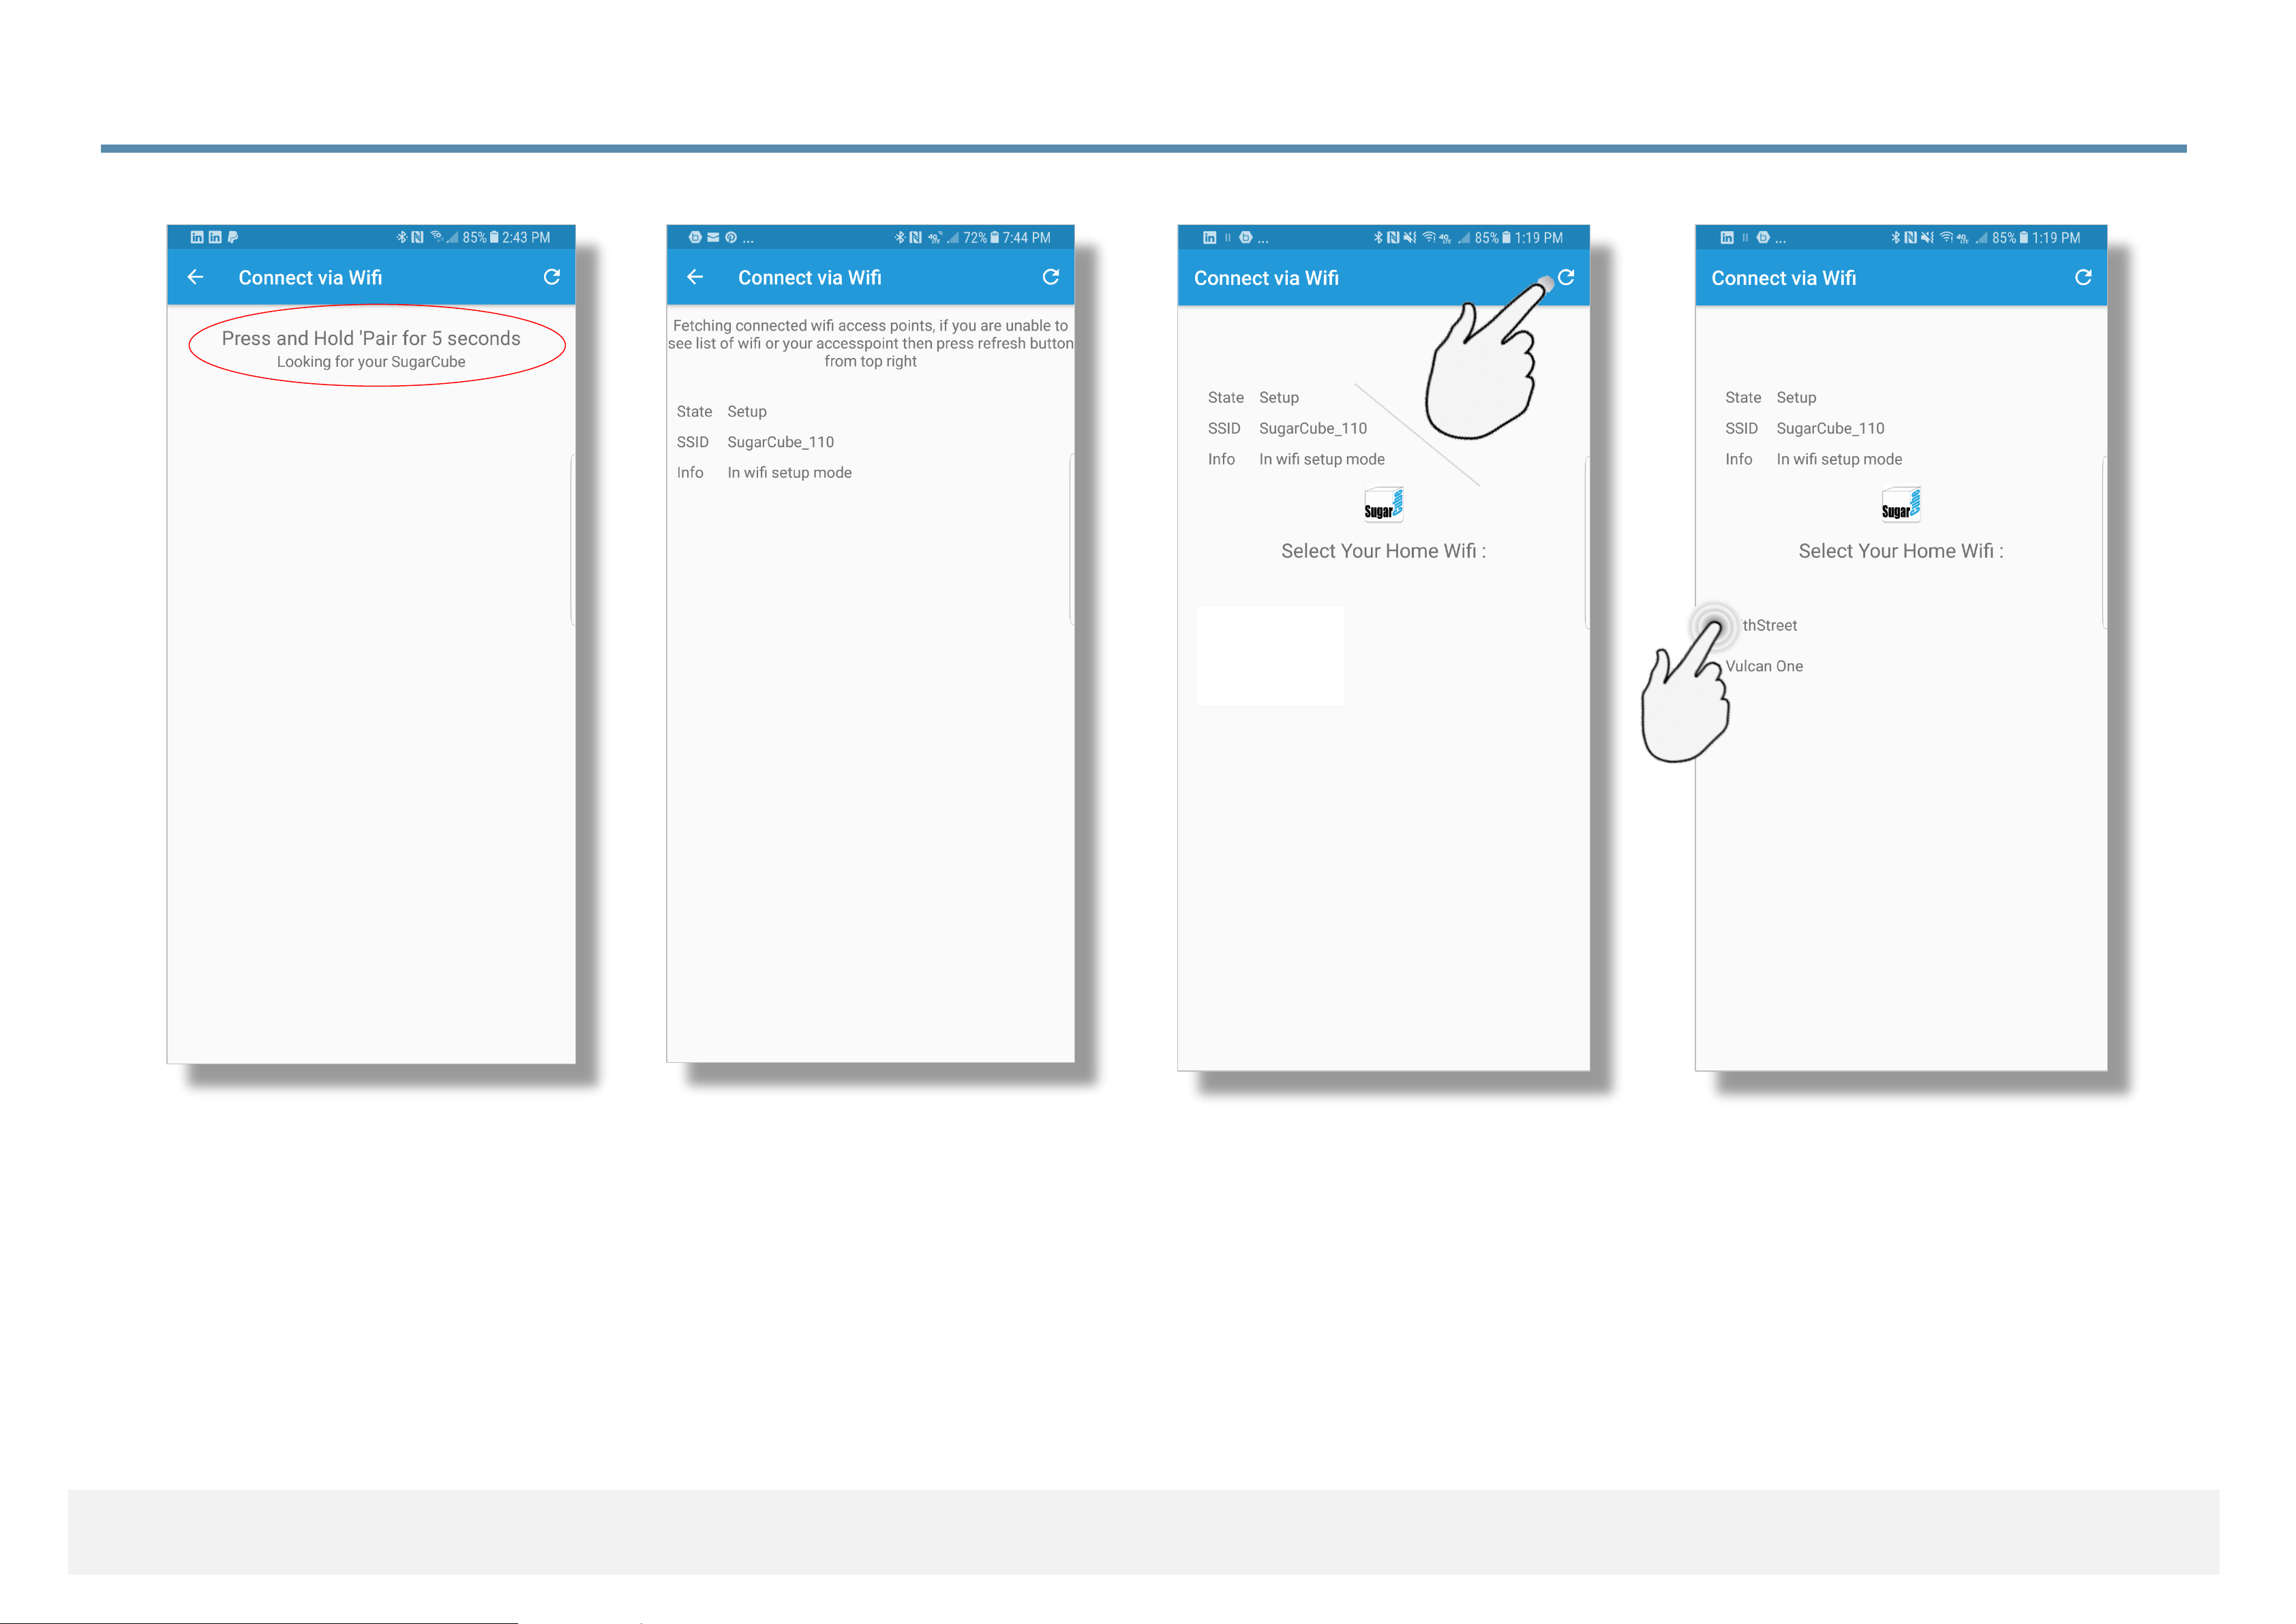
3.4.7 Connecting App with SugarCube on WiFi
(5) Next, press and hold
the pairing button (on the
rear panel) for 5 seconds
as instructed.
(6) After this, your SugarCube
will be configured as an
access point and display its
SSID (e.g. SugarCube_110)
In this screen the app has now
connected to it automatically.
(7) Next, the SugarCube
will find your available WiFi
connections. This could
take a minute but if nothing
shows, please press the
refresh (upper right).
(8) When you see your
network, select the desired
connection.
Android
Page 50
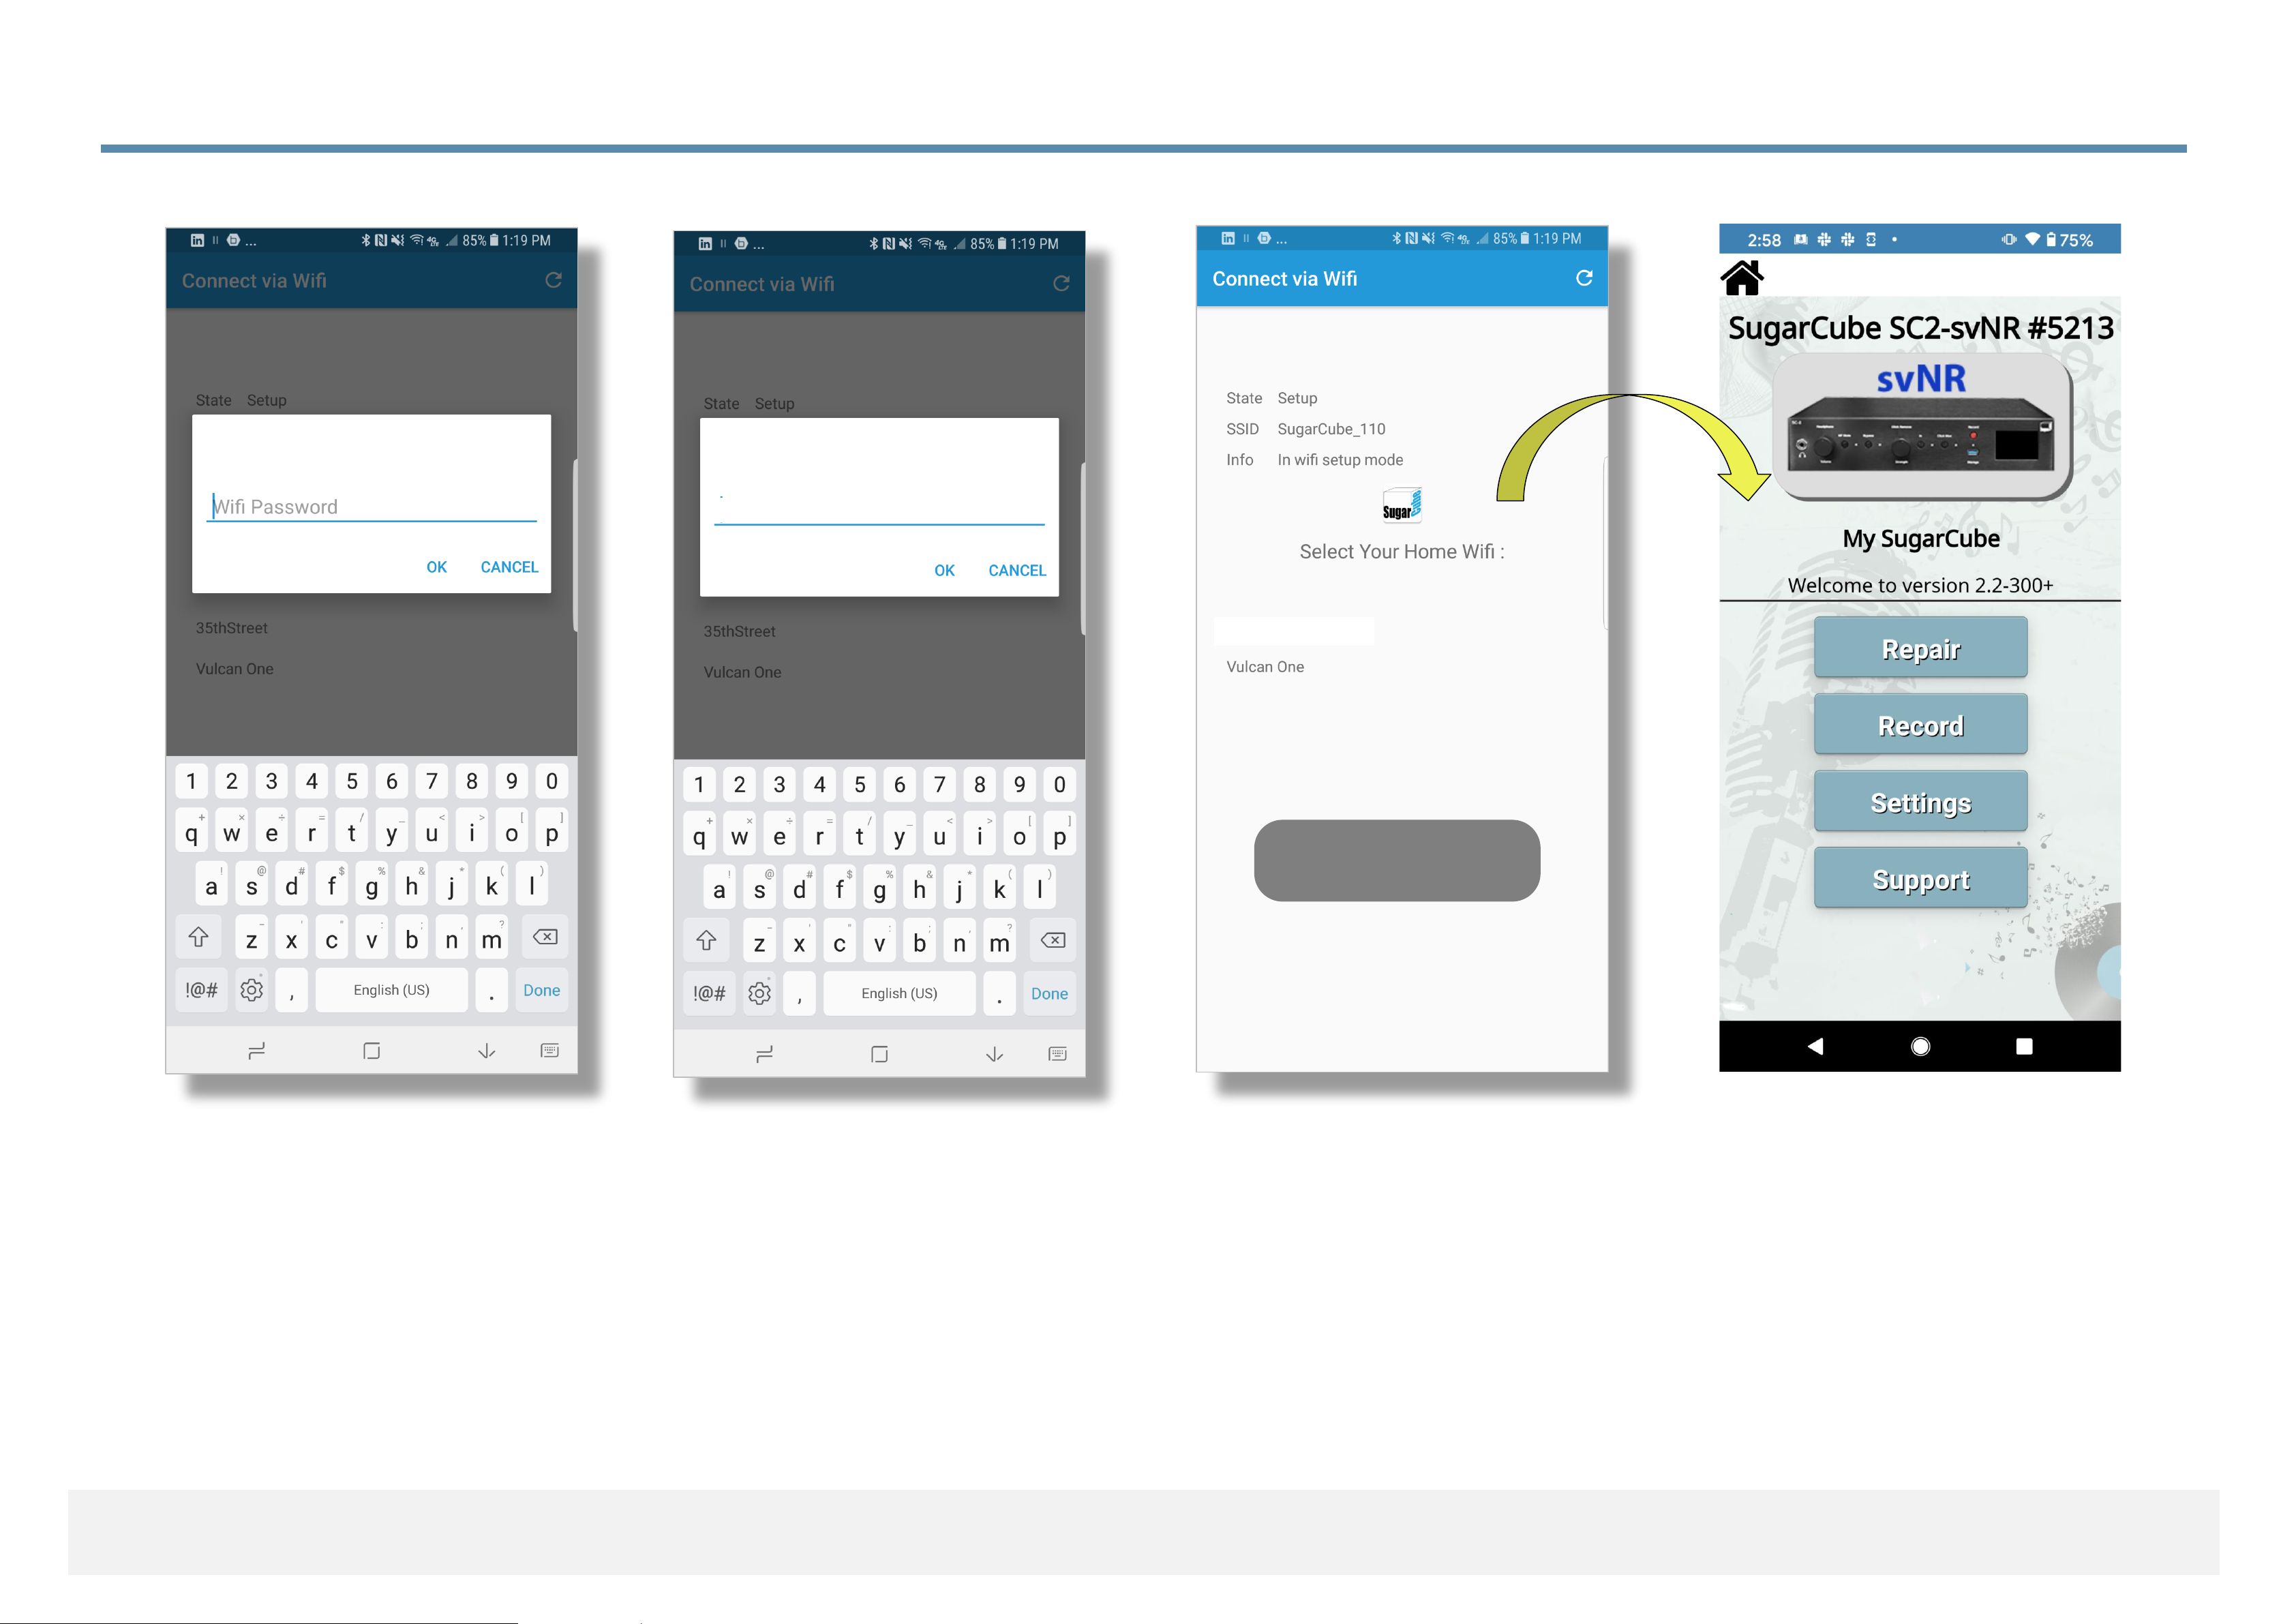
3.4.8 Connecting App with SugarCube on WiFi
(10) The app has connected
successfully with the
SugarCube and will now
jump to the main screen.
(11) The connection process
is complete and you are
ready to go.
WiFi Setup Successful
(9) Next, enter the password
for your WiFi network.
secretagentman
55th Street
55th Street
55th Street
Android
Page 51
Controlling
SugarCube
via a browser
or app
Chrome, Edge, or Safari
browser &
iOS or Android app
Section 4
Page 52
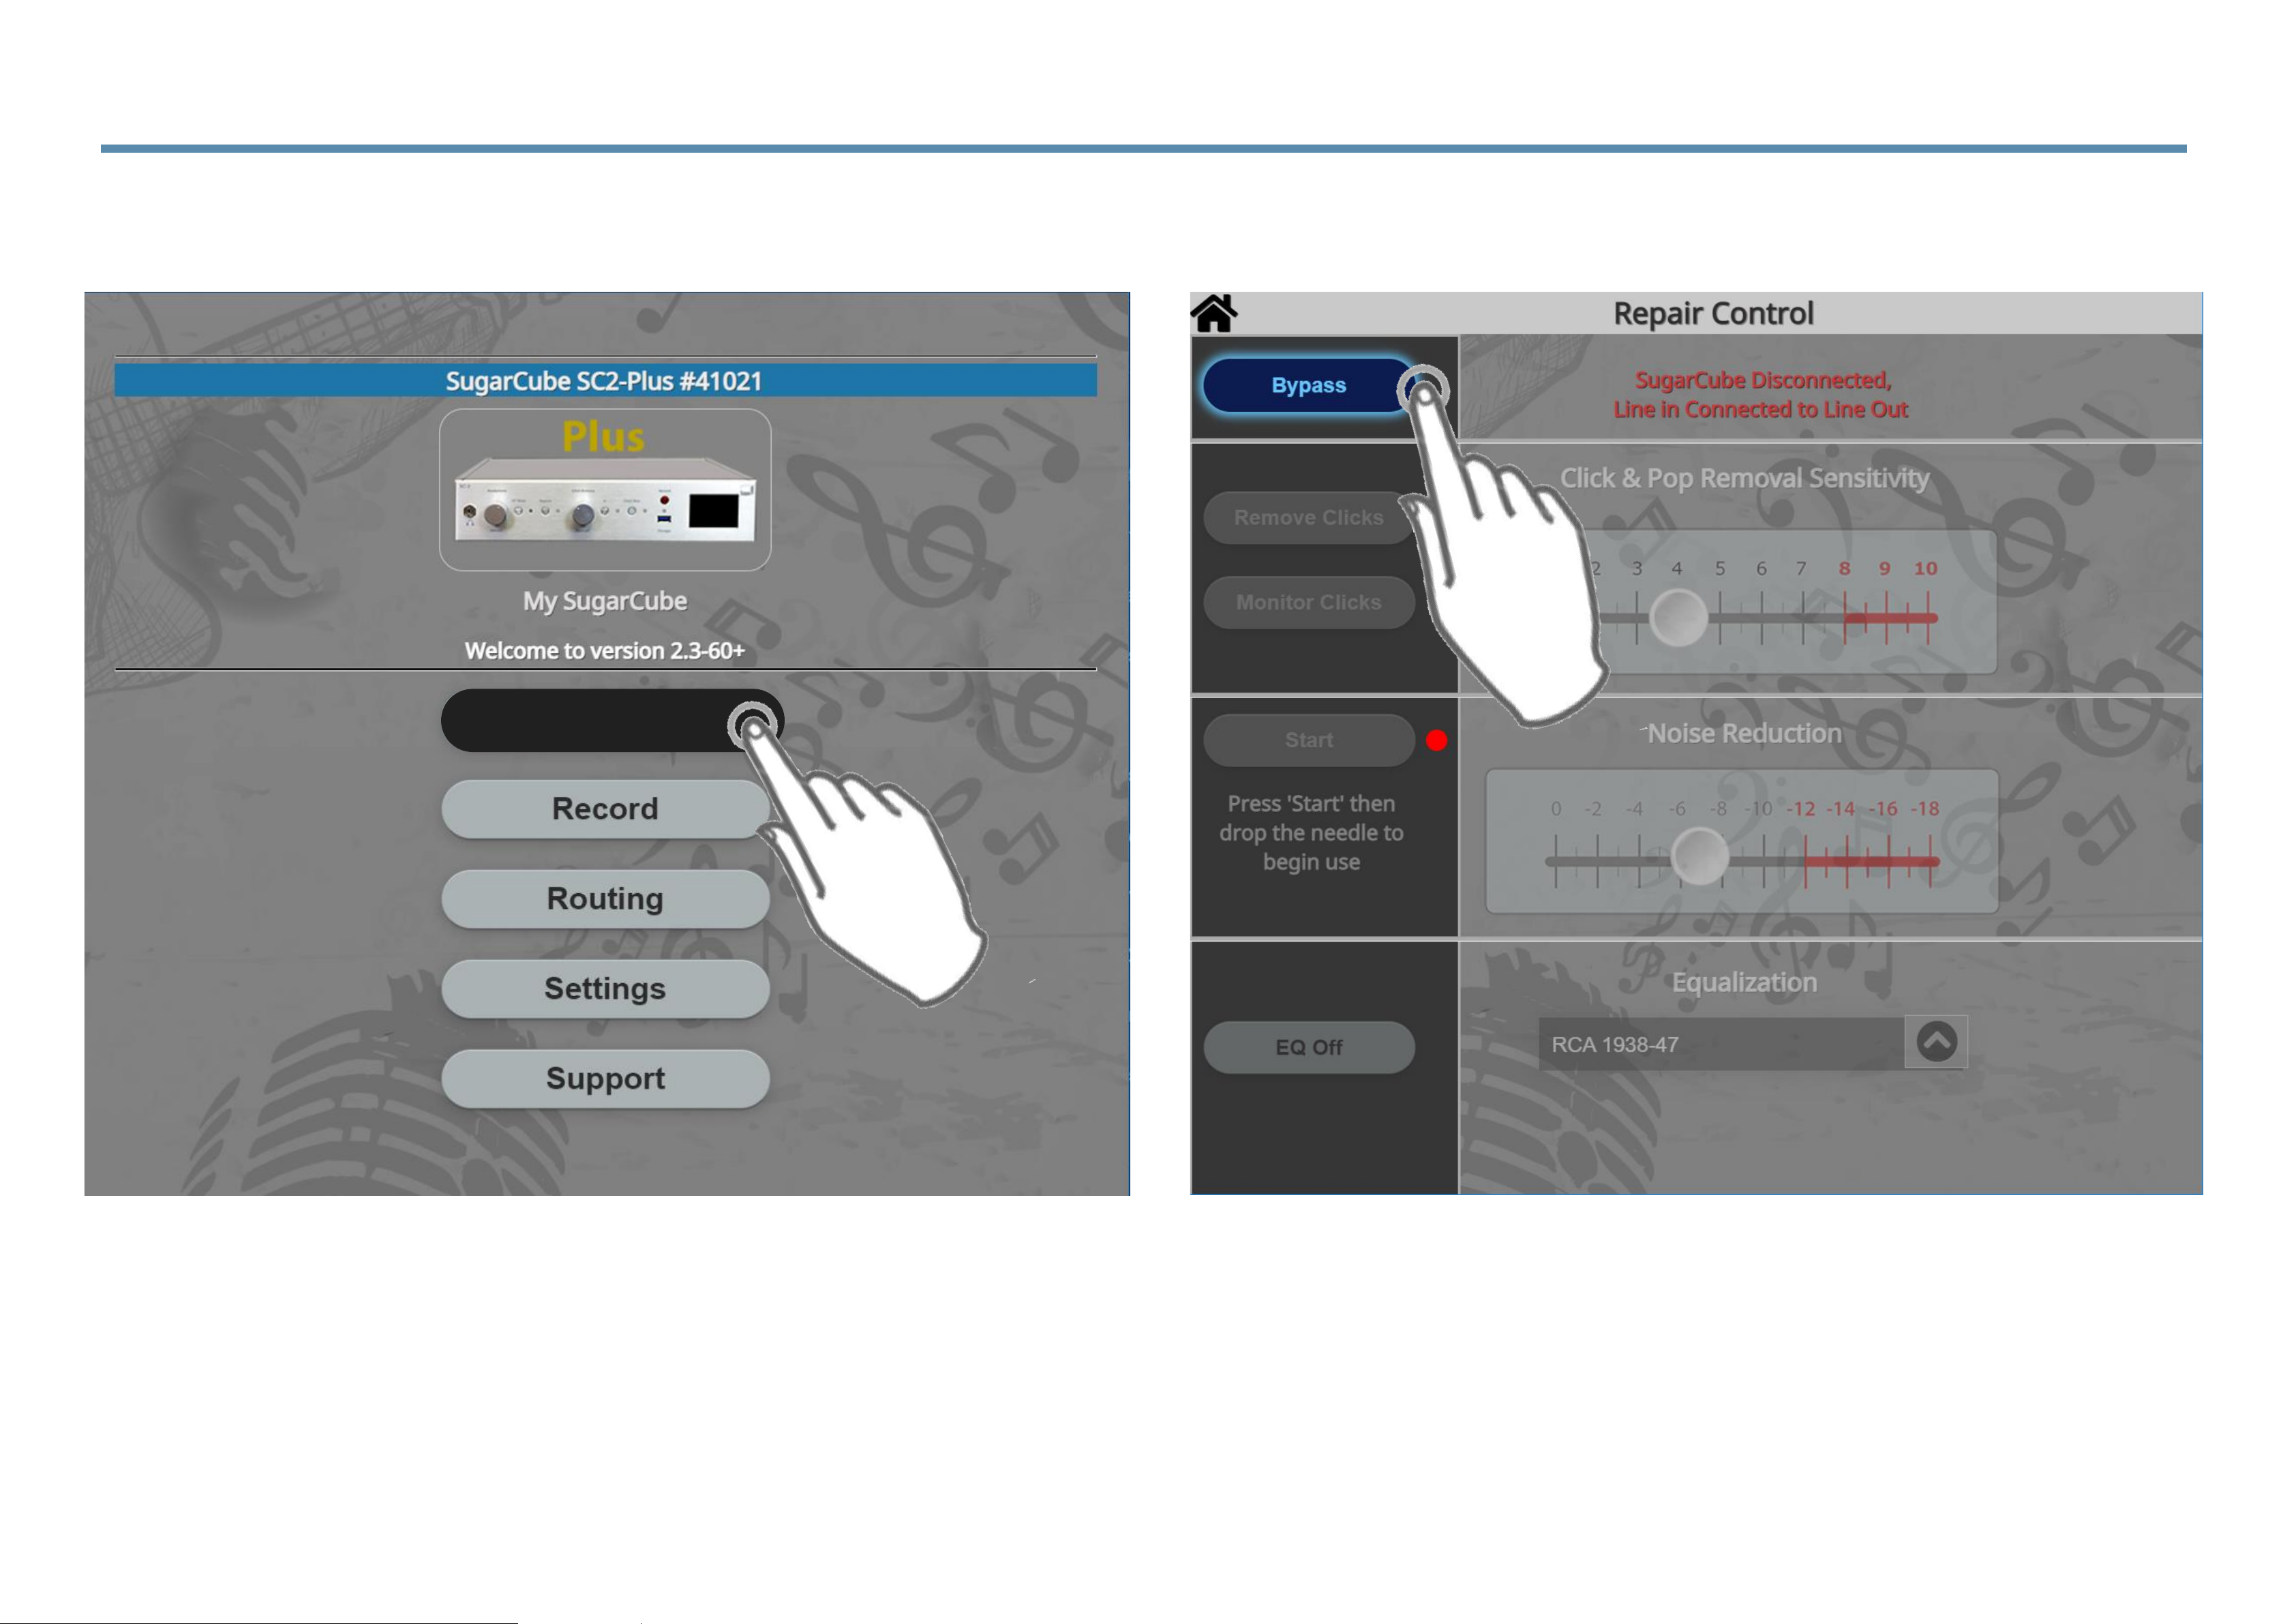
4.1 Home Page and Repair Control
(1) Click on ‘Repair’ (2) Click and Pop and Bypass functions
available mirror the front panel controls. A change
here is reflected on the front panel and a change
on the front panel changes the above.
Repair
Page 53
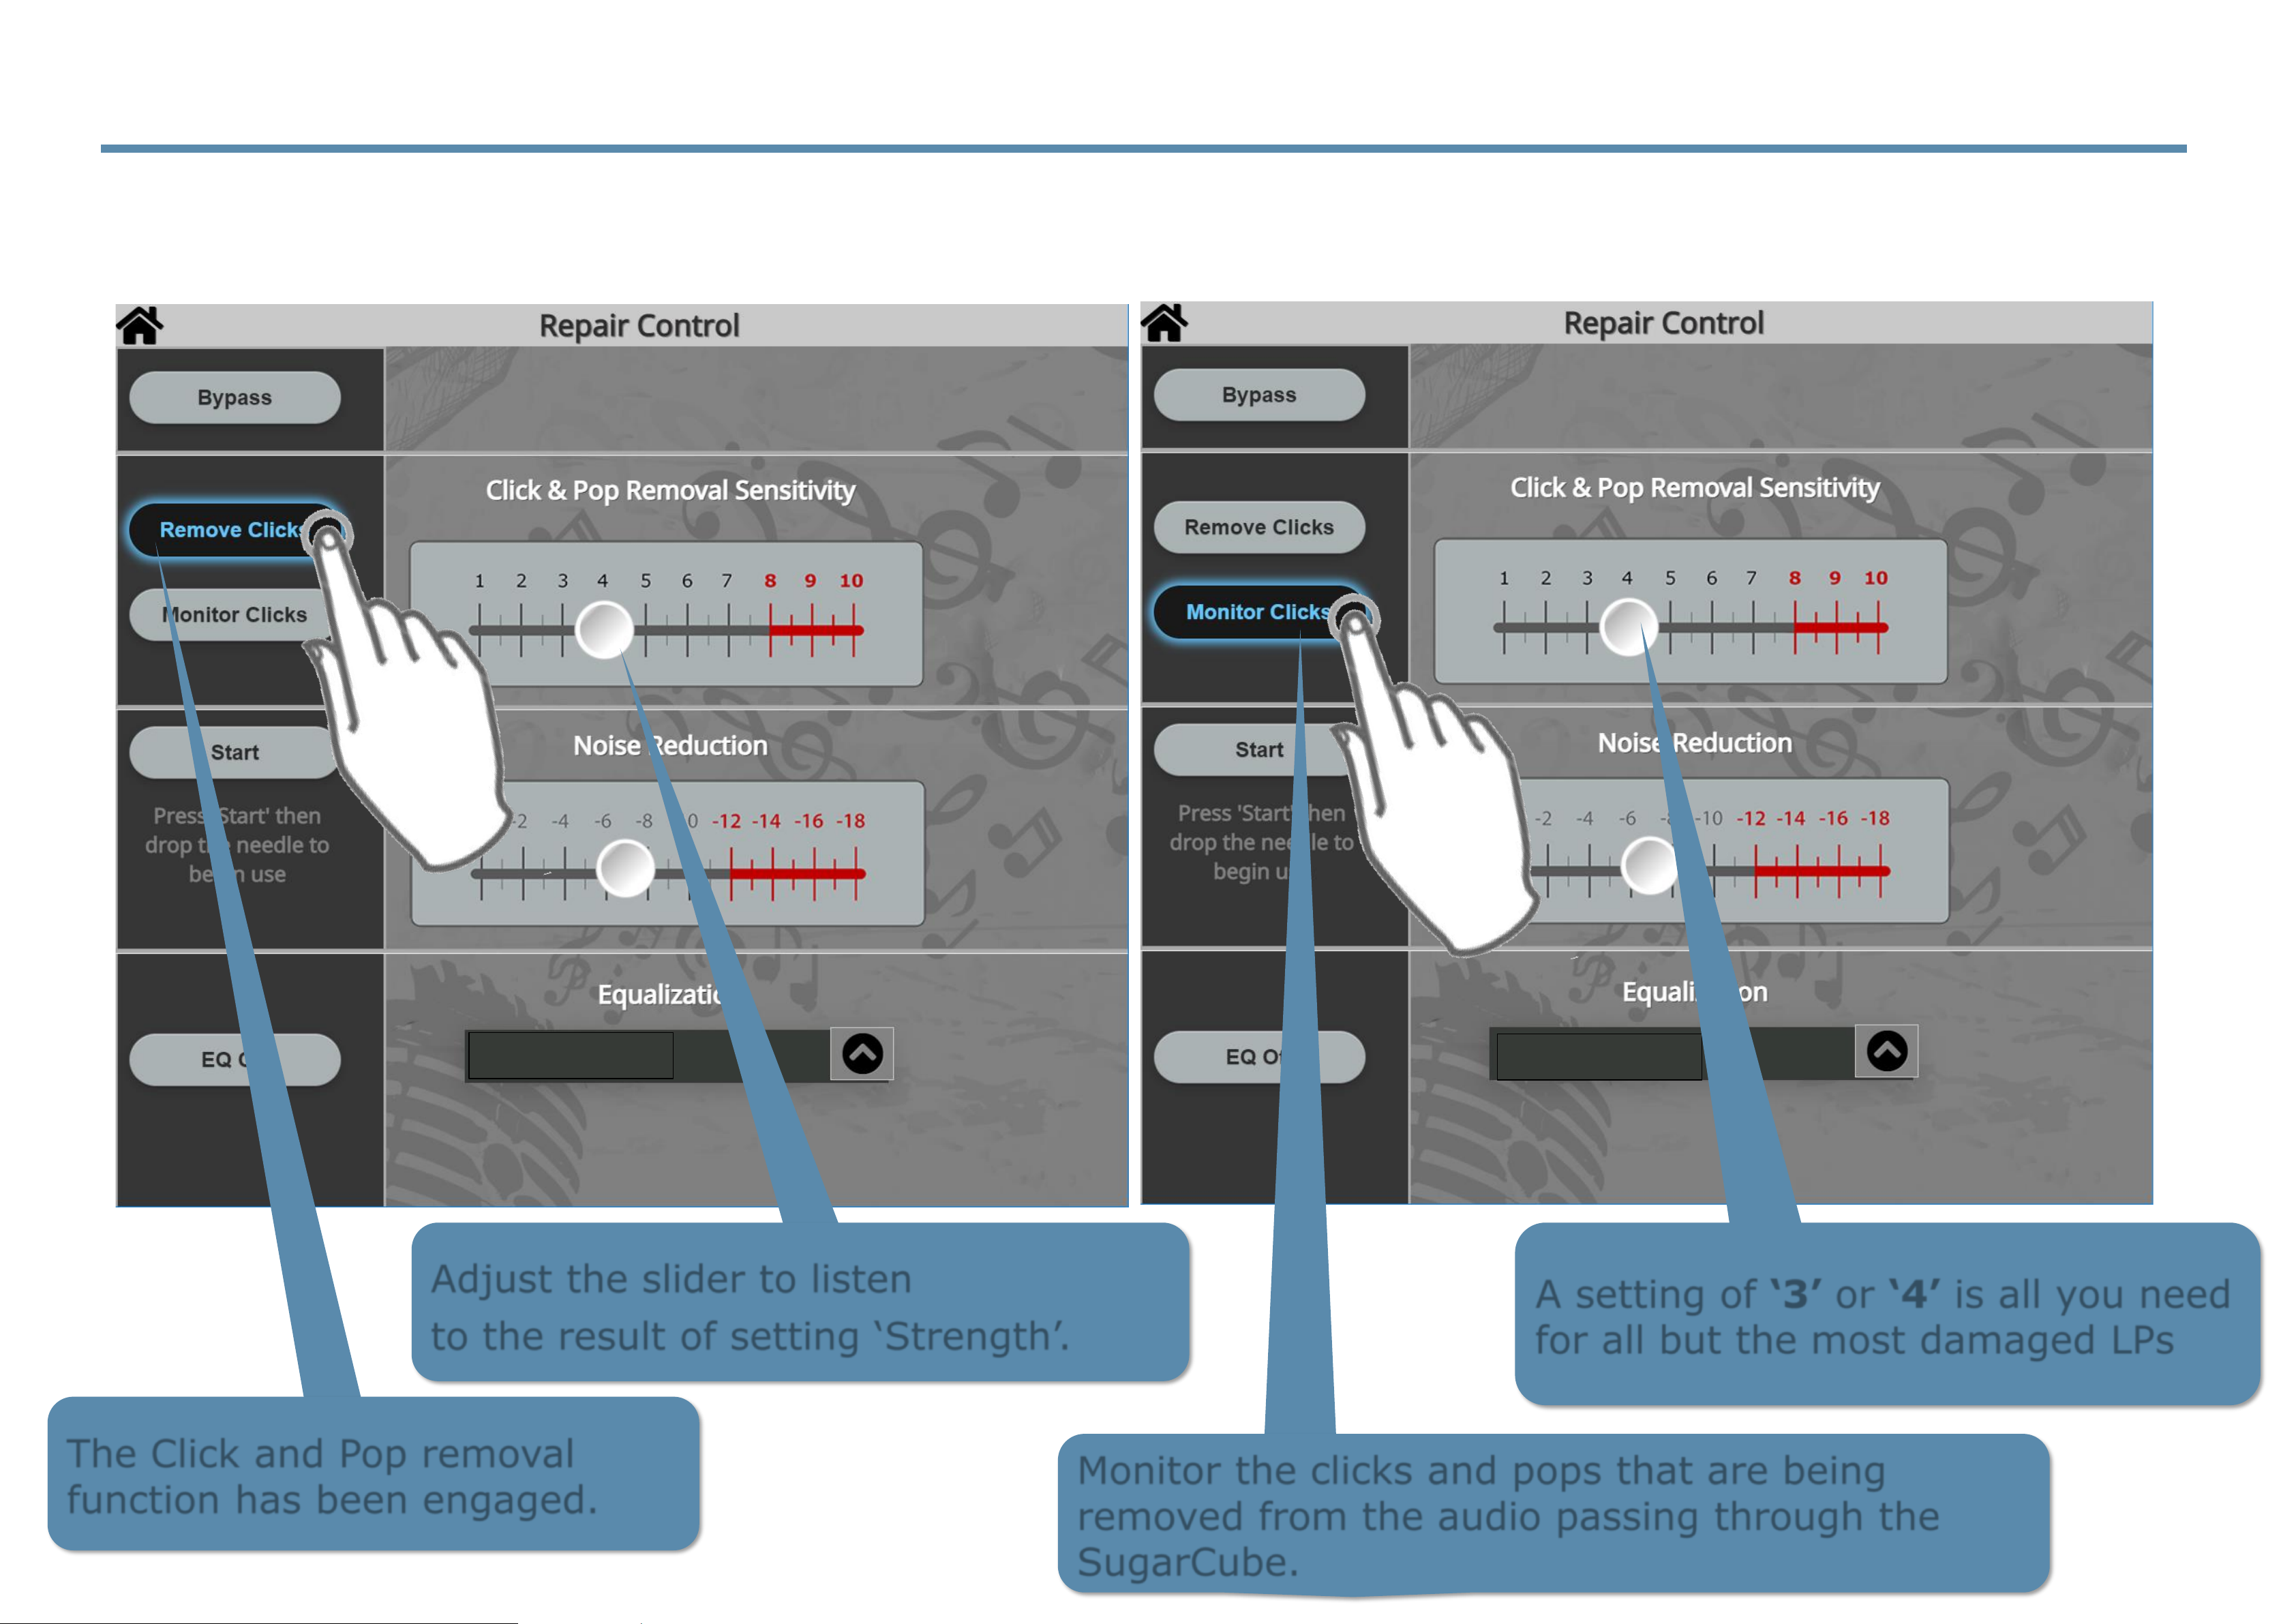
4.2 Repair Control Functions
Controlling Click and Pop Removal
Adjust the slider to listen
to the result of setting ‘Strength’.
The Click and Pop removal
function has been engaged.
Monitor the clicks and pops that are being
removed from the audio passing through the
SugarCube.
A setting of ‘3’ or ‘4’ is all you need
for all but the most damaged LPs
EQ Disabled
EQ Disabled
Page 54
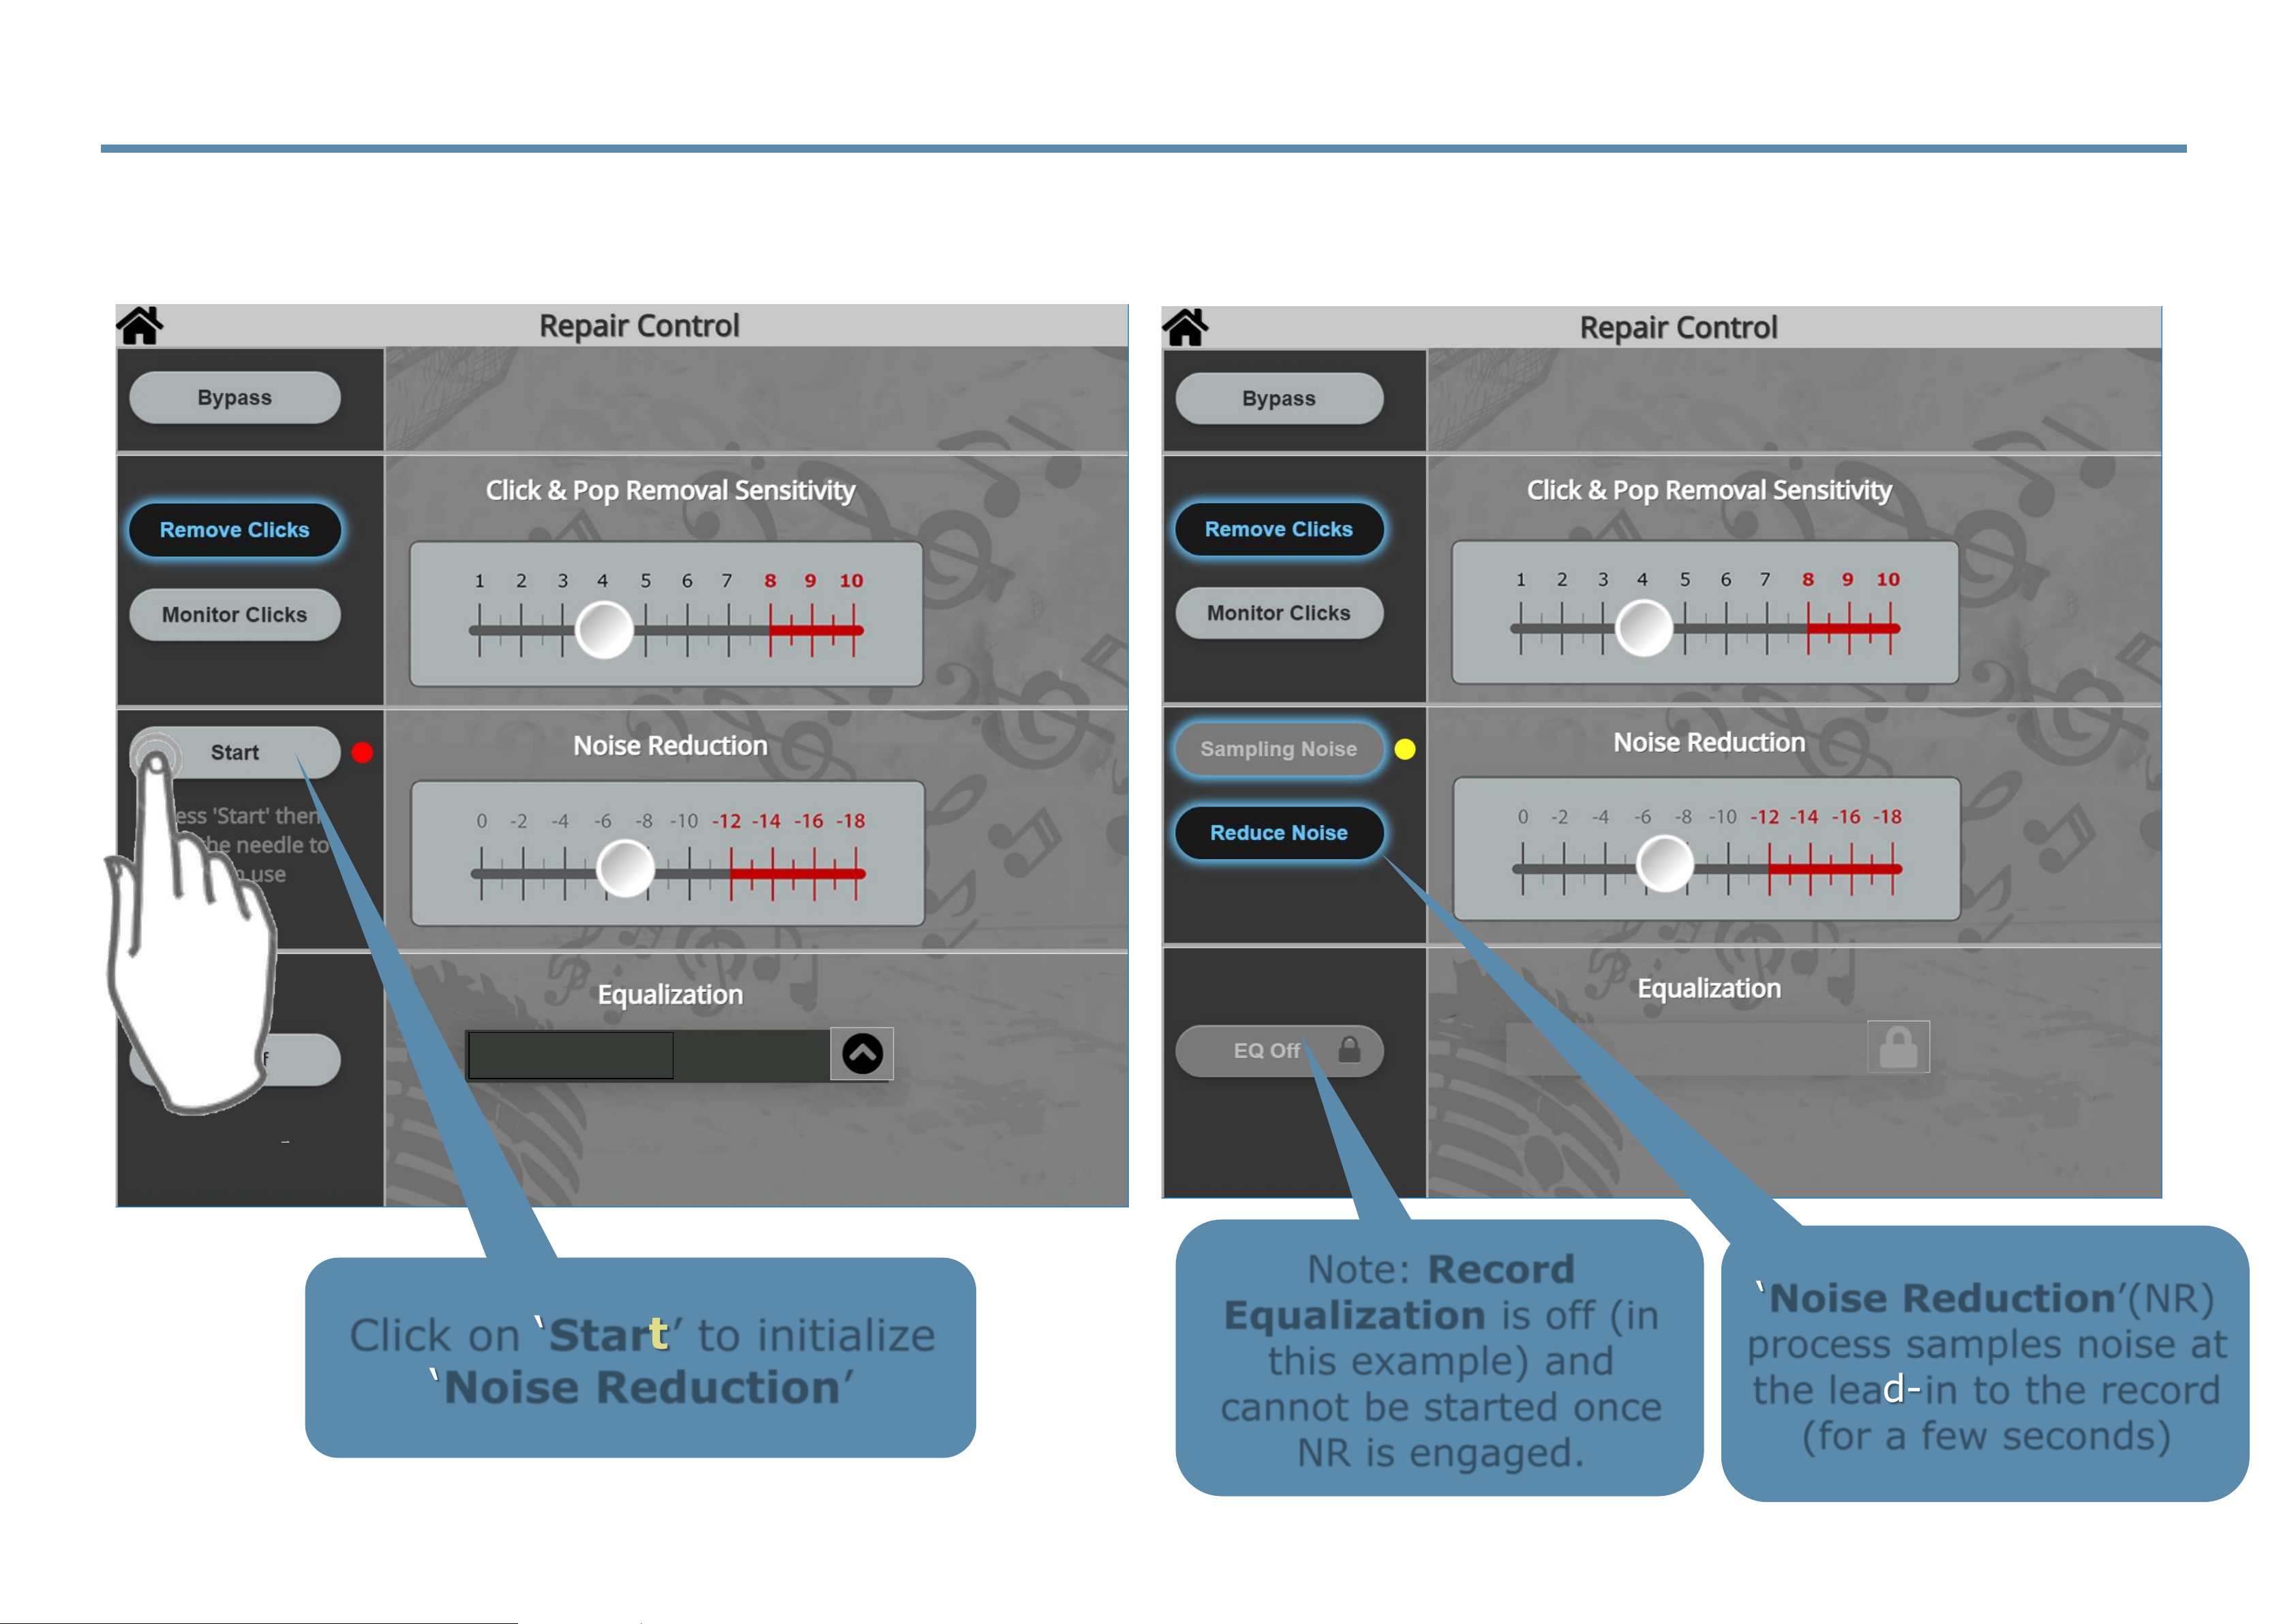
4.3 Noise Reduction Functions
Controlling Noise Reduction
‘Noise Reduction’(NR)
process samples noise at
the lead-in to the record
(for a few seconds)
Note: Record
Equalization is off (in
this example) and
cannot be started once
NR is engaged.
Click on ‘Start’ to initialize
‘Noise Reduction’
EQ Disabled
Page 55
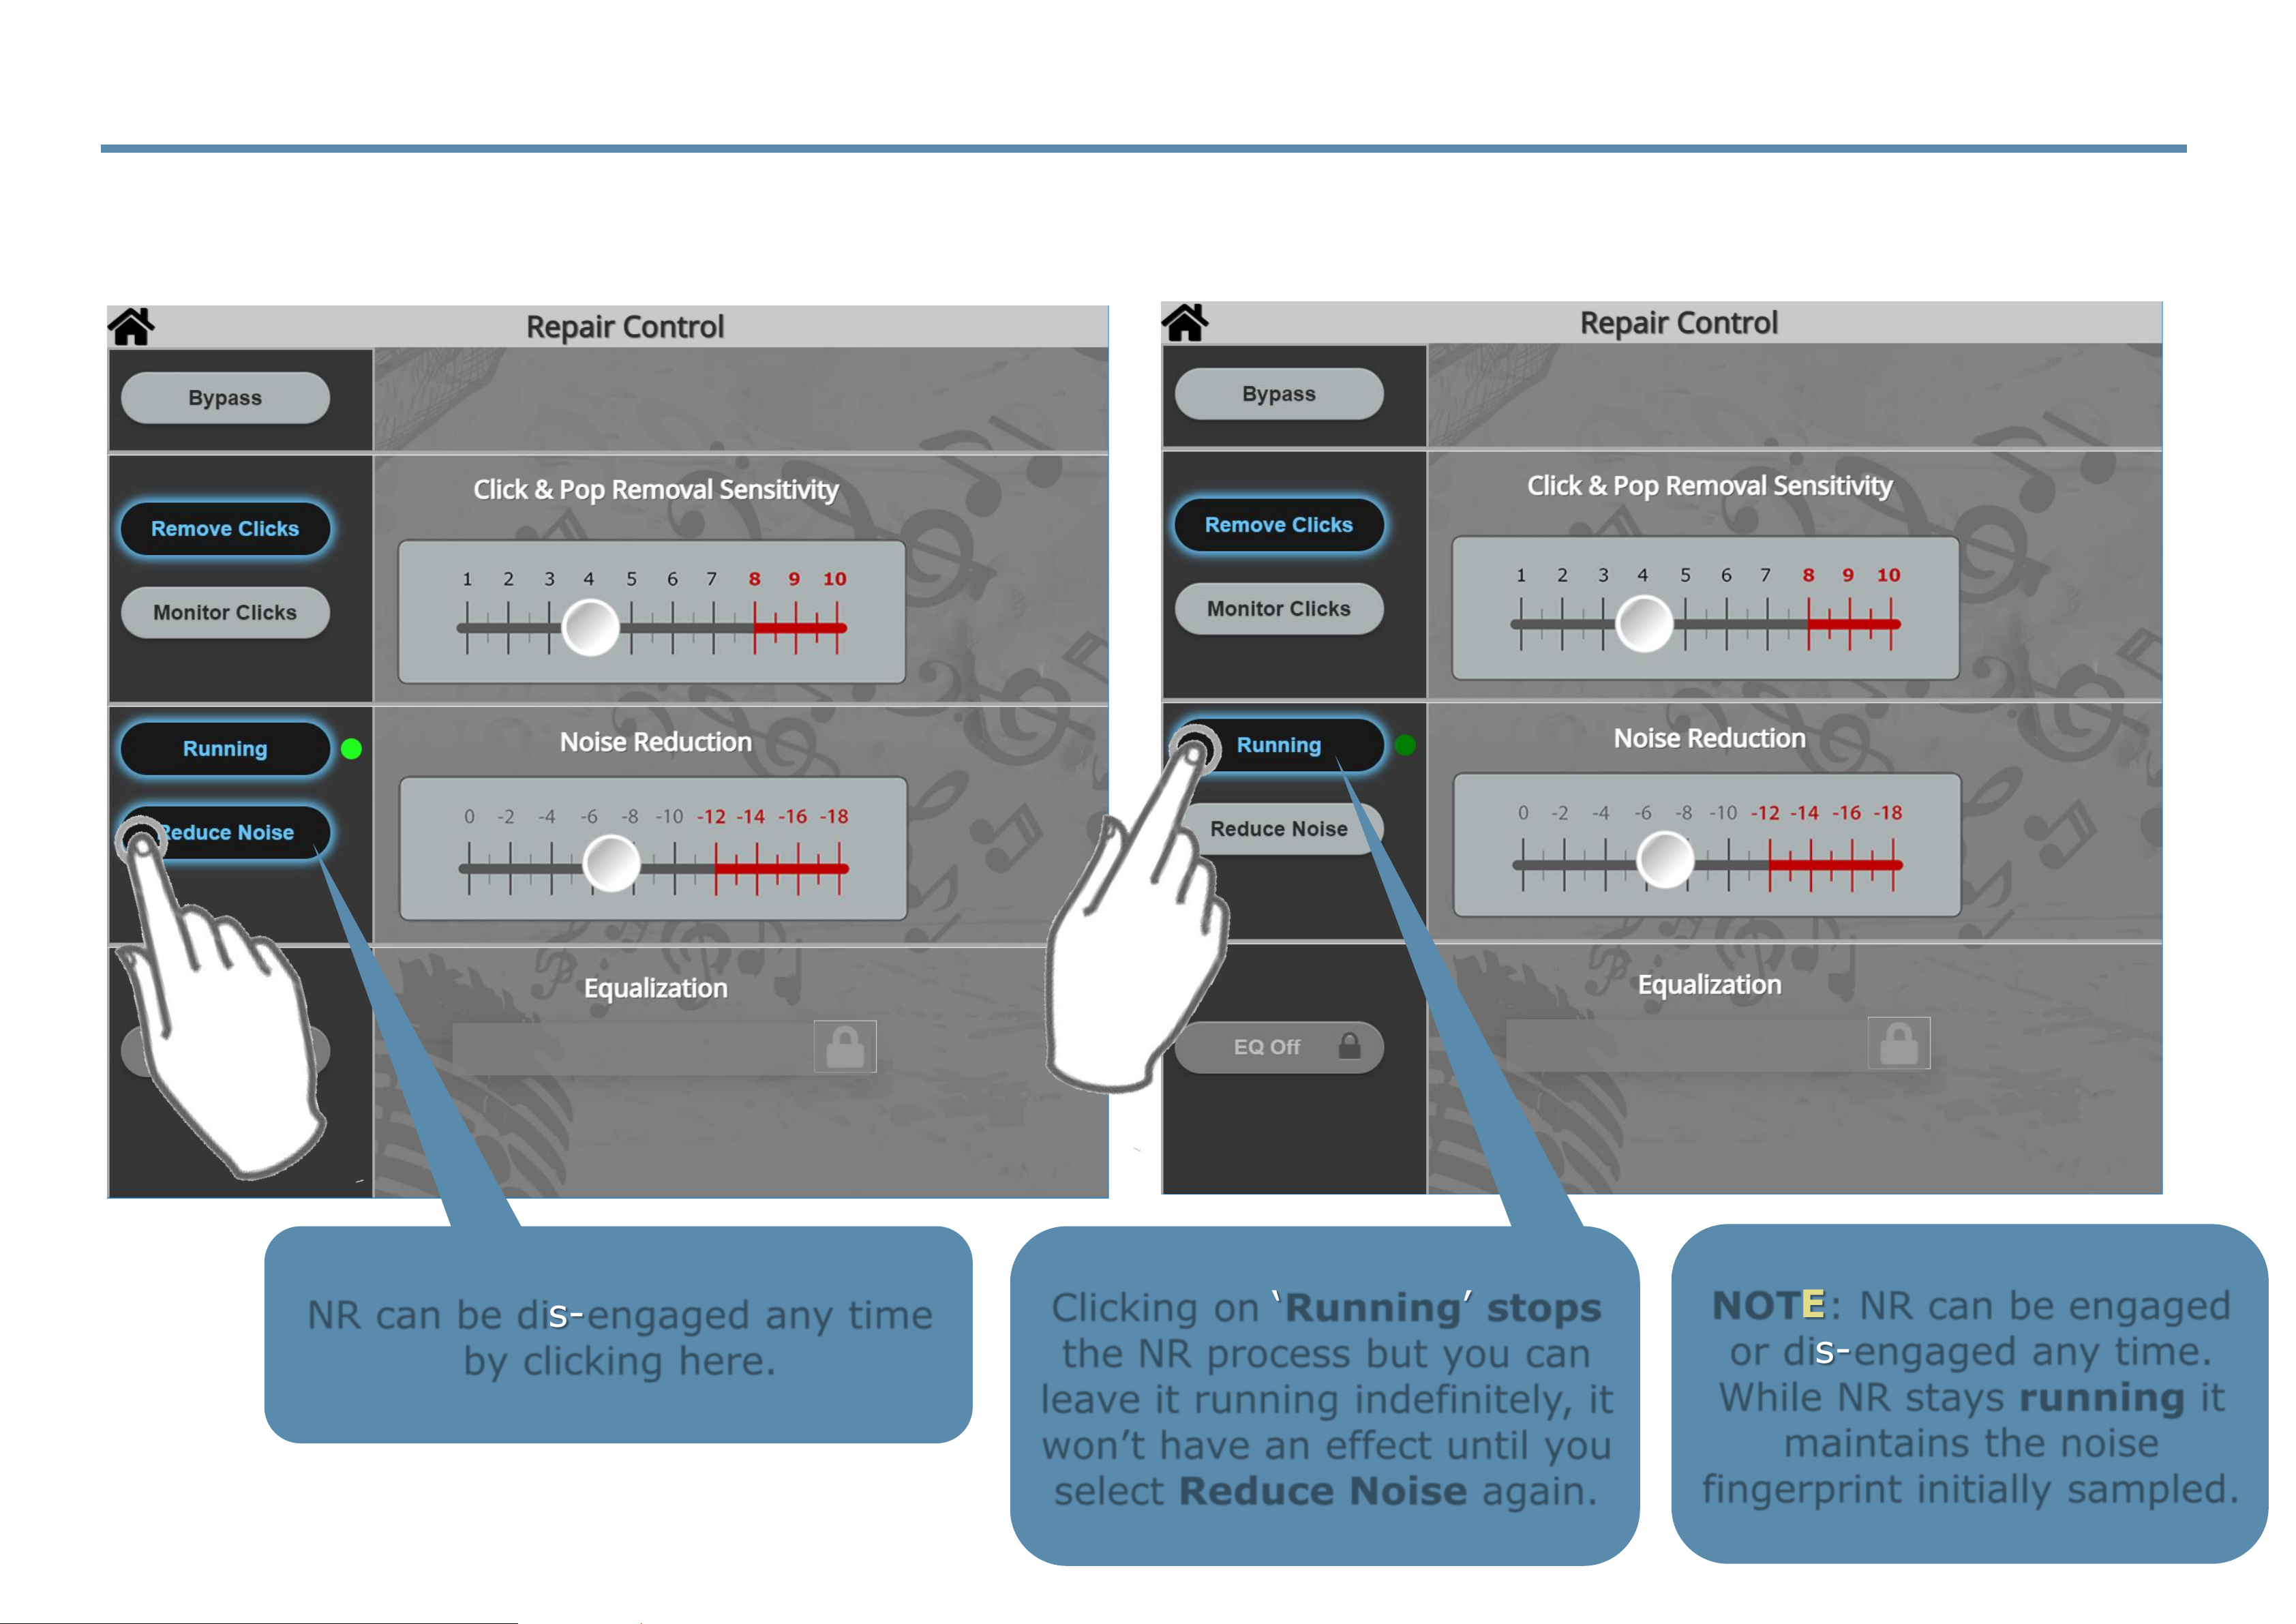
4.4 Noise Reduction Functions
Controlling Noise Reduction
NR can be dis-engaged any time
by clicking here.
NOTE: NR can be engaged
or dis-engaged any time.
While NR stays running it
maintains the noise
fingerprint initially sampled.
Clicking on ‘Running’ stops
the NR process but you can
leave it running indefinitely, it
won’t have an effect until you
select Reduce Noise again.
Page 56
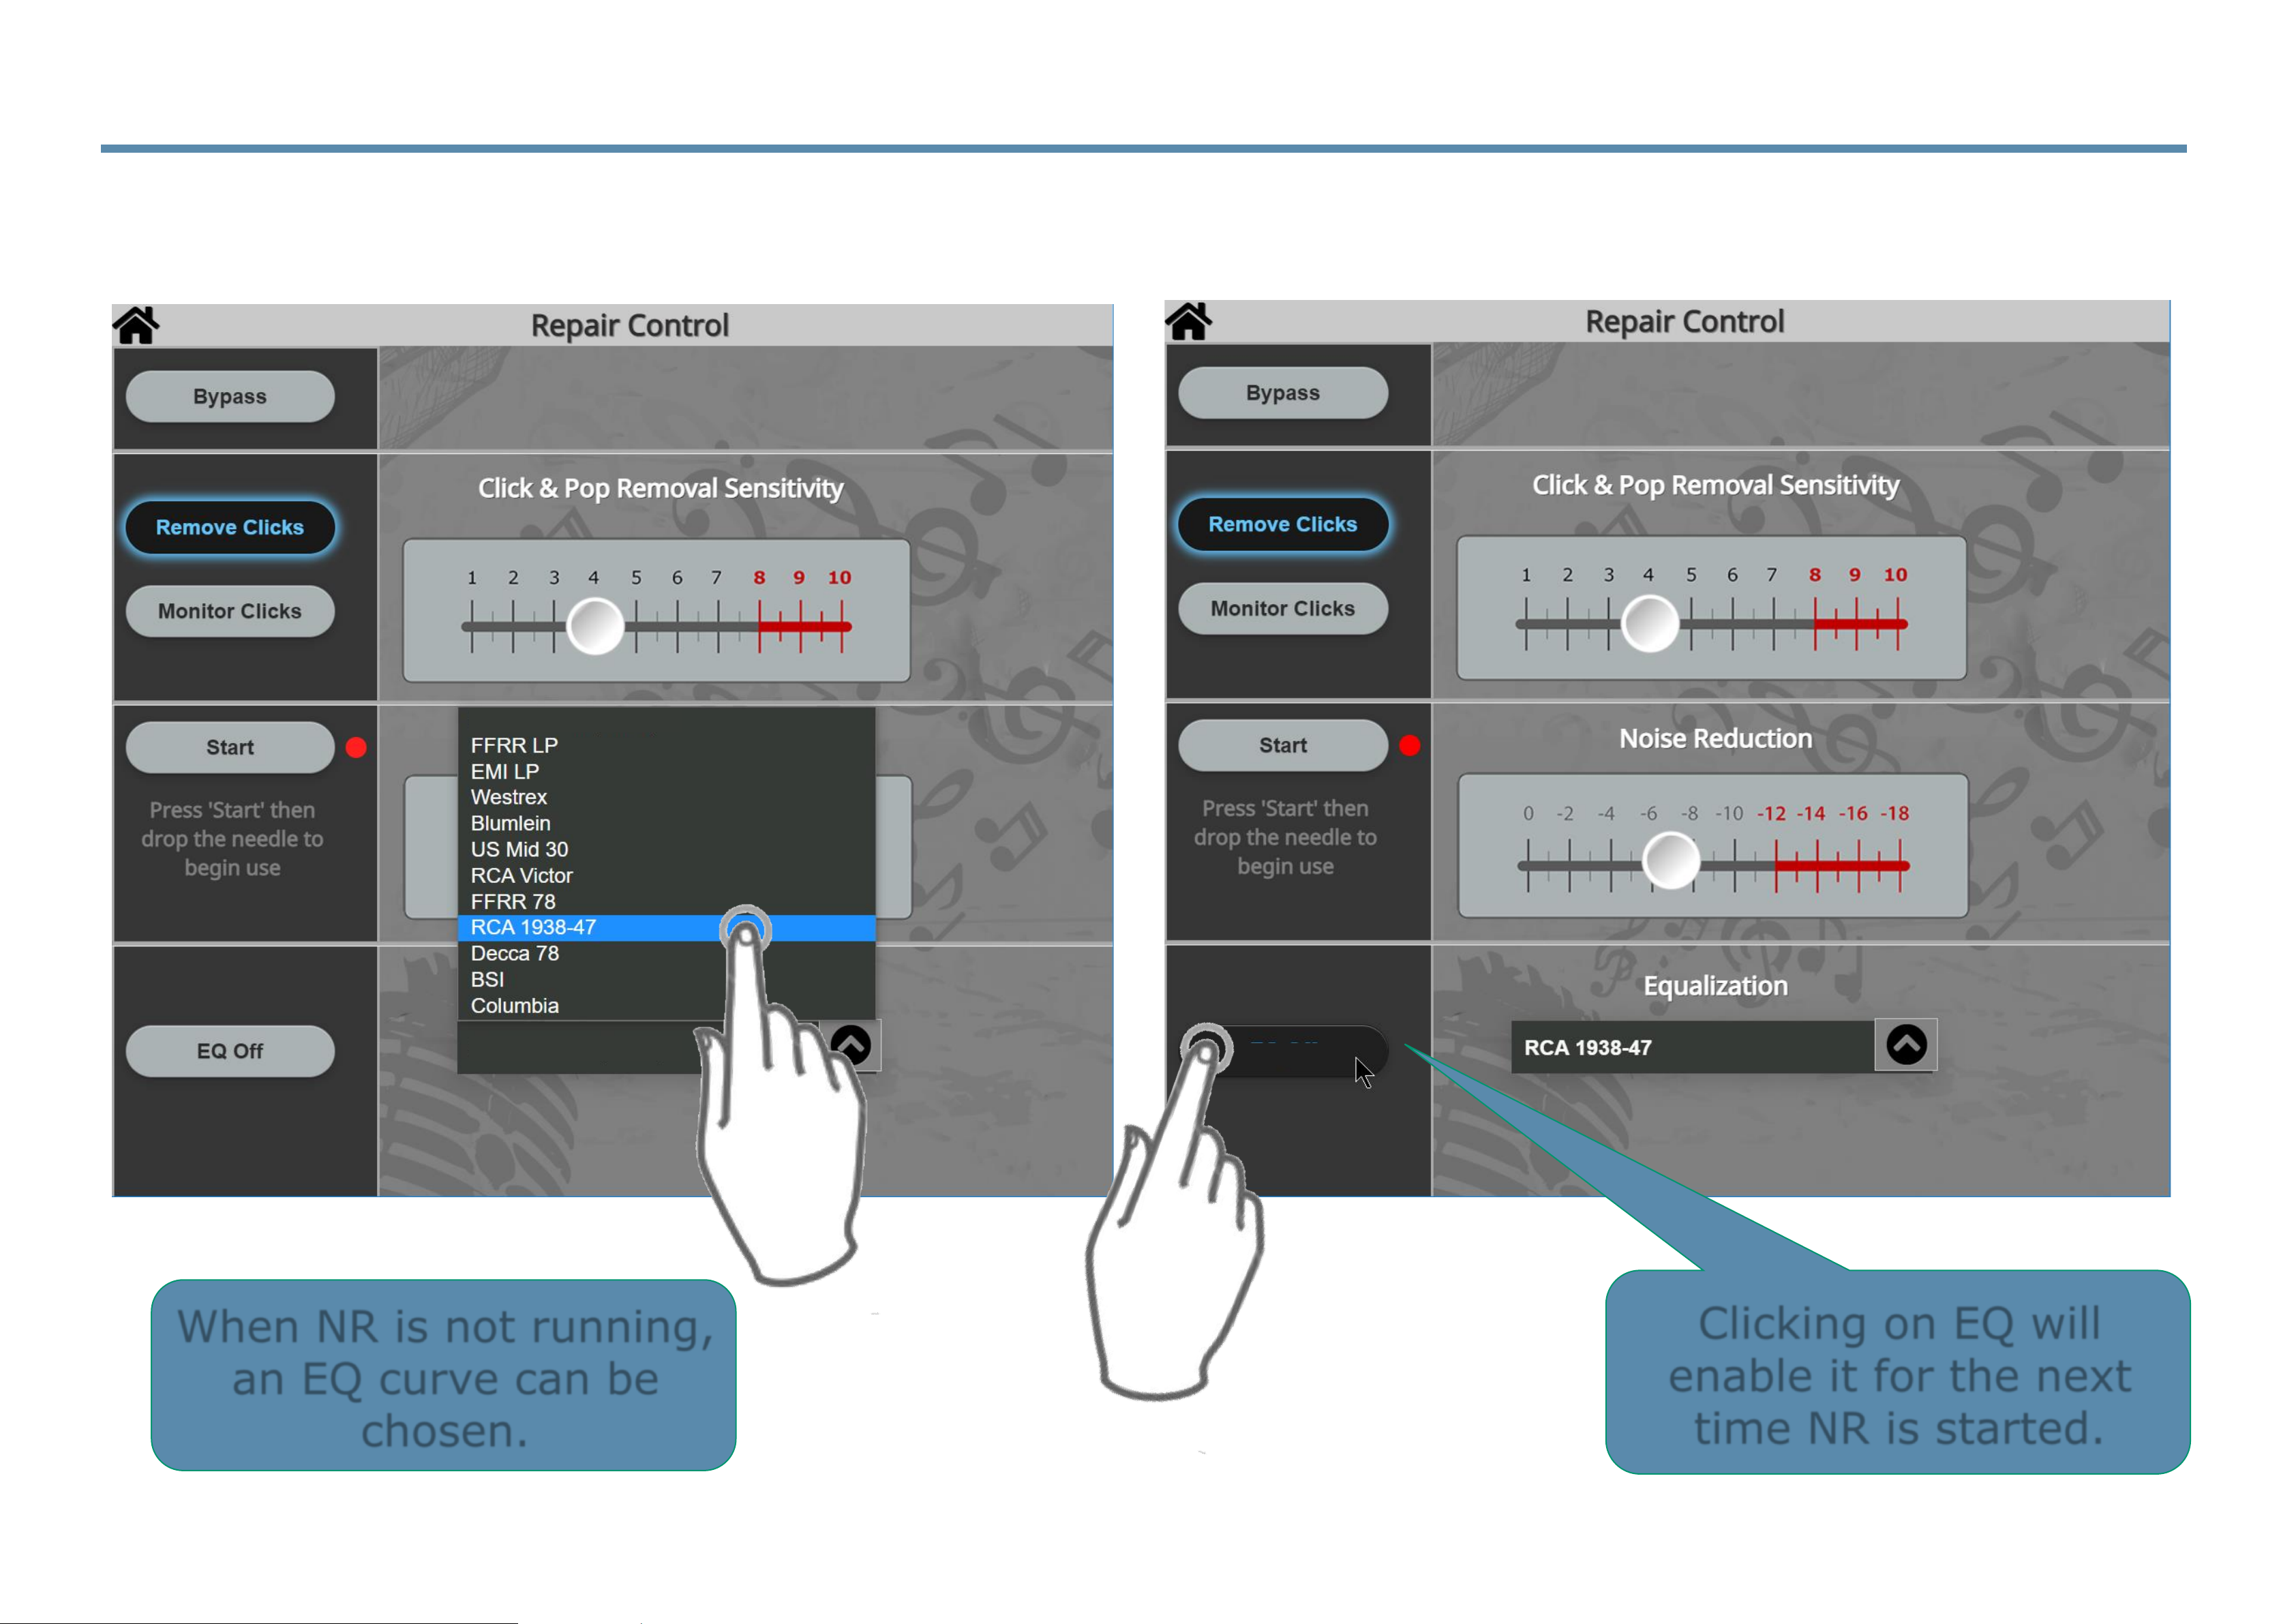
4.5 Equalization (EQ) Compensation
Controlling Playback EQ Curves
When NR is not running,
an EQ curve can be
chosen.
Clicking on EQ will
enable it for the next
time NR is started.
EQ Enabled
EQ Disabled
EQ Disabled
Page 57
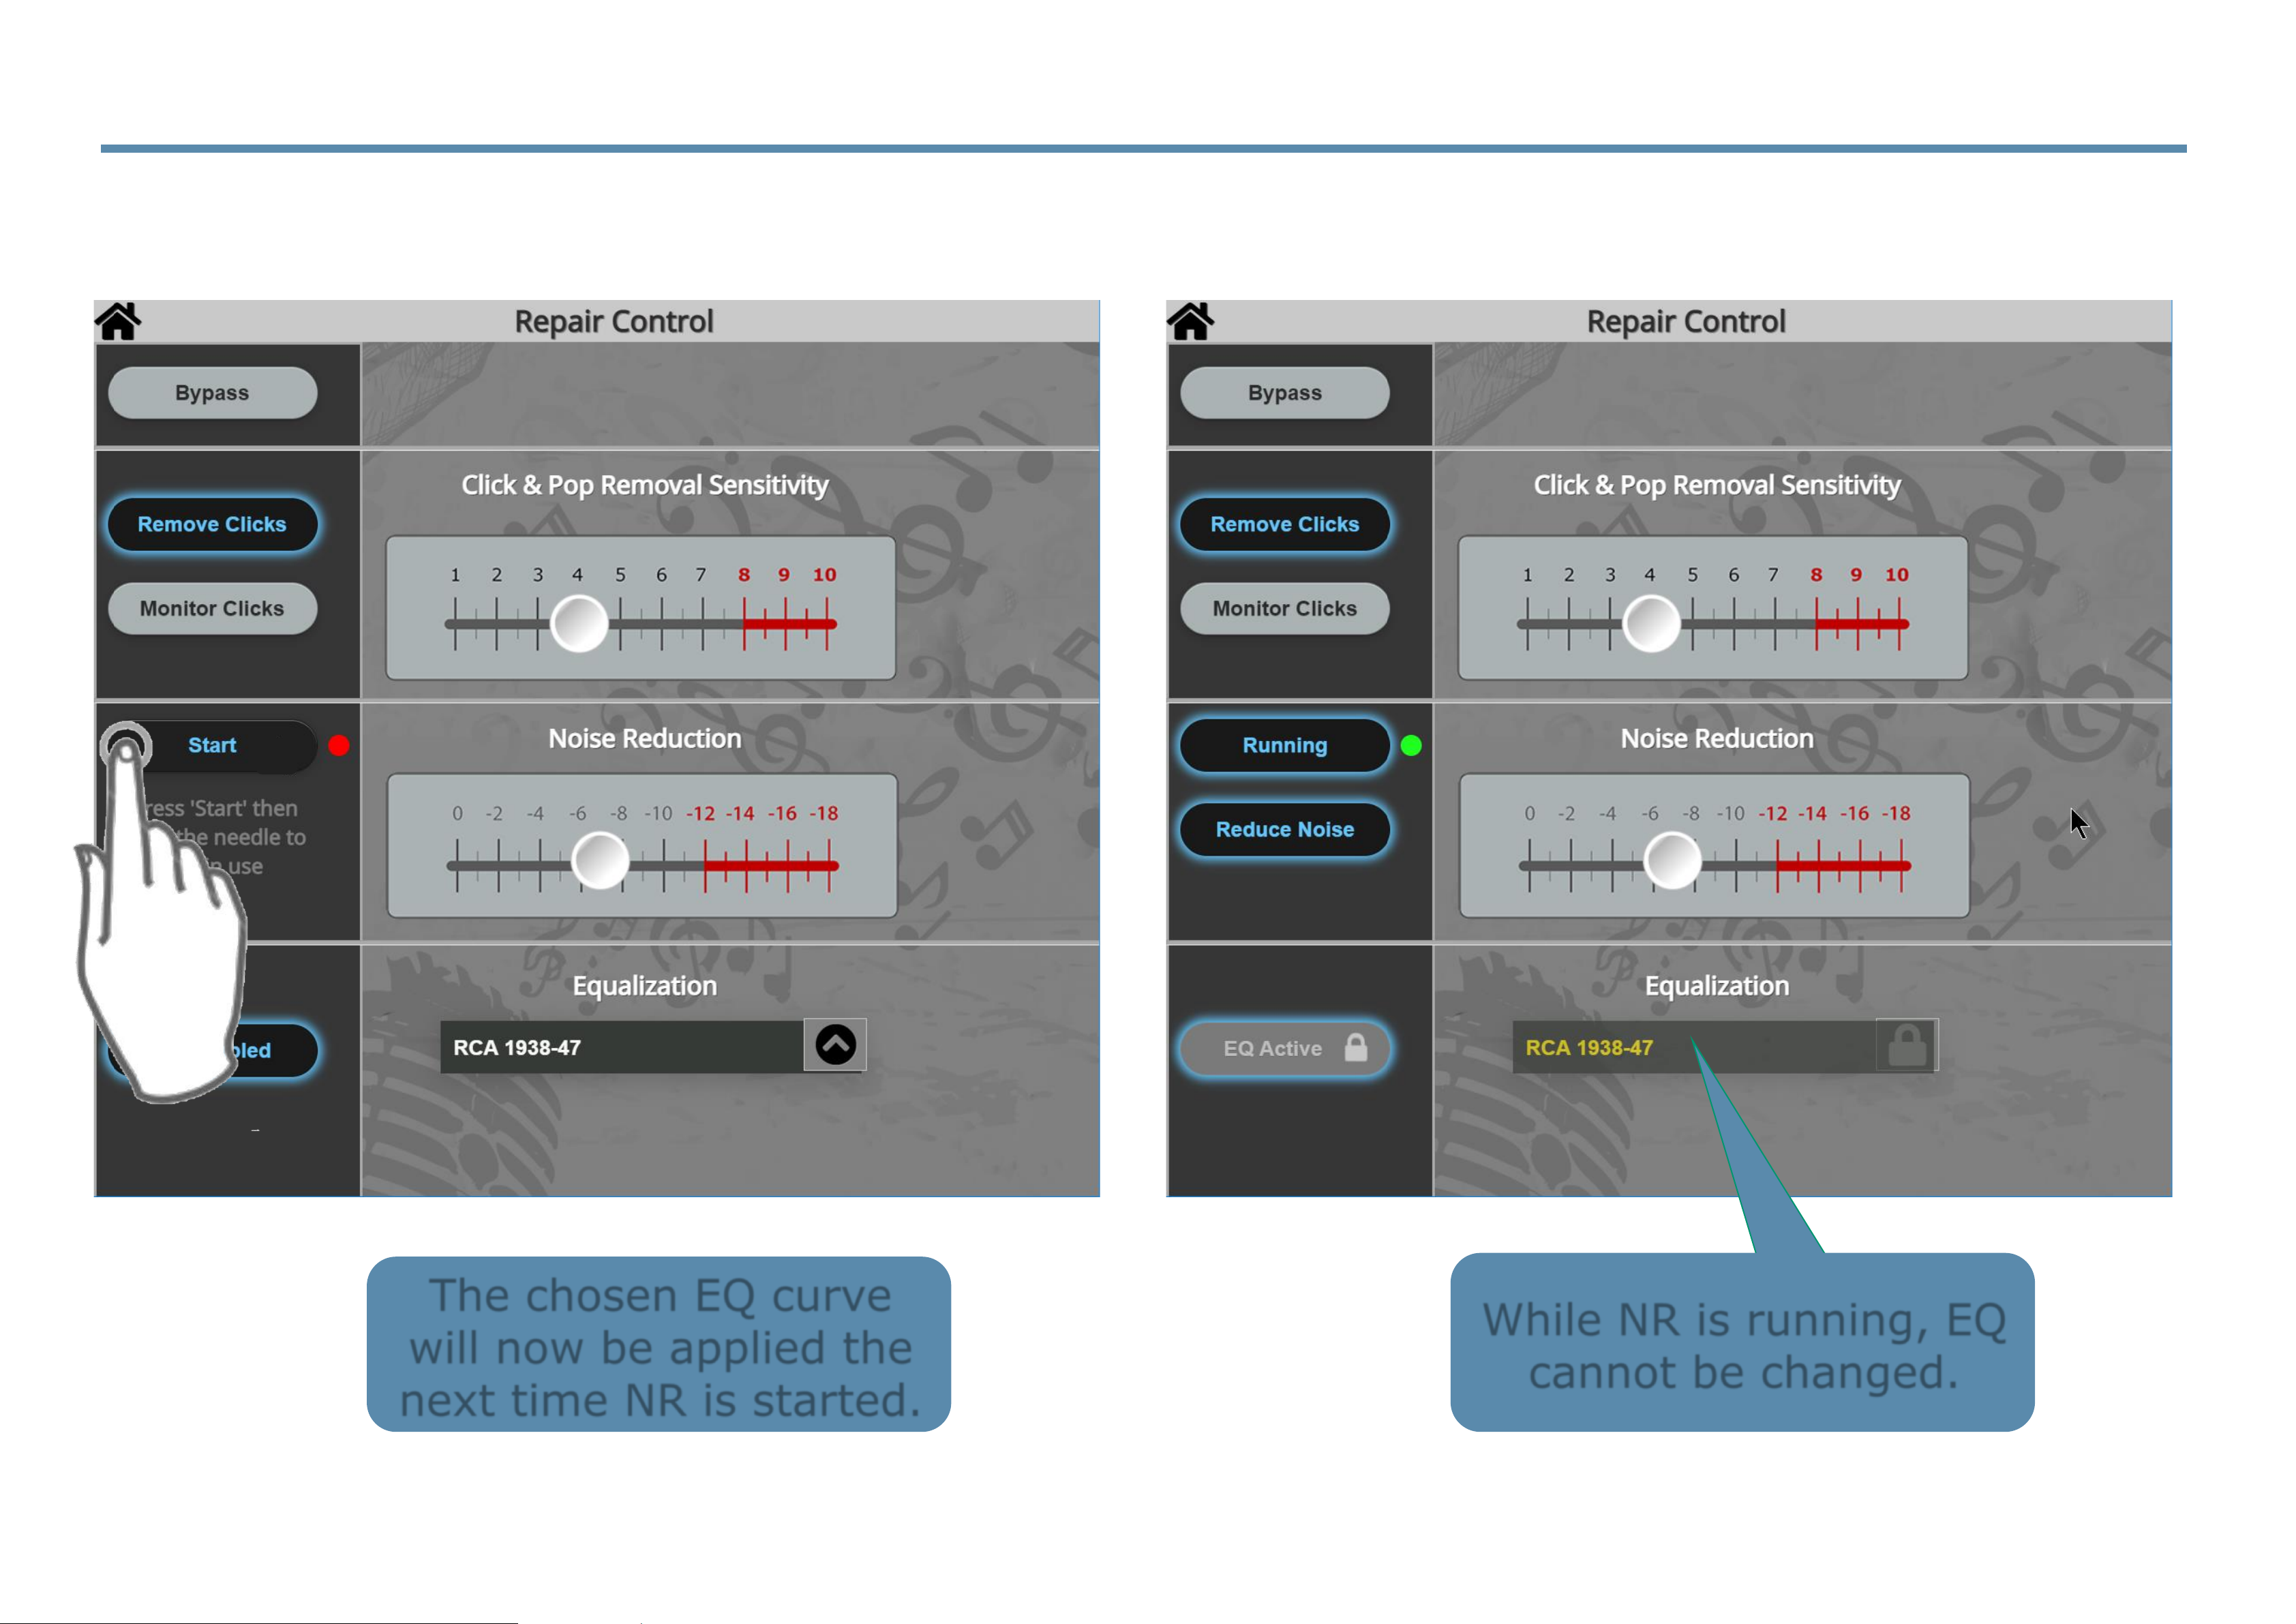
4.6 Equalization (EQ) Compensation
Controlling Playback EQ Curves
The chosen EQ curve
will now be applied the
next time NR is started.
While NR is running, EQ
cannot be changed.
Page 58
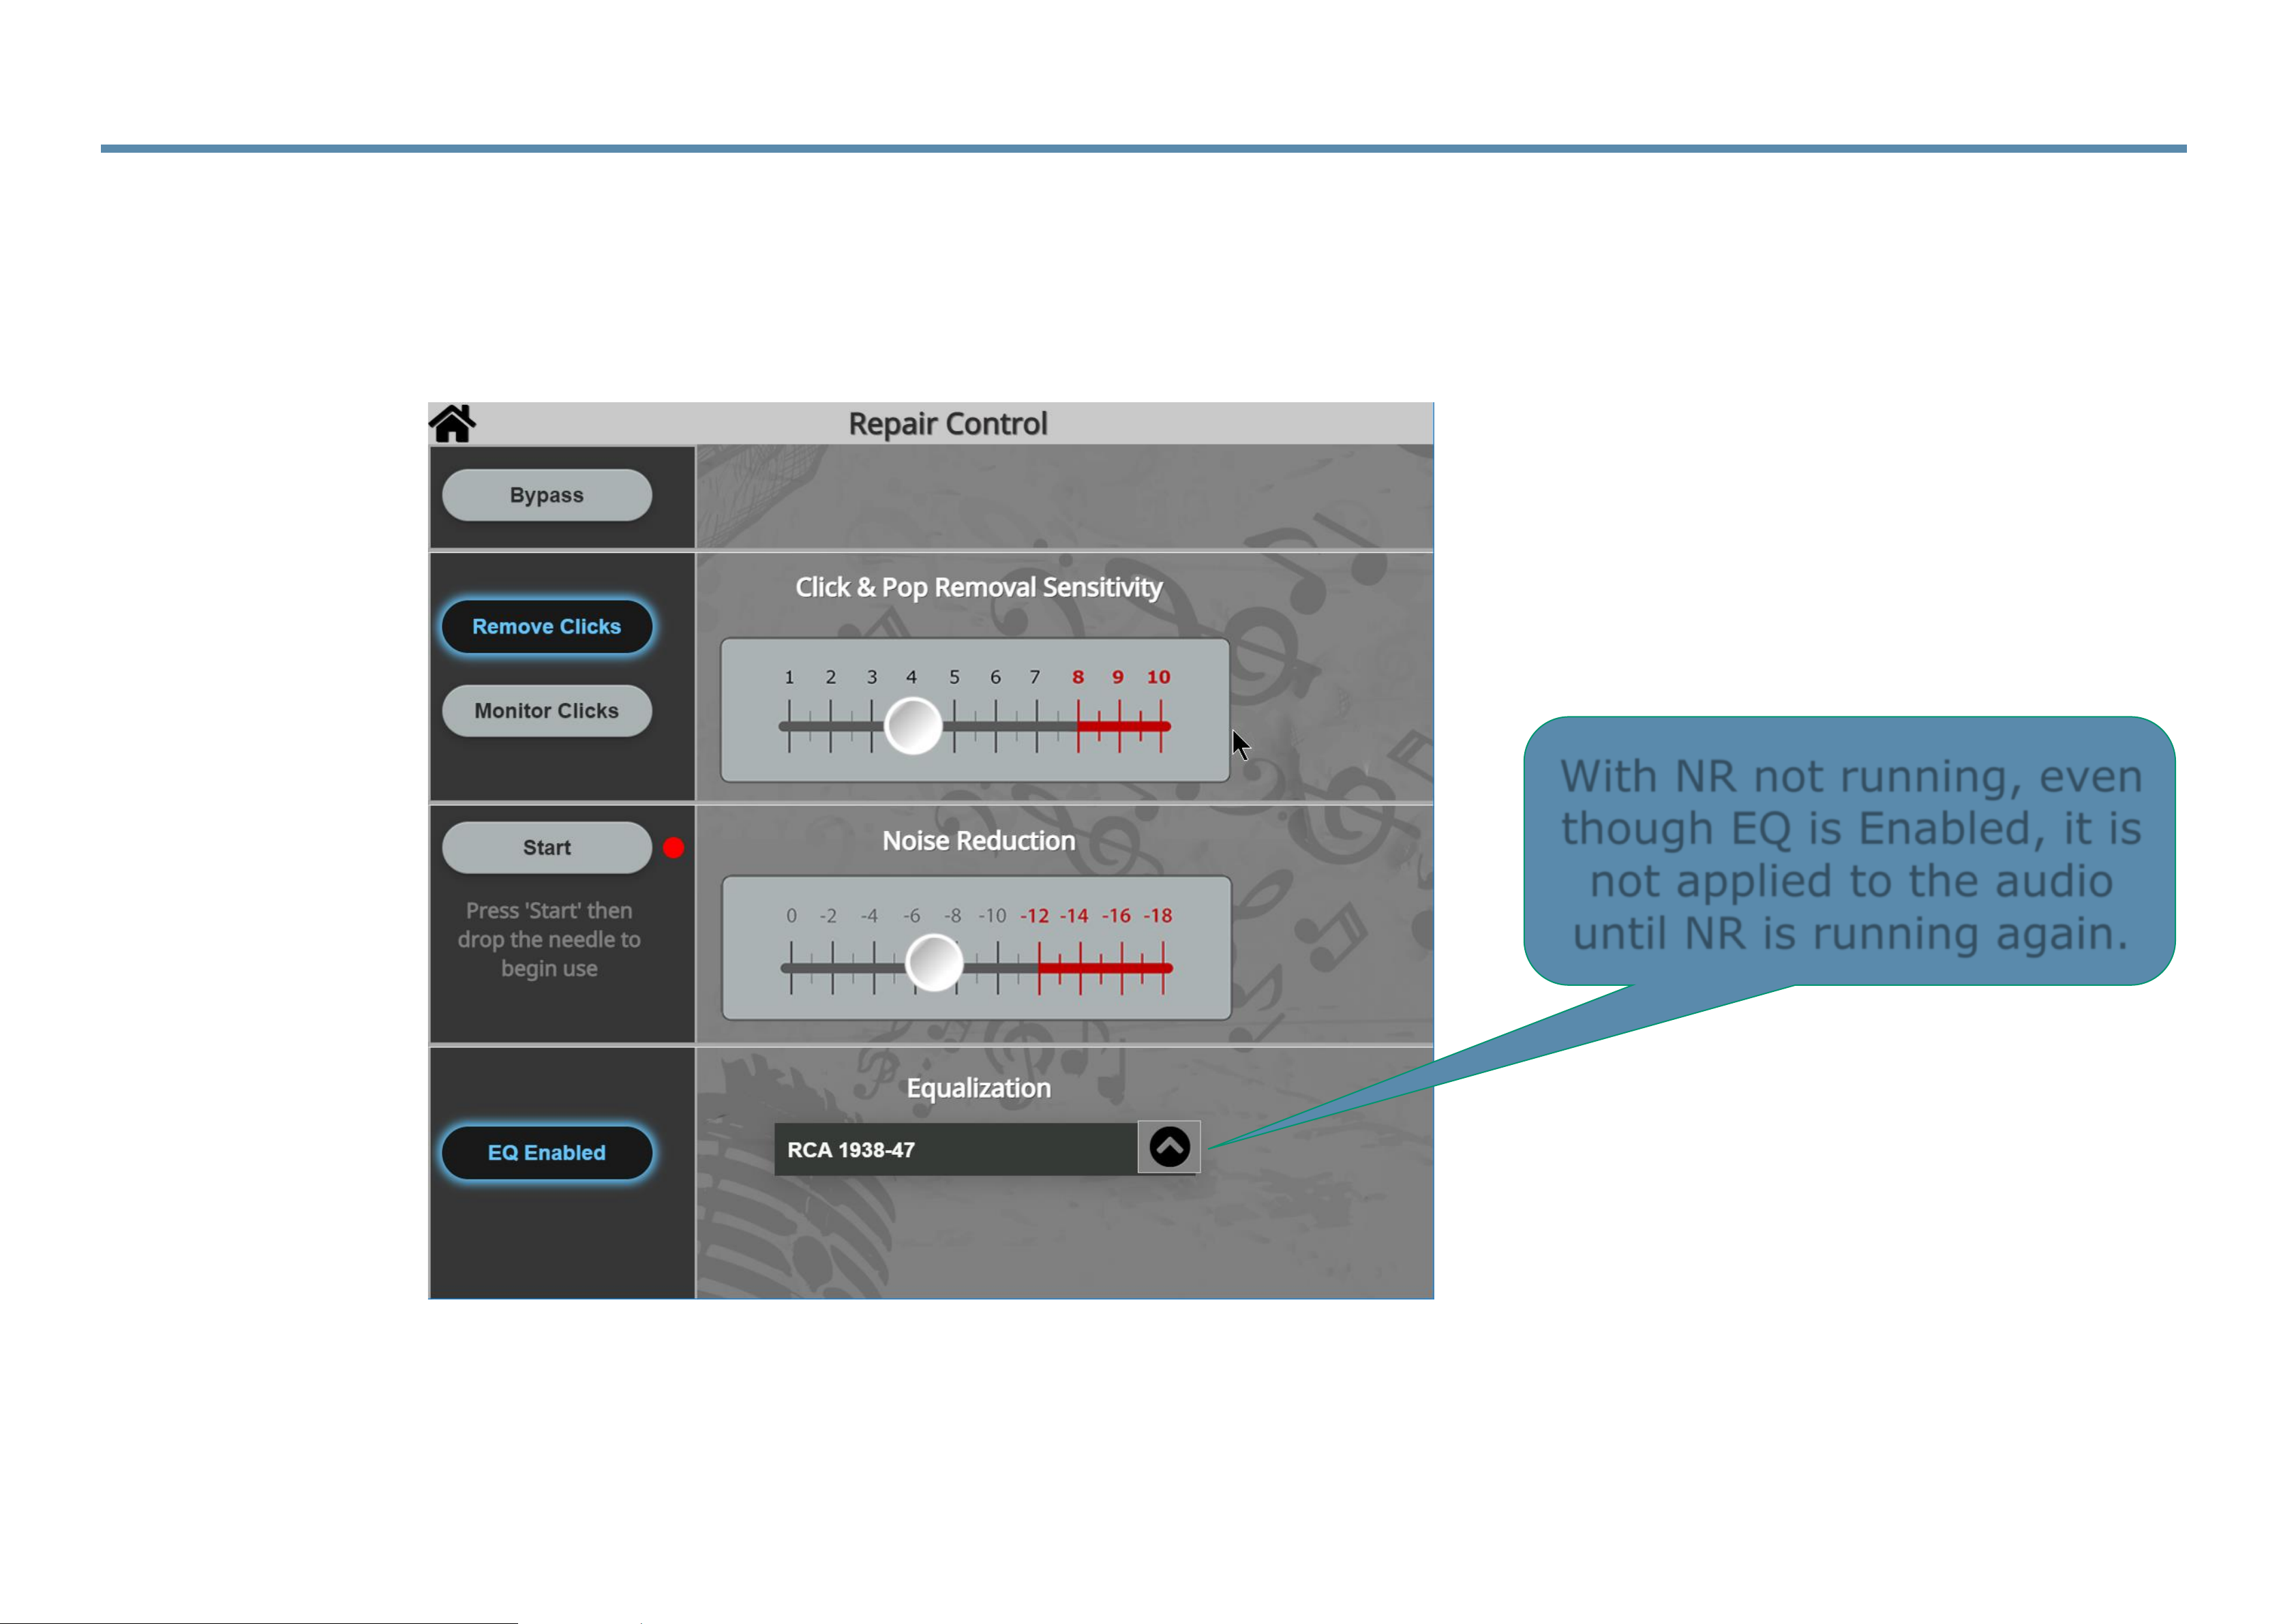
4.7 Equalization (EQ) Compensation
Controlling Playback EQ Curves
With NR not running, even
though EQ is Enabled, it is
not applied to the audio
until NR is running again.
Page 59
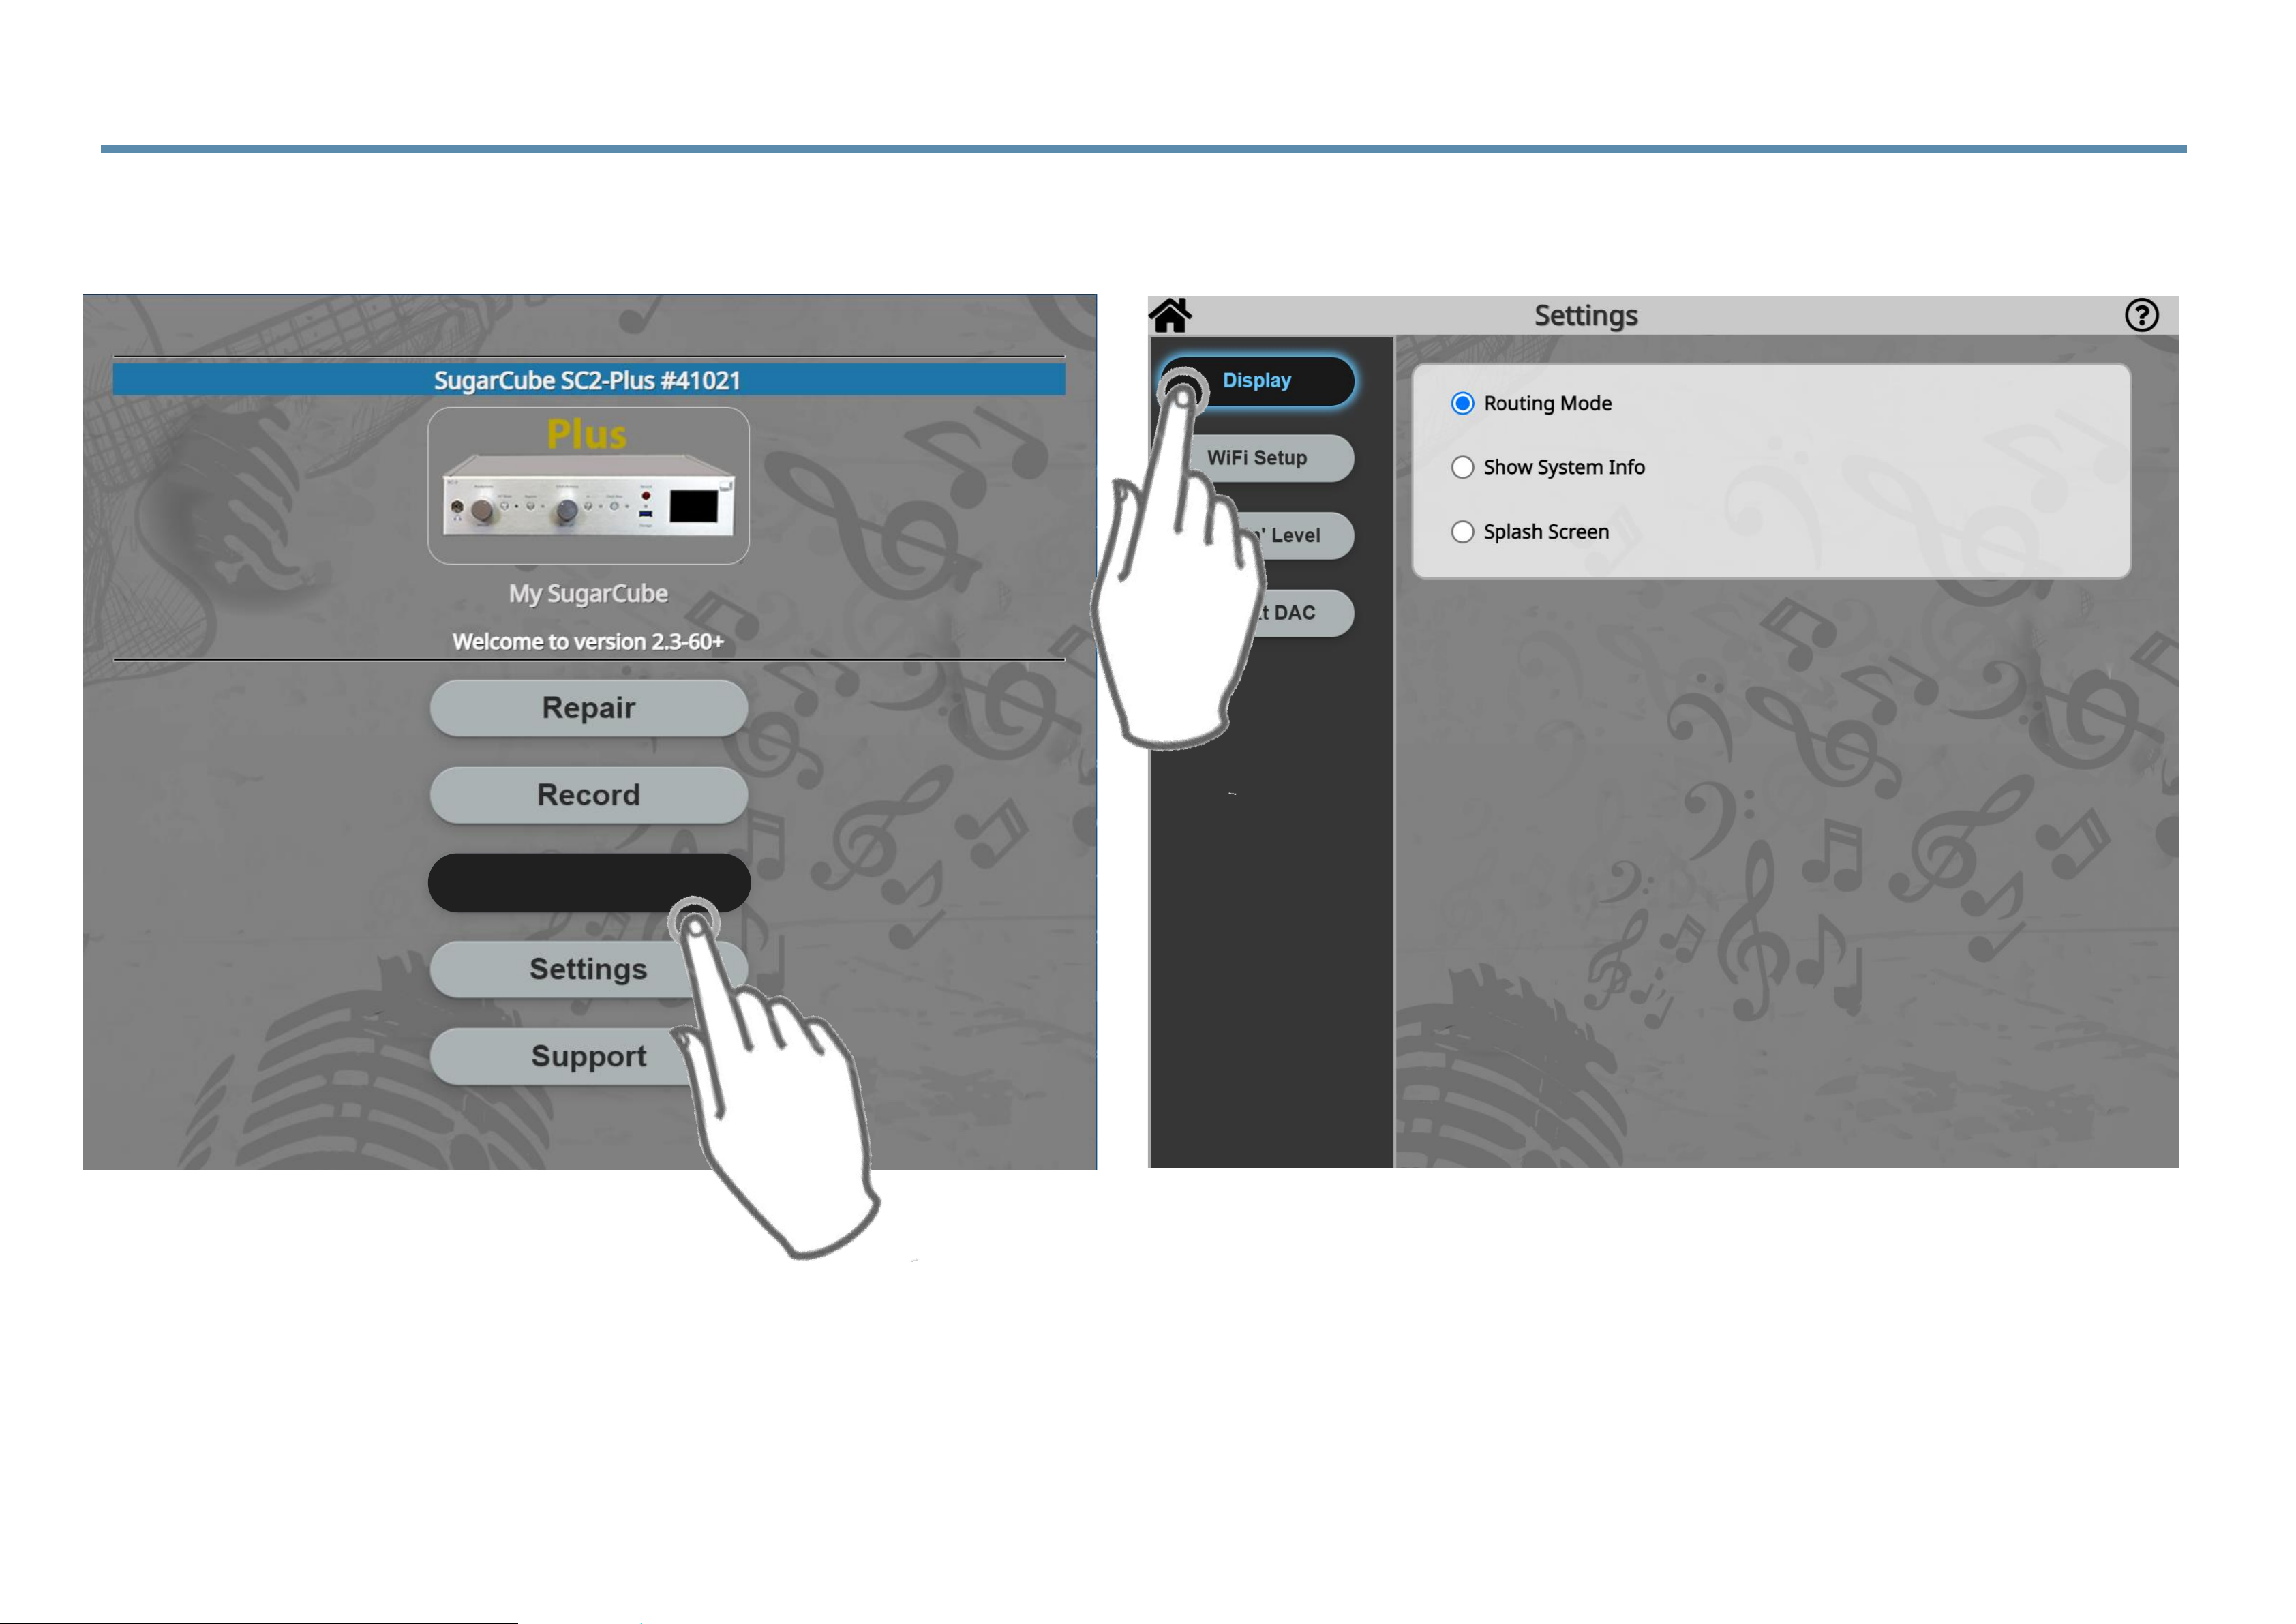
4.8 Settings and Display Functions
(1) Click on ‘Settings’
(2) Display choices include: Routing Mode to show audio
routing information on the display; Show System Info such as
IP Address, and Software Version (which can be obtained
from the front panel by pressings and holding the ‘Bypass’
button for about five seconds), and Splash Screen which is
basically the model name.
Settings
Page 60
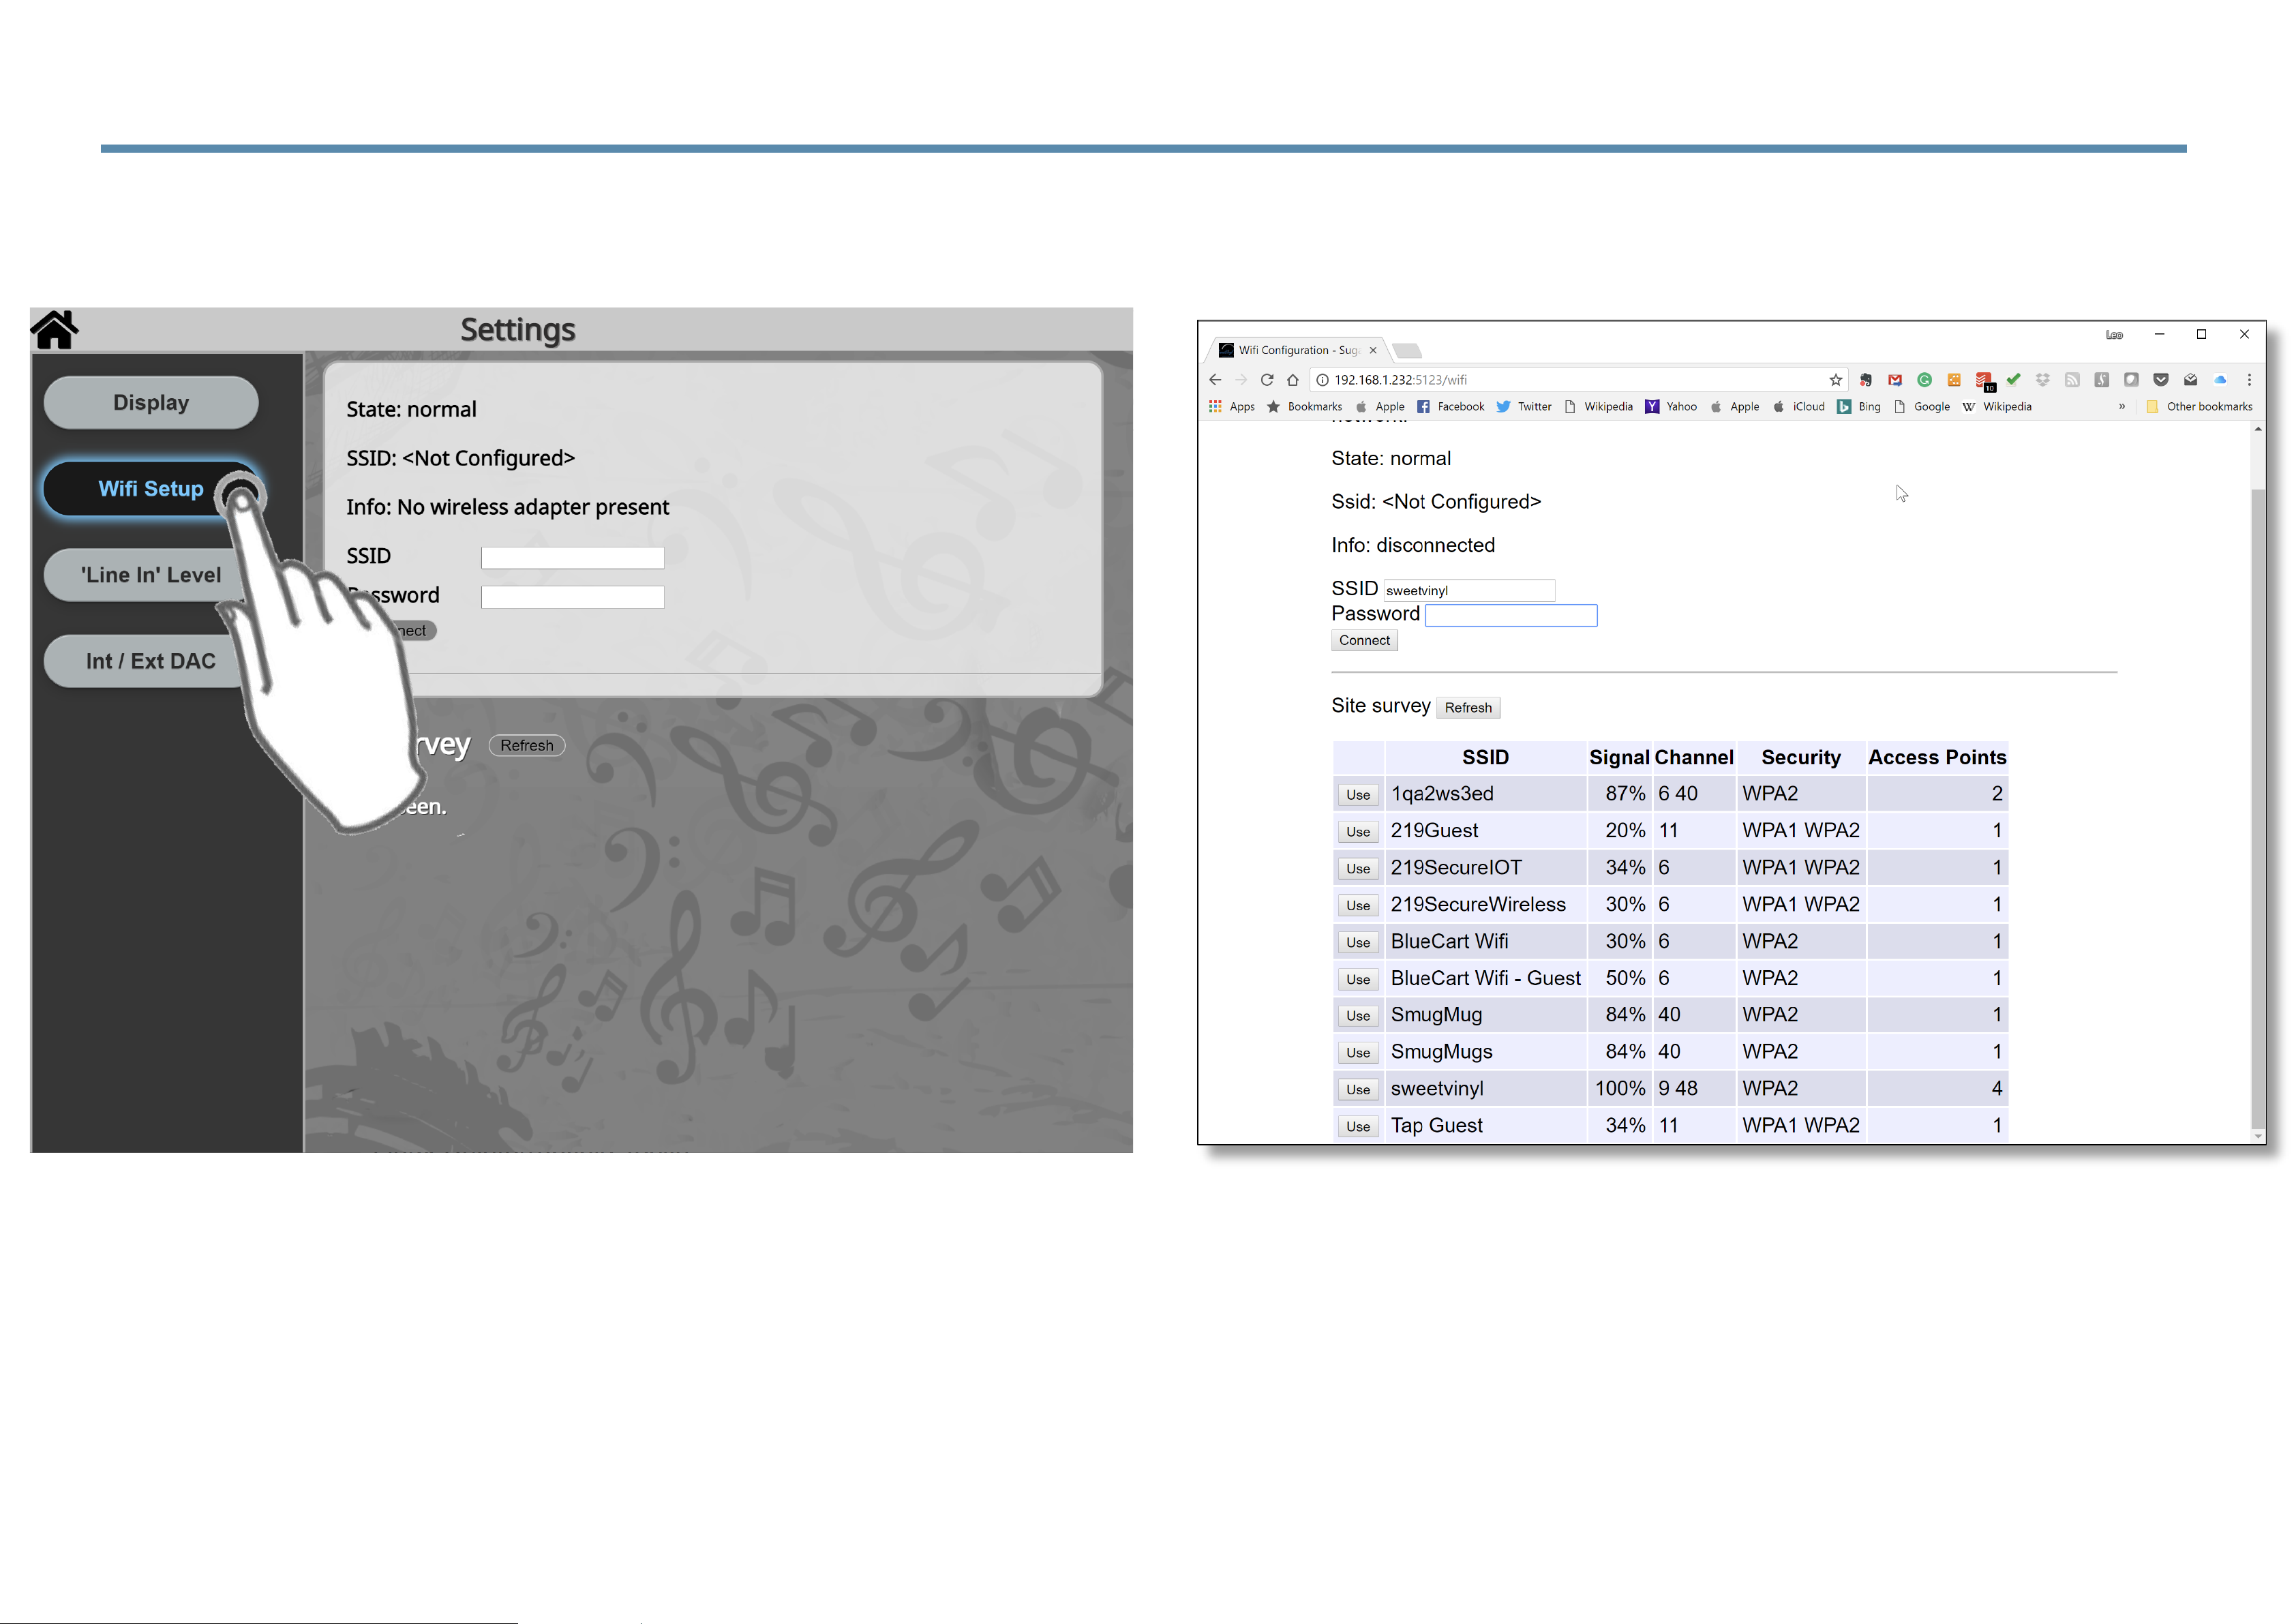
4.9 Controlling the SugarCube via WiFi
(1) Click on ‘Wifi Setup’
(2) When the Wifi dongle is in the rear
USB port available networks will appear
and you can select the SSID and enter
your password.
Page 61
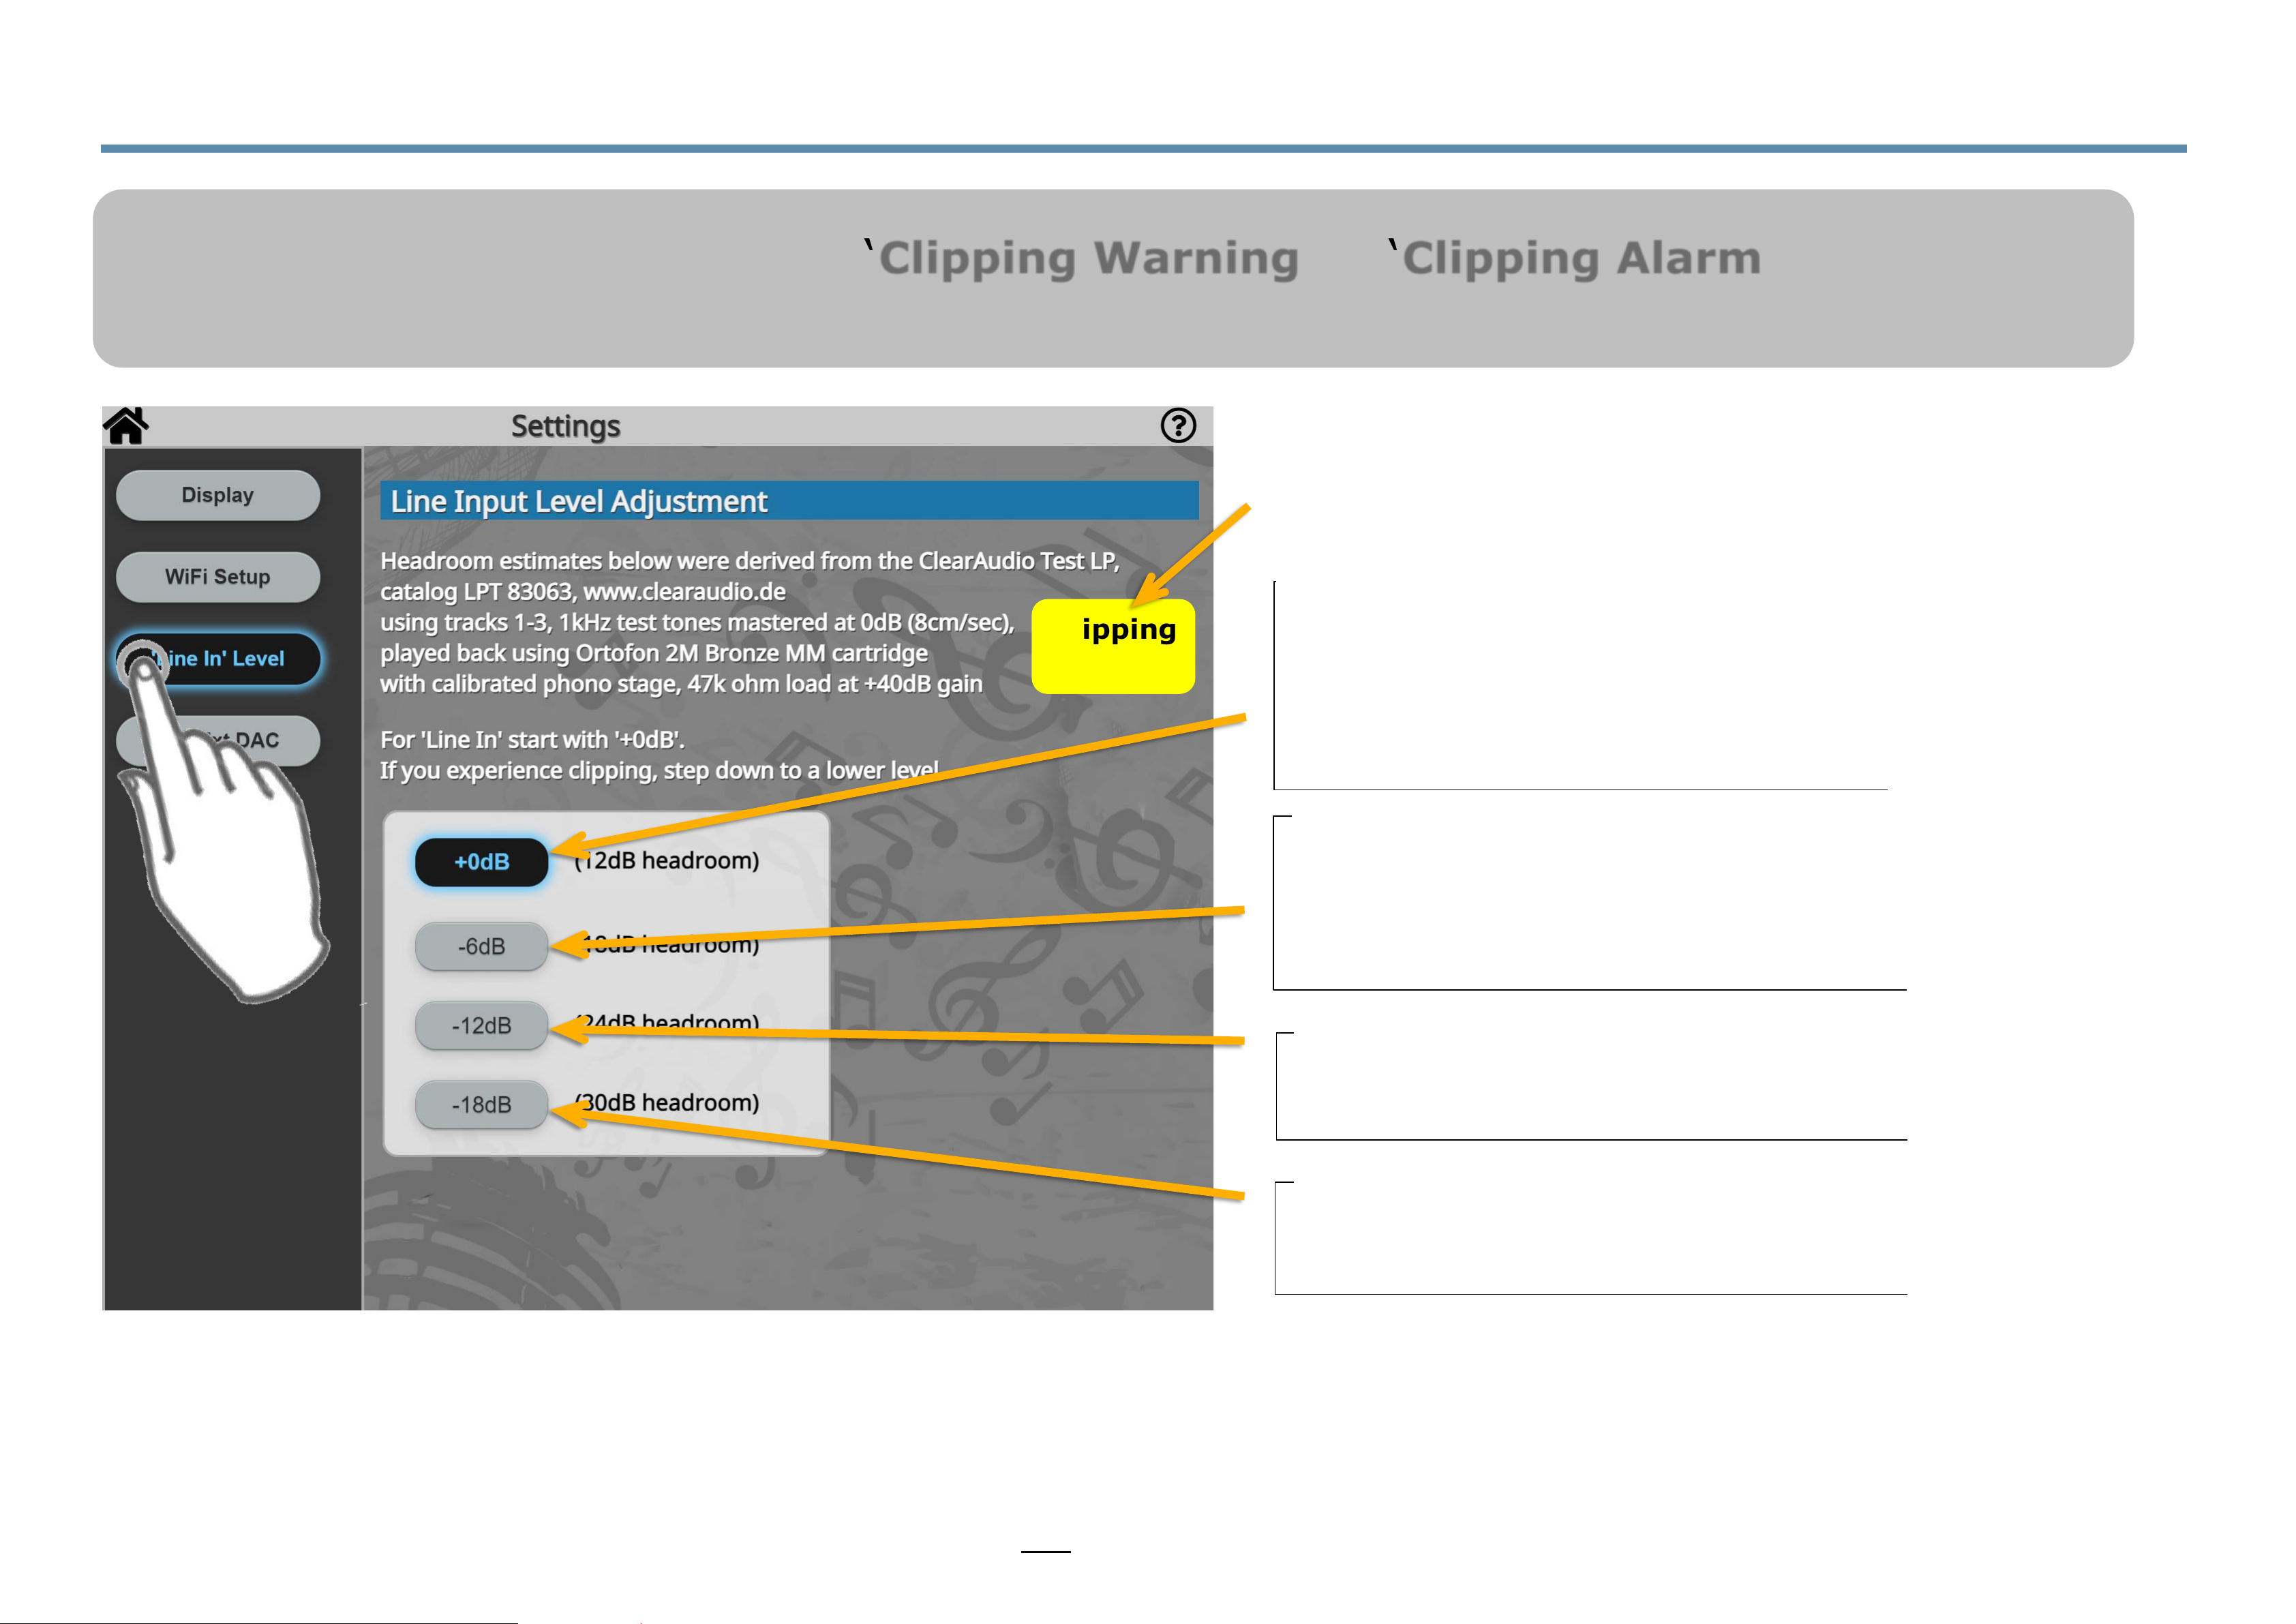
4.10 Setting the Line-Input Level Setting
(1) Click on ‘Line In Level.’
PLEASE NOTE: unless you see a ‘Clipping Warning’ or ‘Clipping Alarm’ appear while
playing music through your SugarCube, you do NOT need to change the audio setup.
Clipping
Warning
Input level is reduced by -18dB but
added back on output
Input level is reduced by -12 dB but
added back on output.
Input level is reduced by -6dB
but added back on output. You
now have 6 dB more headroom
for listening or recording.
This is the normal mode for the SC-
Plus series. No need to attenuate the
input, however, if the ‘Clipping’ alert is
seen during use, go down to ‘-6dB’.
IMPORTANT NOTE: The output of the SugarCube will always equal the input. Changes
in settings here will result in NO change in volume on your system.
NOTE: if this appears on startup or when,
for example, you drop the needle on an
LP, just touch it and it will go away.
Page 62
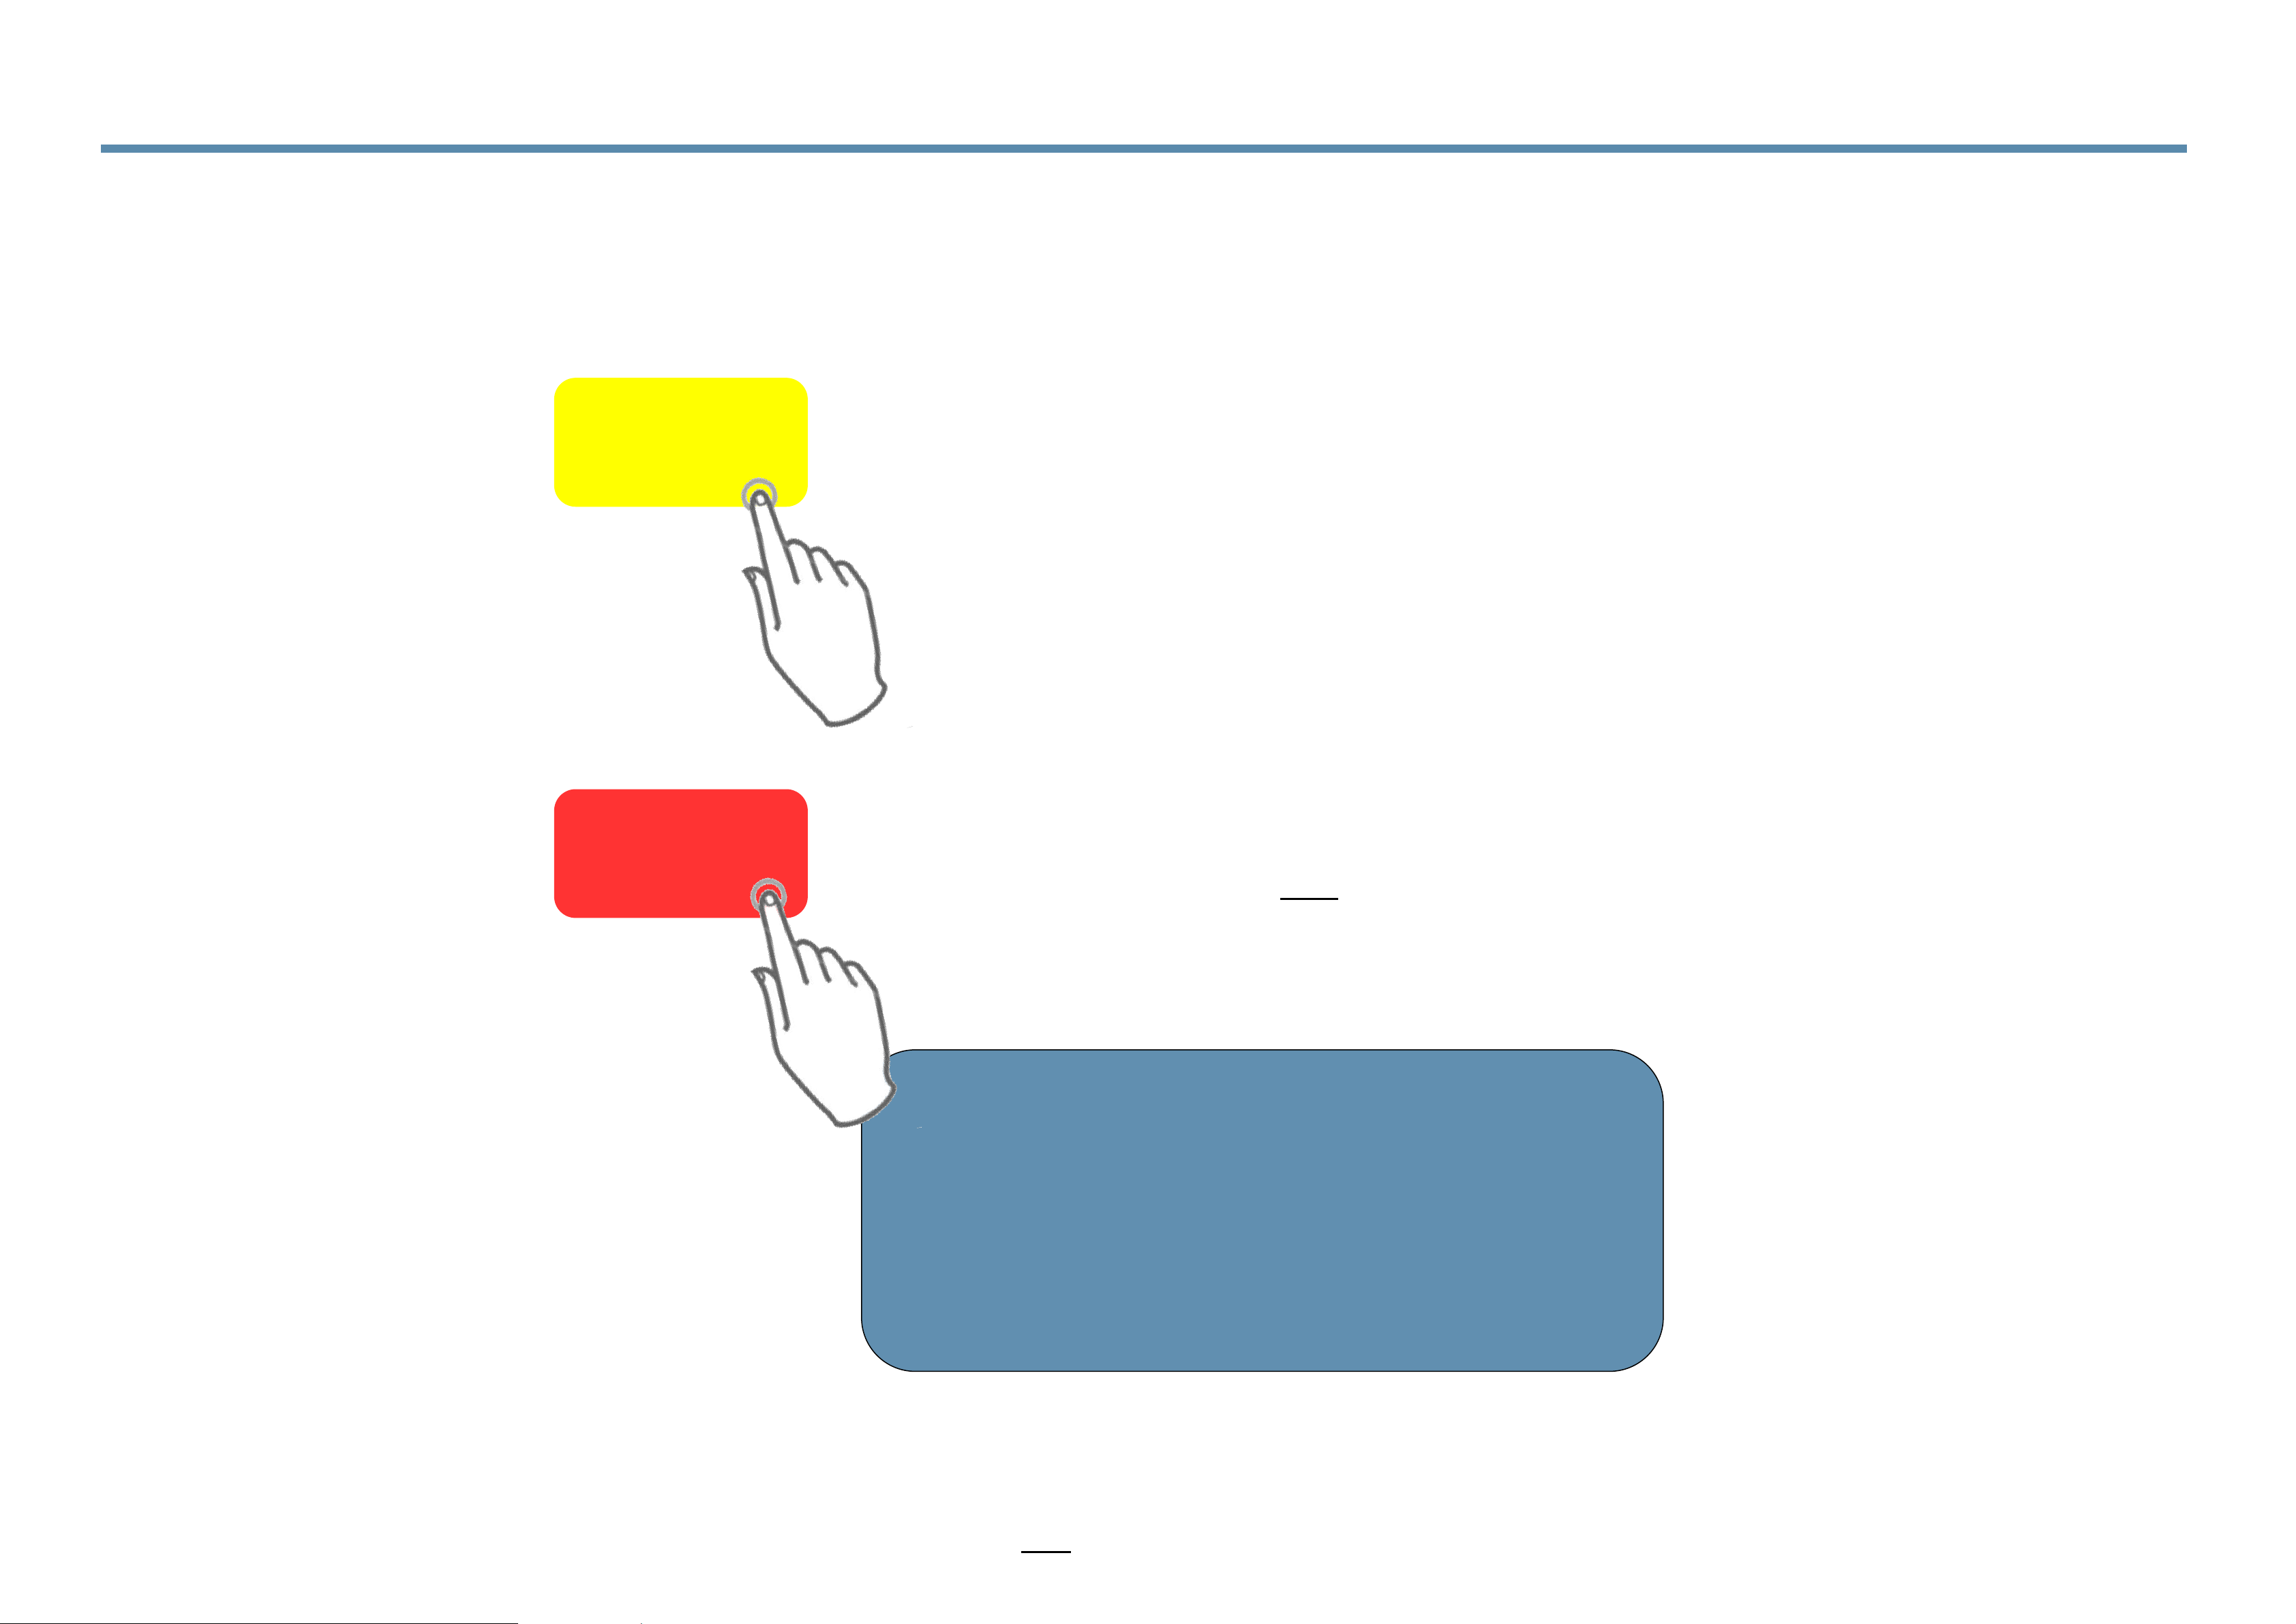
4.10a Note on Clipping Warning and Clipping Alarm
Clipping
Warning
IMPORTANT NOTE: The output of the SugarCube will always equal the input. Changes
in settings here will result in NO change in volume on your system.
When music is playing and this message
appears on any page of the interface, it
means the audio is just about to clip but
has not yet.
However, it is recommended that you
lower the Line In Level one step (6dB
reduction) to be safe from clipping..
Clipping
Alarm
When music is playing and this message
appears on any page of the interface, it
means the audio has clipped and the Line
In Level should be lowered one step.
Touching or clicking on either message will
clear the message until another related
audio event should trigger it again.
Also, if you do not manually clear the
messages, they will disappear after 20
minutes.
Page 63
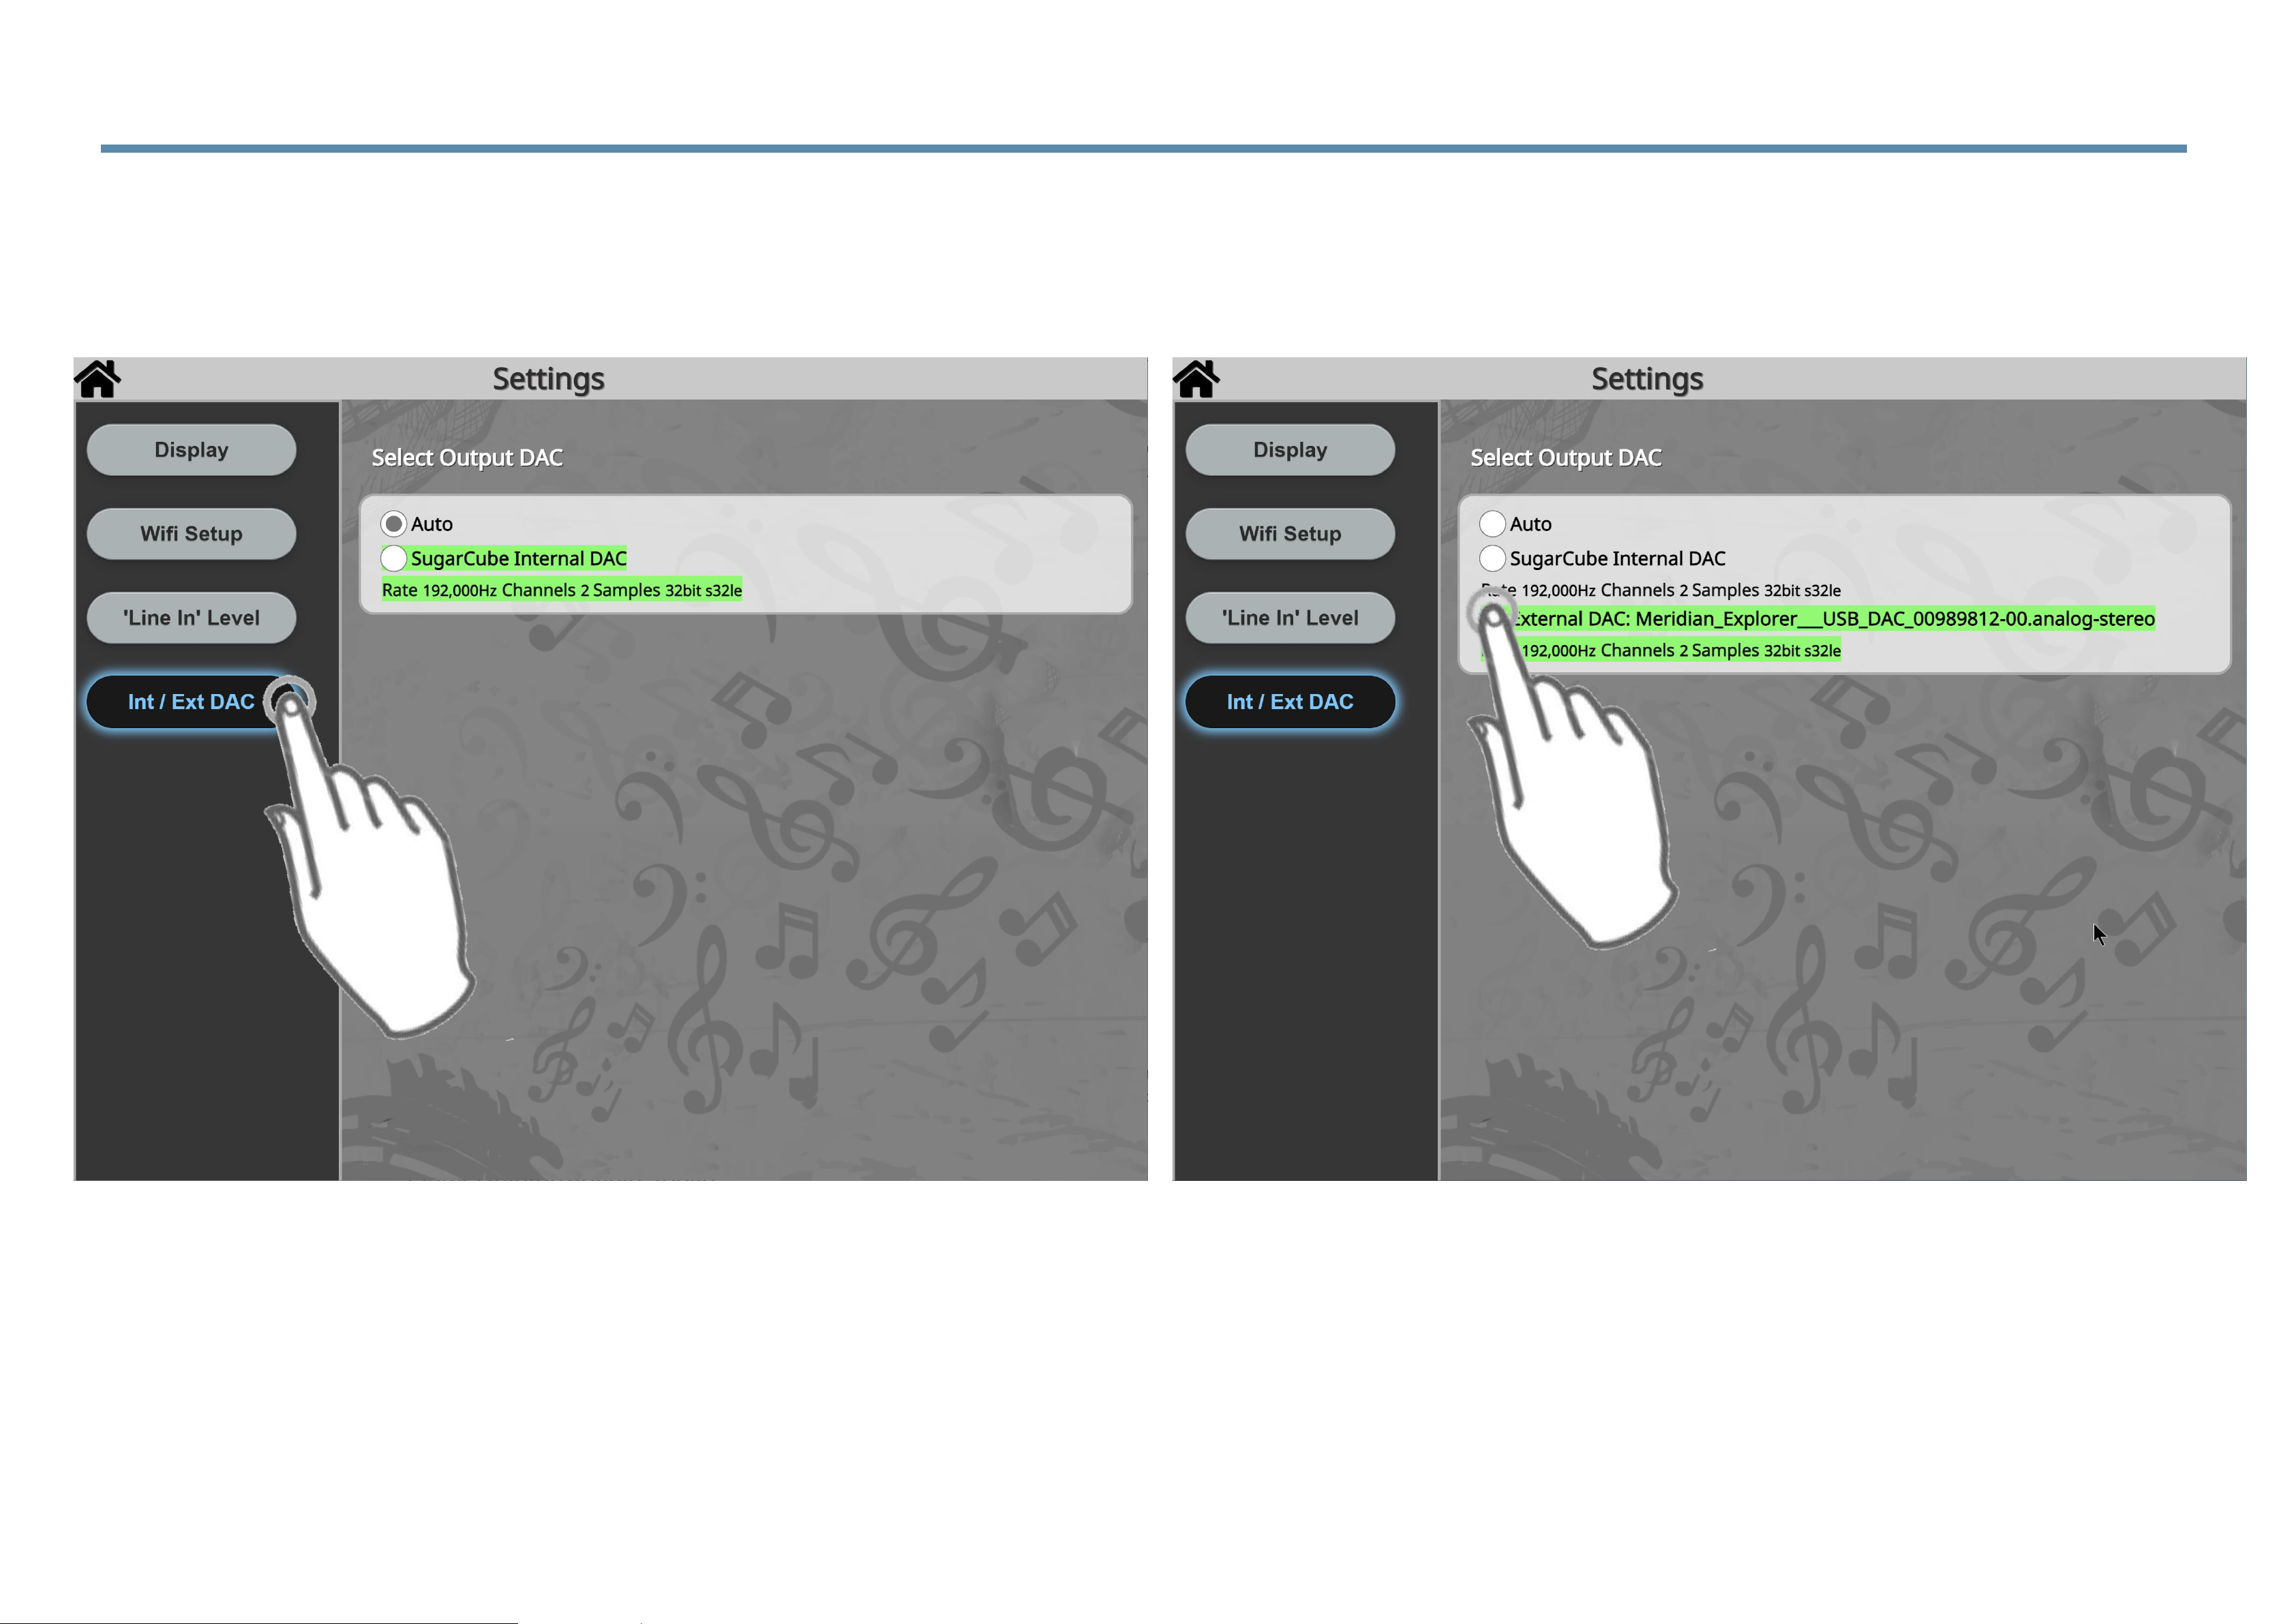
4.11 Choosing an External DAC Output
(1) Click on ‘Int/Ext DAC.’
(2) When a USB DAC is inserted in one
of the rear USB ports, it will appear here
and can be selected instead of the
internal DAC.
Selecting an external DAC plugged into the SugarCube
Page 64
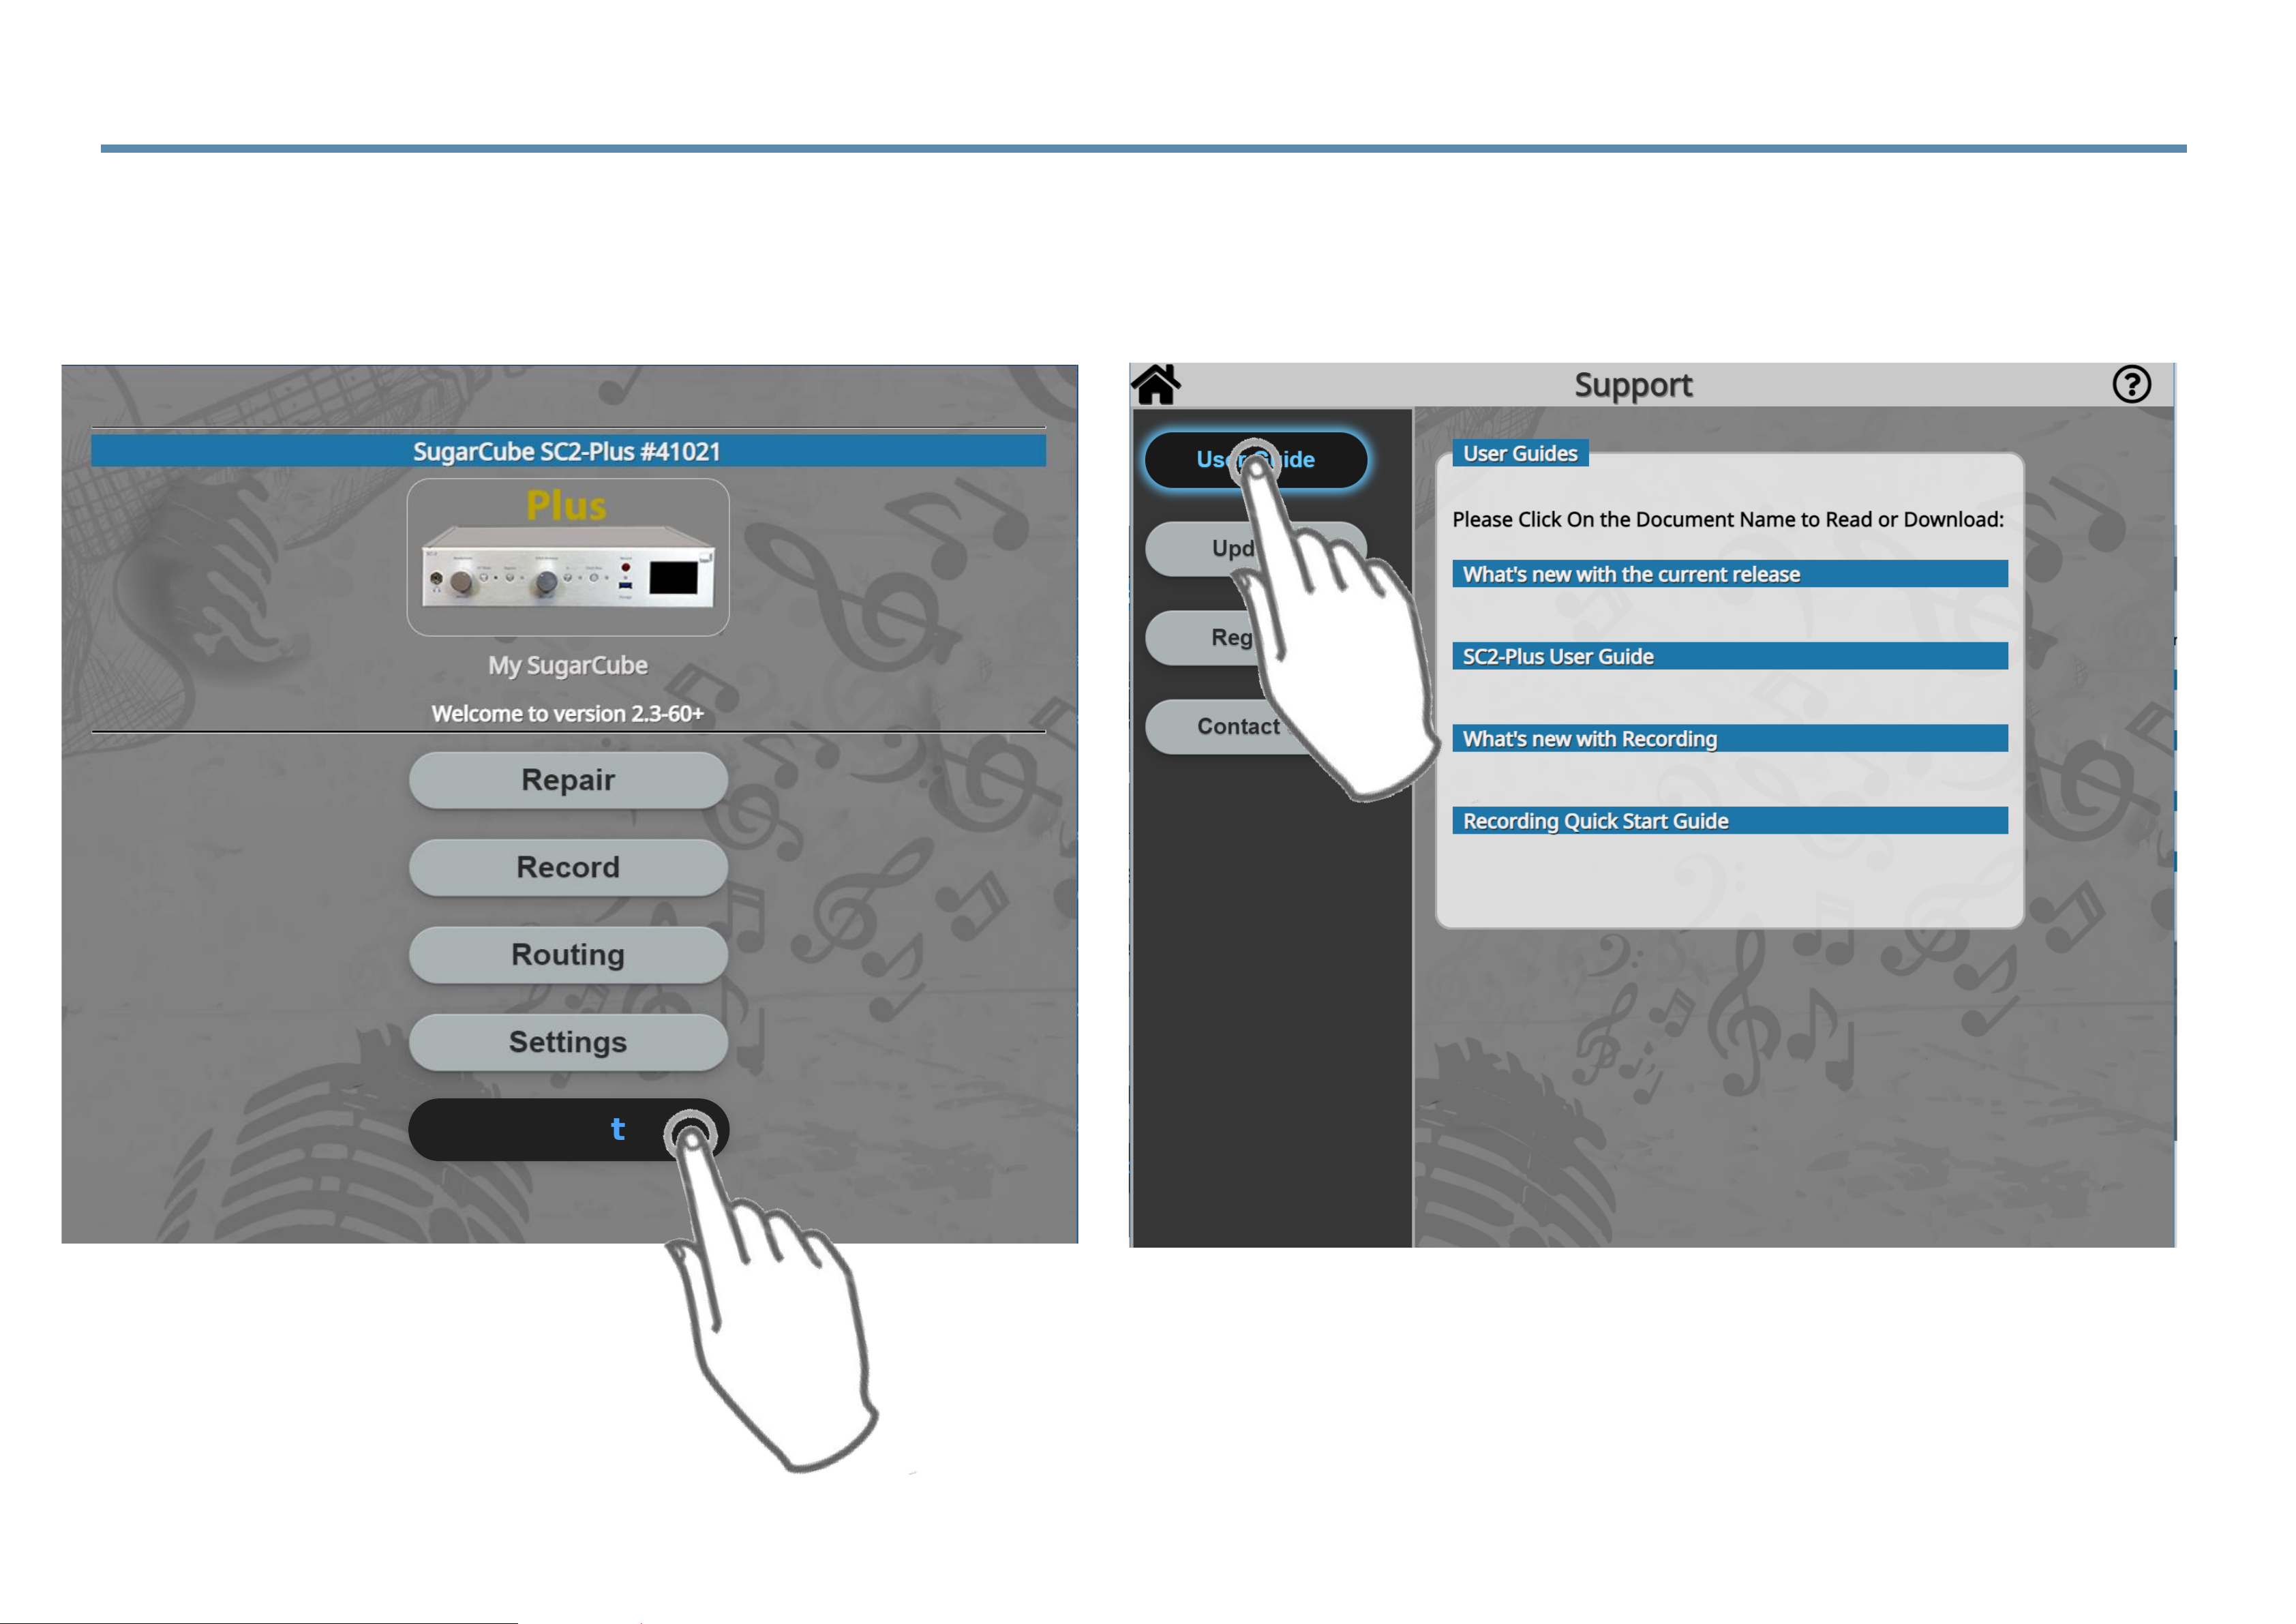
4.12 Support Menu & User Guide
(1) Click on ‘Support’
(2) The current User Guides for your
model is available for download and/or
viewing in the browser here.
Support
Page 65
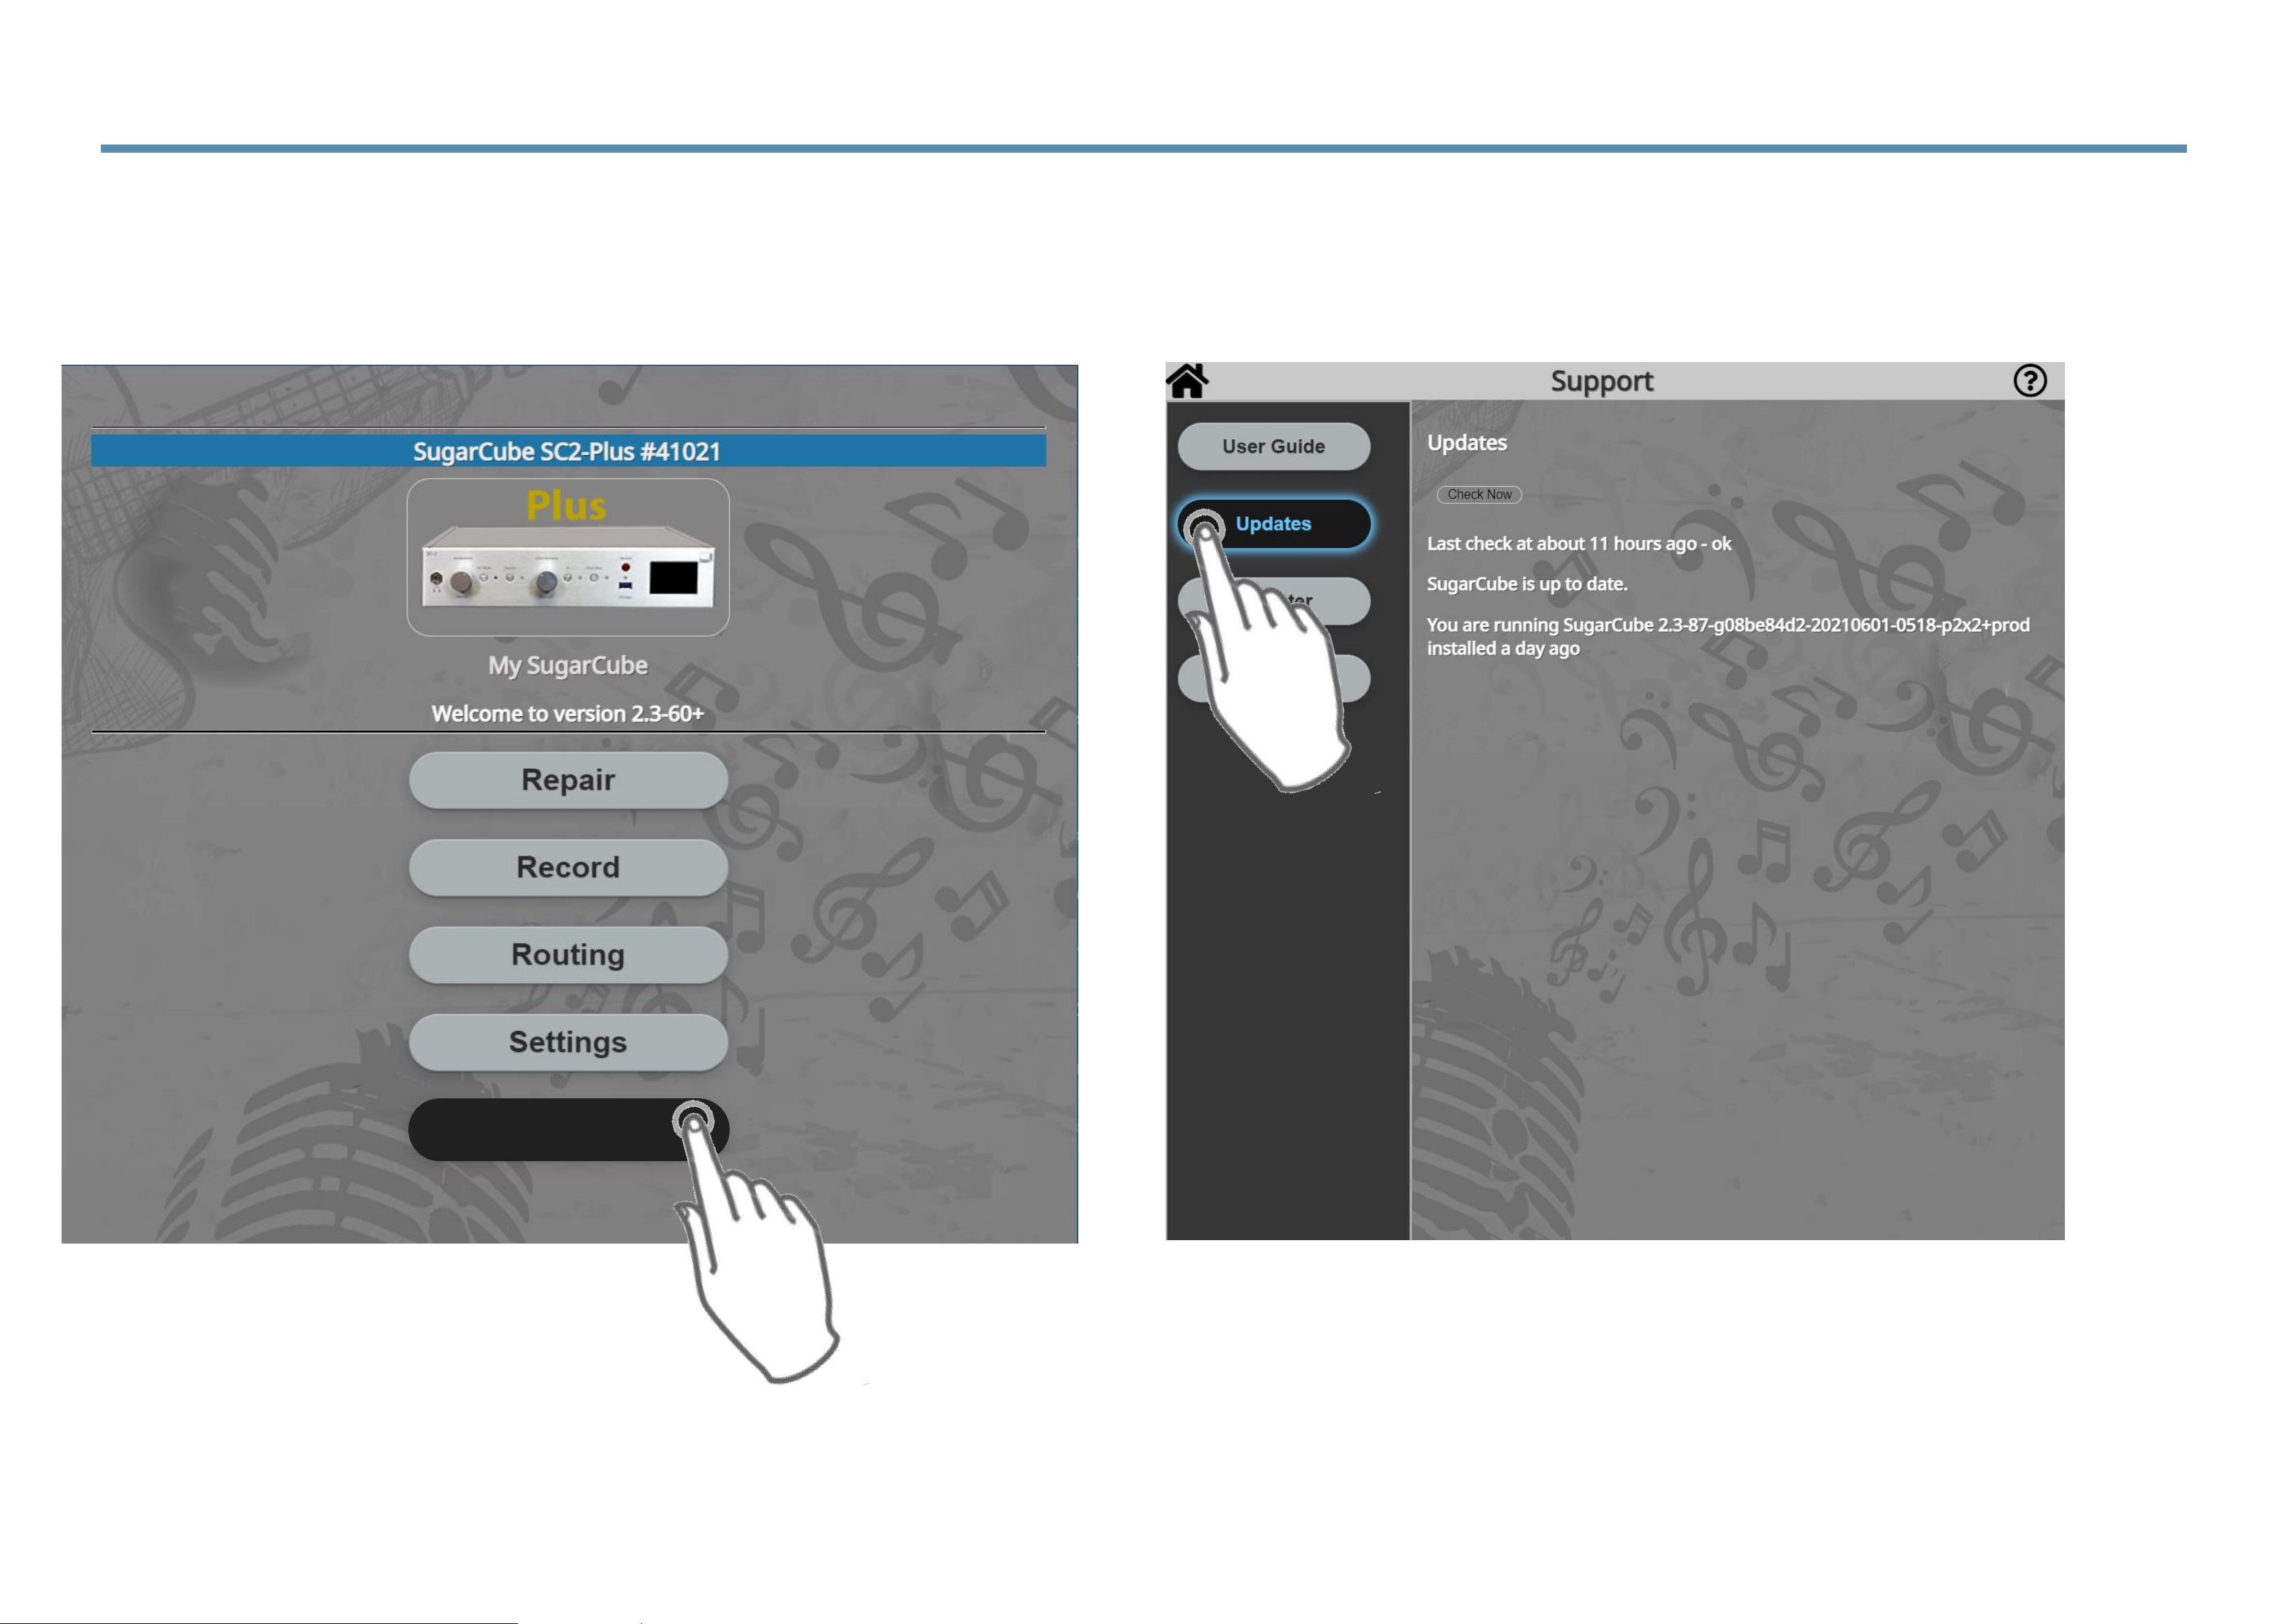
4.13 Checking for Updates
(1) Click on ‘Support.’
(2) Current SugarCube software version is displayed
and udpates can be checked. If updates are waiting
can be updated here. Also shows last update and if
an update is coming.
Support
Page 66
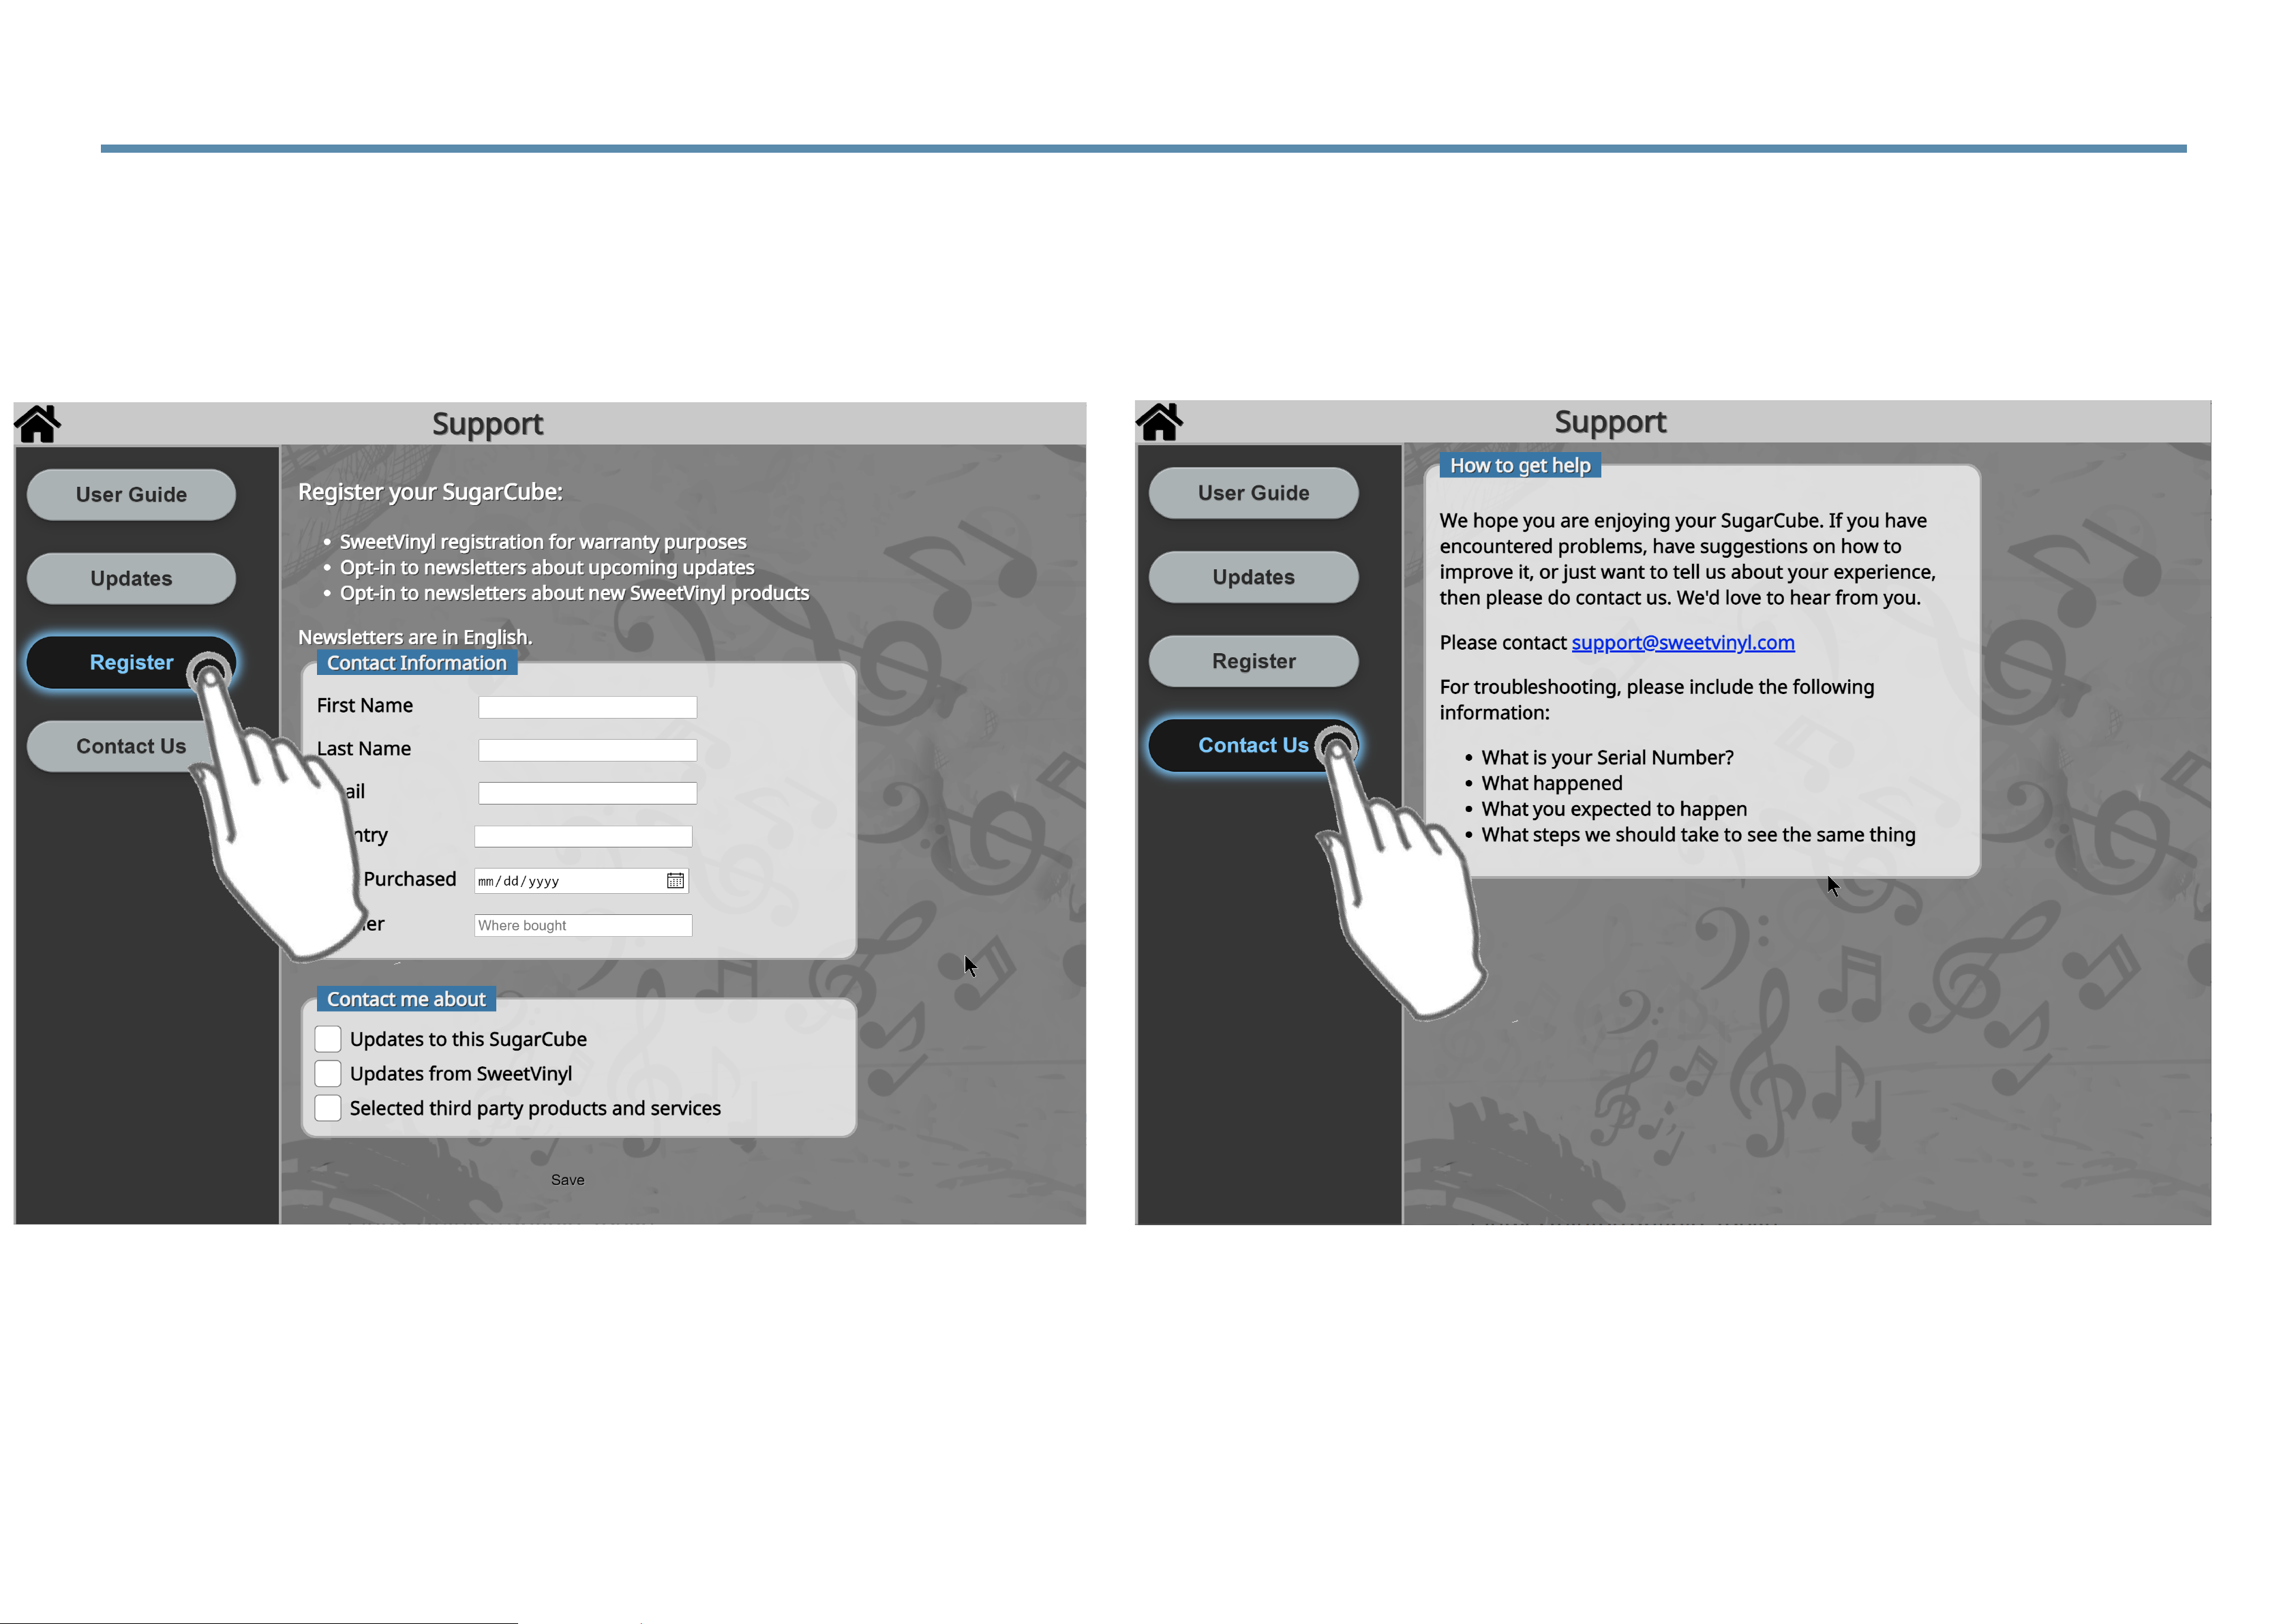
4.14 Register and Email Info
(2) ‘Contact Us’ will taker you to a screen
where you can follow instructions to send an
email to [email protected].
(1) Click on ‘Register’ and you can enter your
information.
Page 67
Connecting a
Computer to
your
SugarCube
with USB
MacOS, Windows,
or Music Server
Section 5
Page 68
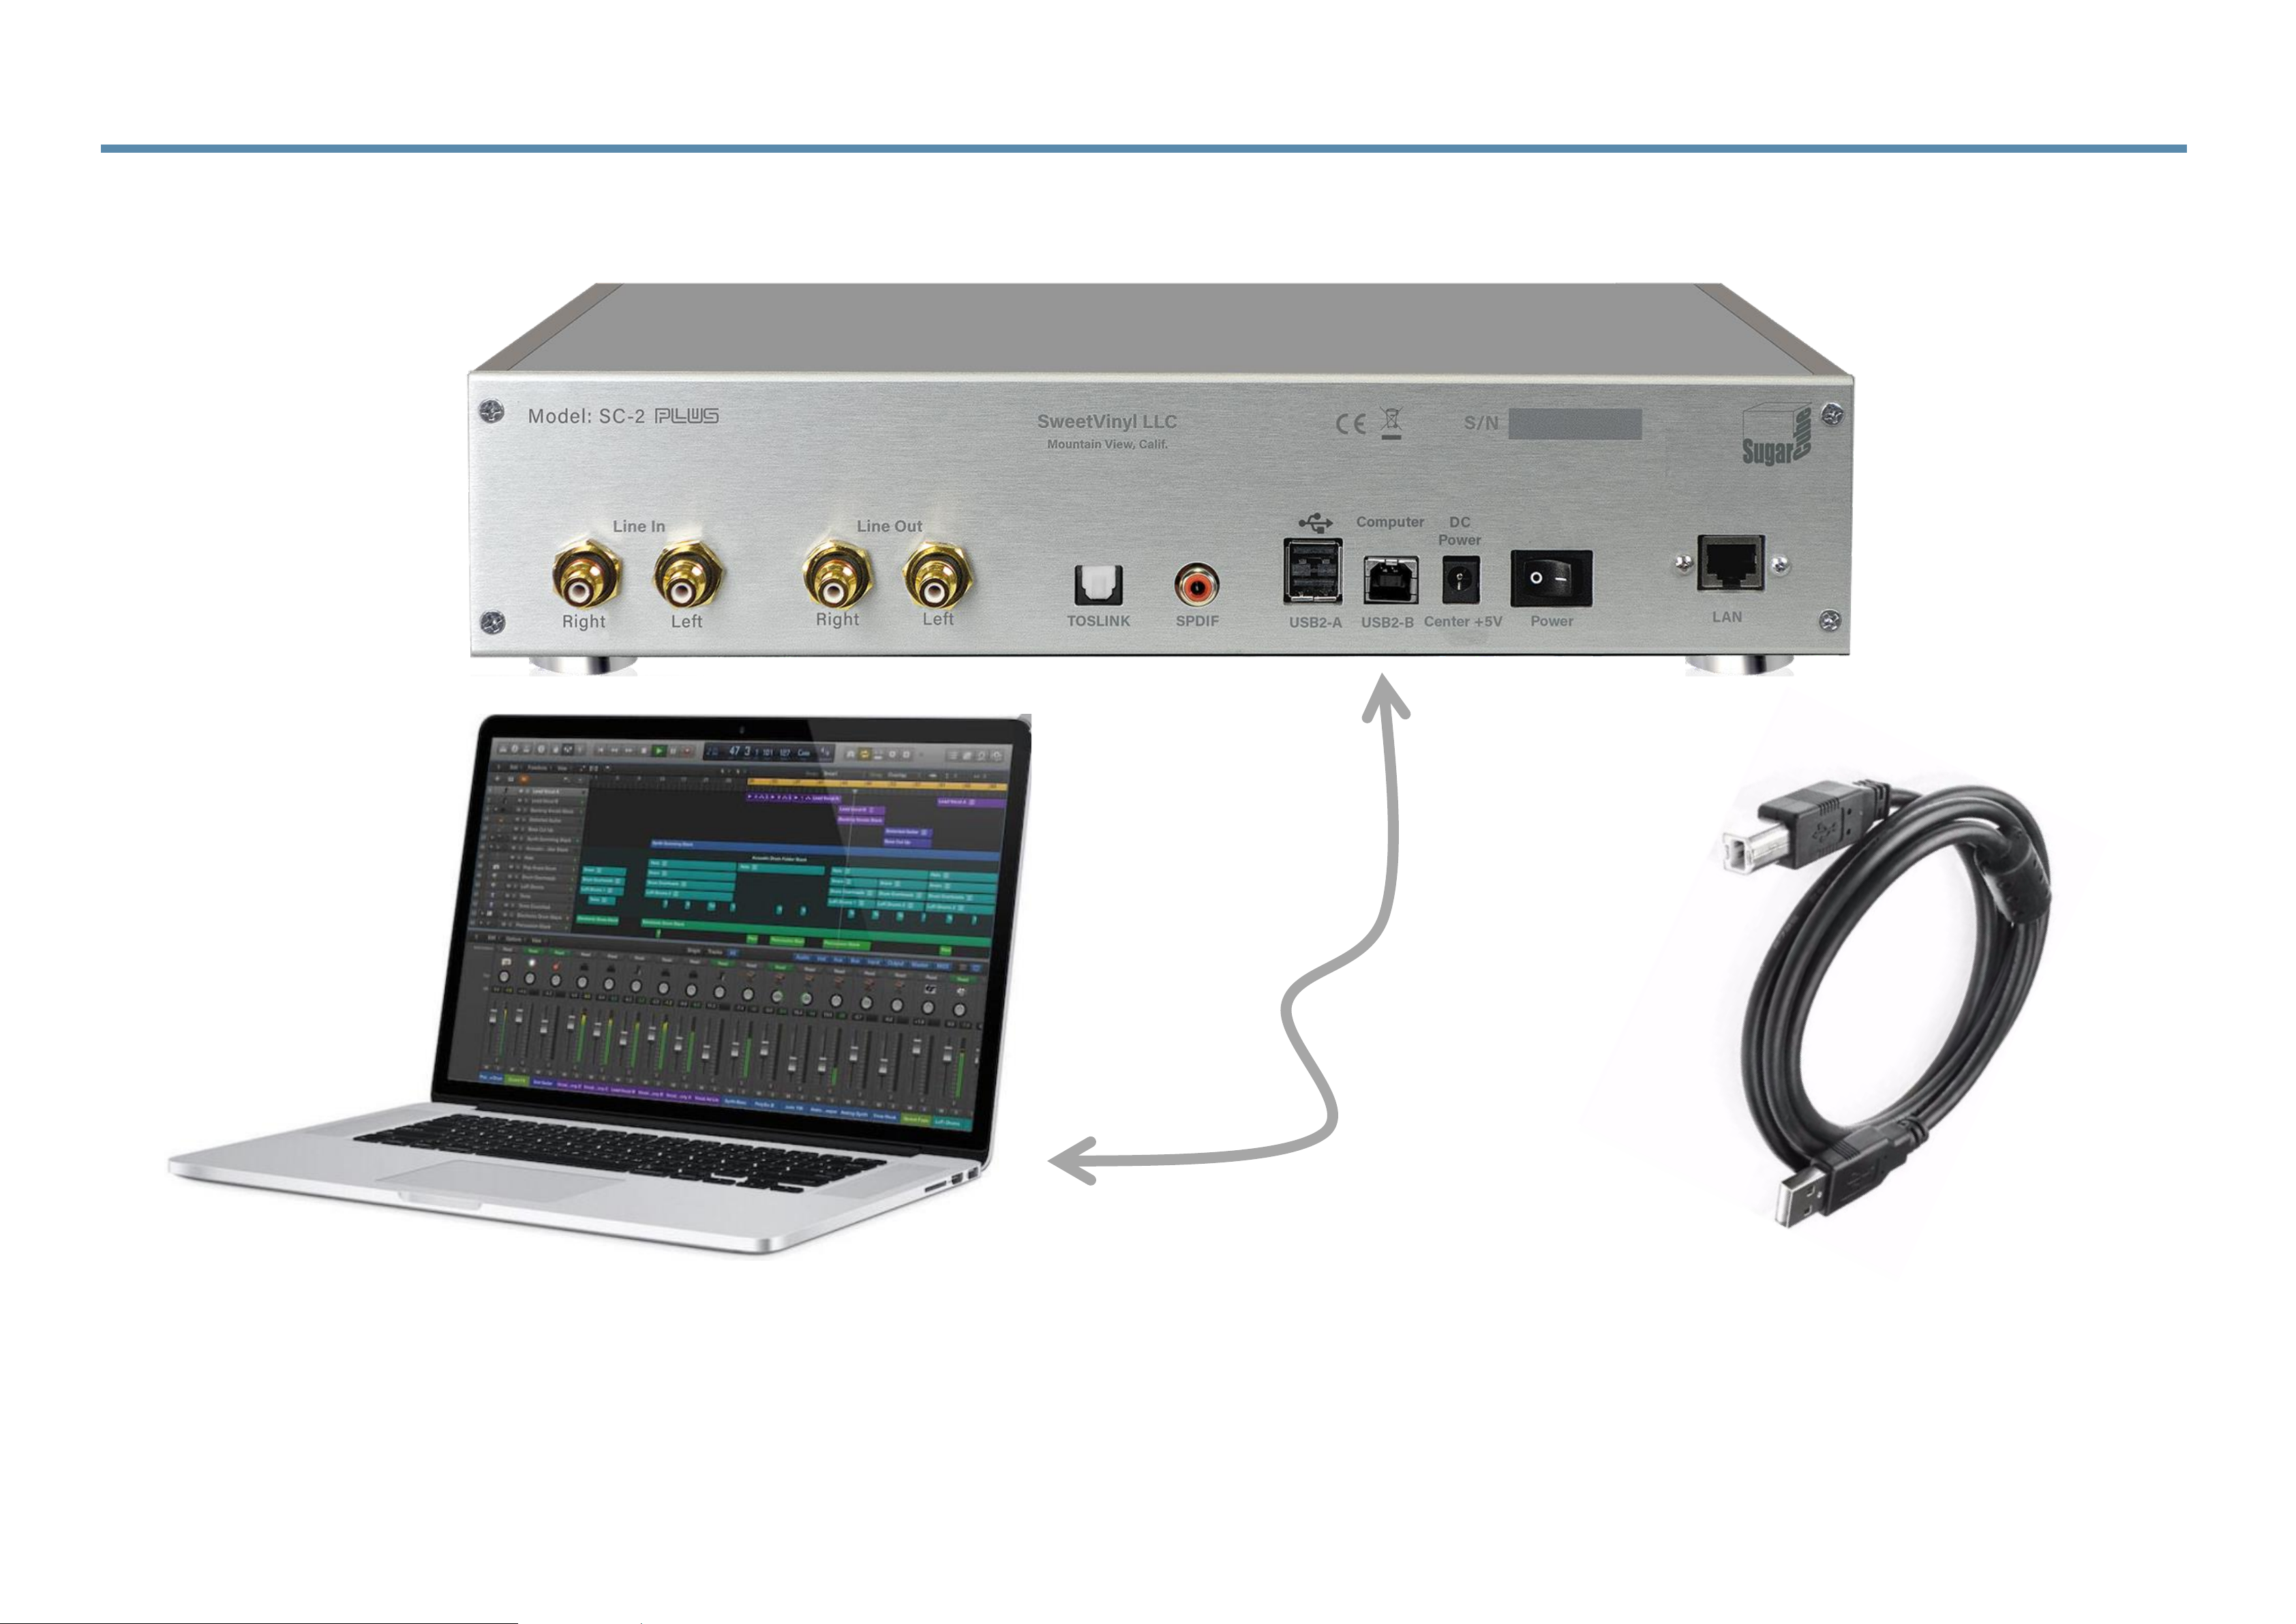
5.1 Connecting a Computer over USB
The SC2-Plus can be connected to a computer via the USB-B port. Plug one end into the USB port on
the computer and the other to the USB-B port on the SugarCube. When connected, the computer will
be able to control the ADC and DAC functions on the SugarCube. The computer can record the output
of the ADC with any software available for recording or play digital files directly through the SugarCube.
Typical
USB2 Cable
Page 69
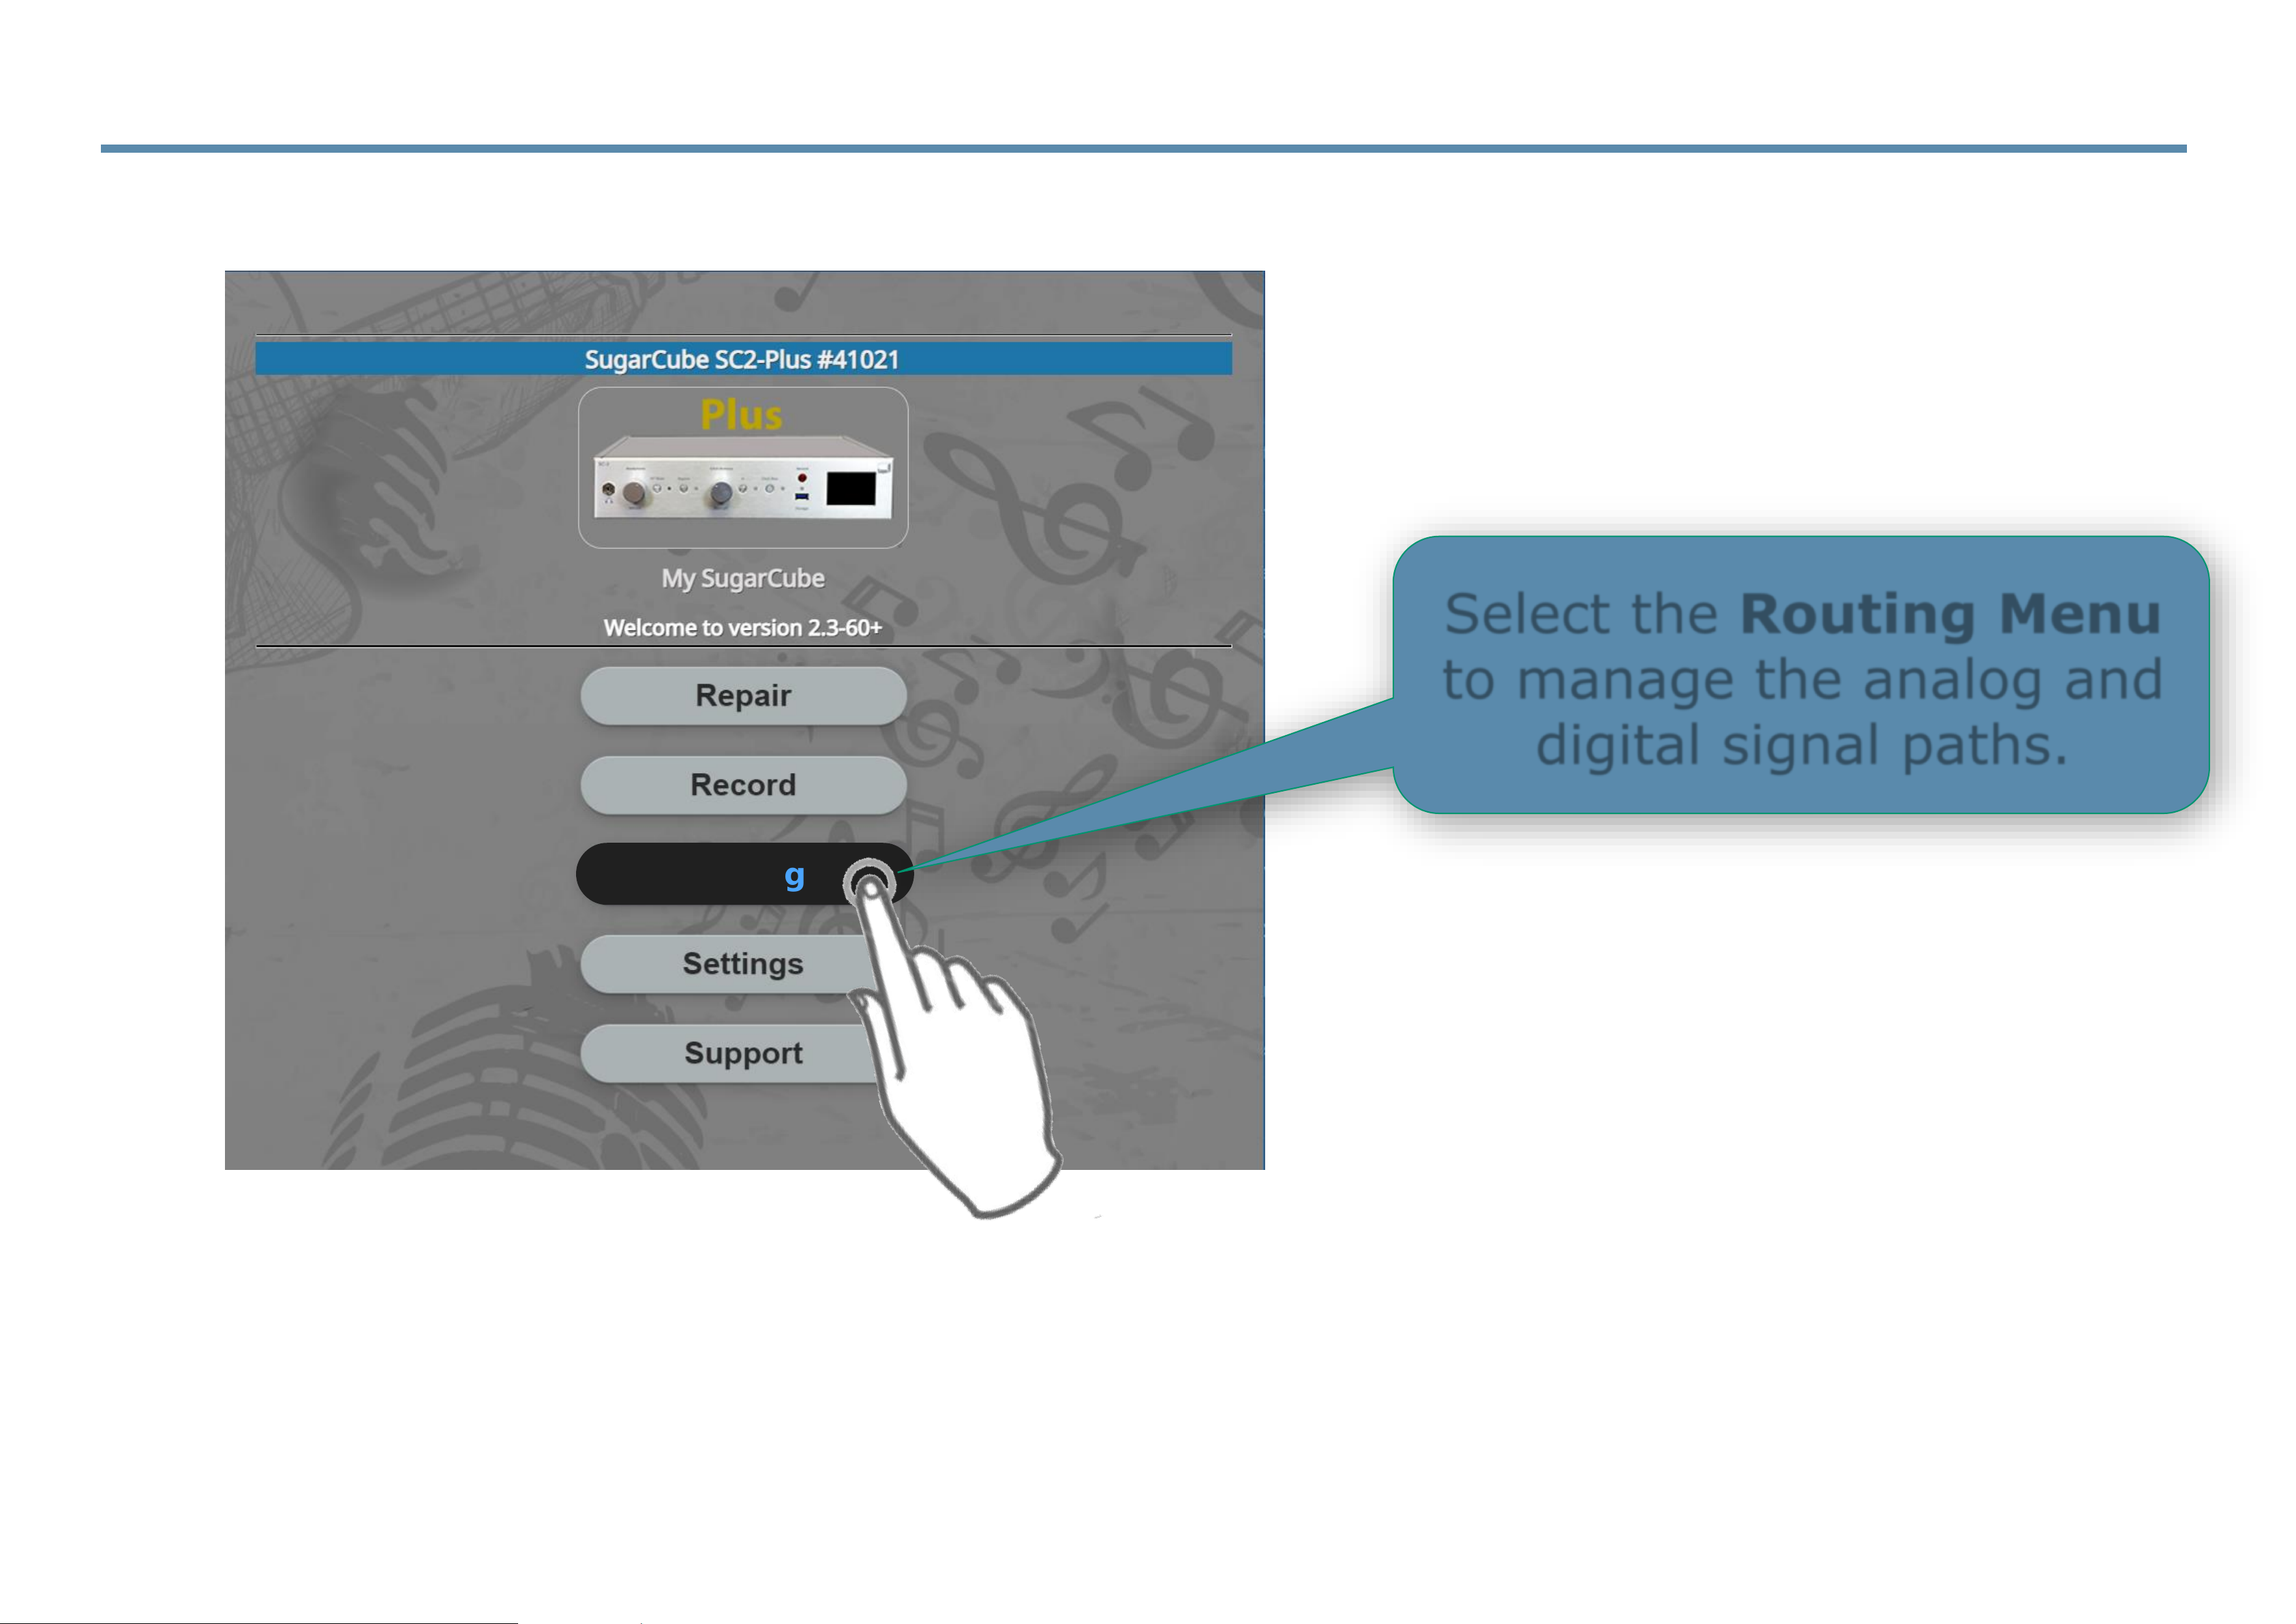
5.1.1 Audio Routing Menu to enter External Mode
To efficiently work with an the SC2-Plus and a computer connected over USB you will want to open
the Routing Menu page. The next pages show how the SugarCube, and an external computer,
work together to provide the enhanced functionality.
Routing
Select the Routing Menu
to manage the analog and
digital signal paths.
Page 70
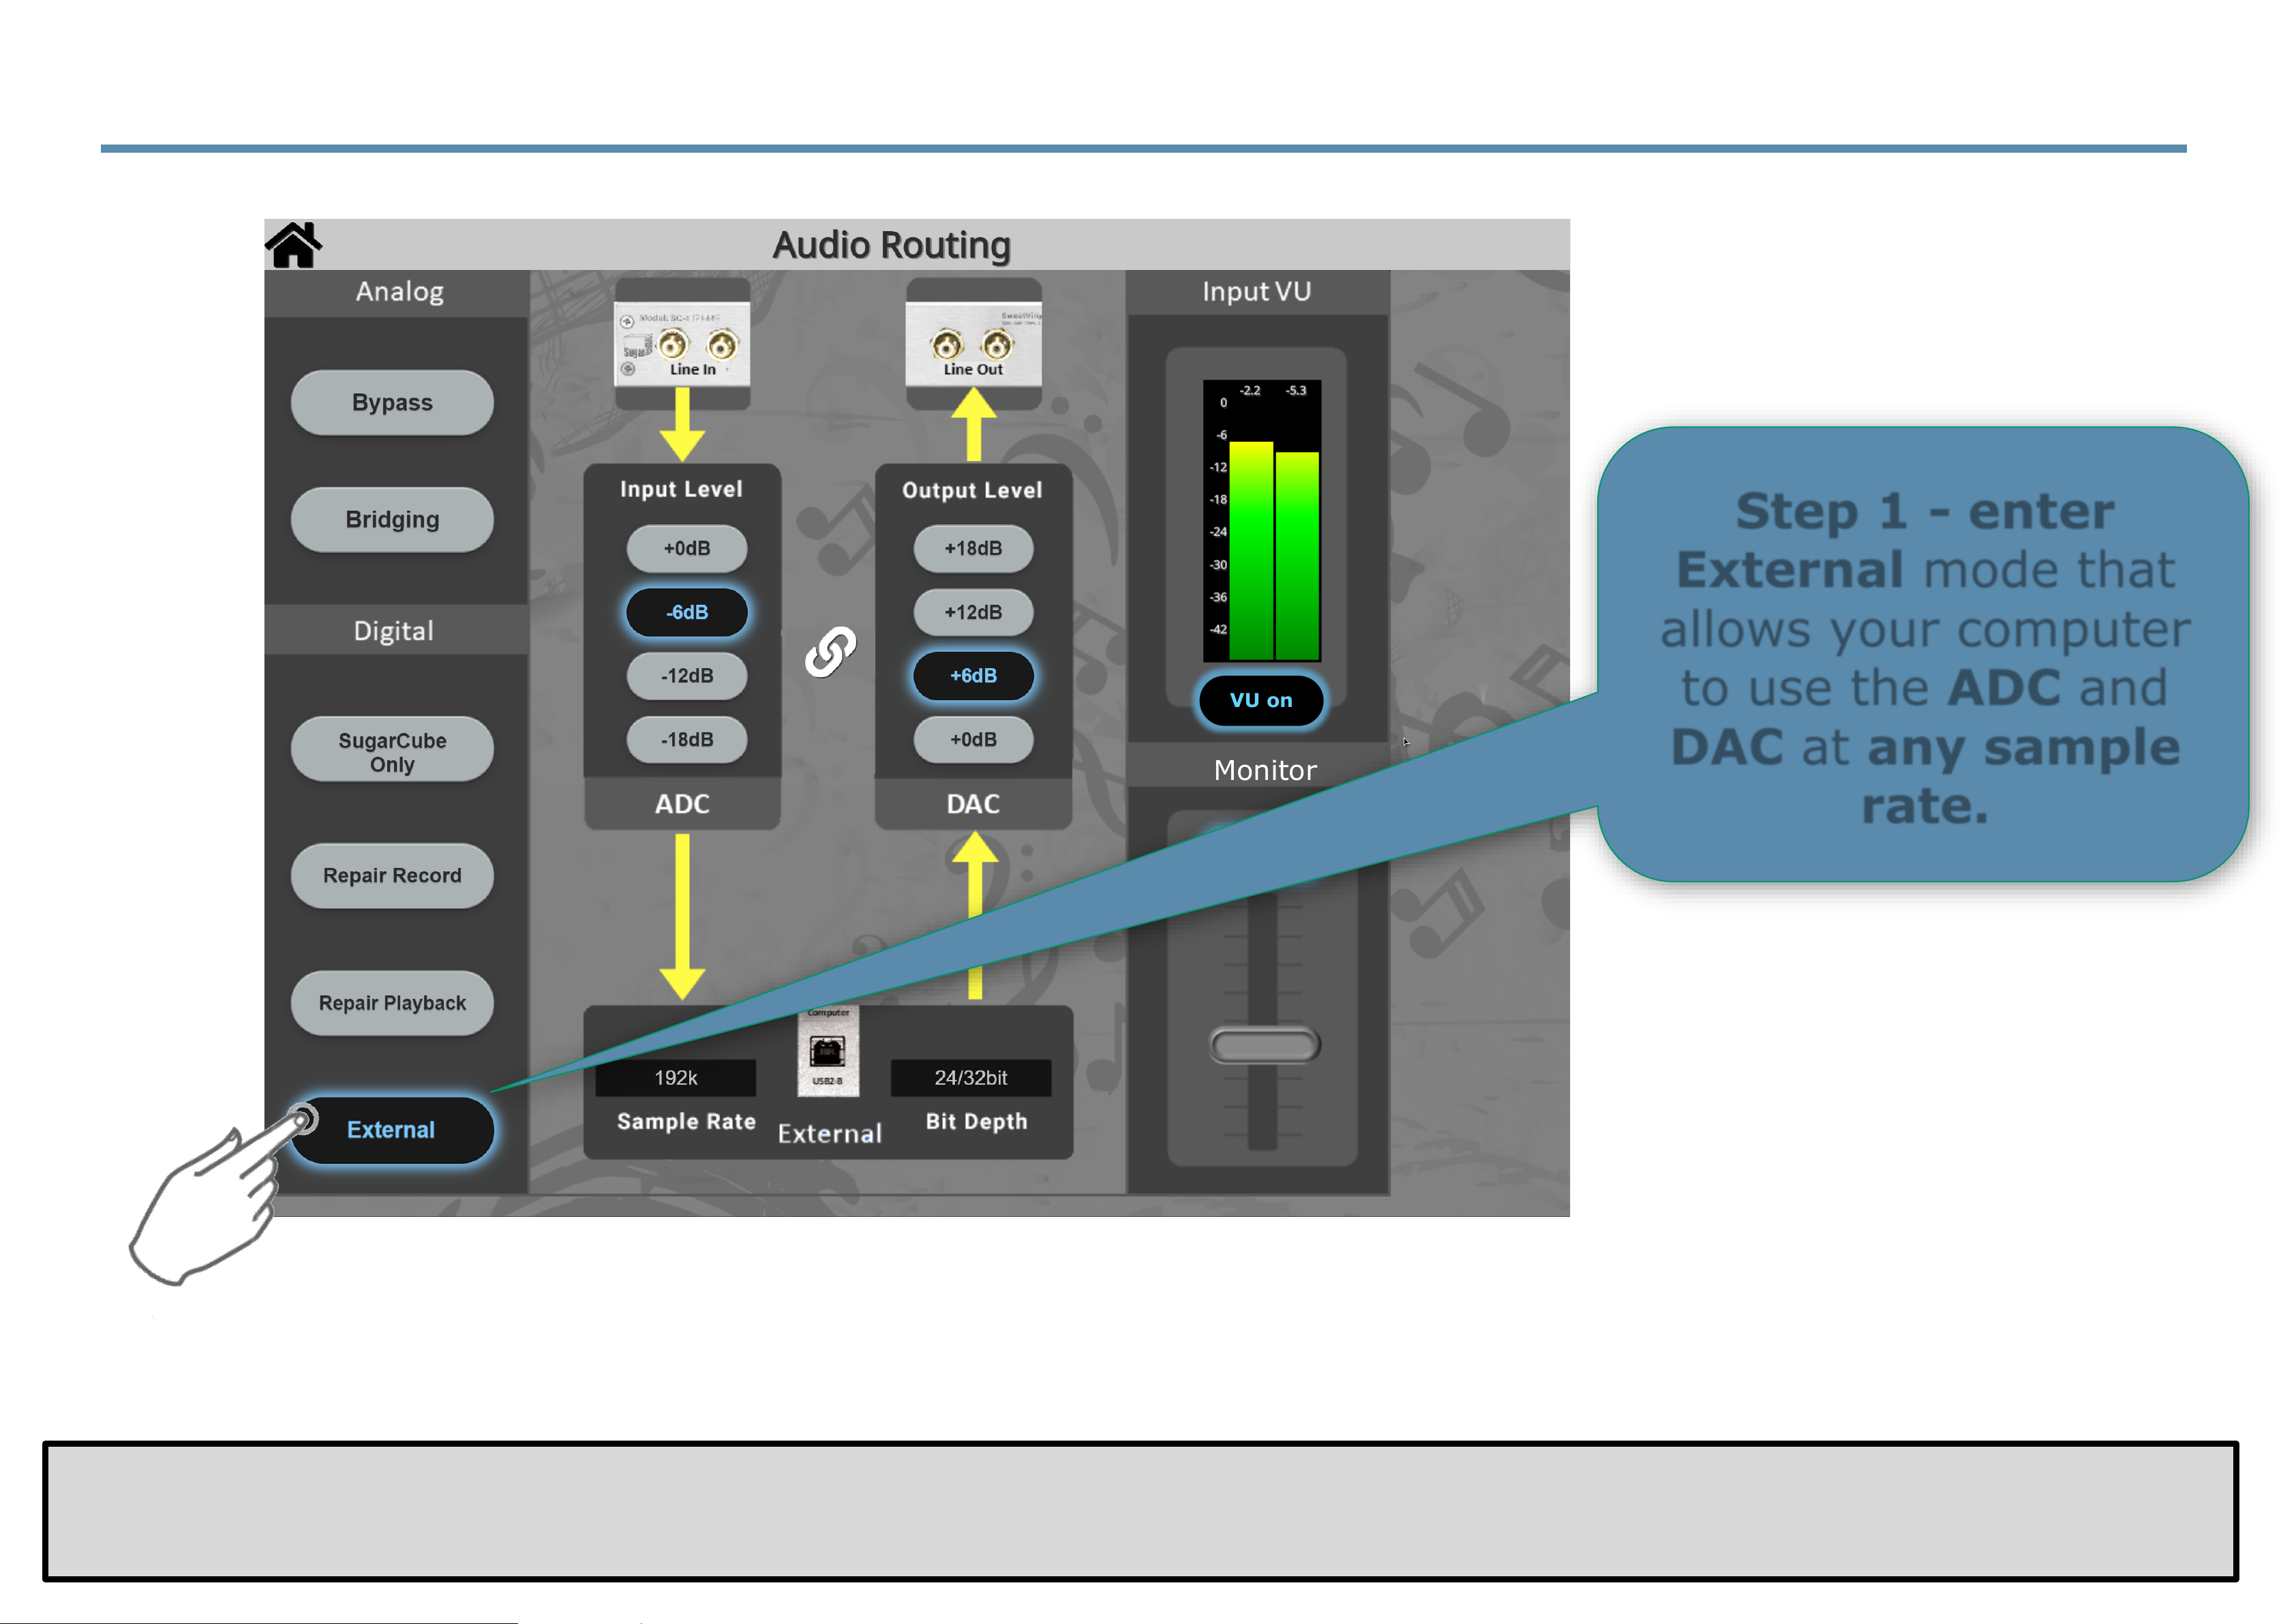
5.1.2 Audio Routing Menu — External Mode
L
R
VU on
Monitor
Step 1 - enter
External mode that
allows your computer
to use the ADC and
DAC at any sample
rate.
In External mode, the SC2-Plus acts like any other studio-quality ADC/DAC pair and will function at any standard sample
rate and bit depth from 192k down to 44.1k and at 16/24/32 bit sample sizes.
Note: Please press again the button of the current mode of operation if the external device loses lock with the
SugarCube (you will certainly know due to obvious digital noise.) This resets the internal timing and restores the audio.
Page 71
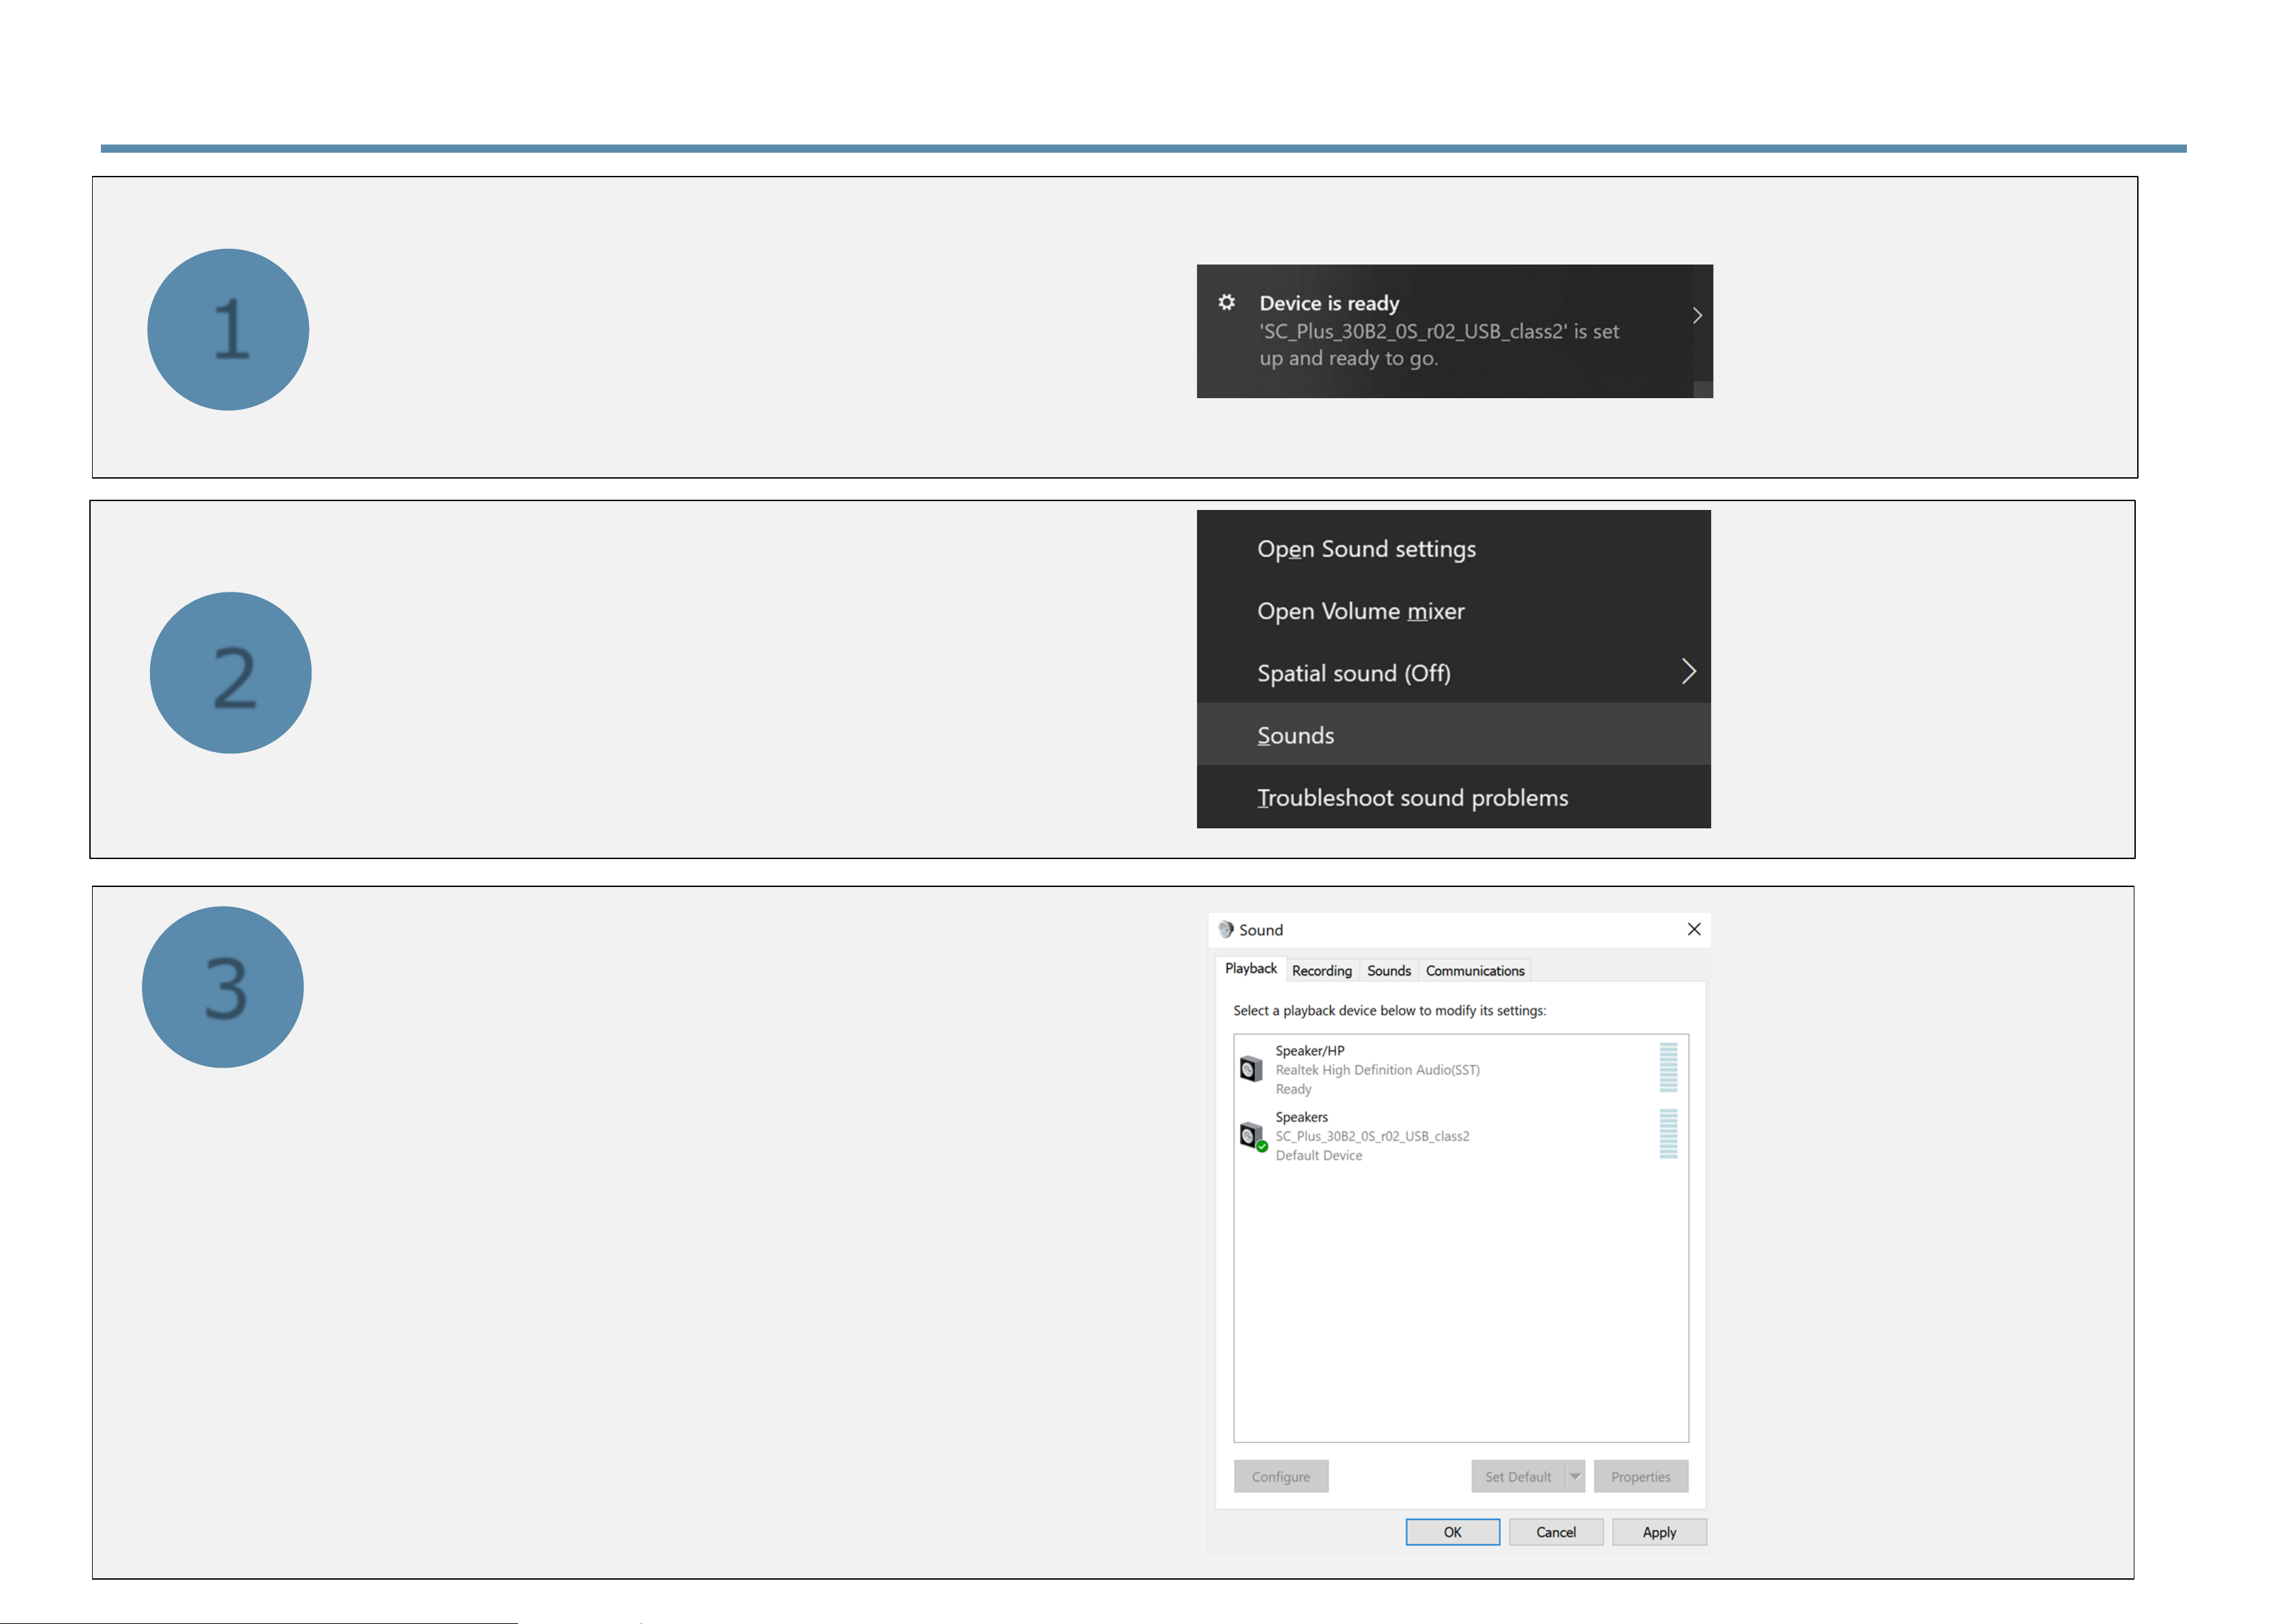
5.1.3 Configuring Windows to control the SugarCube
After connecting your Windows PC,
the SugarCube should configure itself.
Drivers are built-in and you should be able
to see and configure the SugarCube as a
device under Sounds by right clicking on
the speaker Icon in the System Tray (right
end of the Task Bar.)
1
A Window like this will open:
3
2
Page 72
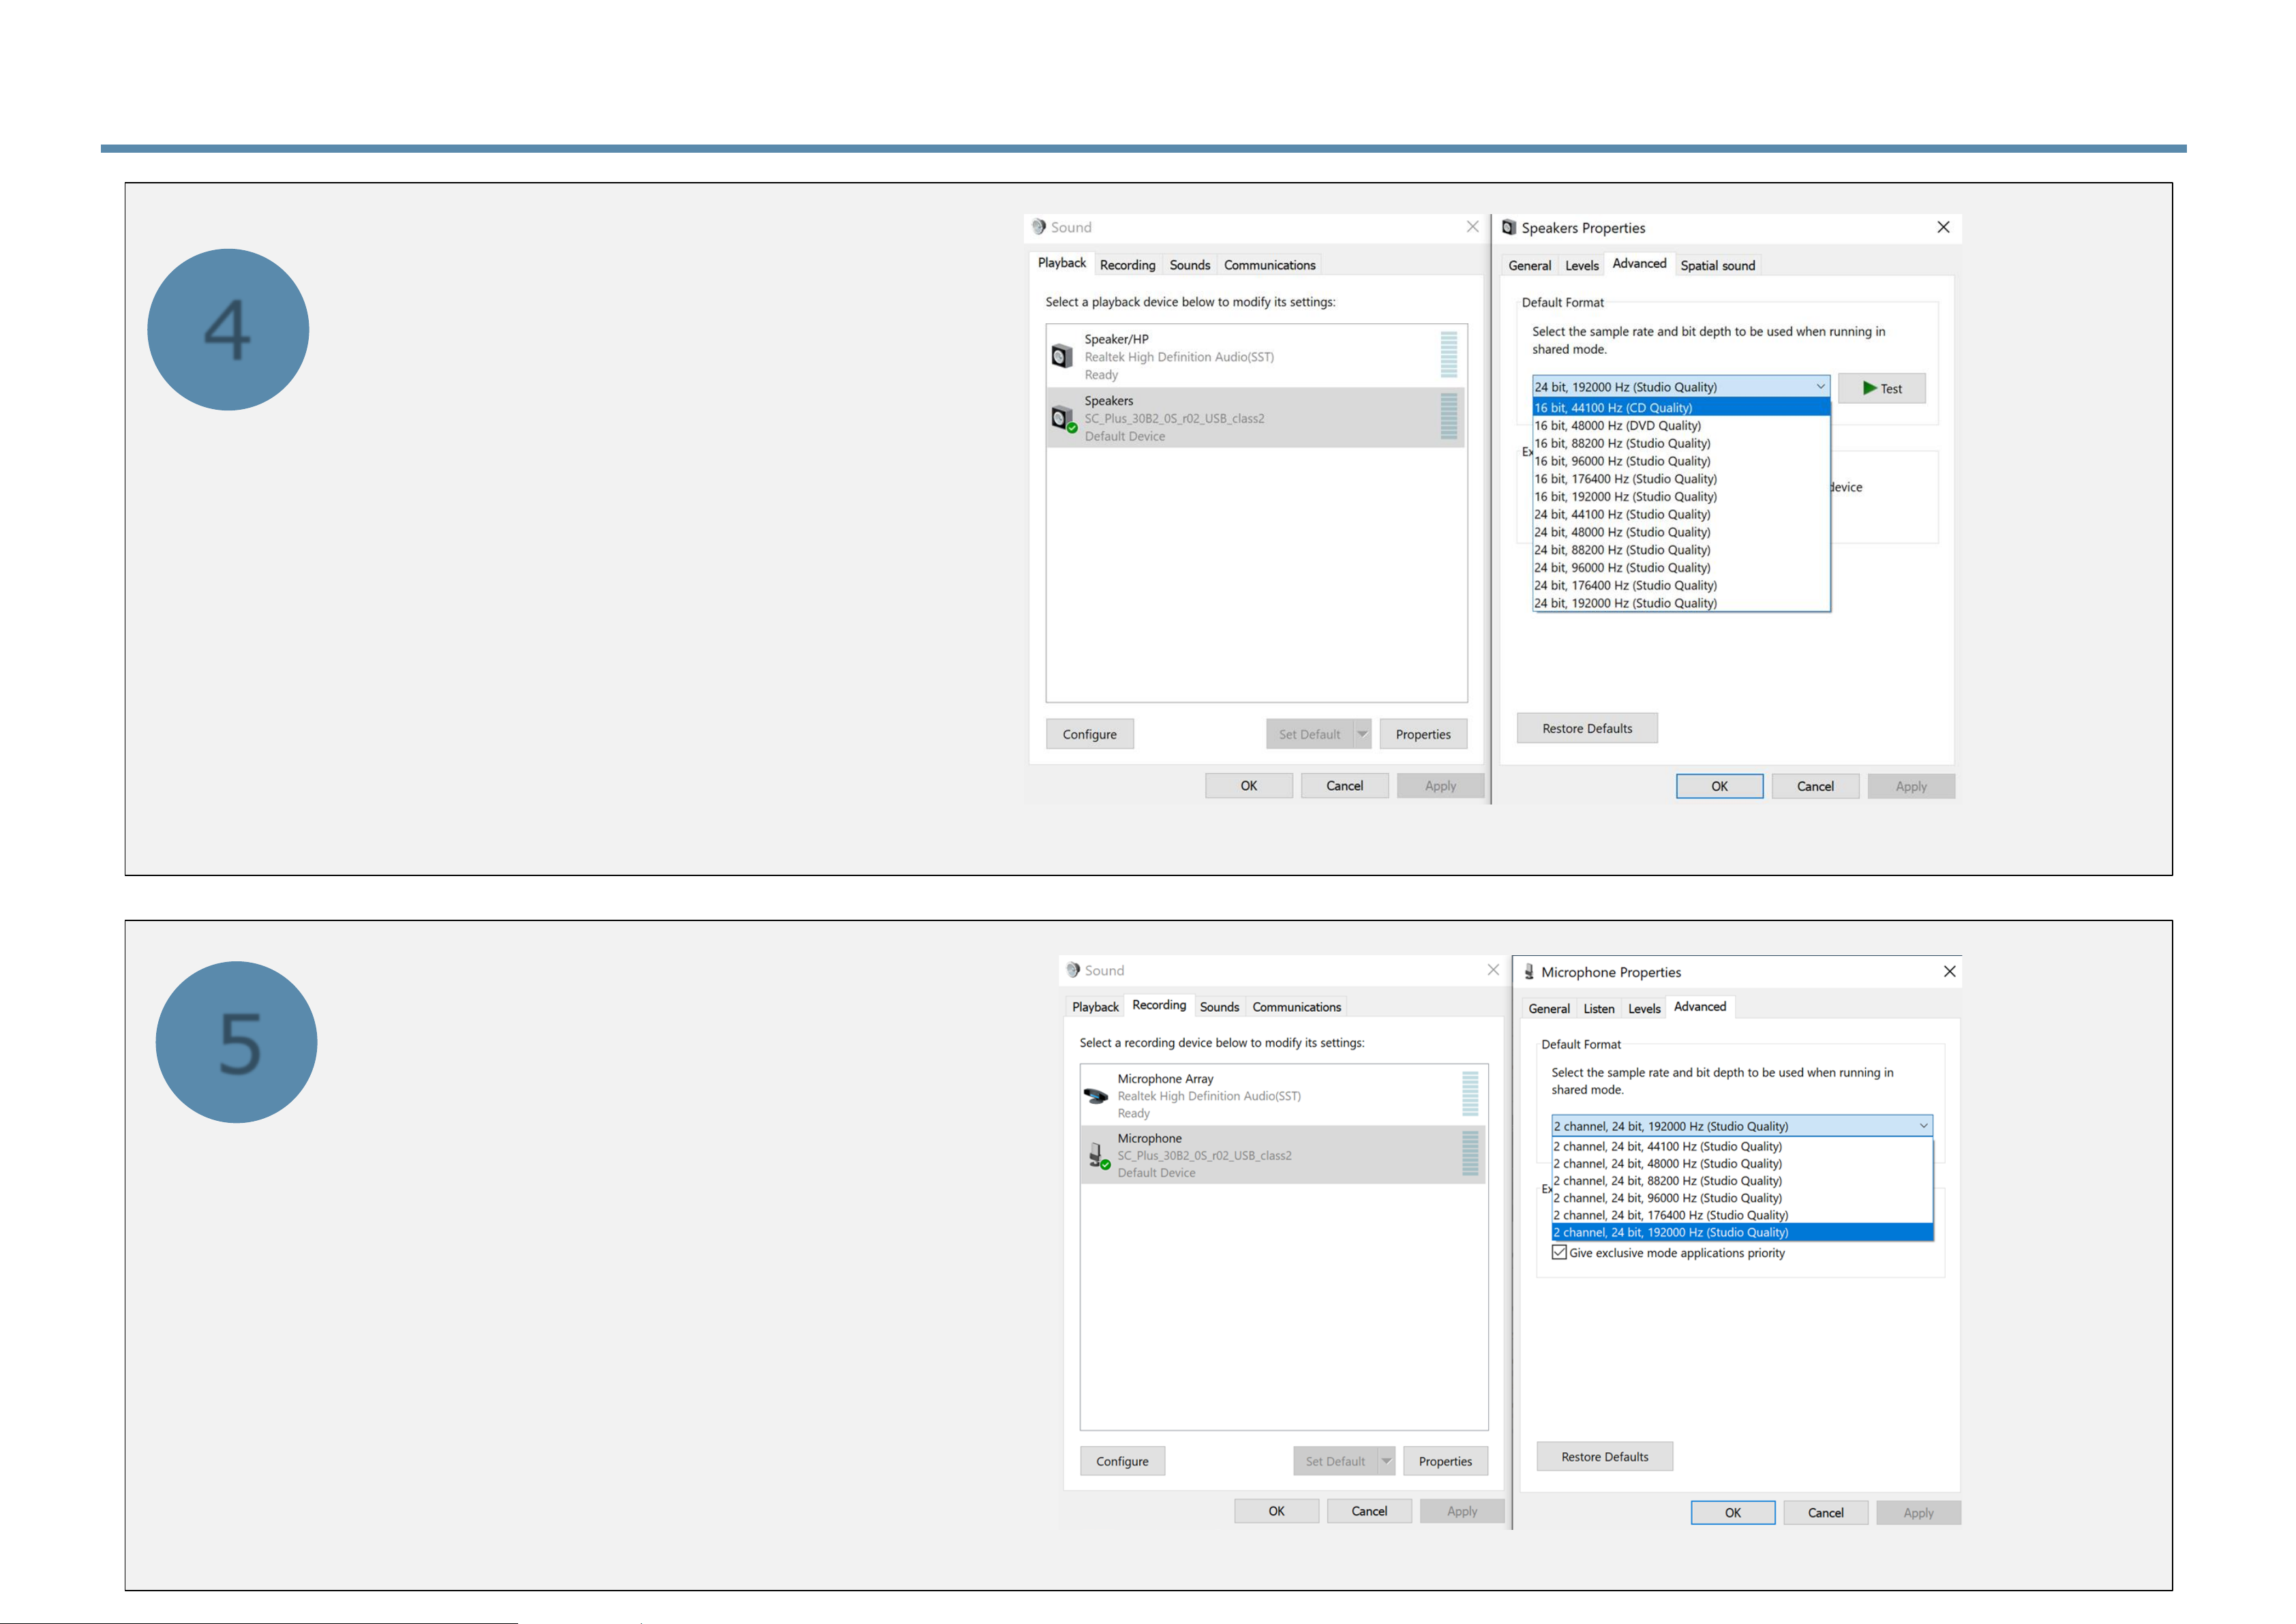
5.1.4 Configuring Windows to control the SugarCube
As a Playback device you
will be able to configure the
SugarCube DAC as a
Speaker – by selecting the
SC_Plus you can then
select Properties and then
the Advanced tab to select
the sample rate and bit
depth. You will want to set
this to 24-bit, 192,000 Hz
if you want the SugarCube
functions to work with the
external source.
As a Recording device the
SugarCube ADC will show up
as a Microphone by
selecting the SC_Plus you can
than select Properties and
then the Advanced tab and
select the sample rate and bit
depth. You will want to set
this to 24-bit, 192,000 Hz if
you want the SugarCube
functions to work with the
external device.
4
5
Page 73
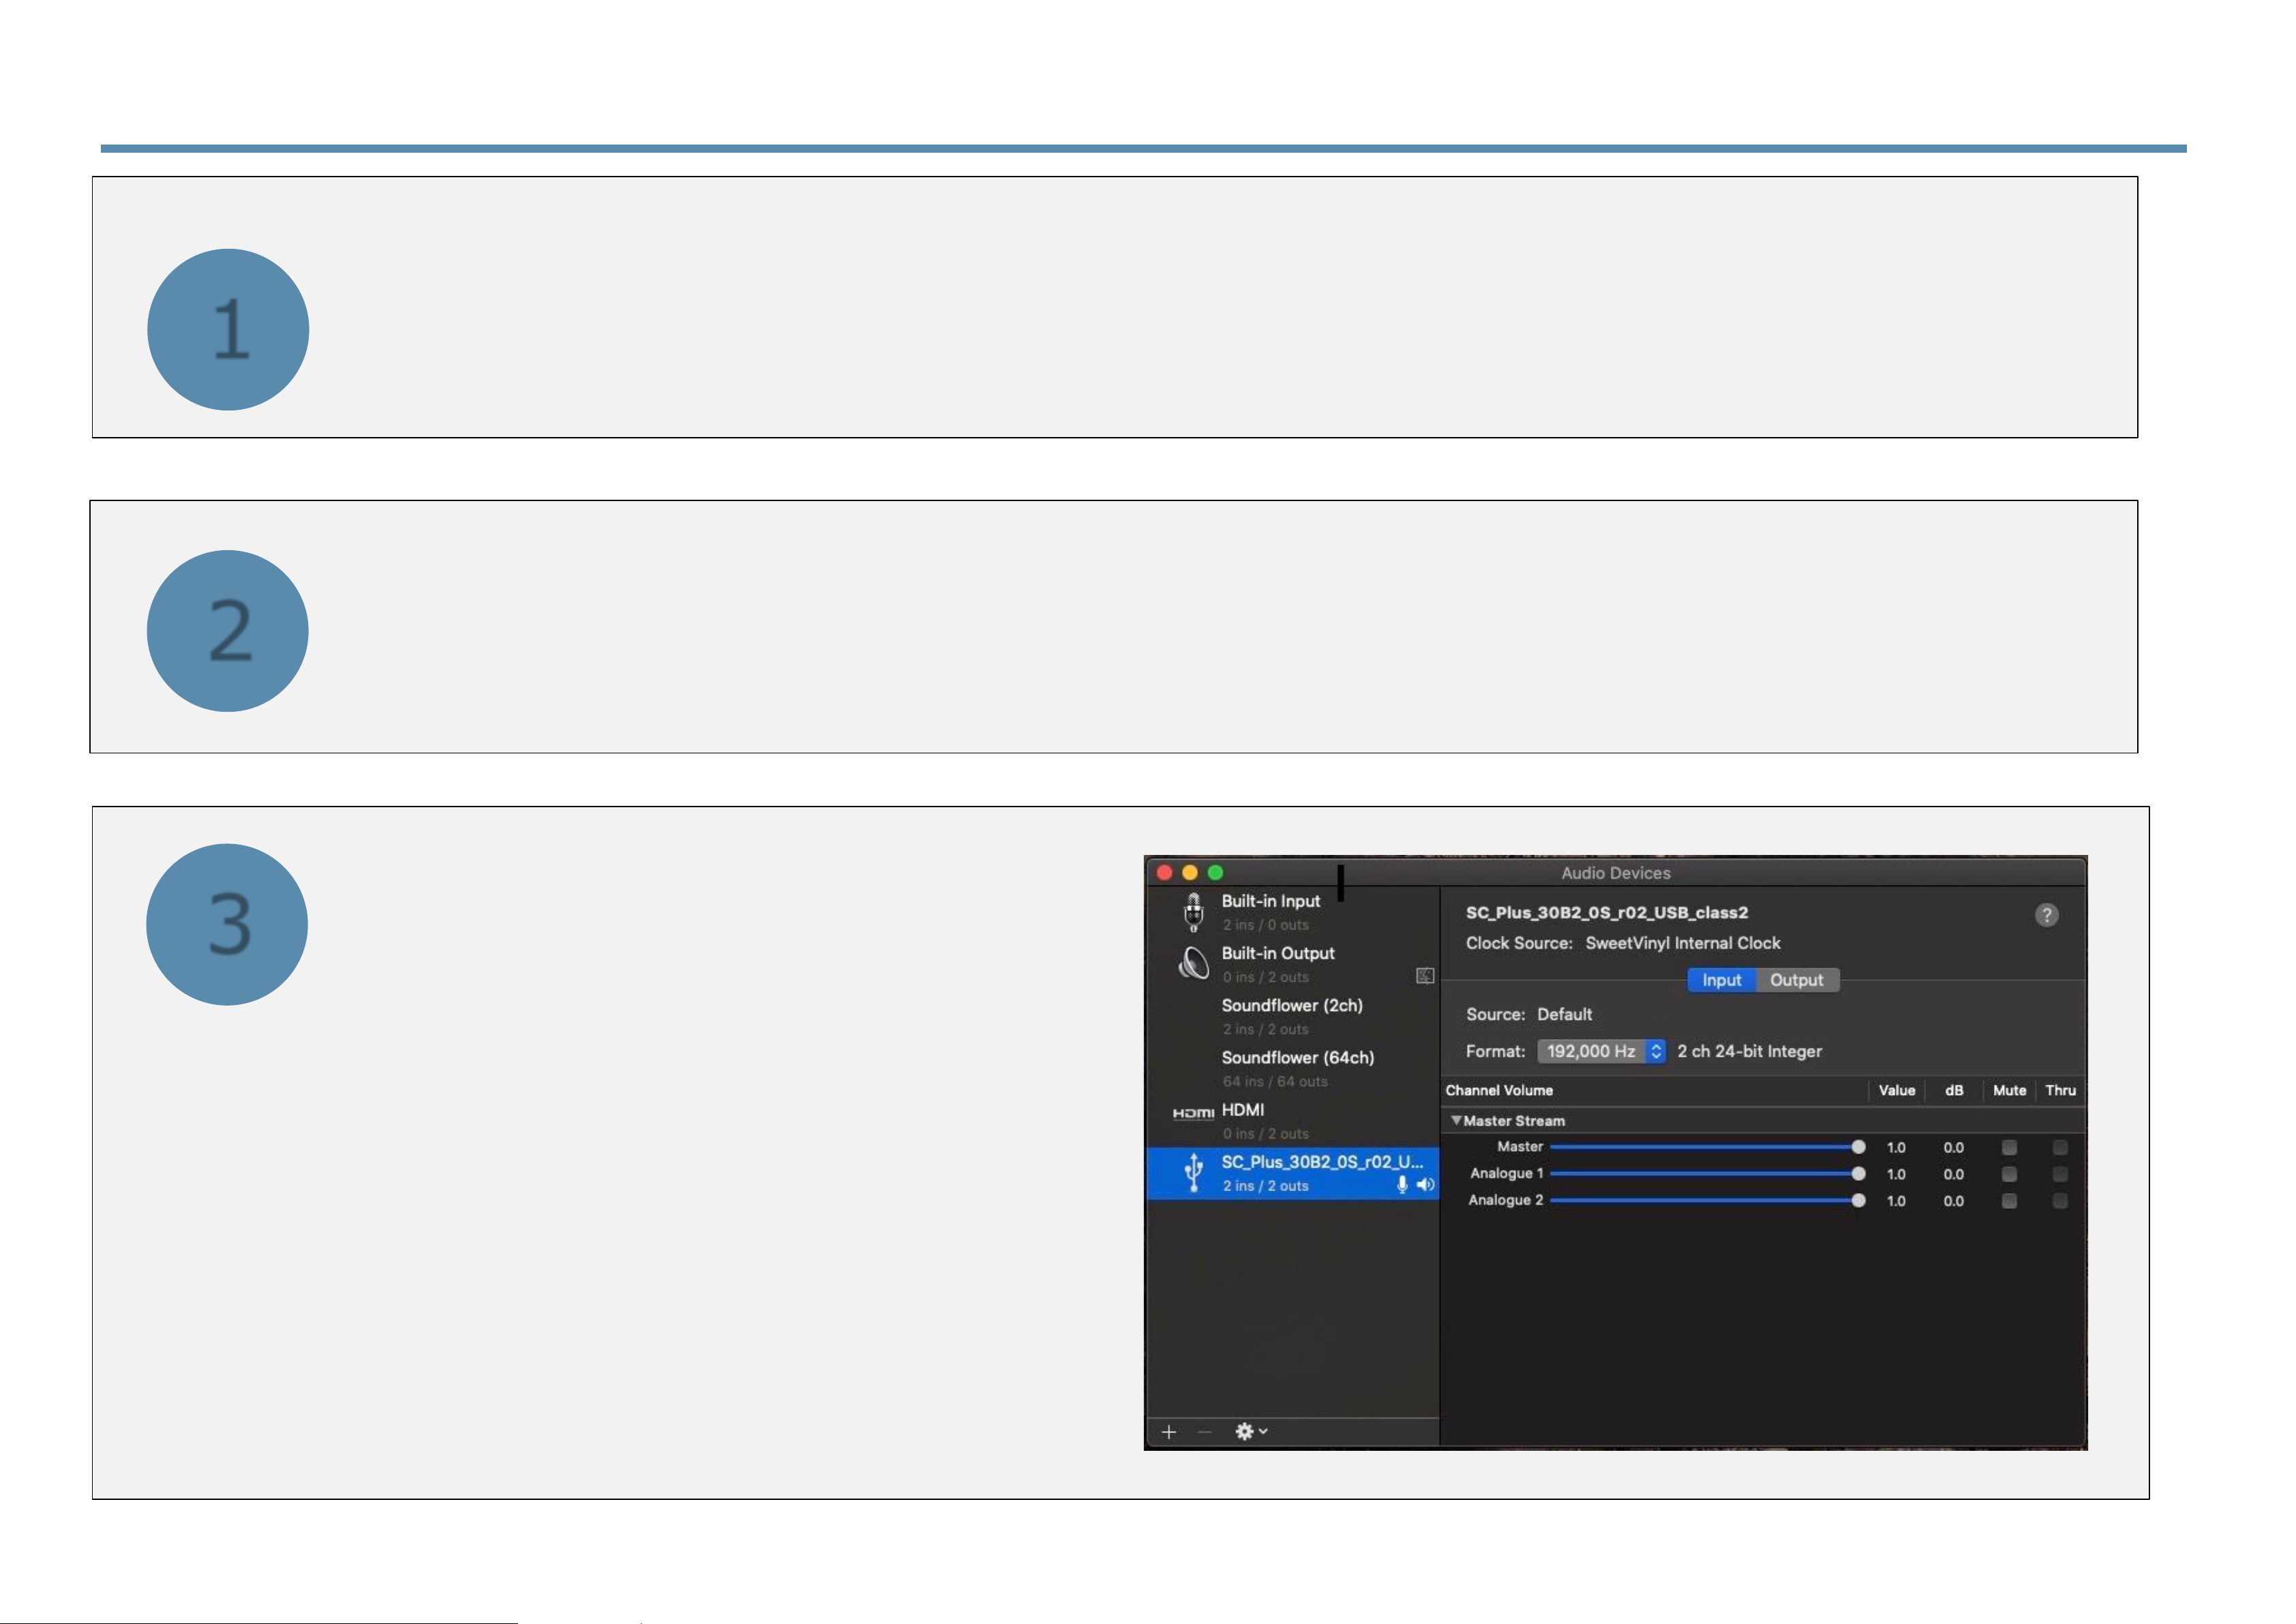
5.1.5 Configuring MacOS to control the SugarCube
After connecting your MacOS computer, the SugarCube should configure itself.
Drivers are built-in and you should be able to see and configure the
SugarCube as a device using the “Audio Midi Setup” app by searching for
this or by going to the "Utilities" folder in "Applications"
A Window like this will open and you
will want to further select the “Audio
Setup” section:
1
2
3
Page 74
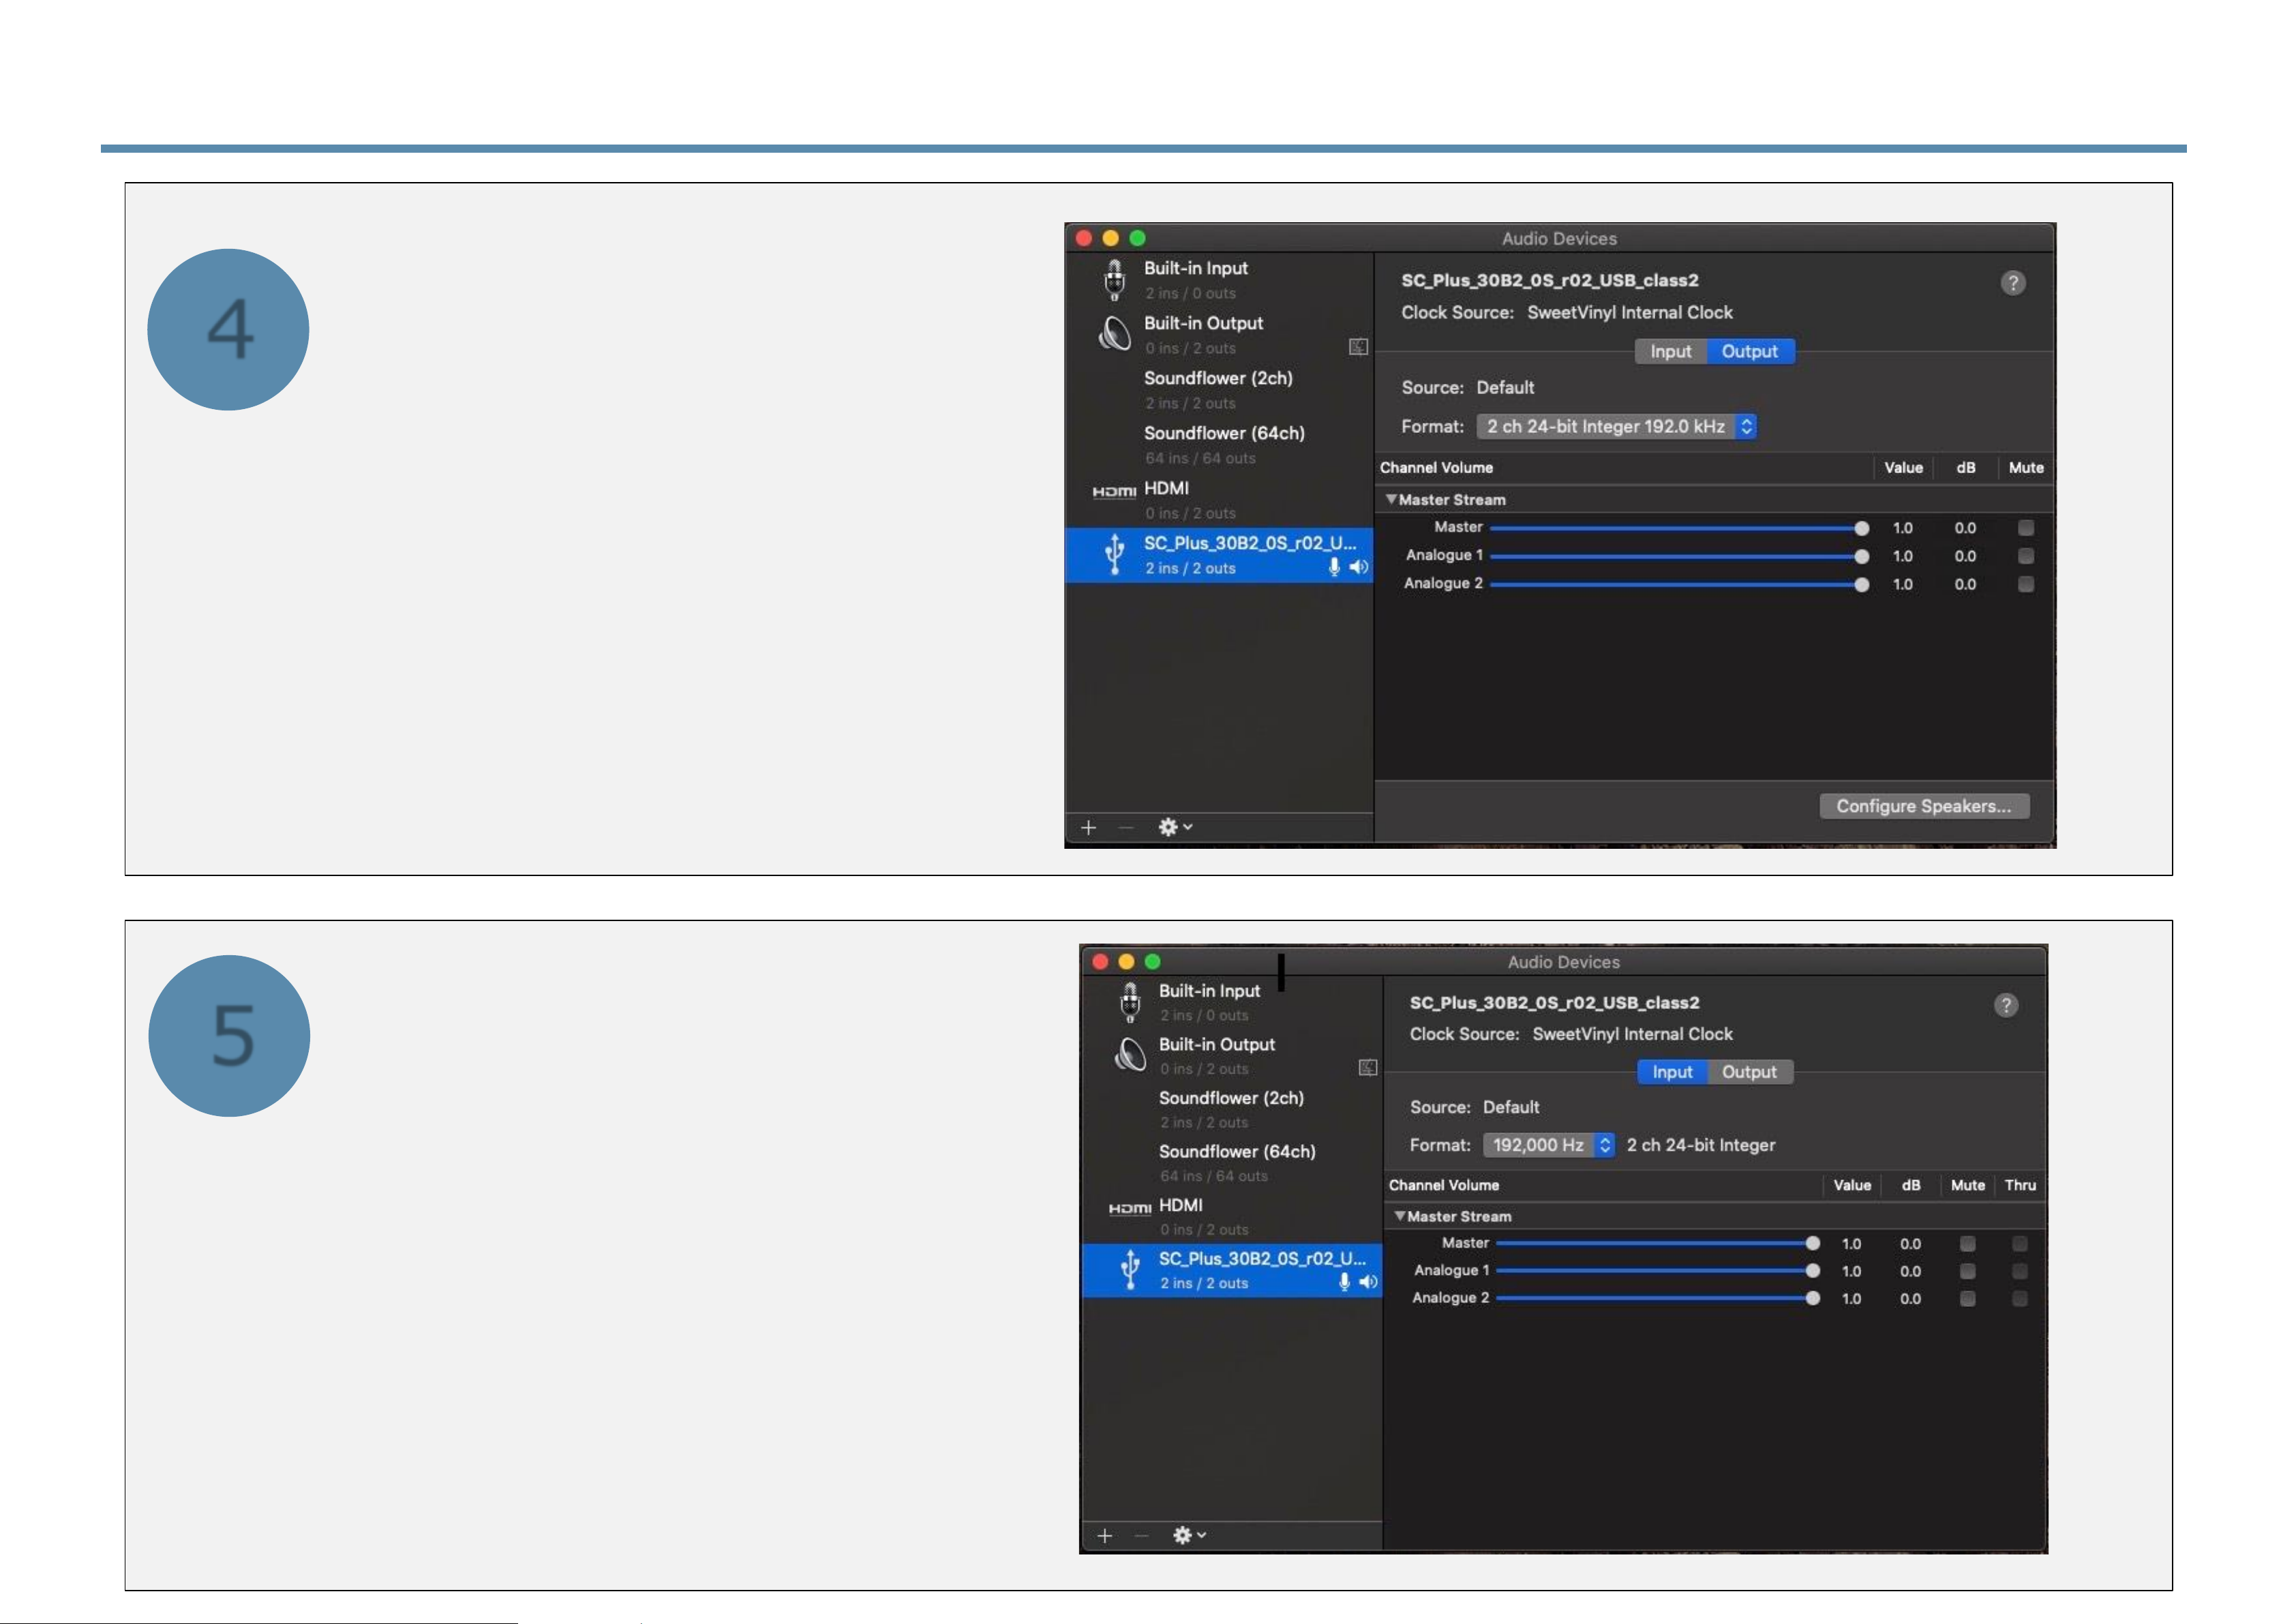
5.1.6 Configuring MacOS to control the SugarCube
As an Output device you
will be able to configure the
SugarCube DAC – by
selecting the SC_Plus you
can the sample rate and bitdepth. You will want to set
this to 24-bit, 192.0 kHz if
you want the SugarCube
functions to work with a
MacOS app.
As an Input device the
SugarCube ADC will appear
and by selecting the SC_Plus
you can select the sample rate
and bitdepth. You will want to
set this to 192,000 Hz if you
want the SugarCube functions
to work with a MacOS app.
Also, note bit-depth is usually
fixed to whatever is the output
but if at 16bit, you will need to
reset it to 24bit.
4
5
Page 75
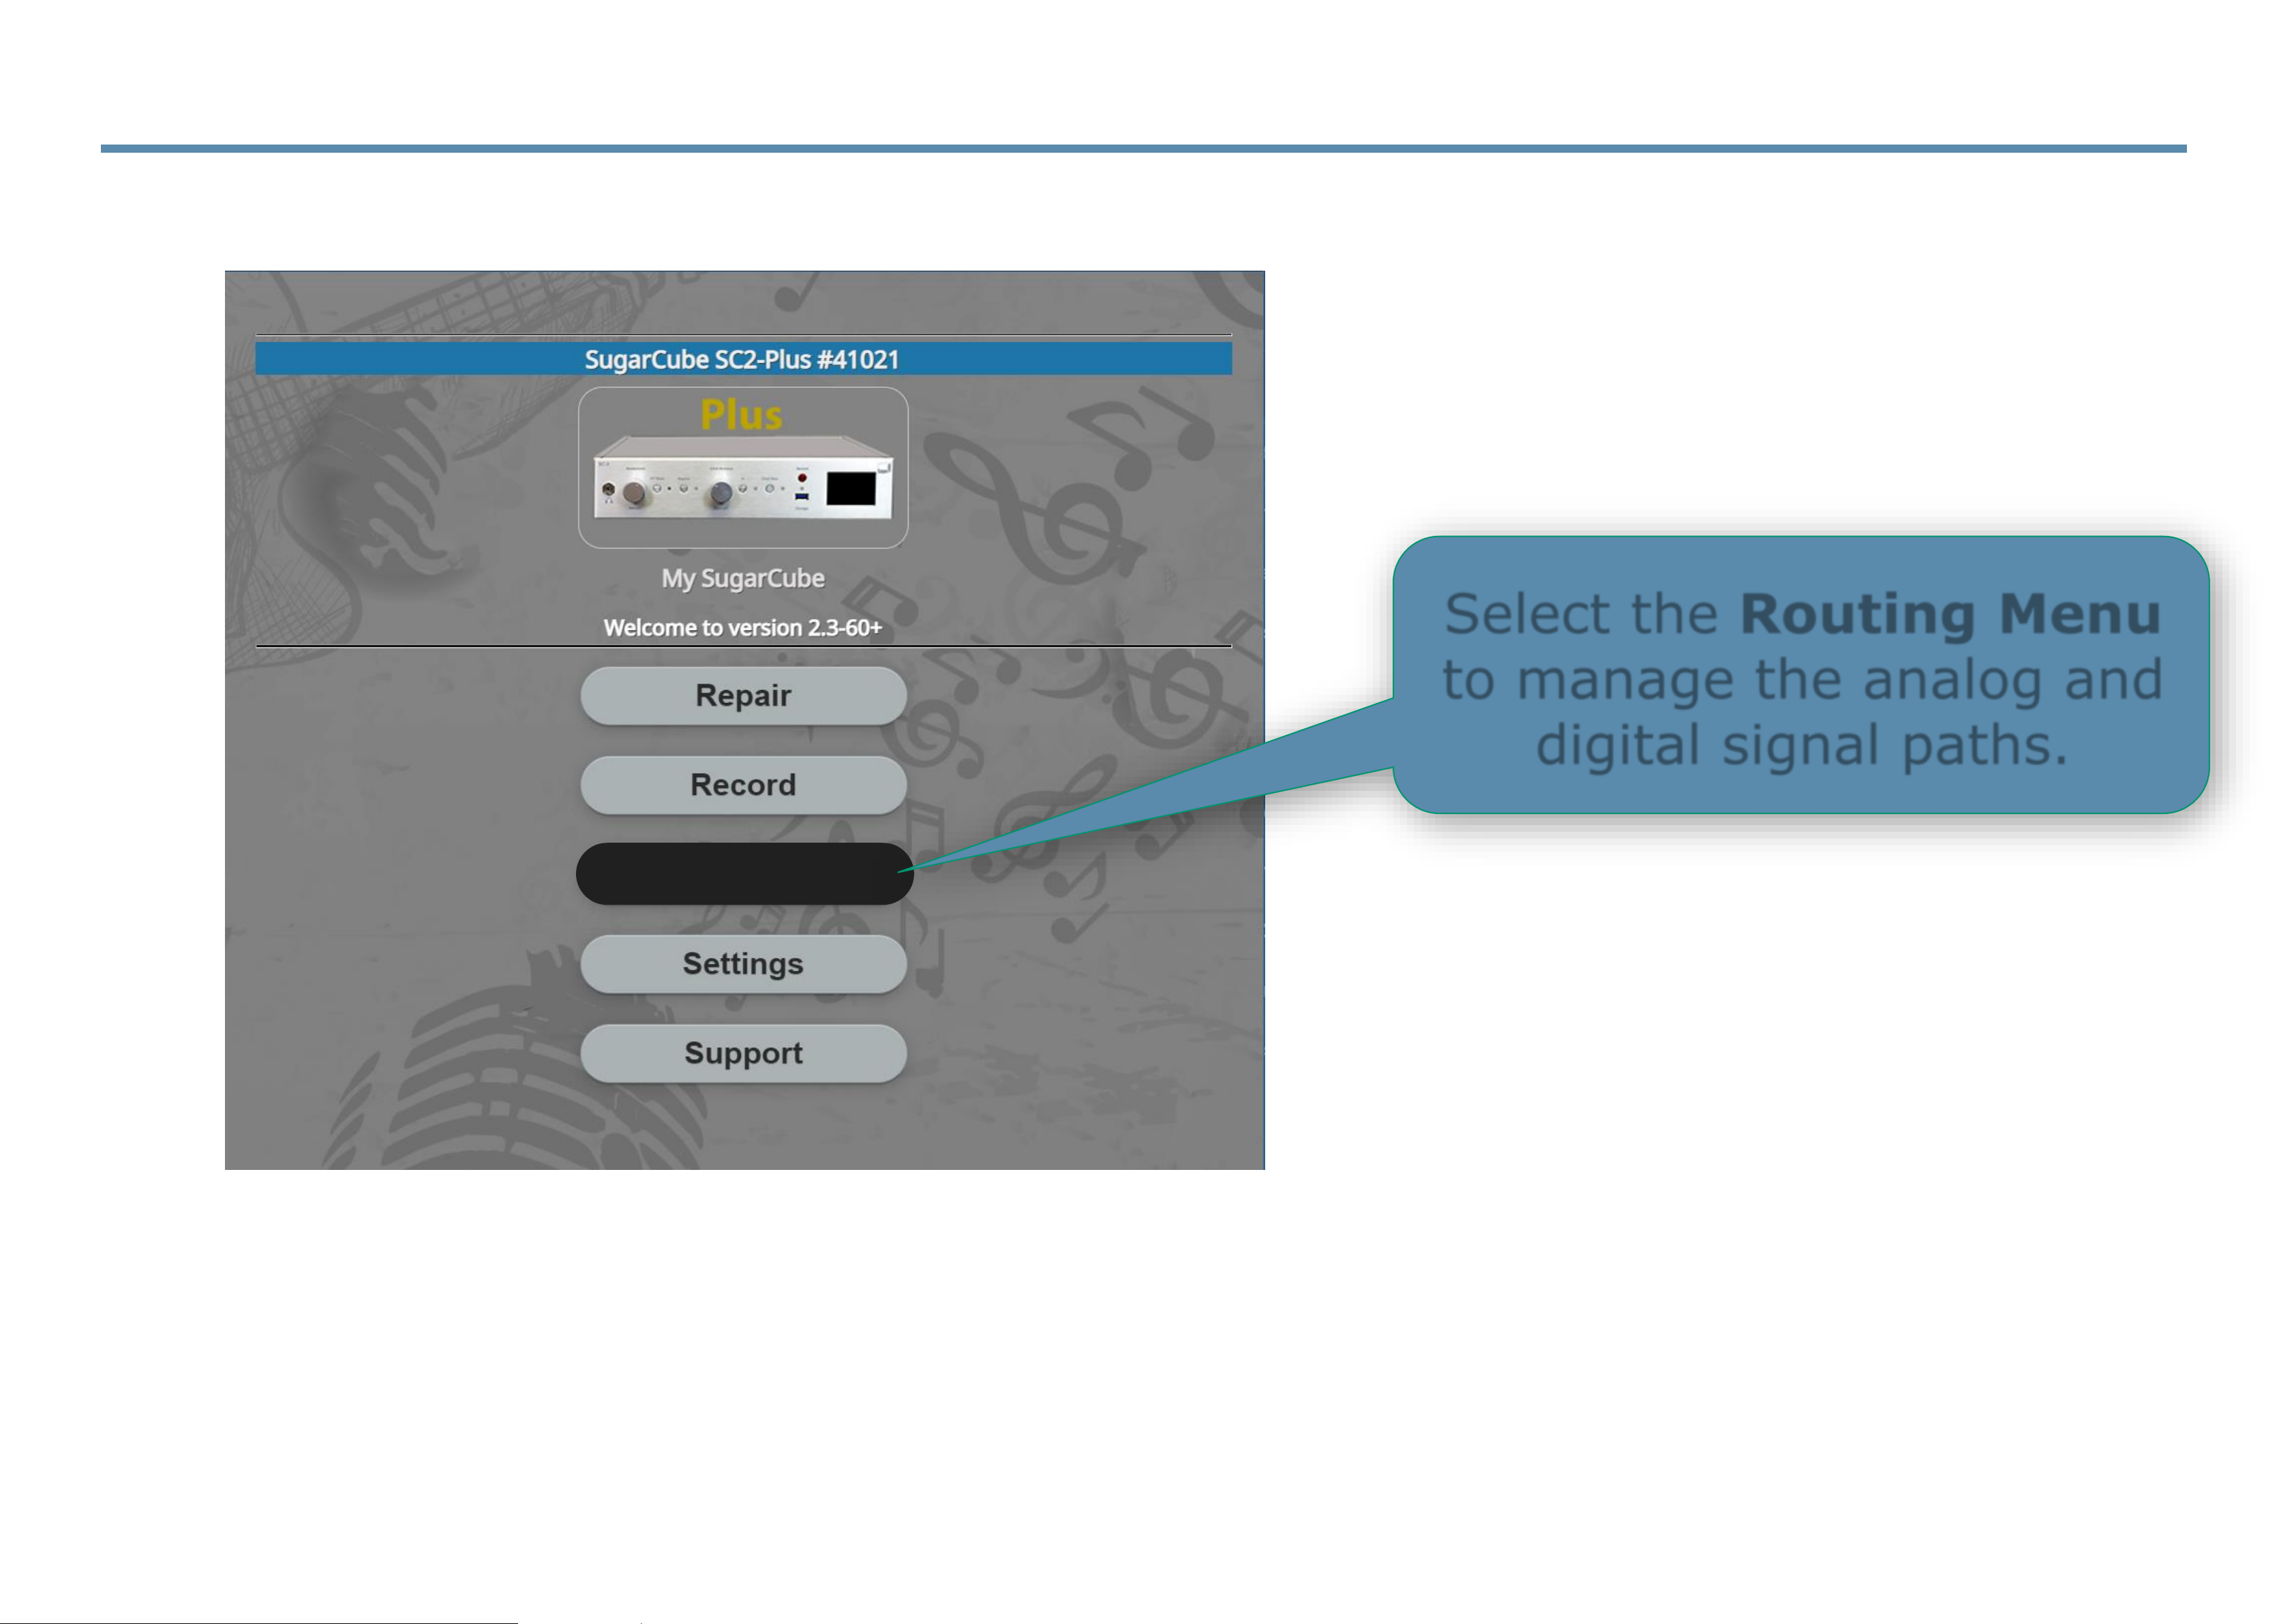
Routing
5.2 Audio Routing Menu
To efficiently work with an the SC2-Plus and a computer connected over USB you will want to open
the Routing Menu page. The next pages show how the SugarCube, and an external computer,
work together to provide the enhanced functionality.
Select the Routing Menu
to manage the analog and
digital signal paths.
Page 76
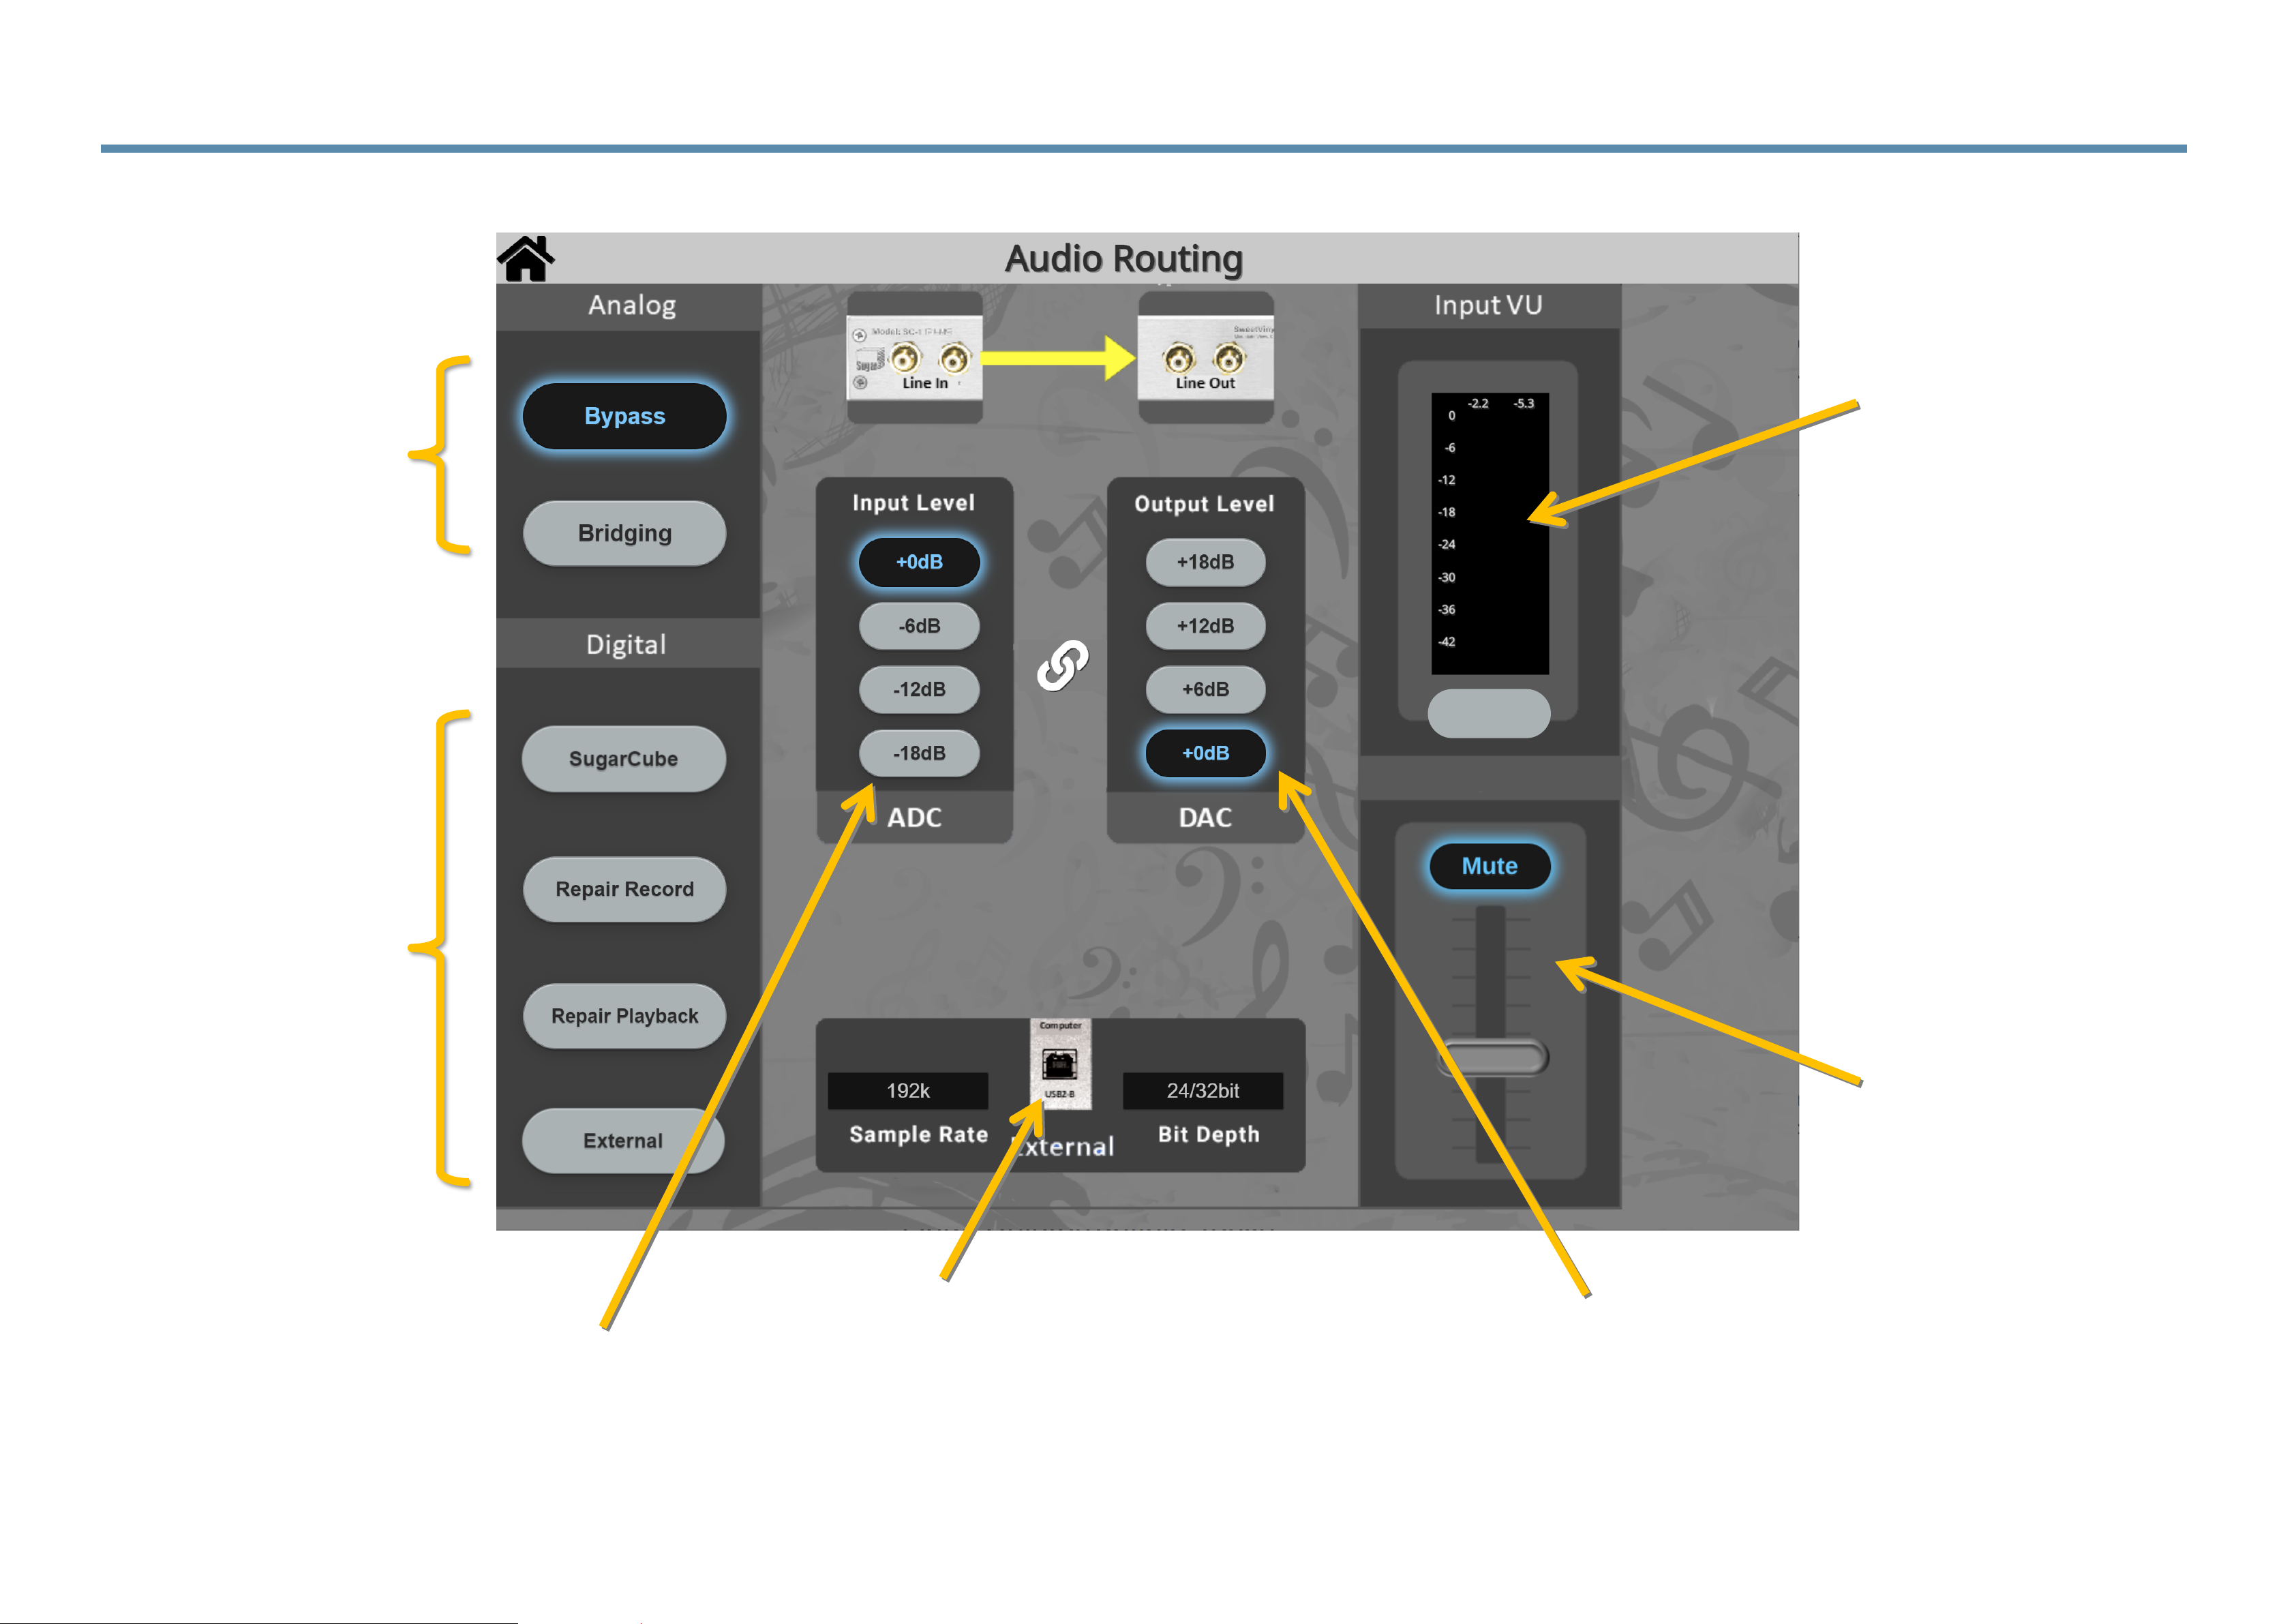
5.3 Audio Routing Menu — Control Layout
L
R
VU off
Monitor
Analog Routing
Modes
Digital Routing
Modes
External computer or music
server connects to
SugarCube via USB2.
The SC2-Plus appears as a
combination ADC/DAC to
the computer
Line-In level setting
controls the level of input
audio to the ADC
Line-Out level setting
controls the level of
audio gain after the
DAC
VU Meter shows level
of input as applied to
the ADC
Level of audio sent to
browser as a
convenience monitor
of input signal
Page 77
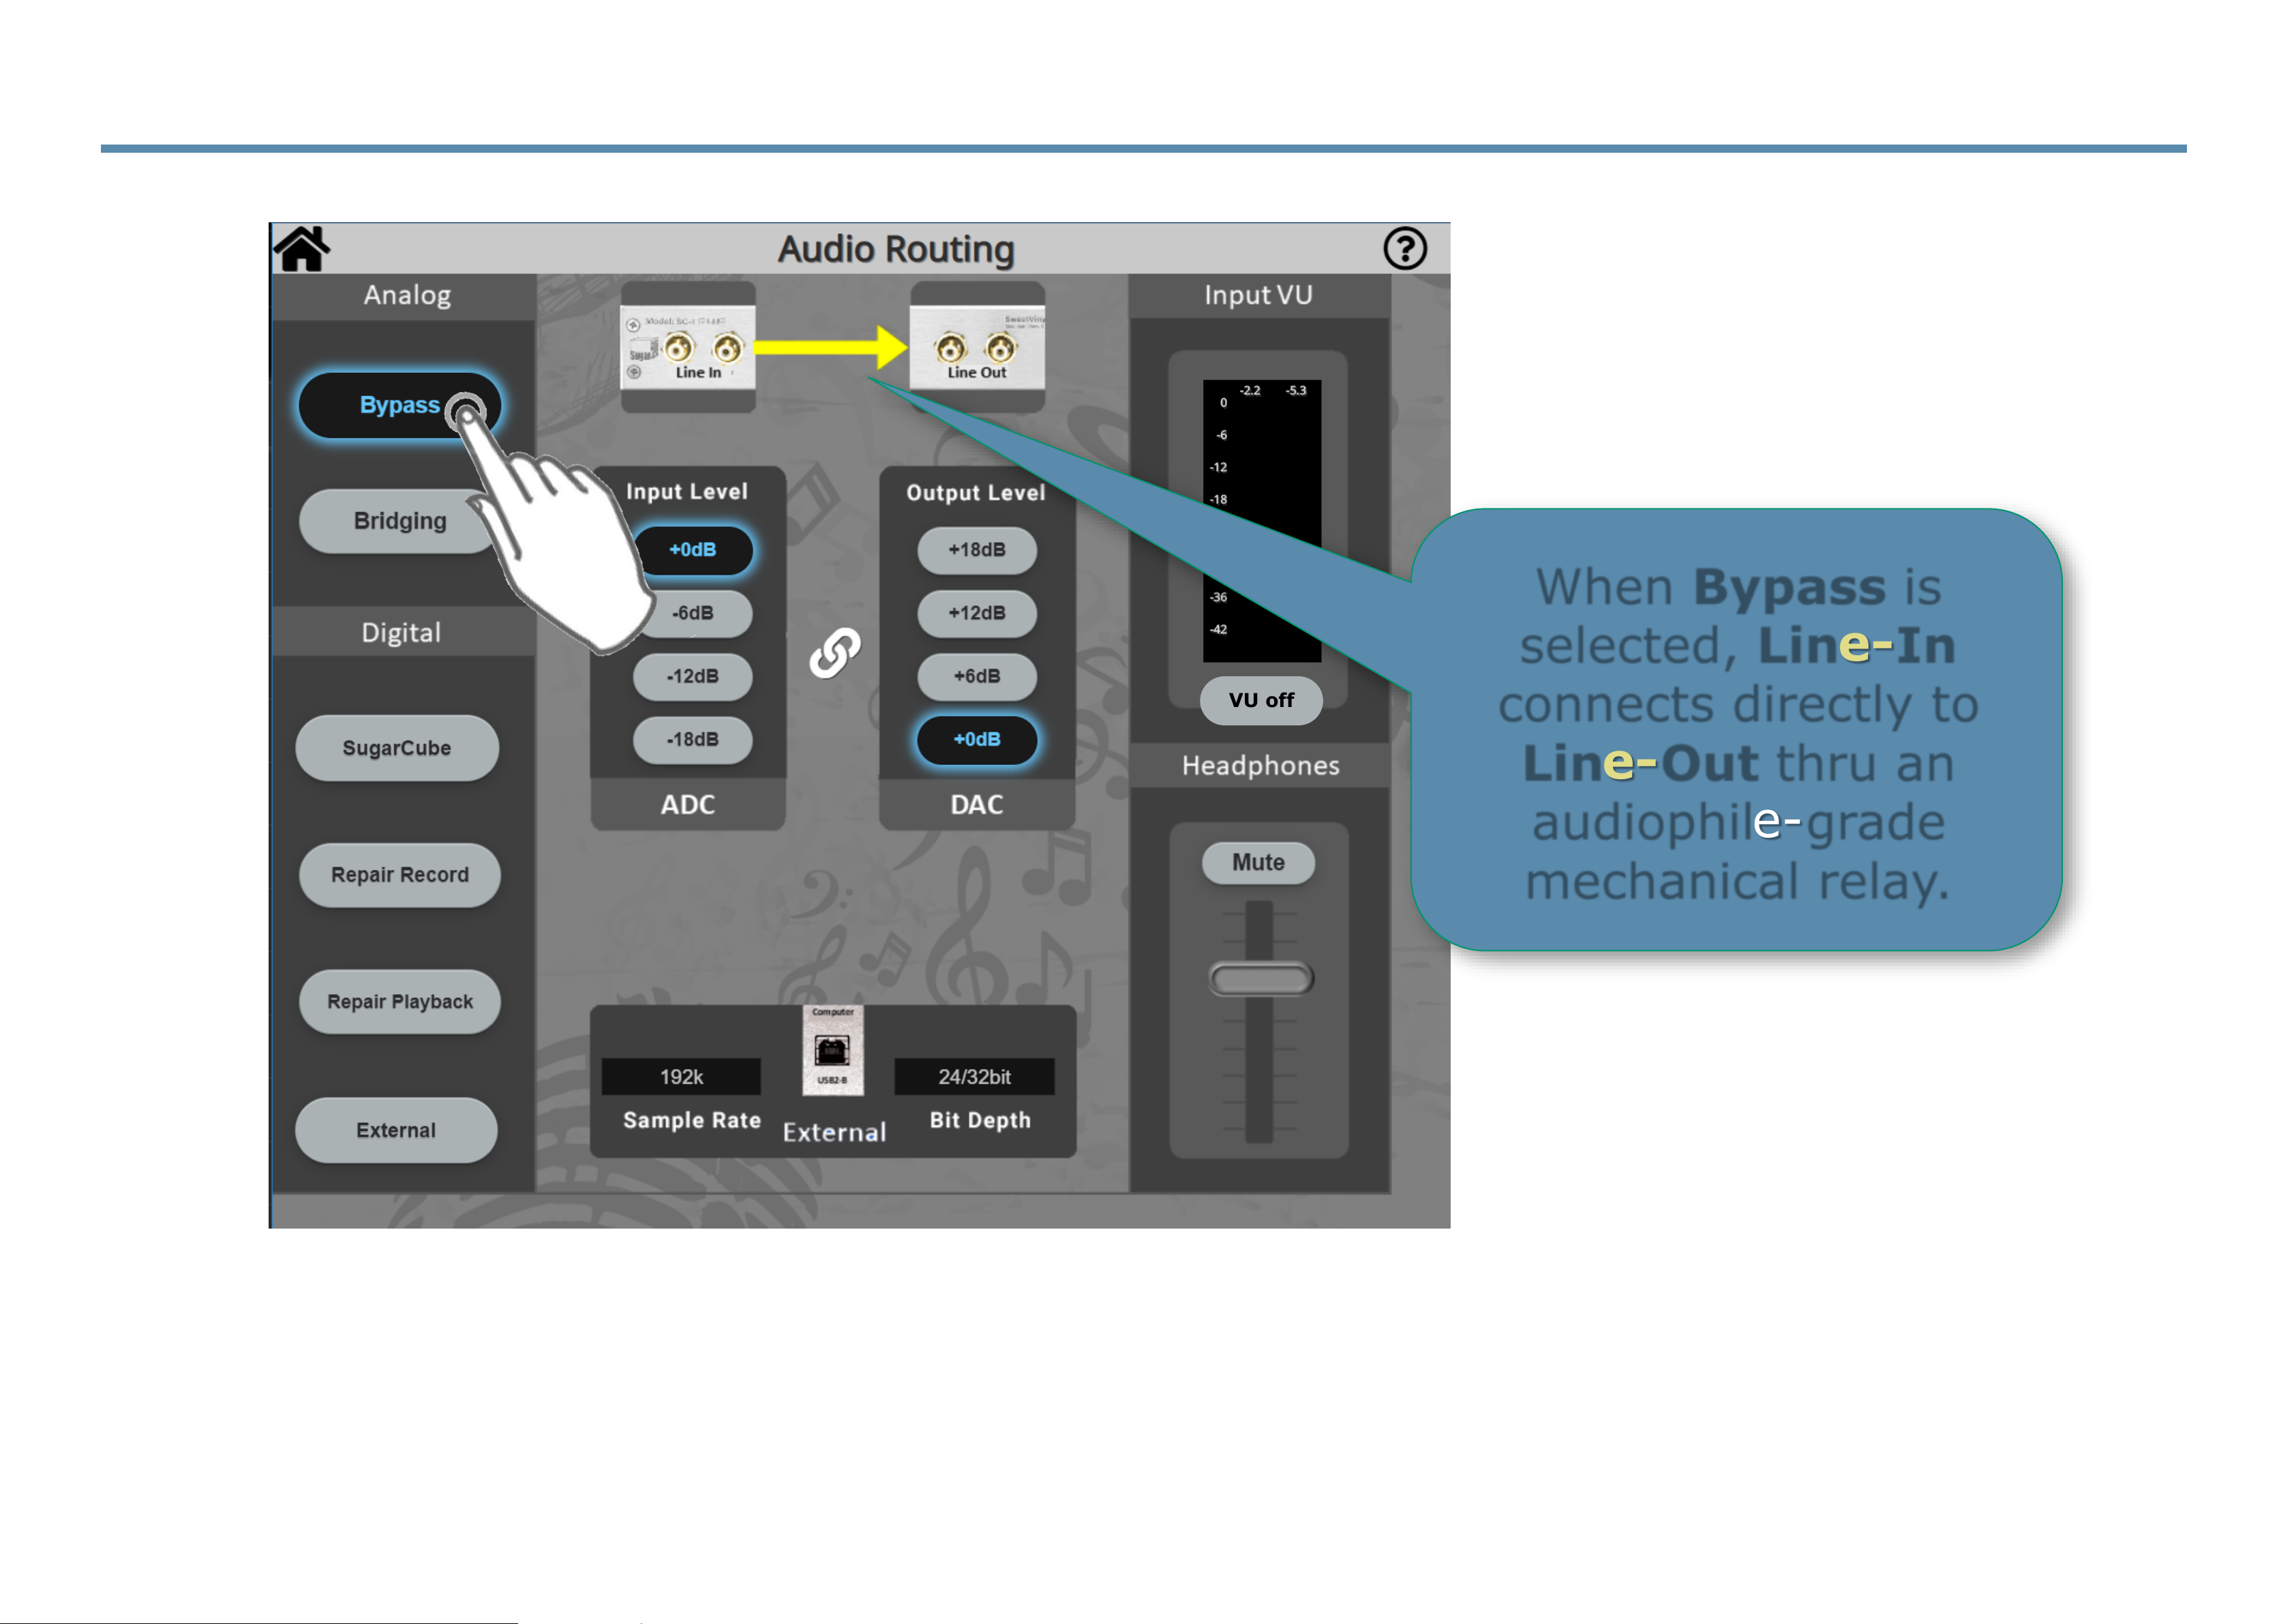
5.4 Audio Routing Menu — Bypass Mode
In Bypass mode, Line In connects to Line Out via a mechanical relay; this can be selected on this menu or
on the front panel. When in Bypass no signal is processed by the SugarCube nor by a connected computer.
L
R
VU off
When Bypass is
selected, Line-In
connects directly to
Line-Out thru an
audiophile-grade
mechanical relay.
Page 78
Bridging SugarCube
Repair
Record
Repair
Playback
ExternalBypass
Line-In connects directly to Line-Out.
Line-In
Line-Out
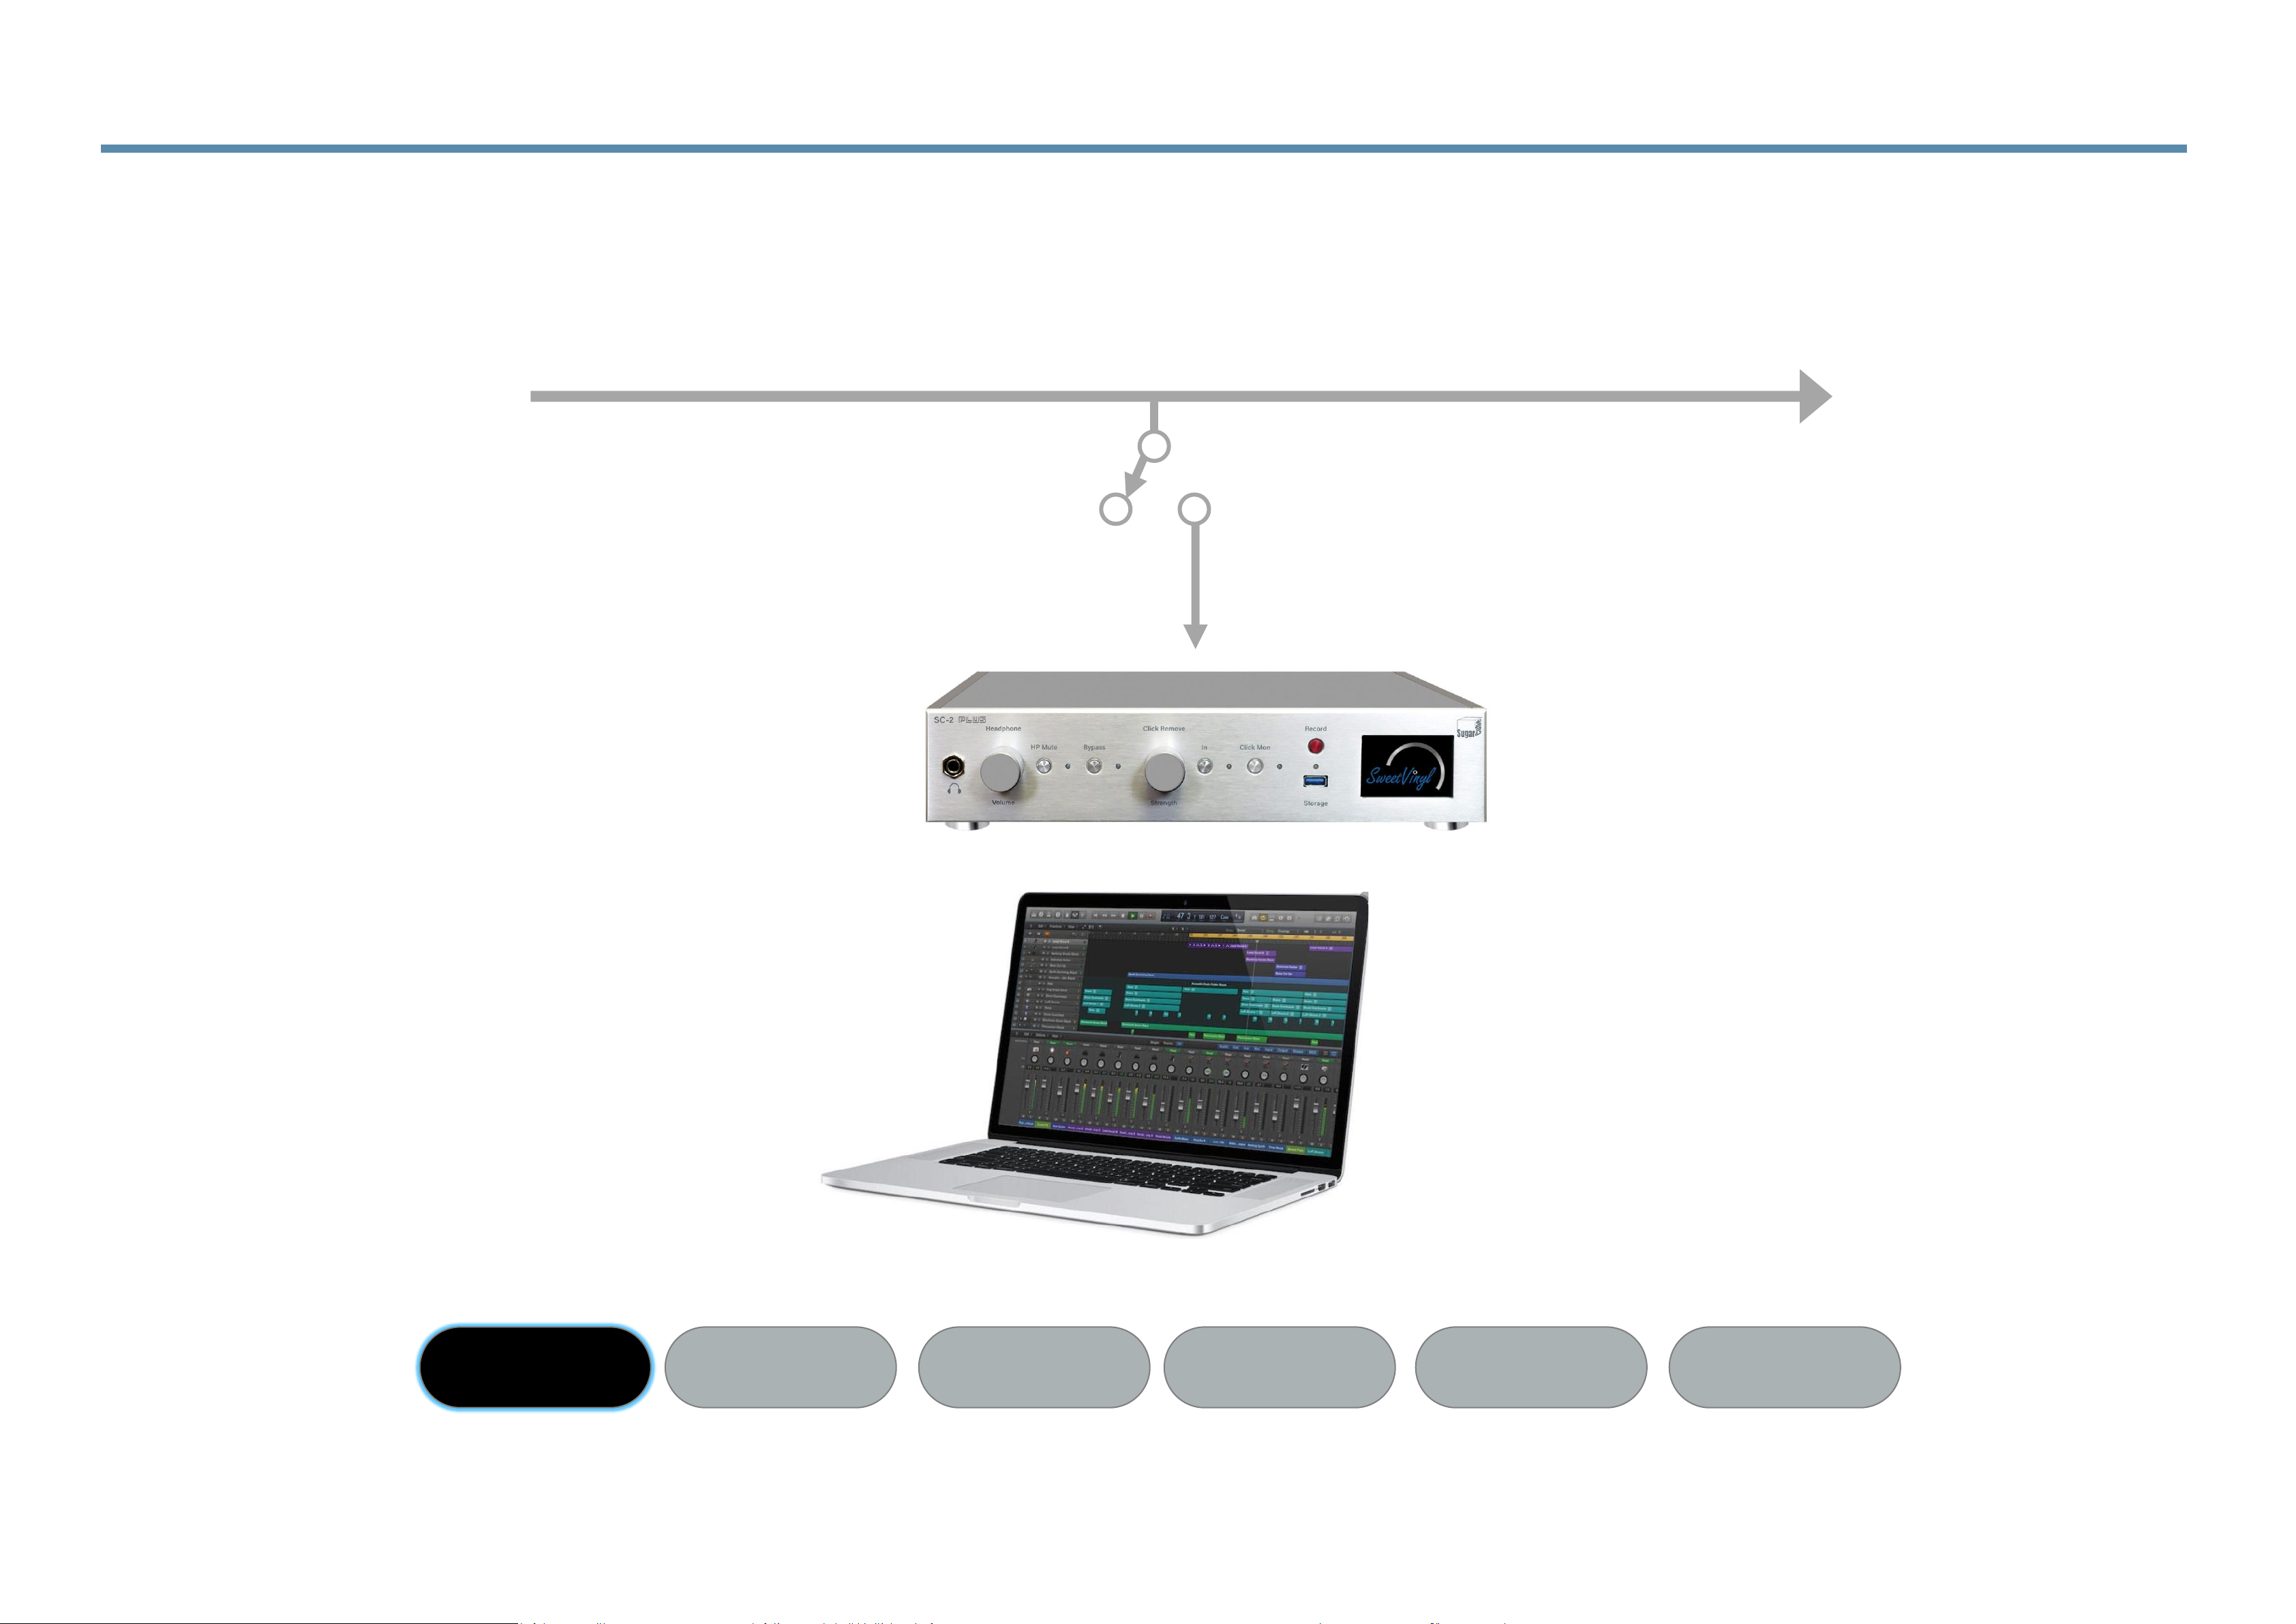
5.5 Logical Flow — Bypass Mode
In Bypass mode Line-In is connected to Line-Out via a mechanical relay, this can be selected on the menu
or on the front panel. When in Bypass, no signal is processed by the SugarCube or a connected computer.
Page 79
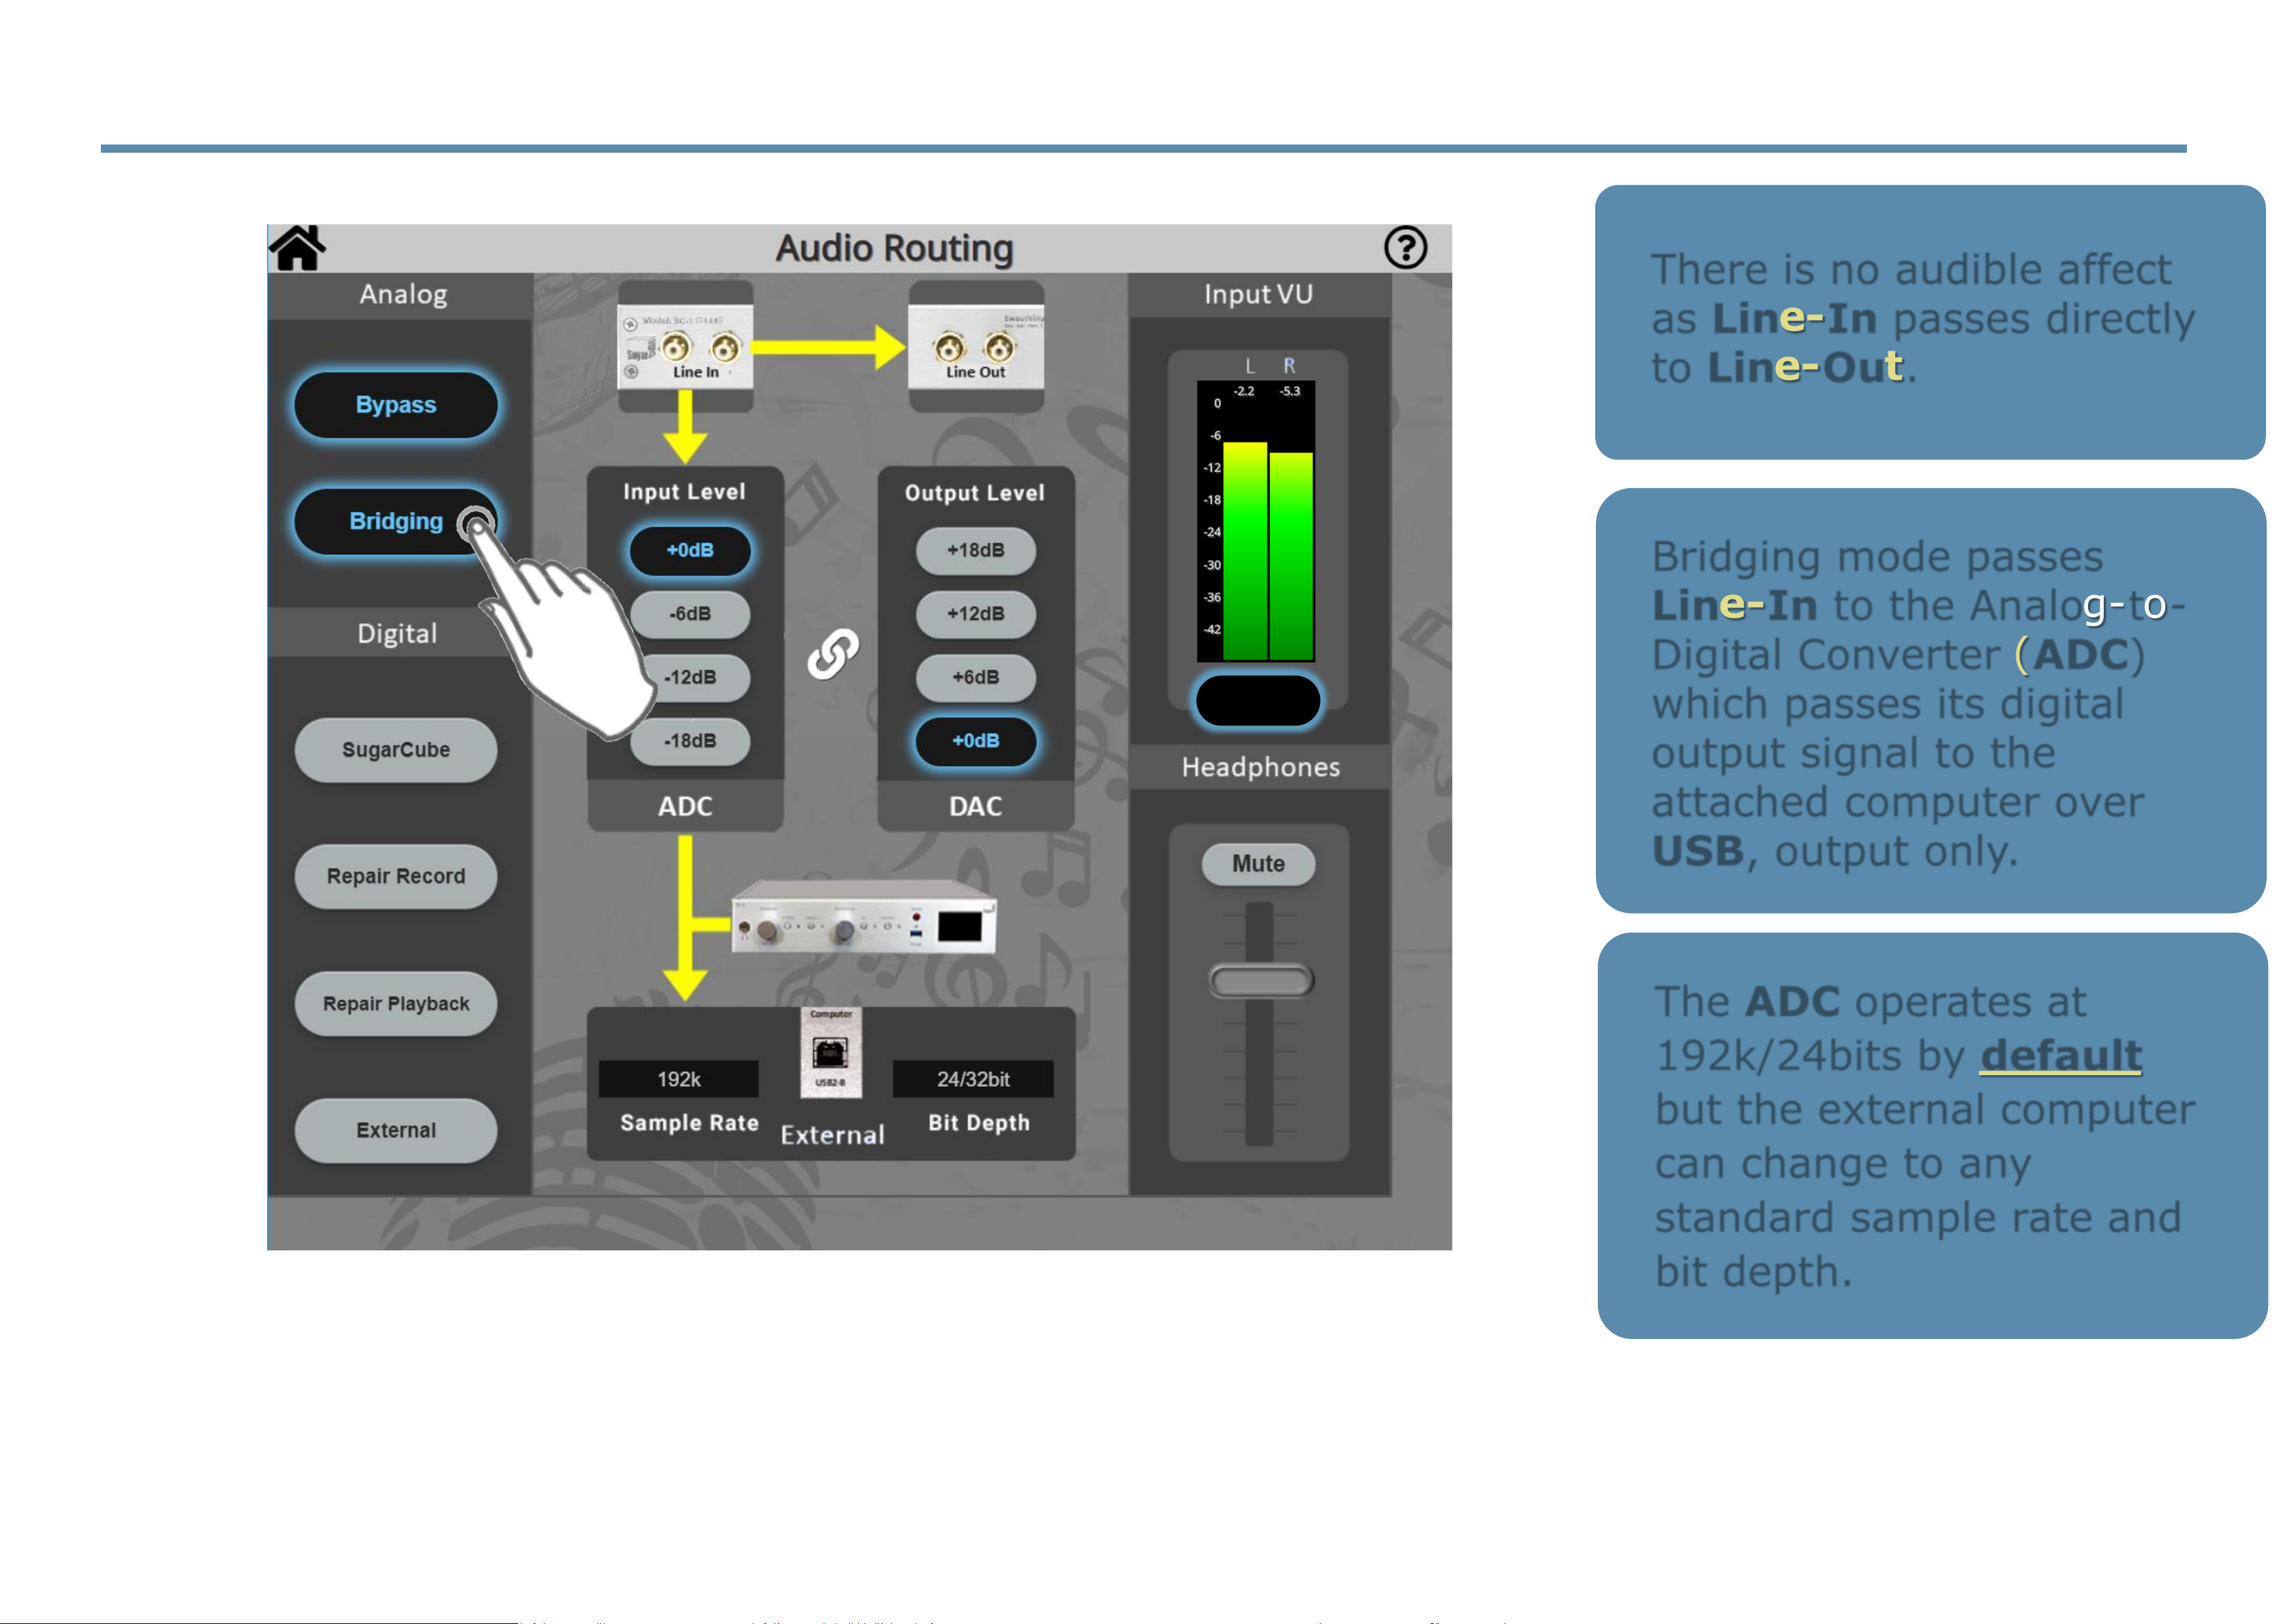
5.6 Audio Routing Menu — Bridging Mode
Bridging mode passes
Line-In to the Analog-to-
Digital Converter (ADC)
which passes its digital
output signal to the
attached computer over
USB, output only.
The ADC operates at
192k/24bits by default
but the external computer
can change to any
standard sample rate and
bit depth.
There is no audible affect
as Line-In passes directly
to Line-Out.
VU on
Page 80
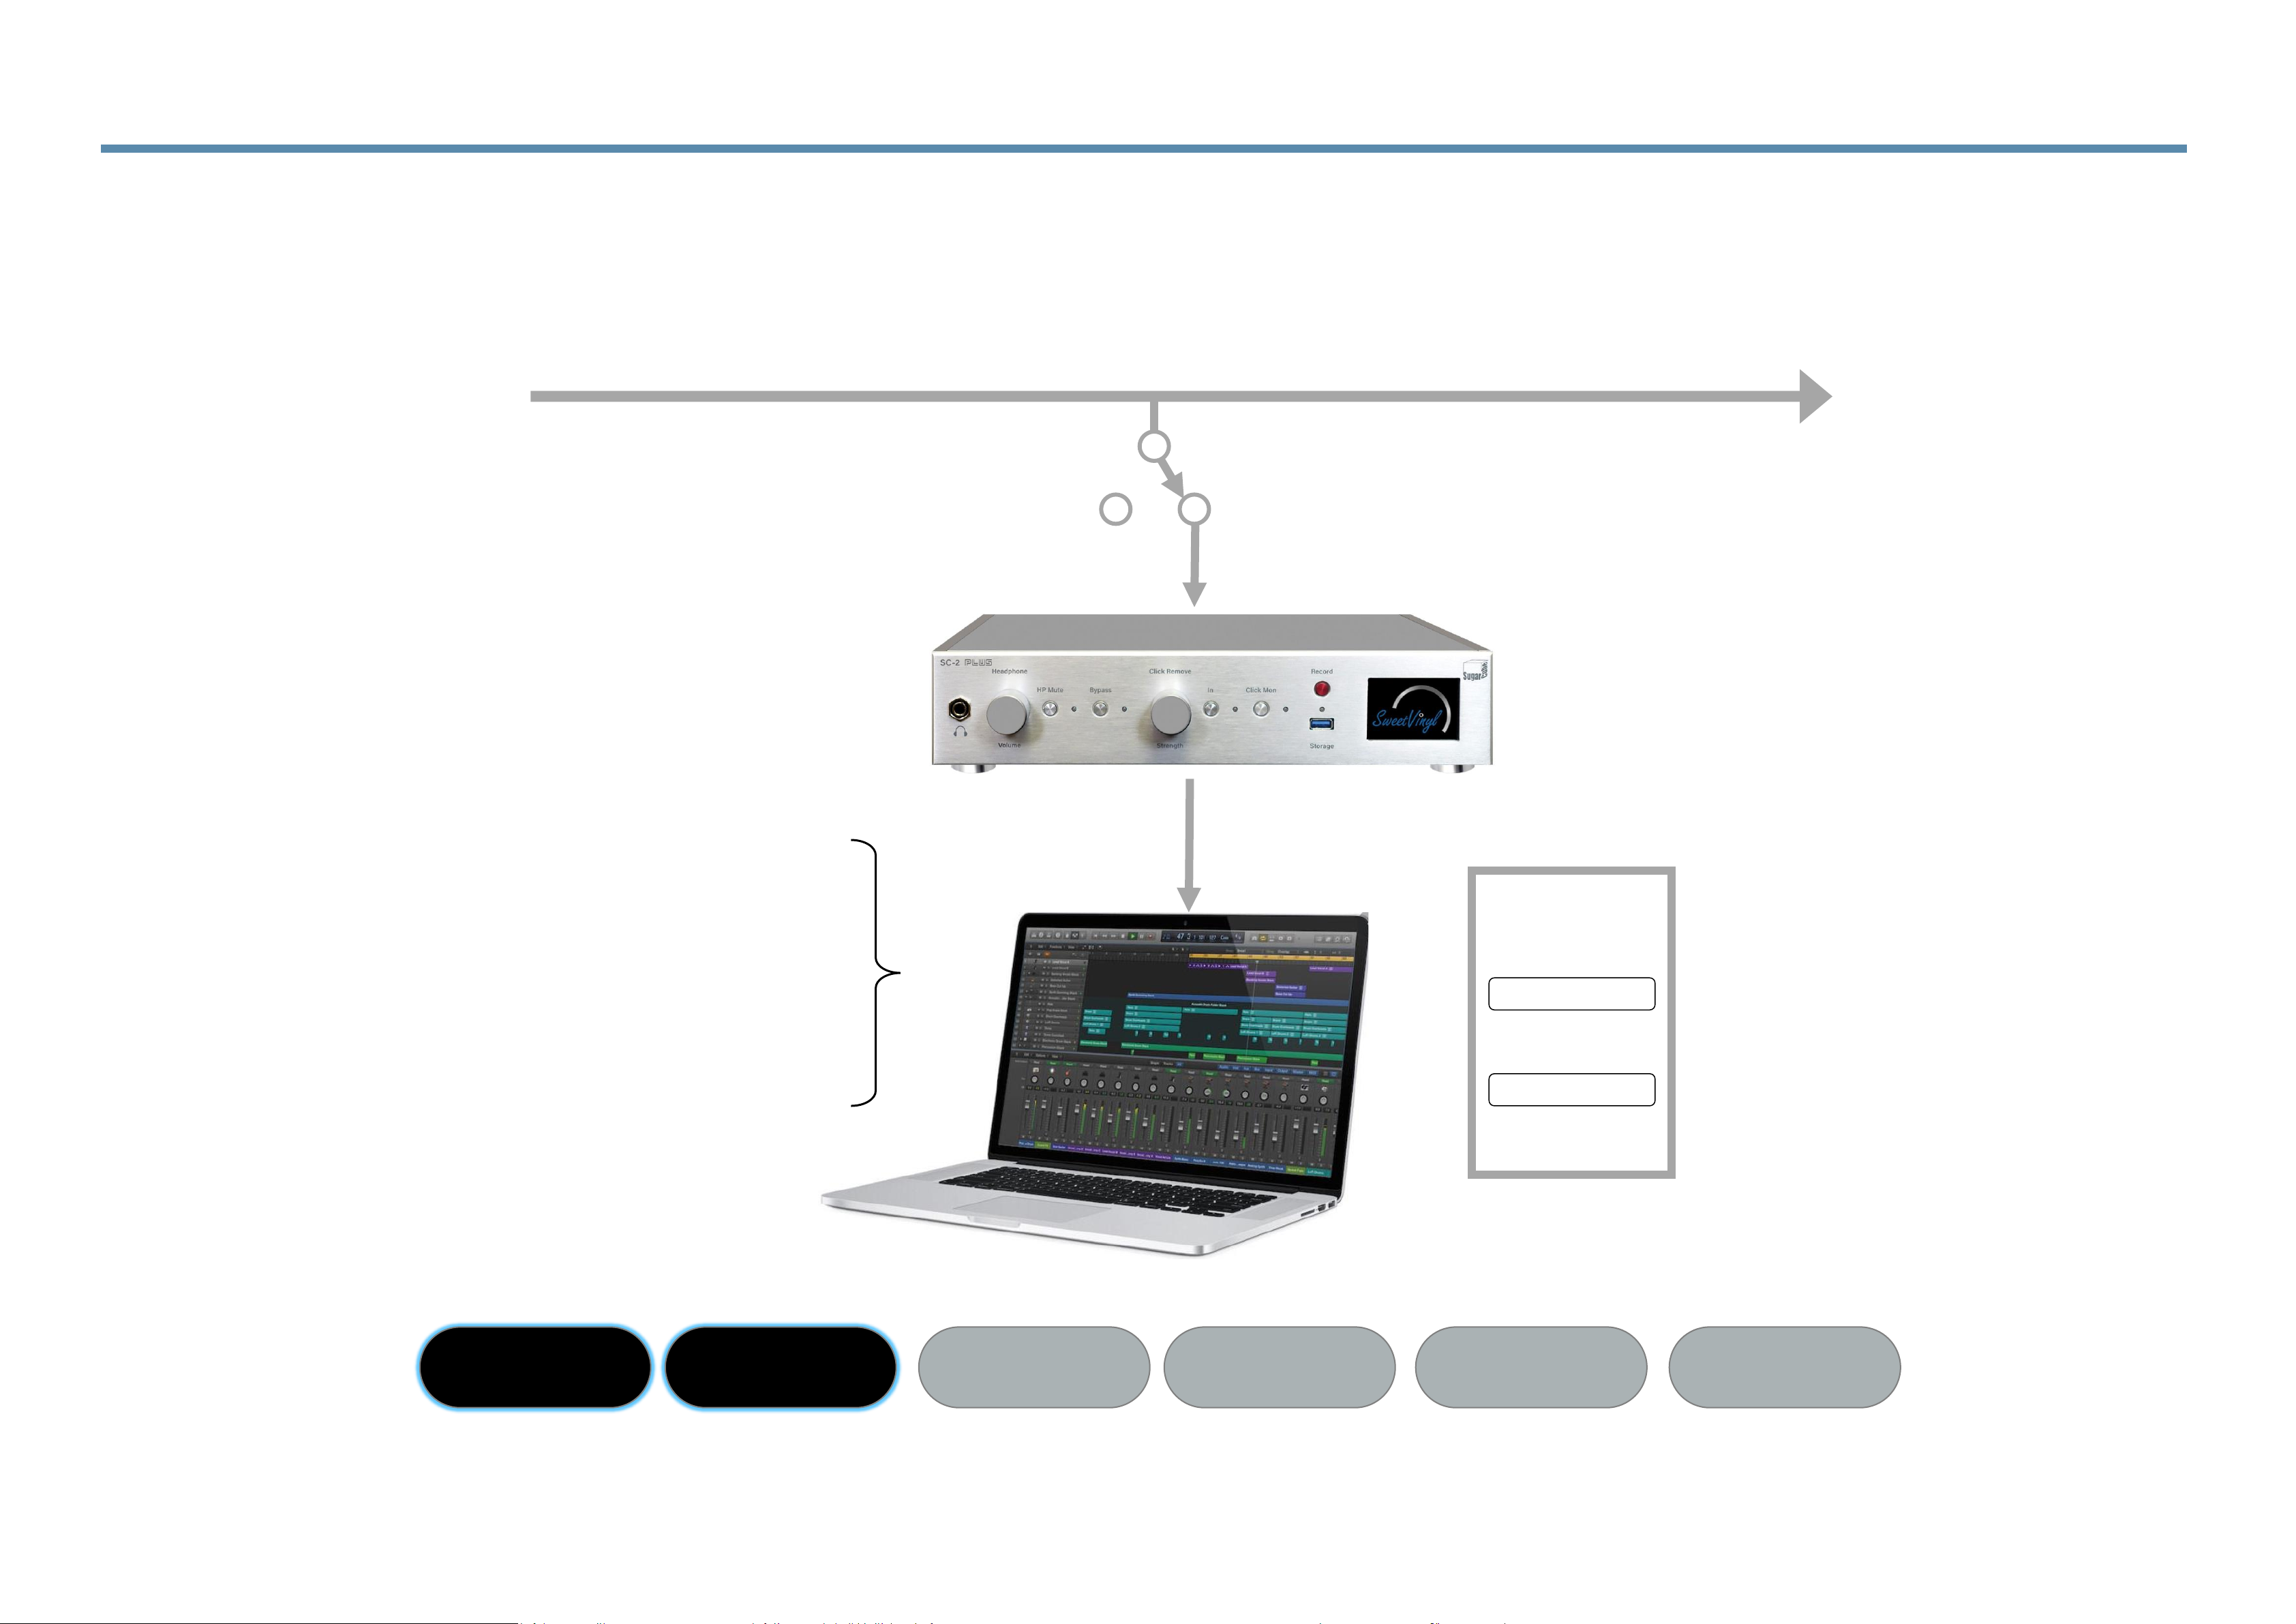
Line-In connects directly to Line-Out and
SugarCube bridges the signal (with high impedance.)
Line-In Line-Out
5.7 Logical Flow — Analog Bridging Mode
In Bridging Mode, Line-In is connected to Line-Out as in Bypass mode, in addition the signal is
passed to the attached computer via the SugarCube’s ADC.
<any>
<any>
Bit Depth
The connected
workstation can
record audio
digitized by the
SugarCube while in
bridging mode
Sample
Rate
Bridging SugarCube
Repair
Record
Repair
Playback
ExternalBypass
Page 81
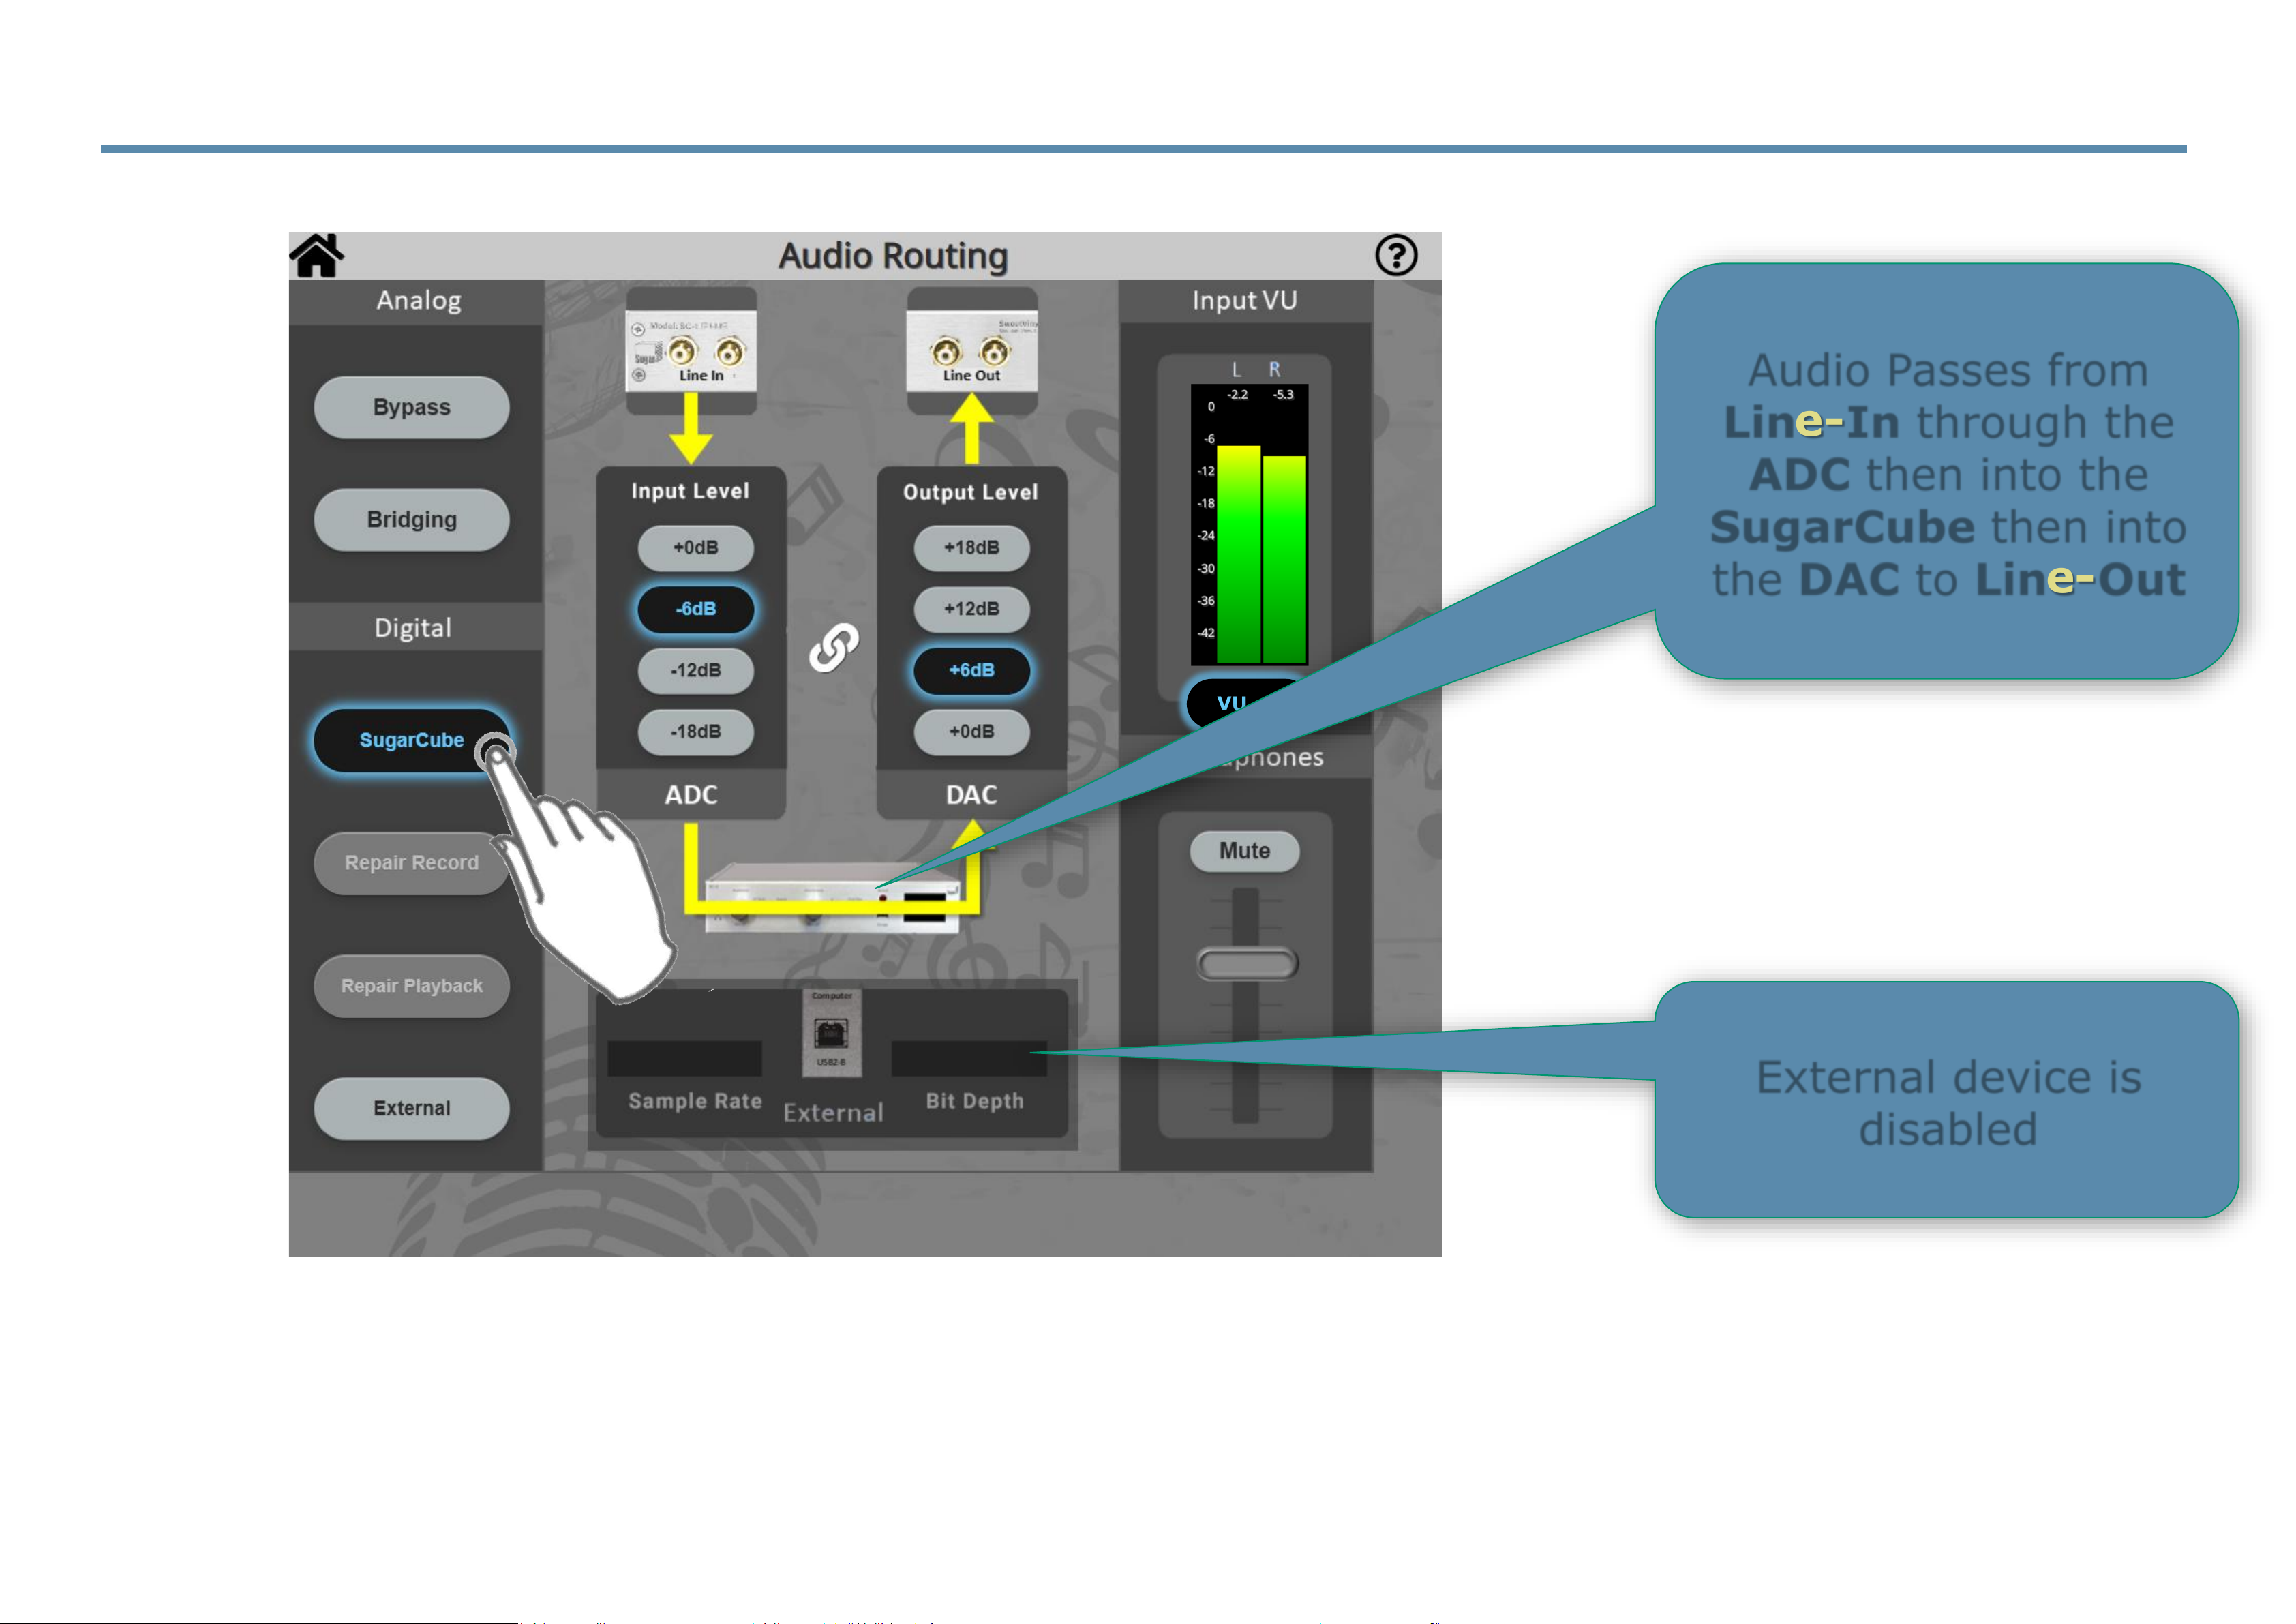
5.8 Audio Routing Menu — SugarCube Mode
In SugarCube mode, audio is processed by the SugarCube as standard on all Sugar Cubes.
In addition, the Un-Repaired Digital signal is passed to the attached computer via the ADC.
VU on
External device is
disabled
Audio Passes from
Line-In through the
ADC then into the
SugarCube then into
the DAC to Line-Out
Page 82
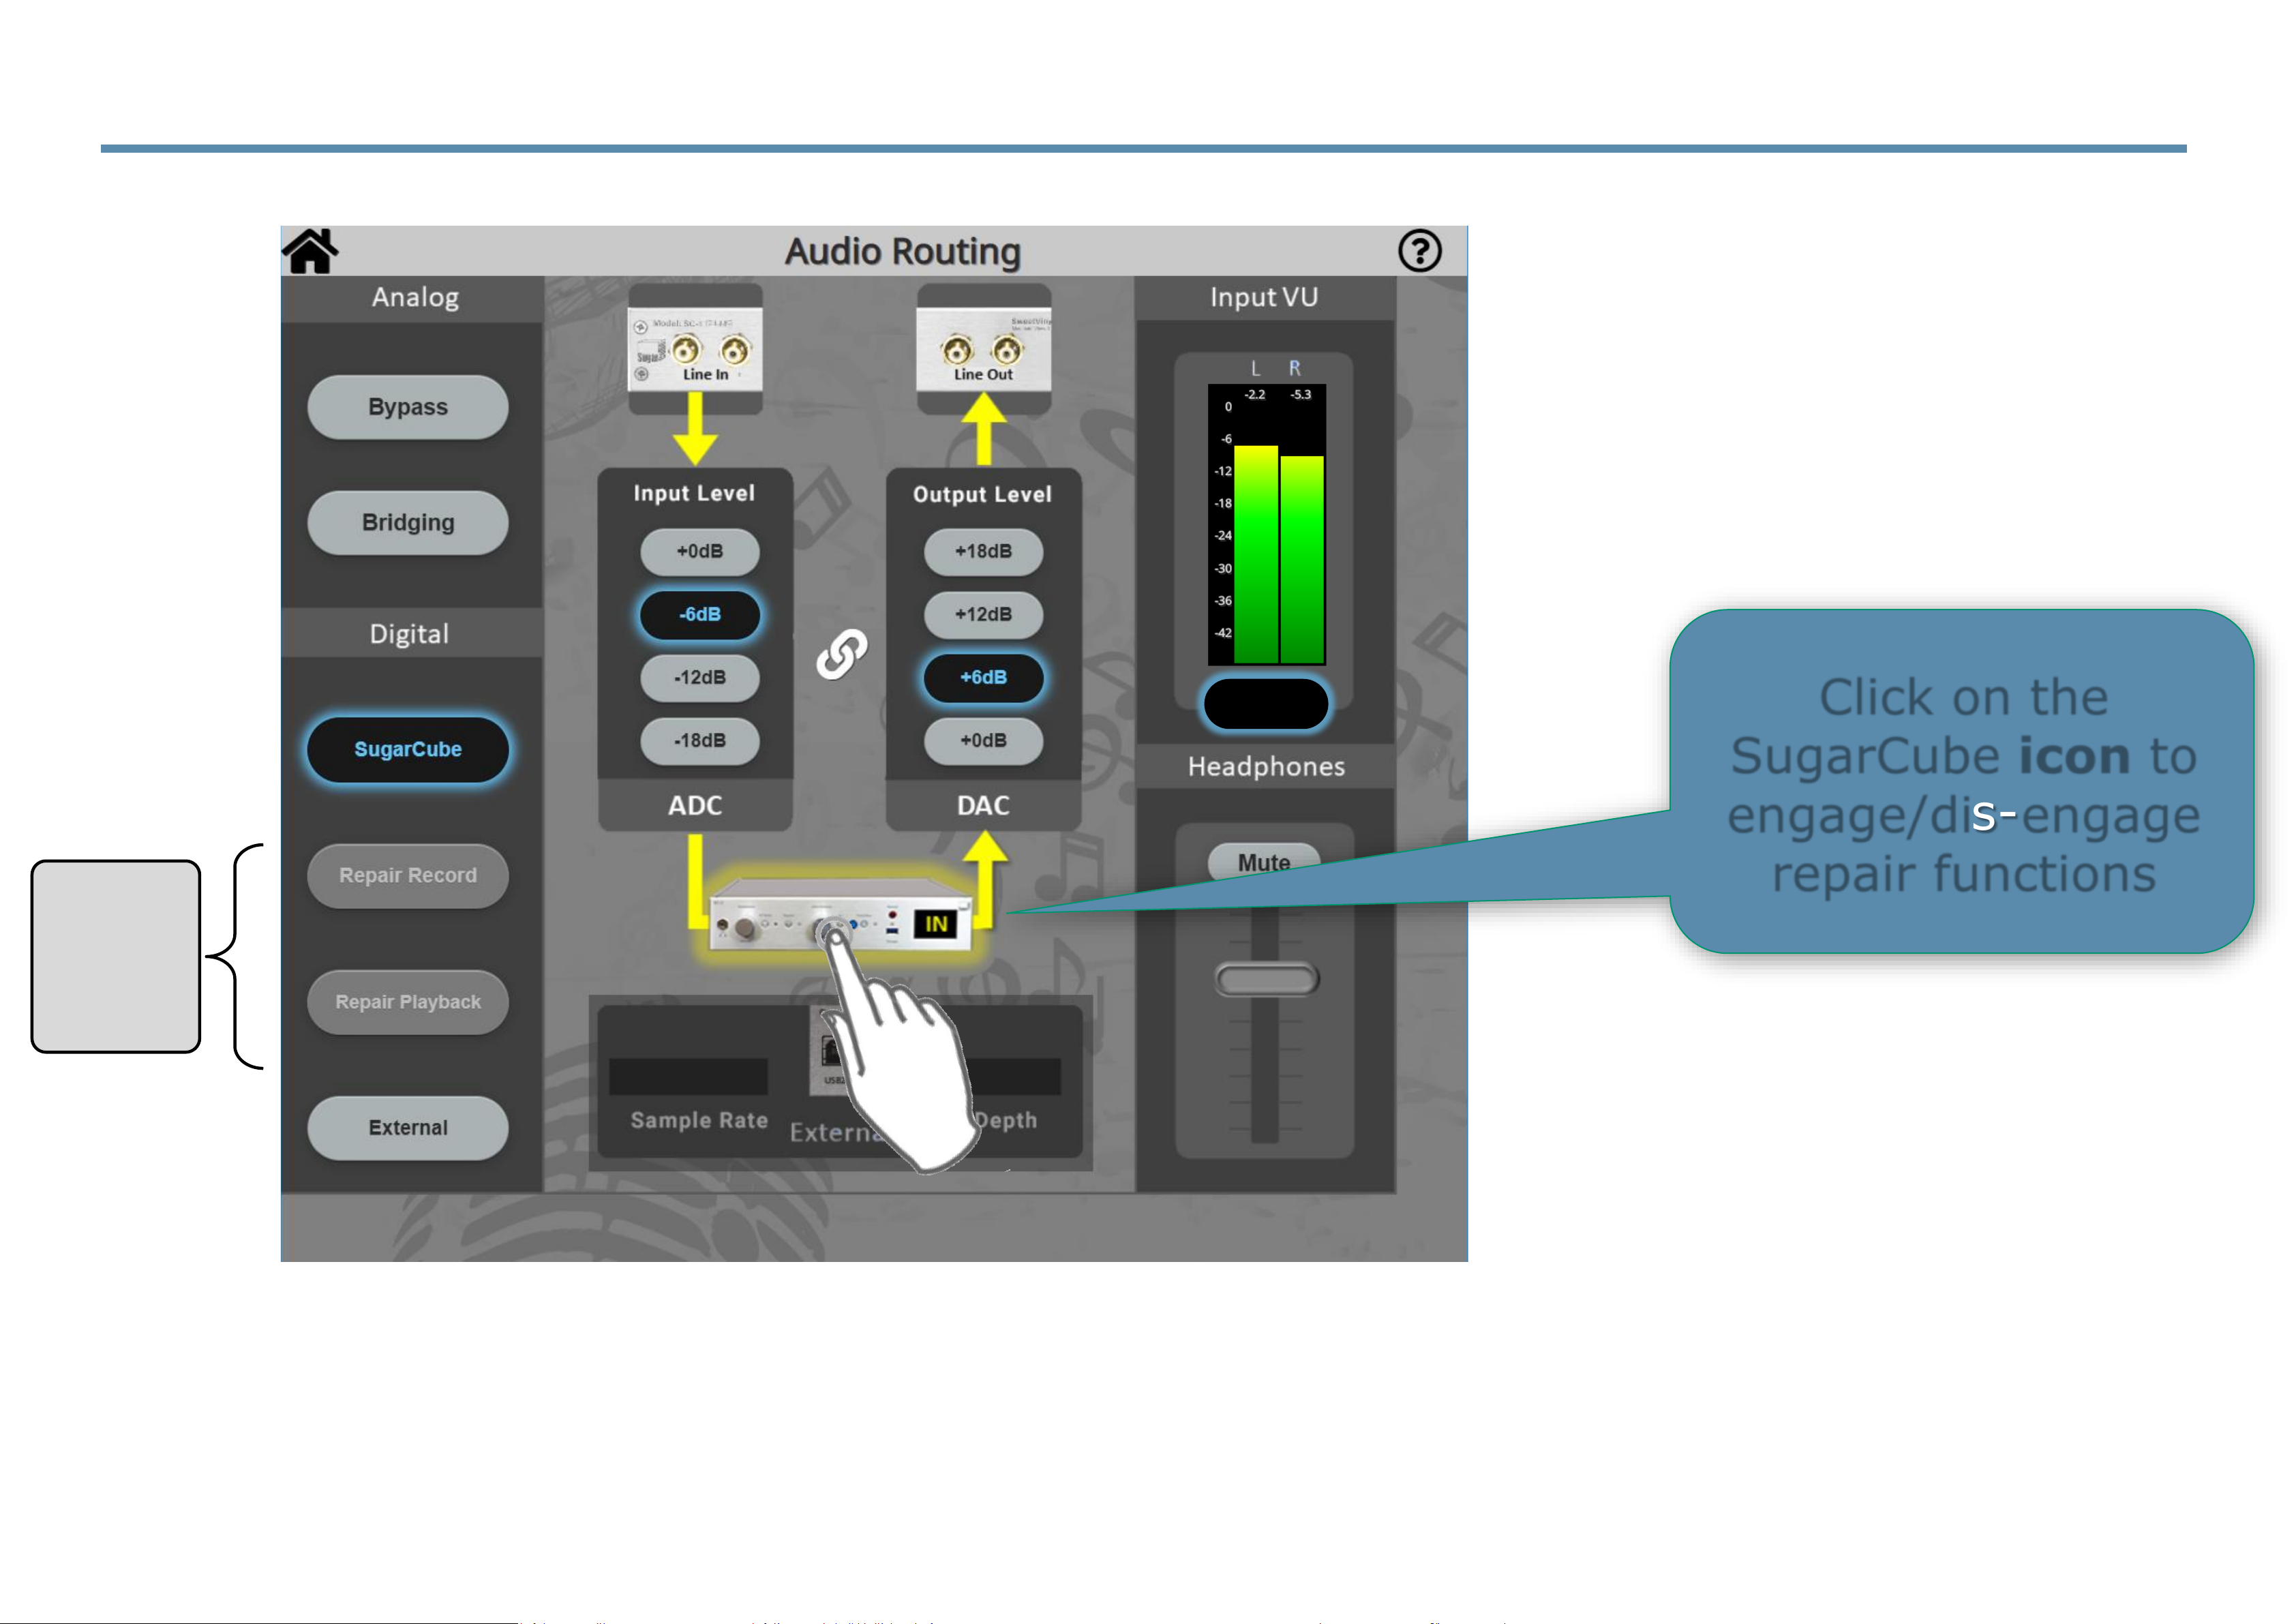
5.9 Audio Routing Menu — SugarCube Mode
In SugarCube mode, audio is processed by the SugarCube as standard on all Sugar Cubes.
In addition, the Un-Repaired Digital signal is passed to the attached computer via the ADC.
Click on the
SugarCube icon to
engage/dis-engage
repair functions
Not
available in
SugarCube
mode,
select
‘External’ to
activate.
VU on
Page 83
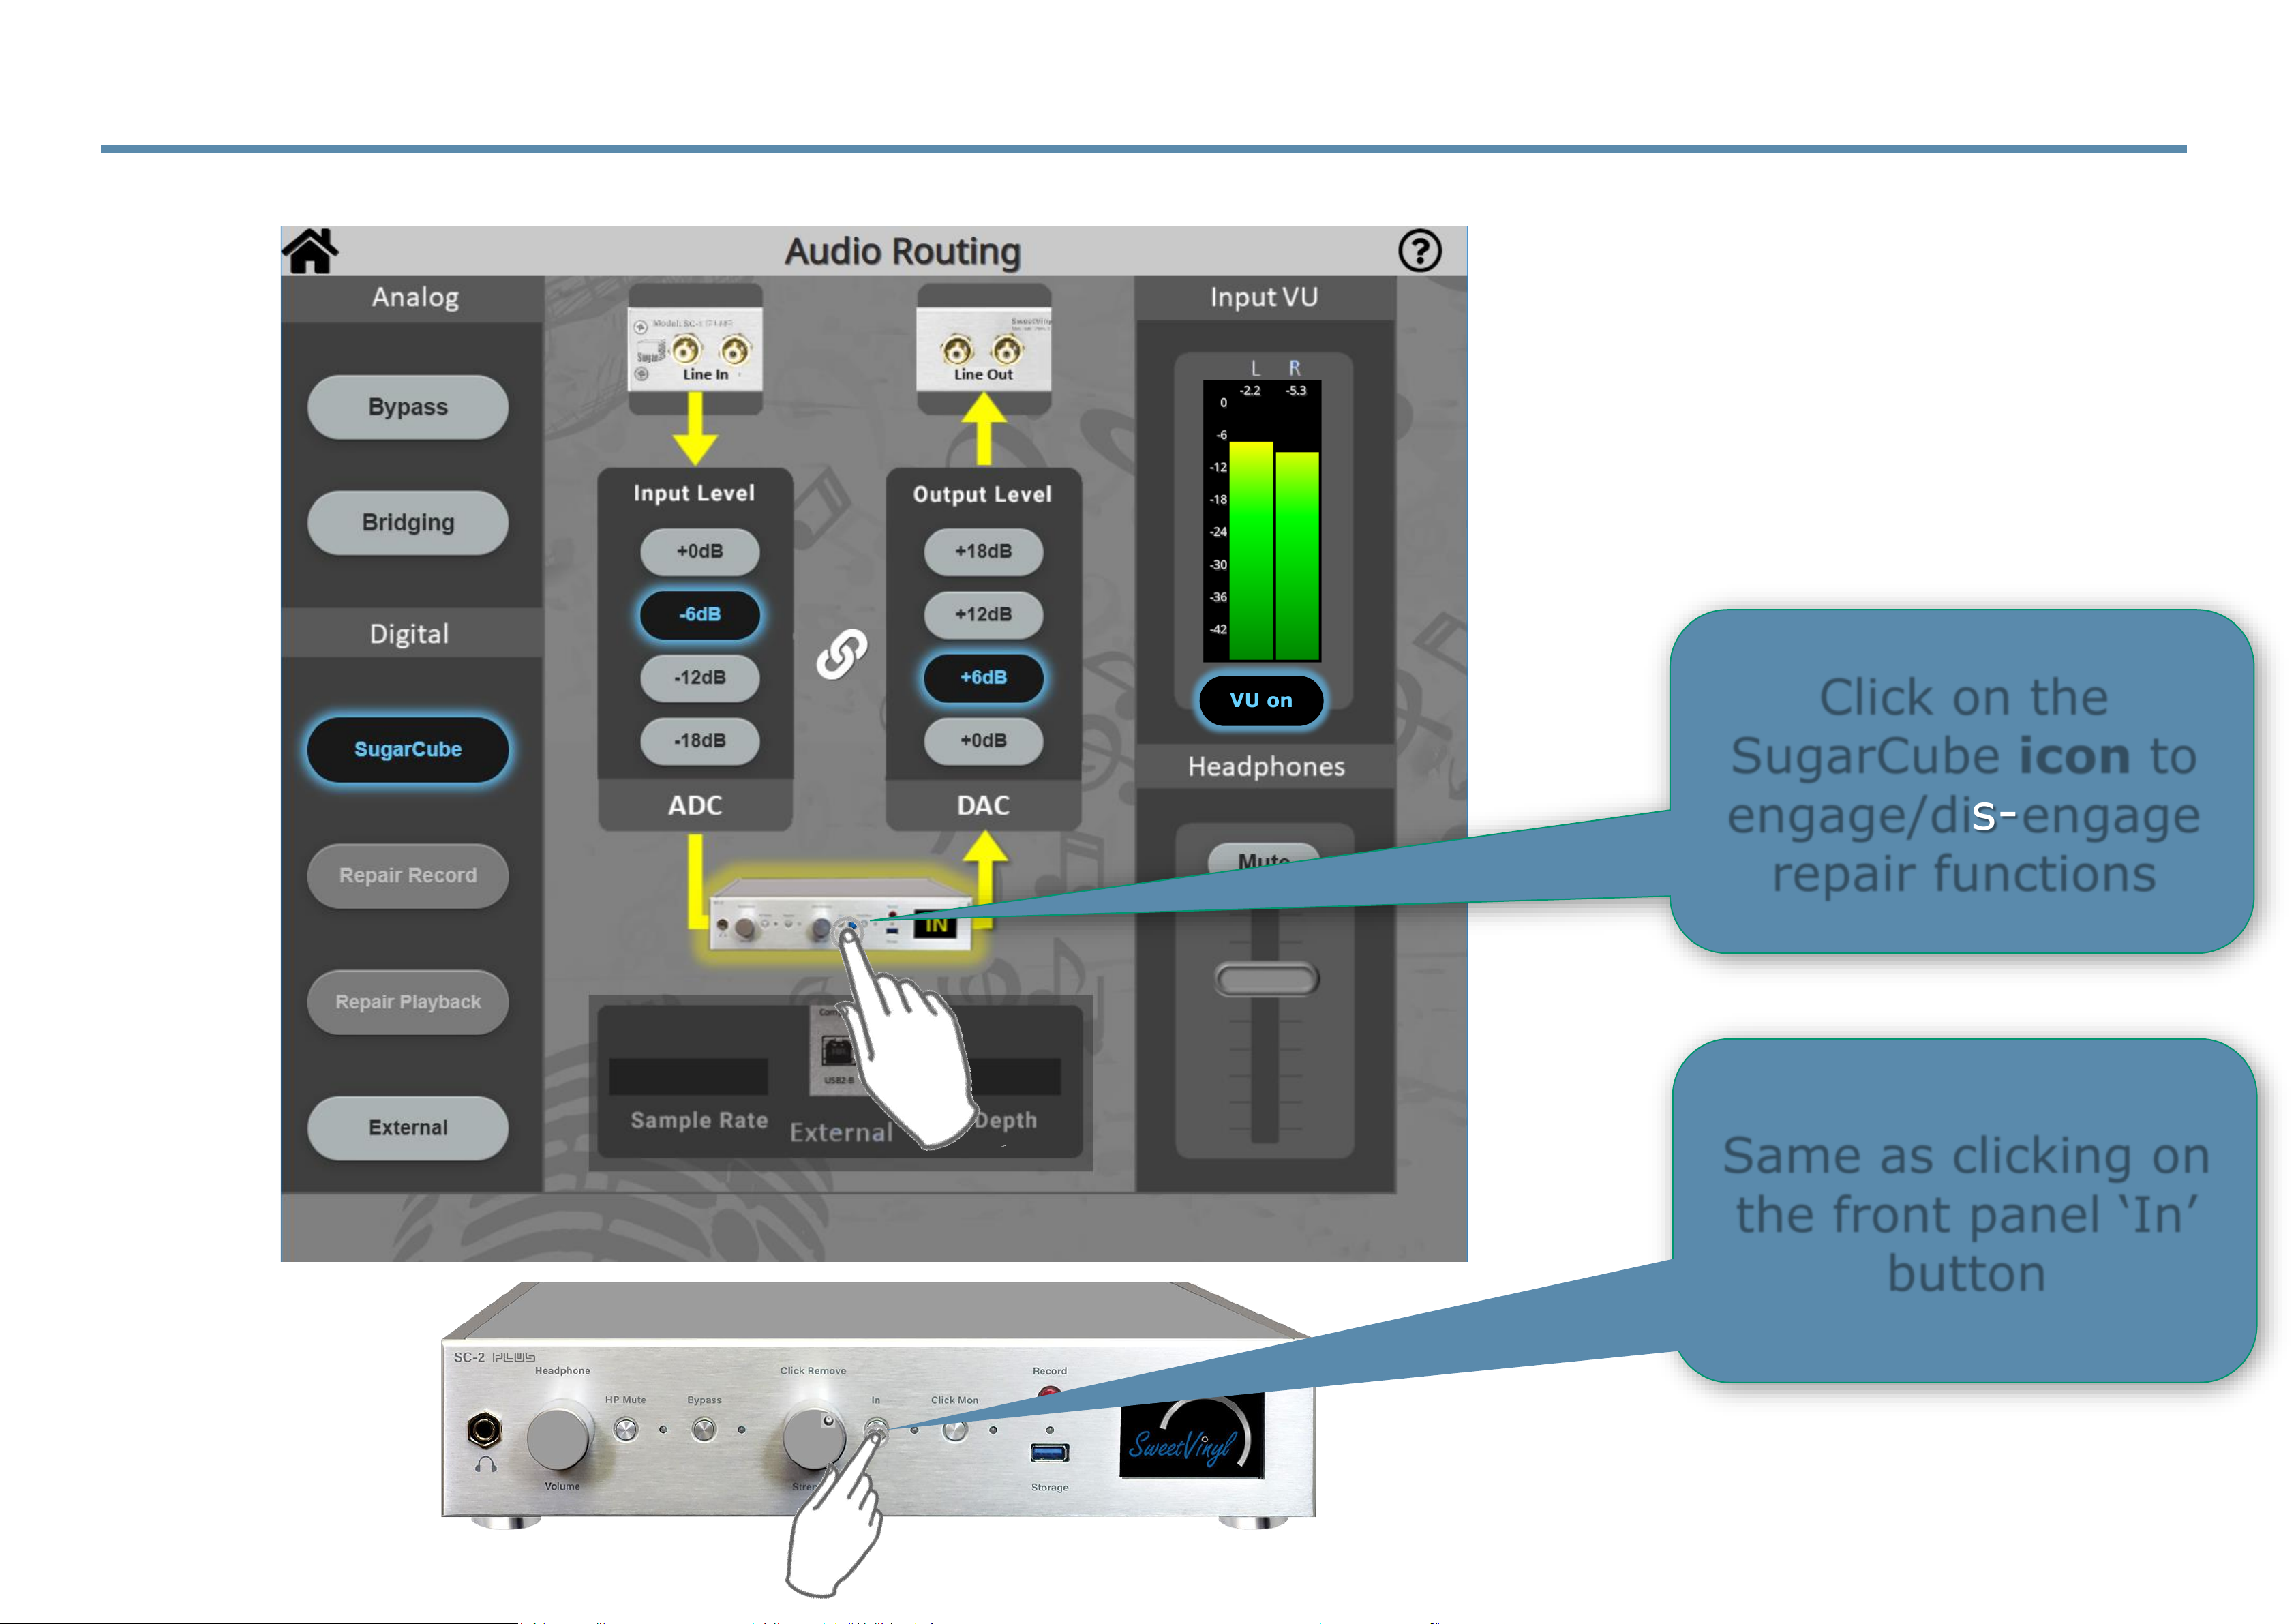
5.9.1 Audio Routing Menu — SugarCube Mode
VU on
Click on the
SugarCube icon to
engage/dis-engage
repair functions
Same as clicking on
the front panel ‘In’
button
Page 84
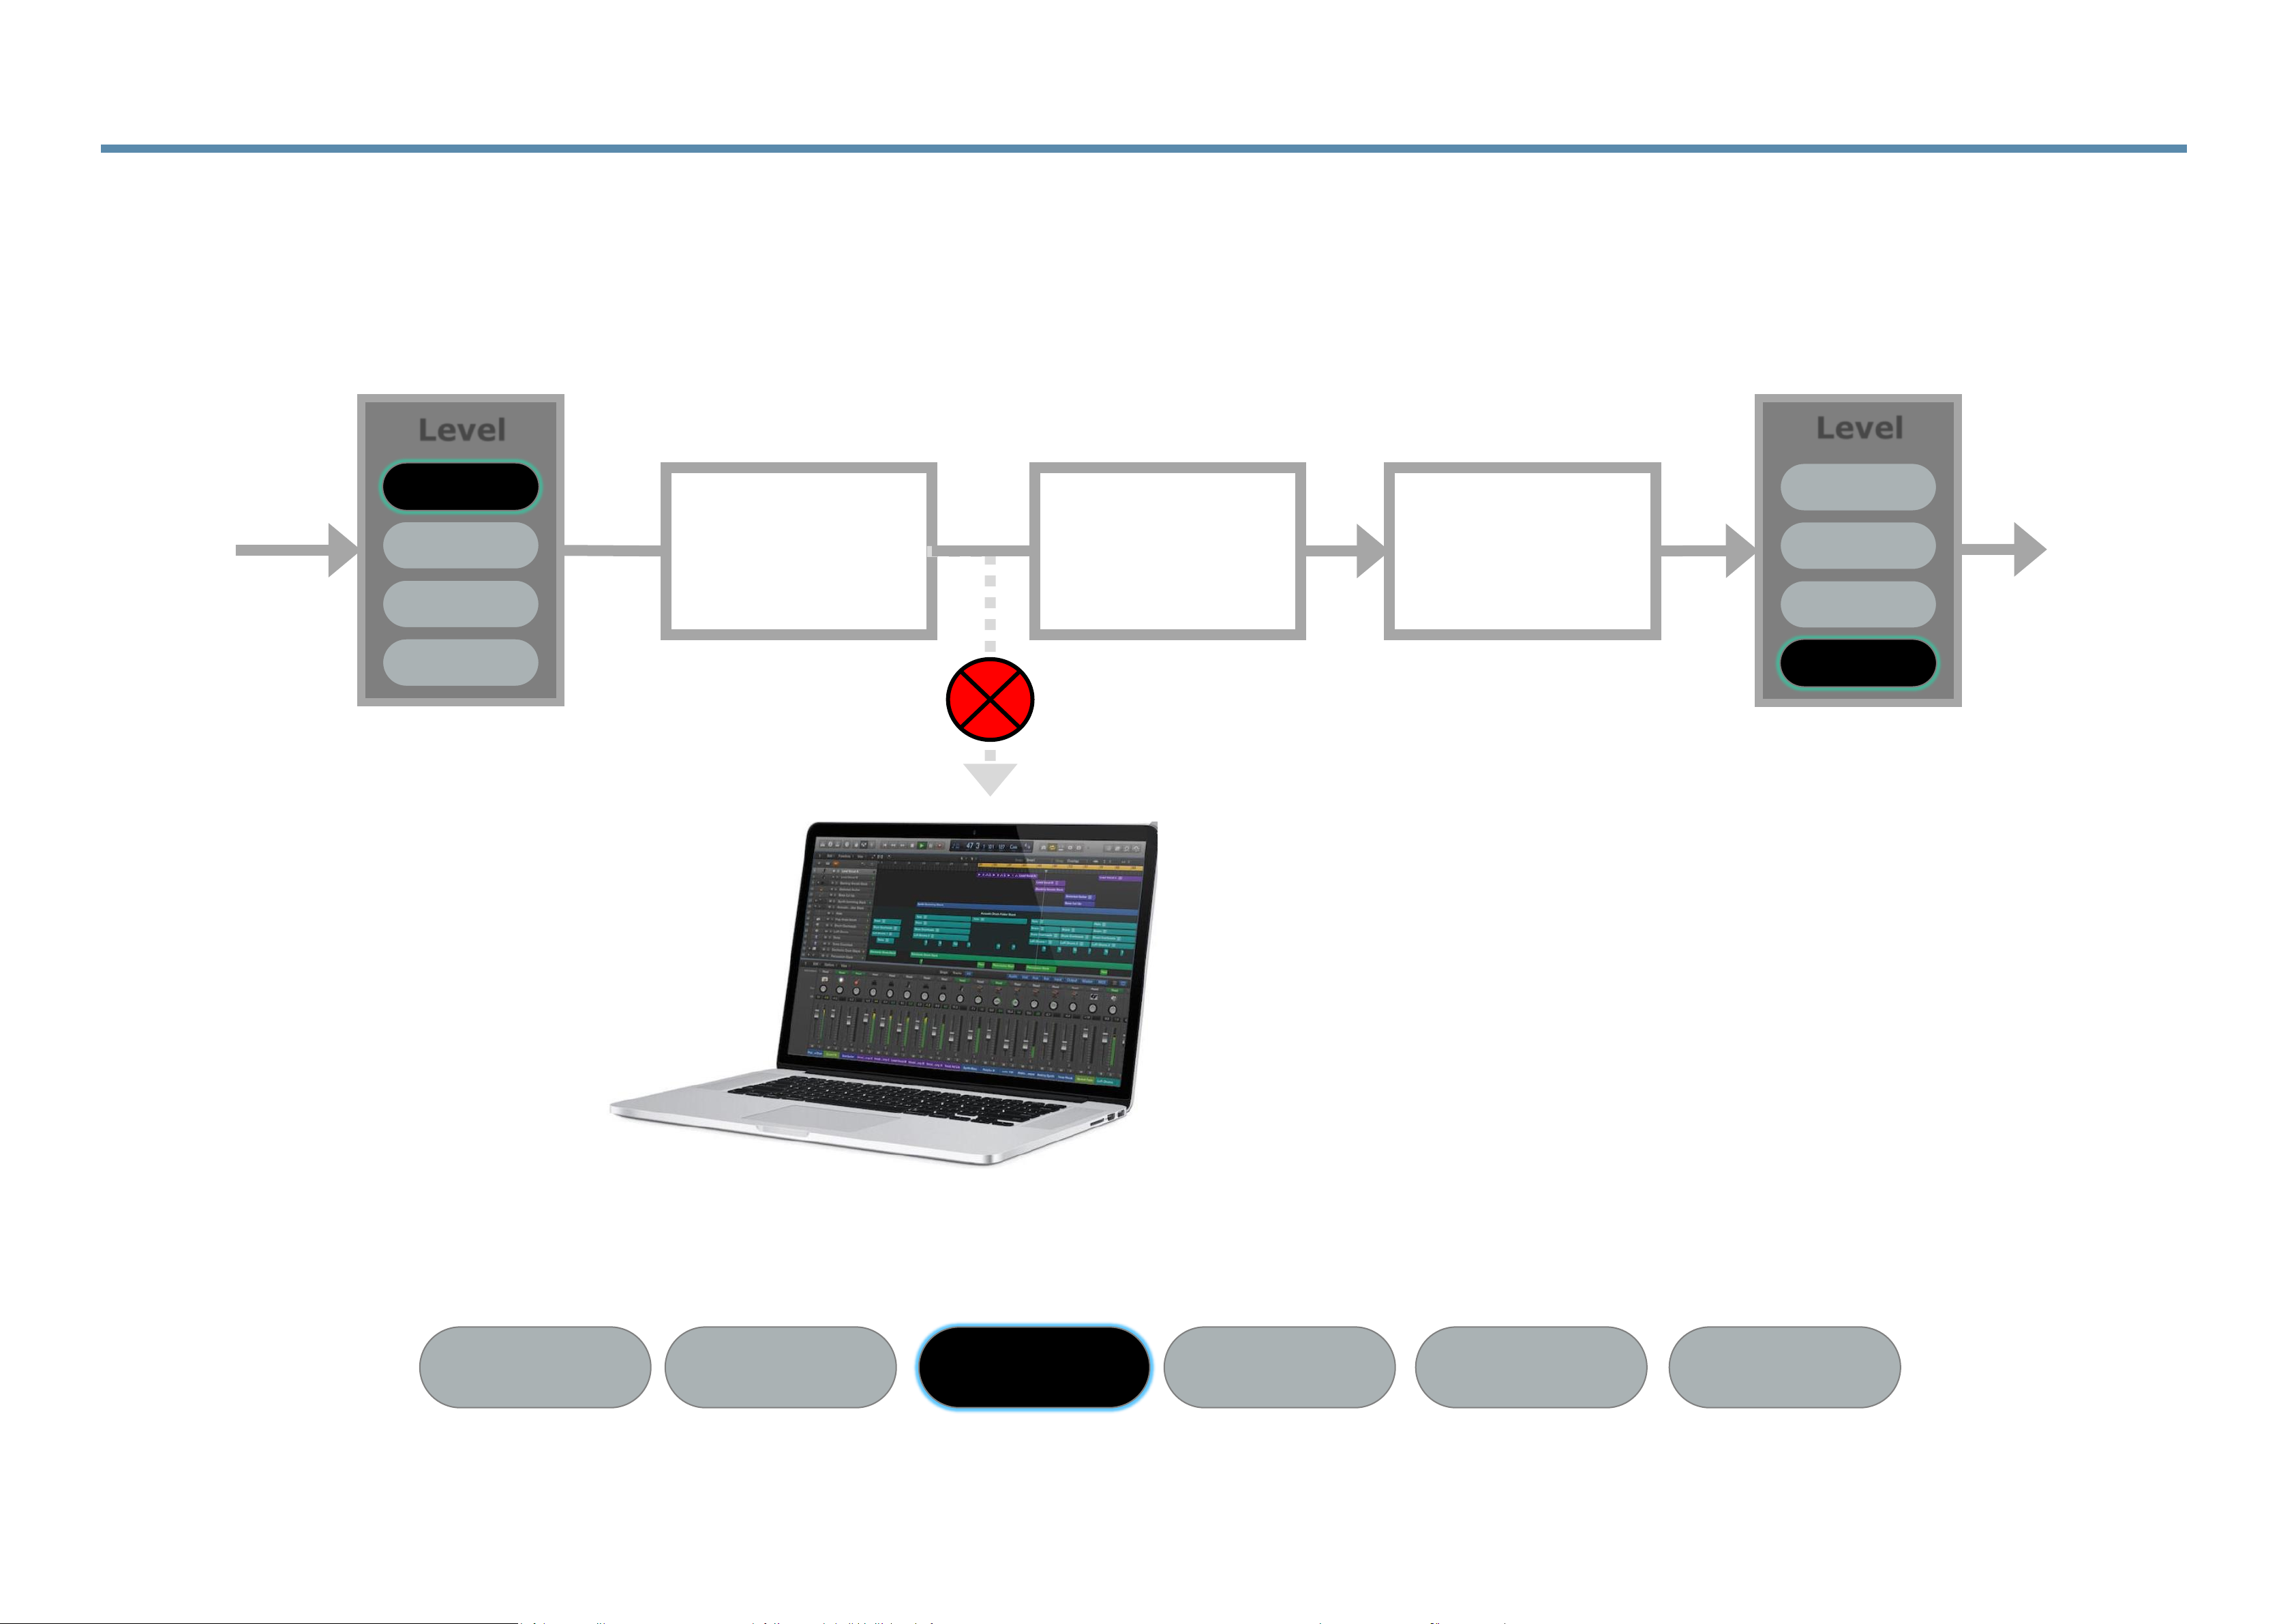
SugarCube
Repair
SugarCube
DAC
+0dB
-6dB
-12dB
-18dB
Level
Line In
Line Out
+18dB
+12dB
+6dB
+0dB
Level
SugarCube
ADC
Normal SugarCube operations without a digital signal from ADC to
the workstation
5.10 Logical Flow — SugarCube Mode
In SugarCube mode, Line-In is processed by the SugarCube where audio is repaired and sent to Line Out as
standard on all SugarCubes.
Bridging SugarCube
Repair
Record
Repair
Playback
ExternalBypass
Page 85
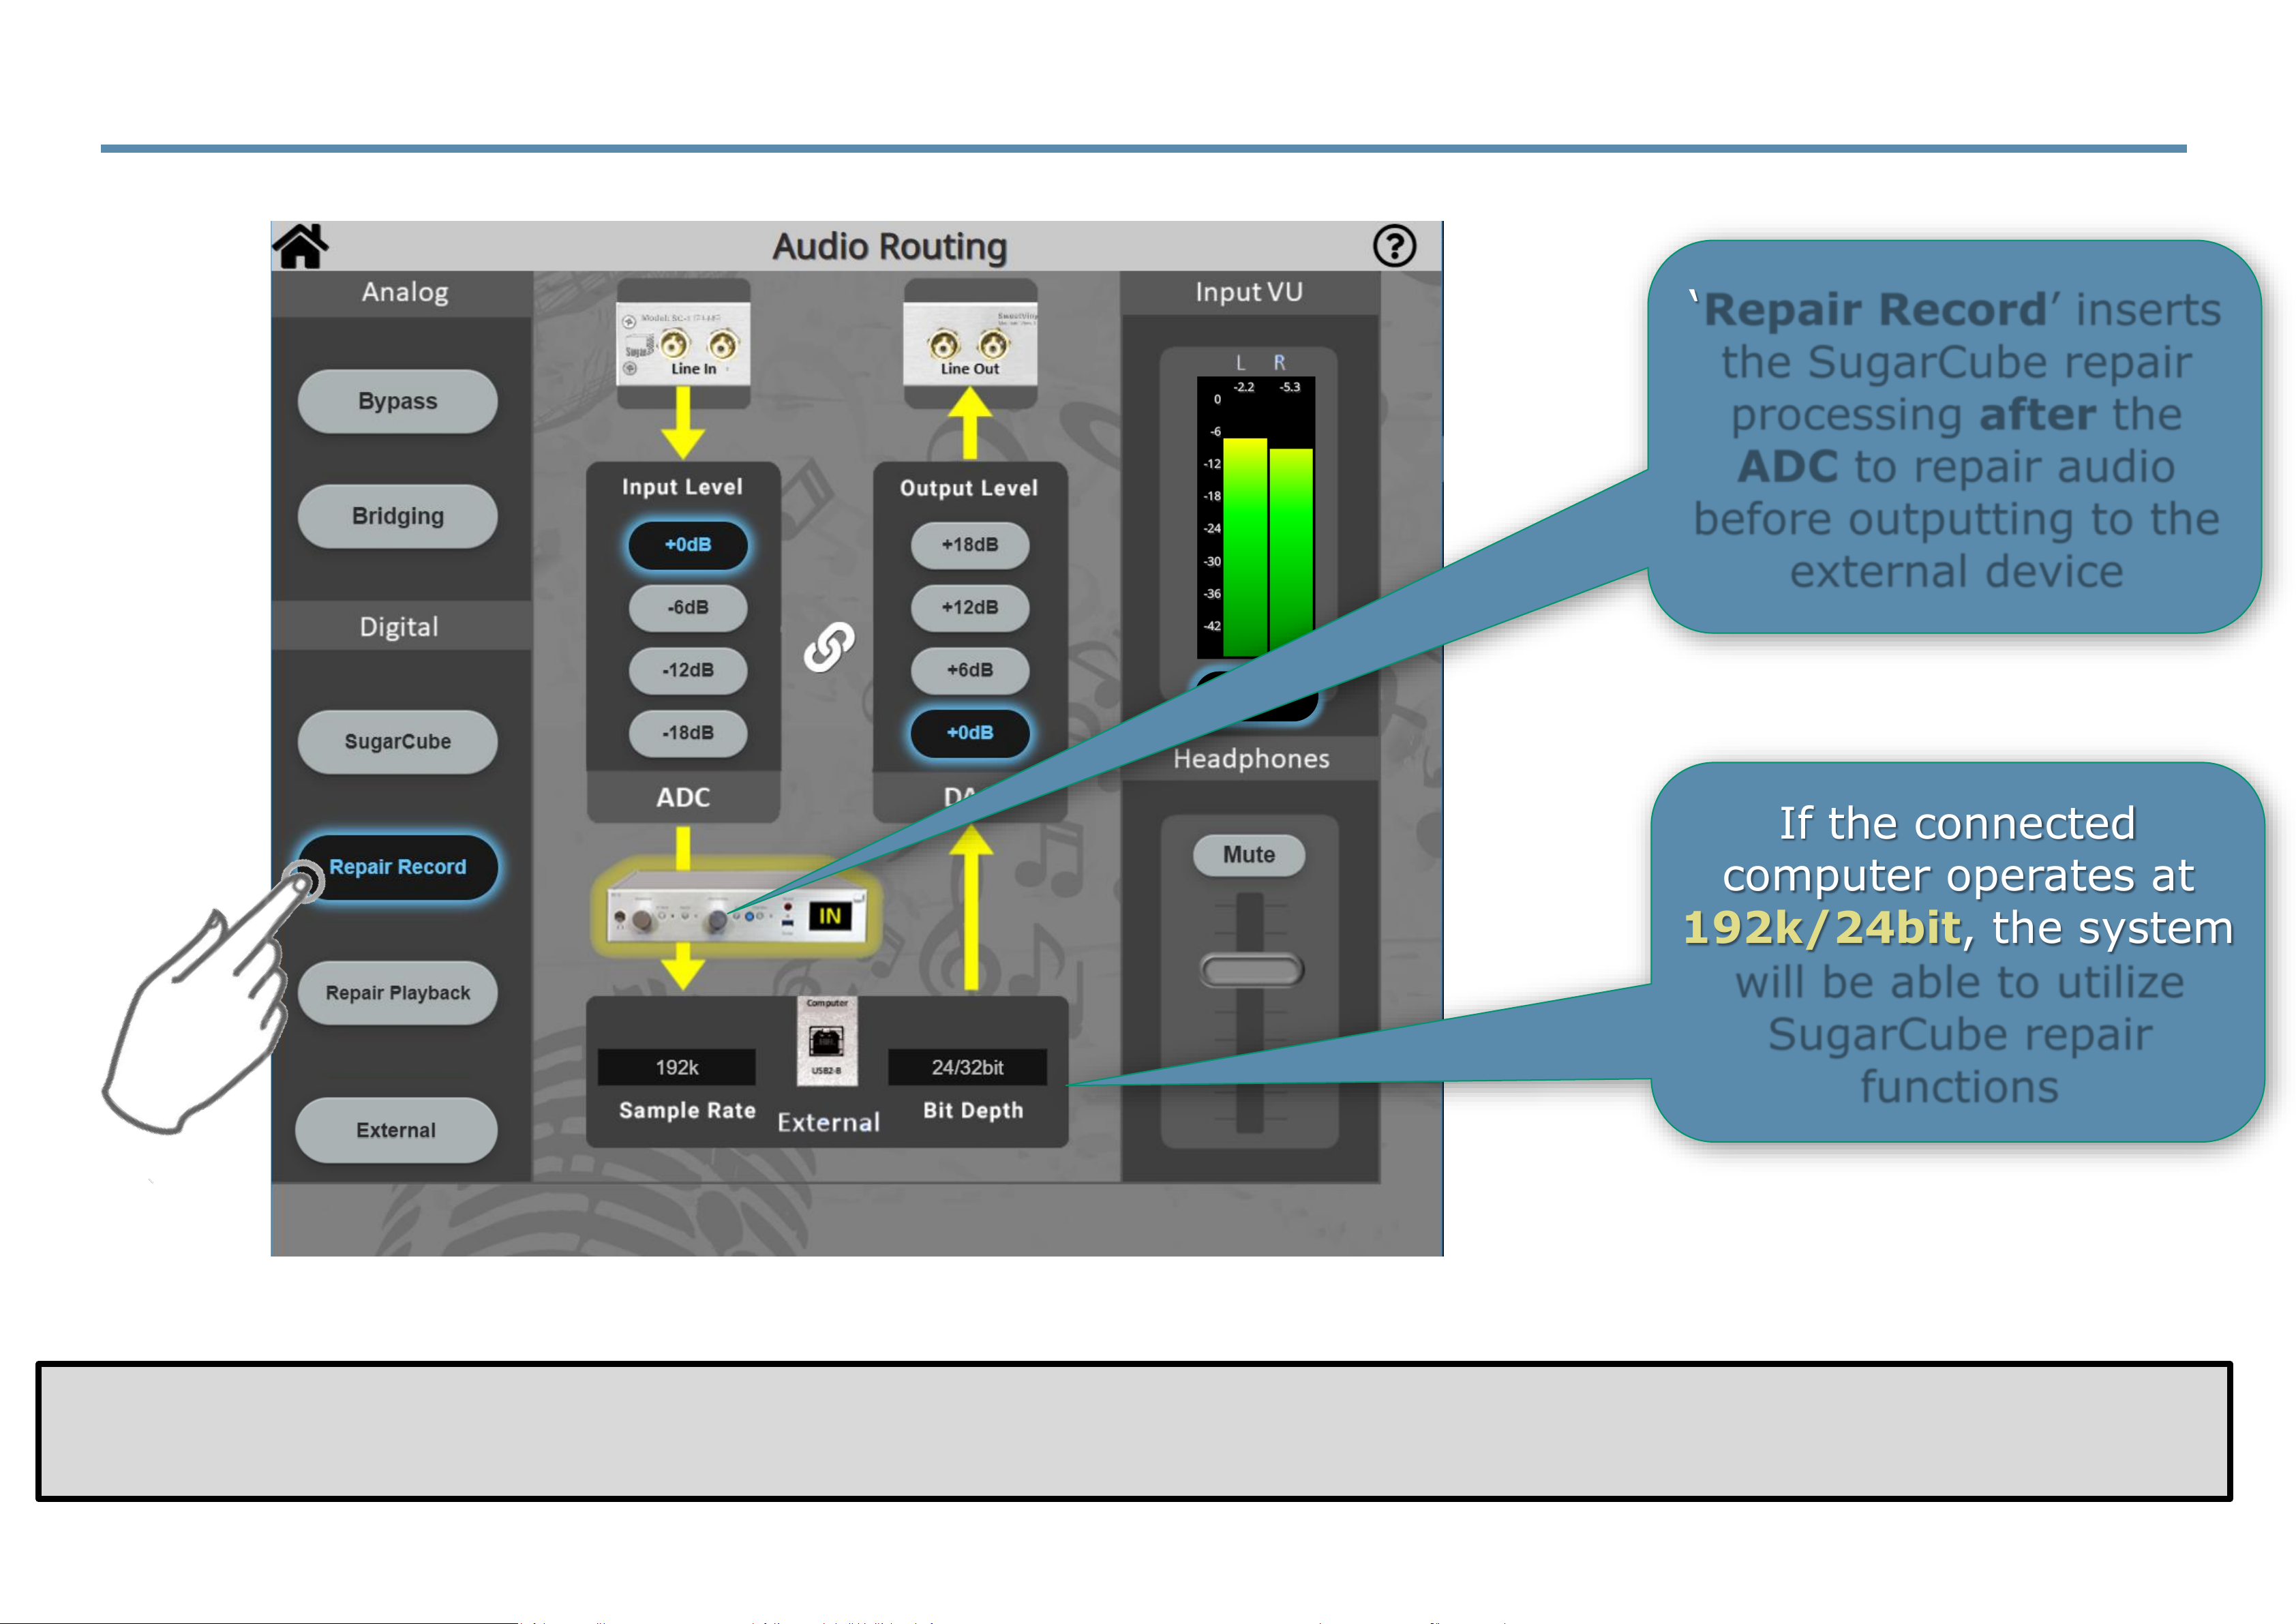
5.11 Audio Routing — Repair Record Mode
VU on
If the connected
computer operates at
192k/24bit, the system
will be able to utilize
SugarCube repair
functions
‘Repair Record’ inserts
the SugarCube repair
processing after the
ADC to repair audio
before outputting to the
external device
Note: Please press again the button of any mode of operation (even though it is already selected) if the external device loses lock with
the SugarCube (you will certainly know due to obvious digital noise.) This resets the internal timing and restores the audio.
Page 86
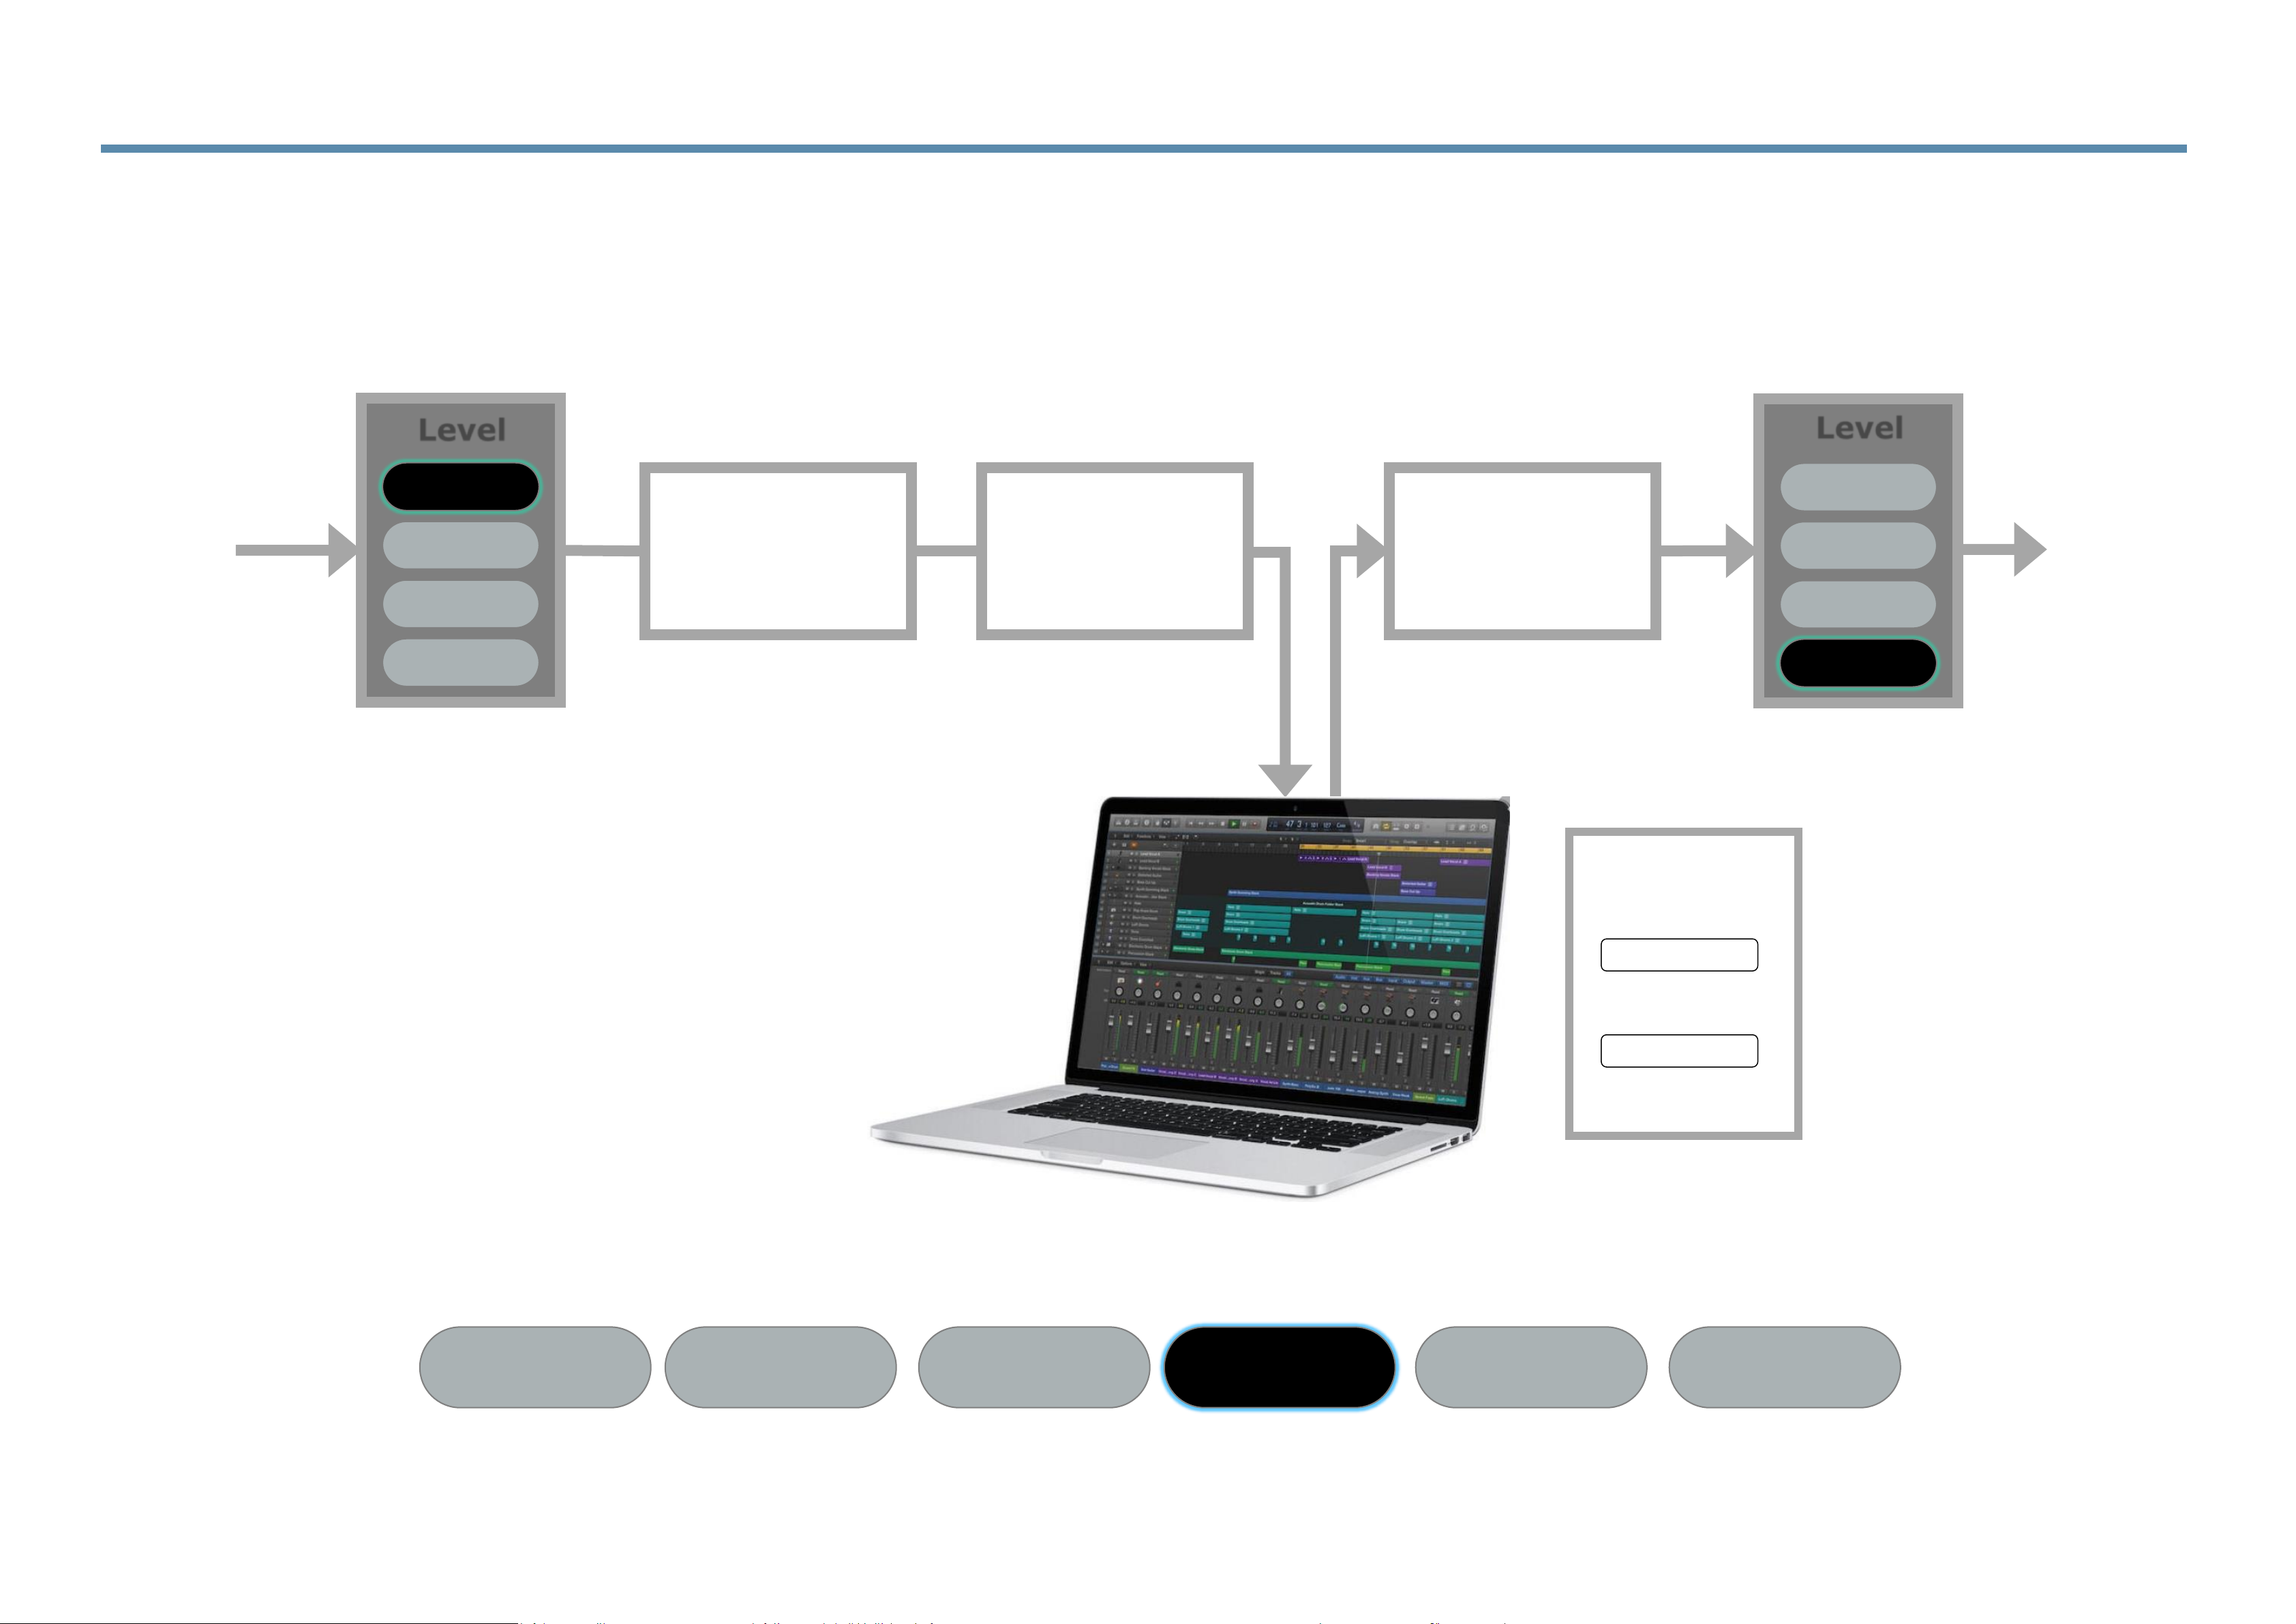
SugarCube
DAC
192k
24bit
Sample Rate
Bit Depth
SugarCube
ADC
SugarCube
Repair
SugarCube repairs audio before sending out to workstation.
Workstation directly drives the DAC.
5.12 Logical Flow — Repair Record Mode
+0dB
-6dB
-12dB
-18dB
Level
Line In
+18dB
+12dB
+6dB
+0dB
Level
Line Out
Bridging SugarCube
Repair
Record
Repair
Playback
ExternalBypass
Page 87
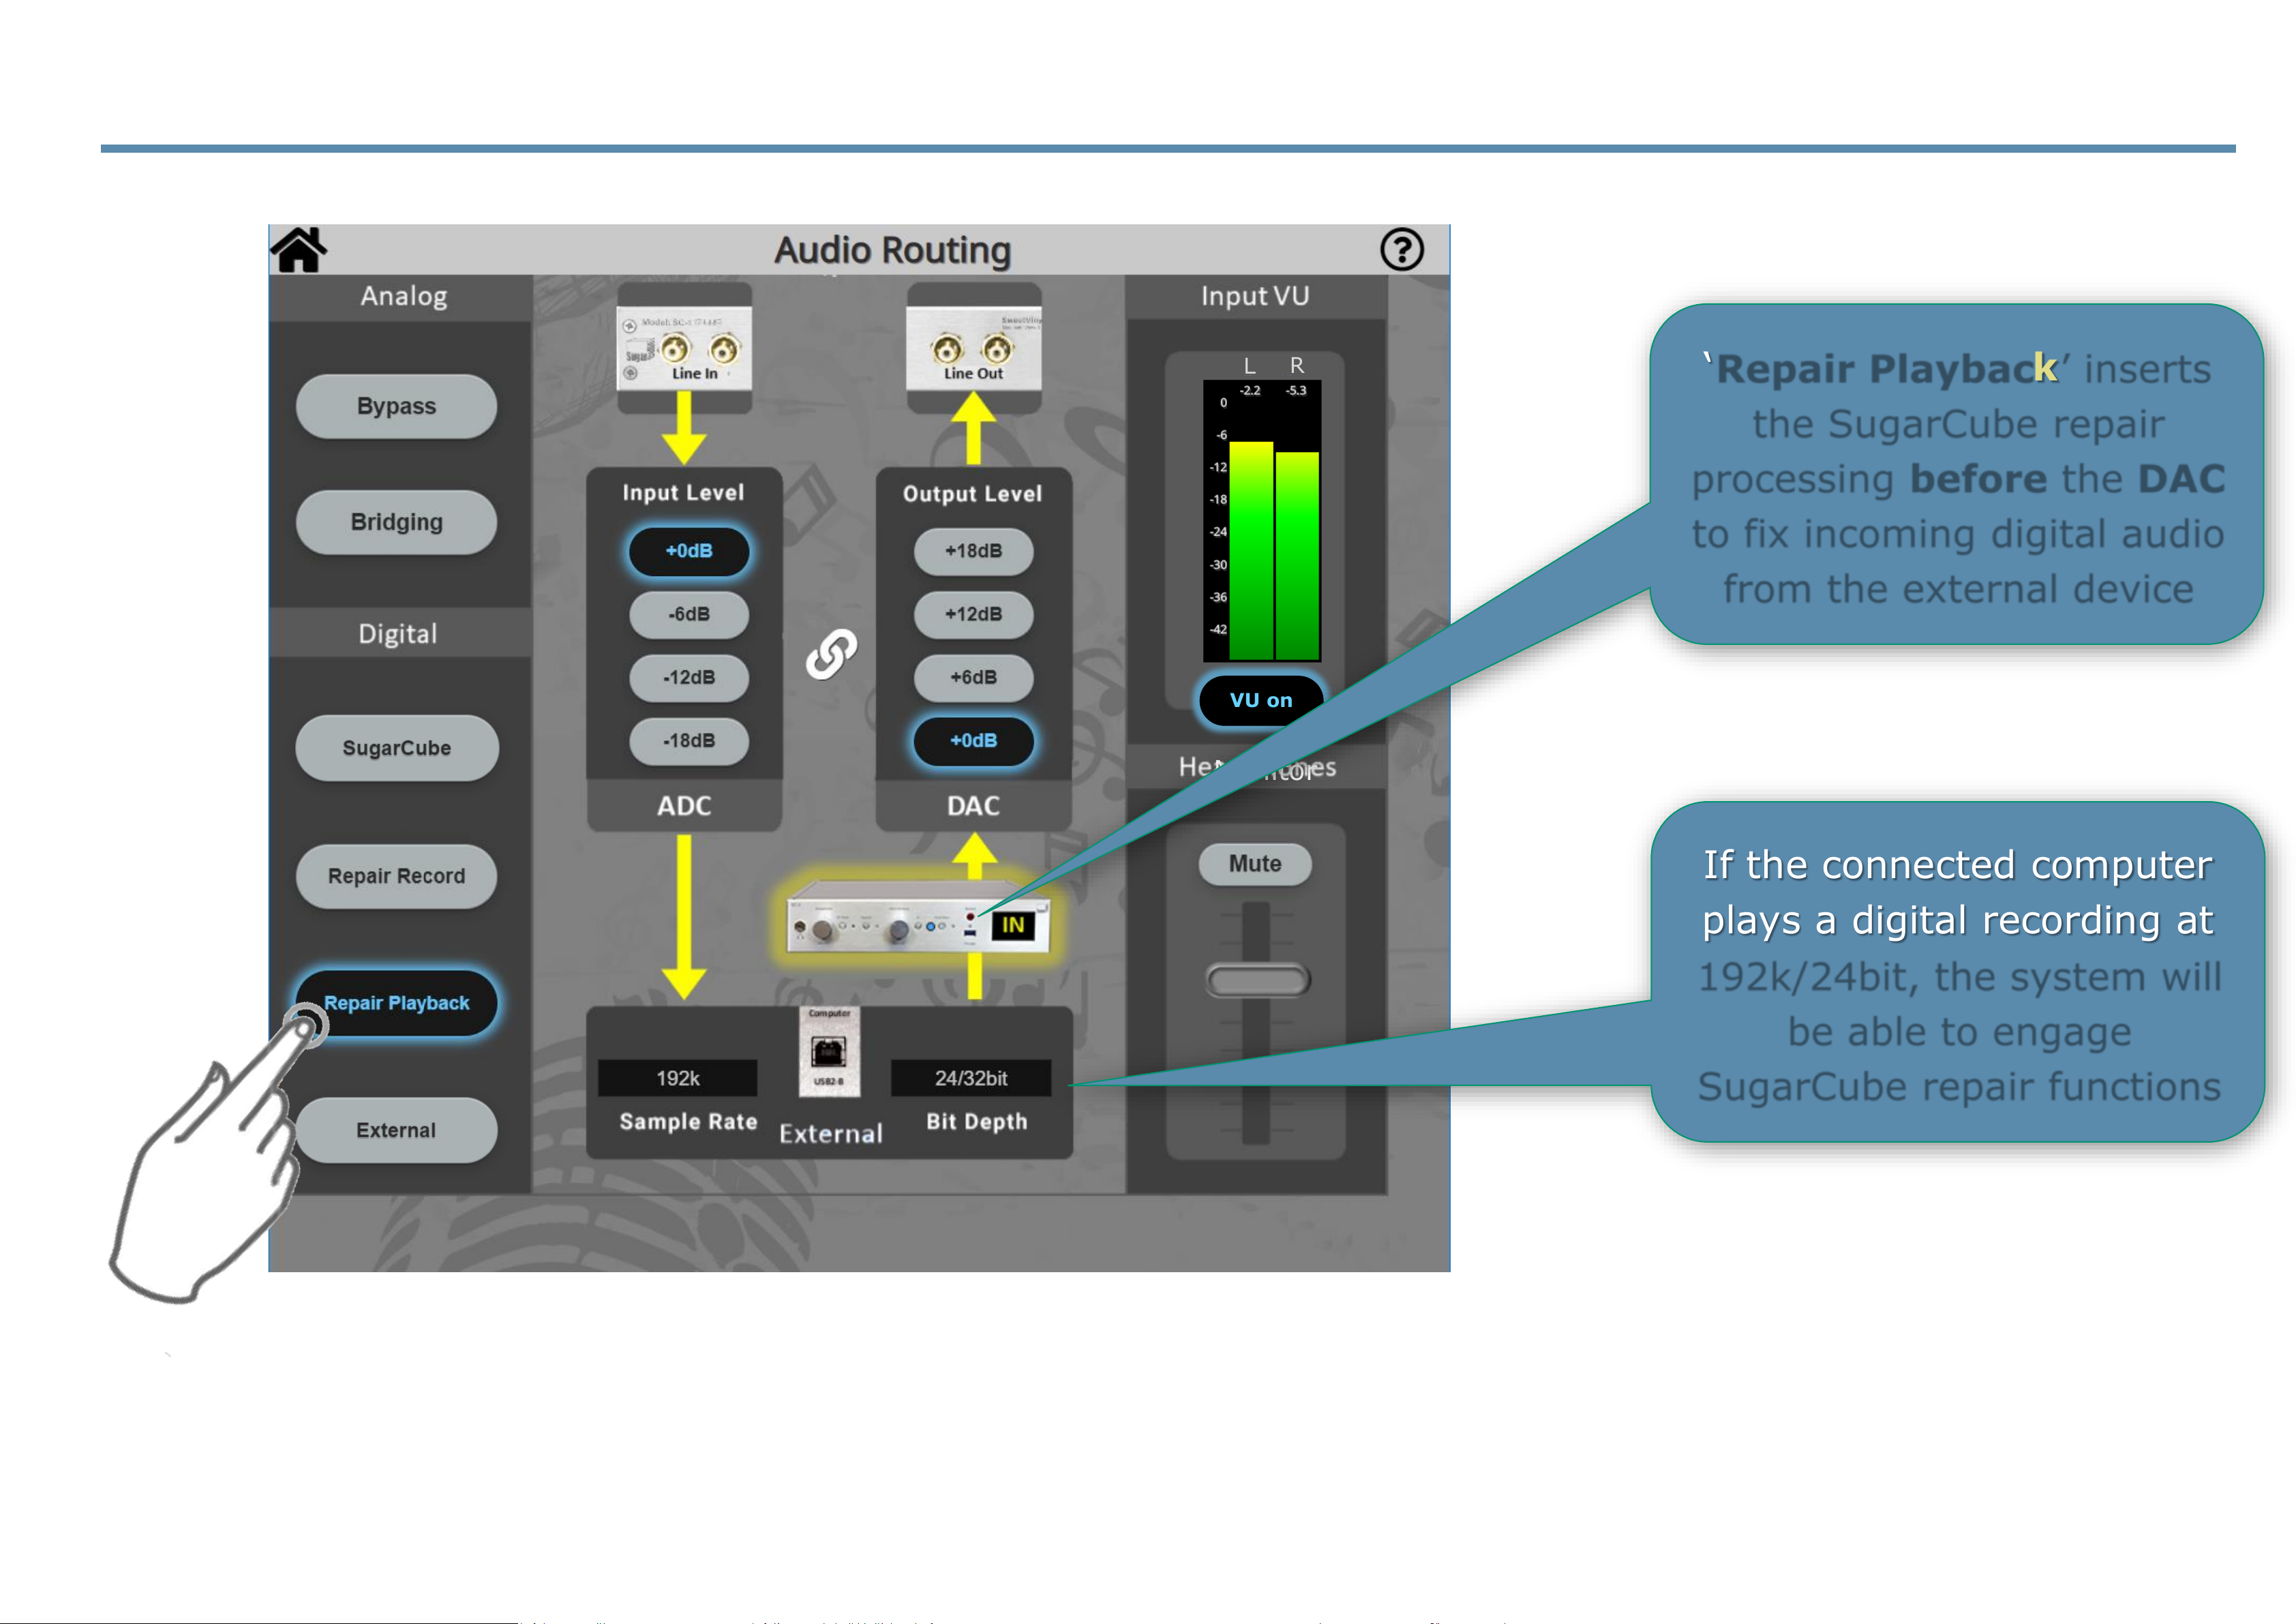
5.13 Audio Routing — Repair Playback Mode
L
R
VU on
Monitor
If the connected computer
plays a digital recording at
192k/24bit, the system will
be able to engage
SugarCube repair functions
‘Repair Playback’ inserts
the SugarCube repair
processing before the DAC
to fix incoming digital audio
from the external device
The Repair Playback mode is particularly useful allowing you to play any digital file from your library to
remove clicks & pops and/or remove tape hiss from previous recordings from any source from the past.
Page 88
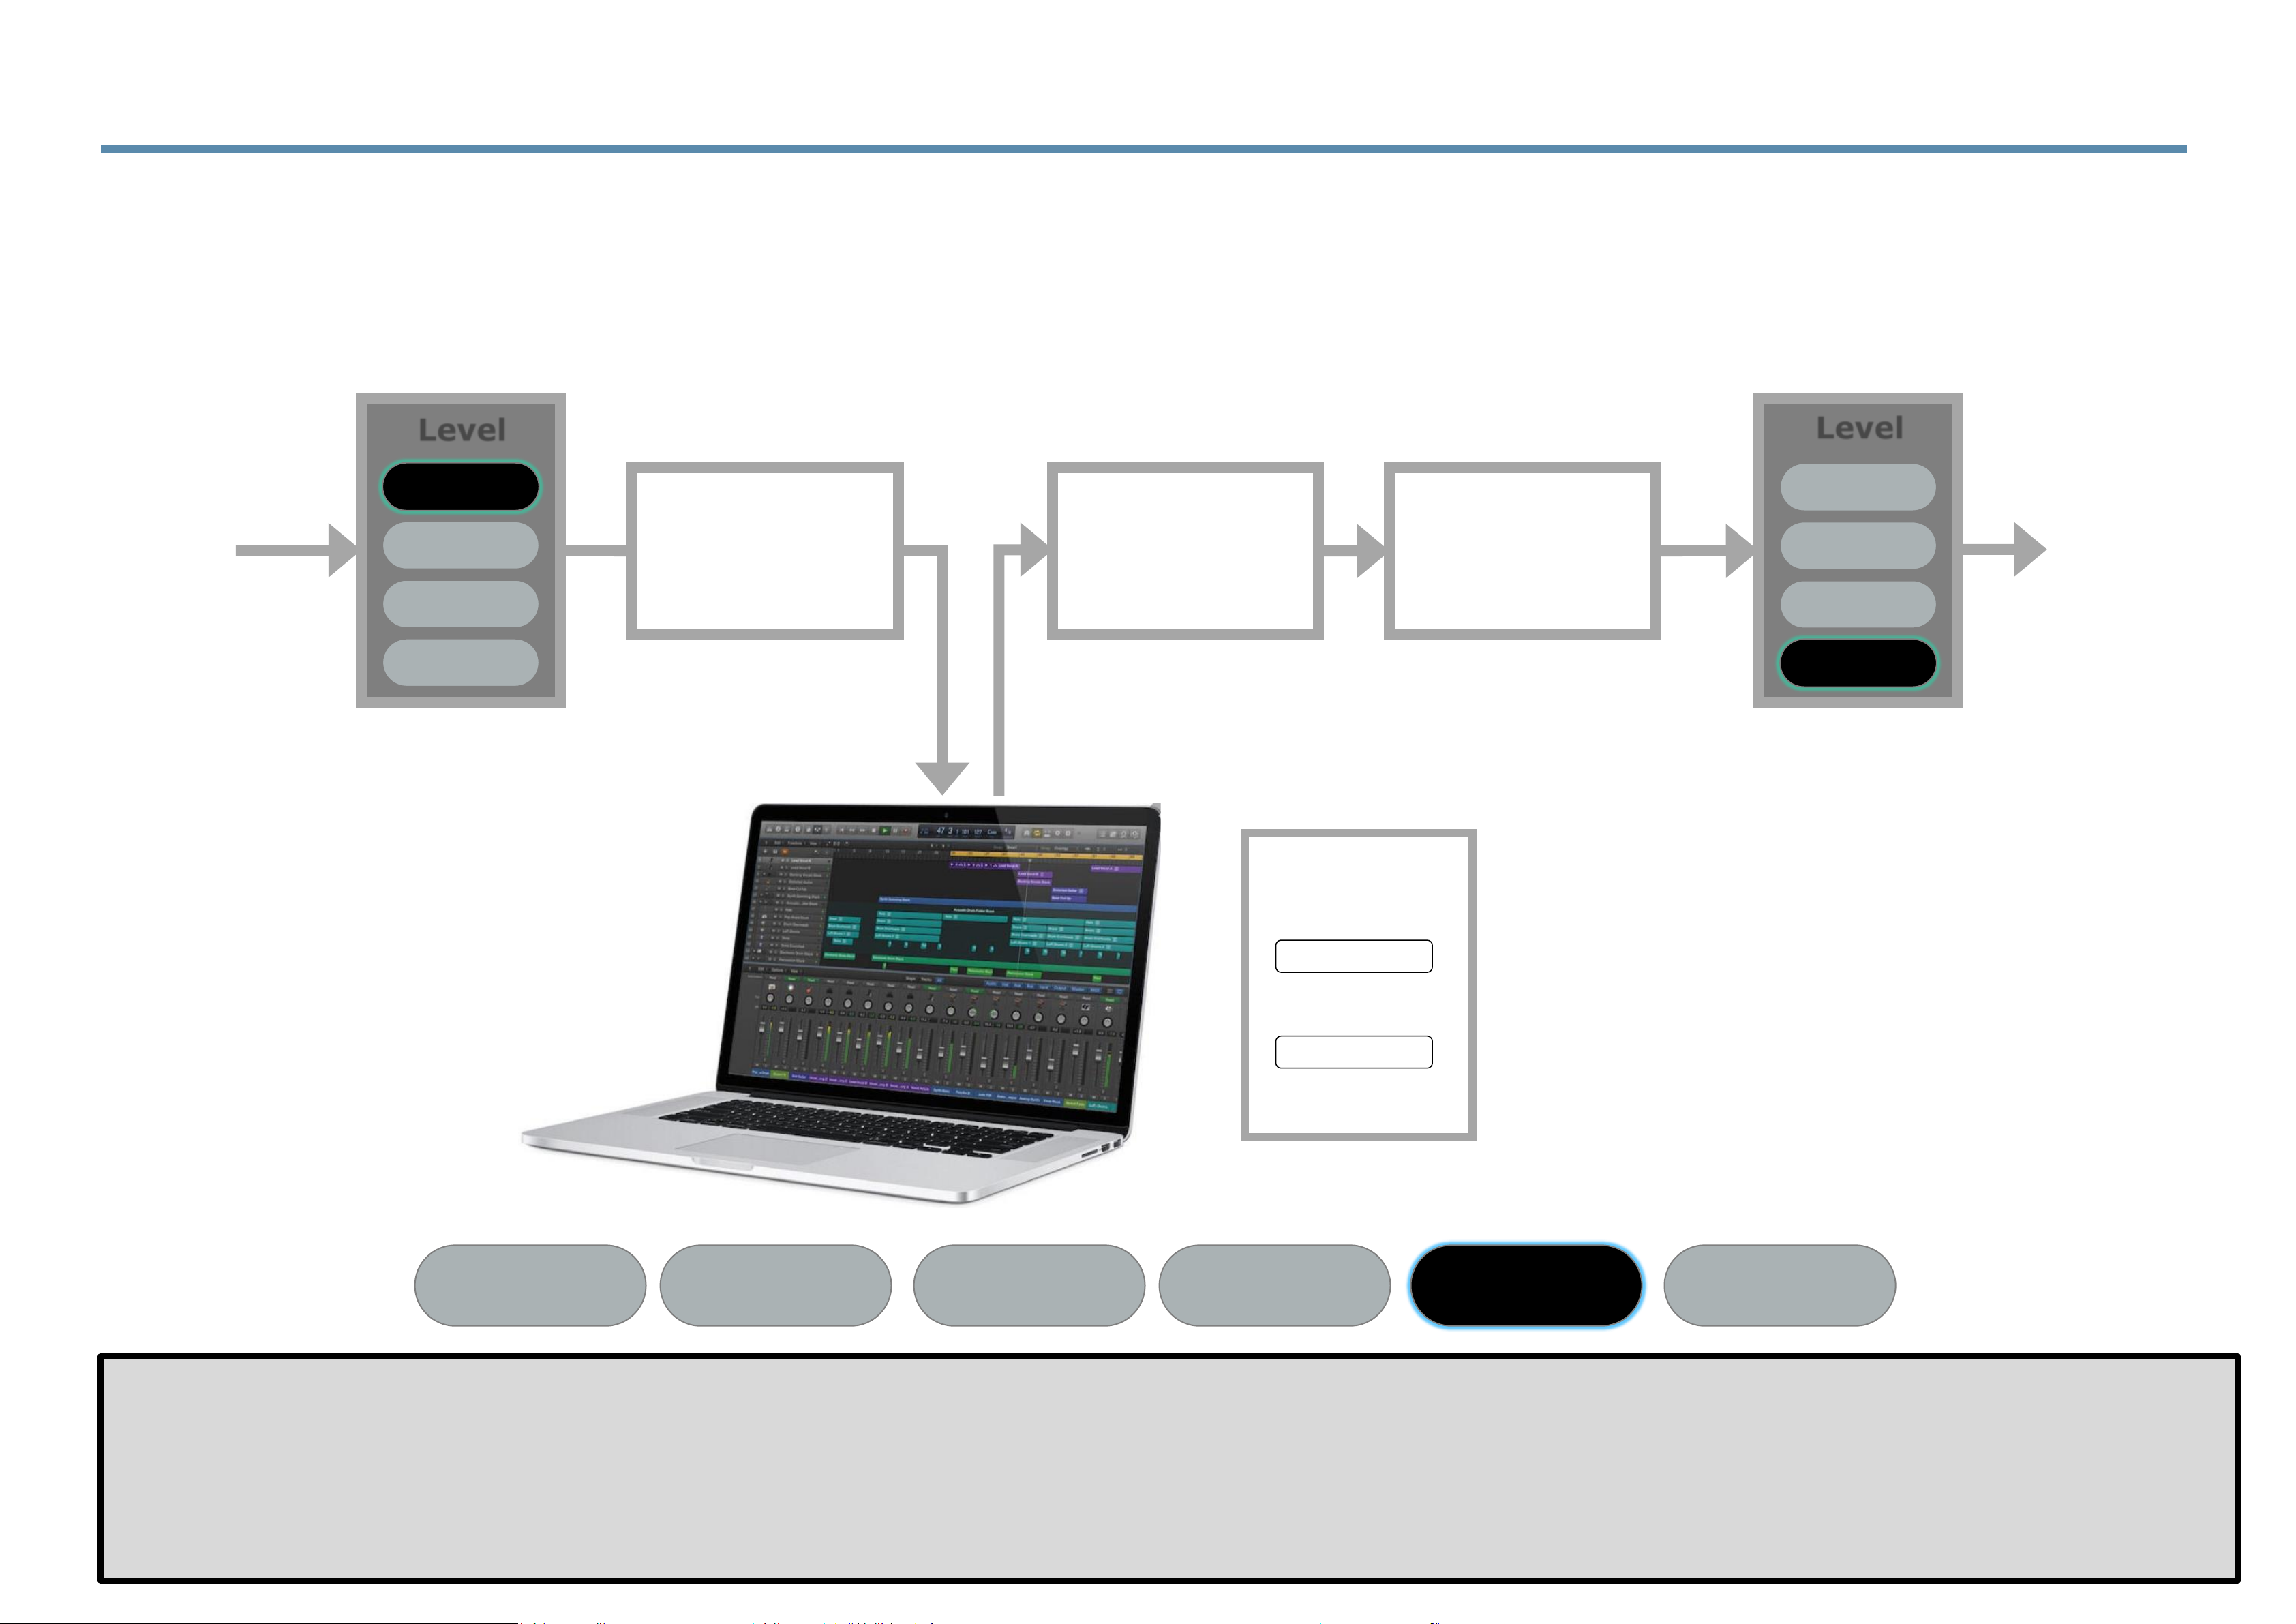
SugarCube
Repair
SugarCube
DAC
192k
24bit
Sample Rate
Bit Depth
SugarCube
ADC
Digitized audio goes directly to workstation. Workstation
output feeds SugarCube for repair before DAC.
5.14 Logical Flow — Repair Playback Mode
+0dB
-6dB
-12dB
-18dB
Level
Line In
+18dB
+12dB
+6dB
+0dB
Level
Line Out
Repair Playback is our recommended mode for operation. All of your files will be recorded “in the raw”
with no SugarCube processing applied. Then, on playback, you can adjust click & pop removal as well as
apply noise reduction (if needed) on a recording-by-recording basis or use no processing at all if desired.
Bridging SugarCube
Repair
Record
Repair
Playback
ExternalBypass
Page 89
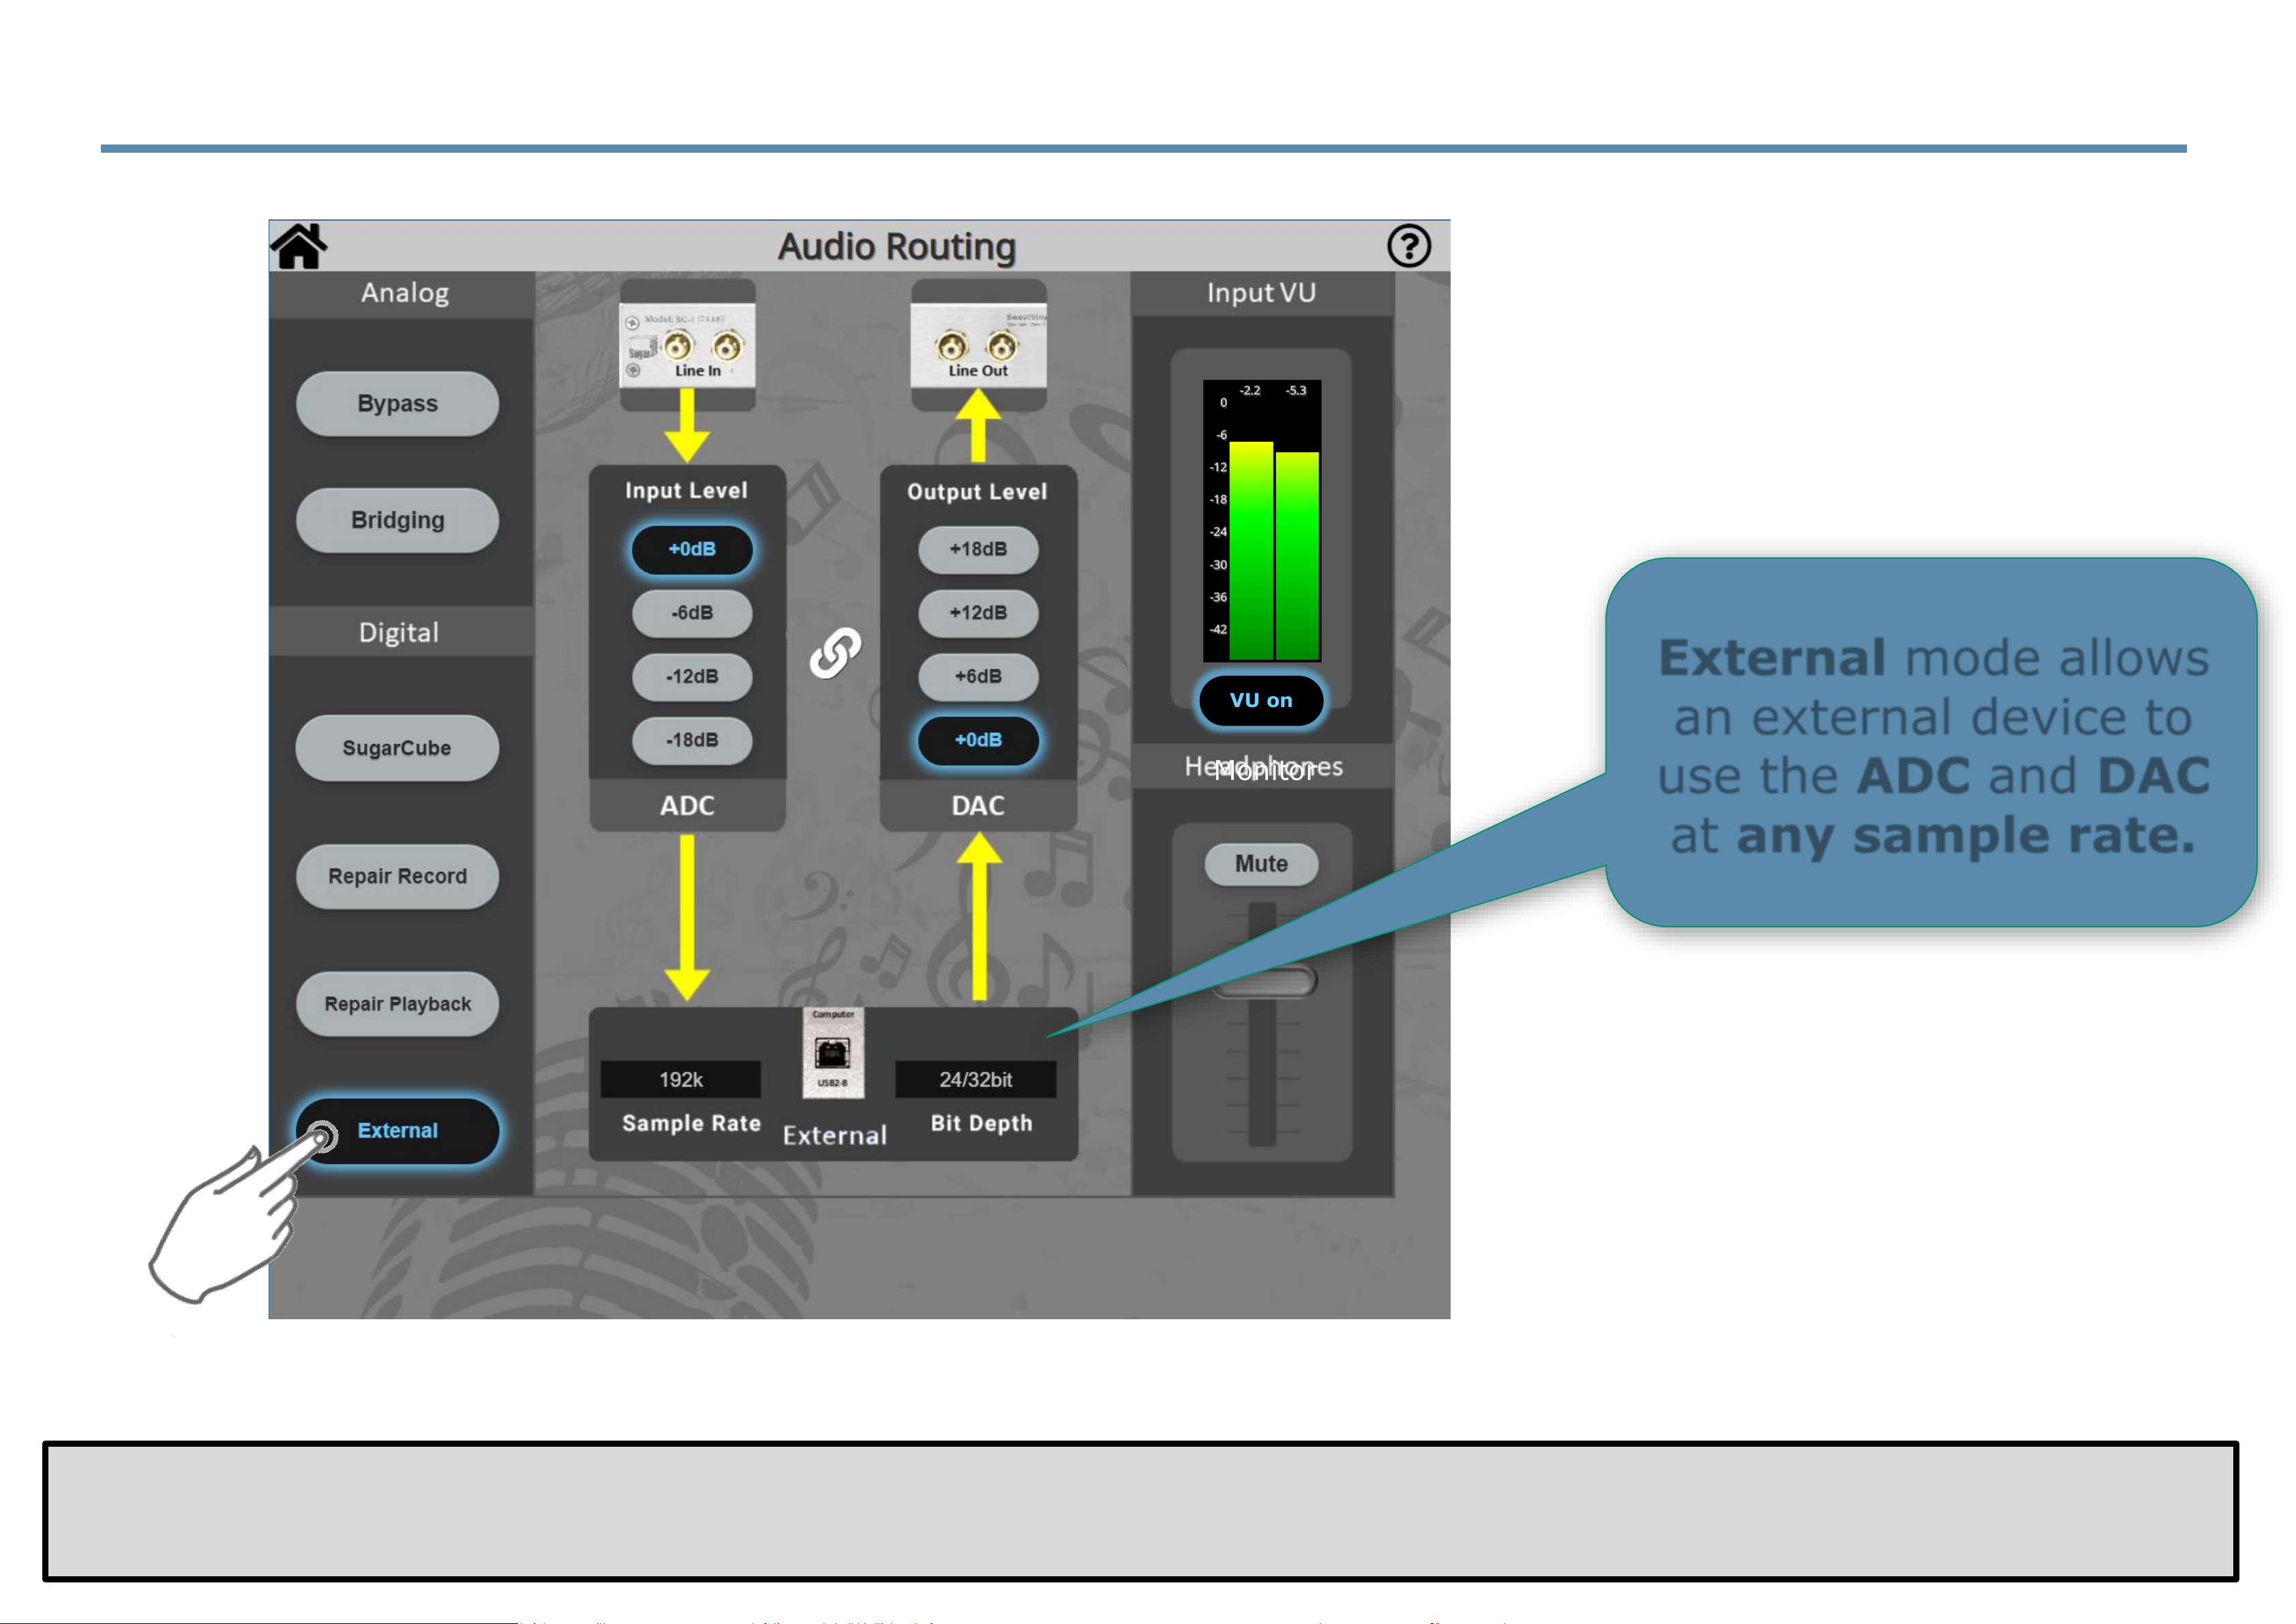
5.15 Audio Routing Menu — External Mode
L
R
VU on
Monitor
External mode allows
an external device to
use the ADC and DAC
at any sample rate.
In External mode, the SC1-Plus acts like any other studio-quality ADC/DAC pair and will function at any standard sample
rate and bit depth from 192k down to 44.1k and at 16/24/32 bit sample sizes.
Note: Please press again the button of the current mode of operation if the external device loses lock with the
SugarCube (you will certainly know due to obvious digital noise.) This resets the internal timing and restores the audio.
Page 90
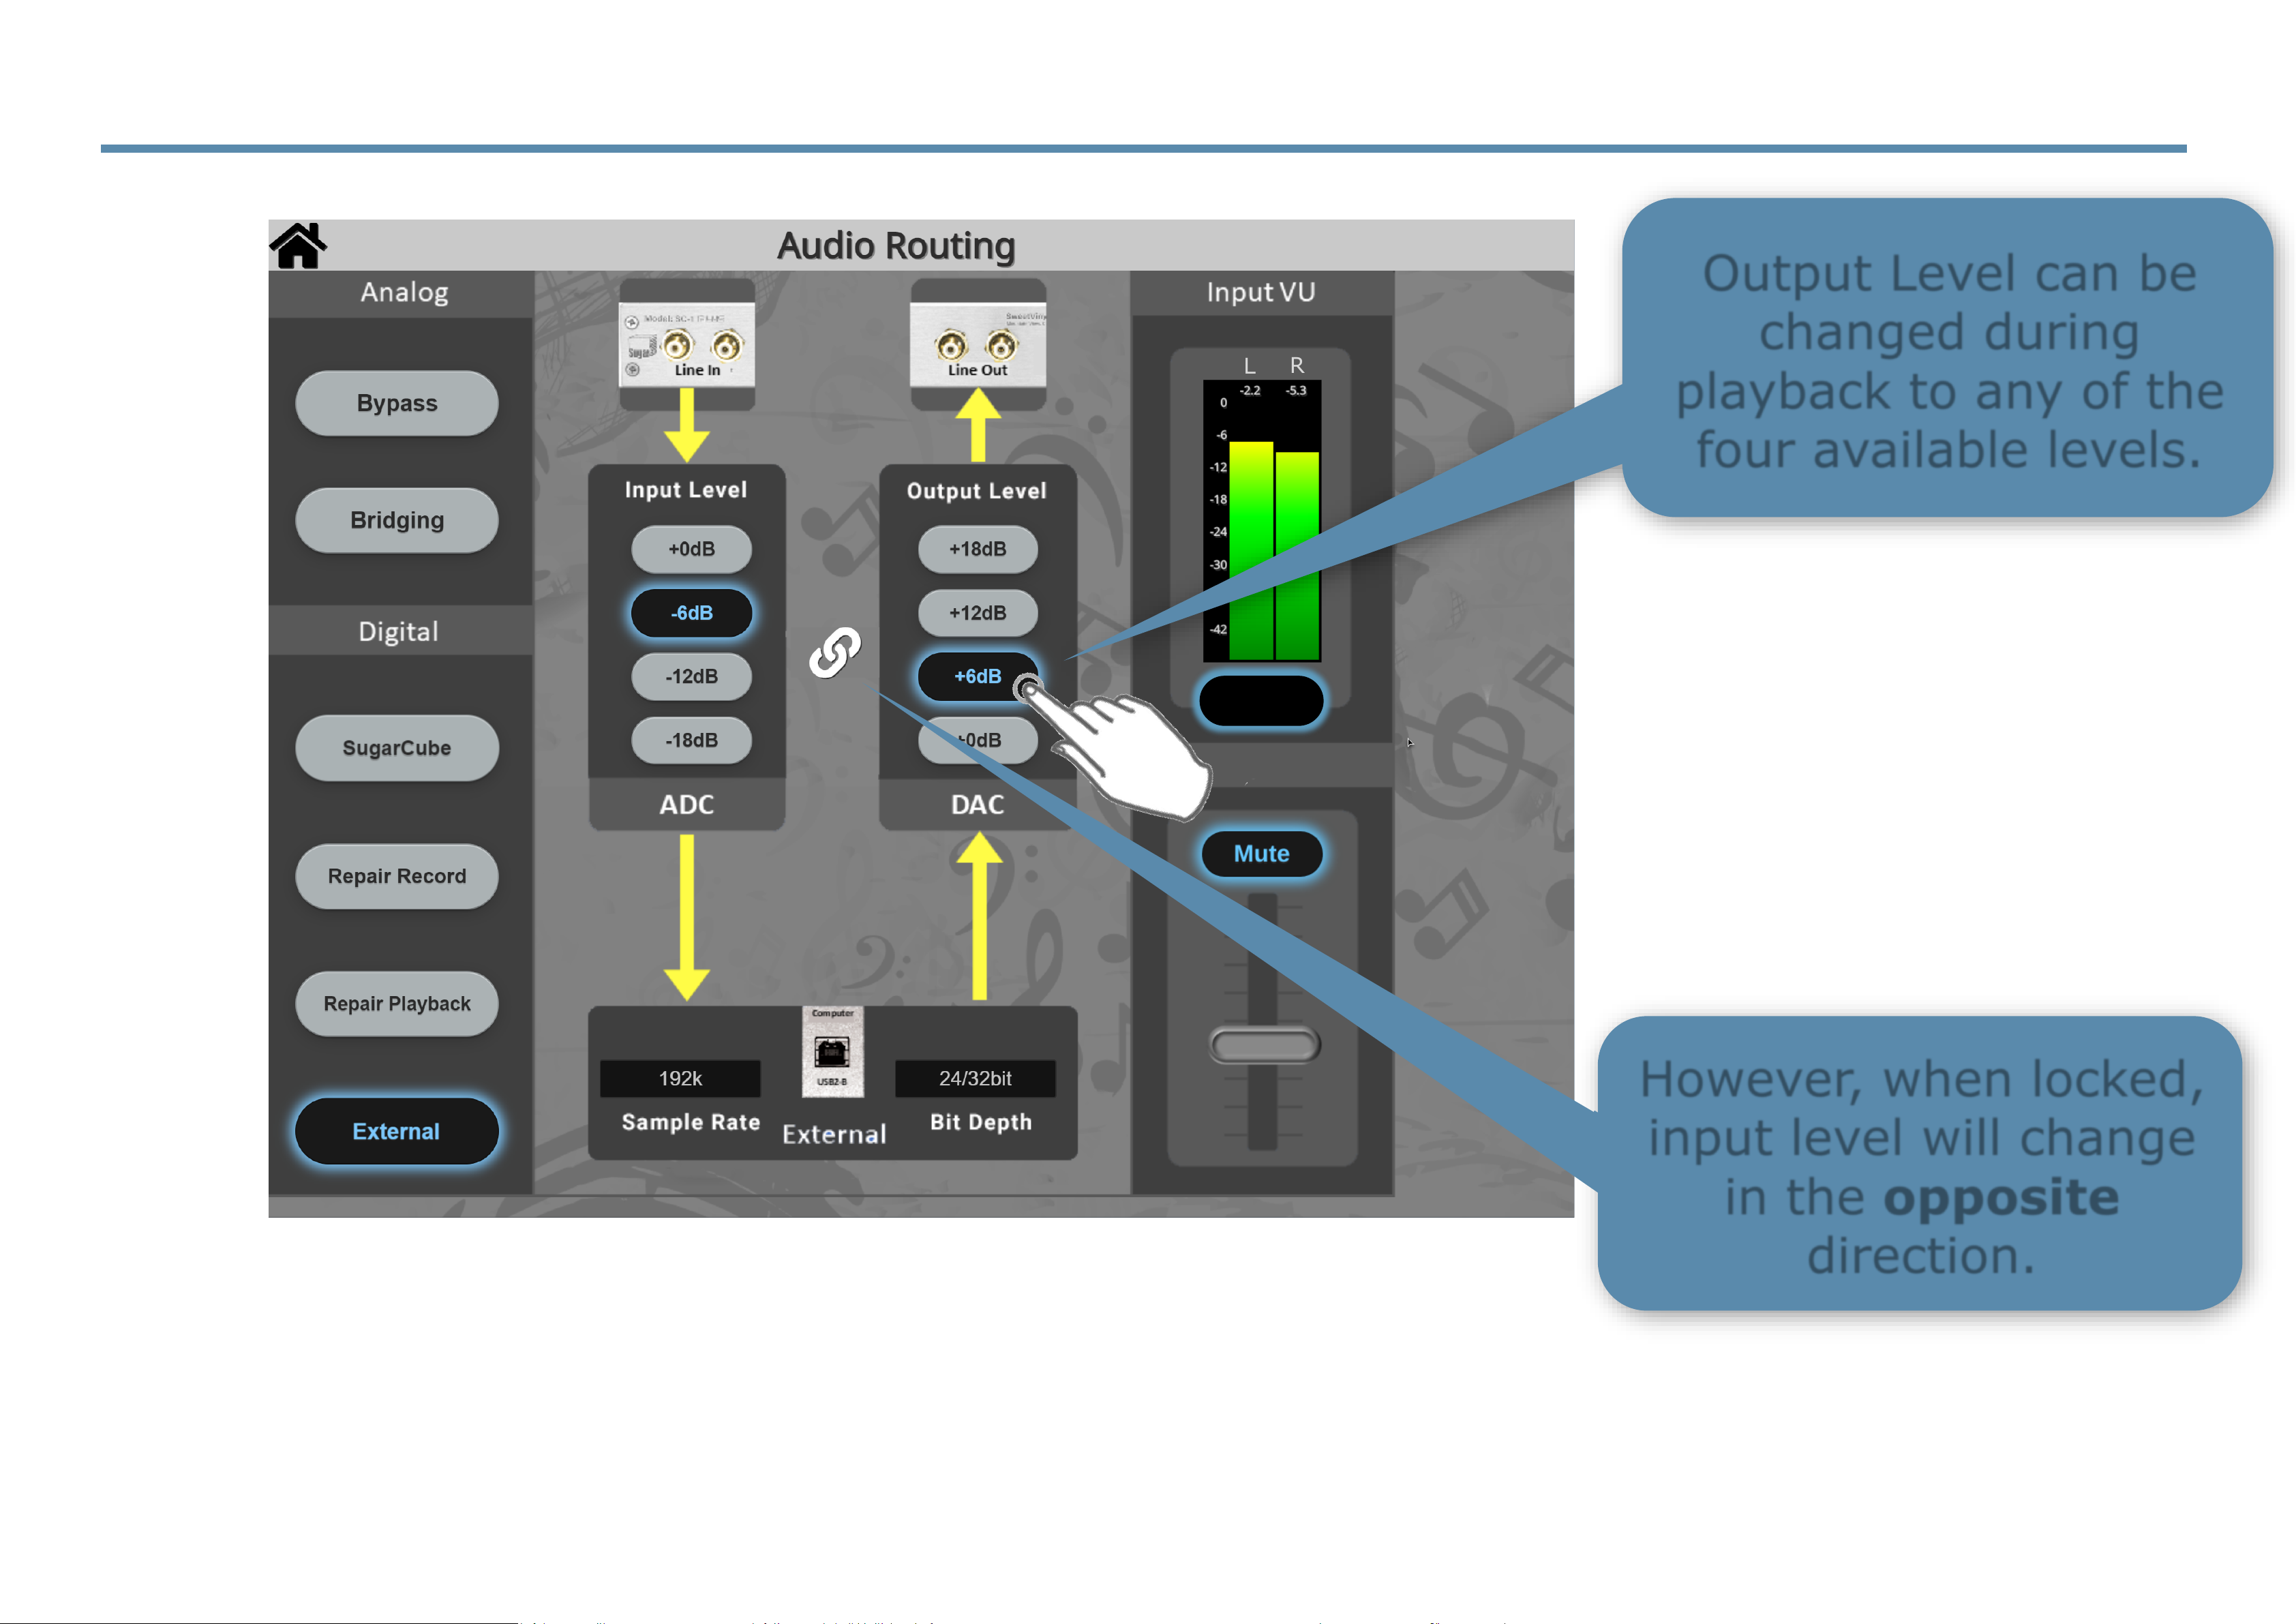
5.16 Audio Routing Menu — External Mode
L
R
VU on
Monitor
Output Level can be
changed during
playback to any of the
four available levels.
However, when locked,
input level will change
in the opposite
direction.
Page 91
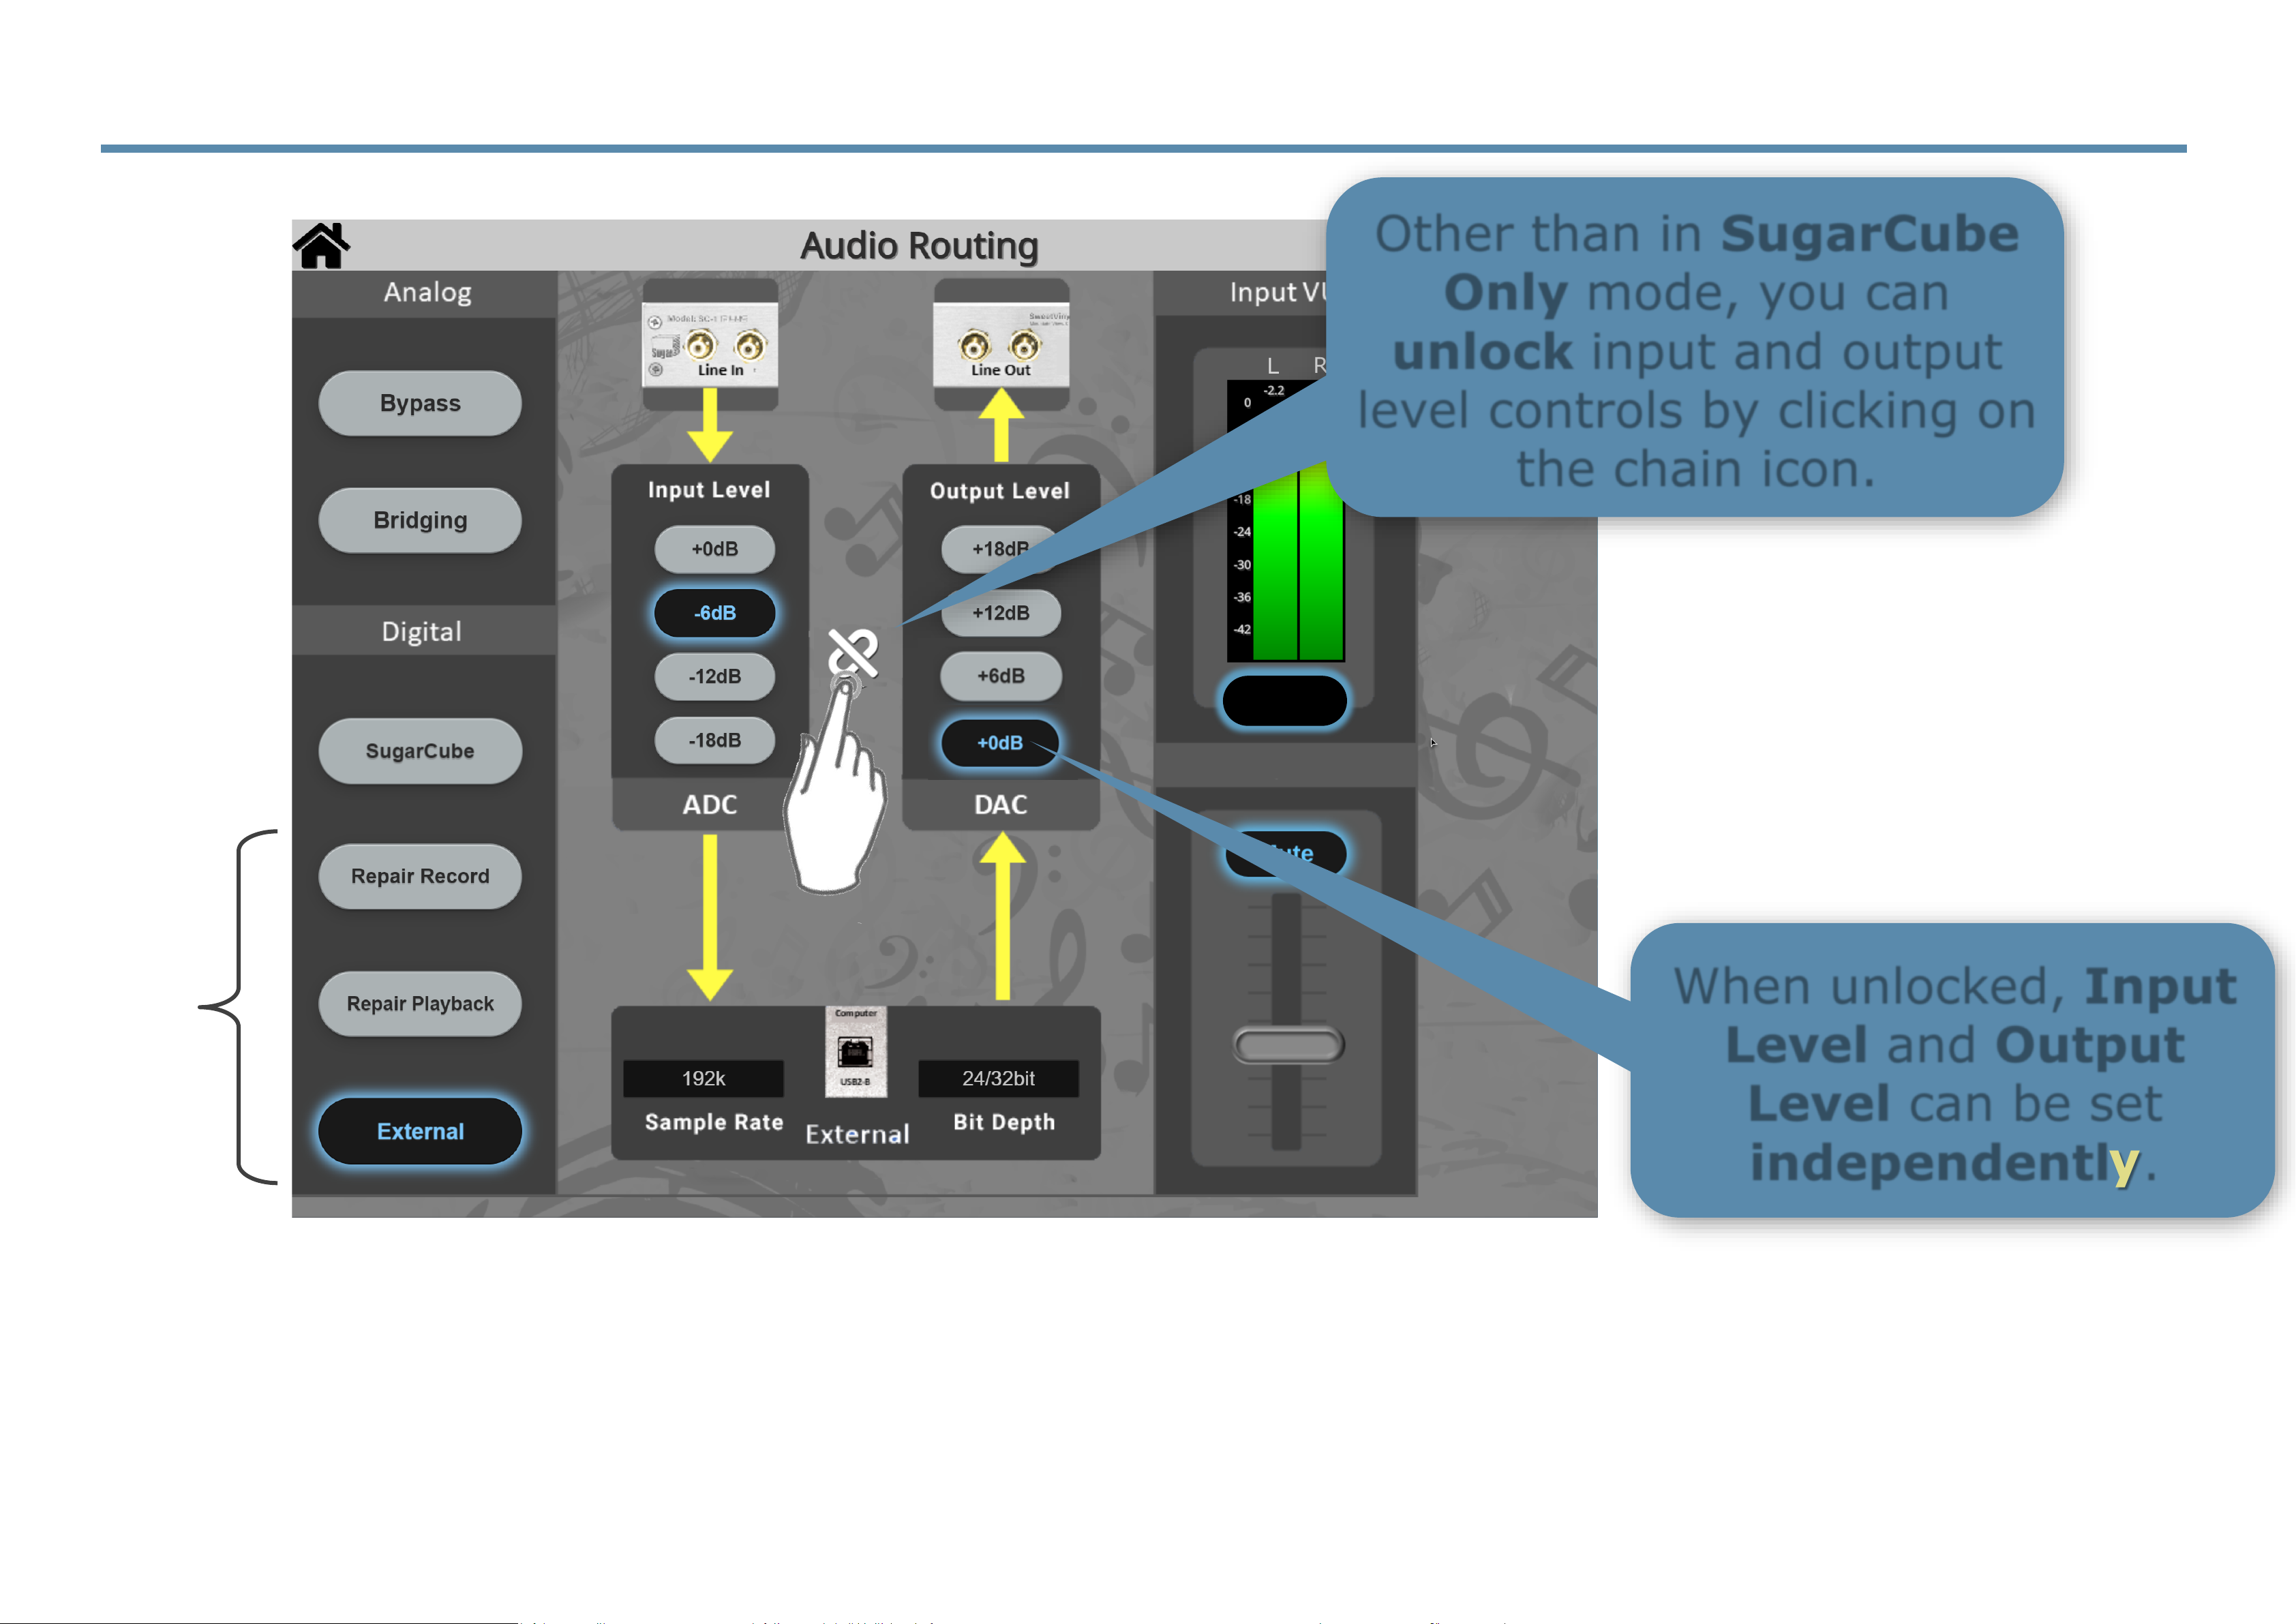
5.16.1 Audio Routing Menu — External-Mode Levels
L
R
VU on
Monitor
Other than in SugarCube
Only mode, you can
unlock input and output
level controls by clicking on
the chain icon.
When unlocked, Input
Level and Output
Level can be set
independently.
External
Modes
Page 92
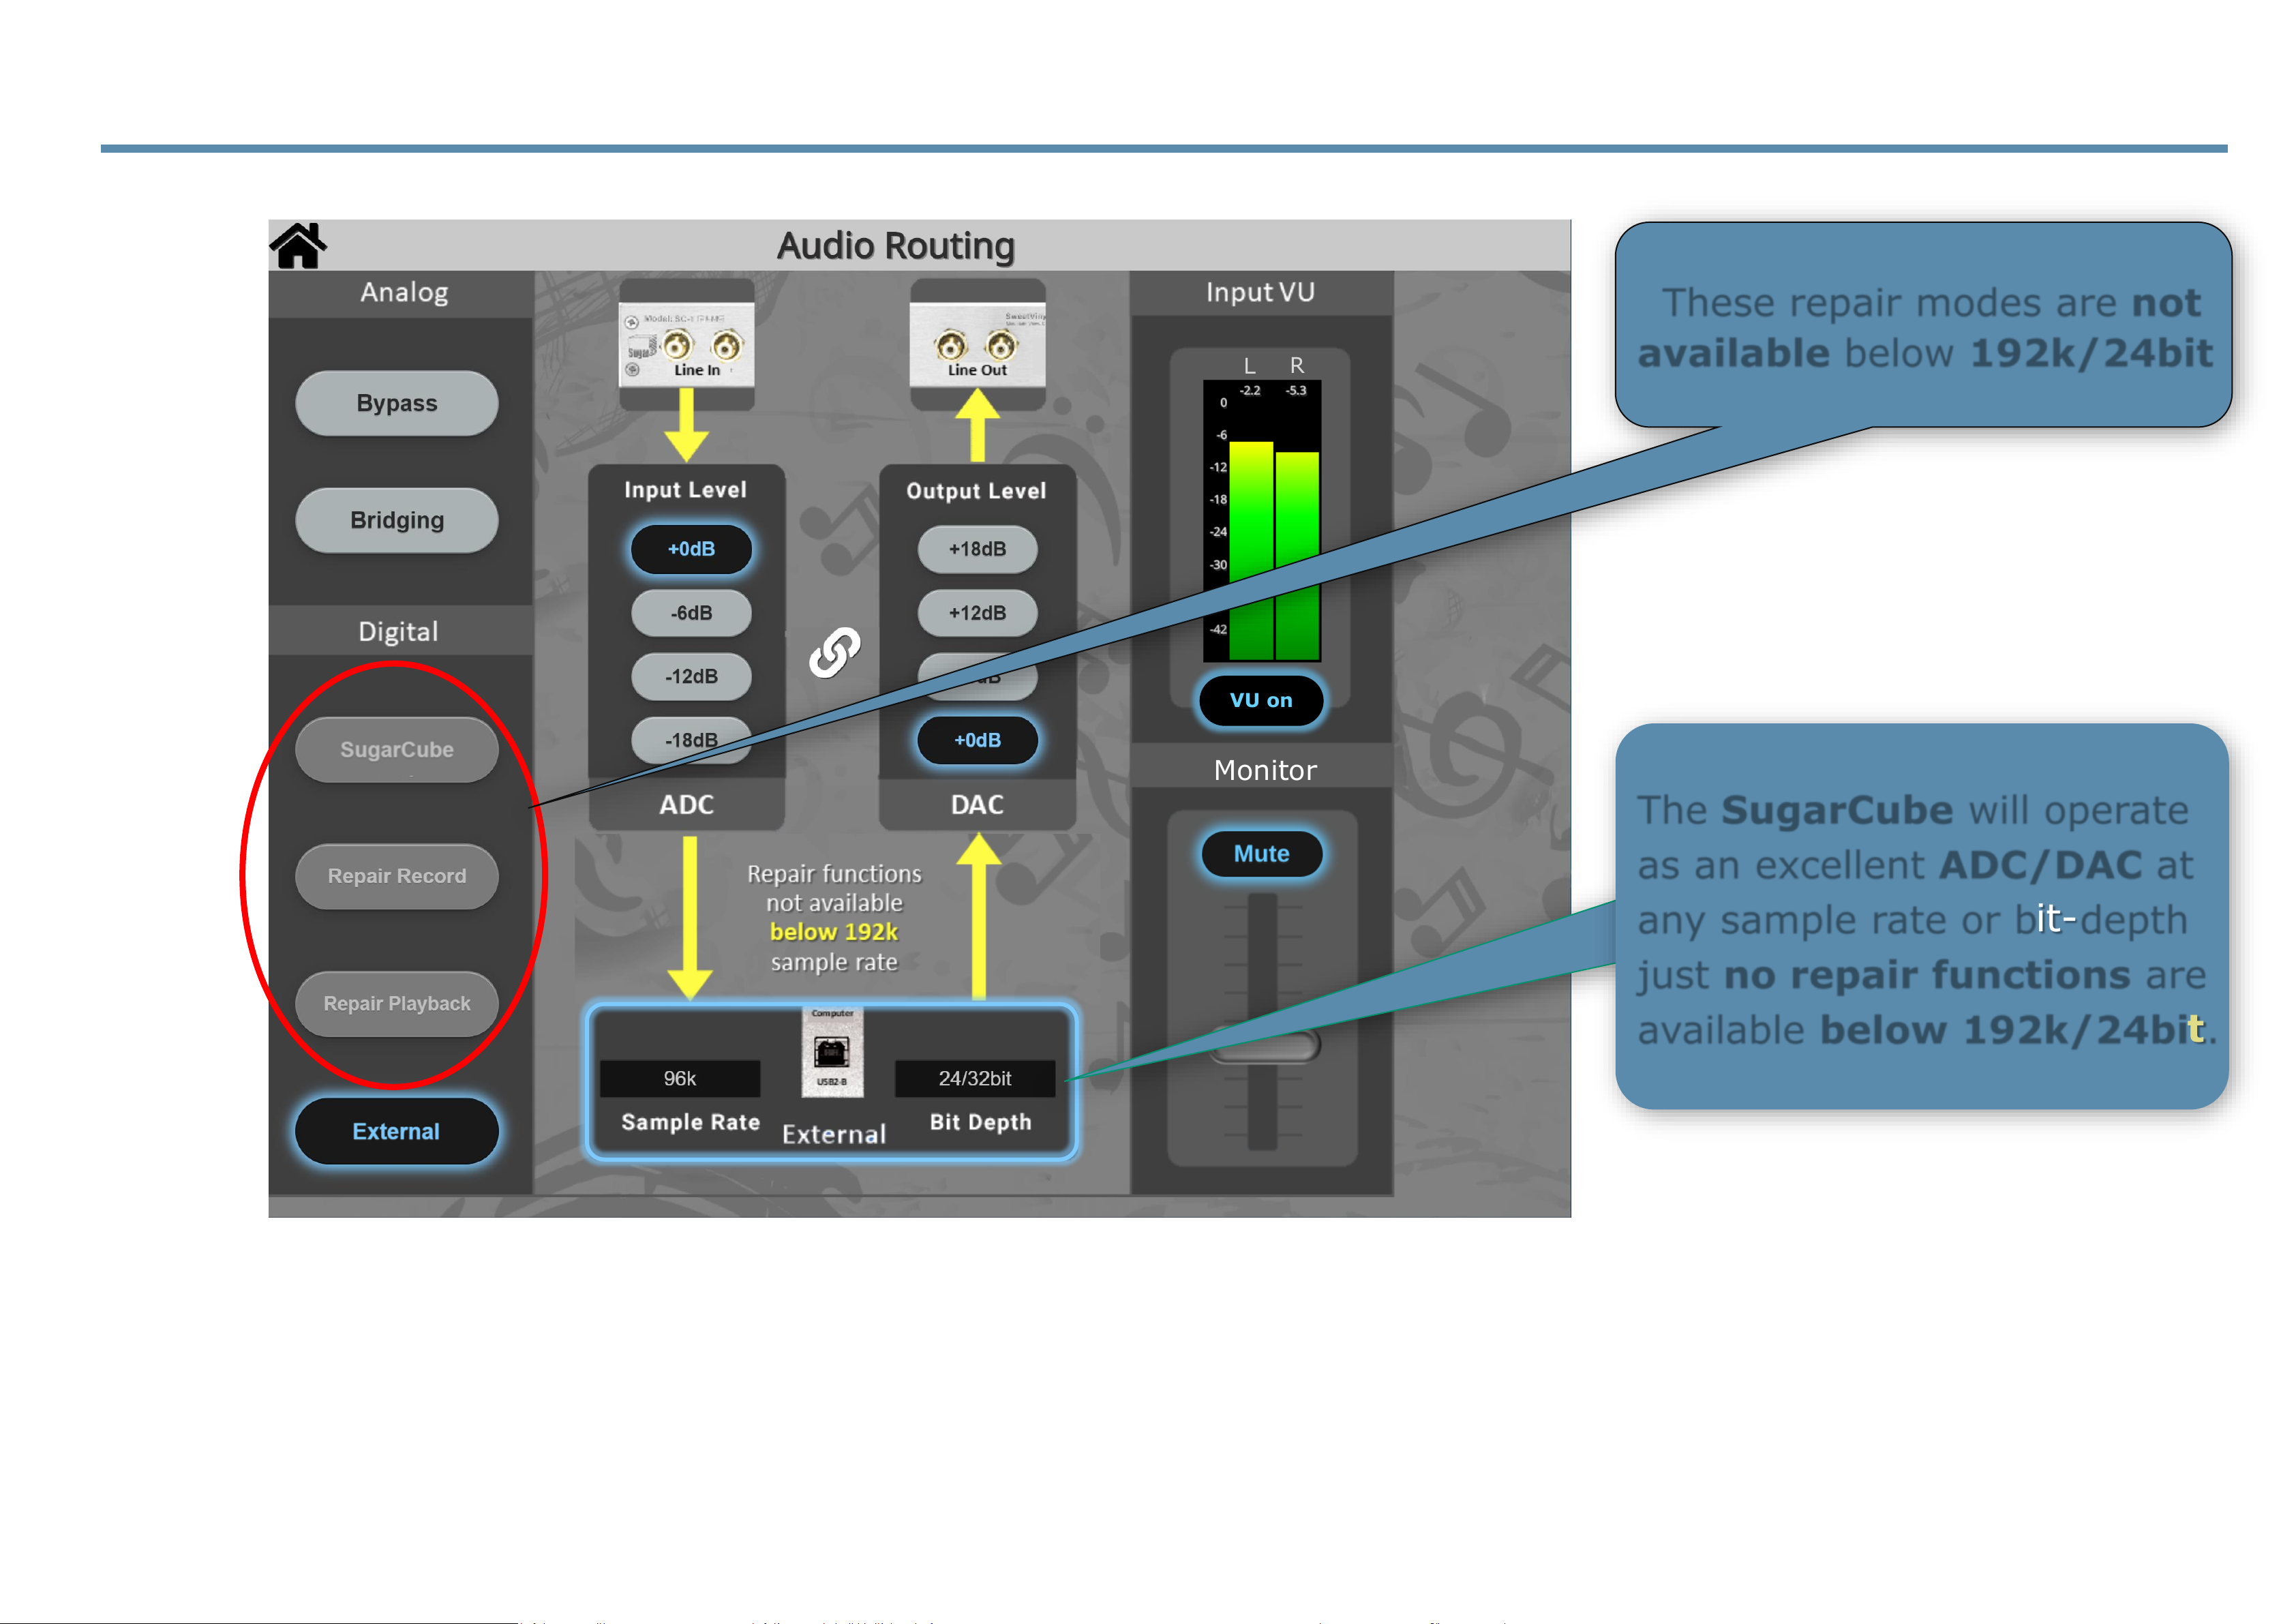
5.17 Audio Routing — External Device Not Set to 192k/24bit
L
R
VU on
Monitor
In External mode, it is fine to operate at any sample rate and bit-depth below 192k/24bit, but
SugarCube repair functions do not operate below 192k/24bit.
These repair modes are not
available below 192k/24bit
The SugarCube will operate
as an excellent ADC/DAC at
any sample rate or bit-depth
just no repair functions are
available below 192k/24bit.
Page 93
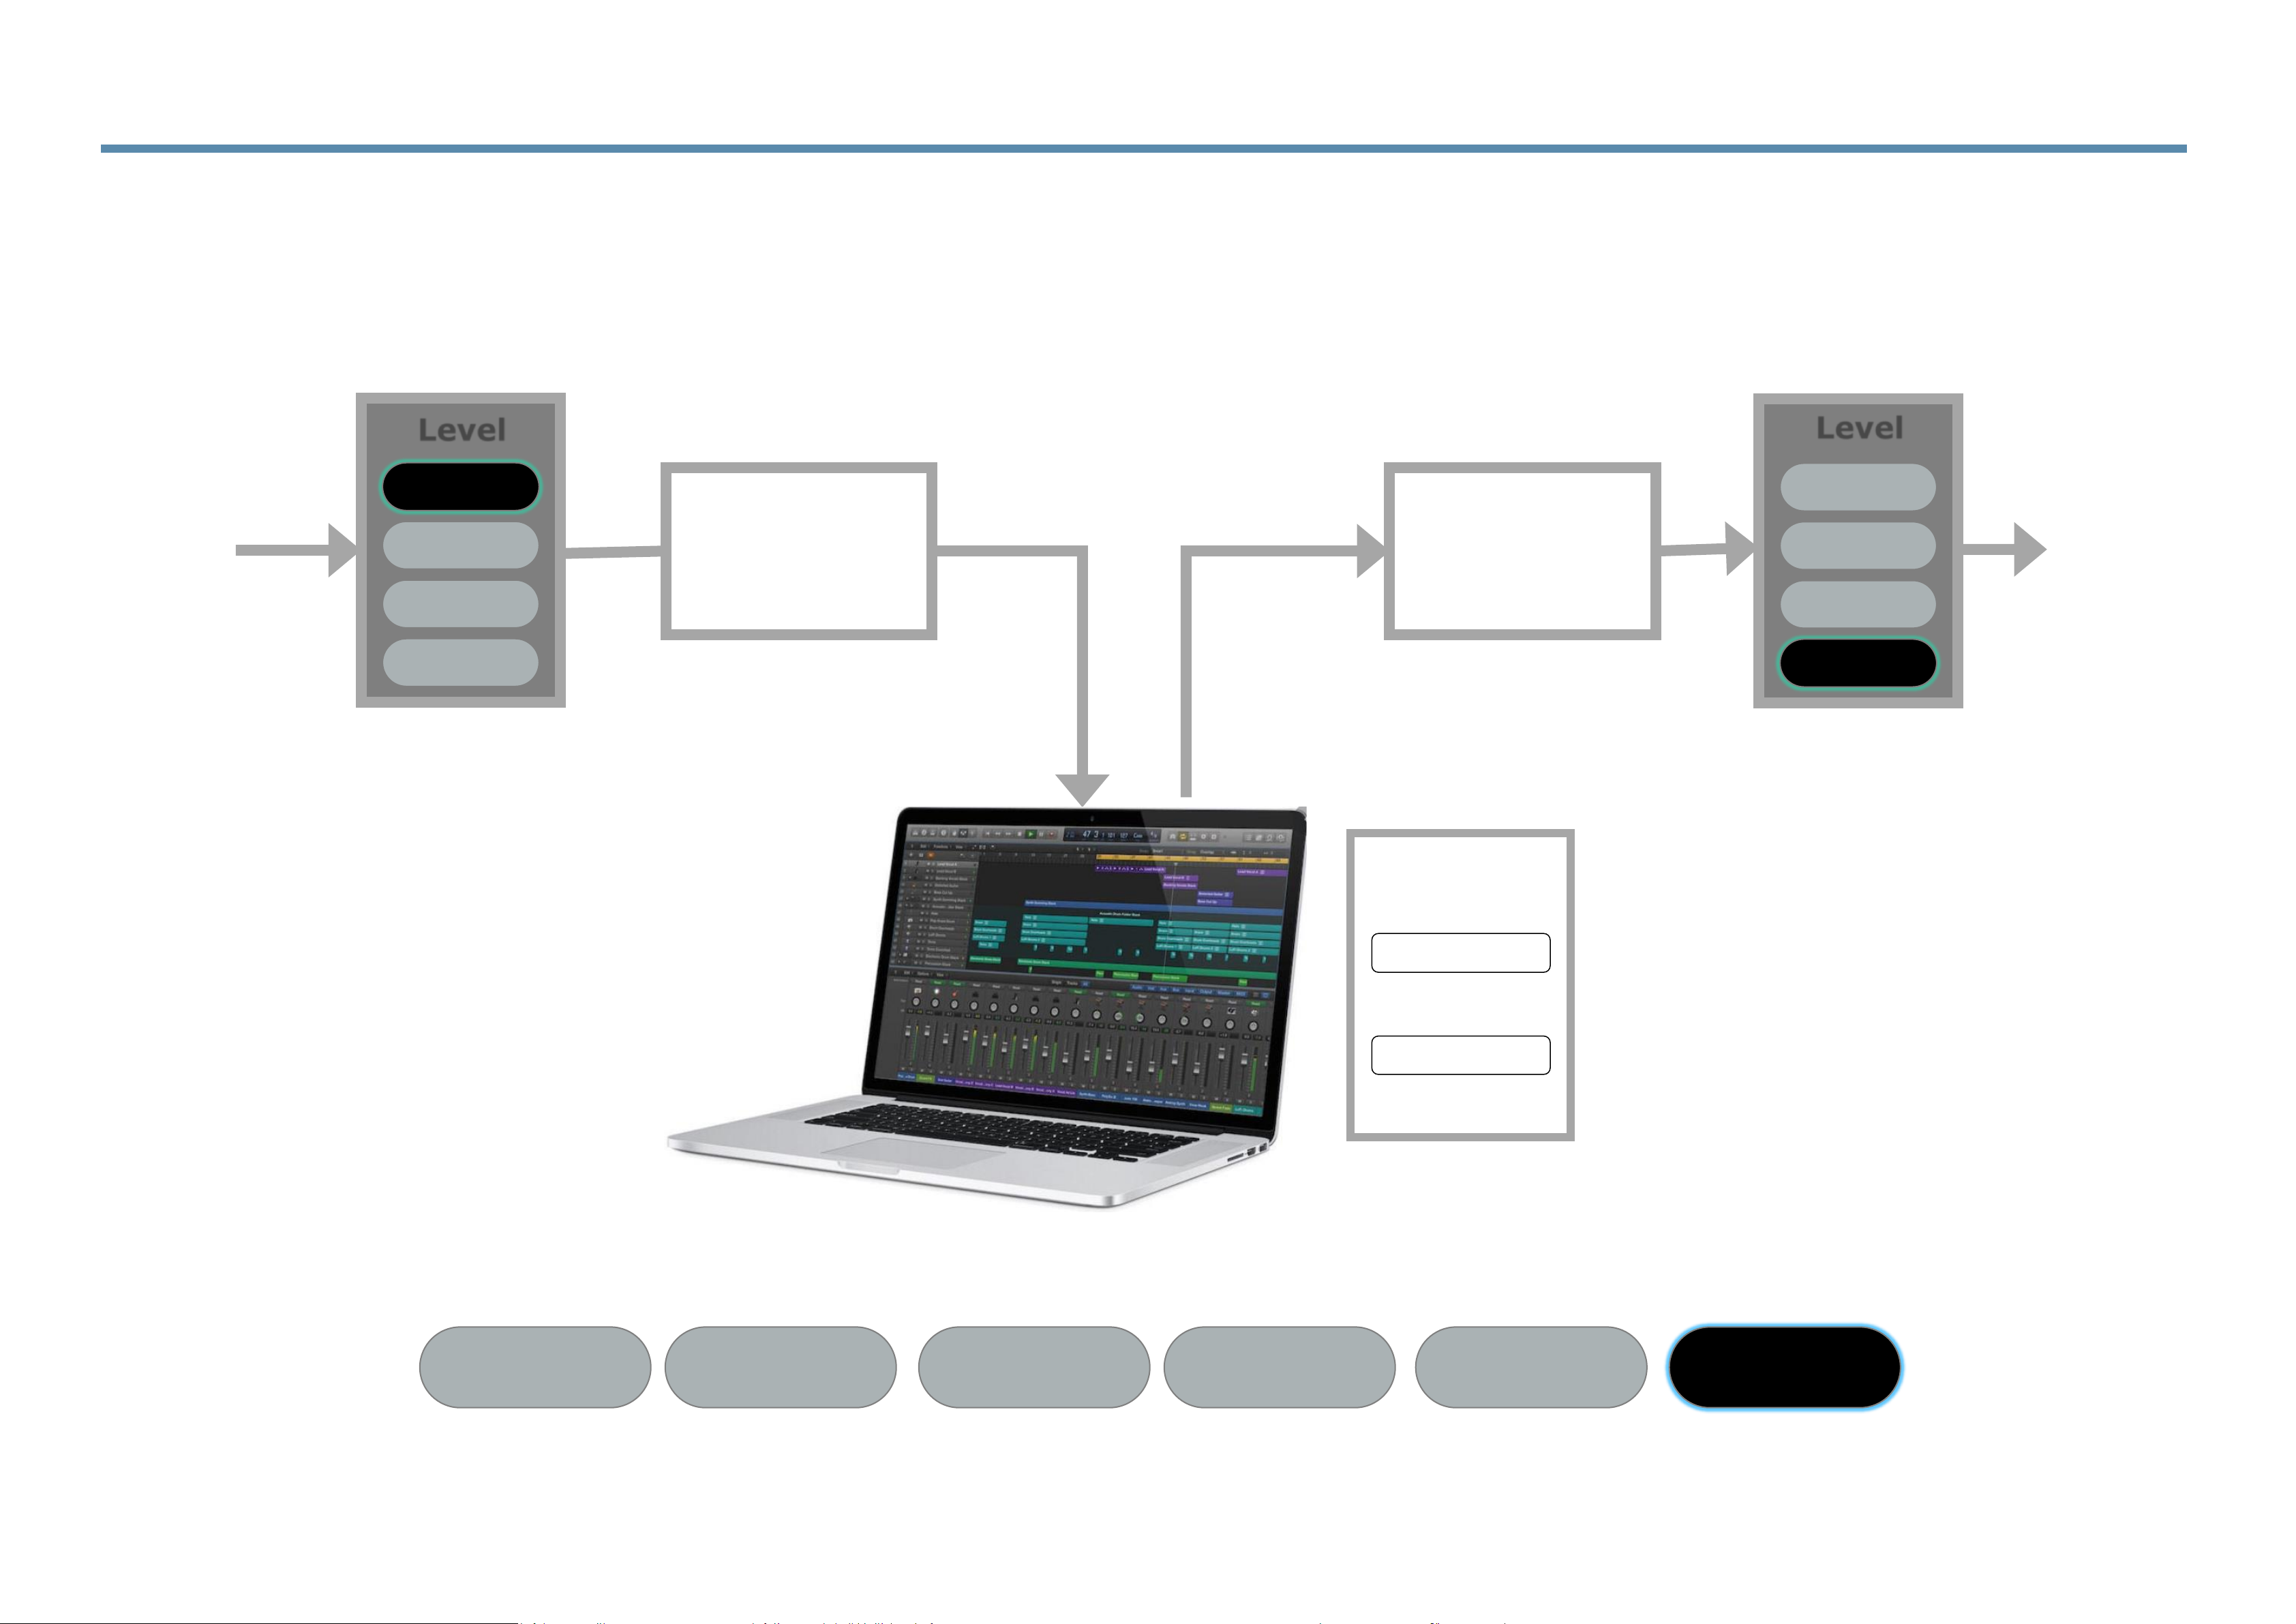
SugarCube
DAC
<any>
<any>
Sample Rate
Bit Depth
SugarCube
ADC
SugarCube repair functions are out of the loop.
Workstation uses ADC & DAC directly
5.18 Logical Flow — External Mode
+0dB
-6dB
-12dB
-18dB
Level
Line In
+18dB
+12dB
+6dB
+0dB
Level
Line Out
In External mode, the SugarCube will operate at any sample rate and bit depth from 192k/24bit down to
44.1/16bit, just like any other studio-quality ADC/DAC pair.
Bridging SugarCube
Repair
Record
Repair
Playback
ExternalBypass
Page 94
Technical
Specs
Page 95
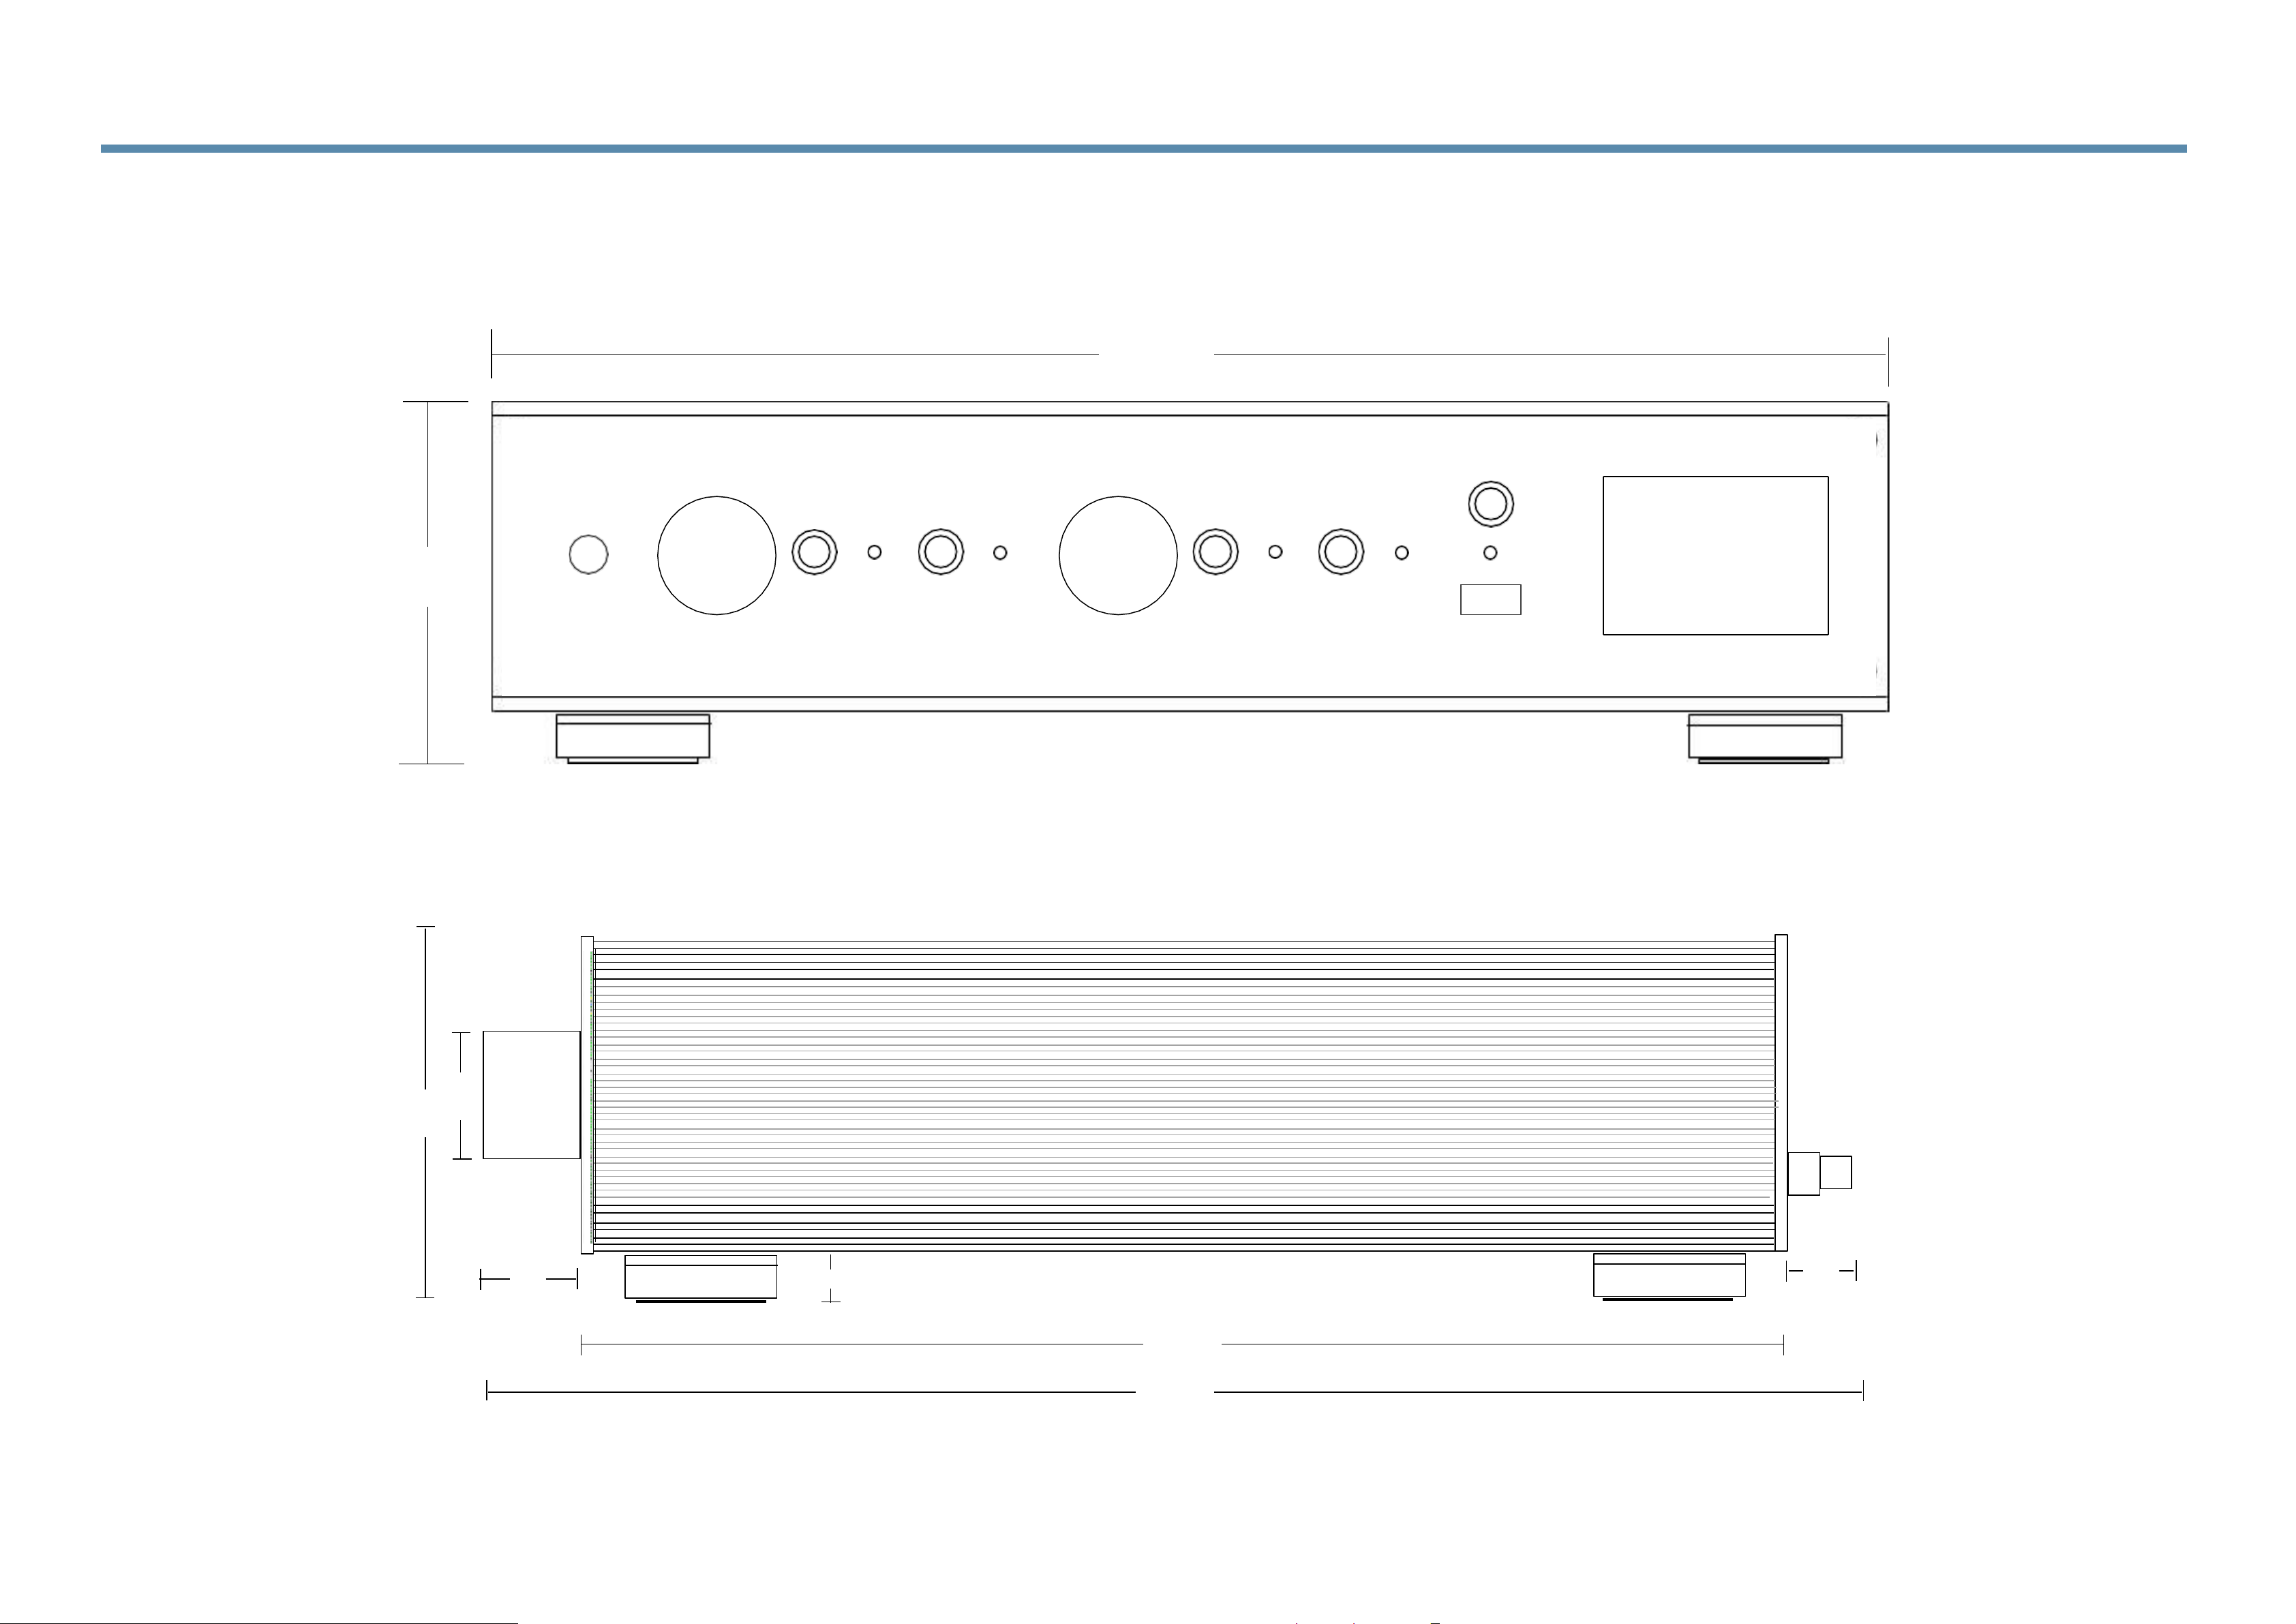
SugarCube SC2-Plus Mechanical:
FRONT VIEW
.700"
.984"
1.184"
.4 50"
3.430"
3.430"
SIDE VIEW
12.250"
13.934"
14.060"
Page 96

Technical Specifications
• Line In maximum level = +22.7 dBu
(approx. 10.6V rms or 30V p-p)
• Line Out level always equals Line In level when locked
• THD+N = 0.0031% (A-weighted)
• Frequency Response = 25Hz to 60kHz +/-0.1dB
• Frequency Response = 15Hz to 75kHz -3dB
• DC in = 5 volts, center-pin positive
• Average Power Dissipation = 11 watts
• Internal cache capacity for recordings = 10
• Internal SugarCube processing operations at 192k/32bits
• External drive formats: NTSC, exFAT, FAT32
Page 97

Support
Thank you for purchasing this SugarCube product.
Please contact customer support at: [email protected]
Trademarks
SweetVinyl™ and SugarCube™ are trademarks of SweetVinyl Inc.
Any non-SweetVinyl trademarks are used for reference purposes only.
Compliance
For the current EU Declaration of conformity, visit:
http://support.sweetvinyl.com/regulatory
For regulatory compliance information in North America, visit:
http://support.sweetvinyl.com/regulatory
SweetVinyl, Inc.
57 E. Evelyn Ave
Mountain View, CA 94041
June 2021
General Info
Page 98
FAQ
Some common questions
& answers about using
the SC-Plus series
Page 99

Basic connectivity
• Q: Line-In level setting, why so many choices?
• A: You can select four steps each 6dB apart to accommodate low- to high-level output
equipment. Whatever level you select for input is mirror the opposite way for output (i.e.--
choosing -6dB line in results in +6dB applied to line out so line in always equals line out.)
• Q: What is bridging?
• A: This is an analog routing mode where line in goes directly to line out through the
bypass relay just like in Bypass mode but is tapped at a high impedance (about 100k ohms)
and passed through the internal analog-to-digital converter and then sent out to whatever is
attached to the SC2-Plus digital interface. The attached computer can operate at any sample
rate or bit depth in this mode.
• Q: How do I connect through tape loops?
• A: Tape Out goes to the SugarCube Line In and the SugarCube Line Out goes to Tape
In. Sometimes the tape loop is labeled Aux or Rec but is the same thing.
• Q: How do I connecting an external computer?
• A: The SC1-Plus appears as a standard ADC/DAC to a connected PC, Mac, or music
server. No special drivers are needed.
• Q: My computer only goes to 48k, how to I fix that?
• A: You can always use the SC2-Plus as an ADC/DAC at 48k but you cannot then use the
SugarCube internal functions. You will need to disconnect the computer when you wish to
use the SugarCube with your turntable.
Page 100

Repair modes
• Q: when I use the noise reduction, do I have to start at the lead in groove or can I play any
track on the record?
– A: This is a yes and no answer: for the first time you play any record using noise reduction (NR),
you must start the noise reduction process then drop the needle on the lead in groove.
– A: Then, if you do not stop the process (that is leave it running), if you are playing, for example, a
box set of records from the same album or a double album, the “fingerprint of the noise that the
SugarCube created stays in memory and, as long as you don’t turn off the SugarCube, you can
drop the needle anywhere or play other side without having to drop the needle in the lead in
groove. The NR process will continue to work perfectly.
– A: Furthermore, you can extend the above concept if you have LPs from the same label and era
(example: late-1950’s Blue Note), the noise “fingerprint” that the SugarCube picked up on the first
side of the first LP will work for all other LPs of your Blue Note collection when you use NR.
– A: However, if you play an LP from say, EMI, that label used a different vinyl plastic formula in
making their LPs so their (EMI’s) noise “fingerprint” will be quite different and will require stopping
the NR process and re-starting then drop the needle once again in the lead in groove.
– A: Finally, you could use NR and only one time drop the needle for a “fingerprint” then never do it
again, NR will still work but it will be far from optimal and there will be a drop in volume.
– A: Bottom line: NR is a very powerful tool that can do an amazing job of lowering noise in
recordings. It is well worth your time to start and stop NR when the LP is different.
 Loading...