


SAVE THESE INSTRUCTIONS
OPERATING MANUAL
English
Model Range: SVP SL
Contents
Section 1
Warning: Installation 2
Warning: Operation 2
Warning: Disposal 3
Section 2
Instructions for use 4
Changing the bag and filter 5
Fitting Instructions 6
Section 3
Specifications 9
Dimensional Information 9
Section 4
Troubleshooting 10
Warranty 11
www.sweepovac.com
Sweepovac_2017 manual.indd 1 14/11/2017 21:41

Section 1
IMPORTANT SAFETY INSTRUCTIONS
Dear Customer,
Please read through these operating
instructions carefully. Please study and
observe the safety instructions on the first
few pages of this booklet. Please observe
all cautionary markings in this manual, on
the vacuum bags and on the Sweepovac
vacuum appliance. Please keep these operating instructions for later reference and
pass them on to any person carrying out
cleaning, maintenance or repair, or to any
subsequent owner of the appliance.
WARNING: INSTALLATION
To reduce the risk of fire, electric shock, or
injury:
A1 Installation must be carried out strictly
in accordance with the supplied installation
instructions.
A2 The appliance must be plugged into
an outlet, located so that power can be
readily removed from the appliance for
the purpose of maintenance, cleaning
and similar purposes.
A3 Ensure power can be switched off at the
electrical panel.
A4 Ensure any extension leads used are suitable
and in good condition. Please consult an
electrician if in doubt.
A5 If removal of the supplied plug-top is
required for installation, or replacement,
it must be re-connected properly ensuring
that the live and earth coloured wires are
inserted correctly. PLEASE CONSULT AN
ELECTRICIAN.
Always ensure that the cable clamp is fitted
and that it clamps the cable outer and NOT
the coloured wires.
A6
If for any reason, it becomes necessary to
replace a fuse, please consult an electrician
to ensure that any new fuse is fitted correctly
and complies with local building codes.
A7 If the supply cable of the appliance is
damaged, disconnect the appliance from
the outlet immediately. The complete
Sweepovac electrical module will have to
be replaced. This should be carried out by
Sweepovac only, or its appointed agent.
If in any doubt please consult a qualified electrician or Sweepovac directly
A8 Fitting Clearances:
The vacuum must have the following clearances when fitted;
Rear of the machine to nearest surface
– ¾”(20mm). Top and bottom of the
body of the machine to nearest surfaces –
1/16”(3mm).
Left hand and right hand side of the
machine body- collectively – 3”(75mm) The
compartment that the Sweepovac is fixed
in should not be sealed and should have
ventilation equivalent to 4” Sq (25 cm sq).
WARNING: OPERATION
To reduce the risk of fire, electric shock, or
injury:
B1 The Sweepovac unit is designed to handle
normal dry dust and debris in a domestic
or office environment. It is not designed to
handle water, or superfine industrial dust.
Do not install or use the Sweepovac vacuum
outdoors, in a bathroom, a wet area, within
10 feet (3.1m) of a pool. Do not expose
to moisture, rain or snow. Do not pick up
water or sweep water into the Sweepovac
vacuum.
B2 Do not pick up water, or any other
liquid. This will cause the product to fail,
and invalidate your warranty.
B3 It is not designed to pick up small sharp
objects, such as pins, paper clips, small
toys, etc.
B4 Do not use without a clean dust-bag
and filter in place. To do so can damage
the appliance, and invalidate your
warranty.
B5 Do not operate the Sweepovac vacuum
when the drawer is removed.
2
Sweepovac_2017 manual.indd 2 14/11/2017 21:41

Section 1
B6 Do not fit anything other than original
Sweepovac dust bags or filters. To do so
can damage the appliance, and invalidate
your warranty.
B7 Always remove the plug from the electrical
outlet or switch off power at the electrical
panel before attempting any form of user
maintenance or cleaning as specified in this
booklet.
B8 This Sweepovac vacuum device is not
intended for use by young children or
infirm persons with reduced physical,
sensory or reasoning capabilities, or lack
of experience and knowledge, unless they
have been given supervision or instruction
by a responsible person concerning use of
the Sweepovac vacuum to ensure that they
can use safely.
B9 Do not allow to be used as a toy. Close
attention is necessary when used by
children. Children should be supervised
to ensure that they do not play with the
Sweepovac vacuum.
B10 Do not sweep any combustible or
flammable material such as gasoline or
lighter fuel into the Sweepovac.
B11 Do not sweep in anything that is burning
or smoking, such as cigarettes. Do not
sweep in hot or warm ashes from a stove,
fireplace etc.
B12 Do not place any objects inside the
Sweepovac chamber when the drawer is
removed.
B13 Do not put your hand inside the
Sweepovac chamber when the drawer is
removed.
B14 Do not disassemble the Sweepovac vacuum
as incorrect assembly may result in electric
shock, malfunction or fire.
WARNING: DISPOSAL
To reduce the risk of fire, electric shock, or
injury:
C1 The materials used in this product
comply with international EU Directives on
the Restriction of Hazardous Substances
(RoHS)
C2 The symbol shown below and on the
product, means that it is classed as
Electrical or Electronic Equipment and
should not be disposed with other
household or commercial waste at the end
of its working life.
C3 If disposing of this product, please contact
your local authority or the retailer where
the product was purchased. In the event
of difficulty, please contact Sweepovac
directly.
3
Sweepovac_2017 manual.indd 3 14/11/2017 21:41

Section 2
Sweep dirt to a point in front of the
Sweepovac.
Sweep in the dirt.
1 - Tap the switch and the Sweepovac will turn
on for 10 seconds.
2 - Hold the switch in for 3 seconds and the
Sweepovac will come on for 5 minutes – The
five minute function is for when the Sweepovac
is being used with the attachable hose (please
see accessories on Page 10)
Clean the brush head by rubbing the bristles
over the powerful suction.
Tap the lower part of the switch gently with the
broom or with your foot.
INSTRUCTIONS FOR USE
1
3
5
4
2
Cleaning: To clean the front face of the Sweepovac. Unplug or switch off at
the electrical panel. Rub the front using a slightly dampened cloth.
when the bag is full
this light will come
on during normal
operation
4
Sweepovac_2017 manual.indd 4 14/11/2017 21:41
Section 2
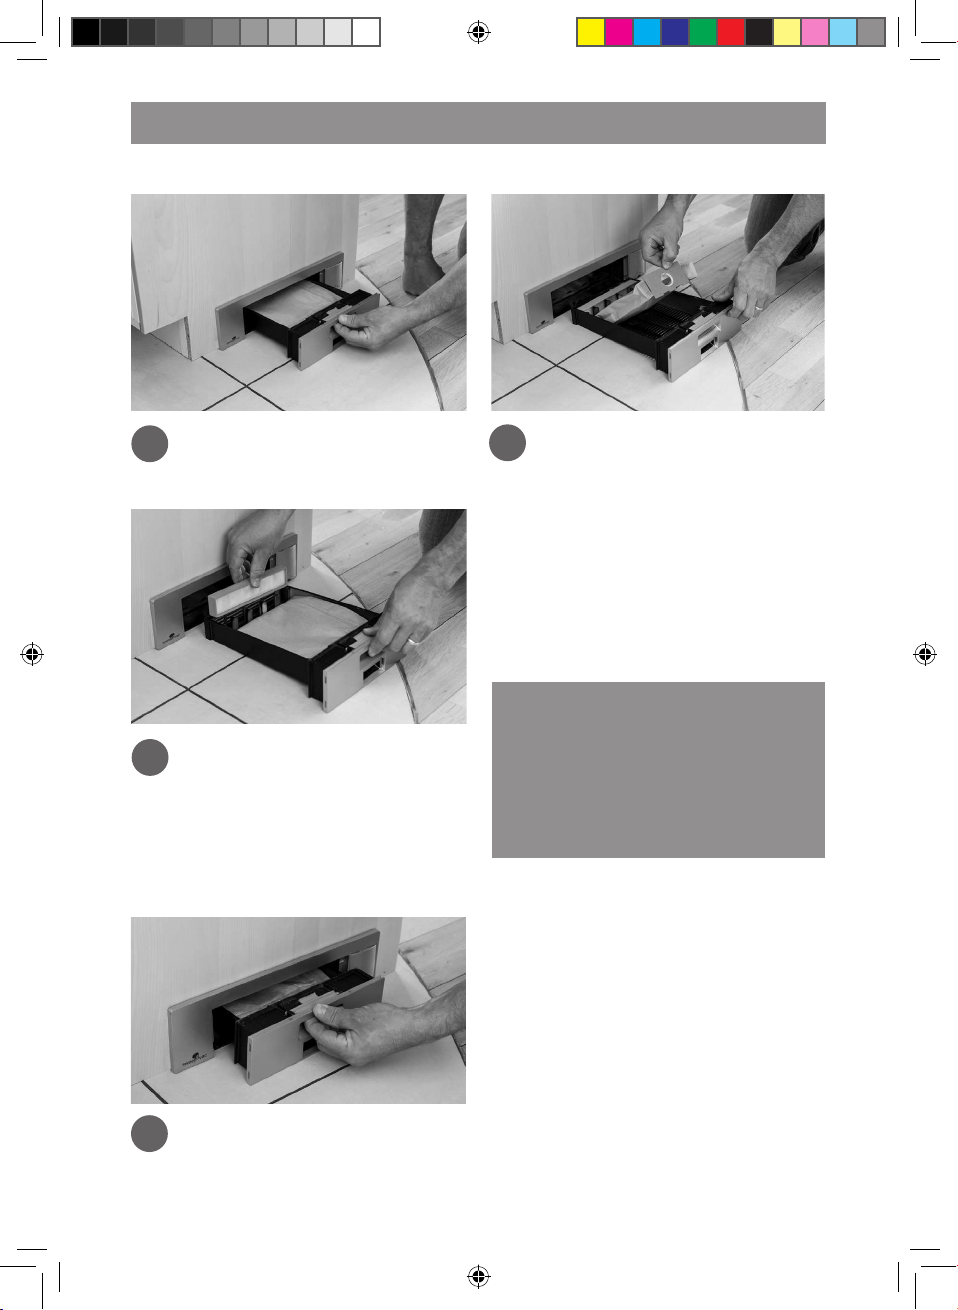
Slide out the bag drawer.
Hold the bag upright when removing to
prevent dirt spilling out.
Disposable bags should be changed every
12 weeks. Re-usable bags should be emptied every 12 weeks. The entire drawer
can be carried to the garbage when emptying or changing bags. When re-inserting
the bag, ensure the 3 cardboard lugs are
slotted home.
Push the drawer home until it clicks back into
place.
It is recommended to clean the filter every
12 months or if it appears dirty on visual
inspection.
To clean, remove and tap to shake off excess
dust. It may be washed gently with warm
water. Leave to dry thoroughly before
re-inserting.
CHANGING THE BAG AND FILTER
6
7
9
8
HOW DO YOU KNOW THE BAG IS FULL?
1. If the light flashes on when in use.
2. If it is unable to suck up all the dirt.
3. If dirt has to be brushed right into the
opening to be vacuumed up.
4. If the motor sound changes.
5
Sweepovac_2017 manual.indd 5 14/11/2017 21:41

Section 2
FITTING INSTRUCTIONS
Contents – What’s in the box
Tools required
l Pencil or fine point marker
l 1/2” to 1” drill bit
l Jigsaw or sawzall
l Cut out template (included)
l Philips head screwdriver No 2
The Sweepovac unit
Template for marking the cut out
A Jigsaw OR a Sawsall can be used to cut
the opening.
T4 * No 6 flathead Philips wood screws -
¾ “ long (17mm)
Dust bags x 3 and Hepa Filter x 1
Re-usable dust bag
6
10 11
13
15
14
16
12
Sweepovac_2017 manual.indd 6 14/11/2017 21:41
Section 2
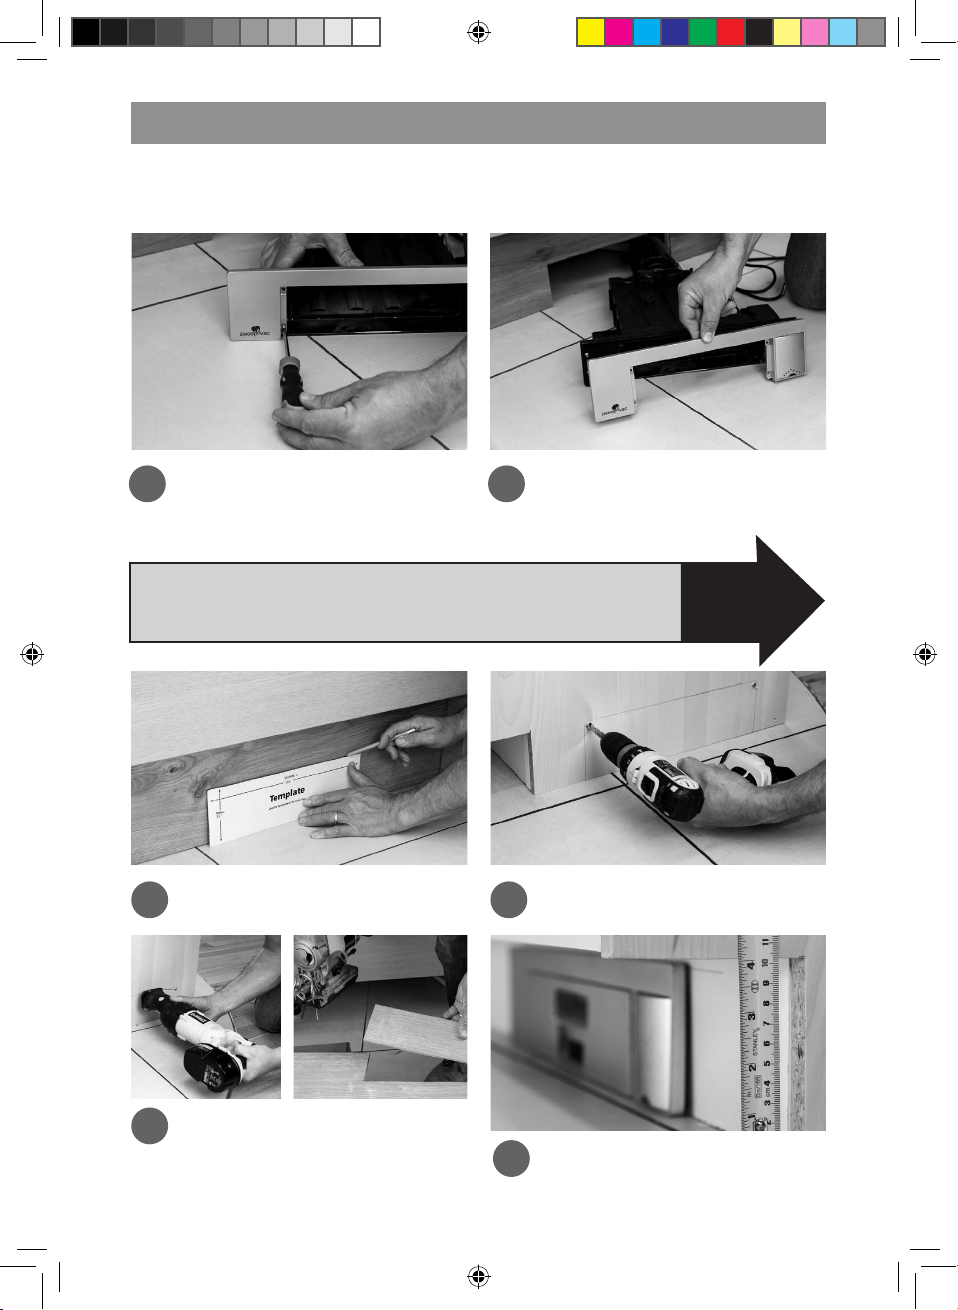
FITTING INSTRUCTIONS
How to fit the unit
Place template against the surface and mark
with a fine tipped pen.
A jigsaw can be used when the Sweepovac is
being fitted in a removable toe- kick.
A Sawsall can be used when fitting in a fixed
toekick or fixed end panel.
The Sweepovac can be fitted in any toe-kick
that is 4” (100mm) or greater.
Drill corner holes
19
21
22
Take the Sweepovac from the box and remove
the 4 hex head screws holding the face plate on.
Unclip the face plate by gently releasing from
the plastic clips holding it to the body. A small
flat head screwdriver used gently may assist
with this. Remove the faceplate.
17 18
20
7
IF YOUR KITCHEN CABINETRY HAS BEING SUPPLIED WITH
THE SWEEPOVAC OPENING ALREADY PRE CUT IN THE
TOE KICK, THEN PLEASE PROCEED TO THE NEXT PAGE.
GO TO
PAG E 8
Sweepovac_2017 manual.indd 7 14/11/2017 21:41
8
Section 2
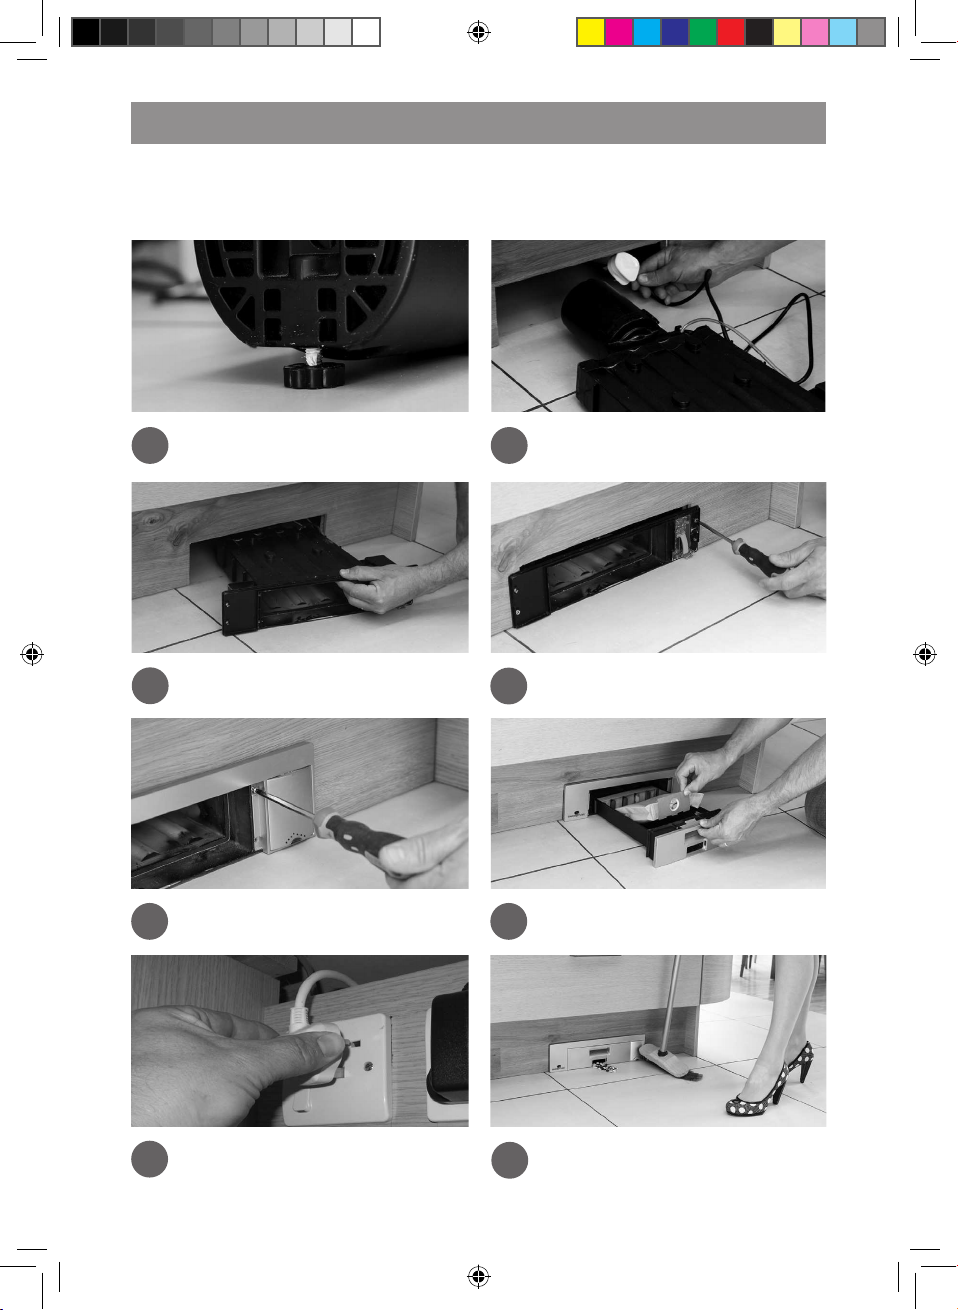
FITTING INSTRUCTIONS
How to fit the unit
Clip the face plate back on to the machine and
insert the 4 screws.
Plug the Sweepovac into a standard electrical
outlet 120V (US) or 220-240V (EU)
Slide in Sweepovac unit.
Unit is fully fitted. Well done.
Screw into place using the 4 wood screws.
Slide in the drawer ensuring that the bag and
filter are in place
27
29
25
30
26
28
Use the levelling foot to ensure the unit will sit
level when fitted.
Slide in the power cable and locate it beside
the outlet it will be plugged into.
23 24
Sweepovac_2017 manual.indd 8 14/11/2017 21:41

9
Section 3
DIMENSIONAL INFORMATIONSPECIFICATIONS
Switch:
The switch is on a 10 second timer and will turn
off automatically after 10 seconds. Gently kick or
tap the bottom part of the switch. Kick once
for on. Kick once for off.
Note:
When using the Sweepovac with the extendable
hose. Hold the switch in for 3 seconds and the
Sweepovac will come on for 5 minutes. Tap the
switch at any time to turn off.
Automatic turn off (10 sec timer). Stroke
movement of switch: 1/4 inch (6mm).
Motor: 650 watt
Bag capacity:
O.5 gallon (1.8L). The bag must be changed
every 12 weeks (for normal domestic use.) It is
recommended to change the filter once a year or
if it appears dirty on a visual inspection.
Bag Specification:
50g brown outer paper + 30g spun-bound non
woven with antibacterial agent. Micro filtration.
Bag pre-filled with carbon particles for extra anti
bacterial effect.
View of the part of Sweepovac that is
inserted beneath the kitchen unit.
Front
Side
A clip on extendable hose complete with three
clip on tools can be ordered separately.
If you have the extendable hose. simply clip
into the front of the Sweepovac ensuring that
the arrow is visible on top of the clip in section.
The hose extends from 6” (1.8m) to 18” (5.5m).
Do not extend the hose past it’s natural limit.
31
32
33
Accessories
452mm
99mm
“
3
7
8
“
17
13
16
94mm
“
3
11
16
94mm
452mm
5mm
17
“
“
13
16
3
11
16
“
3
16
99mm
377mm
14
“
7
8
“
3
7
8
Sweepovac_2017 manual.indd 9 14/11/2017 21:41

Section 4
TROUBLESHOOTING
If suction reduces or the Sweepovac does not vacuum up the sweepings.
Open the drawer and check if the bag is full. When changing the bag, make sure to hold the bag
tray with the front pointing upwards. This will prevent any dirt falling back out through the opening.
Replace old bag with a new bag. The filter located at the rear of the bag tray can be cleaned if it
appears dirty on visual inspection. Try again.
If the Sweepovac stops operating.
The Sweepovac motor has a thermal cut out. If the motor overheats, check for blockages and wait
for one hour before operating again. Check that other electrical outlets in close proximity to the
Sweepovac are working. Check the electrical panel for the house.
If you accidentally operate the Sweepovac without a bag.
Unplug from the outlet. Remove the bag drawer and use the hose of a normal vacuum cleaner to
clean out the internal cavity of the Sweepovac. Clean the filter and insert a new bag.
To check for and remove a blockage at the inlet aperture.
Remove the bag drawer, hold the drawer vertically with the front pointing upwards, this will allow
the sweepings to fall to the rear of the bag. Lay the drawer flat, remove the bag, insert a single finger
through the bag holding pipe, any obstruction will be felt and can be removed. A finger can also be
inserted into the outside opening where the dirt is vacuumed through.
To check for and remove a blockage at the motor inlet.
Ensure the Sweepovac is unplugged. Remove the bag drawer. Visually inspect the rear of the cavity
where the bag drawer sits. A grill at the rear protects the motor. This grill should be free from any
obstruction.
If none of the above are effective.
Contact an electrical repair shop or Sweepovac if the warranty is still valid.
To remove the entire Sweepovac appliance from it’s location.
Consult the fitting instructions that accompanied this manual, ensure that the Sweepovac is
disconnected from the power before removal.
10
Sweepovac_2017 manual.indd 10 14/11/2017 21:41

Section 4
WARRANTY
Dear Customer,
Thank you for purchasing a Sweepovac unit. The Sweepovac unit and associated products
are designed and manufactured to a high standard and with normal use should last many
years. The warranty period on your Sweepovac unit is 2 years from the date of purchase.
To gain warranty assistance in the unlikely event of the unit not working, you will need to
provide us with a copy of your proof of purchase (Invoice, sales receipt etc.). The period of
warranty is calculated starting 2 weeks after this date. This is to allow for timely installation.
Warranty assistance includes: Replacement of unit if deemed faulty. Please note that the
customer is responsible for the removal of the faulty unit and packaging and mailing of the
unit back to Sweepovac. Sweepovac will cover the cost associated with the return of the
replacement unit back to the customer.
Normal use is described in detail in the operations section of this manual. It includes : Never
allowing water to come into the machine or near the electrical parts inside the machine.
Ensuring that wet debris or heavy items are never vacuumed into the machine. Please
insure that the unit is installed as per installation instructions. We recommend changing or
emptying the vacuum bag every 12 weeks (for normal domestic use). Please ensure that any
malfunction is checked against the trouble shooting section in this manual before removal
and dispatch to Sweepovac. Please contact a registered electrical contractor to replace any
damaged cables immediately.
We hope you enjoy your Sweepovac.
www.sweepovac.com
11
1. Sweepovac warrants that, when dispatched
from a Sweepovac warehouse, the appliance
is free from defects in materials and
workmanship for the warranty period.
2. The warranty period is 24 months from the
registered date of purchase.
3. The warranty only applies to products that
have been installed in accordance with the
enclosed Sweepovac installation instructions.
4. The warranty only applies to products
that have been operated and maintained in
accordance with the enclosed Sweepovac
Operation/Maintenance Manual.
5. During the warranty period, Sweepovac, or
its authorized agents, will, at no extra
charge and subject to these terms and
conditions, repair or replace any parts which
it considers to be defective.
6. This warranty does not apply to dust bags,
filters, accessories or similar consumable
parts.
7. The warranty does not apply in the
following situations:
a. Incomplete or improper installation.
b. Vacuuming of very fine dust or wet
materials.
c. Use without recommended dust-bags or
filter.
d. Use of non-recommended dust bags or
filters.
e. Normal wear and tear.
f. Failure to properly maintain or service.
8. Proof of purchase is required before you
can make a claim under this warranty.
General Terms and Conditions
Sweepovac_2017 manual.indd 11 14/11/2017 21:41

www.sweepovac.com
To purchase disposable bags, filters or
re-usable bags please go to:
www.sweepovac.com
Sweepovac_2017 manual.indd 12 14/11/2017 21:41
 Loading...