

SWASH SFF1000CSA series, SFF1001CSA series, SFF1002CLN series, SFF1002CSA series, SFF1001CLN series Technical Education

TECHNICAL EDUCATION
L-86
SWASH™ Clothing Care System
SFF1000CSA*
SFF1001CSA*
SFF1002CSA*
SFF1001CLN*
SFF1002CLN*
* Denotes Engineering Revision
JOB AID W10713431

FORWARD
This Whirlpool Job Aid, "SWASH™ Clothing Care System” (Part No. W10713431), provides the In-Home
Service Professional with informaon on the operaon and service of the “SWASH Clothing Care
System."
GOALS AND OBJECTIVES
The goal of this Job Aid is to provide informaon that will enable the In-Home Service Professional to
properly diagnose malfuncons and repair the "SWASH™ Clothing Care System.”
The objecves of this Job Aid are to:
• Understand and follow proper safety precauons.
• Successfully troubleshoot and diagnose malfuncons.
• Successfully perform necessary repairs.
• Successfully return the clothing care system to its proper operaonal status.
WHIRLPOOL CORPORATION assumes no responsibility for any repairs made on our
products by anyone other than authorized In-Home Service Professionals.
Copyright © 2014, Whirlpool Corporaon, Benton Harbor, MI 49022
Whirlpool®/™ is a trademark of Whirlpool U.S.A. Tide®/™ is a trademark of The Procter & Gamble Company. Swash®/™ is a
trademark of Go Unlimited LLC. © 2014. All Rights Reserved. The WHIRLPOOL and TIDE trademarks are used by Go Unlimited
LLC under license. Product manufactured under license for, and warranty provided by, Go Unlimited LLC, Cincinna, OH 45202
ii n
SWASH™ Clothing Care System

SWASH™ Clothing Care System
SECTION 1 — GENERAL INFORMATION
SWASH™ SYSTEM SAFETY ..................................................................................................................1-2
MODEL & SERIAL NUMBER LABEL .....................................................................................................1-3
TECH SHEET LOCATION .......................................................................................................................1-3
SWASH™ SYSTEM................................................................................................................................1-4
SWASH™ SYSTEM OVERVIEW.............................................................................................................1-5
SWASH™ SYSTEM SPECIFICATIONS ....................................................................................................1-5
SECTION 2 — OPERATION
CONNECTING THE SWASH™ SYSTEM .................................................................................................2-2
BUTTONS AND STATUS LIGHTS ..........................................................................................................2-3
HOW DOES THE SWASH™ SYSTEM WORK? ........................................................................................2-4
HOW TO USE SWASH™ SYSTEM .........................................................................................................2-5
HANGING CLOTHES ............................................................................................................................2-6
EMPTYING THE RESERVOIR ................................................................................................................2-8
CONSUMER TROUBLESHOOTING .......................................................................................................2-9
SWASH™ SYSTEM TIPS .......................................................................................................................2-9
TABLE OF CONTENTS
SECTION 3 — COMPONENT ACCESS
SWASH™ SYSTEM EXPLODED VIEW ...................................................................................................3-2
SWASH™ SYSTEM PARTS LIST .............................................................................................................3-3
REMOVING THE REAR PANEL .............................................................................................................3-4
REMOVING THE TOP COVER & CONTROL HOUSING .........................................................................3-5
REMOVING THE USER INTERFACE ......................................................................................................3-6
REMOVING THE DISPENSING SYSTEM ...............................................................................................3-6
REMOVING THE PUMP ASSEMBLY .....................................................................................................3-7
REMOVING THE APPLIANCE CONTROL UNIT (ACU) ..........................................................................3-7
REMOVING THE THERMISTOR ...........................................................................................................3-7
REMOVING THE DOOR ASSEMBLY .....................................................................................................3-8
REMOVING THE CLIPS & ROLLER ASSEMBLY .....................................................................................3-9
REMOVING THE BASE COMPONENTS ..............................................................................................3-10
REMOVING THE SIDE PANELS ..........................................................................................................3-12
SECTION 4 — DIAGNOSTICS & TROUBLESHOOTING
SAFETY FIRST ......................................................................................................................................4-2
CUSTOMER TROUBLESHOOTING .......................................................................................................4-3
CUSTOMER ERROR CODES .................................................................................................................4-3
CONTROL PANEL .................................................................................................................................4-4
DIAGNOSTIC GUIDE ............................................................................................................................4-4
SERVICE DIAGNOSTICS .......................................................................................................................4-4
SERVICE DIAGNOSTIC FUNCTIONS ....................................................................................................4-5
FAULT / ERROR CODES ........................................................................................................................4-6
TROUBLESHOOTING GUIDE ...............................................................................................................4-8
WIRING DIAGRAM ............................................................................................................................4-10
APPLIANCE CONTROL UNIT (ACU) ...................................................................................................4-11
USER INTERFACE (UI) ASSEMBLY .....................................................................................................4-12
STRIP CIRCUITS .................................................................................................................................4-13
SWASH™ Clothing Care System
n
iii

PRODUCT SPECIFICATIONS & WARRANTY INFORMATION SOURCES (inside back cover)
iv n
SWASH™ Clothing Care System

GENERAL INFORMATION
Section 1:
General Information
This secon provides general safety, parts, and informaon for
the “SWASH™ Clothing Care System.”
Q SWASH™ System Safety
Q Model & Serial Number Label
Q Tech Sheet Locaon
Q SWASH™ System
Q SWASH™ System Overview
Q SWASH™ System Specicaons
Q Notes
SWASH™ Clothing Care System
n
1-1

GENERAL INFORMATION
SWASH™ System Safety
Your safety and the safety of others are very important.
We have provided many important safety messages in this manual and on your appliance. Always read and obey all safety
messages.
This is the safety alert symbol.
This symbol alerts you to potential hazards that can kill or hurt you and others.
All safety messages will follow the safety alert symbol and either the word “DANGER” or “WARNING.”
These words mean:
You can be killed or seriously injured if you don't immediately
DANGER
WARNING
All safety messages will tell you what the potential hazard is, tell you how to reduce the chance of injury, and tell you what can
happen if the instructions are not followed.
follow instructions.
You
can be killed or seriously injured if you don't
instructions.
follow
STATE OF CALIFORNIA PROPOSITION 65 WARNINGS:
WARNING: This product contains one of more chemicals known to the State of California to cause cancer.
WARNING: This product contains one or more chemicals know to the State of California to cause birth defects or other
reproducve harm.
IMPORTANT SAFETY INSTRUCTIONS
WARNING: To reduce the risk of re, electric shock, or injury to persons when using the SWASH™ system, follow basic
precauons, including the following:
n Read all instrucons before using the SWASH™ system.
n Use the SWASH™ system only for its intended use.
n To reduce the risk of electric shock, do not immerse any
part of SWASH™ system in water or other liquids.
n Never yank cord to disconnect from outlet; instead, grasp
plug and pull to disconnect.
n Do not allow cord to touch hot surfaces. Let SWASH™
system cool completely before pung away. Loop cord
loosely around SWASH™ system when storing.
n Always disconnect SWASH™ system from electrical outlet
when not in use, or when cleaning SWASH™ system.
n Do not operate SWASH™ system with a damaged cord, or
if it has been dropped or damaged. To reduce the risk of
electric shock, do not disassemble or aempt to repair
SWASH™ system. Contact a qualied service person for
examinaon and repair. Incorrect reassembly or repair
could cause a risk of re, electric shock, or injury to
persons when SWASH™ system is used.
n Close supervision is necessary for any appliance being
used near children.
n Use care when interrupng a cycle; interior surfaces may
be hot if SWASH™ system is opened when in use.
n To reduce the likelihood of circuit overload, do not
operate other high-waage hardware (i.e. refrigeraon,
air condioner, etc) on the same circuit.
n The SWASH™ system is intended for household use only.
Do not use outdoors.
n Do not use in garages or near any ammable liquids.
n Do not use an extension cord.
n The use of accessories other than those supplied with
the SWASH™ system is not recommended and may cause
injury.
n Use and store SWASH™ system out of regularly traveled
paths to reduce the possibility of p-over.
n Keep the area clear around the base of SWASH™ system
to make sure venlaon openings in the boom of
SWASH™ system are not blocked.
n Do not modify SWASH PODS™ cups or use any alternate
formulas. The SWASH™ system was designed to work
safely using only the unique SWASH PODS™ cups. Any
modicaons could reduce user safety.
n Burns could occur from touching hot metal parts.
SAVE THESE INSTRUCTIONS
1-2 n
SWASH™ Clothing Care System
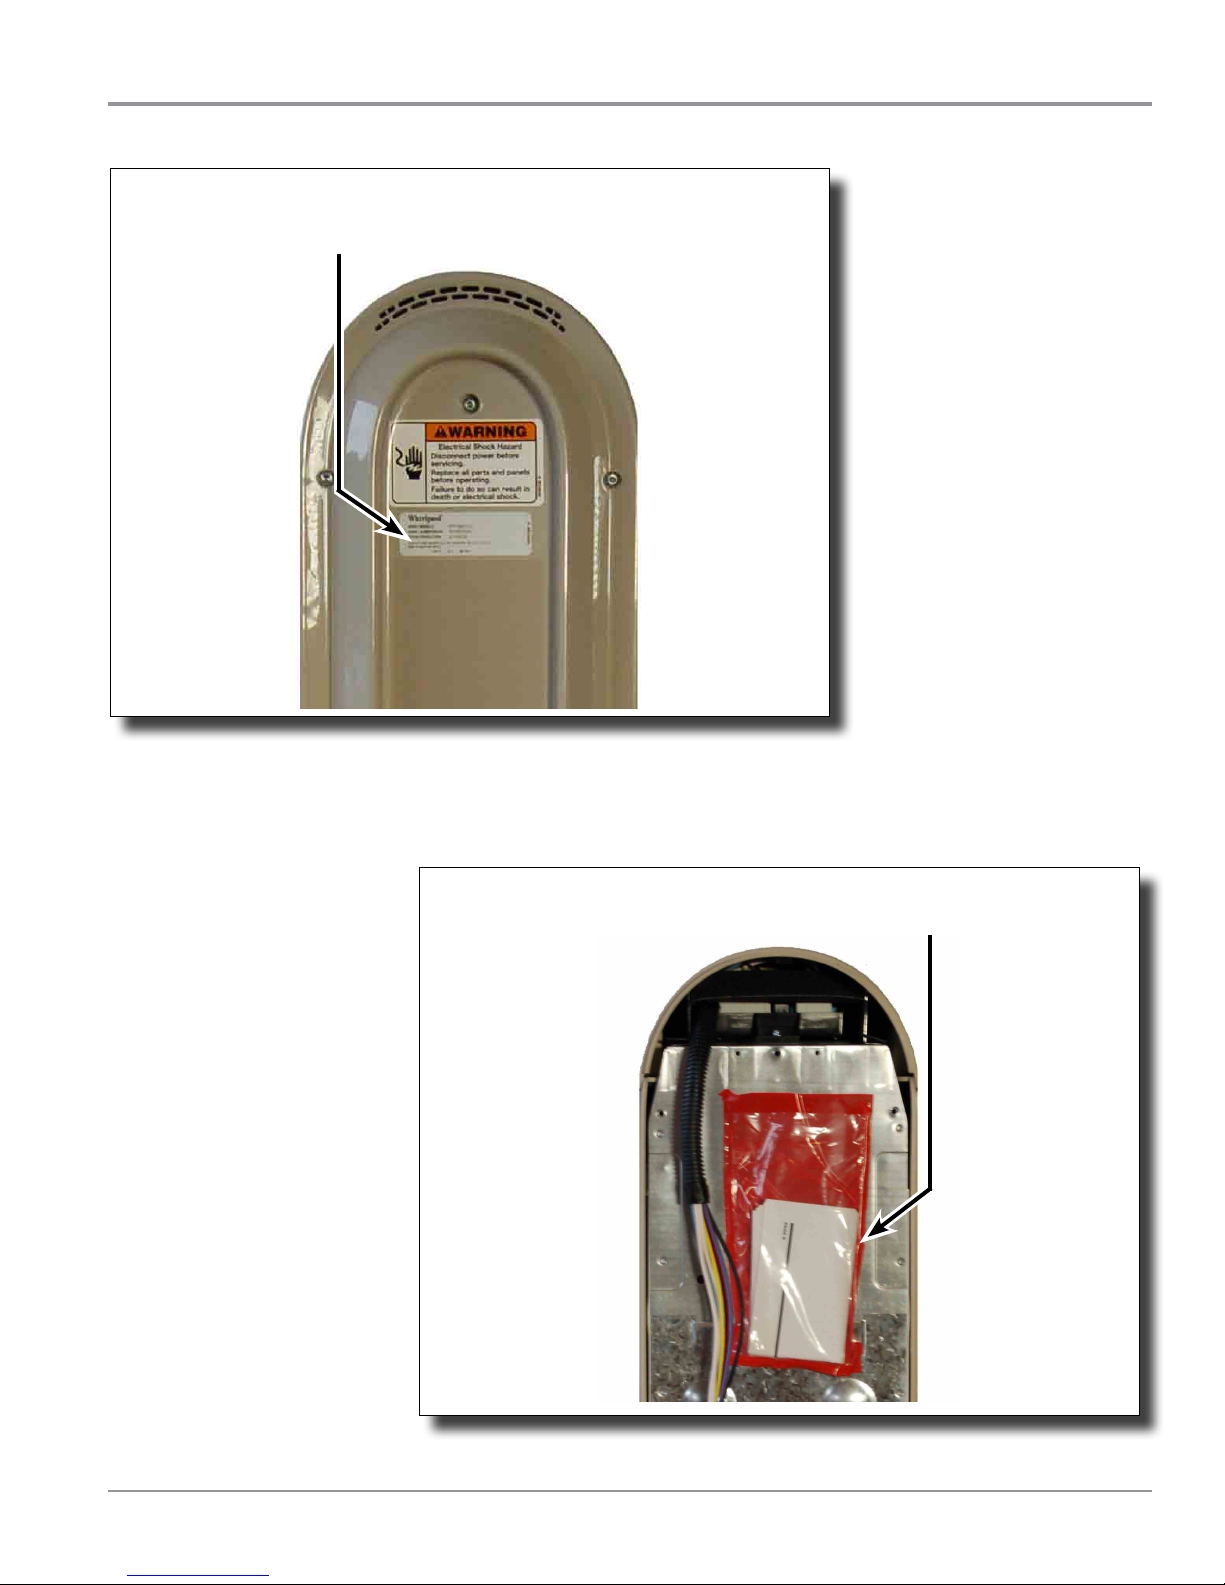
Model & Serial Number Label
Model & Serial Number
Label Location
GENERAL INFORMATION
Figure 1 - Located on back panel of SWASH™ system
Tech Sheet Location
Tech Sheet Location
Figure 2 - Located behind the back panel of SWASH™ system
SWASH™ Clothing Care System
n
1-3
GENERAL INFORMATION
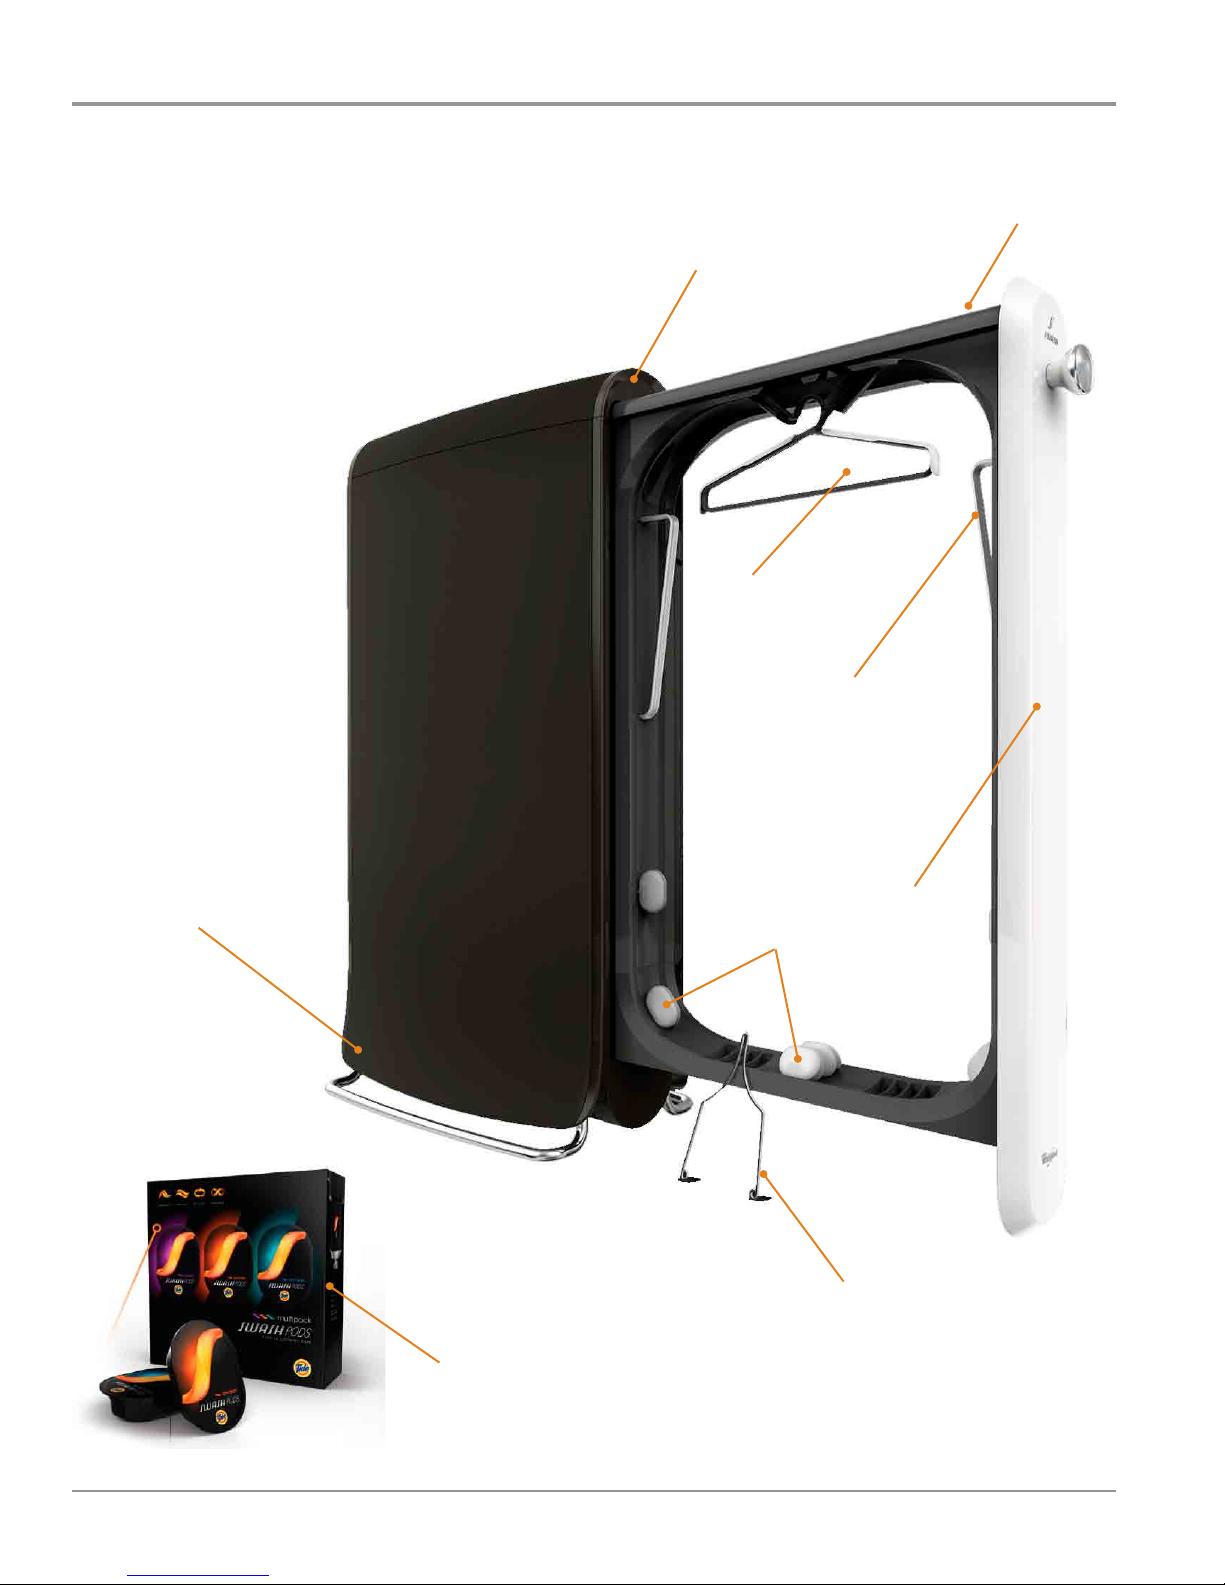
SWASH™ System
SWASH PODS™ BAY
CONTROL PANEL
ADJUSTABLE
HANGER
RESERVOIR
SLEEVE
WRAPS
DOOR
SMOOTHING
CLIPS
SWASH PODS™ CUPS
1-4 n
SWASH™ Clothing Care System
POCKET
SMOOTHER
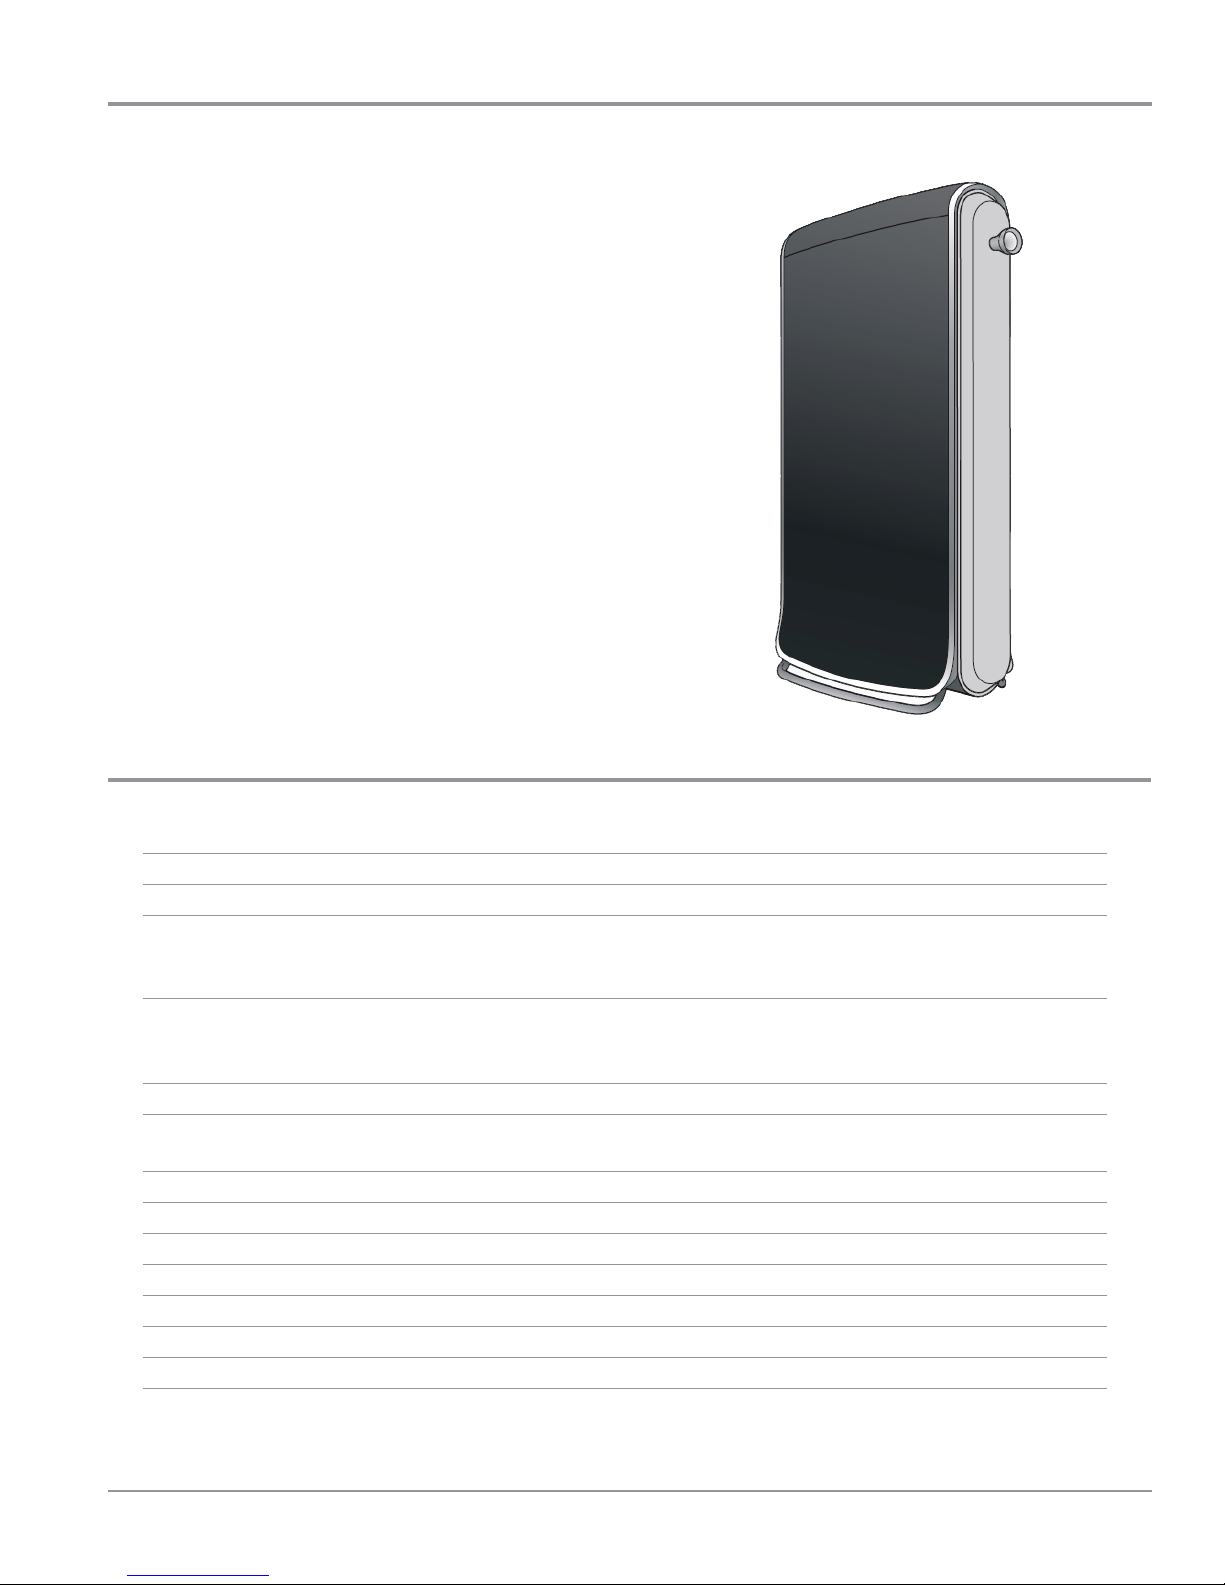
SWASH™ System Overview
SWASH™ Clothing Care System
The SWASH™ system gets clothes looking and feeling their
best. De-wrinkle, Refresh, Restore, and Preserve clothes for
results never before achievable at home with the SWASH
system’s 10 minute express clothing care. The SWASH system,
an all-in-one, in-home, convenient clothing care system, has
elements of a clothes steamer and an iron. Designed to t in
any life-style, the consumer can put the SWASH system almost
anywhere, like their bedroom or closet. It uses a standard wall
outlet, so all they have to do is plug it in and start living life
unhampered.
The SWASH system works with a few key technologies. The
Smoothing Clips provide the right amount of tension; a
superne mist of the SWASH PODS™ formula is sprayed onto
both sides of the hanging clothes, and circulated heat removes
light wrinkles and restores the t to clothes that’s lost aer
wear by ghtening bers without shrinking.
Using the SWASH system is as easy as plugging it into a
standard 120 VAC wall outlet. No water, plumbing, pipes,
vents, special hook-ups, or professional installaon assistance
is needed.
GENERAL INFORMATION
SWASH™ System Specifications
Voltage: 120 VAC, 60 Hz
Heater Waage: 1300 W
Countdown and Display Status: LED Countdown Time Remaining - White LEDs
Cycle Done - Blue LED
Cup Missing - Orange LED
Cycles: Normal - 10 minutes
Heavy Duty - 15 minutes
Cancel
Number of Cycles: 3
Number of Garments: 2-Sided Treatment of 1 Garment
1-Sided Treatment of 2 Garments
Number of Smoothing Clips: 6
Number of Sprays: 4
Pocket Smoother 1
Height: 51 in.
Width: 16 in.
Depth: 30 in.
Depth with door open: 54 in.
SWASH™ Clothing Care System
n
1-5

GENERAL INFORMATION
Notes
1-6 n
SWASH™ Clothing Care System

OPERATION
Section 2:
Operation
This secon provides operaonal use and care informaon for
the “SWASH™ Clothing Care System.”
Q Connecng the SWASH™ System
Q Buons and Status Lights
Q How Does the SWASH™ System Work?
Q How to Use SWASH™ System
Q Hanging Clothes
Q Emptying the Reservoir
Q Consumer Troubleshoong
Q SWASH™ System Tips
Q Notes
SWASH™ Clothing Care System
n
2-1
OPERATION
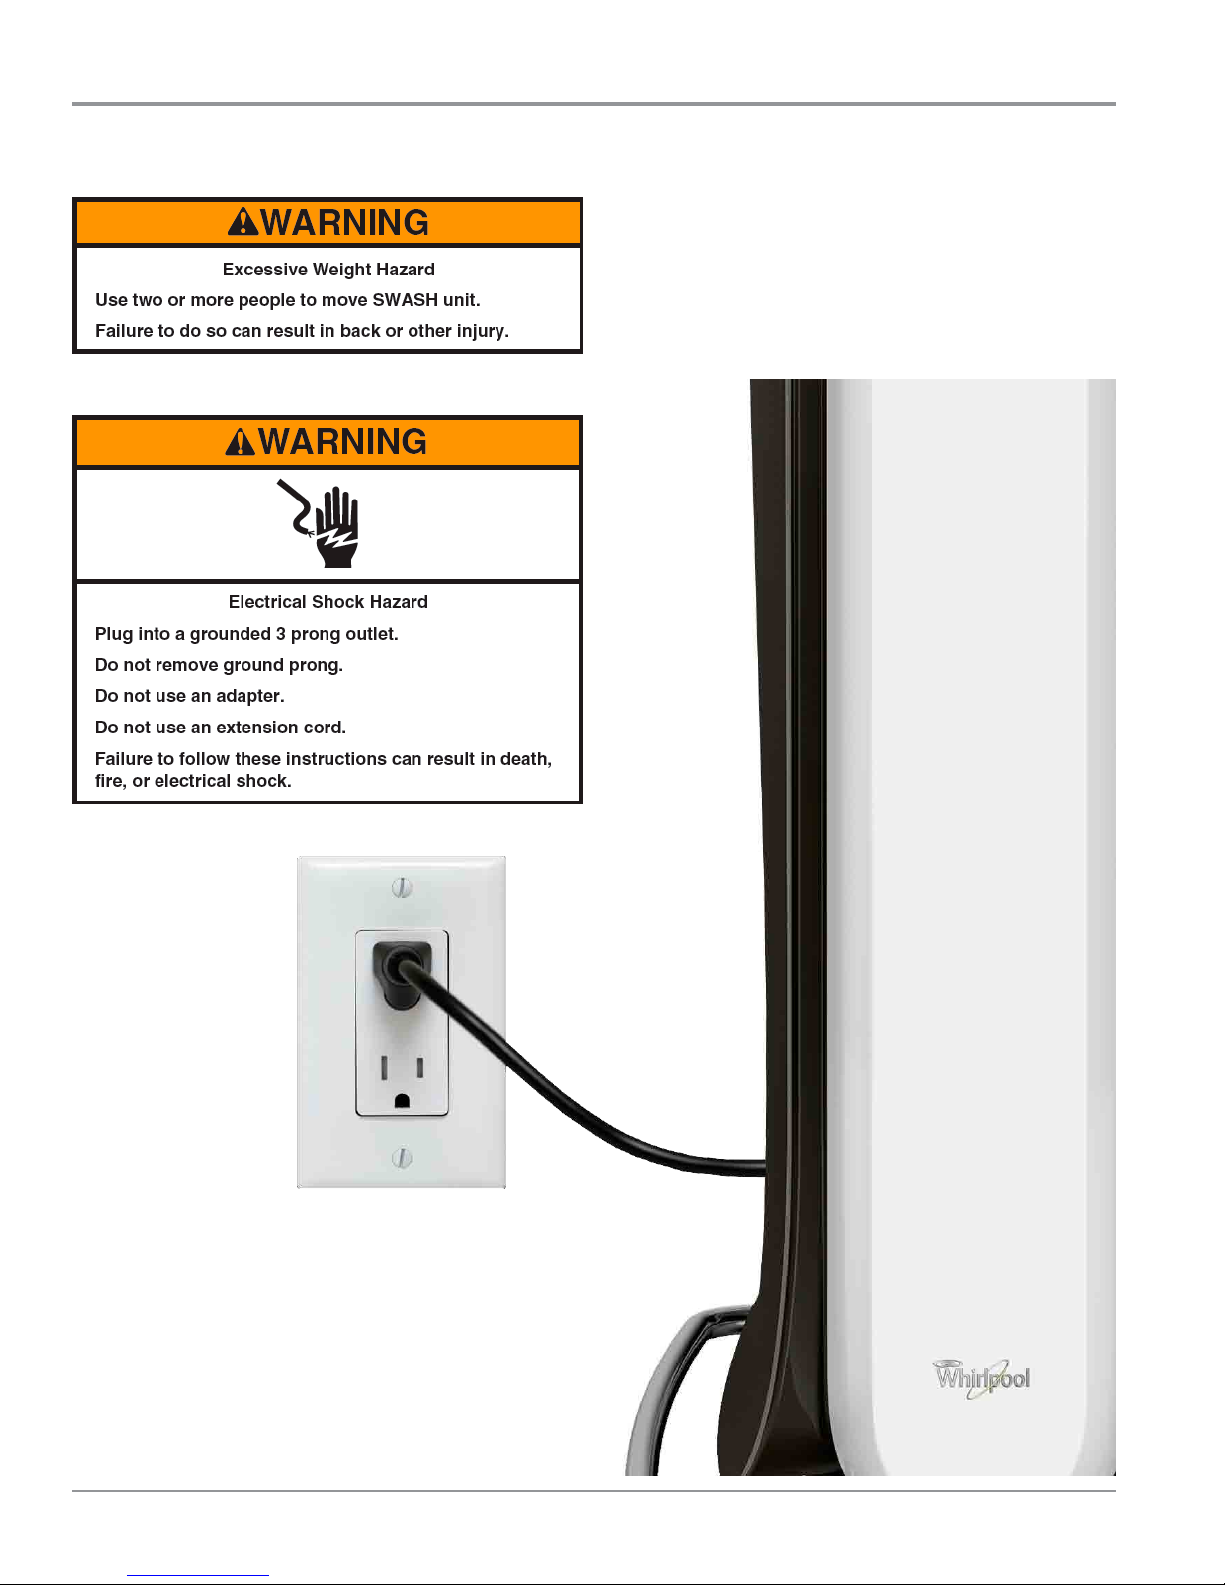
Connecting the SWASH™ System
Connecng the SWASH™ System
Plug your SWASH™ system into a standard grounded electrical
outlet (110v). No plumbing, pipes, or vents needed.
2-2 n
SWASH™ Clothing Care System
Figure 1
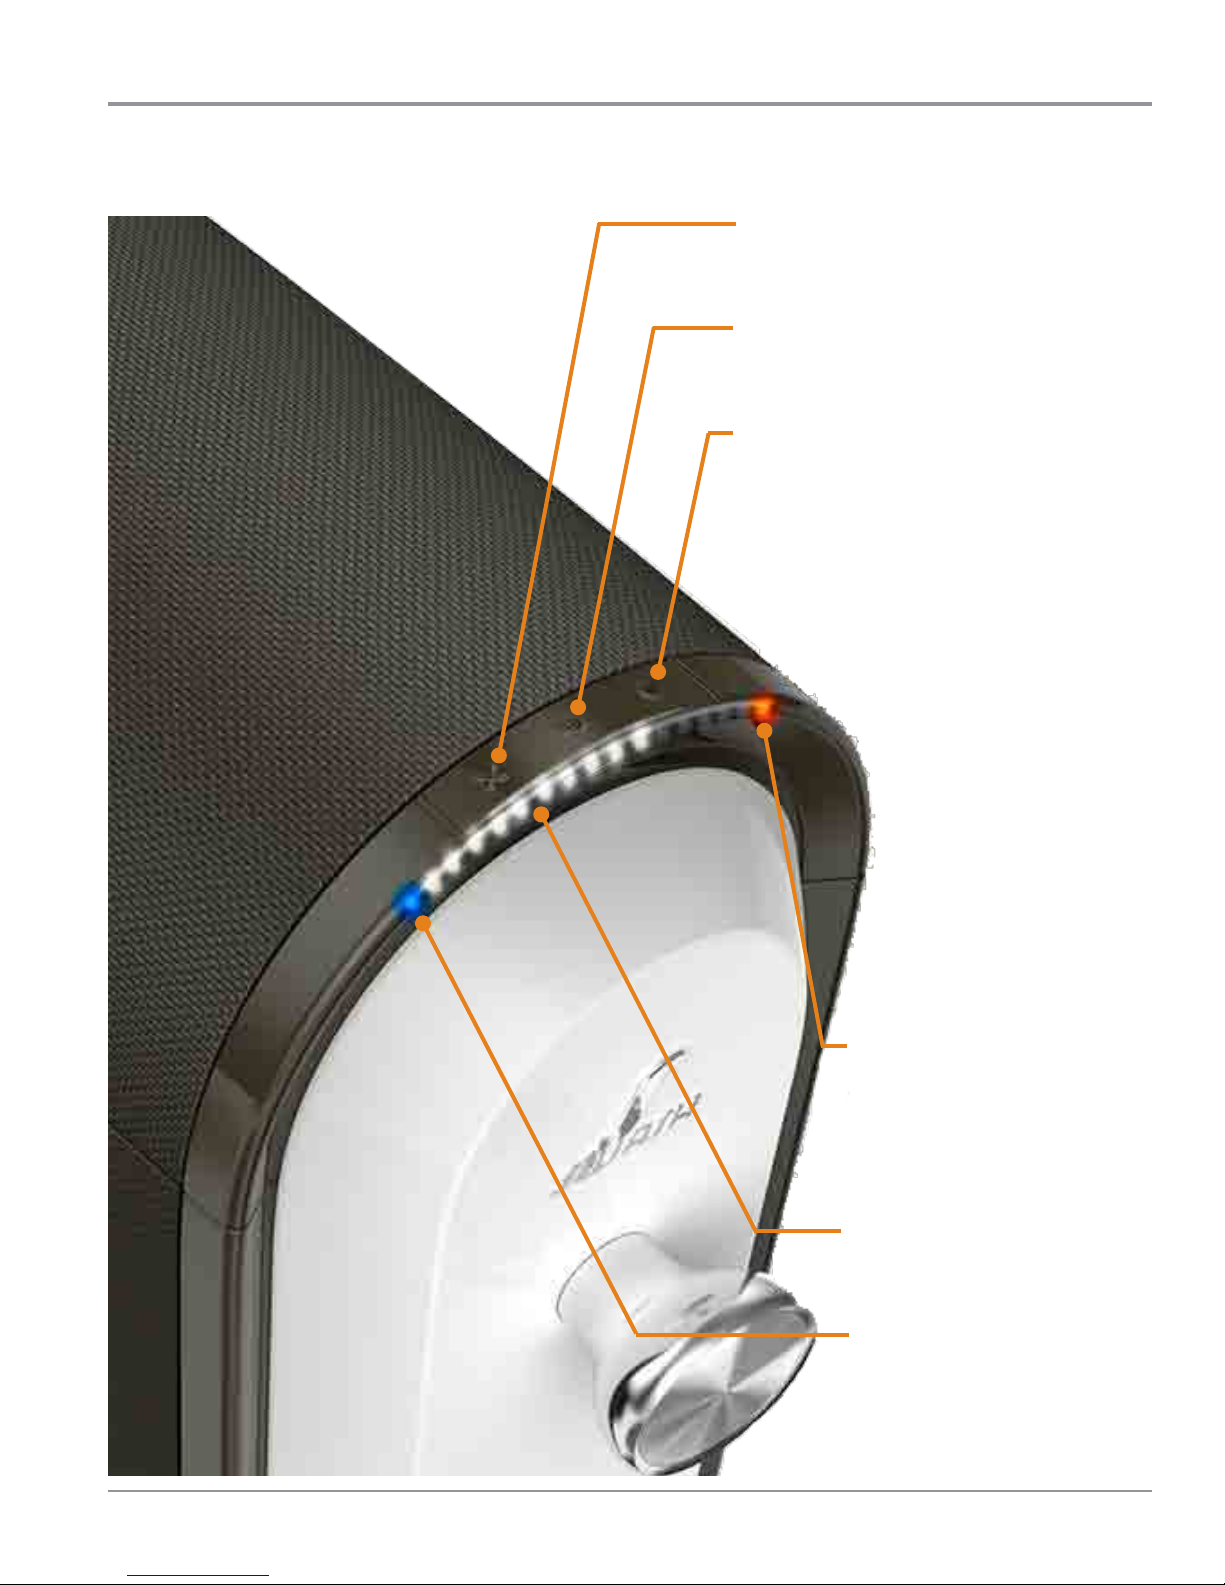
Buttons and Status Lights
X BUTTON
cancels the cycle
10 MINUTE BUTTON (STANDARD CYCLE)
use for most clothing
15 MINUTE BUTTON (EXTENDED CYCLE)
extends drying me for heavier clothing
OPERATION
ORANGE LIGHT
ashes if you try to start SWASH™
system without a cup or if the door
is not completely closed. If other
lights are on with the orange light
(see troubleshoong)
WHITE LIGHTS
count down the minutes remaining
BLUE LIGHT
turns on when your cycle is nished
Figure 2
SWASH™ Clothing Care System
n
2-3
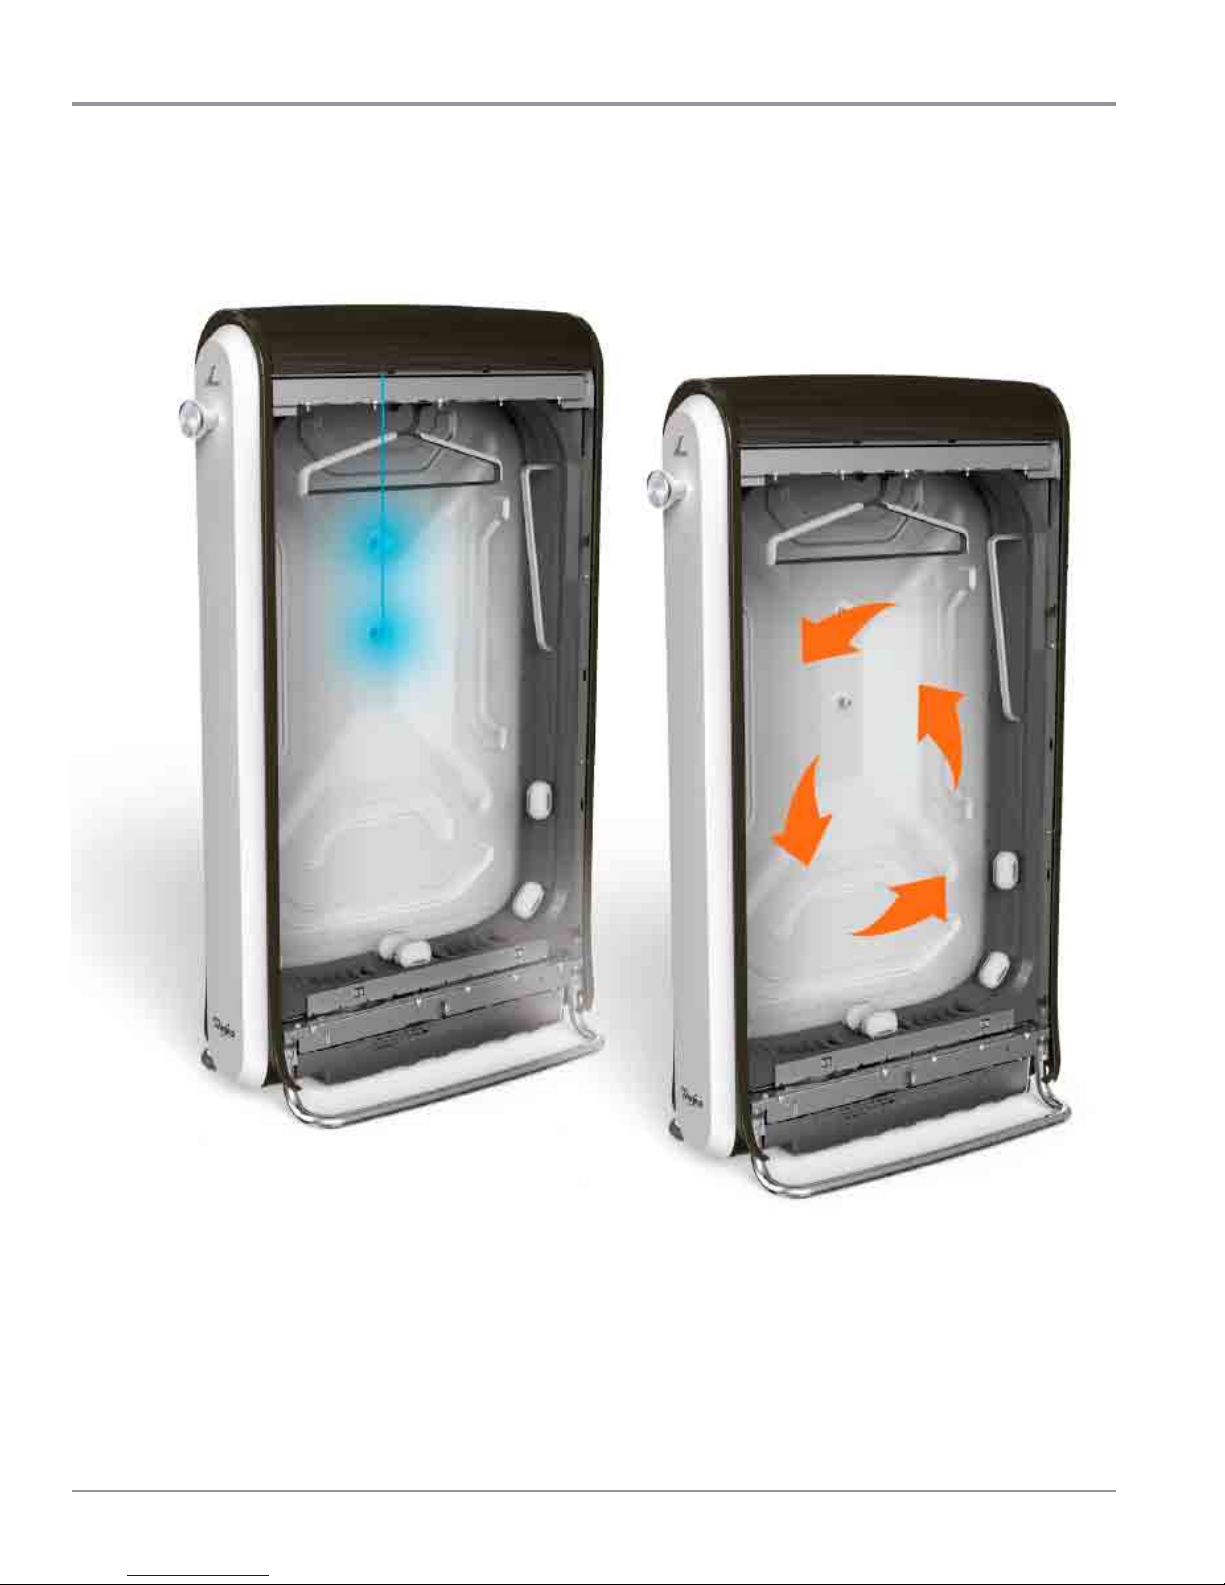
OPERATION
How Does the SWASH™ System Work?
The SWASH™ system works with a few key technologies. A superne mist of the SWASH PODS™ formula is sprayed onto both
sides of the hanging clothes. The smoothing clips (oponal) pull clothes ght, and heat is circulated.
Superne mist circulaon
2-4 n
SWASH™ Clothing Care System
Warm air circulaon
Figure 3
Operang Basics
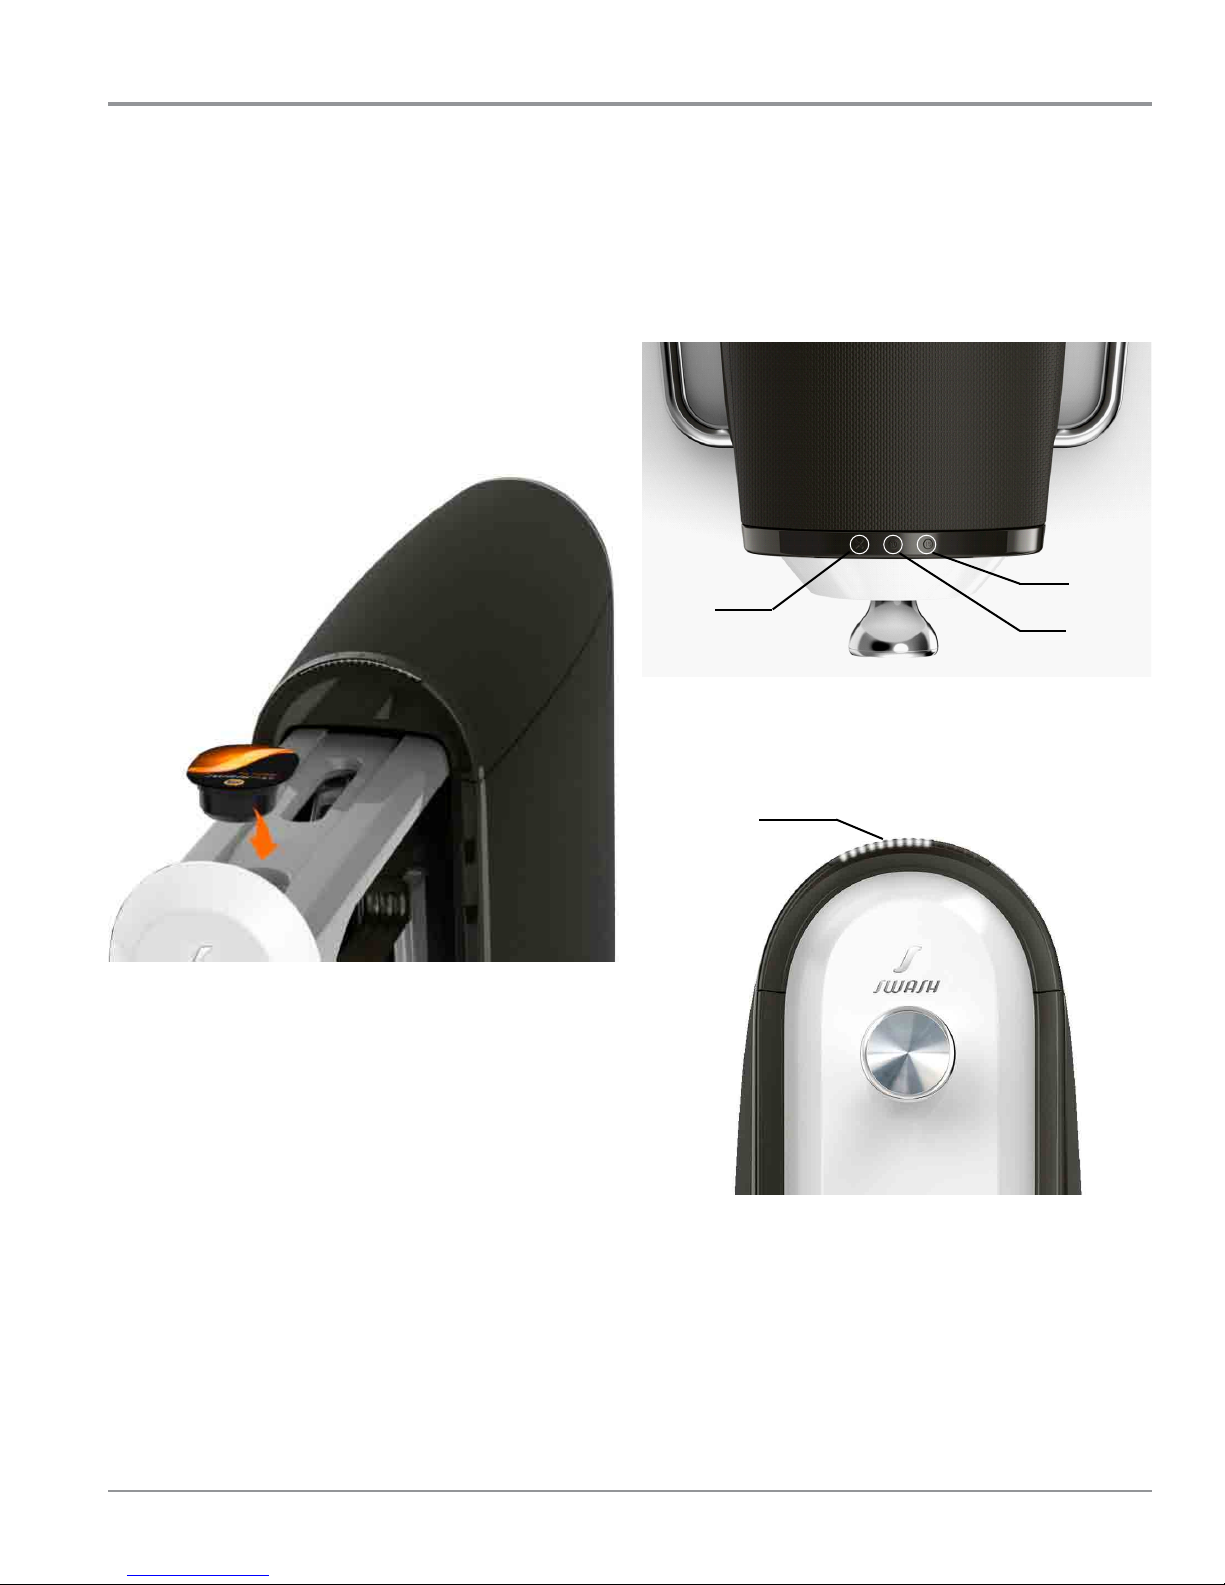
OPERATION
How to Use SWASH™ System
Hang
1. Pull out drawer and hang clothes in machine. See pages
6-7 for more informaon on how to hang clothes.
Load
2. Load a SWASH POD™ cup in top of drawer and close
drawer rmly (see Figure 4). Do not remove lm from cup
as it will get pierced when you push the drawer in. Only
use SWASH PODS™ cups.
Start
3. Select cycle buon to Start. Tap on “10” for standard
cycle, “15” for extended cycle, or “X” to cancel. See page 3
for more informaon.
10
Cancel
15
Figure 5
4. White LEDs will count down the minutes remaining and
a blue light will let you know when the cycle is done (see
Figure 6).
White Lights
(me remaining)
Figure 4
Figure 6
5. Remove the empty SWASH PODS™ cup.
6. Remove garment from SWASH™ system and enjoy.
SWASH™ Clothing Care System
n
2-5
 Loading...